#❓ask-a-question
1 messages · Page 120 of 1
Ah, no discord however there is an Indesign community here:
https://community.adobe.com/t5/indesign/ct-p/ct-indesign?page=1&sort=latest_replies&lang=all&tabid=all
Who tagged me 5 times
Or you could go to the illustrator discord. https://adobediscord.com

Adobe Discord: Participate in events, chat with peers, get feedback on your work, and connect with mentors and pros!
Participate in events, chat with peers, get feedback on your work, and connect with mentors and pros!
So I have thirty pictures open. Is there a way to save all of them to a specific folder (different from the one they were originally in) all at the same time with their original names? Or will I have to do it manually?
I found Image Processor, but that doesn't have a .png option. Is there a different way that has a .png option?
I tried Automate -> Batch but that's saving as .psd
Hi, there’s image processor pro. But it is not always easy to install.
The PhotoShop Scripts project is a catch-all for several toolkits and scripts that have been developed to facilitate the use of JavaScript for…

I would ask what your current goal/workflow is - since there's usually always a smarter way to do something
I'm creating a resource pack for Minecraft. I'm editing a bunch of .pngs and I wanted the ability to just save all of them into a specific folder at once with their original name to make it easier on me but I'll probably just do it manually because I'm now having to redo all my work because I tried something new with the Batch feature and it closed all my files without saving them, and I'd rather that not happen again lmao
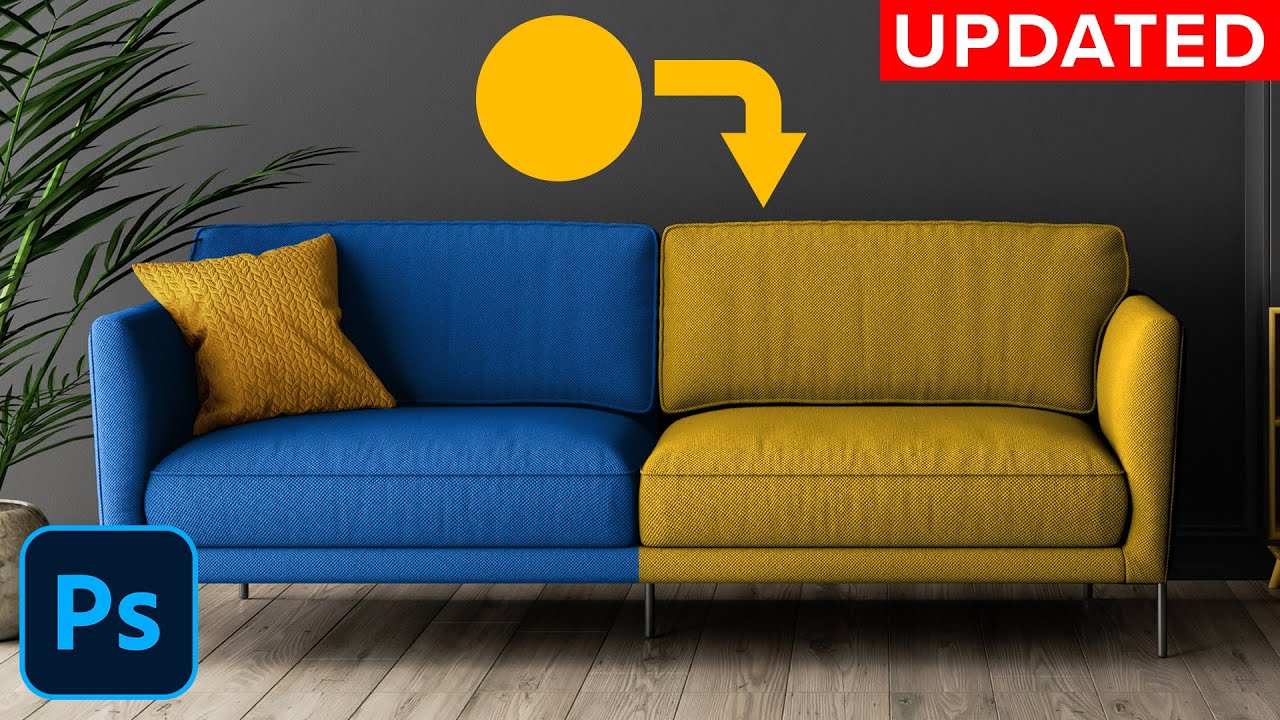
would anyone know how to change the color of this without changing the color of the whole thing?

i wanna change the color of the tan color
this is just an image btw
Use a Gradient Map Layer and choose colors for the dark and light regions.
You might be able to set up something like this for maximum editability...
When I was working on a similar project I had 100s of files I needed to rename. I used this program to avoid doing it manually https://www.advancedrenamer.com/
Batch file renamer for Windows and macOS. Rename music, videos, images, and documents quickly and easily with this powerful, flexible tools.
If you still need to rename them it can save a lot of time
What's the different between Gradient and Classic gradient? Are there any important changes to be aware of with regards to using them? I'm following a tutorial that uses an older version of photoshop where they set the opacity to 100% which is only an option when classic gradient is selected in the latest version of PS
Also they don't have the method option in the tutorial. They're using CC 2019. Should I leave method set to smooth? (the default)
There are several workflow type differences. With the Gradient Tool in "Gradient" Mode, it creates a Gradient Fill Layer which remains easily editable AFTER you create it. That's probably the most important change. With Classic Gradient, you would draw it and if it wasn't want you wanted, you'd have to draw it again.
I guess one thing with the Classic Gradient is you could draw gradients using various Blend Modes and create different effects with it.
If I hide a layer, will that layer show up in the final project?
If you hide it and export out to a different format, e.g. PNG or JPEG, it will not show up when you export.
Alright thanks. With the classic gradient when you say blend modes do you mean the blend mode when drawing the gradient and not the blend mode of the layer the gradient is on?
Gave +1 Creative Carma to @ripe quest (current: #2 - 2831)
Worth noting TIFF supports layers but you can flatten the image when saving
The Classic Gradient has a Blend Mode option so technically you could draw gradients with different Blend Modes activated and it would "build up" the gradients with each successive gradient you draw on that layer.

Oh ok that's cool
This isn't a great example but you get the idea...
hi i need help pls if anyone is available
what do you need help with?
oh thank you so much
Gave +1 Creative Carma to @fierce hornet (current: #43 - 46)
i have an exam which we have to recreate art pieces of our chosen artist
i was looking in dawid planeta
to create a piece about human inner conflict
but my Photoshop skills are dog water


i am tryna recreate the left image then mine is at the right
you're almost there. you just have to cutout the subject a bit more nicely. then use a curve to adjust the lighting. then add fish. cut it out. do the same as you did with the just and you're pretty much done. then do overall color grading and other adjustments.
Shadows are important too

this is how it is goign
add some shadow on marked areas

and try adding cat shadow here too.

Anyone know how to make a brush solid when defining a brush preset?
I want my brush to cover when applied like circled in red, my brush which is circled in green shows stuff below

anyone have advice for doing this sort of light texturing?

im sure thers a fancy name for it but im not really sure how i would go about it?
is it like charcol?
its darker around the edges too
is it better?

Blue marked area hard shadow. yellow marked area light shadow. but do no add any shadow behind the cat as you did in this photo.

also test different angel where the shadow looks most realistic. you can move the shadow with "move tool"
ok np


do you think i nailed it or need to fix the lighting
unfortunately that<s not possible with brushes because a photoshop brush is based on a Black and White image. Black pixels of this original image will "paint" and white pixels will be transparent (and shades of grey will be semi transparent....
Best way to achieve what you want is to mask part of the layer below the layer you're painting on.
I can help you in vc if you want. that would be much easier for me to help
ok np
pls don't flame my ass
You can paint on a layer above your design with a soft and low opacity brush where you want the texture and the vignette (dark edges) then add noise (Filter/Noise/Add noise).
Reduce opacity if you need. I used a soft round brush in the video but you can use random shape brushes (clouds or smoke for exemple)
You also try to find "grunge vignette texture" stock image (on Adobe Stock free for exemple) , Place the texture above and change its blending mode to blend the effect with the design below. (image used in the video: https://stock.adobe.com/images/full-frame-old-white-paper-texture-background-with-vignette-for-design-backdrop-or-overlay-design/280966615?prev_url=detail)
tysm!
is there a way to erase outside of a selected area with the quick selection tool?
Hi! Ctrl+shift +I is the shortcut for select>inverse then you can erase outside your selection.
ahhh tyty!

Learn how to use Photoshop selection tools to make basic or advanced selections. Includes full tutorials on each of Photoshop's selection tools.
Hello, can anybody make a video of how to make the face, eyes, hair more smoother like in the 3rd file 2nd image? I find it very difficult as I am still new to photoshop. thank you!


imagine a drawing with an outline; the outline is darker if its next to a dark background and its clearer if there is something lighter touching it
if I want to remove the darker parts of the background with magic wand, I can adjust the settings and have an isolated drawing
the problem is that the drawings oytline wont be consistent because the outline changes tones
how can I fix this
hi every one
so I have a flower here, I drew an inner circle around it and the circle is pretty big

how do I make the flower "thinner" and "sharper"?
you know, so when I attempt to draw the circle, it become a smaller circle than this one?
@ripe quest hi, could you continue helping me with this? thanks for the video yesterday.
Gave +1 Creative Carma to @ripe quest (current: #2 - 2833)
Please don't ping people to ask for help. You can ask questions here. Then you'll have to wait until someone is available. If they can provide some insight into your issue, they will probably reply. Thx!
Gave +1 Creative Carma to @potent canyon (current: #985 - 1)
got it
You're welcome. Unfortunately, I can't provide a video or any in-depth help right now. I'm busy working. Sorry. Hopefully, someone else can jump in and provide some assistance.
This is a like a 16 year old version of Photoshop. Most of us are using modern versions of the app. One thing I will say is that you're zoomed to ~1000% so you're looking at this at the pixel level.
Hi, I would look at frequency separation: https://www.youtube.com/watch?v=bMkoCQA0o4o
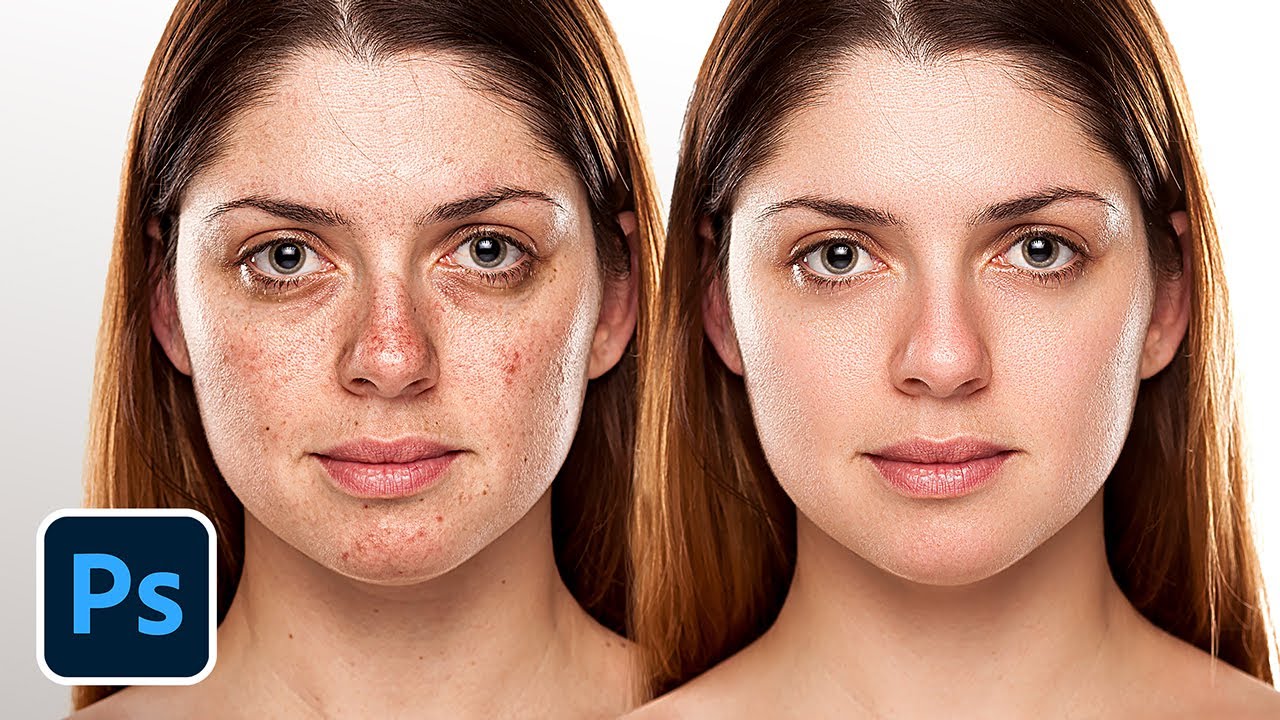
► Join PiXimperfect Pro - The Ultimate Photoshop Training Course: https://pix.live/pro
With the release of incredible new tools in Photoshop, skin retouching with Frequency Separation just got so much easier and faster! In this lesson, we will discover the Modern Method of Frequency Separation that uses the Remove Tool and takes away the labo...
here's the original flower

so I want to shrink it, so the five inner "tip" of the flower is aligned with the circle I drew

how do I do that?
Hi, I would draw and copy thin oval shapes. https://www.youtube.com/watch?v=5R3ZvLhq7hI and https://www.youtube.com/watch?v=ToxEQoxAEEo&pp=0gcJCdgAo7VqN5tD

Discover 10 of Julieanne's favorite tips and shortcuts for using the Shape Tools in Photoshop.
Additional tips, tricks, and tutorials from Julieanne Kost can be found on her blog: https://jkost.com/blog
Facebook: https://facebook.com/julieannekost
Twitter: https://twitter.com/julieannekost
Instagram: https://instagram.com/jkost/
Behance: https:...

In this video, Julieanne walks through 5 tips for working with shapes in Photoshop including quick ways to select multiple shapes on different layers, merge shape layers, use path operations to combine shapes, adjust the stacking order of shapes, and distribute multiple shapes on a single layer.
Follow Julieanne here:
https://www.instagram.c...
You could also duplicate and hide one copy of layer1, select the black of layer 1, invert the selection (select>inverse or Ctrl+Shift+I), select>modify> contract it, then delete?
uhm I'm a bit lost here
you mean I have too many layers?
No I mean to create and hide one copy of the layer before you modify it, it is a security practice when you do touch the pixels.
Hi folks, I have a set of pages separated by selection blobs, all on the same layer. How can I separate, and distribute them into different layers?
Slices? Artboards? Guides??

Funny thing that photoshop doesn't have a way to tell a count of and numbering selection blobs.. 🤔
Make a selection. Then cut/paste to a new Layer.
"count of" - "numbering selection blobs" ? Not sure what that is supposed to mean. Photoshop is primarily a bitmap editor so I'm not sure what functionality you're expecting.

That's wayy to laborous, I have allot of pages!
Are they all part of one bitmap? One raster image?
One raster image
If so, what are you imaging that is supposed to happen?
You have to separate the pixels to different layers.
Yes! That's my wish. programmatically, a selection blob has its area, and borders, and there's oter blobs. Internally, they're still counted anyway, because that's how software works (I assume), unless...
But anyway, I'm looking for a simple parametrical way to separate pixels into many different layers
Is there a script for that?
No idea. There is a Scripting API. You can give it a shot if you have skills/experience there.

GitHub
A collection of Photoshop scripts. Contribute to ES-Collection/Photoshop-Scripts development by creating an account on GitHub.
Exactly the answer I thought I would get, and the kind I didn't wat... :p
If all the pages are the same, and the location of the images does not change, an action could work.
There is a counting tool: https://helpx.adobe.com/photoshop/using/counting-objects-image.html#:~:text=Select the Count tool (located,Choose%20Count%20tool%20options.&text=A%20default%20count%20group%20is,and%20label%20size%2C%20and%20color.
the pages are proportional atleast in the hight, but setting a constant height value is tricky, because there's a shift over count..
loooots of clicks that I'm trying to avoid ..
Oh wait! There's a way to automate that! 🤔
If there are no constants that could be used with an Action, then you'd have to script it, I suppose. Sorry that isn't the answer you want. However, you're speaking in coding terms but don't want to write code. You're also assuming that Photoshop is going to "guess" how to separate your pixels... based on what value or constant then?
Even with scripting, its going to be tricky as we're still talking about bitmap operations, i.e. pushing pixels around.
Sorry for being to jumpy
I'm here for your advice and knowledge
I had to do something similar to this where there were 4 images (in a quad rectangle) in one canvas. They had to be chopped into 4 pieces and exported out to individual PNGs. And there was a lot of files. Scripting was the best option. Writing a script to split the image into 4 and export to PNG. Then use an Batch Action to run that script on a directory of many files. Luckily, all of the images fit that same format and even if I lost 1 pixel at one of the edges, it still worked. I don't know if that will work for you but that's why I suggested it.
There are even command line sollutions for a simple repettative task like this, like Image Magic, etc.. But here I thought that PS would easily do it, was to lazy to go into installing new stuff...
Image Magick comes with its own set of problems. Mostly doing this from a CLI with no visual feedback. At least Photoshop gives you a GUI and you can watch it happening to see where your script goes off the rails.
Anyways... that's pretty much all I had. Sorry. Good luck with it!
I was thinking maybe there's a way to automatically create guides on edges of selection blobs, or snap the edges of sclices to them?
There is a Guides Layout feature. And you can create a Guide Layout based on a set of criteria, like number of guides, margins, gaps, etc.
Another idea would be Arbords from selection rectangles/blobs
In fact, I did a video about that very thing: https://youtu.be/qeIW1I9P9lI?si=_2GsnFK7y1_Oqe8o heh :)

The Guide Layout feature in Photoshop enables you to quickly create custom grid layouts by specifying rows, columns, gutters, and margins. It simplifies the task of adding guides and assists in the precise alignment of design elements in visual design layouts.
This is a Quick Feature Demo for Photoshop (on the Desktop). The General Release of P...
Nice video! But in my case, the guided gap area would shift along the whole of pages, over page count.. 
Thanks! Yeah, I figured that's where you were going this line of discussion. There is a variable shift across many files.
Gave +1 Creative Carma to @distant grove (current: #985 - 1)
Many blobs in a single file in my case
other files are just a repeat of the same process 🙂
Anyone know how to select shapes in Photoshop by pixel size range (e.g. 100 to 200 px)?
Working on a thumbnail for a video. I want to include a type of reverse blood drip on the persons shoulders. So instead of going down its actually going up. Does anyone know a good method for this?


Mainly inspired from MW3

Quick question, how do you swivel on photoshop?
Swivel? Do you mean rotate the Canvas? Press and hold the R key and drag with the left mouse button.
I work normally with premiere pro,
And there is a 3D model that
flattens things
like a rotate

► Project Files, Templates, Animation Packs, Courses & More:
https://brookerfilms.gumroad.com/
► My Filmmaking Courses on Skillshare:
https://www.skillshare.com/brookerfilms
► FREE Adobe Premiere Pro Title Pack (50 Titles):
https://brookerfilms.gumroad.com/l/50titles-pr
► ► Connect:
http://www.twitter.com/BrookerFilms
http://www.tik...
Besides skew
In Photoshop, you'd have to do this with Transform. Edit > Transform... Scale, Rotate,
Maybe create custom brushes. Maybe try Generative Fill and/or Generate Image.
Yeah I have a blood brushe pack. I just dunno how ill make it look good
One thing to try with Generative methods is to do like "water droplets dripping down." See if it will generate something that is workable. Then flip it. :)
It probably won't work if you use the word "blood"
yeah
All the AIs are so squeamish about every word or token, you'd have to do like "red liquid dripping down a wall" because blood will get moderated out and the job will be canceled.
Say more. Not sure what you're trying to do.
Hi!
I want to create instagram carousel with these 2 photos for my project. Is there any way to match the pictures for carousel using photoshop. Photos and idea are from chatgpt and i really want to keep this vision and photos as similar as possible. Is this impossible task and should try something else?


Outside of scripting, I do not think so.
Create a 2160px X 1350px document then place your 2 images on the canvas. Align one on the left and the other on the right.
Create a Selection in the middle and make sure the selection is overlapping the images edges then hit generative fill button and wait for the magic => choose your favorite version.
Display your rulers (CTRL+R) then drag a vertical guide in the middle (hold shift while dragging for an easy alignement) . Select slice tool and make 2 slices then go to File/Export/Save for web (legacy) , set the output format of your two slices, hit "Save.." button, make sure "All slices" option is selected and export...You're done.
how do i erase something thats on the picture anmd i want to get rid of it
a better way: mask it
i just used spot healing
i just messed up my bar, what happened here manm

drag here and drop


how do i get a coloured profile on camera raw filter?because it is only showing monochrome profile
Hi @lunar raft
do you mean something like that?

Mayhaps.... 👀 👉🏽 👈🏽
Kinda like Color Range, but searching for shapes of a specific size (pixel count) range.
Unfortunately there's in Adobe illustrator but not in Photoshop...
Search automatically? Then no. Then the answer from @hushed niche and @viral palm applies.
why can i not download neural filters
when i click download it does nothing
ive tried youtube and everything
Are you signed in to an Adobe Account?
People pirate the app and then turn up here asking why the cloud-based features don't work.
well its for sure paid ps😂

Go to Help > GPU Compatibility... see if any errors or issues are reported there.

Good. So you're saying that you see a download button but you click and nothing happens or... ?

yes it buffers for a like a millisecond then does nothing
Do other "cloud services" work? Like Generative Fill or Generative Image?
yes generative fill does work
i haven't tried the generative image yet but generative fill indeed does work so I'm not sure what the problem here is
this one seems to work since i dont have to download it

but
the ones it gives the prompt to download it does not work
OK. How about trying this? https://www.reddit.com/r/GenP/comments/yd26z4/neural_filters_not_downloading/

Reddit
Explore this post and more from the GenP community
ok tysm ill give it a try, seems to work for everyone else so ill lyk
Before doing that, you could try signing out of the Creative Cloud app. Restart the PC. Then Sign back in. Open Photohsop and try again.
ok ill give it a try thanks again
Gave +1 Creative Carma to @ripe quest (current: #2 - 2834)
what is CCstopper?
and do i have it or do i need to download it
I would just try the sign out of CC. Reboot. Sign back in to CC. Launch Photoshop and try again. Try that first.
I see that your Photoshop shows that its ready for an update. Why not just try updating first?
Glad you got it sorted out!
srry if i came off sorta disrespectful i was just getting frustrated
Nah. Don't worry about it. I understand. :)
thank you once again, absolute life saver
Gave +1 Creative Carma to @ripe quest (current: #2 - 2835)
You're welcome. That's why we're here. To make jobs and lives easier.
@ripe quest do you know how to make it so when I hit open, it goes to my cloud documents
File > Save As... Save to cloud documents PSDC format

I have most of my files saved to the cloud, I just can't get to them when I hit file > open.
sometimes it will say in this second pic, on the bottom left, like open from cloud documents

Go to the Home Screen. Then tap "Your Files" tab on the left side of the screen

thank you very much
Gave +1 Creative Carma to @ripe quest (current: #2 - 2836)
it's a lot faster too then hitting file > open ❤️
Can someone send a poster psd file that they’ve done in the past?
Strange question... Like giving you our labour?
No sir, need it for ideas.
Ok! I understand... Perhaps it would be faster to make some search on sites likes Pinterest... Great for inspiration with few keywords.
Adobe express can also be great... Lot of template for free
I’m currently working with a dataset-driven PSD template in Photoshop by using variables and data sets from a .csv file. Each row in the dataset represents a different version of the design, and I’m using Photoshop’s "Data Sets" feature to export each variation.
The issue is that Photoshop only allows exporting these dataset variations as .psd files by default. To get .jpeg versions, I have to run each exported .psd through the Image Processor manually. However, this process is inefficient because:
The PSD files are large and take up a lot of storage.
I have a large number of dataset rows, so exporting and converting them manually or in bulk is not feasible.
Photoshop does not provide a built-in way to export each dataset variation directly to .jpeg.
I need a way to automatically export each dataset variation directly to .jpeg (instead of .psd) in order to save time, disk space, and processing effort.
Im back
Hi, you would need to find someone who can write scripts. Try Ps-scripts.com
Bridge has a quick export to jpeg function that might help.
there was a script written by someone and I used but it created temporary psd files (which is bassicly the same thing)
I will look into that
Or use the scripting tag on the Adobe forums. https://community.adobe.com/t5/photoshop-ecosystem/ct-p/ct-photoshop?page=1&sort=latest_replies&lang=all&tabid=all&topics=label-actionsandscripting
https://community.adobe.com
Master Photoshop with the help of our global community.
What about increasing your storage?
well it wont work becuase im working with like 4 k variants and each psd file is like 200 MB
I was thinking about creating my own little program that could do it but it will exclude me from making quick changes or smth
An external SSD of a few TB might do the job. You gotta have the area needed to fit your workflow, no?
i was wondering if i got a picture that has been photoshopped, is there any clues either in the metadata or the picture itself that could let me know it has been photoshopped?
the picture does not look photoshopped at first glance, but as i zoom in specific areas it looks very pixilated im not sure if thats a dead giveaway tho
Hi
I am new to photoshop and I accidentaly closed the bar to manage tools (idk how to call it but the one when you edit a text for example or the one where there is AI tools) and I can't find a way to open it again
Rule 1
Don't trust any image that you haven't edited yourself with Photoshop!
The one on the left with the tools? That's the tool bar. The one at the top with the settings for the tools? That's the Control Bar. Both can be switched on and off in the Window menu.
if you happen to know a lot about photoshopped photos, what do you think of this picture? can you tell if its been modified, something looks off to me but i cant quite tell

the bar like that

I'm not sure. But it looks AI generated to me
menu: Window -> Contextual Task Bar
thank you
I'm not sure. But it looks AI generated to me.
Apart from the extremely long phalanges and the unnatural transition between the little finger and the ring finger, there can't be a ring at this point.

thank you!
Gave +1 Creative Carma to @tame cape (current: #17 - 148)
does anyone know how to add text behind images ?
There are multiple ways, and it depens what exactly what you want to do, but one of the most used method is to use a mask
https://www.photoshopessentials.com/photo-effects/place-text-behind-object-photoshop/

Learn how to easily place text behind an object with Photoshop! Create the same classic effect used everywhere from magazine covers to movie posters!
Thanks
Gave +1 Creative Carma to @vapid flume (current: #6 - 945)
What's the best Photoshop tutorial which covers all the basics??

You can ignore/block them you know?
I did
We only ban people who cause shenanigans in the server, we don't track DMs (Hopefully!)
you can also report to Discord
We don't ban people based on DMs 🙂
If you're offended by what they said, I have no words though
I think the ones that are in the software (help>hands on tutorials) is really the best you can find
It even allows you to try directly in the interface with guided prompts


Ohhh I see
Appreciate it homie
Irony on:

Plenty of us have books. I also had very bad books 😅
I still think the tutorials inside the app are the best (I tried them before reaching that conclusion)
I wish I had them in the early 2000s 🙂
Absolutely
🎯
I remember for one Christmas, my OH bought me a full package of Photoshop books, I had the very excellent Martin Evening's "Photoshop for Photographers" (an absolute bible!)
As well as some of the early Bert Monroy books (This guy is a genius)
But in the middle there were some absolute crap, and all of them aimed at the beginners market. This was a time when you could pedal every BS and still be published because the skill was so new. I guess it's the same now with other type of skills (who would buy a book on VR for beginners for example)
I only told him many years ago, noone likes to gift crap stuff 😂
I remember that Photoshop WOW book. I think I had it with the pool and frogs montage in the cover. It was wild years design wise 🙂
Whats your issue
People come here too for paid requests so asking you is not a crime
You have been given the tutorial go watch it so you can be able to do it yourself
thank you sir...
Gave +1 Creative Carma to @vapid flume (current: #6 - 946)
You might want to have a look at my profile
Never assume
Ohh so sorry lol... Thank you ma'am
No problem 😉
The reason I dm him is that someone posted casually like that too and they paid me for working their edit even more than 3 clients from here now...
You also just need to realise that it can come across as desperate, and pushy... Based on the screenshot, that's obviously not a rude interaction (in my book) or anything. But if someone pinged me like that, I would ignore and not engage. But That's just me.
Lots of people do that on LinkedIN (ask you to be a connection and try to shift their ware at the first message) and that's an instant "unfriend" from me.
Normally here if they send a message like that in the server they expect someone to dm
I am also on some other Photoshop edit server... That's how the audience expect not spamming the server in response to their request
They usually do in the #💬chat-general l because that's where those kind of interaction are supposed to take place. As a mod, if someone asks in ask a question, they want a tutorial. If you want to snoop on people who might pay for your service, don't snoop in the #❓ask-a-question . It's not the right place.
Ohh yea i get it now
Also, I am not an admin, so it's not my call, but if I was, I would remove any business interaction from this server
IMHO it is not the place. Here is a place to learn and to showcase. Adobe has a system in place for finding work, and that's where we generally redirect people
You might want to open an account (It's free with any Adobe subscription)
https://www.behance.net/joblist?tracking_source=nav20

Discover your next career move, freelance gig, or internship

hey yall
got any ideas of how I could extend the walkway so it goes to the blue object
Anyone know how I can select the rest of the subject easily, I need to select the entire thing. I have already removed the background but I would like to contract the subject

Have you tried using the same method bul holding shift to add to your current selection?
The issue will be mainly with the white trousers because it may lack definition against the rest
Ultimately, if you deleted the background and want to select everything that is present in that particular layer, just CTRL + Click in the layer thumbnail (not anywhere else, the thumbnail) and you will get a selection of the entire layer content, without the transparency.
So my friend made me this logo for a project I am working on, however I am going to re-make it from scratch. I don't know how to curve the text or get the circle, could someone explain to me please?

You will need to "type on a path"
see that tutorial
Since it's a logo, be sure you do everything with vector tools, not raster ones, otherwise you will get into trouble when the friend will need to make it bigger or smaller.
https://www.youtube.com/watch?v=8Snm7Q3_25w

Today's tutorial is for those of you who may be looking to get your feet wet with Adobe Photoshop. In this lesson I'll be demonstrating how you can wrap text around a circle with Photoshop -- both inside and outside of a circle. This is something that even a first-time user of Photoshop can follow along with.
If you want to learn more about log...
Trace an elipse path then put the Text along the path... Here is a short video
@orchid charm : @vapid flume 's video is well explained too ... Sorry Sandrine, I was recording while you were answering.
No problem!
Thanks for showing me how to wrap the text guys! However, I still don't understand how to get the effect of the 2 circles and the text in-between them
You just need to draw circles (2 of them) with the elipse tool - a vector shape (circle is obtained with holding SHIFT while you are dragging)

I would recommend to put guides at the center of your document, then you’ll be able to draw the circles from there if you hold alt before clicking. After the click, release alt and hold shift to draw a circle and not an ellipse.
See: https://youtu.be/5R3ZvLhq7hI?si=Ls7HpyJcyrnqR5Ty
Discover 10 of Julieanne's favorite tips and shortcuts for using the Shape Tools in Photoshop.
Additional tips, tricks, and tutorials from Julieanne Kost can be found on her blog: https://jkost.com/blog
Facebook: https://facebook.com/julieannekost
Twitter: https://twitter.com/julieannekost
Instagram: https://instagram.com/jkost/
Behance: https:...
Hey, I hate to be bother, but is there any chance you could or someone else do a short video like above? I can't understand the text that well!
I think if you need to understand how to get the text, it might worth reviewing the basics, go to Help> Hands on tutorial, and type for example vector shapes in the box
You got all the videos available there and you can also see some tutorials where you actually practice along as you watch...
Otherwise it could take a while!

I meant i'm more of a visual learner and reading messages I have difficulty understanding compared to copying a video
so i made a thumbnail, and i want the whole thumbnail to be sharpened, what do i do?
it seems like u can only sharpen image individually, i want it the whole thing though..

That's why I pointed you to the videos in the hands-on tutorials within Photoshop
You need to sharpen a merged copy of all the layers. The quickest way to do that is to press, at the same time, CTRL+ALT+SHIT+E (that's called the claw shortut, you'll understand why) It creates a merged copy of all the visible layer. Place it on top, just to keep organised and then apply your filters there
filetrs are applied on layers, you can't apply one on multiple layers, except if you gather all your layers into a smart object, which is another solution on top of the one I just gave
thanks i got it
Gave +1 Creative Carma to @vapid flume (current: #6 - 947)


why is my selection not exact?
im using the pencil to colour it in so idk why theres like a blur effect at the edges
What selection tool did you use?
Automatic selection tools have to handle and interpret anti-aliasing pixels (The Anti-aliasing effect softens the appearance of edges in your image) = > That's what is giving you semitransparent areas. Older tools such as the Lasso tool or the Magic wand can deactivate anti-aliasing, but this will result in a rough contour (stair-step appearance).
How could you get a texture like this?

Besides manually finding it and overlaying ig
I'm not sure to understand your question but this design looks like a flat logo made of shape with Polygonal texture clipped over it.
You can search Polygonal texture on Adobe stock free (for exemple), Place embeded the Polygonal texture over the Logo and create a clipping Mask, You can desaturate the Texture (make sure it's a smart object) with Image/Adjustment/Hue and Saturation and mask out the hue and saturation filter mask to bring back red were you want.
Oooh thanks :)
how do i cut an image using another image?
you can use clipping masks 😄
Can someone help me? I made my logo in a different program with a transparent background, and I want to use photoshop to apply outer glow, but when I do it seems to be limited by this arbitrary bounding box and the outer glow is super funky, how do I fix?

@blazing smelt - You can't advertise products/services here. Sorry.
What is your "transparent background" file format? PNG?
Could you share your entire Photoshop UI with the layers panel?
It is png but I had to convert from SVG to png using an online tool after exporting

What do you mean by cut?
You can:
1- use clipping Mask or
2- Use image 1 selection to Mask Image 2
3-Use image 1 selection to copy image 2
i understand it now from your video already, thanks!
Gave +1 Creative Carma to @viral palm (current: #9 - 773)
Is the brown area around the Z a part of the design or the result of your outer glow FX?

You can place SVG directly in Photoshop without online tool (could be the root cause of your problem).
Try: File/Place Embeded/ select your original SVG file => it should be loaded with transparency and if the SVG file is clean your outer glow effect should work properly (without bounding box limitation)🤞
is layers panel on the left the strat
why do u have it there
just for more space?
the brown area is the outer glow only the blue z is the original design
ok Ill try that
thanks it turns out it was whatever convert to png mechanism. I didn't realize I could directly export svg, and I was inadvently using my upscaled png I needed in a png only platform before I realized I needed to go through photoshop. Still, i wonder what the issue was.
Gave +1 Creative Carma to @viral palm (current: #9 - 774)
It gives me a larger view for the Layers panel (useful on files with lot of layers) but also because I'm left handed and when I use graphic tablet it's less travel.
ah ok
can anyone help me with an after effects effect I want to re create
Trying to run photoshop like usual and for some reason it’s now taking 100% disk usage when it didn’t used to. Any help? It’s majorly lagging everything.
I haven’t made any changes to photoshop for this to happen
Hi, did you make sure to use the correct units? ( 3860x2160 inchesat 300ppi is huge compared to pixels)
yes. it was only 1080 by 1080 72 ppi lol
and it would get to that usage just upon launching, not even having a project open
like even just on the main page before making a new/opening a current project it would be at 100% usage and remain like that with a project open
Hi! Do you mean an EA effect you want to recreate in Photoshop? Which one? Saber ? Or the screen modulation one? State directly your request, it’s faster than extracting the info 😉
In inches/cm or pixels?
Do you have all of Kyle brushes loaded, or lots of textures/presets?
this is what i was working with. and in the past i have been able to draw with way larger proportions too without issue, nothing has changed between now and in the past when it ran smoothly. i only have a few kyle brushes and the same ones i had back when it was running smooth as well

I would try to reset Photoshop’s preferences manually by dragging the preferences folder to the desktop. This way you can copy them back if it does not work: https://helpx.adobe.com/photoshop/using/preferences.html#Manually
i will try when i next can thanks
Better chance to get answer on Adobe Video server (Première/Ae) => https://discord.gg/adobepremiere
Anyone has any idea why my Photoshop sometimes will bug out and not allow to start a New project or Export, I notice my PC will start working harder and even after closing Photoshop it gets stuck in my processes so I need to "End Task it"?
What version are you using (26.5.0) ? To see go to Help/About Photoshop.
If not => update your PS and see if the problem persists.
If it's just sometimes it could depend on what you're trying to do (file size, number of different files open...etc) at this moment and/or other tasks running in background and/or hardware performances... Hard to say with info given.
hey, i have zero experience with photos shop but I need to texture this topographic map both on the water and on land. how do i even begin this process?

Do you mean something like that?
If so search for an old paper texture on any stock image site (https://stock.adobe.com/free) download it then go to file/Place Embede and choose downloaded file. Place it over your design and change its blending mode (multiply for exemple)

close, i meant more adding like a grass texture to a section, sand to another, water another etc
Hi, you could make a selection with the magic wand; expand it by one pixel, jump it to its own layer, (Ctrl+J) then fill with the wanted texture, either in a layer style (the best, allows scaling, rotation, etc.) or via the fill command.
running into a problem when i use magic brush and the raster mask
i usually set the magic brush to 250 to select all non-transparent pixels in a image
however with the raster mask, it's instead just selecting a full rectangle instead
any fixes?
Change your B&W design to Smart object and add level adjustment to crank up the black, Set its Blending Mode to Multiply.
Use the Magic Wand tool (W) to select area you want to paint in, Create new layer above your design and paint with a textured brush inside your selection... (check the short video)
At the end you can add the textured paper effect over if you want.
Magic brush? you Mean Magic Wand?
If so try to play with "Contiguous" setting option and see if it changes something...
But I<m not sure to understand your technique...

contiguous didnt work but i found another work around
is there a way to only select where two shapes overlap?
in this case a solid color triangle and text
nvm found a workaround
sorry for posting questions i figure out
It is not a problem, but it might help others if you shared the solutions…
for the text thing i was trying to achieve the effect in the photo below. My solution to this was very janky, but basically, i duplicated the text layer, and rastrized the topmost one. Then, i switched to the shape layer that i wanted as the background, used magic wand to select all non-transparent pixels, then switched back to the text layer to delete the insersecting text. From there you can use magic wand to select the remaining text and switch it to the color you want

idk if that makes sense, ping me if your following that and need help
@thorn anvil theres probably some smarter way to do this with blending modes, but if you use masks at least you can preserve the text layer without rasterizing
what i did was make a new solid color layer, clipping mask it to the text
invert the mask of the solid color layer, and then add white to where the lines were
how do i change size for my remove tool?
Brush size?
Use brackets. [ or ]
hi- there is no discord for adobe lightroom (/classic) so i must ask here, please help
how do i move the file name so that it isnt covering my image

i want the text displayed outside of my image, fully gone is also an option im cool with
What about a white text in difference blending mode. Then a layer on top to colorize
Hi, a quick trip to the help file would give you the answer: Show/hide info overlay Ctrl+I on a PC or Command+I on a Mac
https://helpx.adobe.com/lightroom-classic/help/keyboard-shortcuts.html
does anyone knows why I joined illustrator server but it's all unlocked even if I reacted to the verification message
Yes, there are some issues for the moment, please be patient.
ok thanks
Gave +1 Creative Carma to @hushed niche (current: #12 - 221)
i have a pdf with 2 pictures. i want to import both on a single page A4 size but when i try to drag those pdf to A4 size page the pictues get blurry. How to fix it ?
Main menu: Image > Mode > Grayscale? Switch to RGB Color...

@gloomy spindle
Is it working for you now? Or should I forward it to a moderator?

dont know where to ask. but can anyon guide how to set up payment gateway for client in Behance plateform?
Why does my Gray - Black Radial Gradient look like this? its not as smooth as the other ones

someone knows how to do this?

how to change brush size for remove tool
It's probably better if you ask in the Behance Server
I can't share the link here as it's not permitted (don't ask 🤦♀️)

search for this server on Discord
anyone know how i can blend bottom of their bodies so it doesnt look so unordinary

and the botttom half of the middle dudes legs
You can create a mask on their layer and apply a vertical gradient on this mask so there is a transition from background to layer

This is called a Duotone. One way to do it is to use the gradient map
https://www.youtube.com/watch?v=a0yR1umwcfg

In this Photoshop tutorial, learn how to create a duotone effect with gradient maps!
MY TUTORIAL CHANNELS //
• Main Channel - http://bit.ly/PixelAndBracketYT
• Illustrator - http://bit.ly/PBIllustrator
• Photoshop - http://bit.ly/PBPhotoshop
• InDesign - http://bit.ly/PBInDesign
• Premiere Pro - http://bit.ly/PBPremierePro
• After E...
just googled it ty
The layer should look like this, see how the bottom will be trransparent (with the background layer appearing there) and the top left as is


Hi! There are not a lot of tones between those colors.
This is not Photoshop?
nope
Then you might bet more accurate help in the dedicated discord, no?
its just the same but looks different, its the same ui and stuff
Maybe, but this is the official Adobe forum, why not visit a Photopea discord?
i think i did at one point and it was dead, but i could have just joined a fan one
not sure why i came here instead

yea
thank you my friend
Gave +1 Creative Carma to @vapid flume (current: #6 - 948)
thank you
Gave +1 Creative Carma to @vapid flume (current: #6 - 949)
I think it makes more sense, I would not visit a Ford discord if I had a problem with my GM, as the answers might be wrong for my problem.
i appreciate your concern but photopea is made to be functionally similar, with many of the same tools, features, and even the same interface
Photopea too broke to host a server of their own? They have a Reddit one though
https://www.reddit.com/r/photopea/

Reddit
Having a problem with Photopea? Try these steps first: www.Photopea.com/tuts/photopea-doesnt-work-what-to-do/
🤣
is there unwritten beef between photoshop and photopea
No, but Adobe is paying people to admin this stuff, I don't know why they should help the competition
It's the same with Gimp and Affinity Photo by the way
thats a fair point
its good that adobe even pays its admins
most wouldnt especially with things like photopea which are near identicle - im not sure waht it can or cant do that photoshop can or cant
I was a Beta tester for Affinity for most of the new versions 1.0 (Designer and Publisher). I was helping the forums as well, we are polite here compared to there about people asking questions about the competition.
anyhow you helped me which is all i care about
That means there isnt a fix?
You could try adding noise to dither the gradient, it will reduce the stair stepping, even if it is counter intuitive…
ty
Gave +1 Creative Carma to @fierce merlin (current: #99 - 18)
yw
Worked
i've tried different thinks now to retouch this but nothing really worked can somebody help me out?

how do i do a chromatic aberration effect
i learnt mine on youtube
super simple, if you want a video
apparently turning off specific color channels in the image works fine
yupp
seems like the result it produces is cmy for some reason but i cant complain

Why do so many artists use it but rarely ever talk about it? What is the science behind chromatic aberration? Is there a way to do it in Photoshop? How to paint it manually? Watch the video and learn about the #1 digital painting hack everyone is using in 2022!
Chapters:
00:00 Intro
00:23 Technique 1
01:14 The science behind it
03:18 How to d...
technique 2 produces red if that's what you're looking for
https://www.youtube.com/shorts/xI5b6HQ2SOQ?feature=share
Is there a way to make this in Photoshop or Illustrator without using generative ai?

probably not, but if you set up a scene in blender, cinema4d, 3dsmax, etc and make a good material, and have some good shaders, you can probably achieve a similar result
if anything it would be better than ai, since the ai result is kind of strange when you really look at it

Can anyone guide me on how to rotate the wheel emblem when it's at an angle? I'd like for it to be flipped upright
Copy the inside of the wheel with elipse marquee tool then rotate the copy
is there a way i can get this sort of font ?

I used killigrew for something very similar to that

In the graphic above I just used the bevel/emboss effect and messed with the contour
Hi! Search for “Fraktur “ or “Blackletter” on fonts.adobe.com or your favorite font site.
Hello guys! Does anyone know how to fix Color Banding in Photoshop or Illustrator? Feel free to PM me if you think you might be able to help thank you! 🙂
Either increase the bit depth of the image (16 bits instead of 8 bits for example) or add a tiny bit of noise to break the bands. It doesn't have to be a lot, just test by trial and error (the amount depends largely on the size of your image)
I dont know if this is the right channel iam pretty new here, but i need a help from someone, anyone. Me and my gf took a nice picture but my eyes are closed! can someone open them for me please? 🥺🥺
Hi, the correct channel for requests is https://discord.com/channels/547473772727238676/548276405151203338
What would be the most precise/fastest way to select this text? I tried using the magic wand, but when i moved it, it left behind a lot

How does one import a grayscale image/layer as a specific colour channel
Working with texture maps and i need to import a grayscale image as a blue layer
Thank you
Ctrl+A to select all your Grayscale image the Ctrl+C to copy it (Make sure your image is in Grayscale mode before copying it)
Open your destination image (make sure it's an RGB mode image) then go to Channels Panel, Make the blue channel active then CTRL+V to paste Grayscale image in the Blue channel.
Note to avoid weird results make sure Texture and destination images heve the same pixels dimensions.
Easiest way is to use Object selection tool... For better result make sure to set the Select Subject option to "Cloud"
Oh wow! Thats perfect
Thank you
Bit of a tough ask, but can someone help me design a few things, basically a few posters

an affect aswell?
is it possible to somehow remove this background? the image is generated using AI, if its possible to do it, can you tell me how?

Hello people !
I need some help in achieving the follow specifications for my image, im guessing its doable in adobe photoshop.

File > New... set it to those parameters.
its a pre-existing image
If it won't "automatically" select the objects, the you'll probably have to carefully add a layer mask and paint out the background manually.
You can't just make an existing image into a higher resolution and hope to improve quality. Raster images don't work that way.
i see
i used the magic wand, lowered the tolerance, and it did a good job, just had to fix a few things but overall it turned out good
Hi! What have you done so far, what are you struggling with that we could help you achieve?
How was your image created? And how big? It needs to be 3600x5400 px so about 20 megapixels, most phone images are of such resolution.
I do not remember one.
As an alternative you can get a list of the layers below the cursor via Ctrl+Alt+right-click (or alt+right-click if you already have the move tool.
I found this page that recommends to create scripts to activate the functions (no need to learn, just copy and save as described) you can give a KBSC to a script.

Graphic Design Stack Exchange
How do I switch, using a keyboard shortcut, from selecting a grouped layer to selecting the layers grouped individually?


There’s lots of effects on that image. Strokes/lines, an irisation effect, thorn paper effect…
i was talking about the main fuzzyness
It looks like a photocopy texture: see https://medialoot.com/blog/how-to-make-a-photocopy-effect-in-photoshop/ and the download

Medialoot
Sometimes you need to digitally replicate the appearance of a photocopy for an image for a design project or simply to achieve a more artistic effect. The process of creating a photocopy effect can often seem challenging, but there is a quick and eas
What do you mean?
i @ the wrong person but someone deleted it for me
Anyone know why the expand button is grey'd out, i need to be able to expand it so i can send it to my mate but wont let me unless i click find edges first but when i do that it makes all the edges wonky, and curved corners

didnt say thanks before so u didnt get karma so thank you
Gave +1 Creative Carma to @hushed niche (current: #12 - 224)
Wrong channel! you're on Photoshop server...
Try to ask on Illustrator Channel :https://www.discord.gg/adobeillustrator

What font is it?
Check your "Type mode" and try different one... It should solve your problem🤞
Make sure you're applying the stroke effect on a Live text layer not a rasterized layer with some low opacity pixels on the edge...
If so semi transparent pixel could be the root cause of your issue.

Anyone know how to get dynamic images for fifa cards
this is a official card but when i find a image idk what size ect

say this is an image

i would have to cut her out ect but idk how to get the shadow at the bottom
cause this is the image above

I don't know what you mean by 'dynamic'?
never mind i did it but the image quliaty is bad

So where did you get the 'shield' part from?
and all the icons etc?
Nothing to 'expand' it looks like just one big raster image
Could someone identify this font or one similar?

Adobe Fonts can help you find the fonts you need easily. Find the fonts of your choice with visual search by uploading image.
does anyone have more examples of text and cloth morph like this and how to do it photosho?

This in particular looks like the text was rasterized, then some eraser and burn effect or shadow added.
do you any examples like thsi? I want to get inspiration
how do i erase a layer, need to blend it with background

something like this

followed the steps, wont happen.
Hi, a layer mask could also work in this case. See the next message for a good explainer.
Hi, if you pain yes in White in overlay mode on the mask, nothing will happen. Hit X to switch Foreground and background, set yo blend mode to normal and paint on the mask where you want to hide the object.
Dark hides, light reveals.
https://www.photoshopessentials.com/basics/understanding-photoshop-layer-masks/

In this Photoshop Basics tutorial, you'll learn all about layer masks in Photoshop, including what a layer mask is, how layer masks work and how to use them
does anyone know of an ai tool or a text remover tool that will remove text from a image with a patterned background? I tried a few basic ones but all seem to mess the background up. The eraser tool in photopea managed to work the best but back ground still blurred when removing text. Some AI “pro” versions say they can do it but I don’t wanna waste money on something that won’t work. Any suggestions?
have you tried Photoshop's Generative Fill?

Does anyone know if there is a adobe software that could help with making patterns I really want to make a diagonal stripe pattern with motifs for a phone background but I cant find out how to do it with online tools?
Hey, I am new to photoshop so I know basically anything and I have a question... I have a 3D model from maya and I want to create the different texture maps for it, but I have no idea of what to do... I already got my png from Maya with the model... What I want to do is the color map, just adding textures instead of paiting it myself

Hi, one can create patterns in Illustrator
https://helpx.adobe.com/illustrator/using/create-edit-patterns.html
or in Photoshop.
https://helpx.adobe.com/photoshop/using/creating-patterns.html
Even in Adobe capture on a phone.
https://helpx.adobe.com/mobile-apps/how-to/make-album-cover-adobe-capture.html
Hi, you could Ctrl-click the layer thumbnail to make an opacity based selection, then add a layer mask, and use levels to tighten it.
https://www.adobe.com/be_en/learn/photoshop/web/make-selection-layer-mask
https://helpx.adobe.com/photoshop/using/editing-layer-masks.html
Sign into Adobe Creative Cloud to access your favorite Creative Cloud apps, services, file management, and more. Log in to start creating.
There are other answers on Reddit:
https://www.reddit.com/r/photoshop/comments/1k57077/how_do_i_remove_alpha_outerlayer/?utm_source=share&utm_medium=mweb3x&utm_name=mweb3xcss&utm_term=1&utm_content=share_button (so that other helpers do not waste time duplicating them)
Reddit
Explore this post and more from the photoshop community
why does my mouse do a little 🚫 when trying to put a paintbucket down normally it asks me to rasterize it (dont know what that is) this time it doesnt
is there a way to change a colour from something to another?
Im trying to make all of these stripes equal in spacing how would I do this?

you could set up a grid, draw / duplicate the lines, then rotate that layer to the angle you need
Rasterizing means changing vectors to bitmaps.
https://www.adobe.com/creativecloud/file-types/image/comparison/raster-vs-vector.html
https://www.photoshopessentials.com/basics/vector-shapes-vs-pixel-shapes-in-photoshop/

Get to know the two main image file types — raster and vector. Learn about the main features and differences between raster and vector to make sure you use the right one.

Learn the important difference between vector shapes and pixel shapes! Now fully updated for Photoshop CC (Creative Cloud).
See: https://helpx.adobe.com/photoshop/using/replace-colors.html either hue/saturation, replace color or the color replacement tool
Here is a video: https://www.youtube.com/watch?v=uFat6ftzR_0&pp=0gcJCfcAhR29_xXO
Easy to follow, step-by-step tutorial showing how to change the color of anything in Photoshop!
This tutorial will show you 5 examples of how to properly select an object and change its color.
I hope that you enjoy the tutorial and learn a lot!
🎯 SUBSCRIBE to get more amazing Photoshop tutorials!
► https://bit.ly/Subscribe-To-PTC
📘 I...
SOS! Has anyone ran into an issue in photoshop where it shows your text like glyphs not matter what you type?? its a google font.. Monte Carlo I cant switch fonts, this is branded.. I have uninstalled, rebooted and reinstalled it...... it works fine in Word

hi, in photoshop, i insert a image and it was clear
when i resize it, it becomes blurry


Set interpolation. to be 'nearest neighbour'
do u have a instruction to do this thing

dopesnt work
You will see the same options when you just 'transform' a layer too. - e.g. begin to stretch/enlarge it
Can you share the original (small image) please
When you make it bigger, multiply it by a factor of 'something' so there's no split pixels
e.g. x10: 17pix to 170 pix
or to 340px etc

oh
Did you get this solved?
Here's a Demo if you need it. - Personally it's better NOT to rasterise something and instead PAINT on a new layer over the top - it's then non-distructive
ty
Gave +1 Creative Carma to @sly hawk (current: #5 - 1143)
Step 1: Place the text over your fold fabric texture then add a layer mask on Text Layer and paint with black to hide parts of the text.
Step 2: (Cast Shadow on Text) =>Clip a layer over the text and paint cast shadow with a soft brush (pick dark color from the texture layer)
Step 3: (Drop Shadow under text) => Make a selection of visible text then create a layer under Text Layer and fill the selection with dark color (You can set blending mode of this layer to Multiply to get darker shadow), Add a gaussian blur effect. Then you can create a displacement map (like in the video)
Step 4: Use Displacement map to distort the shadow and modify Blending opition to display shadow only where the gap between the texture and the text is supposed to be small (lighter areas of the texture)...
Hope videos will be clear enough...
any reason as to why the new photoshops generative is not as great as the 2024 version? i mainly use it to just make like dark green nebulas but even with that, they look terrible in the 2025 version
can i see a side by side ( i cant help you im just curious)
yup!
ill do a 2024 version vs 2025
prompt
dark green nebula with stars
super simple
yea


thats so random, do you know if adobe use their own ai for the pictures or do they pay for a service like chat gpt
i have no idea. figured id ask about it because ive just been using 2024 until i get the prompt to upgrade
😂 wish i could help wishing you better looking nebulas
yea seems like the clear winner
anyone know how to fix this?
when i hold z and drag it shows the area youre zooming in (like frame by frame too) instead of a gradual zoom effect
Perhaps try to change zoom tool option in Preferences/Tools

it should be checked right?
if checked PS will zoom while you hold click, If not you'll have to drag left/right to Zoom in/out...
thank you so much it's fixed now
I am not sure if this is a bug of sorts but I have Josefin Sans font installed, I can access it in all other apps except photoshop, it is just not there, did anybody have any similar issues?
No, but I had the same issue in other programs (like Inkscape), some some reason, some fonts that have been installed through - say - Microsoft store, aren't installed in the same folder as the other ones.
I use a font manager (Nexus font, but there are others) that lets you find the font even if it's hidden. But you can also just do a search in the explorer itself. Josefin is a font from Google fonts, so you can either download it directly from Google, or sync it from Adobe font. All for free. If the font is synced, there should be no issue, but if there still is one, then I suggest you install it from Google. (and vice versa if you installed it from elsewhere than those two)
https://fonts.google.com/specimen/Josefin+Sans
https://fonts.adobe.com/fonts/josefin-sans
Google Fonts
The idea of this typeface is to be geometric, elegant, with a vintage feeling, for use at larger sizes. It is inspired by geometric sans serif designs from the
A sans serif typeface with 10 styles, available from Adobe Fonts for sync and web use. Adobe Fonts is the easiest way to bring great type into your workflow, wherever you are.
I had the issue with the synced font not loading properly anywhere so I moved to the google one, that works perfectly everywhere exccept photoshop where it just does not seem to exist
Are you sure it is installed in the right folder?


Windows

I can see the font there, yes
That's strange then. Let's see if someone else has the solution, but in case noone has, I would suggest you post on the Adobe forum, that's where you can post bug reports and where Adobe employees hang around.
https://community.adobe.com/t5/photoshop-ecosystem/ct-p/ct-photoshop?page=1&sort=latest_replies&lang=all&tabid=all
https://community.adobe.com
Master Photoshop with the help of our global community.
PS and AI


Have you unsynced your Adobe font by the way?
If not unsync it, there may be a conflict
I know there are two i-s in the PS search but it does not search it at all
You can still resync it later if needed
But mine works so it's not an issue with the font (it could be, although I wouldn't expect that from Google)
I do not have it synced from Adobe fonts
OK, another thing you can try is to check with another variable font
Maybe there's something preventing variable fonts from appearing (Throwing things at random there, we never know)
I appreciate the help, I can use Acumin VF normally
OK, wait a bit in case someone else has an idea, otherwise, like I said, it's probably best to file it as a bug report to have more clarity.
Will do, I will wait until tomorrow and then file the report, for now I have took the text from illustrator and pasted it in to have a prototype at least
Or you can do what most people do, import your raster elemenst in Illustrator and add your typography on top there (Unless you need masking etc on top of the typography)
I have never done that and never heard of that option to be honest, this it the prototype, it is far from done, I used to do it all in illustrator but since it's all digital Illustartors gradients were underwhelming

You can do pretty advanced gradients in Illustrator, notably with fre form gradients, which is an option you don't have in Photoshop. (I think it's been requested for a long time now)
In your case, since there is not much interaction between the text and the gradients, that's absolutely something I would do in Illustrator for the text
Some people would do it in InDesign as well, it's where the best text options are (arguable the worst are in Photoshop, since photoshop is not really text oriented)
I think most graphic designers will take the image and add all the vector elements (including text) in a more text oriented software than Photoshop. I understand that sometimes you have no choice, but it seems to be a possibility there...
The issue is, when I exported it the gradient was looking like this, the design is a bit different as I wanted to redesign it anyway but you can clearly see the lines in the bg

Obviously I don't know the details of your design (and how the raster effects have been set if you've done it in Illustrator) but I have done a quick search for leaflets done in Illustrator and Indesign (even templates) and there are loads of them.
when i cut something out of an image it leaves a area of alpha pixels around
how do i stop this from happening
My prefered way to use gradients in Illustrator is to use masks. The cool thing there is that you can stack effects within the masks on top of the gradients . But that would be a discussion for the Illustrator server that!
Try to see if you got any feathering in your selection tool, or any form of anti aliasing
Also make sure you look at things at 100%, because the display accuracy can be patchy at magnification other than round numbers (the best being 100%) and sometimes you see a fringe that isn't really there (You can can check that by exporting and looking at the export)
ok thanks!
If you want 100% accuracy, don't cut things, but use a vector mask, whenever possible. That was you will retain your eaxct cut at all resolutions and there will be no feathering (unless you deliberately apply one in the mask properties)
This is how a vector mask looks. In general, I would avoid cutting and pasting unless there is no other way. Masking is the way to go! (and it's non destructive, meaning that you don't have to start from scratch if you make a mistake)
https://www.youtube.com/watch?v=mqqVmGxvHaY
That's for normal masks

Masking is the granddaddy of skills in Photoshop. Master masking and you're well on your way to conquering Photoshop. In graphic and web design as well as photograph retouching, masking is the fastest and easiest way to erase layers without actually erasing them. This allows you to fine tune your adjustments and graphics down to the pixel withou...
That's for vector masks
https://www.youtube.com/watch?v=7526LhIXzoA

In this video, you'll learn quick and efficient ways to work with Vector Masks in Photoshop.
Additional tips, tricks, and tutorials from Julieanne Kost can be found on her blog: https://jkost.com/blog
Facebook: https://facebook.com/julieannekost
Twitter: https://twitter.com/julieannekost
Instagram: https://instagram.com/jkost/
Behance: https://b...
I will take a look at the AI server as well, thank you for your help
Gave +1 Creative Carma to @vapid flume (current: #6 - 950)
Ended up removing the google version, getting the synced one and all works perfectly fine
How can you straighten the watch like in the image? Because apparently he fixed it somehow in photoshop


any clues where favorites from batch generate in beta are stored?
i think there are a lot of ways, you can cut it and use masks and transform it with 'ctrl + t' and ajdust each section of the watch's bracelet until it get straight
Liquifying is what you probably need here
Is the first image also available in a better resolution? Because you can straighten the bands with layers, the liquify filter and various transformations - but you are guaranteed not to achieve the same high-resolution detailed result of the final image.
@proven shard
How do i get these set up properly as a new animation sheet? When i make a new sheet with the size and height proper- it firstly doesnt wholly fit into it but it also when animated- plays weirdly
I also feel like i did something wrong with it- with the hidden and seen icons. I dont know what else i did wrong possibly. (Size of texture is 256 x 256 so animation sheet should be 256 x 1024) But I saw somewhere, either from trying to export or save or something.. that it said a different size, which might be a factor too if it altered original size.
How do i make similar pack icon?
Do you mean stored? => Generative workspace
Click on the funel icon then choose "Favorited"...
Not sure that's what you were asking for Katarina...


100% agree with @tame cape ... The final picture isn't from the one on the left...
Which version is it? I do not recognize the icon in the app?
my photoshop is all red
quick mask is off
pressing q makes it more red and pressing \ does nothing
how do i fix it

@fervent quiver
Check your channels panel for an accidentally activated alpha channel and switch it off.
asked SoraAI to improve the halftone vintage effect im trying on this cutout, any tips on how to recreate what it made from scratch? (original on the right)


how do i fix the stroke layer style coming out so bumpy and low quality

just add the halftones yourself or find halftone presets on youtube
guys what software is this? is that photoshop?

No. It looks like Clip Studio Paint.
Stroke Fx is applied to a text layer (Thumbnail with a T inside) or a rasterized Text?

If it's a Live Text Layer Make sure anti-aliasing option is not set to "None" ... It could be the root cause of your problem...
If it's a Rasterized Text layer that could because of the edge fuziness of the Letter you're trying to apply the Fx on.
That was the issue, but cjay shotgun the question to several channels, and left without a thanks when the raster layer was brought up.
Gave +1 Creative Carma to @viral palm (current: #9 - 775)
Does anyone perchance have a vintage jersey mockup?
How do i get the exact same colour as in the Screen on print aswell? Please help :((
You need to simulate the colour of your print, on your screen. If you get to print in a print shop, the print shop will give you a paper/ink profile that you will have to load into Photoshop (soft proof) and it will show you the colours as they will be on your print (more or less, it's not an exact science, most people will perform test strips and correct through trial and erroron top of that)
If you are using your own printer and paper, you need to create your own profile. This profile will change if you change paper, or ink, it's a combo of multiple parameters.

Hey there! Ready to unlock a world of precision and vibrant colors in your printer outputs? Welcome to our latest YouTube guide where we delve into the nuances of ICC profiles and X-Rite i1 Profiler! This isn't just a walkthrough - it's a hands-on tutorial designed for YOU, the printer repair heroes who love doing it themselves. We'll show you t...
It also helps if your screen is calibrated. I mean your screen will not show the same colours as mine for the same image, calibrating it will put both in the same area (again, not 100% exact)
are there any colours which are not possible for a printer to print? Because i was scanning child's artwork but when i printed the exact same file which i scanned without any modifications, it came out in a different colour
how could that be?
@vapid flume
sorry to ping
Plenty of colours are out of a printer's gamut
Sometimes you can circumvent that by asking the printer to add extraplates (either digital or litho), but it costs extra and not everything can be solved with an extended gamut process
You can also ask to add spot colours like - say - fluorescent inks
But you will NEVER acheive a full gamut.
Print are ink onto paper, it's a "physical" process
Screen are light beamed onto a screen, completely different
Also, since the same artwork, scanned the same way will not even appear the same way on YOUR screen than on MINE, then obviously, even if all your colours were within the printer's gamut, it might be different as well, that why you need profiles: If I load the same profile as your printer on my screen and apply that printer's profile and you do the same, we will get something more or less matching
If we then print it on the same printer with the same inks and paper than the profile, then we will have a similar print. Again, provided that all our colours are within the printer's gamut.
has anyone ever encountered this issue when trying to edit photos downloaded from Facebook?

top one is what I see on my Ps canvas, bottom is what it should look like...
There were two/three questions here on the server two or three weeks ago (that was also about this partially lined view of files).
I do not remember a solution. It was probably assumed that the downloaded files were corrupt.
found this one
#💬chat-general message
and this
#❓ask-a-question message
@serene coral
@silk owl - if you'd like to share work for feedback, please post in #📝project-feedback
Also, please don't try to ping "everyone"; that doesn't work here and if it did, everyone doesn't need/want to be pinged when you post something. Thanks.
How come prompts with generative fill are very sensitive? Like I understand it censoring things like blood or guns or whatever but I tried to do one of a fireball but it didn't seem to like that.
Hola!! Hope you are all doing well. I was just curious if anybody knew how to recreate this insane effect or what it's even called

It looks like a 3D mesh so my obvious answer would be with a 3D program (vertex based)
It's difficult to answer to that one, because we aren't privy to how the algorithmn determines what's risqué or not. I found that generally any amount of bare skin will trigger something, as long as it's a large area. I also noticed that it depends. I've seen things where I thought I would be flagged, passing OK, and other days where everything was somehow off limits.
you are the best, thank you
Gave +1 Creative Carma to @vapid flume (current: #6 - 951)
oh wow thanks for this! looks like some temporary problem not just on my end...
Gave +1 Creative Carma to @tame cape (current: #16 - 149)
Hi everyone, does anyone know how to make this style of art? How to apply it to an image or design?


If you are talking about the overall look/effect, it's a method known as halftone
you know a any video tutorial?
My Effects Shop: https://justinodisho.com/shop
Adobe Software Download: https://prf.hn/l/dlXjya5
Support the Channel: https://www.youtube.com/channel/UCy7DyWXJ0jghyMsUoOU6F7g/join
i have a question, dont worry the color of picture, true?
What do you mean? As in worry about the color?
I know this server is dedicated to PS, but is anyone familar with camera specifics in After Effects? Had a question.
wait i dont speak english, The color of the image doesn't matter, right? Because in the video it appears in black and white.
Ahh, no it should not matter. they just began with a BW image
I tried to do something similar a few weeks ago without knowing the method but this was the result
Did you use one of the filters from filter gallery?
There is a dedicated discord : https://discord.gg/adobepremiere
I appreciate it, I have asked in there but am still waiting on a reply. Thought i'd give it a shot here
Hi, you have halftone patterns, and in some spots, pixel dithering: https://www.youtube.com/watch?v=9XJiojbALv4

Join PATREON:
https://bit.ly/3FKZiBO
Watch My FREE Skillshare class on Logo Design:
https://skl.sh/46plj3K
Premium Mockups and Templates at Rawpixels - https://rawpixelltd.sjv.io/Y9aq5e
Domestika Design Online Courses - https://domestika.sjv.io/4PJR9Z
Reference Image Download:
https://rawpixelltd.sjv.io/YRDR6R
https://rawpixelltd.sjv.io...
Ok! Thanks for the update!
Gave +1 Creative Carma to @hushed niche (current: #12 - 226)
This one should be quick and easy but not for me tho, I’m confused on the person and the piano, how do you get it to where some spots are opacified and you can see some of the background, I need more explaining or videos on this matter! I have no idea if I’m explaining right but
I did
Adjust the Mask for Partial Transparency
• Select the mask thumbnail by clicking on it.
• Choose the Brush Tool (B).
• Set the foreground color to black. Painting with black hides parts of the image; white reveals them.
• Lower the brush opacity in the top options bar to around 20-30% for subtle blending.
But this isn’t what I wanted to make it look like the second image


I wanted to do the logo as well because there is no font for this

And while we are here, I have a problem with the red haired girls hat , I want it to blend in like the other ladies hair/hats, how would I go about doing this?

When using textured background like this you can use Blend if sliders (in blending option).
Note: Hold ALT and click on cursor to split it and get a softer transition
Lord you are a SAINT!! 👏🏻👏🏻👏🏻tysm for helping me, I really appreciate it! 💗😭🥺
Hi guys! Can I use AI part of the software if I have cracked photoshop or no?
Are you talking about generative fill?
Yes
No, you cannot
Thanks for the answer buddy!
is there a way to suppress the 'merge layers' dialogue in a batch action?
Okay. Now how do I make the font look faded out?

This one is kinda better high quality
I think you could get this result by adding a mask on the text layer and carefuly paint with different grungy bush to build this effect... I created 2 different brushes for the short video. To sell the effect you can add texture over the background color with the same brushes and the same color than the text. I share the 2 brushes made and used in the video if you want to try...
But there's no "One click technique" for this result... You'll have to build the effect...GoodLuck!
Okay, thanks again! If I have any other questions I’ll @ you again if you don’t mind, but i appreciate it tho! I’m going to try 🤗
Does anyone know how I can turn this Halftone gradient into the colors from the first image? I set the blend mode to multiply in the third image to get rid of the white, but there is no way to change the black to the same gradient colors from the first


I just want the same color gradient with a halftone effect
Where is clipping path at in photoshop? @ripe quest
I’m experiencing flickering in the gray panel area of Adobe Illustrator. What could be causing this issue?
Please don't ping me directly when you have questions. Please just ask here and wait patiently for someone to replay. "Clipping Paths?" Do you mean "Clipping Masks?" See: https://helpx.adobe.com/photoshop-elements/using/clipping-masks.html
You might want ask in Adobe Illustrator - https://www.discord.gg/adobeillustrator
CMD+E or View > View Using CPU
@ripe quest Thanks
Gave +1 Creative Carma to @ripe quest (current: #2 - 2839)
Thanks , When disable using GPU, it solved.
I don't know if they have this on the Mac or not but... Main Menu: Help > GPU Compatibility... Does that exist on MacOS?
If so, see if there are any issues reported there.
It might not be the smartest question to ask in the official Adobe Photoshop discord…
Hi, you could clip a gradient map to the thresh.
Hi, can someone tell me how i can recreate this render style?

how do i make my export as saturated as what i have made in photoshop?
this is in photoshop

this is my export

Is there any chances to edit some letters in document like this?
There are, but no ***moderators ***here will want to touch it, since it looks like you're using it to be deceitful/fraudulent and it's against our server rules to support this - (I'm not judging)
Honestly, I don't wanna do this, but my boss made me mad...
Yeah, I appreciate that. - Maybe specify what it is that you want, and if it's nothing too dodgy, someone else may be willing to help.
Otherwise, I think there are reddit groups that might help with things like this too.
There will be no magic button/setting if that's what you mean. - What's your end goal? Turn an existing image into this, or recreate a new 'scene' of your own?
So i have a clean line drawing plan on cad
What i want to learn is how to gove those textures on the ground
It looks like some stippling effect
Can you tell me which font it is at least?..

I wouldn't ty and create a new font - since it will look too obvious - I'd probably try and use the clone tool to use existing characters... and readjust any words needed..
Your question was answered in the question channel (avoid posting multiple times the same question, you'll receive answers from different people in different places and it wastes everyone's time)
Thanks!
Gave +1 Creative Carma to @sly hawk (current: #5 - 1144)
Is that possible to do in Ae? Would be it better?
Is that necessary to create white background?
Hey is there a smart way to edit this building out? Need it to look clean and professional. Thanks !

Nobody can judge that. You would need to see the original file in full resolution. A photo of the screen taken at an angle is definitely not enough.

I'm on the road at the moment and can only view the picture on my mobile phone. However, the quality/size/resolution of the picture doesn't seem to be very good. You won't be able to achieve an optimal result with it.
Ok but this is what I have to work with so what steps can I take to remove the building
You can try the remove tool or generative fill.
Or what should the building be replaced with?
Then first remove the building with one of the two tools mentioned.
The base image is awfully low. - It can't look professional if that's your original shot
I assume it's Derby Abandoned Friargate Goods Yard? - Can you source a better shot?
I assume you're removing the building and want to replace it with some homes and commercial spaces?
Can you not purchase a HR image and use that as the basis?
https://www.alamy.com/fire-damaged-warehouse-at-friar-gate-goods-yard-city-of-derby-2021-image485502787.html?imageid=CFCF0365-B890-47B5-A45D-BDB8B3A97A20&p=842179&pn=1&searchId=115c802bac982736c4524574910e8056&searchtype=0


Lol. - The image above was done with ChatGPT - The one BELOW was photoshop... - whoops

I have rasterized the text and want to "compress" it, but it is getting smaller. How can I do this?
This to make it look rubbish and blurry?
Just make it smaller, hit enter so it re-renders, and then stretch it larger again
Hold on.
Is anyone able to help me please? I'm creating product boxes and now I finally know how to do them. But I also purchased a gfx pack and when I open the gfx it goes to a different window with all the gfx layers. I don't know how to get my editable box into that window instead so that I can use the gfxs. Any help is appreciated


Or how to transfer layers from one window to another please?
Check in chat general, those are smart objects.
In general, when you purchase a mock up pack, it comes with at least a .txt with the explanation on how to use it
Can anyone please help me understand why the text is so dim but when I open the color panel for the text, it becomes bright. Is there a setting??


Thanks.
Gave +1 Creative Carma to @sly hawk (current: #5 - 1145)
😉
Photoshop generative fill

@blazing jackal
generative fill - a possible variant


These appear to be varying in color all around, as for the difference in your two images, they appear to be the same color on my end


Remember:
Vector text → one uniform fill color mathematically, with only edge pixels showing intermediate hues (via anti-aliasing).
Raster text → every pixel is pre-baked; if anti-aliasing, dithering, or interpolation was used, you’ll see many different hues across the glyph, not just along the boundary.
As for your specific issue it probably boils down to your color space, the color picker and your actual document can vary in palette. The color picker spectrum is 'un-proofed' and may differ from your intended space.
Toggle View → Proof Colors (⌘Y / Ctrl+Y).
Or change your profile under View → Proof Setup to Working RGB (if you’re not sending to print).
Thanks !!
Gave +1 Creative Carma to @tame cape (current: #16 - 151)
does anyone know how to fix a gardient on a saved photo garident layer ?
Hi! What is the zoom level in both cases?
Your two texts seem to have a different weight... Make sure you didn't change anti-aliasing settings (video)... Color picking panel opening shouldn't affect Text display (as long as you don't pick a different color).
And as said by @hushed niche : Make sure you compare the two images at the same zoom ratio.

Could you give us more details or share a screen shot of your image?
Hard to figure out with so few info...
what file location do my fonts go in
PC or Mac? (or other)
never mind got it but do you know why when i right click an image layer it only gives me these options

What do you expect to see after a right-click?
🤔
This is the ‘Layer Quick select function’. This allows you to quickly activate one of the layers at the mouse position and then move it.
@river otter
is there a way to use all the features lightroom classic has on lightroom cc?
i can't even get started by importing a photo on lightroom classic because half the images in the folder don't show up, and the entire thing is sorted alphabetically no matter whether i click "all photos" or "new photos"
also it's unusably slow for me
is there a way to make the canva and sticky note more realistic and is there any feedback on what i can do to imrpove this?

for the sticky note you could hand-draw the text with a brush that makes it look a lot more in that style
for the canvas you could try setting the text to the "multiply" blending mode, and maybe use the canvas's texture for a displacement filter but that's kind of complicated
okay ill try that
What do you guys think of this ? I’ve made this in photoshop for a class project and got a really good grade off. Of it

Hi, please use this channel for feedback: https://discord.com/channels/547473772727238676/601848427541692447 It did evolve well from the red version!
can I ask about Adobe Express here? I think this is the proper place, but not quite sure
is there way to remove this guy without using gen ai?

Hi there! I’m new to PS and I’m trying to make a LED board like this one. I don’t have the text font, so I can only fill the text pixel by pixel. Is there any easy way to do it?

use shapes like square and circle
alright
This is a bit ooc but does anybody know how can I remove the middle part of this stinger?
You might want to use a video editing program (I believe PremierePro has a remove option) as in Photoshop you will have to remove it by conventionnal means (or with the help of GenAI) but in all the frames one by one.
There is a video and animation server if you want to ask them
https://discord.gg/adobepremiere
You could draw the letters with the pencil tool. It's really the right tool to create sharp, neat pixel based shapes

So depending on the size of your artwork, (generally pixel art is quite limited in size) you will have to zoom in quite a lot
Be sure to keep the nmoothing at 0, and opacity at 100 (and a normal blending mode unless you're doing specific effects

If you're working on very large shapes, then working with vector square etc will probably worth it, but it will be easier to draw directly, in the same way you'd draw on pen and paper (dragging the mouse/stylus along instead of click-click-click on each square)
Of course it will be way easier if you have a graphic tablet...
Also, it might help if you turn on the pixel grid so you can see what you are doing
Be sure to remember to turn it off, because that's something annoying when you do regular stuff 🙂

Obviously I'm a bit crap at that sort of things, but see how the pixel grid and the text, drawn with the pencil tool (with some outer glow) looks

omg i did it
btw I want to export the grid as well
can I just export like this at the screen?

this is the grid from photoshop
its a blank layer
The grids and guides are non printable, so you will need to create one. My best advice would be to create a pattern in the shape of the grid
If you're not familiar with how to create patterns I will share some tutorials, but basically, it should look like this
All you need to creae is a thin line top and side (so just an 90 degree angle) and save it as a pattern.
Once there you can use it as a pattern layer adjustment (you can see it in my screenhot, in the layer's panel)

You can see it in the thumbnail, just two lines at an angle.
Once a pattern, you can enlarge it or make it smaller by adjusting the scale, and even the angle


That's the kind of thing I think everyone should know how to do, and also create once and for all, as it's super useful
There isn't any shipped with photoshop, you need to create your own, like I did
Alright
The tile is literally just that

is it should be like this

You need to create your tile with thinner strokes (or create longer lines) as it seems a bit bulky here.
Basically you don't want your strokes to be as thick as the space "inside them"
yea lol, i want the grid same with ps show
Obviously there are a lot of trail and errors , you need to change the sizes untill you get what you need
Display PS grid and create a new tile based on what you see on the screen.
Then scale it down (since I assume you'd zoomed in a lot) until it measures - say -100 pixel wide at most, and make it a tile. If it's too large you will end up with 2% scale as you have in your screenshot and you're loosing the accuracy
Again, trial and error
The best thing to achieve would be to stay at 100% in scale (or thereabouts)
Yes, if you don't have a background in your tile (just the lines), then the grid will appear without any background

Obviously you will need to remove or hide the background layers in your layer stack
Your last tile has a white background
OK, I need to go anyway, still have work to do.
You'll figure it out!

is there an ae server too?
does anybody know how this artist has created these cutout paint splatters in the background and how i could do it using photoshop?

Hi, the express channel is there: https://discord.gg/adobeexpress
Adobe Video discord server (Première/Ae) => https://discord.gg/adobepremiere
Here is a short video to show you how I would tackle the grid pattern with transparent BG...
Note: I made a 100x100px Grid with 1px wide lines but you may have to create different sizes depending the dimensions of the design you plan to use the pattern on.
Is there a way to make a keyboard shortcut for something that doesnt have one right now?
I want to be able to turn layer styles into their own layer quickly. How do I do that?
If you mean rasterize Layer style you can create your own shortcut...
Go to Keyboard Shorcut menu (CTRL+ALT+SHIFT+K) , type "Rasterize" in quick search box, select what you want to rasterize and create your custom short cut...
Thank you!
Gave +1 Creative Carma to @viral palm (current: #9 - 776)
Hard to explain and it<s a long way to find exact layer styles used here but it looks like a multi-layers stacking with different layer styles applied on each one. Each layer is certainly made with splatter brushes (you can find ot lot of sets on the web...Brusheezy for example), then different color overlay and drop shadow settings has been used on each layer to give this sense of depth. Some texture layers are placed over and blended by playing with their blending modes... The designer here made an impressive job... if you want to replicate you must be very patient and build the effect layer by layer...
I'm having a problem saving my project with "Could not save as ... because the file is already in use or was left open by another application." appearing every time. How do i fix it?
Is your file on a local drive or on a removable media or network?
If you don't have the file open in another application it could be that somebody else on the same network has it open? Is the file on a shared network? If you're are the only one who have acces to this file you can use this workaround: save the file with a new name.
I took these from Tennessee Football’s instagram. What adjustments do I need to do to make raw photos look like this? I usually use camera raw


How do you put an image in a box like this

Draw a Rectangle Vector Object with the Rectangle Tool. Put your image above it in the Layers Panel. Then right-click on the image layer and choose "Create Clipping Mask" from the context menu. That will clip the image to the extents of the rectangle shape. See this post: https://discord.com/channels/547473772727238676/1081318392750940290
thanks this worked very well do you know how i could move every thing at once?
Gave +1 Creative Carma to @ripe quest (current: #2 - 2840)
Put it in a Group. Group the Layers. Select both layers by holding SHIFT and clicking the layers. Then tap the folder icon on the bottom of the Layers Panel.
Then you can move it all as one combined thing.
thanks got it
Why are these images so lo quality I’ve copied and
Pasted them off google

Because most online images are at the lowest acceptable quality to save on bandwidth. Then are you scaling them as you put them in your document?
You’d need to find high resolution source images.
hello, are there any useful plugins for photoshop anyone could recommend ?
is there any tutorial that help me make this kind of background?


wip
I want to make crt monitor effect
how can I do this
I found some tutorials on youtube but its like a bit tricky maybe there is another simple way?


thats how I want to make
I can take your feedbacks for design too
amazing thank you so much this really helps
Gave +1 Creative Carma to @viral palm (current: #9 - 777)
Any idea on how I can make the paint/brush streaks similar to this poster? I'm making a poster with the similar design as this.

The first question: which streaks? The light ones on the picture? The red ones around the image parts? The black ones on the background?
Sorry if it disappoints you, but the easiest is often to do it in real life, and take a picture of it.
You can find some brushes and try to replicate in Photoshop, but if you do not have a tablet, it might not be easy. You could also create paths and stroke them with a brush. That said I’ve seen some do wonders with a mouse.
mm I that makes sense, is it possible to use vector photos instead?
I'm trying to recreate the red and black ones particularly
Hum... Black strokes look like acrylic paint drips... Not sure you can find vector brushes for these ones.
For the red you can try Artistic brushes in Adobe illustrator...

how do i change this to black so i can draw the red


@river otter - Please do not ping random people. Just wait patiently until someone has time to answer.
okay
2 short videos to show you how I would tackle your design.
Brushes used for the black paint drips are from here: https://www.brusheezy.com/brushes/1476-splatter
anyone can help with my weird ish project
im trying to upscale 250 x 250 photo
using photoshop
im new to ps
WHY I DINT HAVE SUPER RESOLUTION
How would I do highlights like the characters have?

looks like it could be done with a stroke on the inside
Upscaling such a low res image (yes 250x250 is very low res) can hardly gives great result.
I would suggest you to use Neural filter/Super Zoom but to be honnest you won't be able to get great result over 750x750 (3x) /1000x1000 (4x)...
Uspscaling always adds pixels to increase the dimensions of the image. The more you uspscale the more you loose quality.
It's called "Rim Light"... If you have 15 min to invest check this Video from PTC...
Jesus will explain you deeply how to do this. It really worth it!
https://www.youtube.com/watch?v=H-z0j2jVka8

In this video, you’re going to learn EXACTLY how to professional movie poster designers create and apply rim light in Photoshop.
Thanks to my friend Lisa Carney for lisacarney.com for allowing me to share this technique!
Here’s a breakdown of what you’ll learn in this Photoshop Tutorial:
1️⃣ Create a Channel Pull. This technique wil...
Thanks!
Gave +1 Creative Carma to @viral palm (current: #9 - 778)
Can anyone help me to make the project if I give instructions
how do i change this to black so i can draw the red


‘Do it for you?’
Maybe you'd better ask that in https://discord.com/channels/547473772727238676/548276405151203338. Show what you've got. Describe exactly what you want. And wait to see if anyone has the time and inclination.
Otherwise you can also look around on Behance (if it's a paid job).
why when i copy and image from google into ps it looks so bad but in google it looks fine


Not sure to understand...
If you want to change the white mask to Black => CTRL+I with layer mask active or simply paint it black... If it's not what you want please explain What do you want to change to black...
Your psd file is 32bits... If you copy paste image from web browser images are 8bits... Try to "save as" the picture on your machine then place it in your document rather copy paste it... If you want to copy paste anyway don't work in 32bits but in 8bits in photoshop.
Note: take care of copyrights when using images from google.
how can i resize the text box without resizing the text in it?
With a paragraph box like in the video?
Yeah
So you really need to create a "Paragraph text box" click+drag to create a text box resizable.
If you just click, PS will create a simple text box and I don't think you can expand the box without text distortion.(as you can see on the second video)
Okay thank you
 | Hey guys, just wondering how I can import all my presets into a folder into the presets box, atm theyre going and merging with the default presets which i dont want.
my end aim is to have a folder here where i can name it what i want and have the presets i import into there

does anyone know why the outer glow isnt working? Ill add an outer glow to something, and then it will disappear if another object is dragged across it, and it wont even appear in the exported result
Could you share your complete Photoshop user interface so we can see how your file is constructed?
I assume you're talking about the offset+Blending effect on the skull...
That's a layered "sandwich" : 1x Text Layer under the isolated Skull with drop shadow. Then clip a copy of the Text Layer above the Skull change its blending mode to mulpiply and change slightly its position to create an offset effect.
When you get the offset wanted you can link the 2 text layer and move them as you wish...
how do i replicate this cloud like cutout polaroid border?

Hi I'm having issues with the photoshop brush. It lags behind causing choppy lines. I tried increasing the memory allocation, gpu is enabled, my laptop is on its highest performance setting, I tried turning off smoothing, Increasing and lowering the spacing, different brushes, closing other apps, updating my drivers, and thats pretty much it.
I couldnt really find more of this issue online
My laptop has a RTX 4050, and a Intel Ultra 7 155H, and 32 gb of ram
I dont think it's a hardware problem, atleast I hope
I also tried smaller canvas sizes and still had the same issue
they are very shaky like this

Hi, are you using a drawing tablet? Are its drivers up to date? Tried older ones? What is the size, in pixels of your image?
Yes I'm using a tablet with all drivers up to date. the problem occurs whether I draw with my tablet or just my mouse
the canvas is 2100 x 1500 pixels 300 ppi
Could the mouse be interfering? Try to turn it upside down, and when you use the mouse, to have the pen away from the tablet.
same issue
When did the issue start? Did you try resetting the brush? Right-click on its icon it the option bar.
Which tablet is it? Tried an older driver as well?
Huion inspiroy H1161
I was on an older driver before I updated it so I've tried both
I just tried to lower the resolution of my screen itself and it helped the issue
You’d have to ask in their forum.
but no matter how much I lower the resolution and size of my canvas it doesnt help
I dont believe its a tablet problem
for it to run smoothly I have to set my monitor resolution to 800x600 but that literally makes no sense to do

Is it a tablet with a screen?
Does anyone know how to do this motion blur effect? Its seems quite radial since the outside of the photo is more blurry than the middle

Turn your layer into a smart object then Choose Filter > Blur Gallery > Iris Blur.
The default Iris blur pin is placed on the image. Click the image to add additional blur pins.
yo why my luckiest font like this brO 😭

its suppose to be thick

not skinny
i installed the regular one to the pc why is it skinny asf
Would someone help me with a picture? Id like to change the color of the exterior of my house.
People: do not post the same questions multiple times / in multiple channels.
Hey friends
I would appreciate some direction.
I’d like to make my own decals for printing.
I’m not quite sure what would be the most ideal software to do that in.
I’ll give an example for what I am looking to do, if anyone could give me some pointers as to what exactly I should be studying to achieve this I would appreciate it greatly .
Example:
I would like to design the eyes of this character to then print and glue on the model I’m currently working on.


Why is that the generative fill keeps leaving a border that make it looks like cropped instead of mending. I've been encountering this problem for a while now and have no idea why this is happening.

how would i get rid of copyrights?
Not at all.
Copyright belongs to the author. Always. Even if the notes in the file are removed - but that's not legal anyway.
oh ok
When using the Generate Image feature, it was creating three different versions with each request. Now it's only creating one. Anyone know what happened? I can't seem to find a preference to go back to three. Is there one that I'm not seeing?
Hey
what can i use to change the flags on this koala

i need them to look the same
but different flags
fast 😭
No need