#❓ask-a-question
1 messages · Page 119 of 1
Hi, Did you search online? I’ve found this official document https://helpx.adobe.com/photoshop/kb/file-recovery-photoshop.html
hey yall
i'm trying to create a gradient stroke over a text (well i turned it into an image) but it's not completly filling the holes in the letters such as "R" or "O"
and i dont wanna make the stroke bigger but i want the holes gone
what can i do ⁉️
You want th e stroke on the outside but not on the inside letters holes?
Could you explain « I want the holes gone »? O => looks like a Disk?
If you could share a screen shot of your text it would be great…
nvm i noticed it actually looks better like that lmao
but thanks for the help
I think it was used as a start disk
https://cdn.discordapp.com/attachments/1335702408113815673/1358879555917709493/xyq61ux55bf81.webp?ex=67f572b4&is=67f42134&hm=2c81c01e82d7c4a77f72afb72bf4d5dfebbda8a2e76ae36e672094b8811d3a49& any clue on how to do this

do u guys think this poster is okay ? or should i make the backgorund brighter so the logo can show ?

How to do what? Insert an image in the mirror?
You"ll need two pictures: one of the mirror side (with the photographer visible inside it), One of the character taken from the mirror side.
Place the picture of the bathroom mirror => Mask the Mirror area.
Place the picture of the character under the masked mirror layer and adjust its position.
That's a technique used in lot of movies...
Red on red and Dark grey on Red don't give enough contrast... Maybe try a lighter background color.
Maybe yes... But you'll have to change white text color if you go for white.
hmm ill try
does this look better now ?

i want to fit the word "Dante" in there any tips on fonts and text color? appreciate any help

\

why does filter gallery make my image so dark?
I just added black and white then merged it before applying filter gallery


before that I tried this method but only got grey when using some filters like half tone(which is the one I want)
More legible... IMO, some points can be improved...but you are the "creative director"...
You can ask in #📝project-feedback You could get reviews and constructive feedbacks.
Ask a question channel is more dedicated to " How do things with photoshop"...


What were your Foreground and Background Colors set to in the Toolbar (when you added the Filter)?
What's the end goal? Seems a strange composition?

no, not that
he took a selfie in the mirror with his phone but he's not holding his phone
he doesn't even have it with him
how do i do that
How to make them more deeper inside?

I may be wrong but I'm pretty sure he cheated and retouched the photo... If he didn't, I have no idea!
Do you know this guy and ready to trust him 100%?
If not, be careful, the Internet is full of cheaters who only want to impress...
Don't always trust what you see...
I would probably start with larger objects and make a compound shape... Probably be easier with Adobe Illustrator but it can be done in Photoshop with some patience and Step & Repeat.
how do i retouch a photo of me holding my phone to look like im just standing there
Use a tripod and set a timer so you don't have to hold the camera/phone.
Most phones will let you use a hand gesture to trigger an exposure.
Add the gesture setting. Set a timer for 2 seconds. Stand in front of the mirror. Wave. Stand still for a few seconds. Do that a few times. Take the best one. Use the Remove Tool to drop any parts of the camera/phone and tripod out of the image.
Here is my PSD file. You can play around with that, edit it, use it if you think it will be useful to you.


Thanks!
Is it possible to get rid of these imperfections when making a trim on a border?
I used contract selection on a duplicate layer to make a line running through my border, but it looks weird in some spots, I could fix it manually but I'd prefer knowing how to make it perfect if it is possible

To add what @ripe quest said you also can take 2 pictures with your phone (with a tripod or any homemade stand)
Picture 1: the character(you) Facing the mirror with the cell in between
Picture 2: The mirror from where you were in picture1 (ideally cell at the same height than Picture1)
=> Open Picture 2 in photoshop and mask the mirror (as shown in my previous video)
=> Place Picture1 under picture2 in photoshop and adjust its position if needed

thanks
Like the fill and stroke?
If it's layers for the second image the layers are posted in the image under it.
As for the first I flattened the image so bringing a black and white adjustment layer and levels layer down to merge with my picture
Anyone have any experience subnetting here?
im trying to do generative fill but it just comes up blank every time
The only way i figured out how to achieve this is by making a seperate stroke (1/3 width of the border in this case) and using it as a mold to mask that out of the grey part
😁

is there a way to make this gradient smoother, on my screen at 100% i can see the lines for the gradient

It depends if it's something that will have to be printed or for screens viewing.
The easiest way is to extend the bit range (convert the image to 16 bits image>mode>16 bit)
But that will mean that when exported your options will be more limited (not all file formats accept 16 bits) and depending on the device people will look at it on, it may not work.
Another solution is to "dither" the gradient, that is to break the smoothness. I know it sound counter-intuitive, but hear me out.
Place a neutral filter on top of your gradient (new layer, fill it with neutral grey, change the blending mode to overlay) and go to filter>noise>add noise. Zoom in to one of those line and increase the noise level until you see them disapear.
Once done, zoom out to 100% (that's very important, and play on the opacity to lower it until you just about can't see the lines
See all the options you need to check when you create you new layer

that dithering technique is a good idea, I love adding grain by doing that, I'll give that a try!
You may also try to play with those options in the gradients


yeah I tried these but they didn't seem to make a difference, I think the dithering is the best way
It's honestly what people have been doing since the start of computer generated graphics. It's a tried and tested method. If you don't want the noise to be visible, you need to tweak the opacity until it does the trick, but just about.
it reminds me of adding scanlines too
The important thing is to make those tweaks at 100% because noise effect is really dependent on the display method, and Photoshop (and others) don't provide accurate display of very small elements when not at 100%
hey guys, i have an odd question. I've been working on this pixel font, and it works as intended in word or similar word processors. first image is an example of it working as intended. however, when I try to use the same font in ps, it morphs and moves the pixels around? is there any setting to stop this? second image is a screengrab from ps. both images are the same phrase, but as you can see there are inconsistencies between the two. i need the font to be pixel perfect


What are your settings in the top bar of the text tool?
See if switching from one to the other changes things

it's difficult to say what's happening, but it's possible that it could be a by-product of anti aliasing
Have you checked in a vector software? Like Illustrator?
The text display in Photoshop is raster based, so not deemed to be entirely accurate.
Also try to export it, say in PNG, and check in a standard photo viewer (not photoshop) if it looks the same (no guarantees there!)
I tried the options but they all just make them kind of blurry. I'll check illustrator and let you know and try the export too
Also make sure you look at things at 100%, or in increments of it (200%, 300% etc...) and not things like 123.5
It's best to change the size of your font and make it bigger than to zoom the canvas
Basically, same advice as the conversation just above yours 😉
Thank you! I'll try them out. Unfortunately, I do need to keep them to scale because I need the image to be tiny, but I'll keep working on the other advice
Gave +1 Creative Carma to @vapid flume (current: #6 - 939)
Good luck!
Hello can someone tell me how to do get like a metallic and glowy text
smth like this


and how to get this glossy thingy
Does Anyone Know how to fix this Font cache issue? I've deleted all the FontFeatureCache files and nothing. What do I need to do to fix it because I can’t change my fonts at all.

Yep, I've had a look
use Gradient Maps paired with inner glow (if needed), and finally add an outerglow with a blending more set to screen for a brigher apperance
mess around with the sliders
for the random pattern you see here, use a colour overlay for the darker gold, and then a satin with sliders adjusted and then turn the colour either to white + overlay and adjust the opacity or just a brighter shade of gold
for the stroke effect, you need to add a stroke and then adjust it to gradient map and then play around with the placement and add a few more colours in the gradient map
when moving the colours close to each other, you can recreate that "sharp" line for the stroke colour
anyone else who can help me with a corrupted psd? is there anything I can do to recover it?
Had very important stuff inside.
@vapid flume
@hushed niche
what would be the easiest way to transfer the red elements of the armor to the other image?


Umm i'm kinda new to PS
if the documents are the same size you could use a colour selection and then copy it to the other @rancid python
A yt tutorial or smth pls?
Hi, I have already given you the official document that had some advice. You said you gave it a look. What have you tried in it? Did you try to open a flattened copy by holding CTRL+Alt+shift? Did you try a psd recovery app? Did you try opening it in another app like graphic converter on a mac?
Hi, did you try to select via color range?
Hi, most of those effects are foundd de in layer styles : https://www.photoshopessentials.com/basics/using-layer-effects-and-layer-styles-in-photoshop-cc-2020-complete-guide/

Everything you need to know to add layer effects and styles in the newest version of Photoshop!
Hi see https://helpx.adobe.com/fonts/kb/troubleshoot-fonts-illustrator-indesign.html
Are those Adobe fonts, Do all fonts give the issue? Did you try to remove some of the fonts
color range i assume? i tried, it somewhat worked but wasn't the most accurate
no i get this issue when i try to chance a font. the font that i have now is stuck on that font and when i click it to change it, i am brought this error
thanks mate
Gave +1 Creative Carma to @hushed niche (current: #12 - 209)
Did you try to remove that font? Did you try to reset Photoshop’s preferences manually by dragging the preferences folder to the desktop. This way you can copy them back if it does not work: https://helpx.adobe.com/photoshop/using/preferences.html#Manually and then reinstall?
i dont know what single font is causing the problem . its happening for every text regardless of the font
Hi, could anyone who knows a bit more about CR2 files help me with this?
I have 70 or so images, but they're all too dark. - When I first open the file, it actually looks nice, but then it sort of flicks to a way too dark alternative.
It's as though an overlay/setting is applied which makes it look all dark.
I believe CR3 are RAW files that have an embedded JPEG preview inside. That's what you see in the Windows File Explorer and when you initially launch it into the Photo Viewer. Then it actually loads up the pixel data and you see it in its true RAW format.
Thanks. - I just came to the same conclusion a few mins ago. - I think I just want the images to 'export' as per their JPEG default previews then. - Opening them in raw is resulting each one starting off way too dark and fiddling to get it to go back to it's JPG preview seems a bit counter-intuative.
There is probably an app (from Canon) that can extract the JPEG out of it but I'm not sure about the size/rez of the JPEG that is packed in there. Probably want to look into that.
My suspicion is its much smaller and lower quality than perhaps you'd like. Not sure about your requirements.
Thanks. - I ended up downloading some Cannon software
Gave +1 Creative Carma to @ripe quest (current: #2 - 2823)
It asked me for my serial number, before it would let me download it, but I tried typing in 123456789012 (Since I learned a serial no. is 12 digits) - and it worked. - It allowed me to run a batch 'conversion' and the output was a lot brighter than the same batch done in photoshop

Raw 'default' that PS was generating vs canons default RAW export.
The Canon camera probably wrote the JPEG and applied some defaults to it. It might not be ideal.
oh I'm sure it's not ideal.
Its probably an "averaging algorithm" that it does to all photos.
but I refuse to 'perfectly tweak' 70 images from a photoshoot when the client won't tell me the '3' he'll probably use in the brochure etc
This isn't a £6,000 wedding shoot, where I'm willing to dedicate 2 solid days processing ALL RAW images for the fella. 🙂
Understandable
I have a skewed image on Photoshop, I want to have another image (its the same size as the skewed one) to be in the same skew position as the skewed image. can anyone give me a quick video tutorial? people told me in word and i couldnt understand
any1 got this font?

You make a Smart Object and then you replace whatever items within the Smart Object...
am i doing something wrong
Looks like you didn't hit "Save" to save the SO.
Ctrl S
oh damn it works! thanks bro
Gave +1 Creative Carma to @ripe quest (current: #2 - 2824)
You have to Save the PSB after each edit if you want it to update.
wdym PSB?
Those Smart Objects are saved as "PSB" files. Its a special Photoshop Format.

They're embedded in that document.
oh okay
You access them from inside the main Photoshop Document (PSD)
Wait, If i saved the thing I edited on the PSB. the next time i open the PSD, and double click on that image, it open new tab and show all the layers i did on that image?
You can "link" files as well using: File > Place Linked... then its an external file. But for this, I would embed it unless you have a good reason to keep them separate.
Correct.
dude thats so cool, i never knew that
this just saved me enormous amount of time.
Glad to hear it
another question, is there a shortcut where I can copy a gradient color from a layer and paste it right into the current layer? instead of me copy and pasting the color hex code each time
Just one color from the Gradient? Or the whole Gradient?
Like this is my current gradient, if i enable gradient on other image, it will copy the current gradient i have.
But there is another image with a different color of gradiant, if i wanted to copy that gradiant, how would i do that?

If its a Gradient Overlay Layer Style like that, you can ALT drag the Gradient Layer in the Layers Panel to anyother Layer and it will copy that style over.
Or am I confused on what you're wanting to do?
If i wanted to have another image to have this gradient color
oh wow thanks
ALT and drag, then drop
i never knew this, thank you so much lol
Gave +1 Creative Carma to @ripe quest (current: #2 - 2825)
ur making me cry everytime you answer
its like my time is being saved
these stuff is gonna save me so so so much time in the future
i was manually skewing them, and copying and pasting the gradients MANUALLY
That's why I'm here. To make jobs and lives easier.
pretty much everything
im on windows
Can you also teach me how to get sandy texture on a image?
My way right now is to get a image from google and paste it on top of the image layer, and set the opacity to low, so you can see the sandy without seeing much color
Can you show me an example of what the ideal goal is?
What's wrong with this method? Seems fine to me.
it changes the tone and the color of the original background
you can see the yellowish tone
Yeah. One moment.
Either desaturate the sand image or use one that is more white
This probably fits your use-case a bit better. Desaturate. Then use Advanced Blending. It could also be used with Opacity Level. Something like that.
can i make a brush with a size proportional to velocity like clip studio paint?

is there a trick to fix this square issue?

I can easily select it with the magic wand here
Hi, you can use the blend if sliders te o get rif of the darker tones if selecting is an issue :
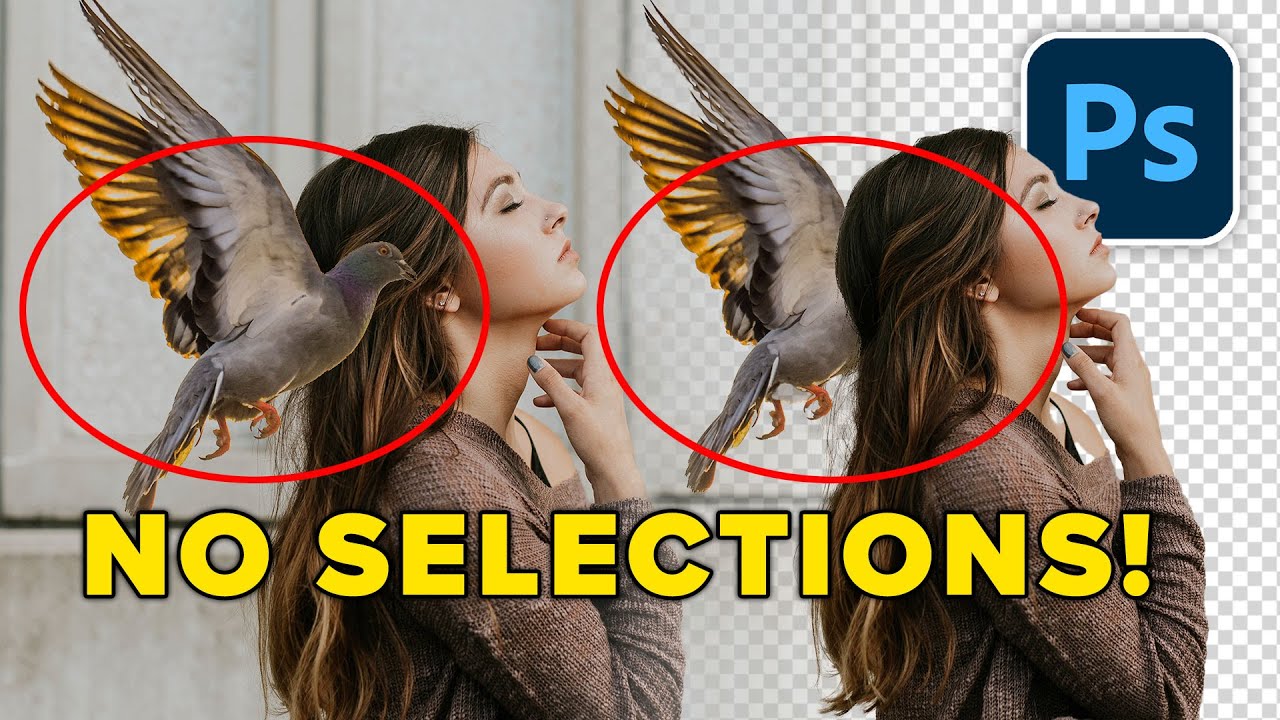
Remove backgrounds and cut out images without any selections using Blend if in Photoshop, aka Advanced blending. Colin Smith shows you how easy this is. Check out Colins course on Layers in Photoshop.
► Colin's new Layers Course: https://photoshopcafe.com/shop/learn_layers_in-photoshop
20% off Code: YTLayer20 (expires August 10)
► Free P...
How did you do that ?
I just used your screenshot and modified it... Hope you're ok
Oh 💀 lol myb
By accent color wdym?
like this ?

I added the red shape with white text to add a color accent on the left side of your design and create some sort of hierarchy.
It could be something else but I found your left side too Bold Black fonts on white... That's a question of taste.
I would suggest you to choose what's the most important Text between "Sept 26-Oct10th" line and "Opening Reception..." line and Put the most important text in Bold and the less in a lighter font weight That's hierachy.
A really short video about visual hierachy:https://www.youtube.com/watch?v=DBHBmeNhYrY
(just an overview because it's a huge topic)
Ahh okay I’m going to watch this now
Hit me PM
I'm new to PC in general and this is my 1st time with any editing software but i cant for the life of figure out if I'm able to increase resolution to see the numbers on this blueprint image i need for modeling so some assistance would be greatly appreciated

Hi, lots of stuff can be described by glowing in this image, sometimes with different techniques. . Do you mean the fade of the outside of the circle, that’s done via a gradual mask, or do you mean the grid and lines that might be an outside glow that is also masked, (layer mask hides effects) or the diamonds, a regular outside glow. https://www.photoshopessentials.com/basics/using-layer-effects-and-layer-styles-in-photoshop-cc-2020-complete-guide/ and https://www.photoshopessentials.com/basics/using-layer-effects-with-layer-masks-in-photoshop/
Everything you need to know to add layer effects and styles in the newest version of Photoshop!

Using layer effects and a layer mask on the same layer can give you unexpected results. Learn the tricks to getting layer effects and masks working perfectly together!
This place is meant to learn how to do it. The general chat is or requests for others to do it first you.
You should maybe start with the beginner tutorials. https://discord.com/channels/547473772727238676/1042633933948465214
On a beginner for day one, you’d need to learn some of the fundamentals first. Where to find the tools, etc. it is not a 5 minutes thing for a newcomer, the essentials site is better done than the Photoshop help files.
You could give a try to use the remove tool on the weapon. https://www.photoshopessentials.com/photo-editing/remove-objects-in-photoshop-with-the-new-ai-remove-tool/

The new AI-powered Remove Tool makes removing people and objects from photos easier than ever, and is now available to try in the Photoshop beta! This tutorial shows you how to use it.
I’m currently walking to work. You need to do some learning first, or you’ll need hand holding all the way.
how do i find the serial number for adobe photoshop 2018? i am asking this because legacy composition is removed in all currently available photoshop versions, and legacy composition is something i need to toggle on to fix the issue of me importing frames as a sequence. i select "import frames as sequence" or whatever it is, but then it just imports the selected frame, and not all of the rest of the frames in the folder. so thats why i need use legacy composition toggled on, and thats only available on older photoshop versions.
is anyone here good with PC's? i have a cpu problem that is heavily affecting my gameplay and im unsure of whats causing it
gameplay? - Doesn't sound like it's a question for a **photoshop **discord?
helloo could somebody help me how to trace the image become black and white like that and then coloring it but still get the black dots/ trace like that?


What method are you using to get to those results?
Can you also share a full screenshot? (with all the menus) most times it helps see why things are wrong
I'm a bit confused by "trace" here. It doesn't look like tracing, but maybe I misunderstood
im sorry i dont really know it was trace or threshold, i dont know too how to get those result which is thats why im asking here :/
What did you do, and what do you want to achieve?
Again, a full screenshot helps!
Maybe it's just a question of filling a layer with black, if that's what you want to do. But showing what you got (showing the layers panel is essential) would help a great deal in understanding what is wrong.
Is it allowed to find people for doing work? If it is, I need someone who uses illustrator and can use it pretty well! Contact me, it's an easy job!
You needto post in #💬chat-general and explain what you need and conditions in the post
Alternatively, check Behance as well. We don't have any official job board here, proceed with caution.
Hire the world’s best design talent on Behance. Discover, connect with, and hire the perfect creative freelancer to bring your ideas to life.
Also, you're on the Photoshop server here, you are probably not on the right one (FYI The Illustrator server doesn't allow job posts)
Got it, ty!
Do you mean that if you do not switch LC on, the he function does not work? If you can replicate, flag it as a bug on the official forums.
I think you are unlikely to be able to improve the legibility.
If you know what it is - google search for dimensions may work
They are trying to follow an instagram tutorial, I already gave some suggestions, will search where it was.
hello, how can i fix this problem?
after booting the program, it is appeared such message

hello everyone, in my photoshop i can't use 3d fiture, my computer has 3070 ti graphic card and its capble of doing 3d, i also use this way to use 3d but i the botton become gray for me and i can't use it : layer->resterize->3d
i reseted everything but nothing changed
There is no problem here to identify. Its a generic crash report screen. Also, this version of Photoshop looks REALLY old. Try updating to a recent version of the app.
The 3D features in Photoshop were discontinued after version 22.x. See: https://helpx.adobe.com/photoshop/kb/3d-faq.html
so i have to use that version ?
is there any new feature for 3d?
If you want those features, you would have to downgrade to version 22.2 from the Creative Cloud app.
No. All of that stuff was removed from Photoshop.
It never really worked that well. Adobe moved to proper 3D apps with the Substance 3D Suite.
Adobe Illustrator does have some basic 3D extrusion features and you could make 3D text that way.
hmm true
how can i make a PNG a .fx
How can i open his eyes i want it to be looked realistic

how can i make a PNG a .fx
Please stop posting the same question. Wait patiently. When someone has time to reply, they probably will.
Also, what are you talking about? PNG a .fx?
Animated PNG?
nah just an image its a png but i need it to be a .fx
What is "a .fx" ?
You'll probably need another photo of that person or someone with similar features at a similar angle and composite the eyes into this image. This is not trivial. Or use some sort of AI model and attempt to prompt for open eyes.
You could try PS neural filters and see if you like the result?

is there a plan from adobe to get rid of the 10$ photography package of lr + ps?
This is a general question, not totally photoshop related (IDK if it's not allowed or something) So is Adobe Stock included when you buy creative cloud?
Generally, no. It's separate. There might be certain Teams/Enterprise subscriptions that include it. You would have to contact Adobe Customer Care for those details.
Thank you.
Gave +1 Creative Carma to @ripe quest (current: #2 - 2826)
how can i remove the hand and there still be a floor?

Use the Remove Tool.
ive tried and its just ended up like this

And you can always try the old Clone Stamp or just copy/paste parts of it and warp them into place.
Hi everyone, was hoping to get some help with an action
I own Photoshop Elements 2024 and unfortunately found out you can't record actions within this program, but you can load external ones
thanks done this really helps
Gave +1 Creative Carma to @ripe quest (current: #2 - 2827)
I was hoping to get help with a simple resizing action
I need the image size to be increased by 300% for both the height and width on nearest neighbor
how can I go by creating this action without access to Photoshop CC?
I don't know anything about Elements. Sorry. If you can't record Actions in there, you'd have to get someone to create an Action for you in Photoshop CC.
is there a channel here where I could ask for this type of help?
unfortunately most of the people I know use Photoshop alternatives
Project requests can be made in #💬chat-general. Describe what you want and wait to see if anyone replies. If someone is interested in working on it, they might reach out to you.There are no guarantees, though.
will do, thanks
Gave +1 Creative Carma to @ripe quest (current: #2 - 2828)
Thanks for the heads up. I can't really stay to wait for people to follow up 🙂
My mind reading certification have been revoked to continual failure to perform my duties so I'm not allowed to practice anymore
Others may have their crystal ball in repairs 😅 ( @tame cape )
Gave +1 Creative Carma to @hushed niche (current: #12 - 211)
It was there: #💬chat-general message
How can i get the higlights out of this pic?

is there a way to stop ps from randomly switching to cpu?
if i stay idle long enough on any project it switches to cpu for no reason so i have to have an empty project that i switch to before stepping away, or else i have to save a psd and then open it again
SUPER annoying
What's ur hardware?
3050 ti laptop gpu, 12500h i5
16 gigs ram
and the gpu has 4 gigs vram
Plugged in?
Did you check your power plan settings?
they're on performance
What does the performance screen for you show here:


Can I see your Nvidia Control Panel settings for PS?


And if you have added it in the windows settings, it's set to high performance as well?

how do i see that
Settings: System>Display>Graphics
You will need to add the .exe manually from where it is located
it's on performance
sorry to keep asking for stuff, only way to really figure out what's going on. How do you notice it has changed to CPU?
it's way slower and says cpu at the bottom instead of d3d12
where at the bottom? also be sure to change ur nvidia control panel setting to maximum performance rather than normal @fervent quiver
here

@fervent quiver

i see, try changing that and then restart PS and let me know if it occurs
make sure to apply your nvidia settings though
i did
and i can't just simply "change" it
i probably wouldn't be asking here if i could
can't simply change what? If it's not set to maximum, upoun idle, the system will conserve
oh i thought you were talking about ps settings
i just changed them
and nvidia settings
but it takes a while for it to switch so i can't know for sure
That's what I was going to ask next, at about how long does this start to occur haha
dunno for sure
maybe like 1-2 hours
but sometimes it doesn't happen at all
Gotcha. I'd check these values/settings as well: From Editing Power Plan

Well I suppose this is a wait and see then
i don't have the ultimate performance option

You won't because it's one that I asked GPT to make a while ago, so it's custom
oh
It's just a name really with a collection of settings
I also have my hard sisk to not turn off but that's up to you
i don't have a hard disk
Niether do I but it's all in good faith 🤭
Hi, I'm making a city map for a dnd campaign and i'm trying to fill in the city blocks with buildings but placing them all manually is going to take too long. how can i make a custom selection shape and fill it with polygonal shapes to imitate buildings on a map? specific buildings i'm fine with placing manually but i have large swaths where i just need the visual noise to complete the map. thanks!
@lapis hearth => Project requests can be made in #💬chat-general. Describe what you want and wait to see if anyone replies. If someone is interested in working on it, they might reach out to you. There are no guarantees, though.
You can probably assemble various pieces that you can reuse.
Ty!
Gave +1 Creative Carma to @ripe quest (current: #2 - 2829)
Hi, what did you try so far? I guess that you selected the black stripes and use it to mask a curves adjustment, or something else like cloning?
Yeah tried those things...
I also selected the highlighted parts only and used adjustment layers but it just doesn't look right
This sounds like a job for smart objects, you could even use color overlays or other effects in color blending mode to differentiate them, like in this video: https://www.youtube.com/watch?v=OStS8e9uav0

In this video you’ll learn the difference between duplicating a Smart Object and copying a Smart Object in Photoshop.
Additional tips, tricks, and tutorials from Julieanne Kost can be found on her blog: https://jkost.com/blog
Facebook: https://facebook.com/julieannekost
Twitter: https://twitter.com/julieannekost
Instagram: https://instagram....
I'll watch tomorrow!
Is it ok if i send the link to you privately so i don't have to search it in this channel?
A selection of the whole area might be better. What about a luminosity based selection to apply the wanted color? https://www.youtube.com/watch?v=oe_VQt3Th_M&pp=0gcJCdgAo7VqN5tD
Or maybe using frequency separation? https://www.youtube.com/watch?v=ldhG9fmgC7o&pp=0gcJCfcAhR29_xXO

Split your photos into tonal regions with Luminosity Masks in Photoshop 2022. What are luminosity masks? How to make Luma masks and use luminosity masks to make your photos look better.
► Photoshop 2022 For Digital Photographers: https://photoshopcafe.com/shop/photoshop-2022-for-digital-photographers-the-best-way-to-learn-photoshop/
► Sav...

―
Download the Free Frequency Separation Action Here:
https://phlearn.com/tutorial/the-amazing-power-of-frequency-separation-retouching-in-photoshop/
What is Frequency Separation?
Frequency separation helps make retouching a portrait easier in Photoshop. Frequency separation works because it allows you to separate the texture of an image ...
Just search for your replies.
i dont have the option for LC, so it will not work. i found some adobe forums saying that if you turn on LC, it will fix the issue. but I do not have LC anymore because it was removed. How can I get access to the LC feature? (also, I can replicate it.)
Did you try on a more recent computer? What is your graphic card? Then post here with a descriptive title like “can’t import frames as sequence without legacy compositing” https://community.adobe.com/t5/photoshop-ecosystem/ct-p/ct-photoshop?page=1&sort=latest_replies&filter=all&lang=all&tabid=bugs but maybe
https://community.adobe.com
Master Photoshop with the help of our global community.
How do I make the “paste special” not grayed out

Hey all, I was importing a .tpl (tool preset) file to Photoshop containing a list of various brushes (via Tool Presets -> Load Tool Presets), but the brush list is going directly as a Group to the Brushes window, and my Tool Presets window doesn't receive anything brushes related. Anyone know possible fixes or what might be happening?

You must have copied something before... Make sure your clipboard is containing something to paste.
Maybe you could explain what you're trying to do...
That's because the ArtHistory Brushes presets have been embeded in the brushes themselves...
I don't know if you are familiar with tool presets but when you're trying to save brushes/Art History Brushes/History Brushes... PS recommends to create brush preset instead... (see window below)
The tool presets you've downloaded have certainly been created according to these Photoshop recommendations.

Oh I didn't read that pop-up. Fair. Would somehow making this pop-up reappear so I could press "no" work? Or change some configs that would make me create tool presets instead? Ty for help in advance
anyone have ideas for why my drag to select multiple things in my canvas is no longer working?
nvm figured it out
If you press no Photoshop will create a tool preset and you'll see it in tool presets panel...
But you won't be able to organise your presets in groups or see stroke previews...

hi! might not be photoshop specific but does anyone know where to get these overlays/addons


Two of them say "Adobe Stock" on them. Thus, you can get them from Adobe Stock. https://stock.adobe.com
Adobe Stock
Search Adobe Stock for millions of royalty-free stock images, photos, graphics, vectors, video footage, illustrations, templates, 3d assets and high-quality premium content. Try risk-free today.
I have clicked on don't show again the first time I got it probably though. Is there a way to change it with settings or a workaround? It's just that for some paintings I like to have a list of my most used brushes (as I know what they look like) right besides the more textured ones on a separate brush pop-up. So it could be helpful for me, as the list gives them more concisely by name. If there isn't a workaround besides resettings preferences, then it's fine. Just wanting to know if it's possible
Hi, have you tried removing the brushes and re-importing the .tpl?
Yep, they reappear on brushes window
after I've clicked the "no" on the pop-up it does this every time
Don't know if there is a way to revert the choice
You must have clicked the “do not show again” as well.
Go to
Mac: Photoshop - Preferences - General
Windows: Edit - Preferences - General
Click the button "Reset All Warning Dialogs"
Oh ty! I'll try it out now
worked! tysm!
Anywhere where i can ask scripting questions?
I’d recommend the scripting area of the Adobe forums. https://community.adobe.com/t5/photoshop-ecosystem/ct-p/ct-photoshop?page=1&sort=latest_replies&lang=all&tabid=all&topics=label-actionsandscripting or on https://www.ps-scripts.com
https://community.adobe.com
Master Photoshop with the help of our global community.
Hello Can Anyone Tell Me How To Remove Green Screen Left Over After Cropping
Maybe its those horrible new settings they added in windows 10
Settings > System > Display > Graphics settings
windows does everything for you even when you would REALLY rather not so i wouldn't be surprised
i think i already fixed all the settings and got it to work though
If not sometimes its this one

Modern state of windows there are 3-4 different places to set this in different ways and they can somehow all work at once. No idea how they decide which setting takes precedence, its a mess.
I would say the best way is masking and paint over bits left over with a black brush on the mask, and possibly a new Hue saturation layer, again with a mask, for those bits of green that spill onto the subject: For example hair and clothes.

Unlock the power of non-destructive editing with Photoshop Layer Masks. This concise 7-minute tutorial will teach you how to isolate edits and create complex compositions with ease.
Jesús' Blend If video:
https://www.youtube.com/watch?v=j314UgwyqH4
Jesús' Ps Brushes video:
https://www.youtube.com/watch?v=ePt0gEOR8Yc
This video is part of an...


0 is the position on the gradient line of the first color (Avalanche), 40 the position of the second…etc
0 is far left, 100 is far right
how can i make a accurate mask of the subject then bring it to a seprarte document?

subject mask keeps making bad selections
Since your model contour is pretty clean (no fluffy hair or highly detailed ) I would suggest you to use PenTool (in path mode) to trace the contour and create a mask from it… Pen tool can be hard to handle if you never used it before but it’s an essential tool to master.

Hello everyone! I would like to ask for your help with editing in Photoshop. My problem is that I am a complete beginner in Photoshop and don’t understand that much. But I need to do one important thing for my project.
Basically, I want the black line to cut out the pngs (illustations and kiwis) that are on the layer below. I want to do that, so it will be perfectly cut where was the outline. Maybe I can use some kind of mask for this? Hope I explained it clearly!


OHHH, Thank you!!! So intuitive now
Kiwis and Shapes are On IMG_2866-2 and 2866-1? Not sure to understand they already look cut-out
You want to do something like this?
Yes, the images are separate. But since I drew 2 of them in Procreate, I couldn’t erase the lines perfectly by hand.
how can i disable antialiasing on a brush?
Yes! I'll try to do the same now, thank you so much for your assistance.
if my image is slightly transparent but the layer opacity is set to 100 then what do i do
what do i do to make it fully opaque, that is
Hello, anyone knows if there is a way to change the color of the grass? instead of yellow, change it to green for these two images?


Can anyone move the dirty black pipe above the bundled-up grey pipe? Is there any chance to move it up 1 foot above the grey pipe and keep that three-quarter-inch blue water tap in on the dirty black pipe and move it up with it as well and aim it towards the dirt?

use the object select to select only the grass and hue-shift it to green
if it looks too pale after that, try using a levels adjustment layer to bring it down a little
thanks! I will try it!
What if you stack several copies of this layer ( ctrl+J) then merge them.
Honestly if you only need it at low resolution I'd be super interested to know what ChatGPT does to then,,,
This honestly feels like something you'd do if you were trying to misrepresent some work that's been done.
Consider my spidey senses a-tinglin.
when i free control, it shows the blue outline thingy when i move this around

i dont know what i just did to make it like that
its starting to piss me off 😭
I'm just trying to understand,
What do you mean by "When I free control"... Which tool are you using...Move tool?
Which type of layer : Text layer, Vector shape layer (path), Rasterized layer, Smart object...?
do you see a blue outline under the text
That outline occur when I free transform + drag around
Before when I drag the image around, the image was normal going along with my mouse cursor
I see the blue outline... Is it a Text Layer (T on the screen shot) or a normal layer.
When you don't free transform what is its appearance ... I assume blue outline is visible only when you are free tranforming it (if I understand well)

or is it the Blue box outline that bugging you?

Is it possible to share the layer panel user interface with the layer that does this highlighted?
Not your design just the panel
If your text (oulined in blue on free transform) is made of vector shape (the blue Text in the video) that is the normal behaving of Photoshop and I don't think you can change this.
If your text is made Text layer or Rasterized Text Layer you shouldn't see blue outline on free transform.
ohh ok
thanks
Gave +1 Creative Carma to @viral palm (current: #9 - 767)
Làm thế nào chính xác thì việc kết xuất thứ thực sự hoạt động? Giống như nó chỉ dán hình ảnh ngọn lửa lên đường dẫn hay nó mô phỏng ngọn lửa ???
bruh
my translator was on
what i MEANT to ask is how does the render flames thing actually work
Hey! I'm having issues with photoshop tonight and any pointers would be helpful. I am able to access my psds through files however it wont load the home screen that shows all your recent projects. I tried restarting my pc and updating all ps versions and still nothing. Is this a PS problem or me?? I am on PS23.

Hi, this sometimes point to a GPU error. In edit>preferences, search for “home page” disable then enable it. You can also do it for “new document”, I think there is a legacy option.
Hi, you usually need to have paths to guide the flames. Or do you mean what is the technology behind it?
Thank you!!
Gave +1 Creative Carma to @hushed niche (current: #12 - 214)
i was asking about the technology
This guy might know… https://research.adobe.com/person/radomir-mech/
found this not sure if it is linked: https://github.com/adobe-research/sunstage/blob/main/FLAME.py

GitHub
Contribute to adobe-research/sunstage development by creating an account on GitHub.
i think it's just based off a python library that creates flame based on a bunch of much faster to simulate factors
this just seems to be writing the interface, and the ability for it to follow paths
Radomir was managing the team. Daichi created it: https://research.adobe.com/person/daichi-ito/ why your question
My canvas in photoshop suddenly moving on their own, I have restarted my computer, delete setting, etc but still the same, only today happened after I updated my photoshop to ver 26.5. Do u know how to fix it?
I have seen this before with a key being stuck or even something on a tablet causing it
Hi, please describe your setup, do you have a touch screen, a tablet?
I think you hold the shift or alt key 🤔
Hold the Shift key @night void
Thanks man
Probably best to save the selection as a path first and then create a mask from that so you always have the selection later?
a layer -> Ctrl+T
the whole image -> menu: Image -> size
Tysm.
Hi, either you hold shift and drag, or you click, then hold shift and move the cursor to the end of the line and click.
Hi, if you do not want to ask every 5 seconds, see this: https://discord.com/channels/547473772727238676/1042633933948465214 or https://www.photoshopessentials.com/basics/
Photoshop Essentials
New to Adobe Photoshop? These Photoshop Basics tutorials for beginners from Photoshop Essentials will get you started with Photoshop quickly and easily.
Lmao, thanks!
Gave +1 Creative Carma to @hushed niche (current: #12 - 215)
hey does anyone know what tool that is what hes using, thank you
They might be painting on a mask.
this could be the clone tool,
ye someone dmed they also think hes just using a mask
Anyone know how to fix this? Adobe used to work fine and now randomally doing this for EVERY Adobe app when installing it. I've tried what it says in the ss.

Are you using Opera as default web browser? If so retry with one supported by Adobe products (Chrome,Firefox,Edge,Safari)
Hi! I’m very new to adobe and have no idea how to do this and I’ve tried for atleast a hour could someone please photoshop a lead out of a photo for me? Dm me ! ❤️
IIRC, the opera issue is only to download the CC Desktop app, subsequent downloads are done via the CC app, no?
This channel is dedicated to getting help learning the app. For request use https://discord.com/channels/547473772727238676/548276405151203338
Show what the issue is, tell what you tried, someone will help you…
Nope this is on MS edge. If I try to sign in manually through the launcher after it tries and fails to connect and login the error still appears
Does anyone know how to move specific parts of a layer?

nevermind figured it out
how to crop the resolution

Hi everyone; I was just curious on if anybody knows how to make little icons like this
And if anybody could point me in the direction of how to learn to make my own (these were AI generated)

hey, so how do I put the car layer above the right arm sleeve layer
car's layer is above all layers there

any fast way to fix these pure white parts?

Hi, either you select, jump to its own layer (CTRL+J) and transform.
Or you can use puppet warp.
Could you explain what you want to do to crop (edit>crop, or C for crop tool) is to remove rows or columns of pixels, to change the resolution is to change the number of pixels so that the image is smaller. Edit>image size.I think it would not be bad for you to learn the basics: https://discord.com/channels/547473772727238676/1042633933948465214
or https://www.photoshopessentials.com/basics/
Photoshop Essentials
New to Adobe Photoshop? These Photoshop Basics tutorials for beginners from Photoshop Essentials will get you started with Photoshop quickly and easily.
Hello, such icons are usually vectors made in Illustrator, but you can use the pen tool , see: #❓ask-a-question message
Please do not spam every forum, You only need to check here: #1360443012169339021 message
Hi, you could select them and paint/clone with some very light colors that you would have sampled on the plane, then a darker one, etc. or use blend modes, such as darken or multiply, to darken as you paint.
Is 99% CIE1976 (CIELAB) okay for Lightroom? sRGB is N/A and i can't find anything about Adobe RGB
Not sure to understand what you mean by "Fix pure white parts" but if you want to reduce the intensity of the white parts you can:
Create a new layer above the airplane, set its blending mode to "Darker color" then pick lights colors from other areas of the plane (but not white) and
paint over white areas. I used light fade yellow and orange to keep the 3D effec=> Don't use dark colors or you'll lost the depth of your plane design.
What do you mean exactly?
If you ask if Lightroom can manage it, or if you can safely use it?
Is the output print? Screen display?
I've been having a hard timing finding the perfect monitor. I don't plan on doing many prints but i want to make sure the colours are going to be good enough for accurate colour correction
I can't really find much information about CIE1976 so i'm not sure if it'd be good for LR
I really never used it, I mainly use either AdobeRGB1998 or ProPhoto. My Display covers 100%sRGB and it's already quite good. I think unless you have an expendable budget (lucky you!) a 100% AdobeRGB coverage is a bit out of the question
Sorry i went from using a TV to buying my first monitor last year (and then i had to return it because it was faulty) so i'm a little overwhelmed by all the specs - it's not just a simple TV anymore 😂
doesn't help when different websites say different things about the exact same monitor
You'd be happy if you have a full sRGB coverage on a monitor 🙂

The Adobe RGB (1998) color space or opRGB is a color space developed by Adobe Inc. in 1998. It was designed to encompass most of the colors achievable on CMYK color printers, but by using RGB primary colors on a device such as a computer display. The Adobe RGB (1998) color space encompasses roughly 30% of the visible colors specified by the CIEL...
Thanks, its actually a 3d model that i want to fix it's textures
Gave +1 Creative Carma to @viral palm (current: #9 - 769)
That's for ADOBE RGB, the coverage is greater than for sRGB
Then here you have a comparition betweeb sRGB and CIELAB , CIELAB is greater
https://en.wikipedia.org/wiki/CIELAB_color_space

The CIELAB color space, also referred to as Lab*, is a color space defined by the International Commission on Illumination (abbreviated CIE) in 1976. It expresses color as three values: L* for perceptual lightness and a* and b* for the four unique colors of human vision: red, green, blue and yellow. CIELAB was intended as a perceptually unifo...
I've found a few Adobe RGB monitors but they don't meet all my requirements. I think that's my biggest issue at the moment; i don't think the 'perfect' monitor even exists 😭
So the monitor i was talking about above with 99% CIELAB, would that be better than a 100% sRGB monitor?
I'm pretty sure you can find an EIZO with a 5000£ price tag that meet everyone's requirements 🙂
Yes definitely, but if you don't print, you don't care.
Also, you will need to calibrate it (unless it comes with an internal calibration system, again, question of price)

i miss my simple TV 😂
In the latest link I shared, you'll see a comparison of both sRGB and CIELAB spaces

If you're THAT serious about colour accuracy (as much as it can exist) then a calibration device is way more important than having an over the top monitor that isn't calibrated.
Meaning that as good as it is, you cannot reliably colour correct over time
should i stay away from OLED? I've seen mixed answers on reddit/forums about IPS vs OLED
probably up to $1500 AUD
$2000 max i'd say
i've got a short list of requirements but i haven't been able to find anything that ticks all the boxes; even if i ignore some less important features
That's quite comfortable
Not sure in Australia, but the cheapest Spyder sets you for £160 here
https://www.datacolor.com/spyder/products/spyder/

Datacolor Spyder
Datacolor Spyder is a premium monitor color calibration tool that ensures an accurate, consistent color starting point for your editing workflow.
Yeah i think it's around 300 here
then you can decide on the monitor.
Technically, the bigger the colour space, the more likely you will be able to differenciate between tones of -say - green that other smaller colour spaces won't get in their gamut

Colour spaces: That's exactly what it is, so it's up to you if you need a better colour representation (wide gamut) or other specs. Again, if your photos end up on a screen then sRGB is sufficient, because that's all a screen can render, in the best of cases.
so IPS, 100% sRGB (or Adobe RGB if i've got the balls to rob a bank) and grab a spyder ✅️
If you engage in high-end grading, with the aim to have your images printed by top notch printers/labs, then a wider gamut is probably better
I wouldn't condone that 🙂
i wasn't really interested in printing anything back when i bought my first monitor but i bought a few frames and made a little collage for a couple mates and that made me wanna do more printing so i'm looking into it a lot more this time
shhh nobody needs to know
I mean, if you can afford it, then why not? I am not up to date with the price of monitors these days so I'll leave that to you. But I'm pretty sure you can wedge a wide gamut display in that kind of prices.
Picked out a few photos on my phone (transferred from my camera) and slapped em into a collage app and got a few photo paper copies printed out before i shot another show
So yeah i'm definitely more interested in printing properly this time

Thank you so much for all the help 🙂 and sorry if most of it is simple, it's just so new to me and i get overwhelmed looking at all the specs 😂
Gave +1 Creative Carma to @vapid flume (current: #6 - 942)
In any case, re: your first question. As long as you're in a colour managed environement (which LrClassic defintely is) then LrC can absolutely cater for CIELAB. Technically LrC doesn't care which colour space (or profile for that matter) you're using, you just need to make sure to make the mot of it by NOT exporting images in a smaller gamut/colour profile if you need your images printed on a printer/press that allows that kind of gamut
It's all in the chain, everything needs to be aligned for it to work.
For example, make sure your printer (print shop, I doubt a personal printer would be having any difference here) can make the most of that gamut
If you check printers, they will tell you what they accept
https://www.theprintspace.co.uk/
see there
https://www.theprintspace.co.uk/guides/colour-accuracy/

Art printing at its finest. Choose from professional photographic C-type printing or fine art printing. Order online.

Read the guide on how to make the best art prints. Use our colour management process for accurate colour-matching to your on-screen image.
The domain of colour scapes and colour accuracy is super technical and I cannot say I even scratched the surface when learning. It's the definitely, a highly scientific, dry discipline.
i think that's the main part i don't really understand, the exporting part. I export to Pixieset for clients to access their photos (and 99% of the time post them on social media).. so in that case would i be better off just going for 100% sRGB? Would sRGB be fine for printing or should i look for Adobe RGB too?
okay so we're kinda in the same boat haha. I can definitely see how technical and in depth it is
you've helped me understand it a lot more than i originally did though so thank you 🙂
part of me is still tempted to buy a TV and put up with it for the rest of my life 😂
Imagine you have to search specifically the colour space of your monitor, and not imagine how likley the average joe would be concerned by such consideration when it comes to viewing image on a crappy laptop or on their phones?
None, definitely
The only people I know who are looking like they understand it work in a lab, in a university 🙂
They're not photographers (or maybe they are, as a hobby)
i don't even know what i used back when i was editing on the tv. I think i exported in sRGB
but i wasn't happy with the difference in colour when i compared the exported image on my phone next to the tv
None of those screens were calibrated, so that's hardly surprising
it'd be a pretty interesting thing to study i rekon 🤔 might put the monitor aside for a few years and go get a degree in whatever it is so i can understand it all before i buy one 😂
yeah i had no idea you could even calibrate screens back then, this monitor hunt has been a huge learning curve
Stick with a reputable brand, ask photographer's forums (like Lightroom Queen, or 500px), you have a decent budget, you won't be disapointed. Anything will still be better than a TV anyway
i originally bought an MSI monitor but that kept going back every 5 seconds. Loved it when i had it though so i'll definitely never be going back to a tv haha
I always had good luck with BenQ
that's another one of the requirements i've had trouble ticking off, it has to be gsync compatible because that was the issue with my last monitor; it wasn't compatible and that's why it kept going black

The Photography Forum
The Photo Forum is the premier Photography Forum on the web! Our community features photography tips, photography help, photography techniques, advice & photo critiques. Chat with other photography enthusiasts about camera equipment, camera lighting, camera lenses, film or digital cameras.
PetaPixel
PetaPixel is a photography news site that covers photo and camera news, reviews, inspiration, and education.
Expert news, reviews and videos of the latest digital cameras, lenses, accessories, and phones. Get answers to your questions in our photography forums.
Thank you 🙂
I'll chuck up a few posts now
Also THAT is worth a read
https://helpx.adobe.com/uk/lightroom-classic/help/color-management.html
Hello,
I am looking for a script that aligns the selected layers next to each other with no space in between.
Here are a visual of how I am usually proceeding :


As you can see, in the last step I am doing it manually (or I reuse the distribute function by hoping the space in between is reduced, after moving the last layer to the right or to the left), but I would like to use a script, since I don't find any button in the Align and Distribute Function that make what I want at this final step.
I did find something similar from a collaborator JJ Mack (who passed away) https://github.com/MarshySwamp/JJMack-Archive with the Photo Collage Tool Kit (PasteImageRoll in the zip), but this is actually creating a document from selected image in the Finder, with a strip of image. This is not exactly what I want.
(Thank in advance !)
hey, im applying the reticulation filter on an image but it applies a green tint over it
Reset your colors to Black and white... You have probably Green rather black and white. This filter is using Foreground/Background you've set.
Shortcut is CTRL+D
yeah i figured that out thanks tho
how to clear scratch disk?

Check your Document/Canvas size. A common error is people set them to be too large. See: https://discord.com/channels/547473772727238676/1045815381392097421
this might be why

Also, that. When the disk with the OS is overloaded, the Windows Paging File is also competing for resources.
Create a copy of the Layer. Select the Layer in the Layers Panel. Hit Ctrl J. Use Object Selection in Lasso mode. Lasso around the characters. Then add a Layer Mask.
hey so I worked on a big file for a couple of days, it's a collage, I drag and dropped alot of stuff, worked with photoshop for years, and I set my canvas and pixel size all to my final print size, but now after exporting, everything is squished. the mistake was: I WAS WORKING IN A 1,33 PIXEL ASPECT RATIO ALL THE TIME.
So now my result is completely wrong.
There must be a fix without having to redo the entire thing??? I just can't figure it out and I have not found a solution online
What if you go to: View > Pixel Aspect Ratio > Square... ?
it shows it, the way it looks exported, so squished in one direction
What size is the canvas?
184,5cm x 71cm
= my exact printing dimensions
i guess thats where it got messed up at one point
I was under the impression that 1.33 pixel aspect ratio was only for preview purposes. As shown here.
But are you saying that you got the Aspect Ratio of the document wrong? Not pixel aspect ratio. Document Aspect Ratio. (?)
no the pixel aspect ratio
for some reason I was working with View>pixel aspect ratio> 1.33 ; instead of square
so when exporting thats when i realised something was wrong big time
How do i add a hat to my subject and make it look natural
Sounds like you'll probably have to rescale some objects then, I guess.
Learn how to do image compositing. Use AI to render it. Bit 'o both.
yeah I cmd+A everything and rescaled it non-uniformly to my be right again, now I'll have to redistribute everything
thanks for trying tho
use AI to add a hat to the subject then fix it from there?
That's one approach.
can you describe your method
Let's see the image and the hat we want to add.
here is the image and i would want to add a farmer rice hat to him

Probably going to depend on many factors. Photo angles, lighting, style of both images. In a traditional workflow, all of those should match or be very close.
Well, I would get rid of that branch first. That's going to give you grief.
would it be eaiser to add it to this image

A sedge hat like this?

Any particular reason this guy is in a bath robe? :)
couldn't get the cloths for it soon enough he said
im assuming amazon was taking to long
back to to task at hand would it be easier to add a hat to the 2nd image and how would i go about doing it
That's up to you. Either way, you'll have to locate a photo of a hat like that (or generate one) at approximately the correct angle. You can fudge it to a certain degree. If you can get that, then its a matter of adjusting it for the proper lighting. This is a quick composite...

teach me your ways 🙏
no way you did it that quick and im still lost
This ain't my first rodeo samurai duel.
I've been at this a while. :)
Then I would add a little shadow using an Adjustment Layer with a Layer Mask to only targer that area on his head/face. And a Curves adjustment to the hat..

if you generated one how'd you go about doing it becacuse google has decent options i think but nothing great like the one you used on the subject
Then I would merge all of it together. Convert to a Smart Object. Add an Adobe Camera Raw Filter and do some additional adjustments to fuse it all together and make the image more rich, colorful, dynamic.

Google has a lot of those hats but I generated it.
howd you generate it
like photshop generator
i give it the promt and the hat turns out not so good
You could try Adobe's Gen Fill. Or others.
what did you use
I used a proprietary tool. You could try ChatGPT 4o if you have access.
Drop your guy image in there. And an image of one of hats you found on Google. Say "put this sedge hat on the guy" or some such thing. It won't do it perfectly. It just has to get close enough. Then you take the hat from that image and bring it over to the original image in Photoshop.
Slice, slice, slice... Move, dodge, slice. Ninja style.


It might take a while. There a millions of people using it to do this stuff now. heh
That's great. Now you've got the hat at a decent angle.
Take that image over to the original in Photoshop. Mask out everything except the hat.
its tiny

Or just clip the hat out and paste it to a new layer. Whatever works for ya.
Well, yeah. You might have to shrink the original one down a bit.
how do i do that
while not having everything look so small
These image generators are limited in resolution it will generate. You can scale the original down a bit. And scale the hat image up a bit. Without going too far before it gets bad looking.
Select that Layer in the Layers Panel by clicking on it to activate it. Then go to Edit > Transform > Scale... Ctrl T is the keyboard shortcut.
im so confused what

it might just be over bro
I think you'll need to spend some time doing some tutorials. If you don't know how to work with the Layers Panel and Transform things, this is going to be difficult for you.
my goal is just to get the hat on the guy :(
this is all i ever want
until next year
Drop both images in here and I'll show you. Or do you just want me to do it?
both do it with me or just record and ill follow
Post both images here.


Give me a min or two.
understood
I've tried to do everything using the menus. Hopefully, you can follow it.
Keep in mind, this is just quick and I'm trying to do this with your skill level in mind. heh
Well, after struggling with ChatGPT, I finally managed to get the code I wanted. However, the issue is that it moves my selected layers — nicely aligned by the code — into a new group, and I haven't been able to get it to move the selected layers after the created alignment back into the folder they were originally in (in other word just move them to the parent folder/one level up from the temporary group) and delete the temporary group. Here is the functionnal code which create an useless folder + the line of code GPT gives ma in order to move the selected layers and delete the temporary group — but that line doesn't work.
You're probably better off asking Photoshop Scripting API questions on the Ps Community Forum on the web. There is likely more expertise there.
https://community.adobe.com
Master Photoshop with the help of our global community.
Thank you, I am almost figuring it out my problem (I will ask this community the next time)
I just don't want you think we're ignoring you or not trying to help. Given past experience, there aren't a lot of Ps API experts here. Sorry!
Don't worry, I have somehow guessed it without being offensed (anyway, I did find out my problem, this is good) If that help anybody, here is the proper code I wanted to have)
Hi guys, I'm having some issue with idk if its a bug or I did something completely wrong. I'm getting this when trying to select my image/layer to resize it with CTRL + T

I'm guessing it has something to do with this at the bottom but I can't select it and I tried some fix with Path and that didn't work either

What do you see when you check your path panel?


Is that path something you've made yourself on purpose? or something that you made by mistake and want to get rid of?
What you are experiencing happens when you make a single point with the pen tool (so no stroke or fill, just a point)
So there's nothing to transform

You just need to remove that point

but when i delete that it deletes my background
and if I move my background up the pen square thingie doesn't move, I also can't grab it and delete it or mark it with rectangular tool and delete it
What a weird situation 😂
You need to select the point with the vector selection tool
The black arrow at the bottom of the tool bar, not the selection tool at the top
You're dealing with paths and shapes, the tools to manage them are different than the regular raster tools 🙂
Going from top (the pen tool) to the 4th downwards (the shape tool) all those are vector tools

(working path) in the path panel just shows you that you have vector paths in your file.
There was a time when including a vector clipping path in TIFF images was more popular and you'd do that with this panel. But TIFF isn't a widely popular format these days. just use PSD.
its safe to ignore the paths panel unless you know you need to use it.
omg ty so much
Gave +1 Creative Carma to @vapid flume (current: #6 - 943)

how would i go about removing the pink pixels on the skin?

Hi, or you select the work path by clicking on it, then click on the trash can icon.
Hi, did you try this ? Paint over with the correct skin color (alt-click to sample) then paint in color mode?
hi, color mode?
In the option bar, change normal to color. https://www.photoshopessentials.com/basics/blend-mode-tips-tricks/
https://www.youtube.com/watch?v=doI1eH_nCxs
see also: https://discord.com/channels/547473772727238676/1042633933948465214

Blending images in Photoshop is easier than ever with these great Blend Mode tips and tricks! Includes a Complete List of blend mode keyboard shortcuts!
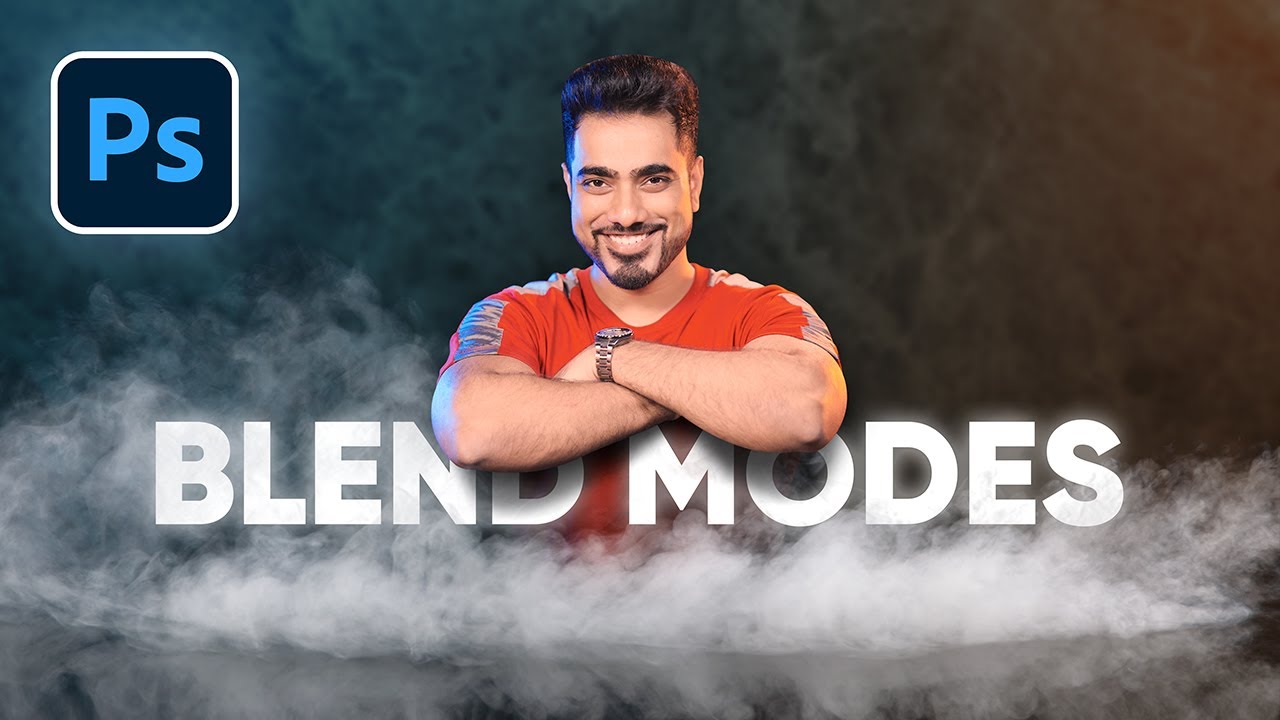
► Join PiXimperfect Pro - The Ultimate Photoshop Training Course: https://pix.live/pro
Discover what Blend Modes are and learn how to use them in Photoshop with easy examples! In this lesson, we’ll dive deep into the 6 most important Blend Modes that you’ll ever need in your day-to-day workflow and share an incredible resource to explore ...
How do I convert the perspective of this map to look normal?

You can also try to tweak Pinks with a hue and Saturation Layer + targeted color... Here a short video that shows how to do.
thank you both! ☺️
Turn it in a smart object then,
Expand your canvas size.
Edit/Transform/Perspective till you get Straight text.
Then Edit/Transform/Distort => drag up until you get the good proportion.
Note: Since the otiginal picture is narrow you'll loose a part of the top with perspective correction... Perhaps searching a flat world map would be better
How do I convert it into a smart obejct
Following what Franck said, you could also try this filter
Lens correction (to which I would suggest you extend the canvas so that the centre of the distortion (the botttom middle is at the centre of the document. You can use Image>canvas size for that)

There will be a lot of trial and error, and maybe less intuitive than the transform method. But if your distortion is a standard lens distortion, it can be super helpful
Frank’s method has the advantage to be non destructive, you can leave it as a layer, it is a better way to work.
Note that you could have selected the skin area, then jumped it to its own layer (Ctrl+J) before working on it without affecting your image.
Hello, I'm trying to make a sharp line in my letters, I might want to make more than one. How can I do it?

Hello!
A line of color, or a line that creates a hole? For the first one, create a shape layer on top and alt+click between it and you text layer to clip it. (Restrict its visibility to the text layer)
https://www.youtube.com/watch?v=zTuihRIdH0o
If you want to remove a line, Ctrl+click the add layer mask icon in the layers panel and draw a shape in the vector mask.

In this short video tutorial, you'll discover how and why to use Clipping Masks in Photoshop to display a photo in text, clip a photo to a shape, and limit the effects of a nondestructive adjustment to a single layer.
Additional tips, tricks, and tutorials from Julieanne Kost can be found on her blog: https://jkost.com/blog
Facebook: https://fac...

In this video, you'll learn quick and efficient ways to work with Vector Masks in Photoshop.
Additional tips, tricks, and tutorials from Julieanne Kost can be found on her blog: https://jkost.com/blog
Facebook: https://facebook.com/julieannekost
Twitter: https://twitter.com/julieannekost
Instagram: https://instagram.com/jkost/
Behance: https://b...
I need to replicate the outline of this image

it has 3 contours around the letter
Ah, you want to add outlines around your image. (You get help faster if you are more descriptive/accurate in what you really want)
You could use the stroke layer style, and add several copies but it has the tendency to round corners.
See this: https://www.youtube.com/watch?v=tY0dEYlfEqI
if you have illustrator , it is more suited to do that.
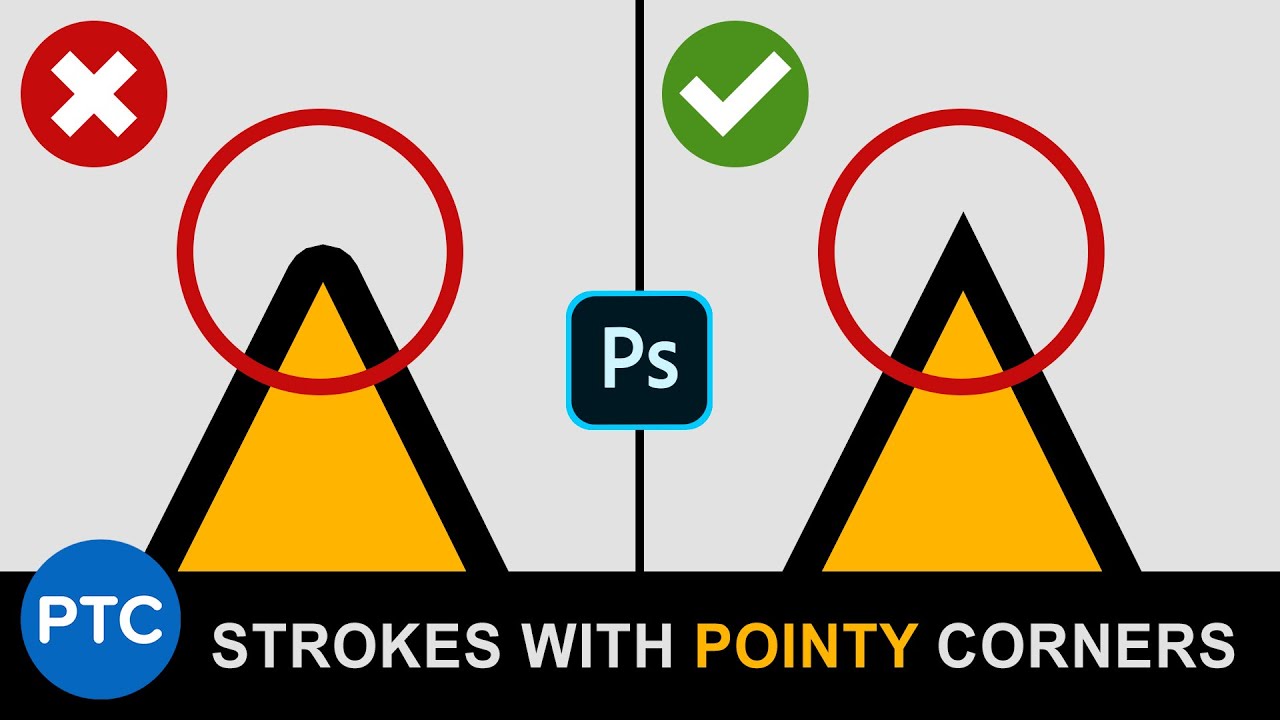
In this 90-second Photoshop tip, you're going to learn how to apply a stroke with pointy-corners to text in Photoshop.
You probably have noticed that the Stroke Layer Style will give you rounded edges on corners. In this video, you will learn a technique to convert text to vectors and apply a miter to edges to get sharp pointy corners.
LINKS:
...
i dont really think u can make this kind of thumbnails on photoshop can you? i guess its blender?

Hi, it can totally be done in Photoshop. Preference vector tools for icons. See: #📝project-feedback message
how do I get this bar back, it just dissapeard
Right click outside of the document , click show status bar, or get to window >status bar
I cant find it either way
Do you mean this one?

yes, thank you very much!
How do I remove the wooden track from this image?

D’oh, yes contextual not status. Sorry. But it is the first option if you do a right click on the area that surrounds the image
Right click on the layer thumbnail in layers panel then choose "convert to smart object"
How come whever i open photoshop the right side starts like this?
it gets annoying having to press "reset essentials" every time

I would suggest to first use "Select Subject" button, Refine selection if needed by holding shift and use lasso tool to add areas.
Invert the selection then use generative fill. (Video 1)
If the result doesn't look as expected you can type a prompt to guide AI and click "Generate" button to get new alternatives based on the prompt (Video2)
I would suggest you to set your panels and task bar icons as you want them to be then save your work space (video) going to : Window/Workspace/New Workspace... name and save this workspace.
This workspace shouldn't change but if it happens you can load it again in one click
Thank you!
Gave +1 Creative Carma to @viral palm (current: #9 - 770)
is there any way to get my photoshop to run better? it's not like it runs bad, just sometimes it lags when I'm working on a big project, then i have to reopen it and it somewhat fixes it

also anyone know the setting to keep the stroke from scaling
Unlike Illustrator, I don't think this is possible.
However, you can convert your text with stroke effect in a Smart Object the effect will be scaled as the text.
For the running issue I have no idea but perhaps you could describe in detail what you mean by "Big project"...
i used text as an example, but I mostly mean shapes, I want to still edit the stroke and fill without turning it into a smart object.
like this would be considered a big project that would sometimes lag when moving stuff
Check the page below, lot of good tips (100 history steps sounds huge for me)
https://www.psdvault.com/resources/10-ways-improving-photoshop-cc-performance/
To add what is said on this page it's good to know that if your rulers are On (I can't see on your screen shot) and you don't need them => hide them.
Artboards can quickly become hard on system ressources...so if you need arboards use them wisely.
thank you!
Gave +1 Creative Carma to @viral palm (current: #9 - 771)
Hi, it is the opposite, you want it to scale with the transform. There is a. Script for that: https://www.mightyplugins.cc/magic-scripts#bgLayers_comp-klpkbgoa1
if you know the percentage you used, you can use Layer > Layer Style > Scale Effects
im trying to make a halftone pattern fill effect and i don't want the white to sneak in (i want it transparent as the background)


Try changing the blend mode of the halftone area on that layer
Hey people! I own an anime news page and am struggling with a design. The "TOP ANIME EPISODES" is one of my better designs, the "top 10 Romance Picks" one I'm not happy with at all. any tips on how to maybe improve the "Top 10" design to make it look less amateur and make it pop more?


I would change the art for top 10 emoji anime. The couple’s pose, the colors, and the scenery of this image doesn’t say romance to me. It looks more like an angsty adventure/action scene.
Pick a better photo and 90% of your problems will go away.
Hello, Can someone explain to me how composition areas currently work in Photoshop? I’m creating a new composition layer to have a different version of the project side by side, but in the newly created composition the crop tool doesn’t work (it's like the tool is inactive). Also, when I drag an object into the new area, it turns into a smart object instead of a flat layer. Is this how it’s supposed to work now, or is something broken?
Hey I've got a question. I run into this issue where if I try to Copy and then Paste, it doesn't follow the placement of the copied layer instead it seems to follow the center of my view. Is there a way to avoid this so it pastes in the exact spot exactly like Duplicate would?
It's not specific to transfering layers from one document to another nor to just duplicate I just find it inconvencient that it pastes based on my position in the canvas.
anyone know how to make this a normal layer? i did by accident but now i forgot
Hi, what are you calling composition area? Can you post a full screen screenshot when crop does not work?
Hi, you could use the blend if sliders to remove the white. https://www.youtube.com/watch?v=-8g1OJnc6dY

Blend If is Photoshop’s best kept secret! Learn how to use it to create surreal artistic effects.
Download the Sample Images:
https://phlearn.com/tutorial/three-ways-to-use-blend-if/
Go PRO:
Interested in learning more about Photoshop? Explore our exclusive PhotoshopLearning Path:
https://phlearn.com/tutorial/learning-path-photoshop/
Join...

Try CTRL SHFT V.
Also, you can drag the layer from the layer panel up to the other document and drop it into the other document… Using shift should have the same effect for placement
I appreciate it thats just what i needed.
I have done my good deed for the day. Now I can lay in bed until tomorrow.
When I use the Shift+V shortcut, the same thing happens. I add a composition area, and that part is fine. But I can’t crop anything inside the newly created composition area. Even though the crop tool is selected, once I move the cursor over that area, I can only make a selection — cropping doesn't work.
The second issue is that when I try to delete a composition area, instead of removing it, the entire canvas expands to include the removed composition area.
Anyone know how to make this?

hey how do i copy a GIF timeline into another photoshop file? im making a steam artwork gif and timeline isnt copying through so its not a gif
You have to break the GIF into separate layers, move all the layers and then add the layers to a timeline. Look at the little menu on the upper right hand corner of the timeline.
thanks goat
Sorry, I’m not quite understanding what you’re trying to do. Any chance you can use screenshots or screen video to show what the issue is?
Help
Let’s go
The gold box with rounded corners?
yup
So you have PS open?
yup
start with making a vector shape. Hot key is U.
Use the rectangle shape, there’s a setting up top to round the corners
Post a screenshot when you got that
Maybe this will illustrate it for you.
where's the setting?
Its called corner radius, should have a rounded corner icon and number input
@night void
yeah im trying to find it one sec
is it supposed to be in this set

Yes, once you have multiple art board/canvases you’re going to have to adjust the size of those. You can’t crop anymore.
or in this

Hello is there a way to export each of dataset row to .jpeg file right now its just exporting to psd and then I have to use image processor but my psd files are big and I have a lot of rows in datasets so its not even possibile to export IT at obce
yup got it

Yes, in this menu, it gives you the option to round each corner. Do you see the four corners?
now whats next
Double click the layer to bring up the layer styles. You want to check Mark the emboss Option and play around with the settings there. To get the shiny edge.
done
Instead of cropping, when you have multiple art board/canvases click on the name of the canvas in the upper left corner this should allow you to grab the edges of the canvas and that’s how you would ‘crop’ or change the size.
The crop tool is only gonna work when you have one image/canvas
Screenshot or I don’t believe it

Lmao why not
OK, but you still need to mess with the settings because it looks really faint and you want something that looks shiny like your example
Alright, i'll see what I can do
any suggestions
kinda new to ps
Do you mean from a spreadsheet? and not 100% sure what you’re talking about. Please share a screenshot or a video so I can see what you mean
Well, you should probably just take some time and mess around with the emboss menu. However, you can do this later we can move on. Now you want a subtle cloud to texture, right?
yup what ever is in the image
I meant Image/datasets dataset xd sorry my english is kinda wacky
OK, make a new layer. Make sure your colors are black and white . Press the D key if you need to reset the colors. With that layer selected go to filter >render >clouds
Then screenshot
Umm
wdym colors should be black and whit
*white
and what should the layer be?
And apologies, i'm still learning-
No worries. But if you share a screen capture or screenshot image then we don’t have to rely on words.
In the bottom of your tool menu, you have two colors of four ground in the background color that should be black and white if it’s not press the D key
Ok, thanks for the explanation. It’s a shame that yet another useful feature has been broken.
Gave +1 Creative Carma to @loud bolt (current: #375 - 4)
this?
In the layers, just click the plus button for a blank layer
Well I'm not able at the moment but maybe in about 3 hours I could be

Move the clouds to the top
to the very top?
Above your golden rectangle
Yes, but first, let’s make a mask
wow, I'm not stupid after all
It’s hard to explain, give me a second
Umm what should the mask be
on the shape?
Take your time mate
Press alt while dragging the cloud layer towards the other layer. You should see the icon in this picture. And let go.

I'm confused
My clouds are at the top (the layer)
should I bring it back down
Hi,they are called artboards. It If I can avoid them, I do.
They are useful in certain workflows., but not in mine.
You can open a second document, and see them side by side- windows>arrange> 2 up horizontal.
wait it duplicated now-
Just like the picture, click the clouds with alt key, slowly drag towards your rectangle and let go of the mouse when you see that icon
it duplicates instead
Maybe it’s not alt key…
Try dragging without alt key
It’s been a second since I’ve done this one
Don’t make me open up my laptop!
Alright sorry
I tried with ctrl
and without pressing anything as well
didn't work
Oops, my bad you don’t have to drag just hover with the alt key and the icon should appear

Perfect
Now you don’t have to keep a track of a mask. It will mask to whatever the rectangle shape is automatically.
thats convenient
OK now you can go through your blend modes and find something similar

It’s because of all the detail in the clouds? Your sample image didn’t have so much detail.
What specifically don’t you like?
OK, so we’re gonna do a couple steps.
Change to multipy

Then adjust Levels - then Gaussian Blur - see video (I opened my laptop after all)
I see — I used to rely on this feature to quickly create multiple versions of a single project. It made it easy to compare and edit different versions side by side. With the way it works now, I honestly don’t know what the intended use is anymore.
So how can I now conveniently create and view different versions of a project within a single document?
I would learn about Layer comps.
what did you do to open up levels btw
crtl L
I think I got it pretty close - I added your example image to check the colors (but its hidden)

I also added a layer for the brightest highlight.
woah how
can you send me a video
it'd be much easier to understand
if thats convenient for you

If you want, we can do a DM screen share... I don't think a video would be small enough (5 MB limit on discord)
Um can you screen record from the point where the important steps take place
like bevel and emobs
and making it look shiny
I did the same emboss effect on the rooster layer, but I made it 'outside' and made it smaller.

@nocturne relic
@night void
@night void final thoughts:
- If you don't like the cloud pattern, just render it again, you'll alway get a new random pattern.
- I also used hue/saturation effect with colorize to get the darker areas of the cloud layer to look less green/gray.
- because the emboss effect is a layer style, it can be copied to other layers and adjusted, so the rooster could be anything.
- there is a Pattern layer style. I am using a default pattern for the duck and rooster, just so it isn't a boring solid color. But you can use this layer style for the clouds if you want to apply this effect to several objects. You'd have to add the cloud as a pattern.

is there a hotkey for this?

i find myself randomly in group mode time to time
when i want to be in layer mode
i must be accidently pressing something
hey pls I would like to know how to put the texture on the eyes and only on the eyes which are themselves attached to the hands

put "grunge horror" on "groupe 2 copie"
because when I try to put it on, he also puts it on "calque 1"
I started having this problem a couple weeks ago where when I launch PS and open a project the user interface takes a solid 10 seconds sometimes to respond to my clicks. Anyone else have this? I can't remember if this came with an update or something but it's getting annoying now. It goes away after a couple minutes but I can't imagine the reason for this.
Can someone help me to get the outer color on the inside of the logo? I can't merge it and has a different shade

Bonsoir!
It seems like you already have a clipping mask. You should select the hands (Ctrl+click on the thumbnail) then use the selection to create a mask for the eyes layer (and unclip them). You can then clip the texture on the eyes.
Hi, Could you re-explain what you call the outside and the inside? Is the inside the half arrow shape at the bottom of the Z?
Hi ! Sorry late reply, there are like 2 tones of black on the screen, I wanted the outside black to be on the inside part of the logo
is there a good way to add chromatic aberration to a monotone picture?
like this^

yes actually. but i would prefer if i could make it blue and red instead of green and purple/pink
No problem... Give me 2 min for a video recording...
oh really? ty
1st: Make sure your image is in RGB mode not Grayscale (even it's a B&W image we need to be in RGB mode=> Image/Mode/RGB color)
Make a copy of your Layer over original image (CTRL+J)
On the Copy go to Blending option and Uncheck G and B channel boxes (Green and Blue)
Select the move tool (V) then nudge your layer with arrow keys to get the offset you want.
wow tysm
okay wait, is there a way to do it on simple this such as this image?

because it works on other.... real monotone pictures. but it didn't work on this simple line art thing.
yes but will affect white parts only (Black still black in the 3 RGB channels)
wait wha..... it doesn't do that for me...
OHH, its probably because it isn't like.... rendered as a image
Is the layer a vector shape?
No problem you found the problem by yourself ... So you're not so dumb😉
Wait, so. i just exported it, opened it as a image, and then tried to do it, and it didn't work. however when i tried screenshotting what you had on your video, it worked?
i'm so confused, does the image need to contain the black part?
could you share the exported image with me
or can it be the white part while just being transparent.

just a regular png
i can also share the .psd file here
It's a bit different with Transparent png containing white only (my english is to bad to explain why but I'll share a work around).
yeah i figured, but i kinda need to make it transparent.
You just need one more step... Here is a short video to explain.
Create a second copy over / check G and B and uncheck R/ then move it at the opposite of your first copy (red)
Export as PNG and you re done!

ah okay
ty
can anyone demonstrate this techinque? im hitting a block right now and whatver i do i can't seem to replicate this technique ( i tried using a black and white gradient tool for the halftone layer,clip mask on top of the texts and mutiply blend mode and tried to put a solid color on top to recolor the dots and different blend mode afterwards ) i can't seem to get the result im looking for

Please find 3 short videos to show you how I would tackle your case (If I understood well)
1- Halftone Pattern creation
2- Halftone Pattern alteration and application on the Text
3-Test different blending modes (I found linear Light cool with those colors).
oh gotcha, it seems like i would have to invert the colors on my halftone layer for my colors to pop. thank you so much. this is extremely helpful❤️
Gave +1 Creative Carma to @viral palm (current: #9 - 772)

Create realistic gold type and logos without any custom painting in Photoshop - scroll through fonts and turn them to gold in real time! Free texture links and more listed below. Thanks for watching and please leave your comments or questions below!
GRADIENT MAP PRESET AND FREE TEXTURES:
https://texturelabs.org/tutorials/ultimate-gold-text-effe...
This method is really good
butits for text isn't it
Pretty sure it will work for any shape but might require some tweaking
Are there any built-in 'object-detection' type tools that could help me with my problem?
I have a procedurally generated image im trying to cleanup by hand, and I essentially need to re-draw some overlapping in the same style as what I have


Hi! Right-click on the text tool in the option bar, and select reset tool.
Go to the character panel window>character click on its hamburger menu and select reset character.
the reset option isn't there
The option bar, not the toolbar.
The horizontal one under the menus. https://www.photoshopessentials.com/basics/getting-know-photoshop-interface/

Learn all about the Photoshop interface and its features. Topics include the Document window, the Toolbar, the Options Bar, Menu Bar, panels and workspaces.
i resetted character and its still the same
Both the text tool and character panels? Can you show a full screenshot (with the character panel visible?)

Ok, could not see it yesterday with the light interface. No tool like magic wand, or select object can make the difference?
And when you type new text, it has the crazy spacing? Note that I had asked for a full screen screenshot. What does the option bar give?


I meant with the text tool active. 😉 But glad to hear it works now.
I could not get it to work dunno. Sorted !!
Would anyone know how I can make something like this?

Hi, ik this is probably not the right chat, but could someeone help me create a certain poster, the issue is that im relatively new to PS, Ik I would need to learn the basics first and all of htat, but I don't have time for that unfortunately, if anybody is kind enough to assist me on this, that'd be great!
pelase ping me if you are looking to help me
how do I make the flower "thin"?

like, I want to draw a circle inside like this

and then shrink the circle
make it look sharp
Can someone tell me why I can't center align this text
when I click centre is doesn't centre

Do you want to centre the text in a layer or in the canvas or do you want to write the text center aligned?
Please show a screenshot in full screen mode with the layer and paragraph panel
I want the text to be centred in the middle of the canvas
In the control bar, click on the three dots (next to the align icons) and choose align on: canvas
Then try it again
hey are you free for a bit
I sort of need help with this 😭🙏
I'm on my lunch break and only write on my mobile phone.
Sorry
is there any fast way of removing the weird background in the top? got like 7 of those and using the pen tool and taking my time seems like the only possibility to me. auto removal doesnt work, also not in the beta version through cloud processing

Hi, you need to increase the size of you canvas (edit>canvas size) then create rectangular selections of the image that you jump (Ctrl+J) on their own layer and move them around. Repeat the same with another image that you desaturated (Ctrl+U)
It might be faster to take a new picture with a clear background…
100%
I'll end up doing that as well
Hello. First time post in this group. I am taking a course on Udemy. Learning about Adobe Capture. When I am under the brushes tab and save my brush to my libary, I get this message when I try and use it in Photoshop on my pc. What am I doing wrong?

And I am using adobe capture on my cell if that needs said. Not sure.
In save for web legacy, the colors section is missing and there are no colors in the color table. How do I make them appear?

Hi, did you save it as a Photoshop brush? See the brushes section at https://helpx.adobe.com/mobile-apps/help/capture-faq.html
In capture, make sure you create a pixel brus, and one compatible with ps and fresco, not a ribbon one only compatible with fresco
Hello, You are saving as JPEG, so there is no color table. Select gif to see it.
Thank you!
Gave +1 Creative Carma to @hushed niche (current: #12 - 217)
Guys im using the pen tool to create a stroke but the shape is linear, is there a way to make the edge of the stroke thinner and the middle part thicker?
That’s a job for Illustrator…
Hello, is there a quick way to change these values to mm/cm ?

When doing a selection
Found it in the preferences.
Thanks for answering your own question, it might help others!
Gave +1 Creative Carma to @zenith summit (current: #984 - 1)
You can use Stroke path and check the "Simulate Pressure" (you need to select a brush with pressure size feature before using the pen tool)...
It could be a work around for simple strokes/shapes but I 100% agree @hushed niche, Illustrator's Path Width Tool if from far better, easier and allow width adjustment all along the path.
Heya folks, getting some really strange effects in substance when im opening my projects...
They were perfectly normal before and havent changed anything, I basicly just re-opened it
"And this is happening to every single project ive ever made"

when i click on any layer this become red how do i fix

Like it keep going red when I click on any layer, and when I transform idek how to explain it
Hit the Q key
Its Quick Mask Mode: https://helpx.adobe.com/photoshop/using/create-temporary-quick-mask.html
All good?
D. Humann, any chance u know the problem on my image that I sent above?
Nvm solved it by disabling the "Sparse Virtual Textures Hardware acceleration"
Thanks for sharing the answer, it can help others!
Gave +1 Creative Carma to @blissful hemlock (current: #984 - 1)
@devout lance thanks
Gave +1 Creative Carma to @devout lance (current: #984 - 1)
@devout lance thanks
okay lets go back into the group
👍🏼
@devout lance thnx
@devout lance thanks
Gave +1 Creative Carma to @devout lance (current: #637 - 2)
It looks like a convo that should have happened in private (screenshoted it, for posterity!)
Actually, we were jsut testing the Help point thing out. We wanted to see how it would work, before implementing it
I am really sorry about this! All we did was just create a chat wall 😭
hey no worries! I was just teasing you. No harm done...
Thank you!
Gave +1 Creative Carma to @vapid flume (current: #6 - 944)
ther we go 😭
bad omega 😠

I think you should resolve your issues.. in private!
Hi, could anybody tell me what tools to use for the 2nd file so that it matches with the 2nd picture in the 1st file. Thank you!


It looks like you'd perhaps want to refine your Layer Mask to soften that edge around the person's body. Also, I would use a Levels Adjustment or Curves Adjustment Layer to improve the contrast and bring more of the dark shades into the image.
You approach it like this... or in a similar way.
After you have that, then you can also start to repair some of the face and smooth those areas out. However, the order of how you'd like to work is up to you.
Hi everyone, I'm having a little technical problem with photoshop. Do I understand correctly that I can share it here?
Correct
Everything was working fine until recently. Today I start Photoshop and this happens.

Just so I'm clear, you have your Windows Taskbar on the top of the screen? And this empty app container on the bottom is Photoshop?

You can try to reset the Photoshop Preferences. Edit > General... Reset Preferences On Quit.
Then restart Photoshop. See if that helps.
Im making a graphics kit, my old kit i forgot to include the air box and ended up making a new kit i started designing a new one on the old file by accident so i was wondering if there is anyway i can add that single vector to my old template so i don't lose my work?
blank is the old file but new design, the toilet paper is new file but old design wanna be able to add it to my new design and still be able to update it when i save the illustrator file to view the mockup on PS if that makes sense


Didn't help...
What version is it? If its out-dated, try opening the Creative Cloud app and update Photoshop. See if that helps.
I guess we'd need to know more about your document set-up. Is this new design a Smart Object? I'm assuming not because, if it were, you should just be able to make changes in Illustrator and save. Then it should update when you open it Photoshop.
Can I ask question regarding other adobe software here??
there are Discord servers for a number of Adobe software - which is it?