#🔀┃art-asset-workflow
1 messages · Page 17 of 1
Which in this case is that a video format will probably do what you want, and much better than a texture, but that only vrchat people can tell you how that's implemented with their tools
Okay well in the case for VRChat avatars don't support videos what they do support is using a shader to play a texture array as if it were a gif, Thry/poiyomi has a neat little feature where you can turn gifs or images into texture arrays and I wanted to know what the limits were on texture arrays so I can do the math to figure out how many materials with the shader I would need
docme supports using texture arrays or spritesheets but spritesheets wouldn't work in my case as the images are far too large
okay so what's this mean
How did it occur?
when creating a texture array maybe the images don't have the correct compression
or colorspace
okay yeah images have the wrong pixelformat
Hello!
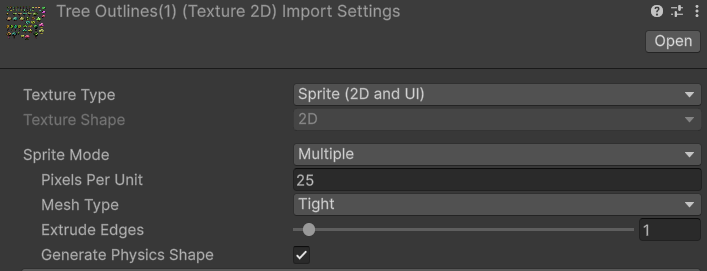
I'm following this tutorial here: https://blog.unity.com/engine-platform/isometric-2d-environments-with-tilemap
But my tiles are blurry in the game scene!
Sprite size is 64x32.
Pixels per Unit is set to 64.
Filter mode set to point (no filter).
Compression set to none.
What am I missing? 

Look at the scene zoom slider in the top of the scene window and zoom all the way out
I did, looks horrible 🤭
Oh no
In the scene window it looks perfect!
But in the game scene it's blurry
screenshot the problem, entire window
Okay writing from my phone right now, will do so in a few minutes thanks
I'd check in advance that the vrchat server won't kick you if you try shenanigans like that
Heya!
I'm very new to unity and would like to ask.
How would I achieve something like this in a normal 3d project?
I'm trying to make a VRchat world, and wanna know how to make this wet ground looking texture.


Thanks
Sorry for not answering!
I was able to solve my issue using the Pixel Perfect camera.
However, I have removed it again as I have now performed the required calculations manually. The Pixel Perfect camera helped me to see and understand what was missing.
I imported an object into unity and a texture. I want to see if it UV unrwapped correctly. Is there a way to see this in unity?
How does getting better lighting work in a built in 3d project?
Would it be something I need to do myself, or are there presets out there?
Cause the base lighting that unity puts is a bit, flat
Or is that the shader graph thing?
Also SSR?
Lighting design follows all the same concepts across render pipelines, but what goes into something looking good is a combination of good lights, good materials and good post processing
While you can't change a light to make it "less flat", you can use more interesting materials and utilize PBR maps
A good PBR material will look good even under one shadowless light
You can also introduce more varied light sources to create specific moods and highlight specific areas, which is the lighting design part
There are also systems for indirect and bounce lighting, which much improves the look of any lit scene, even one without textures or materials
The third part, post processing elevates both lighting and materials, most importantly with tonemapping but also with SSR
@versed light All three parts of the process are kind of different so a "preset" doesn't make a lot of sense
If you have an example scene, you could use its materials but they often have a specific appearance and purpose
Lighting would be very specific to that scene's light sources so not directly applicable elsewhere except as a reference
Post processing profiles on the other hand can be used as-is elsewhere
I'm not aware of many official example scenes for BiRP, but for URP and HDRP there are quite a few
I see.
Are there any tutorials I could follow maybe?
It needs to be BiRP because I'm making a VRchat world
How do I impliment post processing?
Everything just looks a little too flat at the moment

I've got normal maps and stuff
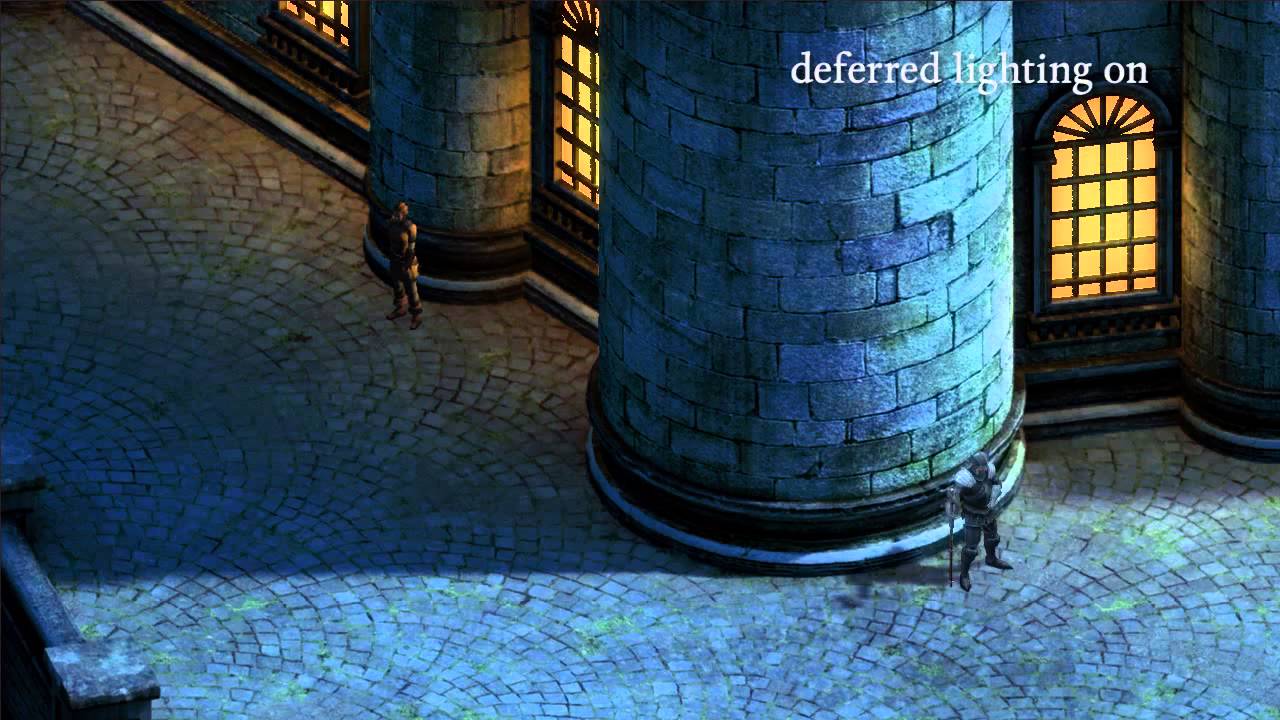
Supposed to look somewhat like this

#💥┃post-processing has pinned instructions
In this image the ambient lighting is darker, and the direct lighting is brighter
Though it could also be that the lighting levels are very similar but there's starker contrast which can be achieved with post processing
So, would that just be upping contrast and saturation maybe?
I don't have the rendering option

Nvm
I figured it out
So, how would I pull off SSR?
"Pull off"?
How would I do it.
Enable the override according to instructions of the documentation
However I recall you mentioned VR
Birp's SSR does not support VR
Guys, what do you suggest to improve level design as a standart level or junior game developer? It requires interior design and builder skills. I have no skills in urban planning.
Do you mean gameplay level design or artistic level design?
In both cases the way to improve is to do more of it and test the result against project goals
gameplay level design
at least for now
should you use template or create completely from your mind
Then you'll want to make levels for as many different types of games as possible
The features of a game determine how the level is interacted with, which entirely determines how it should be shaped
lets say i want to create some basic zombie game
i have some little village type of assets
think like far cry 5 map
but where should i put my assets one by one or how many of them should i use
like that

trees, some special kind of buildings,sitting benches
The level and game mechanics are two sides of the same coin
How your enemies move, how your player moves and how they fight each other entirely determines what kind of level best accomodates them
third person
Too vague
You need to have a game to know what kind of level it will need
Because of this designing levels for an already existing game is a much easier way to practice
Since you're not also designing and building a game to go with the level and you know how the game works to begin with
Then this is why some big companies hire game modders right?
One of the reasons
It doesn't matter what game or engine a level designer has used to learn level design, as long as they know how to design levels for different games
I can't quite stress enough that the game mechanics determine the level design
The same level that works in fortnite is unlikely to be fun to play in counter-strike
@elder hatch note the #archived-game-design channel since you're not asking about art
oh sorry
hey so i just added new terrain layer and for some reason it reflects light?


is this the issue?
That seems like water clipping through from below the terrain. Smoothness wouldn't look like this.
nope, i fixed it
it was due to alpha issues
i fixed it by changing the alpha source to none
nah they won't unless it is malicious like "those people" who put billions of particles on avatars to crash users
You need to be careful with the memory/vram allocation because it didn't sound far from being quite similar
Yeah.
I got it working but will have to put the project on hold need to finish something else first
I can only do around 100 frames per array so will have to do some further testing like cutting the gif into multipe gifs
hi, guys, i have a problem make buildings to unity, what is better? make the base buildings in 3D software or make it modular like second image, and put then together to make the building?
what you do guys to make your buildings? and complex buildings like the third image?


did someone have a 2d key asset to use on my project?
hey i made some models in blender with a special material which changes color depending on the location of the models. is there a way to import the material into unity?
Define 'better.' Modular has a lot of benefits, especially if you need to make multiple buildings. Individually modelled buildings can have more unique features thiugh, so there is a tradeoff.
Thanks bro, i choose modular, because texturing is more easy and you can add details, i am using an asset that is helping a lot
so i have this 2d textture that is transparent (its basically a bunch of squares but in the middle they are dark and get lighter (more transparent) if they are more near the sides when i apply this texture to a sprite only the middle squares are showing. how to fix
Hello! Need some help regarding GLTFast and URIs
I'm trying to import GLTF models at runtime
private async void LoadGltfFromMemory(string filePath)
{
try
{
var gltf = new GltfImport();
        string absoluteFilePath = Path.GetFullPath(filePath);
        bool success = await gltf.LoadFile(absoluteFilePath);

        if (success)
        {
            success = await gltf.InstantiateMainSceneAsync(GLBParent);
        }

        if (!success)
        {
            Debug.LogError("Failed to load or instantiate GLTF file.");
        }
    }
    catch (Exception ex)
    {
        Debug.LogError($"Error loading GLTF: {ex.Message}");
    }
}
This is my function
but I need some help with the errors 😅
This channel is not code related, you should ask in #archived-code-general
Hello everyone. Is there an icon asset package you can recommend? I'm making an RPG Fantasy game.
hello guys, I'm creating a procedural world tool and since I start create this model, I have some issues.
someone have any idea why when I bake the texture it's completely different of my actual shader I have created?

Show your baking settings
My guess you're baking with light contribution
Might also be UV overlaps
let me check


You probably don't want to be baking combined nor with lighting
Since you only have relevant data in diffuse
Also, plug the baked texture into the preview node to check how it would look
look really darker, like as expected

so what do you recommend? bake type difuse?
Diffuse with no light

Hey all, fairly new to Unity but i saw that you can do 2D rig characters, so thought to just start there and try it out before getting any deeper.
Using procreate, with all the parts as separate layers, export it and download it as a PNG and try to put it in my Unity project files.
So, i believe its called a Prefab where it has a small + and show what its made up of, in my understanding this would be each layer.
And currently its just importing as a flat whole image, been messing around with the settings but not much results that make me feel like progress has been made.
Just wondering if anyone can help with it.
It will be flattened unless you use the .psb format and have the psd importer package installed.
Hm I saw that on another video yeah, guess it was just conflicting information from other videos that seemed to imply a PNG can somehow be used by Unity differently.
Alright, cheers for the words.
Png files generally don't have layers.
(That is, I believe that there is a version of the png format with some kind of layer support but it was proprietary and not widely supported.)
Hm in hindsight yeah should of seen it, just got tunnel vision through watching a tutorial and thought unity had some black magic
Pngs work fine, if you are assembling the sprite sheet manually
Would I have any future problems exporting the terrain from my game that I made in Blender to Unity? Or is it safe?
Why is the mesh upside down even tho its rightside up on the Import?

Did you export from Blender?
Its from the asset store so I dont know
ah, I see
Blender and Unity disagree on what the XYZ axes mean
So the prefab winds up with a rotation to correct for that.
However, that doesn't fix the orientation of the actual mesh.
I dont use it on a prefab, its used in the particle system
Right -- so you don't get that correction
If I used it on a prefab I could just rotate that
I think you want to tick "Bake Axis Conversion" in the importer settings.

I have not actually used that before, though.
Now theyre backwards AND upside down
some assets also came looking up/down, seems completely at random to me

Also, this curse happened upon all the fish that WERE on a prefab xd
Guess its probably easier to try and make a variant of the particle system if I dont wanna learn enough modeling to fix this in blender lol

Looks like the bones are in the right place but the bone transforms are flipped and inverted
Again something to do with transform ambiguity when importing
If you're going to use these for a particle system, then you won't be using the armature anyway
so I'd just import the fbx into blender and export it with "Apply Transform" checked

and only export meshes

Apply Transform royally screws up parented things (e.g. a mesh under an armature)
but it gives you a properly-rotated mesh
So when i finished making this map (blender), there is weird dark lines, caused by issues with seams (I think). How can I fix this?


Is that using baked lighting?
Yes
hey guys my player character went invisible after minorly changing some sprites
all the animations just appear as completely invisible
i tried recutting the sprites and relaunching unity
didnt seem to do anything
nvm it was an issue with sorting layers
This is somewhat unavoidable as long as your meshes have seams in the geometry
https://forum.unity.com/threads/lightmapping-troubleshooting-guide.1340936/
Chapter 10.2.2 for more details
#archived-lighting would be the relevant channel
currently using a mix of blender / unity to work on an isometric pre-rendered project and while doing workflow research, i came across these ribbed heightmaps in disco elysium / pillars of eternity. Im confused as to why they are stacked like that and appear to be a gradiant across the layers?
My first thought was that this was for dynamic in game lighting and how the background would react to that but i am not sure and cant really find anything by googling / youtubing around. anyone know the answer here?


Was there any accompanying context where you found these?
It looks like fragment height position visualized by taking the height value's fraction
Using the height position can be useful for many things, but restricting it to such a limited repeating range makes it way less useful
For example, fraction used for helping visualize rendering depth:

The stripes are not what's actually happening, but without them it'd be hard to see what's precisely happening

Internet Archive
191 page artbook for the video game Disco Elysium - The Final Cut. The digital copy is included with the standard edition of the collector's edition via...
page 30 in this artbook is the disco elysium context
Executive Producer and Lead Programmer, Adam Brennecke talks about the rendering processes used in Eternity.
ESRB Rating: MATURE with Blood, Sexual Themes, Strong Language, Violence
about 1:00 in for the pillars example
hmm i sort of understand where youre going with this. would it mainly be useful in the context of real time lighting?
The first document says "height map tells the game engine which objects should be rendered in front of or behind others" and in the video that "these passes are used for dynamic deferred lighting"
Both depth sorting and deferred lighting in my experience require a depth texture from the camera, not a height texture, but it's possible they have a different method for it considering both games fake their environments with totally flat textures
A depth texture normally needs to be from the camera's near plane to its far plane, but that might not be feasible to bake for a level that's just one big image
So I'm guessing they compare the real depth position of the pixel on the flat texture to the height value on the baked height "depth" map
And so they're never limited by color depth (of the depth texture) no matter how big the level is
The stripes are just for visualization though, I'm fairly sure
@misty lantern wow extremely helpful thank you! Its interesting because when pulling apart scenes in Renderdoc, we find both the regular "depth" map in greyscale, as well as this fragmented green height map. So was wondering if it was doing something different... but it sounds like it could be that last part of "they compare the real depth position of the pixel on the flat texture to the height value on the baked height "depth" map"
still trying to wrap my head around all this, but getting a better understanding. thanks again!
Do the stripes appear when looking at the renderdoc too?
yes, i dont have a screenshot in front of me currently but it was in there
I'm on Linux Mint, and my GPU doesn't show up in Blender. How can I fix it?

I'd try asking in blender or linux spaces
!blender
A supportive community for Blender artists of all levels. Share your work, ask for help, and learn from others! https://discord.com/invite/blender
I just did, they helped me out
Let's say I import a model with some animation clips, and I later decide to add or modify some of the animation clips. If I do import the model again, do I lose the reference to the animation clips or stuff that I migth have modified in them like let's say add an animation event for example?
not sure, depends on where you change something.
But i guess you can test it in a few minutes just by changing stuff and reimport the model and have a look if it still performs how you want it 🙂
Yeah, I was just wondering if someone could know before hand just in case I end up messing everything up as always
If you change something directly in the imported animation clips, it will be overwritten if you reimport them from Blender later.
What kind of changes do you mean by "directly"? Like I would lose the setup on an animator controller? Would I lose if the animation speed was modified from there?
No. If your Model comes with an animation clip, and you change something in that clip (what you normally cant, because its read only) and you reimport that model with the animation clip, it would be overwritten.
If you create a animation controller and add it to your model and you reimport your model later again, its all fine. It just replaces the model and keeps the stuff you added in unity.
Its like if you have a chair with 3 legs and use this chair all over the world. If you add a fourth leg later and replace your old chair with the new one, its okay and every chair updates and have a 4th leg now.
Oh, cool, so it is only if I modify the clip directly (which I shouldn't anyway of it is imported)
yep
How do I make it so Unity keeps mayas textures? I ticked the embebed media when exporting and it still imports as like the dull colour.
I have no experience with Maya but while there are ways generally to embed textures into fbx files, you would have to extract them later in Unity
Which makes it more practical to just import the textures separately
There's not really a benefit to putting extra effort to tie together the meshes and textures, just makes them harder to manage and update
FBX materials retain paths to textures anyway, so they will be automatically attached if they're in the same folder as the mesh or in /textures/ folder
Is there a way export animations without the read only? Cause is kinda annoying with shapes keys controlled by bones since those constraints are lost
Ahh alr because my meshes and textures are in different folders so u recommend i put them in one folder then export that folder into unity?
I would generally recommend using the textures folder instead
Or just assigning them manually which I've usually had a reason to do anyway
But my projects are not that big assetwise
You can duplicate them with ctrl+D to create a modifiable copy
Even in read only state they can be modified from import settings in various ways
Kinda messy to have a duplicate just for that, but sure, I will do that, thank you
if i wanted to convert 4 materials into a single material as a Atlas, is that something I'd need to do in blender and adjust the UV's to now be on 1 of 4 quadrants? or is that something that there are addons or procedures to do in Unity for a 3D game?
Not really officially but it can be automated
Do you have a specific situation that makes texture atlasing necessary?
I am building props that would use 4 seperate trim sheets. I am doing a mesh combine and what not and having them all as 1 material lets them combine where if they are 4 seperate they can only combine with other like minded materials / meshes
so would like to just optimize draw calls etc
i have UV Packmaster 3 in blender which lets me move full UV groups to individual quadrants (like a 4x4 grid) so i guess thats an option
Blender can export many sets of vertex colors into an FBX, but Unity's FBX importer only cares about one of them
Is there any way I can get at this data?
I'm elbow-deep in writing a system to manually export that data into a file and then add it back to my model in Unity
but this would be a lot nicer...
Deeper than I've seen anyone else dive in that particular bog
Have you checked if the USD importer has a better support for your vertex streams?
Or checked if Blender's FBX importer lacks the flaw Unity's importer has? Just in case you could steal that code
I was looking at just grabbing an FBX parser and looking for the data myself
That might not be too complicated, really
the complexity is in smashing your data into the format
I haven't tried USD before
Me neither but it's supposed to be technically better than anything before it
No idea if it holds up to that standard or if the importers and exporters work right
my ~workflow~ is centered around using a Blender add-on to automatically export the right objects into FBX files
I also need to be able to export non-color attributes from Blender -- like single-dimensional float or boolean attributes -- so this might be moot
(and then pack them into UV channels)
If you're on URP or HDRP optimizing draw calls is not that crucial
Texture atlasing can cause many headaches because the textures no longer repeat when sampling or mip mapping
But for individual objects or groups of objects it can be practical
If you're already using trim sheets, having more trim sheets in one asset is just more of the same
In that case you might want to work that into your asset creation process from the get-go
Especially considering that you can no longer expect textures to repeat outside of the normalized UV range
Could also look into udim instead of atlasing on one sheet, dunno if they ever got that officially working
As far as I know udims are not well fitting for realtime applications due to their nature
Because the number of texture samples required by an udim shader would not be known beforehand, and can vary a lot from one mesh to the next
That does make sense.
Honestly, with srp batcher there isn't that much reason not to just use multiple materials with the same shader, right?
Then you can reuse the uv space for each.
Is it possible that I lose blend Shapes if they were linked to a bone before importing?; I mean they are not appearing on the Skinned Mesh Renderer
Basically none, although having too many texture loads can become a bottleneck if working on very low-end mobile stuff
I don't know how likely that is to happen in practice though
I am currently Intending to do a little unity simulation for my physics class and was wondering if there are any good sites I can get 3D models of our solar system's planets (Earth, mars, etc)
sorry if this isn't the right server to ask. Just don't know what others rely on for these
"Linked" to a bone how exactly?
Basically the relative position of the bone is the amount of blend shape applied
I know these kind of constrains usually don't apply when importing, but the shape is not even appearing to modify it manually
So I'd assume with a Driver
Yeah
I would presume that information is just casually ignored when exporting
But I guess you could do a test export without it to rule it out
I mean, I was expecting the driver to be ignored but not the blend shape entirely
Is a bit weird
Is it feasible to do cutscenes entirely in Blender and export the cameras and animations to Unity? I did some searching and most say to use Unity's Timeline instead for cutscenes. But I'd like to make use of the rigs I built in Blender and animate with those.
I mean, you could always do the entire cutscene on Blender and then just show it as video on Unity. Basically a prerenderer instead than in-engine
Sorry, I don't mean as pre rendered video. Definitely needs to be rendered in-engine.
Not easily if you want to do more than just move the camera around
You can export keyframes for object transforms in the fbx format, but not focal length changes or anything else
It'd have to be a very fancy camera rig to justify not doing the motion in Unity where you have access to all properties and can see everything synced with the Timeline
Ahh, I meant character rigs
Trying to do complex character animations in Unity is nearly impossible
You certainly wouldn't animate characters in unity
So then I assume the proper workflow would be to do everything in Blender, make a note of any focal length changes and manually redo them in Unity?
That seems like the obvious path
But not a great one
I can't really find a better workflow by searching even though it seems like it should be a pretty common thing
That was my experience searching as well, so I figured I'd ask here
Technically you should be able to convert any variable like focal length in blender to a transform keyframe with Drivers and then convert back in Unity with a script
But that's hacky
Interesting
Tbh I'm hoping the USD format solves this problem because it's ultimately an FBX limitation I think
The pros probably have their own exporters/importers to solve this so they can move any data they need from whichever animation software they use
Hmm, I could write an export tool in Python for Blender for any additional data I might need
NASA published a bunch of planet textures/heightmaps, can start there
Hi guys. My and my friends have been trying to make a game and we are having some issues for picking an art style. Our game will be a pixel game. I have drawn my first background image (well kinda) and we settled in to making a game that would have the same complexity and look as this background picture. The problem is that we have no idea how we could draw the player character (which is a task that has been given to my friend) that can match my background image. Can anyone help me with this?

We tried to find references, and none of them seems to match the way we see that game. Although, if you have a suggestion, don't hesitate and just send me what you think
Is there a promo?
Trying to get a material imported into my sim. Earth Texture is in but its showing up as purple?

sorry if this is the wrong place for this. Didn't see anything for materials
oh maybe its cause Legacy and URP don't work together?
URP should use shaders under the Universal Render Pipeline heading
Gotcha, thx
what could i improve in these, they just seem so empty

I am trying to export a unity scene into FBX but when i import it to Blender 2.79, it seems it imports a same mesh multiple times.
is this because most of the meshes have the combined mesh component?
Wtf?
guys, to make a character that is going to be about fighting running around and jumping , should their idle pose be somewhat dynamic too?
Hello again, back with another Pre-Rendered background question. Going through the Disco Elysium devlog and coming across something that I am thrown off by... specifically what exactly these "tiles" that they are generating are outputting.
After puzzling over it for a number of days, my current best theory is that each "tile" is just the actual render, but that the important part of this process is the underlying 3D that is sliced up as a result of the render camera tiling process. To my understanding, each of those slices is then exported as an FBX, with the camera projected UV's baked into it, and brought into unity. After that, the render "tiles" are able to match perfectly with the FBX "tiles", based on having the same UV coordinates, so that everything matches perfectly going from Blender to Unity. Then they use this to generate shadows and real time lighting data.
so if that is right (and i could be 10,000% wrong or thinking about this in a nonsensical way, I have no idea) would you be generating something like the attached image, or would the UV coordinates be inherently baked into the render result?
Will attach the devlog here as well... page 5 for the Tiling section. https://forums.tigsource.com/index.php?topic=52246.80


DISCO ELYSIUM (we finished it, it's out)
Sounds about right
Except UV coordinates won't be "baked into the render result", they are vertex data that determine where the texture is relative to geometry
Technically you wouldn't need to have the UVs in the mesh data; you could use object space coordinates, assuming each tile is the same size
Since the UVs would be the same(in object space) for every tile
You presumably want to have UVs in 0 to 1 range for each tile, each of which matches each respective background tile
Though you might not need the background tiles at that point when the mesh can display the background tile texture anyhow
This also works, but you'd have to account for the isometric camera perspective in that UV projection
Right, im wondering what the point of this process is exactly if youre doing a completely 2d background, aside from interactables and characters.. so i feel like it must come down to shadows and light.
So you would repeat the UV camera project process for each individual tile on a range from 0-1, and then import both the render result and the fbx tile into unity and have them be attached when either they are called to render in game?
Rendering out image tiles for the background is simple
But according to the post they required a low poly environment mesh for determining raycast visibility, as well as some light calculations, presumably from realtime objects to the world
For that they needed to project the world image tiles onto the low poly world which also needed to be sliced into matching tiles
Okay got it. Thanks for confirming and shedding some light onto this!
i've been looking into blockbench for creating some 3d assets. i'm just wondering if it would be possible to export the texture map so i can make a normal map out of it and then use the normals in unity?
i want to export the texture so i can use laigter to generate the normals
Is there a setting im supposed to change when exporting models from blender? I have a rigged character, and for some reason only the armature has a -90 rotation on the X. First image shows the rotation, 2nd is my export settings.


It may help to set Primary Bone Axis to -Y
https://polynook.com/learn/how-to-export-models-from-blender-to-unity here's the full length explanation
Apply Transform can mess up armatures so it's usually best to avoid it
A script to do this stuff for you may be more convenient though https://github.com/EdyJ/blender-to-unity-fbx-exporter/tree/master
Doesn't work great for all meshes but for most it skips the whole hassle

In this video we talk about the correct workflow to export your 3D models from Blender to Unity.I'll show you the right way and introduce you to common errors and show you how to fix them.
If you are interested in game design and gamedev, we are happy to offer you help on our Discord. You can also check out our Instagram or support us on Patreo...
thanks! this was bothering me for so long and seemed every guide online was the same wrong "fix". Ill check out that script too 👍
my issue was a bit different, it was only the armature that had wrong rotations. i used the same settings that this video recommends
ah, okay.
did you apply rotations?
yes but this wasnt the issue, its alright though as Spazi's resources worked for me
Ok cool
Blender question, how do I project the origin of all my objects onto a given plane ?


The material asset determines cutout / transparency, not the texture
Embedded materials can't be modified so make and assign a new one
sorry i did not understand, i'm new to unity...
You need to set up a material with Rendering Mode set to Cutout. You shouldn't depend on the imported material, since you won't be able to edit its settings as Spazi said. You can read more on the Rendering Mode of the Standard shader here. For the URP Lit shader, you can refer to this page.
If you still feel lost, it may be best to follow a tutorial.
It looks like the project is not using URP, but the process is much the same with BiRP shaders
I get the following error when I try to extract textures from FBX, i'm using 2022.3, someone else on 2020.3 is able to extract it with no issues
UnityEditor.SerializedProperty.get_boolValue () (at <8e887700cd7e4674989da7b046e8eaa6>:0)
UnityEditor.ModelImporterMaterialEditor.DoMaterialsGUI () (at <8e887700cd7e4674989da7b046e8eaa6>:0)
UnityEditor.ModelImporterMaterialEditor.OnInspectorGUI () (at <8e887700cd7e4674989da7b046e8eaa6>:0)
UnityEditor.AssetImporterTabbedEditor.OnInspectorGUI () (at <8e887700cd7e4674989da7b046e8eaa6>:0)
UnityEditor.ModelImporterEditor.OnInspectorGUI () (at <8e887700cd7e4674989da7b046e8eaa6>:0)
UnityEditor.UIElements.InspectorElement+<>c__DisplayClass72_0.<CreateInspectorElementUsingIMGUI>b__0 () (at <8e887700cd7e4674989da7b046e8eaa6>:0)
UnityEngine.GUIUtility:ProcessEvent(Int32, IntPtr, Boolean&)```

I tried extracting Meterial first, and fudging around with legacy material creation and legacy location settings, but no luck
I'd just import the textures separately
It saves no effort to embed and extract the textures
So, haven't worked much with grid snapping in Unity. But it doesn't seem to work the same way it does in Blender. As you can see I'm aligning it by using vertex snapping but if I move it out of position, and then try to move it right back to where it was, it doesn't snap back to the same place.
Here's how it works in Blender:
Blender snaps by rounding the transform operation
Unity snaps by rounding the transform properties
As far as I can tell
I just needed to hold ctrl to move by increments. I'm used to rotating like that but I didn't connect the two.
any1 know how to make like a color gradient that changes color without using videos ( for use on a object)?
That sounds easiest with a shader?
When using the FBX exporter, is there any way to omit inactive gameObjects/ their children from being exported? (Or do I start on a workaround now?)
There are 4 snapping options in Unity as far as I know:
- Grid snapping: This is what you show in the video. It gets activated by clicking the button with the magnet over a grid.
- Incremental snapping: It gets activated while holding
Ctrl. - Vertex snapping: It gets activated while holding
V. - Surface snapping: It gets activated while holding
Shift + Ctrl.
You can read more on the first two here and the last two here.
Blender can do pretty much all of them and more with even more settings/control to get exactly what you need, but what Unity supports is good.
Hi all!
Is there a quick way to apply materials to an imported FBX model? I am currently importing all my textures from Substance, the FBX, then basically dragging the Albedo, Mettalic and Normals across one at a time for every material on the model. Does anyone else have some tips for a humble dev who doesn't want to get RSI?
What do you mean with quick way? Is drag and drop not the quickest possible? ^^
Haha I was hoping there might be a way to setup either a plugin, or even use the names to automate the assignment of textures to materials.
It kind of sort of worked with some textures out of Substance (fbx from blender) haha but I have no idea how I did it for just those two!
Normally you export your model from blender to unity with materials.
Then you export your textures from Substance to Unity, pack them into selfmade Materials.
These Materials can be plugged in into the model in the import settings of the model.
And the last step need maybe 10 seconds, i think there is no need to automate this ^^
Yup sounds a lot like how I am handling it at the moment.
Hahaha my programmer brain out here perceiving 10 seconds of a repeatable procedure as a life time! But like you said, it isn't too bad
Thanks for the help and pointers Kjarudi!
No problem ^^
thanks
I am afraid to say that you'll most likely have to make your own tool for it. It's unlikely that your setup is exactly the same as other people (unless you're using default everything. In that case, try this ).

Use the Easy Texture Assign Tool from Cody Anderson on your next project. Find this utility tool & more on the Unity Asset Store.
Thanks a bunch, at the moment I'm sill pretty new to the Unity sphere so I don't think I'm doing anything too crazy different. I'll check out that tool you linked and see how it goes.
Thanks for the info!
You can always write an asset preprocesser to do it.
Thanks for the tip, i'll take a look!
does anyone now why it's blury on unity?

Exceeding Max Size and being downscaled on import, most likely
thank you it worked
hey do you know why i can't put my text ui in my component?

TMP Text is not the same as Text
#📲┃ui-ux is the channel for misc problems with Canvas and other UI elements
sorry
Have issues with importing a single bone rigged .fbx model from blender into unity. Icosphere with some random weights painted onto it, but when exported into unity all the weights are set to one?
When the bone gets moved the entire sphere moves with it, while in blender it's weighted properly
And deforms
You have a Vertex Group mask on the modifier. This is what's making the deformation limited to the one bone. This doesn't get exported. You can verify this by importing the exported FBX file (assuming that you use FBX) back into Blender.
Anyway, to get the effect you want, you need two bones: your current moving bone and a static bone (root bone) for the static vertices.
The attached blend file was edited in Blender 4.1.1.

@winged smelt show me one of your materials in Blender
Can someone help me? I have a large project in blender, but when I take it to unity, its untextured.
I export the map model as an Fbx, with path mode copy, with Textures Embed.
Blender can only export textures if it understands that you're using them
it works decently with the default Principled BSDF shader node

You're multiplying two different colors together. That's probably enough to mess up the export
Blender can't export the shader itself.

It just tries to export textures that are clearly used in a few common ways
you still have the Multiply node here. I would suggest plugging the texture node directly into the Base Color socket
I tend to just set up my materials in Unity.
rather than using the imported materials
Its alot of meshes. I dont want to retexture from scratch when I get back into unity
if you have many meshes that share a few materials, then it'll be easy
I do, but at the same time alot of these meshes are seporate
At the end, its easily 1000+ meshes I'd need to retexture manually
You can remap materials in the model importer.

you might have tried to use the imported materials
i.e. the materials that are part of the model

that won't work, since they get removed when you remap a material!
You need to create new materials
Ok
but in the end, Im still retexturing everything in unity again
cause I'm creating new materials, slapping those textures into the materials, then re assigning the materials to the slots
when I've seen someone port something from blender into unity with it still having the texture already applied
That requires Blender to understand that an image is meant to be used as a base color texture
so that it can write that into the FBX
It isn't very creative. It can only understand very basic shaders.
hence needing to get rid of that Multiply node
If i got rid of everything
but the texture
do you think it could understand and take it?

Like this
I dont need the crazy shader
all I want is for it to translate when I import
no, because then blender has no clue what that image is supposed to mean
So then could you give me an exmaple where it could understand it?
from my previosu screenshot or your own
I believe you also need to actually save the images out of Blender. It won't save them alongside the FBX for you
in that case, set the path mode to "Auto" in the FBX exporter, and then this will work:

I exported the fbx into the same folder as the texture
Ok, thank you
Lots of work to redo the shaders, but this is better than restarting into unity
thanks for working with me
why is this part DISABLED? how do i edit it?

Embedded materials cannot be edited. You can extract the material from the import settings of the fbx, or just duplicate a new copy of it in your project folder and use that one instead.
@outer halo Can u tell me how to extract? I'm new to unity...
Select the fbx in your project folder, and in the inspector go to the materials tab and extract.
ok
when i click on "Extract Mat." it says to select folder. When i select the folder that contains those two files (in the image) nothing happens

@outer halo i just have the baked image of that tree...

this is what i have
somebody plj help
Then just duplicate the actual material that is inside your FBX, the birch tree mat
ok
what is this now? I extracted the materials & changed "Rendering mode" to TRANSPARENT from OPAQUE

@outer halo but works fine in blender

why is this happening when I put my model into unity from blender?


fixed it by checking Swap UVs in unity
Are then any penalties to using .blend imports? I know this is basically FBX importer in disguise with Blender's default setting, but is there any other negatives besides that?
Hey I'm new and have been thinking about trying to use some of my 3d blender models for the Unity.
What kind of things would I need besides the objects mesh, bone armature and exporting to the appropriate file type?
Do I need normal maps? All of the other kinds of maps? Or is the mesh and armature by itself good enough?
Presumably you would need textures unless you want your meshes to look gray
It may break at any time with unity OR blender updates
Try opaque alpha clip
Hmm, well I don't plan on updating either. At least not for this project
I haven't worked with architecture and indoor scenes yet...I don't understand how I'm supposed to snap wall and floor pieces
neither ctrl+shift nor V work well
they only work sometimes
and also, do I need to manually tile the floor tiles on top of one another? If I scale the floor, I Need to tile the material, but if I want a floor of another size, I need to make a duplicate material with different tiling settings
thanks
does anybody have a good tutorial on how to import model s from blender to unity?
ive tried alot of them and i just dcant get it to work for me
just google blender to unity export settings
Or share more details on your issue and what you have tried.
I can get teh model in, but the textures i try to import appear warped
i assumed it was something to do with my uvs but everything looks fine in blender
Take a screenshot of what it looks like
Are you using a non default material in blender?


image textures
I'd assume that you're doing some kind of triplannar mapping in blender?
triplannar mapping?
Share the material you have in blender


Can't see anything it's blurry af.
Is this better?

Still bad, but better. Are you not using win + shift + s to take the screenshot?@tidal meteor
I am
Weird then
is it readable enough?
sort of
here they are in seperate images if this helps


One thing to note is that you're scaling the uvs, but I'm not sure if that's related to the issue.

do you know what might be causing it? I've looked all over youtube and I cant find anything
On this screenshot it just looks like the uvs are really screwed.
What material are you using in unity btw?
Yeah that's what I thought too, butbi don't see how that could happen when exporting from blender to unity since the uvs on blender look perfectly fine
I'm using the on that was imported along with the. Fbx file I exported from blender

The materials were missing for the sandstone texture at first so I dragged in the diffusion and normal map I baked from blender, and then this happened
Hmm... Well, I'm not sure at this point. Maybe if you could record a video of the whole process of exporting and importing the asset, we could find some clues as to what's going wrong.
It's quite late for me, so I'll just head to be for today and scour yt some more tomorrow. Thanks anyway
@tidal meteor are you sure you're exporting the correct mesh?
It looks like you're baking textures from one mesh to another, but the mesh you have in Unity does not have the correct UV maps for texture mapping so it might be the one you're baking from
Or you might not be baking, but using an UV projection modifier which may be excluded on export
Either way I think the crucial clue is somewhere not pictured in the screenshots
Besides the UV scale I see no issue, and that probably isn't the one
Not sure where to ask, but does anyone know how to blur a sprite or an image in Unity? Similar to Figma (as shown in the video). There are already gaussian blur assets/shaders for Unity, but they don't exactly do what I need. They just blur everything behind the object with the shader, creating a glass effect. I'm looking to blur the texture itself. The effect in the picture is not what I need.
I would like to use the blurred sprite as a shadow, and control how blurry it is depending on the distance to the source, but that's just some context. It has to be a sprite in my case, unfortunately.

What do you mean by "has to be a sprite", a sprite shader or a sprite renderer?
Sorry, I mean sprite renderer
For what reason in this case?
I'd like to achieve something like this in my AR project. None of my previous attempts have worked. I've already tried Dynamic Shadow Projector, but it didn't work either, the shadow just didn't cast. Casting a regular shadow gives me too little control, so I came to the conclusion that I need the setup shown in the image

I've seen people implement it in a similar way, however, their shadows didn't really fade out when the object moved farther up. I thought I'd create my own solution.
I don't get the relevance of sprite renderers, those are only necessary for 2D sorting or 2D lighting
Sorry, I'm not really familiar with the terminology
I would like to blur the black square below the canvas (at runtime)

That's the square

You definitely don't need that to be a sprite renderer in this case, it can simply be a quad with a blurred texture
But I won't be able to adjust the amount of blur at runtime, right?
Do you know a shader that does that, by any chance?
I can't really find one
https://forum.unity.com/threads/how-to-blur-a-2d-sprite-with-transparency.658546/
I found this thread with the exact problem as me, but non of the solutions/shaders worked

Unity Forum
Hello,
I'm developing a 2D game, and I want to blur some sprite layers to show them blurred on top of an un-blurred background. I can't find a way to...
I think I'll just use a workaround. Instead of blurring it, I'll reduce its opacity and scale it up a bit. I guess it will be kind of the same
If this is an option it's probably the best option
Make a few pre-blurred textures and use the one that you have to stretch the least
Blurs at runtime are kind of (very) difficult to do so I'd rather look into shaders with distance field functions if you need it to be fully scalable and shapeable
Just googled distance field functions - scary stuff
I'll try the simpler approach first, if that doesn't work, I guess I'll have no other choice but to look into shaders
Thanks for the help @misty lantern and @lime pollen
hey im pretty new to unity and im struggling with making my character cast shadows and be affected by them. the character is a psd that i will be rigging and animating, as a png it had no problem with the lighting. I was also planning on applying a material with a normal map onto the character and once i added that material as a test it started bein affected by light but the actual colors and outline of the jacket disappear. pls help 😭
i also tried putting the jacket image into the base map to see if that would work but the scale is off and there is not transparency :/


Sprites are not made for 3D lighting, and HDRP is not made for sprites, so the functionality you'll get is limited
Still to get the Lit material work better with the sprite renderer you'd have to change the material to Transparent from Opaque, or to enabled Alpha Clipping
Transparent that specifically does not preserve specular
thanks! the alpha clipping seams to work but the scale is still off so its not the right outline

do you think i should ditch HDRP for URP or could i manage to fix this if i keep working on it? i did really want the nicer lighting for the environments but if i cant make the char work thats kinda rough so i /could/ make the switch
I think the scale should be right if you don't assign a base texture, or any other textures and let the Sprite Renderer assign them instead
I'm not sure
URP has the 2D lighting system but it's limited to purely 2D, not 2.5D which you're doing
I expect you can get 3D shaders to work with the sprite renderer in HDRP just as well as in URP, but since the sprite renderer doesn't generate tangents necessary for correct normal mapping it's still kind of a half measure
hmm :/

yeah i took out the textures and the shape is better but she is black
I would also try with HDRP Unlit to see if that fares any better
You might have to make a Lit Shader Graph that uses MainTex reference for the texture
In case the HDRP Lit does not use that
As that's required by the sprite renderer

ok i will try my best 😬
I guess the shader is not using MainTex
Which in shader graph would just be a Texture2D property with the reference _MainTex

thank you so much! I feel like I'm finally getting somewhere, this really helped^^
Yayay! 
just gotta figure out how to add normals and the i'm set!🎉
Look up secondary textures in the Sprite Editor
You can give the sprite editor extra textures and tell it which material inputs to assign them to.
oh nice, thank you! i've still been struggling with this 🥲
i'm still stuck here 😩
i checked out the secondary textures but the little dropdown menu i need to select it as a normal map is missing and i don't know how to add it to my shader :/

this is what its supposed to be like

this is me
i just put the texture in like that but the the whole character turns invisible so im not sure where i would keep going with this

this is what my shader looks like currently

which makes it look like this 👍

when i add the normal map texture in the properties of the shader you can see that it is doing somthing but i think its still the same scale issue as before, it doesnt align correctly

this is the char in the sprite editor

and this is what the normal map looks like on the secondary textures in the sprite editor so i'm thinking the issue is that they dont lign up in the sprite editor but im not quite sure how to fix this
i also tried making the normal map a psb file so that the layers could be matchen in the sprite editor but a cant mark a psb as a normal map in the texture type

i arranged the corresponding normal maps per hand in photoshop and it seems to be working!! its not perfect but it gets the job done👍
I think the missing piece here is that your shader is not referencing the secondary texture correctly
If your shader uses a property named normal with a reference _normal, then your secondary texture has to be named _normal
As spazi said, the 'name' you set is actually the property it will plug into in your shader
I'm on my phone but I use a script to export the generated sheet from my psb files
Which isn't ideal, but the devs haven't taken my suggestion to let you set a matching psb to a secondary texture
ohhhhh i get it, it works! thank you once again!!!
hmm :/ yeah at least now i understand what i need to make this work, thanks! maybe i can find a script out there ^^
Say I have a world I've created in Blender, and I need to export peices of the landscape as seperate models.
I would like to retain their position relative to the 0,0,0 position the world, so that when they're imported in to Unity, when they're positioned at 0,0,0, the actual mesh shows up in the correct position in the world as it was in Blender

You can see 0,0,0 where the axis lines cross - that bumpy square, and those mountains, are seperate peices. I would like them to be in that exact same position when I import them, but as individual models
I have to have references to these meshes, will references get broken if I try to just use the whole Blend file in Unity?
As separate imported meshes or just as separate objects?
I think object offsets are preserved on import generally anyway, as long as you don't apply transforms
I think Unity might be "helping" by ignoring that offset. If I import one of those meshes and set their position to 0,0,0, they actually move centered around 0,0,0 and overlap each other
But I'm having some success just using the Blend file directly, my components seem to be remembering references to the individual meshes in the heirachy of the imported Blend file, even after I update the Blend file
I've been working on a modifier-based animation in 3DSMax (wip shown) but I realized I cannot figure out how to export this to use in Unity.
Is there any way to bake the vertex deformations at export? Or a suite of vertex animators that work in Unity to reproduce similar to what I'm doing here? My understanding is that vertex modifying is costly at runtime so I think baking it is what I want?

I might be able to reproduce what you see there in a shader, but this is meant to be partially skinned as a cloak/robe so as soon as the requirements get more complex I am not sure how I'd mix and match skinned animation with shader animation
I believe the way to do it is the Alembic format
https://docs.unity3d.com/Packages/com.unity.formats.alembic@2.4/manual/index.html
Alembic format worked exactly as I hoped 👀

I wonder if this can be mix and matched with a skinned mesh renderer but even if it can't, this is already more than I had to start with
Looks like it cannot be mixed with skinned deformations unfortunately
Unity cloth actually works pretty well with skinned renderers, if you wanted to go that route.
Hey all! I'm doing some research for a project, and I was curious to know... Has anyone ever dealt with adding additional properties – not related to the shader – to a Material? For instance, adding a sound to a Material so that when the character steps on it, it makes that sound. Or a particle system so when shooting or colliding with an object using that Material, you see those particles.
Has anyone had experience with this, or seen an asset (Asset Store is fine) that does it? Thanks!
Materials are instances of a shader so you could use shader properties for that purpose
I feel like it'd be more flexible to use a separate component for tracking your material types (or utilize the existing Physics Materials)
My preferred way would be to have a component and some type of list of material types with all necessary associated data like sounds and particles and whatever else could be needed
It could have additional functionality to get the initial material type from the mesh renderer's material, if any, and set the collider to use an associated physics material as well
But I wouldn't authoritatively rely on the renderer material because sometimes you might have multiple material slots or many different renderer materials that should use just one custom material type
It sounds more efficient and modular to keep the non-rendering related material properties out of the shader properties
Then you can use TryGetComponent to find and read the material type of the custom component on collision event
Interfaces are useful if you want decisively different variants of the custom material component, and SOs are useful here for storing the material types
The issue is, you might want a reference to a sound, or a string, etc. and you can't put that into a Shader (or a Material). So a ScriptableObject is almost the only choice.
That's why I'm thinking of doing it as one or more SO sub-assets, embedded inside the Material.
You can embed stuff into Unity's own asset types?
You can use sub-assets, yes
it's a bit tricky because they're very much an editor concept, and there's no good tooling for runtime. So for instance it's tricky to keep a reference to those assets, you need to maintain a list on the main object (the URP Renderer Asset does this, with the render passes). And when it comes to a Material, you can't just add an array to it because it's a closed format.
But I have a way in mind to make it work 😉
Hmm. This way has the limitation that you're duplicating the data quite a lot, no? Like, if you have one Material that is shared between 10 Prefabs, now each one of those Prefabs has the full list of sounds/particles, when in reality it's the same for all of them.
Plus, it requires a new component to hold this data (each component has a cost, they don't come for free).
I know it's a bit like over-optimising, but I'm trying to think at scale here.
Each of those prefabs would have a reference to the same custom material type that holds necessary references, which could be an SO for example
There'd be an extra component but it doesn't need Start() or Update() or such so I expect it's pretty light
Also means that if you have 10 different materials that need the same sounds and effects, they don't need to redundantly repeat that data which also means you don't need to track them all down to modify the shared custom material
Well, I think the relationship is the same:
10x Prefabs -> One custom material, or
10x Materials -> One custom material
So I'm not too worried about that.
In fact, I was also thinking that the sub-object in the Material would only reference yet another ScriptableObject that acts as the actual preset.
That sounds most reasonable
so imagine:
Iron_1 (Material)
-- ExtraProperties (ScriptableObject sub-asset) -> refs MetalExtras (another ScriptableObject)
Iron_2
-- ExtraProperties -> refs MetalExtras
etc.
MetalExtras -> refs MetalGunshot (AudioClip) and/or MetalBulletHole (a Texture2D or a Prefab)
Hope it's clear 😓
That's what I have in mind, but I'm happy to hear suggestions!
How does sub-assets interact with material instances? Does that also mean multiple instances of the sub-assets?
by Material instances you mean different Material files?
or the instance that is created at runtime when you modify one a Material?
I mean the one created at runtime if using Renderer.material
ah I don't know, I presume a whole copy gets created... so I assume also the sub-asset
with that in mind, and in general, my plan was that the sub-asset is a simple reference to the actual preset of that data (MetalExtras in my example above)
so a runtime instance of a Material would point to the same other asset
but honestly I'm not sure if a Material instance carries the sub-assets with it, it might not... because I think it duplicates the C# object, not the whole asset on disk
and that object might have no conception of the sub-assets that are connected to the original Material asset, but I need to double-check this
it's a very valid question!
heyy uhm so im having some trouble figuring out how to fix the character elements being on the right layers, any pointers?

is this character 2D or 3D?

I was just about to say "looks 3D", so props to you: it looks fantastic even with the graphical glitches
i thought i might be because of the rig numbers being wgrong but i adjusted them and nothing changed
thanks!!!^^
What do the SortingLayers number say, on the actual GameObjects?
I might be wrong but it's possible that adjusting the numbers here doesn't change them in the scene, for already-imported GameObjects
(but it's been ages I haven't touched 2D...)


yeah i also thought it might have something to do with that but nothing changed:/
idk if im just doing it wrong
it starts doing the wrong layer thing when i add the material onto the object that i need for it to interact with the lighting, when i jus import it straight with the standard material the sorting is fine and looks like the one on the left
What shader are you using?

The only other thing that comes to my mind is that the shader might not be setup to work well with the 2D sprites
what options do you have there in the ShaderGraph, under Material > Lit? What is there instead of Lit?
because if HDRP has a shader template specifically for 2D, it might interact better with Unity's Sorting Layers
(and can you expand the Graph Inspector to see all the options?)

I would play a bit with those
from the list, I think Lit is ok
the others have other, specialised uses that are not your target
the only better one would be Unlit, but then you lose support for lights
other than that, I'd make sure Alpha Clipping is on (can't see from here, it's covered by the dropdown)
and what is that Depth Offset? it's unchecked right now
yup!

yeah I would play a bit with those settings
like also Rendering Pass, and try to turn off as much stuff as possible
or Surface Type
sorry, I don't think I can help much more without seeing the project
okis i'll try some of that! thanks anyways!!!
wait i think i was just being a fool 😂
Hello
i had the + and - backwards
hi!
How are you?
Ah yes, it can happen... I rememeber that Sorting Layers work backwards? Glad you solved it!
It might be a question for #🖼️┃2d-tools, there might be more experts in there
Surface type has to be Transparent or it has no chance of working with 2D sorting
It might additionally require a proper sprite shader, but I'm not 100% on that
Opaque shaders use 3D depth only, so you'd have to give them offsets in Z axis according to their intended depth
Are you sure about this? I think Opaque can work too, as long as it has alpha clipping.
Yo, I am trying to edit a character model in blender and I have successfully done it in the past but the model file wont import in blender because its an "ASCII FBX" file. Is there any way I can change it to a normal fbx file to import?
Edit:
I have put it thru an FBX converter but it really messed with the model and kinda ruined it
Sprite renderers fully rely on transparency for 2D sorting
https://docs.unity3d.com/Manual/2DSorting.html
Which the skinned sprite renderer here uses internally to order the parts of the character so you can't override it with render queue or such
At any rate I have not found any way to get 2D sorting to work with opaque shaders
Ok, I see. Maybe it works with Opaque ones too, as the docs say "mainly within the Transparent queue". Which makes sense, all of Unity's default components allow tinting with semitransparent colours.
How can I fix this after converting an ASCII Fbx file to normal fbx file?

It does not
If I need to swap out sprite sheets do I just rename the new sprite sheet to the old asset's name and Unity will swap out places with the animation key frames?
Or do I need to manually re-add everything
I guess my question is what is the the best practice for modifying or adding to sprite sheets youve already created animations for
Sorry cross post from #💻┃unity-talk since it wasn't answered there.
That's how I do it.
If the asset imports fine in Unity, try to use FBX Exporter. It supports exporting to binary FBX files which can be imported in Blender. I had no issues using it.
Please note that the FBX format has many versions. Not all converters will have perfect support of all versions. Additionally, the exporter that created this FBX file may have done something wrong. If things don't work out that well, just clean up or repair what you have. It may be the fastest option.
https://i.imgur.com/Mf97ZJq.png
Is there a way to can make a second sprite sheet with a different resolution (pixels per unit) size without duplicating the sprite sheet all together?
so i was wondering how to make packaging textures for game objects, anyone know how to go about doing this
Import it as a texture atlas
sprites have sprite packer but doesnt want to work for me
no i mean like for example make texture images for a product to be sold in a shop game
i have seen on the asset store some impressive examples of stuff from pizza boxes, pop cans, bags of crisp etc
I don't understand what you're asking beyond how do you pack images together to increase general performance and that will be through using sprite sheets or 2D arrays
Hi, does anyone know what's the issue here? my teeth of deformation object (Skinned Mesh Renderer) shows the teeth in other position

but when I drag the model to the scene again it works fine!

I checked blendshapes, Bounds and other settings and scripts but nothing have control on it
Guessing an issue with the bones then
bones are fine cause the model is broken after some setup. if I drag the same model to the scene actually it doesn't have this issue. it's ok if I couldn't resolve it I will reimport the model and setup the scripts and logics again.
how to fix this?

Set it to alpha cutout
lighting looks artificial
I mean, doesn't get much more artificial than a game engine.
Can you be more specific?
Limited to 32-48 of what?
Do these sub-objects / sub-assets have editor interface either? Really hard to find much info on them
They do, they're just regular assets and can be anything that an asset can be (Materials, ScriptableObjects, Meshes, AnimationClips, etc).
Not many here use Blockbench
Ah. You just drag and drop them into the Project panel
It might be more of a question for the Blockbench Discord
So I assume I'd need a script like the one in the example for each type of sub-asset to create, so there's no button or drag&drop thing inside the editor itself to make that happen?
note that you should only add objects to '.asset' assets, imported models or texture objects for example will lose their data
This puzzles me a bit as well, since I don't recall ever dealing with .asset assets
Something more in the field of editor scripting, or asset management scripting specifically?
Googling "blockbench to unity" seems to give multiple relevant results
You'd have to check if they apply to your specific case though
No, there is none.
.asset is a generic format. Maybe ScriptableObjects are stored in that?
Oh true, as are other custom assets
Curious if you got your materials working with sub-assets
weird very beginner question, i've played around a bit with both unity and godot trying out importing my 3D models into them. i realised with the tutorials i followed with godot i could edit my models in blender after importation and those changes would be updated live in godot, is there a way to do that in unity?
If you've installed blender into your OS then unity can automatically import .blend files (at least some versions of blender and some versions of unity)
So you could edit and save over that blend file and have it re-imported
Or you could re-export on top of an fbx file again
Oh yes, that was kinda easy. Following the steps described in the docs, they just work...
My issue is retrieving a reference to them without explicitly storing it in a list or reference or something.
And I mean, I do have a reference to the main asset. But there's no way to get one to the sub-assets starting from it.
which is wild, you'd expect that they're just stored in an internal array, but no
Huh, I thought that would've been the main purpose of this kind of system
nope 😄
yeah it's kinda funny, what is the main purpose... I don't know
the only thing I can think of is that the assets "travel together"
so they can't be separated, or you can't delete one without deleting the others
apologies if this is not allowed here, but can anybody recommend an external glb exporter plugin for Unity that can also export animations with it?
Hi! I'm importing my VRC Avatar into Unity 2022.3 and I keep getting this error for my blendshapes: "Can't generate normals for blendshape 'AH' on mesh 'Chroniko', mesh has no smoothing groups." The blendshapes work fine in Blender and everything is weighted properly as far as I can tell. Thanks!
There are several on github, with different features. BEst to just look at them and see which suits your needs.
This is the main menu background stuff... Is it too noisy?
How do I use Blend Files. I dragged and dropped it in my assets folder but I cannot use it

Export .obj or (preferably) .fbx
Yesss, I figured it out. I deleted the meta file of the .blend file so Unity makes one again and it worked. I wanted to see my Edits in Unity Engine hence why I wanted to use .blend
hi, ive created some grass in bender (subdivided a plate and randomly sculpted it), i imported into unity and it works fine, but im making a field, and my pc is already dying when i placed 4 of the grass plates next to each other. anyone have tips/advice on preformance improvment? i dont think its going to be playable this way lol. thanks (im a beginner i barely have any idea what im doing)
Grass should be one triangle, the fact that you subdivided and sculpted it means something has gone terribly wrong
How many vertices are there in the mesh
400k 💀 @lime pollen
Terribly wrong indeed
how much should i have?
you mean 1
out of 4000000
ohhhhhh
i dont mean one singular grass
i mean a block of grass
Ok well that's still too much and not what you should be doing for grass anyway
Regardless, one triangle for one blade of grass
thanks
Hi!
So, for some reason, the sails of the ship disappear while still inside the view of the camera. I would say it's something about the origin of the sails, although, the origins are still within the view. So should be something else. Also, I remember having this issue before and I fixed it. That was some 6 months ago, so don't know what I did to fix it anymore. Will make sure to write it down this time. It's exported from blender.
Any ideas?
Edit:
It seems to have something to do with the white bounding box of the sail being offset. However, I only have this problem with this ship and I don't know what I've done differently.
Solve:
Only solution I found was to apply all the transformation of all the sails prior to exporting it from Blender.
Hehe, you solved it yourself, but yeah: when you export an animated mesh, a bounding box gets created to tell Unity where that mesh is in space, and perform culling optimisations.
If exported wrong, the mesh will disappear even if in view because Unity will test against this box and think it's outside of the camera frustum. So as you found out, it's a matter of finding the right export settings in the DCC software (I don't think it's fixable in Unity without a plugin).
Hope the explanation helps someone in the same boat 😄
hi, when my camera comes close to any object(still in the scene, not ingame), the part of the object closest to me stops rendering (it disappears), has it always been like this? or am i tripping
(in other project i''d have to be inside the object for it to disappear, but i made a new project and idk why when i get close to any object, it disappears like i was inside of it)
Select an object and hit f
The camera clipping plane is based of the last thing you focused on, so if you focus in a huge object and them manually zoom into a small one your clipping plane will be way too far out and cut off stuff
How do I move the children of an empty object that is the parent, without the parent moving with the children objects so the parent is jsut locked in place
Moving child objects doesn't move the parent
for some reason it is for me tho because I moved 3 objects into an empty object, and whenever I move 3 of them, the position of the gameobject picks the average center of the 3 objects
is it because im using probuilder?
You have the editor showing the center point instead of pivot. There's a toggle in the toolbar
thanks man
tysm
is it possible to put a skybox on an object?
What exactly does that mean?
i have an 2 enclosed environments and i want them to have different skyboxes
they are each inside a sphere
so i was wondering if i can put a skybox on that sphere
@misty lantern
"Have" and "put" don't compute in this context in my mind
There are two ways materials commonly utilize skyboxes
You could have a shader that renders the skybox cubemap texture directly on the surface of the object, as if a window to the sky
Or something which most "lit" shaders have is to render the cubemap on their surface to simulate reflections
I think you maybe mean one of these, or both potentially
ty
noob pixel art drawing. How can I improve this background more? (kinda struggling)

a layer of clouds
dithering
Hi, have a both general and specific question, I guess (I'm a newbie when it comes to all things 3D modeling). I noticed this model on CGTrader doesn't have a polycount listed. It's clearly high-poly, but I'm still curious. I see the file size listed as 373MB for .blend and 107MB for .fbx.
So my question is, is there a rule of thumb for roughly converting file size into polycounts? Or just how would you approach this if you're developing for mobile and are poly-concious? Do you buy stuff anyway and try decimiating its mesh? Thanks for any insight
https://www.cgtrader.com/3d-models/exterior/other/concert-stage-3c655cb8-2df0-4856-8a05-fddae48cbfd5
Well, if you import it unity will just show you the polycount
i'm reluctant to buy it before knowing the polycount
There's no way to convert, since it is impossible to tell whether that filesize is due to polys or textures or something else
ahhhh ofc
It has clouds ingame
is there any tool for painting materials on meshes? Blender only has textures which makes it impossible to combine them onto one mesh without looking like garbage
how do i stop fbx files from corrupting??

It's not corrupted. You have flipped normals, there's a link about it pinned in this channel.
whats the link called i cant find it
Yall know how I can get my textures in here? cuz their all missing but I see them in the folder I exported from roblox studio but this is a blender file

Import them separately or pack them and extract them on import
Under troubleshooting, inverted normals
i'm using rec room studio and i'm trying to figure out how to display the items that are supposed to be on costume dummies but it only shows the dummy and not the actual content itself


i don't know why it isn't displaying the content on the sticky notes, costume dummies, or even text
it only shows in game when i test the subroom, i can move the items around and it displays in the subroom but it doesn't show up in unity/rec room studio
i also tried using an fbx exporter to see if it could actually export the content of the dummies rather than just the preview alone but when opening the fbx it seems it still isn't the actual proper content
my goal is to figure out how to export the actual content that displays in game, some content does display in game (basically anything that is just an object on its own and is not part of a costume dummy, sticky note or canvas, or text)
but i can't get the items to display
you should probably ask the rec room discord, its unlikely a unity issue
ah
i'll try finding if there's a channel in there i can go to to ask
@late geyser There's no advertisement here.
I added these textures repeatedly and they dont show up


I just cant win what is going onnnn

I'm guessing you're using Blender because of the file name, so maybe you could try checking "Tangent Space" on the export tab. It's the only related thing I could come up with.

Or maybe you could try recalculating normals before exporting

bet bet, Ill do both of those
Didnt work sadly
Are the models yours or downloaded?
It's not uncommon to have issues with downloaded models, but models you make yourself usually don't have those kind of issues, unless it's something related to normals, textures, or uvs
Its a roblox model 👀
But its my character to be fair
👀 from roblox tho
I have a scenario where each asset is using its own Shader, even though they all follow the pattern of Base Color, ORM Mask, Opacity. So, i can literally make one simple Shadergraph Shader, and convert them all over (manually) to it, and they work fine. My concern is, that is a lot of work, would leaving each as its own Shader cause resource usage beyond a shared shader? this was a Huge deal in Unreal, but i do not know how Unity handles such things
With BiRP not great
With URP and HDRP, better
But they still gain performance when meshes share the shader
Profile it
Have to learn profiling. testing early stages, so hoped it was a simple answer 🙂 Also, would Material Variants be even more efficient than just using the same shader?
and thanks 🙂
They are just a workflow thing
Ok, thank you
bruh 💀
what?
I ripped it up and started over cuz im soooo SICK of this 😭
I should ptobably do it in unity but like....idk what Im doing over there fr
U tryna model??
Yt tutorial lil bro
what? No Im not im just trying to rig my roblox character which I had it rigged but it wasnt working where I needed it to so I just dead started over cuz its been like a week+ so now Im following a different tutorial
Hey all, i was wondering if anyone can reconize the problem im encountering with importing my 3D character.
the issues is that the ring and little finger of my rig get all sqaushed once i enforce a t pose in the avatar configuration.
Weightpainting is fine, and all the hand bones do get automaticly assigned properly in the avatar configuration.
Any insight would be much apreciated!

Which axis are they being rotated to bring it to that pose? Are they actually being squashed or is it twisting?
when ever i export my model from unity it looks fine but then when i load in it does this anyone know why?

sry im quite new to this
What's the "this" that it does?
Why are you exporting a model from unity?
Yea you are correct, they are indeed twisting not squashing.
This led me down a different route and was able to discover what was wrong and solve it !
i had the fingers connected to the hand bone which basicly created an extra bone per finger within the hand, and unity wanted to take this "metacarpel" bone as the first bone of the finger and that messed things up.
thank you 🙏
Its for veining its does that to the face
And it was exporting ot to add toggles and fix ears
I have no idea what "veining" or "toggles" are, so I suspect this is related to some game modding rather than Unity primarily? You don't under normal circumstances have to export from Unity and should avoid that process
It looks like you've lost the texture or texture refence at some point
I am wondering if there is a way to change terrain's resolutions depending on the player. Lets say camera's location. I have 4 terrains and I would like to keep lower quality on those I'm not on. I can manually offcourse change it but how could the game do it by itself while someone is playing?
Vtubing* auto correct
But in the previews its fine but once it exports it and I test it it does that
What preview? Are you referring to Unity's fbx exporter or some other export entirely?
guys i need help, how do i get my own materials usable in the add layer option in terrain painting?
where it shows changes bottom left and no through the vrm exporter
It's better you ask in VRM spaces
These are not issues that Unity developers face
alr
Made this today, any comments? 

looks incredible!
If you are using unity terrain, it does that automatically; it dynamically sets the detail level of the mesh based on distance.
Any suggestions why Steam art looks a lot better in Photoshop than it does on the store page? Even with compression, it looks a lot better on my computer than it does after I upload it to Steam. It will look jagged and make the edges look jagged.
What do you mean specifically by "steam art" and do you have an example
You should be able to grab the images directly from the steam page and compare
In addition to what PinballKitty said, you can see how the mesh quality changes over distance if you enable Wireframe/Shaded Wireframe in the scene view
got a new logo for my 1-man studio :DDDDDDD

Swordsssssss

I am trying to put this image texture on the model
But the selected area turns black
how do i fix this

BTW I am using Blender
Not really an unity question but you probably should duplicate those faces, move them outward a bit, connect sticker texture alpha to bsdf alpha and enable alpha transparency in material settings
Finally set the material on the vest behind the sticker to vest material
So the sticker is a decal hovering just a short distance in front of the vest
I just wanted to ask about something. I downloaded some model sets from sketchfab (IE a bunch of rooms from SCP Containment Breach), however, the textures are not placing onto the objects and I'm wondering if there's any way to fix that when importing so I dont have to place literally several thousand textures. That or if there's a FASTER way of doing it cause Id rather not have to do every single room, that be hours. The MTL file I can follow at least when it comes to placing the textures. Everywhere my friend looked yesterday kept saying that the only way was to reassign all the textures to materials. It is time consuming but again way faster then having to actually UV map and Tile out the textures
I felt like there was a way faster thing
@tawdry valley thought this was a better place to talk, but for a shape like yours i would have approached it something like this

you can kinda see how i placed my seams, so if i just unwrap like that, it wont be perfect, but will give me something like

if fixed that buy choosing a quad somewhere near the middle of the strip, and making it perfectly square by scaling 2 of its uv points on 1 axis at a time to 0
👀
then i select the whole quad so its the active item, then press l to select all linked
the 4 legs.. i'd use 1 texture for that right (body)
after that i can use follow active quads to unwrap again so its perfectly straight for my strip

which gives what i got in the top
yeah the legs i would prolly just unwrap once and clone
if you want some texture varration that could be added via vertex color blend in the shader or some sort of worldspace mapping of noise or dirt
but what i shows of being able to unwrap rings out to perfectly straight strips really helps both for conserving UV space but also for texturing

you can see in my i hand placed some seams to get the correct uv islands for what i want
wasnt aware u were also pretty 3d model/texture savvy
it does not have to be perfect since you can still further split or join in the uv editor
i a mostly a programmer now, but my start into the game industry as a tech artist

as u can see, the textures dont have to be perfect.. but i want them mapped pretty well atleast
trying to add some earlier day charm when models were super low poly
am still better in maya then blender, but not willing to pay for it anymore so use mostly blender now
yea, i have a friend that also came from a tech company and they're always trying to help me out in blender by trying to find similarities to maya also i believe
i get a bunch of people cranky at me because i stopped using maya actually
ages and ages ago a wrote a plugin for pycharm for writing python for maya, that would allow the debugger to properly attach, and let you execute code in maya from pycharm, and see logs in the ide and bunch of stuff like that
but its just kinda rotting away since i cant maintain it anymore since i have no maya copy anymore

this is workable..


thanks, yeah the follow active quads once to straigten 1 quad in a island is really great for making the whole thing straight while not distorting too much
yup, i found a few cuts that allowed me to use strips in most places
and then cut the spheres in half for the lens and whatnot
used 3 materials to keep em big enough i can add details
This square shouldn't have blurred edges. How can I get rid of this anti aliasing looking blur on this texture? Import settings and material attached


It's probably NPOT and getting resized because Non-Power of 2 is ToNearest
It was adobe illustrator applying anti aliasing for some reason my bad guys problem solved
does anybody know why when importing my model from blender to unity, many of the feathers of my wings are missing?


even the the model appears to have no problems in an online viewer?

Maybe in blender you dont have backface culling on
While unity by default does not render backfaces
If thats the case, you need to either use a double sided shader, or add backface geometry in blender (Solidify modifier, without Fill Rim)
Does anyone know how to handle events when using the Unity Asesprite Impoter? the Docs only show how to add an event not how to call a function with it
@granite sinew might get more information asking in #💻┃unity-talk
Hi, what is the procedure for exporting an animated particle system to be imported into a 3D software like Cinema? I know that sounds kind of backwards, but I found particles to be easier to design in Unity, and now I need to integrate them with my scene in C4D. I know you can export as a prefab, but since that seems to be a Unity-only format, it won't work for what I'm doing.
The answer is you don't, particle systems are not a unified format you can simply export to whatever software
What parameter of the trail renderer is causing that crinkle at the start of it?


Hm the problem appears to have been my width
Now my NEW question becomes: How do I not have this discontinuous sharp hard edge at the leading edge of my trail renderer?


when sampling the UV not entirely sure what I am looking at at the front edge 🤔

Can I alter my shader to reduce/remove the hard lip edge on the front lead of the trail renderer?

What's going on in the group in the top left?
I'd guess you need to lerp from 0 to 1 across a very short range at the front of the trail, rather than just starting at 1
Ill see if that helps. Top left is just part of me taking its UV coordinates and turning it into a mask in the > shape
split 1 axis, subtract, multiply etc to get the correct centered 0 to 1 value range
guys are you proud of me!!!
I made map-less(kinda) shader that lets you throw stuff together quickly!
allows you to have more time touching the outside world and take more photo for textures!
map less!

omg so cool!!!
ahhhhh go in the wing material and enable double sided (iirc it is called that)
Metallic, roughness, normal, and other textures hold different information from the base color. It's almost always not possible to extract this information from the base color and get realistic results. What you're doing with the shader is adding depth to the material, though. I think that's good or better than just using the base color. 👍
i created tree assets outside of unity because the inbuilt tree gen doesnt fit my style, however, i also want my trees to bend and move branches in the wind. how can i set that up?
via shader
Need advice dealing with an issue
I have material attached to a 3d plane but some reason these black line bits keep showing up on the edges of the plane and I'm sure not sure how to get rid of em
They don't seem to be from the image itself, is it due the shader I'm using for the material?


Nvm I figured it out
Had to change a setting in images
Needed to change the wrap settings from repeat to clamp


Hello! I am sharing my latest work with you. My portfolio is available in my profile. I accept 3D model orders & open to job offers.👍

cool diorama
Hey folks, amateur dev and artist here, im making drawn sprites (not pixel art) and animations in Clip Studio Paint for my 2D unity game. I have a number of questions about resolution and PPI sprites should be made at, Should line art be anti aliased in CSP or should i let the Unity URP handle that, and what settngs will give the sharpest results for the final built game?
At present im in very early stages so much can be changed up. Current scene is 4K (3840x2160) resolution though the scale it at 0.31x (dont ask me why i did that, i couldnt tell you). Any suggestions or advice are appreciated.
How are you scaling?
Generally speaking, you'll probably get best results with properly antialiased art for non pixel art unless you are avoiding transparency.
Previously when i was adding sprites i would change the PPU in unity up or down til it was appropriate in size, but i have no idea if thats the right move
My personal take is that consistency is very important, so as long as you avoid visual inconsistency in ppu then you are probably in okay shape.
Some art styles hide variation better than others
ya! it is made to be able to throw a scene together quickly using your own camera assets!
I'm confused about why this is showing as not having a texture. That part has been UV mapped.


Magenta in Blender usually means that it's referencing a texture that cannot be found
Yeah, but It's mapped to the texture on the right, and the rest of the mesh is using it.
Oh I'm dumb, it was using a different material.
Thank you
I had windows 10 installedon my laptop, hadsome unity project which I backed up on NTFS external HDD. I installed ubuntu 22.04 and copy pasted Assets folder from HDD to laptop and png images are corrupted. Couldn't open "image.png". Unrecognized file format. That was error when trying to open with gimp or image viewer. Is there some tool for corrupted image repair ... Or should I just make all those images again?
Good afternoon everybody, Having some success with my character but running into some issues with the 2d Hinge Joint Componant, Basically my characters legs are bending in the wrong direction and when pressing play his feet spring and do a full 360 before returning to resting position, What am I doing wrong with the hinge joint? https://gyazo.com/d84db6821fea03317b5aeb4f3439ce27 https://gyazo.com/1df0cd9080e3f77d69e2b2ef3f7daa45

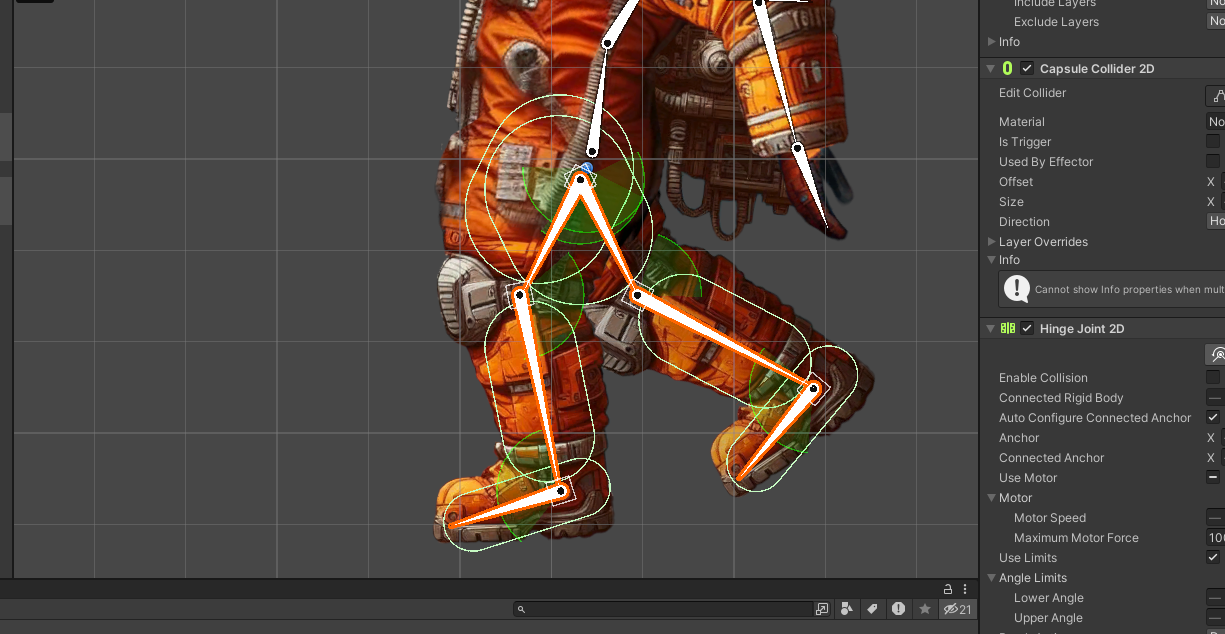
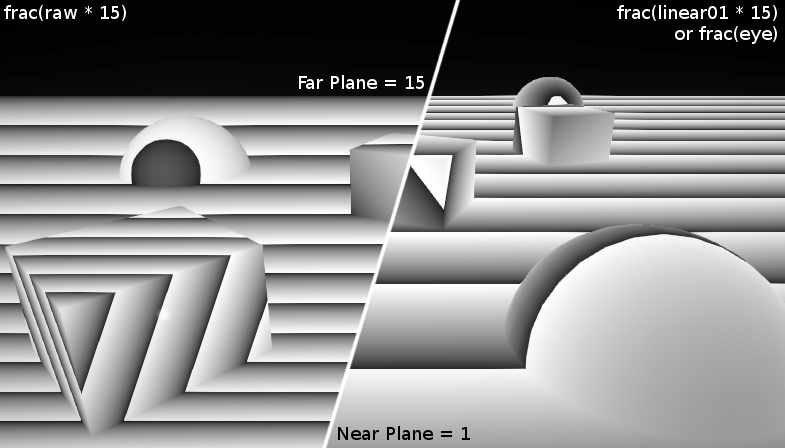
Does anyone else have a problem where when importing VRM models to unity using UniVRM you get a lot of warnings about duplicate files or something? And any minimal movement making the hair float and fly up easily even if it's slow? I'm messing with the physics settings on VRoid to try and make it a bit less exaggerated, but no success still. I am considering just removing physics from hair completely =X
Hey everyone!
Want to create high-quality 3D assets in Unity? Check out this video and learn how: 🙂
This will streamline your workflow and save you valuable time!
https://youtu.be/a57fFqkEoh4

00:11 - Modeling
27:00 - UV Unwrapping and Material Assignment
29:10 - 3D Painting
30:30 - Environment Settings with baking lightmaps and post process etc.
UModeler X, your ultimate solution for creating 3D assets in Unity, is now available for free!
In this video, we will guide you through the process of modeling an isometric room within Uni...
In unity, how to open up this mesh and edit it?

Have you added limits on joints? Also what angle is set to your feets? Maybe it is an edge case, so for some reason it tries to apply joints limit which forces to go 360 instead of 1 degree. On blender example when you auto detect bones joins, you need to make them bent at least a bit, so it would know which dirrection is of your joint. Sorry but just random guesses here.
you dont. you open mesh with 3D software as blender or others, edit it there.
Hi everyone, I have a problem that I can't solve. My current goal is to create a small map for an isometric 2d game. I
I used midjourney to make a background, the problem is that midjourney sent me a complete map, everything is already done but... I import it on unity like sprite but it obviously doesn't work since it's an image, collisions are not managed etc, there is only one sprite... How can I make my image visually usable and make the objects interactive? Do I have to cut everything out in Photoshop? the most important thing for now is just that the player can't walk and go anywhere, if I just cut out the ground in photoshop and put everything else in collider will it work? or it's not at all
how should you proceed?
No need to mess with photoshop, no. You could just set invisible colliders and whatnot to be the walls and other impassable objects.
Use your image as is and just create 2D sprites that cover the regions you don't want the player to be able to go into, then add a 2D collider component to them and deactivate the texture layer to make them invisible. Then make sure the player detects collisions and stops so it does not go through them.
All of that can be done within unity itself, no need to further edit your image or anything like that. After all, if you cut your image up you will have to make the parts be 2D sprites in the map anyways.
However, if you want to make the objects have some depth, like the character passing under/behind something, that specific object will have to be cut from the original image and added separately.
Thanks for the explanation, I didn't know you could do it this way. So I'm going to do that
Glad to be of help!
Long shot, but does anyone know why when importing my model as gltf, the weights seemed to be messed up on my model (notice the part sticking out)

it's not supposed to look like that

No compression settings when exporting from Blender. Tried to see if it was just GLTF issue and imported it into a different engine (Godot) with exact same settings and the issue isn't visible in Godot
Thought it was Unity skinned mesh quality, but even at 4 bones which is the maximum it still has this artifact
Tried both UnityGLTF by KhronosGroup and GLTFast by Unity but both had this issue
I don't think there's any import settings I can change to fix this either

Also ran the GLTF through a validator and it passed
and before people ask why I don't just use a different format:
Literally every other format I've tried (.obj, .fbx, .blend, etc) all have had issues with missing textures, animations, etc. GLTF is the only one so far that has actually been able to actually import all animations and textures but it just seems to have messed up weights
and yes, everything that can be marked as single user so it doesn't get deleted from the blend file is marked as single user (animation, textures, etc)
if no one can answer why GLTF isn't working, can someone atleast tell me why FBX, Blend, Dae, etc don't import any animations?
Figured it out. Quality settings was overriding the skin weights quality
Hello, can you tell me where I should put the textures?

how can i make the texture better please i need help
Define better
I'm attempting to make an assetbundle for Tabletop Simulator. I want to just make a simple "board" asset that has a custom map I've made on it's surface, possibly using a hexigonal tilemap for snapping purposes. I have very little knowledge of how to use Unity, but it's the only way to use a map that has a resolution greater than 10k by 10k in TTS. Would anyone know how to complete this goal? I've tried dragging my high res image onto a plane I've created, but it compresses it to a very bad degree even when I increase the scale of the plane. I want to know how to overlay a high resolution image onto the plane.

From my understanding, Unity should be able to handle images larger than 10k by 10k though when I import the image it has a max size of 8k and automatically will downscale the image
texture sizes of more than 8k was only added in unity 2020
Why would you want a texture at this very high resolution? If the players will see the full board on screen, a 4k texture will be more than enough for a 4k monitor. If they will be able to zoom in to specific sections, you may want to break up your board into multiple pieces. Please note that 10k is not a power of 2; the next thing after 8k is 16k.
Applying the texture to the plane requires a material first.
Hi all. I have a 2D tilset workflow question. I don't create them much myself, so I'm curious on how others do this, since I'm building a tool working with tilesets.
For a 2D Tilset, if you have an animation, say some of your ground tiles twinkle, would you put this all on a single image including each tile and each frame of animation (e.g., side by side), or would you put each animated frame onto a separate image? e.g., on the first image, have your main tiles, then a second image for the 2nd frame of animation (if it exists for each tile, otherwise leave blank).
Sorry, what I meant is that Tabletop Simulator only supports images up to 10k by 10k. Mainly the reason for this is you end up looking at individual smaller areas very often and the map itself is quite large. Splitting it up would work really well for my purposes! Though I'm not sure how I would achieve that, what I've outputted seems to have better compression that TTS so the 8k x 8k it downscaled to actually looks playable.
Thanks for the advice!
If you have your plane, which normally would be textured by your 10k texture, you can split it in blender into several parts, if you split it into 4, you can deal with 4x 2k textures. Or 4x4k or even 4x8k.
But you should always try to keep the texture size as low as possible (as long as it looks good)
I need help, when I use the render texture to make a canvas show what a camera sees
the resolution goes really poor tho
I need help fixing the resolution:

just bump up the resolution of the rendertexture? and also adjust the filter mode
Anyone found other art resource sites like https://www.thebasemesh.com/ that give a starting point for some common models?

TheBaseMesh
- 3D Models
- TheBaseMesh
- Every model adheres to real-world scale and comes with basic UVs, so you can get to making those all-important creative decisions faster.
(why does Discord decide to use so much space for a link!!)
how can i enhance the characters?
because they looks weird


in the playing mode the players looks not good
but in scene edit it looks good
this is in playing mode

this is in sence edit

Game view is restricted to the resolution the game is being played as
"Free Aspect" will not show it accurately
Pixel art cannot be rendered in smaller than native resolution without distortion
You first need to get your game window resolution to be representative of the resolution the game will be played at
Then consider pixel perfect camera workflow, or some type of sprite antialiasing
so how can i get the default resolution?

this is my settings
@misty lantern


now the problem is that the pixel perfect camera is small
A bigger problem you have is that it's not really doing any pixel perfectness here
https://docs.unity3d.com/Packages/com.unity.2d.pixel-perfect@5.0/manual/index.html
You have to understand it to use it
More info about how to set a correct resolution can be found here
https://unity.com/blog/games/2d-pixel-perfect-how-to-set-up-your-unity-project-for-retro-8-bits-games
its my first time making anything like this, just downloaded unity yesterday and i am messing around a lil bit,

this is my second time
The place for progress and showcasing is #1180170818983051344
oh mb
keep it up 👍
Hello guys im working on an horror 2D pixel art video game. if anyone know how to create pixel art (not must to be pro) and simple animations message to me.
For character creation/customization
How do people go about things?
Do you implement each variant into a preset? Do you change specific body parts?
I'm really clueless to how it all works
hey guys!.
is there a reason why parts of my model that are not supposed to be emissive, have this weird artifact where they become emissive when i move far away?
(this is not related to my lods, as my models that dont have lods also have the same issue/artifact)
(also, emissive and non emissive parts of my model use the same material, with an emission map)

There is no universal right answer.
here is the emissive map on this material

'your' models. 
Most likely due to the mipmaps.
yea these are my models...(Half life Alyx inspired)

how do i fix it? increasing margins on the UVs?
for the uv islands of the emissive parts?
Does anyone know why this is happening in between my tilemap tiles?

And what are the options?
Having any combination pre-setup?
Changing individual body parts? How would that work seemless?
And/or changing the mip map settings, yeah.
I have applied a material to my model but when I change rendering mode to transparent some planes looks like there dissapear8ng . I though I could fix it by reverting normals but still not fix. But I think it's becuas3 my model is hollow. I'm using voxels btw
Might need to set double sided, might be sorting issues.
my circles look super jagged


i remember doing some research a while back but not finding anything
does anyone know of any resources on how to make semi realistic looping textures
like this kinda thing

hello did someone have any idea how i can make it look better ? i mean the merge betwen object don't fell natural , maybe it's missing shadow or something , if someone have any tips ? 😎

i think you have to put your metal plate a little deeper into the stones. It should look like that they dig a tunnel to add the "vault" or what it is.
The red part is unrealistic, because it looks like its "floating" from stone to metal.

Add some kind of stone ledge to it. And maybe a dim, flickering light somewhere?
Thank a lot for all that ! I am going to modify that
This happens when your shader doesn't fade out before reaching sprite outlines
Sprites are meshes so they have geometric edges
Normally these edges are drawn outside of the alpha area of the sprite
But with a custom shader the transparency can change independently from the sprite alpha, so the sprite outline cannot adapt to it
If you want to keep the general shape of the sprite, try to adjust your alpha in the shader to not go over the edges
Or change sprite type to "full rect" to disable the outline geometry, but even then you have the respect the full bounds of the sprite
has anyone found good tools for testing Draco compression of glb files? Kronos have a test viewer but it seems quite broken in numerous ways