#❓ask-a-question
1 messages · Page 144 of 1
Those languages stand out before DeepL/Google translate don't do a great job with them
That makes sense
Although I would argue that French is rather OK with DeepL
Spanish translates well, but notoriously German and Japanese don't
You also need people able to answer in those languages and also, equally able to speak English at a good level
Honestly, the 3 X's and not knowing what a "schubser" is, my instant reaction was that it was some reference to the adult film business. Sorry. 😅
Pixel on pixel action!
I'd consider one X probably. Just my opinion. heh
😤
For example I'll be the one answering question in the French channel for Adobe Express (other people might as well, but they are few and far between) and I probably answer 10 questions a year. Most people can also manage basic English anyway. English is more or less mandatory in French schools, probably as a second language or a third.
French was almost mandatory in my high school given the proximity to Canada. Without practice though, I've lost most of it. :)
That doesn't means people are perfectly fluent, but they can make do with a mix of basic conversation and translating tools
I tend to answer using interpretive dance .... and video clips 🙂
That's the universal language.
You're hardly ever wrong when you answer with an elegant dance.
"You press the 'brush' button over near my foot, and then adjust the layers panel where I'm pointing"


Indeed
Given this logic, going forward, I'm just going to answer all Photoshop questions with this: https://youtube.com/shorts/iN0r-Lb60Jg?si=wwCoLdF3lmlVPnBX

I created him with @Photoshop. Now that I animated him, he can barely sit still.
#Photoshop #Kling #Dance #Bear
I have this gradient ready - perfect for feathering around the edges - but Select and Mask feathering doesn't do anything. why doesn't increasing the feather slider feather the outsides of the circle? I believe it is selected


increasing the feather value brings no discernible difference
You're absolutely right. But the username "Pixelschubser" was already taken in the first German forum I was active in since 1998. The same went for "Pixxelschubser". So I simply added another "X" without giving it much thought. And yes, because of the triple "X," I've been asked about this very thing several times in the past...
Anyone smart would not object with it. With such a level, the masks are off in this channel…
You can apply a further mask to get the effect you need.
You believe it is selected, yet I see no marching ants. How do you select it?
Scroll down in the properties panel, isn’t there a feather option, or not for live shapes? I’m in a train right now, can’t check…
Right now I'm more of a "veccctorschubser" anyway. But it looks kind of miserable.
kudos
genius - you're right - thanks a lot king, properties panel was right what I needed!

Gave +1 Creative Carma to @hushed niche (current: #12 - 313)
🤨
Can't you just be an "ImageSchubser" or am I not properly generating a compound German word? 😅
You can answer in the Experts channel. We should leave this one for actual Photoshop questions. :)
What language is that 😤
thank you a lot for the detailed explanation and for taking the time to record that my friend. very useful and helps me memorize this far more easily 🙏
Gave +1 Creative Carma to @sly hawk (current: #5 - 1190)
u guys rock. this Discord community is the bees knees

What a useful panel, that’s how you do all this magic, you hit a button to record a tutorial and another one to start troubleshooting users problem when they do not provide relevant info!
The appearance panel, the most useful one… in Illustrator! https://www.youtube.com/watch?v=zXvRbN03MzQ

The Appearance Panel is the most powerful functionality in Illustrator. You can boost your efficiency using it. In this video I'm showing you how it works and what the items in it and their specific order means.
If you'd like to dive deeper into the layers and appearance system, I'd recommend these videos:
Layers, sublayers and objects in the L...
Here you go... I also share a short video about how to import patterns...

Thank you a lot for this
Gave +1 Creative Carma to @viral palm (current: #7 - 969)
I was kinda confused on how to import the image to use as a pat
Uhm,

Where's the transform I did click windows apperance
Holy Quality
How does one reach 11K by 12K? for example my phone shoots at 2.2K by 4K
Ik its not shot by a phone, but just for the comparison thats like x6 / X3


That's exactly is the advanced level.
You need the green marked circle as helper object. The middle point of the circle is the centerpoint of the black area (see the three guides). Group the circle with the arc segment and give the GROUP in the Appearance panel the Effect Transform with the values shown in the video.
I'll hopefully learn to be advanced, but what? how do you get that middle thing?
I don't get it
I watched it like 5 times now
1 time slow moooo
I can show you a few more details after the dinner.
😋
Have a good dinner
I don't know if you say that in english lol
😆
It might take a while. We are a big family and there's always a lot to talk about in the evenings.
I think so. But I don't know for sure. Because actually, my English is very bad.
😢 🥺
but how did you make a .pat file out of my image?
im lost on it
Could you share the texture you want to use to create your pattern?
sure

also idk how to redimensionate it without making it pixelated or something
the resolution is low and i need at least 2042 for this image
im using it as a livery for a car


We can make the pattern seamless, but it's going to be dependant on how the livery is setup in your game
@wooden crown
we can try
its not hard to put it on work i just need to do multiple tests
with different dimensions
Take your time ❤️
Where's your livery template?


That's how I did! Unfortunately I don't think the resolution is enough good for such a big use...
For this type of work I think vector pattern is more suitable => Adobe Illustrator...

Hopefully one day I wont have to understand all of this stuff, looks kinda hard haha!
Fortunately there are few things AI can't do properly yet... Old people like me can use old techniques and look smart 😉 ...
Our time is running out....

this is as good as it gets


@fallow berry
Okay. (Last Illustrator explanation on this topic here on the Photoshop server)
- Video 1: Align the circle to the center of the black "triangle" and, while holding Alt+Shift, drag it larger than the planned logo.
- Video 2: Group the circle and circle segment and select the group with "Target selection," then add the Transform effect.
(For experienced users, not all steps are necessary, but they can contribute to a better understanding of the process.)
Please ask further questions on the Illustrator server.
I want to ask, but I know I should refrain
The wait for adobe illustrator help is awlays fast, yknow😩
Some platforms sell Adobe subscriptions at a lower price than usual, and strangely enough, some people claim their subscriptions are fully activated, working, and haven't been interrupted. Is this normal?
If you post your questions in the “Ask a Question” section of the Illustrator channel, you'll usually get a fairly quick response... Jack and friends are very responsive!
Can Somone help>?
they are probably selling keys from different regions, it might work for some time but Adobe is checking in which region you are
so they can lock your acc
or change plan to local one
The problem is that it's constantly running and the price is lower than normal.
I was a subscriber before, but when I decided to renew, some people recommended some of these pages that sell at a cheaper price.
Only thing I can say: Using a third party market place is at your own risk...
The sure way to obtain legitimate software (safe to use and supported by customer service) is to download it from the official Adobe website.
...
Red flag signals
Extremely low offers (e.g., 80-90% off) from resellers you don’t recognize.
Resellers offering “global keys” or codes meant for other countries at huge discounts. These may violate Adobe’s licensing terms (regional restrictions, etc.)....
and more...
they will probably work, question is for how long
just like Franck wrote you're on your own
It never ends; it keeps working until the end of the term.
not when they caught you violating region lock
@leaden edge: by the way this channel is dedicated for question about how to do things in photoshop... For this type of question please use #💬chat-general
I think we are done with this topic here... Not the good place
The official price is 6200 Egyptian pounds, but they have it available for only 2000 Egyptian pounds.
Thank you, I just wanted to know if this is normal or not
Gave +1 Creative Carma to @viral palm (current: #7 - 970)
No problem, I don't want to bother anyone here, it was just a question.
nah no problem
just be careful
i can only tell you to check reviews of seller
i personally couldn't afford paying for Adobe and moved to affinity as it suits my needs as a hobbyist
it lacks things here and there
and it's against muscle memory in most of places
but it's ok as a photo editing app
is it true or scam?
<@&548221840750018590>
Image spam across the channels
When you have to ask yourself the question, it's generally a scam 🙂
Any idea how the background of this thumbnail was made ?

Few gradients with mask made of cloud filter
hey people need some help
i'm trying to add a dark spot here

but when i draw it looks terrible
Can you be less vague? What do you mean by Dark Spot?
" when i draw it looks terrible" => Did you draw your "dark spot" in the shared image?
Perhaps someone can help but nobody reads minds here...
A clear description would be the minimum required to give us the chance to identify the source of your issue.
Wdym by "dark spots?"
😅 yeah exactly
so, i'm making a collection of neptune maps, but this one doesnt have the iconic dark spot, wich i'm trying to add, when i try painting it using the brush it looks terrible. i wanted the spots to look like the ones from here

and i wanna pass the spots from there to here

Have u tried using the patch tool?
where is it and how does it work?
U simply circle what u want to move and then move it... make sure to have it set to destination and content aware (top bar when on patch tool)
Press J to acces it
If u press and its not there right click on the icon
also why does photoshop auto saturate my image without me wanting to
no, what i mean is when i open the image it saturates it automatically
Wdym by saturates automatically?
it just makes the image more saturated
like it does it automattically when i open
Idk anything about Photoshop staurating images after opening them.. it never happened to me
Gave +1 Creative Carma to @sly hawk (current: #5 - 1191)
huh?
here's another video where you can see how me changing the sliders is better effecting the image
thanks again
steps were
- Adding texture layer over the top (with the spot on it)
- Changing the blending mode to 'overlay' (Which is like me making it transparent and letting the image beneath come through)
- Adding a hue/sat adjustment layer over the top
- me telling photoshop that the new adjustment layer should only effect the layer directly beneath it
- I'm then removing the COLOUR from that top layer, since both blues together are too saturated
- I'm then lowering the brighness again, to stop too much from the top layer effecting the overarching colour,...
I'm trying to shrink some game cards to print but the text gets all pixely when I do that. Is there a way to preserve text better that doesn't involve recreating the cards from scratch?
i'm trying to use the perspective wrap tool but it's cutting it off at the top and bottom. i'm on photoshop 2019. anyone know what to do here?

just to get the obvious out of the way have you confirmed that it's actually cutting off and not just a graphical glitch? Sometimes it doesn't render the image fully until you lock in whatever changes you're making
i only confirmed it by closing and reopening ps and the problem was still there
darn. I don't have any other help to offer. Good luck!
Could you double-click on the SmartObject “Patio with steps” so we can see how it is built?
Also make sure your graphic card driver is up to date... Perspective warp works on my end with Text turned into a smart object so you shouldn't get this weird "cut"...
Finally PS 2019 is pretty old, upgradding could fix some issues.
got it working, thank you both
What was the problem?
Hey Ive been putting off this picture for over a year now but I decided I am gonna print it so help me God

basically i want all the footprints gone
and the blank rightside midground to have a more symmetrical hill like the left
the problem im running into is that patch tool artifacts the image and doesnt work well, generative fill makes color inaccurate decisions
spot healing blurs too much
and im not good enough with clone stamp
after several hours i always end up around here

but its fake and flat looking
(disregard the right side for now)
so i guess my question is "How do i edit the footprints out and make it look natural"
this is what patch tool does

This result is from every tool in the book, many hours, and blurring uneven colors/tones with frequency separation
but it looks soft, splotchy, way too flat
How does he make the both the characters arm go up instead of stay down


Pretty clear its the same arm
Copy and duplicate it, flip it horizontally, blend on the right
How to add text and styles?
Guys, I need YOUR help, how do I change the brown color bottom part of the shoe to white color

Hue/Saturation
well, it can be done by hue saturation, but is that make sense! I am just telling.
hello i wanna ask what is wrong with my eraser tool. it got the dark stroke on the side

Are you talking about the underside of the sole?

It looks like there is a layer Fx on the layer you are erasing... Could you display your layers panel in your screen shot?
also you should avoid using eraser... Layer mask are non destructive (eraser is).
There are a LOT of footsteps. Sometimes, I clone before using the patch tool. I’m not too fond of the colors on the big images, but like those of the smaller one.
Hi, in Photoshop, hit Ctrl+ F and type “text” you’ll activate the text tool and can get tutorials on the topic. Now, what are you calling styles? Layer styles? https://helpx.adobe.com/photoshop/desktop/create-manage-layers/apply-layer-effects/add-layer-styles.html
how to get photoshop beta access? it doesn't appear here

Check the site: https://www.adobe.com/apps/beta-apps/all-platforms Can you see the Ps Beta there? If so, download from the site.
it appears!
Thanks man
should I uninstall the original photoshop before installing beta exe file?
Gave +1 Creative Carma to @ripe quest (current: #2 - 3180)
No. You can have them both installed.
You cannot run them at the same time on Windows but they can both be installed.
Its good to have both. The beta can sometimes have bugs or features might break so its good to have the General Release just in case.
Screenshot messing with colors
It isnt green on my screen
But i used clone stamp as well it makes it flat
i was exporting gifs fine on photoshop then suddenly it started stacking frames together how do i turn this off
Animated gif? What do you mean by "Stacking frames"?
probably just exporting first frame
no it isnt
it s stacking every frame together in each frame
Could you share a screenshot? @low flume
How exactly are you exporting? Show that window as well.
I assume you understood Francks suggestion? Seemingly no response from you so I don't know whether you just ignored the response, you're AFK or something else....
Hellooo, this is a school project and basically i have to somehow make something edible with an instrument, so i made this guitar and my goal is to put the little thing on the left ( a little hole like tic tac candys), on the right side of the guitar, but im really struggling with the perspective so i was wondering if someone could do a little drawing or somthing like that to help me

Hey all, i have a 3d render i have made trying to achieve my own version of joji's up coming album, i want to achieve the sort of "low light" compressed jpeg the actual image has but im honestly unsure as how to go about it, would anyone have some tips ?


Can someone please help me? I'm trying to remove the background from my photo but also include the water droplets and when I use adobe's background removal it gets rid of the water droplets

does anyone has a asset pack for sports graphics?
the album cover uses color contrast
not just tonal contrast

first of all your shadows have no texture
and u dont have a harsh enough gradient
second of all the album cover has lifted blacks and the contrast is provided by color separation not high tonal contrast
there are desaturated blues in the shadows
complementary color scheme
in your shot there is red everywhere
A simple way would be to use a gradient map, picking the light and darkest colors from the desired photo and adding noise from the filter menu as well as grain found in the camera raw. In Camera Raw you can really dial it in by messing with the parameters: sharpness, grain, haze etc. But the Gradient map will the heavy lifting emulating the color of the picture. A levels is yet another adjustment layer that will help you dial it in. I recommend converting to smart filters before applying any so you can adjust them at will.


The Color Transfer (in Beta) Neural Filter is better at emulating that picture than a gradient map.
Ur shadow is to dark compared to the reference, u need to add ambient light using HDRI with a very low intensity like O.75 to get the same look, also u can export the image as an EXR so u can get a high dynamic range to work with in photoshop camera raw , hope that makes sense
WAAAA is there a way to change a text color on a template 😭

`Yers, but I suppose the colour of the text in this case isn't in the text menu, it's probably applied as an effect

Double click on your layer in the layer panel (or click on the little arrow next to "fx") and locate the different effects used.
You probably have "gradient" or "colour" overlays and this is where you'll be able to change the colours
That depends on what the creator of the template used
WAAA OMG IT WORKSS thank you so muchhh
Gave +1 Creative Carma to @vapid flume (current: #6 - 1069)
Glad it worked!
The creator of the template should have included a .txt file to explain what to change in their design. It should be included in the .zip file you downloaded... (they nearly always do)
omg one more thing im currently watching a tutorial on to apply a depth extrusion using the shortcut ctrl alt shift t but it wouldnt work 😭

I don't know exactly what you mean by depth extrusion. Is it with the Emboss effects?
It's best you give me a link to the tutorial so I have a look
https://www.youtube.com/watch?v=Y-yLbrtvNdE here is the tutorial, its at 3:00

Today, I'm going to show you how to create a Glowing 3D text effect in Photoshop without using the 3D tool. This technique is easy to follow and perfect for beginners and pros alike
✅Editable PSD file:👉 https://bit.ly/3dGlowingText
►LET'S CONNECT:
Facebook: http://facebook.com/LearningScreenPage
Instagram: https://www.instagram.com/lear...
At what time in the video is your effect explained?
I'm not going to watch the full 7 minutes 🙂
oh sorry its actually from 3:30 to 3:45
OK, so this is where they repeat the action of nudging the layer?
Can you achieve a result by just hitting the arrows? (the first part)
if yes, can you see that option in the menu "edit"?

This is basically what he is saying. You don't have to use the shortcuts (in fact, not mentionning where the shortcuts come from is a bit counter-intuitive in tutorials. Shortcuts are for those who already know how to use the function)
They add a "ALT" so it creates a new layer at the same time as it repeats every step. It is necessary because you have a smart object and smart objects cannot be "overwritten" (for lack of a better word)
If you had a standard layer, you could be using the standard shortcut without the "ALT" and all the repeated shapes will end up in the same layer
its disable for me.. ☹️

Have you already performed the first transformation? (With the arrow keys)?
Your last action needs to be that first transformation, for it to be able to repeat it
But in that case you can't use the menu, you have to use the shortcuts
Because of the smart objects situation
So: Ctrl+T -> **move **one arrow stroke on the side and one arrow stroke up or down -> "enter" to apply the transformation -> and then CTRL+ALT+SHIFT+T shortcut
okay it worked YAY, thank you so muchh i hope i didnt cause a burden for you
Gave +1 Creative Carma to @vapid flume (current: #6 - 1070)
It's OK... Good luck with the project!
I must tell you that I made a mistake in my explanation: The addition of ALT isn't because your layer is a smart object, but more because ignoring alt will move the object without adding a new step/new layer. The standard shortcut works with smart objects, but won't add a new layer each time. Sorry for the confusion (I need another coffee 🙂 )
i used save as a copy gif but im not satified with the results


the circle transparency dying is a gif format problem but why are frames stacking?
What if you use Export/Save for web...?
I think I don't understand what you meant by "why are frames stacking?"
Did you create this gif or downloaded it? If you did it yourself the "stacking effect" could come from your layers hierarchy (but hard to say without seeing your layers panel)
You can try to change frame disposal method (video) and see if it's change something
More detail here: https://helpx.adobe.com/photoshop/desktop/add-video-and-animation/create-animation-frames/choose-a-frame-disposal-method.html
i created it myself
they re not suposed to be stacked
they are masked on the frames lines as u can see
save as copy
because im making multiple gifs at a time
Can a photoshop pro help me pls
I need to get this blue/greenish sky out of the trees, but i cant manage to do it with color range option. any suggestions or tips?

Could you share the whole PS UI with your layers panel open?
I assume trees are on a seperate layer and you want to remove blue sky inside the branches area?
Yes i want to remove the blue sky between the branches so that the background glow above the mountain shine through
this ps ui?

Its a tough project for me with a lot of lighting/shadows but i know what i want pretty much
if i manage to make this project nicely i get to go to finland with school
Did you try to change this for "automatic" as suggested before? Any change?
As said in the shared link: "Do not dispose =>Use this when building cumulative animations where elements are added progressively."

If you share the picture of "Layer 0" without any adjustment layer I can try to show you how I would try to do it.

i managed to get some good chunks sometimes with color range

i got some more questions but i would like to fix this first i guess, second one might be harder
i got it myself

dont ask me how lol
some layer work and stuff
ok so next question/help needed
this is the image right now

i want to add a sauna cabin somewhere at the side. how hard is it to make a realistic glow on the snow?
something glowing like this

Background eraser?
No i made two layers of the tree and in one of them i erased a lot of the green snow underneath the trees
Because of that there was pretty much only green left in the tree so it selected easier
Paint bright yellow color spot with a soft brush (flow set to +/- 20) set the blending mode to a "Light mode" => Linear Dodge(Add) for exemple.
Play with blending option if you want for a more relaistic look (blend if technique)
Thanks for the help, that looks pretty good already
It will likely be a different sauna but the idea will be similar
I want to place a sauna cabin and eventually place myself inside. then i have to make the windows foggy and put some words in them
that worked..
thank you
Are you looking to have someone do this for you? Or help you figure out how to?
And if you want someone to do it for you what is your budget?
want someone to do it, and ive found one professional here and he's kind enough to do it for free :3
Again, please do not use this board for that, there are Platforms such as https://www.behance.net/hire for that.

Hire the world’s best design talent on Behance. Discover, connect with, and hire the perfect creative freelancer to bring your ideas to life.
FIY, the general chat is the place for those requests, this very one is for learning Photoshop.
i cant fix it myself so ive got one generous professional to do it :3 also thank u for reminding, ill delete that msg here
Gave +1 Creative Carma to @hushed niche (current: #12 - 315)
looking for a software or a script, that can auto detect a png file, and separate each elements into different file. i know there is a script called png splitter, still a bit slow to click open the script > find the script file>select the script>let it run>save each layer
i have a large batch of photo, i wonder is there a way in photoshop or other plugin that can do a large batch?
You can almost certainly use Auto HotKey for something like this it is very versatile. There's a steep learning curve, but it's genuinely the best option available for scripting on windows if you want to speed up your work flow.
Alright, so here’s a little backstory — my aunt’s in the club and party scene, and she told me I should start making flyers since people pay close to $100 each, and you can easily get around five clients a week. Sounds like a nice little side hustle to me. The only problem is, I used to mess around with Adobe Photoshop a few years ago but honestly forgot almost everything. I’m trying to get back into it and could use some help finding where to get the GFX and design elements used in the flyers I’m about to show you. I’m also willing to pay for some help if anyone’s down to guide me.


I've applied this white SCP logo to this models texture but I need it to blend it better, what's the most efficient method to do so?

play with blending mode
also you can use some grunde brush on edges
as it too clean for military vehicle
if theres anybody that is really in tune with the Vibrance setting, is this generally true? this is a chatgpt suggestion. (oddly specific question i know)

Yeah I have, I thought multiply would work but it just makes it invisible, and overlay is too faded, the others don't really work either
To be honest the whole model is fairly clean, I can't see much grime on the humvee
Where do I send this message to get a answer?
That doesn't make it blend in though
well you can ask here and in #1223011682012369027
Hmm ok
maybe it will look better on model as models have other maps
like normals, roughness
cause you're working on albedo map atm
Eh I guess it's fine in this scenario as the rest of the texture is clean enough
well those soldiers are lucky they have brand new humvee 🙂
K.O
well if they are making mods with scenario they can add a joke about having brand new vehicle to move focus from logo
smoke and mirrors 🙂
there u go 🙌🏼

looking good
To be honest for now these are going to be in world building areas the player cannot access rather see from a distance
Very kind

ah ok
It's non-distractive
is it possible for certain layers to ignore each other?
Idk what u mean by that exactly but clipping mask could help u
i kinda meant that when you have a night layer that darkens the entire project for example if you could place a layer under it which doesnt get affected
Well layer order is really important
yeah its like a puzzle
ok different question
how to make realistic snow patches on clothing/skis instead of white patches?

ski are always full of snow and ice
Well texture and really really precise shadows
yeah ill have to find something out
is it normal that photoshop only does like 10-20 undo's
this isnt too bad from a distance

Where can I go to ask this question??
Ask around i guess
Does someone know how to rotate a drop shadow to invert it upspide down as a shadow at the front (light comes from the back)

Can you?
i mean i have a important project right now so not actively
should be plenty of sites to find assets
Hi, you transform it, and move the top handles below the lower ones, then you fade the shadow.
How to make a shadow in Photoshop to make a person look like they belongs in a picture. Colin Smith shows you his 3 step formula for super realistic shadows in Photoshop.
► Free Photoshop add ons: https://photoshopcafe.com/vault
► THE GEAR I USE: https://www.amazon.com/shop/photoshopcafe
► THE MUSIC I USE: http://share.epidemicsound.co...
Thanks, i will try it out the good way. do you think a shadow makes sense under northern light? #📝project-feedback message
Gave +1 Creative Carma to @hushed niche (current: #12 - 316)
I think it does but this shadow should be subtle and soft.
the one posted in #📝project-feedback is pretty soft right now i think, like 15%. what do you think?
I was recording the same... Happy to see I've went with the same technique than Colin Smith!
Not bad but don't forget to fade the shadow as explained in the video shared by @hushed niche

yeah but i thought since the shadow is longer than the frame shows it isnt really needed
but i could try
There are many sources. Most of them paid , but if you already have a network of potential clients, it might be worth the investment.
You can check Behace, there is one for free: https://www.behance.net/gallery/171833039/Weekend-Club-DJ-Night-Party-Flyer?tracking_source=tagSEOPage

Weekend Club DJ Night Party Flyer
I’m fine with paid because I have potential clients already
Where is the pays websites
Please don't post the same message all over the server.
#📝project-feedback is the place for this type of request.
Sorry sir
You can check here https://www.elegantflyer.com/?utm_source=chatgpt.com
Problem: some of the older files have unclear licenses (for example, external stock images embedded inside). Use only the newest files and always read the license description carefully.
Download 10,000+ Free PSD templates for flyers, posters, and social media. Editable, print-ready, and free for personal & commercial use. Updated for 2025
No problem
Do you think what you are sending me people are using for my examples I’ve sent you?


Because my mom pays money to people who makes flyers ^^ which are those
Hi, I'm trying to recreate the text effect from the 'DARK MOON' image, but my attempt looks completely wrong.
My version comes out looking soft, rounded, and 'pillowy,' but I want to get that sharp, 'chiseled' look with the really bright, glossy edge highlights.
I'm already using Bevel & Emboss, but I'm clearly missing the right settings. What's the secret to getting that sharp, metallic look instead of this soft, plastic one? 😭

I think you should go with the "Chisel Hard" technique for the bevel and emboss, don<t forget the contour option...
Too complicate to explain everything in a chat so I share the PSD used for the screen shot if you want to explore the settings...
Note: lense flares add a touch of realism but the come from stock images not from the layer style itself.


omg I really do appreciate your help, thank you so muchh
Gave +1 Creative Carma to @viral palm (current: #7 - 971)
How can I make this have an overlay I want (from a png etc)

I'm making a christmas post card for my school and I need help with this."
Like make your own pattern?
or just put your PNG on the layer above the spiral and set it as a clipping mask
Do you mean you want to replace the grass by your own artwork? For that you need to create a repeat pattern and add it to your patterns by going to edit>definepattern

If your question is how to create a pattern from a png... Open your png in Photoshop (it should be tileable texture if you want a seamless pattern), Select all (CTRL+A) then go to Edit/Define Pattern..., save and name your pattern.
Back to your shape => your new pattern should be available in the Pattern Overlay drop down list...
The drop shadow really pulls that together.
What does it mean when a layer has this icon (the grey box at the bottom with the line and arrow)?
It means it's an "editable" solid color, gradient or pattern layer...
These type of layer still editable at any moment. If you double click on the thumbnail a window will appear letting you change the settings (color, gradient or pattern)...
Amazing, thank you. I was pulling my hair out trying to Google the answer.
The real name for these is Fill layers. You can add them clicking on this icon at the bottom of the layers panel

They still editable as long as you don't rasterize them.
@iron locust
Anybody here that can photoshop a pic for me?
That’s just one of the places where you can find a similar vibe. I didn’t think you were after exact matches tbh. They might be mixing stuff from different sources, or just good enough to make their own.
I’m trying to make something similar but I don’t know how to make it from scratch so templates are perfect like the website you sent me. They update over 250 templates every month so that will actually be good for flyers cause it updates every month so that’s actually perfectly fine if I can just copy over a template and then put in a different picture of like the person as a front cover, that would be easy money for me
Yeah, guess it’s not that easy money after all. But once you get the hang of it, it’ll get better and faster with every project.
I have a question is trace erase coming out this year or next year
What do you mean by "trace erase"?
I seen the video on YouTube
Say goodbye to clunky object removal. Project Trace Erase doesn’t just erase—it understands. Powered by diffusion transformer models, it removes objects and their shadows, reflections, and environmental distortions, delivering perfectly natural, context-aware edits with almost no manual cleanup.
Learn more about Lingzhi Zhang's #ProjectTr...
This the video i seen i was wondering is it coming out this year or next year bc i don't see it on photoshop
Then i seen a video about adobe photoshop ai assist
Ah OK... sorry!
Yeah but i don't know if its this year or next yeat
Those Sneaks projects are generally a long way awy from releases. There have been "quick" transitions from labs to Beta, like Neo, that took a year or so to be in Beta (and is now still in beta), and some stuff take longer or even disapear in the void
No idea but I do really like it
Oh okay yeah i like it too
there is no guarantee that any of the sneaks get released one day. There's been lots over the years that have been left in limbo and never even went through the private beta stages, and others that are still in Beta many years after their public release (ie: Fantastic Fold)
They may not see the light of day, that's what I mean
And they may be integrated into a software, Photoshop or something else, or be released as a stand alone thing
I can remember when harmonize feature was introduced on Adobe max 2024 I guess or 2020 , can’t remember exactly
If you keep an eye on the Beta announcements, you'll know
None of this year's sneaks have gone into private Beta (I checked)
The usual steps are: Labs -> private Beta -> Public Beta -> General release. They can go through the whole funnel or be abandonned at any stage.
another one I saw something like relight picture or something like this, was impressive
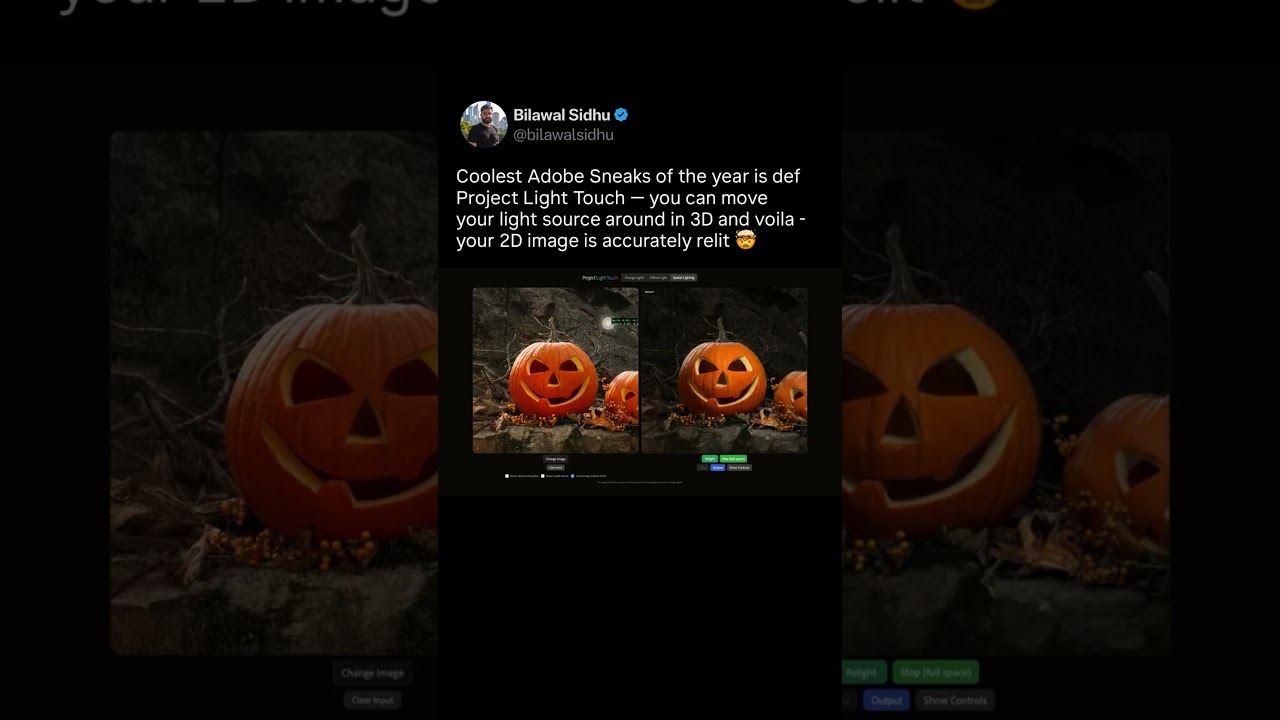
Okay coolest Adobe Sneaks of the year award goes to Project Light Touch.
Adobe calls this "spatial lighting mode" -- interactively move your light source around within a 3D volume and voila -- your image is accurately relit.
They're probably using ML to infer a PBR + depth map under the hood ala. Beeble AI. When creatives ask for control -- th...
Yeah , the best thing about it the light react with objects and bouncing like a real ray tracing or even a global illumination
Thats dope
Ai taking over the world 🌎 making stuff easy and less time ⏲️
Yeah, but there’s something called human creativity and emotion. AI will never reach that level. There’s something special about those beautiful mistakes and natural imperfections

Lol
hello! im in a uni class and am trying to do a simple 6 frame animation on photoshop and am stugling with the rotate tool, whenever i try to use it, it then applies to all the frames, ive looked into it and dont understand a thing, please help, its due monday
it also wont let me onion skin
Note: Onion skin is only available in the Video Timeline if you're working in a frame animation timeline you won't have access to this option.
If you're using the rotate tool (R) = this tool rotate the canvas so all the frames...
If you want to rotate a frame and its content only => use transform feature ( CTRL+T)
what do i do after i press ctrl t, nothing pops up and the rotate is still affecting evreything
also noted ty
Gave +1 Creative Carma to @viral palm (current: #7 - 972)
CTRL+T works only if the layer you want to transform is active in the layers Panel...
Hope I understood well your issue.

Ok, it is the right active frame but it seems the issue was not it rotating the canvas but that all previous iterations on the previous frames are also all being rotated.
so im not too sure how to fit that
Do you have "Show transform controls" turned on or off?
ok, just checking...
In Frame Animation mode (not the video timeline), every frame doesn’t store a “different version” of your layers — it just records which layers are visible.
So when you rotate a layer using Ctrl + T, Photoshop applies that transformation to the layer itself, not to just one frame — meaning all frames that show that layer will display it rotated.

Okay I think duplication will be my only option
(Courtesy of ChatGTP, since I don't use photoshop to animate - that's what we use Adobe AfterEffects for)
Seeing as it’s an assignment specifically for the frame animation feature in photoshop because my prof is psychotic lol
So no video timeline for me
I'd be an awful 'student'. I'd be arguing the toss with the lecturer, thinking I know better - saying that doing it an old fashioned way which would NEVER be done commercially is a waste of everyones time.
However, I guess they're perhaps either working with old school methods they know, or perhaps trying to instil the basics
its a media studio hybrid illustration class, old school prof who mainly works with illustrator but we are supposed to be trying new things like doing rastering with laser and animation

ty for the help
Someone who can make this picture one so my face on the hoodie i would appreciate that really much cuzz im not that good


We're swiftly arriving at a point in the timeline where a lot of student responses will be "Why do I need to know this I can just ask the LLM"
😐
Does anyone know how to make a glow effect for these windows?

i thought gradually erasing from like higher percentages to lower the further it goes would work

does anyone know how to make the gradient fade to transparent if it already has a color?
Select the Color Stop you want to be transparent (by clicking on it) and then set that Opacity value there to the desired value (e.g. 0% if you want it completely transparent).
oh sorry im just really blind
i got this but idk if this looks real

my first time making light from scratch pretty much
this is already a little better i think

or this because of the poles 🤔

I would keep working on it. I don't think you're quite there. Doing this without a photo reference of what it should look like is going to be difficult. Right off the bat, the sauna is "warm" and has saturated colors and the outdoor winter scene is blue and muted. This isn't necessarily bad in and of itself because it might be the effect you want. However, I wouldn't say that it looks "realistic."
what do you think of this?

yellow and white glow and very very transparent black lines for shadow
im no expert but the white glow on the glass is odd but the bottom is good
what glow? around the edges?
the white stuff over the little like
hatver
ts thign is

nvm it suddenly works for no reason ig
idk is it better like this?

a little bit sharper or something
would you say this is good enough to call it finished? i was thinking of adding a little chimney on top which releases some steam

yeah i think so but thier is some small little shaidng issuesat the edges
Here is my quick attemp

idk what u mean. should i add or remove something
i have to keep in mind it has to glow but also look foggy and stuff
but also at night so yeah
its g
bvut
There's a tiny shading error you could easily remove by zooming in or shading.
so u mean like adding a dark line somewhere?
in the corner of the wood pole or something

depends on your skill ofcourse
beginner lol
maybe if you just make the letters in illustrator and photoshop for some shadows it should work
this is what I have so far but how can I make it so the middle part is transparent like what I did was added another element and painted it but its not transparent

got it
No, this looks like it has been drawn on paper, then scanned or photographed, then colored in photoshop:
What are you calling the middle part? Did you work directly on the background layer? Click on its lock, then scroll to the bottom of the properties panel and click remove background.
True Story!
I got it to work
I did the e

came out alright for my first time doing something like this
Hi, I've created a fake 3D text effect by duplicating my text layer many times and nudging each copy by 1 pixel to create an extrusion (as you can see in my layers panel).
This works, but all the extrusion layers are in a group, and I'm stuck. If I want to change the color of the 3D extrusion, I have to delete the entire group and redo the duplication process all over again.
Is there a simple, non-destructive way to change the color of all these duplicated layers at once? Or is there a better workflow so I can easily edit the text and its color later?

did you try to add a color overlay to the group?
If you're going to do it this way, you should make a Smart Object first.
Or better yet, create the 3D text with something like Adobe Dimension and bring that to Photoshop.
why can photoshop only undo like 10-20 steps?
I don’t know how to 😭
History is a setting in Preferences. You can change that. Just realize, the higher you make it, the more RAM/Scratch Disk space you're going to need to hold all of that in memory.
Oh okay I will try it later, it should be easier to make changes I suppose?
Yes. Theoretically. By using an SO, you can change one and all of the instances will update as well.
Make the group active and click on the "Fx" icon at the bottom of the Layers panel => choose color overlay.
I would probably create the 3D text in Dimension and bring it to Photoshop to build the layout...

But you'd need access to that app via CC Pro/All Apps, I guess. Might not be an option for you.
hey guys, made this sun map out of telescope image snippets, how do i make this usable?

Okay I got it thank you so muchhh
Gave +1 Creative Carma to @viral palm (current: #7 - 974)
No unfortunately I don't have this 😭
thanks for the suggestion though, I really appreciate it
Gave +1 Creative Carma to @ripe quest (current: #2 - 3183)
Any good resources, as in forums/discord servers, dedicated to PS Scripting? google search and various llms dropped the ball quite hard on my issue
i tried

The officia Adobe forum is probably your best bet...
https://clommunity.adobe.com/?r=forums&cgen=KH8NV5Z1&mv=other


You have some choices there, either in the PS ecosystem (there is a scrpting subforum) and in the developpers section
You also got the PDF guide (If you haven't got it already
(it's old but still relevant)
https://community.adobe.com/havfw69955/attachments/havfw69955/photoshop/551569/1/photoshop-scripting-guide-2020_unlocked.pdf

thanks @vapid flume
Gave +1 Creative Carma to @vapid flume (current: #6 - 1071)
And the help files as well!
https://helpx.adobe.com/uk/photoshop/using/scripting.html
I don't know in which software you're assembling them, but you need to soften your transitions (might be able to do by blurring the edges)

photoshop, made like a mosaic
out of unwrapped solar images
Then you need to soften the edges of the UV
Or maybe the UV aren't super accurate
wdym uv?
if you unwarp your UV, import the UV in Photsohop and work from there
For example Substance stager exports UVs as PSD files, that you can "populate" in Photoshop
This is how they look

I was assuming you meant "unwrap" an UV in a 3D software)
In any case, if it's just in Photoshop. See how you got dark edges in the screenshot I took?. You need those edes to be like acontinuous tone instead of patches of big areas stuck together
You can sort that by retouching the edges with the clone stamp tool
that was just the map i made placed onto a sphere, i didnt get the map from there
i made logo with canva turn out canva cant make thing symmetrical can i do that in photo and can it make it i want the t looking like the rasputin font

and how
ok i got it

There still seems to be a small error in the image.

does anyone know this font and how to do this glow effect?

gradient+ outer glow
use whatthefont for font recognisition
Alrrr
its intentional, i put the earth to scale
btw, it's not luckiest guy, but that's kinda close....
Thats Alright! Thank you so much I was looking for the gradient editor!
And if you can I was also wondering on the glow effect for turf
I think perfect match for STB = Burbank Big Regular - Black.
Didn't find the exact match for Turf! but I agree with @sly hawk Luckiest Guy is pretty close... I am sharing the PSD file used for the screenshot in case you are interested.


Thank you so much!
Gave +1 Creative Carma to @viral palm (current: #7 - 975)
can someone explain me why my hard brush is really slow?
when i draw a line it only follows it a second or two after
very laggy/slow
Turn down "Smoothing" to 10% or less.
yeah that works enough, thanks
Are you properly logged in to creative cloud ?tried logging off, restart the CC app, then log back in? Which one gives an error
Hey so quick question
I made this thumbnail and I find the fonts a bit bad, and I just want to know, which I can use to sort of make it more professional


There are what's called monospace fonts. They are fonts that aim to replicate programs listings, or typewriter things, they don't have any specific kerning, they just sit within their rectangle and as such will look a bit clunky.
They have their utility, when you want that specific vibe.
The vibe you are aiming for is not the same one
Assuming this is a thumbnail for YouTube. It needs to be way bigger. People have 1/2 a second to read your text before choosing to watch or swipe
Look at it at the size of a thumbnail on a list when scrolling on a phone and I can guarantee you noone will be able to read that.

Also it lacks contrast (Blue on blue? ), The white on blue is better, but the blue on blue text is not legible/readable
If you're into trains, why not lean into that and choose a legible, historic train related font.
https://fonts.adobe.com/fonts/din-1451-pro
A sans serif typeface with 2 styles, available from Adobe Fonts for sync and web use. Adobe Fonts is the easiest way to bring great type into your workflow, wherever you are.
It's free with your Adobe sub.
You can use this tool to check the contrast of your colours
https://color.adobe.com/create/color-contrast-analyzer
Another great tip is to convert your design in Balck and white and see if it's readable. If it's readable in Balck and white, you're more or less guaranteed it will be in colour.
@vapid flume they are using PS it's just me trying to help with design
as i don't have ps anymore
Sorry @ivory rampart this wasn't aimed at you. I wasn't paying attention. I deleted it
np 🙂
I wanted to message you the other day to thank you for your help here, but I think your DMs are closed
Gave +1 Creative Carma to @ivory rampart (current: #31 - 72)
Anyway... Thank you @ivory rampart
Don't tell me about it! 🤣
i didn't knew we had access to this tool
i failed badly with my solution

🤣
There's so many things you have access to and probably don't know about.
yeah internet is a vast space
I meant with an adobe account, even a free one., Adobe colours, Fresco, Adobe Express, the tutorials, Behance, Adobe portfolio websites,
Check this
https://www.adobe.com/benefits
Obviously some stuff is reserved for those who pay, but you will have an explanation of all the ressources you can have for free
For example Behance, you can have a portfolio on a platform that is de facto the standard for absolutely free
i thought it was part of CC
no, it's completely free. You will find people showcasing work done with other software, Lots of Blender folks for example
So there is no excuse not to have a portfolio...
i mean i don't look for work as a creative as it would kill most of fun same with game design it's fun till you don't have to cut your ideas cause some senior decided it won't work 😄
but yeah it's nice feature
That's fair enough!
If you like to collaborate with people (even not in a professional capacity) you can have a page there and join groups. THose groups are created around an area, or specific types of creations (ie game design) and allow people to do some work together.
It's a feature that is not very well known
i think i found one of those collaborations

by the looks i used maybe 10% of what CC had to offer
apart of PS, firefly Premiere
😅
It's difficult to watch or try everything.
In the learning section in this link
https://www.adobe.com/community
You can find tutorials that aren't necessary Adobe apps tutorials. They had a great series in there about graphic design fundamentals, or tools for content creation, things that are more generic.
Since I can't contact you, if you want some specific links, shoot me a DM
Anyhow, I need to go now 🙂
bye!
You'll be kicked if you do 🙂
Hello guys, I'm testing new tools for image restoration. This is the first picture I'm working on : I tried to remove the yellowish thing of the image in lightroom but I'm not sure about the result. Theres something off about the picture that I'm not sure where is it comming from. If you look at the picture of a photograph, there's something that looks good in it that doesn't in the picture that I edited.


Maybe it's the background or idk
🥀
upscale, sharpening can make it better you can make eyes more brighter and more sharp also add some sharpness to face, hair and cloths. you can try sharpen tool with with a new layer on top of your main layers and check the Sample all layers box. so you can remove or lower opacity of that new layer anytime. and maybe you can try a pure white for background.

The layer thingy is pretty hard for me, I tried another pic with the face/hair sharpness + the eye a bit brighter


do you notice the difference?
reference image

The second image I made a mask online on the eye and did + 0.2 to exposure
yea. you've added little sharpening to the 2nd image.
Do you know if there a way to remove this texture?

you can remove tool.

I need to install photoshop right
if you're not in photoshop. then yes. you have to install to use those features.
I'm not sure but lightroom might have that feature too.
wait do you mean the texture all around the image?

when i install shop of the photo, it installation fails s (also for after effects, premiere pro and illustrator)
You want to install photoshop?
im not sure how to do it in Photoshop
yes
what's the error message your getting?
error 146 for photoshop
and when i restart CC it goes to 304 until i reinstall
do i give the Adobe folder write permissions for user
also it gets stuck at 87% alot (with the same 146 error)
are you using creative cloud?
There is an older plugin that allows to do that, but it's rather complicated. You need a special brush (should be included in the plug in) and there is an action to instal with a specific step by step to follow.
It's called Fast Fourrier transform (FFT)
Let me check if I can find it
Yes
The problem is that I'm not sure it still works with newer versions of Photoshop
When I take a screenshot of the picture the thing diseaper
Disepear
desepear
bruh
You could also use a technique called frequency separation and do a very slight noise removal on the High Frequency layer
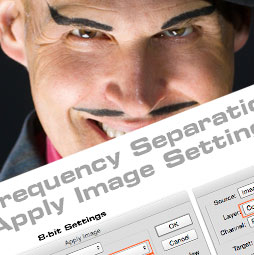
Free photoshop tutorial on Frequency Separation. This allows retouchers to separate the high frequency pixel information from the low frequency pixel information in images and make edits to them separately, in other words you can work on texture and detail independently from colour and tone and vice versa making most day to day retouching so muc...
Do you think it will be visible when Ill prinit the picture
@fierce hornet yes
it's generally used to retouch skin, but it can be used to remove small artifacts
I will check that ty
Gave +1 Creative Carma to @vapid flume (current: #6 - 1072)
No idea, it will probably depend on the quality, resolution and size of the print
it could storage issue. sometimes a simple restart can fix. You can try reinstalling creative cloud.
That's for the FFT filter: Have a test!
https://ft.rognemedia.no/

Photoshop Pattern Suppressor
Free plugins/actions to easily remove periodically repeating patterns 😃.
I'm not sure how to install this


I can't access it
k it's wokring
Ok well it doesn't work
AS I said, I am not sure it's still avaialble for newer versions.
You need to read the help files. Maybe it's not compatible anymore. I've used it when it was for CS6 (probably more than 15 years ago)
I am just tranfering the one I have so I think it still works. It comes as an action

You need to install the action and run it from there.
I haven't tested it for many years now.
yeah I tried the colo
Theoretically speaking if I could keep Plugins on a SATA drive, but photoshop installation on an NVME drive, would the loading, usage and processing times of plugins be slower?
Hey everyone. Looking for a hand here. I'm trying to simulate a pen pressure effect for a orbit line here, and I'm using a pen then "stroke path" to brush with pen pressure. But as you can see the middle is getting a diamond shape. How to avoid this and keep it smooth? Thanks in advance!

why is my selection stroke not blue anymore and barely visible?

does someone know how to match the skin color/green blue ish lighting of these two people?

i tried a bunch of color overlays and stuff but cant manage to get it right
the quality also is way better on the right person but i should be able to fix that with some noise
hey, i want to fill this gap smoothly but it creates a line

a harsh transition
how can i fix that?
when i try to put the pixel copy of text in vanishing point it doesnt show any texts
nvm got it
i can copy paste my potoshop folder and when i install back keep all my settings and custom pencils?
if so where that folder would be?
i gonna reinstall my whole pc so im making emergency backups
Hello, for those, You do not use the cc app, just copy them in the plugins folder: C:\Program Files\Adobe\Adobe Photoshop [Version]\Plug-ins
Hi! Is your plugin folder that big?
Hi, Photoshop itself no, but the presets and préférences you can: Users/[user name]/AppData/Roaming/Adobe/Adobe Photoshop [version]/Adobe Photoshop [version] Settings (For unsaved stuff that is only in the panels) and C:\Users[user name]\AppData\Roaming\Adobe\Adobe Photoshop [version]\Presets if you save the presets at the default location, and not elsewhere on the disk.
Hello, it wasn’t high enough in the layers panel?
Hi, how are you filling? Did you try select>modify>expand by a few pixels?
yeah i was thinking like copy the folder after install paste all but if all my stuff is on roaming i be there ty
Gave +1 Creative Carma to @hushed niche (current: #12 - 318)
Howdy! I would try to sample the darkest and lightest tones of the green face, maybe also the midpoint, and use it as a gradient map over the skin. You can then play with the transition points to give some thresholding/stairstepping.
Please change your handle, this place is NOT a jobs board.
??????
im literally asking because i needed help is the first time im reinstalling potoshop and have that kind of progress saved
Hi, the selection stroke? Do you mean the active path highlight? Then the GPU pipeline might have crashed, switch your status bar in lower left to GPU status. https://helpx.adobe.com/ie/photoshop/kb/photoshop-cc-gpu-card-faq.html
If it is the targeted layer highlight, get the move tool, then in the option bar, click on the cogwheel and look at the options.
Hi, the goal of this board is to help users, as I just did with you, and not a place to do paid commissions, etc. Your username nurtures the sentiment that it is ok to do it here.
ahh thats just my username gotta change it then to this server
done (yet thats just discord fault is not like i live in this server)
Have you tried selecting the skin only in lr, and then using negative clarity and texture?
Thank you , it is better for me than a mod to notice it 😉
Gave +1 Creative Carma to @glossy snow (current: #1023 - 1)
Hi, for others, this was also asked, and answered, on: https://www.reddit.com/r/photoshop/s/YsiXufl7t6 basically, once loaded (very fast anyways) it runs in RAM, so not difference.
Reddit
Explore this post and more from the photoshop community
When cropping my large multi-layer image to a smaller size, random layers (or parts of an image) get deleted. I have a frame animation going on and the layers that are on-screen always stay when cropping but layers that only appear in a non-selected frame sometimes disappear or get cut-off. What's up with that? Can photoshop only handle so much?
Do you mean that the layers that become empty as their content is now in “big data “(off canvas) gets deleted? What are your crop options? You can select to keep the off-canvas content. Or if the crop is not rotated, maybe can you use canvas size? Or select then edit>crop?
So this is one of the frames of the animation. When I crop the whole image to only fit that gray frame (second image) the red phone drawing disappears (the layer is still visible but nothing shows up). Sometimes instead of something disappearing only parts of it do


Where can I check the crop settings?
Cropping an image shouldn't delete layers... strange.
well the layer is still there, it just doesn't show up. Here's another instance of something happening, this time part of the girl getting cut off on the left


oh I use the crop option under Image so I can crop based on my selection. Having tried the crop tool, that seems to not have the same weird effect, so that's good. Is there a way to use the crop tool based on a previous selection?
Still works in the same way. - Just because you do/don't tick that box, it doesn't mean you have to crop 'without using a selection'
(I always crop by drawing a box/selection)
Hmm... no, even having unticked that box, the crop option still has that glitch while the crop tool doesn't
Want to do a quick screenshare/call? - Not saying I can definately help, but figured it was worth a shot?
sure
In the option bar, and there’s a gear for more options for some tools.
By crop option ,I think that they mean via the edit menu, I am not sure of what it entails behind the scenes.
Yeah we talked about it. Basically using the crop tool works, only the crop option has this issue
why wont photoshop always not open for me 🤔
Care to rephrase? That's like a triple negative question. You're saying Photoshop doesn't open at all?
Feel free to share more about the problem. What version of Ps is installed? Are you signed in to an Adobe Account? Did it ever work?
like i'm trying to open it and it never opens even though in task manager it's opened
its the 2026 new version
Hold down Shift Ctlr Alt keys and start the app. Keep the keys down. When it asks to delete the Settings choose Yes. See if that helps.
Is there a way to set markers or nodes outside of the canvas that stay visible? Maybe to make perspective guides?
No
Hi, I'm working on a sci-fi/cyber-themed poster. I've created all this stylized text and a glowing background, but I have a realistic photo of a rock that I need to 'fit' into the design.
Right now, it's just a plain gray rock, and it looks totally out of place.
What are the best techniques to transform this organic rock photo? I want to make it look less 'real' and more 'stylized' like it's made of chrome/metal, or has glowing energy lines, or a holographic feel. My text has a hard 'Bevel & Emboss' look, and I'd love for the rock to have a similar high-contrast, glossy texture.
I'm new to this, so I'm not sure what filters, adjustment layers, or blend modes I should be using


Wow, turns out you can do that exact thing I wanted to do using an Artboard, amazing.
Thanks for meeting expectation, D

Gave +1 Creative Carma to @ripe quest (current: #2 - 3184)
<@&548221840750018590>
thanks!
Gave +1 Creative Carma to @fierce hornet (current: #32 - 68)
A printed photo from Photoshop looks bad due to differences between screen and print mediums, often caused by improper color space settings, screen brightness, and incorrect printer profiles.
First: adjust your Photoshop color settings to CMYK, calibrate your monitor...
You said "outside the canvas" which isn't possible. I suppose if you use Artboards, you can put things outside the Artboard.
And in regards to your "meeting expectations" remark, if you're going to start up again with your passive aggressive comments, you can leave.
Hi, and if your image has lots of noise and threshold it will look different at non 100% zooms.
Hey, asked a question earlier and at the time I had no answer, is it allowed to repeat it from time to time? And if yes, how often is it allowed to send the same question if not answered previously?
It looks bad because there are lines accros the picture
I will send a picture here
Hi. On that reddit post, due to the initial rudeness and confusing answers rather than giving direct answers, I felt it was necessary to get clarification here. Can you please tell me your personal opinion on whether topaz plugins loaded on a SATA III HDD (not SATA SSD) are slower compared to if located on NVME 4x4, not only load them to ram, but also to operate and then process to the image afterwards?
and idk the quality overall if bad
please upload files directly instead of using links
It's 40mo
I can't
Might be slower simply because its on a spinning disk but doubtful it would be noticeably slower to process the request. Topaz uses the GPU to run the the job.
do you have another solution
make it smaller so others can play the video directly from here. opening links and downloading files can be dangerous, you know
I know that it is a video file
Yes
Thank you!
Gave +1 Creative Carma to @ripe quest (current: #2 - 3185)
You can quote it, but not after a few minutes…
Edit: the SATA is an SSD or an HDD?
For someone remembering spinning hard drive, an SSD is blazing fast.
Again, does the plugin host lots of textures/files it needs to load into RAM as it works?
If yes, they would load at xxx MB/s vs xxxx MB/s. (Potentially, as there are many different metrics in addition to burst speed, like sequential transfers), mMybe check the specs of both drives on thessdreview.com )
Can you afford to potentially wait a few seconds? If not, go for NVME.
Also, maybe could you just try, uninstall and reinstall on the other media, and report your discoveries?
Ah, it was the scanned one that you tried to smooth the texture of? Please give some context, as we help many users during the day…
It might help if you were to give some information: which printer is it?
My experience is that some older Canon ones leave lines, and that Epson need often print head cleaning.
What are the settings you used? Is it on photo paper.?
Can’t you just take a picture of it a close distance, rather than a moving video?
how do i make it like the text is actually painted on the newspapr

You can first try to play with blending mode of tour text layer
yeah idk
Difficult to say here, but could as well be lines produced by your printer. It's quite common .
I would personally test on someone else's printer or ideally order a print on an online printer (think Cewe etc) that are printed on real photographc paper.
A good way to check that would be to print a square of grey and see how it goes

just create a grey square in photoshop, with white borders and see if the lines are visible in the print. It doesn't have to be big
I mean if you don't see those lines within Photoshop but only in the print, that means the printer is at fault
In that case, maybe either run a cleaning routine on your printer or order a print online.. You'll need to check with your printer user manual
Here is a short video to show you what I meant.
Note: I your case try to not use a full black for your text color. Using a dark grey+Blend if technique will give you more flexibility.
hey, how can i get the cloud text effect, i did it a long time ago and i forgot now

like this
Perhaps by turning your text layer into a path then stroke the path with a smoke/cloud brush then apply a bevel and emboss layer style.
damn bro thats pretty awesome that you recorded it
appreciate it
❤️
You can get more depth by repeating the process on sevral layers and with different smoke/clouds brushes.
I'm sharing 3x cloud/smoke brushes I used for the video.


guys
If you download the picture you can zoom on it, and it does the weird uniform grain pattern
I'm cooked

I'm not sure if it's this thing that give me weird texture
when printing
could this work

it worked
thanks
Yeah this should do the trick, still it will probably eat a bit of detail
hey, im working with some vectors but im removing their black backgrounds & using a lighten composite instead of making their shapes by scratch for the sake of effeciency. i want the white vector's color to match the red text, is there any ez alt method other than color overlay to do this?
"Muhammad"

and you have to play with settings
Yeah I tried and it doesn't work
the grid gets removed but it's all blury
lol
I'm sure there is another solution
I tried median but same the picture looks like poopoo
You can use Blend if to hide all the black then merge this layer with a blank layer and add a color Overlay Fx...
you could try those topaz filters they added in new PS 🤔
i think they added two

now its not opening again 😢
there was one of neural filters that was removing jpeg artifacts
you could try to use this
If your graphic element is Black and white you also can use itself to load a selection with channels technique, Mask it then clip a solid color layer on it... Here is a short video demo.
But if you have a vector app and the vector file you could just remove the black background in the vector itself...
really dumb question but im a beginner, why on certain layers when i try use my brush it doesnt work and my eraser is the brush instead? for example here ive got an adjustment layer with hue/saturation clipped to a png and its an inverted mask, i want to draw on it to start doing my highlights on the image but it wont let me brush
You got to toggle the swatch. White reveals and black conceals.
Ah I've only just worked off Pinterest links for free assets 😅 I'm still a noob I guess. The vid helped tho I'll use this after dinner, thanks!
Gave +1 Creative Carma to @viral palm (current: #7 - 976)
Still stuck?
this method worked beautifully, will go a long way ty again Franck
😄

Happy to hear that!
does anybody have this type of brush pack?

been seeing somebody draw with these brushes these look good tbh
if anybody knows about it
Where is the screenshot coming from? A video tutorial?
If so, I would suggest you to find a moment where you can see (at least) a brush or set name...
Without any more info, I think it will be hard to guess what the set is... Good luck
screenshot from a discord screenshare
since the guy was using these brushes to draw
Ah...Ok.
A particular drawing style? Manga, cartoon...etc?
Also if you know the Discord username you can try to ask directly to him/her/them... Sometimes people are kind enough to share their tools...
drew this with those brushes

i've asked them... but they gatekeep stuff
honestly seen him draw other stuff with these brushes, just curious if you know them
Sometimes painters make their own brushes and don't share them in order to preserve their “secret touch”... That's completely understandable.
TBH I'm not really into digital drawing/painting so not the best reference to help you find exactly what you're looking for...
You can try to browse here and see if you find something similar https://www.behance.net/search/projects/free photoshop brushes
There is also the Adobe Brushes library : https://www.adobe.com/products/photoshop/brushes.html?promoid=XKMMHH6G&mv=other#

Behance is the world's largest creative network for showcasing and discovering creative free photoshop brushes work

Find the exact brush you need to elevate your digital art with custom drawing brushes or preset Photoshop brushes. Let your creativity flow today.
i deleted my brushes to restore a backup, but the backup only gave me one brush. are they all gone now?
the whole brush system can feel clunky and archaic sometimes
im missing one brush pack and it the only one i paid for grrrr
theres also some custom ones i made that should be in the backup
The brushes are still stored on your hard drive. The issue is that they can be scattered: desktop, downloads folder…
Well, I agree with Frank: if they took lots of time to iterate and create those brushes themselves, to create their own style, I can understand they might want to keep it for themselves… some painters jealously kept the formula of their paints a secret…
yeah i mightve just messed myself up not knowing where everything is...
anyone wanna check this? maybe in PS '24?
maybe i just never tested it
i thought i'd used it before but its only 50 kb
what would be the maximum requeriments for potoshop have perfomance at maximum settings? without need to have reading potoshop format window?
Just read the Photoshop requierements page:https://helpx.adobe.com/ca/photoshop/desktop/get-started/technical-requirements-installation/adobe-photoshop-on-desktop-technical-requirements.html
but those are the recommended not the maximum settings
i remember get s gpu for a game thay says recommended and lagged in max settings is why im asking for be cautious
hi, does anyone have a tutorial on how to achieve this style?

it feels like a clean and shiny skin, with marked highlights
another example

Ok, understood.
As far as I know, I don't think there is a specific maximum GPU performance for Photoshop... As long as it is a supported GPU with an up to date driver...
Are you asking because you plan to buy a high performance GPU and you're afraid that Photoshop won't support it?
yes i gonna build a am5 pc im using a 5600g has a temporal pc for keepnworking
and i notice the m.2 struggles to open without a gpu making me though the igpu was suppose to do the thing
cache tile used ro be at max now is at 128k

5600g is good
Sorry I'm not really a technical guy and I run photoshop on mid end machines ... Perhaps somebody else (with more technical knowlege) will have an answer for you.🤞
just buy a small 8gb gpu
you can get a 1660 Super for like 80bucks
is more when is deliver ship on mexico if you mean ebay used

lol I thought I had a mid-end setup... I was a way off! I run photoshop with a 6GB GPU.
yeah I mean you don't need a gaming gpu to change the background of a photo lol
I said the 1660 bc it's an old gpu and you shouldnt buy a gpu with less than 8gb in 2025
Yep... I don't play on my PC so I'm pretty close the recommended requierements...
Sandrine I fixed my problem!
if I make a hue adjustment layer and turn down saturation to 0 is that an inaccurate way to get a grayscale image?
because on the left I used proof setup grayscale to check for my values. But on the right I used the hue adjustment layer but you can see how the value of the beak is changed and I do not get accurate results

No, simply bringing the saturation down to zero with H/S adjustment layer is not an accurate way to get a true greyscale image because it ignores the original brightness (luminance) of the colors. This method often results in an image where different colors of the same brightness end up as the same shade of gray, losing detail and a natural appearance.
Great! What was it?
Well I found a solution for it. I use a ai software to soften the texture and then reupscale it
The grid pattern disappeared when I was using gaussian blur on photoshop thats the only solution that I have for now
Thanks! I Sym Link'd the Plugins to SATA HDD and didn't notice a difference in Plugin load times. Solved.
Gave +1 Creative Carma to @hushed niche (current: #12 - 319)
Well there is always a trade off when using softening techniques. You need to find the sweet spot.
That's why sometimes people prefer photographing photos with light at a particular angle rather than scanning them (although there are ways to avoid slight patterns with scanning as well)
I see yeah ty
Thanks for making that point! More on the topic: https://threadreaderapp.com/thread/1251763478177644544.html
Thread by @timsoret: All my life I've seen pro painters talk about "values" by desaturating in Photoshop, and turns out it's one of the most ead mistake: this is the wrong way to assume values, as the maths are wrong, and let me show you why: Desaturatin…
Gave +1 Creative Carma to @viral palm (current: #7 - 977)
I'm more on the Trick #1 side (solid Black layer set to color)... (#2 is too complicate for me XD)
Thanks for sharing this with us!
Gave +1 Creative Carma to @hushed niche (current: #12 - 320)
Guys how do I make the right eye white looking like the left one 😭

I tried spot treating thing on photoshop but it doesn't work well
Hah a little Baader Meinhoff effect: I open a tab to notice a webinar on light valu s and color: https://www.youtube.com/live/yBsLhbeCPqg?si=Q6ek_1hf6638vXpG

Shop the Proko Black Friday sale! Save 20% on all of Marco Bucci's courses - https://www.proko.com/@marcobucci/coursesJoin Marco Bucci for a special livestre...
guys how do you make white in lightroom

this is insane
does it looks right

It's grey like what the flip I can't make white 😭
<@&548221840750018590>
Image spam
thanks!
Gave +1 Creative Carma to @tame cape (current: #14 - 246)
And thank you for the quick action, as always.
Gave +1 Creative Carma to @serene coral (current: #8 - 939)
Wertos with the quick draw action!
this ss is from a tutorial my guy
Not sure why you're asking here. What does this have to do with Photoshop?
oops wrong server
Sorry. Just probably easier to ask in the Blender Discord, no?
Sandrine I have the answer lol. The thing was compression from downloading directly the image from the "download" bouton
It was compression de webp image to jpeg. Now, I download the webp and cover it to png and theres no more artefacts


I thought that you were scanning images printed on textured paper…
Hello folks, I just started learning some basics of shading, Shadow/highlight
What's the best way to make a good, realistic Contact shadow ?


► Join PiXimperfect Pro - The Ultimate Photoshop Training Course: https://pix.live/pro
Discover simple techniques to create clean, realistic, and seamless shadows from scratch in Photoshop! In this tutorial, we'll explore how to perfect realistic shadows with simple masks and filters that are easy to apply. We'll learn about shadow layers, cr...
Actually, I was looking for something like this, bouncing light reflective on & shadow, not fully black
<@&548221840750018590>
Image spam
i'm trying to do this 3d brush effect and according to the tutorial i'm watching i have to sample the gradient layer with my mixer brush. however when i draw anything it only pics up that specific color and not the gradient.

this is how it's supposed to look like

@luz dont use a gradient fill layer, instead, use the gradient tool on a new layer
@finite otter
on the top bar hit "clear" button and then type your prefered values
you mean like this? it doesn't work

select mixer brush tool > check at the top bar ther's a dropdown check if you have "load solid colors only" option selected
@finite otter
wait what?
that worked, thanks!
Gave +1 Creative Carma to @dire crystal (current: #195 - 9)

thanks
is there a way to use the mixer brush with smoothing?
@finite otter hit the gear icon on the top bar
they're all greyed out for some reason

alr thank u again!
Gave +1 Creative Carma to @dire crystal (current: #183 - 10)
hey guys how do i fill these areas?

maybe this can help a lil? i dont think he made these

but yeah thanks ill go look for brushes there also
There are lot of Youtube tutorial about this treatment... A simple search with Mr Beast thumbnail will gives you tons of results...
That's pretty basic: Camera raw filter to soften the image without loosing detail+ increased contrast, Dodge and burning to increase hilights and shadows and give the "cartoony" look finish with the background underexposure and Glow under the subject => you are done.
I'm sharing the PSD file I created if you want to explore the structure... Good luck!


hi guys why does this rectangle become all pixelated?

Can we pay someone in here to do custom content for content creation? Like an entire theme of banners, profile picture, etc. for Twitch for me?
I would definitely use generative fill for that. Select the area's you want filled (I'd use selection brush tool) and then click generate. I'd first try with model Firefly 3 (I wouldn't even use a prompt) and if that didn't work use the model Gemini 2.5 and it probably needs a prompt. The edges might show, but tracing them with the remove tool usually blends it in with one pass. (assuming it doesn't have to be accurate)
Thanks, much appreciated
Gave +1 Creative Carma to @viral palm (current: #7 - 978)
ooh then what is the correct way
thx
Gave +1 Creative Carma to @hushed niche (current: #12 - 321)
You are looking at 1030 %… pixels everywhere at that zoom level…
The layer is a smart object, was it an illustrator file? A pixel, or a Vector layer? Some think that smart objects allows endless scaling for pixels, what they allow is no degradation if scaled down and then up.
Especially Check the ctrl+Y technique that allows instant verification, or the second window for your image.
Try to recreate them, watch: https://www.youtube.com/watch?v=V6BgnRoURwI
https://www.youtube.com/live/n9EMuBFGmS0?si=GIP_NEXogDXKx7Ik
https://www.youtube.com/watch?v=hUULVrMypAk
and I guess you tried all the brushes that come with your subscription ? https://www.adobe.com/be_en/products/photoshop/photoshop-brushes.html

New to Photoshop? No problem! In the third episode of this multi-part series on Photoshop basics for artists - follow along with Kyle as he gives an overview of brushes in the app, explores the vast brush library available through Creative Cloud, and shares how to make your very own brushes!
Kyle T. Webster is a Sr. Design Evangelist at Adobe b...

Making decorative borders or designs in your illustrations can be done much more quickly with custom pattern brushes! Kyle will show you how to design some o...

In the fifth episode of this multi-part series on Photoshop basics for artists, follow along with Kyle as he shows you the best brushes to emulate natural media - such as watercolors, pencils, inks, pastels, and oils.
Kyle T. Webster is a Sr. Design Evangelist at Adobe based in North Carolina: https://www.behance.net/kyletwebster/
Join u...

Find the exact brush you need to elevate your digital art with customised drawing brushes or preset Photoshop brushes. Let your creativity flow today.
Yes i use the ctrl + Y a lot. It is very handy but if i were to want to export the photo as grayscale or eyedrop the values I cannot with this proof setup
Is this good enough to start charging

It may have been discussed already - but that screenshot from the pink is from 2017 when photoshop supported 3D. - They've since moved it to illustrator. Your tutorial is way too old.
Just to add to Franck's comment - I can see your shape is vector, but it still needs to be displayed using pixels. - so there will ALWAYS be pixelation when you zoom in at over 1000%. You could take a billion pixel nasa image and if you tried to display it on a gameboy screen - you'd still see 'pixelation'.
Any tips on how to fill this in a easy and effective way?
Bucket leaves a line, wand selection leaves transparency issues outside the selected area... I usually pen select it, manually, but since is a complex line to pen all over, I was wondering if there's a smart good other way to do it.
Thanks.

Sorry I didn't elaborate because @hushed niche gave a great answer and I had nothing to add. Hope you are fine now.
If you're using paint bucket tool try to increase Tolerance and activate smooth option.
Here is a short video that shows you how PS behaves depending on the settings you use.

By the way Paint bucket is a very destructive way to work... I would suggest you to paint each colors on its own layer.
You can use Magic wand tool to make your selection (increase tolerance, check smooth and contiguous pixels option) then fill your selection on a new layer. Use one layer for each color...

@ember yacht Note: In your case you can set the blending mode of colors layers to "darker color" , this will allow you to edit each color layer individually.
(as shown with green layer in the last video).
I'll follow your tips, thanks.
Gave +1 Creative Carma to @viral palm (current: #7 - 979)
hi
i just removed the inside of this tv with quickselection tool, im wondering whats the fastest way to smoothen the edges now?

i tried blurring and smudge but no good
would be good if u could just draw a line around it all and type "smooth edges" lol
i tried that with ai generative fill but it just filled everything up
anyone have any bright ideas?
feel like its probably simple im just a novice
I was thinking about blur and then playing with curves to regain detail, but this might not work
Maybe try to retrace your image in illustrator and then remove inside
If you try to put something “inside tv” you might be better to use smart object

🌐 Creative Assets https://filmit.io
🔊 Epidemic Sound 30 day free Trial - https://bit.ly/3ihjmwV
💜 Join the discord https://bit.ly/3kSLhVF
👌 Patreon, earn rewards! - https://bit.ly/32VFPuR
🔴 Click to subscribe! - https://bit.ly/35VZBIF
📷 Instagram - https://bit.ly/32UAe8c
🐣 Twitter - https://bit.ly/2G1qfoB
------------------...
im so suprised this isnt easier lol