#❓ask-a-question
1 messages · Page 139 of 1
I don't know what this is supposed to mean. Sorry. Good luck.
How do I get this aberration effect on text?


Are you talking about the colours?
the effect/color in general
i try to apply the same thing to my image and i cant recreate that effect

1st one is what is called a sepia tone, you can achive that using a black and white adjustment layer (check the help files in Photoshop for how to use them)
second is the same but with elements still in colour (the first one is monochrome)
That would mean masking the black and white adjustment layer to hide the effect on those element (you will need to select those elements first, and use a mask on the adjustment layer to hide them)
For how to use layer masks, again, check the helps files as well, either the "hands on tutorials" or the text based help.

Third one is a simple colour correction with a yellow tinge. It's "simple" to tell you that, but you need to know a bit about colour theory and know your way around the curves or the levels (I prefer curves) adjustments
Here are a few pointers
https://helpx.adobe.com/photoshop/using/color-adjustments.html
https://www.psdvault.com/basics/color-correction-photoshop/

PSD Vault
Color correction is an essential part of photo editing and can be done using various tools in Photoshop. In this article, we will take a deep dive into how to correct color in your images using the various color correction tools and techniques in Photoshop.
Most tutorials, like this one, will teach you how to colour correct an image to make it more "realistic". You want a cinematic look, so in a sense, you want to do the opposite.
https://www.youtube.com/watch?v=i2vEulebH5k&t=44s

🌎 𝐓𝐡𝐞 𝐏𝐡𝐨𝐭𝐨𝐬𝐡𝐨𝐩 𝐕𝐢𝐫𝐭𝐮𝐚𝐥 𝐒𝐮𝐦𝐦𝐢𝐭 𝟓 - 𝐆𝐑𝐀𝐁 𝐘𝐎𝐔𝐑 𝐅𝐑𝐄𝐄 𝐏𝐀𝐒𝐒: https://bit.ly/photoshopvs5
How to fix colour issues in Photshop using a single Adjustment Layer PLUS an extra tip using a 50% Grey Layer for even better results...
If you learn how to use the tools, you will be able to make your own grading.
You can also search for "vintage look" or "old film" for that kind of stuff.

Today we show you how to give any photo that vintage film feel with a free Photoshop template! Download the template and follow along to add motion blur, film grain, subtle coloring, and a vintage film border to any image—and in just a few easy steps.
Download the Sample Image & PSD Template:
https://phlearn.com/vintage-film-effect-photosh...
bump
Can you post a screenshot instead? Once you play the video on Discord, the thumbnail disapears (at least for me)

NO worries. I just think it's a duplicated text layer, slightly offset, with a different colour, in the form of a gradient, that case a sort of cyan on one end, and red on the other end. The middle should be 0% opacity.

it's better explained with a screenshot
So I just duplicate the text layer and apply this gradient?

The thing in your example is that you will have to do it for each letter separately
Because you can see the effects is set up that way
But I doubt this was done for every separate layer
So I would advise to outline the text (a duplicate of your main text)
Separate all the latters into their own layer, and apply a layer style onto each
I also think this is something typically done in Illustrator. Way easier than in Photoshop
I wouldn't know for sure, you can't be sure either
There are problaby 10s of ways to do that, that's just one solution
Of course my gradient example is too soft, you will need to tweak it so the middle bit is less soft and the edges harder
Typically moving the end points (cyan and red) closer to the middle
Alrighty, thank you
did you find the answers?
I had a quick go, see the screenshot
check the layers panel, and particularly how the fill is set to 0 (so the middle is transparent)


hi, im new here and im also a beginner. I'm trying to do a similar tattoo design on photoshop,, how would you do the background of this tattoo ignoring the text and stars?

I would create shapes (with the pen tool) filled with a gradient from full colour, to transparent.
and then blur it a little
Rough example with a triangle there


I'm thinking about the cloudy shapes here, feel free to clarify. Obviously you'll have to draw the shapes first
Can be done with 3 drop shadows Layer FX...
Here the psd file if you want to analyse the drop shadows sandwich...


can anyone help me make this image more orange like autumn, ive tried changed hue like seen in the second picture but i feel it still looks weird or is it just me? (i will edit the image more i just need the colours changing rn)


how can i make the cloud shape without it being choppy? And can I do it without the pen tool?
can someone for free cut a object out for me to use? That i can use or not
Step 1 - Add a color balance Adjustment layer and push reds and yellows to get warmer tones.
Step 2 - Add a Hue ans Saturation Adjustment layer and play with Reds and Yellows H/S sliders to get autumn vibe you want.


omg tysm - im wanting to do digital graphic design when im older so im learning photoshop and i never thought of that! (The image is for a cd cover btw lol)
Hello! 👋🏻
Is there a way in adobe animate to support the drawing of a circle?
I don't want it perfect just a little supported.
I saw that function in an apple device one, and thought it could be an adobe feature as well
Step 3 - Then you can increase contrast with a S Curves Adjustment Layer

how do i get the bar with settings thats ussualy up here back?

wow thanks so much. You're talented
Gave +1 Creative Carma to @viral palm (current: #8 - 918)
try windows --> workplace --> reset essentials
yes thank you
Gave +1 Creative Carma to @upbeat timber (current: #1014 - 1)
can someone for free cut a object out for me to use? That i can use or not
Without sharing the image involved?
Hope someone can help
Could you explain why you need help?
Hey So my friend sent me an improved work of a thumbnail I did and his work is basically a much higher rez / edited thumbnail of the one I did with Raw camera filter... the thing is I dont know what are the right options he used and I've been experimenting for the past 2 hours
anyone can help guide me to the right filters to recreate what he did ?
Can share screen for ease ❤️
I have AE beta, PR beta, Ps beta, is it beta for 2026 versions or? Can someone explain please
hey i have made this cd cover for a fake brief and its one of the 3 cds and i was wondering if there are any tweaks i should make to the title as i do feel i could do something better but it might just be me being picky!

also i have changed the text to made it more balanced from the border after that
ohhh sorry i didnt know thats there!
@thick tangle do u know
as shown in CC desktop app, Ae beta is 25.6, Pr beta is 25.6, PS beta is 27.0...
Thank you man
Gave +1 Creative Carma to @viral palm (current: #8 - 919)
Appreciate it
I need some help
im trying to make a custom skin
for formula alpha
in photoshop and everytime I scale down an image it gets unbearably pixelated
no matter what i use to try and keep quality
it gets real bad, though whenever I see somone else make one (ex:Purple Sector) it never pixelates
Make sure to convert tha layer to smart object before u scale it if possible
It is
Even if a smart object it pixelates like wild
Can you explain exactly how you are scaling. A screen capture would help.
You are zoomed in to nearly 500%. Shouldn't you be seeing pixels?
I'll run a test at my end. Give me a minute.
yeah but thing i dont get it
is
look at this video
keep in mind same image for the texture map

MODS I NORMALLY USE
Liveries made by me - https://www.overtake.gg/downloads/authors/purple-sector.3636642/
Formula Alpha 2024, Formula Beta 2024 by VRC - https://www.virtual-racing-cars.com/
F1 Track Add-ons Extension by Pyyer (Patreon) - https://www.patreon.com/pyyer/posts
Track Mod by Fenryr (Patreon) - https://www.patreon.com/fenryr24
F1...
I created a perfect vector circle in Illustrator and exported it out as an SVG. When placed and downsized in Photoshop it looks like this.

yeah
i just wanna know
how is his non pixelated
but whenever I do it
it's very pixelated
like here

Could he just be using a larger image? Perhaps your image is like 1K while his is like 4K.
Maybe let me try something
His also looked a little pixelated in places although the YouTube video compression makes it hard to tell
Cool. Try using a much larger image for your texture. If you are using a 3D program like Blender it won't care whether it's 1K or 8K. The UVs will still work the same. Sure an 8K would be slower but...
anyone know the best way to move images like in the X axis for a perfect 2.5 pixel or so.
the video basically shows what im doing, im trying to move the FACE texture so it switches facial experression but im unsure how to addjust the image texture so it will be a nice number
Everything looks ok with your setup in both Blender and Photoshop. I think the problem is you are moving the X coordinate in multiples of 0.1. Try more precise numbers like 0.54 for example.
yeah thats the thing i wanted to avoid. when i tested it i kept having to do 0.5419 0.5418 and so on and it wasn't perfect still
the texture is 2048 by 2048 btw
Hi guys, I’m not sure why this is happening: when I use 'Auto Options' in Curves with 'Find Dark & Light Colors,' it behaves strangely. The color correction looks different on a large empty canvas compared to a canvas that matches the image size. Also, on the large canvas, 'Snap Neutral Midtones' doesn’t seem to work.
In both documents, there are only two layers (the image and the adjustment layer).
Even though the image below looks better, it still has some purple/magenta areas in the shadows. In the reference video I’m watching, those purple/magenta tones don’t appear.
Tysm.

Perhaps you should be better laying out the heads within Photoshop. Make each head exactly a quarter width of the image in Photoshop. Then in blender you can use multiples of 0.25.
View > Guides > New Guide Layout

ohh perfect this was actually what i was looknig for
Cool
Thank you so much for the help
It worked
Isn’t it possible to make the Histogram/Adjustment layer curvers only detect the clipping mask? With the Ctrl+M shortcut it works fine, but when using adjustment layers it doesn’t. Isn’t this a problem when working with a document that has multiple images? Because the Histogram will take the whole document into account


Fantastic and good luck with the project
Do you mean in a situation like this?

Hi, yes, what I mean is that I want Curves (or its Histogram) to only detect the clipping mask. I did some research and saw that some people had this issue with older versions of Photoshop, but my Photoshop is fully updated.
The problem is that when I use 'Auto Options' from the dropdown menu, it doesn’t work correctly.
I think this really is a Photoshop issue, because I keep getting the message 'Calculate a more accurate histogram.' Even if I click it, close Properties, and open it again, the message still shows up. Does this happen to you as well?
Btw, tysm for your help

thanks yeah that grid is exactly what i needed
Gave +1 Creative Carma to @nocturne cairn (current: #13 - 246)
Hey that's looking great. Thank you.
Gave +1 Creative Carma to @bright needle (current: #1015 - 1)
ur a life saver thank u so much
Gave +1 Creative Carma to @vapid flume (current: #6 - 1023)

What do you mean by only detecting the clipping mask? Only affect the clipped layer? If it is part of the clipping group it should be the case.
Hi! Your screen capture is not fullscreen. What is the background color? Here’s wondering if it might affect the auto settings despite the transparency
You're most welcome!
Did you try duplicating the text, and on the lower copy, use a fill and two hard drop shadows? (Make sure global angle is unchecked so that they can be placed at different spots)
is there a way to remov these strokes i made with the brush painting tool? it makes my image look weird

@midnight onyx idk how im gonna put the brush on a separate layer when its a color though
wouldnt that mess up the color separation
nope. each layer acts like a clear sheet of glass.
so its too late to d o ti?
you can go to your history and see if you can roll back far enough. Go to window>>history
nah theres a billion functions going on
not happening
all those brush strokes are a different color also
i dont thik i can do what youre talking about
I have two more ideas you might be able to make work
im only concerned cause idk if itll show up on a screen printing file
i dont think it will but who knows
its for a shirt design to be screen printed

and now catgirl has blue squiggles on her that you want to get rid of
theyre like gray
but this is the screen printers file and it didnt show up so
i dont thik it will be an issue
but i want to learn how to get rid of it anyway
i used the brush tool to color in some sections
so when i clicked expand or whatever it made those little lines
I'm sure "backside" works as well in that sentence... Can you correct it?
They're all the same shade of blue. I just eyedroppered them. The shade is 4f80ff

its blue cause i selected it
Colour separation will have to be done at the "channels" end, not regarding the layers you are creating
Colour separation can be done with 5000 layers, or just 1, it's a completely separate step, generally at the end

If they are into a unique layer, the only way is to erase them... sorry

That's why Photoshop is a multi-layer software, so you can work out your brush strokes on different layers. Ideally, you could even create a different layer for each colour if you wanted to
so theres no wayt o get rid of the lines
Erase them and rework the whole thing... Take it as a lesson learned
so if i rework them how would i hide the lines to begin with
i used teh calligraphy brush
I am learning Blender atm and I'm trying to understand things on a file I'm working on, and it's genuinely the 5th time I doing it again from scratch. it happens, that's part of the learning experience
hjmm it says here to use the blob brush tool next time
You could try masking them, create a mask, and paint in black with a brush on the mask
I think the blob brush tool is in Illustrator 🙂
yeah i was making it in illustrator
That's a different kettle of fish then!
You know you're on the Photoshop server here?
yeah
but the illustrator discord cou ldnt fix the issue either
xd

and the lines are still in the ph otoshop file
Then that means it's not fixable, not sure how you'de expect to have a better answer on the PS server honestly
Do you mean you rasterised things in Illustrator? I'm a bit confused. Anyhow, our colleagues on the Illy server are much more knowledgeable than I am, so you should trust them, not me
how do i make a canvas for brand kit design
Fun fact: This question has never been asked by you on the Illustrator server.
Solution: As in your previous questions (before you left the Illustrator server).
Separate same colours on separate layers (should already be done in your file).
Expand the appearance (if possible/necessary).
Expand (stroke and fill).
Combine/unite areas of the same colour.
Note: Due to the large number of paths and anchor points in the file, you should not edit everything at once.
How do I move the artboards
Try something like that
What it does to me is it highlights something instead
does this instead
Can't see your layers panel. Sorry
with Move tool active: activate one Artboard in layers panel -> then move it
@errant cipher
why not?
Try again as shown by @tame cape but with Auto-Select turned off.

this may be stupid but how can i get a similar border style in photoshop

@viral palm
These Borders?

Step 1 make a copy of your Model without background for the out of bound effect.
Step 2 Trace the shape you want to apply the image on then clip your image to the shape.
Step 3 make a selectionand fill it on a new layer (or make a copy of this shape) then place it on top of the layers pile. Set its Fill to 0% and add a stroke and inner shadow to it.
Step 4 make an other shape under the first one (the one the image is applied on) and apply a stroke Layer effect
Step 5 mask out the copy of your model made at step one to keep only the out of bounds part...
It's not exactly the same shape as the one in your example image, but I think you get the idea.
how am i able to create those people smoke coming out of them idk like a silhoutte

this is like the 4th time posting this image but i js like rlly need an idea
It's simply a masked Silhouette with black Smoke painted on a layer under.
For a better effect, bring back silhouette painting white on the layer mask with smoke brushes.

yess this is what i was looking for ty are you able to give the exact smoke brush?
Gave +1 Creative Carma to @viral palm (current: #8 - 920)
Hello, I have a question regarding editing some text. I found this cool image and I wanted to learn how to edit out the text without ruining the banner in the background. The image is a single layer, so I was wondering if there was a way to do that? Or would I have to make this from scratch? I already have the font though I have no idea how to add the rusty texture to it

I made the brushes from a free stock image found on AdobeStock Free
https://stock.adobe.com/ca/images/abstract-image-of-white-and-black-smoke-or-fog-in-black-and-white-background/366790607?prev_url=detail
ok ty
1st, if it's a 1 layer only file you'll have to "remove" the original text... Easiest way is to use AI feature (Generate fill or Remove).
Thank you for the quick response! What about adding the rusty and shadowy gradient to the text? I'm not sure if that's possible through photoshop but I am curious because I did find the font.
Gave +1 Creative Carma to @viral palm (current: #8 - 921)
Yes you can... First, I used Tagmarker Free font (https://www.dafont.com/fr/search.php?q=Tagmarker)
then I applied a layer Fx (Stroke, Gradient overlay, Drop shadow) to it.
Then place your Text inside a group.
Find a black&white grunge texture, place it over your group, set blend mode to muliply and reduce its opacity then clip it to the group.
I share a short video to show you all the layerFx settings (you can pause to see them clearly) .
Hope it will help...
Thank you! This is more than helpful it's perfect. Thank you for the video, helps out a lot
Gave +1 Creative Carma to @viral palm (current: #8 - 922)
Happy to hear that!
Hello, whenever I make the black&white grunge texture into a clipping mask the entire image dissapears
Do you have any way to circumvent that issue?
Make sure your Text layer with the layer effect is inside a group and that the texture is attached to the group and not to the Text layer itself.
Otherwise, the layer effect will replace the texture...
I mentioned this at the beginning, but you may have forgotten this crucial step.

Thank you, I was able to fix the issue however now I am unable to edit or change the text. Is there a way to fix this? I do apologize for the continuous questions

Gave +1 Creative Carma to @viral palm (current: #8 - 923)
No problem! It seems your Text layer has been rasterized (Lorem ipsum Thumbnail rather a "T" in layers panel) ...Am I wrong?
Unfortunately if your text is rasterized you won't be able to edit it and you'll have make a new text layer...
By the way it looks like you are in quickMask mode (layer highlighted in Red)...(Hit "Q" to enter/exit the quick mask mode).
I did all the changes you have made and yes I was using quickmask mode by accident... Now I'm able to do everything without an issue! Thank you for everything and the quick responses as well as the videos
Gave +1 Creative Carma to @viral palm (current: #8 - 924)
Simple question, how would I be able to change this saw so I could print it out as 9 pages (3x3)?
Hi, the issue is that the histogram takes the entire canvas into account when calculating its data.
For example, if the canvas has transparent areas, the histogram changes completely because it includes those pixels.
This becomes a problem when you’re working with images on different layers and want to use the “Auto Options”, since these rely on the histogram to apply their adjustments. If the histogram is inaccurate, then Auto Options won’t work correctly either.
The same issue happens with any image that contains transparency.
The histogram and Auto Options only work properly if the image has no transparent pixels and if the canvas size matches the image boundaries.
In my opinion, the histogram should only take into account the clipping mask (the layer linked with Alt + click), not the entire canvas.

Easy workaround: You can make a selection of your image then create the Curves Adjustment layer...
The histogram will be made based on unmasked parts only...
Thank you so much!!
Gave +1 Creative Carma to @viral palm (current: #8 - 925)
please?
I highly doubt that it is possible to create a Mercator projection from this image using Photoshop.
Tried with lens correction, perspective transformation + different Warps nothing can gives us a perfect straight projection...
Sorry...Perhaps with a 3D software(?)
I don't know sorry. I'm not a 3d expert and different searches with AI chat said "you'll need specialized mapping software" without naming one... Sorry. Perhaps an other user will be able to answer later🤞
what can i do to improve this poster, especially the big typography?

Hi! Blender is free and has lots of tutorials. I’m wondering what kind of virtual lens and concave sphere would fit the bill. There must be blender discords or reddits.
Hello! To help readability maybe a slight black to transparent gradient at low opacity behind the text?
can u think of anything "cooler" for this? boss man want something more flashy but idk
Do you have to use this image? Looks like pandemic era, lots of masked people, not very inviting.
“Come” can have some unwanted meanings. Maybe “k town the place to be?” Yellow might stand out more from the background .
Also it seems that it invites to an area, rather than a given shop… but now, this belongs to #📝project-feedback
@rulanga
Basically a program that can handle UV unwrapping. That could be Blender (free), or that could be Cinema 4D (expensive), and everything in between
The learning curve is very steep though...
See this article
https://en.wikipedia.org/wiki/UV_mapping
Your aim is to do the exact opposite. (Which can be done using the same tools)
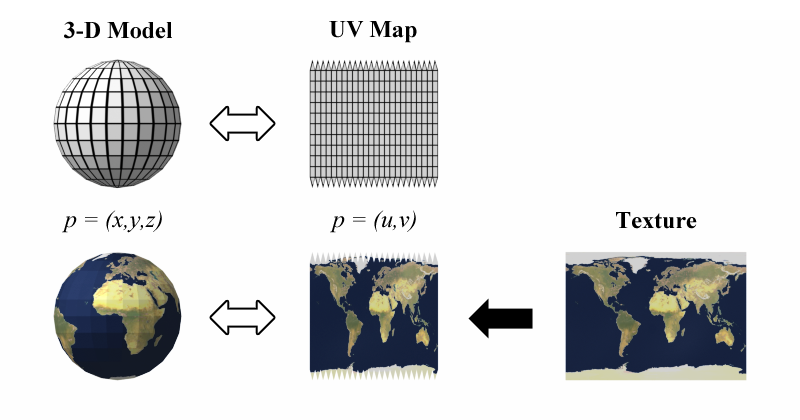
UV mapping is the 3D modeling process of projecting a 3D model's surface to a 2D image for texture mapping. The letters "U" and "V" denote the axes of the 2D texture because "X", "Y", and "Z" are already used to denote the axes of the 3D object in model space, while "W" (in addition to XYZ) is used in calculating quaternion rotations, a common o...
thank you so much @hushed niche @vapid flume
Gave +1 Creative Carma to @hushed niche (current: #12 - 288)
Gave +1 Creative Carma to @vapid flume (current: #6 - 1026)
Hello there! I have a question im thinking of buying a new computer. I always used Microsoft, but my friends of the industry uses Mac. For editing photos and videos what kind of equipment do you use? Thank you 🙂
"Macs offer benefits for Photoshop users through their optimized Apple Silicon (M-series chips) leading to faster native performance and consistent color accuracy out-of-the-box. PCs, however, provide superior hardware customization, potentially higher performance ceilings with powerful components, and a broader range of price points and monitor options. Ultimately, the choice depends on budget, preference for ecosystem, and hardware needs, as Photoshop runs well on both platforms."
It is becoming less and less true that Mac is the industry standard...
I'm aPhotoshop PC user for decades and I can say you won't have any problem as long as you're set-up meets the recommended requierements (RAM, Graphic Card...etc) and if you keep your machine clean of suspicious software...
If you want to be able to upgrade your machine without paying a fortune, the PC option is worth serious consideration.
But final decision is yours...
How can I make the ruler of Photoshop automatically connect to the line of the canvas
Like a magnet thing
Use this shortcut : CTRL+SHIFT+;
Or, in top menu go to : View and activate "Snap" option then, in the same menu, set the SnapTo options.

Hi! Also , if you hold shift as you drag a ruler, it’ll stick to the bigger tick lines.
Hey hey!
I'm not so experienced with Photoshop, but I recieved this file including this pattern overlay that I really want - the issue being that I don't have the pattern icon thing that seems to be used here.
Is there any way I can find this online or recreate it?
Thanks!

Not photoshop interface but by the way it looks to be the right Pattern since the blend mode is set to "Overlay" with 50% Opacity...
Black and White pattern with these settings will look like this when applied over a light brown color layer...
Please share
I'm pc lover but I didn't know how to use Photoshop on my actual pc without breaking the RAM. I was thinking of buying a portable because if I had to go work in another city it's more easy, in thar case, which items or characteristics should I have to consider?
You need help for what? I you really want help you need to give us more info...

Since you said you want to do video editing too, I would say any machine which meets Premiere Pro recommended requierements...
But the answer is highly dependant of your budget and tageted application (4K video, Animation...etc)
Does anyone know where can I find someone to assist me with my project? It is a minor school project and people told me they completed it in 5 minutes and I would be willing to pay however the deadline is literally in 3 hours so yeah lol
Can you provide a brief as to what you're trying to achieve?
pass the exam i dont wanna take hahah
I get that, but you need to remember that you're asking people to dedicate their own free time to help you. You need to take the time to specify exactly what you're trying to achieve and what you've managed so far.
I agree that many school projects can be completed in a couple of minutes if you have the right skills and experience.
@abstract sage
yes?
Hi 👋 I’ve just started sharing my work on Instagram. I’d like to know if it’s allowed to post my profile link or my projects here. Thanks in advance!
So? What do you need to accomplish?
Welcome in!
Not here this section is dedicated to questions about Photoshop but you can introduce yourself in #👋community-intros and/or share your work in #1110544577850511401... If you are looking for feedback => #📝project-feedback
thank u
@viral palm - I'm genuinely confused by that person above. They ask for help, say that it's urgent - two people respond to say "yeah, how can I help?" - and then they dissapear again?
Personally - I love the chunky font. - But don't like the alignment of the copy. - Especially 'To'. - I'm confused by the image proportions, - Is it meant to be a social media post? A printed banner?
The stuff at the bottom is almost unreadable and to be honest, from a commercial point of view, the image isn't that appealing. - Why would somone want to go there?
The three-hour deadline has passed, so I don't think he needs any more help... Maybe for the next exam.😉
So, I’m not alone with that feeling!
Please! 😉
it was a close deadline thing i need to do i so slap it on and forget about it lol

can somebody cut this tree out for me pretty please?

Hi, does anybody know how i can make it so the paper says : Samuel Wang isntead. its for my video please. and is it possible to do it for all the frames in my video?

Take a brush , hold Alt, click on the color behind the text (some sort of white) paint over it
Then make a new text layer and put it there
I guess the font doesnt have to be exactly the same so just find something similiar or something u like
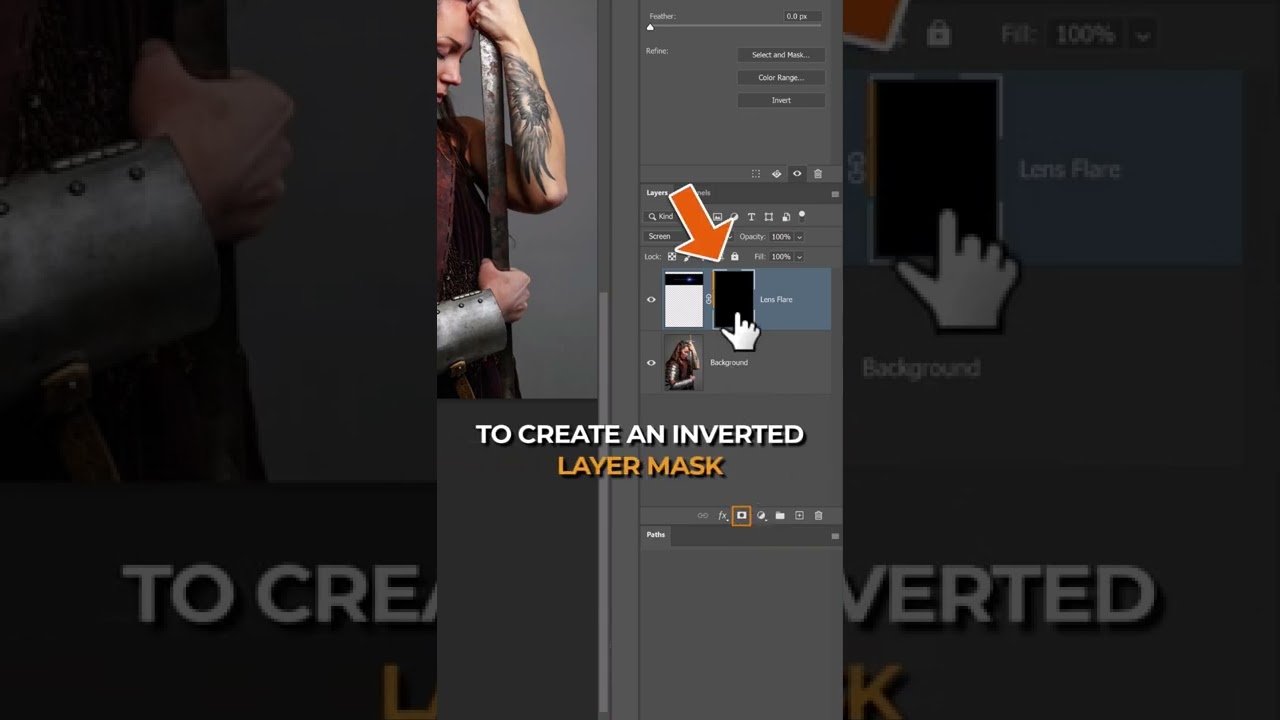
But this is destructive if u want it non-destructive make a new solid color layer with that color, invert the mask of the layer, then paint in the mask
@desert pawn

In Photoshop I only see ‘Create Frame Animation,’ no option for ‘Video Timeline.’ but that's the one I need! I’m on the latest version (RGB, 8-bit) and on desktop version, why is this missing? please can soemone help 🙁
You need to ask in #💬chat-general (you can ask here if you want to learn how to do it)
Also, beware of scammers in DMs
There should be a drop down menu, and upon choosing your option, you need to actually click on the button


That's the issue though I go to do that but I don't get the second option, I used this tool long ago so i'm not sure why it's happening now
Which version do you have?
If that's a recent version, probably worth filing a bug report.
Can you share a screenshot? (select the whole interface, layers and all)
It's version 26.10 latest so I'll report a bug encase and do you mean like this?

@vapid flume
and what happens when you click on the down arrow?
I already did it for him
.
It only has 'create frame animation' no 'create video timeline'
Does it still display a "choice" - just that there is only one, or does it display nothing?
It only display the 'create frame animation and nothing else, no other box, like i select the down button and it's just the create frame animation box

Strange, you can still report it as a bug here
https://community.adobe.com/t5/photoshop-ecosystem/ct-p/ct-photoshop?page=1&sort=latest_replies&filter=all&lang=all&tabid=bugs
Be sure to indicate Photoshop version, OS version, add a screenshot, including a screenshot of when you click on the down arrow to illsutrate your point.
I quickly scanned the existing threads and there is one instance but dating from earlier this year, from someone on a Mac.
https://community.adobe.com
Master Photoshop with the help of our global community.
I am using a microsoft surface pro 11 don't suppose it's that, I'm sure in the past I use animation with it
In any case, have a look here
https://helpx.adobe.com/uk/photoshop/using/creating-timeline-animations.html
There may be instances where it could not work, for example, non-square pixels.
Also check if it changes when you create multiple layers (as background layers cannot be animated, although the option is still visible on mine)
I'm not acquainted with Surface pros (I wish I had one though 🙂 , for working with Fresco )
So not sure if it can be a reason for it to bug
I definitely recommend for photoshop, probably the best tablet I ever had
and thanks, I'll do what you recommended
Well, I really need a big screen for the kind of work I do. I have Fresco on Ipad, but still prefer working with it on my Desktop
The forum posts are monitored by the team, you'll have better luck than here
Also if you want to share the link here, I can see if I can flag it on my end
Sorry if you felt targeted, but I wasn't talking about you (unless you have multiple accounts). I was talking about people who just say “I need help” and disappear as soon as you ask them for more details... I don't think that was the case with you. Anyway, glad you finished your design.
My drawing tablet pressure sensitivity isn't working. It's not working like it always has for me (where I have only previously used the circled settings to control what the sensitivity does). On PS (and PS Beta) it's 100% with any amount of pressure. I have tried with multiple tablets that have worked fine in the past. Also on the tablet software in the pressure sensitivity adjustment with test area is working like normal. I've toggled the circled buttons and tried the brushes labeled for pressure sensitivity but with no luck. I'm excessively tired and am hoping there's something simple I'm not thinking about. I have uninstalled and reinstalled all PS versions and CC recently.

oh naw im not offended at all haha, @nocturne cairn was very helpful and i was very busy at work at the time so i didnt respond yet but ye i dropped by and thank him already
Gave +1 Creative Carma to @viral palm (current: #8 - 926)
Gave +1 Creative Carma to @nocturne cairn (current: #13 - 250)
Got technical support, turns out it was because I'm using a Microsoft surface pro, which surprise me alittle but at least i know now
It's good to know, I'll keep that in mind if that happens again. They may have a OS version change making it not compatible?
It's good to have contacted technical support!
Perhaps they'll open a ticket and fix the issue in the next updates...🤞
Hi! Checked this? https://helpx.adobe.com/photoshop/kb/tablet-support-faq-photoshop.html
Tried a more recent or an older driver?
I haven't done either of those things yet, thanks for the heads up I'll try. Since it was 2 different brand tablets it made me not even think about messing with drivers.
Gave +1 Creative Carma to @hushed niche (current: #12 - 289)
Hello!
When I press f5 as a shortcut it changes my laptop backlight, how can I switch so it uses the adobe shortcut not the laptop one?
Hallo! That is something you need to check in the bios or the proprietary software for you computer, unless there is a Fn modifier key to get functions and not the controls of luminosity, sound…
Hey guys, recently i'm not able to use shortcuts in photoshop. Next to the elements I see the shortcut but i dont can use them
Did you create any custom shortcuts?
If so try to reset to "Photoshop Defaults" in shortcuts panel (CTRL+SHIFT+ALT+K) and test if default shortcuts are back.

you also can try steps shown here: https://helpx.adobe.com/ca/photoshop/kb/keyboard-shortcuts-stop-photoshop-mac.html
CTRL+SHIFT+ALT+K is also not working
Weird...Did you try other apps... Like CTRL+S or CTRL+Z in any office software?
Just to be sure the problem comes from Photoshop...
yeah in every other programm shortcuts work
did you try the reset preferences option of the shared link?
yes
Thank you
Gave +1 Creative Carma to @thick tangle (current: #68 - 30)
No worries
And no change?
Did they work before and stoped working today? New install? Is Photoshop up to date?
hello, how can i make this image more realistic?

would someone be able to point me in the direction of a tutorial on how to get a workflow like this?
😳
.
.
#mixedmedia #collage #poster #posterdesign #graphicdesign #design #designgrafico #experimentaldesign #photoshop #adobephotoshop
Likes
28767
or help me understand if he is using masking clips or how he is so seamlessly cutting up one picture to have all those clips
You'll need to work on matching the light/light source and also shadows. It an apparent composite as you cannot see any color cast or shadows on the woman's body. Also, you'll need to soften the edges a bit. They are very harsh and look like 'cut-outs' as it is.
I doubt you'll find a tutorial for this exact workflow. They are basically showing you roughly in the video what's going on. The head is being chopped into pieces and transformed. They are using Posterization and/or a Threshold operation. That is converting the thing to a only a few shades. At that point, there isn't much "matching" or "masking" that needs to take place.
could i ask someone to cut these images out and make them transparent backgrounds? with the words and images. thats all please and thank you


How can i posterize smth?
I was pessimistic but uninstalling and reinstalling the driver 100% worked. My drawing tablet's easily my favorite item but without sensitivity its not nearly as cool, I'm so relieved that problems solved. Thanks!
Gave +1 Creative Carma to @hushed niche (current: #12 - 290)

wait i misread ur response my mistake, what i mean is how is he able to so easily chop the pieces
@desert pawn


You need to ask in #💬chat-general , the channel we are in is reserved for Photoshop questions: How to do something in Photoshop.
Ask there, but be aware that there are lots of scammers operating in private, be mindful of what you agree to in DMs.
I mean technically it was a question... 😄
Has a "Job Requests" channel already been floated and dismissed here?
I would have reworded the channels if it was my responsability, but it isn't. The thing is "ask-a-question" is for photoshop questions, since there is no specific place for a job board (and if it was my decision, I would remove all this mess of asking for projects anyway)
There is no "Job Requests" planned, and I can safely say there never will be.
Be aware that most Adobe servers (Illustrator & Video for example) already ban those requests and they just save themselves the headache.
Adobe has its own job board, it's called Behance. Other platforms are available (PPH, Upwork, YJ etc)

Discover, connect with, and hire the world’s best design talent on Behance
I already did it
Yes, thanks for that. I was just warning the OP that it was the wrong channel
Gave +1 Creative Carma to @thick tangle (current: #67 - 31)
Oh okay mb
can i make it so the curves are aplied to all other layers and the curve layer is gone

Well select everything and then convert to smart object or press CTRL + E
Or if u want to keep those layers make 2 more copies of the curves layer and merge one curve with one layer
This will make everything one layer
i see thx
Gave +1 Creative Carma to @thick tangle (current: #66 - 32)
yea i want to like combine the layers into diffrent parts
Alright CTRL + J is for copying layers 😉
Alternatively you can group the layers (CTRL+G after selecting them) and apply the adjustment layer to the group as a clipping mask (select the adjustment layer and right click to choose "create clipping mask CTRL+ALT+G)

the adjustment layer will now only apply to what's inside the group
Both approaches (grouping + clipping masks, and Smart objects) are valid, they might be used for different workflows
so i can't rember that since when they doesn't work but i reinstalled it in the newest version and still it doesnt work
Sad to hear that and I'm sorry I'm running out ideas... Perhaps someone else here will have an idea.
I fixed it! Basically, on my windows machine, I've installed the English Language. As a german, I had Photoshop in German - now I changed my default windows language to German now everything works - thx
Gave +1 Creative Carma to @viral palm (current: #8 - 929)
Oh! Great!
I'll make a note of that, it could be useful if someone else encounters the same problem!
Thank you for sharing the solution with us!...
Gave +1 Creative Carma to @gaunt barn (current: #1017 - 1)
is there any way to make actual 3d text in photoshop with plugins or sth
The 3D capabilities are been removed a while ago, but Illustrator got new 3D features in turn.
If you want to make quick 3D effects, you can have a play with Project Neo as well! It has a 3D text tool.
It's an online tool, still a Beta, and free (you need an Adobe account, the same one you use with Photoshop)
The result can be exported as .svg, to be integrated within Photoshop if needed.
Hey! I have a print designer interview tomorrow, and part of the test involves "3D modeling in Photoshop." Since native 3D features are gone, I’m wondering what agencies actually use now and what could be asked in the test—Smart Objects for packaging mockups? Imported 3D files? Other things I might not have thought of?
Oh that's a tough one.
Do you think it has to do with packaging modeling? Mock ups?
Or products digital twins?
See that article, it could be helpful
https://3dartist.substack.com/p/deep-dive-3-package-design-in-product

In Start Here: Product Visualization for 3D Artists, I introduced product visualization as a career path.
I would say, you could start with some features in Illustrator. Rendering, lighting and Staging in Substance Stager (or using Blender but that's a steeper learning curve)

Adobe Substance 3D Stager is a 3D rendering software used to create 3D scenes with real-time 3D visualization and high-quality renders for virtual staging.
I really don't know, because in the job description they mention posters, catalogs, stationery (with motion design as a bonus), but not 3D.
They only mentioned 3D when I asked what the test would be about on the phone
Do they mention any software at all? Do you have the list? We could deduct from that.
they talked about 3D on photoshop
the others are illustrator, indesign, premier, after effects, nothing special
I have a hutch: See if it's too far fetched or not. The person on the phone is reading from an older Photoshop certification skill list. The way it's phrased rings a bell.
I hope they aren't working on an old version; it's an agency. I'll take a look at them anyway, thank you for all these references, they're already very helpful. 🙏
Gave +1 Creative Carma to @vapid flume (current: #6 - 1029)
Do you have a link? (even DMs, ignore what's written on my profile)
If you want to test out things without paying a substance subscription, you can try Dimension, it's an end-of-life product, but actually close enough to Stager
https://www.adobe.com/uk/learn/dimension?locale=en-GB&learnIn=1
Access Adobe Creative Cloud apps, services, file management, and more. Sign in to start creating.
You can find it in your CC app

The files it exports are .PSDs so perfect to do compositing. It lacks some of the features of Stager, but if you can understand the principles of Dimension, you won't be lost in Stager. And that way you could tell them that 3d is done with those tools now in the Adobe Universe
From reading the PDF the scenario that would fit would be to create realistic 3D mock-ups (think renedering whatever print you create on an actual product. I think you can use Dimension/Stager. Illustrator 3D features are more to create models, and not create mock ups
Okay, I'm going to explore all of these scenarios and I'll be more prepared than any of the candidates. 😉
Thank you so much, you are fantastic!
i opened photoshop after many months of not using it trying to test it out again and im unable to click on almost anything in the layers tool bar on the side. i can only click the mask button, the actual image itself (not off to the side of the layer image), and properties
i couldnt find anyone talking about the same issues on reddit or adobe forums so im confused
also tried reopening photoshop and trying a new file to see if that was the issue
just noticed too when i tried to click back into the photoshop app off to the side i straight up cant click anywhere on the layer window that isnt those specific areas -- it wont bring up photoshop so its like it doesnt exist idk how to fix this
Hello, I want a free psd fivem design. Can anyone who has one send me a dm?
Could you maybe record a short video of what’s happening in the Layers panel? 🎥 It would make it much easier to see what’s going on and help figure out a fix.
Ok the issue got resolved — turns out the update I’ve held off doing fixed whatever bug suddenly popped up
how i do remove the background but keep the vfx

that's bit low quality image but select by color should do the most of the work

but tbh you probably better to start over with some custom fire
and just change color of flames
does anyone know if the generation happens behind the scenes or is there an option to toggle?

Depends on the end goal.
If you're layering within photoshop, use blend modes...

If you plan to save this image without the black background as a transparent png with the hope of using it directly and keep the vfx as intense as the original, you won't be able to do that.
The most dramatic effect of this image comes from the interact between bright areas and black background... You can use blend if to reduce the opacity of the blacks but your vfx will be affected(Video1).
If the result is good enough for you, you can add a blank layer above your Vfx layer(with blend if treatment) and merged them into a Smart Object (Video2)...Then export it as png... But as I said the vfx will be less dramatic...
If it's for compositing inside Photoshop @sly hawk gave you the best solution....
Thanks for letting us know --- hang tight, the update is coming tomorrow I believe... Looks like the What's new note might be a bit early. Apologies for that.
Gave +1 Creative Carma to @silk grove (current: #1017 - 1)
thank you for the clarity
Gave +1 Creative Carma to @spark snow (current: #96 - 20)
hey peeps! I'm currently creating a 3d mockup with this logo, however keep getting this artifact at the back of the logo (i have tested with other images to make sure it's not a model problem, and it is consistent only with this image)
have you any advice on how to deal with this? I've attempted exporting through lightroom, that fixed nothing, rasterizing from svg - png, that gives the same result

Anyone know how I can create a rectangular prism like this?

guys can it happen that if i open curves or levels in a raster image by shortcut key, it automatically opens as a new adjustment layer
<@&548221840750018590>
Yes, if you remap them in edit>keyboards shortcuts
thanks man
How are you doing it? Is there transparent background ? Photoshop version ?
You'll have to make it one side after another by creating rectangle shapes and skewing them
use isometric grid
how to stop my crop tool from snapping
my crop tools snaps to nearest whole number in the ruler even when i am not pressing shift
You can remove the snapping by going to view>snapping
You can even choose what's snapping, and what isn't

Alternatively you can toggle it on and off by using the SHIFT+CTRL+; shortcut
<@&548221840750018590>
Thank you! 💖
Gave +1 Creative Carma to @ivory trellis (current: #1017 - 1)
No, just a bunch of dimwits, it's happening on all servers as far as I see
oh
These are likely bots I guess

do you also shoot or just edit
Does anyone here know how to intuitively warp "curves" into shapes? (forgive my terminology)
I'd like to create something resembling the 1st pic, but more similar to a donut shape.
Tried liquifying rectangles but I think there must be a better way, 2nd pic is my best attempt :p


Using the latest photoshop version, has a transparent background before export, and exporting via export as > png
You could try some filters in the Filter>distort section, starting by straight lines.
For example the spherise filter, but by all means make some tests. Convert the layers/s into smart objects as you'll be able to run tests with different settings without having to go back one step and running another set of settings

You may have to stack multiple filters on top of each others as well
A cool way to do that is in Illustrator, where you can apply a design on a 3D shape (so the design deforms according to the shape)
It's no longer possible in Photoshop since the 3D features disapeared (and I'm glad they did, it was very clunky)
all right, thanks so much ❤️
I downloaded this template from google and now I'd like to place some images exactly where all the squares and rectangles are, I know I can just import my images then resize them and position them in the exact same spot but that would take a while, is there any faster/better way I could do this?

If you're asking for a one click solution I don't think there's a way...
I would suggest you to "place embeded" your images in your document then clip them to the Thumb Shape you want them to be on...
Usualy good template makers join a tutorial about how to use the template... That's not the case for yours?
He didn't add a tutorial sadly. I'll try out what you suggested though, thanks
Gave +1 Creative Carma to @viral palm (current: #8 - 930)
Typically, a template like this would assume you'd double click each plain thumbnail in the layers panel to 'open it up' - You'd then quickly drag in your image, scale it up until it's bleeding off the edges and then you can hit SAVE and go back to the main artboard...
your image will then be neatly placed into position without any more requirement to faff about with cropping etc
Is there a simpler way to mask a stroke?
The way I've been doing it is to literally duplicate the image and add a stroke to 1.. then use the mask on the entire image, but is there a less round-about way of doing it?
A stroke adjustment layer would be awesome, but I don't know how I'd achieve that.
Lets rewind. - What's the end goal?
I thought the same thing but thumbnails are Shapes not Smart Object...
[Zooms in to look....] - indeed!
To essentially have a mask layer on top of an active stroke effect/adjustment layer.
The mask to show/hide/adjust the stroke, but not the image it's applied to.
Sorry, I mean - what look are you trying to achieve? Can you share a screenshot? - There might be a completely different approach you could take.
It sounds like you could do that with a clipping mask?
Hard to understand what you're trying to do without any shared image but you can mask the effect of a layer style...
Check this box in blending option panel.

Oh, no I'm literally wondering if the concept itself is feasible.. I don't currently have an application, but on many more than one occasion, this would have been useful.. so I'd just like to know if masking specifically a stroke is possible, without altering the layer underneath.
My current method is creating two copies of the image, with the one on top having the stroke

Like this?
Sorry, not the best at explaining.
So #1 is with Layer Mask Hides Effects unticked
And #2 is with Layer Mask Hides Effects ticked
But what I'd like is an active or 'dynamic' Stroke effect which I can control the opacity of, per-pixel, with a mask.
#3 would be the desired result if that half black/half white mask only affected the stroke.


Mmh.. forums seem to say there's no native way to do this..
It'd be cool if you could apply layer effects like adjustment layers, so you could add masks to things like shadows or bevel & emboss
Anyway, no worries, I don't think what I'm after is possible.
i cant access the canvas extension color. im trying to increase the size to something like this

after he changed it, it became like this

but when i do it, nothing happens. im guessing its because of the canvas extension color
It's making it transparent because of it I guess
If there is a pixel layer in the background, it won't fill the empty part of the canvas. If you want that behavior, use a Solid Color Fill layer instead.
i found a solution but
now im havin a hard time with this

its getting annoying on this part lol
im trying not to select past the line
but it keeps getting selected there
Turn on Snapping (View > Snap). Then get the Rectangular Marquee Tool and drag a selection to the edges of the Guides. It should snap to the Guides.
There is a workaround but you'll have to creat a copy of your shape. Apply the stroke effect on the copy (set fill to 0%) and check "Layer mask hides effect" option. Mask your Stroked layer as you want and link the two shapes if you plan to move them.
Yeah, that's my usual solution
After creating a layer effect, you can right click the layer in the layers panel and "Create Layers" to move the effect to its own layer, then you can add a mask to that layer.

Ah, that essentially 'rasterises' it though and it stops being dynamic.
True...I mean, it was raster in the first place, but I know what you mean, it's no longer editable using layer effects panel. I think the idea is tune it how you want it, and when ready you can put it on its own layer for masking if needed.
Yeah. That's probably my best option.
Over the last few years I've been getting addicted to.. basically working as non-destructively and adjustably as possible.. if I can create an end result where every step and effect used along the way is purposefully re-adjustable, it is very good for my dopamine.
Ahh yes, non-destructive is the way! You could always duplicate the layer with the effect on it and hide it, so that you always have a version that's still as a layer effect that could be modified.
I was wondering if anyone knows how to do a rollover ad? I know i should know how to do this bc Im on my last semester of college before I get my Associates Degree in Graphic Design but I don't because I don't belive i was ever taught and I haven't had any practice so if someone who knows how to do it could show me visually because I'm a visual learner and I would really appericate so much!
Rollover ad... You mean something like that?

Yes please!
Can you show me visually how to do it please?
@viral palm
you can make it with adobe Ae
do you have it?
i can record you a tutorial video
can i send a dm? don't know is it ok or no
Photoshop has very limited animation features so Ae would be better if you want more organic animation...
You also can use Adobe Express animation => There are few cute pre made animations...
Let me know if you're still interrested in PS animation solution...
Sorry I was AFK...
Short video to show a simple animation workflow in PS
Not a fancy work but you'll get the idea.
Note: The placed embeded "frames" image has been premade to fit the Video width.
Thank you so much that's perfect!
Gave +1 Creative Carma to @viral palm (current: #8 - 931)
im on photoshop and when i try open this one plugin it just stays like it is right now. iv disabled and reenabled the plugin multiple times, deleted and reinstalled the plugin multiple times etc and this still happens. although i know it worked because when i first installed it and i checked to see if the plugin was working, the plugin appeared to work completely fine. it was only after i closed photoshop and tried to open the plugin again then it started doing this

Please don't spam the same post multiple times / in multiple channels. You'll probably need to contact the developer of the plugin. Adobe doesn't provide support for 3P software.
whats 3p software
"third-party"
ah
either way tho i thought there wld be a solution for it without having to contact the dev no?
I don't know. Never used it/don't know about it. Other than ensuring that "Enable Generator" is active in Preferences > Plugins and ensuring that its enabled/registered however they require you to register it.... You'd have to check the developers.
👍 lemme try that
How do I put the image behind the slime creature bru

create a layer of the slimy boi, delete slimy boi from original image
then rearrange layers as you wish
thats how i do it, but if theres a better way let me know xD
you can also just just try generative fill on that area
Thank you I think it work
Question - is there a way to speed up "load files into stack" or a way to perform the same function quicker. I notice (by accident) if I opened all the images on their own they open into their own window in Photoshop fairly quickly; but load files into stack takes a lot longer. Looking at Task Manager Photoshop isn't hitting anything like the limits of my processor/graphicscard and my RAM is only 50% utilized.
So I'm wondering if there's any way to do this process quicker
my photoshop crashes as soon as it loads, ive tried everything on google, but it doesnt seem to work, could anyone experienced assist me please?
I probably won't be able to help you much but have you check those steps?
https://helpx.adobe.com/uk/photoshop/kb/troubleshoot-crash-or-freeze.html
Which version are you on?
the latest
Tell me the number 🙂
You can find it in your CC app, if you can't load photoshop

okay
btw i cant do most of these fixes because it doesnt even open 😭 it loads and then opens the normal photoshop surface for 1 second and crashes
Did it used to work or are you a new user (or do you have a new computer)?
it used to work, but then i reinstalled it and it just went to hell
how do i get to this page?
Your CC app, the app you used to download Photoshop
You can access it online with your Adobe account
https://www.adobe.com/apps/all/all-platforms

So that's the latest (I was just updating so it's the latest)
Do you know if your computer is up to date, particularly graphic cards drivers?
yes it is
Unless someone can point you to the right direction, I will give you a link to post, potentially a bug report (while we're the oficial discord server, this is not a place where Adobe employees hang out, so any bug report will take quite a long time to get resolved, whereas, if you post in the forums, you're more likely to get an appropriate answer quite fast)
https://community.adobe.com
Master Photoshop with the help of our global community.
be prepared to:
- give a full list of your computer specs, including OS version and anything that you deem relevant (that includes GPU brand and model, RAM available)
- tell them you can't check scratch disks and performance settings since you can't access Photoshop (you will be asked)
- State your subscription specifics (student, team, school account, individual)
- Which steps have you taken to resolve it already
- If you tried to uninstall and reinstall again, after the first one made it crash
- What did you do EXACTLY prior the crash (including just before installing it again)
and, of course, the reason why you had to uninstall and re-install it again (which is probably the biggest clue)
oh my god 😭
Yes, they aren't mind readers and they don't have access to your computer. They need clues
Of course, I'm assuming it's a legit version. Otherwise don't even try 🙂
Honestly, it shouldn't take more than 10 sentences, not the end of the world
just one problem: what is a computer spec and an OS version?
im not knowledgable in this 😭
Mac or PC?
Which version of the OS?
the list of hardware in your computer. You can find a shortened version in thedevice specifications (on a PC, no idea on a Mac)

oh okay thats good
ill try it out
OMG WAIT THE WEB VERSION WORKS?
NAH THIS IS A LIFESAVER
i dont even need to fix it then
on a PC settings > system > About
The web version is a light version, with way less features, working on a browser, it might work because it's less heavy on your computer. Difficult to say
It's not the same Photoshop though
that might be why
Well, one of the first things to see, if if your computer is powerful enough for Photoshop. You probably already checked that (it should come first in a google search)
Just in case
https://helpx.adobe.com/uk/photoshop/system-requirements.html
The pain point is often the GPU, see if the one you got is powerful enough
i dont have a gpu, only cpu since its a laptop
but i can run premiere pro + after effects smoothly, so i should be fine haha
You can have laptops with a separate GPU (I used to have one)
Certain features will not properly work in Photoshop with a CPU alone
oh
I dont know man, the heavier adobe softwares work for me
Define "heavier"... after effects certainly isn't (except for the rendering)
premiere pro
I don't know really, see with all the info I gave you and don't hesitate to post in the forum if you need it solved.
And check your computer specs against Photoshop requirements
Ps can be as demanding as premiere pro or after effects depends on project you’re working on
Exactly!
Try to generate meshes from the liquify filter on large images and tell me that Photoshop isn't demanding 🙂
Your GPU will beg for mercy 😂


Actually I had a laptop and it was quite cosy in the room in the winter 🙂
lol. That would have been my computer whilst trying to run Crysis back in 2007.
I remember i had to buy new gpu to run crysis
That was almost 20 years ago you old ~~man.... (or woman).... bugger 🙂

hello, anyone know if is possible to export that three shading layers into transparency png, so when i open the png there is only shades, because now when i export to png is filled, without background but not transparency, hope you understand me what i want

The brightness/contrast one, doesn't contain any pixel info so you won't see anything if you export it as a PNG
The other two should be alright
is anyway to convert somehow that i can both of them export as shadows
There is a way, but it's a bit of a challenge.
okay, do you maybe want to share how to do it ?
Lol - I was working on that
The 'logic' behind it uses this approach:
https://www.youtube.com/shorts/IvgzAjt0flc
I'd show you specifically using your own assets as an example - but unfortunately I need to dash off in 2 mins to pick up kids from school.
Have a try using the approach me touches on in the video - and if you struggle to apply this to your own project, feel free to send over the PSD file here on discord and I'll try it out for you in a few hours when I'm back home.
okay so i can contact you throught the dm
is there any way to make an action/script that replaces specific color numbers with given color numbers?
Even if there was, I'd be doubtful it would work exactly as you're expecting. Are you working with a vector based graphic with PEFRECT lines?
That's fine - but won't be home for a few more hours
working on 3d models, and if i want to quickly change skin tone color, it would be very usefull

so i have skin tone setups
Ok, but remember that the pale skin there is using at about 20 shades of pink.
Any 'script' would need to reference every single hex reference used.
I don't know the answer right now, but googling it brought up "Adobe Pixel Bender"
could anyone suggest a good way to make highlight the seams (marked them on the image ) even more
i already played with brightness/contrast
also i tried exposure, but it makes surrounding shadows darker as well (image 3)
is using mask really the best way to highlight them?


the visible seam is due to the difference of contrast between darks and hilights... That's not a "line" you can brighten... IMO the only way to make it more obvious is to increase contrast and it will change the original colors.
If you want to highlight it without changing the colors of your image you can paint over it or trace it on a layer above and play with blending modes and/or opacity of this layer (as shown in this short video).
thank you! never seen this method or anything similar
tried it and tbh seems light "trace" makes them even less visible
tried dark one as well, but the result was even worse than with the dark one imho
your note about contrast touched me up to try playing around with levels and here's what i've managed to achieve
i think that's good enough for me
thanks again!


Gave +1 Creative Carma to @viral palm (current: #8 - 932)
I'm glad you found a solution!
im trying to set 512x512 but it wont let me, why? why it wont let me? where should i possibly click or do to do that? thanks

Could you share the whole Photoshop UI?
If you're is "Export as" panel and your image is not square you can't get 512x512 "image size"
You can set canvas size but crop will occur.
There is a workaround but honnestly if you plan to export a 512x512 picture the best practice would be to design directly in a square ratio format.
Here is a short video to show you how to export a 512x512 design from a 600x800 canva... Hope it will help you to understand what I meant.
oh i managed to make a preset
which was exactly what i needed but didnt know i could do
made a 512x512 preset so now i just throw stuff in it
convert to smart object and then i just fill the screen with the texture i want
is affinity like photoshop
interesting
thanks for your time!
No! It's a different image processing software... Some tools are similar, but the software, user interface, etc. are different.
Hey could someone with generative fill help me? I have a photo, taken in portrait and want to make it 9:16. Unfortunately i dont have it :( Its a simple photo so should extend easily. Could i dm someone? it would only take a minute and would make my day!
why does my text disappear when torn edges is turned on, I followed the tutorial properly it shouldn't be doing that
Hi there ! I'm currently working on something and my goal is to be able to get the same blue dotty border on my text, i dont know how is possible to have it without having the original dot pattern


The yellow layer is the korean text and the blue layer is the blue border. The first picture shows when the blue layer is the only one active and the second picture is when only the yellow border is active. I hope someone could help me even if it's to tell me there is no solution except creating it myself ! 


before, i can click on the object and itll automatically select that,
now i have to click on the layer itself on the layer tab just to select it and move it around etc
how do i go back to just clicking on the image in the canva instead of clicking on layer?
sorry for the different language but is this option selected ?

nopoe, i just enabled it and it works, thank you so much!
Gave +1 Creative Carma to @high tangle (current: #1017 - 1)
no problem ! have a good time
THat's simply because your Foreground and Background colors are both set to white. Try to hit D to reset them to default (Black foreground/White Background)... This filter and most of Filter Gallery filters used these colors so if both are set to white you'll get a whole White Background only...
how can i make it so the stripes dont stick out like that

i dont know how it's made in your file but i would select the red circle and then select the second option when you right click with a selection tool and then use the eraser
sorry i cant name the tool or the option properly as i dont know the name of it
Could you share more of your UI and let us see how your design is built?
if i wanted a seperate image to have the same lighting would that be possible on ps or would i have to do something else

*ohh my bad im working on illustrator
oh that's why loool i dont remember much of illustrator but there is an option where you can select both shape (the half circle and the rectangle) and you'll be able to reshape an object with another one
or try with the cutter if it works
i found it back and it's the pathfinder tool !

great ! enjoy !
is there anything automatic / generative for matching the color grading between two images? I have cut a selection from another image, and it actually fits in terms of shadows and lighting, but the color is just off. One is more washed out, the other is very saturated. Anything to normalize them in Photoshop?
hi ! there is actually a tool for it but i never tried it tbh lol i learnt about it months ago, if you go to image and then adjustements and then match color you'll have the option you're looking for !
before using the option you just have to have both image on the same psd and then proceed to put the one you wanna adjust on a layer on top and then the image with the color you like right under it
why does the text smartobjekt not get affected by the gradient

my boy
Hi! I up my question just to know if someone has the answer 
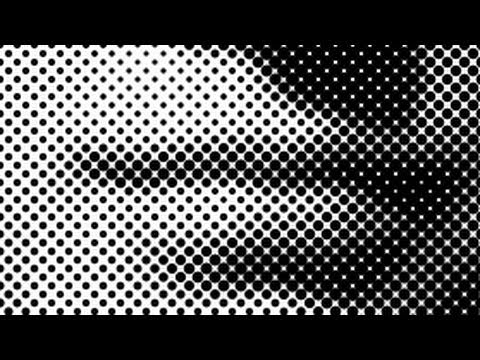
That's called a halftone effect. You can use the halftone filter to do that
https://www.youtube.com/watch?v=usDDwwraaRk
My Effects Shop: https://justinodisho.com/shop
Adobe Software Download: https://prf.hn/l/dlXjya5
Support the Channel: https://www.youtube.com/channel/UCy7DyWXJ0jghyMsUoOU6F7g/join
you probably won't find the exact thing you need with tutorials, so you'll need to adapt. They are sometimes called screentones
Thank you very much! I'll hop on the pc right away and see what I can do with it
Gave +1 Creative Carma to @vapid flume (current: #6 - 1030)
You're very welcome!
Thanks again ! as i didnt know it was called halftone, now i could check another tutorial to make it in the text and i found this https://www.youtube.com/watch?v=WJcNglaxORE very helpful haha my work can continue lol tyyy 

Here's a quick video on a halftone effect approach in Photoshop, there are more ways to achieve different kind of halftones but later those are gonna be uploaded as well so stay tuned. This time this effect was applied on text and on narrow lines like letters, the halftone need to be applied with a different approach in order to achieve a correc...
Gave +1 Creative Carma to @vapid flume (current: #6 - 1031)
why cant i use the object selection tool
when i use it on another pic i can use it but on the other i can
hi can you give more context please ? also is this option activated when you use the modification tool ?


You want a soft transition between the two images?
If so try to slightly overlap both images then use layer mask and fill it with a black to transparent gradient.
hello guys, i dont use or have photoshop, but my friend does, i wanted to put this explosion
behind the logo of the can, i tried my best but it's way out of my skills, i know this is some of a strange request, but can anyone do it (possibly keeping the dots)?
feel free to refuse, if anybody is willing it would be great, if not, it is what it is, pls dont post me on r/choosingbeggars


Well apart of posting your request in wrong channel no one will post you anywhere you should post in #💬chat-general
if ur struggling with removing the "splash" from the background just set your blending mode layer to screen
I just realised they already left the server... darn 🙂

great job anyway James!
guys does anyone know why my png is full of theses weird squares behind it? im trying to load on another software


this is the texture
i took off its background and set transparent, exported as png
but when i use it it shows like this

We don't support other software here. Your png loads correctly in Photoshop so why don't you use it?
will try hold on
im using it, i said im using it in another software
didnt for support for another software i asked for the png above, idk if theres any hidden information in it that i dont know of that is causing it to be read like that
Well with that one above, I ABSOLUTELY GUARANTEED there was no pixel data around the edges
I set the mask here to have a threshold adjustment, which means that mask pixel is either black or white - No 'in-between' -

what you did worked... it changed how the texture behaves but still not transparent as it should be... weird

maybe i need to do something with masks like you did to have some transparency maybe
Hey! I want to make it looks like it's moving, I tried with motionblur and it turned out like this. Is there a way to make it more visible that it's moving?

Hello. I was wondering if it were possible to cover my face, and perhaps even a bit of my girlfriends with my phone similar to how she is at the bottom. I am new to photoshop and I am completely lost. Can someone point me in the direction of where to start?

hey can someone who has generative ai fill help me?
with what?
Is there an official group for After Effects?
for all Adobe apps about Video (Première/After Effects) => https://discord.gg/adobepremiere
Ope
Did my message delete
Is anybody able to give me a hand with photoshop real quick
What ya need?
yeah i can do that
how did you do the transparent background thing
how can i merge this three together so i can mask it depending on how i wanna mask it

Nvm found out how, it's Ctrl e lol
I would recommend Ctrl+Shift+Alt+E. This will preserve your original layers and create a merged copy of all visible layers.
Preserve original layers?
if u press ctrl + e thats basically destructive if u want to change something later or tweak something u cannot because u already merged everything together ...
preserve original layers means u "keep" the original layers
it's much better to work non-destructively
you can group and hide the original layers and if you don't use them that's okay , but it's better to have them and not use them rather than not having them at all and needing it later
Project requests should be made in #💬chat-general channel.
Ahhhh, I see! I'll keep that in mind. Thank you!
Gave +1 Creative Carma to @thick tangle (current: #63 - 33)
np
Yes.
I am a fan of non-destructive work. That's why I like to work ‘on the safe side’ and use mostly Ctrl+Shift+Alt+E instead of Ctrl+E.
(@thick tangle has already written you the more detailed explanation).
I'm not sure to understand what you plan to do with the merged layer of your three images but rather CTRL+E or CTRL+SHIFT+ALT+E you also could turn them into one smart object. This way, your workflow remains 100% non-destructive and you retain the ability to edit each layer independently by double-clicking on the smart object thumbnail (it will open it inside a psb file containing all the layers and their masks).
i downloaded an image from facebook and when i put it on photoshop it is like this

how do i fix this lol
Try again. Take a screen shot. Use a different image.
its still the sameee noooo
View the image at full resolution and take a screenshot of it.
Perhaps try with an other file (from facebook too), see if it's the same and let us know...
check Image, Mode, Make sure its RGB Color 8 Or 16 Bit


Does it work ?
Or u can just Dm me the image so i can try to fix
I'm sorry for the late response, i fixed it before by trying to screenshot the pic again and it worked but if it happens again, I'll make sure to try what you suggested.
Heyo I have a question. So I recently noticed that when I make a selection in the layers using the shift key, if there are collapsed groups within that selection it will select all layers in that group and not just the group itself. So if I then toggle the visibility of such selection it will turn all the invisible layers in that group back to visible altought I just wanted to toggle the visibility of the group I selected. Did anyone else notice this changing?
can someone help me no idea why the pencil does this

Hello! I would like to extend the ground of this picture to fill the white area, but I cannot use content aware tool as it's basically 80% white, is there any automatic way to "fill" or "loop" the selected ground to fill the white?

can you do a full screenshot
of what the whole image is

3px pencil at 885% zoom... It looks to work properly...
i have symmetry on
@fallen zealot I initally agree, but I want it to repeat on the bottom as I will have text there
😄
Oh! So symetry doesn't work properly with pencil...
Does it work with brush?
yeah but brush isnt really good for pixel art as it leaves like "fading" things when its really small idk howt o explain it tho
I understand!
can i fix that somehow
try to increase "smoothing"... It seems to work for me
if 0% => I got the same than you
at 10% => symetry seeems to work correctly... Let us know.

ill try
where the sigma is smoothng
nvm
its greyed out for me

hiow do i fix that now
fixed
Tysm!
go to brush settings...
by the way it doesn't really fix the problem I think I have the same than you even at 20% smoothing...🥺
for me it fixed it so
Mouse or graphic tablet?
mouse, im too broke for a tablet haha
they are not much expensive
you don't need to those one with screen (you can buy them later )
i know
i have like 40 euros to my name

30 not even 40
wish the best for you
@fallen zealot I had NO idea that this existed, I could literally just select WHAT to fill it with, fantastic!

i bought a xp pen V02 for 11$
idk i dont really need a tablet i wanted to do UI not drawings
and now do the blending by hand but me too tho haha
A mouse will do just fine... No need for an expensive model... If you were looking for a Christmas gift idea, you may have found it... It all depends on your actual needs.
So mouse will definitevly be enough...
yeah
Hi, I am new to photoshop, I have absolutely no idea how to edit a photo and get a psd file for an event. I am trying to merge two different animals. I am trying to put the Guerrillas head onto the crows head, but I am having difficulty, any help would be nice!


Hi, wasn’t sure what channel to put this message in but I have ended up with a corrupt psd photoshop file, it’s happened since my pc crashed on me. Opened it up and it now comes up with the following image. Tried all type of repair sites etc… even asked ChatGPT to help but no luck so far. File size is still 1.2gb so it’s still some what there. Any help or advice would be great. Thank you

Honestly if it's web size, the google thingy will do it for you.
Nano Banana
If you actually want to learn photoshop, then you've got a lot ahead of you.
(And arguably it's shortly to be a dead skill anyway.)
#feelingRatherDevoidOfHopeCurrently
Shot in the dark, but I'd at least check if you have a system restore point set after you saved the PSD and before the crash.
Nano Banana did it well with such a simple prompt "put the gorilla's head on the crow." All I did was drag the two photos into the same canvas and select the whole canvas with that prompt in the contextual taskbar.
But to do it manually you are wanting to learn masking for starters (isolating parts of an image ex. the gorillas head). And to blend it in you can brush with with a soft brush on low flow around the masked edges. Or another way to blend the heads is to simply use selection brush around harsh edges and Firefly 3 will likely blend it out.

Hello Im making an orthdoox monastery in Roblox and I need the icons to look old the one i posted above is done by ai since I asked but Id like to know how i can do this

Hi! Please elaborate, are you asking for prompt suggestions or how to create/draw something similar from scratch in Photoshop?
Hi, yes, I was trying to “cut” and paste the guerrilla face and pasted it into the crow. But I was use the drawing thing but it is very hard to draw a good outline of the face. So I was having an hard time with that. I would definitely take your suggestions in mind. Thank you very much!!!
Gave +1 Creative Carma to @bold galleon (current: #36 - 57)
I have the icon I’m trying to make the effect of locking it old
Like not black and white
But like the icon I posted above
Can you show the other icon?
Here's an example using layer masks (which to me, is easily the most important part of photo editing). It's how you nondestructively isolate things and "erase" what you don't want (everything but the head of the gorilla). Here, I used the selection brush to select the head and then refined it with the black and white brush, refined further with the select and mask menu using smoothing. Brushing black on a layer mask makes it go away, brushing it white makes it come back, brushing it with low opacity/flow brush fades it. Brushing it with grey fades it too.
How do I check this?
In the Windows search menu type in "restore point" and you will find the menu

I’ve got one from 4 days ago, so does that mean I’ll have the psd from 4 days ago?
I'm **very **confident that's correct. But I can't guarantee it. I have done it probably 10 times for similar reasons, and it has always worked out that way.
If there is something between 4 days ago and now that you created that you would like to save, I would recommend saving it to something external because I'm sure it will go away if you do the restore.
Okay thanks. How long did it normally take? Currently doing it but it’s taken like 15 mins so far
Gave +1 Creative Carma to @bold galleon (current: #35 - 59)
It does take long, I vaguely remember it maybe even taking an hour or possibly more. I wouldn't get worried if it takes even longer.
I used to be able to drag my screen above the white canvas, I changed laptops now and this one doesnt allows me to drag the screen below the white canvas and this is the furthest I can reach, how do I change it?

so im trying to make an animation but
let s say if i wanna have a new frame with a new image
i can't replace the image directly with same position and settings
but i have to edit it manually
how do i fix this
Are you using frame animation or video timeline? I make new layers and/or groups for each new frame when I animate, usually a copy of the previous layer that I slightly alter (what I'm assuming you are "calling editing manually". thinking of frame animating in Timeline specifically. What your problem is, isn't clear to me. Maybe reiterate clearly stating your problem or post a screenshot.
im actually just editing an image over and over to make new frames
can you explain how i can use the things u said
Sure, give me a min
Didnt work sadly, Maybe the psd is just corrupt all together.
Here is an example of using frame animation. A very cool part of PS, although it isn't super intuitive and needs a little getting used to but is very rewarding to learn.
@bold galleon do you know any other ways?
@low flume You will see me at the end re-adjusting the visibility of the layers for each frame. This is a fumble on my behalf as I haven't used it in a bit and there is a way to properly do it without that extra step that leaves my mind. One of the reasons I claim it "isn't very intuitive." It's best to learn it with simple things at first.
I do not and am pessimistic for your situation. I would send Adobe an email being as descriptive as possible if I were you.
the thing is that doesnt work with multiple images
what if i wanna add a frame where the eye is yellow or where the mouth is open
i am animating something like this

You can do that. I definitely recommend experimenting with it. It does takes some learning. Depending on what your doing with that image, it can be very complicated. I would literally learn with a 5 frame or less simple animation.
okay i ll try ig
thank you ❤️
Gave +1 Creative Carma to @bold galleon (current: #34 - 60)
I would suggest you to start by adding a texture over your icon and play with blending modes of this texture.
For this short video I used an old paper texture from AdobeStock Free (https://stock.adobe.com/free)...
Note: The choice of texture will depend on the characteristics of your icon image.
Hey everyone, here would be a good place to ask for a scripting question?
For some reason I can't sign in to adobe forums, it simply gives this site can't be reached error
You can ask here, but keep in mind few people here are familiar with scripting (I'm not...Sorry).
Then I guess I will try my chance both here and #1223011682012369027
The thing is, long ago I made this script with some help but right now I totally forget all about scripting and I need a litle update.
What it does is just combining several layers into a smart object, and rename it to the bottom layer. Now, if possible I want to copy the layer's color as well.
This is the script
`function main() {
var s2t = stringIDToTypeID;(tr = new ActionReference).putProperty(s2t('property'), p = s2t('targetLayersIDs'));
tr.putEnumerated(s2t('document'), s2t('ordinal'), s2t('targetEnum'));(lr = new ActionReference).putProperty(s2t('property'), n = s2t('name'));
lr.putIdentifier(s2t('layer'), executeActionGet(tr).getList(p).getReference(0).getIdentifier(s2t('layerID')));
var nm = executeActionGet(lr).getString(n)executeAction(s2t('newPlacedLayer'), undefined, DialogModes.NO);
(r = new ActionReference()).putEnumerated(s2t("layer"), s2t("ordinal"), s2t("targetEnum"));
(d = new ActionDescriptor()).putReference(s2t("null"), r);
(d1 = new ActionDescriptor()).putString(s2t("name"), nm);
d.putObject(s2t("to"), s2t("layer"), d1);
executeAction(s2t("set"), d, DialogModes.NO);
}app.activeDocument.suspendHistory("Smart Obj Script", "main()");`
I also found about this post which should help I think but I am unable to apply to my own script.
I would appreciate the help :)

Stack Overflow
I have seen a lot of questions and answers about how to access or change the colour of a fill on a layer through javascript, but that's not what I need. In a Photoshop document you can tag layers w...
Hi, unfortunately, IIRC this is only for windows files, not user documents. For that you need to use file history (before the crash, to save a copy of your files) : https://support.microsoft.com/en-us/windows/backup-and-restore-with-file-history-7bf065bf-f1ea-0a78-c1cf-7dcf51cc8bfc
Learn how to configure File History and how to recover files and folders that have been deleted or accidentally changed.
Or save files on creative cloud in addition to windows: https://helpx.adobe.com/creative-cloud/apps/work-with-cloud-documents/manage-and-restore-files/revert-to-earlier-version.html
That solves the mystery why it didn't work for @olive flint
Hi, try a different browser for the community forums, or post at https://www.ps-scripts.com
And if you are coding in UXP, there is https://forums.creativeclouddeveloper.com/c/photoshop/63

Adobe Creative Cloud Developer Forums
This is the parent category for Photoshop. There are sub-categories for each API:
Different browser or VPN didn't work, but I just tried with my phone but it worked.. weird.
About considering I don't know what UXP is I doubt its the thing that I am looking for :)
Anyway gonna try official forums from my phone, thanks
Gave +1 Creative Carma to @hushed niche (current: #12 - 291)
It is the new coding environment
https://www.youtube.com/watch?v=4nL5xFbUF9k
https://www.davidebarranca.com/development/adobe-uxp-things-you-need-to-know

Learn about the Unified Extensibility Platform UXP: What it is, what it isn't, and why it might be relevant to you.
More Creative Cloud developer resources: https://www.behance.net/creativeclouddevs
I am starting a new series on Adobe UXP development, very much along the lines of the CEP's HTML Panels Tips. But on video.
can someone explain how this effect works and why each tutorial says to use a different blend mode?
https://www.youtube.com/shorts/jNFE9piVWy8 Screen
https://www.youtube.com/watch?v=Vuefhhtl3X4 Hard Light
https://www.youtube.com/watch?v=sSDQM_6igQo Multiply
https://www.youtube.com/watch?v=OjQiIYARZdo Normal with 20%opacity

Welcome to our comprehensive Photoshop Glass Effect tutorial! 📸✨
Are you ready to take your graphic design skills to the next level? In this step-by-step tutorial, we'll guide you through the process of creating stunning glassy, glossy, and translucent effects in Adobe Photoshop. Whether you're a beginner or a seasoned designer, you'll fin...

make an object transparent in photoshop || how to make transparent color in photoshop
how to make an object transparent in photopea
make background transparent in illustrator
make object transparent in photoshop
make transparent background in photoshop
make a layer transparent in photoshop
make transparent in photoshop
layer transparency photos...

TOP 3 Tools Before Video Editing.Try Uniconverter converter and compressor tools now: https://event.wondershare.com/api/s/2g0 #wondershare #uniconverter
In this video, I’ll show you How to Create a transparent glass effect in Photoshop. Enjoy!
LET'S CONNECT ✅
►Instagram:- https://www.instagram.com/grapexels/
►Facebook Page:- https:...

Hey guys, in this fun episode I will show you how to create this Water / Glass effect in Photoshop.
You can then apply it on any image that you want.
Have fun!
DOWNLOADS:
➤ Here you can download a tutorial files: https://goo.gl/X9XUTj
➤ Complete PSD file of this tutorial (just for my Patreon friends): https://goo.gl/Kz4QKb
____________...
it seems like that step basically boils down to "fiddle with the blending options until it looks right to you", which obviously doesn't work for me or I wouldn't be looking up tutorials in the first place
I am not going to watch all of these tutorials, but just a tought. Blending modes are ways to achieve a change dependent of what's underneath the layer you are working on. That means that's it difficult to tell someone to use a specific blending mode without knowing what they are working on. Some blending mode will achieve what you need to do, but only if your layer sits on a dark background, and conversely, some will only work on a light background (and many other type of interactions)
lowering opacity doesn't rely on an extra layer though, just the blending modes. The way the tutorial creator work will only work for the same kind of underlying layer they've chosen for their tutorial. Typically you need to understand how blending modes work... The theory... in order to adapt them to your own work
That's why tutorials are only a tiny part of the learning process. You rely on someone else's workflow and sometimes there is no real explanation on how to reproduce the same steps in your own work.
One of them is a transparent apple on a greenish background and I could see why you'd want to use a different blending mode for that than for the wine glass on a brown/orange background. Would you be able to tell me why, say, the "screen" blending mode would work better for the apple and "multiply" would be better for the wine glass? What is it about that second apple that makes Hard Light a better fit?
As I said, I will not watch all of the tutorials, but their use of blending modes may also be down how the rest of tutorial is showing.
Typically multiple will darken the bits that are both dark on the layer A (the one you're working on), and the layer B (the one beneath). It multiplies the darkness.
Screen will do the opposite, lighten the light bits and multiply that lightness to the lightness of Layer B.
Darken and lighten will do the same respectively, but without the multiplying element.
Here is an extensive explanation
https://helpx.adobe.com/uk/photoshop/using/blending-modes.html
and here is a very useful video
https://photoshoptrainingchannel.com/blending-modes-explained/
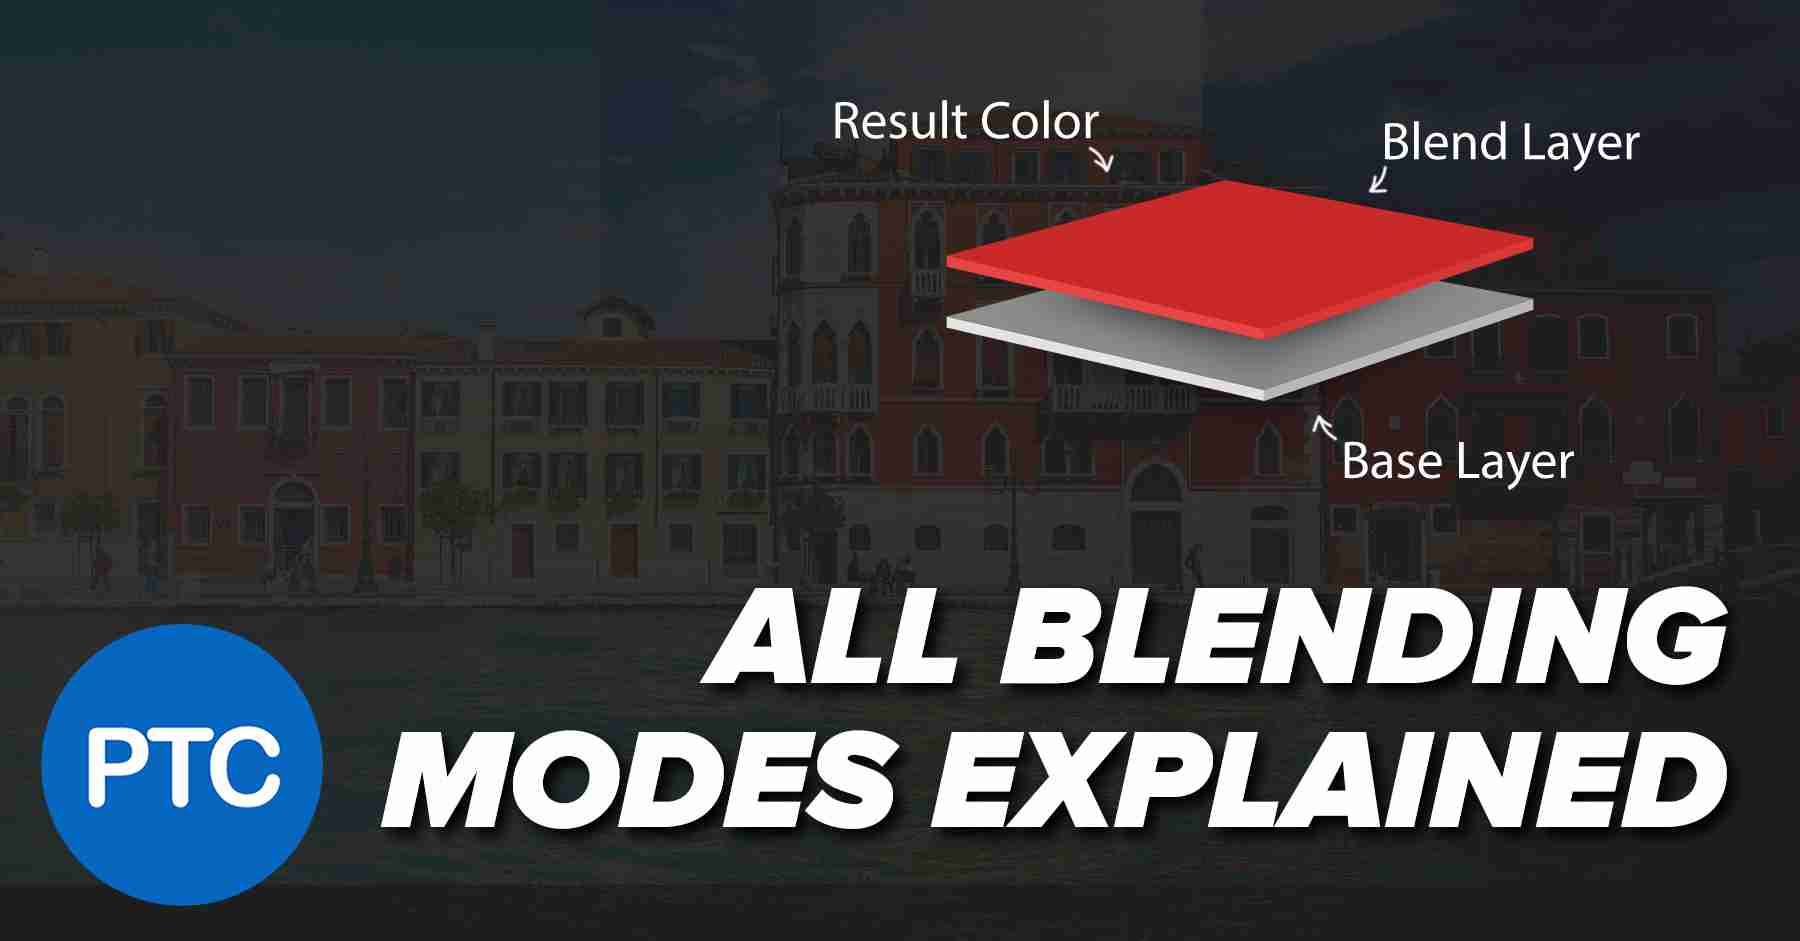
In-depth explanation of how Blending Moes work. No more scrolling through all of them to find the right one!
Please be mindful that there is about a hundred ways to do the same thing in Photoshop, bar a few very niche features. You will watch 5 tutorials about say - changing the colour of an object - and you'll see 5 different (and very valid) ways to do it.
yeah, that's not what's happening in these tutorials. Like you said, Multiply is a very different blend mode from Screen so this isn't a case of taking different steps to get to the same end product
Hi @rancid dome
That's not JavaScript (Adobe Extend Script), that's not UXP. That's pure Photoshop AM code (Action Manager code).
But what exactly do you mean by layer colour? Colour the area around the ‘eye’ in front of the layer thumbnail in the layers panel?
Since this isn't our common topic for this channel, can you please respond to their post in the Questions Forum? https://discord.com/channels/547473772727238676/1422196956259680369
I would like to avoid people having this conversation in multiple places.
Of course. (I wasn't sure which of the double posts to reply to, so I opted for the channel.)
Thanks!
Gave +1 Creative Carma to @tame cape (current: #14 - 228)
Can anyone help me with putting this QR code on my business card to where it scans please I’m having hard time doing it right

@ripe quest so the card design is ai generated with a dummy QR code on it and I’m trying to replace the dummy code with my QR code but a lil bit of my email keeps running under the QR code and eveytime I try to add my code it doesn’t scan I just started my own real estate media business so I do real estate photography and I’ll eventually need a good video editor to hire to do videos but I gotta get this business card fixed
You just want to swp the QR code on the image by yours?

@viral palm it’s only blurry cause I removed my contact info before I posted do you want me to dm you that actually card I didn’t wanna post my contact info in a public chat
You have trouble to put your own QR code to replace the one on the sample image?
we answered #Chat , the OP posted twice
@viral palm so basically I generated a design I liked for my business card and placed everything around the dummy QR code just to see how it would look so I just need to get my email to not run under the QR code and replace it with my actual QR code but some also told me that the purple and gold QR code my not scan cause of the colors but I definitely want to add my QR code so people can view my portfolio
@viral palm I’m open to anyone that can help me improve my design but I mainly am having this problem
Ok! thanks Sandrine!
Gave +1 Creative Carma to @vapid flume (current: #6 - 1033)
Gold on purple could work (it does for me en the screen) but I agree my friend you should stay with Black and White if you want to be sure everyone can scan your QR... For the rest I think they replied correctly all your questions...
Next time, please avoid posting same question at several places especially if people are already helping you in one chat.
Thanks!
Gave +1 Creative Carma to @astral wing (current: #1017 - 1)
@viral palm ok I won’t
Hi everyone, how can I extend image like this and blur so it looks so seamless like on Apple Tv? https://tv.apple.com/us/show/lego-ninjago-masters-of-spinjitzu/umc.cmc.2qiuh9j9huqpyrzlg7l5y7iu8


Apple TV
According to legend, one hero will rise to become the Green Ninja...but who? Ninja masters Kai, Jay, Zane, and Cole take on a powerful adversary who r…
what font is this

How to make this effect

Identify fonts with our font finder tool using an image or photo. Upload an image, and we’ll search our collection of over 133,000 fonts for the best match.
I did something similar to this. It might give you some ideas: https://youtube.com/shorts/Bdm_qMUV8rg?si=-xUp3tv4j_p12whH

In this demo, we'll take a look at using Filter Gallery Effects in Adobe Photoshop to create a glitch effect for a futuristic page layout.
If you found this video interesting, please like, share and subscribe.
© 2025 D. Humann. All rights reserved.
#art #cg #design #graphicdesign #computergraphics #adobe #adobephotoshop #photoshop #creative...
dw lol i decreased the pixels size to make it smaller by default
managed to finish the animation just fine
To the experts of photoshop, there is a new company that seems quite suspicious in a lot of ways. They seem to be faking a lot of things, but it would be helpful to confirm if the guy in this image photoshopped himself in front of this model. Would anyone be able to help?
Sure
Maybe it's like this. But with this (bad) resolution, no one will give you confirmation. If you suspect criminal activity, please contact the local authorities.

perhaps, i should ask the poster what specific details led him to that conclusion. i'm just trying to figure out if there is something to spot that's off, because to me, the photo looks fine.

here is a slightly improved quality image. not sure how much that can help
Not at all. Additional processing tends to have the opposite effect.
how do you center a gradient on an even photo? I can only seem to get it centered on a pixel, not in-between pixels
Like, I want a radial gradient's center to be in-between four pixels so that is radiates from four pixels out
@viral palm If you can help me that would be awesome If not imma just keep trying myself
Please do not ping moderators or employees. This is undesirable and against the server rules.
@tame cape i didn’t know I guess everyone is a mod here ok I won’t tag anyone
@tame cape please send me these rules cause every time
I post I seem to be breaking them am I not allowed to ask questions or for help here
You can find the rules at the top.
Yes, the server is available for questions or help. And: Don't ask if you can ask. Just ask! If someone has the time and inclination, he/she will certainly answer you. Most helpers and moderators are volunteers.

it’s all good I just joined so I just didn’t wanna bother anybody
Don't worry. Only a very few people are bothered here.
🤣
Thank you for letting me know 👍
why is my tile texture so not seamless idk what im doing wrong or how to fix

Im designing clothes but the object on my shirt has a blending mode applied and when I try to get the PNG of just that object the blending mode disappears, how can I export as PNG of the object with the blending mode still applied?
Hello! Does anyone know how to make glass flowers?
How can I make an image smaller without making it pixelated?
Convert to smart object , then transform
Or
Image>Image size
U can chosse dimensions + resolution there
This is what I did and it made it more pixelated
I wound another workaround though where I don't need to edit the image
**Problem: **Photoshop is using the incorrect GPU, causes crashes when 3D editing.
**Version: **Photoshop CS6 Extended.
**Picture 1: **Photoshop 3D Settings shows only 480MB of VRAM, which I assume is the AMD GPU. DirectX Diagnostic Tool displays a Nvidia 6GB GPU and an AMD 500MB GPU. I wish to use the Nvidia GPU for more VRAM.
Picture 2: Attempt 1- Graphics Settings under Windows System settings, set Photoshop to High Performance (Nvidia). Attempt 2- Nvidia Control Panel, set Photoshop to High-performance Nvidia Processor. These attempts did not work.
Please help me troubleshoot Photoshop to use the Nvidia GPU instead of the AMD GPU. Thank you! :)


Apart of switching off AMD gpu in device manager can’t think about different solution
okay I'll try! thanks!
Gave +1 Creative Carma to @ivory rampart (current: #32 - 64)
should I turn AMD back on after Photoshop session or just keep it off?
Well it’s up to you
Amd is integrated gpu so in most cases windows will use nvidia anyway
Hi, please state if if the device manager worked, as M4gpul suggested?
Please state how large it is and how small it needs to be.
Cropping?what was the workaround, if might help others.
Instead of downsizing it for web I just forced it to shrink with my CSS code so it fit where I want. I didn't change the image at all
I was originally trying to make a square 3100px img down to a square 350px image and it looked horrible every time
Hi, there are countless tutorials that show you how you can do that. https://youtu.be/RhnuTdN8tNg?si=3Z3B6g6plyNYqVmu

Photoshop How to Create The GLASS Effect! - Easy Tutorial
In this tutorial I'll show you How to Create The GLASS Effect! - Easy Tutorial
Image Source
▶ https://www.pexels.com/photo/gray-rock-8892/
Subscribe
▶ https://www.youtube.com/channel/UCPocOiYJXP5ZJkMZMjjowBA
#glasseffect #howtoturnobjectintoclass #photoshop #graphicdesign #photosh...
Thank you!!
Hi, PNGs do not support blending modes, unless on a webpage with some css tricks, IIRC. Have you tried using the blend if sliders instead? https://www.youtube.com/watch?v=-8g1OJnc6dY

Blend If is Photoshop’s best kept secret! Learn how to use it to create surreal artistic effects.
Download the Sample Images:
https://phlearn.com/tutorial/three-ways-to-use-blend-if/
Go PRO:
Interested in learning more about Photoshop? Explore our exclusive PhotoshopLearning Path:
https://phlearn.com/tutorial/learning-path-photoshop/
Join...
Hi! Did you try the high pass technique? https://www.youtube.com/watch?v=9_36YihB8I4

► Join PiXimperfect Pro - The Ultimate Photoshop Training Course: https://pix.live/pro
Discover the professional way to convert any texture or design into a seamless pattern in Photoshop! In this tutorial, we will use the power of content-aware fill, generative fill, remove tool, and pattern preview to blend the edges of the pattern to make i...
You’d need to add resolution as the pixel is the smallest element out there.
Hi, I tried disabling the AMD GPU with Device Manager but Photoshop was still using it. I think it's because the AMD's integrated. It's hardware problem more than Photoshop software, am now looking to buy a PC. Thank you! :)
Gave +1 Creative Carma to @hushed niche (current: #12 - 292)
Then I’d look in the BIOS to disable it.
How do I cut the line? not the anchor point, like cut it as if I didnt connect it to the first anchor point

Can anyone tell me how to remove the yellow ring on the bottom? Remove tool seems to damage the image

Could you please upload a JPEG or PNG or screenshot (in a format that Discord can display natively)? You may then receive more responses.

Hmm. It should work just like the bags you asked for not too long ago. (Unfortunately, I'm on the road right now.)
when i insert pic it says this

is it because the canvas is too small and pic too big?
nvm found out why
Your image is 719.4 × 510.4 inches (5.32 GB one layer)! Intentionally or by mistake?
Like whenever I use the object selection tool it goes way beyond the black line but I want it inside the line

intentionally i guess? lol is that bad or maybe by mistake
Who knows ...
how about this onee
With which?
Like whenever I use the object selection tool it goes way beyond the black line but I want it inside the line
From the pic here
Hi @mighty river
First remove the yellow strip. Then use the generative fill. The result should be similar to this (quick and dirty).

<@&548221840750018590>
Image spam
Thanks!
Gave +1 Creative Carma to @tame cape (current: #14 - 232)
And thank you also for the very quick reaction as always.
Gave +1 Creative Carma to @keen dagger (current: #108 - 17)
Adding resolution would be very unfavorable as this is for pixel art
Is there some plugin that can allow this?
a 4 pixels squares?
Your link doesn't show the high pass technique?
I was a bit dissapointed, since I wanted to watch that 🙂
I assume the idea is that you use a high pass to get the 'texture' and place it over a solid colour with something like a multiply blend mode?
Idon't know if there's any plug-in but I highly doubt... You can't align in between 2 pixels in photoshop.
i need help with making a picture if anyone is willing to help
why are my dashed lines like this?

It always seems like 2 layers of dashed lines stacked
They are. Hold a min and I'll show you what's going on.
Under the hood, the Line Tool is just a Rectangle. So when you assign a dashed stroke to it and change the thickness, you will probably notice this "staggered" saw blade effect. If you just want a plain Line, use the Pen Tool instead.
thank you
It would be better if u explained what do u need to help with...
I want align a gradients center though.
I just want its center to be in the center of 4 pixels.
So sorry, I remembered an older link, and searched for high pass seamless, thus thought that one used the technique; found this in the mean time. https://help.browzwear.com/hc/en-us/articles/4921542746905-Equalizing-Texture-Maps-in-Photoshop
or this… https://tolas.wordpress.com/2009/05/26/tutorial-how-to-equalize-textures-in-photoshop/
it is akin to freq sep.
Browzwear Help Center
If minor shading issues appear on the fabric in VStitcher, the fabric may need to be equalized to make for a cleaner repeat.
To identify shadow issues, check the fabric in both 2D and 3D as the ...
Isn’t it a beautiful concept to make textures using DSLR cameras? It is, until you won’t place them on a big surfaces and hit tiling problems like uneven brightness, visible seams, colo…
Ah! There it is ! Long life the archive: https://web.archive.org/web/20130102055244/http://www.gamasutra.com/view/feature/131482/the_power_of_the_high_pass_filter.php
Then you’need to manually paint them, a pixel is the coordinate.
There seems to be a typo in your link. Shouldn't that be ‘Kamasutra’?
😆 😂 🤣
You won't be able to do that with an even number...1 pixel is the smallest value... So you can center align odd values (5 pixels for exemple) but not even...
Sorry
quick odd question. so sometimes i'm working on a PSD that i need to export as a PDF to share with coworkers, is there a way to hit save once and both the pdf and the psd get updated?
(it just gets a bit annoying when I'm on draft 37 and i have to keep saving two separate times)

hey yall
Ummm
dumb ps question
why is my pencil only drawing grey
not my selected color?
but if i u se color picker'
it works fine
Can you show us a screenhot of your Photoshop interface with your file open? It will help locate a few clues

Because your document is an indexed file
image> mode> rgb or CMYK

you will be able to access the colours then, for the moment your document only shows grey tones
why is it transparent
It looks like a display issue (sometimes caused by the graphic card). I can see your mask displays weirdly (grey, black, white)
You should be able to get back to normal by closing Photoshop and opening it up again.
If it persists, check this link
https://helpx.adobe.com/uk/photoshop/kb/photoshop-cc-gpu-card-faq.html
hi guys how would i be able to do mockups like this to fit a curved surface?

i was using the skew/transform button but couldnt really imitiate this
im trying to remove EVERY spec of white in this picture. what is the absolute fastest way?

what im trying to do is to keep everything that is black, black. the rest i want to have transparent. im going to take the black part and paste it onto a flag and then print it out
go to chanels, and ctrl/command click on any layer(r,g,b), that will load up a selection, go back to layers, and alt + click the mask button, invert the mask if you need to and all done @stuck wraith
2nd method is to go to select>color range>shadows @stuck wraith
Convert your image to a Smart Object (or "place embeded" it). Then go to Image > Adjustments > Levels and drag white cursor to reduce the grey artifacts in your image.
Then go to Blending Options and use blend if sliders to make the white disapear. Merge it with a blank layer then add a Black color overlay effect to finalize.
Color range technique as @dire crystal said is a nice and short way to do it too... (you'll have to play with fuzziness settings to keep the contour smooth)
Hope you have a larger file than this one if you plan to print it...
293x313 in 72pi resolution is very small!
@viral palm why do you not use layer masks and instead create new layers with the selection? just asking for my sanity 😂
Please don't laugh at me🫣 😉 ... Masking is totaly correct if it works...
I went with these techniques since Grov Portion asked for a full black against transparent background.
Mask could keep some bright pixels...
Filling the selection with black ensures that I only have black pixels (no lighter colors)... (Same for black overlay color option in my first video)...
And I also like to make my life complicated...😉
yes the mask could keep some bright pixels, but just select the mask edlayer and add the "color overlay" effect after you have created a mask. the layers gets filled with whatever color you want, and mask keeps your layers simple and clean, also it takes less storage when you export the document as a PSD file.
@viral palm
idk if this is the right group , but if i was to send a photo to someone could they edit it and make it look good ?
I think we are on the same page!... but you won!
Many ways to get the same result with photoshop...
And honestly, with a 293x313 pixels file size, I'm not really worried about disk space.
hey, no I did not win lol, this is not an argument haha, I was having a simple discussion and I love seeing different methods to achive similar results. sorry if I have mde you feel like I was arguing or making fun of your workflow
agree on that part lmao
No no! No problem at all on my end!
Don't worry! Sorry if my response sounded unhappy... That wasn't the case at all.