#❓ask-a-question
1 messages · Page 138 of 1
I dont have photoshp😞
Then use the proper channel, #💬chat-general , as this one is for users who want to learn how to use Photoshop.
Hello guys!
I'm using photoshop variable feature to bulk update text using a csv file. It did work correctly. now, i want to clear the previous data and use a new csv but it doesn't forget old data upon selcting a new file. it adds up new columns to the old one. how do i clear that memory?
Note: If you have change some input in your CSV file you have to re-import it to update the data.
Photoshop loads the data of the CSV file It does not read the data contained in the CSV file directly.
So each time you make change in the CSV file => you need to save the CSV file and re-import it to load the data changes

Thanks a ton! my query got resolved
👍 Happy to hear that!
this

you are in full and unlocked so the problem come elsewhere

in preset do you have the option "as shot"
yes
I just noticed that if I set it in "as shot" it gets cropped like it was before. I think it changed to full when I manually set it to the original size🤔
Hello comrades i got reallz big trouble because i was exporting png shirt design with transparent backround but the ISSUE is in printing text outershadow/outerglow ...
What i asking from u guys is way i can provide supplier png without outer shadows/outher glow... basicly what is breaking design :/
I really hope someone can help cuz there is a lot of talented people in photoshop, and im struggling with this for while... im also sending my designs and prints that provide me the supplier... on shirt i will like to get design as it on clear png... no way with white shadow or black... but is caused because of printing method + the shadow and glow in transparent png, by eye u cant really see nothing when u check png
and last thing only for understanding that i will really like to keep way the effects are applied to fonts...
already tried way with rasterize the layers or converting to smart objects but im really not sure if its alright, also it changing whole font effects


the white shadows was made by printing... gueassing they converting png to pdf so they can printed im not sure
they send me another version with ficed version but it also looks dissgusting and im way to sad about that so im asking for help here 


If I understood well your problem, I don't think there is an easy way...
Printing process allows only two states: ink or no Ink (Since semi transparent ink for T-Shirt printing has not yet been invented. ) So everywhere you can see the checkered background through the Shadow/Glow you'll get a printing issue...

thanks franck i already thought about that and easiest way is to delete the shadows and glow
Gave +1 Creative Carma to @viral palm (current: #8 - 903)
here is way i fixed it

its already without shadows on text layers
but still figuring about shadow on picture layer.....
i mean the white outline


this the only effect i got on and its brightness thats all
yeah, doesnt work unfortunately when i tried yesterday
though im on a different computer right now and it works fine. maybe i'll try reinstalling photoshop
i mean do somone know easy way to make layer not transparent ?
To get no transparency => Make shure your layer is in Normal Blending Mode, 100% Opacity, 100% Fill
If you want to keep the boarder like "fading" you can try to mimic with a layer mask and use a soft brush set to "Dissolve" mode with a low flow value. The dithering effect will give you an irregular border made only with 100% solid or 100% transparent pixels.
A bit grungy and not as smooth as your original design but "dissolve" effect is widely used in T-shirt design to mimic soft shadows and faded borders.
Sorry I'm running out of idea... Perhaps a T-shirt and Printing expert will help later ...

Hi there can someone help me how to reupdated my photoshop account, plz its urgent
thanks i have change them ant it should be good now can u approve it please ? there will be no issue in print


Gave +1 Creative Carma to @viral palm (current: #8 - 904)
Hi everyone, I am trying to create an image in this style. The idea is that I have Gandalf from LOTR with some hills, Bag End, and some other LOTR images. I am just not sure what the best way to go about getting this style is. I have gotten part of the way there, but I really don't like the result so far, and it seems convoluted. Attached is the WIP. Does anyone have an idea of how to achieve this?


Hi, we do not deal with accounts, please post at: https://community.adobe.com/t5/account-payment-plan/ct-p/ct-account-payment-and-plan
oh ok thank you
If its urgent, you should contact Adobe Customer Care via the Adobe website or find Adobe Customer Care on the Threads app.
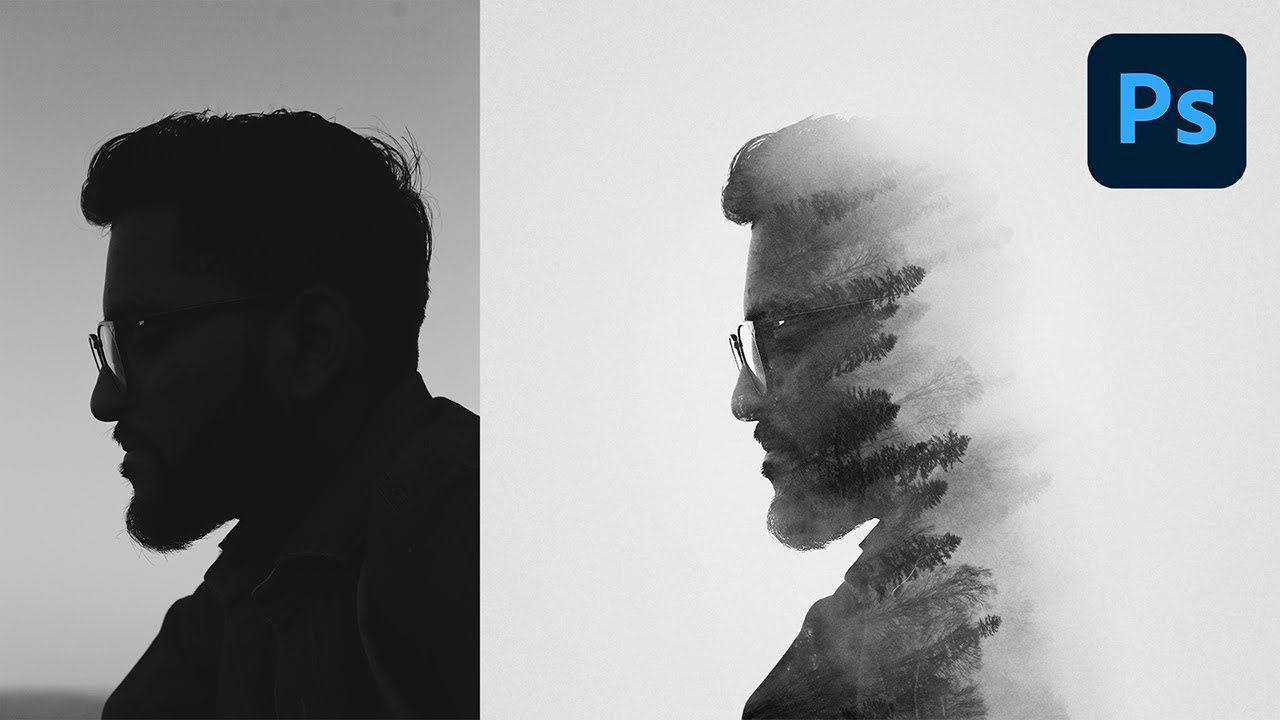
The examples you provided are more illustrative. The piece you're working on seems more photographic in style. Regardless, trying to find that balance in what can be 'eliminated' in the framing component is the crucial element in any "Double Exposure" composition. A good bit of it is trial and error. A lot of experimentation goes into it.
Yeah. I get it. If its account-related, you should contact Adobe directly. This is just the Photoshop Discord Community. We don't have access to anyone's user accounts here.
Yeah that's alright thanks for the guidance I appreciate it

Learn how to combine two images to create a double exposure effect in Adobe Photoshop with this easy-to-follow tutorial. Try for free today!

SUBSCRIBE for more Photoshop tutorials ► http://bit.ly/Letsgettoit
In this tutorial, we'll see how to create a wonderful double exposure effect using two different images and blending them together in Adobe Photoshop CC 2017. the main idea for this tutorial is to know how to quickly blend images together using blending modes and layer masks,...
► Join PiXimperfect Pro - The Ultimate Photoshop Training Course: https://pix.live/pro
The Easiest Way to Create a Double Exposure Effect in Photoshop! In this tutorial, learn how to use the basics of Masking and Blend Modes to create a simple but elegant double exposure image.
► DOWNLOADS:
- Subject Image: https://www.pexels.com/photo/gr...
Thank you! As I examined them more, I realized the illustrative component really is more of what I want. I will pivot and experiment.
Gave +1 Creative Carma to @ripe quest (current: #2 - 3129)
Thank you! I will watch both of these.
Gave +1 Creative Carma to @sly hawk (current: #5 - 1180)
Thanks! This looks super similar to what I want.
Gave +1 Creative Carma to @pseudo frigate (current: #383 - 4)
If you look closely at the Harry Potter example, that is really composed of illustrations and not photos. Which is a cool effect as opposed to the more traditional photographic 'double-expo' effect.
You still have some semi transparent areas which will certainly give you the same white bleeding result when you'll print your designs...
I have exported your png designs in 8bits png (without any semi transparent pixels)...
If the result is ok you can use this technique: Export> Export as> Choose png then Smaller File (8bit) => Semi transparent pixels won't be visible.


Yeah, it was on Hogwarts specifically that I really realized that he wasn't using photos. I like that one a lot, so I will see if I can can come up with some illustrations instead.
I really like that approach. I've played with that style a bit myself...

WOAH! That's super cool! I love it
i remember this thing used to appear in potoshop older versions now no longer does it in 2020 i reset in factory after i learned new things of potoshop but this thing no longers appears

Hmmh? 🤔
Are you sure?
I could be wrong, but I've never consciously noticed this icon in Photoshop.
Where in the UI should it have been?In the tools? No. In the palettes? No. In the brushes? Hmmh. Maybe there.
Or could you perhaps have seen it in Photoshop Express or Image Ready or similar?
is when you select some brushes
a tiny screen appear on the left
it use to appear but i have the theory this appear just if you enable some options for the pencil usb
Good workaround, thanks! I’ll check if one can tweak the chosen halftoning .
Gave +1 Creative Carma to @viral palm (current: #8 - 905)
Oh, great job !
Could you share where you find the lotr and hp one ? Thx
Gave +1 Creative Carma to @patent wigeon (current: #1013 - 1)
They are called "legacy brushes", you can find them in the brush menu
For example you will find a whole section called "erodible brushes" that "loose" their sharpness over tiime, like pensil does. You would need to sharpen them again to be like new. It was a way to mimic a real life experience (A marker that looses its ink, that you can use for shading, like lots of mang artists do, a watercolour brush that looses its water over time, you see the concept)
They've been abandonned because I belive they weren't used much and they were quite slow (I seem to remember there were issues relating to smoothness as well but don't count me on that)

yeah i have the legacy brush what i meant is a small brush preview that goes down show up when used

My Video Tutorial on how to set up the Photoshop Legacy Brushes to get way more creative possibilities with a ton of brushes that already come with Photoshop!
thanks!
it's there, you need to tick the relevant views

(if you don't want the name just untick it, but what you got is "brush tip")
in the same brush hamburger menu (F5 is the shortcut)
If you want them showing big, use the slider at the bottom of the panel
Here in my screenshot, I removed both name and stroke, leaving just the tip. I also made them way bigger. You can choose whichever combo suits you

i have photoshop 2025 and i dont have AI
where did you download it? from your CC app?
Idk i cracked it
That's why. AI is only available on the legit software
Also you're on the official ADOBE forum here, it's not particularly wise to talk about piracy here 🙂
That's an understatement. 🙂 - @tawny venture - You can't have a cracked version and AI, since photoshop relies on contacting AI servers for AI brainpower.
You know I tried to be gentle today 🙂
Too kind Sandrine😉 !
Please remain at your computer. The police are currently determining your location.
OH NO
Seriously: work with legal software. Then you will have access to all functions and avoid the risk of malware, legal consequences, etc.
but my window defender said its safe
Piracy has consequences.
If you found this interesting or entertaining, please like, share and subscribe.
© 2025 D. Humann. All rights reserved.
#AI #Animation #DigitalArt #CGI #AnimatedShort #FunnyAnimation #FantasyAnimation #Animation #ComedyAnimation #Pirates #Piracy #SoftwarePiracy #Crypto #Bitcoin #Yarrr
Are you serious? Seriously?😶🌫️
Yep
You won't have access to AI tools without a legal installation of the app.
They must be trolling
French dude new on the server telling they have cracked software noooo they are legit and want to contribute in the server
I remember that
I think it was a CS3 thing...Not really helpful
No, that was in Ps CS Up to 2020 21 22
That was like an animation & position rotation of the brush, it's more like a preview
Weird... I still have an old PC with CS6 on it and this preview doesn't appear... That's why I bet CS3...
That's the artist. If you scroll down on his main page, you'll see both the LOTR and HP pieces there. I would directly share, but the links are extensive and I don't want to send a wall of text.
Yes, it has been removed. It was the live tip preview for erodible airbrush and bristle tip brushes. It was removed at it used openGL that’s been obsoleted in Photoshop.
Looks like the helpx needs an update, as it still mentions it. https://helpx.adobe.com/photoshop/using/creating-modifying-brushes.html
Thank you for the info
Gave +1 Creative Carma to @patent wigeon (current: #651 - 2)
Bonne chance alors 😆
With that level of poor grammar I wouldn't even qualify it as French (but I digress)
un passage sur mon profil te rassureras: oui et non
hey ive seen this ilustrations in twitter recently and i wanted to know if it would be possible to do them in photoshop

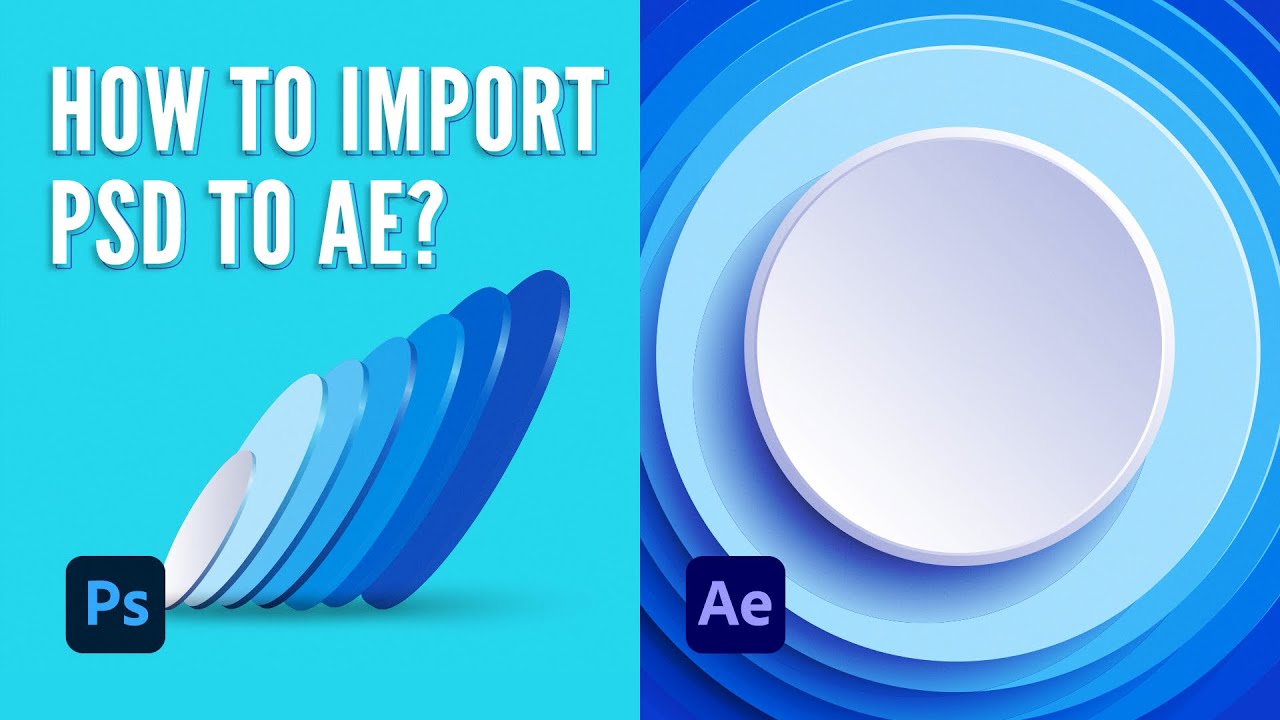
Hello, I was wondering how to export many layers in the same position I have them on my board. I tried and each layer became small and out of place, I would like to export them the same way they are layered that way I can layer them in After Effects. Could anyone help me?
export -> export layers to filechoose png or tiff if you got transparency

Do I have to group them before, or do I just highlight them?
You technically could, but it's typically something that calls for a real vector software ie: Illustrator (simply because of the kind of detail you got here)
This is what shows up when I do exactly what you said to do.

Okay, thank you
Gave +1 Creative Carma to @vapid flume (current: #6 - 1012)
so its probably a thing of illustrator? because i guess they take a real world picutre and make it that way (is it a vector draw?)
Just make them visible and choose the appropriate tick box
It looks like a an action just launched. I have no idea why. It should give you that

if its that way ill go to look ffor illustrator software server, but anyways thank for orientating me
I mean nothing is impossible with Photoshop (or Illustrator), you will just make your life harder if you don't choose the right software
Thank you I exported them and now will import them to After Effects and let you know.
Gave +1 Creative Carma to @vapid flume (current: #6 - 1013)
It definitely look like a vector drawing. In the vein of a technical drawing which is Illustrator playground (particularly as you may need accurate dimensions etc)
Good luck!
When I export them to After Effects, I put the same composition as Photoshop but they are still centered differently.

Did you tick "trim"?
If yes, untick it and it crops the frame

Other than that it may be something to do with after effect, in that case I' can't help, and you may probably ask in the AE/video server
I need to go anyway
Bye!
Life saver thank you so much !! It worked !
Gave +1 Creative Carma to @vapid flume (current: #6 - 1014)
Goodbye, thank you very much :) !!
thank you for the advice
@viral palm
That was the Live Tip Brush Preview (also known as Bristle Brush Preview). Unfortunately, Adobe discontinued it starting with Photoshop v21.1, so it’s no longer available in newer versions.

@viral palm
https://youtu.be/TjWMelyGpBw

The Brush Panel in Photoshop CS6 includes plenty of new features. In this episode of our Introduction to Photoshop CS6 series we will explain how to work with Live Pen Tilt Preview, Brush Projection, as well as the new Erodible Tip and Airbrush brushes. Let's get started!
The easiest way in your case is to save your PSD and then import it into After Effects (as I showed in the video). The key to keeping the same composition is to make sure your Photoshop canvas has the same aspect ratio as your After Effects comp.
But here’s the trick: the resolution needs to be 72 dpi instead of 300 dpi.
And hey, I’m not as good at drawing as Picasso anyway 😅
do u guys know how to prevent text like this from becoming so pixelated?

Sorry for you if you used this feature... I have never found it useful... Perhaps because I don't do digital painting... Tip and stroke preview are enough for me😉
Yeah same for me I didn’t use it either
If your text is still live text => Try to change the anti-aliasing mode (In text properties panel)

ah, and if its not should i just restart?
whats the best one to prevent the pixelation?
Hello, how can I recreate this? The grain (I am not sure if there is even one but it looks like it?) and gray effects in particular, cause I have no idea how to grey out the image..

I think for your exemple Smooth or Strong should be good...
Difference are subtle you have to judge yourself depending the font and its settings (thin, bold, caps...etc)
Most of the time, I use Strong or Snooth... Avoid the “None” option.
ok
Hi there I also have that too what suggestions can you give me?
If i may ask, where did you download the dots?
If you can't see the dot pattern perhaps you have to load the set "Legacy Patterns and More".
Here is a short video showing you how to load it. Dot 1 pattern is located : Legacy Patterns and More > Legacy Patterns > Legacy Default Patterns.
Not sure to understand what you main by "Grain" but for the "Gray effect" there are several ways to achieve that
IMO the 3 easiest ways are:
1- Hue and Saturation Adjustment layer or,
2- Black and White Adjustment layer or,
3- Gradient Map adjustment layer.
Oups I almost forgot the easiest one...
Convert your imahe to smart object then go to filter > Camera Raw Filter
In Camera Raw panel go to:
=> Color section and drag saturation cursor to -100 then,
=> Effects section and add grain to your image.
How would I go about removing the Simpson logo and writing from the top of the helmet visor?


Why is the other stuff like can't be selected
And I can't even use vanishing point on a new laywr
Probably the wrong bit depth. Image > Mode > RGB Color? Change to 8bit
Ohhhh, I see noww, thank youu!
Probably just painting over it with the Remove Tool...


With a selection active, you can do Edit > Copy and Edit > Paste or just hit Ctrl J.
do you know where i can use a site to remove background
like when i remove it, its still high quality
because on other background remover sites, it lessens the quality of the image
hi there, i want to remove this shadow of the hour and minute hands, and the centre thingy... but with the scratches intact... how would one go about it?

i just have this png... so unfortunately i can't edit the layers
is there a straightforward way to adjust the canvas size such that it is just the size of the layer?
Probably u r working on 32 bit go to image > mode > 16 bit
Oooo, I see. What's the difference with the 8, 16, 32 bit though
The color information 32 bit it’s wide color gamma means more information and more colors HDR high dynamic range
8-bit, 16-bit, and 32-bit refer to color depth (how many tonal values each color channel can store):
•8-bit per channel → 256 levels per channel, about 16.7 million colors. Standard for JPEG/PNG.
•16-bit per channel → 65,536 levels per channel. Much smoother gradients, great for photo editing and color grading.
•32-bit (floating point) → practically unlimited range, supports HDR (values above pure white and below pure black). Used in VFX, CGI, and HDR imaging.
👉 In short: 8-bit = normal images, 16-bit = professional editing, 32-bit = HDR/VFX work.
Ooooo, I see!!!
Thank you so much for thiss!
Probably the same suggestions I gave to the other user 🙂
anyone?
you could try using the clone stamp tool and work with area near the clock hand
yeah but the scratches tho
my approach (from a nonprofessional perspective) would be to use clone stamp tool to mask out, and try to create new scratch myself
Depends how long you want to spend on it. If you don't mind, search for "Frequency separation" techniques online. I won't explain it here because is quite dense and complicated. But that's the technique I use when I need to retouch something without changing the underlying texture (like skin for example)
Otherwise, for a quick one, I would honestly find the separate elements online and and add a scratch texture on top, unless it's crucial you have the exact same image for whatever reason
i guess i could add the scratches back... thanks guys
oh I forgot about that I used it on skin following a yt tutorial, I will keep this in mind too, thx
Gave +1 Creative Carma to @vapid flume (current: #6 - 1015)
Ctrl+Click on the layer thumbnail to make a selection then Select the Crop Tool (C) and hit [Enter]
omg thank you
In the case your layer is larger than the canvas you can :
Make the layer active in layers panel then go to : Image > Reveal All to extand the canvas then use the first technique to crop the transparent areas around if you need.
Sorry but TBH, I don't think it's possible to do in a simply way...
Easier to remake your clock design and add scratches texture.
i reckoned... i just wanted to make sure if the pros knew of something i didn't
Know that almost everything is possible, however is the time you spend on it is worth it? That's a question only you can answer 🙂
absolutely not... this is going to be a prop in a 3d scene, and its not even the object of focus... i guess clone stamp then adding textures on top is the most efficient way for me
lol
Yes, it's time when you need to think what is worth your time. (I had the same issue about the topology of an object I was creating - I am trying to learn 3D, I was spending way too long trying to figure out how to do that thing, until I ealised it was a hidden face 😆, it will stay like this. I'm telling to myself that it was good enough that I recognise there was a problem - as a noob)
Tysm!
+rep @viral palm
Gave +1 Creative Carma to @viral palm (current: #8 - 906)
An alternate method: alt+click on the eye of the layer to mask all other layers, then go to image>trim
How would I remove the logo and writing from this visor?

Smart!
Hasn't it already been answered? Or not???
#❓ask-a-question message
Use remove tool...
Already said this last night... #❓ask-a-question message
The remove tool?
True question is, will the remove tool keep the reflection in the background on the visor
Please look at the image I posted.
No kidding. That’s it.
Mine was done in like 5 seconds. If you take your time and put in a bit of critical thought and care, its likely you'll arrive at a result that is perfect.
The remove tool. Ok.
I can demonstrate it if necessary. Keep in mind, that this requires a current version of Photoshop. Older versions won't have this feature.
Ah ok.
D. Is the shortcut for Da GOAT.
It should if your use the tool carefully

You're too kind. Thanks!
Gave +1 Creative Carma to @hushed niche (current: #12 - 283)


how can i photoshop this logo onto the wall of this shot to make it look like its been graffitied onto it
This is just quick but you could do something like this. It could be a lot better if you take your time and plan it out a bit more. I only had couple mins to work this up...
yeah thats really smart thank you for showing that
Gave +1 Creative Carma to @ripe quest (current: #2 - 3131)
how to creat this type of mask in ps

No problem. I would probably spend more time working on the drips and drops. Add a bit of perspective distortion and blur to it as well; the logo wouldn't be "crisp" if it were painted on a wall and then photographed. Some overall adjustments to brightness, contrast, highlights and shadows as well could bring it together more.

so i can just erase some part
That is a Curves Adjustment Layer with a Layer Mask attached to it.
yeah like cruve and and a mask
how to creat one
Hello, when I work on many different files in Photoshop at different times, I see a lot of the templates I’ve used in the “New Document” section at the beginning. How can I remove them? Sorry I can’t provide an example — I had to completely restart Photoshop today — but this section is really overflowing with too many templates. What can I do to delete them?

Bottom of the Layers Panel...


That is Exposure. In the example you showed, it was "Curves"
So what are you asking?
yeah it was curves it was mistake i added the exposure
okay found it, no need to solve 🙏


do u think i could make this better it still feels kinda sharp?
Click on the creat mask icon.

like this?
@tight ravine
You could try to apply a gaussian filter (low value for a subtle effect) and/or try different blending modes
Hi, I couldn’t find an answer to my question about payment methods on Adobe’s main page, or maybe because of my limited English I couldn’t fully understand the response. I’d like to ask: when I cancel a payment—in other words, when I want to cancel my Adobe subscription—how many days does it usually take to process? I don’t have any issue with the payment itself, but I don’t want to be charged for an invoice I don’t want just because the cancellation process takes too long. For example, if I want to cancel my subscription in January, and it usually takes a month to complete, then I’d need to start the cancellation process one month earlier. So, how many days does it usually take to cancel?
I’m on an annual prepaid plan
does anyone know why i cant use smoothing anymore? ):

And hold alt as you click on the add adjustment layer icon to get a black mask. Iirc, you might alt-right-click on windows.
Hi, I would ask this on the accounts forum: https://community.adobe.com/t5/account-payment-plan/ct-p/ct-account-payment-and-plan?page=1&sort=latest_replies&lang=all&tabid=all
Hi, I would advise to learn the basics: #❓ask-a-question message
https://vimeo.com/1117578291?fl=pl&fe=sh how can i wrap around this wings?

This is "Desktop 2025.09.10 - 23.18.04.03" by itamar raz on Vimeo, the home for high quality videos and the people who love them.
3D has been retired from Photoshop for such a long time… you’d have more luck finding help for substance or even blender…
@cinder bolt - I'm assuming you figured it out?
thanks
Gave +1 Creative Carma to @ripe quest (current: #2 - 3132)
if i decrease the contrast from an image to zero, do i lose quality/details?
Yes. Anytime you directly edit the pixels, there could be quality loss. Convert to Smart Object first or add an Adjustment Layer above.
i always create an adjustment layer
but i'm asking specifically about the brightness/contrast
I thought what I said was clear... "Anytime you directly edit the pixels, there could be quality loss."
This is why you use Smart Objects or Adjustment Layers... so you do not permanently affect the pixels on the layer.
what i understand from this is, "if you don't create an adjustment layer or convert the image to a smart object, there could be quality loss", so i replied with "i always create an adjustment layer". that means, even if i lower the contrast to -50 i'm not losing any quality or details
If you use a Brightness/Contrast adjustment layer then you are not directly editing the pixels. So there should not be any permanent damange to the layer.
If you use the Adjustment Layer and you NOTICE there are artifacts or something in the image, then it was probably already poor quality.
I'm not sure how many different ways I can say the same thing.
ok damn
Does anyone know how this effect is done?
How do they get the model exactly in the same spot and also get the color to change (while preserving things like folds etc)

Using the Basic Concepts of Blend Modes, Easily Change White Into Any Color, Including Black, in Photoshop!
🚀 Join PiXimperfect Pro - The Ultimate Photoshop Training Course: https://pix.live/pro
Create realistic colors by combining the power of Blend-If coupled with Adjustment Layers and Blend Modes! In this tutorial, we will be using Solid ...
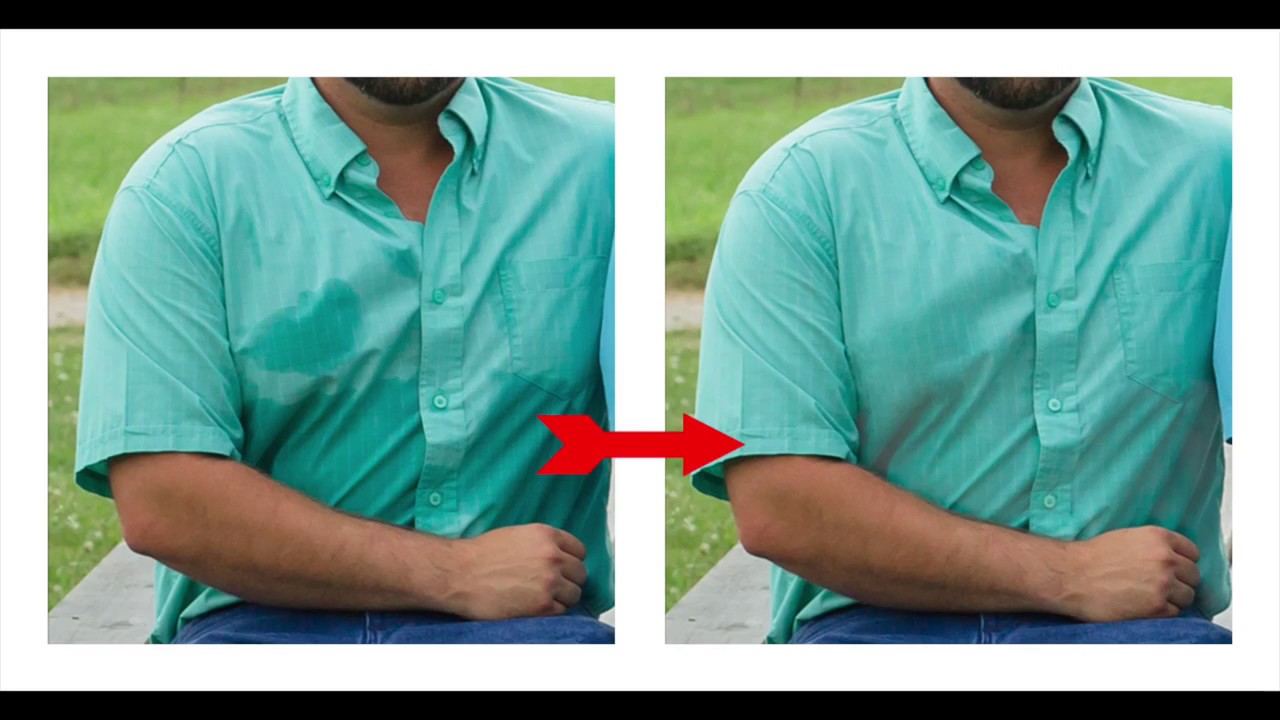
That's not an effect. They ‘just’ recoloured the shirt. This can be done with any colour, but black and white are much more difficult. With these two colours, a gradient map adjustment layer often helps to create a good starting point for further editing.
Thank you for the help!
I'm used to using lightroom, and was having a tough time figuring it out but I think I can do it now
Hello everyone! how would you remove the red highlights? Just play around with hue and curves manually?

Hi Folks, does anyone have any information on a full version of Photoshop coming to android please?
Cheers
I’d try sampling the normal skin color, and painting on a top layer set to color mode, lower opacity , clipped to the subject , might be a good start
A full version would surprise me, but they are porting the iPhone updates to Android.and also, those who know about future changes are generally not allowed to talk about it.
If you did take the picture, in the future, try to have a neutral grey environment, it’s was faster than retouching.
My prefered method would be to try to harmonise a little with a Hue/Sat adjustment layer and then finesse with curves. It might require multiple iterations of H/S with different masks as the intensity is different depending on how the background spilled into the object. (as the object has different colours: Skin colour doesn't respond the same way as a lighter colour)
Like @hushed niche said, it's better to have a "no-spill" background whenever possible, particularly when you shoot white or neutral objects. They absolutely take in all the surrounding colours.
Grey would be the best fit, as you can control ground and contact shadows better (if you do keep them). You would kill them with a dark/black background, even a neutral one, and white BG would give you shadows too harsh to control)
If you don't have grey but only a white background, you can make it grey by underexposing it and playing with lights in the foreground.
Oh fair enough, that makes sense. I just remembered seeing a while ago that they had "plans" to put a full version on android for tablets etc.
Where I can get Kyle's all brush pack free?

Find the exact brush you need to elevate your digital art with customised drawing brushes or preset Photoshop brushes. Let your creativity flow today.
Most of them are compatible with Fresco as well
Thanks 😊
Gave +1 Creative Carma to @vapid flume (current: #6 - 1016)
Hello, why does the rendering look awful when I add a border to my hearts?

Probably because your hearts contours are not "clean" enough...
Could you share a screen shot of one of them zoomed in and without the layer Fx?

If u used stroke for the black outline ... as Franck already said ur heart is not smooth enough
Thanks! could you also share the Layeer Fx settings ("Contour" settings)
Gave +1 Creative Carma to @halcyon widget (current: #1014 - 1)
Let me guess you're not using this one at this size but several copies of it resized multiple times... Am I wrong?
If you want to do so I would suggest you to convert your original heart into a smart object before.
If you don't, each time you increase/decrease the size of your heart some artifacts will appear on the edges and at the end will give you this weird contour look. Smart object won't do that.
I would go with a vector shape rather a pixel based graphic.
Here is a psd file with a Heart made in vector shape...

In fact, my heart, I convert them into a paintbrush.

Hello! How do i disable AI in PS 2025?
You don't "disable" it. You just don't use the Generative Features.
well that is, not very helpful
What isn't? If you don't want to generate pixels then don't use Generate Image or Generative Fill. You're not obligated to use any of those features.
And there is no way to "remove them" from the app.
well why is there not a function that lets us as users revert back to previous version?
There is. In the Creative Cloud app. You can roll back to like Ps v22. But I'm not sure why you would do that because there have been numerous bug fixes and other things that you'll probably want.
Just don't use the generative tools if that's your prerogative.
im using the descktop version
Photoshop, like all Adobe tools, are installed and managed via the Adobe Creative Cloud desktop app.
Are you stating that you installed it some other way?
and to hide functions in sub sub sub menus is a waste of my time tbh
OK. Sorry to hear that.
You're free to provide feedback in the #1093156942647660615 forum or the Ps Community Forum on the web.
ok thx
Hello, when I want to use gemini on the website of adobe it says I have not the access, it just said that I have 5 free try

It load and then put the message in red at the top
You're speaking about the Adobe Firefly website? Could be overloaded. I think a lot of people are hitting the service.
Oh I didn't thought about that, since it's a website and not an app I forget
and yes about the generation in the board menu
Firefly Boards? You might not have access to use that without a subscription. I think that is a beta feature for subscribers only. Not sure.
Try using Gemini in the Text-to-Image app in Firefly.
since it's in adobe and I have an account it clearly mention a free 5 images trial
(when clicking into gemini)
In TEXT-TO-IMAGE. Not Firefly Boards.
Yes I understood, but it mentioned it into the board when I change the ai
Sorry. I don't know what this means. Try the Gemini model in the Text-to-Image feature on the Firefly Site. Not Firefly Boards.
I will try that, thx
Gave +1 Creative Carma to @ripe quest (current: #2 - 3134)
Ah...Ok! It could be the reason particularly if you play with the brush size... Each time you change the size Photoshop recalculate the pixel to show/hide and harch edges will appear and when you'll apply the contour effect it will follow the harch edges...
I guess you want to paint your hearts with scattering effect, that's the reason why you are using a paintbrush. Isn't it?
if you want you can try to make a pattern from the vector shape then use the "Random Fill Script"...
Surely not the expected work around for you but unfortunately I don't see any solution to get a clean result with a Contour applied on a variable size brush stroke...😢
Tedious workaround for a clean result could be to paint Scattered hearts with your brush tool then use the design as a guide to place vector shapes...🤔 That's just an idea.
Hello
i bought a plugin how can i import to photoshop? and is it dangerous?
i bought from gumroad. it is zip document, is there anyway to import?
Is there a Video or something that i can learn everything i need to know in photoshop in the shortest time?
You could start here: https://www.adobe.com/learn/photoshop?learnIn=1
Access Adobe Creative Cloud apps, services, file management, and more. Sign in to start creating.
How it gets installed and used will depend on the type "plugin" it is. Plugins are generally installed via the Marketplace. If you got something from Gumroad, it might a script. If its a script, you need to place it in the "scripts" folder. More info: https://helpx.adobe.com/photoshop/using/scripting.html
Thank you 👍
Gave +1 Creative Carma to @ripe quest (current: #2 - 3135)
can anyone teach me how to make that graph behind?

Behind the trees?
no in generally
i wanna add this graph on this photo

but i have no clue how to find that graph or smth similar atleast im really new to this stuff
and is there a way where i could make the gravestone with the text more visible idk give it a light but only to it or to do smth to make it stand out more
like that's all i need the graph and the gravestone to stand out more
is there a way you could help me with a tip or anything i dont wanna take too much off your time if its smth too hard to make i just really dont have a clue @viral palm
help , my pen tool is suddenly making filled shapes out of selection, how do i turn that off?
Left upper corner
Choose path instead of shape
In pen tool
yep, or if you DO want shapes but just not filled, turn fill color to null

can anyone help me how i could make this graph?
do you know how to draw a line with zigzags?
❤️ thanks
Gave +1 Creative Carma to @thick tangle (current: #69 - 29)
yea but i mean with that fade
No problem
and wait i actually dont know what tools i need to draw the zigzags =)))
im pretty new to this sorry
Thats either gradient from red to transparent or simply red with lowered oppacity and changed blending mode
could any of you come vc for 5 mins max?
once you have your line, create a red gradient under it using the gradient tool. Then either mask or delete the part above the line that you dont want
then play around with blending modes and opacity until you get soething you like
nah im at work lol
I cant sry
ohh alr
well i'll try to see if i can make it alone if i have anymore question can i ping you guys?
and thank you both for helping 🥂
Sure... I don't mind pings
alr thank you again guys
thank you man @dusk lagoon
Gave +1 Creative Carma to @dusk lagoon (current: #237 - 7)
i'll try playing with it more to get smth to fit but really thank you alot for your time man
how did you make the brush to just click and make the graph cuz for me it dosent work
hold down shift
and here it dosent show color or anything

how do i change the color =)))
ah nvm i found how
i think

or actually nope i didnt
thanks mannn
i know its a pretty complex picture and im also new i dont know mostly anything in photoshop
i work as an editor and 3D Artist but in photoshop im trash
3d artist gang 
you work as one aswell?
yeah im a 3d artist for Light & Wonder 
niceee
im mostly making ads for companies
with 3D scenes and stuff
like ads for product and stuff like that
but here in photoshop im at 0% knowledge it overwhelms me 😂
dope B) Ive never been great with advertising myself so gigs arent easy for me 😭
ive had like 5 photoshop classes from HS to university and have been using it about 8 years now and im STILL learning new PS stuff every day
damn im a mechanic 😂
but its a way to make extra money with edits and ads for companies and stuff
like i got 200$ for a 50 sec video ad
For more light grave stone you can convert your image into a smart object and play with shadow hilights adjustment.
For the graph integration usually the basic idea is to place it in sandwich with foreground and background but in your image graveyard/trees are really tricky to mask to isolate the background...
how did you do this so fast im struggling for 2 days 😭
thanks alot for taking you time helping me this much if its not too much to ask if you could hop on a call for 5 mins atleast to teach me or anything like that cuz i dont know ps at all
i dont find the adjustment

to play with the shadows and stuff
You're in the wrong sub menu... it's there: Image > Adjustments... > Shadows/Highlights.
Don't forget to make a copy of your original layer (CTRL+J) then convert it into a smart object before .
ohh alr thanks man
Gave +1 Creative Carma to @viral palm (current: #8 - 909)
GUYSS I need your help, is there any way to fix the blur when an image is adjust to small sized

You could transform this logo to path and then you will have vector file which is scalable
How tho?
Hi all, In this photoshop tutorial you will learn how to convert raster image to vector image.
To get more updates: https://rb.gy/akeszt
Keywords:
raster to vector photoshop, convert low resolution image to high resolution, raster to vector, photoshop tutorial, raster and vector graphics, raster to vector converter photoshop, convert image to v...
I just crop out the logo from the image, can I still use that method?

Just to clarify....
If you took an AMAZING high res logo, and then placed it onto an image that was only 300 pixels high, it WOULD still pixelate and look rubbish.
It would be like trying to show a high definition video on a gameboy screen.

Hey is anyone reporting issues with "Export Artboards to Files"?
My (and other colleagues) attempts are just causing photoshop to crash - See video above.
idk if it helps but 2 days ago i got disk problem and i reinstalled photoshop, maybe it can be helpful for your problem.
Thank you.
It sounds like a more global issue, since it's multiple users reporting the problem. - I'd rather not tell my team of retouchers and designers to uninstall and re-install photoshop. (yet!) 🙂
Any ways to fix that? By increasing the pixels?
photoshop itself is amazing app but sometimes there can be minor errors, and these are usually software-related so i recommend reinstall because this is sometimes gives your computer's hardware a chance to re-evaluate Photoshop and solves about ninety percent of the problems.
Yes. Increase the size of the main image (of the bag)
You know what. I'll give it a try. 🙂
How tho
Image > Image size
Also, if it gets fixed, could you share the result with us? That way, when we encounter the same issue, I can prove to myself that this suggestion is a good reference.
I suddenly changed my mind. I have multiple brushes, patterns and plugins that I really can't be bothered to reinstall today.
I'll give it a few days and try again next week.
Hello, can we draw in 3D on Photoshop?
"Draw" in 3D? There are no 3D tools in Photoshop if that's what you're asking. They were discontinued back in version 22.x. More info: https://helpx.adobe.com/photoshop/kb/3d-faq.html
Hi, actually it is not so often that Photoshop issues are fixed by a reinstall. Most of the problems can be fixed by recreating the preferences.
One can simulate 3D the same way one does when working on a piece of paper: by using perspective.
And, to be complete, there is 3D substance viewer beta, to add 3D objects in Photoshop beta: https://helpx.adobe.com/substance-3d-viewer/using/photoshop-3d-intro.html
if you have the full creative cloud, there is Cinema 4D lite with after effects: https://helpx.adobe.com/after-effects/using/c4d.html
Yes I love it...also fun fact I am using a portable version of photoshop.....sometimes when I keep going crazy with images and being extremely creative, the app crashes because my pc graphics card cant take it...lets say am using a very old model pc (will upgrade soon once life starts flowing for me.)
Thank God I save as I go constantly...PDS files are really life savior...also sometimes it recovers the files
You are currently on the official Adobe Photoshop server.
There has never been a legal ‘portable version’ of Photoshop❗
👀
Oh nah, I just said portable meaning I move my Photoshop setup between devices sometimes. I’m definitely planning to upgrade to the latest CC soon though.
and how is it used?
you know what it is photoshop and i have 4090 rtx with 32 gb ram asus tuf. And still got disk problem😂
If you have a full CC Subscription, there is also Adobe Dimension which is a smaller app that allows you to manipulate 3D objects. There is no modeling there; you would have to import 3D objects in and create the scene. However, that said, you could move images in or out of it and back to Photoshop working to create composites.
Your GPU has nothing to do with scratch disk errors.
but i thought if my computer can handle cyberpunk and gta 5 at the same time , then photoshop wouldn't be problem either😭
I just have a Photoshop subscription.
Scratch Disk errors have to with the DISK, specifically the swap space it uses as temp memory when working on documents.
Well, then you would have to do something else. You could try upgrading your sub to get other tools. You could also try out Blender which is free. Just keep in mind that Blender is a complex app and it has a steep learning curve.
i m curious how are the prices in USA. I m in turkey and if prices are different it would be interesting but maybe also need because of different economic situation
In Blender, you can't use the png format.
you can use png and it is coming as alpha-based plane object with addon
My comments about upgrading subscriptions were not directed at you. It was a reply to @halcyon widget
And what? You would build something in Blender, render it and bring the image to Photoshop. (Probably)
yes you are right
edit - preferences - file paths - applications - image editor
select the photoshop
then when you click to quick edit, your mesh directly go to photoshop with UV map
What do you mean? And to which part of my answer are you replying?
This person is not even using Blender so please stop describing the entire process.
Most of the scratch disk issues are due to using a wrong unit in crop or image size/new document…
yeah you are right, i was using cm instead of pixel so my canva was really huge even my 32 gb ram couldnt handle
i fixed it anway
My goal is to design a new outfit but in 3D for a character.

i m working as 3d character artist, you can ask me whatever you want, honestly because it is photoshop specialized area i dont wanna explain it will be different topic and disrespectful to this channel but for these type models, you need to learn topology and how to do retopo. Photoshop is great for blender. You can paint or create stencil texture in photoshop. I was using gimp but i guess photoshop is industry standart and better than all alternatives. So yeah mix them they are great
or houdini for make 3d clothes for 3d characters
Where can I find people who do photoshop work for commission
If you want to someone to make something for you, you should post in #💬chat-general with the brief description of the project. If someone is interested in working on it, they might reach out to you.
why is my text so damn pixaleted

Please try the options here

oh wow thank you!!
hello people i am going to ask a really stupid question as it was working 2 seconds ago. i am trying to copy one thing that i had to remove the background from to another project which already had the background removed. after doing some adjustments i tried again, now it won't let me free transform after placing.. what am i doing wrong
is your layer locked?
Could you share you entire Photoshop UI? (Hard to figure out with your description only)...

no worries i figured it out

can anyone explain how to do this
I use photopea on this computer but I have photoshop at school, I just dont know how to make this work
The easiest way is to create a repeat pattern (that way you will be able to apply it as a texture (for example for backgrounds)
https://www.youtube.com/watch?v=WQvWsW1fvFM
Learn how to create a repeating diagonal stripe pattern in Photoshop.
In this video you will learn how to:
👉 Use the line tool to create a diagonal stripe
👉 Use the offset filter to make a repeatable block pattern
👉 Define a Pattern in Photoshop
👉 Change the color of your pattern using a color adjustment layer
👉 Save your patte...
Well, you're on the Photoshop server here 🙂
I don't know how to use photopea, you should ask on the Photopea subreddit
when making a new layer is it supposed to bucket fill one by one
Hello can sb please help me. I did this design and i need to extract the white font design from the shirt. I tried it but i cant extract it…

Hi! Im not going to lie Ive been having some trouble using photoshop for an assignment, And its been super confusing and I have NO idea what im doing right or wrong :'] I was wondering if anyone could sit with me in VC or help me with all of this </3
I’m confused with the layering can someone send me a resource for that to help me out
What I trying to do is retexture a dress
so uh, yesterday my photoshop work looked like this

now it looks like this?

wtf happened
Image corruption. Did photoshop crash? Did you save another copy? Saving as PSDC on creative cloud allows to have earlier copies available. On a Mac, one can setup time machine with an external drive, to have backups. The windows equivalent is file history: https://support.microsoft.com/en-us/windows/backup-and-restore-with-file-history-7bf065bf-f1ea-0a78-c1cf-7dcf51cc8bfc
if it happens often check your disks and system, and maybe use an auto increment and save script: https://www.ps-scripts.com/viewtopic.php?t=6550
Learn how to configure File History and how to recover files and folders that have been deleted or accidentally changed.
actual size of the brush

but when i make the brush size small the line effect stays same the effect of the brush not reducing
https://buzzheavier.com/u6q2sj1ht5gc please check this video i am not able to upload the video because of the size
Fast and reliable file hosting service.
For Brushes which areusing Patterns you need to go to Brush Settings panel > Texture > change scale value of the pattern.

Ohh thank you so much bro☺️☺️
how do i replace 1 layer with another without duplicating

im trying to turn unity N_map into source N_map
so i need to swap colors with each other
do you have any total beginner videos please
I want my layers styyle to be a squasre like this

rn its just hella rectangular

how do i make it to square?
nvm, its my canva resolution size
does anyone have beginner tutorials
guys, i just learned pts for a day, can i do like a custom font text typography then save it somewhere so the next time i can copy the changes of it to my newer texts later to save time and accuracy?
You're not in layers panel you"re in the chanels panel...
Not sure to understand what you are trying to do...
well i am trying to change unity normal map to source map
i need to swap channels
red to blue
i am also not sure if i can turn the rgb into rgba or sum
i was trying gimp but got so confused
with the ui
i am trying to decompose
the normal map
Hi in Photoshop, hit Ctrl+F and look for beginner tutorials. See:
Hi! Use the channel mixer. See: https://graphicdesign.stackexchange.com/questions/17062/how-can-i-easily-swap-colors-swap-channels-in-photoshop

Graphic Design Stack Exchange
Back before I could afford a Mac I used a PC (when Windows XP ruled the earth). At that time I couldn't afford Photoshop either. So I had a WinXP box with Irfanview installed - and I thought that was
Yeah i converted rn png to targa so i can get alpha channel
You’ll need to output to a file format that understands transparency, like png
Hey, any idea how i can turn this image into an illustration similar to this print? I tried using a threshold adjustment layer but the result is not really what im looking for.


whats the easiest way to quickly crop a face from an image?
Ask an AI model to convert the image to the style of a vector graphics image. Then take it over to Adobe Illustrator and use the Trace Bitmap features to convert it to ACTUAL vector shapes.

nvm i dont need tga
i just need to split channels
Explain what you mean by "crop" because I'm thinking you are referring to something other than cropping the dimensions of an image.
cut out my bad
ik i can use a mask to remove the background but i mean the selecting process
Draw a selection around it (using any of the marquee tools. Lasso probably). Then copy and paste it to a new document. That's the easiest based on the description of the problem thus far.
ig
how to make this edge rough

how to add camera raw filter with the fixed composition

is there a way i can centre the arrow, all the text to like one line down the middle
looks so off centre and I HATE IT lol..
can i align everything to like one line down the middle

like with a guide or even a shape
If you want to align elements in the center of the canvas:
1- CTRL+A to select the whole canvas then
2- make the layers you want to align active in the layers panel (CTRL+Click beside the layer's name)
3-Choose the move tool (V) and click the "Align horizontal centers" icon in top menu bar.
If you want to align centers of different layers along a guide replace the CTRL+A of the point 1 by making a "Single column marquee" selection then follow 2 et 3.
How would I render the entire background here white?

If by "Fixed composition" you mean the whole design, I would suggest you to add a blank layer on the top of your design ( Over Group 1 in the layers panel) then hit CTRL+SHIFT+ALT+E to make a flat merged copy of your design.
With this new layer active, go to: Layers > Smart Objects > Convert to Smart Object then you can use Camera Raw filter
Hey all, how can I separate this black entity that I want to pick without being destructive on the layer?

Hi, Ctrl+C, Ctrl+V? Or simply Ctrl+J?
Well its only a image or u have everything in separate layers? If its only a image and u want to move with one of the black silhouettes u would have to isolate the entity from the background...
If u want that I would do it like this :
Make three copies of the image layer -
1.st copy u just hide it u dont do anything with it its just the original if u mess up something u'll have the original there
2.nd copy u delete one of the entities , that means u'll use : content aware, AI fill, remove tool, clone stamp, patch , basically anything that will work the best to blend the silhouette with the background
3.rd copy u do the opposite, delete everything except the entity u want
At the end you will have separate layers for bg and those black silhouettes so u can do whatever u want with them
so i am currently working on a poster, but i am facing a few problems. I wonder if there is any way to make the text size shrink as it goes? something like perspective

i am currently using the warp text thing to make it look like perspective
Right click when in transform there is an Perspective option
Np
how can i put this graph completly behind the trees and make it look smooth?

like i need it smooth smth like this but on that picture and behind the trees

this is the actual image and i need that graph to look clean behind the trees

@viral palm if you could help me im really lost here
i tried all ways i really cant find smth to look good on this picture
What’s the best software or website for drawing rough sketches for Photoshop creations (thumbnails, etc.)?
Use another, somewhat outdated tool: a pencil and a sheet of paper.
okay how can i improve this, i have this idea but i think i dont have the knowledge to execute it. any thoughts

Also
I'm starting to get the hang of Photoshop, I feel like I need to upgrade my knowledge, gradients, shapes, mask, masking only a specific layer and doing stuff for that, blurs.
What can you suggest for me to study next, to move forward?
Please do not tag mods, whomever has the time will help you.
Hi! Free some time, Watch these 3 tutorials and take notes and experiment!
Alright, thank you so much!
Gave +1 Creative Carma to @hushed niche (current: #12 - 284)
Hi, this is more for #📝project-feedback but I would cut more of each cup, so that it looks like a single one.
Something like this?
To bo honnest the first time you asked I have tried several things but if you want the same effect you'll have to build your own background.
Tombstones and trees are really blended with the background and it's impossible to get a clean and sharp edges mask from it.
I share with you a short video to show you how I would build my own BG and a small size psd of this design if you want to analyse the layers "sandwich" recipe.
Hope it will help you.


Do rewatch them in one week so that everything sinks in, it is really a masterclass on masking.
Can anyone recommend the best YouTube courses to learn 3D modelling fully in Photoshop? If you do, please send me a DM.
thank you so much man it really helps alot and sorry for the ping and really thank you for taking your time to make this for me
Gave +1 Creative Carma to @viral palm (current: #8 - 910)
ik the pic itself is kinda bad cuz its AI made
Hi There is no more 3D in photoshop. https://helpx.adobe.com/uk/photoshop/kb/3d-faq.html Adobe has some tools like dimensions or Substance modeler. Cinema 4D Lite is bundled with after effects, others use Blender, or other tools.
i just started, i wanna design posters with fonts advancingly, are there any youtube courts i can take? (i rlly wanna learn ab how to attract ur attention to words, and color using, how to input image and layer masks stuff, also making 3d or more other types of typhology)
? Looking for some help with a problem I'm having uploading a library, very new to Photoshop. And very new to this platform.
how do u get this effect? where the shapes arent exactly like a full blown line and its like fizzy if u get me


Hello all. I don't use photoshop and I am more on the photo editing side of stuff with lightroom but I'm trying something new with some graphic design stuff. Right now, I'm trying to make an image where a symbol (the foreground) in the middle of the picture is transparent allowing pictures to be seen through with the background staying as it is. Any ideas on what I can do? I'll attack the picture here.

It might be hard because of how faint it is but anything helps
Well if I understand you correctly u mean u want to convert a negative film , right ?
U need some basic knowledge about layer styles, pen tool , blending modes, and textures
U will achieve that easily
What library?
film?
yeah i want an image to have a negative overlay corresponding with the layer under it
Do u have an example image,
Anyway if u want to get the negative overlay just copy the image and then press CTRL+I or on Mac CMD+I
You can try to convert your text and/or shape into smart objects then apply a wave filter + stroke effect as shown in this short video.
Oh, actually, I didn’t know about this wave filter,
That was really helpful 👌🏽
hello, i was have a section of a building I would like to apply brick pattern to. I made a brick pattern but Idk how to apply it only to certain spots.

ctrl+i just switches it from white to black and vice versa lmao
pretty sure ive asked this exact question before and despite even following step by step instructions on youtube the results do not replicate whatsoever
If your pattern is on it's own layer you can add a layer mask and paint black on this mask to hide patterns where you don't want it.
thank you this answered my question!
If you want a part of your image to be masked to negative overlay based on the shape layer you have, follow these steps:
1. Duplicate your image layer and invert it by pressing Ctrl+I.
2. Add a mask to the duplicated (inverted) image.
3. Go to your shape layer, hold Ctrl (or Cmd on Mac) and click on the shape layer thumbnail in the layers panel to load it as a selection.
4. Go back to the mask of the inverted image, make sure your foreground/background colors in the tools bar are set to default black & white (press D if needed).
5. Fill the selection on the mask with either Ctrl+Backspace (to fill with background color) or Alt+Backspace (to fill with foreground color), depending on whether you want the shape area to be visible or hidden.
Hide the shape layer.
hope that makes sense
@pseudo frigate Flurbos FX pro
Wdum !
@pseudo frigate I think I was approaching wrong, confused, I'll try again tomorrow.
Alright 👍
Hi
So i am trying to use the new harmonize tool in Photoshop beta
But it is stuck on generating
The green bar is full but it is not finishing
I tried to shut my pc off and on and yet still not working
Any idea of what could be the couse ?
ok. i asked a similar question yesterday, how do i align a guideline to a shape such as this blue part.
i want the guideline to be slap right in the centre

First Your "blue part" must be on it's own layer. Make sure "Snap" option is on (View/Snap). Make the "Blue part" layer active in layers panel then if you drag the guide slowly it should snap when it will be close the center.
It won't work if the blue part is painted on the same layer than the background image.
Any help on this?
hey gang how would i select the whole bottom of the image without having to polygon lasso tool the entire thing by myself? magic wand doesn't work properly for some reason bcs of the darkness ig

object selection tool + little manual masking might work?
You might find the pen tool WAAAAAYYYY less cumbersome than the polygonal lasso tool. The pen tool gives you a path, that you can then turn into a selection. The pen tool is like what the Force is in Star Wars, own it or it will own you. You can't do without.
https://helpx.adobe.com/uk/photoshop/using/drawing-pen-tools.html
And yes, sometimes you will definitely have to do things by hand, that's inevitable
hi, how do i make a black fill layer and then fill it to 0
Main menu: Layer > New Fill Layer > Color... Choose Black. In the Layers Panel, change the Fill value to 0%
thank u sir
Gave +1 Creative Carma to @ripe quest (current: #2 - 3136)
I accidently broke my zoom, i used to hold Z and then move around with left click but now it doesn't let me, it draw a circle with my left click and it zooms into that
does anyone know how reverse?

Click on the Zoom Tool. Then check the options on top. See if Scrubby Zoom is enabled.

my lines i writing is getting weird

the output of lines i want to be

how can i make
it look this way
How can I make those edges more rough so it doesnt have perfect edges? I dont want to fade it I want to make some kind of rough texture

Try Type on path instead of warp
now i cant type anything there
here is the video
Can you please upload the video as mp4 or similar format (that can be displayed natively by Discord)? Then nobody has to download a foreign file.
oh gimme min
here
Do not click direkt on the anchor
@odd nest
can someone for free cut a object out for me to use?
thank you
Gave +1 Creative Carma to @tame cape (current: #14 - 222)
What ya need?
Whats the issue?
Can anyone recommend me website where I can get anything in stock images for completely free, no charge ? Please DM if yes.
guys how am i able to do like this speed effect idk


on the blue text
if u see the other one it has like an effect like its running or something
nevermind this text now pls if anybody know that effect

the one that says "kaishi" btw
gotcha, thank u v much
Gave +1 Creative Carma to @viral palm (current: #8 - 911)
I would maybe try the Wind filter to make speed lines. You could also paint some of the larger ones. Probably a combination of both techniques, I guess. Experiment with it.
never knew this was a filter ty I will def try both
Gave +1 Creative Carma to @ripe quest (current: #2 - 3137)
"Ask a question" section is for questions about Photoshop (how to do things, how the tools work...
Please use the #💬chat-general for this type of request.
Chcek DMs if still looking for help
Can somebody help me with that?
Add a Layer Mask to the layer and paint on the mask so the edges are irregular. You should try different brushes to figure out what sort of edge you want.
The problem is I cant figure out like with what brushes or something like that I could make a better border
Then I guess you'll have to experiment with them until you find one that meets with your needs. This is a question of style and aesthetics. Nobody can tell which brush to use. Only you know what the desired result is.
Please can somebody help I accidentley closed the line editor I cant get it back

Is it Photoshop?
Yes it is on the browser
It said hide taskbar or smth and I clicked it by accident and cannot get it back
I never used the web version, on the desktop software, it's either TAB or F key
Try it, just in case!
Making a "Line" in Photoshop Web is pretty much like making a Rectangle. And like anything else, you would have to select it to do any editing. The easiest way is to just to click on it. You can also click on its Layer in the Layers Panel.
Take a look at the two videos from @viral palm . Two good options are shown there.
hello! i have a question. How can i cut a shape? is there something to cut it as i want?
Can you please show something?


you could create shape and use it as mask
Perhaps this video will help you?
#❓ask-a-question message
I have been having problems with applying like a texture overlay on my pictures, I used to always be able to add the texture, add a threshold, create a mask for the picture I want to add texture to then select the textures using "select color range" and then press on the picture and "delete" that way it only deleted the selected areas. Recently I havent been able to do it because it remove the whole picture, anyone knows why?


Maybe I'm not understanding the problem but why not just use a Clipping Mask? Put the texture layer above the text, right-click and choose "Create Clipping Mask" from the context menu.
sorry im not sure if this is the right place to ask this, but im a beginner and was wondering how i could achieve the 2nd photo more accurately. help is really appreciated 🙏


Not really what I am going for
I'll show an exaxmple
You see how one is slightly disstressed using this texture


Wow, glass look… Apple can set trends, can it!
yeah they can lol. but i was just on pinterest and wanted to replicate it but im not on that level yet. could you help figure how to fix it?
I see a warming of the tones, less noise in pic 2 vs 1. I’d try multiple successive blurs, rather than a single one. Maybe playing in the blur gallery for some mild grain?
how do i make it so the white "background" layer doesnt come up whenever I create a new document?
When you create a new document, you can choose the Background Contents... Select "White" from the dropdown.

You can also do this at any time by using the Main menu: Layer > New Fille Layer > Solid Color... Choose White in the color picker.
thanks!
Gave +1 Creative Carma to @ripe quest (current: #2 - 3139)
I fail to see the different here. Unless you're specifically referring to using the image to create transparency in the object (spaces that that you can see through to the background).
Well I am not trying to put the texture in the text, I am only trying to apply a texture
Here you put the the texture in the text
I still want it to be red
Like this

Then you just do as I demo'd and then change the Blend Mode of the Layer so the black drops out... Used Linear Dodge in this example.

Oh alright, i'll try that thanks
Gave +1 Creative Carma to @ripe quest (current: #2 - 3140)
so i started over and have this now, how could i add the noise and blur only inside the text like that?


@ripe quest would you know how i could do this please? trying to match the second image
I would try this: convert the "CIRCLE" text to a Smart Object. Then I would apply the Filter Effects to the Smart Object. Then make a selection if the inside of the the text on top and invert it and fill the Smart Filter Mask with black, essentially "hiding" the effects where they are not covered by the text. Something like that.
I'm in the middle of writing some code and I don't have time to build all of these assets and demonstrate this now. Sorry.
all good no worries, thank you ill try to figure it out off what you gave me!
Gave +1 Creative Carma to @ripe quest (current: #2 - 3141)
yeah i think ill just wait till you get the chance to if thats all good with you, i got no clue what im doing from here 😭.
how can i make something like this? like the ripping mask

it looks pretty cool and just got inspiration from this to create a project
i just think that this ripping mask thing is going to be hard..
What do you mean "Make something like this?" Its a drawing by a talented artist. You'll have to learn how to draw/paint.
well, it's possible to mimic it photoshoping it right?
How? With AI?
uh i dont rlly know
but i just want to make something similar
Exactly. If you want something like that, you'll have to learn how to draw. Get someone to draw it for you. Or use an AI model that might be able to "generate" pixels for you.
😬
well thanks
I'm really not sure what sort of answer you were expecting here.
idk
idk how im going to draw professional grade comic characters
its propably going to take me like 2 years
Like everyone else does. Learn how to draw and practice drawing. Incrementally getting more skilled as you train.
since i dont know that much about drawing other from free drawing something
any courses i could take for learning on how to draw comic characters
I think I've already suggested some YouTube channels to learn drawing.
specifically comic characters though
There are probably some others on there that specialize in "comic book" or similar illustration.
I think you're probably capable of searching YouTube for that, no?
just some guy talking rlly fast idk what they saying
blank page etc
https://www.youtube.com/results?search_query=how+to+draw+comic+books
Now "comic books" are going to show up in my feed from now to eternity, so you're welcome.
@ripe quest not sure if you saw this but i could still use help only if you've got time 🙏
I've already suggested what I think as a possible solution. I don't have time to build all of that to try things out.
you know how to draw? just asking
alright sorry was just wondering because i honestly dont know how to perform the instructions you gave
What about trying something like this? https://youtube.com/shorts/C0_m_eG_Yzc?si=g2Yo2KrdeZTJdge3
@ForeverDansky shows us how to create a glass effect on Photoshop which you can save and reuse with just ONE click! #shorts
Subscribe: https://www.youtube.com/user/ukAdobe?sub_confirmation=1
Adobe News: http://blogs.adobe.com/creative
Facebook: https://facebook.com/adobeuk/
Twitter: https://twitter.com/AdobeUK
Instagram: https://instagram.com/...
Or search YT for "Glass Morphism Effect"
swear i was good at drawing back then but just gave up now im rlly bad
i think i can practice this comic tut rlly helped me
just ordered 2b pencils and a sketchbook 🫡
is there a option in photoshop for do seamless textures? like if i brush to a side of the corner it teleports to the other side?
how do i distribute the distance between the text eually

Is it about the last line? If it has a different x height as the previous font, you’ll have to tweak the line height for the last line.(assuming it is a single block of text)
Hi, go to view>pattern preview:
https://helpx.adobe.com/photoshop/using/pattern-preview.html
i mean is there any shortcut to equally divide the distance bw all text
Yeah it seems i gotta install again the last version of potoshop i was sticking with 2020
thanks!
Are they individual lines? Or is it a single block of text?
individual
Get the move tool, Select them then in the option bar select distribute spacing. https://helpx.adobe.com/photoshop/using/aligning-layers.html
thanks
Gave +1 Creative Carma to @hushed niche (current: #12 - 285)
any way to improve this to make it look better?

Is there a keybind for this perhaps?
There isn't but you can create your own in Edit>Keyboard shortcuts
here, I chose ALT+F2

Thanks, do you know if there is an option to set a keybind for an action as well? I was thinking about making that an action and keybinding it.
Gave +1 Creative Carma to @vapid flume (current: #6 - 1018)
- Double-click on your action in the action panel
- Select a shortcut
Gave +1 Creative Carma to @tame cape (current: #14 - 224)
how can i seperate each part from a character or a png seperatly and then once i take that same file and put it in after effects it puts each layer in the same file but like seperatly so i can move each part how ever i want instead of it being a still image
Don't quote me on this since I'm not an expert in After effect, but I think you can create comps in AE with smart objects. Of course, the individual elements would need to be separated and embedded in the smrt object and the PSD imported within AE
https://www.youtube.com/watch?v=qZheTq2LBTU
Might explain it better than me 🙂
🎁 DOWNLOAD THIS PROJECT FILE & ASSETS FOR FREE! 🎁 https://som.bz/3q5E0qK
You have several options when importing a layered Photoshop file into After Effects. Do you need a single flattened image, or all your editable layers and layer styles? What's the difference between "Footage," "Composition," and "Composition - Retain Layer Sizes?" Do...
Doesn't change the fact that elements need to be selected, separated into different layers (CTRL+J) and the end result saved before import
how does anyone know how i can replicate the way the text looks in the "strongest pokemon tier liist" thumbnail
the one on the right is mine, its still a wip and I plan to add more text but i want it to look like the text on the right


You mean "i want it to look like the text on the right Left"
Yeah, sorry
I kinda figured out how to do it kinda?

I would suggest you to make your text FX (gradient Overlay + 1st stroke contour) seperately then put them inside a group and apply the Black Drop Shadow with Spread set to 100% and a slightly wider White drop Shadow Spread set to 100% too.
You'll be closer but you won't be able to make sharp corner with layer Fx in Photoshop (it looks to be an Adobe Illustrator Appearance thing)
I share 2 short video to explain what I mean and a PSD file of the effect if you want to see how I built it.


thank you so much
Gave +1 Creative Carma to @viral palm (current: #8 - 912)
Hi @shadow bane
With Illustrator, you can actually recreate the structure much more accurately. With more advanced knowledge, you can also create an editable construct.
anybody know how i can put this guy in the cliff but him being backwards smth like that


How do I edit this photo. I thought the was a tab at the top that brings back the camera raw to edit after creating it as a smart object.

This is a urgent matter
how do I make the stroke smoothjer?

Guys I need YOUR help, how do I clone the white colour part to fill the entire selected box? Using clone stamp works?

Double-click on the Smart Object thumbnail in the layers panel to open it for editing in ACR. You can also apply the Camera Raw filter to the Smart Object.
You'll need to start with a higher-resolution, sharp drawing. Stroke will exaggerate any rough edge, unevenness, or aliasing.

thx
Gave +1 Creative Carma to @molten solar (current: #181 - 10)
Clone stamp should work fine. Make a new, empty layer, call it "Cloning," and set "Sample: Current and Below" in the Options bar.

Ok thanks
can anyone here help me with editing pdf file? need to edit signature , can pay
Are you asking for help with forgery? If so, it's no allowed
not quite
So please feel free to explain further, share the image in question, and also do it on #💬chat-general which is the right place for that kind of stuff. We don't have a job board here, so we reserve the right to delete posts that look fishy.
Here is the channel for help with Photoshop
got you, thanks
Hello Adobe Photoshop Community,
I’m fairly new to Photoshop and I’ve been given a task where I need to remove the visible contours of a white undershirt showing through a white shirt.
Is there a common approach or recommended technique to achieve this?
Thanks a lot in advance!
Here is an example:
https://putthison.com/wp-content/uploads/2014/04/tumblr_n4tnjn2ApC1qa2j8co1_r1_540.jpg

Hello, I'm wondering if anyone knows how to or could remove the grid from this for me? I'm using the remove tool but it's making a bit of a mess and needing a LOT of retouching. Is there an easier way? I just want the grid gone

for something like this you can use the remove tool. I'm a total noob, too, though

Wow it's perfect. Thanks!
Gave +1 Creative Carma to @pastel ermine (current: #1014 - 1)
There's probably a better way to do it, but for large areas of "similar" colour the remove tool works well. As above in the example I've asked about it's much less useful 😕
Hello, do you know how to use Adobe programs (Photoshop, Illustrator, etc.) without internet and without having to log in please? Thanks.
Without to log in?... Why?
Kind reminder: you're on an official Adobe Discord Server.
We won't help you using a non legit/cracked version.
a message suggests that it is possible to use photoshop offline.
"Collaborate seamlessly with other users and enjoy Photoshop wherever you are, even offline."
because I don't have internet everywhere I go
it's a paid version... but it's useless if I have to have internet... since it doesn't work without it.
can you help me please?
Without guarantee:
Adobe checks at certain intervals whether there are any updates and whether the licence is still valid (I believe it is approximately 90 days).
In the meantime, you can usually work offline, but you will have to do without the functions that require internet access.
Okay, can you tell me the procedure please?
With internet access, install the programmes you need.
Work offline for a while.
Connect to the internet once every two months.
Work offline for a while.
and so on …
I can't work offline, every time I try the programs turn off
yet apparently we should be able to work offline
I think you need to be online to login and then it doesn’t need to be online till you need to use some ai features
can I share a link (Adobe page in French), which seems to indicate how to use Adobe offline permanently?
I work offline regularly. There are apps that don't allow it: Adobe Express, to a certain extend Adobe Fresco and a few others. One thing is that you files needs to be available locally, on your hard drive (not on the Creative Cloud). You need to be online for GenAI features, syncing of libraries, and a few other stuff though. And obviously for logging in your account, in addition to the online verification of your subscription which happens once a month, if I remember well.
apparently there is a procedure to be able to activate it permanently on a computer that is not connected to the internet
https://exception.licenses.adobe.com/aoes/aoes/v1/cst1
There used to be a certan subscription for people who are in secured, non connected environments (defence orgs for example), not sure it's still possible. However, these weren't available for the average user, you needed a spacial subscription.
I will try the methods you suggest, thank you
and why couldn't I secure my workstation by disconnecting it from the internet?
The link you shared seems to be for those special subscriptions, that are only available by speaking to a sales representative.
You would need to be connected again within 30 days
But it will work (bar the exceptions I shared above: GenAI etc)
I went without any internet for 5 days a few weeks ago, and was perfectly capable of working in Photoshop. Actually I was way more productive than usual 🙂
It's a complicated procedure...
That's the kind of things Customer service is there for. You need to contact them. We're just volunteers helping people with their Photoshop technical questions, we aren't actually employed by Adobe.
Alternatively, you can ask in the Photoshop forums, which are the official means of reporting an issue.
They will probably lead you to the first link you shared, which explains exactly what we've been saying all along
I'll see if I can contact customer service.
https://community.adobe.com
Master Photoshop with the help of our global community.
Is it normal for customer service to send a robot to answer me?
Yes, you need to ask for a customer rep
Literally every company I could think of have bots nowadays
I can't talk to robots, they are maddeningly rude.
Sorry we can't help here
thank you for your help
Good luck!
hi am i allowed to ask someone to help me photoshop a photo. im just trying to make a simple cat t shirt thing
If you do, do it in the #💬chat-general channel, explain what you need to do, attach any relevant image to help people decide if they are interested. There is no guarantee someone will be.
That said, we are aware of a flurry of scammers taking advantage of people who want some work done.
There is nothing we can do about it, since most transactions happen in DMs, so you need to exercise caution.
We do not operate an official job board on this server.
can i make the outer box like the text

Yes with layer mask you should be able.
i made black bars can i somehow make them transparent and the layer below also

or sth
To illustrate what I meant...
ooooooh i see thanks
Gave +1 Creative Carma to @viral palm (current: #8 - 913)
You also can paint black rectangles on the layer mask to match the scanlines of your text...
heyy anyone know how to turn an image into CMYK and export the channel layers? im at this part but i cant figure out how to export the channels and save each layer indivudually

do you want export photo? or want to export every layer separately
Hi, you can target (click) on a layer, then copy it to a new (greyscale) file. Target channel. Ctrl A - Ctrl C - Ctrl N - Ctrl V - Ctrl E. Rinse, repeat.
Or you can use Use Image >Calculations to create several new documents each with just the required channel select, your image, the Cyan, for both sources, normal blending mode. Then, in the new document, go to Image>Mode>Greyscale. Save.
To add what @hushed niche said, you also can go to channels panel then click on the hamburger menu icon and choose split channels.
Photoshop will load each channel in its own gray file...
Then you'll be able to export each file separately...
Hello everyone,
What is the easiest way to straighten a tie?
In the CR window I have been encountering this "blue" effect only in the CR editing screen. It occurs specifically in the black areas (I really cranked up the blacks for the example, it's usually more patchy on average use). When the CR changes are applied by pressing OK, it looks normal but it hinders proper editing. Multiple updates have gone by with this remaining for me.
The first pic is CR editing window, the second pic is the applied changes on CR (the same changes that showed blue inside CR)


My first attempt would be to Liquify it.
It’s the dark area clipping warning. Click on the blue triangle in the histogram.
J is the shortcut.
Okay that's a big mystery solved, thanks!
Gave +1 Creative Carma to @hushed niche (current: #12 - 287)
You can temporarily activate it by holding alt as you drag the exposure, white… sliders.
If there is so much blue it means that you crushed the shadows. No more details…
I will try it. But I think that's pushing not moving
Yeah using liquify is assuming it's only slightly unstraightened and just needs some nudging.
If it's bad I would remove the tie for a base layer, then add a layer on top with just the tie masked/smart objected and puppet warp the tie, maybe liquify afterwards too.
Generation is worth trying before doing that though, maybe it will do it.
Omg this method works like a charm thank you two!!
Gave +1 Creative Carma to @viral palm (current: #8 - 914)
Hello everyone, I always struggle to separete the subject from the background especialy hair and fur, what would be the best way to do it ?
Thx

Try select&mask
There is an refine hair function
That might help u with the fur
Select and mask is what I am using but it leave me with unwanted thing that look "off" when I seperate it from the backgeound
There are circumstances where automatic method will always fail because there is not enough information for an algorithmn to detent edges and shapes. On those occasions, what those method achieve is a base mask that you will have to correct yourself, using standrad tools like brushes, and the secret hair and fur masking tool: The smudge tool.
Use it to extend and contract a mask hair by hair in a way that doesn't seem too obvious. That is better done at higher zoom and with a graphic tablet (although the latter is really for comfort)

That said, I have had good results using the object selection tool
see screenshot for settings

there is a possibility that you still will have to tweak by hand, but probably less.
Select and mask can also be a bit tricky to master, particularly if you're using the default settings. I get superb results with it, but there is an amount of trial and error. Check if content aware fare better than colour aware (it may not be what you think) and also play with the shift slider to remove unwanted areas (alsi obviously, you will have to refine your mask with the tools on the left, and notice that you have an object selection tool as well in this window


Ultimately, you can try select> select subject, making sure to enable "cloud selection" in the preferences as it's more precise.
If you're trying to select something very difficult, there is a good chance that you will have to slect different parts using different methods, store the selections (select> save selection) and assemble them to create a unique one, then tweak the mask by hand.
Wow thanks ! I will test that on another of my picture, thank you for your time I really apreciate your dedication
Gave +1 Creative Carma to @vapid flume (current: #6 - 1020)
Are there any shortcuts for changing the size of the brush?
Square bracket keys[ ]
sadly I have mac
They don't have Square Brackets on the Mac keyboard? I find that difficult to believe
I have them on the Magic KB for iPad. Check again.
Hold Alt + Click&Hold Mouse Right button and drag
Left/Right is size
Up/Down is hardness
Unfortunately [] works only with English/US keyboard's configuration.
If your computer is not set with this KB config you only have access to the @thick tangle 's option...
I wish there was another solution because I myself have to constantly change my keyboard configuration to be able to use this shortcut.
Not all languages, /keyboards configs have them. For instance AZERTY does not. Do search the keys after op kl and nm
In French, I believe it is : and ;
They are not next to each others
Or is it *? The list might be wrong: https://helpx.adobe.com/be_fr/photoshop-elements/using/keys-painting-brushes.html
Tell us the kb language you need.
It's unthinkable that Adobe never considered all users who don't use a QWERTY keyboard...
I use a “Canadian Multilingual Standard” keyboard and have to switch keyboards every time I use Photoshop in order to access certain useful shortcuts...
Me personally ... I use the Alt option all the time ... its easy and fast I just like it
I suppose it's a matter of habit... and not really convenient for a graphic pen user 😉
The most important thing is that everyone finds the technique that suits them best.
@strong nebula Do you have a graphic tablet? If yes, does it have a roller control?
If yes again, you can program the tablet control to take over certain shortcuts.
For example, on my tablet the roller has 3 functions: Increase/decrease brush size, rotate, and zoom
Been fighting this for a long time. The worst? AZERTY keyboards need shift to do the numbers> no change of opacity on a laptop…
Im not sure but isnt there a bind option for keys?
And UK keyboards aren't even the same as US keyboards, despite sharing (broadly 😉) the same language
the ~ key is a prime example
Most graphic tablets will allow you to personnalise express keys, by software. For example I use mine for Blender and the express keys and rollers controls are dedicated to Blender when I'm on Blender, and to Photoshop when I'm photoshop.
Some shortcuts are hardcoded. There is https://exchange.adobe.com/apps/cc/ca57f118/keyflow-windows-version that might help
Or this for Mac: https://exchange.adobe.com/apps/cc/1aa161b0/keyflow-macos-version
Yes, I sympathize... Here in Quebec, we have the advantage (disadvantage) of speaking two languages and having QWERTY keyboards...
I just need to switch when I write in french to get accents and latin letters like Ç...😉
Only English uses square brackets? I also find this interesting and ridiculous.
How would anyone write code? QWERTY ONLY?
Perhaps it's the reason why French Canadians named English Canadians "Square heads"?🤔
... I'm joking of course!
Sold at John Lewis... It has brackets

It's also expensive (but it's john lewis! probably equivalent of Macy's or Bloomindales? Not sure)
I can't say for AZERTY since I live in Canada but I think the problem is even if european keyboards have brackets keys Photoshop's shortcuts don't work with them...
the brackets are placed elsewhere on an Azerty keyboard, but I'm pretty sure Photoshop doesn't link them the same as in US style). It's the case with plenty of keyboards types. Adobe only "speaks" American

And you can't change them since they aren't linked with a menu
Yes and the problem is: Alt+( gives [ but doesn't work for Photoshop shortcuts
Well, it is an American company. And there are only so many keys and opportunities for shortcuts which is why they allow you to edit them.
But not this one 🙂
It would be great if people could customize Brushes size/hardness shaortcuts... I don't think we can for now... Am I wrong?
wishing Photoshop could come with Bridge (and Premiere) keyboard shortcut management system

Well, there are methods to edit the brush size. Square Brackets aren't the only way, thankfully.
The main problem is that the help files, even when translated don't take this differences into account. (I mean the HelpX files)
At best they will not indicate the keyboard shortcut, at worst they will indicate the US keyboard one.
These are ridiculous keyword layouts. I don't know how people could write code on them. Not everyone who writes code speaks English or has a US keyboard. It must suck. Heh
I have a file with 3 linked smart objects (Sub images) in a group.
When I duplicate the group, the smart objects are linked. Is there a way to break said links but keeping the thing as a smart object ?
So I want a "new" smart object (Which is cropped and scaled into the correct place)
I manually went through with "Copy as New Smart Object" but can't find a way to do it en masse
I usually select "new smart object by copy", and delete the first one if needed. It creates a non linked copy of the original. If you select "convert to smart object", the link is conserved

I am pretty sure there is a simpler way, I haven't searched in a while.
Yeah I just had to do it... many many times 😄
With multiple layers selected you can't do that alas.
It's done now, just wondered if there was a quick way
I have an QWERTZ keyboard. For brackets on mac I have to press:
[ = option + 5
] = option + 6
I only adjust the smoothing with that. No worries I'll find the solution.
There is still the possibility to assign a shortcut. I don't have one for this, but I have one to "convert to smart object" and it's one that's wearing off on the keyboard 🙂
Hahah ain my work I hardly use them, but every now and then I need to do mockips with changeable placeholders etc
Iirc, it is ù and either , ; : or !
I cant find a way to correctly mask the background grass to change the sky behind. Can someone guide me on how to mask these or have a tutorial that i can watch. tysm


It will be hard to get a decent result with such a pixelated and blured image...
You can try to generate a layer mask with channels technique but IMO you won't be able to get something really clean with this image quality.
After that you can try to soften harsh edges applying a low value Minimum filter to the mask.
Note: in the video I kept the original layer and its mask (just in case)
i want to adjust 2 image in one project i want that half faces to split and like merg it half face of diff image and other face of diff image

make a copy of half face and with mask, and color correction makes it like the other side
i cant perfectly aline their faces

use transform menu options
were is it
Ctrl+T and then play with Warp, prespective and etc
jelouuu
i'm new here
i need help
how can i "uncurve" this map that has the curvature of the Earth so that it looks like a Mercator projection?

How can i fix\remove these squares on the wall without messing up shadows

Use CRF
Thank you!
Gave +1 Creative Carma to @raw bison (current: #1014 - 1)
Hi! Go to image>trim and select transparent pixels.
For the tools, you can click on the three dots at the bottom of the toolbar, or go to Windows>workspace>reset workspace, or select the default one.
I had a button here called "remove" (Generative), and now its gone? How do I get that

Wasnt "remove background", it was just "remove" with a bandaid symbol
please provide useful input, that would be greatly appreciated
1% flow is still giving me too much color. What's going on here? Am I misunderstanding what flow is supposed to do? I thought this was supposed to represent how much paint my brush leaves behind.
is it possible for the menus to be changed to a dark theme?


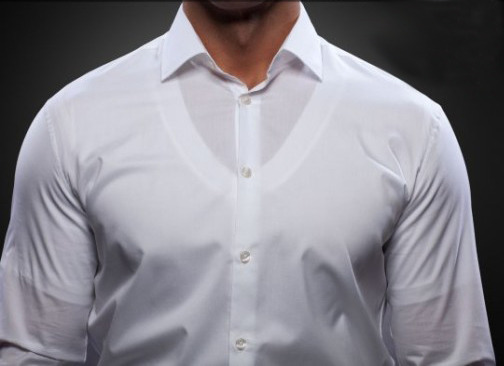
thanks a lot for the vid
Gave +1 Creative Carma to @viral palm (current: #8 - 917)
Hello guys how can I make less cloudy?
I am dealing with clouds looking like that:

What do you mean by less cloudy? Brighter?
Less depressing. Brighter sounds good
Levels adjustment layer could be the way...
Drag the black output slider to make darks less dark.
ireally dont know how to remove background

pls help me remove these unneccesery stuff on the screen
@foggy vapor
yo bro mind showing me?
Please don't post the same thing multiple times. And please don't ping random people. When you have a question, just post it and wait for someone to reply.
ok
You start with the Remove Background feature which will give you a Layer Mask to start with. Then you can refine the mask to either show or hide portions of the Layer. Something like this...
i only need the text removed
but the background is black on every jumpscare
You asked about how to remove the background.
oops
Now what it is that you want?
accidently


i want like this
a friend made this
but he wont show me how
you get it/
since he made it im trying to practice to make it myself but it all ruins
Use the Remove Tool. The Clone Stamp. Sample the color and paint over it. Probably some combination of all of these.
mind demostrating?
is there not any faster way?
Sure. Ask an AI to do it.
Since you're in the Photoshop Discord, we're going to assume you want to learn how to do it with Photoshop.
well yea
but its blury when i try faster way
So paint over it.
I'm not sure what you're expecting here.
If you're looking for some sort of "magic button" that reads your mind and removes all the stuff that you want removed... that doesn't exist.
The closest thing is to push the image into Google Gemini and say "Remove all of the text." Maybe that will work. Maybe not. But that isn't what this server is about.

Hello guys
How do I achieve this text outline showing but not the fill

I wanna do it for the E here
One of the easiest way is to have two text layers, and your monster sandwitched between those two layers
The top text layer should have just the outline, and the one at the bottom (behind the monster) will be with a fill only
perfect, thank you
Gave +1 Creative Carma to @vapid flume (current: #6 - 1021)