
#❓ask-a-question
1 messages · Page 122 of 1
how are these white specs made and the 99 star is kinda like glowing

Make a new document and go to Edit > Generate Image... as a test. Try a simple prompt. See if will render anything for you.
Gave +1 Creative Carma to @hushed niche (current: #12 - 233)
whats the feature called so that i can mask things myself
Layer Mask. But you'll need to do a tutorial about that because given your skill level, its probably going to be difficult to understand at first. Please learn the basics.
why should i learn the basics of random stuff that i wont use
i looked through the video and 85% was stuff im not using
So instead you want to sit here and continually ask questions and have people spend the time to help you and you don't really care about learning how to use the app. Is that right?
ill just use yt if asking stuff is such a big problem
Why should I help you if you don't care about learning the app?
I suppose my time is unimportant to you.
i do, just not the parts that i will never use
You don't know what you will use or not use because you don't even know what you don't know.
those are some wise words
There might be a Layer Style on it. Outer Glow, possibly. The person looks like it might also have an Outer Glow on it as well. The specks might just be painted with a brush.
I recommend to use an incremental save function, it is built in if you use creative cloud PSDC files, or here is a script, if you save locally: https://waffledoodle.gumroad.com/l/FoBHA or https://www.artstation.com/marketplace/p/XOdlp/save-as-today-s-date-auto-version-up-photoshop-script

Gumroad
This script brings the "Increment and Save" functionality (as found in After Effects and Maya) to Photoshop!Now you can save out an automatically numbered copy of your art with a single button press, and no interruptions to your workflow. No more having to manually go to "File->Save As" and name your iterations. Simply run the script (or bind...

ArtStation
Resources - Save As Today's Date & Auto-Version Up (Photoshop Script), USD $0.00. This is a remix of Mark David Teo's Auto Name Saver ScriptWhat this script does:
For a new document, the script will automatically...
But remember to save often!
This and Generative Expand worked without any issues. It was only Generative Fill that was giving me issues.
I reached out to Adobe’s Support Team and allowed them to remote control my computer. They installed a previous version of Photoshop and the issue seems to be “fixed” for now. I was told to skip the latest update as this is a recurring issue for some users. 🤷🏻 then the Support member tried to get me to purchase Adobe Express lmao.
Just giving the update in case anyone else might experience similar problems 🙂
Which version is installed on your PC so I will know to flag it? If someone complains about the same issue?
What version did you have? And what version do you have now?
I currently have 26.6. I had the 26.6.1 version from today’s update before the Support member downgraded me.
this is a bit more advanced so i feel like i should be allowed to ask this. how do i do this?
hey could someone please help, im trying to finish an assigment thats due tonight through the web version of PS however when i zoom in to work on details i can only zoom into the middle of the canvas and not where i need to, is there any way to move where i am zoomed into?
Is there a hand tool? try the spacebar, or H.
this question aint really related to photoshop but dose anyone know why i can drag anything im trying to put an png from my downloads into ps but it dont let me darg anything no t even on my desktop or files
ive figured out i can use my mousepad on my laptop, its really janky but its the best ive got
what should i change/add? i feel like text is very ugly

first time trying photoshop
could add shadows
delete it 
nah jk mate, feel like the text could stand out a bit more deffo. i like the red how youve done it. maybe a shadow of some sort like you say on vvd?
shadows can help to make the Liverpool text stand out, especially in the light part of the background... Try to reduce a bit size settings of your drop shadow (less blurry) and play with opacity to add contrast between text and its background...
use a mask, a soft brush, and paint what you want selected, after, jump into the mask and gaussian blur your mask to smooth out any harsh lines
his neck is being cutoff by the nike logo, try to adjust whatever's causing that. Additionally, you could make the text all capital letters to better stand out and feel more impactful
also try to post it in the project feedback part for more responses, this is more like general questions and support
Should I ask a client for compensation if I put in time and work into something for them to just say that they don't need it anymore?
done man i feel like it already looks way better. I could also add shadows to the players and nike logo if that would look good

could also make the bars on the left more white
but it kind of matches the logo rn
what is this brown thing i actiated by accident and how do i deactivate it and what does it do?

If you want feedback on work, please post in #📝project-feedback
Its a Slice. Its for cropping/chopping an image. To turn off visibility of Slices, go to View > Show > Slices and uncheck. To delete a slice, select the Slice tool, then click on the slice you want to remove and press the Delete key.
You can ask for payment. However, if you don't have any legally binding contract or agreement in writing, there probably isn't much you can do. Always get a down payment up front before starting any freelance gig.
I replied in the #📝project-feedback channel.
just opened ps and my work from yesterday is gone... any way to get it back or do i need to restart? 🥲
i thougt that it would save by itself
No. You have to save files just like any other application. If you didn't save the PSD somewhere, its gone.
i saved the file but when i pit it back in its all just 1 layer
There are PSD files that save layers, settings, styles, filters. Then there are files that Photoshop exports, e.g. PNG, JPEG, etc. Those are flattened to one background layer.
Its the type of thing you learn when you do beginner level tutorials.
I want like a line out of this color to fill the area beneath it so it has like a two layer sort of look

But I forgot how I did it the first time
How do I make it a line rather than it just popping up like that with the color
nvm got it
did not see that in tje beginner guide
Beginner Tutorial: Create Your First Design...

Shapes can have Fills and Strokes. If you just want the stroke, give it a width and color. Then cancel out the Fill.
yea managed it thank you
i I hope this is the right place to as this question.... in photo shop ay gen fill i keep getting an error saying that because of high demand i can not use it it started last night is any one els have an issue with the AI Generative fill ?
I just used Generate Image and it seems to work for me.
No issue on my end
oh ok thank you
Hey I get this error every time I try to open my project. It's about 500 MB in size and has various artboards and smart objects (if that helps).
Does anyone know how I can fix this problem and get back to work?

Hard to say... Did you send the report?
Perhaps you could update your photoshop to the latest version (released 2 days ago)... It could help.
Sending a report won't fix the issue today :/
I already tried updating to the latest version about an hour ago
hello, me again. i really like this wind effect. can i somehow use it as a separate layer or do i have to apply it directly to a layer?
because i would like to keep my different layers to edit them further and then just put the wind filter over them.
Convert the layer to a smart object before applying the filter! (goes for all filters)
yes that works, but then only for one layer. i would then like to apply the filter to all layers below and not just for one layer
You can move all those layers into the smart object after double clicking the smart object layer thumbnail
Have you worked with smart objects before?
Sorry to hear that... Update can fix some issues sometimes...
I know the report can't solve your problem right away, but it's important to help engineers solve common problems.
Have you made any changes since the last time Photoshop worked properly?
Hard for us to figure it out with info given by the error message
Rolling back to v26.2.0 seems to have fixed it 🤔
The issue must presumably be related to the most recent releases
anyone have any idea why no transofmration is snapping to middle, another objects, etc?
idk what happened just now, but its working again, it is able to snap
before it wasnt
"Heineken" is misspelled. (You have "Heniken")
Angry Orchard, Coors Light... These are proper names so those words are capitalized.
I have some text. Is it possible to apply an fx to only a couple of words or do I have to split the text out?
If you're speaking about Layer Styles and those FX, they get applied to a whole layer. So, if that's what you're asking then: yes. They might have to be split up into separate layers.
Thank You @ripe quest
Gave +1 Creative Carma to @ripe quest (current: #2 - 2848)
Is there a way to get a custom template for adobe portfolio/welcome page from other sources then load it in to my own adobe page?
Adobe Portfolio or Behance?
Adobe Portfolio has some template sites you can use (I think)
I haven't looked at that in a while.
behance
No. I wish Behance did have some templates. About the only thing you can do is use another project to create a clone. Not ideal.
oh
They don't even have templates with the Pro Account in case you were wondering.
Yeah. Behance needs a lot of help.
Ok happy to hear that you've found a work around... Sometimes it happens (that's why it's important to send report 😉 )
bro they provided disable right click to avoid copying image on site editor but didnt do that on the behance website
I think the same but not sure something will be done soon... There would have to be a return on investment to get things moving on this front... I'm not sure that emplates will..
I pay for "Pro" so I expect more than what they're providing.
They could make the default editor much better than it is.
Its not good at all.
Oh! Understood... I was in the position of a "Free" user... I agree with you Daniel!
I'm on behance since 2012 and it was better at these times... I remember we were able to load a background image and place our designs over + more features than now... Don't remember exactly when they changed but I had to rebuild all my old project (they were a mess)...
I don't mean to be harsh. I know what writing apps is like. People are saddled with all kinds of legacy code, not enough developers, whatever. I just wish it was better. :D
does behance have social icon for discord in behance site editor
Do you mean icon for your Behance profile (like IG,Facebook,Linkedin...etc)?
If so I don't think there's Dicord in the available icons... I see a lot but no Discord
oh
and also
behance should find a way to avoid people saving an image on behance projects
I have an image that has a sunburst in the background. I've put it on a bigger canvas. Is there a way to extend the rays?
I may be wrong, but I think you can download your own images inside your own projects when you're in “edit a project mode", but you're not supposed to be able to download images from other people's projects.
you can “Copy image”
how can i create this "blurred face” effekt? so what tool can i use to distort and blur an image like this?

is it becuase im doing this on my own project
Yes that what I said... You can download your imange from your own project...
Try to download from anyone else project... You re not supposed to be able to do so
Did you try "generative expand"?
Is anyone familiar with this software packaging box? I really want to obtain the PSD

I think your sample was made with a long exposure shot of a model who moves the head during the exposure...
If you try to mimic this effect with a normal picture you can try to use Filter/Blur gallery/Path blur on a copy of your model placed over the original shot...
Once the blur effect applied, play with blending mode and opacity of the filtered layer to blend it with the original shot below...
Note: it's easier to get this result with a low key picture.
thank you!

Not sure to understand... Looks like a polygonal shape with a darker shade of blue fill and Feather property cranked up... Am I wrong?
good reference, you showed me the 50% of what i wanted to do lol thanks
Gave +1 Creative Carma to @viral palm (current: #9 - 785)
but i also need another 50% which is how to make the shape of it
like this process, how do i make this thing?

Pen tool set to "shape" then set your "Fill color", click to create anchor points and "close" your shape. You can select and move individual anchor point with "direct selction tool" (white arrow) or select the whole shape with "Path selection tool" (black arrow)...

Try to make an eleptical selection/inverse the selection then type "sunburst" as generative fill prompt. It should work
That did it. Thank You So Much !!!
Gave +1 Creative Carma to @viral palm (current: #9 - 786)
Can someone help me to make this
You just want the rounded rectangle with a texture like that?
yup
Sure. I'll take a look. One moment.
thanks mate
Maybe something like this... I've tried to do this with menu commands instead of keyboard commands. Hopefully, it makes sense.
what domain does behance users use mostly like ".me" or something
What?
Here is my PSD if you want to take a look at this...

for custom domain adobe portfolio behance
Appreciate it.
So first... Adobe Portfolio and Behance are two different things.
ok behance portfolio i meant
Behance doesn't support custom domains.
ou
oh im tweaking bruh
cuz when iclick on profile in behance
it shows me adobe porfolio
so i keep thinking the portfiolio is related to behance
like behance portfolio and not adobe portfolio
Adobe Portfolio is a completely different service. That builds a whole custom website. Behance is Adobe's social network; it allows you to build a profile and project pages within Behance.net.
should add custom domain to behance fr
Well, there are a lot of things Behance "should" do.
i mean i guess its reasonable to expect missing feature you desire the most
because theyre basically top dogs in stuff like photoshop and other famous adobe
Adobe Portfolio used to be free for All Apps users. I'm not sure if it is anymore.
That will allow you to create a whole custom website and point it to a custom domain.
Behance is just on... behance.net/your_name/
To be honest, if you're not ready to create a custom website and do all of that work, Behance is probably easier. However, less configurable and less customizable.
small question
is it possible to do that
in another shape
Sure
it'll still work right
i lowkey rather pick behance.net because its more easier and it has 1:1 features such as messaging and hiring. forgot to mention the user profile statistic option
Yep. You can even copy the thing and re-use it.
Umm, I get this when I open your PSD

I have 2020
ah
You'll probably have to try and follow along with the video. See if you can recreate it.
Oki, i'll do my best thanks
Gave +1 Creative Carma to @ripe quest (current: #2 - 2849)
I might be able to change my capabilities settings and save it again but some of the objects in here might be incompatible with 2020. Also, it would be better if you can learn how to do it. Then you can make your own edits in that version.
Yup
yo
I didn't understand how you made the shape fit
Right-click on the "cloud" layer and choose "Create Clipping Mask". Make sure that layer is above the geometric shape. It will "clip" to it.
Essentially clip out everything outside of the shape
can't fill because there's not enough pixel layers
I'm not sure what this means. My guess is that you mean the Clouds layer isn't large enough. Just make it bigger. Make it fill the entire Canvas. Then clip it. You can drag it around afterwards.
thanks
Gave +1 Creative Carma to @ripe quest (current: #2 - 2850)
yo for the clouds, which blending mode did you choose
its blury
I think I chose Soft Light but experiment with them. See which one you like best.
Maybe. Overlay probably works too. Any of them in that group are decent.
how do I make it a bit darker
because I have a logo which is a similar colour and it doesn't reall ycontrast it
Add an Adjustment Layer: Levels, Curves, or whatever you like. Put it above the Clouds Layer and clip it to the Clouds. Tweak the Adjustment to make it darker.
How can I make this look more professional, its a wine label thats meant to be on gift wines the brand is going to send to employees

Do not stretch fonts!
More space to the left and right of the main text. Definitely no italics for the "&" sign.
(Personally, I don't like the font. But that's just a matter of taste).
Thanks for your response man will take note of this! Could you maybe recommend a font? Different ides help you know
Gave +1 Creative Carma to @tame cape (current: #15 - 169)
The question of a suitable font is very difficult to answer. What ideas does your customer have? What does the wine represent? Are there already labels for this customer?
It's best to get inspiration from the web based on your conversation with the customer.
eg
https://www.google.com/search?client=ms-android-xiaomi-rvo3&sca_esv=92a388f48f73ef37&udm=2&fbs=ABzOT_CWdhQLP1FcmU5B0fn3xuWpA-dk4wpBWOGsoR7DG5zJBteutRhCIwSdaS7of3GY5DRWR17Rd_UWljYKqQTlajY9Vxmfg7KAk--Ebq_MEj2PH7tZrSPHIIF8Ws5GZpt0accGjtSndqEVVuzoDZFVOkk2qy5SuvLyxx6b6ClIOtcQNIl2xmE-Us0eRvUOtUNRbW4K08A-gAY3obfgydV5DPespIlstw&q=wine+labels&sa=X&ved=2ahUKEwjwpvDdjJuNAxXrVUEAHaAfCqsQtKgLegQIDhAB&biw=392&bih=735&dpr=2.75
Great thanks man!
Gave +1 Creative Carma to @tame cape (current: #15 - 170)
hi folks! I'm very new to photoshop, literally downloaded it today. fair bit of experience in programs like GIMP but decided to bite the bullet and pay real money for software lol.
I'm having a problem, I want to use the elliptical marquee to select a very specific sized area- in GIMP I would usually make a selection, then edit the number values in the left panel to whatever I want. From a bit of internet searching, I see that I am supposed to use the elliptical marquee tool, then set "Style: Fixed Size".
I have selected the marquee tool, however "style" says "Generate image"... I am unable to select "Fixed Size" as that option doesn't appear. What am I doing wrong? Thanks 🙏
select the selection tool that you want.
Then:

Thanks. Interestingly as far as I know I was doing exactly that with no luck (still just said "Generate Image"). But after opening it again now it works fine.
Gave +1 Creative Carma to @tame cape (current: #15 - 171)
I do not think you had the marquee tool selected.
i did! i checked at least five or six times that the selected tool was "elliptical marquee"
(for reference, however it seems to be working fine now as it lets me choose fixed size. unless there's something else here that i'm not aware of haha)


Based on your second screenshot: Can you please post a fullscreen screenshot with the Layers panel open?
Hello! is there a way I can remove these window reflections aside from using the clone stamp method?

Does anyone know how to make or generate this type of watermark?
You can see the watermark on the picture with “FiveR” with other lines

thanks, will check it out
Gave +1 Creative Carma to @tame cape (current: #15 - 172)
this is my box right now


this is the box after i flip it
how do i make it so the design stays the same direction and position but only the box switch?
Have you kept the layers separated? You’d need to use transform on the front and sides, and switch their positions.
like skew them?
The automatism doesn't seem to work well enough with this image (but I haven't tested the function very often either).
Perhaps preliminary work with the Remove Tool / Generative Fill is a better alternative for this image.


i dont understand what this mean
how can I make myself stand out in this photo? I’m new to photoshop/photo editing


Yes, apply edit>transform>perspective
Or Command + Option + Shift (Mac) | Control + Alt + Shift (Win) -drag a corner anchor point to change the perspective of an image.
https://jkost.com/blog/2019/06/new-free-transform-preference-in-photoshop.html

Here are several shortcuts and tips for transforming and warping layers in Photoshop.
Do you only have an image of the box, or did you create it and thus have the sides on separate layers?
If not, you’d need to select the sides of the box separately and “jump” (Ctrl+J) them to their own layers, to transform them separately and move them where they should be.
Remove the person with a mask or the eraser.
Use Generative fill for the emtpy space.
Clear up the remaining discrepancies.


I don’t want to get rid of myself, I wanted to make me stand out in the crowd. Maybe like blurring the background or darkening the crowd?
the yellow rectangle here, id like to increase the brightness a bit to match up with the blue part.
the blue side id want to increase the saturation slightly as well
whats the best way to go about it? i could select it as a rectangle but would look crap

Sorry, mb
read over it too quickly and translated incorrectly.
Maybe
duplicate your layer two times and activate the top duplicated layer
draw an elliptical selection with the Elliptical Marquee tool and create a mask from it
next step
use eg filter gaussian blur on the mask with a value around ~30
activate the layer below, select all and use the filter gaussion blur again with same value
one possible result:

would you be able to lower the blur to be more subtle and then send it here? it would be super helpful!!
This seems to be a panorama. Did you stitch it together yourself?
The easiest way would be to edit the individual images BEFORE stitching. Would you like to try that?
Wouldn't you like to try it yourself and improve your skills?
(Because another channel is actually intended for ‘please do it for me’: https://discord.com/channels/547473772727238676/548276405151203338)
I could do it myself but I figured since you already had it you wouldn’t mind sending it, I also just don’t have my laptop on me rn lol
mb i’m new to this server
cant, it was sent to my by someone who had already stiched it all up
can i do it like it is now
Compromise:
I save the file.
You try it yourself.
If you're not happy with your result - or if you have any questions, just get in touch here again.
(One problem is that I'll probably have to test several more blur values before I get a satisfactory result for you. Such edits are almost entirely dependent on personal taste).
how do i make it so i can ddrag this down to squish the box

instead of manually having to skew it down on both side
Yea true, I can definitely do it, it would just save me some time/trouble
How can I remove the grey so that the dark fade part near the stroke also stays? Because if I remove it with the magic wand, it looks very choppy.


I know I might be asking too much and maybe it's a stupid question, but on this server can you also help to make projects from 0? I'm new and I would like to start the graphic designer path on photshop
On the other hand: you improve your knowledge and can easily carry out similar processing yourself in the future. This is a win-win situation for you. And that is also the purpose of this channel.
😉
I've tried to use smoothing and feathering, but I'm still not getting the result I need.


Try Select/Color Range... I think it's the best way to do what you want
could you clarify "the result I need"^
you don't want the black shade?.
I do want the black shade
And there's line residue left as well

I'm unsure how else to explain it

This is the original from what I wanted to make

Did you try the technique I shown earlier? It should work fine!
Hey, I made this flat chest in photoshop but it has no depth at all, so the boy nipples just look asymmetric, while one is stretched up because of the arm up. How can I improve this?

I did so yeah! Though as I said, a bit rough around the edges.

Maybe I could just apply a VHS effect, a bit of blur and it would look fine
Does anyone know a watermark generator that can does this type of watermark

how do i make this rat cartoony

hiya, the issue seems to have resolved now.. i can remember to do this if i have this problem again though?
though if theres something specific ur looking for i think i remember mostly what state it was in
atleast basically haha
Glad to hear that.
Hi again! Marquee around the top three points, then use the arrow keys.
You know you can just type some text and lower the opacity, play with the blend modes?
anyone able to help
is there a way to place a watermark automatically to all my projects on behance or do i have to upload a watermarked image manually
No automatic watermark on Behance.
You'll have to upload watermarked image in your project.
yes you can simply use Blur tool make the mask active and blur the area you want to be smooth or Make the mask active and use Filter/Blur/Gaussian blur.
thats gay bro, that would probably be the most handiest feature on behance
How do I make it so i can align each image in a position grid?
like place each image in a orginzaded position
Hi, you could add an adjustment layer and make a large brush stroke on the layer mask, or start with a rectangular selection, switch to quickmask (Q) and run a large blur?
Or maybe better, use camera raw, and its gradient masking.
https://jkost.com/blog/2022/10/everything-you-need-to-know-about-masking-in-adobe-camera-raw.html

Discover how to take your photographs to the next level by enhancing selective areas of a photograph. In this video, Julieanne Kost shares tips, tricks, and techniques for making the most out of Adobe Camera Raw’s new masking tools including automated selections based on Adobe Sensei (Select Subject, Object, Sky, People, and Background), manua...
There might be another word to use.
You can do your own design / make a pattern with it then apply the pattern over your image ... Change Pattern layer blending mode and adjust its opacity to your taste.
hi! how can i separate an object like this into 4 pieces with a spiral like the second photo so i can color them separately?


anyone know how to fix the could not complete your request because loaddeepfontcache in getdeepfontcache failed ??
Here's one option 🙂 - Not 'perfect' but might be good enough as a raster graphic
I mistakenly thought it was 3 pieces, so went with 120 degree rotations... 360 / 3 = 120
You will need to make them each 90 degree rotations instead
Have you googled it?
https://community.adobe.com/t5/photoshop-ecosystem-bugs/p-ps-2025-could-not-complete-request-because-loaddeepfontcache-in-getdeepfontcache-failed/idi-p/15071592
https://community.adobe.com
Hola! tengo el mismo problema, borrando las carpetas FontFeatureCache y CT Font Cache el problema parece solucionarse. Pero una vez que se vuelve a abrir el problema regresa. Alguien ha podido solucionarlo definitivamente?


genuinely thank you so much. ive been struggling with this for about an hour now
Gave +1 Creative Carma to @sly hawk (current: #5 - 1149)
yeah I've followed everything there and it still isn't working
does anyone know anywhere i can get loads of pngs in like a zip file
like mostly just transparent background images that i can mess around with
I new to photoshop can anyone help me composite a photo?
Hi, I would go online and search for “free Photoshop png texture pack”
Hi, explain what you struggle with.
https://www.youtube.com/watch?v=KmWMQtkYkEE
Begin your compositing journey in this introductory follow-along lab. Every day, we are exposed to a proliferation of images of people or objects placed on different backgrounds. This is what compositing is — the art of combining photos to create realistic images or surrealistic works of art. Learn how you can use Photoshop to create those see...

Learn how to create composite images and explore photo manipulation in Photoshop by using these 10 steps that will get you on track creating great composites of your own! We will cover lighting, color, shadows, perspective, and much, much more in this Photoshop tutorial.
Get a free 7-day trial for Envato Elements here: https://1.envato.market/...
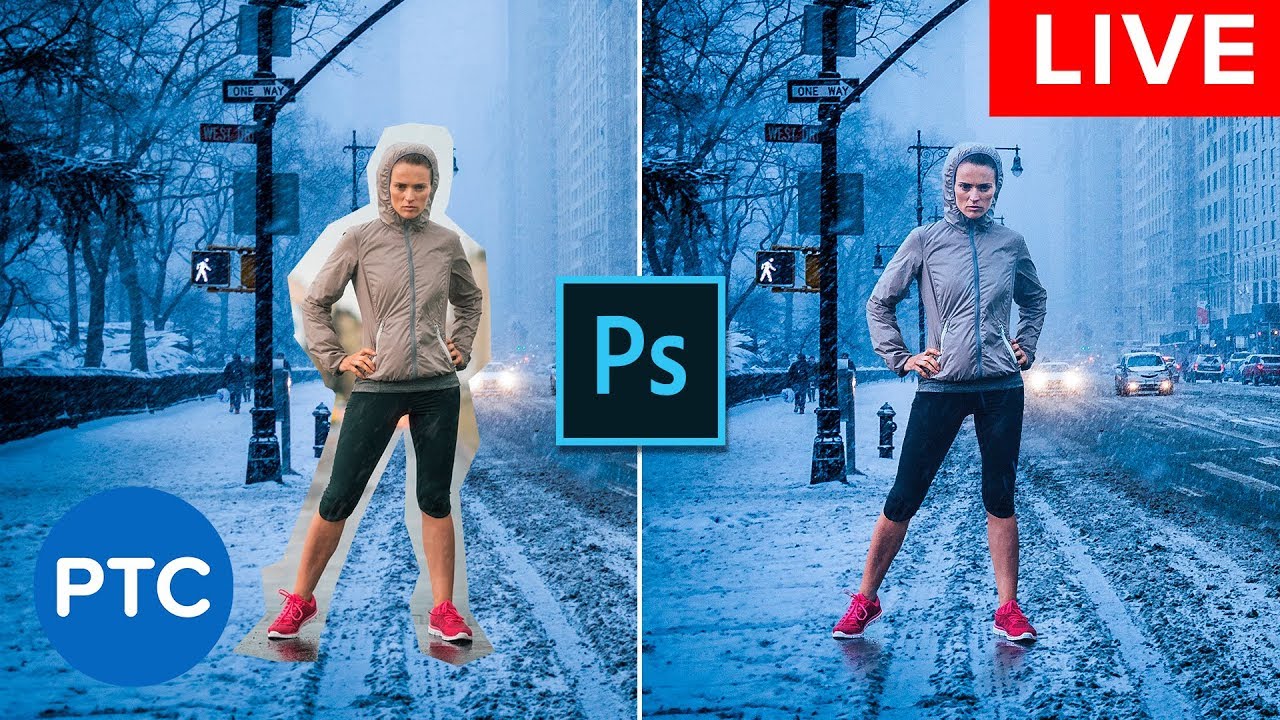
In this Photoshop tutorial, you will learn how to
📘 INDEX - Compositing in Photoshop - Blending Photos Together
00:00 - Introduction
04:44 - Finding Perspective for Compositing
10:55 - Masking For Compositing
13:42 - Color Matching for Compositing
22:33 - Blending Modes
29:18 - Making Composites Cohesive
34:14 - Remove People From Photos
Ph...
Hi how could we reproduce the blur effect like this image ?

Which blur effect? The whole picture is blurred. Probably a screenshot was simply downsampled with interpolation.
Or do you mean a different blur effect???
I mean reproducing the effect on the screen yes
It looks awful in every respect. - It's more than just a 'blur'. There are white dots on it, the white in the sky is overexposed, the text is unreadable.
In case anyone is reading this, I'm not critiquing someones work 🙂
Looks like some box blur (Fiilter>blur>box blur) it sort of "averages out" the details instead of just blurring them.
On top of all the other "things". And yes I agree with James. 😂
Hey all! I am losing my mind, i made this effect with fonts in adobe ps and can't recall how i did it. I thought i used the merge shape then it made the text kind of melt/blend together. Any help is appreciated, been trying for hours to do this effect again. Kind of like an ink blending effect.TY

Looks like stacked text with negative kerning and low leading value (line space) … till letters overlap. Then CTR+click on the text thumbnail to make a selection from this text. Create a new layer with the selection active go to Select-Modify-Smooth and type a value (depending your text size and document res the value can be different - Try and error). Then fill the selection with yellow. Add a drop shadow effect with a low size and high distance value… You should have something close… There are many ways to get similar result in photoshop perhaps someone has a better technique.
Thank you! Going to try this now and will let you know ☺️
Gave +1 Creative Carma to @viral palm (current: #9 - 787)
@stuck kestrel @viral palm - Looks like the text has an outer-stroke too
Yea, i was just trying that
Kind of got it

i recall when i did it before i had overlapped the letters, and converted to shape
When i merged them it automatically did the effect
I wonder... if it was in AI not PS
Doubtful, i rarely ever use it
lol
Google is saying Pathfinder in AI maybe?
Maybe something like this?
If you did it in AI, you probably extended offset the outlines.
It looks like your STROKE is set to the inside instead of the outside
Yes you could get the same in Ai… But you’ll have to round corners where letter overlap… Outside stroke lines as said by @sly hawk seems to be a great idea (I didn’t have).
I don't know whether this is true, but I suspect that adding an ill-considered 'stroke' around text is how Microsoft office makes a font BOLD, when a bold font doesn't even exist.
Yes, agree
Ok, well this works great ty ty ty
i just wonder how i achieved it by merging after making a shape from the font. It's confusing lol
I recall it automatically giving that bleed effect onto the other font
The stroke does it great though, that works perfect ty ty
I used threshold and that worked amazingly however, in doing that it did not let me change the font color
Pretty much this effect but able to color it
just did that
In addition to @sly hawk's very good suggestion: in Illustrator it is actually possible to build the complete construct based on a single line of live text - with all the inside and outside curves shown - and to edit it at any time.
Oh wow you guys are awesome tysm!! Was banging my head on the wall trying to get this right and there's not much of if any info on how to achieve this. Ty!
Are there any ways to "paint" a different opacity onto a layer?
chat can you tell me best colour garding for this ??

like somthing changes also i am new

does anyone have any experience with javascript and photoshop? i'm trying hard to make a script but chatgpt got completely stuck on an error (creating a color balance adjustment layer)
Gave +1 Creative Carma to @sly hawk (current: #5 - 1150)
This one looks better
And maybe add a soft vignette on the outside
Hey guys. Why does the Hue / Saturation have no options here ?

duble click in icon

Hi!! How can I equal what is circled in red? I want all the skin to look uniform but the model has a darker color in her forearm and I don’t know how to make it look uniform😅

Does anyone know how to make simple logo professionally shaped like this? Like how it’s evenly distributed and shaped

Like basic logo that’s modernized etc
Hi, i search for someone who can use PS for a personal project, obviousely i will monetize the creator, if someone is interessed you can come to my dm
It could be done with illustrator or Photoshop
I think you'd have a better time trying to do it 'properly' in Adobe Illustrator,
Oh and I forgot to 'outline stroke' and then have some fun in firefly afterwards....
Hi, a layer mask is the easiest. To add opacity, duplicate and mask the copy.
Here's one quick win 🙂
is it possible to do so in Photoshop?
I only have photoshop right now
yeah, same sort of principals - Use a big stroke and the pen tool.
How did you make the lines skeleton in the first place, the curves etc
That's what the 'pen' tool is for.
The video above is an example of me fudging my way through it in photoshop
Yes. With a layer mask.
Wow your really good at this
is there a way to do it perfectly, because sometime you may not make a straight line out of it
Yeah. Hold SHIFT.
what about a perfect curve?
Lines then will remain straight
Like that semicircle... just draw a circle if you want, then delete the top 'point'
oo thanks
what about having a pentagon type of stuff at the end? How would this work?

this poster seems to look empty, what should i add??

You probably draw rectagles and play around with the corners
Looks pretty good to me but the framing on the left could have something similar on the right side also
Awesome, exactly what I was looking for! Thanks legend!
Gave +1 Creative Carma to @sly hawk (current: #5 - 1151)
Thx king!
The weight of the design in general is shifted to the left because of that one random extra border item, so it doesn't look centered
ive just made a few camera raw filter masks. where can i go in this screen to edit them afterwards

@stoic ore how is this, i've added another one of those border items.

Could you explain what you want to do exactly? Your question is a bit confusing... Not sure anyone understand..
how was this effect achieved on the sparkles? is it gradients and textures or something else?

what happened to the spot remover brush in LR?
You can get something similar with layer style (Bevel and Emboss(chisel hard)+Stroke+Color Overlay)...
See settings on this short video or load the .ASL in your LayerStyles panel... It could be a good starting point but it still needs some tweaks.
Hope it will help.
what do you mean?
If you need feedback on your design please post in #📝project-feedback channel. Ask a question channel is more for questions about how to do things or how tools are working in Photoshop/LR. Thanks.
Gave +1 Creative Carma to @pearl sorrel (current: #988 - 1)
Maybe give it some kind of background design thats low opacity
tysm for taking the time!
guys how can i achieve a good views in behance
Hi is there a way to scale pixel art up 1.5x without creating artifacts? I tried doing nearest neighbor but no luck. I orignally made my pixel art in aseprite and the dimension is 1232X706. I realized that this image is too small and want to zoom in by scaling up my image. I can only scale up the image by 2x, 3x, etc. Scaling up to something like 1.5 will create artifacts which makes it look awful, Is there away to scale up while not creating these artifacts?
1X

1.5X


How do I remove this V without using generative fill cause it ruins it.

Select tool then delete after rasterizing
oh wait sorry
lol
Try the healing brush or remove brush
Clone brush but it will take a bit
it doesnt do 1.5x 😦
Try this
Detailed Steps:
Open your image in Photoshop.
Go to Image > Image Size.
Uncheck the "Resample" box: to prevent resampling and potentially degrade the image quality.
Adjust the width and height: to your desired dimensions in the "Document Size" section. Make sure the chain icon is linked to maintain aspect ratio.
Choose an interpolation method: from the drop-down menu after clicking "Resample." "Preserve Details (Enlargement)" is a good option for upscaling.
Click OK: to apply the changes.
Tips for Best Results:
Maintain aspect ratio: The chain icon ensures that the image doesn't become distorted.
Choose the right interpolation method: "Preserve Details (Enlargement)" is generally a good choice for upscaling, but other methods may be suitable depending on the image.
Experiment with different interpolation methods: Try different options to see what works best for your image.
Consider using a third-party AI upscaling plugin: For even more impressive results, consider using third-party plugins like Topaz Sharpen AI.
Chatgpt was pretty helpful.

i dont think this solution works too well with pixel art
the results looks pretty blurry
i did ask GPT a solution for pixel art upscaling but it doesnt work too well either
Hi, how do you expect it to work at 1.5? there is no such thing as half a pixel… (in pixel art)
I have no Idea! This is the best I could get it so far

I meant that it would not work. You can scale by x2 or x3 but there is no way to get pixel perfect if you scale by non-entire increments.
I didn't know, thanks
Gave +1 Creative Carma to @viral palm (current: #9 - 788)
Ok how can I add ?
Like this one
But make the colour of the blue
Black
If you get me
I'm new too but quickly learning
i lost this file, but i got this screenshot, is there any way to restore the quality of it??

You can try to upscale it and you will probably lose a bit by doing so (but it will be larger)
Given it's not super difficult (not many effects etc) I would suggest re-doing it instead, unless you pressed for time
If you want to upscale you can use the super zoom neural filter in Photoshop
thank you so much
Filter>neural filters> super zoom

click on the magnifying glass to upscale (X2, X3 etc...)
Once done you'll notice that your image is cropped instead of enlarged. FEAR NOT!
Go to image>reveal all, and you will get the whole thing


Why do I keep getting this message ???😭

It's possible that the system detects it as "too much skin showing"
It's not a human, it's a software, it lacks some kind of finesse (that's the problem with GenAI, it's artificial 😀)
It's probably detecting underwear instead of shorts
(That's in the ToS by the way)
I really encourage you to provide feedback so it happens less and less
Unfortunately, generative fill and Firefly are currently very conservative. Too much bare skin has been discovered. If you want to change the girl, then I can't offer you a solution. For the environment: Cut out the girl and then try again.
Ahhhhhhhhhh okay okay That makes sense! Lol I found a work around
Since you want to extend the background, select her with the select subject, fill the shape with a black fill layer (in another layer) so it hides the woman
Now try and it will not see anything to clutch its pearls about
that's pretty much what I did haha thank you!!
Excellent!
Is there a way to make a window partially transparent to trace something? I'm trying to translate hair from normal art to pixel art.
You could select that window and place it on another layer (CTRL+J to copy and paste on a new layer) and lower the opacity of that layer.
Or you could mask it: create a mask, fill the window with black and then lower the opacity of the mask
I would prefer the second solution
mask opacity is called density (don't ask!) in the properties panel

Sorry, it should look like that instead where the rectangle represents the window
If it ends up like my first screenshot, all you need to do is invert it (CTRL+I)

What that does is lower the opacity of the content of the dark rectangle (your window) you can delete the mask when you're done
"clutch its pearls" - lol

I think I did the whole.... "lets add a censor box over that perfectly innocent leg and arm" when it starting panicking about presumed nudity.
I really think it's cultural: We would balk about the amount of weapons people try to create (and an honorable mention to all the games assets creators, what would they be without vats of blood and ridiculous weapons?)
and we are midly amused by the reaction to someone showing a bare ankle

If I understand correctly, your current image is sized so each 'pixel' in your art is really 4 pixels in photoshop.

You could easily increase the size of the 'image' so that each 'pixel' in your artwork is actually 6 pixels. - effectively making it 50% larger,.

The end result is a nice clean 1602px wide image.

- oh sorry, it looks like you were already told this above! - I should have been paying more attention.
good
how do I change to color only on the "SAICO" and not the shield, this is a PNG

You can use a colour based selection method (Magic wand, Colour range) and choose only the blacks. Then use that selection to create a masked colour fill that affects just the writing
The quality of the selection greatly depends on the size of the image: Too small and it could be jaggy.
If all fails, you can still trace over with the pen tool, in "shape" mode and make it the colour you want.
Hi, you could also add a new layer, and paint in the new color on top of the text, don’t worry to overspill, then alt-click to create a clipping mask. https://youtu.be/zTuihRIdH0o?si=ul73eAQy4Lqc4LSY

In this short video tutorial, you'll discover how and why to use Clipping Masks in Photoshop to display a photo in text, clip a photo to a shape, and limit the effects of a nondestructive adjustment to a single layer.
Additional tips, tricks, and tutorials from Julieanne Kost can be found on her blog: https://jkost.com/blog
Facebook: https://fac...
thanks for the help anyways 🥲
Gave +1 Creative Carma to @sly hawk (current: #5 - 1152)
Hello, does anybody know tutorial / setup that would achieve similar gold glow effect as shown here - through smart object / effects that can be aplied to any shape.

did they change how the gradient editor worked? I cant seem to add new colors anymore
Hi, i'm trying to configure this photo. I want black colour on the text and the line in the middle. i cant figure it out. I tried changing the colour with adjustment tool but then the yellow went wrong colour. Any tips or ideas would be nice

Sorry, that's quicker than describing it. Take a look at the *.PSD file at your leisure.


Please show us your gradient editor.
They changed it maybe 4 years ago?
or are you talking more recently than that?
You could also 'invert' the middle bit, and then adjust the brightness to make the thing in the middle darker
(P.S. - I like the Yellow)
There are now simply many more options for editing a gradient.


Thanks for the help
You're welcome. You are also welcome to show your finished result.
FYI: @sly hawk and me have used different edits. Personally, I always prefer the free adjustment options of the colours via an Adjustment layer Solid Color.
But as the saying goes, there are always at least three ways to edit something in Photoshop.

Depending what you're callimg gradient editor.
Gradient tool has changed few years ago but the "Classic Gradient" mode still available...
With new gradient tool mode (even is not really new any more) you can add color directly along the gradient bar visible on the canvas (a white arrow with a + sign will show up when the mouse cursor is placed beside the bar => click and choose the color you want to add.
To access the old "Gradient editor" window you must be in "Classic gradient" Mode.
So, the yellow colour didn't turn exactly f9da14, not sure if thats a problem

Hmmh?
The yellow was FADB14 right from the start ...

oh
Would you like to change the yellow to f9da14?
Yeah, i really would
Or
wait
I would like to have the FADB14 on the second picture
Already printed 3 shirts with FADB14
Take care of the sample size when you use eyedroper tool ... I suggest you to use a 3x3 or 5x5 to sample your yellow line color ...
11x11 gives me f9da14 but smaller sampling size gives me fadb14...

You can use a ‘Color overlay’ layer style with your value.

nvm, I found the tool. it was under a different name.
ok! Happy yo hear that!
i used a certain brush for this layer, like a sprinkle brush kinda thing. i wanna use it again in my project. how do i find out which one i used for this layer

If by any chance the brush used is still loaded in your Photoshop you can start by using search box, hit "Spatter" or "Splash" or "drips" for example... If the brush has a name with this words it will show up... To find the right one you'll have to try and compare each one.
I wanna put this graffiti tag on a poster. Anyone know a quick/easy way to get this as some sort of image to work with other than tracing?

Hello, Does anyone know how to do this effect? Or is it just a colored brush with a Guassian blur and linear overexposure?


Magic wand + Lasso tool (Hold ALT and trace with lasso tool to remove selected areas, Holt Shift and trace to add area to the selection)
CTRL+J to copy selected area on its own layer. Lock transparency then use Clone stamp tool to clean the graffiti if needed.
Note: I used level to increase contrast and see clearly the section to select where the R overlap the graffiti.
preciate it. looks cleaner than what I did 💀
probably a very basic question but how do I select the beige and copy it onto a different file and also have the ability to change the color

It could be a shape layer with a solid color with Clipping mask layer. You can paint with a soft brush (set to a low flow) a color slightly brighter or darker to build the depth...
Videos are just to show you what I mean - Sorry I'm a bad painter 😉
By beige you mean all the bright elements (mountains, names, tree, roots and 2025)?

You could try: Select/Color range/ choose "Midtones" and play with Black and White stoppers untill you get the best selection (It could be tricky because of the gradient on the roots) then click OK.
With selection active => CTRL+J to create a copy of selected area on a seperate layer => you can apply a color overlay effect with a color of your choice.
It's really hard to get anything good out of images with a high level of anti-aliasing (blurred parts at the edges) => they're not black, they're not white, but PS has to make a choice and select them or not... And since it's these blurred parts that give the image a smooth appearance, whether PS keeps them or not gives the image a weird or harsh appearance.

well hopefully my school doesnt use my rough draft 😂
You also can try to combine Gradient Map to tur your image Black and white merge it on a new layer then use Blending option to make blacks disappear (on the video I put a red layer below to better see what I do)... Once you have the part you want to keep I create an empty layer above them merge them together and apply the color overlay Fx... It could be a workaround
The faded roots and anti-aliasing are really tricky to manage here
Alright thank you

i want to cut this shape and have even thickness lines
what should i do?

for example if i cut with front shape theres a smaller line and i want it to be the same size as top and bottom line

i want width and height to be same
i used the measuring tool
but is there a better way to do it?
You could try vector shapes instead of pixels. (For me, however, Adobe Illustrator would be the better tool in this case.)
thank you i will check both out 😄
Gave +1 Creative Carma to @tame cape (current: #14 - 175)
Hello everyone I'm new to Photoshop and I wanted to ask what would be the best way to make those shadows part of the face kinda blurry to properly blend so it's a 3d but the texture is 2d so I was trying to fix it.
If you can see the side profile and low angle the shadow looks solid... I don't know how to make it soft looking


A Genshin Impact character, my friend?
Select the shadow area
Use the "Quick Selection Tool" or "Pen Tool" to precisely select the shadow part of the face.
Press Ctrl+J (Windows) or Cmd+J (Mac) to copy the selection to a new layer.
Apply Gaussian Blur
Select the new layer and click "Filter" → "Blur" → "Gaussian Blur"
Adjust the radius value (2-5px is recommended) until the shadow edges become soft.
Adjustment layer blending modes
Change the blending mode of the new layer to "Multiply" to make the shadow blend naturally.
Reduce the opacity (50%-80%) to make the shadow more transparent
Using gradient mapping to enhance depth
Create a new "Gradient Map" adjustment layer
Double-click the gradient bar to set the gradient from dark gray to light gray
Set the blending mode to "Soft Light" and the intensity to about 30%-40%.
Final detail optimization
Use the "Dodge Tool" (Exposure 10%-15%) to brighten the highlight areas
Use the "burn tool" (exposure 10%-15%) to enhance the shadow levels
Press Ctrl+Shift+Alt+E (Windows) or Cmd+Shift+Opt+E (Mac) to stamp the layer.
For hard shadows on side faces and low angles, you can use the "Sponge Tool" (reduce saturation by 10%-15%) to reduce the harshness of the shadow, and then combine it with the "Smudge Tool" (strength 20%-30%) to fine-tune the edge transition. These techniques can make 2D textures present realistic 3D shadow effects.
Yup but the body is from WuWa so I was trying to mix them up and I got to this point but I think it's still lacking
Did you make this model using blender?
That I did ❤️
Currently learning the jargons hehe Idk the terms xD
Bro, are you also a Photoshop user from a non-English speaking country?
Yes I am haha
You will need to ask the video server
https://discord.gg/adobepremiere
oh, thank you i didnt notice its the photoshop server 😅


Bonjour à tous !
J’ai besoin de votre aide , sur une page de dictionnaire je dois garder la forme exact avec les couleurs mais modifier et mettre mon texte, pouvez vous m’aider svp je galère à fond !
Merci de votre retour
Add some blend and some texture
I will create a thread for this as this server is in English only. French will be in the thread!
To be fair, you've done a really good job using photoshop.
The top image is built more like a 3d render with additional lighting etc
I absolutely agree with you. However, I am firmly convinced that the first image was generated by AI (slight inconsistencies in the light and shadow areas and also the irregularities at the edges of the digits very much speak in favour of this).
Kudos to the AI - the hammer finish and the worn edges are excellent. You really need very, very good programme knowledge to recreate this in Photoshop.
@ruby sun
Hello, i have a question. I know that it might not sound ethical, but is there any way to download the "Adobe Photoshop" for free? I already tried, but it somehow still asked me to buy a subscription...
i just want to edit one photo because of my uni project xD


Hi, there is a 7days test period. Download the creative cloud app with a browser other than opera, then you can download and use Photoshop for a week.
Hi, the best is to select it (object select, for instance), jump (Ctrl+J) it to its own layer, then use the remove tool on the base layer, you can then move and scale the logo in place.
hello sir
this sounds like hard idk i am new to photshop
I see, i was trying to add new colors a different way. thank you!
Gave +1 Creative Carma to @viral palm (current: #9 - 789)
i am willing to learn
why does the bounding box size change when i try to resize?


Hi! start here: https://discord.com/channels/547473772727238676/1042633933948465214 to learn the tools and their basic uses.
For your issue, you need the object selection tool: https://helpx.adobe.com/photoshop/using/tool-techniques/object-selection-tool
once the logo is selected, jump it to its own layer with the creek+J shortcut. Then hit Ctrl+T to transform it, and place it lower.
Click on its eye to hide it in the layers panel.
Once this is done, click on the background layer, and use the remove tool on the old logo. https://helpx.adobe.com/photoshop/using/remove-tool.html
You can then click on the eye to show the top layer.
Hah! Our messages crossed. Congratulations, you did it!
Hi, is it a smart object? Can you also show the option bar ?

is this what you're talking about?

or this
thank you
Gave +1 Creative Carma to @hushed niche (current: #12 - 234)
Yes, this is a smart object. Do you think you need to change its size several times? If not, right-click and select convert to layer. Then you’ll be able to get correct handles. Here is a primer on smart objects: https://youtu.be/yeQR0qAl_-k?si=klX0AkJ4KTtD8Xq2

Experience the power of Smart Objects in Photoshop! This tutorial will guide you through using Smart Objects to modify layers without sacrificing image quality or losing the flexibility to revert edits. Plus, we'll even show you how to use them for compositing!
Download the Sample Image:
https://phlearn.com/tutorial/smart-objects-in-photoshop-...
okay, thanks! I haven't used photoshop in a while but i didnt rremember the object handles changing like that
Gave +1 Creative Carma to @hushed niche (current: #12 - 235)
Before, imported objects were not automatically converted to smart object. You can disable that in preferences if you do want to be able to edit them at the pixel level directly. That said smart objects have their advantages as well as explained in the video.
To do so, Go to Edit > Preferences General (PC) or Photoshop > Preferences > General (Mac) Uncheck "Always Create Smart Objects When Placing," and click "OK."
I have a problem why does the file format change when I insert images?? When I press ctrl +s, the psd save format is

how do I make it save only in png? I didn't ask you to save it in a different format every time.
Usually, you get that when you have an indexed or CYMK file, but I see that yours is an RGB file.
You do only have one layer, right?
Did you try save a copy? Because if you flatten, you lose transparency.
You aren’t editing a smart object, are you?
is it possible to make it possible to save if there are several layers? Without the save as menu
I get a menu if not just one layer.
@steady gorge
Is this what you want? (created in Illustrator)

The image on the left is what I want my photo to look like and it does on my pc but when I export it and look on my phone looks like the one on the right a little desaturated and losing the darker shadows how can I fix that?

hi, i tried the vector shape method you told me 😄
thank you again ❤️

Yes, this is a black shape with a white stroke.
Is this the result you want (your original image looks different)? You can create shapes like the original image more efficiently (and editable) in Illustrator.
If you are happy with your result, then have fun experimenting.
😉
@steady gorge
yes this was the result i was looking for
i was creating strokes by cutting the shape 😅
Photoshop's vector tools are absolutely sufficient for rudimentary vector work.
how can I quickly reload a file in photoshop?
menu: File --> open recent or
home button and select the desired file
No, it didn't work out. I need to update the image immediately when I made the changes in blender.


Ok, it is to prevent you to lose the layers. In preferences, you can check “enable legacy save as » you’ll be able to save the files that do not allow all attributes. But do not come crying if you saved a file to jpeg and lost all layers masks, etc.
I'm not quite sure what exactly you want to reopen and how? But ...
Have you already tried a smart object?
someone help pls
No, it didn't help, nothing is happening. Is it possible to automate it so that the file is reopened?
reloading the file
Are you applying a color profile such as sRGB when you save?
My color settings are Srgb and Assign Profile is Adobe rgb 1998 Ive been messing with it and looking it up and every video is saying something differnt but would that be the way for best colors?(Srgb and Assign profile 1998) I had nivida color vibrance to 80 and I put that to 50 the default settings. When I export it looks more vibrant now on my I phone but on my ipad it looks the same as on my pc (less vibrant) I'm happy with how It looks on my phone now but its less saturated on my pc which is not good cause thats what im actually working on
The iPhone might be set to auto-adjust to luminosity, to adjust tint with the hour of the day, while your iPad might not be set that way…
Would Srgb and Assign Profile is Adobe rgb 1998 give me the best results?
Not necessarily. The old method was saving in sRGB for web export. AdobeRGB was for inkjet printing.
See: https://gregbenzphotography.com/photoshop/which-colorspace-should-you-use-for-photography/

There is often confusion around the best colorspace to use for photography. In this video, we'll go into great detail to help compare the key options and why you might pick one or another. You'll also learn how colorspace affects detail and contrast (not just the vibrance of your color). We'll get into the
I look into that thanks. What would be the difference with Save for web file and just exporting it as a png and should I have either of theses checked?

And you do not assign profile unless the file has none, you convert to profile. Set some time apart and digest this: https://www.computer-darkroom.com/ps19_colour/ps19_1.htm
Yes, you want to embed the profile if you convert (or even if you do not)
ok thank you ill look into what you sent
hi! is there a shortcut key for the mask in the pen tool? because i remember using it to create paper like cutout images 🥲?
would anyone know the easiest way to take this tread texture and make it into a perfect circle without distortion?

how hard would it be to make the letters in the roots the roots?

Can someone help me. I can't figure ouit how to turn off this grey outline on my shape

dos anyonee know the effects used on a photo likee this , I know gaussian for the background but it looks shaded

i followed the tutorial now but does anyone have any clue on how to get that type of wet texture?
You would have share a screenshot of Photoshop with the Layers Panel open and the relevant layers visible. No one can diagnose this based on this.
True true, I did just reinstall my photoshop. Going to try again
The Camera Raw filter has a Lens Blur effect that can blur based on perceived depth in the image.
I'm not sure what you mean by "wet" but possibly by painting in extra specular highlights.
DIfficulty is directly proportional to skills and experience. heh
This would probably be easier with Adobe Illustrator. Convert to vector art and then create a custom brush to use as a stroke. Similar to this technique: https://youtu.be/DiHcc1h5Pk4?si=uoXfolyAPlXMpRkk

How to make border designs with Adobe Illustrator.
Free Rodeo Brushes are in Graphic Design Launch Kit: https://thevectorlab.com/pages/newsletter
Illustrator Flex Frames are in T-Shirt Design Master Collection 2: https://thevectorlab.com/products/t-shirt-design-master-collection-2
i mean how it looks kinda glossy and it reflects something nearby, kinda like metal
As I said, you'll probably have to add other effects. Most likely painting in highlights to make it look shiny.
Give this guy a raise
I am tryna do a hybrid animal project and for some reason the backround is all white while it supposed to be a forest like the right why is this happeneing I am a newbie


What happened to all my tools br

Tap the TAB key.
Your so smart thank you
Gave +1 Creative Carma to @ripe quest (current: #2 - 2852)

One moment
Thank you
Its probably going to be difficult to get rid of those features and place this rabbit head over the elephant.
You can try to paint over portions of it with the Remove Tool.
ok
Any way I can just get rid of the nose part only?
I can just use the ears
and say they are apart of the rabbit
Even if you get it "right" its still going to be strange as the rabbit has fur and the elephant doesn't

oh thats actually
fine
how did u do that bro?
its fine because its a school project
and it doens't have to be perfect
its our first time
Thank you so much
Gave +1 Creative Carma to @ripe quest (current: #2 - 2853)
Thank you so much D.Humann
Life saver right here
sorry for keep bugging you but how do you have that finger tool?
The pointer finger thingy

It seems like I dont have it
If its on your toolbar, its probably the Blur Tool right now. If you long press on it, there will be a fly out menu.

Hmm. You must have some basic Workspace loaded right now.
If you go to the main menu on top.... Window > Workspace > Essentials...
You're not dumb. Photoshop is a big app with a lot tools and functions. You just have to learn your way around.
Got it thank you bro
?
should I write a scritp or
Please explain exactly what you do with the file, both in and outside Photoshop
no
If it is the only computer you have, it’s the best one you have access to. Tablets or especially computers are way more complete options.
everything is no longer needed, I did it through a script.
Care to explain or make it available (GitHub, gumroad…) to others if it fixes a workflow issue?
hello im trash at photoshop how can i remove the texture outside the controller

Why is the controller layer 'see through'? - I think there is a smarter way than the way you're trying to do it
could u tell me the other way? i really know nothing about photoshop
Gave +1 Creative Carma to @sly hawk (current: #5 - 1153)
I have a problem: The color lookup work on a normal image, but it doesn't work on design anymore. How can I fix it?

Answered in your thread, as Sandrine guessed, it was not an RGB file. As I said, work in RGB, preview in CYMK, IF you know the exact profile and IF you print on a press.
Desktop printers expect RGB. Even if they print in 4 or more colors.
is there any ways i can make the multiply one brighter or is screen fine in your opinion


and is there a way to replace the texture only without repeating the whole process
Yes. Turn the texture layer into a smart object first.
Right click that layer in the layers panel and set it. Then later you can double click the layer to easily 'swap out' the skin.
If you have LOTS of textures, you could even run a batch process
There is a way to brighten the texture but I can't recall right now since I'm nowhere near a computer
double clicking it opens it in a new tab

When you say colour lookup... do you mean the colour picker tool? - if so, it's not working because you're probably 'colourpicking' from a black and white adjustment layer
Try clicking 'sample ALL layers' at the top and try again
........

@void grove 👆
i know im being stupid but double clicking that text still opens it in a new tab
and turning it into a smart object seperates them
If you double click the thumbnail it will open that 'layer' in a new tab - yes
But then try pasting some other random image into it and then hitting save
It will then impact/swap out that image on the 'original' controller image

how would i go about creating such a background?

i assume it's some kind of gradient technique?
nvm i got it i had to delete older background
Hello, i need help, why is the image after exporting as jpg always at 96 dpi even thought i made it 300dpi in PS? 🥺
Yeah sorry still out. - you can resolve that issue if needed.
thank u
How are you exporting it?
I just click EXPORT AS, then JPG and max the slider, the image is a background picture which i need to add to illustrator for printing purposes
The DPI doesn't really matter that much anyway as long as your resolution is good...
5,000px at 1dpi is just as good quality as 5,000px at 300dpi
When I'm home later I'll check it out for myself
hello, i wonder if someone can help me out? i want to make a jigsaw puzzle from one of my GF's pictures, and i even did the "cut off" effect part, but i wonder if there's an easy way to extract each piece into an image? magic wand isn't being helpful to respect the lines of separation between them
There are probably online sites that can do specific puzzles for you like that
I see, my image is 14999 x 9000 pixels, is it normal XD
@sly hawk
thanks a bunch
Gave +1 Creative Carma to @sly hawk (current: #5 - 1154)
That's VERY large
that's what she said
Lol
(sorry)
Wait will it affect the printing?
@sly hawk can you also help me out with my thing?

btw is there a good way to paint the handles or is that advanced for me

the first one only does the "effect" thing, but doesn't give you each piece as an image, it's almost useless lol
I've gotta go AFK but will support all I can in about an hour when I'm back
radial gradient - foreground to background color
@rancid python

maybe i found a work around actually, will be a lot of work, but maybe i found something @sly hawk
thought there be an easier fix lol
Here's a nice easy way
If your goal is to literally make your own puzzle, surely you would print the picture WHOLE?
Not as individual pieces.
oh i didn't explain it right
the idea is to use it for an online game made in Scratch
@sly hawk
it's not for "real life" puzzle
oh. Got it!
Have you tried this?
https://exchange.adobe.com/apps/cc/12143/free-puzzle-pieces
i meant like paint them to a solid color using a brush or something but keeping that pointy texture
like make them from grey to black

Select them, then add an adjustment layer, like curves or levels. https://youtu.be/VNSe8BglAHs?si=nYTBJet-kxsuzRuC

Learn how to create and use layer masks in Photoshop! In this tutorial we'll show you the essential techniques for isolating elements, refining selections, and achieving seamless blending in your images.
Download the Sample Image:
https://phlearn.com/tutorial/create-and-use-layer-masks/
Go PRO:
Photoshop 2025 is here! Explore all the new tools...
ok thank you will watch
Gave +1 Creative Carma to @hushed niche (current: #12 - 236)

–
In day 4 of 30 days of Photoshop, we show you how Adjustment Layers can change the way you work! From exposure adjustments, to color grading, to creating seamless composite images, Adjustment Layers can help us tackle a lot. Learn about all of the different types and how you can use them to enhance any photo non-destructively.
Download the ...
ill give it a try
what adobe editing app has the ability to make something like this?

bruh, it sent as image
This looks like photoshop
what adobe editing app has the ability to make something like this?
yeah, i accidently sent as image, i sent a video for my real example
adobe premiere pro
not after affect?
it could be after affect as well
you would have to try
for me, I only use adobe indesign, photoshop and premiere
oh ok, i’ll ask someone that’s more familiar with more variety adobe apps
Premiere pro and after effects can do it. Even photoshop probably do it. I don't use Photoshop for animation. I take the PSD file and animate it in Premiere pro or After Effects.
What would be the most efficent app to do the quality and animation?
both. Premiere pro would be easy start.
After effects all the way
you can ask for help on this serverVideo (Première/Ae) => https://discord.gg/adobepremiere
You could do animation with PS ans premire but After effects is a way more powerful...
i have photographic memories, so any editing app would be fine, i can just learn
Agree with @fierce hornet Premiere may be more easy to learn and after effects' learning curve is longer but lot of effects visible in your sample video were made with Ae (99.99% sure)
hi guys , could someone tell me if this pic was photoshopped ?

In principle, I only believe my own pictures.
Only the creator of the screenshot can tell you whether something was faked here.
And you would need a lot more comparative material. You could possibly assume in the blue channel that these two marked prices and also the $ signs differ somewhat from the other prices in terms of sharpness and brightness distribution. However, this could just as well be due to the device resolution.
As I said: just a guess and not proven!
Which places do you suspect?
@worn urchin

I want to change this texture where it's a clear coat with no camouflage on it. What is the best way to do this?

Guys i lost original file of my logo and only had bad whatsapp low quality photo, i have been trying to sharpen logo and get high quality from yt tutorials but keep failing this is best i got does anyone have some suggestions?

how do I export my psd file that has text layers as a pdf with the text layers as pdf text?
can someone pls make me a rhino puppet, with overalls, brown shoes, and white gloves with four fingers for adobe character animator
Easiest way is to use Adobe illustrator "Image trace" feature.
In PS I would suggest you to re trace it with pen tool to get smooth contour.
Use "Minion pro Display Bold" font for the text.
I made this from your original picture... Size x2... if it's good enough I share the psd file with your logo as shape layer (= you'll can scale it without quality loss).


Did you try this?
File/Save as/ choose "Photoshop pdf"...

Hello! Hope everyone is doing good. I have a question, im trying to make a logo and chatgtp gave me a cool idea that is the photo im sending, but anyone know how can i do it on ps?
Trace it over, Make one outline color, Make fill color gradient, add glow outside maybe
like this? did a quick design


Use the letter F, cut lines into the F, use stroke, and gradient, use outter shadow and glow
hi everyone i am new here and i need help with something
before

after

do anyone know how to do this if yes please let me know or share a tutorial
Omg its so cool haha. You didi it on PS all? i really need to lear tons more
basically select tool around the chair, then add the background layer and add a shadow to the chair, basically placing the chair on the photo
yo bro can you also give me some advice ?
Sure yes
i wanted to ask that how can i get background like that, i have gotten a project where i have like thousands of images like this the client have given me images of object like these like furniture with white bg all of the images are with white bg but i don;t know how to convert them like the after image i send you and how do i get the bg and different everytime
You are referring to the chair background?
Ok, you would need stock images or you can create them with AI as I do sometimes. So you are needing to place the objects onto a scene right?
yes
Ok sec i will show you
So basically you find an image like here are some https://www.freepik.com/free-photos-vectors/empty-room. Then you would pull the image up in PS and go to File - Place embedded.
But the images that you were given are they transparent backgrounds? Or white
all of them are white
no png's
Ok sec
After you do the inverse, double click the background layer to make it a layer then hit delete, it will delete the background
ok
going to try this now
thanks for your time bro
then when you have the background gone save it and the next step is just opening the scene and going to file - place embedded
can i dm you if i face any problem?
yea no prob
Sorry didn't realize it picked up the music. Lol. I have it muted
Forgot it was playing lol
ohh no problem
does anyone know where i can hire someone to do phosothop work?
i have a really simple request but if i can pay to get it done id rather do that
Hi, please Use #💬chat-general for that.
Is this psd file cant open in on phone?
Yes it it. - You'll need to get off your phone and use a computer
This is a stupidly impossible ask. - They want you to add literally 1000's of backgrounds to images?
yes
I mean i read what u write but i dont know half of the things you said so
Dont bother 😄
but like
bg works when you know about how to shadow the object light and other things
this took me 30 mins to make and figure out stuff and it still looks very bad
Gave +1 Creative Carma to @sly hawk (current: #5 - 1155)
Yeah, that's a lost cause - Your perspective will be off on almost every shot.
can you send me a tutorial or a channel link for where i can learn all this stuff?
or do you know anyone how can do stuff like this if yes how much is he charging?
1,000 images, each with custom backgrounds, that the designer will need to source and reposition.
yes
If that was a 'genuine' request from a proper client, I'd tell them that we would need to create a 3D roomset first, e.g.

you will get the images with white bg or with normal bg in which the photo is shot
before

after

example


Then I would explain that since each product is taken from a different angle, I would need to position the 3D scene seperately for each product. - and then render the environment background, then one done, I'd place the furniture into position, and then adjust the lighting and shadow to make it look more realistic. - I'd probably charge £50,000 for 1000 images.
man that's way out of my budget
yeah. It's an insane ask of any client to be fair.
but thanks for giving your time and explaining it
Can I add to this this I would create a set of 3D models of the furniture as well (just the shape, not any specific material etc, to get the right lighting and shadows on the furniture that will be eventually composited into the scene
That's why real photography with real furniture is still a thing 😉
@vapid flume - I know I'm being a bit 'blunt' above, but am I being fair?
If one of our clients (and we work with some quite large brands with decent budgets) asked this, I'd straight up either say no, or quote 50-100k for it.
Totally fair, if someone were to ask me that, I would be stunned, because it doesn't make sense to have that many. A set design, a photographer with all the gear and a couple of assisting big muscly guys (or gals) to move the furniture around will be cheaper
Ikea catalogues aren't made with 3D stuff
and they have money
@vital skiff - Realistically, I think your best best is to use photoshops generative fill features like my video above.
It would take weeks of time, but if you have the patience, it's worth £1000's in 'value' to your client.
brother i appreciate you giving me your time and energy but my budget only goes up to 150 dollers
but and thanks for everything
5 minutes an image x 1,000 images = 5,000 mins. Plus admin and prep-work, uploading and sorting = 5,300 minutes / 60 = 88 hours
Assuming you work CONSTANTLY for 8 hours a day, that's **11 SOLID **days of work.
If you found a freelancer in the UK for perhaps £300 a day, that's £3,300 which is more than 20 times your budget.
I don't have PS on my phone but works with PS on the web...You can't edit the shape but you can scale it... Here the logo x4 (made with PS on the web)

1000 images. Phew... That's a lot.
Set the resolution to 300 first
Then use the Noise filter... you want to reduce the noise
how can i merge the two masks into the same group

In PS you hold down shift and click on each
then right click one and choose merge
Sorry read that wrong lol
You just drag it up to the folder
but then it says replace layer mask
If you want to add more than one layer mask to a single layer, you can put that layer into a group and add a mask to that group
yes im trying to add them to the same group but it says replace mask

Don't you mean increase the noise?
Yes, sorry increase
nvm i found out from youtube
do you happen to know why blending mode isnt changing anything?

Hm, you clicked on the vivid?
I know sometimes it won't show me a preview if i don't click it
np 😄
- Ctrl+click on the thumbnail of the layer mask
- (depending on the settings - possibly invert the selection)
- Click on the mask of the group
- Fill the selection in this mask with white
@blazing mason Sorry. We don't provide support for apps from other manufacturers. Check their documentation.
Exactly. That is the "normal way". And use the modifier keys Ctrl/Shift/Alt to generate the desired calculation ...
😉
I have loads of assets sets of banners here, and there are 6 'sets'
I want each 'set' to be linked to the same smart object. -
So I swap ONE and the others in the set change
Any smart ideas on how to do this?
Are they in the same file, different artboards?

If you create one, convert to smart object and duplicate each , and then when all duplicated, transform each, they should follow
They're all linked at the moment
3 second chane and I can do ALL
but I basically want 6 different smart objects all managing their own 'set'
I know there are two option: one that syncs and one that doesn't
I hadn't Photoshop on, so wanted to check visually
yeah. One is normal copy and paste the other is 'new smart object via copy'
Layer comps maybe?
Layer comps + smrt objects
like you choose which layer in the list. Maybe I misunderstand
don't worry, I'll show you what I mean once I've got it working
Copy via drag on the "new layer" button of the layers panel gives you a linked synchronised smart object.
Right-click and "new smart object via Copy" gives you a new independent smart object.
I've manually done it now, by making a 'new' smart object and then replacing the old set each time. - tedious now, but done!
Idk what that means in German. But I'm busy at the moment. Maybe in a few hours ...
OK. You did it
no, no I'm good! - I'm sorted 🙂
Hey anyone know about more technical/scripting based discord or forums for PS?
You could post to the PS Community Forum on the Web. There may be more help there for scripting. https://community.adobe.com/t5/photoshop-ecosystem/ct-p/ct-photoshop?page=1&sort=latest_replies&lang=all&tabid=all
Normally the Adobe PS forum - and sometimes me
https://community.adobe.com/t5/photoshop-ecosystem/ct-p/ct-photoshop?page=1&sort=latest_replies&filter=all&lang=all&tabid=discussions
thanks
… - and sometimes me
haha good to know
Non related photoshop question I guess or not depending if I can just find the PSD of it.
Does anyone know where I can find a place or even a mockup psd file where I can show the inside pages of a book?
Like a mockup for inside pages? Specfiicaly children's book. I remember seeing a website that did that but don't remember it where.
Question. To save some time, is there a script to... In this example, save 3 seperate PSDs from this file. Where they each PSD would contain all the layers from the text and box folders, but only 1 layer from the image folder?
Large scale, I'd want to place like 300 images into the image folder, and run a script to save 300 files, but each file would have only 1 image.
PSD** dealing with too many PDF's this morning, haha
Sorry. I don't understand the task, which is why I can't answer the question.
So if I had seperate layers, would there be a way to run a script to save 300 PSDs, each PSD being one of the individual layers.
So PSD 1 file save is layer 1, PSD 2 file save is layer 2, etc etc
But then I need to go a step higher. What Im really attempting to achieve is that within a folder. But each PSD file also has another set of layers.
Sort of
You can export 'layers' to seperate files.
The description is still too vague. Maybe the script Layer Saver by Paul Riggott will help you
Maybe share some examples of your workflow - there might be a more suitable approach
(back in a bit)

Layer 0 is a blank layer, then I drag drop an image (1) there. I save as a PSD (1). THen I drag drop the next image (2) beside it, delete image (1), and save as PSD (2).
I repeat that X amount of times.
I wonder if I could just drag drop X amount of images into that image folder, then run a script to get my X amount of PSDs. Each with 1 unique image from the X amount, and all other folder/layers.
The other layers are a template, preset fonts, colors, settings, that kind of stuff.
So you want to create a bunch of images, each with a different background layer
and the layers in front of it you want to keep as is.
You have a few options
One is to use a premium bulk mockup plugin
the other is to use a simple 'Export Layers from group' script
@fathom warren
Gave +1 Creative Carma to @sly hawk (current: #5 - 1156)
Also, a friend suggested using "actions" to rebuild the layers "from scratch". That may also be an option.
mm. maybe, but I think there is a better option]
If you can share your PSD we'll look at the best solutrion
solution*
Hello! Anyone here knows how to make an animation for things?
Can you help me with how can I put different types of blues?
Why doesn't Adobe Fonts install Seoge UI? I tried signing out of Adobe, restarting my pc, nothing
Segoe UI*
Apparently it's due to a "conflict" (notification doesn't specify what type of conflict)
There is probably a collision with an existing version of it. Perhaps there is a version from another provider, like Google Fonts, already installed. That might cause an issue with the Adobe version. Check Windows Fonts to see if there are other versions of it installed.
Tap the Windows Key and start typing "Fonts" and you should see "Font Settings" - In the Fonts page, search in "Available Fonts"
Hey @deep citrus
Are you using the file i put up here?
you will need the psd most likely
I did one by myself, it’s kinda late right here but tomorrow I can show you?
hello i need a little bit of a help with masking due to masking is not covering the area i have selected. it just covers a little bit instead of the whole selected place
okay so im a super noob and trying to make this logo into a 3d printable logo an i am so aggravated and ready to quit can anyone help im a army veteran and this is way above my paygrade lol
Yea np ☺️
You're trying to turn a logo into 3d?
i am trying to make the logo itself to where i can print it with my 3d printer
Ohhhh. Hm.
I'm not very familiar with 3d printing sadly
i really just need the white background removed and just the logo outline and then i can go from there
and im a super noob
i am not my friend was and he gave up on me
Ah ok
how do i get that glow effect and that fading effect on the guitarist

can't really do payment or anything I'm 14 but my friend wanted me to ask if anyone can put nightmare Freddy or bonnie in a photo
DM if u can
Easier to remove white from SVG file with adobe illustrator...


with the polygonal lasso tool, i can't seem to scroll up or down or any direction, is there any way to fix this??