#❓ask-a-question
1 messages · Page 110 of 1
Actually, if other people are willing to help out on this, I'm going to go do something else. :)
Pinsky posted a quick tutorial on LinkedIn the other day, with gradient maps for changing hair colour.
https://www.linkedin.com/posts/howardpinsky_photoshop-activity-7285126458027454465-xXWw?utm_source=share&utm_medium=member_desktop&rcm=ACoAAAUnGWcBO1o_W8zdR8TEh6hGPHYouMuwGbQ

A quick way to explore new hair colors in #Photoshop using selections and a Gradient Map adjustment layer. 💇♀️
Too many cooks in the kitchen.
I am also here, but just came up to take the orders, I'll go back to the dinning room 😅
I just don't want to be stepping on other people's explanations. I feel like this is getting mixed up. :)
definitely😭
Anyways, I hope that helps. I'll be back a bit later. Got some stuff to take care of. :)
Hence me apologizing for posting semi simultaneously. You reminded me of https://www.youtube.com/watch?v=QrGrOK8oZG8

Too Many Cooks
Watch Full Episodes: http://asw.im/3cyX3a
SUBSCRIBE: https://youtube.com/adultswim1?sub_confirmation=1
About Adult Swim:
Adult Swim is your late-night home for animation and live-action comedy. Enjoy some of your favorite shows, including Robot Chicken, Venture Bros., Tim and Eric, Aqua Teen, Childrens Hospital, Delocated, Metalo...
The lighting seems to be insufficient…
ok i edited the exposure but is there any settings that are like a MUST?
No, there is no must have settings, it depends on the image. Some swear by the auto button as a start, others despise it. Some image gain a lot by pushing clarity or texture, but not for a portrait with a skin that is no perfect…
hmmmmm ok, thanks for the info tho!!! so just do as i see fit?
also what should i export it as for print, it should be a pdf, no?
Some use the swing: adjust a slider from an extreme to the other and go towards a point that works, going gradually towards the center by overshooting it on both sides until something works. Go from top to bottom.
But if you are doing reproduction of artwork, it needs to be accurate. Some use a grey card, To neutralize the color casts.
Talk to your printer, ask the format, resolution, color mode, color profile…
Hello, what can I do to improve masking process? I am often facing it be very jaggy where I have to go in an manually clear it up. I know that generally background with contrast color works but I am dealing with what I have

I would draw a vector path (Pen Tool) around the object and use that to make the selection.
🤔 that certainly sound more efficiant. Thanks!
Gave +1 Creative Carma to @ripe quest (current: #2 - 2695)
I know this isnt about photoshop but there isn't a lightroom discord server, I am having a problem selecting objects or people where the selection tool will create a random mask of either a box or random patches around the person or object, does anyone know how to help
You can ask Lightroom questions here. Unfortunately, I'm not a Lr user so I probably won't be able to help. Perhaps someone will chime in if they know the answer(s).
ok

this is the problem
when i go over to click on the person it just selects a box and not just the person
i also tried it on different pictures last night and had the same problem
Did you click on "Person 1" in the panel?

yes
in that i selected his torso with object select
ive never experience a problem like this before
Does seem like an odd problem. It works in Camera Raw in Photoshop. I imagine they are the same or similar algorithms to make the selection.
Is this an older version of Lightroom installed? If so, you could see if there are updates available in the Creative Cloud app.
i already checked for updates and its the newest version
i could use photoshop
is there a way to import photos in more of a gallery than just layers in photoshop
well i guess thats just lightroom at that point
maybe ill try using an older version of lightroom
Photoshop doesn't have a "catalog" like that
Yes, you could try to roll back to a previous version. Perhaps there is a bug in that version.
maybe
but idk if ive updated recently
i dont remember updating
so i think im on the same version ive been using for a while and i havent had problems before
CC can update apps automatically if you have that setting activated in the CC app.
i do have auto update enabled
i didnt know that
what are updates i may have applied?

Probably whatever updates were in the newwer version.
Good luck
thanks
Regarding "catalogues". Not Photoshop, but if you are using Bridge (and you should 😉) you can apply ACR (Adobe Camera Raw) directly within Bridge, without even opening Photoshop
It has mostly the same capabilities than Lighroom has, lest the collections, the metadata and the flagging/star system. Although you can do many of these things within Bridge.
In fact Bridge/ACR is a bit like a lighter version of Lightroom, without the need for a real catalogue.
As for your portrait selection issue:

Stupid question but since Lightroom uses artificial intelligence systems to define the selections, you need to have a few things in order: First of all a legit version (sorry I have to bring that up!) and an internet connection + being logged in your account.
All that failing, it could also be a bug and as such should be flagged in the bug report system:
Where, depends if it's Lightroom Classic, on the web, or the cloud-based version.
And by the way This is the latest version

so it's 14.2 which did update a couple of days ago (There have been a major update)
And there is a Camera Raw update today!
Before last year update, any major Lightroom Classic update required that you create another catalogue (the old catalogues were transfered to a new one)
and it was annoying with no real reason as to why.
With newer versions, this is no longer required and the transistion is seamless. If you update to a newer version, I really encourage you to update to the latest so you won't have the message you posted earlier. That only happened for older version. This is hopefully a thing of the past now...
if you update just keep an eye on any message that will ask you about presets and plugins so you can either delete them or keep them (I suggest you keep everything)
yes
i have a legit account
and it just stopped working 2 days ago btw
never had a problem before that
like it shows me the outline of the person when i hover over the button and then when i click it then it puts a box
i have lightroom
i do not have lightroom classic
i do have an internet connection
the current version of lightroom is 8.2 i think and i just went to 8.1 and it kinda works now
OK, I am not super expert in Cloud based lightroom, but it definitely works with being logged in your account, so maybe, it's either a bug or an issue with cloud based system on Adobe's end
i think its a bug with adobe
cause im using the same computer that ive used for months
The trick on using Brisge+ ACR still stands as a workaround, not using PS at all
and i havent changed anything
its alright for now, i can select people now


i found a workaround
just have to click every part indevidually and it works
If all fails, you can still post your specs and issues in the proper bug report channel and see what the team says
https://community.adobe.com/t5/lightroom-ecosystem-cloud-based/ct-p/ct-lightroom?page=1&sort=latest_replies&lang=all&tabid=all
that's where bugs should be reported anyway
ok
Looks like something on the software end. Since it's cloud based, you may have the latest version and everything in order, if something changes on Adobe servers end, then it will affect the performance of the app
Where are you situated?
wdym
I was checking Adob estatus, to check if there was some maintenance going
It's usually by areas: Like EMEA, America, Asia Pacific...
although I don't see anything anywhere at the moment
america
Adobe Status provides service availability and performance impact information for all Adobe products and services. It includes incidents and maintenances that are ongoing or in the past that affect Adobe products.
I can see some maintenance for Experience cloud in the Americas but it shouldn't affect Lightroom
yea
Anyways I will need to go now 🙂
Post the bug report and hopefully you should have a resolution soon
Don't hesitate to post the link here when you're done (and tag me as well) so I can pass it on to people who may be able to chime in
No problem... Good luck!
thanks!
Don't forget to include as much info as you can, including your computer specs - graphic card etc as it helps them checking the bug without too much back and forth
ok
I have been making an animation using "Create Frame Animation" on timeline. And was wondering if there was a way to resize something multiple frames in, and not have it affect the previous frames. I know I could copy it and resize it but I can forsee the amount of layers quickly getting out of hand that way
The way you can move things in future frames but not resize them surprised me and I got so far into it before realizing that was how it was
If it is the latest update that has an issue you could try to install the previous one? https://helpx.adobe.com/download-install/using/install-previous-version.html
Use the Creative Cloud desktop app to find and install previous versions of your Creative Cloud apps. We provide installers for our current apps and the previous major version of each.
i tried that
just installing lightroom C, theres only an option for north america, not europe - is there a way to change that?

There doesn't appear to be any other options for English that I can see...

You're going to have to suffer with words like "Harmonization" heh
okay nevermind aha i thought there was a seperate language/format for ppl in the uk but maybe not
not to worry tho thanks 😄
"Harmonisation" and "Colour" would bother me as an American, so I totally get it. :D
just tryna install my presets, every time i select like 2+ folders it brings me inside one, i want to install all the folders as they have presets inside them

I think both languages are absolutely bonkers anyway. If I invented a language it would be a hell of a lot simpler.
We use words like Lead, Tear, Row that are literally spelt exactly the same but have different meanings depending on context
There's bloody Homophones where they sound the same but mean different things.... Their, there, They're
Contronyms are stupid too. These mean their own opposites! Sanction and Dust. Even bloody 'fast'. (They ran fast!, They were stuck fast!)
I think the word "Set" or "run" has literally 100's of meanings!
... don't get me started on words like on silent letters like Pterodactyl, Gnome or Knife.
Literally, the K in knife has no purpose other than to cause confusion.
Honestly, I have absolutely no idea how non native people around the world can understand a damn thing we say.
They're over there with their people. heh
Although at least we don't have Masculine & Feminine Gender words.
Apparently (don't quote me on this) but "beard" and "moustache" is feminine whilst "breast" is masculine...
Sausage is....
...
Kinda dependant. If it's a big cured dry thing, it's male. If it's softer, smaller and fresh... it's female. 🙂
- However, I'm sure that @vapid flume will be here tomorrow to tell me that I'm wrong on all counts.
(Feel free to delete my ranting if I've gone too far off topic)
Sounds like you've found your calling: English Language Reformation Project. heh
looking for flyer animator
I generated this picture using AI. Then spend 3 hours trying to generate the same picture but with visible elbows. I gont nothing 😢
Tried to "prolong" the hands using PS. Clone tool works nice bet messes the lines between shades on the sleeve.
Selecting the area and just copy&paste doesn't work either.
What instruments I should use to "prolong" hands ?

How do I subtract "characters" from "background"?

characters is the people cut out
i want to subtract them from the background layer
nvm i worked it out we are bing chilling again
masks an allat
I made a long message in response and this message have been deleted by the bot. You are free to retrieve it if possible, I am not rewritting 7 lines of grammatical explanation
My conclusion was "necessity is the mother of invention"
The separation is entirely due to evolution of language, there are no rules. Leprosis is feminine
I don't know the exact tranlation of female is in French, but the world exists as is (Femele) and is used only for animals and plants. If you say of a woman she is one, you are showing your contempt and will pass as an unsufferable chauvinist no one will want to talk to. Although it's OK it's you use it for a mare, a sow, or any other animal. Maybe my disgust of that term in English stems from that background.
When I came in the UK the first time, the best thing I've done is get a library card and read all the books I could find (and understand) about the English language.
The consensus is that there are no rules on how to pronounce words, and that American have a version of English that will appear "more right" to language historians, because they managed to have English standardised sooner than the British.
In ye olden days both written versions of "labour" and "labor" were found in written English, in England. When first dictionnaries were written, you could find both versions. When the Americans decided to standardise English, they opted for one version, and it has since became their official English.
the British standardised theirs later and opted for the other version, probably out of spite (Obviously I am joking 😁)
(Did you go into the mod archives and find the autobot deleted message or write it again?)
No, I didn't. I was pretty flummoxed about this. I don't know why it flagged it. It was perfectly SFW, it was grammar FFS!
Also, let's be honest, I don't know how to retrieve it! 😁
I managed to find it
of course I couldn't correct the multiple typos which have become the hallmark of my input here 🙂

Maybe the bot coralled me because it was posted on the wrong channel. The bot is right then!
i want to select the table only, but somehow my magic wand tool selects the entire layout, what settings do i have to apply in order to select only the subjects i want?

Try it with "contiguous" ticked
you may have to hold SHIFT to add to the selection as you go along, as, as its name indicates, it will only select pixels contiguous to the one you clicked on

THANK YOU SO MUCH
You're very welcome!
You can try to draw a basic shape of the composition you want (hands with arms and elbow shapes), save it then load this image as composition reference image in Firefly (text to image). Then load your original AI generated image as Style reference... You could get something that works.

Is there a way to stop this getting pixelated when I make it smaller? I tried making it a smart object but no luck

Does it still pixelated when you confirm the transformation?
Tranform preview is always pixelated
Oh
No
Not so much at least
Still slightly but idk if that's avoidable
Bit better at least

You can try to change image interpolation for "bicubic sharper" in your preference panel and see if it's better...
Note: Don't forget to reset to "bicubic auto" after... It's the best in most cases.

That is a tad better
That's as good as it's going to get I think
Unless I find a really small version of the image but I don't imagine I will
Hey everyone. Since there is no seperate Lightroom discord, I figured out I might aswell ask here.
I did a fresh install of Windows and just installed Lightroom, while I have backed up all my settings and prefferences.
I have all my original pictures sorted on a seperate drive. Now, whenever I open LR, it wants to move the originals somewhere else. All I can do is "stop until next start" which is quite frustrating.
Is there a way to prevent LR from moving my originals around?
Is it even touching my raw files? It seems like it is trying to move the "copies" I loaded into LR around. But why?
Hello,
How do I create this kind of light particles please?

so sick of this in photoshop, it always happens when I upgrade. I used to be able to use the type/warp tool (next to the colour in the top text bar) and now I can't. Can anyone explain why? Thanks!
This is really doing my head in.
THIS why is it greyed out?

Please show a screenshot in full screen mode with the layers panel visible. There must be a text layer and the text must be selected.
is there a way I can do this?


how can i make it same color thanks shows me a reflection I try to move the item itself and it seems to me that it is not completed

Why do adobe flicker each time i click something?

Its so annoying!
I have repaired so many times

I have been stcuk on this forever!
how can i select all the content of a specific layer?
Hi! Ctrl+ click the thumbnail in the layers panel creates a selection based on the transparency of that layer. If you want to copy a layer, Ctrl+C, Ctrl+V, or just Ctrl+J
Hello! What is peculiar about your installation? Most users do not have that issue.
Are you using Opera to download? It does not work, prefer chrome, safari, edge…
Hi, what are you calling Adobe?
Hi, could you rephrase it? I do not understand your question.
Hi! The easiest is via a clipping mask: You need an image with the squares, then select them, jump them (Ctrl+J) on their own layer, then add the picture on top and alt+click between the layers in the layer panel.
https://www.photoshopessentials.com/basics/clipping-masks-essentials/

Learn how to create and use clipping masks in Photoshop to hide parts of a layer and fit your images into shapes!
A tedious way is to create a grid layout then make multiple layer via the "New Layer via cut" option.
There may be a script somewhere on the web that can do this automatically, but I haven't found one...
My question is this: I’m trying to make the image a uniform color, but it’s not the same color. I tried moving the image to a different place, and when I did, it showed me that it didn’t complete everything—some shadows remained.
Even scripting it, its probably not going to turn out the way they want it. It would still take some "artistry" to do it in a visually appealing way. :)

I like your idea of using the Guide Layout to visually design the grid. Gonna have to think about how I can script that. :D
Thank youu
Gave +1 Creative Carma to @viral palm (current: #9 - 705)
@ripe quest hey bro I’m kind of new to photoshop, I know how to do very few things but do you know if it’s possible to recreate this effect

I know how to get the text and all that but what about that texture/ overlay used , it looks very clean
You're speaking about the blue portions on the bottom there?
To me, it just looks like a piece of cloth that they've used there. Just a used a Layer Mask to hide some of it and reveal the action shot. Maybe they've colorized it as well because the blue seems very saturated and bold.
Could you give me a step by step on how I could recreate this ? Because I don’t know how I would do that to be honest
I've upscaled and split it up for you. If you want to play with this, look at it, use it, be my guest.


Uh. Well... maybe. I don't have any of those assets. I'd either have to go find them or make them. Then you're asking me to make a tutorial. heh
Oh wow thank you
Gave +1 Creative Carma to @ripe quest (current: #2 - 2697)
You're so smart! I have to confess I'm near of 0 with scripting...
Thanks!
Gave +1 Creative Carma to @ripe quest (current: #2 - 2698)
Instead of you doing it maybe you can help guide while I send some pics ?

Can you send the actual images though? Not a photo of your screen.

No. The actual images. Not screenshots. Not photos of your screen. heh


What do you guys think of my latest photoshop artwork? c:

Something like this probably... (?)
Hello. Looks cool. Please use #📝project-feedback to show work and get feedback/suggestions.
my bad!! Sorry about that!
Your talented 💀 dam man you got that in 5 seconds my brain is breaking even after looking at it but yea I’ll follow your steps
That’s what I’m looking for
I like it. There are a lot of elements in here. Interesting wavy overlay on it; gives it a weird glitchy screen effect which I like.
I also will have a few questions about something else in a minute let me just figure this out real quick
Thank you! The wavy effect comes from a CRT glitch overlay I modified from a YouTuber’s preset a while back. Still figuring out how it was done—might reverse-engineer the actions as a foundation.
This piece is part of an evolving time capsule— a visual journal of my thoughts, experiences, and growth. The style itself is like a universe I’m building, shaped by radical honesty and self-reflection. Art has been my way of healing, and I hope it can light the way for others who’ve felt lost. Symbolic art holds deep therapeutic power, and I want to use it to help others find clarity in their own journeys.
Gave +1 Creative Carma to @ripe quest (current: #2 - 2699)
Excellent path you're on and a great use of visual media. Keep going!

Nice work!
It came out neat thank you

Hi there, is there any way I can make these chevrons longer, but keep the actual size of the arrows the same? I've tried to copy paste and even cutting half off the copy but they don't line up properly

I would probably get this started in Adobe Illustrator to get the 3D portion going. Maybe do it all in there. Or bring it over to Photoshop to give it that "painterly" effect.
Would you say it’s easy to do this for a star possibly
I don't understand what this means. Did you try "Content-Aware Scale"? - Make selection. Edit > Content-Aware Scale...
Content aware scale is greyed out for me
What kind of "star"?
The Layer is probably a Smart Object. I guess it would have to be rasterized.
@ripe quest Thank you so much!!
Gave +1 Creative Carma to @ripe quest (current: #2 - 2700)

Ok, I have no idea how this content aware fill thing works though
Yeah. Illustrator. Like I showed above. That's probably easiest to make a custom thing. Only easier if you could actually just find those 3D stars and drag them into Photoshop, I guess
Content-Aware SCALE... not Fill.
Anyways, I don't even really understand the goal so perhaps that isn't even valid.
Yeah that's not quite what I need

Basically
I need

This
But I need them to line up properly
But they don't
No matter how precise I try to be they won't quite line up right

Draw new ones, I suppose. You really only need to make one and a background. Then duplicate it n times to fill up the area.
How do I do that precisely? The ones I have were premade
Maybe something like this...
That's a good idea, unfortunately I just went through the painstaking process of getting it as close as I could then fixing it pixel by pixel with the pencil
Painful
But
It worked
Great. Glad I wasted my time on this. heh
Lmao Sorry
it worked, thank you!!
Gave +1 Creative Carma to @hushed niche (current: #15 - 152)
hi everyone, I'm trying to merge separate pen tool path layers, but when I do it creates new lines and I'm not sure how to correct this, any ideas?
They're open Paths. We can't expand strokes into shapes in Photoshop as you can in Adobe Illustrator. I mean, you can but its a convoluted process.
hey guys, was hoping to get some help on this. fairly new to PS still. im trying to make a sort of template for photos im trying to print and then cut into squares. the issue i'm having is the white space on the left side of the image (blue arrow) is suppsoed to be smaller than the gap in between the 2 photos (red arrow). when i print them out they are the exact same size. would you know why?

and there's no way to delete the lines created after merging?
I'm not really sure why. Perhaps your printer has some default or additional margins being applied. I'm just spit-balling here. Sorry.
What is the goal here? Is it to retain the vector lines?
If the vector lines don't matter, you can rasterize them first. Then merge the layers.
ah good point, thanks again!
If you're trying to retain those vector shapes, I can probably suggest another method. However, it's pretty convoluted.
please! I'm all ears
They're no longer going to be paths or lines though. They're going to be shapes.
that's fine
Don't shoot the messenger. :)
When rasterizing and converting from selection to vector path, your mileage may vary. heh
Alternatively, you could create your vector graphics in Adobe Illustrator.
There are more effective vector tools in Illustrator. For instance, it's easier to expand lines into fills and merge shapes.
@ripe quest ready for my next project ?
I don't know, pal. Depends on how involved it is. I won't be on much longer.
This what I’m aiming at doing but I want to switch it up , I don’t want to blatantly copy the guy any advice on how I could recreate this ?

Just start by chopping up your images and start sliding them around on the canvas.
Is it fairly easy to mask the players ? I forgot how to do it
Try the Object Selection Tool in the toolbar and try the "Select Subject" button. See how it goes. Then apply the Layer Mask. Sometimes it works really well.
If not, you can always paint in the mask to either hide things (painting with black) or reveal things (by painting with white).
To illustrate what @ripe quest said... I suggest you to put some rulers to help for composition.
You can mask out subject then bring back the background using rectangle marquee tool and re-fill the mask in white to recreate the "Grid" like effect.
This is nice stuff thank you so much , I just joined today and am getting so much help. Love the community already thank you 🙏
Gave +1 Creative Carma to @viral palm (current: #9 - 706)
How did you get that outline/ ruler set up
I have two colours, is there a way I can find the needed hue shift values to turn one into the other?
Probably best NOT to do a hue shift and use a gradient map instead.
If you don't know what that means just do a quick Google or YouTube search for a basic example/ guide
I've used that before, yeah.
Think I'm remembering why now lol
HSL is kinda a nightmare if you wanna do anything precisely, huh?
tbc, gradient map or gradient overlay?
Gradient map.
Thanks
Ok
So
I've got a kinda idea of the tool, I think
But I'm still struggling in turning one colour to the other.
I tried putting the source colour on one end and the target colour on the other, but it didn't quite match
Further, it had quite the opposite effect I wanted on other colours (which I was hoping would be changed in a similar direction (in this case, darker))
I should note, I'm working with digital stuff here, not photos. Here's the project I'm testing on (simplified sample out of the actual project on my other computer)
That's so tiny lmao
better pic

Colour on the right is my target colour, colour on the upper left is the colour I want to change into it.
Colour on the bottom left is a colour I'd like to change by the same "amount" in the same "direction" as the source colour.
When I try the gradient map, with the source on one end and the target on the other, I just get this

Reversing doesn't make it much better

Hi, You had not stated the other spot that needs to change color in your first post. I guess that a regular color change might be better suited. In this case the gradient map remaps colors according to the chosen colors, it could not calculate how to affect the other tone in a similar amount, you tell the changes with the second tone in the gradient.
Yeah, my bad
I ended up just using hue shift and approximating it, got it pretty close and that was good enough
Hey, how can I make a transparency fade based on a shape?
so I have this frosted glass image

but I want to have a transparency fadeon the insides
i was thinking of having a shape inside it and applying a transparency fade based on that?

any ideas?
um <@&548221840750018590>
Thanks!
Gave +1 Creative Carma to @undone linden (current: #968 - 1)
ty haha
I'm a bit confused by what you mean
At the moment, that top image has NO fade.
from the center
I want to add a fade
that's the thing
ok. one sec

like a fade starting from the center
just to transparent-out the inner edges if you get what i mean
uhh
yeah, 2nd video I think is what you want
but how
Follow the steps in the 26 second long video 🙂
At the 6 second mark, I DOUBLE CLICK on the layer mask thumbnail
alr gotchu ty
(to get the sliders to appear)
Sorry @stoic ginkgo - It was 5.30 in the morning when I previously responded. - My kid had woken me up, but I fell asleep again shortly after 🙂


I can see at 0:40 that the transparency state doesn't change, i need it to stay even if there's nothing in the background
it's a game asset
there won't be any images inside the png
OK, in that case, skip the blend mode and manually brush in your mask
Basically just do the 2nd half of my video

Try and use the mask tool instead if you can. It's non-destructive

Ctrl+R (or in top menu go to: View and check « Rulers » option).
When rulers are on just click on it and drag guide on your canvas.
i wan after effect server
Adobe Video: https://discord.gg/adobepremiere
thx
Gave +1 Creative Carma to @ripe quest (current: #2 - 2701)
hi im a a complete beginner im trying to use a template for my social media but idk how
I see that there’s a “your photo” file but I don’t know how to import my photo to it

I tried to import it but it seems like i didn’t do it right it looks messy
Just doubleclick that layer in the layer panel
it will OPEN UP a new window
drop your image in there... full canvas, hit save,.. and go back to the template
it will magically have appeared in place
if you're still stuck, let me know @fossil vale
thank you for the help
Gave +1 Creative Carma to @sly hawk (current: #5 - 1110)
one moment! 🙂
Hi, you need to save and close the your photo one.
Hi, please ask in the general chat, this place is to learn Photoshop.
it worked!! thank you so much
Gave +1 Creative Carma to @hushed niche (current: #15 - 153)
it worked thank u for the help
No problem. Glad you sorted it.
Those things are called 'smart objects' - they're basically 'files inside files'.
Think of them as 'nested'
Thanks for leading them, I picked the low hanging fruit.
Gave +1 Creative Carma to @sly hawk (current: #5 - 1111)
you edit that 'inner' file and it shows on the main one.
Teamwork
i appreaciate this a lot thank you guys
Thanks for your gratitude.
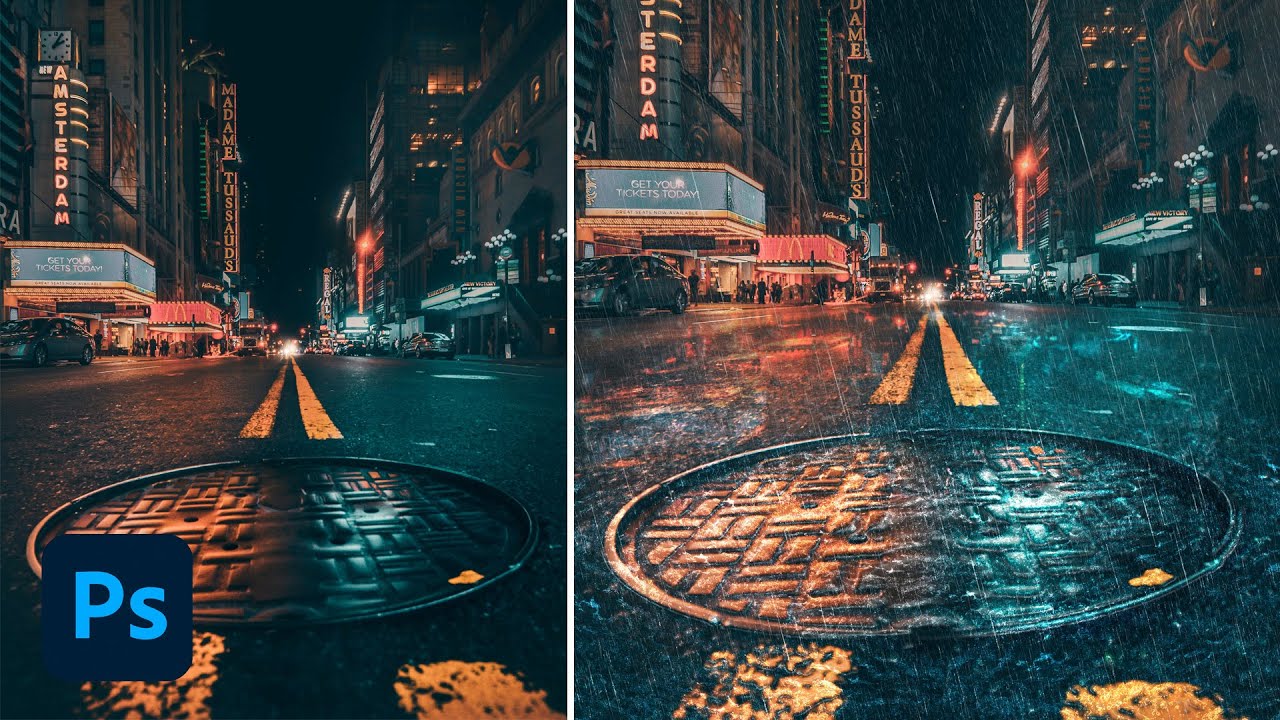
hi, i was following a tutorial on yt on how to make rain effect[https://www.youtube.com/watch?v=ckfkURdd2ok&ab_channel=SpoonGraphics] but the moon reflection becomes that weird color on the corner when I do color dodge

📥 Download over $5,000 worth of premium design resources: https://spoon.graphics/membership
In today's Photoshop tutorial we're going to use the power of Photoshop to change the weather by making it rain within a photograph. We'll incorporate various tools and filters to not only create a downpour of raindrops, but also make adjustments to the i...
does anyone have tips on how to not make that happen
so sometimes whenever i'm in PS and i need to switch between any tool and the zoom tool it just bugs out some time
for example
i'll be masking something with the brush
then' i'll press Z to zoom around
and it just does not go to the zoom tool, and i end up brushing across my screen, instead of scrubby zoom doing its thing
is it just me / i'm doing something wrong?

option 1 2 and 4 seem like likely culprits
oh! lol
???? what i'm i saying that is blocked by the server

Can I make 8 different variables of the same variable in the same file?
Sometimes, after running Ps for a while, I think it can encounter display issues related to the GPU and/or driver. I've just restarted Photoshop. At least, I've experienced this and that was/is my solution.
Can I at least export the variables files in png and not psd?
The bot doesn't like the word "finger - ing"
Not sure. Perhaps someone else will chime in.
And about this #❓ask-a-question message ?
😂 ok fair
yes, this i've noticed as well. it usually works fine the first few minutes - hours
but if its been open all day starts getting a lil buggy
It only seems to happen to me after a long while using the app. I can't pinpoint what I'm doing or whatever operation that seems to cause it. If I could, I'd report the bug but since I can't reproduce it with certainty... Nope.
hmm, i'll try to record my screen next time
i'll see if i can get some software that can record my keystrokes too
wassup everyone soo
i m having a lil' problem with bucket tool
i am an artist i really need it
if i change tolerance on pb tool nothing changes and it doesnt fully fill the line
and i dont want to use magic wand for this EVERY TIME cause bro it eats so much time
Also would like to know how to fill not fully closed line
i guess u can see those empty pixels

Use magic wand, Fill the layer below it after doing Select > Modify > Expand
anyone else experience one monitor having different keyboard shortcuts than the other?
On my Cintiq, the shortcuts are normal/the default, but when I drag PS to my main monitor, V becomes "View" rather than brush, and the bracket keys no longer change brush size, they just make the error noise
there is really no shorter way for this? i used to work in krita and just changed tolerance to what i need and thats all
you can make an action if you want
wym action? on questions forum?
https://helpx.adobe.com/photoshop/using/actions-actions-panel.html
Actions let you record a series of actions (ie epand >fill) and then replay them anytime with a shortcut
oh thanks
i just wonder why is there a tolerance number then
if it does nothing
depends on ur canvas size
i have 1920 x 1080
2 pixels should be fine then
if youre doing the expand method that is (for pixels)
but magic wand, i usually keep it at 15ish
i think i misunderstood ya earlier lol
tolerance just means like-
1 ONLY selects damn near 1 exact hex code. Meanwhile 50 would select everything green thats touching if that makes sense
yeah i know but it just isnt working
either if 255 or 1 doesnt matter
result is the same
is "sample all layers" selected?
What you should be doing to fill is select with the wand where you want filled, make a layer below, expand, and then fill
if you are talking abt this,yes

i just decided not to mess with this tool
i ll just use hotkey of expand instead
bump
sorry i dunno i am a newbie lol
Hello, does anyone know why my ps keeps creating new layers when I want to change the saturation of my image?
do you have a pic?
Is there a Lightroom DC server too?
I recall them saying there wasnt? And that you can just ask here since theres overlap, but I could be wrong
thanks for the quick response!
That's correct. You can ask questions about the photo/imaging apps: Photoshop, Lightroom, Camera Raw, etc
@ripe quest how do I toggle that ruler

Ctrl R toggles it on/off or View > Rulers... (from the menu)
How do you set up the lining ?
I don't really know if that creates any clarity

so I want to change the saturation of layer 2 but then it changes everything
i was mainly trying to surmise if it was actually a normal layer or adjustment layer
yeah, that is an adjustment layer. It lets you edit non-destructively. Hold alt and click between the Hue layer and Layer 2. It will make it only effect that layer
I clicked them both with alt but somehow it didn't change haha
Dont click them both, hover your cursor in between them while holding alt. Your mouse icon should change. THEN click
O my days
what a life saver
thanks man been struggling with this for a while now
it works
np
To create Guides, you drag from the Ruler out onto the Canvas.
Yea just saw that thanks
Gave +1 Creative Carma to @ripe quest (current: #2 - 2703)

Idk if it’s a issue on my part but the line is disappearing after I drag it on
View > Show > Guides... toggles them on/off
also make sure Extras is checked


Guides seems greyed out, hm. Gonna be more complicated then 
😳
Im too lazy to google it but good luck m8 

Is there also a way to connect layers to each other so when I scale one, I scale the rest aswell?
I don’t even have it on my toolbar am I cooked
Select both layers, Control G to group them. Scale the group
OR, select them both and ctrl T to scale them both at once without a group

when i try to open a psd file it says program error and doesn't open it, it only happens for that one psd file.
anyone got a fix?
nice job king 
hi! ive recently dowloaded photoshop and i am trying to add my custom font. from the website im using the font to download keeps giving me ttf woff2 files and photoshop dont elt me import them due to the file normal cant be opened?

Hi, if you search for “online Photoshop file fix” there are different sites, I never used them, but …
Hi, fonts are installed at the operating system level. Double click the file should work now on windows or MacOs
this is what im being told.

That is for another software, not Photoshop.
You are trying to drag it in photoshop, or to open it from the file>open menu? You need to go on windows explorer, and double click on the file. Not from within photoshop
I tried like a few but it didn't work for me
am i doing ir right or..?
Uou somehow associated the file with photoshop. In windows explorer , show the extensions. Drag the files to C:/windows/fonts or whatever it is now.
A woff2 is not supported by default by windows: https://www.reddit.com/r/web_design/comments/coqakj/what_is_a_woff2_font_and_where_do_i_find_them/
Reddit
Explore this post and more from the web_design community
Did you save an earlier version of the file? If on a Mac, do you have Time Machine enabled?
im confused. When i download the font file it gives me a zip with these inside??

@hushed niche
Fonts are installed in Windows. Not Photoshop.
For TTF and similar files, view in the Windows File Explorer. Right-click and choose "Install for all users"
Then restart Photoshop. And it should [hopefully] recognize the new font.
Why does she have no nose?
WOFF2 is not a "Photoshop" document and Photoshop will not open that. I'm not sure why the Windows File Association is attached to that format but that's not correct.
i did it but.. but do i change the colour of my backround..
hello can someone help me with clone stamp tool? When I try to use that, I only see this error:

Alternatively, you can select both, right click and choose "link", Any transformation, displacement of of of the two layers will be followed by the second one. It's an alternative to grouping. Grouping allows more stuff, like applying clipping masks and effects on a group. When layers are linked it only affects the position and transformations
Do you click on ALT first? because that's what this message means
i should click alt and then click with mouse or hold alt and click with mouse?
because i tried both and still dont work
i saw this red space, but i still cant use stamp tool
i still see this error
same error
Click ALT in the reference area to set it, then release the ALT key and click on the Left button of your mouse (or with the pen of your tablet) to paint the refrence area to the target area
You need to release ALT between the two actions
You'll see that to get a proper result you will need to change the reference area often, so need to click ALT repeatedly at different places

The Clone Stamp tool copies pixels from one part of an image to another.
See the help files, if it doesn't work when you click ALT and release, maybe there is an issue with your ALT key?
my alt key work, I checked even that
and when i hold alt and move my mouse when im holding left mouse button, it doubling my layer
Try to do exactly the same (alt+click, release and click again) but with this tool (it's for checking)

okey wait
Do NOT hold the ALT key
yea i know but it still dont work when im not holding alt key
Hit it to set the reference AND RELEASE IT

i only see this error
PS think you didn't click ALT. It happens to me as well when I go too fast or when I forget
If you follow the sequence properly, it shouldn't happen
i clicked alt

I click alt, then release it, and click with left mouse button
it dont work
i tried multiple times for 2 hours
You can see that my layer is not blocked
See that capture
At some point, you see a crosshair (and only that), That's me clicking with the left mouse button while hitting ALT, For very brief period, you can see the crosshair disapear, that's when I release the ALT key
Then you see a simple cross and a circle. The cross is the reference point (that was set by hitting ALT), and the circle is the taget point that I paint using the left mouse button alone
If your layer was blocked, you'd had another error message. The message you have is very specific to the action of NOT hitting ALT
wait
im gonna send you video
because i do everything right
@vapid flume i send you video on private message
can someone help me with that? please
If you share the video... Maybe.
Please share it publicly!
I need to go anyway, Franck might take over if he wants to!
can you screen shot the whole Photoshop UI? Hard to figure out what your settings/tools are with this video.
I have the photoshop free trial but it saids my device is not compatible so i can't download it. Can anyone help please? I have everything I need to download it

My pc is up to date

1-reset your clone stamp tool (as shown in this video)
2-When clone stamp active hold Alt then click on the source you want to clone then release alt
3- Paint where you want to apply the cloned source
Your move tool is selected rather clone stamp tool so if you alt+click and move you make a copy of your layer...
Sorry I took this thread on the fly anf just want to be sure I understand well...You want to clone stamp a part of this image... Am I right?
i want to remove a text from this t-shirt
I did everything like you on this video and it still dont work
i only see this error
Got the same message once my Stamp Tool is reset but when I ALT+Click to pick the source then release it works fine...
Be sure to follow the steps strictly... It should work
i did everything like you
everything
still dont work
what can i do??
thank you guys then
@viral palm hey this may be a easy and simple question how do you restore a image

You see the wings on the hornet ?
You removed the white of them... Right!
Did you mask or erase^
Removed background
@ripe quest any help possibly ? I think this particularly a easy fix
If there is a Layer Mask, you can paint with white on the mask to reveal the hidden portions. If you've merely erased the pixels, you can't. Import the image again.
As @ripe quest if you used "Remove Background" you should have a layer mask. If you paint with white on it you can bring back the hidden parts.
Perhaps It would be better to make a clean selection and a new mask... I used the good old "magic wand tool" it works well with this hard contour logo...
hi im using a video layer to make a simple animation, is there a way to like move the content i made on one frame and move it to another one?
Your animation is made with "Video Timeline" or "Frame Animation"?
video timeline
im trying to just do copy and paste
but for some reason this one specific frame
when i paste it
it makes another layer
Thank you again
Gave +1 Creative Carma to @viral palm (current: #9 - 707)
someone help this man !!
it's cool i figured it out
ii
Try downloading with something other than Opera
yeah that was the issue. Thanks tho
Gave +1 Creative Carma to @ripe quest (current: #2 - 2704)
its rlly funky sometimes it works perfectly, sometimes it creates another layer, sometimes it pastes but not at the same position
Photoshop has Video features but they still basics. I don't think you can copy like this in PS.
Your copy is now a stand still image and you want it to move, Am I right? If so you can copy the whole Layer1 and simply shrink it to keep only the needed part...
im trying to delete some of the layers in the middle, so like im copy and pasting the frames next to it and copy the contents to the now empty frames
There is no tool to split/ripple edit a video layers in photoshop... The only way I see is to made multiple copies of your layer 1 then choose each part you want to keep then put them side by side along the time line...
I share a short video to show you how to duplicate a video layer and how to select just a part of a video layer (click and drag the ends of the video layer on the timeline). But to be honnest with you for advanced video editing you should use a software made for that.
ah
thats tedious
but thx
Yep Tedious... Unfortunately😢
You need to press the mouse button while holding alt down.
hey guys, was hoping to get some help on this. fairly new to PS still. im trying to make a sort of template for photos im trying to print and then cut into squares. the issue i'm having is the white space on the left side of the image (blue arrow) is supposed to be smaller than the gap in between the 2 photos (red arrow). when i print them out they are the exact same size on paper. would you know why?

how do i warp a human face? so for example lets say if the human face is smiling, how do i make it frown?
@shell wagon
Can your printer print borderless? If not, that's the reason. Simply try printing over the entire surface of a page. This will allow you to determine the exact size of the margin that your printer leaves free because it needs this space for the paper guide.
i'm trying to replicate this effect but it's not quite working. how can i achieve the intense blue on the shadows?


I got this granulated effect by feathering a selection, fill it with white, than having a duplicate of the selection without the feathering under it in black. Is there another way of doing this? With possible more control?

Sorry for all the questions.
I'm have differences in image when exporting, 1st screenshot is "export as" 2nd screenshot is in the project. It may have something to do with the gradient which is not converting correctly on export.
Thanks a Heaps


Hi, see the image at 100% (Ctrl+1) to see an accurate preview. Mmh, it might be something different, I do not see that much noise, which usually causes the issue.
Hi, it might be because you have less contrast in your image, there are fewer/no large areas of blue in your result. Make sure to watch the image at 100% when dealing with noise or small halftones.
Hi! The Liquify filter will help you as it can recognize elements of a face. https://www.youtube.com/watch?v=2zhgvNfJTnM

Photoshop CC 2015.5 tutorial showing how to use the Face-Aware Liquify.
One of the fancy new features in Photoshop 2015.5 is called Face-Aware Liquify, and in this Photoshop video tutorial you will see how each of the individual adjustments work—eyes, nose, mouth, and facial structure all can be manipulated easily and independently of one anot...
Hello, what does happen if you remove the border on the left size? It seems that your printer adds the same area to grab the paper.
Painting with the “behind” blending mode might help if it was erased. Get the brush tool, Hit D, then X to have white foreground color, and in the option bar click on normal and change it to behind. Paint away, then switch back to normal to avoid being puzzled later.
im trying to get a filter gallery halftone pattern on this black part of the image but its not working? anyone know why

Can you share a full screenshot? Particularly with the layers, tool bar and the original image showing
Halftones are dependent on the original foreground and background colours as well as those in the tool bar.
@hard reef
Halftone ‘lives’ from different colours or from colours with medium brightness values. Black is unsuitable.


Are you saying that it's like looking at a ball through a red lens?
ball object provides the shape
Red lens provides the colour
.... you need both parts to see the 'image of a red ball'
How about this comparison: The OP tries to draw a pattern on a black board with black chalk?
@ PEC,
Your reaction is perfectly attuned to the topic.
🎯
It's not going to work the way you're thinking. Just use a Layer Mask to remove the background.
I had to quickly and crudely remove all of the stuff from your screenshots to do this but something like that with the two images.
Gave +1 Creative Carma to @ripe quest (current: #2 - 2707)
Since you're new to this: I'd suggest taking the time to learn about Layer Masks and how they really work so that you can use them effectively.
There have to be literally hundreds of them on YouTube.
This will get you started: https://discord.com/channels/547473772727238676/1045711257178738760
Why would you need to get rid of that? You have the original background without that stuff on it, don't you?
You're welcome
You'll have to study image composites / photo composites, compositing. A successful composite will require various things to be considered, size/scale, perspective, light/shadow, etc. This generally might incorporate many tools inside Photoshop.
This isn't a specific tool: "Composite my images."
It takes knowledge and skill which you get through learning and practice.
Gave +1 Creative Carma to @ripe quest (current: #2 - 2708)
Tried blurring?
Is anyone able to help me w this assignment I got no clue how to transform a picture like they’re asking into a “reformed” picture


They want you to restore and old photo.
You can find one online easily enough
I found one online but how would I approach restoring it
Like this photo for example, is there any tools that I could use to restore this picture easily?

you can Photo restoration. Filter then Neural Filters. ? For best result hand work needed I guess

Yeah that worked well thank you I appreciate the help
Gave +1 Creative Carma to @fierce hornet (current: #49 - 40)
yeah @noble obsidian
Removed
Ninja speed!
Well, they were my videos so...
Just to tack on- if this is for a photoshop class, theres a chance they want you to learn how to do it manually without AI. Depending on your teacher, they may not accept work thats mostly a neural filter (just so you learn the tools, yknow?)
This could very well not be the case, but wanted to mention just in case 
I don't know what is the course the OP does, but I did moderate and mentor a few courses + assignements for CalArts (their online graphic design courses) and if you weren't demonstrating how you did it, that was a straight nope.
Obviously not every course is that diligent, but just submitting a before and after doesn't show anything.
hi im new to photoshop, in illustrator you can add masks then throw some texture on an image how can you do this in photoshop? if you knw just reply to this message, thanks
Photoshop has masks as well.
yes, but how?
Clipping Mask is one method. Layer Mask is another...
Can someone help me with clone stump tool?
it dont work, I only see this error:

I did everything right
Download Watercolor brush pack https://www.adobe.com/products/photoshop/brushes.html?promoid=XKMMHH6G&mv=other
Create and enhance your photos, images, and designs with Adobe Photoshop, the world's best imaging and photo editing software.
im clicking right alt, then clicking on texture i wanna clone with left mouse button and I still see this error
I need this tool but it dont work
Google Docs
There is video
Hold Alt then LEFT click (not right) to pick your clone source then Release alt and left click.
Then paint where you want to apply cloned source.
bro sorry but you understand what i wrote?
We can see double arrow on your video> You're not using the clone stamp tool but Move tool.
Be sure to select the clone stamp tool prior trying to sample your source.
i did
everything like you
and it still dont work
im using clone stamp tool
not move tool
i can record you another video
im not stupid man
I understood but you wrote: "im clicking right alt," >>> to clone you must Alt+Left Click...
yes i tried it too
i did everything exactly like you
i can even call you and show you on stream that i do everything right if you dont believe me
I didn't say that... I'm just discribing you the normal behaving of the clone stamp tool.
Did you set custom shortcuts or something like this? Maybe try to reset your preferences to default...
I don't understand why it doesn't work on your end... Sorry
I believe you 100%, but I don't understand what's going on.
how i can reset those preferences?
i will try it because i dont know whats going on right now
Hello, does anyone know much about repeating a pattern?
I am experiencing something that is rather undesirable and I do work with mesh clothing.
The small I take the item it becomes blurry
Would making this a smart layer be better? I am just unsure what to do as my diffuse turns out very blurry.
I will try a smart layer or the Bicubis technique. Sadly I never can get an answer in here.
Hello. I have this photo of a horn with fur around it. There is one stripe of white fur, two stripes of black fur, and a loop of white fur on the end. Is there a way I can change the white fur to be a fairly bright red fur? Maybe like a red in the neckerchief tied around the horn. This does not have to be perfect in maintaining the detail and texture of the fur

I already said that yesterday but first try to reset tool before and retry.
Then, if it still doesn't work> go to File/Preferences/General/Click on "Reset Preferences on Quit> Click OK > Close Phostoshop, restart and try to use clone stamp tool... Don't forget to save your file before closing Phostoshop...
Hope it will fix your issue🤞
anyone here familar with CS3? having trouble with Pen pressure, not sure why but it's stimply not working for me! I use a Huion Kamvas 13 on Windows 10.
It's going to be extremely difficult to pick out the WHITE fluff to recolour... 😦
it will not delete all my projects or fonts i have installed?
Font are installed on your Operating system, not Adobe Photoshop
Files like PSDs are independant of photoshop. They won't be removed.
they might dissapear from your 'recent files' though
@north stone

but the actual files will be safe
thank you
Yes.
You cannot take a pattern and literally make it 'smaller' and expect the quality to remain the same
Hi James, I was able to by doing a smart layer.
A smart layer will work to a minor extent, but it depends how small you're making it
picking the right 'interpolation' settings will make a huge difference
I was texturing something on mesh
the mesh model was laid out different and rather than use substance painter, I wanted to use some older methods
now I cant create project
What do you mean?

James, so many just jump to SP before trying the PS methods. I love PS 🙂
ok its working now
What's that resolution set to? **11811 **px per cm?
oh sorry, ignore me - it's the equivalent of 300 PPI
2000cm is F*CKING MASSIVE!

Yeah. not suprised don't worry
Use ALT to pick a clone source
and also make a new layer to PAINT onto
the current layer is a smart object
....that you can't directly paint onto
so what should i do?
one sec
ok
Could it be that you are not working with an original (or with a modified) PS version? The colours in your screenshots (e.g. title bars of the dialogues) are not normal!
i have original photoshop
from school

then release it and start paintin
it will probably show another error message/warning about rasterising
click ok
then paint away 🙂

did you hold alt and click on a spot to define a source point?
is your alt key broken?
are you on a laptop... where ALT is linked to an Fn set of keys?
When you're holding ALT, the wrong tool seems to be getting selected
the clone stamp tool, when ALT is being held down, looks like a targeting reticle
yea but im not switching it
and it doesnt show that its switched
i can show you on call or something
i can do livestream on call
with a screen keyboard
Should look like this...
wait
im gonna record video
to show you
wtf
bro
i opened screen keyboard
and i have clicked ctrl
and now its working
XD
but i was not holding ctrl
from yesterday
Hello. Does anyone know how to create a #d concave shape from an image? Though it was simply cyanotype, but after looking closer, it's not.
99% of the time, when someone says photoshop is 'broken', the issue is sat between the chair and the keyboard.
Which is understandable, there's a lot for someone to learn, so it's usually my first assumption 🙂
i was not saying that photoshop is "broken"
i was just looking for help because i dont know what was going
It's all good. I wasn't accusing you saying that either. - just saying that it's usually down to a misunderstanding somehere.
but big thanks to you and another moderators for searching for help
Nevermind. It just seems like you guys are bickering over nothing. 😩 I'll ask in the questions forum and check back in a few days. . . . .😒
Did not seem like anyone was goin to. You two have been at it for 3 hours.
Goodnight.
now it dont work again
and i checked screen keyboard
i didn hold alt

It doesnt have to look good at all. All I’m trying to do is create a concept to simulate certain colors (in this case red) and how they work with the rest of the original design. It does not need any detail, just the right shape (just because im trying to avoid something TOO blocky). What I’m really asking help on is how I can select a color (white) in a GENERAL selected area (the fluff) and recolor it to red
for some reason i can only write in uppercase, how can i fix it? ps. obviously i dont have capslock on

pls anyone
Check the character settings. You must have it set to caps.

(Untick/unselect it)
thanks 🙏
Gave +1 Creative Carma to @sly hawk (current: #5 - 1112)
Yes draw a basic selection box around it.. then go to 'select' > colour range
Then use the slider and try to pick out the white area...
Then add a hue/sat adjustment layer
And click 'colourise' beneath the sliders
Drag the sliders (probably all the way to the left) to make the white RED
And then raise the saturation
Then use and black and white brush to 'paint' the mask a bit better on the mask layer to show/hide the bits effected by the red adjustment layer
so im trying to put this house behind the first layer of foliage, is there an easier way to do this other than just lowering the opacity of the house and erasing where the leaves are?


Hi
I´m trying to use the clone tool, but nothing happens? Nothing at all?
Hi
I want to redefine the border when using the magic marker. What do I do?
yo can someone help me with something rq
Does anyone know a free tool which would help add my younger sister to a family pic where she's missing (due to school)? We want to get that framed but don't know how to proceed; any online AI tool prob or something? I asked chatGPT for the same, was told to wait for 2 hours, promised a great result, and then was told that they couldn't edit independently. Any leads would be appreciated! Thanks 🙂
Post a screenshot, we’ll be able to see if you have a selection somewhere, if the blending mode of the tool or the layer is not set to normal, if you are cloning on a layer mask, etc.
Please do not post in each channel.
Hi, I’m not on my computer, but you could try a blend if based on the green channel? https://youtu.be/-6YJiTbx1SM?si=lgPZnOoIAoHJ29GN

Discover Photoshop's hidden gem—the "Blend If" feature! In just minutes, learn how to blend layers based on luminosity and color for professional-level edits that will wow your audience.
Get access to Jesús' free Blend If Photoshop practice file:
https://adobe.ly/blendif
This video is part of an 8-part Photoshop series with professional photo ...
Stop spamming or you will be removed
hello does anyone know how to do this alpha thing in photoshop so my pixels are locked on the same area but on a different layer?

Is your screenshot Photoshop?
krita
Hi clipping masks? https://helpx.adobe.com/photoshop-elements/using/clipping-masks.html
Because the system might not be the same
yeah i know, but i need that effect on ps
The opacity of one layer controls another.
ty ill go check that :)
Gave +1 Creative Carma to @hushed niche (current: #15 - 155)
Generally, an Alpha channel is a saved selection (select>save selection) but I am not sure that's what you want here
There are also opacity locks on the layer panel, so that you protect pixels.
i mean that i have my base of a shape, but i want to put shades on it on a different layer, but dont want them to come out of the shape
So that's what @hushed niche pointed out. But it's not called alpha in Photoshop
i clipped them but the line still comes out of the shape of pants? i dont understand 😭

Create your shape, then the other layers immediately on top, and then right click to create a clipping mask

Do that for all the layers on top of your shape
You'll get that kind of thing, all the layers that have been clipped will have their visible content restricted to the shape they are being clipped on

<3 ur my hero
@hushed niche might want a share of the award! 😅
ur both my heroes ty, im so lame in photoshop its too complicated lol
BTW that works with groups as well you can clip to groups
Well, let's be honest, Photoshop is a professional software, there is a lot to learn, you need to go at your own pace and do not expect to know everything in a week. It's not possible. I've been at it for more than 20 years and I'm still learning thinmgs!

the funniest thing was that i couldnt find airbrush for a week and it was just soft round brush lmao
There is an airbrush setting in the brushes top bar
thank you! it will safe so much time
Gave +1 Creative Carma to @vapid flume (current: #7 - 901)
You're welcome!
Hey all, How can I "Upscale" my image in photoshop? Ive been using the AI online tools for some time now, but Id like to learn how to do it in PS, since AI makes the text weird and everything is quite unrealistic...
Usually my images are 500kb, when saved from an online source, and normal photo which is taken with your own phone is 2000KB+, so how do I manage to do that? Thanks!!
There are multiple methods in PS, there is even an AI upscaler within it, which from my own trials I think is better than Upskayl (but more complex to use)
A caveat: Upscaling is always "wrong" from the point of view of good practice. Any way you look at it, you're asking a software to invent pixels when there are none, problems will always occur
The method you use will depend on the level of magnification you require. The easiest to use VS the best result is IMHO the super zoom neural filter
You probably have to download it first... (Little cloud icon next to it)


Once you've played with the settings, (X zoom image: Click on the magnifying glass icon to increase the size)
Apply the filter and you'll see your image cropped. FEAR NOT!
Just go to image>reaveal all and you'll see yourimage in its entirety
Other methods include simply increase the image size with Image>image size and ticking the resample option

and using ACR with Bridge to run the "super resolution" option (It's the one that gives the best results, but only works for X2 magnification)


Will try, thanks!
Gave +1 Creative Carma to @vapid flume (current: #7 - 902)
That’s the one I go for usually. Any pretext to use bridge and ACR is a good one 😉
Yes, fake internet points. Nah, glad that the hive mind could help!
USE BRIDGE... or ELSE!
Why don't people use bridge more often, I wonder
It still bears that reputation of being a slow program, vs ACDsee of years ago, but while forgetting the color management, etc.
I often share the bridge additional pdf of Martin Evening’s ps for photographers. An eye opener!
Yes, I think there are some tweaks to be done within Bridge, but I don't find it any more or less slow than Lightroom is TBH. I couldn't live without it.
How can I disable when I zoom in a lot, it'll display the pixel grid? This makes it hard to see what I'm doing precisely if it's so gray.

You can't really disable it, but you can come pretty close by changing the colours, here

go to EDIT > Preferences> Transparency and gamut
It's Photoshop menu, then preferences on a Mac
Didn't work unfortunately. But thanks!
Gave +1 Creative Carma to @vapid flume (current: #7 - 903)
I think I misuenderstood your question. I thought you were looking at the transparency grid, while you want the pixel grid to disapear
Try to hit CTRL +' (That's the key with the @ on it on a UK keyboard)


See if this guy helps
https://www.youtube.com/watch?v=8MKoxp1fZFU
In this video, I will show you how To Remove pixel grid lines when zoomed in to an image in Photoshop CC 2023. To remove the pixel grid in Photoshop, go to View / Show / Pixel Grid. This will toggle the visibility of the pixel grid on your canvas. You can also press Command + ' (Mac) or Control + ' (Windows) for the same result.
Tuesday's 2 Min...
Also bonus question, how on earth do I do perspectives? In GIMP, there's a tool you can use to change the image perspective. But every tutorial I see, it's always perspective warp,. Which isn't what I'm looking for.
Will do!
It would be with the vanishing point filter
Huh?
The Vanishing Point Filter and Perspective | Photoshop CC Tutorial | EASY
This Photoshop CC Tutorial discusses how to use the Vanishing Point Filter to add images, text and graphics to a photograph while maintaining proper perspective. This Photoshop tool allows us to create a simple grid and panels based on the perspective of your current image...
You can also find it in the help files if you search for "perspective"
Man, I'm never gonna be able to truly learn Photoshop if mundane things universal in every other software is changed to something like "vanishing point filter". No way I'd ever figure this out 😭
Thank ya, again!
Yes, but we got CMYK 🙂
True...
That's why we're here!
Every software is different and the way they handle things differ because they come at it from a different perspective (pun intended)
Photoshop was built to retouch photos (It's the 35th anniversary today and the first thing that someone has done with Photoshop was retouching a photo)
The interface was built for that, referencing analogue tools converted into digital so that people could easily transfer their skills from the lab to the computer. It has evolved to be the behemoth that it is today, but at heart, it still cater 100% for people who use it to retouch and composite.
HAPPY BIRTHDAY PHOTOSHOP! 🎂

Yeeh, I also don't know if this is the one either. Because what this is doing is angling for a placement on some object. I meant this in GIMP:
Perspective transform

Yes, that. I cannot find it-
I would try free transform as well, I prefer having all 4 controls
Aye, captain! Will do!
it's in edit BTW!
It's kinda hard for me to adapt to the fact some tools and options are behind these tabs instead of being in my toolbar. 😅
You can also find them, most time, by right clicking

and CTRL+T (assuming you're on Windows) to enter the transform workflow
Noted! Thank ya again!
Gave +1 Creative Carma to @vapid flume (current: #7 - 904)
You're welcome!

Do you want to learn how to do it, or that someone do it for you?
You absolutely need to be more precise in what you want. Do you want to learn how to draw these on a computer, or how to transfer those designs into a photo of a jacket.
What kind of prior knowledge of Photoshop do you have?
Do you have some examples of what you want it to look like?
I’d just like to make my drawings in ps.
I’m like avarage at photoshop.
I just don’t really know what the best way is to remake my “sketch” into photoshop.
I know how to insert the drawing, but i don’t know how to start making it “more realistic”
Talking about transforming my sketch into a desired design
Hi, where are the glyph settings for typography located in photoshop?
it's in window > characters

Thank you so much
Gave +1 Creative Carma to @vapid flume (current: #7 - 905)
Well as I said it depends on what you really want to do: Just drawing what you got here but in digital, and in that case all you need to learn really is how to use brushes and basic document layout
https://www.youtube.com/watch?v=KhP3RnAa82w
Or create designs like these


Learn the basics of Digital painting in under 5 minutes! This is a beginner tutorial video in which I will show you how to paint in Photoshop using the basic tools and techniques. You'll learn the brush tool, the eraser tool, custom brushes, hue, saturation and Brightness slider, colour swatches, eye dropper tool and blending. I use Wacom Intuos...
Really a few examples/references of what you want to do would go a long way
View>show>pixel grid
To find something, like a tool or a filter on Photoshop, use Ctrl+F to find it.
Right clicking is underrated, it has so much power, right under your fingertips!
Thank you very much!
Have a nice day
Gave +1 Creative Carma to @vapid flume (current: #7 - 906)
this shapes

Turn down the Smoothing setting in the Options bar.
Thank you!
Gave +1 Creative Carma to @hushed niche (current: #15 - 156)
Hey just wondering, is there anyway to recover projects from like 3 or so years ago?
Did you save them to the Creative Cloud?
If not, then probably not.
What do you mean? I mean I remember saving all the projects and then downloading them but that was on an old pc so, I don't recall ever using a onedrive or anything though
Many Adobe subscriptions come with cloud storage. People save data there. If you didn't save the projects in question there or somewhere else, then I'm not sure what you're expecting.
Yeah I tried looking in files it was saying there wasnt anything there
question for yall rergarding printing, i personally have not been able to tell it apart but, when making small flyers is there a difference between working in photoshop in 300dpi vs illustrator at the same flyer size?
This is why people make periodic backups of important files.
<@&548221840750018590>
Sorry. I use Photoshop. Not GIMP. You should go check their documentation. We don't support products from other manufacturers here. Sorry.
Gave +1 Creative Carma to @ripe quest (current: #2 - 2711)
Cool. I'm glad I could help and that you were able to learn something useful.
If you want to make a project request, please post that sort of thing in the #💬chat-general channel along with the images and a brief description of what you want done.
And also delete that stuff from here so we're not having the same conversation in multiple channels. 
Thanks!
why my text is so pixelated? how do i change it?

which one should i use?

or which one is the default one
I have a background fire effect for my text, but I have no clue how to make it stand out and shine brighter than the actual thing. First image shows both the highlight and text, and second is the highlight I want to be brightened and make a shine. How could I do that?


pick the one that suits you most, I personally like 'crisp'
Many ways to do this.
You could double click the layer you want brightened and add an outer glow
You could add an adjustment layer (levels or curves) and make it brighter like that
You could scroll through blending modes until you find something bright (maybe color dodge, screen, Vivid/Hard Light)
Alright, so for the glow, just do gaussian?
that blurs, not brightens
hey i need some assistance
for some reason whenever i save my photoshop file into any format, parts of the text looks different to how its supposed to how its supposed to look in the photoshop preview
this is how i want it to look

can you share an example?
and this is how it looks when saved

as you can see the text is a lot thinner in a lot of areas with weird lines in some boxes
ive made 5 other images for this magazine and not had this issue, only with this front cover
the shadow seems to be smaller, how are you saving the file? are you exporting it with any specific settings?

just make sure the dpi you export in is the same of the project
how do i check my dpi?
found it
Just got a Chromebook cause I couldn’t get my MacBook to work, having trouble with it currently but so far I can tell it’s a lot nicer. Can anyone let me know what to do to turn on a Chromebook?


@sly hawk
Uh okay so I know the Chromebook’s have a different turn on mechanism than the other computers but this one didn’t come with a construction manual or anything
The only joke is this computer man, you’re right it isn’t good
The button that says “Do not press” is the only one I haven’t messed with
Button to turn it on is your "do not press" button
A chromebook won't run usual desktop photoshop anyway
How do I press it safely?
I’m using a 3rd party photoshop app
With your face... or finger. Your choice.
Okay, so like I press it with my nose and it will turn on?
Go for it.
I'm done. Bye!
That’s what the other guys said too jeez
So do I sell my Chromebook now too or what
Me rn

This is Adobe Photoshop. We don't do "hardware tech support." Sorry.
Just ban me already man 🥲 if yall can’t help me turn on my Chromebook, then yall can’t help me turn on my will to ask questions anymore
Enters alcohol anonymous meeting:
"hey guys my dog has fleas, fix pls"
hello everyone, I have my logo traced in photoshop, but for some reason there are no defined points? (here's a test image to show the difference)


Unfortunately, you do not show your entire screen (Tool Bar, Layers Panel ...)
A shot in the dark -> Press the ‘A’ key
beat me to it 🙂
Just to illustrate what @tame cape has already said, select one of the path selection tool ( shortcut A) .
Path selection tool to select a whole path, Direct selection tool to select only anchor points.
Voilà!
what the texture in side pleas i searched but i can found it 😦


i wan same like that pleas pepole ❤️

I would probably use such or similar search terms.

how i can make same sitting
?
marbling vector blue
section [images]
No I mean the way to merge with the logo for texture
Start with a text that serves as a cutting mask for your structure