#❓ask-a-question
1 messages · Page 107 of 1
Maybe Adobe's TIFF filter is jacked up. Could be a bug. Difficult to know.
Its weird that windows can read it correctly
Windows is so 1997 too! :D
Right
If Microsoft had their way, we'd still be using BMP files. :D
I need this project done soon, atleast after effects is coming in clutch
Good luck!
Thanks 😄
Are we sure the alpha channel isn't there though? Like have you looked at the Channels Panel for one of the TIFFs? Just as a sanity check?
Channels Panel in photoshop?
Window > Channels...


OK. Straight up ain't there.
Lol
Maybe a plugin that reads it better?
Free Windows Photoshop extension plugins to support additional Graphic Arts TIFF and BigTIFF composite halftone and NColor formats.
Mhmm
Maybe this could fix it
Never heard of it but who knows.
Ehh "Not Secure Site"
yo im tryna figure this out
im tryna use the halfton pattern in filter gallery but whenever i use it, it just turns white

Anyone knows how to recreate this background?

What color is the silhouette to begin with?

There are multiple elements in there. Its not going to be some "simple" explanation.
and its supposed to be something like this

Im just trying to figure out how to do the bottom blue bit.
the circle at the bottom?
behind the bike?
This

yeah semi circle
Draw Vector Shape > Ellipse Tool. Assign a Gradient to it.
yea that
did u ever figure this out ? @ripe quest
This doesn't have a halftone applied. It just looks like Posterization or a Threshold adjustment.
it does

AhHhh okay thanks
Gave +1 Creative Carma to @ripe quest (current: #3 - 2646)
Convert your Redeemer Layer to a Smart Object. Then try to apply the Halftone to it.
it kinda worked

You could try Filter > Pixelate > Color Halftone...
I think you're going to need a larger image though. I had to really blow this up to make the halftone visible.
alr holup
Also, its not great detail so its going to suffer a bit there too.
Hey guys! Does anybody know how to recreate this effect in illustator?

You might want to ask in the Adobe Illustrator Discord: https://www.discord.gg/adobeillustrator
i finally found a plugin, thank you so much tho
What are your foreground and background colors? It is not visible on the screenshot?
What are the other options available under format?
I think that Adobe follows too closely the specs of the tiff file, as it is a format they created…

Ok, that is the bit depth… no options for alpha channel? Please show a capture of the entire menu.
Nope!
There seems to be a tiff+alpha option: https://forums.autodesk.com/t5/maya-shading-lighting-and/help-with-alpha-channel-using-tif-fin-maya/td-p/7669241
Autodesk Community
Hi, I'm new(ish) to Maya and I'm trying to render out a sequence to overlay onto a video I shot earlier. I have rendered out the sequence using both PNG and then TIFF and what should be transparent is black. I'm probably missing something here, do I need to render out something else or is there a way to render out the files so that I can jus...
I was wondering how I could get rid of these white outline on the palm tree thanks

Since it seems to be just a silhouette, I would fill the shape with black
Try with the layer styles > Colour overlay.
Of course the result depends on how you got there first

Anyone has any tips on how to improve this poster?

You will need to ask in #📝project-feedback
I'll start with the text though. We can't see what's written at all!
you need to write that weblink with a better contrast
Yeah i was thinking about that too, but i didnt know what colour to make it
You don't have to change the colour necessarily. Contrast is about the difference in tone between the foreground and the background. So you may have to change the background.
I don't know what this background is, and why there is crumbled paper here (I understand it looks nice, but what does it means beyond being nice? In that context?)
The simple thing you can do is to create a stroke around your black text (search for layer styles in the help files) so the black parts of your background will be hidden by a white stroke
I would also rethink the font. It's very condensed is not particularly readable
What background would you say to try and use ?(what style ?)
1st ask yourself the question what is it for?
What audience, who will read it?
I cannot make those decisions for you, but you should ask yourself why each element in your design is there, and does it make sense for people who see it.
Those questions are useless if you're making a work of art, but if your end goal is making a design for others to see it and act on it (say, for example, visit the website) then you need to think about those people.
It's not about what looks nice (that is your opinion alone), but what others see.
I know nothing about bikes, but the little I know I will say that crumbled paper makes not much sense here. But obviously I am not your audience, so go with what makes sense to the people who will read this poster
Ok I understand thank you
Sorry for the late reply, thx the small vid. The thing is, you did the editing using an image, I want to be able to edit my text directly. If I could convert the text to image, then back to text that would be a different story. I somewhat managed to make it look the way I wanted to but it's not really optimal
Gave +1 Creative Carma to @ripe quest (current: #3 - 2647)
Does anyone know why this error pops up when I want to use the generate fill tool?

Then you should've explained how it was set up. I was going on the info that I had. Also, if you have that graphic a as font or vector graphic, then it should be simple to manipulate.
Are you signed in to your Adobe Account? What sort of Layer is it? Feel free to share the entire screen so the Layers Panel is visible.
Could be a feature that can't run due to your computer below required specifications. Could be wrong though, so if anybody has a different solution that fixes this should correct me.
I was able to write a TIFF with an alpha from Photoshop and then load it back into Ps. Also, double-checked in Windows Photos and both seemed to work. I don't have Maya to test so I can't be of help there.

Generative Fill runs in the cloud. Data is sent to Adobe, they process the pixels and send it back. So they either aren't signed in to an Adobe Account, were not connected to the internet when they tried to use the feature or maybe their firewall or VPN is causing some issue.
Hello, why I cant make this part transparend?

The Background Layer is locked. Click on the Lock icon in the Layer Panel.
how can i make my images more "wide" 😇 🗣️🗣️🗣🔥🔥🔥

thank you!
Gave +1 Creative Carma to @ripe quest (current: #3 - 2648)
Hi, how do i use photoshop to creates tshirts such as there

Adobe Illustrator is better for that I think
I think I fixed it thank you
Gave +1 Creative Carma to @serene beacon (current: #966 - 1)
how can i add hue and saturation (or any adjustment) to a group without each layer below it getting the effect?
use clipping mask 
surely there must be another way
you can find tshirt mockups and templates online and they usually come with various layers so that you can embedd your graphics easily
They're flooded on the internet these days. People used to make a lot of money creating nice mockups templates and it was never easy work. Rip, but hey man get with AI or fall behind. I feel for people but I can't get with the mindset to be stuck in an old way
Please show something. Maybe a picture and your structure in the Layers panel.
can you feed ps images so that it generates somewhat similar AI results while also taking into account the overall image style, texture, lighting and so on ?
Hi! How can I achieve this camera FNAF style-static?

Lets I want to generate the image of clown with specific traits and colors. So I feed several clown images with similar vibes. My background is a grass field
I was thinking about perlin noise, but I tried and it didn't exactly come out that good.
huh? clipping does exactly the thing you want. unless you want something else?
yes, you can also do it directly with the Firefly
this is basically a horizontally stretched noise with some kind of distortion effect applied
will check it out !
anyone know how to crop a photoshop without screenshotting it?
Sorry. "Crop a Photoshop?"
I wanna crop this design I made but I cant seem to figure it out

press C to select the crop tool 
Hi


I want to make it like

When I put this globe,
it only changes the sky
and not the stadium

Learn how to easily replace skies in Photoshop 📝 GET THE FREE LESSON PDF here 👉 https://bwillcreative.ck.page/941798efa0
👨🏫 JOIN MY ONLINE PHOTOSHOP COURSE: https://www.bwillcreative.com/21-day-photoshop-expert/
✏️ MASTER PHOTOSHOP SELECTIONS IN THIS COURSE: https://www.bwillcreative.com/selections-made-simple-photoshop-course/
🌐 *VISI...
I know how to change the sky bro
Bro....
What's the issue then? You were not very clear.
No, photoshop for that is fine!
I think they want the sky replacement to modify the appearance of the stadium too.
The best I could guess.
I'll let somebody else deliver the bad news.

I need help with fixing this image...its super over exposed
i tried just lowering the exposure/brightness and other adjustment tools but you see those bright blotches on their faces
I took 6 sample points to explain why you won't be able to save this image... There too many burnt areas on faces... Low S values (saturation) + High B Values (Brightness) = White....

You may want to adjust each person individually...

There are spots that are just too washed out though. There is no detail there to recover.
i figured that this couldn't be saved...too much exposure
im not sure whoever took the photos didnt adjust their own camera settings lol
thank you a lot though guys
Maybe they didn't master this particular camera?
If you take photos in Jpegs the tone range can be extremely narrow, meaning that one bad step and you're doomed. That's why most people who know a bit about their camera whioll shoot in what is called Raw, meaning direct from the camera. The sensor on most recent camera have a tone range that is way broader than what a standard JPEG can cover, meaning that you can correct an over exposition by an "under exposure" in post production
On a jpeg, what you see is what you get
Of course, even Raw files have a limit, but you generally can recover things
Hi … I want ask about the mockup,, why photoshop don't have mockup like illustrator,, esay
Good question, but I doubt you will get an answer here, unless someone from the Adobe dev team turns up!
Most people will create their mock ups in Photoshop with smart objects and stuff (in the case of fabrics etc) the result is way better in Photoshop if you use the "blend if" features and displacement maps
Those in illustrator work well for hard surfaces, but for soft ones, I'd rather stay in Photoshop!
But you're right, that would be a very cool addition
you can add your vote here! #1093156942647660615
really I have problem with photoshop mockup,, I saw many videos in YouTube and tray to make like video but dos not work, there is something Ronge with me
Keep in mind this, I am used to making mock ups for clients and I can tell you most tutorials are crap
I say that because most of them explain things in - like - 5 minutes. A good, accurate, well lit mock up takes time.
I tend to do mine with a mixture of 2D and 3D and the thing is even something really "simple" like a paint can where you have to put many labels on can take up to 1 hour if you start from scratch. Most people don't want to spend that, and people who create tutorials know it. Hence the "make a mock up in 5 minutes" BS
So it's not necessarily your fault, you need to find tutorials that explain things, in details, and take the right time to do it
The best advice I can give you is reverse-engineering
Find a good, already done, mock up (so depends on the style you want), if you have to buy one, do it, and then open it and dissect how it works.
That's how I learned
I design the visual identity of the logo, Pattern, decorations and logos, and I do not know how to apply it to the mockup in Photoshop to make it realistic and approved by the customer.
The problem of the illustrator is limited in models and does not have the property of adding materials.
Have you tried to do that witha mock up that has already been created?
What kind of products do you need your logos on?
Yes, I applied it in the Isellator.
Medical clinic specializing in kidney and urology surgery
Yes, that's quite a niche thing.
Not sure you can ind one specically for this (whatever that is!)
I downlod vector mockup
How does it look like?
I generally don't download things 🙂
I had a look with the number
They're not really realistic aren't they?
You can find some directly in Photoshop
Go to file > New and search in "print"
THese are Photographic source, and that's what we call a real mock up

UNless you don't want it realistic
Test this one from Adobe stock: It's free
https://stock.adobe.com/uk/images/white-stationery-set-on-light-background/135061391
Adobe Stock
Download White stationery set on light background Stock Photo and explore similar images at Adobe Stock
Adobe Stock
Download Set of items for branding on grey background Stock Photo and explore similar images at Adobe Stock
But these aren't real mock ups. They are photos you can use to create your own mock ups
can someone make a photo of a pufferfish with the Chinese hat thing
If you want a real mock -up, you need to search for templates
Ask in #💬chat-general , unles you want to learn how to do it!
Ok thank you
Hey, need some quick help, what are these types of images/the "filter" called? And how do you make them?
I've used to do this a long time ago but I completely forgot how to, it feels so simple but I'm blanking hard right now

This is a template @hushed moth
so it comes as a Photoshop file, in this case PSDT (T stands for template)
https://stock.adobe.com/uk/templates/stationery-branding-scene-mockup/119308515

Looks like something drawn with the pen tool (looks like vector paths)
As to what they are called, I have no idea. When you drop it to Google images, what are the kind of results that you get? (or you can do that with Pinterest as well)
"vinyl decal" comes up a lot

Google Images isn't any help, trying to search for this just gives me suggestions of different ideas with the name of the actual depiction in the art. I may have done in Illustrator? It has been so long since I used creative cloud I completely forgot everything
Yes, illustrator seems like the natural contender
I do vividly remember being able to put any simple image in and pressing a button to transform it into that
Can't for the life of me remember the name tho.
Oh Ok, so it's in Illustrator and it's the auto trace feature
oh my god thank you I was going insane over this

How to Auto Trace an Image in Illustrator in 60 seconds is one of those things you can easily master in a matter of seconds! And we want to help you get there!
🛎 Subscribe for more tips just like this: http://bit.ly/ulearn-subscribe
You have found a logo that is an image. No vector logo exists. And well, you are not an expert in drawing in Il...
I was searching for the style while you were looking for the technique! 🙂
I'm not sure if it has an actual name, but the "how" was basically all I needed so thank you!
thank you🙂
Gave +1 Creative Carma to @vapid flume (current: #8 - 880)
Umm, how does that work?
You can use filter - render - clouds and then scale the layer to create something sort of similar
Check something like this out.
https://www.youtube.com/watch?v=sy1w5mTif-E&t=734s

► Join PiXimperfect Pro - The Ultimate Photoshop Training Course: https://pix.live/pro
Learn how to create an easy drag and drop t-shirt mockup template in Photoshop! Just drop your design, and your template instantly matches your graphic with a t-shirt, mug, or any surface! In this tutorial, we'll cover the concept of how a Photoshop template ...
Hey, I was hoping to learn a bit about filters in Photoshop. I'm happy with my picture, but I want to mask some areas I couldn't get quite right like my hair behind a filter. I’d also like to hide my identity a bit more.
I found a filter I liked called Halftone Pattern under Sketch. It looks great, but my issue is that the contrast is too low, which becomes especially noticeable in a smaller profile picture.
I'm not entirely new to Photoshop, but I am new to its filters (I've only ever used Insta and Snow), so I might be missing something basic.
Does anyone know how I can make the darker colors a bit more dark for more of a contrast?

I apologize if this isn't the right area, I'm totally new to the server. 
You could quickly add a Levels Adjustment...
Do you have a reference or inspiration as to what you would want it to sort of look like? My first thought is using levels to "crush" your image a bit


help me my filter galery isnt working

The Filter Effect is off. Toggle it on...

Thanks
Gave +1 Creative Carma to @ripe quest (current: #3 - 2649)
😅
I have a stroke on this text, and I'm wondering if I can make it less blocky/straight edged

I want to have it completely smooth like a bubble
im interested in the background of this image how would i make the wave effect in this?

how could i imitate the text circled where its like looking up if somebody understands me its not just straight its like tilted upwards

would you guys reckon the dark yellow color that drops below LA GARDE is a font or an effect?

It looks simply like the copied text, on a layer benaeth the main one, and offset by a few pixles on the right and bottom
And there is a drop shadow on that one too
Wait, I see connections, so maybe it's more like I said above, but with a blend effect in Illustrator. In any case I don't think it's the font (However you can never be sure, as you can create a font based on those effects anyway).
You can type the text and use either the perpective transform, (edit>transform>perspective transform) or use a filter called "vanishing point", which is a little more tricky to work on, and works better when you have a surface to guide you.
I include this tutorial anyway
https://www.youtube.com/watch?v=w5aMceFycN4
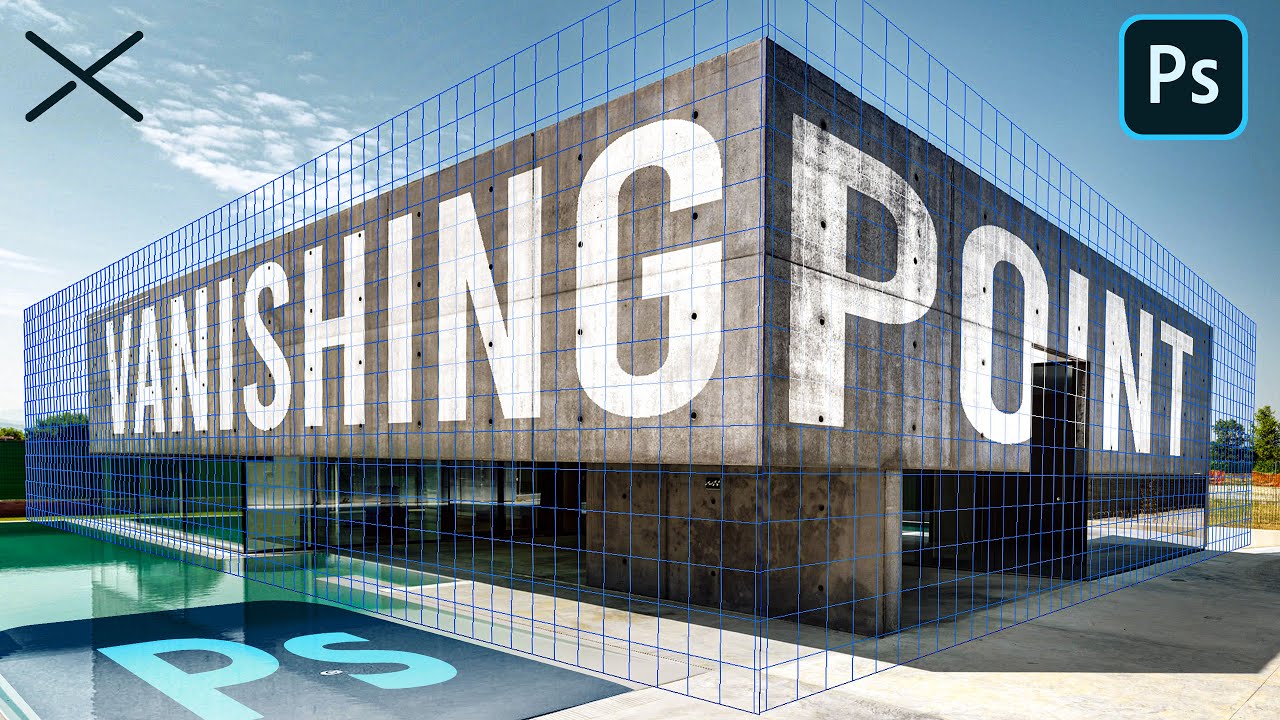
The Vanishing Point Filter and Perspective | Photoshop CC Tutorial | EASY
This Photoshop CC Tutorial discusses how to use the Vanishing Point Filter to add images, text and graphics to a photograph while maintaining proper perspective. This Photoshop tool allows us to create a simple grid and panels based on the perspective of your current image...
It could be different things, simple raster shapes that have been distorted with the smudge tool (with "finger painting " on), or it could be the same shapes distorted with a filter (for example "waves" or similar)

All these filters could work, combined...

Hi @frozen magnet
One way to achieve a similar result (with Live Text in Illustrator)

hey so i just removed an exit sign, and i cant figure out how I would remove the marked areas to match

hey when i edit raw files my screen looks different to others with less features does anyone know why?
mine:

others:

You're using an old version of Photoshop and Adobe Camera Raw.
Probably some combination of painting, Clone Stamp and the Remove Tool
Can you please show the unedited picture? (Manipulations on already edited images are usually more difficult)

FOr the exit sign I would suggest you to use Generative fill to avoid the big dark blob.
For Red reflection you can use a hue and saturation Adjustment layer then target the Reds > reduce saturation.
For better result you'll have to reduce Magentas too then mask the adjustment layer to bring back Reds where you want.
thanks a lot bro 🙂
time to open the wallet again
Thank you!
Gave +1 Creative Carma to @vapid flume (current: #8 - 882)
also works in PS, albeit a little more complicated

Yo guys.
I'm trying to do a compositing for merging these two image (the mask on the second image to the face of the girl in the 2nd image).
I tryed this but as you can see it's not realistic. Do someone know what's missing ?


you have to fix the shadow and cutout
you can also use firefly to fix the issue.
the shadow under the mask ? or create a shadow on it ?
under the mask

Two biggest problems I see and that are easy to fix:
1- Your mask is too bright when you compare with the model picture> you can fix with Curves adjustment layer.
2- Realistic cast and drop shadows must be added to sell the realism...
Here is a short video to illustrate my words...
My subscription is too expensive, I pay 67€ each month for all creative cloud but I only use a few softwares. why isnt there a cheaper subscription for only photoshop illustrator and id ?
I want a cheaper subscription with only the apps I use, please make more different formulas
i need illustrator so I cant subscribe to the photo offer, and I cant afford 67€ each month
Hello. You'll have to contact Adobe Customer Care about your concerns with the CC Plans and Subscription prices. We can't do anything about that here. Sorry!
Hey everyone, I edited this picture in Lightroom, and for context, when I took this picture, I only had my phone with me (not my camera), and so you can see that the bokéh it produced is very uneven. I made general adjustments in Lightroom, but now I’m planning to move it into Photoshop. Does anyone know how to brush bokéh in photoshop? Thanks!

You can download some free premade bokeh brushes on the internet like these below https://www.brusheezy.com/brushes/40450-24-abstract-bokeh-brushes
Then paint with a bright color on a layer and use one of the lighten mode (Lighten, screen, Colordodge...etc)
Thanks a lot ❤️
Gave +1 Creative Carma to @viral palm (current: #9 - 687)
@viral palm Hi Franck. I did again with your tips, its a lot better now. But it seems again not real here even after the tips, do you have some clue ? thanks 😉
It's really good actually but it seems like the mask is not in 3D

Gave +1 Creative Carma to @viral palm (current: #9 - 688)
Anyone know how to turn manga panel and give it coloring
Think @ripe quest already replied you in chat general... Please avoid posting the same question in several channels
You should distort the mask a bit. Turn your mask layer in smart object then use "transform/warp" or "Filter/Liquify" to sell the effect ... Hard to make a clear video without the layered file... The idea is to distort the mask to let it follow the shape of the face.

Weird question
Can I ask about After Effects here?
Or is that a different discord?
@viral palm insane thanks again, it works for me 😉
Gave +1 Creative Carma to @viral palm (current: #9 - 689)
thank you
Gave +1 Creative Carma to @vapid flume (current: #8 - 883)
also for this graphic is this black and white from editing or is it the render its self because its black and white but colorized like red letters on the shirt

For after effects question you should try the Adobe Video server https://discord.gg/adobepremiere
thank you
Gave +1 Creative Carma to @viral palm (current: #9 - 690)
Is there a question here? If so, I'm not sure to understand... Could you clarify?
so the photo is black and white but the text on the shirt is red or the earings or how some parts of the photo are actually colored
You can create a blank layer over the Black and White one the paint with color on it.
If you want the color to be applied over whites only set the blend mode of the layer where you're painting on to "Multiply".
also, the mask is way too high up. in the original picture it reached just below her cheeks
@cedar kestrel which original picture ?
this one?
oh yes right sorry
Hello, is here someone who can remove people from my picture and add to girl mob from the game, please? 😄
I am not really sure where to introduce myself but I work on Mesh clothing design for avatars where I sometimes use substance but I also love to stay with Photoshop as it has been my friend for a long time. I am just a tad puzzled with a technique.
Hi there, I'm new to Photoshop, and the version I have is the newest but the digital artists use another version, but I don't know which version it is. I bought a course for digital art but I can't follow the tutorials because I don't have the same version 🥲
Hello, how do I fix this?

Find the missing font online
Minecraft is pretty popular so the font shouldn't be too difficult to find
Or, if the original font is not that important, replace the text
I believe this channel is more meant for technical questions related to using Photoshop.
Actually you can still use the newer Photoshop and save under a compatible format so it can still be read in the older Photoshop.
Otherwise, find out which version they use and find a copy.
Or, use tutorials and videos online to find your own way, it isn't that difficult. It is a matter of doing.
I also have a question
Exporting in svg vector graphics in illustrator ruins alignments


I'd like to find out more about the cause of this issue
I have no idea what's causing it
Are you sure it is Photoshop, and not Fresco? Fresco is more commonly used for digital art.
No, it is used for all questions related to Photoshop.
I uploaded the 2023 version because, according to Copilot, that's the version artists use, but there are more versions like 2023.01, etc. And it wasn't exactly the same version so I'll try until I get the right version XD, also I already asked in the tutorials but the probability of getting an answer is low anyway thank you so much for your tips 🫶
Gave +1 Creative Carma to @formal sun (current: #966 - 1)
It's Photoshop 😭 but thank you
Copilot doesn't have any way to know what version of Photoshop that most people use. Different people will have any number of different versions installed.
Some people are still running CS6.
People with active subscriptions usually run the latest versions or near to the latest versions. Some of us run both the General Release and the Beta. heh
Exactly, copilot it's not accurate, 🥲 so it mostly depends on the person
Yeah. Don't ask GPTs those types of questions unless you like wrong answers. heh
Oh, I'm new to this, but it makes sense; for now, I need the older versions to follow the tutorials or courses, haha, while I learn. Thank you for the information 🫶
Gave +1 Creative Carma to @ripe quest (current: #3 - 2650)
Sure haha, not happening again
The Creative Cloud app will let you install older versions of Photoshop, back to 22.2.

I'm not sure that's a wise move but whatever you wanna do.
You will, however, find that some of the snazzy new features aren’t in the old versions of course.
You're only allowed to install minor versions in the 25.x-26.x series. or 22.2 which was the final release that still had the old 3D tools.
So I'm not sure how old of an install you're wanting but be aware that certain versions might not be available.
how do i trim this singular layer's canvas down without shrinking the entire project?

Not really sure what that means. The Canvas is the entire document. The Layer is the size of the canvas.
You want to crop the entire canvas?
Crop the canvas to the size of that layer?
Sorry i got confused i thought that layer had extra canvas area when copy and pasted and needed extra trimming, turns out it doesnt need trimming
Thank you so much 🙏🏻✨
Gave +1 Creative Carma to @ripe quest (current: #3 - 2651)
Unless you paint on it, those areas are transparent.
That's right, I'll try the new versions later for editing MUAHAHAHA
You will waste a lot of time that way. 🤷♂️
Noted 🖊 thank you so much for your help
Gave +1 Creative Carma to @ripe quest (current: #3 - 2652)
I want to focus on digital art for now but for editing pictures I know the newest versions are the best
For digital art, Fresco is the way to go. You can do both vector and raster illustrations, cool effects, and It’s also not too far from the Photoshop experience. You can also do animation, and it's FREE!
How do I like put the font into photoshop that I downloaded?
Did you find the font on Adobe fonts, or is it a font file you have on your computer?
Font file on my computer
Are you on PC or Mac?
PC
Ok, open the file
ok
there should be a button in one of the bottom corners that says “install font” or something similar.
Pressed install
Perfect
It should be good to go now. If not, you may have to close and reopen Photoshop.
It worked thank you!
Fonts are either installed in Windows directly or via Adobe Fonts (using the Creative Cloud app or their website fonts.adobe.com).
If you downloaded some font to your computer, you can just right-click on the font file and choose "Install for all users"
Generally, you just need to restart the app if its open. Sometimes you need to reboot Windows.
Sometimes, it will just go right on smoothly and you won’t have to reboot anything.
It varies.
When is the live co editing private beta gonna be a public beta ?
I signed up for it but never got the invitation that’s y
What's the best way to go about applying wear and tear / a grime overlay to this text?

I'd recommend masking and create the effects in another layer for easy editing
yuh, that was the plan. Should I be using another image for it though? Or like a type of font? Just wanted some alternative ways
It really depends on the goals for your project. Will you print the final result or use it digitally? For printing you need a high resolution pixel image or vector shape preferably. For vector graphics illustrator would be more appropriate.
(fonts actually are vector graphics in most cases)
Digitally, as a decal in Source
Photoshop should be sufficient for this.

Are you on an artboard? I could tell if you show me the layers panel

The best thing is if you could show the whole window
ill ss the whole thing
You are in an artboard 🙂

:0
Reveal all does not work on artboard, if you want to reaveal what's outside an artboard you need to increase the size of the artboard , in the properties panel

so is there no way to having images to the side of the artbaord without increasing it?
No, not in Photoshop. Photoshop doesn't have a paste board like Illustrator does (unfortunately)
No worries. You need to decide if you neally need to work with artboards. If not, maybe they aren't worth the trouble?
It's absolutely not manadatory. I rarely work with artboard, unless I need to craete multiple documents within the same file, which is not very often
i saw some tutorial show that i needed to do an artboard to do something else to show the images off the canvas butit just didnt work
This is typically how you would use artboards
as in here I have 3 artboards, that I will export as 3 different PNGs

That said, maybe there is a way to make the outside visible (if only dimmed?)
Let me check that for you. Have you checked the help files?
I have not
When I use CROP it makes it blurry.. is this a bug?

OK, when you use "reveal all" did you highlighted the relevant artboard?
I am asking as apparently it should work, but not when the artboard isn't highlighted

sorry i got rid of that save
ive just started again
doin geach image individually
I'm checking that one
NO worries.
Drop it it looks like it used to work in the past, but not anymore. Maybe your tutorial is an old one?
https://community.adobe.com/t5/photoshop-ecosystem-discussions/how-to-make-objects-outside-the-canvas-visible-in-photoshop/td-p/3134102
Check that one
Tutorials older than say 3 years should be taken with a grain of salt, particularly if they focus on features as opposite to workflows
It depends if you use crop and change the size or just crop.
Can you clarify how do you crop as well as if you're changing the size as well? (a screenshot of the whole interface will do)
I uste the crop tool to adjust the size of the canvast to match the art but then it gets blurry and small

By using this fields, you indicate that you want to change the size. If you don't want that, you need to delete what's inside

Do you just want to remove the transparent pixels? If so, just use "image">"trim"
it's quicker! 🙂

Thanks so much!
Gave +1 Creative Carma to @viral palm (current: #9 - 691)
how do i make a white on a picture 0% opacity its black and white picture
Using Blending opition/Blend if seems to be thr easiest way for me. Here is quick video to illustrate my words.
Please don't post the same question multiple times/in multiple channels.
sorry bout that
Is there a way to get the transparent pixels to a solid colour?

What do you mean by transparent pixels? Partially transparent pixels I suppose... Like dark blue pixels on your image are "aqua blue" with a low opacity... Am I right
Yes
hum... Not an easy one... Could you share the layer you want to "recolor" in png format?
I have 27 of them that needs doing
hey what tool would you recommend to make the eyes appear naturally more happy as if someone is smiling ? So far I've used lasso tool combined with Pupped Warp, Liquify tool, Neural Filters. Even tried generative fill with only the prompt, or by using strokes, reference images by overlapping them and dimming the opacity. None of it gives a real satisfying result.
Understood... I just asked to help us find a way to do what you want... 1 is enough.
If we find a way to proceed you'll just have to repeat the steps for the others...

Did you try to use "Neural filter/ Smart Protrait"?
You want the whole design the same solid color?
Not really, i print on to clothing and my printer doesn't understand transparent pixels so it prints a solid white instead, if i remove the transparent pixels than half the image is gone so not sure what i can do tbh
Yes, but it gives out a uncanny feeling tbh. I'd like my model to have fine lines too. Something like this but with eyes a bit more open as if he was excited/energized too

@broken pilot - Please don't DM people. If you have questions, you can ask them here.
okay, sorry
i’m willing to pay anyone who can make an edit in photoshop for me.
not a question but still
OK. Briefly describe the project/goals in #💬chat-general and if someone is interested in working on it, they will probably reach out to you.
You can try this technique and see if it works for your application.
Thanks, But i need to try keep the colour they have sent it in
Gave +1 Creative Carma to @viral palm (current: #9 - 692)
Sorry, I can't find how to get what you want with this image...
Perhaps someone else here would find a way...
No worries, appreciate you taking your time to try help at least
@viral palm just so you know I've tried a couple of online tools specifically made for altering the expressions and seems to work pretty well. Only the quality is a bit low
Can you not do something with a mask and and a threshold adjustment?
Even after reading the conversation I'm not that clear with what you want to achieve.
If you can please share a full image and the goal again, I'll try to help too.
You also can combine Neural filter with the liquify filter/face aware liquify to tweak your result.
Notes: 1- change your layer to Smart Object before to get afterward control. 2- Avoid extreme settings to keep the result realistic...
Guys, can anyone experienced here help me out? It's very urgent and for a Media Studies project that I'm having issues editing.
I'm making a concept film poster and one of the characters is clipping through the trees in the background and I can't remove the shadow effect.
When I scale up pixel art, before clicking done it looks like it is gonna stay the same sharpness as it was before but when I click done, it gets blurry. How do I make it look like it does before I click done after I scale it up?


Make a fragment shader that adds sharpness to screen image and it'll look sharp as knife😇
Sorry, by the way, here's an example of what I mean. You can see the portrait clipping through the trees.

How do I do this 😂 😭 sorry!
- Download minecraft
- Make shaders
- Apply your image to screen
- Apply sharpness effect you made
- Screenshot
- Enjoy😇😇😊😊
Not sure to understand... You want the trees to clip over the character shape only?
lmao
Does anyone actually know how to fix this though?
the thing I noticed is that I focused too much on the eye while completely forgetting about the other parts of the face and when someone smiles it changes alot ! I defenitely did try the first two tools you listed, smart object is a nice tip didn't think about it. Facial expressions aren't easy at all honestly
now i'm quit happy with the result i got
Haha, sorry for the lack of clarification. The whole character portrait is currently over the trees but since I faded some of it, the shadowing effect is still present. Is there any way to remove this effect?
Happy to ear you've found a way to make things work for you!
Here's a comparative example without the character present. :)

So yeah, the character clipping behind the trees would probably be ideal.
Looks like your character layer have a special blending mode (Multiply maybe...)... Am I right? If so try to set its blending mode to normal.
Yeah, I had it set to color burn as I thought the blend looked cool. Normal gives this result:

I can see trees over the character so I presume your Character layer is below Trees and clouds in your layer panel.
Trying to understand, sorry for my dumb questions: You'd like to get a Solid Red and Black charater shape in front and Trees+Clouds in Background?
It's alright, editing is complicated aha. Yes, your assumption is correct! :)
And my trees are actually in the 'main background' layer.
Can you share here the character you're using in png?
Yeah, the original image?
Yes,
I could try to show you how I would tackle that
Can I send it in DM's? It's an image of a relative who was kind enough to help me lol.
i have this image that i brought in from another window, and its like 4000 x 2000, but its really pixelated if i scale in? what can i do?

I don't wanna put them out on this server.
Yep!
You need to temporarily accept my friend request, sorry! :)
Ok could you also share a screen shot of the Whole Photoshop UI of the first image you've shared (Solid Red and black character with clipped trees)... Please be sure I can see the layer panel.
Do you want the face to be visible?
Yes, no worries! No, the face must not be visible. :)
One moment.
Do you want the whole image as well or just the layer panel?
Just the layer panel it's ok but the one which gave you this...

@sly hawk@viral palm I think i figured it out

I sent you it. :)
I'm convinced now hahaha, I'll give it a try then 👺🤌🏻 thank you so much
Gave +1 Creative Carma to @static phoenix (current: #206 - 8)
hi want to ask how i can make my illustrator more efficent because when i want to make some designs it randomly close and it happend every time
Happy to hear that! Don't hesitate to share your solution
Your illustrator software keeps **crashing **when you're using it?
Reversed/lowered the threshold, what ever was transparent it made it a sold colour
For example i got 2 files open and when i copy sth from one file to second one and just do 1 one move with that what i just copy my illustrator crashes
where it says outfit how do people make this transparent glow ive tried so many times and different ways and nothing is working

A glow is easy to add...
are you using the layer effects panel @river otter ?
not the glow but its transparent
yeah


Would you say that either of these are 'right'?
based on the effect you're going for?
If so, remember you can change the blend modes of both the fill AND the EFFECTS seperately.

Anyone know the best way to turn this flat sun image to an outline? (empty fill with green stroke around) tried magic wanding and filling but having some trouble
TYIA!

yeah
how to open this or to edit text like this

Gave +1 Creative Carma to @sly hawk (current: #5 - 1094)
I want to paste a transparent PNG into the Vanishing Point, but everytime I paste the transparent PNG into the Vanishing Point tab, the background is always black. Can anyone help?
If your only intention is to edit it and not preserve the signature itself and if this is a handwritten signature, you can use an OCR software to extract the text, then find a similar typeface and rewrite it
no i mean the way he is like warping it where he is moving the text upward on the right side
for realism
Oh you can use the warp tool, perspective warp or puppet warp
ik i tried but it only worked for a certain spot
but ill try that i only tried regular warp
Alright!
how do i merge computer monitor and letter "M" together?
can you guys help me with this? it's going to be in a company name so how do i do that
I'm not sure what u meant by "Merge"
Someone help?
are both files .ai?
And are both files saved on the same version of the ai?
Also i think u could get better assistinance regarding this in Illustrator server
Yes
Both were saved on the same version of ai?
Some files saved on an older version can be incompatible but still open in the newer version
but when u try to edit them they crash teh software
i mean as in a logo. in some way we can put m and monitor together into one object so that we can read the m as well as see the monitor. i want to put this in between a word and use that as a logo you know
the word smile
I want to replaced m here with this object which is a merged version of M and a computer monitor
is there any way to get this align menu for unrasterized type?

Oh i think i got what u meant

If youre interested getting yourself custom made logo, i can make but not for free...
Link etc in my bio ^^
How to create 3D logo using photoshop CS6.Heres my new other logo tutorial:
Photoshop Logo Design Tutorial - TEXT / LETTER LOGO 2017
https://www.youtube.com/watch?v=A7Jl0bkYqFo
Font is called Arcade: http://fontm.com/arcade-font/
If you ...
Watch this from here
Once u have written the text
u just need to create a clipping mask over the alphabet M


how to mirror this well?

i have a task where i have to place a new image over a old packet but i am have trouble doing so and would be very happy if someone could help me
Anyone know what's off about my shadowing? It just looks so bad


I think all this is unnecessary shadow... Look at the laptop some heavy shadow then add reflection and reduce the opacity
Thanks for your help, what do you think of this?

Gave +1 Creative Carma to @crystal elm (current: #966 - 1)
It needs more fixing
If you don't need now I'll try to fix it for you when I'm home okay?
hello, my photoshop just crash and when i try to reopne the file it just says, "data type isnt supported" ? Is there a way to retrieve my file
can someone help me to blend images together

Okay thank you that would be great, do you think you could let me know what you do so i dont have the issue in the future when you get the chance? Also how do I put it into this chat as it exceeds the max file size
Gave +1 Creative Carma to @crystal elm (current: #628 - 2)
plz can someone help me
How can I free up space in the cloud, I’ve 20gb and it’s already full though I don’t have much pics on my iPad and desktop, how can I make sure photos or edits are not save to cloud, rather saved to local ?
Ooh wow you walked right into Adobe's business model :/
On the desktop it's simple, just save-as to a location of your choosing. On the mobile apps, I'm afraid I have no suggestion beyond turnin g off cloud sync, which is obviously going to push things to your Adobe account.
how do i combine those together to make a logo

i am trying to blend these two images together where the image to the left is supposed to be placed on the right image while retaining the look of the right image

Can you elaborate a bit on your question? I found it a bit confusing
Well you see the image on the left? It has to be like the image on the right.
you mean the dark wrapping?
hey
can someone PLEASE help me
its my final presantation tomorrow
and i need help
with Ai or photoshop
@shadow comet can u help me?
is there like set origin for photoshop like the one in blender?
because i want to resize my canvas and snap the rotated, moved image at certain point of the canvas.
I dont understand
Its impossible for someone to help you unless you specify what it is you need help with. Ask specific questions here and if someone knows the answer(s), they will probably reply.
oh
my bad


i need to make these 2 pictures
as a sculpture like the last one
iin other pleaces with people arond it
if someone can help me with it
ion mind if its AI to
i just need to have it ready for tomorrow
What do you mean by "help me with it" exactly?
You'll have to find or generate images to use with those existing images to create the composite.
what do u mean by this
my english its not the best sorry
i mean if like someone can do it for me
could help me with it
I doubt anyone is going to do this for you.
well asking it dosent hurt anybody right
This is channel is for people who are trying to learn how to use Photoshop. Its not for requesting that people do their work
ion have time to learn it its for tomorrow
i know for what is it
thats why i joined to learn
and its not for my work its for my school
You just asked if someone would do this FOR you.
are you listening to what im saying or not
i knwo what this channel is for but im asking for someone to do it for me cus i dont have time to learn it
i cant learn how to do it for tomorrow
i have a presantation tomorrow
so im askijng
Then perhaps you can pay someone to do it.
Get on Fiverr and hire a freelancer, perhaps.
ion have money why u beeing a jeark abt it
im just asking
if no one can help me they will not reply
thats all
no need to make it this big
im just askin for school
It doesn't matter "why" you're asking for free work. The server doesn't exist to fulfill project requests for people. You can post in #💬chat-general, briefly describe exactly what it is that you need. If someone is interested in working on this, they might reach out to you. But there are no guarantees.
Also, you can't SPAM the request there. Make your post and wait to see if anyone responds.
k
Furthermore, if you insult people, start with the name-calling, i.e. calling people a "jerk" for explaining how the server works, you won't be welcome here. I hope that is abundantly clear.
It would be relatively simple to create an image with the Firefly web service using that thing as a Composition Reference. Then bring both images to Photoshop and composite them.

Hey i have a logo for my clothing brand and think it would fit into the surrealism design trend. anyone I could send it to to give me some feedback?
You can post in #📝project-feedback and see if people have ideas/suggestions for you.
Hey sorry if this isn't the right chat, but I'm trying to help my dad design a stick for him and his friends' motorcycle club, but I can't seem to get the text like he wants it.
Is there a setting to make text get progressively smaller like this?
I'm kind of new to photoshop, and can't seem to figure this out sorry. 


I would probably do this with Adobe Illustrator, tbh. Warping and Distorting text in Photoshop probably won't produce the result you're looking for. (I'm guessing)
This is distorting text in Photoshop...

Oh jeez IDK anything about illustrator, but i'll look into it, thanks!
I'll try to get it in the box. 👍🏻

Gave +1 Creative Carma to @ripe quest (current: #3 - 2655)
@ripe quest thank u
Gave +1 Creative Carma to @ripe quest (current: #3 - 2657)
The idea is that you would do it. Visit https://firefly.adobe.com and do the same thing I did.
You need an Adobe Account. You can use it for free on a limited basis. Like 25 image credits per day or something like that.
Thank u
After you sign in to your Adobe Account and visit the Firefly website, this is basically how you could get started...
Changing some of the words in the prompt might be more suitable to get the results you want. For example: "...with people in the background" or something like that.
whenever i expand a circular selection, the circle becomes wonky. is there a better way to expand a circular selection?

https://gyazo.com/efc6d22b65c9f3722555c01ddab216ca
how do i fix this?
lel xd ppe btw
How are you 'expanding' it? I just tried and it expanded as I expected it to...
Fix? - You mean reset it?
Just pick a different gradient from the prebuilt ones...
It gets stuck in the corner
i guess i can just reset it
you just have both opacities over the top of each other
just drag the top left ones to the right
drag them UP perhaps? to remove them?
Select>Modify>Expand


( do you have your ALT key stuck down?)
or is 'sticky keys' turned on?
No i dont ,dragging them up kinda worked
I can press shift as many times as i want so sticky keys is probably off
Umm... you 'create more' if you click and drag on an empty space.
@sly hawk random question but since you are here ,would it possible somehow to make a wave to represent the growing wave length on an electromagnetic spectrum?
If you're clicking on the exisiting icon and it's not working, it sounds like more a bug than a user error.
Thats what I did at first, but then I made a fixed circle selection to try and get a perfect ring for the cutout but it doesnt want to become a perfect circle when expanding it
What like this?

umm... - I'll have a think

If you're making a 'perfect circle' and then expanding it, then the expanded selection would be 'perfect' too...
in that box ,if it helps
mmm... - what if you found a normal 'wavelength' and then manually stretched different sections of it?
You could always trace it later to get a better line
how can i stretch it?
thats what I thought too! but as you can see in my before and after images, the circles are a little wobbly, I can live without it but i was just wondering if there was a way to make the circles better
Perhaps like this?
Can someone help me in removing the dotted line passing through the signature?

or a tutorial or short video would be helpful
Maybe make a duplicate layer.... and then add a massive stroke to them and see what happens
Can't you manually erase/mask it?
Yeah that seems to work ,im gonna try it later ,appreciate the help !
What's the end goal? - Signature looks a bit of a mess as it is?
Where is it being used?
bro is probably forging signatures lmfao
This is $5 gig I got to extract the signature from the image the client has sent me. The image is very small

last time i did this i just when in by hand, sometimes i get lucky and the pen color is different from the dotted line so i use color range
damn i was broke
I'm halfway through the process. And I achieved this using photopea.com as I do not have photoshop. If someone can remove the dotted line for me passing through the signature, that would be great

ah... on reflection... that looks rubbish!
ive got a little bit of a bump in the road with this one. i need some way to add lighting to the characters face, arms and body, but i have no clue how to do it. The explosion is made out of lens flares, so there is color dodging going on, anyone got any tips?


Yeah, just use a mask to remove the darkness adjustment layer you added over the face
im gonna need more detail on that explanation
even though ive been using this program for a while, explanations still confuse me lol
for more context here are the layers

Gave +1 Creative Carma to @sly hawk (current: #5 - 1096)
Yeah, take it back into photopea and change the 'Maximum' filter as seen here
is there a way to make a selection in the center? whenever i try it takes it to the right

So here you can see that I've added that DARKNESS filter, like you must have... - you may have used a brightness adjustment or something
and then you basically just 'mask out' the bit you don't want as dark
yeah... move your mouse into the middle of the circle...
and then click and drag...
whilst you're still dragging, hold ALT.
The 'centre' will then move... to where you started 🙂
Hold SHIFT then too, and the circle will stay perfectly proportioned....
Thanks bro ❤️ Can you also tell by recording a short video like this one for how you removed the dotted line?
Gave +1 Creative Carma to @sly hawk (current: #5 - 1097)
thing is, the black isnt made from a filter, its done by the color dodge, so your suggestion doesnt really seem to do much.... or maybe im doing it wrong
without them as you can see the scene is very neutral in color


Probably much better ways, this is how I tried it...
Your subject is right at the bottom layer... - so everything above is effecting him

thank you man
actual brainfart moment
Is this rust?
or dayz or smth
far cry 5
Thanks man. You're a gem
Gave +1 Creative Carma to @sly hawk (current: #5 - 1098)
damn ok
so like , i got this png but i cant cut the wave

i wanna remove the background
i could do it manually i guess
Set blending mode of this layer to multiply.
where did all of this wisdom come from 🙏
Photshop magic powers 😉
🙏
Sorry, just seen the image
oh, you were happy with multiply blend mode. - Nice work @viral palm
no worries ,appreciate the help from both 🙏
Omg just seen the image and i got the visible light spectrum wrong
its supposed to be violet on the left and red on the right
lmfao
why does my image look like this? Its a normal photo from facebook, should I change my color set? its a JPG

It looks like a corrupted file or a graphics card issue.
Try to open your jpeg in an other app to see if it's ok.
Try to update your graphic card driver.
Open it in Windows Photos to double-check the file. Does it look the same?
What websites can I use for free to ps
Not sure what this question means. Photoshop requires a subscription.

Try Adobe Express. There is a free tier. Its like a universal design tool. https://express.adobe.com
Ok Ty
If we will hunt realism and professionalism.
That would go like this.

Stop trying only to use distort.
Use "everything" to make it look realistic.
That looks amazing, thank you so much. I'm going to challenge myself and try replicate it rather than use it. Fair play 😍
Gave +1 Creative Carma to @torn condor (current: #175 - 10)
Just select the layer with the spectrum, hit ctrl+T for transform and put a minus before the W: value. Or go to edit>Transform>flip horizontal
Ye no worries ,i fixed it already, just wanted to point out that i wouldnt have seen it was wrong if james didnt ping me again

Those are guides. You can press CTRL+H to hide them, or right click one of them, then press Clear Guides to delete them all.
there's no such option

i tried ctrl+; and it worked
thanks @sweet field ❤️
Gave +1 Creative Carma to @sweet field (current: #23 - 99)
You must have right clicked on the background outside the canvas, you'll have to hover over it until the mouse turns into the move icon then right click. But yes, you can simply hide them as well!
Glad to help ❤️
my generativ eexpand isn't working
how to use firfly
i need to expand an image,
Hi @warm crater
here is another good visualisation
https://www.wir-machen-druck.de/resized/media/farbspektrum_848X327.png

no, looks normal, my graphic card is perfect, I open other images without any problem, this exact image in other programs is fine too. Only in photoshop it looks like this
Is there a way to make the colors smoother ,did you use a gradient?
Thanks for reminding me to add the nanometers ,at first i didnt want to make it complicated for the average viewer but adding the nm shouldnt be that complicated to understand now that i think about it again
Gave +1 Creative Carma to @tame cape (current: #18 - 131)
update: changed JPG to PNG and its okay now
Hi! Which error does it give you?
The image is from the website of a German printing company. You will find many similar ones on the web.
Yes, a gradient ensures a smooth transition of colours. Here is a quick and dirty reconstruction:

yoyo is anyone available that could help me with a fill in feature?
I am waiting in the community talk channel ❤️
I'm having trouble downloading the program
that would be very helpful!
Every time I attempt to download it through the web browser I am sent a link in my email, yet when I click that link it tells me to go to my email and resends me the link trapping me in a never ending loop
Does anyone know how to fix this?
Did you download the CC app? That's where you should start. Also don't use Opera as it's not giving you the right links
No, can't do that either. I am using opera though so that might be the core issue
When the CC app is downloaded, either the Photoshop download will start by itself, or you will download Photoshop directly in the CC app
Opera isn't supported. That is the issue
send it here mate , a screenshot and we can help
Firefox, edge, Chrome all work OK
Most people are very reluctant speaking in the voice channel without knowing more about what you need
So i made this sketch of a logo and want to fill in the gaps. How can i do this without overdrawing the lines

Besides, it's a community server, knowledge is there to be shared!
How did you draw the logo? is it a vector file?
It was a vector and i used "fill in vector"
Not sure if thats the correct designation i am german so my program is german aswell haha
fill contour or sum
I can only tell you in English

its fine its fine i understand english! 😉
You can find the fill option there (also in the properties panel
It depends on how your shape is built as well, which we could see if you want to share a screenshot of the full interface, with the layers panel visible

These aren't vector shapes!
Vector shapes are built with thiese tools in Photoshop

And why are vector shapes different from others?
Yeahh i made a vector and then i "filled contour"
Hwhich program did you use? Photoshop?
Yea
nothing specific info. jus sying 'encountered issue. try again'
Vector shapes are matematical shapes, they don't change their atrributes when they are enlarged or reduced, you can also change their attributes without affecting the quality, unline raster shapes, with are made with pixels
Ohh I see
attributes like?
Logos are always made - professionally - with a vector program (and usually using Illustrator, although it's not mandatory)
I used to make shapes with the rectangles and then warping
Started using the pen tool recently and its much easier and better
Colour, curvature, size, effects, distortions etc
Pen tool is one of the most important tools to learn i guess
okay
Absolutely, it's something no pro would live without. Bith in Photoshop, but also in Illustrator, InDesign, anything that has to do with graphics

Get to know the two main image file types — raster and vector. Learn about the main features and differences between raster and vector to make sure you use the right one.
And when i have a vector shape like this? How can i fill it with a color or gradient and make a black contour around it?

So that I am still able to edit the inner color afterwards? Do I do that by turning it into a smart object?
Oh I did it
this you want to fill the shape! or jus need to xpand stroke.
Use the features I shown you in the screenshot I shared "fill" and "stroke", be sure you are in the "shape " option
Learn the differences between raster and vector images and their common usage.
Hah, that’s the one I was searching for, thanks!
Gave +1 Creative Carma to @vapid flume (current: #8 - 884)
hi i have question about adobe beta ai. I tried to change arm position and it won´t let me. It was working before but somehow it just not working anymore

There is an issue with the generative fill feature at the moment. I saw a major problem in the Adobe Status
https://status.adobe.com/
Adobe Status provides service availability and performance impact information for all Adobe products and services. It includes incidents and maintenances that are ongoing or in the past that affect Adobe products.
hopefully it's temporary
Hi, I was going to ask the same, I am not able to do any generative fill at the moment
thank you for this information
Gave +1 Creative Carma to @vapid flume (current: #8 - 885)
You're welcome!
Thanks @vapid flume for sharing. At least I know it is not on my side. Fingers crossed
Gave +1 Creative Carma to @vapid flume (current: #8 - 886)
No problem. You can subscribe to a few things on this website, and it will notify you when there is an issue.

1.) If I've an aestetic image, with breasts of a woman, posing aestetic (nothing with sex) and I cover the breast with filling it with a color and then I set an selection area there where I want use the generative filling on that image,...is this agains the rules? I know, a bit sneaky...bu you know..at the end, is the truth: Because I covered the breast of the woman, it doesn't count as naked. So...what you would say?
2.) Another Question: Currently I get alwys the message: "There was a problem and your request cannot be completed at this time. Please try again later." When I use generativ fill right now. I tried several times. The most time it doesn't work, but briefly it works. Really weird. But the most time currently not. What does this mean?
Basically anything that shows skin will probably get you in trouble with Gen Ai
Just scroll a couple of messages up and you'll know the reason 😉
How you meant that? I said: I cover it with color.
Hi everyone, could someone here advise me on Adobe Fonts?
Months ago, I had a project where I applied an Adobe Font to a 3D object. At that time, I still had Creative Cloud. I still have the 3D object, and I rendered some images back then.
The font is essentially embedded in my object. Now I'm wondering if I'm still allowed to post the images, even though I no longer have Creative Cloud, but only the Substance subscription. I know it sounds like a silly question, because it should be possible without any problem, but I dont want to risk anything.
The original image is still showing skin
You can still post the images, because you cannot use that font anymore for another project
Yeah, but it dissabled. And I mean: Theoretically, I could the original image keeping out of photoshop. Until...you know lol
The only thing I can tell you is to try and see what the program says
It will display an error message if it's against the ToS
Means: I make a copy of the original image (with breast) dissable it. The Copy I paint the breast with a color, to cover them, and only then, I use generate fill. 😁
Otherwise, all you have to do is do it manually, like we used to. That way you won't at the mercy of a machine 🤖
Oh, it works fine. ALWAYS. I wanted just ask, if this is legal 🤣
It depends on your country 🙂
Ah really? Didn't know that. Hmm.... Sounds.........GREAT. 😁 👌🏻
Adobe doesn't make the laws, they set up terms to use their service, you might break those rules, but they are distinct from laws
You can do something that isn't against the rules but still against the law
if you manually composite someone into a situation where you prentend something happened (fake news), Photoshop will let you do it, it's still against the law (at least in country)
Ah okey. But you know.."laws" sometimes are also not perfect. Laws can be bended. 😆 Like in this case. Because finally: I mean, if I copy the image and cover the naked breast with a colors,...in that moment, that image is not the same. And with that...lol - But ok. Thanks for the answer. Interesting...
Gave +1 Creative Carma to @vapid flume (current: #8 - 887)
Thank you so much for the quick answer! 🙂 Am I allowed to create new rendered images or an animation as well? I am not planning to do so, but it would be nice to know. The font is already integrated, and no changes are made to the object itself.
Gave +1 Creative Carma to @vapid flume (current: #7 - 888)
You do you, I personnaly don't "bend" the laws
If you have used an Adobe font, and you still have access to Adobe fonts and this font is still distributed in Adobe font, then all good.
The issue here is to know if you still got the licence to use this font.
So are you using a font? or the outline fo a font.
If you're using a font and still got the licence, all good, if you don't have the licence anymore: Not good
If your font have been turned into a 3D shape, and no longer a font, then all good
But if you no longer have a creative cloud or adobe licence of any kind, this font will not be available anymore
So problem solved.
Well,...bending in this case sounds only so evil..But hmm...I mean,...laws are made in countries. And the people who make laws, are not ethically perfect and were never. Therefore a.) exist in every country different laws (I mean: Would one say, that in russia the laws are ethically correct? You know? ;-) Or in other heavy dictatory countries?) and, the history shows, that they changed always laws. I trust in that case myself. I think as long I don't make pornos and more, you know, aestetic beauty images,...I don't see it a so badly or evil at all. I mean, professionaly photographers do also aestetic photography with naked breasts. And Photoshop was also always (before generative fill) their tool/programm. So...you see the ethic point? ;-) It's difficult....the thing with the "laws".
☺️
Since fonts are synced and not downloaded
Except in Iran and such countries, I don't know any country where it's against the laws to show breasts or men's genitals
Can we share here somewhere Ideas, for new abilities or functions of photoshop?
Ah, sorry,..I see it. Ideas-and-features.
how to download photoshop on linux
How can I make hair in Adobe Fresco?

In this video, I show how one can install Adobe Photoshop CS6 on your Linux distribution. If you stuck with anything, don't forget to mention it in the comment section below, Thank you.
Install Wine in Ubuntu or in other Linux Distro using the below commands :
- sudo add-apt-repository ppa:wine/wine-builds
- sudo apt-get update (This is option...
Law is always dictated by person in charge and what suits him.
Grab people content, become Google, and make rule that no one can copy any sentence of any author.
We are different by morals, not laws.
when i started using fresco i made my own brushes maybe this can help u : https://community.adobe.com/t5/fresco-discussions/how-to-create-a-custom-brush-for-painting-hair/m-p/10643805 , but it depends on what kind of hairstyle u need
Thanks ill definitely check it out
Gave +1 Creative Carma to @cyan python (current: #967 - 1)
Hello, is the generative fill giving you problems?
There is an on-going issue for some Photoshop users.

The Firefly issue seems to have been resolved. So that is available if you need to generate something.
https://firefly.adobe.com/

oh
same for me
just read the previous msges
guess its down or something
i tried restarting my pc + PS but no luck
will try again later i guess
It's not your PC. Generative Fill occurs in the cloud. The selection is sent to the Creative Cloud, the service processes the pixels and sends them back.
There is currently an issue from Photoshop. If you need to generate something right now an alternative is to use the Firefly web service.
ok, i'm trying to clean up a photo
i can try it in firefly
wonder if they'll make it local, cuz i definatly have a powerfull enough machine to handle gen fill
Generative Fill on Firefly might work or you can wait a bit. Hopefully, it will be resolved soon.
We don't know how large the AI model is so you don't really know whether or not your GPU could handle it. heh
(Or if Adobe would even ship it with the products.)
thats true, i forgot about the huge pile of data it needs to tap into
well, i dont really know how it works 😂
Maybe it takes an H100 to process Gen Fill. WHo knows? :D
Might be able to get a used one on eBay for like $8K. heh
lmao thats not too bad

also odd thing
i'm signed in into my CC account, my company pays for it so i have full access
but every time it prompts me to try the free trial
is someone here that replies
very odd
im having a problem with generative fill, when i click for generative ai fill, it says error
Dang. 2000 credits. That's 'rock star' level access. :)
lol i had no idea, i'm just glad my job provides CC to me
I've got 1000 and that's as a mentor haha
i'm on a education licence
work for a college
advertising their programs and whatnot
either way, i dont think i could use all those credits even if i wanted to
i dont AI generate enough, but i do quite a bit of gen fill
Yeah, still doesn't work...inside photoshop. Tried several times. Nothing.
yee its down, check pins
- ai generation cant get as complex as i'd like it to unfortunatly
still a lot of atrifacting

Do you have a graphic tablet with pressure sensitivity activated?
Turn on Name, Stroke and Tip....

Then at the bottom scale the preview down so they will wrap and go side by side...

If that is what you're referring to.
Also, the size of the fonts may be more a function of Windows Scaling than anything Photoshop is doing.
gen fill works now!!!!
Look at the difference between the 2 @ripe quest
Then you won’t see the tapering or opacity changes linked to the pressure sensitive the idea is that it is WYSIWYG
So you want the tapering to show on the Brush then? Is that it? Because I see multiple differences in the size of the brush tip preview, font size, etc.
If its about the tapering then @hushed niche suggested the solution above.
I think this can also be controlled in Shape Dynamics: Size Jitter > Control: "Fade"
Good workaround! But it’d need to be set for every brush, right?
quick question about LrC / camera raw in PS. the AI denoise only works for raws. any idea if it will be available for JPG, PNG and other files?
kind of frustrating
/is there a way to denoise a jpg?
I guess you mean to AI denoise a jpeg, as the regular controls should work, knowing that a JPEG is already denoised by the camera’s DSP. https://helpx.adobe.com/camera-raw/using/sharpening-noise-reduction-camera-raw.html
yes, AI denoise
yee this is the good ol fashioned way
i'm familiar with that
but i'm talking about a low rez image for example

i just did it in topaz for now

after
a bit too smooth
but it will be a small image on a page
but you can see the color noise in this image, just something i screenshoted on google maps
the color noise is terrible here
Is there any way to stop #photoshopbeta on the phone to stop changing the brush size when zooming in?
hello, i'm a Newcomer here.
I edit some transparent bottels and containers,
i want to transparent this packaging containers,
i always do them with product in them so it's easier 🙂
do you have any idea to do that with no product in that bottels ?
so how to fix it
bc it still happends and i cant work
Hi
Can you share any images?
so we can see what you're trying to do
I would say recreating or opening and saving the file in different format
and then importing it to another file
ok ill try
Hello im trying to make something but its hard to like do on photoshop im trying to get 2 images but make them half each
Symmetrical? Split down the middle?
hi, how can i create a straight line after creating a curved line with pen tool?
as you can see in this video im tracing this white thing, i want to be able to make a straight line. is it easier to do without having to use curvature?
I'm making an assumption here based on what you said. Generally we would use a Layer Mask...
One moment
Technically, you can just draw all straight lines at first and adjust the curves later. Just click to set an anchor point instead of clicking and dragging.
ye like im trying to get 2 logos together for like a logo
like i support 2 football clubs but im struggling to pick a logo
It would be easier if you just show the thing or the images that you're trying to combine...


You could essentially use the technique I showed above. Place both images into the canvas and use a Layer Mask to remove one side or the other.
We use a mask instead of deleting because deleting is a permanent change. Using a mask, you can change your mind. Adjust things. Etc, etc.
meh i will try that i am new still but i do follow tuts
yeah "works"
that tut so confusing
It's like 3 steps.
Perhaps you'd benefit from doing some of the beginner tutorials. Then you can get familiar with the basic tools and techniques.
If you're trying to do something else, then feel free to describe the goal a bit better.
i thought of a better idea for a profile picture
imma get the 2 clubs shirt and fit it in this

so its like half and half


i can not see the lines on side

View > Rulers... It's in the tutorial.
Then View > Snap... so that the guides snap to the center of the canvas.
View > Snap... so its toggled on. Meaning that it has a check mark next to it.
Then you drag a guide from the ruler edge to the center of the canvas. As you drag (slowly) you'll notice that it wants to "snap" to the center.
i done it

I have to step away from the keyboard. Good luck with it.
Edit > Undo... Edit > Redo...
ok thanks for helping
When i get my image i will find a way to get to fit inside circle

finished idk if it looks bad

Why is the top glow not the same as the bottom one I want them to be the same
Not great at photoshop I am wondering why this mask layer with color fill is still showing and I can’t delete because it doesn’t have a layer of its own
Never mind I just fixed it silly 6’4 me😭
Just copy and paste top text then change what it says to free
sorry for the video i guess it won’t even work so i added a picture, does anyone know why the brush thing won’t work in my select and mask tool? it’s for every option that it’s greyed out and it’s so frustrating, this hasn’t happened before.


Hey guys, does anyone know if its possible to take an image and then make it look drawn like this? i have the exact pixel brushes to create this style. say for instance the original image i have looks like the one in color but i want it to look like the image in black and white


guys, does photoshop have "show hidden Characters" option & Tab settings for paragraph. im using photoshop 26.3 version
thanx
@kind rune I don't think Photoshop ever had that option (Illustrator and obviously Indesign have it)
Photoshop has some text features but it's really not its strong suit...
this is the bottle i am talking about
it is for saffron spice packaging
i use green backdrops to shoot picture and then transparent that

what are your thoughts guys?
You could try to make them pixelated by using the bitmap mode, not sure it will give you the exact same result but worth a try
https://www.youtube.com/watch?v=0eZ2gjIHF7A
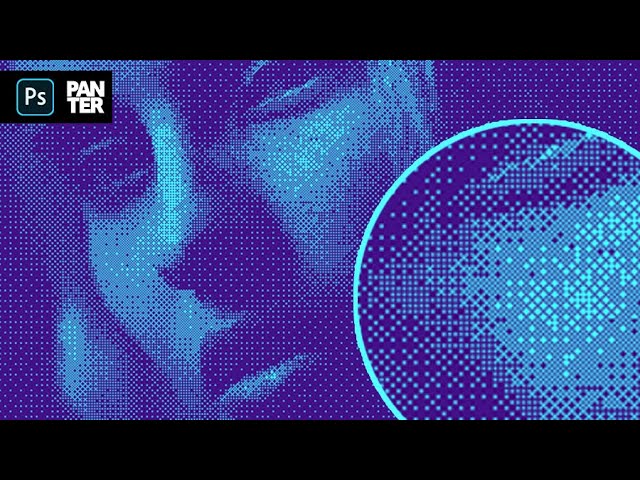
Today I gonna show you how to add bitmap effect on photos in a short manner of time. The process is simple as well and the effect is pretty legit.
👉Subscribe: https://www.youtube.com/channel/UCS1gMhu2KgHqW4OunIAaKrA?sub_confirmation=1
Check out these insane Photoshop online courses with photo manipulations, photo montage and advanced editi...
Do that on a copy of the file as it's a destructive workflow...
i want to that without any saffron in bottle
Have you tried gen fill yet?

Works pretty well... - Just need to make it more transparent etc

I just tried chucking something in it, seems believable enough to me 🙂

Can anyone explain to me whenever I move things around? It's become laggy
Does the project have lots of layers and groups ?
You could hide some stuff (pressing the eye and make them invisible) and it will stop being that laggy
Ok, so I create new file and put the size I want
When I use the rectangle tool. It's goes laggy for some reason
hello could someone photoshop 2 pictures for me or is it to much to ask ?
Assuming you didnt put a crazy size for the template
It shouldnt lag . I dont think i can help further than saying your pc maybe cant handle photoshop but if you think it can ,then wait for an expert to reply
Damnn it
Like I need to finish a banner for my uni
An expert will reply shortly im sure ,in the meantime ,what cpu do you got
and this SH$% happen
what you want
Intel Core i5-14400F
im not saying photoshopping but i have 2 pictures and i need to put a picture in the background for my pfp bcs my skills are bad and i have no pc
yeah it shouldnt lag ,idk
oml
could you send the pictures and what you want exactly to see if i can do it rq
im also not responsible for helping others ,please wait for an expert