#❓ask-a-question
1 messages · Page 104 of 1
Alternatively, you can draw an elipse, select the two points horizontally, like this

And use the convert point tool to turn them into sharp angles

Move the two vertical points closer to make a line

Of course you can draw tappered line with a brush, but you will probably need a darwing tablet with a pressure pen
It's a great suggestion, but I don't think it's suitable for my case. Thank you so much for helping me find a better solution

No worries
every time i try to drag an image into my project, there is a huge quality loss of that image. Does anyone know a solution to it?
it looks right before i click done, but after clicking on done it turns into this


You can't infinitely rescale raster-based graphics without quality concerns. If the images are not the same size and resolution, there will potentially be quality loss. Particularly if you attempt to scale the image up.
The Interpolation Method may also play some role but that doesn't change the fact that resizing pixels can be problematic.
thanks, i placed it in a bigger canvas and it kept its quality.
does anybody know a trick to make the text that overlap the mirror have different color?

blending modes maybe? You could also select the text and color it in with the brush?
right now this is what i come up with, duplicate the text and select the object and then use the selection as layer mask then just change the color


however i was wondering if theres a more dynamic or easier way
You could create a Solid Color Fill layer with a Layer Mask and "clip it" to the text layer.
ah this is nice, didnt thought of it, thanks
Gave +1 Creative Carma to @ripe quest (current: #3 - 2607)
@ripe quest since ur only one who helped me before i got a question for u
Go for it
my photoshop is a bit weird, the colors are slightly darker when i export them, i thought the problem was from my laptop but its not colors are fine so i thought there is a problem with the color correction in photoshop? do you think you know the reason
Maybe its a Color Profile issue. One color profile being used in the Photoshop document and you're exporting to something else, e.g. sRGB, perhaps.
like this for example you will see it darker then what i actually see it in photoshop

no, cause you can see colors normally when i take a screen shot, but in photoshop itself the colors are different
i dont even have to export them
Show both images here so we can see the difference. Maybe someone else has ideas.
wait one sec i think i found out let me test
yea figured out, ty for trying tho
Gave +1 Creative Carma to @ripe quest (current: #3 - 2608)

Sure. One moment.
is there a way to even out these like, dot artifacts left from a scan? I cant just blur it or use noise reduction since I have to keep it all the same color pallete of 12 colors, any ideas what I could do?

that was really simple and easy thank you @ripe quest ❤️ 
Gave +1 Creative Carma to @ripe quest (current: #3 - 2609)
If you can't soften the edges then I guess you'll have to paint around them using the same color(s).
You could perhaps blur and then re-trace and in illustrator
Something like this....
Anyone know how i can smoothen the edges? Tried a couple of youtube fixes but didnt quite do the job figured i can try here thanks in advance
You could try auto-tracing a selection and converting it into vector shapes...
From there, you could modify the vector objects individually. Maybe not trivial if you're not accustomed to working with the vector tools in Photoshop.
looks way better than before will try it for sure
thanks
Please explain what the issue was, it might help others!
do you guys know how I could replace the words on the bottom to say something else but still in the same style?

i know this sounds kind of simple but how can i copy this star, the red background is layer 1 and this star is layer 2, i want to make the same star but make it be layer 3

Select Layer 2 in the Layers Panel (click on it). Then tap Ctrl J.
You'll have to remove the original text first, either by painting over it, cloning it out, or using AI to replace it with something else. Then you can create new text in that area.
ive taken a photoshop class but am just coming back to it and need help with a few things i would greatly appreciate some help
can anyone help with this
You'd have to describe the problem, show the error message, etc.

Fonts are installed into Windows. So if you're trying to drag/drop a font into Photoshop, that's not going to work.
im not
Just post your question(s) here.
then, like I said, you'll have to do a better job of explaining the problem.
You posted this... and then show the "drag/drop" file interface. Thus, I assume you're dropping a font file into Photoshop.

oh sorry
So what is it that you're trying to open into Photoshop?
yess
That was a question. What type of file are you dropping in there?
oh
Go to where that file is and right-click on it. Choose "Install" or "Install for all Users"
ok
Then restart Photoshop.
The font should be available to Photoshop after its been installed
let me rephrase and make my question more specific, what effects would i need for my new text to look the same?
Look "the same" as what? Did you provide an example image?
Oh. I see the football image
yeah the cfb national championship text specifically
how do i make the paper like bigger and like more faded into the backround

As I said, the first problem you'll have to contend with is to remove the text that is there now...


No. Its probably more complicated than that...
or like this

then you're going to choose a new font and add in whatever text is going to replace it...

After that you can worry about styling it.
thanks
I assume that this is what you mean....
yes
..glad I could help. I guess. 🙂
am i able to do that on cs6?
Yes,
ok
also is there a way i can make the eyebrows have more texture if yk what i mean
like mae them more fuzzy ig u can see
like more texture
?
Yeah, just google 'furry eyebrow png' or make your own custom brush. - The first suggestion is easier though
Can anyone help me to spot if there has been any photoshop done in this photo

i would appreciate it a lot 🙏
tks so much
i tried following step by step and idk where i messed up lol

if anyone could help it would mean so much (im pretty sure im getting scammmed)
is there a generative ai alternative
No idea. Don't know what this is "supposed" to look like.
Generative Fill or the Remove Tool.
it has to be creative commons license though 😭
thank
just look for common photoshopped signs
Its a very poor quality photo so my answer is: I don't know; it could be manipulated. There is no way to be certain.
Alrighty appreciate the help though
Last man standing say hi
how do i add a gold trim to the text?


Double-click on the Layer (on an empty spot in the layer) in the Layers Pane. Add a Stroke Layer style. Gradient Overlay. Drop Shadow. Any or all of them.
thanks
im unable to install photoshop on my PC it says update require, but both my windows and graphics card are up to date
How are you trying to install it? Are you using Opera to download?
Yep. Opera isn't supported. Glad you got it sorted out.
Thank you 🙏
Gave +1 Creative Carma to @ripe quest (current: #3 - 2610)
Want to try to remove this serated outline from the helicopter, any ideas on how to do this easily?
https://i.gyazo.com/58be95308adbe69e2b0f9b3369af7797.png

The original seems to be made with more than photoshop Layer styles (3D?)
Made a quick try with only layer style... I share psd file if you want to analyse the layer style used.


do you have the png without black background?
Sure, Ill get it in green but it wont show the white well

Kinda goes away in Green and vibrant colors but sadly the background I'll be placing this on is black/grey so
Actually I may end up just using a different image, nevermind 😛
I tried but I can't get rid of the white artifacts without loosing details... I don<t have any easy solution to give.
that's the best I can do...

Its good I found a way to make it work, thanks anyway!
Gave +1 Creative Carma to @viral palm (current: #9 - 673)
I tried too but ended up having to redraw a lot of it. :)
Good to see I'm not the only one to struggle Daniel😉
hey peeps, just wondering - how can an image thats already edited, into camera raw? When i open that same image in camera raw, my unedited version only pops up. Thanks!

Is there a method to place objects under hair / place hair above object?

The edited images are saved as a cr2 file ( I shot with a canon) with an additional xmp file next to the cr2 in the folder. When I open the cr2, it opens camera raw and shows me an unedited photo even though I have made edits and saved them, the metadata should be with xmp file that should open along with the cr2.
i would suggest make a selection of the hair, make them into a new layer and then u can place the object layer under the hair layer
How can i join channels that i want to, i want to join some german language practice channels
Please keep questions on this channel related to Photoshop,
also to come to your question,
- u can go to discover area of Discord to join German Servers, or
- Look for a few listed on Disboard
These are a few ways to find German servers...


You merge the Photoshop edits to a new layer: CTRL+Alt+Shift+E and send that one to ACR.
Probably yes, right corner is very mysterious. Do you see black line? Like a scraper? This is maybe after bad photoshop using... tha's my opinion.
How do i make this ready to be a sticker? Like how do i make the outline a bit thicker:
Kinda like this:
Just so there isnt a gap between tha A and l and so on


well u could make some gap and then make the outline thicker 🤔
Thicken the Outline
Stroke:
Select the text layer.
- Go to Layer > Layer Style > Stroke.
- Size: Adjust the stroke size to your desired thickness.
- Position: Choose "Inside" or "Center" depending on your preference.
- Color: Select the color for your outline.
Expand:
- Select the text layer.
- Go to Select > Modify > Expand.
- Pixels: Enter the desired expansion amount (this will thicken the outline).
- Click OK.
- Fill the selection: Create a new layer (Layer > New > Layer) and fill the selection with your desired outline color (Edit > Fill).
should help 😭
@graceful stag AS always with that kind of things, it's better with Illustrator, that's why it's made for. You can set the size of the offset, and the mitter, that is, the way it's behaving when met with sharp corners)
With photoshop, just apply a stroke, better, of course if your shape is vector, and increase the size until it's thick enough so there isn't any holes. The rest of the options will be threadbare.
Or trace it with the pen tool and create a filled shape out of it to be placed below the text in the layer stack

I do wish my tablet handwriting was as aesthetic.
My tutorial graphics always look like someone's had a stroke during the annotations.
Thanks 🙂
it's also the result of being repeatedly slapped at school for my tiny, unreadable handwriting 🙂
I don't recommend!
Hahaha my pen-writing is fine but it doesn't seem to translate well to the tablet - presumably because I'm configured for retouching rather than illustration so things aren't as pen-ny as they could be, IDK. Feels like I need a photoshop handwriting sheet and a Victorian school mistress to sort it out 😂
Oh no I need the Victorian schoolmistress
I'm of the opinion that's when fine handwriting died.
The lackadaisical attitude towards handwriting in my school meant everyone left with... mostly what they came in with 😄
"Johnson stop holding the pen with your nose! But if that's what suits you, fine."
I am a professional graphic designer available for jobs and commission work, delivering impactful designs.
Logo design
Banner design
Thumbnail creation
Custom packaging design
Explore my portfolio to see examples of my work:
To get started, could you please share a bit more about your brand? The style or vibe you're going fo, Any specific colors, symbols, or themes you'd like to incorporate, The target audience or demographic, With this i'll create a designs lthat fits your vision.
Reach out to me now!
I remember my parents where taught with a dip pen and ink. When we moved on to ball pens, everyone was relieved. Parents who didn't have to power wash their kids for ink stains every day, teachers for their classes would be spent actually teaching something instead of waiting for kids to finish writing their sentences. Fine handwriting is nice to look at, but something readable suffice. Some things needs to die for good reason. Now it's fine when it's your job or a hobby, but realistically, it was just useless.
Now I am not someone who writes very fast on a keyboard, I am faster with handwriting which is why I still do it (and probably why I feel the need for it to be readable) but honestly, if I could type things instead it would be OK.
I do not disagree - I just wish I'd worked harder at it when I was young, as one doesn't tend to get the time when old! 🙂
We don't really have a job board here, and be reminded that most people here are regular PS users, sometimes themselves designers. So, basically you're talking to your competition here
I can direct you to Behance, where you can advertise your services
see this link
Blog :: Add a Freelance Service to your Behance profile to let visitors know the specific types of projects you’re available for. Set your own price, timeline, and revisions, and get paid upfront for your work.
How does a person create font? i remember a convo where u were discussin or saying that u do so.. Just out of curiosity
You can use a software that does everything (you draw your glyphs directly inside the app)
For example you can use Fontographer, Glyph, or Fontforge
Or you can use a plug in like Fontself (it's the one I use) which will turn glyphs designed, in either Illustrator or Photoshop, into a proper font, one you can type with with a keyboard.
On both the methods, you'll have to have at least basic understanding of what a font is: Kerning, X-height, ascender, descenders etc...
So many difficult terms 😭 I need to. expand my vocab
Also thnx it does look interesting
Monotype.
As type designers we can get immersed in an insular typographical bubble at times. It’s easy to forget that our language, the lingo, words and terms that we u
That might help!
 Stop bein so nice
It doesn't pay being a jerk 🙂
In regards of creating fonts, it can be quite complicated if you want to create a proper one, like -say-Times New Roman, or Helvetica, Honestly, it can take months/years.
It's a craft that very few people can achieve. That said, most people will create simplified fonts (like I do) where you only need a reduced set of letters, generally just the Caps, the lower cases and figures.
It's also not very rewarding financially, given that everyone wants free fonts.
(and that's why free fonts are generally crap)
So it's fun doing it, it's a challenge in itself, and challenges are good for the brain, but I wouldn't advise it as a career, unless you plan to do it full time, put the hours in, and be ready to eat noodles every meal in your early carreer 🙂
IDK why does everyone want to take hobbies and skills as a career option, I do graphics for fun but that doesn't mean i want to earn from it 😭 , I was just curious on the how u create fonts, yk i like bein a jack of all master of nthng kinda guy, I like to write poems and literature that doesn't mean I'mma be a author and live my life on noodles, It's just nice to expand your horizon and have many hobbies
and yea finance is a major aspect of life, to sustain and go on with your days, for which i am doin my MBA 😭 but i like this stuff too is there any harm in it
Creating fonts is a kind of hobby for me, but it has to be said, plenty of people come here to use Photoshop as a career, it was my path, good for them, I welcome the competition. 🙂
is it possible to make a cartoon themed cover design in ps

Yes it’s. You can paint-draw directly in photoshop
So the best way would be:
- Include a "full image" (1920x1080 I presume?)
- Applied double exposure effect image should have enough contrast.
is there a way to make this have a white outline around it?

I’m on mobile for now so I will try to explain (I can’t share image or video).
If you search (on pinterest or google image) for double exposure you’ll find lot of exemple and you should see that Double exposure works well when one of the image is used as « container » and the second one is applied to it. In your case the woman face can’t be used as container besause it is trimed to tight (you should use a character with the whole head shape visible) and the fire image has not enough contrast to be used as container too… That what it tried to explain in my first post. Hope it’s more clear now…
Is the 8 shape on a different layer than the red background or did you draw the 8 directly over the red on the same layer?
a diferent layer
Ok so make the layer containing the 8 shape active,h it the « Fx » icon at the bottom of the layers panel then choose « stroke » to add a stroke around the 8 shape… you’ll can set the stroke width, color, alignement… in the layer style panel…
It worked, thanks!
Gave +1 Creative Carma to @viral palm (current: #9 - 674)
uhm can anyone split a image for me into 2/4 parts?
i dont really know how and am too poor to get ps
i need it for a school project
Indeed, thank you!
Gave +1 Creative Carma to @viral palm (current: #9 - 675)
Good evening/Good morning everyone, I just bought photoshop on my PC, but it keeps giving me an error saying "update required" how do I fix this? I have already updated the PC to the latest version and also the video card drivers, help please.
Are you trying to download Creative Cloud/Photoshop using the Opera browser? If so, that browser isn't supported. Try Chrome instead.
ok
i think it work now
ty
Bonjour à toutes et à tous,
Je sollicite votre aide car je ne suis pas à l'aise avec l'informatique en général, et encore moins avec Photoshop. Je n'ai aucune idée de la manière de modifier cette image.
J'aimerais changer son inclinaison pour l'avoir de face. Je me tourne donc vers vous et votre savoir-faire.
Merci d'avance pour votre aide.

désolé d'avance si je ne suis pas dans le bon channel pour mon message...
(Hello everyone,
I'm reaching out for your help because I'm not comfortable with technology in general, and even less so with Photoshop. I have no idea how to modify this image.
I would like to change its inclination to make it face forward. I'm relying on your skills and expertise for this.
Thank you in advance for your assistance.
Apologies in advance if I'm posting this in the wrong channel for my message...)
un grand merci l'ami ! est il possible que tu m'envoie le résultat ? :x
et si la demande n'est pas trop chiante/dérangeante pourrais tu me le faire pour quelques autres images ? :3


A big thank you, my friend! 😊 Could you please send me the result? 🙏
And if it's not too much to ask, would it be possible to do it for a few other images as well? 😇
Gave +1 Creative Carma to @sly hawk (current: #5 - 1080)
If you don't have photoshop, I understand. You can do the same for free with photopea. - Good luck
Le but de ce serveur/channel n'est pas de faire le travail pour les autres, mais de vous apprendre a les faire. John vous a montré comment faire ca, en 44 secondes, donc c'est pas trop dur 🙂
oui j'imagine bien, merci pour vos retours :x
Si vous utilisez une platforme de generation IA, comme firefly, vous pouvez charger une reference de composition - dans votre cas, une boite de face, comme ca vos generations serons d'entrée de face

Les modèles et services de Firefly permettent d’exploiter toute la puissance de l’IA générative dans les applications de création d’Adobe. Découvrez les nouvelles fonctionnalités de Photoshop, de Lightroom, d’Illustrator et de l’application web Firefly.
toutes ces applications sont elles payantes ?
gratuit! 🙂
D'autres plateformes peuvent etre payantes
Il vous faut un compte Adobe par contre, mais si vous avez Photoshop, vous avez forcement deja un compte
Hum... you're optimistic Sandrine😏
I know, but I have to assume the best in people, so yes, optimistic, and maybe somewhat naive 🙂
It was just because I've seen your post on the community expert forum this morning 😉
I'm with you on this...
for editing a photo like this, how would you do the translucent parts behind the chair?

how would i select the pen designs and logos so i can paste, flip, so i can put them onto the opposite shroud

Not the place for this type of post.
Please don't post in multiple chanels... Chat-general is enough.
can someone tell me how to blend this char with the background?

I have this transparent logo - how can i fill in the transparent background to white, and not it being transparent?

Add a Color Fill layer underneath that layer.
thanks! i was getting mixed up between the mask itself and the colour, since i wanted it white.
Gave +1 Creative Carma to @ripe quest (current: #3 - 2613)
(if you know what i mean)
Hi, you’d need to match the color of the light/atmosphere, the tonal values, see: https://www.youtube.com/watch?v=g3qe4rDw1XU

Learn how to create composite images and explore photo manipulation in Photoshop by using these 10 steps that will get you on track creating great composites of your own! We will cover lighting, color, shadows, perspective, and much, much more in this Photoshop tutorial.
Get a free 7-day trial for Envato Elements here: https://1.envato.market/...
Hi! Do you have the color shapesand logis/text on different layers? Some you’ll need to flip, others to rotate, or the texts will be upside-down.
Can anyone Photoshop sumthin for me for free I'm not home to edit on my pc
Just need change color background
Regarding this activity, the generative models are fantastic at relighting things I've found. Suspect/hope that adobe take their tools down this route rather than the silly "I want a monkey on a unicycle" generation that absolutely nobody needs.
I think just a partial, light mask would work well.
Hi I'm pretty new to PS 😄
Would it be possible to copy/layer the same color theme from one to the other as seen in the picture?
also if yes, can I get some hints as to how? 😄

Also if there happens to be a good guide/video on youtube that would just as good 🙂
You could give the Colour Transfer neural filter a quick try

Learn how to transform the colors of your photos in Photoshop with the Neural Filters’ Color Transfer feature! In this tutorial we’ll show you how to apply colors from a preset or even your own image, and fine-tune the effect for a perfect look.
Download the Sample Images and PSDs:
https://phlearn.com/tutorial/how-to-color-match-images-in-photo...
If it actually works, that'll be the "easiest" way.
Otherwise you're going to be looking at some masking and some HSL/Colour overlay faffing, or any of the other 1847 ways to adjust colours in PS :
🙂
Guess it's the hard way, doing what he did in the video Changed 0% so don't think it's working 😅
Will try and look up your keywords on the not so easy way, thanks for the help 😄
You could try adding a gradient map...

obviously feel free to spend** more** than 30 seconds adjusting it like I did.
ohh nice yeah that looks pretty good for what I wanted, thanks will try that 😄
(I'm about to join a teams call for 45 mins so will be away)
Can anyone remove the background color like transparent and only change the font color to the same green as the background

Can anyone do that for me I'm not home to edit it
Though a gradient map might have been a bit fiddly given the fact the "Mortar" on the target image was much lighter than source, though with some tweaking you'll win.
How do you do the karma thing, James needs some.
He doesn't really need it.
But it's always a nice gesture to say thank you @sly hawk for the help.
Gave +1 Creative Carma to @sly hawk (current: #5 - 1081)
Is it automatic off a " thankyou @sly hawk " ?
Normally you should not ping moderators.
It is sufficient to reply directly to a post. However, a thankyou is not counted (because it is misspelled).
A thank you or a ty is accepted by the bot
Gave +1 Creative Carma to @stiff trail (current: #129 - 13)
Go over to #💬chat-general and see if anyone is willing to help
This channel is for Photoshop questions (how to use etc...)
Oh, that was me trying to get it to apply the karma, not an attempt to ping them.
Don't stress too much about Carma points, it's just a nice number next to our name
It doesn't even count on a CV 🙂
If you don't want to tag people, I am pretty sure it works when you answer TY or Thanks or whatever without tagging, just replying should work
Creative Carma is just there to remind us that we've not been as helpful as Sam Peterson. Heh
You'd have to work for years to catch that guy in carma points. :)
Does someown know how to change color of a image after using blend photoshop
I used the blend option but I want that the color of the plane stays the same color

This is why I would advise against using Auto Blend Layers and merging down when you're a beginner. It's generally advised to work "nondestructively" keeping the layers separate and easy to edit.
Now you have to make a selection around that object and try to separate it again so that you can only affect that area.
how do i make text wrap around the shield like on the second image? i really cant seem to do it right


You need to make a path... and then you can write along it...
elipse tool with path setting maybe?
nah. - Pen tool.
Obviously just play around with the line shape to get it right...

These settings here may also help you...
James you are a legend
thanks a bunch man!
also just a quick question how do i enable the ruler i kinda forgot lol
yup
i'll try to make the text now, will share results if you don't mind
why does my text only write to here? did i mess something up?

hey guys, i dont edit photos myself. but i was wondering if anyone could help me out. its my moms birthday tomorrow and i wanted to gift her a costume made jigzawpuzzle (her biggest hobby) with an iconic picture of my sister and I. the photo is in somewhat bad quality, and I was hoping if anyone could help me improve it. it would mean the world to me, and hopefully my mom as well. i just wanna know if this is the correct group to ask for help, and if not, if you could guide me to the correct group
You can drag the start AND end of the text
Reddit is your best bet.... - but if you just need to improve the quality of the image, you could try posting in #💬chat-general and someone might be able to brighten add some vibrance, high pass and maybe upscale it. - but it depends on the quality of the original image.
thank you!
Gave +1 Creative Carma to @sly hawk (current: #5 - 1082)
cuz i have a problem with the SHIFT+CTRL+ALT+T shortcut, can anybody help?
Gave +1 Creative Carma to @sly hawk (current: #5 - 1084)
Hi @rough plume
The shortcut creates a copy and repeats the last transformation with this copy. How do you proceed? What is not working for you?
(example: -> #💬chat-general message)
hi, well its quite simple, when i use this shortcut it just doesnt do anything, i check the history window and it says that my last action was the transformation so in theory it should work, but when i click it nothing happens nor anything pops up in the history tab
idk 💁♂️
Please show what you have (complete screenshot with layers panel open)
at the end im clicking the button
but since it does nothing you cant really tell
also the shortcut is there unchanged, so idk

it was changed!

wdym, then what do i do for to fix it?
At first
Try it with a normal layer (not with a smart object)
what happens?
how to export photo layer from ps to illustrator without saving as png?
also how to select the transparent parts like glass or crystals? i just want the object, no shadows by the way.

Not sure what this means. You'll need to use a file format that supports transparency. If not PNG, then just use a Photoshop document. You'll use a Layer Mask to hide the portions you don't want to see. Then you'll embed that PSD in Illustrator.
it's like dragging the layer from ps to illustrator via the mouse
because for files, u can easily drag from folder to photoshop and bam you have a copy image
You can insert Photoshop files into Illustrator... if that's what you want.
I created this image in Firefly and I like the overall composition, but how I zoom out so that the cap isn't cut off at the top?

how to do that?
Learn about importing images and paths from Adobe Photoshop to Adobe Illustrator.
If you want to keep the same size then you'll have to scale this down and fill the empty/transparent areas with Generative Fill. Something like this...
Otherwise, you'll use the Crop Tool to change the canvas size and/or aspect ratio and use Gen Fill in the same way.
Do whatever work you need in Photoshop. Save the file. Then switch to Illustrator and the file you're using there. File > Place... Bring in the PSD.
thanks!
Gave +1 Creative Carma to @ripe quest (current: #3 - 2615)
also,, by any chance is there a way to select glass objects like the tube in the picture? it's almost see through so the selection is not perfect.
hey how can i get the image in the background only in the text? the text is an image.

What is an easy way I can add that black and white glow on the left to the circle on the right?

Position the Sky layer so it is directly above the text layer in the Layers Panel. It looks like it might be set up that way already. Then right-click on the Sky layer and choose "Create Clipping Masking"
"What I have" is that all one layer?
yes
In the Layers Panel, dbl-click on an 'empty' spot on that layer (where the layer name is) to open the Layer Styles. Then add an Outer Glow. Make it white and adjust it to your liking. Do that first. Then you can add a Drop Shadow style as well.
I know that almost no one practices these thumbnails, but I wanted to know where you can get assets like this and I would like to know if there are any tutorials on how to get colors like this


rawpixel
rawpixel is the professional all-in-one graphic design tool. Easily create stunning Social Content, Templates, Mockups, Remix Designs and more.
How can i fill the upper part wil sky of the similar image type

You could add a sky there. There is a feature, in "Edit", called, replace sky. It will replace the sky in your image, and will not replace the black box. BUT, if you reveal the mask the function adds, there is a lot of chances you can get a nice sky to fill your black box.
OR
Use generative AI to fill that box with a sky, just select a bit more than the black box so the system recognise what to replace it with (Let's say select the black + 1/3 of the sky you already have as well)
Don't put anything in your prompt, just leave it blank
You can also do it the standard way: Go to select, "select sky", save that selection, take another image you have of a similar sky, place that image on top, use the selection to create a mask, refine the mask.
Thnx alot i used content aware fill and it worked :)
That was another solution!
Glad it worked...
I did had to use remove tool to clear the content aware fill and the OG picture difference layer
hello guys im new in photoshop, im having a probem with a shortcut , im trying to use option [ to move between layers but it doesnt work and i cant find it in the keyboard shortcut
im on a mac
can anyone help?
can't u just drag and and move layers?
U don't need to press a shortcut key for that 🤔
yeah i can but im recoridng and action and i need to use the shortcut
Screen recording?
U can set a shortcut for that from preferences
u can create ur own
Move layer up or down:
• Command + ] (Mac): Move layer up.
• Command + [ (Mac): Move layer down.
These are the defaults
If u want to set ur own u can do so from preferences too
okok , and if i just wanna select the layer down using a shortcut how can i do that?
@true lichen U can set ur own or use the default one
To set your own go to Edit < Keyboard Shortcuts < Application Menu < Layer (Scroll down)

thank you
but i just realized i have a diffrent problem , this shortcut moves layer , the one i need selects them, im sending a link to a video so you can understand and maybe help me

Photoshop tutorial: Fix flyaway/stray hairs on the face FAST! Use this easy method to remove annoying flyaway hairs on the face in the cleanest, most natural & fastest way possible!
Chapters:
0:00 Intro
1:33 3 Old/Other Stray Hair Removal Methods
3:13 QUICKLY Remove Flyaway Hairs (On The Face!)
Old Method: https://youtu.be/AEUjUp7hCPc
^ PiXim...
minute 9
a 9.15 he moves the selection of the layer using command [
but for me it doesnt woek
9.15 is the end u said minute
9 minute and 15 seconds
This video is only 9:07
sorry wrong video+


Create smooth skin with beautiful texture in one minute or less with this high-end skin retouching action in Photoshop!
🚀 Join PiXimperfect Pro - The Ultimate Photoshop Training Course: https://pix.live/pro
In this tutorial, learn a unique way to retouch skin, where we create a brand new skin texture from scratch and use advanced blurring techn...
ahyahhahaha
im a mess sorry
ohk so what's the problem here?
He said OPTION + [ which works on macbook
if it doesn't for you maybe u should reset ur Preferences
This clearly works for me 😭
🤔
@true lichen check your keyboard shortcuts. On a PC, it's in "edit">keyboard shortcuts (can't remember where on a mac)
when you're there check in the layers section

again on a PC
alternatively, check in the menu at the top: Layer

See that each command comes with their shortcut, when available. See what you got there
So you see that on a PC, the OPT+ [ or ] is obviously replaced by CTRL
If you got something else, you will be able to see it in the menu, but if you want to change what you've got, you will need to change it in the Edit>keyboard shortcuts.
And for the love of what is precious to you, save those preferences...

Hello- does anyone know how I can crop out the hood in this image? (the black at the top I want to take it out)

Create a layer mask then paint black on it where you want to hide pixels (black hood)
Thank you @viral palm !
Gave +1 Creative Carma to @viral palm (current: #9 - 676)

Does Anyone one knows how Make these Colors to Black sorry butt idk how to do it i never Photoshoped Before im on mobile
Is all i need for my Spotify Album Cover
Adjustment layers tab, use the black and white adjustment

as you see on the right side of the screen
"Adjustments"
@river otter
Do you know how to make it black?
Olney the Green and Pink
The white background can be white
do you want it more black than this?
I want it to full black
just play with the black and white settings
Just the triages

Can you send it?
@candid cairn i never dune Photoshop before am on mobile Pls can you just send it
Hi! If you want others to do stuff for you, please state it beforehand, the goal of this place is to learn how to do stuff.
Pl ask explain directly.
when im trying to save it as png my colors are ruined

Sorry never Dune this before butt he could just send it when he was dune

And does work Screen Shot is to bluray and pixelated
Does it look the same as the PNG when you look at 100%
does anyone know how to fix it its for my uni project and i really need to fix it
i meant jpg sorry
jpeg
Sorry i never dune This wish i could help you
because the layers are merging together its creating this ugly brown look
u guys know how to help me?
@agile thicket can you help me to make this picture black like he did he just turn the back front of me just left me no one wants help me
Hi, if you flatten everything on its own layer, Ctrl+alt+shift+ E, does it look the same? Also check the image at 100% with Ctrl+1 Is your image color managed?
send me in private, i will give you the picture
can we join community voice so u can explain it to me by looking at my screen please
I did
Please go to general chat, and clearly state if you want others to do edits for you. This channel is meant to learn Photoshop
sorry
is this possible @hushed niche ?
Can’t for the moment . Double click on the zoom tool. This zooms your image at 100%. Does it look the same? If yes, look at a flattened copy, hit Ctrl+Alt+Shift+E
Also try the baseline setting.
If the image has lots of noise the preview at low magnification is an approximation. Zoom at 100% to see how the image will be once saved.
the problem is when the layers merge all together the colors are ruined
@agile thicket - Please don't ping the server staff or admins.
mb
You still haven’t answered my questions. Does it look as wanted when seen at 100%?
Ok does it look good in a merged layer?
.
And it is the same with Ctrl+alt+shift+E?
Is there another layer on top of the color lookup?

you telling me to select em all and do ctrl+alt+shift+e right
?
i just screenshoted it nvm
the quality is not as good but it will work
you got any ideas how to make the pomegranate seeds red?
@hushed niche
Select nothing, or the topmost layer then do a flat copy on top.
yeah the result is the same
Same as unwanted dullness?
You could you that as a start point, and try to push the saturation via hue/sat, or Camera Raw as a filter..
I used your screenshot. First created my own screenshot of the PS document (1).
Then saved a PNG (2). I can't see any difference. @agile thicket


Thanks for chiming in! Their second screenshot is lighter than the first one.
Gave +1 Creative Carma to @tame cape (current: #19 - 126)
I would do the same as you: a merged layer of everything visible and then save this layer.
I just can't tell from the posting history which colour varinate is the one he wants. And r talks about saving as PNG - but in the screenshot you can see the JPEG save as dialogue.
@agile thicket Can you please describe this in more detail?
They want to save as JPEG, and it seems that it is not a zoom quantization issue, but that the issue occurs when flattening/merging.
Im trying to make all the white black but without leaving any white

how can i increase selection

In the top menu go to: Select>Modify>Expand.
I'd use Advanced Blending...
woah...
o
how did you unlock yours

Tap the lock icon on the right
What is indexed color

A smaller color mode that can only have a max of 256 colors.
RGB is capabable of millions of colors.
Because Indexed Color can't be edited like that. With Indexed Color, transparency is either on or off. There is no variable transparency like other file types, e.g. PSD, PNG, etc.
Oh
What about like making it a different colour on the inside

I have to step away to take care of something, Perhaps, @viral palm can suggest a method. :)
Oh Thanks
What color would you like?
Any colour except white or black, just curious how it'd be done
since it leaves this

IMO, Adding a Hue and saturation adjusment layer would be the easiest way to do.
If your canvas is 720p (1280x720) and you place your 1080p image using "File/Place embedded" > your 1080p image should be placed as a smart object and be sized to fit the canvas.
hey, I need some feedback on my user persona and user journey. If someone doesn't mind letting me know if it needs anything, I would appreciate it. i wanna put it into my portfolio for a fictional energy drink i created in school


Hey! Quick question, how do I get to this tab where you can remove the background?

you select your item and then while you have the selection tool selected, you go to the top, and there will be a button that says select and mask

got it thanks!
Try on the #📝project-feedback section to get feedback.
Hey, need some help blending this in. just started using photoshop and have no clue how to use these tools


The ALT key. Click and drag on the handle
how do I take the background to being transparent wut method would you use

Thanks a lot both 🙂
Gave +1 Creative Carma to @ripe quest (current: #3 - 2618)
hi i have a problem with exporting a photo. At first i put a raw photo in ps, i put a threshold and similar effects on it. When i want to export this photo everything changes to something else what should i do? the photo looks the same except that the threshold causes such pixels and in my case it is as if blended with the original photo
Since blending option doesn't work well with this color background, I would suggest you to use color range to select the BG> inverse your selection> make a layer mask > apply a minimum filter to the mask itself to remove the artifacts on the edges.
Be sure to compare the two pictures at the same Zoom ratio... Previews looks can differ depending the zoom level used.
oh okey thank you
silly question but how do i copy and paste onto the same layer? when i select something with lasso for ex it makes a new layer for it every time. i probably don't have some simple thing checked but i've been trying to figure this out for around half an hour now
would merging the layers do the trick
maybe, im gona try and find the button
i think you select two layers and do ctrl+e or right click and select merge layers
i think

two or so
oh, i don't have much experience with keybinds, trying to figure out the tools right now
i have a fair bit of paint.net experience but photoshop is like a whole new dimension
yeah
As suggested, I would create the thing on a new layer and if you really want them to be one, I would merge the layers. Select both layers in the Layers Panel (hold Shift and click) Then right-click and choose "merge"
i want to blend like 3 of the same things together, im using blur tool because idk anything better and i thought it'd be easiest to have them all on one layer
Perhaps it is worth trying to group everything, copy the group and merge the copied group. Or create a smart object, copy it and rasterise the copy. That could solve the problem ...
any free thumbnail design courses?would really appreciate if someone could help answer my question
How can I apply a Camera Raw Filter to my entire picture?
in this tutorial (link timestamped) he says "now we apply a camera raw filter" to the entire picture, but when I select everything I cant apply a crf https://youtu.be/lJiq3hsiLto?si=nO64Ya3wWLWlXF80&t=297

Learn how to create a VIRAL detective pinboard thumbnail in Photoshop! This tutorial walks you through adding red strings, notes, and photos to create a mysterious and eye-catching design. Perfect for true crime, mystery content, or any video that needs a standout thumbnail.
- Follow Me :
X ► https://x.com/HoussamBoubagra
Instagram ► / houssa...
Hey, I need help with logo creation I have no photoshop experience at all
I have a mobile picture with a letter G that I would like to be spelled as a word..
anyone willing to help? Or not really
Did you try thumbnaul design with photship search on Youtube?
Im new to thumbnail making too, and Im just looking for tutorials for the specific style Im looking for
Im a noob and Im just making this right now, so I would suggest looking in YT for tutorials, there are rlly good ones out there

@tame cape @hushed niche thank u guys
Gave +1 Creative Carma to @tame cape (current: #19 - 127)
Thank you @hushed niche
Gave +1 Creative Carma to @hushed niche (current: #16 - 136)
The problem with this type of tutorial is that the content creator shares the accelerated process to impress and doesn't explain all the steps. To be able to use Camera Raw filter you must make a "Merged copy" of your whole design change this layer to a Smart Object. Check the print screen of the tutorial, you can see the smart object used for camera Raw filter on top of the layers pile.

Here is a short video to show you how to create a Merged copy of your design, change it to a smart object and apply a Camera Raw filter.
1- Create a blank Layer on the top of the layers pile,
2-Merge all visible layers inside this new layer with this shortcut: Ctrl+Alt+Shift+E
3-Change this layer to a Smart Object : right click beside the layer name in Layers panel then choose: "Convert to Smart Object"
That's all.
@twin crown - You can't post self-harm images here. Sorry.
oh sorry
what is this edit called>

Hi. The style would be surrealism. The method would be a clipping mask.
Hello everyone, I need help
I exported my psd file as a pdf (adobe acrobat)
now I want to open it as photoshop file, but I can`t, there is an error "version is incorrect". I don't remember what version I used for that file, so how can I know, or how can I turn it back to photoshop file

I never had this but it's possible that you have applied some weird PDF settings when exporting (or you didn't check them when exporting and had faith in the current ones, which may have been modified prior)
BTW, important to know : PDF in Photoshop will not keep it editable (like it is in Illustrator, or in the Beta version of InDesign)
So I would question the need/advantages of saving as a PDF only to open again in Photoshop.
Does the file open correctly in Acrobat? That's the natural habitat of PDF files...
Bottom line, you cannot turn it back to a photoshop file like that.
A tip would be to open it in Illustrator, identify the layers (as long as you didn't rasterise anything like the text layers, it should be good)
And copy each layer, and pasting each layer separately in Photoshop (the regular CTRL/OPT+C, then CTRL+OPT+V)
In Photoshop, when prompted, choose either smart object, or paths (not layer or pixel) depending on the type of layer you are copying.

It's a tedious recovery system, but hopefully it will serve as a teaching lesson: Always keep your files as .psd!
anyone teach me to create thumbnail in photoshop . i'm very new to ps
It will be difficult to teach you to do something that can be quite complex without you understanding the basics first. Even if I share some tutorials with you, they will imply that you aren't a complate begionner.
You need to learn the basics first
However, it's quite easy, it's within the app!
Go to help>hands-on tutorials

Then you can go to specific collections of tutorials, here are the ones you will need for Thumbnails (among others!)

Thanks! I ended up just exporting the image and making the changes on another porject, but this is much better, thank you!
Gave +1 Creative Carma to @viral palm (current: #9 - 677)
how can i get rid of theese gaps between the letters?


tysm
No problem
Hey guys I want to change only the tank contrast. I already created a mask for the tank but I think i'm doing something wrong.
Can someone tell me how to change the contrast only for the tank?

Try to use clipping mask
Hold Alt + click between layers (Brightness layer and mask of ur tank) ... clipping mask does that that settings from layer above will apply only for the layer below...
Hi, That’s for character width. Use the one just on top.
Mb
I tried this but the color/contrast of the tank doesnt change
Use Curves maybe instead of brightness
No prob, it was very close 😉
Thanks for leading them the good way
Gave +1 Creative Carma to @thick tangle (current: #106 - 16)
Did you click between both layers? Post a screenshot showing the properties of your adj layer, and the layers panel.
yeah I did but I did something else wrong. Found the fix now it works!
Thanks for you help guys
Care to share how, it might help someone else. You could also move the mask from the layer to the adjustment layer, alt-drag
Oh yeah
I forgot to add the mask on the layer of the image.

You need to add a mask on a layer of a image. Not a emty layer
Why not change everything?
@still warren

à force de test j'ai réussi à faire de ces 2 images (1 et 2) l'image suivante (3) mais le résultat ne me plait pas trop...
J'essayais de faire en sorte que la bouche soit en fait le couvercle de la boite, auriez vous des conseils à me donner ?
After some trial and error, I managed to create the following image (3) from these two images (1 and 2), but I’m not really satisfied with the result...
I was trying to make the mouth look like the lid of the box. Do you have any advice for me?


Ton image ne pourra pas être convaincante et réaliste car la perspective de ta boite ne permet pas de voir le dessus du couvercle.
Pour que cela soit réaliste ta prise de vue de la boite doit être plongeante et non ascendante.
SVP garde tes question en anglais lorsque tu postes ici car:
1 - Plus de monde pourra t'aider et/ou répondre à tes questions,
2- Les réponses données pourrait également aider d'autres personnes qui ne maitrisent pas forcément la langue de Molière.😉
Alright, sorry about that. In the future, I'll post my questions in English. Thanks for your quick response, my friend 🙂
I liked the darkness but the tank needed to be lighter
But what setting did you change. Will try it.
I'm trying to create an animation using the timeline. I want to let wheels turn around. When i try this it almost works. The wheel does turn but the highlighted edges i created using Bevel & Emboss turn with it while they should remain static. Does anyone know a solution to this?
If you're rotating the object, the Effect goes with it.
and how do i avoid that?
I don't know. I'd have to think about it. It would likely require a complicated solution with an additional layer, transparency or Advanced Blending.
hm, so i would probably be better of either removing the highlight or making the highlight consistent over the entire wheel?
You can also hide the effect around the tank in the mask of the filter
here is the psd
@still warren


If your wheel is a smart object and the bevel and emboss layer style is not rasterized it should work...
If you've rasterized the effect the hilights and shadows will follow the rotation (video #2)
The effect is applied within the smart object since i need the effect on the inner parts too

I think i found a solution. I'll just convert the inner part of the wheel (inner circle and lines connected to it) a smart object within this one and make them rotate, that way it'll look like the wheel is rotating.
As I suggested earlier, you could make a copy of the outer shape, make it black and apply the Bevel. Then use Advanced Blending to make the black surface disappear... Then group the objects. I'm not sure how practical that is but it would seem to work.

Ok... Hard for me to go further without seeing how your file (smart object) is made...
You could try to animate the smart object without style and place over a copy with style but with fill set to 0%... It's just an idea....
Eventually, when the effects get too complex, you have to consider that you're not using the correct tool. Adobe After Effects would provide more robust control over animation of individual objects.
I will try @ripe quest 's solution first and if that does not work I'll send my smart object here.
Btw thanks a lot for helping me :)
Either way would work. Using the Fill Value or Advanced Blending. I suppose it depends on how much control you want over the transparent effect.
Thanks! Just stared a few days ago so I’m still bit new
Gave +1 Creative Carma to @tame cape (current: #18 - 128)
i've tried it and it seems to work. Thanks a lot to both of you d.humann and Franck Beaume
Gave +1 Creative Carma to @ripe quest (current: #3 - 2619)
Glad you got it sorted out
You guys just do this in your free time?
Yes. I've been a volunteer here for years. Trying to give back to the CG community. Also part of the Adobe Community Experts group.
Unless it is a cosmetic effect of your choice, I’d consider centering the circles with the alignment features.
We're all here to learn. Education never ends. Thinking through problems and demo-ing techniques helps to keep the blade sharp. heh
The world is happy to have people like you
You would imagine how much one can learn helping others and seeing other’s solutions. And it feels good to pay it forward.
Never stop learning!
hello I have a problem when I try to open a smart object I get this message, I think it's because I had set "always open with..." on an old version of photoshop

can you help me please
« Unable to modify the original Smart Object because the application with which the Smart Object was created could not be launched. »
Was it created with somethinmg else? (another software?)
Say you embed a file format that is recognised but from a software you don't have a copy of (illustrator for example)
Can someone write a word based on a style provided in picture?
you won't be able to launch it
If you need someone else to do something or you ask in #❓ask-a-question
Be sure to be detailed and share images and stuff so people don't waste their time trying to mind read you!
No time wasting. I need a word "Glonks" spelled in exact same manner, style, font, colors.

Still you need to ask where I told you!
This channel is for when you need help with Photoshop, #caht is for the rest
Only if you are prepared to do the work, help with Photoshop, not "I need someone to do something for me) this is different
I can explain you how to type the words, and I'll do it here 🙂
You told me to shoot straight up. So I did. Before I asked, can anyone help...
There goes the Help...
Sorry my bad, I typed the wrong channel, #💬chat-general is where you need to ask
Sorry
You may find someone in #💬chat-general who wants to do it for you... Ask a question is more for people who needs help to do things...
I am doing things. I'm asking. LOL
question closed, I moved to general chat
Weird that when working with code you can help people and people help you. I my self help peops with codes. You know, as a no big deal type of thing. Nothing major, you know. But this photoshop, it's like asking for a kidney. Second time in my live I ask help, and man it sucks...
🤔
There are a lot of very committed people here to kindly help photoshop users... Perhaps you could ask yourself how you ask for help...
So 20 mins have passed, no one has worked on your project and that is unsatisfactory?
You'll have to wait patiently until someone (who has the skills) has the time and the desire to work on it. However, there are no guarantees that anyone will do it.
Why when I try to make rounded rectangle, it ends up so stretched? I want the roundness to be the same for angles, just like a regular rounded rectangle

Why don't you use a black shape with a thick white stroke (instead of two rounded rectangles)?
what do you mean by "black shape"? I need only one rounded rectangle but I don't understand why it looks that stretched.
something like that

thank you kind sir
Gave +1 Creative Carma to @hushed niche (current: #16 - 137)
Is this masterpiece done with graphic tablet and real photo or someone draw this from zero?

This is probably generated pixels.
i like highlights, shadows.
I have tried this for year using diffetent photos, but never really succeed to make it look this good.
I ask, perfectly, like a most humble person in the world
Allow me to reiterate: you can make project requests in #💬chat-general. After you make the request, you'll have to wait patiently until someone has the time and the desire to work on it. However, keep in mind that there are no guarantees that anyone will do it. This is a resource for people who use and are learning how to use Photoshop. It's not a design service created to fulfill project requests.
Many of the generators can produce painterly results.

In my opinion, the image was generated - there are some typical AI errors


does anyone know why my inverse crop is blurry?
also does anyone know why i can't crop a second inverse circle?

What do you mean by "crop" a circle? I'd suggest using a Layer Mask?
This can happen when there is feathering applied to a selection.
here's what i was doing
(using inverse though)
I'll try your approach
You can do this compound vector shapes but I think the Layer Mask thing is easier (to do and understand, if you're a beginner).
Also, the Layer Mask is one of the most important concepts to grasp when it comes to being effective with Photoshop.
I reset the tool, and it still looks like this

it's somthing that has to do with the project I suppose, since when I open another project, the rectangels get rounded properly
it's something with the grid
Please show a fullscreen screenshot with layers panel and title bar

Try again with a new document and make sure that Pixel Aspect Ratio = Square Pixels

It seems that your document was created incorrectly by mistake. see excerpt from your screenshot

yeah going to watch some videos, i always feel like i'm missing fundamentals and trying to brute force everything.
Hello, quick question. Is lens flare removable ?
Not immediately removable if it's burned into the image.
If its part of the image, you'd probably have to do some image manipulation to get rid of it. How successful that would be will depend on the image and severity of it.
I have sent you a personal message, if you could please respond I would greatly appreciate it
If you want to ask questions and learn, you can post here. Then everyone can learn at the same time.
I can't have everyone DM-ing me to ask questions. Sorry.
Also, then other staff and Community Experts can chime in as well.
I desperately need some help to make this frog jump. I combined all its layers and this took me weeks to create the frog alone cuz i'm new to photoshop but the whole thing needs to be finished due to tomorrow. I barely have any time and I desperately need this finished. Please dm me if someone would be able to help me to finish this 

anyone have advice for how to word things for AI
im trying to fill in a hole in the background and its being dumb
Hard for us to help without context...Perhaps you could share the image with the hole to give people a chance to figure out how to help you?

Use remove tool to erase the initial text then add your text with a handwritten or manuscrit font.
Wrong server.
We don't support other app here.
I don't know anything about Gimp.
what is the best way to perfectly smooth the jagged edge? The green object with the jagged edge is on its own layer, the curve continues outside the bounds of this example image and creates a more complex shape with a few sharp turns

use a higher resolution
@echo dust


Can someone help me with how I can make the frog look like it's jumping naturally in just 4-8 frames?
I ended up using Illustrator to trace the edge, then used blur within the edge of the trace to make the new smooth edge green
What is going on here
why do squares randomly appear
sometimes its one, somtimes its two
Main menu: Help > GPU Compatibility... Any errors or issues reported there?
ill try
Perhaps the GPU driver is out-of-date?

Open up the GeForce Experience app and update the drivers. See if that helps. :)
who can help me do my homework of ps dm me
Why don't you post your question here and we can help you do it yourself?

lazy lol i got oo many other homework
So you want someone to do your homework for you?
Can you explain in more detail what you did to trigger this?
yes lol
At least you are honest about it I guess 🙂
u want to help me?
i got too much homeowrk
for the holiday
Cheeky. I've got my own work.
ok 😦
Heya there, i got one 'problem' and one question 🙂
So i had this image which i removed the background using select-colour range- than mask, than i made the selection so it was whole, i than hid the image so only selection is left and filled it in with black, but as you can noticed in the 3rd image inside the black are white lines but my selection had is solid and theres not gaps in in the middle, i dont know hwo to fix this, i think it has to do with the original image.
Also another question is there a way to make the pixel count on the selection higher so its not as jaggedy?
Thanks in advance.


Hi, just painting in black with the brush tool does not work? The marching ants show only what is more than 50% selected.
Hi, do you need to be in CYMK, or are you in duotone or something else? Check the title tab of the document or color>mode.
Please show a full screenshot. Did you click in the image? Did you change something in the preferences?
That is not the most space efficient screen setup, it looks like you docked your panels to the timeline one, then disabled the timeline. But to each their own.
I have a massive monitor, this allows me to effectively see the layers panel which is 99% of what I do on Photoshop
If there's a better workspace, I'd love to upgrade

Hello everyone,
I want a help from you all
Does anyone has any idea how to add elements like this in your existing logo


Hello, that’s very few frames! I’d start with a foreshadowing of the action, make it look like the frog is getting ready to jump by getting closer to the ground. Then you’d have the jump itself where you’ll need to separate the legs to puppet warp or redraw them totally as they extend. Not a few clicks operation.
Hey Pecourt thanks for replying,
I tried brush an no it doesnt seem to work: It does when i spam click it and even spam click with the bucket, but than all this grey stuff appears on the outside.


Gave +1 Creative Carma to @hushed niche (current: #16 - 138)
i might have an idea
Spam click? Like multiple clicks? Just make the brush wide enough, and click and drag along the line, or even click, shift click to draw segments.
The spill is because your selection was not click or white, it had lots of grey tones. Maybe hit Q for, quick mask, tighten the tones with levels, Q again?
Yeah, spam clicks.
iIll have a go at what your saying, cheers thus far.
I feel like i am doing too much, i am making a poster for a friend, the comics shown are all the times batman has exhibited these qualities listed, and also the font i dont really knkow what to use


My question is, how to improve it

oh my bad
dude @woeful cargo great job mate they all look incredible!!
can i use them as a wallpaper please?
sure im almost done
look at #📝project-feedback
how do i make the "hours" have the same stroke as "day order" ?

wait can i ask illustrator quesitons here?
Select Both Objects (Hold shift)
Apply the Stroke [Window > Stroke] (Shift+X)
Hi, we are friends, but the correct spot is at: https://discord.gg/adobeillustrator
Would it be alright if I ask for some help to finish this please? I barely have time to continue and the problem is I need to finish this due to tomorrow. It took me about 2 weeks to make the frog since I don't have any experience before this 😭
What is this on?
U can share the file, I'm up for the challenge, will take about 2-3hours max, I'm just lazy
It’s kind of you, but I am not sure if that’s their homework, and there’s very few learning involved for them…
🧙♂️ Just tryin to help
I’m not chastising you, but wanted to point out the giving a fish vs teaching how to fish thing.
Maybe it would be good giving pointers, or helping the separation of the limbs, and showing tips, directions rather than doing everything would be beneficial for everyone. That said , if you learn from it as well, good thing!
 i offered to help since they said they did try and the deadline was near, but i do appreciate ur POV of letting them do it themselves so that they can learn, I will take that into account from next time
Yeah, it's a bit of a strange request to be honest. The original image looks to be a vector, but I'm not confident that the OP created the original frog image themselves (I mean credit to them if they did!). - Better than I would do - *But also, I wouldn't have the patience to spend more than 2 hours on a drawing/illustration, let alone 2 weeks.
They would need to redraw the same frog another 3-4 times each in different poses.
You can't really use puppet warp, since the limbs and perspective wouldn't allow for it.

Your best bet @dense linden, instead of asking someone to 'finish off' 85% of your original task, is to start again with a frog that is in a more 'side profile' view, and then copy the limb positions from something like the example above.
hi, whats the best way to achieve this? other than doing manual masking
goals: i want the red line to be behind the guy on the left (right now its in front of him), and then behind the guy in the middle (which already is) and then in front the guy on the right (so the red line is visible again)
hope its understandable, thanks in advance

yeah, this is usually done with 'masking'
you just hide/erase the red line when it's supposed to go beind the subject
thats manual work, i was wondering if theres a technique or trick that can be implemented in this scenario
Hey guys, apologies if this is the wrong chanel to ask this as i am new, im attempting to save a photo that i have edited on Photoshop but for some reason it wont save all the stuff ive done only the base photo? im so stuch 😦 is there a way where i combine every layer?
how do you save it, and why is it only saving the base layer. if u can provide your layer screenshot it would also be nice

this is essentially what ive done, and i tried saving it by both saving as copy and save as
and ive placed it in RGB Colour mode 16bit
How do you export as SVG? The preferences tab doesn't have a use legacy export option anymore
If you want all the layers SQUASHED TOGETHER like a normal image, Export it as a JPG or PNG
However, ALSO save it a PSD file, so you still have your original work/layers available to you
Was this directed at me cause i have no clue what SVG is 😭
lol no, I don't think it was
No, SVG is Scalable Vector something, lets you resize image without loosing quality
I really dont want to have to switch from photoshop to illustrator, so I hope there is a way to
have u tried file > export > quick export as png?
I'm not judging, since I'm not a pro in that area, but why are you using photoshop to try and work with vector graphics?
YOU LEGEND I LOVE YOU
i cant play the video rn my internet is so horrible, need to download it first
thank you soo so so so so so much, i spent 30min trying this out hahahaha
😹 😹 np happy to help
I already had experience with photoshop, and I personally found it easier to make vectors (In my case, used with GUI elements) with photoshop instead of illustrator. But anyways, I think I would have to learn illustrator, because; Photoshop image, vs SVG converted image


You can just COPY And PASTE the vector shapes out of Ps into Ai if it helps.
Yes and no; If the guy on the left is separated from its background, you could try changing the order of the layers, so that it is placed above the line. You could also copy the line a few times, and cut it out, so that you could apply a blending mode such as darken to be behind the grey drawing, but appear above the white.
wrong guy man
yeah all those subjects r pngs, i was just wondering if theres a clever way to achieve it. because the task itself is not hard to achieve, but it sure require some manual work
Graphic design is a craft; not everything can be automated, and taking two minutes to learn masking is IMHO the best way to spend your time.
Basically, hit D for default colors, get a default round brush, target the red line layer.
Click the add layer mask icon [O] at the bottom of the layers panel.
Make sure that the mask is now targeted (black outline) then know this: black hides, white reveals, and in between you have partial transparency.
Hit X to switch to white if you hide too much, etc.
It's fine, I just need tips on how I can make it look more natural cuz I've been trying to make it look better using the puppet warp, but it just doesn't give me the result I want or need
Yeah, puppet warp absolutely won't work.
The term animators use I think is 'character rigging'.

Each limb and joint is typically adjustable to allow you to move them independantly.
then how do i fix my frog?
(TLDR - You can't, unless you're incredibly good at drawing quickly)
then i suppose i'll have to do it differently so the water flows and the frog just sits on the lilly while it gets dragged along
probably a quicker/easier win - yeah
for an animation which i am creating, I'm trying to animate smoke. To make the smoke disappear i have to play with the opacity. Some circles overlap creating this effect. Does anyone know how to fix the overlapping parts combining?

Would it be easier if they all shared the same gradient mask?


You could still include a texture...

Oh thanks, ill try that
dont know how to call it but i how add this texture onto the white pattern only


I'm probably doing something stupid but why is this not working?
I've got 2 hues of yellow, how can i match the desaturated one to be the same as the brighter one

i dont want to use color range as I don't want small artifact lines which havent been selected to still be different
please show layers if u want betterr help
well u can inverse
im trying to give this image a better background kinda like this one


and ur question is?
there are no layers, thats the 1 img
if it is about feedback then please head to #📝project-feedback
any tips on how i can do this
ohh sorry then u can just create a mask or fill
and how can i make a mask based on just that hue
https://www.youtube.com/watch?v=XclZZSW2WSc trying this but its not really giving me a clear difference since theyre so close in value/color
Quicky Remove Any Stain, Color Cast, or Tint Using a Very Powerful Technique in Photoshop! Learn how to use the range feature in Hue and Saturation Adjustment Layer to selectively target colors and remove stains.
Hope this tutorial helps you.Thank you for watching :)
Full Version of the video: https://youtu.be/8-5GqhjHkZQ
► IMAGE CREDITS:
Tra...
Right click on the layer go to blending option

one sec
Do u want it fixed or are willing to learn to fix it urself?
learn probably cause there are 3 other files like it
-
Use the Eyedropper Tool:
- Select the Eyedropper Tool (shortcut:
I) and click on the yellow area in the image with the correct color. This will set the foreground color to the desired yellow.
- Select the Eyedropper Tool (shortcut:
-
Create a New Adjustment Layer:
- Select the image you want to correct. (U can make a quick selection layer for it)
- Click on the Adjustment Layer icon at the bottom of the Layers panel and choose Hue/Saturation.
-
Adjust the Hue/Saturation:
- In the Hue/Saturation properties panel, check the Colorize box.
- Move the Hue slider to adjust the color to match the desired yellow.
- Use the Saturation and Lightness sliders to fine-tune the color to match the target yellow.
-
Use the Color Balance Adjustment (optional):
- If further adjustments are needed, add a Color Balance adjustment layer and tweak the shadows, midtones, and highlights to better match the yellow.
-
Blend and Mask (if necessary):
- If the adjustment affects areas you don’t want, use a layer mask on the adjustment layer.
- Select the mask and paint with black on areas you want to exclude from the adjustment using the Brush Tool (shortcut:
B).
yes, u can do so by creating ur own rays and picking a gardient for the background
ill give that ago. Just worried it will look flat and fake

▽ FOLLOW
Instagram ► https://www.instagram.com/obaedakorani/
Facebook ► https://www.facebook.com/obaeda.koranii
▽ PLAYLIST
Latest Video ► https://youtu.be/zlomFl0KSVQ
▽ Stock Image
Street Light ► https://unsplash.com/photos/BhgsNr1t8tU
Thanks for watching.
Any comments are welcome!
#Photoshop_2022 #Design #Short_Tutorial #SpotLight #Tutori...
the problem isnt the light its the background. i just want it to be the plane navy with none of the wood visible
It seems like you'd have to carefully mask around these objects.
😵💫
and then replace the background with just a rectangle?
it will look flat no ?
After you get rid of the background, that part is simple.
well why not just make a background navy color gradient layer and give it texture
remove tool?
does qnyone know a solution?
i know how to do that. ive tried it and it looked bad
thank you
Gave +1 Creative Carma to @grizzled spade (current: #173 - 10)
no worries
@ripe quest can help, I haven't tried animation stuff on ps until now
...yes ive tried those options before, but none of them overlay on the white only
Perhaps I'm not understanding the goal here.
i want the overlay over the transparency to be transparent
I showed u in the screenshot that the black is gone, i have only white now
i don't understand sorry
if you look at my second image you will see my goal. but in this image there is more of the wood that needs covering and just wondered if there was a more professional and refined approach
this is for my college portfolio so i need it to look real lol
Well, there are transparent areas in there where you can see the wood behind it so that part is challenging
This requires a very careful masking job, for sure.
so theres no real way to do it other than masking?
do you have any suggestions to make the background after the masking?
D. Humann can you help me with this
this

i want this.
but not made awfully through ten thousand online apps
that's easy
yeah i get it
its easy for you experts
but im new there are eight million different buttons and i dont know the function of each and every one
sorry no no, i didn't mean it like that
Show me the image, unedited.
Is it this?

And you just want to drop the white pixels?
yes
yeah
It doesn't tile well. Like I see a "seam" there. Is that also an issue?
nah thats just collateral, anyone can fix that with better juxtaposing
this is what i did

nope
thats exactly what i needed
Just do the first step as i told u
uhuh
Use the blending option remove the balcks
Is that the goal then? To have that other texture "fill" the black spaces of that pattern?
yeah i need to learn how to fill only certain pixels of an image for example
And then use the Magic wand selection toold to select all the white, Once u have selected all of the white, make a mask of it
if that makes sense
I'll send u a video of doin it
OK. One moment.
thanks a ton
@runic stone - This is what Dhumann was suggesting.
yes
Just change the blending options -
move the slider on the LEFT to hide the blacks
move the slider on the RIGHT to hide the whites
how did my screen recording go for 173mb
1 file sent via WeTransfer, the simplest way to send your files around the world
I won't do a screen capture if you've got this. You on it?
Here u go just follow
I did it
i just did it in a haste, i would suggest u do each selection of the white object while holdin down Shift
Yeah, I think so. - Alternatively I can leave you guys to it. #TooManyCooks
I'm sure we're all coming up with similar narratives. :)
can someone help me with this now (if you're done at least)
actually this is nice, didn't know this way of doin it
i made a mask of all the white particles, and linked it to the texture
There are several ways to go about this.
The one thing i love about being here, u can always get surprised of doing the same stuff in so many ways
It's probably something obvious! - But unfortunately I don't animate in photoshop.
Maybe just remind yourself with a real beginners video on youtube. You'll probably spot the missing step.
Did you see this warning?

i did but i disabled the mask
would someone be able to help me for a moment in a voice call? I made my frog into a smart object for frame animation and i can't seem to figure out how to make it work in my main timeline


In this video will look at the basics of how to animate in Photoshop. We will create a bouncy ball animation which will contain a blend of transformation and opacity control animations. At the very beginning, we will create the basic bounce motion, then we will add realism by adding spin and squeeze to the bounce, and we will finish it by adding...
@dense linden
Convert the shape to a Smart Object and it will be "animatable"
i already made my frog into a smart object though and the frame by frame is in there.
I think perhaps you want the Video Timeline and not the Frame Animation.
i need the frame animation
They don't "work" the same way. The same options aren't available in Frame-based animation as with the Video Timeline.
Were u able to do it?
what did you do after selecting all the whites with the wand?
since i cant see which shortcuts you're pressing

oh sorry i pressed Ctrl + J
Command + J on mac
No wait
press ctrl + z
undo

done
done
and then drag and drop it to background
or wtv u want the texture to be
and delete the upper layer wtv that was
got it?

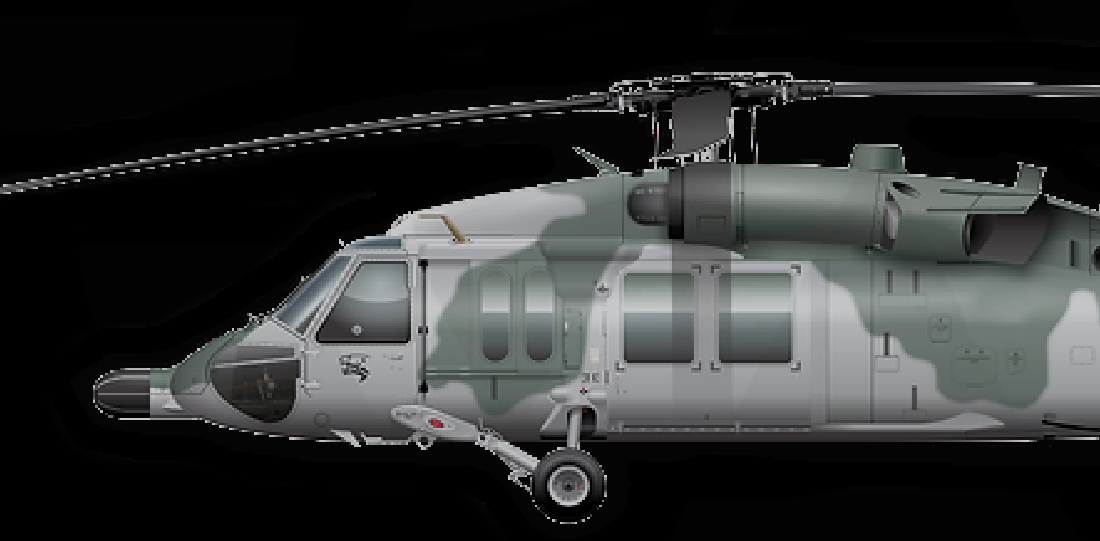
yes now u invert it

click on the mask go to properties and invert
got it now?
😭 please tell me u got it


show me ur layers

i dont know
i never rasterized it