#❓ask-a-question
1 messages · Page 98 of 1
thanks!
Gave +1 Creative Carma to @ripe quest (current: #3 - 2538)
Or maybe an easier, less editable and goofier approach if it control doesn't matter as much. heh
Yeah. Sounds challenging. The first thing would be to make the two faces. And make sure they "line up" when you do the mask. Then worry about the "unzipping" part after, I guess. Then you'd need assets for a hand and an appropriate zipper that would make sense for the comp.
but you know im the hardest designer alive. it will be done by tomorrow
just need a monster and a good playlist
thanks for the tips
Gave +1 Creative Carma to @ripe quest (current: #3 - 2539)
i could really just switch that skeleton thing for the demon but that feels like cheating ngl

The "C" stands for "Confident"
but this is a good reference
I'm not sure that zipper makes sense to me. I would want it to be down the middle. Symmetrical. But that's just me. :)
i hear you
like functionally it doesnt make sense
but as long as people understand and i like it. i dont mind

Edit > Transform > Scale... i.e. for making stuff larger.
can i ask a question unrelated to photoshop
If its going to turn into a conversation about unrelated topics, then post in #💬chat-general, please. :)
Hi, if I want to replace contents of an object, it has to be converted to a smart object first right?
if the object is something of a placeholder, then yes
Dear Photoshop experts, I need your help perfecting a procedure.
I'm trying to create a tutorial for how to make a Ditherpunk image sequence.
My current action sequence is:
-Pick Image size
-Adjust Image Canvas
-Select Indexed Color mode (Set to 4 colors, black and white)
-Change "Color Table" to load a saved Pallete file (.act)

For some reason, including "Change color table" always messes up the image sequence, and I don't know why.
I've managed to finish sequences by only selecting a pallette with the "Convert to indexed color mode" action
But this limits the amount of control I have over the pallete and the contrast.
Ideally, I make a set of action where I first convert to a 4 color indexed color mode,
and I am then able to hand select every color by editing that pallette....
This is an expert trick, but it's very important I master it....
I want to make this white background either transparent or black and was just going to do a mask with some manual work with the bullet effect but was wondering if there was a simpler way? Mainly wondering because I run into this same situation every now and then

But I really don't mind doing the manual work that photoshop already makes easy
can anyone photoshop somehting for me rq like super easy just changing 1 number
Please don't ask for help with forgery...
its not like that lol
How can I accept myself and my work on ps?
Accept?...
Okay fair enough
Can you clarify your question?
Okay I meant got like an artist idea block in creating new stuff on ps
Idk how to get that going
You can look for inspiration anywhere, go for a walk, meet your friends, listen to some music... 😁
Take two dissimilar ideas and try to combine them together in a unique or interesting way.
There are also sites that will suggest design prompts at random.
Gotcha
Just suggestions. There are lots of different ways to find inspiration.
It happens from time to time.
No wait I don't feel confident enough to be good like you all
Ps many hidden features Ik some of them but ye...
Do you guys know any paid professional course which helps a lot to progress ?
hi all! 
im trying to scale up this pixel art im working on and id like for it to keep the hard edges and crispness of it when i do that. i thought thise setting here for image interpolation would help but it didnt. any ideas on how to go about this? :3


hey is there a reason i an use smoothing on my brush?
i dont have an image as an example but this could be easy to imagine if i have a character or a whole image how could i put text behind the character
ill try to find an example
this image how he has the text behind his head how could i achieve that

Hi so, so i use lightroom cloud in another computer. So the option "edit in photoshop" download the image to then open in photoshop.
Where are stored that photos in my computer?
Use layer masks
I wanted to ask about this another time.
I think it has something to do with how Photoshop initially generates the black and white pallette?
In some pictures, the colors will be right in the picture, but have a slightly different order in the pallette
so when I import a pallette file, it changes the wrong ones.
how do i make the texture of these guys same as tomerry from lor?

i did have an idea about just using clone stamp but it looks kinda messy

Looks fine to me
thx 😄
Gave +1 Creative Carma to @craggy osprey (current: #957 - 1)
Hey guys im really new to this photoshopping stuff and you probably are going to think im ridiculous but i randomly came up with this idea in my head after listening to “Six Foot Seven Foot” by Lil Wayne and i just wanna try and edit this photo to where it looks like the elf on the shelf wrote a lyric from the song on this “christmas to do” list but im so bad i dont even know what im doing or how to make it look realistic 🥲 here is a reference photo if anyone can try and offer help or even just do some simple photoshopping urselves im willing to recompense for ur time thank you! 🙏🏾 and Dms are open

How do i make the ShaPE pEN outline Curved?

What do you have as a strat photo for this. Do you already have some text written on the notebook, or do you start from scratch.
Because as it looks now, it looks like the lyrics are already there? unless I misunderstood something
You need to manupulate the handles with your direct selection tool (the white arrow)

why cant we clip mask groups
Some people like to draw first and finesse their curves later (Nothing wrong with that!), some people like me, like to try to get the curve right with the pen tool, while drawing, directly
i feel like this is something that is very needed but not talked about
i dont want to convert to smart object cause what if i want to go back and change something
https://www.adobe.com/uk/learn/illustrator/web/pen-tool-exercises?locale=en-GB&learnIn=1
For some exercises mastering the pen tool
Access Adobe Creative Cloud apps, services, file management, and more. Sign in to start creating.
and i dont want to create a new group to convert because my scrach disks dont like it
What do you mean by that?
clip a whole group a to a certain layer
You can, if you convert the group to a smart layer
say i wanted to clip the composite to the car radio

isnt that just a smart object
No i want the have the end of the outline not in the middle
like we get sharp edges when we leave the outline
You'll get a smart object called "composite" clipped to car radio, but a smart object that contains the group in its entirety (and can be tweaked)
what
Try it!
na bro
wait wat
wheres the smart layer thing then
i only see smart object
where

So I'm afraid I don't understand what you mean

thats going to merge everything into a smart object
i still want to tweak each individual layer
Yes, but it's not really merged you know
but it acts like one you know
This is what I'm getting at

i don't wanna bend the outline line i want the edge to be smooth and not sharpy like this
i dont get it

you're going to have to create individual lines for that i think
you're asking for 2 things at once
check the stroke options when you got your path selected
I assume you want a rounded end instead of a square end
can you send me some fire gradient maps
for graphic designs
crazy color combos

Sorry I don't have any
Not really the kind of stuff I would need 🙂
i found this one freebie pack that had like 50 gbs of stuff. and i LOST IT BEFORE I DOWNLOADED ANY
im so mad
try FIlter - stylize - oil paint and alll value 10 exepct of last
Browser history?
Yes
Shush then
Yes thnx exactly 😄
God forbid someone tries to better their understanding to help
In that case use the screenshot I shared earlier ("Rounded cap")
Well not really like u helped anyways.... U should've read it from the beginning for better understanding anyways
You don't have to open the "more option" window if that's just what you want to do but I had to to be able to screenshot it


Glad you got it sorted! 🙂

BTW, you can have the same with corners (rounded or straight)
Also, and I don't know if that's the case with OP, but English is not everyone's first language (It's not mine either)
So sometimes just a little bit of empathy doesn't hurt
mf u think i didnt try
Sorry 
nvm bro
🤦


im a better designer than you bro
They arent there im trying to get rid of the text on the notepad to add the lyrics except i still want the “christmas to do list” on there so essentially what im trying to do is something like this but still in a checkbook format and get the same color as the “Christmas to do list” text on my photoshopped text if u get what i mean

calm down
OI, you two!
Stop it or it's a time out. I said we are moving on
Let's start with the rough idea, The first step would be to create a notebook page like the one you see, and write on it. Not in perspective, just a new page, with a new document
And then we'll apply this new page to the original notebook
@grizzled spade remove that emoji, or it's a time out
Thank you
okay i dont wanna be annoying but im super new to this so how would i go about making a new notebook page?
@bigE, so create a new document with a white background, write your text how you want to see it on the page. And once done, we'll put some blue lines underneath to create the lined paper.
That's the trickiest bit, because you'd want the lined paper of the first page to align with the lining of the edges if you get what I mean
Say that this note book is an A5 format (looks like it by the size of the elf etc)
any ideas on how i could make the fish look a tad bit more realistic?


so create a new document in A5 (it will be too big but that's OK, all we need after all is the right ratio)
na bro.
If you don't know how to create a new document, I would suggest you start with the inbuilt tutorials within Photoshop, because you will need to know the basics to follow along the steps
I'm not a bro
my fault
okay thank you will do if i get stuck ill come back here with questions much appreciated
Gave +1 Creative Carma to @vapid flume (current: #8 - 820)
i will say i am on mobile as well
Go to "help" in the top menu, and then "handson tutorials"
Start with the beginner drop down menu and follow along with a few tutorials, you'll gain 1 week worth of knowledge in an hour 🙂
I can only help you for Photoshop on Desktop sorry
using ps on phone is insane
its okay i understand 😞
LMAO bro u gotta hear me out here it was a last second social media idea and i cant get to bed so 😭 i figured might as well ask
theres apps which are 1000 times easier to use
any recommendations?
picsart 🤷🏻♂️
cause this is lowkey a pain in my backside
bet thanks for the feedback
Gave +1 Creative Carma to @reef gate (current: #957 - 1)
The sequence of events will be:
1- create an entirely new page with your writing on it, apply a series of lines with the method of your choice (the ideal method would be to create a repeating pattren so it can be changed), you may not have to create those lines depending on how #2 works. Save that doc and give it a name
2- go back to the elf image, and ask GenAI to remove the writing from the original page. It will help keep the lighting and shadows as you will need to make it realistic and not paste an entirely white page with no lighting (see the light and shadows on the page in your ref). If the Gen AI reproduce the lines well enough, then no need to have them in #1
3- Paste the page document from #1 and use the transform options to make it fit in the perspective. (file>place as embedded)
4- change the blending mode of that new layer (the writing) to something like "overlay", you'll need to test which one is best in the list (it will keep the light and shadows from the original)
5- I think that will work without any further amends
Copy and keep that sequence of events somewhere so you can refer to it as you learn.
hi Sandrine
do you have any ideas for this?
Not really, I think it looks realistic enough
It's really blurry though, but I guess that was the intention
ah i think its just bc its a screenshot
@loud cove I wouldn't have said it like the other person, but designing on a phone is really bonkers. You need some screen real estate (and some powerful machine) to do what you want to do
Not saying that it's impossible, I can still retouch photos the old way if I want to, with brushes, ink, an airbrush and some Frisket films. But I won't
It would take me 10 days versus 10 minutes in Photoshop
If you need the right tools, then you need the right tools
If you need to colour grade something, using a mobile is OK-ish as long as you don't want to be super accurate (I'm thinking lightroom mobile). But what you need to do? Use a desktop.
Hi @turbid umbra
I don't see any difficulties with the ‘nearest neighbour’ interpolation method ...

can someone send me like a preset or a file that makes colors looks more cooler?>
in photos
like a color booster or smth you got me?
You can start with Photofilter

Cooler as hip, fashionable or as color temperature?
If you go to the gradients panel, in its local hamburger menu, select legacy presets, and load the photography toning presets in the gradient maps, with lowered opacity.
Anyone know how i could get that blue/red/gray smokey texture thing

Paint Blue and red color on a layer then play with blending modes... Depending your image and the effect wanted multiply, softlight or color blend modes could work...
Apprecite it ill try it out right away!
Any chance u could send me that picture?
found it nvh
It's just a layer fill with filter/render/clouds with a second layer above where you pint your colors on then play with its blending mode to get the effect you want.

hi everyone ! do you know how i can remove those border to have a full use of the letter size?

where is the 2D tiger silhouette in photoshop?
THese probably depends on your printer. I have those as well but just on the edges, because my printer isn't a edge to edge
It's possibly that you may just need to change the orientation (landscape VS portrait)
This print pop up is driven by your printer drivers
Dashed areas are defined by your printer settings... Try differents "paramètres d'impression"
this one?

it's in the custom shapes

How would i replicate this type of dispersion-ish blur effect with the text?

TYSM!!
isn't that cause you're using my png and not the actual pixels like me tho? :0
thanks!
Gave +1 Creative Carma to @vapid flume (current: #8 - 821)
Your PNG is broken and not usable.
Or I have overlooked the original file. Have you posted it? That would have saved me a few minutes of work ...
i.. kinda forgot i could do that im sorry hahaha
yeah! i can as soon as i get home
you're appreciated !!! 
You are welcome to do this - but you don't actually have to.
If it's pixel art, then your image should be the same size as the one in the top left corner (one pixel = 1 colour dot) that I posted there before:
#❓ask-a-question message
Maybe a little off topic but i haven't used photoshop in over a year so cancelled my subscription and i wanted to use it the other day but its like £23 a month now MY question is. Is there a free alternative that i can use for a fairly simple edit ( A tattoo the Mrs asked about)
affinity has like a 6 month free trial iirc
Trying to recreate this, how would recreate that kinda broken texture for the pink text

Torn paper effect on the left or the grunge texture overlay?
thanks a lot, you happend to have any idea on which font it is
Gave +1 Creative Carma to @viral palm (current: #9 - 646)
I Don't know... Hard to see... It's a Bold sans serif font for sure.
oh im so tired dident see it was a question, torn paper, thought you said torn paper as if it was a tool
Imma search
does anyone know how to get this type of blur around the fighter

ayee we both doing ufc posters
yessir
I can't find the same D with the square inside hole... Classic "Helvetica Black" or "Impact" could work... Here is a quick video to show you How I would tackle the texture effect...
Ty! I got 2 more questions, how do i zoom out lol? and how would i remove the background of this pic


are you able to do a cutout (lassoo tool) then make that a new layer?
Ctrl+ to zoom in, Ctrl- to zoom out, Ctrl+0 to fit in window.
The checked background is often used as watermark if you want to remove and keep transparency you'll need to buy/licence this image.
You can search for free smoke background on internet... Adobe stock free section is a good place for that https://stock.adobe.com/free
Adobe Stock
Stunning, diverse collection of free Adobe Stock photos, vectors and videos. Free to download, cleared for commercial-use, royalty-free, no credit card required.
adobe won't let me download anything, it tells me my OS (?) isn't compatible. i've checked every requirement and i have them all, even exceed it in some places. i've no idea what the problem is and i need adobe for my project please god help me ive been troubleshooting for an hour 😭 ( im on windows 11 pc )
yes i have a good gpu, yes my processor is fine, i dont think its my graphics
how do i get a dot brush without the anti aliasing fade effect thingy?

just a solid color
Are you using the Opera Browser to download the Creative Cloud apps? If so, use a supported browser, e.g. Chrome, Edge, etc.
how do i remove the black background on this image

Try Advanced Blending....
thank you
Gave +1 Creative Carma to @ripe quest (current: #3 - 2540)
what can i do about the stem? i feel it takes away from the main flower but im not sure how to do anything but erase it and i cannot use ai

Clone stamp it out
Why not just paint over it?

I'm not sure what you're looking for, but the solution might be to change your brush mode to “Dissolve”.

if anyone is free can u help me with a project
what can i add to this

i dont know how to do much in photoshop atm, how would do i go about doing that?
I'm not sure you'll get many answers from so little information.
if you could give more details you might be more successful...
You should start by following the basic tutorials available in the "Learn" section of the photoshop homepage.
That's a good place to get started.

anyone know how to achieve this effect?

Basically: Adjustment Layers can get you most of the way there: Posterize and a Gradient Map.
I’d increase the size of the screen and fix up the typography
I like the overall design of him coming out of the screen
A better font and more consideration of letter spacing
The titles are all over the place, They're not aligned off anything and just floating awkwardly around.
Hi, can someone please tell me how to make the shadows on my main subject’s face ‘less stripey’?

I’ve followed some of the steps in this tutorial - https://youtu.be/mzkacYEaAG0?si=YgUxFAOTACklVEtr
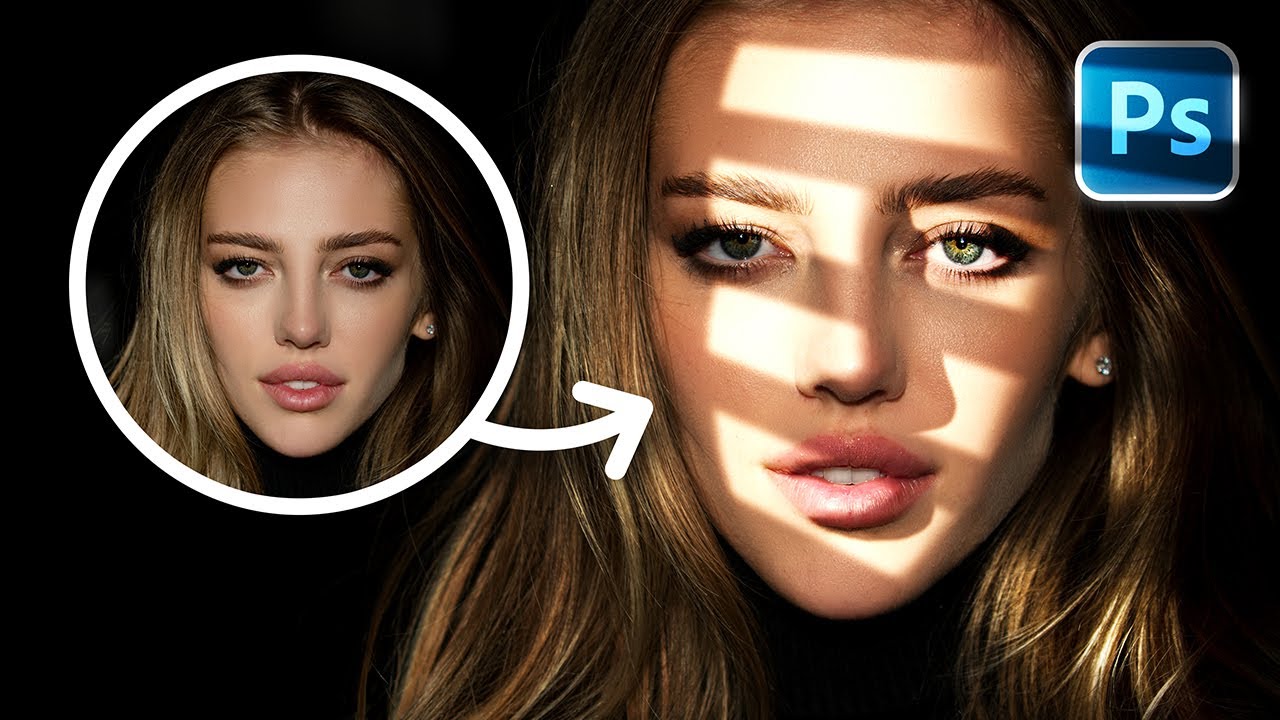
Add creative lights to portraits with realistic highlights and shadows using simple adjustments and masking in Photoshop!
🚀 Join PiXimperfect Pro - The Ultimate Photoshop Training Course: https://pix.live/pro
In this tutorial, we'll learn how to create beautiful and realistic sun rays on faces and portraits with Photoshop. We'll create lights a...
Just lower the opacity so they stand out less
Does anyone know where to get image processor pro?
The PhotoShop Scripts project is a catch-all for several toolkits and scripts that have been developed to facilitate the use of JavaScript for…
only place I found seemed to provide some other PS Scripts folder
Thank you! I’ll try!
Gave +1 Creative Carma to @sly hawk (current: #5 - 1055)
This is the only thing available right now unfortunately :(.
Oh that's great. I went to the same site, but when I clicked your link, it actually gave me the RIGHT file!
Oh that’s fantastic, I’m so glad
How to do this?

how to fix this shape text

Hi guys, i need an advice... What should i add to make it look better? And for you, whats the better version? Thanks!


yo bro can u also help me to make text like that

- The Typography looks too detached from the rest of the scene
- Option 1 is better in my opinion (personal opinion) since I think it has more atmosphere and mood
- You could probably set the red figures on the sides to a blend mode to make them appear blended into the composition
- Maybe you can blend in your central subjects and car a little more, and make small sky adjustments
Ok, thank you!
Gave +1 Creative Carma to @wooden minnow (current: #957 - 1)
Put it back and stretch it **without **using the direct selection tool
I think you should make the car bigger and closer to the camera. - Looks too small like they're driving a clown car around...

They also seem to have a dark shadow on their orange outfits. Especially the guy on the left
It's just shapes stacked on top of each other... as layers
completely overlooked that thanks
Gave +1 Creative Carma to @viral palm (current: #9 - 647)
Gave +1 Creative Carma to @sly hawk (current: #5 - 1056)
Hello do u guys know illustrator tutorial i can learn illustrator
Hi Maxxy, FYI, there is an illustrator discord, https://discord.gg/adobeillustrator and illustrator comes with lots of built in tutorials (into its help menu)
We are all humans, are busy working/attending school/designing, volunteers are not there 24/7. I learned a lot in AI from Deke McClelland https://www.deke.com and Monika Gause., https://youtube.com/@vektorgarten?si=GMVxrCCCnf1sEtI8

Self-appointed expert on all things graphics and imaging, here to answer your questions and serve your needs.

YouTube
Have you ever wondered why something didn't work in Illustrator? Or didn't come out as expected? Or do you want to know how to create certain styles and effects? Look no longer, because that is what this channel is all about.
My name is Monika Gause and on this channel I'll be discussing pesky Illustrator problems. Why things do not work and ho...
@sly hawk it doesn't work
Hold SHIFT when you drag
...
...
...
tadah!
thanks
Gave +1 Creative Carma to @sly hawk (current: #5 - 1057)
Or hit Ctrl+T, and Uncheck the link in the option bar
Between H and W
would anyone be willing to help me with installing adobe photoshop running into some problems namely running the correct installers
What wrong send a screenshot
its not letting me open it with any of my programs do i need to install it on chrome instead of operagx?

you can try to use chrome
Opera is unsupported. Try Chrome, Edge, etc.
DMG is for MacOS. The Adobe site can't detect your OS so its defaulting to the MacOS installer.
If you're looking feedback on the design, please post to the #📝project-feedback channel.
Got it my bad lol
Hi, I tried to blend this hourglass into the wall. but this is just rough and I know there must be a better way. Can someone please give me suggestions?

Gave +1 Creative Carma to @sly hawk (current: #5 - 1059)
i would like to create a similar layout to this in PS. is there a better way to go about this without warping each one of my page designs to fit the curved pages?

is there a better method to achieve this look in InDesign or other software?
it took me a while to even spot the hourglass. what are you trying to visually achieve exactly?
Yup, that’s the problem 😭, and also I’m trying to achieve a blended effect (blended into the wall so that it looks like it’s kind of a blended mural if that makes sense). Keeping in mind, this is a small piece of an entire composite that has already been completed, and this is the only element left.
hmm. maybe if you have an example of how you would like to be blended i can help you
Oh and to answer your question as well, I highly recommend InDesign for this, and if you’re unsure where to start, Adobe has a bunch of InDesign Templates like these available for download if you have Adobe Stock, but you can use the templates within InDesign to get started nevertheless! And definitely check out an Adobe Coach Certified course to get you up to speed - https://youtu.be/k01oYs6cPV0?si=-LxQg8ySN0ddhR5h

Access this course + 30 of my other courses for $20 p/m: https://www.BYOL.com/IDADVFC
Free Exercise Files: https://www.BYOL.com/IDADV
Free Trial of Adobe Indesign: https://byol.com/FREETRIAL7
Listen to the BYOL Insider Podcast here: https://bit.ly/3qajmCy
Follow me on Instagram: https://www.instagram.com/bringyourownlaptop/
Follow me on TikTok...
Sure, let me look for one! Thank you!
Gave +1 Creative Carma to @lunar belfry (current: #73 - 26)
i just scim through this vid, i think he mostly shows how to create a document. i already have a document designed and printed, i want to visually reprisent some of the pages like the screenshot i showed above. i've done it with 1 page flyers before, but this ones slightly more complex and looks more 3d, so just trying to figure out the easiest way to show my already finished project in that specific manner
Well, in that case, I’m sure you know that you can create pages in InDesign and rearrange them how you wish, but I’d suggest a combination of image placeholders and text placeholders in different layouts and placements! I think you should be able to achieve the look you’re aiming for! For example, for the tower page, it would be a vertical rectangular image placeholder for 3/4th of the page, then dividing the remaining 1/4th into two parts, and applying the header with some spacing and then once again applying a text placeholder for the body and basically just putting it together!
Once you’re done with this, you can export each page as a PNG and maybe put it into a book/magazine PSD mockup. The mockups typically consist of smart objects so it’s easy to replace and change up your content. You can find plenty of these for free online, but if you’re willing to pay, you can definitely get better options.
yee the last bit is what i need
Okay great
lmk when you find one
Ideally I’d love a concept like this where the statues seem to blend into the wall but also have a 3D effect, so it would be amazing if that could be achieved with the hourglass too. If this isn’t quite possible, maybe a mural style like a painted wall with the hourglass blended into it would be a good visualisation?

https://www.youtube.com/watch?v=hgPnXL_jGTI this tutorial kindof does what you want

Photoshop CC 2015 tutorial showing how to create an invisible, camouflage effect!
➤ Get 15% off BORIS FX OPTICS! - The BEST special effects plug-in for PHOTOS in Photoshop! Go to https://bit.ly/3aDnh4A and use my special code: bltv2020
Photos provided by Shutterstock.com
Images #:143984269, 271339997, 271785818
Music provided by Mysoundmark...
Thank you so much!
Gave +1 Creative Carma to @lunar belfry (current: #70 - 27)
you can also try the double exposure method
if you look it up you might find what you want
Interesting, I’ll have a look!
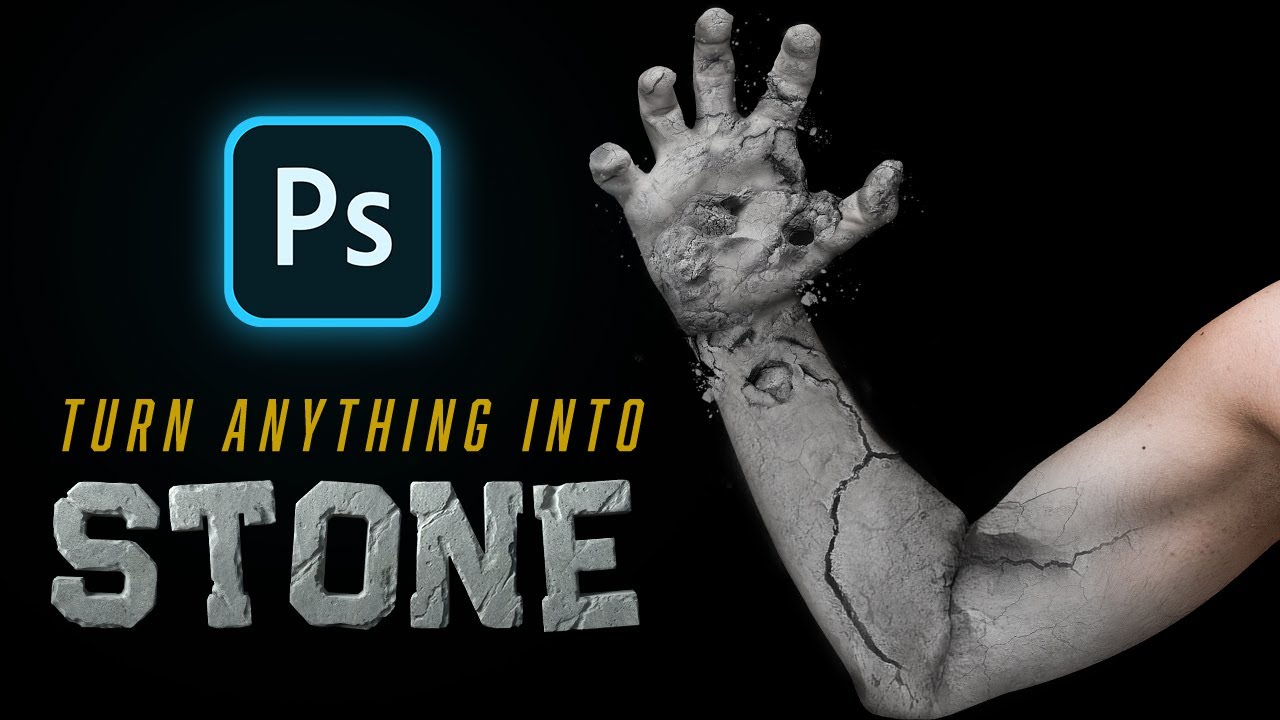
For this week's Photoshop Tutorial I am going to show you how you can easily turn anything into stone. I am going to cover some great texture tips and tricks that you don't want to miss out on. Please download the stock links below and follow along. I am also providing you with some extra rock textures if you would like to experiment and chan...
you can do something like this
turn your hourglass into the wall texture
that way it blends in more
your screenshot seems fairly low rez but this would be the cleanest way to do it
if its just a tiny detail maybe leave as is
Okay thank you so much!
How can i make my design stick out like this

How to put the layer on top of the background
Can someone help ? I used polygoon tool, i placed it, i did CTRL J but they arent visible...
i have recieved error 201 uppon installing photoshop i know i have enough space i have 150gb reserved for ps and ive used ps before on this laptop so im not sure its a hardware issue i would like to be able to use it paid for a year lol
simply using the layer pannel in photoshop
create your background
put your subject on top
thats it
if you get stuck, ask a more specific question
looks like thast because its white on white
just blends in
use the transform tool and you'll see where it is
is your GPU driver up to date?
that is often a likely issue
also make sure your internet connection is solid
& that your firewall is not somehow blocking adobe/photoshop from doing its thing
ok bet thnx


How would i replicate this type of dispersion-ish blur effect that's on the text

I thought about this question yesterday, but it's not easy to solve... Could you share a higher resolution image?
It looks like a mixture of effects... Dispersion and color glitch. But I think there are manual actions and not just filters.
This one is a little higher quality i think

actually maybe not lol
Do you mean doing something like this?

thanks
Gave +1 Creative Carma to @viral palm (current: #9 - 648)
Sorry I can't.. There is more than Photoshop Layer Styles involved here...This was perhaps created with 3D app.
Thanks
Gave +1 Creative Carma to @viral palm (current: #9 - 649)
yo quick questionn is there a way to save a layer or layer group in photoshop so u can quickly reuse again in another project?
Open the Libraries Panel. Main menu: Window > Libraries... Open a Library or a create a new one. Then drag the thing from the Layers Panel into a Library.
It should ask where to save it. Save it. Then it should be in that Library.
is there a command in photoshop 2020 that makes the layer go to the top and go back where it was just for see how it looks above all the layers
and also is posible duplicate a layer while you are animating on puppet wrap or im forced to add the pins all over again
CTRL+SHIFT+] = Bring active layer on the top of the pile. > CTRL+Z to reverse your action
That's shortcut on North American keyboard, don't know if it works on other regions keyboards.
For puppet wrap, I'm not really familiar with animation things but I think if you've made your layer a smart object before to apply pins they should stay editable inside your smart object (🤞 )
keyboard is latino
Azerty?

any ideas on how to make this less blurry?

AZERTY or QWERTY physical keyboard?
If yours is QWERTY you can change for US.
(I have to switch my windows settings too here with French Canadian keyboard )
Brackets are just beside the Return key (far right of the first letters row)...
You can also customize a shortcut...
go to Edit> Keyboard Shorcuts...> Unroll the Layer section> Scroll down to Arrange ...


ty
anyone?
Blurry feeling is perhaps because there are a lot of greys in your Pharahon mask... Not sure you'll like my idea but you could try to apply a Black to White Gradient map to the face and drag Black cursor and white cursors toward the center to reduce the greys (More the cursors will be near the center less shades of gray you will get) ... Worth a try

Hello. I know that everyone is already tired of me here, but I need to ask something else... I noticed, that emboss here is "white". How can I do this exactly like in here?

I feel like you've been doing this for a long time. Can't you just pull it off with a simple Layer Style?

I sure freaking do... Thanks, I'll try.
Gave +1 Creative Carma to @ripe quest (current: #3 - 2542)
I would probably make it a lot larger than you actually need to give yourself some space to tweak the Layer Style values.
To be honest, place, where I need to print this, says that .psd is not goes...

I can't read any of that but I'll take your word for it.
Generally, if you're trying to have text printed with embossing, the printer handles that and you wouldn't put that into the design.
We're taking about "professional" printing. Not some consumer-level, home-based printing.
And what should I do then?..
You just do the layout with no effects. Then use a printing service that does embossed printing. Many of them do that.
So I just tell 'em to do this like it shown in the movie and I don't need to edit it? I thought it's necessary to make in file...
She said, that I need coral, .pdf or Ai-files...
Maybe, I really need to do this in Ai all over again?..
No. Find a printing service that does embossing. Show them the picture of the card and ask them if they can do it like that. You just provide the flat design. They handle the embossing in the process.
Yes. Do the layout with Adobe Illustrator in fonts and clean vector graphics (if there are any graphics)
Yeah, that's what I'm thinking about, why is Ph makes it possible to do embossing in it then?..
It's just a special effect. To visualize a certain effect or style. Its not meant for printing.
Got it, thanks.
Gave +1 Creative Carma to @ripe quest (current: #3 - 2543)
Will I be able to put screen from the movie on background and to type on it to make it accurate?
Screen?
Are you talking about that texture that is on the card image?
I'm about this.
I don't understand the question. Sorry.
Do you mean put that image into Illustrator and "trace" over it?
Like, use it as a guide?
First, you should ask the printer if they have a business card template that they want you to use. Many of them have templates. It will show bleed lines and cut lines on the template. You should follow the printer's instructions to create the layout.
@ripe quest I've put it there and typed with Silian Rail to make it exactly how in movie, symbol by symbol.


np <3
Cute AF.
Yes u are right, we can do this on Blender but for that i would first need the vector of the font, than have to try metal finish material with lightning @polar swallow


Is it any good, and how cloud i make this effect liek on refference so it is not boring color and shape?

If you create a thin black rectangle with thick wite stroke you could place it over your hexagon and it will work. Of course it would be two shapes instead of one, but if it's the result that counts and not the steps, then it should work
Those complex vector shapes are a bit tricky to do correctly in Photoshop (not impossible obviously), they're way easier in Illustrator


Of course you'll need to adjust the 4 corners individually, which I've only roughly done here
Sometimes printers will ask you to provide a second (most likely PDF) file that shows them how to create the embossing die. The printer will have to create (as in manually build from metal) an embossing mold (Sorry I don't know the exact terms)
First things first, you SHOULD ASK YOUR PRINTER. Don't ask people on the internet while there is one person who knows the answer and will be 100% right. The person who will print your design...
Also I sent a video the other day, so you should know how embossing works. The guy demonstrates with a bespoke embossing mold (the logo you see in the video) and this mold has to be built with from a file (most likely with a CNC machine I suspect) but @tame cape will confirm or throw me into the fire, depending if I told you BS or not 😂😂
Bottom line: The printer is the only one who can reliably answer your question
Rule #1 of the graphic design club: TALK TO YOUR PRINTER!
Hi Sandrine
Full agreement. There's nothing to add.
I am saved from the wrath of the printer! 😂
Anyone know why copying an illustrator file into photoshop as a smart object makes it become grey scale?
Please @ me if you reply
NVM I fixed it
is my portfolio good?https://exquisite-guardrails-202954.framer.app/
Made with Framer
Ok, now I can't make it exactly on right place...


Maybe your Photoshop file is in grayscale mode? Please show a fullscreen screenshot with visible title bar, please.
When you will give the file to the printer, don't include the effect. Give them the flat text file
And the second PDF will only be the text in black
Yeah, I've already got it...
I'll just do it again in Ai...
But have you talked to the printer about what you wanted to do?
And ask about costs too. Creating the die isn't cheap
Isn't cheap?..
No they have to create a die for you, and just for you. Have you watched the video?
Once they finish your job, the die is useless, they have to bin it
See this: It's an illustrator file for a gold foil design I created
On the left, this is a block black series of shapes that indicates to the printer where the goil will go
On the right, the design without th gold bits
That will be two files (PDF) to be given to the printer

and that's the result (althought gold is difficult to photograph)

So for you it will be the same: A flat black text to indicate the embossing to the printer, and another file with the design without embossing.
And yes, I had to call the printer to ask about what they wanted, not all printers will want the same kind of files. That depends on their machine
hey guys, can someone tell me how to make it so that text would be behind this roof but above everything else (this is just an example photo i found)

hello,please can you help me change the lenguage of the program 🙏
duplicate the layer and then mask out everything in the background apart from the roof and then anything you put in a new layer between the original and the top masked layer will be behind the roof.
hmm alr ty ill try it :D
Gave +1 Creative Carma to @lucid crane (current: #26 - 87)
pls check dm <3
I need to make vape liquids bottle lable what is the best thing to use?
Hi, you need to change the language of your Creative cloud app, and reinstall photoshop, it’ll just add the language. Then, in preferences/interface you can select the language you want and restart.
To fake one in an image, or to print an actual one on future products? If the latter, InDesign or IIlustrator.
Hello, I have a recurrent issue on lightroom (sorry there is no discord for lightroom) anyway the same feature exist on photoshop. When I try to run AI denoise on some RAW picture Iget this message (GPU runtime error.Camera raw requires gpu accelaration.This has been disabled for rest of session) on someother picture it go fine. My GPU drivers are up to date. Maybe some picture need much more processing than other and since my gpu start to be quite old and slow I'm thinking it could be that. My gpu is Nvidia GeForce GTX 1050 Max-Q 2Go VRAM
Sorry but I still do not underastand how you did that 😅
Observe the layers (that why I ALWAYS Include them) as well as the properties panel in my screenshot
https://helpx.adobe.com/photoshop/using/drawing-shapes.html
All the rest can be done with the standard commands for the vector shapes
But I do not have stroke option like you do?
I can just chose color is it look like normal, i can use either black or either white


Check that your stroke is going outwards

Also check that it's not too big
How do i insteal Creative Cloud? keeps downloading a dmg file but every time i open it it only opens in notepad
and when i try to install from the website it says my system is out of date or something like that
are you on a windows based machine?
yes
DMG files will not open on windows, as they are designed for Mac OS
ah
Access Adobe Creative Cloud apps, services, file management, and more. Sign in to start creating.
navigate to that website and at the bottom there should be an installer
that just installs the dmg file again
could you send an ss?
screenshot


most websites are configured to automatically detect the os when no download options are available, because you are using opera it could be an issue
do you have edge or chrome?
if so, try downloading through one of those
If i try to install it through the apps pade it says update required buy my PC and all the parts in it are significantly above the recomended and my PC is fully updated

I see, let me know if that persists, after opening the link i sent in chrome or edge
doing it through chrome worked
i am assuming .exe or not allowed lol
@ionic spoke - Please do not post EXEs in the server.
sorry
not sure why opera keeps downloading it as a dmg file
If you're using Opera, that browser isn't supported.
Please use a supported browser, Chrome, Edge, etc
opera is designed for privacy in mind, websites are unable to get access to certain bits of info they would normally get from other supported browsers
Ah
it must of have flagged you as a mac user, in that case giving you the DMG
guess im keeping chrome then
Using Opera, the Adobe site can't detect your OS and it will default to MacOS and show you the DMG.
you're welcome
I like that your YT channel points to Thames Valley Police 😁
Is that intentional?
looking to make a quick meme like this but how would i transform the black box with text as the same perspective in photoshop? instead of inside the video editor im using

there are many ways to do this, let's use the vanishing point tool for this
start by selecting your text and duplicating the layer
this is what i had so far 

im curious if i just merged the text with the background & perspective transformed the 2 if it could work
im sick atm my brain isn't here today srry
no worries, you could do that too
Ok glad to hear, if you wanted to use vanishing point it can produce more exact results:

Hello Everybody,
I am wanting to create, within my adobe cloud, a cloud file with embedded links to additional files on the cloud, but a photoshop error message says that cannot be done. Is this true?
I think you are better off using Bridge to acomplish this
ooo
ok, ty 
Good afternoon. I am extremely new to all adobe products (2 weeks) and I have the undertaking of making some logo and jar wraps while learning from scratch and I have a logo that someone else made and I am wondering if someone might point me in the right direction to make the image actually round like the logo instead of rectangle shaped? I do have the entire library of programs available to me but it's like a different language in a sense. Any suggestions would be appreciated!
Yes, its a bit of a joke amongst the british that have had to sit through the same video at least once a year in high school
hi, is there any way to make the subdivision dots on the grid more scarce?
Do you mean, not trying to use the cloud for embedded links? The further i research the more it looks like its not even possible at this point.
How would you use bridge for this?
Thank you. 🙂
Gave +1 Creative Carma to @ionic spoke (current: #104 - 16)
I can't tell from your description, but you may be running into the fact that Adobe has deprecated cloud storage. Also "embedded links" is contradictory: either they're embedded or they're linked. Embedded objects wouldn't be a problem. Linked objects would need to be in a CC LIbrary, because there is no longer such a thing as an Adobe Cloud file. (That said, you can accomplish effectively the same thing by using OneDrive or Dropbox. Just be prepared for crappy performance any time objects need to be downloaded so they can be displayed/used/edited.)
oops, i meant "place linked". I have large files that i would like to compile in a single .psd and the "place linked" is ideal.
i see, so i should upload the files i want to link as part of an adobe libray?
Also, what do you mean by "deprecated"?
Thank you so much.
Gave +1 Creative Carma to @molten solar (current: #270 - 6)
Can you share the visuals/requirement here? e.g. screenshots etc
As long as you ensure you have the file synced to your local computer or available via a direct path (like Dropbox's folder on your desktop) and NOT a web URL, you should be fine to do this.
Theoretically it means you could focus on a layout and another person could edit the logo file remotely.
Yes, in the preferences, you can change the grid settings and level of subdivisions
@digital shadow - how much are you typing!?
Just turn it into a smart object and then drag the corners around whilst holding ALT. - You can easily skew it into the right angle.
Thank you for the reply 🙂 I would just like to be able to have this round instead of the entire rectangle it saves as. Ive tried to see if it has layers and it doesn't (I don't think) And also the little microbes I tried to removed with the lasso bit it took part of the text as well. I'm VERY new to this
Gave +1 Creative Carma to @sly hawk (current: #5 - 1060)
Oops PDF, let me copy it instead
It's ok I've got it.
Thank you
ALL images in the world are saved on canvas that are rectangular. - however, the trick is to make the rectangle parts transparent
Is it 'transparent' in your photoshop window?
No it isnt
Hello all! :)
I am in a bit of a pickle and hoping I could get some advice regarding getting a design/shape extracted from a web image/photo and make it clear enough to print in good quality. Source image attached (.avif) and what I'm trying to extract is SpongeBob, as shown on the shirt.
For background, the shirt is sold out and a friend really wants it, so my idea is to get it printed on a shirt as the next best thing. I did try something on my own already both in Photoshop and Illustrator, but the result is still not great (also attached - blurry edges on .png and a lot of wobbly lines in the .ai version). Is there a quick and easy way to do/fix this? :/
Thank you!


Gave +1 Creative Carma to @sly hawk (current: #5 - 1061)
Here's a better one with a black edge
The video was extremely helpful, thank you so much for your time.
You ALMOST got there on the illustrator version
you just need to tidy it up and merge a bunch of shapes together to loose the dodgy ghosting and extra lines etc
Thank you, James! ;D I'm going mad with it, as I'm just not as familiar with either tool. I've been struggling with getting the various "shapes within a shape" to merge, so that the smooth tool would work better or more consistently, but it's just so painful without having them merged. Is there an easy way to merge them so that I can smooth out the actual shapes as desired and where needed?
Dammit.
I recorded a video of me 'fixing' it
but It ended up being 50.2mb
the limit here is 50mb
yeah course
just doing it
As you'll see... still needs some final 'fixes'. - but since this is the PS discord, and not illustrator, I don't want to send the chat here off down a rabbithole
Adding a Stroke Layer Style to the folder should work (if I understand well what you want to achieve)
Layer Style give the same result on both folder (Design 1 and Design 2 in the psd file)

btw,,, I'll fix this and send you a new AI file

And I forgot... If you want interaction between your stroke and the Background image don't forget to play with stroke blending mode to find the one that suits your design.
(I don't use illustrator that much, so I was a bit slow)
Slow? I've been working on this for days and you've seen the end result - you were lightning fast, if you ask me! :D
I appreciate your help - it will be much, much easier to smooth it out now, I'll dive right into it! :)
Thank you, kind sir! :D
Gave +1 Creative Carma to @sly hawk (current: #5 - 1062)
Best I can do with original picture...

Thank you very much!
Gave +1 Creative Carma to @sly hawk (current: #5 - 1063)
Hey! I'm trying to replicate these paper edges on this banner - can anyone help me how to do this? I mean I could probably get roughly that look by making a selection with the polygonal lasso tool but I don't think I'd get those "frayed" edges.

Also what keyword should I search in order to find the texture that is overlayed over the whole image
Search for Torn Paper texture on Stock sites... Adobe Stock free section has a huge selectionhttps://stock.adobe.com/free
Adobe Stock
Stunning, diverse collection of free Adobe Stock photos, vectors and videos. Free to download, cleared for commercial-use, royalty-free, no credit card required.
You should be able to find some stock images of 'torn paper' segments
Alright thanks, found one. What's the easiest way to cut off the image where the torn paper starts?
Gave +1 Creative Carma to @viral palm (current: #9 - 650)
I also made a stream (speechless) on how to mimic torn paper effect from scratch... it could (perhaps) help...
https://www.behance.net/videos/98e5080c-84b8-4004-b802-bab28cd65305/Simple-Torn-Paper-effect-Photoshop

Let's mimic a torn paper cut out effect from scratch in few minutes.
Share a link to the pic here and perhaps Franck or I can show you 🙂
I downloaded this one: https://stock.adobe.com/de/search/free?k=torn+paper&search_type=usertyped&asset_id=300621245
That looks very interesting, thanks. I'm want to get this done quickly but I'll look at your stream tmr and try it out!
Gimmie a few mins, just need to boot my kids off the PC
@sly hawk posted a great video on this topic a few days ago, not directly about torn paper, but definitely useful for your subsequent editing.
#❓ask-a-question message
#❓ask-a-question message
1min to 8min 20 that's enough for torn paper effect (you can speed up the video x2) => 4 min and you're done. Beauty of this one is you can do any torn shape...
I'll probably try it because my laptop appears to be too slow in order to load the illustrator file
My way kinda cheats, since I'm using adobe Firefly for help
if there is no longer an adobe cloud file, what is it that i am uploading and syncing to? is it that pure cloud documents are no longer available and now its just .psd, .jpg, etc, instead of .psdc? is .psdc gone? (chat GPT has some outdated knowledge!)
Your PSD would be saved locally on your desktop
Your assets would still need to have a 'local address' on your computer.... such as a dropbox folder, or one-drive location etc
this means that if someone was to SWAP OUT an asset on dropbox, your PC would resync and claim the 'new one' and then the PSD would in turn, update to the new asset as well.
@merry phoenix - Did my suggestion/video make sense?
thank you. So there is no more pure cloud document.
I'm not sure to be honest. I don't use it
I use a cheaper cloud storage solution anyway
i never did either, but now i am trying to be able to work across multiple devices.
What do you use?mHow do you do it?
It did but I think I’ll try the manual methods from above since I want a bit more control over the textures and edges
@sly hawk Might I ask you one more question? I'm using the lasso to try to remove the little microbes there that are "highlighted". However it isn't removing anything, so I am quite sure I am doing something wrong.

You're currently selecting the WHITE bit
Not the microbes
If you invert your selection first... you can then paint over them in white
.... to 'remove' them
@broken igloo
Thank you! Self teaching PS and Illustrator is insane! I appreciate your time very much 🙂
Gave +1 Creative Carma to @sly hawk (current: #5 - 1064)
i'm making a smart object in photoshop but the gradient curve always has the colors flipped, left triangle needs to be black and vice versa. because they're flipped the shape of the object in the game mod i'm working on ends up inverted. i'm using a black and white linear gradient and have no idea what to do differently. anyone have any ideas? https://cdn.discordapp.com/attachments/1108627547287199754/1318710159463415988/image.png?ex=6763500a&is=6761fe8a&hm=d92080ec0294dc1179ca7091cf1f5bfd9024fd33b6687f09be939c217be96902&
I also noticed when i open the curves editor these boxes to the left are swapping from B/W to W/B and i don't know if this is part of the issue


Hello, how can I export a psd file to substance painter with every layers ?
Old school method (without any Firefly AI things).
Place your image over the torn paper texture> Clip image to the torn paper texture> turn off visibility> Select the plain paper with the best selection method (I used Color range because It was the best for selecting orange paper)> Use selection to create a layer mask on the image you want to apply onto the texture... Repeat with others pictures/textures.
could you share the whole Photoshop UI?
What's your Curve preset (top of Curve properties window-we can't see it)?
sec

the colors need to be inverted so black is white and white is black in that square and the selection triangles on the curve window apparently but i have tried so many things and i'm completely stuck
That s what I was thinking... The problem is that you're working in Gray mode... If there is no particular reason to use this mode you should switch to RGB mode.
To do so, go to Image>Mode>RGB Mode...Your curves should work normally.

with what i'm doing i have to be in grayscale mode, this is part of a heightmap for a game so it can't be RGB
i just can't figure out why i can't get these colors inverted
this is what it should look like from the tutorial i was following:

...and i just noticed he's in RGB mode
you are incredible

in theory this should work now will finish it up and test, thank you so much
TBH you can work in RGB you just have to use only Black,White and Shades of grey.
There's a 100 ways to get the same result, but I used this probably overly complicated route this time
hey so i have this image (attached), and im trying to make the wave designs that i boxed, fade out as it moves right. how can i do that?


Would apply a gradient mask do the trick?
apply a mask to the waves layer, choose the gradient tool, check it's a black the white gradient, trace a gradient over the waves, while the mask is highlighted.
If the waves aren't on their own layer, it's probably better that you cut them and place them on their own layer, otherwise the gradient will affect the turtle monster as well

How can i mix these so it looks like its one picture

I would apply a gradien on the bottom layer mask like I explained in the previous post.
I would also align tone and luminosity with a levels/curves adjustment layer so it looks the same time of day
The bottom one is blue the top one looks like it's black and white
One nice thing to try is the "replace sky" option.
Choose the bottom layer, and go to edit>sky replacement

You can choose the replace the sky by one offered by default, or your own image. In your case, choose the top image and when the sky is replaced, you can tweak the layers and masks that Photoshop have created for you

In the latest episode of #PHOMO, Adobe evangelist Paul Trani shares some cool ways to use the new sky replacement feature in Photoshop. Check out this video for helpful tips and tricks to end those feelings of #PHOMO when it comes to design.
Subscribe to Adobe Photoshop: https://adobe.ly/3vWtAiy
Learn More About Adobe Photoshop: https://a...
What can I use to have good auto lightness because my monitor is not reliable, I end up with such contrast in every work?

Anyone know how i can improve this fight poster

The text at the bottom is a bit hard to read, could be improved by making it bigger. Wouldn't the "VS" be on the right side? Right now it looks like some unnamed fighter is going against "Davis Alderidge", which I'm guessing is not the intention
Yeah ill add that thanks! Anything more?
Gave +1 Creative Carma to @sweet field (current: #24 - 93)
Other than that, I think it works well as a poster. What's the intended purpose for it?
Other than calibrating your monitor, you can familiarize yourself with the histogram feature in Photoshop (and other apps), which lets you see the balance of colors and values
Its to promote a boxing fight in a game called prizefighter!, thanks for the advice looks sick
Gave +1 Creative Carma to @sweet field (current: #23 - 94)
Why is it that when I open an AVIF-File I see the camera Raw Filter section first?
It's probably because there is a file association within ACR
I can't show you right now as my apps are updating, but you can change file associations for ACR, within Bridge
Edit>camera raw preferences, if I remember well
thx bro <3
Gave +1 Creative Carma to @viral palm (current: #9 - 651)
My bad, it's not in Edit> Camera Raw Preferences, but in Bridge main preferences

You choose here what opens with what

Ooo thanks Sandrine!!! very helpful👍
Gave +1 Creative Carma to @vapid flume (current: #8 - 823)
You're welcome!
Can someone help me make a perfect circle at the bottom of the sword like figure


bro where can i find some practice projects to enhance my video editting skills
So everytime i upload a thumbnail onto a yt video, it becomes blurry on the channel page. I export them in 1280x720 and always under 2MB. I use adobe photoshop ofc and are there better export settings or something? Or is it just something youtube does.
Has anyone got experience with this?
if i wanted to copy paste translated text from english to korean & have it appear in a text box do i need to install anything?

the boxes here are korean text but not picking up
nvm found it!
Do I need manually to draw two blue and two black box or there is option? also i am looking for such angle so it is not straight line
So I would need 4 rectangles?
And how cloud I make it like go from lighter to darker color ?
in same rectangles
Probably not. Black background. Three blue rectangles (probably)
But there is blue black blue black?
You could Group the rectangles and then use a Gradient Overlay on the Group.
Or are you saying that the white part is a design element?
I am doing memorandum, white is just background
I think it is okay cloud be better ( it is just cropped upper part )

I mean, There are a lot of ways to go about this. Here's one...
How can I get this kinda transition?

Thank you very much 🙂
Gave +1 Creative Carma to @ripe quest (current: #3 - 2545)
Do you mean the gradient on the text?
Why I am getting Could not select a layer because the point you clicked on is not inside the vector mask of a visible layer. when I want to use path seleciton?
It's been a while, but what does the bottom symbol entail again?

The cartridge, disk slot, box looking thing in the bottom of Layer 0
Like when I move it out

Then out of all Artboard, it turns into this finicky thing

I think the initial thing came about because of me creating Artboards... But anyway, I kinda forgot my PS essentials, so some help is appreciated
This is a solid color adjustment layer.

Huh
Hmm... soooo, what it does is... just change colors?
Do I get rid of it? Do I keep it?
Actually a concise manual page might suffice if it needs a length explanation
Things like how images are rasterized doesn't need a course in CS, but a little guide gets the point across, as an example
If I understand you right …
https://helpx.adobe.com/photoshop/using/adjustment-fill-layers.html
Too many words, but that is what I was talking about, yes
It's a solid color adjustment layer (white), by the look of it.
Like all it does is just be a certain color?
What about this thing?
It probably goes weird because it no longer has anything to adjust. An adjustment layer not on an art board is probably undefined in the underlying code.
Ahhhh, so it is like a paradox or glitch or something
So I should do without it?
I was intending on setting a single color across all Artboards, but this got tricky from the looks of it
It's meaningless. Like trying to adjust the feathering on a vector mask.
But I thought feathering on any mask works
Erm, well... alright
So, in order to set a color across these Artboards, what do I do?
The top three adjustment layer options (Solid Color, Gradient, Pattern) all show that kind of thumbnail.
Hah, so weird!

Set up the color layer however you want, and make it a smart object, then copy the smart object to each artboard. That way, if you change the color in one SO, it will change everywhere.
Oh, so I HAVE to set multiple layers as the color I want for each Artboard
Well, let me figure out how to Smart the Object
Photoshop isn't Illustrator. Layers live inside artboards.
That would be a good strategy. Pick almost any YouTube tutorial on smart objects, or use the Learn module. You should be using smart objects anyway. Non-destructive editing is the pro way to Photoshop.
I'm sure it's a no-brainer once I get going
Anyway, I have one more question
Actually, wait, 2
1- Doesn't the need for multiple Smart Objects impact the storage or performance or RAM usage in the PSD file?
2- If I am working on a comic, does Illustrator ever come to mind as a solution? Between it and PS, I mean...
Yes
- Smart Objects are .psb under the hood, so they add to the file size, but that shouldn't be significant if it's a single color. It's a different way of working. No impact on RAM.
Do they add a LOT or just a couple o' kilobytes? Probably odd to ask, but I am admittedly low on storage, hah 😅
- It depends on your style. Many comic artists use Illustrator, but at least as many use raster techniques, so they work in Photoshop or any of a dozen other raster apps. In general, a vector file is smaller than a raster file with the equivalent content.
Oh?? Is that so?
Hm... I may need to reconsider my options for my art career
I mean, I like not seeing pixels when I do my art
Umm... Storage is cheap. If you plan to make money with your artwork, consider it an investment.
Smaller sizes and no pixels makes I a considerable option
By cheap you mean the PSB's don't add a lot, I hope
I mean adding storage is not expensive. In the years since I went freelance, I've never avoided investing in what would earn money: faster computer, more storage, better pen tablet. Yes, it might hurt in the short term, but anything that allows you to turn out product faster and/or better will pay for itself.
A .psb takes up more space. Every raster layer in Photoshop takes up space. Vector layers (the solid color is a vector layer) take very little space. It's the pixels (even if they transparent) that add size to the files.
Mmm okay it seems the precise numbers of space eaten up by PSB's are inconclusive, but you make it sound like it's not a lot, so... I guess I'm good
Much appreciated
@summer violet A 2k x 2k 8-bit pixel layer uses 4 x 10^6 bytes, at one byte/pixel. Vector adjustment layers don't use nearly as much. You can experiment. That's the best way to develop a gut feel for how it works.
"Don't use nearly as much" certainly sounds good!
4 MB isn't a big deal per adjustment layer, if they take up 4 MB each, which you say they don't. Soooo I'm good!
Much appreciated, again, @molten solar
I will look into Illustrator
I hope it doesn't have a huge learning curve for a PS user
@summer violet I don't know your style or how you work, but my best advice is to try everything until you find the tool that best fits your personal workflow. I know some fantastic artists who outline on paper and scan into the computer to do the inking, for example.
Well, I kinda select shapes, then mask, and then start working in necessary layers for BG and colors and lineart
Nothing beyond that
If I use PS, can Illustrator be learned relatively quickly?
....
Oh, yeah, help the dudes out
Illustrator has its own learning curve. It's very different from Photoshop because it's all vectors all the way. A layer can have dozens of objects, unlike Photoshop. Be prepared to spend quality time with the Learn module. The basics aren't difficult, but Ai is a different thought process than Ps.
Duly noted. Thanks!
Find some free vector art and download it for editing in Illustrator once you've got a handle on the basics. I would highly recommend a visit to your local library and find any of Deke McLelland's "One on One" titles for Illustrator and for Photoshop. Structured learning will get you up and running a lot faster than noodling around on your own. Once you have a grasp of how the app works, you'll be able to ask more specific and more useful questions.
Gee, it sure does sound like a handful now!
Either way, noted!
How can i fix this cutout

You mean the outline?
Please show the unedited original.
And the layers
Here's the thing: If you plan to make money with your art, your art has to be good enough that people will pay you for it. By definition, that makes you a professional, and the first thing you have to know is your tools. Look on the bright side, a couple hundred years ago, you would apprentice to a master, spend 4 years cleaning and tying brushes, another few years mixing pigments, then maybe be allowed to help the master. What we have today makes it a doddle.

I can't argue with that. I do take a little while to learn some things like Blender. I could certainly use structure
But I think that's enough about me. Other users are in need of help!
This seems to have a much smaller size than your cutout shown ...
opinion and suggestions?


how do i create the falling water tezture

for starters - the hair is much more complicated
now it's time for something to eat.
😋

You're not getting the right result when you make a gradient on the text?
Here you go. It's not perfect - but it might fulfil your requirements.

Upps.
Here is the PNG @feral crag

Can you please explain to me how you cut this
Hi guys, it's me again
I am kinda struggling with Smart Objects for some reason
I was trying to set a PSB file with a pattern to apply across multiple Artboards, with the method of placing each copy of the Smart Object in the bottom layer of each board
But...


Just if you ask why: it would just be nice to apply patterns as one pleases
And holy **** the PSB's are giant in size
AAAAAAAAAAAAAAAAAAAAAAAAAAAAa

WHAAAAAAAAAAT
Ogh I think I'm gonna hurl
Oh, my God, how did I let this happen
Well, now I'm over 30 GB's free
Object selection tool Select subject (cloud-based) - result similar to yours
Select and mask ( shift edge)
Draw and refine manually in the mask
can you send me a video tutorial because that's what I've been doing and it haven't been working
Or we can hop in a call and you can show me.
Discord does not support the formats of my screenrecording software. And it took much longer than 10 minutes. So I would definitely exceed the maximum possible 50 MB. So unfortunately no.
Okay thanks anyways
Sure i can try to help.
You are welcome.
have you tried Asking Chatgpt It is really helpful
... N-no
...


I used regular transform tools to accomplish this
I feel like I shouldn't have to do that

@feral crag, I appreciate your effort in asking GPT for me, but I did not find it helpful
I meant GPT, not your effort
Please don't share AI generated responses as advice here, it is not accurate and shouldn't be trusted as a source
Looks like that might be a graphic error. How does it look after exporting?
Hold that thought
Okay
So, I tried once more with a different pattern

I used no transformation

It's... kind of working? But I think there's something missing
Like it's behaving unpredictably
What do you think is happening, @sweet field?
Ugh, and every time I copy the Smart Object the Scratch Disk gets full
I am 30 GB FREE WDYM IT'S FULL?!
Hahahah... maybe I should try this out on a smaller file
PSBs are huge in size. You might be running into issues because of that
You need a lot of space if you're working with big files. The space used in scratch disks is more than the size of the file
And I was told otherwise
sigh
Okay now the PSB's ate up my storage again
8 GB free
Let me try amending this... @sweet field, where are PSB's normally stored?
You choose where to store them when saving
But if you have another drive that has more space then you should switch Photoshop to use that for scratch files
Hah, okay I'm not getting my 30 GBs back for some reason after clearing the Temp folder
Wait wait it's definitely because PS is running
Yup haha, was about to ask
There we go
30 GB again
Man, this application sure could use storage optimizations
ANYWAY, yeah, what were you gonna suggest for the BG thing?
To be honest, that's not really enough space to work in Photoshop, especially with bigger projects. But try with a smaller file and see if that works for the patterns
I'll do that right this second
@sweet field, do you convert a regular layer by clicking on it once with the Artboard tool on?
I could have opened a new file with Artboards automatically set but I'm stupid
New, hopefully lighter file


Ugh
This is the PSB

@sweet field ?
I don't get it. Why is each Smart Object copy offset like that?
Interesting...

A symptom of Artboard behavior

@sweet field I feel like I'm making a breakthrough, but how do I put an end to this behavior?

Hmmm...
I need to resolve this before two days or else I'll be in trouble!
Even an all-encompassing Artboard has some offset

If people are quiet here because they think I'm going insane, I'd appreciate it if you tell me so
This looks fine to me
Look at the bottom
What is the reason you're doing it like this? What's it for?
And left, but I left the bottom because it's clearer
As I said before, it's just nice to control backgrounds across multiple Artboards
.
I was trying to set a PSB file with a
Reminder: using multiple artboards can be quickly intense on ressources and you could encounter performance issues.
If you're doing that just because it's nice why not, but if you have a specific goal to achieve, there's perhaps an easier way to follow.
Hi, so I have a question. How do I move a layer mask to another document while retaining its properties, but then I’d like to attach it to another layer that it wasn’t originally attached to
Are the two documents the same dimension?
They are, yes
You can not drag the layer mask directly from one file to an other but you can drag a layer with its layer... If the two file have the same dimension you can align them. To drag and replace a layer mask hold: ALT+Click on the Layer mask you want to move then drag it over the blank layer mask.
After attaching the layer mask to the new layer, can I turn off the original layer and will the effect still be maintained? In my case, this didn’t happen
how would i make a texture like this, just the dots with the spacing in between

Not sure to understand... Could your share the layers panel of your Photoshop UI?
I had needed to move a gaussian blur effect from one document to another since initially I thought that the effect was applied to a mask. But then, I realized that it was applied to a merged layer with a mask, and so when I tried to move the mask to another document (similar to your demonstration), the gaussian blur effect wasn’t applied to the blank layer. I tried reapplying it but it said the layer was blank so it couldn’t be applied. I think that was the problem, so no worries, it’s all good now!
If the layer onto you applied the blur is a smart object you should be able to copy the blur filter to an other smart layer.
If the gaussian blur was applied to a raster layer this effect has been "burnt" into pixels of your layer and is no more editable or movable.
Okay thank you so much, noted on this!
Gave +1 Creative Carma to @viral palm (current: #9 - 652)
Hello, I have product packaging which needs to be slightly altered, will pay.
Anyone?
Hello, does someone know how can i get the first image look like the second, i mean only the hole that is pure black at the bottom and then gradually smooths out, im new to photoshop so sorry if its kinda dumb question


ain't that fortnite 
Haha yeah

Gradient Layer... Diamond Shape. Adjust Rotation. Set Layer Blend Mode to Multiply.

anyone know how to clean up a photo removing the RGB Pixels?

I draw some line art and I want to colour it in, how do I use the brush tool to paint it but stop it from going over the lines?
Hi @meager scroll
You can try for example:
- Photoshop Filter Denoise,
- Photoshop RAW Filter (Denoise),
- Lightroom Denoise,
- Paid plugin eg Topaz Denoise
Hi @minor crystal
For example, you can draw on a layer below your line layer.
Best bet is to set the black and white outline layer to have a MULTIPLY blend mode
and then paint on the layer below it
...or simply use the fill paintbucket tool
Im new to photoshop (started 2 days ago), and I was wondering if theres a more precise way to skew an object? Because when I try to skew something to 12.3, it always goes to 12.2, or 12.4, it skips 12.3 every single time, even though I did it on another rectangle.. Edit: I'm on MacOS if that changes anything*
Is there a way to make the brush recognise lines and not go over it? My lines are 3px thin so that method is a bit tough
Actually.. I have a rectangle with the desired skew, but when I clone it the skew changes depending on the size, is there a way to keep the same skew no matter the size?
Please show something

how do I get this highlight off the right side?
I tried masking and changing exposure but it's not been providing the best results
so um my arms and dress are different layers like this, so I wasnt able to use paintbucket or the magic wand

question if i want to have a mask to know exactly where i can write during the edit is it possible?

i can't find a way to remove the border because if i try they say it is not recommanded and they propose me another format for that

How do I change the width of an object without adjusting the Skew?
I remember using a tool like that, but can't remember where!?!
Omg thank you so much 😄 🙏
Gave +1 Creative Carma to @ripe quest (current: #3 - 2546)
Does anyone know how to merge two paths that are on different layers?

when I try merging it does this weird thing

nevermind fixed it
You can, but this window is driven by the printer, it's likely that you won't have any indication of the exact dimension. If you're ink rich, you could print a black rectangle that covers the whole area, and then measure on the sheet of paper the exact non printed area.
Maybe because your printer CANNOT print edge to edge, and therefore you'll be missing bits
You need to create an area that corresponds the printable area within an A4 sheet and then only design in that area. Maybe make a template you can resuse, in the same way you have printable templates for addresses labels
What is it eaxctly that you are trying to print?
Remember that we can't really give you fixes for your printer,
is it possible to merge the arms and dress together? and then maybe I can try the method with the multiply blend mode
I try to find place a logo in a top right, for the edge to edge I know my printer can do edge to edge, exemple : pictures 10x15cm so idk why it’s different for letter but I will try to find the spot with test
Because I think "letter" is wider than A4 if I rememeber well and it's probably edge to edge for A4 only. Just guessing here...
font?

Does anyone know why my PS would open so small?

What is the best RGB mode? My images are washed out in Photoshop for some reason... They are missing like 30% contrast

You may not even be in RGB mode. Please show a screenshot of the title bar of an open image (or in the menu: Image -> Mode)
My PS is in Russian, but it's in RGB i think
Yes.
It is in RGB 16 bit/channel.
Okay, this is weird, i just opened a picture next to it and it's the same color now
I think it bugged out somehow, it's fine now
Thanks!
A computer restart often helps.
😉
I've a question, what type of filter is this? I've seen it on many anime photoshopped stuff

And GFX overall
And could someone tell me what this means?

hello can someone please help me with putting text in a text?
i want to put around 120 names in this "25" text

i want something like this

so basiclly i am trying to download the creative cloud
and it wont let me donload it
or use the ps

how to do that background?

What browser is that?
If it's Opera... - don't use it to install anything from Adobe. - Try chrome or edge instead
`i did chorm too didnt work
Are the adobe servers blocked on your machine for any previous piracy related reasons?
uh no ?
first time using it
i just paid the year plan
What if you try visiting https://www.adobe.com/apps/all/desktop
i i pressed download on creative cloud nothing happened
here
Sorry I'm not sure mate
cant mention higher ups for this or
like i just paid a year plan for it and end the end it not working :/
hey is it possible to have a window at the top right constantly showing a zoomed out and flipped version of the current work?

You might need to contact customer support
how ?
You can have multiple windows showing the same canvas at different levels and yes you can flip a preview


for some reason it wont show my plans too

i tried to do customer support but it wasnt much of help
You'll have to contact Adobe Customer Care because no one here can access your Adobe Account.
Gave +1 Creative Carma to @sly hawk (current: #5 - 1065)
thank you they fixed my problem
Gave +1 Creative Carma to @ripe quest (current: #3 - 2547)
I'm glad you got it sorted out!
Yes.
I know.
Hello, i have a problem in 
I need your help.
Could you tell me how to improve image quality?
Do I need to send to someone fonts if I am giving them pdf ? They just need to view not edit
No. Everything that is required is embedded in the PDF file.
(Please note: There are also fonts that do not allow embedding).
Thank you!
Gave +1 Creative Carma to @tame cape (current: #21 - 102)
Is there a way to know if font dont allow embedding?
As soon as you try to create the PDF file with a ‘restricted font’, you will receive a clear message.
yo, I'm on Photoshop 26.0.0, it seems the Masking feature is entirely broken?
the brushes don't wanna work, so I restart, and reset all the preferences, and then only one brush works, but poorly
I can't tell if its just my incompetence or a bug - but this is the best I can do with trying to crop out a logo from a white background

I have this text here that doesn't really have any special attributes, but I was wondering how can I transform it into a type of font like the second image attached?


I believe that is hand-drawn
the second one?
Sorry, I'm on 26.1.0
@river otter

how could i do the southside text part where it has that lag effect

how can I adjust the points on the curve so that they are evenly spaced/centered with the oval

Hi @warm orchid
something like that?

like, I know i can move them by holding CMD, but it doesn't really let them snap or anything
I am forever in debt to you
thank you so much
I've still no idea what's gone on with Photoshop but I guess I just need a newer version
I'll update when I can
Have you considered the possibility that the problem may not be with Photoshop at all?
🤔
You can use guides, which can be placed at specific location, the points will then snap to the guides
https://helpx.adobe.com/uk/photoshop/using/grid-guides.html
thank you, whats the best way to put them at 1/4, 1/2, and 3/4ths of the oval
Gave +1 Creative Carma to @vapid flume (current: #8 - 824)
You got that in view>guides>new guide (or you can also do with "new guide layout)
and type 33% and 66% (you can type the % directly in the input box, Photoshop does its own calculus there)

appreciate it!!

you can even do multiplications, substractions, divisions and additions there (for example you can type 33% + 20 mm and it will figure it out)
Would it perhaps be a good idea to create a copy of the ellipse and write the text directly on it?
🤔
possibly! how do I write on the ellipse?
With the type on path tool. (Important: Ellipse should be path or shape)

was that tool removed? I don't see it
oh, its an illustrator tool
Sorry, my bad. If you hovver with the 'normal' Type tool over the ellipse - then it becomes the Type on Path tool
😉
hmm, its not doing that
Does that help a little? It still works the same, for years
https://www.youtube.com/watch?v=wQKmrKOHyao
In this quicktip, you will learn how to apply text to paths in Photoshop CS3.
Be sure to SUBSCRIBE because there will be a new tutorial every week.
Follow me on Twitter @RiverCityGraphx
Like us on on facebook: http://on.fb.me/i8UQpt
Suggest tutorials at http://www.rivercitygraphix.com
For project files, help forums, and more ch...
ah! it worked, thanks, how do I flip the text here
Gave +1 Creative Carma to @tame cape (current: #21 - 103)

