#❓ask-a-question
1 messages · Page 89 of 1

Do you have any Hidden layers?
Yeah aplently
More than half probably
Is transparency lock related maybe ?
ie lock transparent pixels
Nevermind, found the cause
Deep deep deep deep buried
Had couple layers locked
Hello. I have a logo witch have a white backround. I want to make the abckround transparent, how can I make itt?
And I have a part where can't be transparent
Why not post the logo and make it clear what has to be transparent and which bit you want to keep 🙂
I have in almost in the middle a football which has white parts but itt can't be transparent
Why don’t you share the logo?
the logo is not mine
use the object selection tool on the football and see if that works then you can mask it to hide the background or possibly use the remove background tool.
Itt worked. Thanky you ❤️
np
is anyone able to remove a hand out of a photo for me?
emm meybe how bc shadow is in the 3d model
you have photoshop? It might be simple enough for you to do but you could create a selection mask by selecting the hand first then masking (hiding) the hand via the mask layer and might be all you need 🙂
Isn't it a separate layer?
glad you figured it out, I knew it wasn't on a separate layer
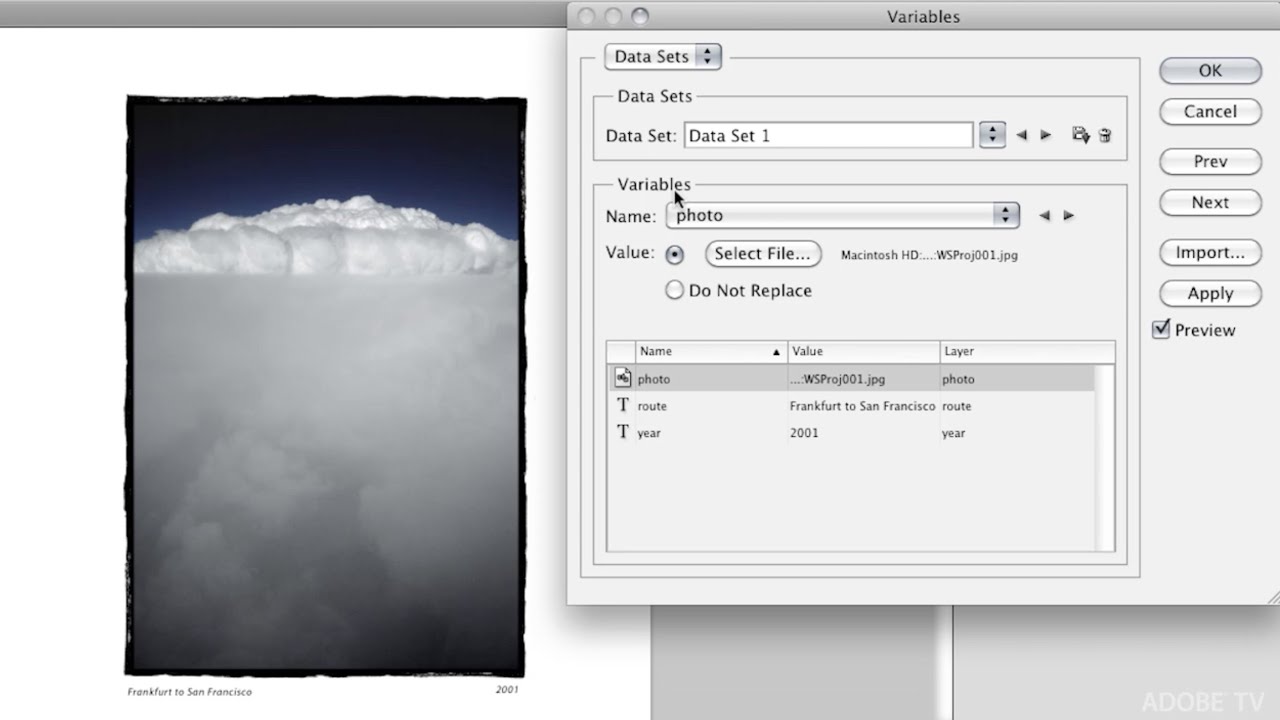
guys so im messing around with variable data and it just doesent seem to work I have tried many tutorials and the only solution which actually does import the data set is a script I found but the problem is it exports the automatically but I want to add a few actions to it
so I was wondering if anyone knows why the variable data wouldent work even when I do exactly the same steps as in the tutorials could this be connected to how I export my data though I have tried many ways and with the mentioned script I can make it work but not with the actual variable in photoshop
How do i remove the handle on photoshop. I don't really like the facvt the handle sometimes effects my vector line
every time I change the import settings it just comes up with a different error

Click on anchor point with the Convert Point Tool.(the last tool of the pentool set in tool bar)
Alt+click on the last anchor point made to delete the handle you’re shaking on the video. Is it this one you want to remove?
japp
Does it wok? I can’t show you now I’m on a mobile device…
Ooh, wait i get how
So I selected the anchor point handle and i clicked ctrl and then alt to the middle anchor and it disappeared
Thank you for your help anyway!
Gave +1 Creative Carma to @viral palm (current: #9 - 597)
how do I fix this exactly?

Not familiar with variables but looks like your .CSV file has too many columns compared to your .PSD file variables…
Could you share a screen shot of both CSV file and PSD file variable setup? Could help peolple to find what’s going wrong on your side.
this is what they look like

though what I am wondering is if the "," in the actual data set text are screwing up the importing
Anyone have any ideas how to make this size label look good? I still need to write the size in this, its for skipants for a brand called alpex

ah I see you got the E blended into the astrisk/star 😄
oh you remember me or haha
This is the best one i've done, i don't really feel like its good enough tho. It should be more normal i guess:

I mess with this a lot

Probably a mess with your imported data set « layout » check this video to be sure you didn’t miss something important with the data formating.
https://youtu.be/1PYu9dsaE5I?si=NkS9k0j5uK4owK73
In this Episode of The Complete Picture, Julieanne Kost demonstrates the incredible power of Variables in Photoshop. You will learn how to cut hours out of your production time when you need to combine text and photographs. Although this feature has been in Photoshop for many releases, only a small number of customers know if its immense power f...
Usually csv uses « ; » as separator rather than « , »
its fine I just decided to use illustrator as it worked almost immediately once I learned how you need to set data up for illustrator but thankyou nonetheless for your time 😉
Hi! Ive been trying to use this plugin in my work but every time i try to use it it just seems to get stuck in an infinite loop of loading, stopping, and loading again whenever i do anything
Its the mobchain plugin from doronsupplies, its a live displacement map and all of the videos ive seen it instantly updates the original file but with mine it just gets stuck
Ok, and I know variables are used with Illustrator more often than with Photoshop so you could find more info online in case you have trouble.
yes one thing I was still wondering do you happen to know any way to lets say only limit the text box horizontally and not vertically meaning the textbox would adapt to the amount of rows instead of being static
i have 2 images that i would like to change a small thing of but idk how to do it and it would be for free ( idk if this is post in the right place in any case ) thanks in advance
No I don’t. I don’t often use variables. Sorry.
Is this possible in PS?

Hey there! This might not be the place to ask this, if so feel free to remove. I’m a high end retoucher and use PS for work daily. Today PS updated and I’ve noticed that gen fill is significantly worse at blending in selections with a blank prompt. It almost always spawns in random objects/animals/patters that are not found in the image itself and I’ve noticed a significant decline in the quality of such selections where as in previous iterations it used to be very responsive and accurate (albeit it still needed some help on my end). Is it no longer possible to just leave the prompt blank and it would extrapolate from the surroundings? Me and my co-workers are trying to figure out if we just need to revert to a previous PS version as the difference in quality is pretty big.
hello,
How can i convert this selection into a new layer ?

did you answer to me??
No? Mine was a question and I did not tag you?
oh okay im sorry also that i tagged you
It worked really well for me in previous iterations. I use it in conjunction with a lot of tools.
is it possible to make is so even if i got a picture with barely seen text on it to remove that text?
It depends on the image, but for the most part it should. It also depends on the texture of where you’re removing that text
could i send an example in private?
No, sorry! Im not a helper here and I’m working at the moment, I came in for my question.
i meant as in showing you
not asking for help
just asking if its possible
if your able to tell by looking at it
if not then nvm
right click and click copy
Hey guys! Im currently working on a project on photshop but for some reason my text layers has become regular layers and i cant edit the text is there any way to fix this somehow? Best regards!
With a selection and the appropriate layer active, Ctrl J will JUMP the selection to a new layer.
@unkempt mantle @ripe quest thank you!
Hi, Where are these random colours coming from?

I think this is a known issue and is also impacting the Remove Tool (or they might be related). Downgrading to the previous version for the time-being might be a decent workaround.
I appreciate your response! It seemed like a jarring difference. I’ll revert to a previous version, thank you!
Gave +1 Creative Carma to @ripe quest (current: #3 - 2437)
You could downgrade to the previous version of the General Release and hopefully that will allow you to work. You could install the Beta if you want to play with some of the new features for the time being.
TBH your picture is too small to figure it out... You didn't ever explain where is it coming from...🤔
Sorry, I am using the Oil wet flex brush and I can't really explain where they are coming from, I just pick a colour and they appear when I use the brush

why is generative fill greyed out? Worked yesterday
Yeah it just updated this morning, I thought I had stopped automatic updates, but maybe I was mistaken. I usually hold off on updates for a while since I depend so much on it for work.
But will do thank you. 
Gave +1 Creative Carma to @ripe quest (current: #3 - 2438)
No problem. Is it a regular brush or mixer brush? I'm curious to know...
Just a regular brush, Kyles Real oil wet flex
Are you talking about Beta (V26.1) or Regular (V26) Photoshop? Just curious to know before upgrading my Beta... Yhanks in advance!
If I wanted to make a halftone pattern, would using photoshop or illustrator be better?
I think the General Release has an issue. I'm not sure about the Beta.
Depends on your goal. For a print document, I would probably be doing the setup for that in Illustrator.
It's just gonna be part of a profile picture, I'm probably going to end up using both anyways though
If you have the time and the interest, try both apps. Its worth it just for the learning experience.
can I get generative ai to take style from another picture? like I want to have a certain painting style but its just not doing it for me. Can I show it the style I want so it can try to replicate it?
Yes. You can try it. Its not an exact science but it will take a style reference and try to match it up.
how do I do that though
One moment
From the Generate Image GUI...

Reference image and what it generated...

But can it use the style from the reference image to the image I'm working on?
cause this just generates a completely new picture based on the reference image
Generative Fill doesn't have the reference image feature.
Here's a brain teaser for the big brain Photoshop users- I have two colour palettes, one is the original and one is a modified version that has had a colour plus a blend mode applied to it (that I don't know). Is there a way to reverse engineer that to figure out what was done to the colours to reach that result? I'm assuming the answer will be no, but.. you never know if you don't ask lol
do you have the two color palettes? Honnestly there are so many filters/effects/blending modes/Adjustment layers...etc that can affect colors...
I have both the original and then the modified version, but unfortunately do not have the steps taken to get to the modified version. So you think I should just kinda eyeball it and make up something from scratch that gets it close enough?
When you say the original and modified version are you talking about pictures or a color palettes?
Both- it's flat shading, so I have a colour palette I can grab from it that is exact colours
Can you share them here?

Hello i am trying to turn my pants into a white colour from grey
I want the white that is on the right

however i always get this weird almost transparent white when i adjust hue and saturation for white colour
what can i do tto fix this?
these are the original pants

hey guys how do i remove this fly?

It looks like you've taken all the saturation out of the colour. This might sound counter intuitive, but you want to brighten the white area a tiny bit, and then add a bit of blue-ish purple to the white area. Only a tiny smidge, but it will make it look whiter.
Reason this works is because an old traditional method of making clothes look whiter was to do something called blueing, which means you add a hint of blue, which strangely enough makes it look whiter than it being neutral.
you mean something like this? but it still looks not right?

Looks better though! The other problem you have is that making a black object look white is actually quite a difficult task, because you need to maintain the shadows and contrast.
Which colors are the originals which are modified? is it left colors => Right Colors? If so I don't think it's an easy one here...
Relations between HSB values look different on each lines.🥵
Left is original, right is modified. If it's not an easy one, I'll just eyeball it in that case then.
(Basically, it's an eye character palette between a character regular and character in shadow, but I need to now take another characters eyes and do the same thing... but I was not provided the mapping for how to take the colours even though that was expected to be provided lol, so making it up as I go)
Cheers! Will just eyeball it in that case
Good luck!
why do my PS files now not have any thumbnails?

Even new files dont have any thumbnails now

In the File Explorer, right-click on the File and go to Properties. In the General Tab, look at the "Opens with" field. If it doesn't say "Adobe Photoshop" there, hit the "Change" button, locate the Photoshop App in the list.
gotcha. cheers mate
how do i turn this into an actual texture?

Please describe what you mean by "actual texture"
well
when i try to overlay it onto a picture
it darkens the picture too much
i just want to add the cloudly texture to an image, without making it a whole different shade
let me show you an example
normal vs with it


and when i use overlay it becomes a different saturation entirely

@ripe quest
Have you tried other blend modes? Screen or luminosity might be more what you’re looking for rather than overlay
well when i use screen/luminosity the texture is hard to even notice
let me show u

just made it look brighter
I'm not sure the styles of each image actually compliment each other.
no ik but its about the consistency
like i want to use the black background for all my icons for this certain project
One moment.
I mean by its very nature, having that cloudy image as a texture is going to lighten / darken portions of the image. How bright vs how dark will depend on what you’re going for. For example, you could take that cloud image into its own project, desaturate, crank the contrast/adjust curves, export as a png and then use with a blend mode of your choosing. Your lightness and darkness values will be more apparent, but if you want the texture to be noticeable that’s the trade off
something like this?

You could try to do some Advanced Blending using Blend If and perhaps adjusting the Levels of the overlay.
As you can see, I also masked around the icon itself.
yeah that has a really noticable effect and it dosnt change the color itself too much
If you don't want to change the icon, then I would mask that first.
And only do this "texture" effect over whatever background you're going to use.
I put a border around my icon to separate the elements.
You want the texture to be applied on the icon itself or only on the background?
Ideally, these would all be separate layers so that you wouldn't have to do complicated masking but my example shows that you could do it after the fact if you really had to.
Oh. I thought you said you wanted it as the "background" Guess I missed that part.
font boldness is inconsistent? any ideas?

You could do a combo effect where you use different overlays for both foreground and background but that might be getting too complicated for you. :)

If you don't want to alter the colors I would suggest you to Desaturate your texture and play with levels to keep texture without too many contrast between Blacks and White. Clip the texture to your icon then try Multiply blend mode.
You can add the original texture under your icon layer if you want.
Choose a different font... (?)
Does that font do something different with each letter or is the bold font only assigned to those letters?
no to both
its montserrat
it shouldnt do this
It shouldn't
i've tried even retyping it, making a new text, both didnt work
Save your work and reboot Photoshop.
And/or test Monserrat in a different app. This seems like some glitch.
did that, didnt work, but i tried it in another project file and the problem seems to still persist

You could also try uninstalling/reinstalling the font itself. It might've gotten corrupted on disk or clashes with an old version.
Ill try that
Yep weird , It looks like you have different font weight depending the letters used... What Montserrat font are you using (weight)?
This seems like Regular and Bold are getting mixed somehow. This might happen if you installed it directly in Windows but also via Adobe Fonts.
bold
this didnt work
I would remove it completely. Like look in the Windows Fonts folder. See if its there and remove it. Also, remove it from Adobe Fonts, if you installed it from there. Then reboot Windows. Then reinstall Monserrat from Adobe Fonts.
You can get Monserratt from multiple sources. Perhaps it got crossed up somewhere.
You font is probably corrupted... Look mine is behaving as is supposed to.

tried this
google fonts
its alright
ill just use another font
Remove it completely. Reboot Windows. Resintall it from Adobe Fonts.
Unless you have some need to use the Google Font elsewhere?
i did this
its all good though
human sans does a fine job aswell
thank you both for your help
You removed it and rebooted Windows and it still didn't work? I find that hard to believe but OK.
I think its been installed multiple times. I've seen this happen before with fonts installed both from Adobe and another source.
yes
Anyways, good luck with it.
You can check Adobe Fonts and see if it thinks that Monserratt is still installed: https://fonts.adobe.com/fonts/montserrat
A sans serif typeface with 36 styles, available from Adobe Fonts for sync and web use. Adobe Fonts is the easiest way to bring great type into your workflow, wherever you are.
Hello! How do I create a text effect like this? It looks like a strongly saturated, slightly orange-tinted pattern texture was applied to the yellow text. I'd like to know how to achieve that effect.

Hello. Can someone help me, I want to make blurred square frame, but corners are wrong

Can you take a screenshot of your current layers you’re using?

the bg layer is just a color
and frame is frame with blur filter applied
basicly I just need a frame, nothing more
Anyone know if there is a way to make my logos like this? Or is it something you would just have to make from scratch.

looks like it was made using vectors, drawing locking alpha, gradients and textures
I figured it
Made it kinda manually, but not too much
I made a few frames with different alpha and blurred them together, so corners look like I want them to look
Hey yall, how would i go about degraining a image?

well while making some designs i didnt look the ratio and now i want those to be posted on instagram . so is there any way to adjust the size of psd without disturbing any element or do i have to work on a new one ?
No. You're going to have do a new layout for that aspect ratio. Adobe is working on AI tools to do this sort of thing. They showed them off at Adobe Max this year. However, they're still just R&D projects at the moment.
okay
Are you familiar with the Camera Raw filter in the Filter menu? Scroll down until you find the Noise Reduction slider within the Detail section.

I also suggest converting your layer into a Smart Object before you apply the filter. That way you can easily edit the filter at any later date without actually altering the pixels within the layer.
Smart Objects are a little more advanced. So if you don't want to use them, I suggest at least duplicating your layer and apply the filter to the duplicate. That way if you mess things up you can always throw away the duplicate layer and you still have the original.
Hey guys imma build a pc and photoshop is my time to time program i work with files that are 10 to 15gbs, do i need a seperate ssd for scratch disk will it give me any performance advantage ?
I would suggest it, even if it's not the biggest storage capacity
Ideally you'd want a Hard Drive for the start up (typically C:) then a separate scratch disk.
Of course it's down to budget etc...
Check this and see if it helps
https://helpx.adobe.com/uk/photoshop/kb/optimize-photoshop-cc-performance.html
What sort of spec were you working towards anyway?
I just bought a new PC that has these specs:
- Intel Core i7-14700KF Processor
- NVIDIA GeForce RTX 4060 Ti Graphics
- 16GB DDR5 RAM, 1TB NVMe M.2 SSD
I've already put in another 1TB SSD and I also noticed that with just:
Outlook, Chrome (1 tab open), Photoshop (with a 6 layer, 5,000px image), teams, slack, discord, plus standard Microsoft operating system bits (MS firewall etc) - my RAM usage is:

10+GB RAM usage when I'm not even pushing it.... - yesterday when I was batch processing photoshop scripts for some bulk mockups, the RAM was completely tapped out.
- meaning that I'm going to upgrade the ram to 32GB of DDR5 today.
Hey there- anyone know how I can make this vector not have so many layers? Do I have to group them or something?

Those corners are 100% correct. That IS what would happen. Imagine the gradients from the top and side combine in the corner, laying over one another. - making it 'thicker'

JEEZ!
Yeah, if you don't plan on editing it further, just group them all and either turn them into a smart object, or merge them into a raster
I need it to be a vector for printing and they need to edit all the colors of the file
if you delete a section, what's behind it? White? or another layer?
Its all grouped under 1 layer so if i take out the layer its white in the background
No, I mean if you delete a single tiny shape, what's behind it...
oh it doesn't matter. - regardless.
If you want it to remain fully editable as a vector, you need to keep the layers and shapes as they are
How can i group sections of layers without having to select them using the layer column?
However the thing is which i hit everytime when i research into this topic, how much will it be different to use 2x 2TB nvme vs 1x4TB nvme i'll have the same storage capacity nontheless is it still worth to put a seperate scratch disk
i7 14700kf+rtx 4090(will be upgraded to 5090) 2x32 6800CL32 ram with storage to decide
- custom windows which has amazingly less memory usage
Idle memory usage is between 1.7-2.2
With that spec, I don't think it really matters. - Just use an SSD scratch disk with a few 100GB free and you should be golden.
I just changed my PC with the aim of getting into 3D so I have asked in 3D servers (Adobe Substance) what was preferable and I was told definitely 2 smaller ones
My config is
AMD Ryzen 9 7950X 16-Core Processor
128 GB (127 GB usable)
GeForce RTX 4060Ti 16GB
3 SSD internal (2TB, 2TB and 4TB) and one standard HDD external for my archives (4TB). One of those SSD is there for the automatic back up, meaning that my scratch disks are set for both C: and D: .
That means I do not practice what I told you earlier 😂
But honestly, I don't work that much with files exceding 1 GB, and my photoshop usage is mainly ecommerce and beauty retouching, I used to do fairly complex comps but not anymore and if I did, I would look more into 3D integration. Times change!
Thruth is, 2 smaller SSD costed me less than one equivalent big one
So it made sense to me.
OMG…I feel so ridiculous when I see your configurations🫣
I sold two kidneys and an arm. I wouldn't recommend!
That said, I used to have a super powerful laptop and used to make them "last" 4/5 years, but this one is a desktop, so definitely cheaper than a laptop and I will look into updating it instead of changing the whole stuff
So it will cost less (fingers crossed!) in the long run
Also, it's in my business expenses 🙂
my "old" 4 years old laptop was still pretty good for Photoshop. I had no complains. Illustrator and 3D stuff, on the other hand...
I'm not even going to state my system specs then. You might become ill. :)
I don’t use laptop anymore… My last one was an XPS running on Vista XD…I’m desktop all the way since I don’t travel a lot…
Yes, the one I bought before this one was bought with travelling in mind, then came Covid
But if I had that kind of hindsight.... I'll be rich 😁
I don’t have any doubt… I won’t share mine ‘cause you won’t speak to me anymore🤣
The thing is i work with really high res images as i'm preparing large print outs in real world which are exceeding 70cmx100cm thus my file sizes tend to be multiple GBs generally crossing 15-20
Bloody hell, nobody cares! It's what you do with it that count (and no, there is no double-entendre here)
You've sufficiently proved that you know your onions.
And sometimes i prepare 3-4 of these and merge them into one bigger file
PSB for the win! 🙂
I was jokking… I know you and Daniel are kind enough to still talk to me 😂
Definatly so i guess i'll go with 2x2TB rather than going with 4TB and making that stracth disk at the same time
Yes, I don't think you need a gigantic scratch disk (I may be wrong though) but investing in a speedier one defo does the trick
In the end, the two smaller ones I bought were faster than the 4TB, and cheaper
The thing is 4TB single disk is cheaper than 2x2
If i go with 4tb one i'll make that disk my os disk in the sametime
That might depend retailers then
or where the market is
If I had bought a 4TB, I would have split it in two, with 2X2 I didn't need
What do scratch disk exactly do yeah the things generally do not fit into the ram will be used by it.
Generally crop gradient and such
And as file size gets bigger the bigger scratch disk size we need
They take care of the overflow when the ram is full, so technically if you have plenty of Ram, so need less scratch disk, but given what you are working on, you probably need both
Did the link I gave you of any help?
However what will be get faster when i get a faster scratch drive generally its said that ssd speed do not matter that much ?
I'm probably not technical enough there
Adobe hides their words like they do not explain or elaborate yeah it did to some extent
I have read a lot of puget explanations
Last few days
Did you try asking in the Adobe forum? That's where you might get hold of Adobe personel
Did adobe had a forum god damn new day new info thanks, i'll take a look around there
Gave +1 Creative Carma to @vapid flume (current: #8 - 767)
Let me get you the link

https://community.adobe.com
Master Photoshop with the help of our global community.
The forum is alive and well for many decades now 🙂
Discord servers are relatively recent in comparison
I have 2x500GB scratch disks. I bought the cheapest Samsung SSDs I could find and I only use them for file transfer and scratch space. If they die from too many read/writes, I don't care. I'll just replace them.
If you don't have space or money for two, 1 500GB SSD would probably suffice.
Can anyone help me to make a thumbnaile like this pls?


im trying to resize this, however it comes out as blurry
how can i make sure it still is a pixel solid color?


how can i adjust more parts of the circle
when i try to reshape it, only a cross set of dots apear to edit the scale of it
When that happens, right click it
You'll see the warp/distort etc.
If that's what you mean.
What i want basically is to edit the circle shape more. When i try to scale it, only 4 points apear to edit
I want to edit other parts of the circle

Because i cant get it to this shape for example
It needs to be turned into a path if you want to have more points
What I would recommend would be starting from a path, so from your shape tool that you drew the oval with, select path from the drop down rather than shape

Alternatively if it's still active as a shape layer you can use the pen tool, and press CTRL and then click on the line of the shape, your mouse will look like this
Is there ai to make mascot with different poses?
Hi everyone,
I'm looking for someone with good knowledge of this thing that, It's kinda urgent. Would you please like to guide me that I'm unable to bring this kind of arrow below, so that the dustbin and other options are going to come in the panel. How do I bring that? Plz guide me step by step because I'm a beginner in photoshop software with victus laptop in wacom one tab.
If you would like to help, please
ping
Thank you!

I don't really get your question but one thing, if you're trying to work with 3D with Photoshop, know that the functions have now been retired (unless you're using an older version)
new versions have most of the 3D disabled now
I'm using 2021 version
Would you please like to tell me on which versions does this 3d works?
Because I was finding it extremely challenging to draw this accurately with correct proportions.
Well I would say prior to 2020 it should work but I am not entirely sure
Adobe has now its own 3D tools (3D in Photoshop have always been clunky anyway)
not sure you can go back as far as 2020 in the CC app though
I wouldn't use 3D in photoshop even in older versions though (I mean I did at the time and it was a apain in the butt)
But I can't go back to 2020 version because I took the help of an engineer to install the software offline. Because online downloading of the software was containing virus. If you would like to help me install 2020 version then it would be a gr8 help for me?
Are you using a legit version?
Why was it so? Reason?
Because it's better with a real 3D software
I'm using a cracked version because I can't afford the paid version of it.
Okk
So the 3d objects won't gonna work with photoshop, is that what u r trying to say so?
For example Blender is free and it's a real 3D program. Or Substance tools, they are top notch. Even Illustrator is better at 3D than Photoshop was
So do you realise you are on the OFFICial Photoshop server here?
maintained by Adobe?
OK I'm a complete beginner so I have no idea on how do I draw a correct proportion 3d cube.
We can't help you if you are using pirated software
As I said, Blender is free and is better for your task anyway
I'm not using that now. I'm using paid version of 2021 version of photoshop software
Then you could probably go back to the 2020 version using the CC app
Sorted!
Still i was facing that
So the 2020 version is much better than 2021 paid version?
Both would be paid, they are available in the CC app
the 2020 will have the 3D features but not any Generative AI stuff. If you want all that you need to have the latest version (2025) and use a proper 3D software for doing 3D
So u r trying to say is 3d won't be possible in photoshop, right?
It's not a question of what is better or not. If you insist on using 3D in Photoshop, you need an older version (with less of the other features)
Not anymore
Photoshop is not a 3D software, period
Idk y that utube channel was teaching us how to use 3d in photoshop. That's why I followed. So how do I stop that from buffering without deleting my older projects in process?
What is the date of that tutorial? 5 years ago?
check that
it should be included with your subscription
this is a proper 3D software for simpler projects
It's very easy to use
Check if you have ray tracing on, and kill all of the other instances. After that it's down to the ram your computer uses. it might crash if too heavy
7yrs ago
Idk y this link is not opening. If you can guide me step by step like what particular command do I have to click?
Would you please refer to this video where I'm stuck currently?
This is a link to a new software, Adobe dimension that should be included in your Adobe Subscription.
I wouldn't know how to guide you for the rest
Nope it's not there with my subs

You should use your mouse in that instance, it's easier. The pen might slow down things
Your computer is computing the rendering or something. it's either your leave it to finish, or your stop the process with CTRL+ALT+DEL
Anyway, I need to go!
All the info you need is in the conversation above.
Will it gonna delete my old work which I was doing b4 Dat?
If you didn't save it yes. If you did save it, no
Tysm 4 ur guidance.
You're welcome!
Got a question/issue, i'm hoping someone here will be able to answer or provide any tips on. I am looking to fill in the rest of the lip color here to match the lipstick but im struggling with finding the best approach to do so.

My general approach would be to use a technique called "Frequency separation" that creates 2 layers one that only affects the texture (and that you won't touch in your case, but is still required in order for the retouch to work) and on colour layer that will be coloured in. I would use the clone stamp tool on that colour layer (Named "low frequency" layer, the texture being the high frequency layer)
► Join PiXimperfect Pro - The Ultimate Photoshop Training Course: https://pix.live/pro
With the release of incredible new tools in Photoshop, skin retouching with Frequency Separation just got so much easier and faster! In this lesson, we will discover the Modern Method of Frequency Separation that uses the Remove Tool and takes away the labor ...
On the Youtube thumbnail, you are seeing the result of the high frequency being retouched. You, on the other hand will be working on the low frequency layer.
A word of caution, like in all things related to portrait retouching: less is more. A perfect skin doesn't exist and looks horrible.
why is the W off like this, cant get it to work

Does it fix itself if you raise the dpi / ppi
yes wow it did, everything on the poster got better lol. Thanks!
Gave +1 Creative Carma to @molten nacelle (current: #195 - 8)
You're welcome! You'll find most things a little more detailed and crisper on a higher density 🙂 Just don't go overboard and raise it too high, or file sizes will balloon with diminishing returns... for the most projects 72 ppi will be enough, but if you're making large scale things for print (like posters) 300 dpi is the standard. I don't know what yours was previously set to, but when vectorized things like text are looking pixelated that's a pretty good tell that the pixel density is too low
Alright, you know some stuff!
Thoughts? This was before the dpi edit

😅 I mostly know things now just by doing things wrong for a long time first... and am probably still doing many things wrong, but hey that's the process!
On first glance of your poster, I love how clean and modern it is! Very much looks like a sweet poster that some car nut friends I have would hang near their desks. I have a few subjective suggestions, but I would love to see it now after the upscale, I'd probably be able to give some better feedback if that's what you'd like 🤘
Alright!
@molten nacelle here it is

I'm curious when you use an iPad to draw or paint in real time on PC you have to use an app to make the connection, does it work well? Or would I be better off using PS directly on iPad and saving to the cloud?
Is sending a creative brief questionnaire to a company that is ordering a design a better option than just asking questions via email? What are your experiences with this?
how do I check what inputs I put in for the oil filter on a certain image?
Did you already applied the oil filter? If so, the image was changed to smart object before or you've directly applied the filter on a rasterized layer?
I applied it and then closed photoshop
OK if you didn't used this filter in other design photoshop should give you last settings used if you re-apply this filter.
yea I used it in others already and changed the settings
Any chance you've applied it on a Smart Object?
If it's applied to a smart object you should see the oil filter smart filter above... Double click on it to access the oil filter settings used.
If you rasterized the effect applied, I'm sorry to say that but your settings used are lost...
The interest of using Smart object is to keep the effects editable afterwards so you should avoid (as much as possible) to rasterize a Smart object.

what is rasterize

Raterized image is an image with fixed resolution. It is no longer considered an editable graphic, and changes to the object cannot be undone.(effects/filters applied are fused inside the image).
A smart object, is an image that has been embedded within a Photoshop document. It is still editable, meaning changes to the object can be undone and modified at any time and you keep access to the filters applied to it.
If you have the before and after image at the final resolution I can try to find settings used (or something close)...
Don't promess you anything but could worth a try... As you want.
?
Thanks but its not worth it
Gave +1 Creative Carma to @viral palm (current: #9 - 598)
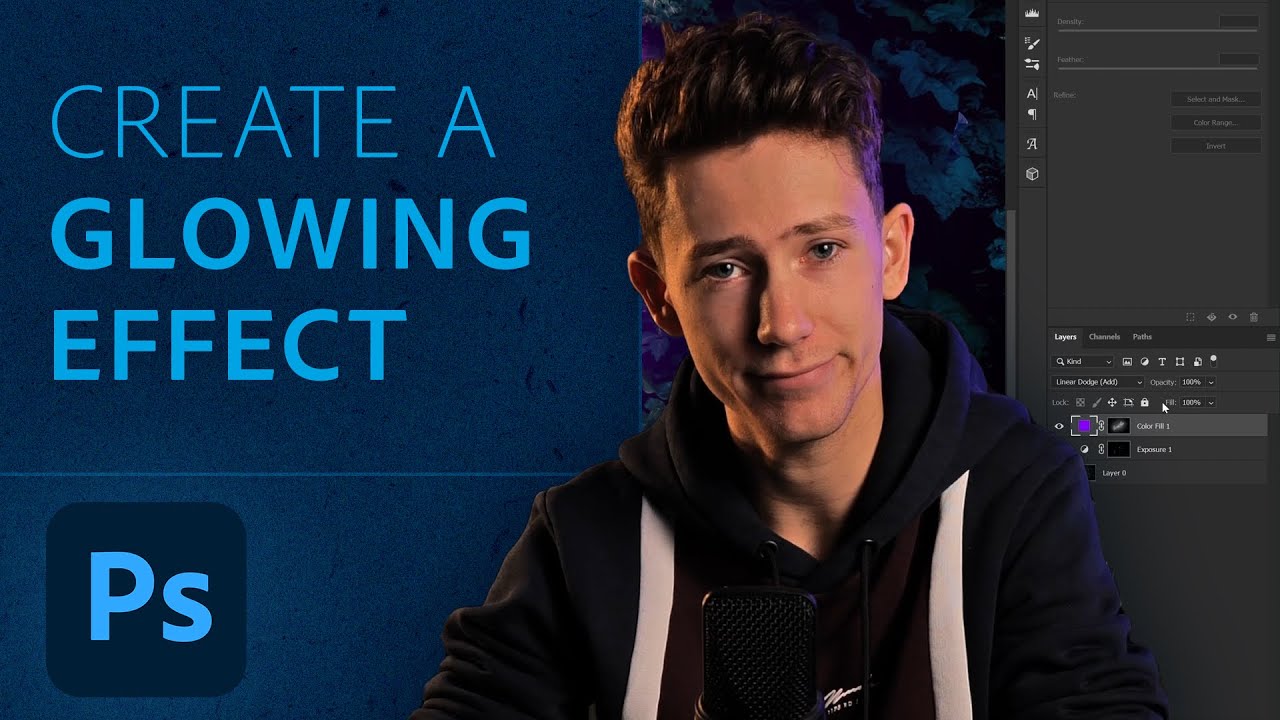
hi , i have a questions , i want to make a glow. i use the solid color feature and i press control + i. and last thing i need to do before using my brush is to make it into linear dodge(add)
but when i use the linear dodge(add), the color fades away and turns into pure white
i really apperacite if someone helps me with that , thanks
Welcome back to Photoshop in 5. Follow along as Benny teaches us how to make glows and create glow effects in Photoshop in just under five minutes.
Remember to tune in next time for more five-minute Photoshop tips.
Follow Benny here:
Instagram: https://www.instagram.com/benny_productions/?hl=en
YouTube: https://www.youtube.com/channel/UCa_SO...
hello i want someone to help me with a picture
is to remove a watermark but is a pretty hard to remove watermark and i tried everything to mixed results
Could you provide a screenshot of your layers and what colors you’re brushing with / on top of, etc?
@molten nacelle hey could you help me with mine, i could provide screenshot of the picture
I can't help. Idon't use Ipad to draw on PC. Sorry.
You can feel free to go ahead and share the screenshot. I just may have to preemptively warn you that depending on what the photo / watermark situation is, many folks here may be reluctant to help you. Often because watermarks are protective measures against using peoples images without credit, permission, or compensation. With that out of the way, show me what you’re working with! 😅
yeah sure, is nothing bad. I will explain it to you better on DM
Did you follow step by step Benny's demo?
Is a solid color layer(with the grey cursor line under the thumbnail - like on the screen shot) or a regular layer filled with a color?
If you just filled a regular layer with color be sure to invert the mask and not the layer itself.

ah I just like the idea of using an iPad better than a pen pad
I assume you have an Apple Pencil...
yeah the new iPad came out and so did the new pencils
my current iPad IMO is too old for this
How would I non-destructively remove a single color? I need the full bright green to be gone using an adjustment layer of some kind.

Bright green must be transparent or you want to change its color/hue?
Must be transparent. If changing the color/hue to black or another pleasant color is an option, that would be equally fine.
Ah, here we go.
I just used the color range tool and applied a layer mask.
Strike that. It's not amazing.
Yep... You figured it out!
You can apply a light value "minimum" filter to your mask to clean the light green fringing around...
I was hoping there might be an adjustment layer that acts like a band stop filter. Just cut out all of a certain luminance.
That's what I get with the technique shown in the video...

neato... can minimum be done with anything that has fringing?
You can easily change the color with Hue/Saturation adjustment layer (like on this video) but to get a transparency it's more tricky since there are some green parts in the design you want to keep...
so why not change it to a color that isn't in the design that way it doesn't disturb the design iself?
True, true.
Oh that's such a neat button. I had no idea it existed.
Hi guys I wondering if anyone could make the hair sticking out and the hair inside the helmet along with the logo on the helmet gone if that’s okay?

?
minimum is a quick way to shrink a mask... Often used to remove the white "halo" around a masked out subject... It's just a trick (works better on high resolution image 'cause we can<t go lower than 0.2 value)... And doesn,t work on anything => Really bad on hair and fur masking.
was going to say... cuz contracting or expanding or feathering, etc seem harder
even refine hair can be tricky too
leave my boy refine brush alone! He aint do nuthin wrong!!
smh wrong channel, discussing a feature and its best uses
May not be a question, but it’s just banter relating to the topics being discussed
Hope I understood what you're asking for...

Could someone change the text proof; SubToToJikun01 to Proof: Lil_brogamer3321 and remove the other red guys message.

** If your working on it react to the message **
Yeasirrr appreciatechu
Oh wait also you see that “ Hayes Fawcett….” Can you remove that as well please 😭
how can I make the shadow on the pumpkin match the on the bottom teeth

Hello im asking for a help to recreate this gold medal in ai but high quality and png hehe for educational purposes pls

like this but realistic design

I’d have to have a better idea on your layers you’re using to create the shading in order to really advise you beyond suggesting adding a new layer, selecting the brush tool, holding Alt to sample the color of the shadow, manually brushing in additional shadows, and masking off areas you don’t want the shadow on
thanks a lot that worked perfectly
Gave +1 Creative Carma to @molten nacelle (current: #180 - 9)
Right on 🤘
Rather than trying to use AI to recreate it, there’s a wealth of free PNGs online if you do a little digging. Like this one for example?

Like this?

i think this is more okay i will just manipulate it '
I mean the cutout is pretty rough because it’s from my phone, but that’s a real medal
Gave +1 Creative Carma to @molten nacelle (current: #168 - 10)
Anytime 👍
it seems if i chose a dark color , it wouldnt work , i need to chose a light color
ok, so when i edit the right part of the shape, how can i "mirror" it to the leftt side
so the shape can be symetrical
Is there a way to like ai/auto generate shadows under car in photoshop?

i want to make the blood look thicker , any idea how?

blook?
yeah.

This was done with Gen Fill.
how do i open that box because i cant get it to open

The 'box' on my screenshot? on the right? - It's just the layer properties of the Gen Fill layer
If you can't see it, maybe go to Window > Workspace > Reset Essentials
oh wait...
you mean the box at the bottom,
this one at the bottom yeah
Are you using the latest edition of photoshop? Non-pirated etc?
I'm not judging, it's just that it won't work if it's not a legit copy. - this is because it connects to Adobe servers etc
how? what is bloook?
You tell me. You typed it.
oh yeah its of course the real one, it dissapeared yesterday


Where is the blood? Sorry I was looking for something red 🙂
um the dark red thing , i used brush

Can you share the whole pic? Seeing it in context may help.
The fact that it has an opacity isn't helping
Some highlights instead would work wonders!


Gave +1 Creative Carma to @sly hawk (current: #5 - 1020)
You need to add some dimension to it, make it more 3D. You can use a layer style "emboss"
does it cost money?
emboss?
@sly hawk Yesterday this generative fill worked great but I havent got it to work today at all. It doesnt do anything

sometimes all it does is just like cut small parts of the car out
thats what i needddd

it looks better now

Obviously mine looks more like ketchup now, so you need to add that dimension to a shape that already resembles blood,
ey nothing wrong with ketchup haha
dimension?
is it another tool in phtoshop?
3D effect? a sense of dimension
no, the tool I used is called "bevel and emboss)
idk , i am a beginner
oh oki
(You can download this asset for free from here:
https://pngtree.com/freepng/blood-red-dripping-three-dimensional-realism_6861041.html
It's a way of expressing the need for a more 3D feel: to add dimension to a design = make it look more 3D
What did you select before asking it to generate anything?
I used the pen tool
(This is what I selected)

i see
@sly hawk yeah it could have been that problem. better now


do you know how i can make the size selcetion longer , as i need the brush to big but either itss to big or its small , its too sentsetive


You can type numbers directly in there, unless I missed something in your question
but idk what nummbers i want , i just toogle the thing untill i find the size i want
You can use the up and down arrow as well. If you check in your preferences you can display the real size of your brush as a cursor, it helps
but whe it comes to end , its so hard

like what it this lmao

sorry little confusing
Check my settings, that way you will see th exact size of the brush with a cross hair in the middle

you can also use the [ and ] keyboard shortcuts to increase or decrease the size of your brush on the fly, without touching the slider
i dont find the AND key on my keybaord
(if you got a graphic tablet with express keys and/or a roller these shortcuts can be added to the keys, it's easier for drawing)
the and is not a key, the key are [ or]
or is not a key it's a word
just hit they [ and see what it does. Don't follow blindly what I say, test it for yourself
which one is it?


I really like this shade of blue but I need it to be like a yellow version of that but using hue saturation isnt even showing me yellow

how do i achieve this
You could use "replace colour" instead if you know the exact hue you want to change it to.


I dont know the exact hue, i just know i want it to be a yellow version
am trying colour lookup to no success rn
Colour look up is different, it's changing all the colours (it's more a tool to grade photos)
I tried channel mixer but i just learnt it and not really working
if the design is on its own layer you can also try that

but that removes the gradient
if you want to use the Hue/Saturation layer, then click on the colour with the eyedropper (in orange in the screenshot) it will only chooses cyan (or blue) in your case, mine show red.

it sometimes gives better results that changing the whole colour
Sorry the image you posted is small I didn't even see there was a gradient
If the design has a gradient on it, the solution is either hue/saturation or play with the individual channel curvesso in your case, lower the blues (low blue = yellow, like in standard colour theory)

Am playing with these rn
now its just green
trying to remove the green makes it black
I had a try and I can see the gradient now

I would play with the sliders at the bottom. Because your lighter colour is cyan, but the darker is blue it won't work unless you extend the scope of what Cyan and blue are

iill try this
too
theres green though
thanks for taking the time
to help me
You need to play with the slider in both the cyan channel and also the blue channel

Personnaly I would apply a new gradient to this design, but it would need to be separated from the white background. I don't know if that's the case
yeah thats what i asked gpt to do
It would be easier (the other methods are valid though)

It's always best if you show the whole window, because that way we can adapt our answer based on how the layer stack looks. If it showed a separated layer for the design, I would have suggested otherwise
I don't use chat GPT, so I wouldn't know
yeah i know, but like is there a reason to avoid it?
I found that answers posted by people using chat GPT are often wrong
THis is a conversational agent, it scrapes answers humans have posted before (it doesn't invent anything) so if a human posted something wrong, the answer chat GPT gives will be wrong
Of course it will be right if the answer the human gave is right
but I like to try things by myself, that way, I know what is true
I say use GPT as a tool, if you know what you are doing then its a great help, also with o1 preview using reinforced learning to look at its answer, and then correct itself, and do this process again and again
You need to check the answers though. Too many people take what it says at face value
Agree with this
It's like what you read on Facebook 🙂
I only use Ai writing tools to correct my grammar and writing flow because I am not a writer and English isn't my first language, so it's not like I don't use it at all. It's just what works for me
i use it mostly for programming, like in unity if i need it to create like a quick Gizmo displayer for the area in which my enemies spawn in (a rectangle showing on screen in runtime) it will do that, without me having to like spend time doing it
I also use it to teach me or explain math/physics, and give me feedback on my english. Especially with claude being so much advanced now, the nature of these subjects math/physics is that i have a textbook right next to me so if i get it wrong i know straight away, and the more you use gpt the more you get a feel of when it answers right compared to wrong
as for english, that is really what gpt is built for, so i know its accurate
The thing I know is that for answers made by people here using it, it often gives a wrong, or a circumvoluted answers
i meant for essays or creative writing
Sometimes people come here because they don't know how to express the issue they are having
stuff like that
my parents use it a lot since they dont know english well, using it to write emails
If you know the jargon, you'll get any answer from any tool, if you don't know the jargon, only a human can understand what you are saying
I'll probably use it when it will do the dishes and the laundry 🙂
Can anyone help me to make a thumbnaile like this pls?


Which part of the thumbnail do you want to make (I wouldn't help for the brick 3D design 🙂 )
can you be a bit more specific?
i mean I can make the Thumbnail but i am beginner in PS soo what should i add to make the thumbnail more intresting attractive?
What do you start with? can you show the design you have so far?
ok then i am finishing it after finishing the main part then ill show you ok?
Othewise there are plenty of tutorials to make thumbnails attarctive. I am not a specilist, I never dome Youtube thumbnails before. I can only answer questions about Photoshop tools
You should show to #📝project-feedback
Ohh ok
This channel is for Photoshop issues, yours is an "aesthetic issue"
As I said, I would be useless helping you with that 🙂
Ohh okk Thanks
Gave +1 Creative Carma to @vapid flume (current: #8 - 769)
Learn how to create the best YouTube thumbnails to get viewers clicking on your videos and grow your channel!
see if that helps
Someone please tell me How to cover faces in Photoshop like this?

ahh can you help me ? how can i remive the watermark?

@vapid flume
Answer please
what brush can i use to mimic this

let me try
Looks like conté crayon or something similar (any dry medium like pastels etc)


thanks
Gave +1 Creative Carma to @vapid flume (current: #8 - 770)
Usually you must use a light color to create a glow effect… In « Linear Dodge(Add) » mode , BLack is a neutral color (effect doesn’t work on this color) so the more the chosen color is dark less the effect is visible.
Anyone know why generative fill doesnt work here? Does not create anything that looks like a shadow lol
Make sure to get your selection right, select more than you need first, including the lower part of the car and see if it's going in the right direction
Okay, you know how this generative fill sometimes messes up parts of the car? Like the wheels etc. Someway you can fix that? Like erase the generative fill at that specific spot?
You can simply refine the mask the generative fill layer has by default
Oh okay so after the generative fill has made the shadow I can like readjust the mask?
Exactly
Awesome thanks
Gave +1 Creative Carma to @serene coral (current: #6 - 913)
It is on Turkish but it doesn show up in the PS program.. anyone?


Did you change the install language after installing?
how do i mimic this effect?

Filter>blur>motion blur
blurring, isolated red hues, noise & grain, soft feathered masking
Thanks!
Gave +1 Creative Carma to @viral palm (current: #9 - 599)
Thanks too!
@real dagger - Please ask questions here. There are more people to help if I'm not around. :)
Kk
how do I open the mask again to readjust now that it looks like this

The mask should be visible beside the Layer thumbnail in your layers panel.
the thing is that i want to be available to get these lines visible that appears when using the pen tool again
@viral palm this is what i want to open after genrative fill

I think the problem is that generative fill works with layer mask… What you show me here is a vector path… I don’t think generative fill feature can create a vector mask rather a layer mask…
okay thanks
also why wont generative fill create any good shadows here? when I try to make shadows in another document it works great.

Gave +1 Creative Carma to @viral palm (current: #9 - 600)
can anyoone help me with this
TBH I don’t know why you get weird result with the shadow here… You could try (on an other document) to merge your car with a white background and try to generate a shadow? Does it give you the same weird and (unfructuous ) result? Generative can give uncertain results…
did it in a new document and it worked well, so weird

You won’t like my answer… Unfortunately you can’t edit several anchor point handle simultaneously in photoshop and there is no « snap » feature on vector handles…
You can add guides over your first modified handles to bring the handles on the opposite side at the same place/level…
A bit tedious but it works…
yeah i just cut it in half and copy pasted it to the other side
is there any way to like copy this one into my original document?
You can use a trick now… Wait 2 min I will type here…
In the document where you get the good result > copy the bottom part with the good shadow and paste on a layer above your car in the original document… Put the blend mode of the shadow on « Multiply » > then align shadow under the car… Does it wok?
cant really get that to work, isnt there just a way to copy the whole car plus the shadow to my original document?
is there any good addon or tutorial that lets you add details to letters, like scratches, paint worn off effect, ect


actually got it to work now but heres the thing, compare the lower part of the car in these pictures, generative fill messes it up. can you fix that? It kind of cuts out a bit and also messes up the wheels


Check out another of my videos: "BREAKDOWN: Select and Mask vs. Refine Edge - Photoshop CC"
https://www.youtube.com/watch?v=DTw78XQNjAo
-~--~-~~-~-
Join the discussion and view the tutorial on Tutvid.com here: http://tutvid.com/photoshop/shattered-broken-text-effect-photoshop-tutorial/
||||
||||
Follow this simple and fast tutorial to le...
i guess this will do
Honnestly I’m not a generative AI guy so for this type of work I would prefer spend time « painting » or building shadows from scratch rather wasting my time trying make AI works… AI is just a timer saver for me so when it doesn’t work I switch to classic techniques to mimics real shadows…Sorry, maybe a more AI oriented people could help?
yes it was first at english then i had to change it to turkish to make a video , then i had to install that language but it still didnt show up
get it all good thanks
Gave +1 Creative Carma to @viral palm (current: #9 - 601)
Soo good looking volvo!!
I love volvos so much
Btw someone help me fix this...

Every png file on my pc opens up in photoshop :/
Right-click on one of the files in the File Explorer. Choose Properties from the context menu. In the General Tab, look at the "Opens with" field. Click on "Change" and choose the app that you want to use to open PNG by default. Then enjoy your images in that app. :)
Yeah it is a nice one
File Explorer crashes when i try to right click, it's really weird.
I hope i'll own one of those older models or like a newer V70. <3
(but now it didn't)
Sounds like some problem with Windows. Rebbot Windows and try it again. Or see if there are Updates for Windows that you're missing.
Fixed it haha
Thanks man
I was too late to say, but it did crash once, when i right clicked.
But not now atleast 🙏
Glad you got it sorted out.
Thx for the help again. 👍
Gave +1 Creative Carma to @ripe quest (current: #3 - 2440)
Yeah right, swedish gold
Fr!
You might have to reinstall the program with Turkish selected beforehand
Hi @stark bramble
I would go the 'old-fashioned' way.
Add two areas as shadows + core shadows underneath your cropped vehicle.
Then reduce the opacity of the core shadow to approx. 75% and the opacity of the second shadow to max. 15-30% opacity, depending on the background.
(I have only roughly cut out the vehicle for demonstration purposes)


Is there a way to copy the location and transform setting from a layer to a different project with the same specifications?
Got it, for reference, Right click and duplicate layer, click drop down from window that pops up and select other active project.
Got a problem on Fresco Windows: when i draw something it’s make a Line first. Someone Got the problem before and can resolve the issue ?
It seems to behave normally for me. What version are you running?
I think you simply use a thin brush... Check the video from @ripe quest to see how to change your brush...
5.5.5 version
I can't reproduce that. Seems to be fine for me.
Are your GPU drivers up-to-date?
Yes
make sure your pen tablet drivers are up to date and enabled for Fresco, that line is how Windows handles pen input by default...
I wanted to print a custom label for a soda can, so i measured the can, made a photoshop document with those measurments, and edited a label i found online to fit the size of the document. When i print this out, it should in theory fit perfectly right?

are you making it in CMYK color pallete?
Yeah
300 dpi?
But idk if the label i found online is in CMYK, does that matter?
Not sure how to check that tbh

whats here?
Image > Image Size
Oh yeah it's 300 dpi
Thanks <3
Gave +1 Creative Carma to @molten nacelle (current: #147 - 11)
Oh no it's just for a DIY project. I'll just print it on printer paper, cut it out and glue it on the can for a halloween costume
Uhm, so Pantone: Where is it? I have Pantone at work but can't use it at home. Pantone Connect is no help and has bad ratings apparantly
Generally asking, not just for Photoshop (actually need it for indesign)
Does anyone know how to set up the symmetry correctly so that it is the same on both sides?

does anybody in here help me i dont know what to do and i need to use photoshop in my school and i dont know nothing
Start with the tutorials and lessons that Adobe provides with the app. Open Photoshop. Hit Ctrl F on the keyboard to open the Discover Window.
does anybody know someone that will due commisons on photoshop ?
Try Behnace Hire: https://behance.net/hire
Hire the world’s best design talent on Behance. Discover, connect with, and hire the perfect creative freelancer to bring your ideas to life.
is there a way to keep the middle selection? I understand i can just redo it but just curios if i can break a already committed selection
Break? You can hold ALT to subtract from a selection.
gotchu dont think its possible for what im asking
Sorry. I don't really understand what you're asking.
my goal was to select the hat but i accidently selected the bottom, i asked this question because i liked the top selection but didnt like the bottom selection i was wondering if there was a tool or way to break a selection to be able to select the top of the hat with still having the middle selection untouched
was just wondering if there was a shortcut
There are ways...
Hello, ive been trying for the past few hours to make a seamless hexagonal pattern but im unable to, any idea on how to make one?
i watched couple of tutorials
where have my panels / toolbar gone 

they barely helped
Tap the TAB key.
just does this sidebar here https://gyazo.com/37946841636f522bf5e89d4cf694488a

gotchu thanks for the info
Gave +1 Creative Carma to @ripe quest (current: #3 - 2441)
Window > Workspace > Reset [Workspace Name]
Will that reset all my workspace settings?
It will bring it back to the whatever state it was saved with.
I don't know what this video is supposed to show me.
If you just want to turn the Toolbar back on, you can go to Window > Tools...
Anyway to heal corrupted PSDs?
Here we go... Sorry for the delay

You will need a recovering app... Google is your friend! Search for "PSD repair "... Lot of offers (some are free online...) but I honestly can't recommend one in particular as I've never used this type of software. Don't put too many hope on this 'cause many recover softwares can't recover really clean files... I hope I'm wrong🤞
Franck.
Any question?
It depends... I can't promisse anything with so few info...
Shoot your point we will see.

Ok so
Can you make the Proof; Subtoto smth say Proof: Lil_brogamer3321
and remove the red guys hair and his text.
How does increasing ppi increase image quality? I can't see a difference
Tell me if its possible frank
I'll try to keep correct but... Even if I could I wouldn't do that... Even if it 's a game picture I don't do any sort of forgery... Sorry
I see you already posted this request yesterday... If nobody replied it means I'm not the only one... And I doubt any serious user here will do.
Hm, Alright. Thanks though. Just wanted to cheat proof so i can skip trainings in a game.
Do I use the deafault photoshop color profile for printing an image or do I use sRGB IEC61966-2.1.
PPI doesn't make any difference on the screen... It makes the difference when you'll print your image.
first 1:30 of this video explains what I mean... And the rest is great to (if you have time)
https://www.youtube.com/watch?v=73o_UnmAeP0

Does changing the PPI really increase or decrease the image quality? How is DPI different from PPI? What actually is Resolution? In this lesson, we will answer all these questions, understand the difference between PPI, DPI, and Resolution, and delve deeper into what they actually mean with the help of fun examples, experiments, and a little bit...
Since I'm not a printer specialist and nobody seems to reply I would suggest you to read this from the Photoshop help online.
Perhaps it will help: https://helpx.adobe.com/photoshop/using/printing-photoshop1.html
Send me a DM.
is there shortcut keys for photoshop timelines?
I'm trying to make the objects behind the picture frame appear in front of it intstead, like the plate, candle, flowers I know I need to mask it but I'm confused how and I feel like I should know this already but I'm not sure I have the layer order correct either

I did have a layer mask but something's not right
here's what I'm trying to do:

do I do a gradient mask?
I have it almost how I want it; but I don't want it translucent like that

oop, nevermind; I figuerd it out 😄 I just copied the two objects to a new layer and put them on top; problem solved

you'll get better answers in #📝project-feedback FYI
no one answered :\
does anyone wanna teach me photoshop through photopea im willing to learn
u can record me and upload it to yt if u want
What would be the best way to select these keys and fill them in black on a new layer?

Have u tried object selection?
I haven't I'll give that a try
Or try remove background
Object selection worked decently well ty
Np
Hey! Can someone help with my tiktok/yt pfp, i am trying to upload an image (1080x1080 res), i try it all, compressing the image, changing res to 200x200, and nothing quality still bad
I cannot really help (as don't really know about these specs) but one thing: the more you compress, the more the image will look bad
So you should stop compressing and start over
ok thanks
One thing to consider if the platforms allow it is to upload in PNG instead of Jpeg and see what it looks like.
so it would be: 1st having your Photoshop file set at the right size and resolution (but the resolution doesn't matter, the pixel count do, since you're not printing)
File> export as> PNG
and don't change anything
For example Instagram accepts PNGs for images and the result is always good on my end: No compression
Can someone help me putting 2 images together in 1 to see how they look like?
Do you need someone to explain how to do it, or do you need someone to do it for you?
if the latter you should go to #💬chat-general
If the former stay here 🙂
In that case ask in #💬chat-general then and see if someone will be kind enough to help
Hm, okay. I was hoping for some reccomendations via experience.
How could i make the inner imge brighter?

One moment
Add an adjustment layer over your design with a layer mask revealing the effect only in the center (black mask with a white elipse). You can try different type of adjustment layers: brightness and contrast, levels curves…etc
You could try something like this...
Hi,
I would like to make a blur at the bottom but only at the bottom of this png so it is a little bit smoother and not this abrupt. A sort of ghost effect but with only a blur
Tried a few blur but I did not found what I was looking for.
Also tried to mask it and blur only the mask but same result, not exactly what i was looking for

Blur and fade the bottom or just blur?
What exactly are you looking for? You'd have to explain that otherwise we're just guessing...
And do you think is doable to like remove the text that is written already ??
Sure. Try painting over it with the Remove Tool.
Did you try filter>blur gallery>field blur (you can add pins to control the blur zone and strength)?
Thanks a lot
Gave +1 Creative Carma to @ripe quest (current: #3 - 2442)
Quickly with the Remove Tool...

Many thankd @ripe quest , could u send me that image? To check if it works with my plan?
If possible
Here you go, pal.

I think you’ve guessed it better than me…
Perfect
Thanks this is what I was looking for
Would you add/change anything ? Seems strange but I can't find what is offf

Gave +1 Creative Carma to @viral palm (current: #9 - 602)
Sometimes, I'm a good guesser. Other times, not so much. :D
@ancient ferry #💬chat-general message
I'd suggest you erase/mask the old branches and then copy, paste and flip the the ones from the other side.
You can use puppet warp to tweak the angles/position
They can't do it. They're asking for someone to do it for them.
I am thinking what would be the best approach to change the sign to "I have a dream". Than I have to make this pictures with same in 3 more different languages. Any good workflow for that?

Credit: Foto by Nathan Dumlao form Unsplash
Yeah, sounds like a smart object for the text is the way to go...
@iron locust
Firstly remove the existing text 🙂
Then add the new text in... not forgetting the smart object step
Then swap out your text 3 times
You could also include a displacement map to help avoid the text looking so 'flat' and fake...
Hello,
I have a question about Photoshop's background generation feature. In Photoshop v25, when I selected an object, used "inverse selection," and generated a background, I could get a nice background based on what I prompted. For example, if I had a colorful cup and asked for a table, it would create a realistic table, making it look like the cup was placed on it.
However, in Photoshop v26, this doesn't seem to work the same way. If the cup is colorful, the entire background ends up looking like something out of a Disney movie. Is there any way to adjust this to get a more realistic background like in v25?
Thank you!
Oh, this is perfect! Thank you @sly hawk 😍
Gave +1 Creative Carma to @sly hawk (current: #5 - 1021)
Hey Huda - You can't get it for free, unless you're talking about a dodgy pirated copy.
and asking here, on the official Photoshop discord group, literally run and operated by Adobe - isn't a smart idea.
@thorn mason
It's always surprising the amount of people who self report on official channels...
But yes, just get the photography plan through the creative cloud and pay for it legitimately
i have a question why this happens with my image quality
left pre pfp:
right pfp:


Images are post-processed by Discord to meet file format, file size (dimensions and data on disk) and compression requirements.
Ooo ok, what a im supposed to do if i dont want that quality loss
I mean the largest resolution discord supports is 512x512
Export to PNG and try uploading that. There could be some compression/decompression artifacts/quality loss taking place. Difficult to know.
Can someone please explain or link a vid that shows how to turn the truck's container colour from green to red and the black letters yellow?

Maybe someting like this...
Updated to PS 2025 and now I can't resize my text box at all, I don't know why it started doing this maybe I accidentally enabled something going through prefrences but its quite annoying.
any advice for what to do for the framing of this scene? like background, position, rotation etc?

Thanks much
Gave +1 Creative Carma to @ripe quest (current: #3 - 2443)
Hello, my Photoshop just crashed unexpectedly, and I was expecting for the file I was working on to be saved in the background, as usual, but it wasn’t. I went into settings, and it appears that the “Automatically save recovery information every”…. is grayed out and I’m unable to activate it. Any thoughts what it could be and how to fix it? Thanks
should i upgrade from cs6 to the newest version of photoshop?
I mean CS6 is probably over a decade old at this point and Photoshop has only become more powerful and capable every year
Why can't I use these alignment tools up here to make the thing centered?

Do you have something selected?
Align to what?

Yeah
Gave +1 Creative Carma to @ripe quest (current: #3 - 2444)
@viral palm Thanks for the help also!
does anyone know to get the effect around the light?

Do you know if it's possible to like line something like this in blender? I have a circle and I want to add these objects easily around it evently. I have a GIF using 3d software blender as an example.https://gyazo.com/16078b7fd13feb97c785a8648d75c4e5
I want to add images around the circle easily and evenely without hand placingh each image around it. I've also attached a reference image


You're asking how to do this in Blender?
no no
in photoshop.
I used blender as an example since it's the only way I know how to show you
like how they dynamicaly change around the circle
based on the amount there.
It would be easier with Adobe Illustrator now their new feature.
Okay, do you know of any affordable illustrate plans? Like I get photoshop for $9.99 with lightroom but don't want to pay the $23 or so for illustrate separate.
It can be done in Photoshop but its probably going to require a bit more effort. As far as other Adobe Plans, I'm not expert in the different plans and pricing. Sorry.
Okay no worries thanks!
With Photoshop, you could probably use 'Step & Repeat' https://youtu.be/9Cn9R8edryA?si=GXhg0bkrpoZ2y6KU

Learn how to use the step and repeat feature in Adobe Photoshop.
With step and repeat you can make a transformation to an object and then repeat that step over and over again.
In this tutorial I show you:
- how to repeat multiple rectangles in a line and have them evenly spaced
- how to quickly repeat an object around a circle
- how to create ...
Hello i am using photoshop and i just started i need some help
Let me try this ! Thanks!
Gave +1 Creative Carma to @ripe quest (current: #3 - 2445)
I have packaging for a product for a presentation im trying to get rid of everything on the package but maintain the package itself with its structure just want to get rid of the name and design
so i want a completely black package
Best Photoshop settings for exporting an image downscaled from it's native resolution? Dealing with JPGs, PNGs and TIFFs.
ive been messing with color range but nothing is working could anybody help please
Tried the remove tool?
I'd need to see a screenshot of what you're trying to remove to give the right advice
I feel like im not explaining to well
yeah let me ss
ok this is it right

forget the ghost and the pumpkin
i want to get rid of everything on the package
such as the name and the designs like the bat and skull
so just a black package
Well, just so you know... something like that would require more of a manual approach (aka more time consuming) to selecting and masking than color range selection. Color Range selection is best utilized when theres a single color value, or values very close to that color. This bag has many different shades, and shading on the crinkles, etc. The approach I would take would be selecting around the elements you want removed with something like the lasso tool, seeing if generative fill / content aware fill can do some of the grunt work, and if not then you'll be going in with a brush, carefully sampling colors, and painting in the plastic packaging yourself
ill try the lasso
how do i use content aware after selected with lasso
wait nvm
its working!
Yay! Glad to hear it
Hi, any tips to refine edges smoothly in Photoshop?
hey guys i actually need help when i click on camera raw prefrence it always closses adope

Feels like given your current arrangement you should make the stencil in Blender, then drop it into PS as a guide and place by hand 😐
Which version, did you recently update, have you reset preferences ?
In future, the remove tool is your new friend.
Also if you need to do any cleanup, search for a tutorial on "Frequency Separation", it is a technique very very useful for cleaning up jobs like this.
A picture is worth a thousand words here - screenshot of the problem.
how do i make my photo like this? im completely new to photoshop and ive been fidgeting for 30 minutes to try and mimic this effect

@Gaothearsonist on insta
I mean the image you're trying to edit sorry.
Looks like you want to desaturate, block the shadows up a bit, and add both luminance and colour noise
Nik Colour FX has a plugin that does all this analog mangling
But IDK if there's still a free version of that already.
Maybe try using https://deepfriedmemes.com/
Simple online tool to deep-fry images via filters, jpeg crushing, and bulging (new!). Serve with laundry sauce.
At that point, maybe just get a new crisp packet mockup psd?

free standing pouch of potato chips mockup with customizable background. This mockup is specifically used to showcase snack pack products,
You can then make it whatever colour you want
P.S. - Here's how you can use mockups on photoshop
Not bad for a 4 minute, off the cuff, attempt:)
I love those smart PSDs, every time I use one I forget just how clever they can be
Had a business card template that was sublime in its execution, real inception level stuff for the repeating cards
Yeah, I use that sort of workflow a lot in my own work for roomsets, rugs, carpets etc.
I have to revisit how they're built every time, as it never comes up for me.
Yeah, it's handy to download a few to see how they're constructed, and then once you understand the principal, you can then go away and make your own custom ones for your own needs.
I wish I had call to, I'm just retouching McDonalds grade images as fast as I can :/
(As an aside, don't suppose you have CaptureOne and a wacom/windows ink tablet do you ? Just looking to see if someone can quickly repro something.)
Should only take a mo, if you're willing lemme know and I'll message you!

Even with generative expand?
I could not make it work
Worked ok for me?

I dont know what im doing wrong but thanks!
In my example, the bottom of the card didn't look very defined, so I added an extra bit above
@real dagger
Thanks!
Hey guys, sorry if i'm question is too dumb.
but i'm just a beginner and i would like to have a guidance, where to start at first, can someone give me some hints?
Start with some beginner lessons from within Photoshop

Then watch a few youtube videos on whatever interests you.
@sly hawk i reallly appreciate brother.
i will start it now for real, i was just worried bcs sometimes if u dont filter good on Youtube you always find
advanced videos
You should be fine, just include the keyword 'beginner' and you should be golden.
"learning' is just discovering these short quick little 'techniques' that you then combine together at the right time to get your desired result.
Key thing to mention that 99% of photoshop uses existing assets. Don't feel like you need to literally hand build everything from a blank canvas. You're not learning to be a painter in the 1400's
anyone plss check my feedback message
Can anyone help me edit a picture pls dm me I need help
"Have a goal"
That's not facetious - Have an idea of WHAT you want to do, and you can work toward it.
Pls rq any good photoshop editors that can help me
indeed, makes sense bro!
good ideia bro, thx anyways
Gave +1 Creative Carma to @stiff trail (current: #196 - 8)
Dear photoshop magicians, Ive got this picture that u want to "scale up" or atleast (which is my main goal) turn it into "pixel art" 😅 but idk how lol
I'm serious - it's easier to answer "How do I change this red handbag to a blue one" or "How do magazines get that smooth skin look" than it is a generic "How do I learn photoshop", if that makes sense ? So if you have a photo, think of wht you want to DO to the photograph, and that'll guide what you watch.
ALlllllso Photoshop can be used for everything from photo retouching, to composition, forensic work, graphic design, etc... And they all use different methodologies and tools. So having a steer on that is a big part of it too.
Right click - Make selection ?
Then layer->Layer mask->reveal selection
Is that what you're after ?
Do I do that when on the bezier tool?
Sorry, where do I see this part. On the layers tab?
File-Edit0Image menu
Up at the top
For me it's Ctrl+Alt+Shift+M but it's possible that's a custom shortcut 😂
It was haha😂 But I found it
For some reason though, it was greyed out

If you don't have an active selection it will be.
You need to turn your path into a selection

I've done this, but for some reason, it isn't working. Am I doing something wrong?
Also, thank you for taking your time out to help me
You already HAVE a layermask
That's why you can't make a new one 😂
OK so you wanna fill the existing layermask with black, make your selection, then fill it with white.
Or delete the layermask by dragging it to the bin, and then the option to "reveal selection" should be back.
In your video your layer is active not your mask. You must make your mask active if you don’t want the menu to be greyed out.
Ohh😅 I'm coming from Inkscape, so this is a bit new to me
Umm, where would I find the existing layer. I feel it might be the one that I used to remove the background of the brain
Hmm.. How would I make my mask active?
