#❓ask-a-question
1 messages · Page 81 of 1
Explain how to remove camo from this texture map is fairly impossible through a forum and to be honnest with you… Here it would be less heavy duty to make a new texture from scratch than try to remove camo from this one ( particularly if you want to keep pockets shapes , borders stiches…etc). Photoshop is powerful but sometimes it hits some limits.
There's no way this is what you wanted. What parts do you want preserved? The stitches?

It would be fine, if there will the the stitches
yeah, that way
I don't understand what "if there will ne the stitches" means. Try again?
how do i sharpen an image without giving up quality
I meaned the more parts of the texture will be "saved" from camo remowing, the better texture will be
it depends on what's causing the blurriness. You can add detail back in manually, or tell photoshop what details it's okay to lose (noise, artifacts, shadows, etc), or be more explicit about what details you want to keep.
I want remove the camo and save as much parts of this texture as possible
Like the stitches for example
try creating a new layer and tracing over the parts you want, then hide the original layer. Here's a really sloppy version I did. The line tool has a "dashed line" option that looks very similar to stitches.

Srry i forgot to say i use lightroom
I think its the edits tha cause it and the crop
What is the difference between darken and multiply? And is there one I should use for shadows
You can use both for shadows. Multiply mode gives you more darker colors so you’ll need to lower the opacity. I think Multiply is the most common mode used for « shadowing »
Thank you
Hi @midnight onyx
Does that not works for you?
Select the pen tool, press additional the Ctrl key and click on the shape or path. Release the Ctrl key again.
Then click on the desired anchor point.
Note that the cursor changes (depending on where it is currently located, each with different ‘symbols’, but similar to Illustrator).


hey, im new to ps and one thing bugs me is when i resize a simple square as in strech it down to make it longer it also seems to be able to rotate in degrees, is there a way to turn it off so i can only change the size without me having to always preciseley hit 0 degrees?
You must place your cursor over the handle (or the edge) to resize without rotating (you should see a straight double head arrow when you're hovering the side of your rectangle) . If you are too far from your object you should see a double head curved arrow => rotate your object. S o stay close the edges if you don't want rotation.

Hi im new to photshop, I thought it wouldnt be too difficult since i know how to use after effects but I was wrong. Can someone send mea tutorial or show me how to make a banner thing like this?

I got it working! The problem I had was that I was using the 'curvature pen tool', not the regular pen tool.
post what you've tried so far? Which part are you getting hung up on?
Im up to here and I want to make those whit lines on the borders now

nice! if you used custom shapes to make the black banner ribbon part, then the lines should be really easy. Right click on the 'shape' tool and select 'line'. The lines are straight by default but you should be able to curve and resize it once you've drawn it.
how do i bend it?

oh, huh, the default line doesn't have the handles on it, okay. "curvature pen tool" is the more reliable method, but it's a pain to use if you're new to photoshop. You draw out a path, then tell photoshop to "stroke path".
where is stroke path

@midnight onyx
its greyed

I redid it and now its not grayed but it does nothing
nvm got it
why is properties now on a different tab?

my entire photoshop has been messed up lately
IM LOSING MY MIND THERE IS NO SUCH THING AS A FILTER > DISTORT > DISPLACE. WHAT AM I MISSING?
Hi! I'm doing some practicing with the pen, and I'm making paths for pixel art, and sometimes the art is almost simmetric, like a circle, so I do one half of the path, copy, paste and merge them, but sometimes when it isn't totally symmetric I need to make some adjustments, in this case I need one more point in the middle to connect both sides, and then I need to add points to add the shape on the right, what would be a good way of doing this?

please some dude
anyone know why instagram refuses to upload my image properly? the image with the note is what is being put onto instagram, but the logo is fully transparent?


Spent like 20 minutes trying different color variations, solid backgrounds, uploading from mobile & pc to no avail
Only thing I can think of is something about how I'm exporting the photo
Instagram doesn't support transparency
Interesting
So I'm either forced to make it look good for light mode and bad for dark or vice versa
does anyone know how I can replicate this pixel-rainbow effect other than just manually placing coloured pixels over an image?

Yeah.

Switch layer to a smart object first
Filter > Pixelate > Mosaic
It's right there for me

just to confirm, did you get what you wanted? there is way too much chat for me to see if you found the answer
Did anyone answer to you yet? (same thing, too much chat so i cant know for sure if you were answered)
No. Can i dm you?
hey guys i need help. can anyone help me?
Do you want to learn how to create something with Photoshop or are you looking for someone to create something for you?
how to create and i think my problems solve is easy
Ask the question and if someone knows the answer, they will probably reply.
I want to shine around objects like this. how can i do this?

Try using a Layer Style > Outer Glow
someone please help and guide
i need to put store some of files in cloud.
how to do it.
i have images, video, ps, ae, pr ai etc.
how to keep them in cloud storage
could you send me the pictures or whatever in here
ill try my best to help you out
I don't think you can do it 'automatically' in photoshop, but you could if you use adobe Illustrator?
Explain me pls how can i cut out the stich here

Actually i going to change camo here
wait so under this camo is supposed to be something else?
i dont think i can help you with that....you have the final image only?
do you have any other image?
Only this

And normal and ao
i didnt realize you were expecting photoshop to magically bring what was under that....
sorry i dont think i can help you with that
like its literally impossible
you have other of this map?
like things inside?
could you please just send me EVERYTHING you have?
@native shard - What's he/she trying to do?


if i understand correctly, this person wants to remove that camo part hoping something else would be there
Right
but object selection can only just make it transparent/white
You can kinda isolate the STITCHES with the colour selection tool and threshold adjustments:

im so confused man
@twin breach - What's the actual end goal? - Not the process you want to follow. The end goal.
Cam you show me can i do, step bt step
It is the texture of the helmet camo. And i want change the camo on this cover. Here is multicam, but i want OCP. So the end goal is make the texture with another camo.
Pls show me how did you isolated stitches
so the blue part of the image here, you want it to be where the camo is?
made it primitively

just to show what i want
another camo here
Gave +1 Creative Carma to @sly hawk (current: #5 - 1011)
Alright, I've tried feathering. It is good. Just wondering if there are alternate means of smoothing jagged pixels also.
You can act on maks with filters, the same way you can apply a filter on a layer. Not all filters are compatible, but in your case you can try the noise>median filter
Be sure to select the mask and not the layer when you apply the filter

basically you can try all the noise filters (except "add noise" of course)
Roger that.
Appreciated.
You're most welcome!
How to open Layer style ?
Double-click on a free space next to the layer name (in the layers panel) or via the hamburger menu of the layers panel
it has to be pixelart tho
Forget that I bothered showing you anything then. - good luck @snow rose
how is this white and black effect done? it looks like a scanned old picture

anyone knows how to solve this???

Does the error message only occur with this one file? Is this your own file - or a third-party file? In most cases, the file is corrupt. Do you still have an older backup of this file available?
If the file comes from a Mac and is to be opened on a PC: Are you absolutely sure that the file was saved in the correct format with the correct file extension?
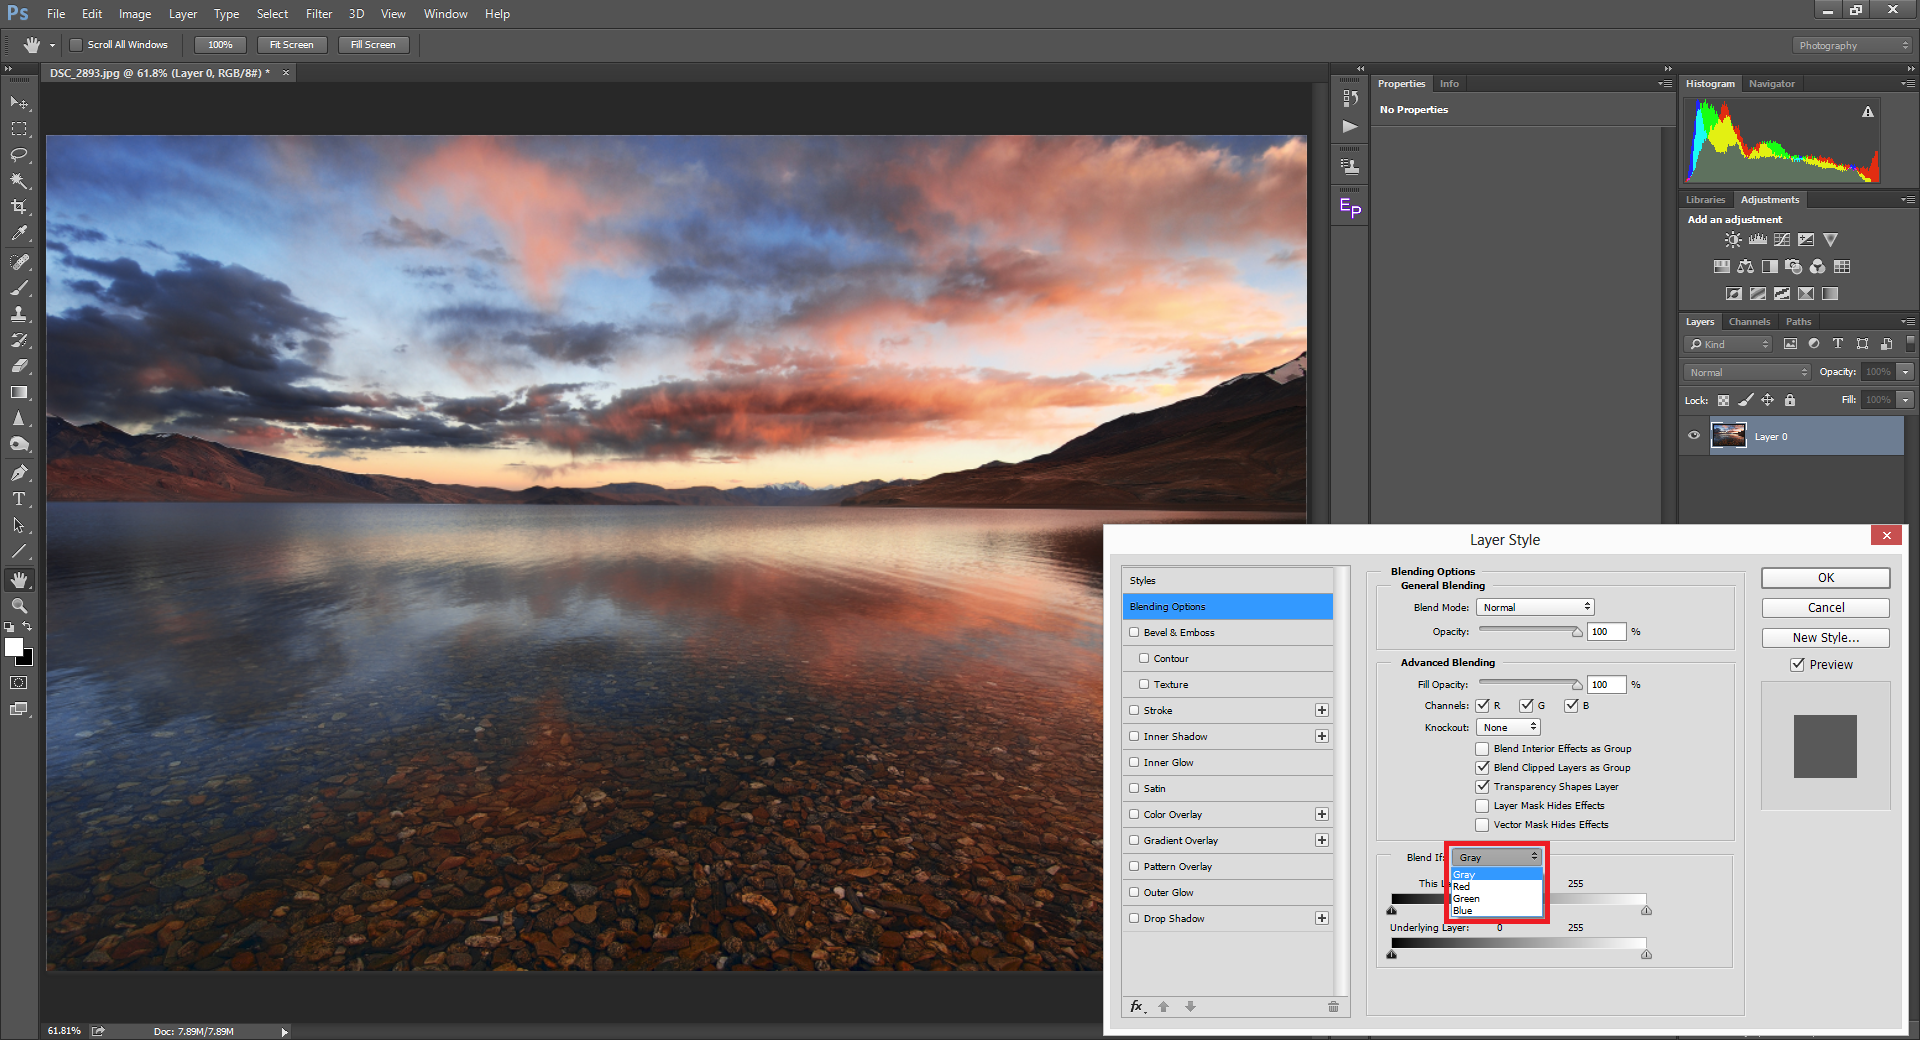
How could i remove all this grey colour from the background? I tried using magic wand but it takes to long and doesnt provide a good result

You might be able to do it with Advanced Blending. It will probably require Level Adjustment. Since the graphics aren't completely white, some of the items in the lower left might be a bit tricky.
This is very helpful, thank you! ❤️
Gave +1 Creative Carma to @ripe quest (current: #3 - 2413)
When you're done tweaking, you might want to convert the Layer and the Adjustment to a Smart Object (or merged the two together). I suppose it will depend on the direction of your project.
What does "Smart object" do?
It will combine the layers into a self-contained document and keep it safe from direct editing on the layers.
It comes in handy. If you don't understand the advantages of that or you don't need to edit it again, the layers can just be merged together, I suppose.
is there a way u can make photoshop's quality better like when i zoom out the quality of the image stays the same like when im zoomed in
what would be the best way to colorize those spost so they blend with the rest of the skin? I either have problems selecting the white areas properly so the borders look weird, or fail to adjust it properly and it becomes very flat.


nice~ tips for doing that?
I didn't have time to explain it in detail ATM so I just did it. Sorry! :D
don't worry hehe~ Do you mind if I ask you to either explain me later or show me how you did it later? I don't want to bother you too much and I'm not in a hurry so it can be whenever it is not a problem for you, if any!
I might be able to give some tips later or tomorrow. Sorry. Just up against a deadline rn.
ofc don't worry! gl on your project there ^ ^
hey
okay, how would i go about removing this inside icon from this coin in this texture, but keep it pixelated? Sorry for the noob question. I'm just so frustrated on this.

keep pixelated?
like exactly the same pixels you mean?
or any pixelation?
Yea, seems like im making headway with the mixer brush tool
That was what i was trying to do

still kinda looks smooth though
ooh gotcha, I thought you wanted the logo inside
try adding a gradien inside and blending it in
since the og img had a gradient in it
okay, how would i do that?
1 sec let me to it real quick just tto check if that's what we want
np thank you for your time
np I'm also not an expert hehe
something like this?

or maybe this?

yea that looks a lot better
the original one had a circular one, but since it's an hexagon I think that fits it bettter as well
so, what you gonna do, it's that you will create a gradient layer (botton right corner) and change it to diamond
this buttom right here

next, click on the gradient window and it will get you to a new window where you can decide the color (by clicking the tttiny colored square) and how the gradient works (drag the black and the white squares around to get a feel for it)

when you are satisfied with the result, copy that layer you created, and change the angle to 45 degrees (original was at 90)
then you can mask off the sides of the coin if you don't wantt for the gradient to apply tthere
Okay, im woking on that now
^ ^

congrats ^ ^
thank you so much!

how do i get rid of this streak

i tried painting it pixel by pixel but it wasnt straight
Only with this file, is my own file, maybe is corrupt but it still having 85 mb in there and not the 1 kb that appear when you hace a corrupt file, i don't hace an older back Up
The first time the problem appears was when i tried to open this in an other computer, mine computer with 2021 version and the other computer with 2024 version, and now doesn't open in any computer
Hello,
How could I dilate the white part of the eye?
Like in the image of Stella's eyes.
I'd like to have the same kind of rendering


One way would be to trace over with a circle shape (as it's not 100% circle, then trace with the pen tool would do)
Then go to edit>transform and enlarge your shape.
Hey guys, I am trying to remove the background on an image in photoshop (3468 x 2788), but when I import it in photoshop it gets all pixelated, the image was upscaled, is very smooth and should be very high quality, have you ever had this problem?
@halcyon widget alternatively, select the white part and go to "filter>other>maximum" Check minimum too for the other way round
how do you import the image? Do you place embedded or copy and paste?
Also what kind of interpolation method do you have in your preferences?
I'm using this button " import image" at the bottom of the canva, I also tried copying and pasting it but same result :/ the interpolation is cubic automatic. I tried place embedded now and the edges are still looking pixelated


The interpolation is good. Have you tried "file>place embededed" instead?
In any case, your main document size (and resolution but it's less important) must be similar. If you place a 600 pixles wide image as a new layer in a 5000 pixel wide document and it resizes automatically (or if you resize it yourself) you'll seee some deterioration
What are the two files respective sizes (in pixels)
If the images doesn't come with a transgorm control automatically, check that you have this options as mine in the preferences
sorry the first one should be this one
So for the document it's 3840 px by 2160 px (resolution 300 dpi), the image is 3468 by 2788 px,

OK, it's quite similar
doesn it improve when you hit enter to commit to the transform?
See the tick on top

sometimes the visualisation is a bit crappy, but improves when you commit and the rendering takes place
I have the same options as you, but I noticed something now, basically if I'm trying to look at the image say e.g 30% zoom so that it can fit the screen it looks pixelated, but when I zoom at 100% so the original size, it looks perfect, maybe it's a problem with my laptop's screen that doesn't have enough resolution to process that?
No, it could be normal. Photoshop is a raster image program, it only displays the real thing at 100%, and at set % counts (50%, 25% etc). The worst is when you look at something at say 16.3%, it's not accurate (it's about the same for every raster based software where the visualisation is not entirely re-calculated at every change of the maginification, it works different in Illustrator for example)
Hopefully it's never a real issue becasue it doesn't show when you print or export, but can lead with head-scratching issues like when you have very small patterns, like halftones , or any repeating small textures...
Check "moiré" online to see what I mean
That's one of the first rule of any raster program, always judge things at 100%
(the worst is when you like an effect when displayed at a silly magnification and you know it will never show that way when exported 🙂 )
oh ok so if I'm trying to change details in an image I should work at 100% even if that requires me clicking more times to follow the outlines than if at say 30 %?
Yes, check at 100% and if you have to do minute changes that require zooming in, check the result at 100% regularly. Double click on the magnifying tool for a quick 100% shortcut
You can also split your window in two, if checking as you go along is important, one window at 100%, the other zoomed in where you work
See at the bottom

"new window for....
Thank you so much for your help Sandrine! this thing was driving me insane haha, really couldn't figure it out, and also super helpful tips 🙂
then you get that, and you can even tell Photoshop to match the position of the two windows
(don't tick match zoom as it will defeat the purpose)

Doing that with a second monitor helps free the space on the screen as well (It can become a bit crowded)
You're welcome!
Yes i'm starting to think getting a second monitor may be the way to go, I have always too many windows open where I need to go back and forth with shortcuts
If you got a laptop with an additional graphic card and an HDMI (or Display port) output, then you can easily plug in an extra screen
If you got a graphic tablet you can also set it so it does only pick up one of the screen (It can be nightmarish if you don't do that as you never really know on which screen your cursor is 😁)
Hey, does anyone know if I could set this as an ACTION? - I have 350 matching PSDs to do
In the recorded attempt, the 'action' is recording the specific colour I'm picking, and not the fact that I picked the *average *on that area.
I don't think you can (you could if there was a way to pick up the selecter coordinates which I think is possible only with a script and not actions. However you could introduce a stop menu where you pick manually but all the rest is done automatically
It's one of those 3 depending what you want to do

and it shows like that when the action is set

OH MY GOD!
so basically the action runs until it stumbles upon a stop, to which it waits for your input, and resume after the input is done.
I feel like I genius 🙂 - Or perhaps an idiot for not thinking of it earlier:

All you have to do is hire a monkey to click in the center of the canvas 😂
Yes, that too (and I didn't think of it earlier!)
I haven't tested this yet... - but I just discovered a filter called 'average'.
Box blur should work too, at high numbers. I use it often to "simulate" neat gradients from images
If I link both smart objects to the same item, I can create an average version of it, AND the proper, non blurry one.
ooohh. I shouldn't be this excited over something like this 🙂
would this be a channel i can ask for help on printing stickers
i just need to know quality base
I’m not a sticker expert but you can ask here or in the same section on the Adobe Illustrator Discord server (most of stickers people use Illustrator). Someone should be able to help you.
Kind of abstract question but not sure where else to turn, currently in the process of making a sketchwork akin to the longsleeve shirt shown below. Just wondering how can I make it so the longsleeve part is engulfed with the print I want to place upon it - like what tool/effect would I use?


What I’m working w/ for reference.
Hello, is there a forum post on how to read crash reports and figure out what is causing crashes?
i made the picture for the second time and i still cant save it it says not enough RAM, (i have 8gb), i tried many youtube fixes but none work
any help?
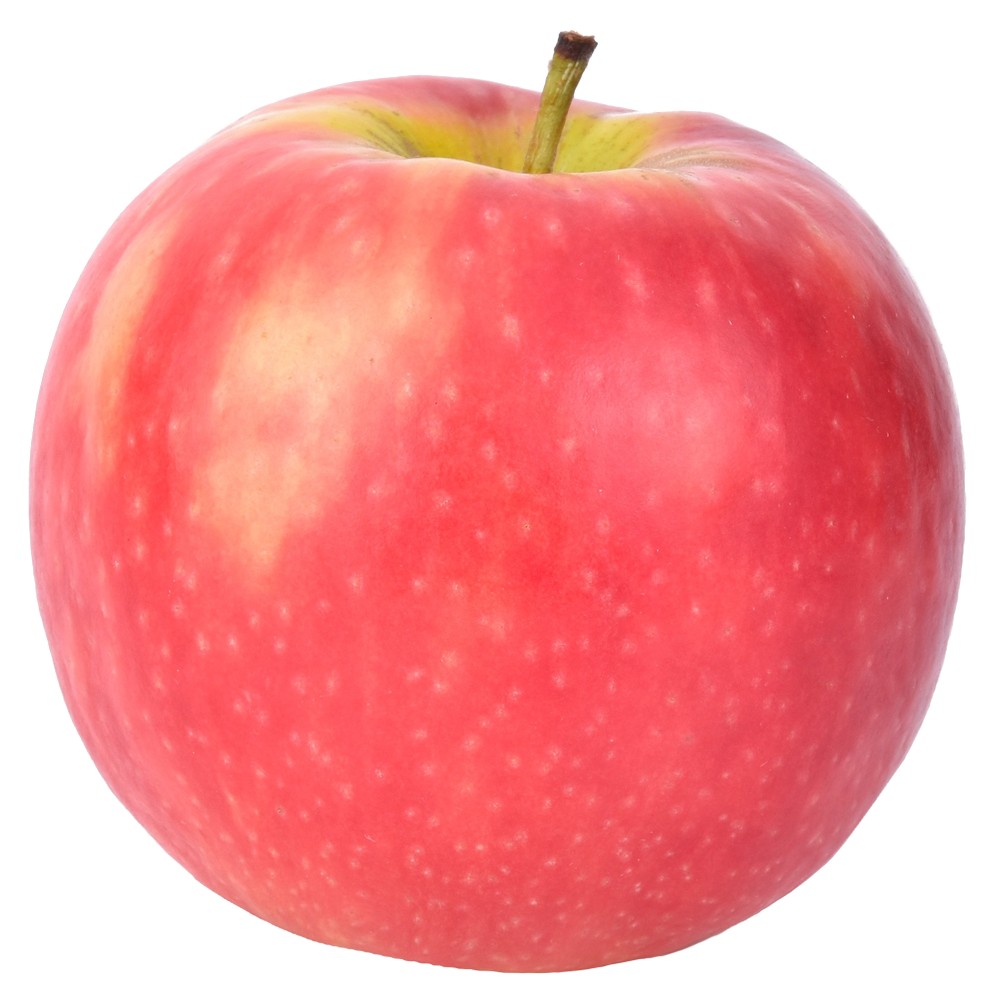
how can i fuse face of person with fruit ?
There is no specific page for crash reports. You can search the Ps Community Forum on the Web: https://community.adobe.com/t5/photoshop-ecosystem/ct-p/ct-photoshop?page=1&sort=latest_replies&lang=all&tabid=all&topics=label-actionsandscripting

https://community.adobe.com
Master Photoshop with the help of our global community.
This sounds like bizarre behavior. Perhaps you accidentally made the document canvas is insanely large? Check: Image > Canvas Size... What does it say there?
Also, please don't post the same question multiple times / in multiple channels.
Do you have both images that you're trying to combine?
That's the best request I've seen so far
Did you still need tips on your issue from yesterday?

I would like to know how to do it in case I need to do something like that in the future yes :3
But no need to rush hehe.

how can i fuse these 2 images to make him an apple face
canvas size is 11+ and 8+ inches
11.25 and 8.75inch
I generally do combinations of Adjustments with Masks, Remove Tool, painting, etc.
do you have an example of something similar?
ooh I see, tysm ❤️ I tried doing something similar, but no matter how much I fiddled with the sliders, I could not get myself to a result I liked. I must practice more.
as in make a post and share my crash report there?

I would report that on the Web Forum as described in #🪲report-a-bug or you could post a question to the #1223011682012369027 and describe the issue.
but with hair
Something like this, probably...

The hair isn't going work for this if you intend to put the face on the apple.
ok the
how to do it ?
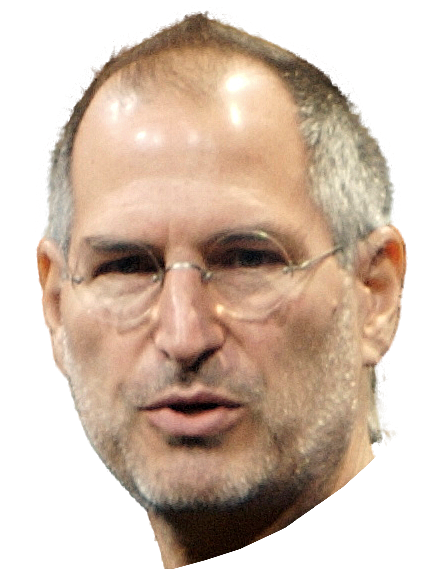
Use a Layer Mask to hide those portions of Jobs' head. Then apply a Hue/Saturation Adjustment Layer above it. It's shown in the screenshot.
@fickle phoenix - Do not ask for pirated software here.
Something like this...
thank you !!! 
Gave +1 Creative Carma to @ripe quest (current: #3 - 2414)
You might want to find a better quality picture of Jobs though.
can anyone train me on using photoshop please?
I've already replied to your question in the forum. No one is going to be able to "train you" as in teach you one-on-one. You should start with the tutorails that come with Photoshop.
I know roughly how to use it I just find some of the controls confusing, so is there no way I can join a discord call for any sort of tutorial, thanks for the reply
Then if you have specific questions, you can ask them here.
Try finding a simple goal like composing an image with other images you found online, then if you don't manage to do it, make it simpler. if it does not work after some time, try asking about how to do that one task. It's gonna be easier for people to help you if you have something specific you need to achieve.
I used canva alot, i got use to that but discovered that photoshop will be beneficial in the long term, I need to create 3 UI assets for a horror game but i want to achieve this through photoshop, ive managed to get a background and stuff but I was wondering if there was anyone that would be willing to join a discord call to run me through it, but as you said, look at videos etc. Its for my Game Design coursework.
oh gotcha. I don't think I'm well versed enough in photoshop to help you, but maybe if you post the assets you're inspired by here ppl will be able to help.
Make a rough version if it, it's okay if it's all croocked or patchy. Then get one that's close to what you want, people will be able to help you to get from A to B
If you have specific questions about how to do something, you can post them here. If someone knows the answer, they will probably reach out to you.
Ok, I appreciate the help, if anyone would be willing to "train" me in anyway that would be greatly appreciated, I've been trying since 12:00 through videos etc! - I really wish I got Photoshop a lot earlier than I did, im usually good at these kind of things lol.
But as far as, one-on-one individualized training sessions, I wouldn't wait around for that specifically.
Ok, understood. - thanks.
Thank you, I've reported it on the bug forum 
Gave +1 Creative Carma to @ripe quest (current: #3 - 2415)
The struggle is real BUT the work instills the worth. Its nice to make progress. Thankful there are folks around that can help nudge us in the right directions.
I started to put my new logo in my coin.... looks like trash, but its something!

That's how I might approach it. "Think different."

lightning or no lightning? i cant tell if its drawing too much attention away from the mouse itself


This is too perfect XD
I can’t XD
What about "less lighting"?

yea could do so, the original idea was to have the lightning spiral around the mouse but i can see how that mightve been overkill
would u recommend me to add small bits of lightning on the highlighted spots of bright blue?

or if u have another idea im open to that asw
What about just putting it behind the product? I think if you asked most marketing managers, they wouldn't want the product obscured by effects.

(I'm not saying use this lighting. This is just to demonstrate the idea.)
yeah for sure. makes sense, thanks
Gave +1 Creative Carma to @ripe quest (current: #3 - 2416)
@ripe quest is this better? or do you think i should remove the lightning on the mouse wheel (in interest of keeping the product clear)

also its worth noting that im just doing this for practice, its not actually being used officially, idk if that changes things or not
I think it looks cool. I was just stating that, in the past, I've heard marketing directors not wanting objects obscuring their product.
canvas size is 11.23 and 8.75 inches is that okay?
you told me my canvas size might be too big
my file is 33MB for some reason even tho its a picture
What is the resolution?
3375x2625
That doesn't sound too bad. Seems fine.
but i only need to print something on A4 paper
can i screen share you in voice chat?
im a novice its most likely some stupid mistake
I can't chat right now. I'm at work.
8GB of RAM isn't very much. Photoshop system requirements state 16GB is recommended. This can sometimes occur when your C Drive / drive with the operating system is very low on free space, i.e. less than 20GB. Other than that, I'm not sure what the issue is.
this is an older version i think

i literally cannot zoom because there isnt enough ram
Yes. That is like CS6. More than a decade old.
what should i download thats newer?
I don't know. I've already stated this: #❓ask-a-question message
It could be your system isn't robust enough to run Photoshop effectively.
So I have an assignment on the university that requires me to do mockups from existing images.
For this assignment, card design
I intend to use cards like these as mockup baseline

and my card is 9x5.5cm
Not too sure about how to do mockups with these
Do the designs flat, like you normally would. Then worry about applying those designs later.
Drag a rectangle over each card and make a smart object of each.
Double click on smart object > put/make your design inside then save.
Go back to your document , your design should be updated.
To finish just mask your smartobject
To let the clips visible and round borders realistic
I already have the design ready.
Then read what Franck said above.
Mask the S.Obj to display the rounded corners and clips via mask manipulation.
Correct?
If your design is already made and have the same ratio than cards on your mockup you can place it « embeded » directly over cards on your mockup.
It would be placed as smart object then mask it to reveal the clip, hole on the original design and make your modified mock-up realistic.
@true cloud :sorry I can’t show you i’m away the office and on my phone
Appreciate your help. Will take notes.
Don’t hesitate ask questions.
bump?
can anyone tell me how to invert an image from black to white and not have it look like a negative of the image?
when i go to invert it with adjustment layers i lose most of the detail of my image
Can you please show something?
Sorry but that’s what « invert » is supposed to do, make a negative of the image. Maybe if you share the « black image » you’re trying to changee in white we could help you.
Hi, can someone help me? I would like to center my logo in the middle of the t-shirt. How can I do this please?

this is not a real brand
@fair escarp @viral palm


Make logo and shirt layers active, then with move tool selected (V) you should have acces to align option in top menu and/or properties menu. Select « centered » and you’re done
i was wondering if there was a way to keep the same look as the black one but have it white instead of black. i know what im asking is a little counter intuitive but i hope someone knows what i mean
i understand that adding an invert effect makes a negative of the image but i wanted to know if there was a method like how you could use the pathfinder in illustrator to invert while keeping details
Yep invert can give weird look (particularly with solid B&W design as your’s). I would suggest you to use gradient map adjustment layer over your design and test différent color combo with white on the left and a darker color on the right… But avoid Black if you don’t want to get the same result.
I recommend aligning by eye. The mathematically precisely aligned result will probably ‘look wrong’.
thx !
Gave +1 Creative Carma to @viral palm (current: #9 - 533)
thx too
the problem is i have 2 layers how can i separate them into 2

I think you won’t get a good result with « light color » (brightness value>50%) on a dark background. But give it a try just in case I’m wrong
how do I get this type of effect on the face?

How to make the golf man to ralph lauren logo?


cant seem to figure out how to write text on an empty text layer after ive deselected it
can someone help
very complex demand but you could totally mask out the ralph lauren logo off the 2nd picture, and use it as an overlay for the 1st one while using a specific blend mode, you could get a rough picture of whatever you had in mind
dont understand how
layer 1 is picture 1
layer 2 is picture 2
select picture 2
press remove background
once you have the red insignia of the 2nd picture
resize it to fit the black outlines of the 1st specifically
and change the blend mode from normal to something else
for more advice look up masking and blend mode tutorials
anyone know why this is happening?
oof you can't see my mouse
i'll try record again with it
here
it doesn't let me make the text space the size i want
Dont understand from here
@faint garden

resize it and stretch it so that it covers the whole man
fine

is this blend mode sir?

ellers skal du fanme få tæsk
🫡
i dont think its allowed to talk another language
Ohh
so idfk but if it looks good its prolly good
men er det her blend mode

anyone?
mongol lad mig lige prøve
yes sir
nvm i just restarted ps and all good
Har du prøvet
ok
jeg fik en garn texture af internettet
så lavede jeg 2 kopier så det er mere garn på billedet
smart
så brugte jeg mask subject på det der 40 årig mand der spiller golf
jeg brugte solid color adjustment


Prøver du at lave dit eget tøjmærke
Har et i forvejen, men prøver noget nyt
awh hell naw
du skal slappe af og etablere din familie
ej jeg laver sjov
du skal se på videoer der forklarer om masking og blend modes i photoshop
bro pas på har en gøb og radio
eller måske bruge illustrator
kan ikke finde ud af det lort
det er ok ikke alle kan blive iværksættere
hahah
ej
hr gindesh fra indien
han får 5000 dollars om måneden på at sælge photoshopped diddy party shirts
men du giver op på basics
det fandme grineren bro
præcis

godt så
jeg er din overmand bro
Can some help me to make this ralph logo to this golf man, with the same color and texture


he tell me i cant do that because my item is "dynamic" someone can help me please ?

If this is a Smart Object, you would either have to enter into that document or rasterize it to edit it directly.
Sorry. I don't read francais. :)
dont worry thx
it says "Unable to perform this operation because you cannot directly edit the dynamic object
I'm assuming this is a Smart Object. Dbl-click on the Layer Thumbnail to open the Smart Object in a new tab. Then you should be able to edit it there. Save and Close to go back to the original document.
Alternatively, you could convert it back to a regular layer or rasterize the layer and then you can edit it directly.
@ripe quest Can you help me please
The golfer is hand drawn. There is no one click filter to do it, unless you consider the AI generation. You could use the golfer for the style and the Ralf Lauren logo for the structure
Sounds like a pretty involved project. Seems like you'll first want to convert that artwork into some sort of embroidered version of that golfer. Then put it on the shirt after...

yah i need it on this

Is it possible to make it all red like ralph lauren
You're going to have to create that embroidered artwork first. That's not a trivial task.
How to do that
Its a complicated effect. Maybe using a technique like this: https://youtu.be/_pLPGUTk7xM?si=PrnkllX0b91f1yxL
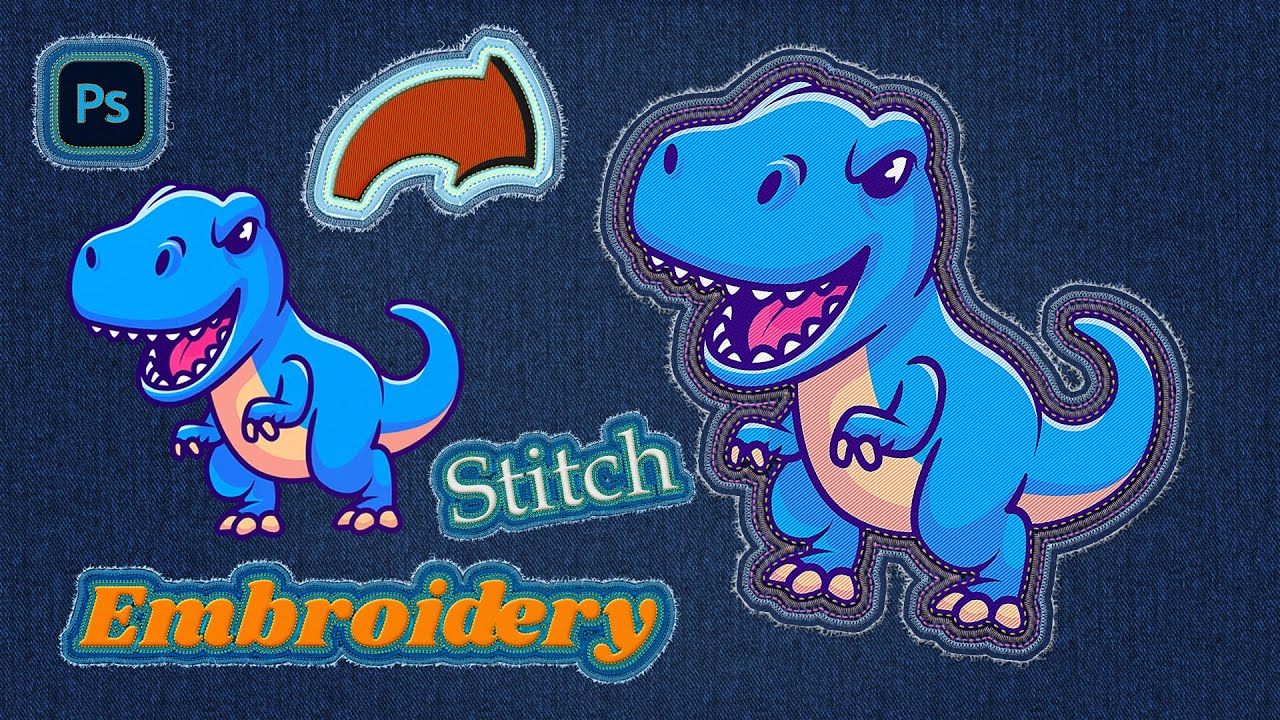
😎 How to turn your photos or designs into embroidery #effect. Make effect like the best made in adobe photoshop.
Adobe #photoshop tutorial to learn how to make fabric, stitch or #sticker #embroidery. #Effects in photoshop that we can apply in different projects. Make fun #designs and #illustrations made up of different stickers and Different te...
Otherwise, you'll have to do in 3D with Substance or Blend.
i wil try
Or maybe you could generate it with an A.I. mode.
but bro the picture is like this

Then you'll have to work on the graphic. This is a complicated effect. If you're not experienced with Photoshop and other apps, this is probably going to be difficult for you.
I don't know. No. But its going to require that you learn how to use Photoshop.
Should i maybe pay i guy on fiverr to do it
If you use some of the techniques in that tutorial, you can probably get to something like this...

This is a quick attempt...
For exporting in the PNG format, is 'Preserve Details' best?
Project Requests should be posted in #💬chat-general. Please try to post all of the images in one entry.
oh my bad
how do you disable these guidelines when selecting a shape?

why can't I resize whatever I selected?
Is there a way to change the structure of the pixelation? As in can an animation be made where it’s more pixelated in certain areas. As if the pixels are breathing
Any input?
What are you referring to?
Use File > Export > Export As... PNG and set the desired options.
Resampling options when exporting an image.
Where are you seeing that option?

I would just leave it on Automatic.
Unless you think you can tell the difference between them.
Hello can anyone please help me, I recently started photography in college and I’m completely new to photo shop. I need help how to save a raw photo as xmp while resizing to 6x9 300ppi.
Hello guys I'm new here. I have any many questions lol. Let's start with 1 .
If I have a template I made with a picture skewed. I have guides to a latest right on top of that image to know where it goes if I want to replace that image with another and land right in the same spot everything. How do I import a new image and replace the existing image without having to skee it all other again to my guides? Thanks in advance.
This is specifically what SMART OBJECTS are used for
A better video than mine, can be seen here:
https://www.youtube.com/watch?v=nRtBM6xL8vw
@autumn jungle
Would anyone happen to know why layer masks dont span across the whole layer that was first selected as the mask ?
img1: layer selected as mask
img2: after the mask is applied


They don't follow the layer, they only work across the canvas (I don't know if that's the case for you, but if you select an object in the layer and mask all the rest, if the rest happens to be out of the canvas, it will not be masked. It shouldn't be an issue since you cannot see anything out of the canvas, unless you move the layer x mask combo and reveal out of canvas elements, which will appear unmasked.
That's true for raster masks, vector masks will mask everything.
how to match the lighting of the product?


Would it be a nightmare to remove all the purple and turn it into a transparent logo?
or is it possible?
Yes it will be a bit complicated, mostly because of the internal fills here

I could suggest a blend if method,
https://photographylife.com/blend-if-photoshop, and try your hand at digitising it, by colour.
But, given that that flower might come from somewhere (either stock image or commissionned from an illustrator) you may be able to work from the original and sort out the text later.
Methods to select by colour and by shape in Photoshop will have a hard time producing neat holes like the ones you have here
If you are not worried about hose holes, the best bet is to outline the flower with the pen tool, just the outlide and "change the colour of the internal purple bits with a hue/saturation layer.
Is it something someone has done for you? If so You should be able to ask for a file without the background.
If it needs to be absolutely perfect you can still muster the courage to redraw the white outline entirely with the pen tool. Everyone who does silo paths for a living knows the drill. It's a proper pain in the bum. On the upside, you can film the process and upload it as an ASMR video on TikTok! 😁
That's the best I can do with Illustrator (tracing)

I guess you'll have to rework the text!
wow
thanks a lot
the flower and background was created using adobe firefly ai
I added the text later
If I can raise my hand. I feel the text style is good, I don't like that black stroke around. It kills the elegant aspect of it
You can also try to select only whites with: select>color range. Click on white portion of your logo and increase/decrease fuzziness value to get the best result then click OK. With your selection active create a mask
This is actually perfect, idk what tracing is but I hope it didnt take too much time. Could you tell me how to do this myself on illustrator so I can get the best quality or does discord already use max quality so I can use yours?

that's my settings
I already tried this, unfortunately the image isn't 8K quality and it has many lines, (AI) so it doesnt come out perfect
thank you very much Sandrine, I will also consider not adding the stroke to the text as an elegant look is what I'm going for. Thanks again for your help
Gave +1 Creative Carma to @vapid flume (current: #8 - 751)
Sewsen means iris flower in kurdish btw
So, first open a new file in Illustrator, go to file>place and place your flower. If it goes over what you've chose (bigger) don't touch it. The bigger, the better when you image trace
if you now click on the flower the contextual bar will show "trace", click on it. The result will be crap, but don't worry, it's a live effect (until you expand)
open the image trace panel (top) and copy my settings

the image will be balck and white... all good
when it's done, click on the word "expand" at the bottom of the panel, and when finished, right click and choose "ungroup". From there, select all the black bits (you can select all> based on appearance, check the Illustrator help file) and change the fill colour from black to none
export as .png or whatever you need
Hi I just installed Photoshop, and I'm having trouble starting it because of this error : (I already repaired WebWiew2 it did nothing) can you help me resolve it ?

Ok no problem… you’re in good hands with @vapid flume 😉

@vapid flume not gonna lie idk how to continue after this step
i ungrouped
idk how to select all black and change to none
That was the part of my explanation that required you to search in the help files
https://www.youtube.com/watch?v=NSXw9MsrXAU

#illustrator #rees3d
• We can select objects based on similar fill colour
or stroke, Appearance attributes, etc., using the
Select Similar Objects button.
• To select objects with the same fill color, select
one of the objects, Click the arrow (Select Similar
Options) in the Control panel to show drop-down
menu, then Choose fill color.
• Not...
i cant find
there is a spcial function that allows you to do it
fill and stroke

none is the first square there

there is a pop up that says "none" when you hover over
I cannot explain the whole of Illustrator here (particularly on a Photoshop server 😁)
You need to check the help files
It's the same than in Photoshop by the way


first swatch white with red diagonal is "none"

where did my white flower go
You probably need to recolour it with white
Depends what you've put in "ignore colour"

OK, I may have given the wrong screenshot. Go back over and don't tick the ignore white square (It's usually there by default, I might have left it there by mistake, my bad)
okay

thank you 😁
also

is it hard to swap the colors here? making flower purple and background white

this was an amateur attempt
Use the fill option like you would do in Photoshop (see the screenshots above)
https://helpx.adobe.com/uk/illustrator/using/painting-fills-strokes.html
No worries, I need to go anyway. Work awaits!
anything i can improve?

The font at the bottom causes accessibility (and plain english!) issues...
Pure, Natural.... Moodness?
(Obviously the context here tells me it's a G.)
I agree with @sly hawk for the readability of handwritten text. I would try to fade the reflection from the bottom of your image to top of « 100% Fresh Fruit ». I understand why you use water splashes but I think they need to be less bright and saturated…Keep them but you could try to make them more « translucide » and less distractive (blend modes or blend if). The star of the show must be your product … Not sure fruits in bottom corners are useful… You could make a version without them and compare… If you want to keep them I suggest you to adjust strawberries scale but don’t forget main focus must be on the product. Hope it will help.
Hello does anyone know why I can't paint in photoshop ? I searched yt, tutorials, even gpt solutions but nothing worked, why shouldn't a basic tool like painting work on get go I'm confused, thank you for your time!

Wrong tool you’re trying to paint with History brush tool… Try regular brush tool (B)
Still doesn't work, but thanks for letting me know of the missuse of tools!

Shift+B to cycle brush tools or click and hold on icon in tool bar to see the different brush tools.
You’re on color replacement tool
Bro God bless your soul thanks that helped me, wonderful day!
Gave +1 Creative Carma to @viral palm (current: #9 - 534)

I saw you fade the whole reflection… My point was more like: fade away the reflection only on the bottom by masking with a gradient or large soft brush=> keep reflection visibilty as it was near the product and make reflection progressively invisible under the text lines. Hope my point is more clear 😉
@cunning wren : for the fruits I think there was a misunderstanding, Fruits on the side of the boxes were OK for me. I was talking about fruits in corners. So I would place back apple and oranges but try a version without strawberries and blueberries just to see…
hello, i have a bunch of folders each with a few layers
is it possible to batch export these folders exactly as they are to windows folders, each with the png inside them? basically exactly as they are in PS

Try gnerate assets function
https://www.youtube.com/watch?v=EAsj7wQ052I
not exactly what you’re looking for but can help
A hidden feature that automatically generates and updates the assets of your Photoshop project in real-time! In this tutorial, learn how to use the "Generate Image Assets" feature in Photoshop to quickly create composites of any format!
This feature not only auto-saves individual layers but also updates them as you work on them. I hope this tut...
yea.. that's what i'm struggling to find out how to do
How many folders are there?
Generate assets won’t save folder structure so forget about me… @sly hawk maybe could help you🤞

https://community.adobe.com
I have 75 group folders in the layer window, each of those groups is named and contains 32 layers. I am trying to use the 'Export Layers to Files' built in script to export everything, however it is losing the group folder structure and just putting all the exported files in one folder on the had dr...
I've used this script (or one like it) frequently in the past
i'll take a look, thanks
You rock James! I’ll try me too for sure!
how can i delete the layer

Screenshot too small (layer panel not fully visible)
Please hide all other layers and show a complete screenshot again. Perhaps the layer is connected to a smart object???
It is probably an advantage to switch to large layer thumbnails.
hello for some reason when I try using smudge, photoshop starts to behave weirdly, first the smudge tool doesn't do what it's intended to do, second I can't switch tools, third the software responds from the commands after like 7 seconds, I don't believe it's from lag, all the other tools so far worked in their right sense without such anomalies
well I can switch tools after it starts actually reading the commands

it says "Unable to perform this operation because you cannot directly edit the dynamic object
I would like to cut out the outline
It's because it's a smart object.
Rasterise the layer, and then you'll be fine. - OR apply a layer mask to it instead
oooh ok thanks you 😉
Iam getting freaky of this error, can somebody help me?


Image > Canvas Size... Did you accidentally make the canvas too large? A common mistake people make is not paying attention when they set the unit type, choosing "centimeters" when they meant "pixels" instead. 2000 centimeters is like 65 feet wide. Making a canvas this large without an adequate amount of RAM will cause problems.
Yeah, you right. I was getting freaky, u saved me. Thanks alot
Gave +1 Creative Carma to @ripe quest (current: #3 - 2417)
Glad you got it sorted out. We don't want you getting freaky up in here. :D
its simple yet, it look a bit disoriented, what can I do to improve this, in addition to that, what should i add?

If you're looking for advice/feedback/suggestions on projects, please post to #📝project-feedback

how do I swap the background and flower color professionally?

without this happening
Illustrator would be fine too
okay
Is your flower on an individual layer( all the white on the same layer)?
If it’s an Ai image you should try to modify colors in Adobe Illustrator.
There are certainly different path for each color
In my opinion, the flower is far too delicate and complex for a logo. Have you ever thought about simplifying the flower? How much of it remains when the logo is displayed in 200x200 or 100x100 pixels on a website?
that is a very valid point
This isn't a permanent logo though, I am going to using for a limited amount of time
Then I will definitely need a simpler logo but for now I think it's visually pleasing
I'm trying to export an image but the preview shows a white screen and on other occasions I get this message.

How can I go about doing this?

mainly used darkness to cover up my bad skills

Something like this is definitely the direction I should go in
looks easy enough to recrate something of that style too
lads any idea how to make this look better?
Im very impressed by Ai designs when I give it logo prompts, but it'll never be the same quality and convenience as having a native vector file to edit
OK just realised that when you say Ai you talk about Artificial Intelligence (AI) and Adobe Illustrator file (Ai)... I'm so sorry
On my end I would go with color range selection (I know you're not in for that - earlier messages) to isolate whites and make a layer of it, then you can clip a solid color on it.

You can generate AI VECTOR images in AI 🙂
Good evening, I would like to have your help because I use Photoshop in the school framework on a project to fight against harassment, except that Photoshop's AI blocks me from words related to harassment. Do you know how I can proceed?
Hey, I have a question regarding recoloring/changing the color of something - I'm making a minecraft texturepack and want to recolor this blue block to a few colors including purple but when I use a hue/saturation adjustment layer it just looks awful. How can I fix this?


Adjustment layer gradient map maybe?

Good idea, I'll try that tmr
And once you get your gradient map well (as explained by @tame cape ) you can add a Hue/and sat layer to generate different color tiles quickly playing with hue and saturation cursors.

Thanks for the tip!
Gave +1 Creative Carma to @viral palm (current: #9 - 535)
Great idea! Thanks for sharing!
Gave +1 Creative Carma to @tame cape (current: #44 - 43)
Very flexible concept
Thank you
Gave +1 Creative Carma to @viral palm (current: #9 - 536)
Hi @pulsar vortex
This could be a first step towards simplification ...

Heya, when iam using Lasso and click too fast without moving mouse it will snap to the starting position, is there a way to disable that?
If not, is there a way to redo any action in lasso ?
Which AI?
What did you use to create that?
You probably mean the polygon lasso. No. This is interpreted as a double click. A double-click closes the selection.
One way would be to reduce the double-click speed in the operating system. But you can also add more polygon selections by holding down the Shift key (or subtract them with the Alt key).
Or do NOT use the lasso - use the path tool instead. This gives you much more flexibility and the paths can be saved.
Is there a solution to fixing this?

Ai, but not artificial intelligence but Illustrator - with the pen tool and the curvature tool.

Im procrastinating learning logo design
"Adobe Illustrator" 🙂
Okay thanks for the tips!
Gave +1 Creative Carma to @tame cape (current: #42 - 44)
We do a lot. But we certainly don't make fun of those seeking help.
🥹
Did you sketch over the original photo?
Is it possible reduce the size of an image to save on image size?
nvm I found the answer
Youre welcome
Yes, that is the usual procedure.

I'm trying to export but I keep receiving this error message. I have updated to the newest version of Ps. Has anyone come across this message?

I kinda prefer maximalism
Thank you for the compliment.
😎
Gave +1 Creative Carma to @pulsar vortex (current: #938 - 1)
Did you give me that
Thanks
Go ahead and finish that flower for me ill see ya tomorrow gn
… Go ahead and finish that flower for me ill see ya tomorrow gn
Nah.
Here it is. I want you to have some fun too.
😅
Where do I go to get help with Adobe InDesign?
Unfortunately there is no InDesign server.
Just ask your question. If it cannot be answered, you can always try the official forum https://community.adobe.com/t5/indesign/ct-p/ct-indesign?page=1&sort=latest_replies&filter=all&lang=all&tabid=discussions
Stupid newbie question. I've been trying to use Generative Fill to create a scene around an object. It works on occasions, but it's tendency is to mess up the object by expanding on the object itself, rather than just generating a background. What should I do differently to ensure the layer/object I'm generating around stays cleanly represented (which is just an item, on transparent background)?


They may not have been drawn manually - ya nerd. 🙂
Could be way more :

Hey! Where is legacy plugins are kept in last version of PS? I tried everything(what I got in mind today, now gona take a nap), still 'legacy plugins' menu is greyout. -.-
Maybe I need to reset something or something else. -.-
Hello everyone, im a livery designer for ingame vehicles. I work on projects that have hunderds of layers and that are very high quality. But i have been struggeling with the saving process for a while. For my work i use the Nvidia .DDS Plugin to save my files to the correct file type. But it takes a while to save, from 1-5 minutes. Now, im looking to upgrade my PC, and i have 32GB of ram, Would you guys recommend me to upgrade to 64GB for this line of work? Im comfortable with my GPU and CPU (Ryzen 9 5900x, RTX 3080) so im not that worried about that, but im more worried if 64GB will make a change, thanks in advance
hey i was wondering how i could recreate this smudge effect. is it manual smudging? or is there a way to make consisten smudges?

i have a filter on one of my layers, it is just on that layer, but i need to duplicate the layer, when i do it applies the filter to every layer under it, this is very frustrating, how to fix this problem please?
Do you mean "Adjustment Layer"? Because "Filters" are applied directly to a Layer. Share a screenshot of Photoshop with the Layers Panel open and so that the Layers in question are visible.
You can probably use a duplicate Layer with a Motion Blur effect...

nice and simple! how could i go about controlling the falloff of the blur? darkening the whole thing?
Not exactly sure what you mean by falloff but you can control the Distance inside the effect.
Just clip it to the one layer. If you insert a new layer and it goes in-between the original layer and the Adjustment, you will have to move the new layer up or down in the stack and probably clip the layer again.
Do you not know how to clip the layer or what is the problem?
the adjusment layer is not showing up, i don't know why
So this is not helpful. I can't see anything. Perhaps build a simple example that demonstrates the problem.
something about it is so messed up, i am Just going to restart the whole thing, if i run into same problem then yes i will show good example
In the #📝project-feedback channel, please.
falloff as in how gradual the blur / how abrupt is the blur
whats the best way for me to increase the size of an image without sacrificing so much quality?
mention me to answer question since im about to go to sleep
from where i can add stroke on text??
thank you it's nice having nerds like yourself around. actually useful
Gave +1 Creative Carma to @sly hawk (current: #5 - 1013)
what have you done here?
I find the "enhance" function in Adobe Camera Raw or Lightroom being the best, even against dedicated plaforms like Upscayl etc. My tests
To access Adobe Camera Raw, the best is to use Bridge (that ships with Photoshop, it's free. You're not uysing Bridge? BOO HISS!)
Open Bridge, select your image, right click on it and choose "open in Camera Raw"
You'll see that it looks like Lightroom develop module

when you're on the image, right click and choose "enhance"

when there, click on "super resolution"

It will save as a DNG, which then can be saved as a file format of your choice
It only does X2, so if you want to multiply by more, then you'll have to save it as a JPEG, and run it again.
If you need to do more than 4X then you need to reavaluate your workflow, as it's not normal, but it still works well IMHO, I went up to 8X for a test and it was not bad.
To be honest no method will ever be perfect, it's just trying to add pixels when they are none.
I'm currently too busy being a nerd at the moment to help 🙂

i ahve installed the Adobe authenticator.
in my mobile.
how to add account to it? asking to scan. but what to scan lol. 😂
https://helpx.adobe.com/uk/x-productkb/global/about-adobe-authenticator-app.html
have you tried the help?
I installed it, and deleted it, it was a pain in the bum!
pain..... 😅
If I remember well, i think you need to activate it in the CCapp/account settings first
Enjoy yourself 🙂
First of all, did you activated it in the account settings/security?

when there....
This was generated using Adobe Firefly, using your image as the reference image. - It was then enlarged using Upscayl and then vectorised/traced in Adobe Illustrator.

Very cool thanks
Gave +1 Creative Carma to @sly hawk (current: #5 - 1014)
Sorry, it's probably something with your account. We don't have access to it here, we're volunteers, not Adobe employees, you will need to contact customer service
no worry.
Good luck!
clicking on toggle asking to install the app in mob device. and i install it.
opening app asking to scan qr..
i jus can't find the qr to scann. 😅
do you understand thi error guys

how to fix it? this is popping up while dragging assests/layer to the liberary. as i want to keep the element in liberary.
guide me please.

Custom shape or warp a rectangle
Im guessing you are new
so basically
You can draw custom shapes with the pen
and if you make a rectangle
you can warp it
if you go to Edit-->Transform --> Warp
I would draw a vector shape with the Pen Tool. Actually just draw half of it. Then duplicate it and flip it. Merge the two pieces together.
Hello everyone, is the correct channel to ask for some asistance ? my first time using but i cant quite figure it out
If you have specific questions about Photoshop or how to do something with Photoshop then ths is the right channel.
Great, thanks
So i have this picture which i plan to print and frame as a gift. the original is pink but i am tring to change it to blue. The original picture isnt a solid color as it was hand drawn so when i add a layer and change the hue/saturation you can still see some of the orignal pink underneath. how can i fix this

the snippet has decreased the quality so can cant quite see what im referring to as well
Try this...
Thank you!!!
Or this... if you want to control the background as well.
Okay so i can just eliminate the 'gaps' entirely? that seems like a better option
Perhaps. Using that method. You should be able to eliminate most of the inconsistencies in the lettering.
I thought you wanted to keep that so that it looked more hand-drawn.
Now i'm torn between the two lol
either way, with your help i can get a better graps of how to do it now, thank you
I used ai generator on photoshop to create this background, and i'm trying to replicate it again.

Anyone know why when I use this and try fill the background it just doesn't turn out like this?

@ripe quest Is there a way i could remove the text onto a seperate layer adjust it from there and then put it back on the background so i dont change the background ?
see that you have "generative expand" selected in the drop down menu when you use the crop tool to enlarge the canvas

But let's be honest, this is unlikely that you'll get exactly the same result, as each variation is always different from the next.
Wait I don't get it

If you want to fill the empty space with generated content, you need to select said empty space first
once selected, you'll get a new option in the contextual bar

click on it and don't type anything in the text input box. Click on "generate"
No worries!
i need help turning an image into a phone wallpaper and i have no idea what to do
you want to do yourself or want someone do it for you? what's your phone backgroud resolution?
You want to know how to do it with photoshop?
Im trying myself but im so bad at it
would be so nice if someone would offer a hand and do it
How could i change ps language?
is it possible to share the picture you're trying to work on? Maybe we could guide you...
Yes

Im trying to remove the person behind me
id be better if someone else did it for me
my screen resolution is 1800x2400
20:9 aspect ratio
these 2 image


less blurry version of the second image

Easiest way is to make a selection over you and the man want want to remove > generate fill to get a version without people then painting with white on the mask bring you back.

Thank you that’s perfect!! :)
Gave +1 Creative Carma to @viral palm (current: #9 - 537)
No problem!
could someone help me with a photoshop issue. im trying to take an image and basically make a line drawing of it and take an existing photo to use as a sort of skin for the line drawing
i cant find tutorials online cause i cant figure out what its actually called.
Search for line art or pencil sketch effect with photoshop you should find what you're looking for...
https://www.youtube.com/watch?v=Z9gsQBgktbs
https://www.youtube.com/watch?v=trGTKZymi4M

how to turn picture into a pencil sketch in photoshop the easy way. Colin Smith shows you how to turn a photo into a sketch in Photoshop 2023.
► Free Photoshop add ons: https://photoshopcafe.com/vault
► THE GEAR I USE: https://www.amazon.com/shop/photoshopcafe
► THE MUSIC I USE: http://share.epidemicsound.com/photoshopcafe
► SUBSCRIBE FOR M...

For quick results check out the Photo To Line Art Photoshop Action FREE DOWNLOAD
► http://bit.ly/2ZcQzkH
In this Photoshop tutorial I will show you two methods for converting any photo into a line art drawing.
Subscribe NOW
► https://www.youtube.com/c/PSDDude?sub_confirmation=1
Support Us on Patreon
► https://www.patreon.com/psddude
Check ou...
no thats not it. like i said its hard to explain exactly what im trying to do in words lol
its not line art. ive seen people do it before where they have for example a helmet. and they have a picture of a bunch of apples idk. like a background image. and they somehow wrap the helmet in that apple picture without any of the apple picture remaining outside the helmet
its like the inside of the helmet is transparent and the apples are behind it
you mean a helmet design with apples?
some example image would make it easy to understand

i have this
and i need the gun to be transparent
and i wanna be able to move the flag freely as a sort of skin for the gun
also no judgement im making a logo for someone lol

got it kinda. problem was i was using a png of the gun so there was nothing to cover the excess flag. probably a way to do it the original way but i went a different route that worked for now
Thumbnails like this require blender or is it just old images aready?

If you don't have any question please use #1110544577850511401 or #📝project-feedback
i see, glad you solved it, also sorry i dont leave tab open usually i wait to get pinged so i can see and respond
Go to 00:50 you have a technique to make object transparent.
After that you'll to place your flag under and make a mask prome your gun shape (should be easy if it's a png)
https://www.youtube.com/watch?v=aKFzl7Bj7gQ

In this video, we'll be exploring the transparent effect in Photoshop. By using a few basic techniques, you'll be able to create transparent graphics that look amazing!
If you're looking to create transparent graphics that look amazing, then check out this video! By using simple techniques, you'll be able to create transparent graphics that loo...
Honestly, it's hard to say, but I don't think these images were made with blender... Perhaps some of the characters were created in advance in blender and then placed in the thumbnails. 🤔
1800x2400 is not a 20:9 ratio... Could you tell us what the dimension of the background image you need/want? Do you want the two pictures side by side?
Your images are really lowres so I share what I get with one of them upscaled to 1800x2400...

thats what it said when i googled my screen resolution
i dont know what dimension it needs it too big for the screen and zooms in and i want the image to fit the screen
i guess that cant be avoided without streching the image
either one is good i dont need them side by side
hi guys i wanna know
is there any poseable way to not let the brush over painting it own paint ?
i am trying to texturing a word with it but it is keep over painting it own paint making it beach black
what to do?
i was fed misinformation my actual screen resolution is 2400 x 1080
its too zoomed in for my liking id like to see what id be like if the image was smaller had black bars above and below so itd fit breadth wise or if it was stretched

What do i do to clip the blue color thats out of the lineart?

Hmmm does anybody here know any way to replace each area with a different color fast?

something like color dynamics
but that only works for brushes i think
not for paint buckets
nvm what i just said was dump when i though about it again XD
i forgot that brush over paint it self
thanks for the tips but I already found out how to kinda do it by searching reddit and installing a certain plugin. there remains one issue tho 😅

there is still a border between each province


which i need to kinda remove
i tried using the minimal filter
but it mixes the colors
and i need for it to be all 1 color
something like you see on this map here

it looks like some of the borders are not colored
i wonder why exactly
like this?

i think they are but they are just barely visible because the colors in between them are similiar
or not
hmm
if we fuggier it out we may find a way to force it on other borders
i wonder
how about redusing the strok of the borders before using that filter
i am actually interested to know how to fix this as i may need that at some point of my life XD
hold up...
HOLDING monka

may i know what reddit you find the solution in?
try to move this settings and see if there is any difference?
aaaaaaaaahhhhhhahah it just turned brown now 😭

XD
Reddit
Explore this post and more from the photoshop community
You should better ask on reddit (the place you downloaded the plugin)...
and get the answer like few years latter ?
Asking here how a plug-in dowloaded somewhere on the web works is neither the place to get a quick support... Am I wrong?
ah yes I love when I finally found somebody that was asking the same question I was looking for years.... (only to be still unanswered) (i thought that i have completly made that game up by the time)

also idk why tf i remember this game from my childhood so much
you know what is more funny?
when he ask the exact same question then reply (never mind i figure it out) 😂
ha maybe i should be looking for some different question now
like how to expand by 2 pixels
in a certain direction perhaps
that might work
ahhh
finally

@wanton tartan i just copied the layer 4 times and moved it by 3 pixels in each direction
i have so many question XD
why and how
and how that worked
- there is a lot of green it is dominating the photo
it didnt work perfectly tho. there are still a lot of these little fellas

but who cares
it should all be different green tho (i hope) 😭
i am sorry for not helping this is more than my potato brain can do XD
np you still were a good help 😅
i just need to communicate with someone when troubleshooting
idk why
i guess i make you know that the problem is not from you XD
the only problem is with the overall texture
the rest is ultra easy
i am still struggling with textures in general i am still learning it
DM me if you want to see if i can help
I’ve mostly used light leaks and whatnot and just dissolve it into the photo im using.
just use a old photo textuer then disolve it
for the blue and red you can use brush or the gradient tool
for the photos in middel you can layer mask them then with low flow brush paint them to show
the text is simple no need to even expalin i think right?
correct lol
oops
yeah
did you make the top half of the rose yourself?
its too low quality on discord can you upload it somewhere else?
no it looks perfect on my phone already
thanks a lot, really
hey so I recently switched from pixlr to photoshop (finally) and I've been trying to do some editing stuff for my football team and I'm not sure how to get my layers tab to look like the one thats in the tutorial, anyone know why?


click on a layer and then go to the top of the screen and click "Filter"
convert to smart object to use smart filters

You'll probably want to convert the Layers to Smart Object BEFORE applying filters. Right-click on the layer and choose 'Convert to Smart Object' from the context menu.
Maybe they are referring to the display of the Layers Panel. I guess we'll have to wait for a clarification from the OP.
yeah in the video they added a filter but my quality was worse than the picture they were using so I didn't add a filter, because of that I thought it was some setting that I just didn't have on. Appreciate the response though
I want to create a feeling as if it was made on glass. But I kept failing. I don't know how to give the texture and sensitivity.


how can I move around the image without losing quality I swear it never did this
Transformations are destructive. Convert the Layer to a Smart Object first before doing a transform like Scale or Rotate.
If you want general feedback and suggestions, please use the #📝project-feedback channel.
oh sorry I didn't notice that channel
Hello! Could someone help me with making a gif for a stream panel? To begin i started with a gif (that i had permission from the artist to use) and placed it into photoshop. I tested that the gif worked in timeline, which it did, and then cut out a text in every frame saying 'starting soon'. (as shown in pic 1.). I did this so i could put a animation behind the text that would play alongside the original gif. The problem I'm having is that both videos work in timeline, but when I convert the timeline into animation frames the text video completely disappears. How do I fix this? Picture 2 is the properties of the text animation.


Here is a video of my issue..
anything i can improve?

help idk why my selection doesnt move what i selected


Once the selection has been created, **switch to the Move tool **and try again.
ty!
Does anyone know whats going on with my animation frames?
not seeing your timelime screenshot
that might help
@still verge
any suggestions?
Show us a screen shot of your timeline
Its in the video, but will do.
sorry, didnt see the video

So that looks like a single image on the time line, is that the gif?
oooh
starting soon looks like it's transparent
). I did this so i could put a animation behind the text that would play alongside the original gif. The problem I'm having is that both videos work in timeline, but when I convert the timeline into animation frames the text video completely disappears. How do I fix this? Picture 2 is the properties of the text animation. <<< Ok let me think about this
when you say animation, are you trying to turn it back into a gif?
is the mkv what you want the animation to look like?
So, technically both images are a gif. The pixelart is a gif, and the starting soon is a video
right
Im trying to turn it into a gif, yes. I mostly just want it to loop..i use gif as it sounds the easiest way to do that
So, in the video I sent, The timeline pressing play is what i want it to look like...with the characters moving, and the text having the moving flame
but I want that to loop.
you need it as a gif?
Not necessarily, Just need the video to forever loop
Sorry if im explaining things weirdly, Im new to photoshop and graphic design in general...I want to learn desperately, but I'm having a hard time wrapping my head around some things haha
Thats fine! Please, take your time.
show the timeline again with the group expanded?
ok
i see
you need to convert the video to a frame animationfirst
you might try this first:

Adobe Photoshop CC 2023: How To Import Video Frames To Layers
This tutorial will show you how to import any video as Layers & Frames in Adobe Photoshop CC 2023 which can be used for a variety of video editing techniques including adding hand-drawn elements frame by frame.
Chapters:
00:00 Intro: About The Tutorial
00:32 Example Video Overvie...
you need your video to be a gif first
So i would do that to the 'flame'? Not the other one since its already in layers?
import the video as layers, then the add the pixel art gif, then go to frame animation
Gotcha, ill try that out. Thank you!!
@late vortex post what you've done so far here and I'll help you finish

check out the "select" menu. Everything you want is black, so you can get it all using "select color range"
Can you do it for me I don't use photoshop
sure, can you venmo me $20?
Come on
I'll DM you my details
It's really quick right
no, I've spent years figuring out how to do this stuff lol
@late vortex
(do not C/P this image - save as png instead)

Hey there, what would be the right channel to ask someone for some photo editing?
If you have any questions about editing with Photoshop, you've come to the right place.
No to ask if somebody could edit some pictures for me
There is no job board here like on behance.
Well if anyone is reading this, I've made a few pictures of my car and need a quick little edit to make them look better. DM me :)
Dm me
Its showing color in the layer but not in the workspace what do i do

please anyone tell me quick
anyone??
oh the layer opacity was at 10%
well problem solved : D
Hey any germans here?
Anyone know a good filter that can do like a sketch effect like this image above

Try Adobe Firefly. Upload the photo as a Composition Reference. Then experiment with Style References. https://firefly.adobe.com
This demonstrates the idea: https://www.behance.net/gallery/196446991/Still-Life-Apples

Experiments in generative imaging, style references and pixel manipulation.
Oooh okay, thank you! I’ll try it out
Gave +1 Creative Carma to @ripe quest (current: #3 - 2418)
Yes, but English is the preferred language on the server.
https://www.tiktok.com/@hatimdesigns/video/7407487816172621061?q=designing process&t=1728221178003 how can i make this?

TikTok
25.4K likes, 106 comments. “Posting design everyday @Kobebryant . . . . . . . . . . . . . . . .”
hey guys, I have this render I am trying to touch up
what would be the best way to go about making the sand grains be less big and look more like proper sand?

Learn photocompositing... There are lot of tutorials on the web.
People who share fast-track processes convey the false impression that everything is easy and can be done in a few minutes by anyonewithout any experience. Sorry but explaining how to do this in a chat is not realistic.
you know how to do that ?
I think so... Even if the video goes really fast we can see every steps of the process except the final adjustments (contrast and colorgrading).
Any "Advanced" guy should know/understand how to do this type of piece... But as I said before "explaining how to do this in a chat is not realistic."
Note: It would take a lot of time just to find the stock images to use...
If you make some searches on YT you should find tutorials to do this type of design.
If someone knows how to photocomposite, then @viral palm is the one 🙂
He's very good at it!
And he will probably tell you that it takes years to learn!
i meant to the way he shows the design process with the brush the before and after
The photoshop will only be able wto work with what you already have (the 3D render) or help you with deleting this sand and replace it by a new photo, or render with more accurate sand. Photoshop cannot "produce" the sand you want, unless you use Generative AI to do so.
So in oreder to retouch it with photoshop, somehow you'll need the proper sand (And I would suggest rendering another file with thr proper sand - I know I'm cheeky saying this, but it's the easiest solution. Imagine it's done in Blender then you can act on the size of the particles, either directly or via math nodes)
damn, yeah I've tried geometry nodes in blender to add some more, but this amount of them just crashes the entire program :p
my english is not so the yellow from the egg yk
You could render just the sand without displaying the rest (just in render so you still have the light interaction etc) and apply the new sand to the old sand in Photoshop
It looks like time lapse... There are a lot of cuts in his videos
I think he's just cheating... (Perhaps the reason why he doen't shot the whole screen.)
Something like premade "Frame" placed under the previous step then he paint on a mask to reveal the next step and capture only when he is painting the mask...
it will be done with erasing the old sand (gen ai is very good for that) and then applying the new sand explosion on top of the original layer and play with masks etc
I'll give that a try, thank you
Does anyone have a video or playlist explaining all tools?
Or maybe a content creator you’d recommend

Learn how to create composite images and explore photo manipulation in Photoshop by using these 10 steps that will get you on track creating great composites of your own! We will cover lighting, color, shadows, perspective, and much, much more in this Photoshop tutorial.
Get a free 7-day trial for Envato Elements here: https://1.envato.market/...
In this tutorial, we break down the compositing process with techniques for choosing images, making selections, and enhancing light and color. Learn to analyze light, perspective, and camera settings to predict how well photos will blend together.

LinkedIn
Join Deke McClelland for an in-depth discussion in this video, Loading my custom dekeKeys shortcuts, part of Photoshop Masking and Compositing: Fundamentals.
The links I shared just above were for .Senior, but you can have a look as this is the kind of tips you'll also need (on the Photoshop side)
Here an exemple to illustrate how I think he use brush to reveal his steps (final step design is always under the starting point)