
#❓ask-a-question
1 messages · Page 80 of 1
That's actually a lens flare, (diffraction of the sun rays)
You have an effect built in Photoshop already !
My advice would be to apply it to a neutral layer in overlay mode
CTRL+SHIFT+N
and follow what's on this screenshot

(overlay + neutral)
You'll see a grey layer appear on top of the one selected.
then go to filter> render>lens flare

You'll have multiple choices and you need to test them to see which one you prefer
If you want to build one from scratch , then you can use multiple layers, filled with a colour and at very low opactity. Concentric circles for the circles, layered on top of each others, with something like a hard light blending mode (you can test them all and see what fits) and beams could be done with rectangular selections, filled with white, again at low opacity, and possibly a motion blur applied to them, with a direction parrallel to the direction of the beams. Typically you'll need to learn the basics (and then some) to do that from scratch, but it's far from difficult if you're willing.
F12 and then "hands-ons tutorials" are a good source of learning - within Photoshop - for beginners
thanks for the help really helpfull!!!😁
You're very welcome!
It was an app scale issue caused by my display resolution. Thank you!
Gave +1 Creative Carma to @hushed niche (current: #18 - 115)
Anyone know a good photoshop tutorialist youtuber who could help me try and do lighting like this photo?


Learn this simple yet powerful technique to apply a dual lighting effect in Photoshop!
This tutorial is part of my Photoshop in-app tutorials. You can open the tutorial image directly from Photoshop and follow the coach mark overlays to follow along. You will need Photoshop 2021 (22.5) and newer.
In this tutorial, you will learn how to use Gra...
Hello, so I've made a normal map for this texture like a year ago, and I have no idea what kinda filter I used to achieve this look.... does anyone have maybe the slightest idea? (not the exact same crop of the image)


Let me understand what you’re looking for… you have the black and white picture and you want the colored one?
its not just "colored" its a normal map generated through the filter/3d/generate normal map
but I have no idea how I achieved those fat edges
just looks like this after I generate

Hi, to me, you had a black to white image with a small gradient, then a filter like glass. Try the filter gallery…
But, I don’t think it is still possible to generate a normal nap in the current version
the border of the black and white IS made with glass
Ok. What if you duplicate the layer, then p oh at with blending modes, like darken.
Sir. Duplicating and overlaying with linear light was it.
Hello
I feel like the default background remover of photoshop is kinda glitchy
Is there any better ways to background remove?
Just to compare, i used picsart's bg remover before and it is actually better than the photoshop's background revomer
So im just wondering am i doing something wrong or is there anyways to fix this?
Yeah sometimes it won't give you the expected result
You can use other tools which I personally prefer
Such as remove.bg
Okay
hello how could i pixelize the text like here ?
Anyone know how i can do this outline effect ?
Glow

Here is an easy way to create a neon Glow Effect in Photoshop. You can easily create neon glowing light lines using the Curvature Pen Tool. This Photoshop tutorial will explain how to make tapered lines with the glow effect of any colors. You can also use the regular Pen Tool if you want smooth straight lines.
The Curvature Pen Tool is in Pho...
you can download that font from font websites to make it easier
just search pixel fonts for photoshop
thanks
Gave +1 Creative Carma to @native shard (current: #131 - 12)
Hey guys! is there anyone doing real estate photography ? I'm looking for some real estate RAW files for editing practice.
Hiya I’m looking for someone to create this symbol that I drew and create it into a masterpiece for the colours I want it to be the traditional Yin & Yang symbol and the handshake to be transparent but have a black outfit around it so it’s visible on any colour dm me if interested of course will pay if done properly
Thanks

Can I download patterns for photoshop? And if so, where is a good place to download free patterns
Did you try to « google » free photoshop patterns?
Lot of places where there are free ones: Adobestock/free, Brusheezy.com, freepik.com, …etc.
Hey guys, I am trying to replicate this logo ( with AE symbols) and thats what I got so far. I want to know how to add these ends ( the ones I marked ) to a letter "E". And overall, what can I do to make my logo to look better ? Thanks for your answers !


Turn the text into a vector 'shape' then drag the corners around using the direct selection tool and the arrows on your keyboard 👆
Heya, when i cut something out with laso, copy it, delete the original layer and Ctrl+V back this new layer back on the same spot, it leaves the mark from cropping tool, is there a way to make it so the 1px is filled automatically aswell? this was just an example, idk how else to do it and i dont wanna manually repaint back all i crop out.

Simply uncheck the anti-alias option.

thanks man, i've been having this issue for toooo long, finnaly fixed 😄
Gave +1 Creative Carma to @viral palm (current: #9 - 530)
Thaaaaaaaaaank you!
Negative. :)
This isn't an exact science. Its a slot machine. You win some; you lose some. heh
Can someone tell me how to buy Photoshop with Ai in North Macedonia country
You should contact Adobe Customer Care on the web. We don't really deal with plans and export restrictions here.
How do I keep the warp lines straight? When I apply the image within the layer shape it comes out distorted.

What exactly are you trying to "warp" here? Are you just attempting to recolor the container?
Not quite. I'm following this tutorial (https://youtu.be/cii8UIPAjmE) and the main idea is to
- Create a shape covering the shipping container
- Convert to Smart Object
- Ctrl + T for Warp
- Align warp with the corners of the shipping container
- Open Layer and place image
But this is the result I'm getting


Using Adobe Photoshop to create realistic product mock-ups which can be used as template mock-ups for rebranding, redesigning and applying changes to the product mock-up itself. This Photoshop tutorial will show you how to create a product mock-up in Photoshop, how to adjust the lighting, how to warp textures or smart objects and more. This Phot...
Can I see the truck image and your logo separately?


So with the logo artwork, the desire is to retain that blue background color or not?
I don't like that approach anyway.
I think it's better to just drag out the corners manually holding ALT
You got this?
I don't want to duplicate efforts. :)
Is photoshop only for editing pictures or can I use it for making game charecters and ui systems?
Photoshop is used for creating and editing raster graphics (pixel-based imagery). So anything in that realm. Which is just about anything.
oh sorry for the delay - I was just recording 🙂
The benefit of this option, is that you can then EASILY swap out the graphic later and it will still work well.
Thanks, @sly hawk
Gave +1 Creative Carma to @sly hawk (current: #5 - 1008)
Hi, how do I add a grid INTO an image
Show>Grid is just a photoshop overlay, not part of the image
Set up the Photoshop Grid the way you like it and take a screenshot. Then pull that into your image comp.
I lose a lot of resolution that way....
Then draw it with vector lines.
Oh true
You really only need to make one line. Then duplicate it n times. Then rotate it 90 degrees, duplicate it. You could use the Align and Distribute features to space them out. Or use Step and Repeat to do it.
Could you write some more detailed instructions on how to do that? I am not very used to PS vectors. It's ok if you don't want to, I will figure it out on my own.
Ok to be more specific how can I make a vector line pass exactly halfway through my canvas?
I draw it, then I click transform to put it in the right place but how can I determine the specific pixel location I want it at?
Draw the line and align it to center/middle.
What kind of a grid do you want? Something like this?

yes exactly
ok got it
I think im getting it
Hold up. I got something for ya.
thank you
Sorry. I'm used to doing a lot of operations with shortcuts so its tough to find the right menu items.
I'm using SHIFT ALT and dragging the object to duplicate it.
Locking the Guides is fairly important or you might move the Guides by accident.
You could probably do this by just duplicating the lines and then using Align/Distribute but this way you can see a preview of the Grid and then create it.
Maybe there is an easier way.
Hi I’m creating a fundraiser poster for my mom with breast cancer and I’m having a little trouble can anyone help please
how do i make a circle within a square
hey can someone pls tell me why the logo is kinda blurry im cooked

how to get rid of this?

guys please
i cant fail this assignment
its due in 40 minutes
anyone
sorry for spamming dont ban me
but please
Hello i have a question regarding fashion ecom retouching. I currently developed a solid workflow but with with one task i'm not particularly satisfied. After cropping, freq, seperation etc. There has to be a transparency image. This transparency image should still include the shadow on the shoes (on a separate layer), it should be a slight cast. If i try to separate the shadow via channels there is still a bit background coming with it. With all the new Ai enhancements and considering we are talking about 500 images that need to be edited in various poses. Has anyone insight that he is willing to share how i can archieve this task with good results? TLDR need to extract/create a new shadow just for the shoes on ecom images.
My properties used to be in the same layer as layers and I want it back

Although its a little late, you use the pen tool, but tbh im not a super duper pro at it and also it would take a while for you to re-trace using pen tool
anyways im guessing no point now cause your assignment is over 😅
reset your essentials
Idk how
Can i see one example of the image please?
click on this

and then a drop-down appears, click on reset essentials
omg ty
Gave +1 Creative Carma to @native shard (current: #122 - 13)
welcome
i can't share an exact image but it looks like this

the problem im facing if i seperate the channels there is still some background coming through
I mean it makes sense right? the shades are in different colors so photoshop doesn't know what value to pick
just a range
So if im correct, you want to remove the white background from this example model image you sent me, but you want to leave these shoe shadows while extracting and removing the white yes?

the yellow highlight is the shadow i see
yes exactly, i tried to separate the channel but there is some background always left. Which on a cutout image is visible specially for print. And if i draw the shadows it doesn't look as good.
well you have 2 options:
- just take the model WITHOUT shadow and re-create the shadow
- select along with shadow

On this channel you'll see all kinds of content about Photoshop, After Effects and Premier Pro.
Social Links:
Follow Us on Facebook:
https://www.facebook.com/ultradesignz
Follow Us on Instagram:
https://www.instagram.com/creative.visuals786/
I'm not trying to teach, I'm simply trying to inspire and entertain!
Feel free to subscribe if you lik...
check this 3 minute video out, should help you for selecting the models and getting shadow even in a PNG transparent image
How to Make a Shadow in Photoshop 2023 (Fast Tutorial)
photoshop Tutorials in a minute
Show More :
• How To Crop an Image in Adobe Photoshop : https://youtu.be/kkfjOMvlNvI
• Stroke/Outline Text in Adobe Photoshop : https://youtu.be/DnwZ3YPsiNg
• How to Remove Pimples in Adobe Photoshop : https://youtu.be/C1Q1yNqe3Qo
• How to Change the Size of ...
And this is for option 1 which i mentioned, to re-create the shadow
Thanks i will try it, will take some time before reporting back
Elliptical marquee tool, should be here. To make a perfect circle press shift while creating, without shift it will create ovals or whatever

It's okay, during weekends im free thats why im helping out here haha
all the best
That's really nice, I can try to help, where are you facing difficulty exactly?
Yeah. I was going to the say the same thing...
If you're right at the start and not sure how to get going, I'd STRONGLY advise you check out things like canva and adobe Express. They should both have some lovely templates!
I got an extension
What do I do
The blurring bothers me personally much less than the wrong perspective.

I know the blurring is very annoying how do I change it

Don’t miss this AI tool: https://bit.ly/4anjoyK Upscale your image to 8k
Get the full license of VideoProc Converter AI:https://bit.ly/3Tm5vdb
For Colored Graphis : https://youtu.be/KU8LRPsRH6Q
BEST WAY TO CONVERT LOW RESOLUTION TO HIGH RESOLUTION in PHOTOSHOP : https://youtu.be/zFgn-BLUO9c
Two Minute Photoshop Tutorial : Convert a Low Res...
And like pixel said, i would also suggest you applying the logo correctly than just plainly stamping it onto the wallet. That would provide a much more cleaner perspective and the final image would suit you best with the sharper logo.
Chat I have a proposition. Sooo I've been wanting this game for a while now and i'm just wondering if anyone is willing to gift me FC25. Feel free to respectfully decline the offer as I understand it is a big ask. If anyone is willing to do so please dm me. I will be greatly appreciative of your actions. Please and thank you
how do i make this effect? (the green shadow)
i know how to do this but its not working on 1 color
pls some1 help me

can anuone help me , i cant use ctrl+t idk why
Can you show a screenshot of the whole interface (the WHOLE thing)?

FYI, do SHIFT+WinKey+S to do s screenshot of any area of your screen instead of taking a photo (I assume it will be less cumbersome thatn transfering photos from the phone to the computer)
Difficult to say here, but your layer doesn't seem to be highlighted (selected) so maybe the CTRL+T isn't working because it doesn't know which layer to transform
my bad im using discord on phone, i didnt had it open on laptop
so i need 2 layers yes?
No worries, it was in case you didn't know
Layer highlighted
versus layer NOT highlighted


you need to highlight/select a layer to transform it
how do i creatw a new one??
see the little + icon at the bottom of the layer panel? that's the one
If you need some basics covered, you can check F12 > hands on tutorials and it will give you a guided tour of the interface
how do i create transformation window?
Not sure what you mean by transformation window? The transformation menu does't create a pop up window, it's in the menu (edit>transform> and then choose the option you want)
how do i make this effect? (the green shadow)
i know how to do this but its not working on 1 color
pls some1 help me

You can create a threshold adjustment layer and then a solid colour on top of it, clipped, on hard light blending mode (test other blending modes.
You can also colour the adjustment layer by other means
How did you create the shadow in the first place? the method to colour it will depend on how you do the effect first
i dont really good in photoshop
Maybe you have a guide to send me?
Gradient maps are another solution
https://www.youtube.com/watch?v=X2ijiu6ImTQ

Learn to use gradient maps in Photoshop to give a unique look to your photos and typography designs! Let me know other techniques you'd like to learn in the comments ✦ ✦
Download my free design assets here: https://thisiszosia.gumroad.com/
Learn to make your own textures: https://www.youtube.com/watch?v=jN_jdxbW16o
Follow Zosia:
✦ Instagram: h...
i know how to do this but its not working on 1 color
You said you knew how to make those kind of shadow? what did you use?
this is the problem

Getting back into Photoshop with the results of the latest experiments in the lab! The question: How can we create noisy, grain-shaded Gradient Map Adjustments in Photoshop? The answer: A little bit of Adjustment Layer alchemy...
Download the 5-Color Gradient Presets here:
https://texturelabs.org/tutorials/grain-shaded-gradient-maps-in-photosho...
Can you show me a screenshot of the file you are working on?
Does it help?
https://www.reddit.com/r/PhotoshopTutorials/comments/191t8pd/how_do_i_change_the_color_of_the_black_part_of_a/
Reddit
Explore this post and more from the PhotoshopTutorials community


Well, I don't mean the image, I mean a whole screenshot, it's so I can see what you've done so far
Like that

Because as it stands, your angels images don't tell me anything about what's happening
Oh, I deleted it because it didn't work
Can you maybe have a call and explain to me?

From bottom to top, in the layer stack:
1- the original image
2- A threshold adjustment layer
3- a gradient map adjustment layer
can you send me the settings?
There are no settings!
Just layers
You adjust things based on your image, they will be different with your on image
Could I get someone's help here to tell if the writing on the notepad is photoshopped?

Are you wondering if that photo you saw online is real? In this guide, I’ll show you 15 different ways to tell if an image has been Photoshopped.


i actually spent a bit of tiem googling before asking this question. I used analysis tools and reverse searched using yandex and google, bit my skills arent developed enugh to determine if it is or not tbh

You need to learn what adjustments layers can do, once you know, you'll be able to make your own judgement depending on your particuar iamge. there is no "setting" per se, they depend on the images, the colours you use, and the dimension of your document
https://helpx.adobe.com/uk/photoshop/using/adjustment-fill-layers.html
https://www.youtube.com/watch?v=pUv7npHOk7E

–
In day 4 of 30 days of Photoshop, we show you how Adjustment Layers can change the way you work! From exposure adjustments, to color grading, to creating seamless composite images, Adjustment Layers can help us tackle a lot. Learn about all of the different types and how you can use them to enhance any photo non-destructively.
Download the Sa...
No sorry, I don't do calls
Just follow the tutorials and more importantly the Photoshop official documentation
nope
so can you just tell me what to do?
I mean, you need to learn the basics, that's your first step, then once you know the basics, you can tackle projects
im working on it for like 5 hours
its not
I just did with my screenshot! what else do you want?
I can record a video of what I did, but that's about it
I also have one colour, the dark green (White is not doing anything in that case)
You cannot invent shadows where there are none. Your angle doesn't have any shadow, it won't work
If you can try it on just a single color without any other shades and see what happens to you
The cupid you shared as a refrence did have a shadow, so it works
your image doesn't work
You need to draw a shadow by hand or find another image
no its doesnt its only 1 color
where do i find?
You need more than one colour for this effect to work, there is no way around it


rawpixel
Angel · Free PNGs, stickers, photos, aesthetic backgrounds and wallpapers, vector illustrations and art. High quality premium images, PSD mockups and templates all safe for commercial use.
i dont need cupid
there are two colours, the dark green and the white, the original before the threshold had more colours
find another image in multiple colours
try with one image of an angel and follow my steps, just to try. Then you will be able to do it with any image (one that contains more than one colour that is)
try with this one (you see more colours than just one)
Now just follow the steps in my video
@fading storm
you need a grayscale image
- converted into B/W
a gradient map
and a green background


If you only need one colour, then it doesn't look like your reference where there are 3 colours: Dark green, white and the background in middle green
i only need the character
I will need to go anyway, I will leave you in safe hands
How do i do this?
how do i convert it after?
what?
@tame cape can you help me?
you did it great
Sandrine has already shown you everything in her video. You definitely need **a picture with at least two colours **as a base.
ok i got it now how do i make the grren on only the side?

similar to this
Sorry, just coming in, mid convo...
Green only on 'the side'?
yea
as in... only half of his body has the green tints?
.
thank you so much!
Obviously not all steps are going to be relevant for you, but hopefully you can pick out the specific moments 🙂
Hello, when i use Clonning tool, how to make it so that clone i make with Alt-click doesn't move? I had it like that before but somehow i disabled it and its moving now.
try to untick the "aligned" tick on the top menu
Tried that, but didn't help :/
Have you tried the clone source settings?

If you had it one way before, you can still reset it

here are my settings, also iam using older version of PS


Learn how to enhance your photo with Howard P. in Photoshop.
Subscribe to Adobe Photoshop: https://adobe.ly/3vWtAiy
Learn More About Adobe Photoshop: https://adobe.ly/4bUzQbh
Try Adobe Photoshop: https://adobe.ly/3womKm8
About Adobe Photoshop:
Adobe Photoshop software is the industry standard in digital imaging and is used worldwide for des...
Things have changed since, see that you have the source set to 0, in your clone stamp tool settings, I don't think it's right (I must admit I am not the best with the clone stamp, I tend not to use it much)
The source changed to a different number when i Alt+click with it on image, i tried to Reset it but didn't help, it's still moving
Let's see if someone else knows the answer. Did the video I shared helped?
All of the presets in the clone source are exactly the same for me, in the video he changes something different
I think there is some keybind for it, to lock it on place and i pressed it by mistake
see if using those settings help (they might not)

I will try to find the answer if I can
Weird thing is happening 😄 its dissapearing and not even clonning
i have idea, lemme dm
The issue is, I didn't even think it was possible for it to not move, if you told me that it wasn't moving and you wanted it back, I would have told you to reset your preferences.
I had it like that maybe 5 or 6yrs ago, then something happened and i never managed to make it work again
(generally people want to avoid it not sampling for different areas because otherwise you see repeating patterns)
Yeah i need vice versa 😄
Reading the forum answers I can see in an older version there was a bug where it didn't move
oh bug 💀
Definitely not the right way of using it. I'm sure someone will come to the rescue!
no problem, thanks for the help anyway
Gave +1 Creative Carma to @vapid flume (current: #8 - 744)
see those answers
https://community.adobe.com/t5/photoshop-ecosystem-discussions/clone-stamptool-source-location-do-not-move/m-p/11401779
https://community.adobe.com
Hello There, When I use my Clone Brush, the cursor stays fixed at the source location and no longer moves with the clone brush movements. Cloning continues normally but it is unworkable because the source area can no longer be determined. How can I fix this? Michael


(definitely NOT waht you want, but maybe it will give you an idea)
i usually use it on repainting like strings of hair, which are only few pixels wide and if i put clonning tool at the top of the hair it starts to move and messes up the color, its usually one solid color, only fix i figured out was to manually crop out the hair so the clonning tool only moves inside the cropped part but it takes very long time
before with this "bug" sadly, i could have locked the clonning tool and have it done in a few seconds
maybe if there was some plugin for it or something
I checked on Adobe marketplace and I cannot see a plugin for that. However lots of plugins are created outside of Adobe's platform (for example, GitHub, Envato etc)
I used to paint/retouch hair with specific brushes some of them I created myself (with a pressure control with a graphic tablet)
and a very low pressure of the Smudge tool (the only use of the smudge tool that I know of 🙂 )

both of them: brush and smudge tool at small size obviously
you can paint using those tools aswell? i always used smudge tool to only remove very pixelated areas
One of the person complaining about the clone tool sampling not working as expected ended up figuring that it was an issue with their graphic tablet (wacom in that case) and the use of the "windows ink" tick in the settings
maybe you can try that as well

yes it drags the colour across, gives you a very natural end of hair strand
iam not THAT advanced 😄 i dont have pen, only mouse
You can check the pen settings if you have a windows OS (check the settings)
Can't find it in settings, maybe it wasnt in 2017 version? thats the one iam using
I am talking about that

it's just a wild guess!
If you retouch a lot of hair, then a tablet will be greatly beneficial, if only because if the pressure sentitivity (mainly for hair tips)
aye found that, i should check in the windows ink?

I have learned with her (a good while a go)
https://www.youtube.com/watch?v=OnF9Rvj4_jo
Hair retouching - Hair compositing - High End Hair
Ever wondered how the ladies in the hair product ads have so much lustrous hair? Usually they don´t, we comp it together :P
Ph @freyadt
Model: @aeromanova
@anm_mgmt
Makeup: @mttthw
Hair : @ryanlmcgovern
Try with or without. I have it on, so I guess you should try to untick it
tried both but didn't help sadly, maybe not possible anymore 😄
Ill check that
I don't know how she does now, but when I started retouching she didn't have a wacom either so she proved it was possible (although very impractical)
other brands are available (You can find a cheap XpPen for €35)
i use PS recreationally, not everyday like i used to, i just had this issue for very long time and couldn't find answer
and i suck at drawing, so pen would be no go for me 😄 when i did motion animation i worked with pictures that were already painted
Od 2005 roku XPPen dostarcza profesjonalne tablety graficzne, ekranowy do rysowania i rysik. Idealny do pisania, obróbki zdjęć, rysowania, malowania, szkicowania, robienia notatek i projektowania graficznego.
I suck at drawing too! 😂 that doesn't stop me though
Yeah 😄 its just that i wont find a good use for it, i crop stuff, make layers, not paint myself, only repaint and repair some things i want to have different
Fair enough!
thanks for help anyway, maybe in a future they will add it as a feature in PS 😄
If you can't find a suitable solution from someone else here, you can still ask in the community forum, I'm pretty sure they'll give you an answer there
https://community.adobe.com/t5/photoshop-ecosystem/ct-p/ct-photoshop?page=1&sort=latest_replies&lang=all&tabid=all

https://community.adobe.com
Master Photoshop with the help of our global community.
can someone please help me

is there a faster way to put this mask over every frame of a gif?
i have so many to do and the only way i know how is to go frame by frame
Does Photoshop Express for Android have a generative fill feature where you can extend the background of a photo? There's the "Heal" button, but using this over a large area (like the empty space where I want to extend an image) basically paints parts of the original image into the blank space
Try to put all your layers in a group and alt+drag your 1st layer mask on the group itself.
It should work.

I'm trying to edit my photo using photoshop to remove everything in the background so its one color
i was trying to use the stamp tool but its leaving streaks behind because the background isnt one solid color

Did you try select subject?

There are these new options in the Ps Express app. If you don't see them, perhaps try updating... You could also try using the Adobe Firefly link in Ps Express, hit the Generative Fill option in Firefly and upload your image there to use Gen Fill.

I want to keep the goal post / field though
Please use the #📝project-feedback channel for advice/suggestions/feedback.
I also want to keep the color in the background, I just want a way to remove the background objects without it being too messy
is that possible?

This is what i've got so far idk if its too obvious
Try painting over the objects you don't want to keep using the Remove Tool.


It leaves this kind of abberation behind
Then paint over it again with the Remove Tool. Or use the Clone Stamp Tools. Or, it seems like almost a solid color, so pick the color and paint over the area with a soft round brush.
tysm dude
I would probably get rid of everything in the background (except the goal post). The other objects are distracting from the main focal point.
hi guyss i have a picture of my baby and there is a slight orange streak in it, any idea on how to edit it and fix it?
Final photo if ur curious
thanks for the help :)

Good work!
I think I answered this yesterday. If you can't purchase it directly, there might be some sort of reseller in that area that handles it. You should contact Adobe Customer Care to find out the details. Hit the Adobe Website and scroll down to "Contact Us."
but from resellers its so Expensive
We don't deal with licensing or the cost of plans here. We don't have that sort of information. You'll need to talk to Adobe Customer Care or Sales Support about it.

my brother lives in germany, i live in North macedonia, he have photoshop, can i get his Email and open photoshop on my llaptop ?
how do i make this layer style

Probably, a "laurel wreath"
I'm not commenting on the licensing/legality but from experience I know that it's fine if a person has multiple computers. I myself have it installed on my home PC, office PC, laptop and my wifes computer too. - two machines can run it at exactly the same time.
Yes but He livs in Germany i live in Macedonia, is it possible for me to install photoshop from his Gmail
❌ It's 100% illegal.
so i cant do that ?
no one is going to hunt you down if you choose to do it
FYI: you are on the official Photoshop Discord Server.
I can't reply nothing else than 100% illegal...
.
Hmm, my PS Express doesn't look like this (Android, app latest version). It opens immediately to a "select which picture to edit." Is your screenshot from iOS?
No. Its on a Samsung Phone. Did you try going to the Play Store and updating the app?
You also might need to sign in to your Adobe Account to use the cloud-based services.
Yep, play store says I'm at the latest, and I'm signed in to my premium account. About the only diff is that I'm using a Samsung tablet rather than a phone. I'll have to see if it looks different on my Samsung phone
Huh I'll be darned, the app does look different on the phone. On my phone it looks like your screenshot.
I guess my next question is: when can we expect feature parity between Android phones and Android tablets?
why is my gradient (on the left) not as smooth as the reference image?

I realized this channel might not be the best place to ask a question like that, so I've posted it in the #1093156942647660615 channel. https://discord.com/channels/547473772727238676/1289679226538295442
How are you doing it?
1st, try to change Method.

my bad 🤦♂️ im on illustrator lol i asked here out of habit
im going to ask in their discord, but thanks tho!


a similar principle to this one:
#❓ask-a-question message
and this
#❓ask-a-question message
How do you create the shading effect on artwork for example in this photo ?

Another example

it doesnt work
for some reasons it goes to whole picture
How do I remove the see through box around the cats? (imported image and its on the same layer)

idk what i pressed but how do i get rid of these guide lines?

View > Show > Slices
@ripe quest so ther is my hard explaination,i want to make my own world alternative history with no country, and my issue is im writing on thes ocean and i dont want. ther is my issue
Sorry. I really don't know what this means or how it relates to Photoshop.
@ripe quest i told you its very hard to understand my issue
This is the Photoshop Server. Are you trying to make something with Photoshop?
@ripe quest what do you mean about that
The server that you're posting in is dedicated to Adobe Photoshop. Photoshop is an app used to create images, pictures. We discuss how to make images, graphics, etc with Photoshop. Do you understand?
uh yes but i dont want get you mad and i dont want be banned or kick
Do you have a question about Photoshop? I can't answer questions about a "world alternative history" or whatever you're referring to.
@ripe quest sorry i shut down photoshop becaus im going to sleep
@plush basin
Yes, I have seen that.
Use one of the options to isolate the person -> https://helpx.adobe.com/photoshop/using/making-quick-selections.html
Then you can continue exactly as shown in the two links.
is there a particular reason why my levels keep resetting on smart filters?
uhhh for an example
No particular reason...Mine is working as expected.
Smart objects are supposed to retain level settings without resetting.
Try to close and restart your photoshop...It could help.
 tbh this has been a consistent problem across all of my files for some reason, at least since updating to this version
is it due to the colorspace...? 
The colourspace isn't the culprit. It could be if it gave you the option to act on the other channels and didn't register it as an error, but you're acting on the grey channel, so all good.
It could be a glitch. Did you try to reset your preferences?
Hey there! How are you? Got this beautifull mockup but i can't edit the 3d element, and nothing happens when i double click or something on it, can I have some help to edit this mockup please? Thank you sooooo much!

THe issue is that most of the 3D features have been discountinued for a few years now, and it's possible that they are no longer compatible with how the mock up was made. Is that a relatively recent mock-up?
If you really want to use it, you'll probably need to revert back to older versions of Photoshop, which is possible in the CCapp. How far do you have to go, I would guess before 22.5, for the moment, the earliest version available is 22.5.
Do I have to set up something in premiere to use GPU while rendering my videos or is it that already selected by deffault?
Cause while exporting my GPU is not being almost used and my CPU is at 100%

@arctic quail https://helpx.adobe.com/uk/photoshop/kb/3d-faq.html
I've got this option like this...

Well, you'll probably need to ask the good folks in the video/anim server... Bear with me for the link
Sure!
It probably depends on the GC you have though, I see CUDA, and as far as I know it seems to only be available with Nvidia cards (not AMD)... Just a thought and a wild guess there...

What happens if you commit to the placing?
hit enter
My mistake, I can see you already did it. It could be that your design is a much smaller size than your actual document
Can you open the babies design on its own in Photoshop, and see what is the size and resolution?
It could also be that it's too large for the canvas and that the interpolation method is not the right one. (Lots of anti aliasing)
Check both resolution and dimension (in pixel, mostly dimension as resolution is pretty irrelevant unless you print it)
and if you can screenshot it, I could see if it's an issue with the interpolation or something else
idk cause it looks good before commiting

Yes, but before commiting, it doesn't apply the interpolation (sometimes it's the opposite, it looks crap before and better after, it depnds if the design is bigger or smaller)
Before commiting you only have a tentative display, not the full render

It is smaller, which interpolation do you have?
see in the preferences?

guys do you know how to fix this phtoshop problem when i try to go on my phtoshop work for example it keeps saying progress and that loading screen and it takes like half an hour for it too load

If it's not bilinear or nearest neibor, try to change it to that (and revert back after that)
Or try to export your design at twice the size you have now
I can see you are trying to read a .psb (large document) how big is it?
How are you with your scratch disk?
am not sure all I know it takes a long time too load

all there is is a text
I still need the size of that stuff, no matter if it's text or not.
were is that
Either in the file properties (right click and properties on windows) or directly within bridge


i mean the settings i cant find them
Click on your file (the one you are trying to open with the right mouse button) and then click on the word "properties... (see the screenshot above) and it will tell you the size in Mb, Gb, whatever

It depends if your memory and scratch disk can handle your file size
so..... what am i ment too do

but i dont have that
anything larger than 2Gb will automatically open as a .psb (large document) because .psd can't handle more than that
Where do you have your file stored at the moment?
Are you on Mac or Windows?
idk
windows
Then I can't help you
How on earth do you NOT know where your file is stored?
i just dont know simple
How did you find it when you decided to open it with photoshop?
do a search in your computer with your file name maybe?
ty so much, this helps me rly well!
Gave +1 Creative Carma to @vapid flume (current: #8 - 747)
You should know what you are opening, maybe that's the issue...
If you go to the explorer (on windows)
go to "My PC" and when you're there, type your file name in the top search bar. It will tell you where it is

You're welcome!
If you downloaded it from elsewhere, there are good chances it will be either on the desktop, or on the folder called "downloads" @brazen bane
But even if your file isn't that big, it could be something like a corrupted file or a wrong file format, we can't tell you without more information.
guys any one knows font name?

Have you searched in the usual font identificators?
I don't know this one, but you can try with the search websites online
yep i searched but it cant find it
It's possible that:
1- it's not a font but something someone has drawn from scratch
2- A bespoke font for the exclusive use of the person/brand who commisiooned it
3- a font too obscure to be registered
Have you asked the original creator?
in case you want to know about your possibilities
https://www.instagram.com/p/CqughxJstif/?utm_source=ig_web_copy_link&igsh=MzRlODBiNWFlZA==
I'm doing pixelart on PS and I'm having trouble with the color picker, it doesn't picks the colors I want directly but rather gets a shade that is a mix of it's enviroments and not doing it's job correctly. I first thought the reason was because I'm working with the tiniest pixels (as can be seen when I zoom out) but my brother's computer seems to be color picking just fine so does anyone know about how to fix this problem?
You first need to make sure your colour picker tool has the right settings

oh god that really worked! thanks a lot man I really needed this :DD
when you click CTRL to switch from the pencil tool to the colour picker, you use the settings of the tool itself. So here, in my screenshot, you'll see that I chose "point sample", that's where it will pick the colour exactly where you click it and not make an average of the colours around
thank you! have a great day
You're welcome. You too!
Hi guys, I'm trying to find the AirBrush in Photoshop, I'm on a Photography plan
Does that make me not have an Airbrush tool?
I thought it's part of any basic version of Photoshop but I can't find it to save my life
is an Airbrush just a "Soft Round Brush" now?
The airbrush is not a separate tool that you will find in the Toolbar. Its an option of the Brush Tool itself. Select the Brush Tool and look at the Options bar on top.
Please don't post the same question(s) multiple times.
ah sorry mb
yeah I know but where is it?
it doesn't show up on the search bar when I'm in the brushes

There's no Airbrush in any of these and no brushes here:

Am I blind?
or is the Soft Round brush an Airbrush ?
You've posted in the forum so we'll use that one.
Airbrush is just a setting in the options bar for the Brush Tool that control how the Flow behaves.
I don't know why you're not seeing it up there. Its a little icon that looks like an airbrush...

That's Use Pressure Sensitivity
Hover your cursor over the tools. There are tooltips.
I am so confused
Why is this so hard, there's no tooltip for showing me that I'm going to be using or not using an Airbrush, every video tutorial I've watched has the people picking up an "Airbrush" from the toolbar
Search bar doesn't show it
Googling doesn't show instant results and even trying to download assets is hard 😄
This is probably the simplest thing in the world somehow but I can't understand
So why can't you show me it?
I am so confused

is it one of these?
Because I'm not at PC atm. Also, I'm busy doing something else right now.

I think you should learn how to be patient. People respond when they have time and capacity to do so.
You have absolutely no obligation to respond to me unless you are paid of course but then why do you respond when you're not available and basically taunt me with "It's just there why can't you see it" instead of actually sending me a screenshot
Firstly, I suggest that you calm down. I'm not taunting you. I was replying from a phone. I can't take a screenshot from there as I don't have Ps Desktop on a phone.
If you continue on with this attitude you will be timed out.
You were literally trolling me with 'its just there bro' but somehow I'm at fault
Its ok ill just come later
That's not what I said, so don't mischaracterize the situation.
And the Airbrush setting is there. Selecth the Brush Tool and look at the Options Bar...

Also, I'm sorry if it came off that way, I never had the intention to direct my frustration towards you at all
it's mostly with the fact that I'm trying so hard to find it but I couldn't 😂
Thanks! For some reason when I hover over items I'm not getting these tooltips
Gave +1 Creative Carma to @ripe quest (current: #3 - 2408)
I understand being frustrated but don't take your problems out on other people. We provide a great deal of support here and the people who provide that support, we're all mostly volunteers. We have our own lives and things going on. Not just this.
If the Tooltips aren't showing up, that sounds like some kind of glitch. Perhaps save your work and restart Photoshop.
its probably hard to see, but I am wondering how I could make these slopes go down more gently. Left is the grayscale, and right is how it looks when 3d rendered. Its supposed to represent the continental shelf sloping into the abyssal plain, but right now I am getting these ugly terraces.


Its probably a problem with the bit size of the colors
You could try a Levels or Curves Adjustment but that will change the colors of the image...

It does make the topology a bit more apparent. Not sure what the end-goal really is here. Sorry.
Sorry this was a hyper-specific question, ill figure it out
Also, the first image appears to just be black. I don't see any variation on it.
yea thats the issue, its supposed to be a heighmap of the second picture (darker = deeper) but its squished into such a low bit length
I suppose you'd have to work on the "ramp" image to make it more like a gradient and less like the stair steps.
yes exactly
But you're probably not doing it with this black image. I don't see enough variation in the pixels to make it effectively editable.
Or do you want to do that after, as a post-process? That's what I was getting at above. First Level adjust. Then perhaps you could smooth this out.

my goal was to improve my relief map by adding underwater relief, but I think 3d detail doesnt really work out for it. I will just go for a 2d color glow instead

How can I make a rectangular marquee selection of fixed size at a fixed place? (i mean i want to select for example the (900,900), (900,1100), (1100,900), (1100, 1100) box)
where those numbers are pixels
I know how to make it of fixed size but moving it around is a bit imprecise
you can nudge marquee boxes
with arrow buttons
yep
Does anyone know why this button doesnt work? When I click it, nothing appears

Ok thanks for the info Sandrine!
Gave +1 Creative Carma to @vapid flume (current: #8 - 748)
I would draw a rectangle vector shape with no stroke attribute. Then you can resize and reposition it at will and by using specific number inputs in the Properties Panel. Then if you want to make a selection of that, you just Ctrl-click on the Layer Thumbnail for the Rectangle.

I guess, technically, it would be more like this (since my original example has a Stroke defined) :D

oh wow thanks thats exactly what i was looking for
You could also use different shapes, I guess but I think you were asking for a rectangular marquee selection so I used the Rect. :)
3D features in Photoshop have been discontinued a few years ago
https://helpx.adobe.com/uk/photoshop/kb/3d-faq.html
Check out Illustrator if you need a shape extruded...
😟 , Thanks
I have this graticule I made in another program. Whats the right way to overlay it on the map on the right? I tried selecting the whites and deleting them but it doesnt seem right.


Set the Blend Mode to Multiply...

Thanks again!
i cant fill an rectangle in photoshop

This is not an effect. This is ‘good old’ retouching work, which can nowadays be made easier by AI.
i need to do it in photoshop
good way to learn spot healing and clone stamping
did that in a high school graphic design class
Is there any way I can automate this effect to make the edges appear broken/crumbled


where do i download patterns and how do i import them
You can find free patterns on Adobestock, Brusheezy, freepik, etc
This is where you import patterns I believe

ive downloaded one but its a zip file what do i have to do
becasue when i click import its not there
this feels like a pretty stupid question but I'm trying to select just a vector mask but instead I'm selecting both the mask and the layer. It works with every other layer but the one I need to select. Not sure if I've accidentally turned something on?

every other layer I can do this

is there a keyboard shortvut for this?

I want to split a bacteria in the middle and make like an "explosion" animation on AE
is there a way to split a shape?
in photoshop

you mean like cut the purple thing in half and seperate the two halfs?
Pretty much
is the purple blob a different layer to the background?
Yes
use the pen tool to cut through it and then pull it away from it

@warm crater
Hi @lucid wave
Select the path selection tool (black arrow) and try again


Not by default.
But you can assign a customised shortcut.

You have to unzip/extract the files
Right click on the file and there should be an option
i dont know what thats says
can u send it in english?
Thanks
Gave +1 Creative Carma to @steep brook (current: #936 - 1)
No, unfortunately I don't have an English PS user interface installed.
But you can manage it. 👍
open menu: Edit -> Keyboard shortcuts


Vector mask behaves differently than layer mask.
If you want to move a Vectoe mask independantly the layer itself you have to choose path selection tool (A) click on your path and move it.
make sure u have the layer selected
Its not really 1 layer ,it is multiple
i should merge layers?
merge all the layers that make up the bacteria by pressing 'ctrl + d' whilst pressing on the layers and then press 'crtl + e' to merge them
Alright
hey photoshop lovers
why my photoshop randomaly freezes when I use a drawing tablet
has this happned to you?
what about the leftover lines ,can i also make them 2 layers now? Each part each own layer

it is super annoying
Maybe make a copy of your group before merging it (safer)
make sure the pen tool is on path
great idea
Wdym
@steep brook
Was this answer sufficient?
#❓ask-a-question message
Okay fixed the lines ,what about the seperate layers
Copy your group, then Rasterize your copy.
Lines come from the Fx applied to the group.
How do i rasterize and what is Fx
i wanna make it seperate layers so i can animate it afterwards
yes thank you very much
Gave +1 Creative Carma to @tame cape (current: #46 - 41)
Oh i think i did it
i selected the area from one and then the other
And pressed "Layer via copy"
You are welcome.
I just wanted to know if you needed any more help with this.
Good that you've solved it.
👍
Copy your group (ctrl+J) then in layer panel right click>Merge group (Ctrl+E)
There are many different ways to achieve something with photoshop... Only the final result matters😉
Hi i cant seem to be able to download photoshop
Says "Not compatible"
looked into it and my specs match the desired ones so
Are you using Opera?
yea
Try with an other web browser. Opera is not supportedfor Adobe product
ahhh
aight lemme check then
seems to be working thx

was kinda concered abt it
How do i get my tools back i cant even see the layers

Try to press tab key or F key.
you probably have switched in preview mode...
dont work
How do i create a video time line xd cant seem to be able to do it
Neither "F" key or "Tab" key?
Go to: Window>Timeline.
You should have Timeline panel displayed at the bottom of your screen then you'll can choose "Create video Timeline" or "Create Frame animation".
It seems you need:
1x Tab key and
1x menu: Window -> Tools
(Unfortunately your screenshot doesn't show the complete screen, so it's a shot in the dark)

🫣 What did you do?
Is it merged (just one layer)?
its test for my clases
i need to turn this white mass into normal part of picture
So you the shared image is your original and you have to fix it. Am I right?
ye
Create a level adjustment layer on the top, use rectangular marquee tool to make a selection with the exact same shape than lighter area then invert your selection (ctrl+I) and, with the selection active fill the mask with black.
Then in Level properties push the black cursor to the right..

thank you a lot
Gave +1 Creative Carma to @viral palm (current: #9 - 531)

Looks good... Even if you're working with Photopea not Photoshop...
Curves are more powerful than level but can be more tricky to handle...
I see
also

so Photopea is still preеty good replacement
when i try to change the color of a rectangle it appears a white rectangle with a red stripe

It means its transparent
how do i change the color of it
double click that rectangle with the red stripe and then the color map will appear
didnt work]
Are you selecting a color?
yeah
Make sure your Rectangle Tool is set to "Shape" Mode...

thx
Path doesn't produce a shape with Fill or Stroke attributes. Just a Path Object
@ripe quest thank you for the videos makes it easier
Gave +1 Creative Carma to @ripe quest (current: #3 - 2409)
Hi! So i have an adobe account through my school, and I'm trying to download photoshop on my mac. It keeps telling me that my OS is outdated, when my OS is on Sequoia 15.0 (the latest version.) anything is helpful!
this is the message I keep recieving.

Are you using Opera browser?
@low fable : check minimum requirements (maybe the problem isn't your OS)
https://helpx.adobe.com/ca/photoshop/system-requirements.html
Opera isn't supported and the Adobe Website can't properly direct you to the correct Creative Cloud download page.
yes i was! ill try again with google chrome!
I did, every minimum requirement was met
how can i make it normal size instead of small like the second photo i sent


what do you mean
good morning everyone here
can anyone let me know how to do these people hand in straight line ?

is there any website available to get ready all category ""prompts" means "remove, add, color change, etc etc .... for photoshop AI...??
Hi everyone,
I'm looking for someone with good knowledge of this thing,that ik that it's not possible to learn photoshop for beginners for free, but if it's possible, then would you please like to share the youtube links of those masters, who haven't skipped the steps and I will be getting guidance on my doubts on the spot. If you would like to help, please
ping
Thank you!

Why have u sent me this?
transforming and liquifying
Photoshop has a lot of built-in tutorials that take you step by step through many different scenarios. Additionally, there is a lot of text/video based official tutorials.
https://discord.com/channels/547473772727238676/1042633933948465214
https://discord.com/channels/547473772727238676/1061006627806920734
change the size in panel options


It's the proof you can learn for free (answering on behalf of @serene coral sorry)
You can absolutely learn Photoshop for free, and anything that requires paying is mostly because
1-it will cover very niche usage (say medical imaging, that kind of stuff),
or 2- are full on courses with mentoring and feedback from teachers, which cost money.
Apart from that, learning Photoshop within Photoshop is the best way to start out (it really is!)
then you can use Adobe's own videos from their Youtube Channel, in addition to the help files (there is nothing as comprehensive as the help files to understand how it works)
THEN:
you can try the PHLEARN channel on youtube
PixImperfect, PTC (Photoshop training channel)
also on YouTube, but if you're starting out, the learn panel in Photoshop is the best.

Turn the stump wood yellow? - Match the log nearby?
How straight? They're not all the same height 🙂 - It would look silly if they were a perfectly photoshopped line.
I think also it is good to decide about lighting. From where it comes. Than addjust everywhere. On the logs it is form the top and little right. On chain saw you have it form left and top and on stump, from the right and top.


Doesnt matter much, it is just for FB ad.
Just not to be obviously bad.
Hi, please how could I deal with this issue ? "Incorrect document type"

what kind of file are you trying to open?
Sorry, can anyone please give me a hand. - This sends me bonkers every time.
I have a load of 6m images.. here's a sample of 3....

I want to crop them down to 1.2m x 1.8m

I make a simple action.
No 'opens', no 'saves'.
Does your PSD file aside from this still have its changes saved?
Images are flat JPGS
Like when you change another setting or property i mean
And are these images you took or gathered from someplace?
gathered/created by me previously.
um strange.
I just unticked this and tried again. - it's now working 🙂

lol🤣
How large are the files (in MB)?
There wasn't a command called 'open' in the first place, so I don't know what it was trying to override
each image is 500mb
they're bloody 6m across 🙂
Yeah I was gonna say… then try workarounds such as changing the images sizes in another app then export as new images to be worked on thru photoshop. Bc I can’t think of how to do it within PS itself lol
Glad you seem to have figured this out tho
OK.
Then my suggestion with "Load Files Into stack" no longer applies.
😎
Yeah. I'd have dragged them all into a single PSD, cropped it and then exported as layers....
but there are about 400 images, each 500mb each
I ain't creating a 200gb PSB 🙂
you can select all the layers and use 'export as' with ctrl+alt+shift+', have you tried this?
I'd do something like that, if the files were smaller 🙂 - but not when each of the 400 layers is 500mb each. Thanks @serene coral
Gave +1 Creative Carma to @serene coral (current: #6 - 909)
what would you like to export them as then?
the 6m areas are 500mb. - a 1.2 x 1.8m image is much, much smaller.
Either way, I unticked a seemingly pointless box and it's now working as hoped.
anyone know how to make this text style?

this is not exactly the same but here's a video https://youtu.be/T7pG48tLsTg

Here is a tutorial how to make a Gaming styled text for banners! I used it in my recent speedart and I was asked to do a tutorial on the text so here it is, hope you enjoy!
I would like to thank Destopiia for making my 2020 intro, you can check him out here:
https://twitter.com/Destopiia
My AWSOME members!
EditzShoker: https://twitter.com/Edi...
how do I make a similar effect to this, i have a head already and a picture to be put opacity inside the main head

this looks like double exposure but that's not really it. I believe it was made with just masks and opacity
any tutorial on how to do it?
Heres one way . .
https://youtu.be/d-lhr83hEhk?si=O7hlXya5EKJ9QfPh
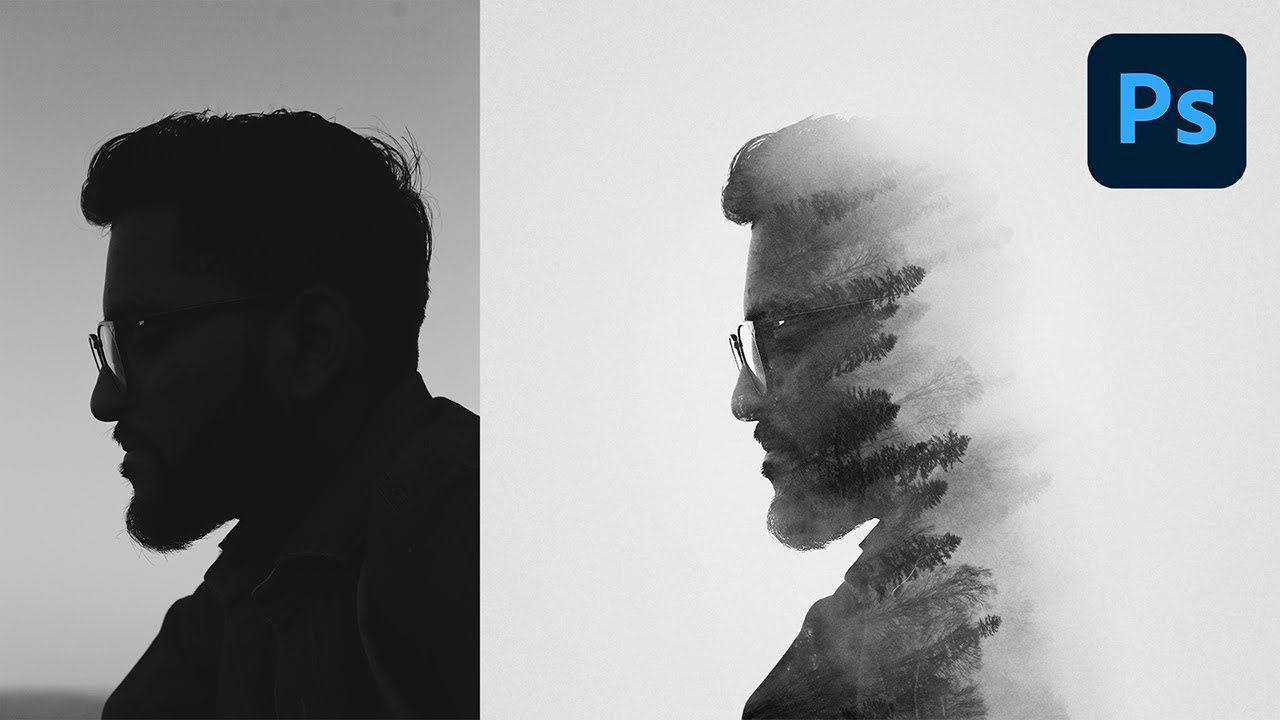
The Easiest Way to Create a Double Exposure Effect in Photoshop! In this tutorial, learn how to use the basics of Masking and Blend Modes to create a simple but elegant double exposure image.
► DOWNLOADS:
- Subject Image: https://www.pexels.com/photo/grayscale-side-view-photo-of-man-in-glasses-3762863/
- Landscape Image: https://www.pexels.co...


How to make Double Exposure in adobe Photoshop
Order Any Graphics Work: http://www.fiverr.com/s2/79d96e6832
Check out these great related Tutorials:
► Double Exposure - https://www.youtube.com/watch?v=8yELE5mwaKs&t=33s
► Facebook Out of Box post design -https://youtu.be/QGugvqLtN40
► Circuler Pixel Stretch Effect- https://youtu.be/z5RkML16C...
anyone know where i can get a free phone mockup

Mockups Design
All kind of devices mockups. For free of course. All mockups you can find here are made in high resolution and are super easy to download.
you can use distribute horizontally button but you'll have to select all the 3 elements
i need a skin design mockup for a phone ( to make a custom phone case)
you mean phone case?
yes, my bad
where can i find symbols and paragraphs?
like how do i get those 4 things on my workspace??

https://www.freepik.com/psd/phone-case-mockup
first google result

Freepik
Find & Download the most popular Phone Case Mockup PSD on Freepik ✓ Free for commercial use ✓ High Quality Images ✓ Made for Creative Projects #freepik #psd
under window tab
Hi, I need to make the image the exact size like the canva. How can I do that? (It will be printed, so I don't want to expand the image and lose the quality)

here?

Gave +1 Creative Carma to @serene coral (current: #6 - 910)
generative expand?
yes, see character  and paragraph
  ?
?
thanks
Anyone know how to make the frame like this? thank you

I'm not sure what this means?
I made a A4 print canva > Then dragged the photo in it > Croptool > Generative expand - And then the blue box came up

I'm having trouble with the Stamp filter in Photoshop. When I apply it, the result looks too thick or bold compared to what I want. I've already tried adjusting the Light/Dark Balance and Smoothness, but it's still not giving me the detailed look I'm aiming for. Any suggestions on how I can refine the filter or make it thinner? I'm using a smart object if that helps.,

can you share the image before stamp filter?

it only works if you expand the canvas. if your canvas is already expanded you'll have to select missing areas and generate one by one side by side
it must be like this but

do you apply any noise together with stamp?
how do i make a new layer?
nope i am doing exactly same thing as the tutorial https://www.youtube.com/watch?v=FmM95gL6ZCc

Step by step guide on how to add the Photocopy Effect to your image in Adobe Photoshop. Easy method for all skill ability!
BLK MARKET COPY SCAN FX:
https://blkmarket.com/product/copyscan/
SOCIALS:
► https://twitter.com/ta4or
► https://www.instagram.com/taylor.ultra/
are you working on a screenshot from this video?
yes
filters from the filter gallery work in different ways, stamp in particular calculates nearby pixels. by having the source image of lower resolution you'll get lower resolution results. if you look closely you can see the author of the tutorial has this image in about 3500x5000px giving them way more detailed result
how do i put a background here?


or ctrl+shift+n
how can i change colour of this ?

Is it possible to make an exact size, then I don't need to drag the canva? It will not let me have the exact size I need, when I use the mouse
color fill layer style
yes, just select parts you want to generate and use generative fill
yooo thanks broo

Gave +1 Creative Carma to @serene coral (current: #6 - 911)
cant find it for some reason( im new and stupid)
sorry, it's called color overlay. you have to double click a layer for this window to pop up

still cant find it and its too complex for me so could i just pay you a 1gbp to change the colour and put it on the phones

Oh okay, I just selected the unfilled background instead of the crop button, thanks!
Gave +1 Creative Carma to @serene coral (current: #6 - 912)
I am trying to get a hand bunched into a light fist with the generative fill... but PS seems to think I'm doing something dirty. 😭 Any idea how to phrase it? It really seems to not like the word fist.
hey, does anyone know if Piximperfect's new course is just a compliation of his free tutorials in a structured way or just a new course with new videos?
please help me 😦
Which bit specifically?
sr i don't get wym
Well here is a bit of the 'frame' of one of the boxes.
thank you very much, it helped me a lot
I finished tastytuts tutorial a couple of days ago and I don't know what to do next I'm kinda scared to take on actual work at least before I do one more project but I don't know where to find a project really
I have this picture and I want to put in that V printed on the t-shirt another picture, the second picture. Can someone help me how I can do this?


how to mask this picture into 3 different comps

i dont rlly understand masks
i need help
1-Selectect the paths in the path panel to make them visible.
2-With selection tool (Black Arrow) select all individual paths you want to merge.
3-Ctrl+C
Switch. To the path into which you want to merge them.
4-Ctrl+V
Yep, this is slightly different than in Illustrator (not a real merge) but blue lines won’t appear on your final art (it’s just a preview of paths)
I see, so if i export > paths to illustrator it will show the pathing that is shown in photoshop in AI? I haven't got it downloaded so I'm unable to check.
Yes, ideally I would like to keep the blue background.
Where? Tattoo'd on his chest?
No, you’ll get two paths but is easier to merge them in illustator. Just select them and use « pathfinder » (shift+ctrl+F9 if not visible)
fantastic, thank you so much franck!
Gave +1 Creative Carma to @viral palm (current: #9 - 532)
You’re welcome!
The 'zoomed in' version would have a giant gap where the little person is blocking the big persons arm/chest.
no,on the V from t shirt
I think you'll be dissapointed by the result?
Is photoshop save to png always slow?
mine is taking 5-6 minutes to save a 30-megapixel png whilst psd or jpg only save in a few seconds
Hey guys, question, how can I make an image look like it is embroided? any texture?
James provided you with a good solution for what you were asking about. Please see: #❓ask-a-question message
I want it to make it look like this (embroidery) so if anyone got any idea contact me please

Ah, I didn't see this. Thank you for your help!
Gave +1 Creative Carma to @ripe quest (current: #3 - 2410)
Thanks, @sly hawk
Gave +1 Creative Carma to @sly hawk (current: #5 - 1010)
I'd like to throw 4 pictures at photoshop and with the lowest amount of effort get a neat and tidy image with each quadrant of the image being one of the 4 pictures. Is there a tool or easy method for this in PS 2020?
They would all be the same size

Png files are bigger than jpg then should take more time to save.
But we talk about few seconds more (depending the speed of the support you’re trying to save on) not minutes. I tried with my computosaur: took me 2 sec more to save a 30Mpx picture to png(26Mb) than jpg 8.6Mb…
Think problem is on your end.
hmm what could be causing the problem?
Tiff saves instantly despite being way larger than png
so problem is likely with png itself in Photoshop
Tiff is uncoompressed format (if I’m not wrong) so quicker.
What is the support you’re trying to save on?
Could you share your export menu with settings used maybe somone here could find a clue?
i save tiff always with zip so it's compressed


on an internal nvme ssd
Any reason why you don’t use Export>Export as…?
I tried to save th same test file with your method and my saving process is as long as yours now (stuck at 76%) :(.
Using « Export as » to save png worth a try.
valid
also the png saved via export is only 10% of the size of that from save
that raises a question if there's lossy compression involved
how do i make letters overlap
Honnestly it’s possible but on my end. Save as version is 22.3Mb Vs 22.8Mb for the Export as… version=>0.5Mb difference for a 22Mb file is a tiny difference but there is a difference…
like this

Be sure « smaller File (8-bit) » option is unchecked in your export preferences.
Try setting up a Guide Layout: https://youtu.be/qeIW1I9P9lI?si=0P3ngpubZ9Bl4_-2
After setting up your grid, you can drop your images into the Canvas. You could use the Frame Tool to crop/position the images to fit into each quadrant.

The Guide Layout feature in Photoshop enables you to quickly create custom grid layouts by specifying rows, columns, gutters, and margins. It simplifies the task of adding guides and assists in the precise alignment of design elements in visual design layouts.
This is a Quick Feature Demo for Photoshop (on the Desktop). The General Release of P...
somone sent a video of it but i cant remember where it is
This was covered as a possible solution the Questions Forum. See: #1288877054745645142 message
tysm
it wasn't and still the 30-megapixel file came out at 4ish MB which is small for even a high quality JPG
How do I go about having the blue square fill the container without extending out? I would use a clipping mask correct?

Clipping Mask or a Layer Mask.
Just once? Not bulk thing?
Didn't multiple people, including myself already explain/show how to do this? EDIT: Oh, you found it 🙂 - Cool
yes i knew someone already had but i couldnt find the message, sorry lol
Yes, thank you!
Gave +1 Creative Carma to @ripe quest (current: #3 - 2411)
I think I demo'd one way to do this a short while ago here: #❓ask-a-question message
You did, but I found trying to match the exact company color code harder on a colored object than it was a white option. Which is why I'm using a solid white container.
Ah. Then you can use the method James showed above and dial in a specific RGB value.
I did that as well but the specific color is coming out completely washed. For example, I applied the clipping mask and added a 122,205,248 RGB color code and this was the result. (Blending Mode: Screen / Opacity: 100%)


I think I'll have to adjust the levels for a while.
You want to make the crate that exact colour? - Use a gradient map then.
@livid otter
I did the same thing on the back of the truck. - That was for you wasn't it?
Did you try setting the Blend Mode to "Color"?
..


nah, colour blend mode alone ain't gonna cut it... - unless you then later play with the brightness below the colour layer
Well, there are a dozen different ways to recolor something. Surely, they can find one that works.

We've shown you a lot of different ways to approach this and its still giving you a migraine? heh
it happens
Bust out the Tylenol and practice your Ps techniques.
👍
I was able to finish this one.

Is there a font in photoshop that has a star symbol like this? ★
Maybe. But you could make one.
How?


Can you explain a little better how you want to blend things? are you talking about these kind of effects?


If so, after creating the mask of the subject you want, apply it to the desired filling and to the subject. Then, you should have 2 layers ("frame" and "fillings"), both witth the same mask. Copy the "frame" layer over everything and change the blend mode to lighten (I recommend checking some material on how each type of layer blending works if you're curious). After that, you can work on the mask at the higher layer to blend it better.
For a better effect, give the background some color that's similar to the one inside. Make sure it's breathable so it does not pull away from the center focus
The problem is in harsh transitions between inside colors.
You can not do that in background, because it is one colored.
If you color it like inside it would not make any sense, as it would not be two parts but it would melt into one.
Try using smudge tool on inside parts, weaken the saturation as well, too many colors in one image is never good, accent important colors, weaken non important colors.
Think outside of the box.
I commented first image.
Second is ok.
Third needs weakening of that blur of background.
Your problem is in harsh transitions.
You can't just have element so sharp and then next pixel blured on 100%.
Many people miss some main things in photography.
- Back parts, as they go further in background they are more like grey, in myst, have less contrast and arent so sharp.
Near objects are sharper.
- You can not just add sunny photo with winter photo.
You would have to fix saturation first.
- Once you fixed saturation you would still have the problem of cold and warm image and color balance or selective color would help to bring one to more warm or cold colors.
- Always work in such a way that your image consist of few important parts.
What I am telling is, if your points are Background, Bike and Text, make them in different groups.
So you can merge the one or another and play with camera raw to get greatness out of it.
- Merge parts with camera raw and again play with new camera raw.
Camera raw (full editting image) is very important tool in photography, many times used alone.
- Some colors just wont look good.
Saturated or sharpy green forest with snow land and winter sky for example.
That does not make sense, because winter green is actually not green, but has weaken green with more blue and cyan on it.
- Having circle of colors to see what oposes what, what melts with what color helps.
I did not memorized it as well, and although its everywhere in PS, I never tried memorizing it and I have that wheel or circle which helps me what colors I need to blend and where I need to get contrast for text usually.
That is basically all photography knowledge in short terms.
No big science, but it still takes practice and feelings to get good results.
I still have hit and miss designs and photos.
Some photos also just will not work together.
Even I said all this, I did not realized the same at beginning.
It just takes practice and all this will make logic once you work, work, work, work and work.
After few years 1 out of 5 photos will be good. 😄
👆Why I tell this is, umm, you have grayscale person exposured with rainbow colors.
No, man, just, no.
Bring that all to cyan like 99,99% people and then at end use camera raw to get this or that color accent. 💪
Your edges of added cloud explosion are black like you have stroke on them.
On mask use -1px to erease it, use soft brush around 20% and soften all edges afterwards.
🤷 Image takes time.
Please use #💬chat-general for requests.
Hi y'all, I got photoshop and i'm trying to install it but it says that I dont meet the minimum requirements when my computer does, what do I do??
Opera isn't supported. Use a supported browser like Edge, Chrome or Firefox.
howdy yall. this is probably an extremely basic question, but i have next to no experience with photoshop lol.
Basically, im making proxies for card games for personal use, but I need to expand the edges of the cards for printing reasons.
What im doing currently is "Select-Modify-Expand" , I choose my pixels, and then make a new layer and then "Alt-Backspace" to paste, combine the two layers, and call it a day.
The only thing is, when i do that, the border is a static color, and its obvious when i finish the printing process.
Im hoping theres a way to expand the border, but make the colors blend correctly.
The Blue arrow is the border of the card, and the red arrow is what it looks like afteer doing the "Select-Modify-Expand".
I appreciate any tips and suggestions. Thank you!


Hi everyone, I need help identifying the cause of a rasterization error bug that seems to only occur in later versions of Photoshop.
My book covers are rendering fine into PDFs in InDesign, but when I try to open the same PDFs in Photoshop, I get transparent hairlines that embed into the actual layer itself.
(Green fill layer applied behind the first layer to showcase the problem.)


In an older version of the program, however, the hairlines aren't appearing.
This was done in Photoshop CS5.1.

I didn't install the programs on my older machine, but all the settings seem to be the same. Does anyone know why the hairlines are actually appearing as transparent lines? Thank you in advance.
Well it's nice you found a solution
That old machine is going to someone else, so I wont be able to use it to fix problems like this forever.
how do I tell photoshop which end of a line to connect the next anchor point to? Right now if I click, it'll create a new point connected to A and I want it to connect to B.

if you select the B point while holding ctrl and use the pen tool to create a new point, will it behave the way you want?
I got on the horn with an Adobe rep. It was technically a bug, but in InDesign.
The boxes were split and aligned perfectly with each other, but the hair lines were generating because of the margins. It may have been 'fixed' because of the lower resolution and DPI on my old machine.
That's what I was about to answer, the hairline might be less than one pixel wide on the old screen and more than 1 pixel wide on the new screen.
Isn't that just a visualisation issue though? Generally these don't print. (Sorry I didn't follow the whole discussion)
ctrl+click seems to disconnect the new anchor point completely. I can then connect that point to A or B, so that's a bit of an improvement, but still not ideal.
I thought so too, but this was in Photoshop, and I had a similar issue with a less obvious fix for another cover I was working on.
I'd exported that cover in PDF/X-4 and opened it in Photoshop. It stopped rasterizing the hairlines at that high of a format. It didn't work for this one, so I got worried. 😅
I think you're on the money, Sandrine. I mentioned that the resolution might be playing tricks when I was talking with the rep.
What you are experiencing is the need to account for the bleed, a thing that is very common if you're using Illustrator or InDesign, but unfortunately Photoshop isn't kitted to do.
Ultimately it's something that you need to prepare for first.
The only way I can see to extend the background is to use either edit>content aware fill or edit>generate image after you've selected the black border area.

you could also try to crop, extend and use the two options there

which are the same but save you the hassle of selecting first.
If the background generated is the same for all cards, then you could make it a specific layer, using the first method (not the crop) and use that new layer as a background for all the other cards (if you have many, that's something that can be turned into an action)
Personnally, and maybe because I'm a bit of a masochist, and provided that I have many to do, I would take the time to create a repeatable pattern from that cloudy texture, and create a new pattern adjustment layer as a background, It's a pain to do make the first one, but then it take seconds to add a new background to all the cards
I managed to do it by selecting the direct selection tool (A key)  , selecting the path (again?) and the with the pen tool
  click on the point you want to continue with
I can't screenshot my cursor but you should see a little -[]- (I think it's a link 🔗 )
The way I do it generally is click esc to remove the starting point (the fully filled square) then use CTRL to switch from the pen tool to the direct selection tool, and click on B to convert it from a idle point to a slected point (empty fill to filled one)

Illustrator has a specific icon for that (It's the pen tool icon with / next to it) but Photoshop doesn't
I think you can see cursors shapes when you record a video (I am testing here and now, in Illustrator, I'll delete if it doesn't work)
Since it works, I am sharing it for photoshop for the OP
Then I click on the top left point, there is no specific icon to resume like there is in Illustrator (Difficult to justify why there is a difference there)
Basically the point needs to be selected first to resume drawing from here, and can only be selected while everything else have been deselected (empty VS filled point)
how do i remove background from a picture?

rn i am using lightroom but how do i use a preset i just downloaded one from a website and i dont know what folder to put it in
Hello I need help to install PS on my desktop but I'm told system incompatible, I watched tutorials and did what is asked but nothing changed! if someone can help me please !

is that on the app or website
Let me guess… Your web browser is Opera? If i’m right, try with a suuprted one (safari,Chrome,…etc) Opera is not supported.
ur the goat
hello, today is my first day in photoshop, how can I add text to an image instead of another word, to make it look like it's exactly from there.. I saw something on youtube but it doesn't work at all..
Edge, Chrome, Firefox... on Windows.
Is it possible to change text that is already on an image, if not could someone help me re do the text myself ontop of the image
u talk with me?
?
doesn't matter
alright
You can "change text" in an image if its editable. If its been flattened, combined with the background, you would have to paint, retouch, clone out those pixels to remove it. The difficulty of that depends on the image and your skill level.
Its uneditable but im just having an issue with curving it
It difficult for us to help you if we can't see what you're working with.
Too lazy to list them all😉… I’m on my phone.
How can i modify the name? from girgore to emil to looks little bit real? i m watchinb on youtube but i don't understand..it's my first day in photoshop, it's hard to do that in first day?

And yet you were able to type this response. heh
Find the font or at least the most similiar to it ... delete grigore put your name then some effects to "blend" it in
You'll need to remove that text. Probably by painting over it with white. Then you'd have to use text on a path to add the new text in its place.
But if its your 1st time with PS try something easier, learn how Photoshop works a then u'll be able to do it with no problems
i understand you, but for me that will take 10hours.. :))
What sort of document is this? We can't help you with forgery.
just about with one test for 11 class :))
Are you asking how to forge a document?
Start with some Photoshop Basics first
Yeah. Start by learning the app before you move on to cheating on tests and forgery. heh
okk...thanks a lot 🙂
yo guys, i need your help
i have a couple of images of old book maden by phone

and i wanna make a book with this images
how can i make this
it should have two pages at one A4 format paper
Use the object selection tool, select the part of the image you want to be removed, if you want to select multiple times hold shift and select so that you can add more to the selection. After that just press backspace or delete button.
Same to you broski, use the object selection tool and select the camo texture, hold shift to select more, and then backspace or delete button to remove it. After removing it will show as transparent. If you want to save it as a transparent file without the camo then save it as .PNG if you want to save it as just white instead then just save it as .JPEG
Hope it helps
you mean add text to an image that ALREADY has a word in it? what do you mean by "another word" exactly?
meaning one page should have 2 pages? like divided in the middle
vertically divided
But i need it like original, with all parts, fabric, not just transperent spot
