#❓ask-a-question
1 messages · Page 59 of 1
usually it's at.everyone in channel that you hid
like i have some pings over here in annouce channels
Well the thing is it didn't show up in other channels or any channels. Except said they were in this server 😅
But yeah
Discord mobile is way glitchier than desktop
Sorry, thought you had replied then deleted your message
I mean that was my first thought for the ghost pings
Nope. I did not reply and delete.
No. This is the proper place for questions.
You'll have to wait for someone to reply who might know the answer.
My skill at ps is limited. Gotcha. So context. Someone had shared a modified texture map which they shared on a public forum, but never told the process on how to get it like that. So I had been trying to recreate/modify the map the way they did.
That person hasn't been online so I can't ask them either. 😭
I'm in the middle of something. I don't have time to offer any support at the moment. Sorry, folks.
That's cool. I was just giving context to my question/query
why is this popping up? The file is a .png file

Apparently, Photoshop's import filter doesn't think so. The file could be corrupted or the file could have an incorrect file extension.
does anyone know how to make this thing on my collar?


Create a flat rectangular pattern. Merge the parts together and then "bend it" with a Transform operation. Edit > Transform > Warp...
uhh
emm
Perhaps you'd benefit from doing the tutorials that Adobe provides with Photoshop. Help > Hands-on Tutorials...
oh i just dont quite get the "create a flat rectangular pattern" 😭
but will look some up
Draw rectangles in a long row. Merge them together. Then bend the thing with a Warp operation.
oh oka
is there any other way to do it? or no
Locate a similar image/texture via Stock Imagery assets online or generate a similar texture using Photoshop/Firefly and use that. I think just making your own would be faster and easier.
Oh yeah it just doesnt quite look how i wanted it
Welcome to the world of computer graphics and design. Creative problem solving is the nature of this work.

I want to achive something like that but when i wrap it i dont quite get it
Maybe i'm doing something wrong😅
also where does dis thing come from? 😭
The Reference Point is shown when you Transform something. Edit > Transform...
oh oka
I know "OK" and "okay" but what is "oka"?
same thing
How can I edit it to make it look like the jersey is on her.
Here is the og pics to show


Hello! I'm having trouble generating a PDF that requires e-signatures to send to my photography clients using Acrobat. Would anyone here be able to be of assistance? Please and thank you 🙂
This is about Premiere Pro wondering if someone can help. My text keyframes when it comes to the postion isnt working.

Does anyone know a similar font?

I am trying to create a form in photoshop, how can I create a straight line from one point to another?


Like this
If you want to join two already existing points , like in you're scenario, all you have to do is click on one, and then on the other (no dragging between the two)
it's the same when you want to draw a line from scratch, just click to place the point, and then the other
You can also draw a curved line and turn one point or all into straight lines.
In that case click on each point with this tool (convert point tool) or hold alt/opt while you're on the pen tool to switch between one tool and the other

You can find everything you need here
https://helpx.adobe.com/uk/photoshop/using/editing-paths.html
Can anyone help with this?
It's difficult to answer without downloading the .psd, and I am not willing to download a random file (and I suspect that's the case of about anyone here)
Can you share a screenshot of the image and your specific issue?
Sorry, Ignore me on that, I should have scrolled up higher
@fluid wasp what have you done so far to get to the result you've shared?
Well I noticed people sharing PSD files in the project feedback or mods sharing stuff here. And I did ask about that as well. If there's any other format I can share in I can otherwise all I can show is my settings of what I had done and share the images that in trying to modify. Screenshots are up in the post.
Sorry, I am working on other stuff and I can't really look at .psd files now, however I can help with workflows on the top of my head.
Just as an aside: Mods are just that: mods, we are there to make sure nobody gets spammed or insulted and everything runs smoothly. I happen to also be a regular contributor, but I was before I was made a mod. Everyone can help others, this is actually highly encouraged.
From what I can see I would say onviously invert the image and then run a curves adjustment layer (or curves on an alpha channel) but I suppose you've already done that
That's fair. I'm not sure if I'm looking for workflow as I've tried all stuff that I can. I shared the context of my query here. I'm trying to replicate someone else's stuff. So I have an original file, and a modified file. Since the person is offline I can't specifically ask the actual values or stuff done to it. I've done what I could and asked here if someone could improve upon my trials.
One way to check numbers would be the scatter a few samplers on the target image and place the same in the same areas in the original and get the to match with the method of your choice

see how it looks paired with the info panel

Yep. I'm only looking for improvements if someone could get the results closer than what I got them to be like.
OK, so at this point you're more looking for someone to finish off the work for you than ways to do it yourself?
That helped but I'm not sure what it is. There's a slight difference or I'm not sure if it's a mask. There's something else going on besides color inversion and/or curves/levels. That's what I'm unable to pinpoint.
To be exact, yes. Idk finish is the right word since if no one else I'll have to sustain with the results I got. But yeah
There is a possibility that what appears to a be a grey scale image is not exactly grey: What do the numbers say?
As in, you should have 3 times the same numbers if that was ggrey, maybe the original isn't grey and you made it grayscle?
Just throwing things and see what's stick there
If that's the case that the image isn't really grayscale you'll need to work on the individual channels and correct each channle to match (again you can do that with the numbers in the imfo panel)
From what I see roughly on the examples I am seeing
The background is way lighter on the right
The tone gradation is steeper in your original, meaning that there is probably more contrast in the original than your target
you can see it around the "mouth", the right side as a smoother gradation from darker grey to lighter grey and eventually white on the mouth, but the original is in fact more abrupt, there are less steps in the gradient from dark to light
So typically, for this particular area you'd need to increase the contrast (basically lighten the lights and darken the darks)

see how the extreme aren't on the far right and far left anymore
It looks like you will have to make targetted corrections, with either masks or vector masks
and apply levels and/or curves only on specific areas of the file
If you really want to check what is different from one image to the other do this:
Do you want me to send the image so you can analyze that? The original image is indeed greyscale but the person who modified it, switched the profile to RGB. It wasn't edited from PS but Gimp so the conversion probably happened from there. Okay lemme try my edits on after I remove the color channels.
place the two image neatly on top of the other, be really careful it's well aligned
Change the top one to the "diffrence" blending mode
Evereything that matches exactly will be plain black
so that the areas you will be happy with

I took an image randomly, I just adjusted the levels very slightly on the top one. The "difference" blending mode revealed the areas of change (the middle) and the surrounding being black, we can safely say it's matching the original (the botton layer)
Okay, so the original is definitely greyscale, the modified seems to have RGB channels, but even if I greyscale, there doesn't seem to be any visible changes. If I turn the channels off, then there's quite a difference. Anyways. I've already tried that. Masks was my assumption but I don't think it's mask(s) that's being used.
here is when I only displlay the original

There are so many ways to achieve the same thing in Photoshop that we could be circling round for method, while I can get that the result is all that counts here
However, if it's truly grayscale everywhere, then you could go to image>mode>grayscale and you could see if it's now easier to correct once you don't have those persky channels to work with

because after all, if all is grey, you don't need the colour information

That's being a problem
Let's say if I have the color channels, putting it to greyscale doesn't do anything or give any visible changes. But disabling the color channels definitely having an effect.
all you see now is the blue channel, you don't see the others (you would have to select RGB to see the whole thing)
How can I export an image after I disable the other channels
Of course it has, the grey is the result of the mixing of all the channels
like you would mix an equal amount of red, blue and green paint to obtain grey. If you forget to mix the green, you'll get you won't get grey, you'll get purple
That the "purple" isn't displayed for some reason is not the issue. the issue is that the grreen info is missing from your mix
that's why I am telling you to turn it into grayscale, so you are genuinely buying grey paint, already mixed from the shop, instead of having to mix it yourself
Can I export an image's individual channels as a png?
If you're 100% sure no masks were used, then that means you have access to the person who made it first and in that case, I would ask them directly
Yes you can, bear with me I need to rememeber how to do it
it's been months and the person has been offline since, so no dice there.
Silly me: with calculations!
https://community.adobe.com/t5/photoshop-ecosystem-discussions/saving-channels-to-png/td-p/10107745
now, you can try and acquaint yourself with calculations on a deeper leevl as it's a good way to MAYBE obtain the result you need
https://community.adobe.com
How do I save RGB specific channels as a png? Whenever I try to save the image with channels disabled the file saves with all channels enabled. If I switch from RGB I lose the option to save as a png.
You can also try the channel mixer
Fair, I guess I was wrong on the concept of what grey is. But, if I have an image that's already in greyscale, if I copy paste another image into that, wouldn't that turn the pasted image's data to greyscale too?


No necessarily if the documant is in RGB (I can see the file is in RGB in your screenshot)
it would if the document mode was in grayscale
Grey is just an equal mix of the R, G, and B nothing more. If your numbers look like 128/128/128 or 36/36/36 then it's grey
If they look different, it's not grey
even by 1 unit
if you convert your file into grayscale instead of having 3 channels to mix, you'll get one channel made up of X shades of black and white (eg: 128 shades in one channel)
RGB 8 bits is 128 shades in 3 channels
You can do the math for CMYK 8 bits (4 channels) and for 16 and 32 bits
If those files contain an Alpha channel (a transparency which what most games assets will be using) then you can add that extra channel to the computation.
More on the calculation menu
https://helpx.adobe.com/uk/photoshop/using/channel-calculations.html
If in difference mode the entire image is black, that means its identical right?
Yes. Just be careful as sometimes it's only maginally different, and difficult to see, particularly if your screen is not good, or not calibrated. As always believe the numbers
but if you are sure it's 100% black then all good
Yeah it's 100% black, and yeah that was it. The numbers barely have a 1% of difference in one or two places out of the 8 I placed randomly.
So that's it, it was basically just removing the channels
So that means you're on the right track. Test in other areas just in case. Just drag your smapling points with the mouse if you are running out
Good you got there in the end!
Worth a read, if you want to understand what all that means
https://en.wikipedia.org/wiki/Channel_(digital_image)
Color digital images are made of pixels, and pixels are made of combinations of primary colors represented by a series of code. A channel in this context is the grayscale image of the same size as a color image, made of just one of these primary colors. For instance, an image from a standard digital camera will have a red, green and blue channel...
Oh nvm false alarm I had the same layers on 😅
Damn!
Anyhow, I really need to get back to work now 🙂
I'll leave you with all the links I shared, hoping it will help eventually!
Bye! 👋
I'll just wait for a few days and someone else. I don't think I have enough know how to get this but thanks for the help.
anyone know why when i try and acess blending menus on a lyer photoshop beta automaticly goes to the hand tool. and i have to press escape to get out but then it just goes back to default move tool . basicly i can(t acess blending mode menu because photoshop switches to hand tool
I cannot reproduce this bug. Try updating the app... or uninstalling and reinstalling the Beta.
@proven tinsel - Please do not DM people your questions. You can ask general Photoshop questions here. If someone knows the answer and has time to help, they will probably reply.
Does anyone know how to make these lines?

heres my image with a transparent background, when I import this into uefn it does this... apparently its something to do with the alpha channel not working
how do i fix this??


its like everything is just merging together
What I can do if I lost the ICC file after importing pictures from Camera Raw to Photoshop? 🙂
Hello to you. Small question. Is there a way to remove all small pixels with an opacity of less than 100? Because I have a lot to delete but one by one it's impossible thank you

How can I edit a mask with a single-pixel pencil? I only see brushes.

how do I make the distance between 2 objects even, I want to make the objects on the bottom border and top border the same but I don't have an idea how to do it
those rectangle 1 copy 6 and rectangle copy 4

Maybe smart guides can help u
You can use the alignment tools at the top of your screen 🙂
You use the pencil tool OUTSIDE of that mask edit window you're in.
Best way is to make a threshold adjustment
I don't think it's a photoshop issue. - I'd ask on the uefn forums/reddit
Hello there. I am looking for little help? Trying to send an application for new job and need to edit my photo.
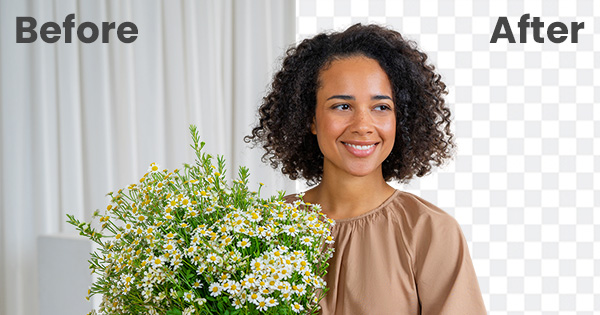
The photographer was a newbie and did a poor job, leaving outlines on my photo, can any one help me fix it please??

and around my head, face
is it possible to fix this?? please help
It depends on how much you're zooming in by. - Can you share the whole image? - DM it if you prefer 🙂 @unborn kiln
sent DM
(sorted!)
somehow it didnt work T_T idk if its bugging or maybe i was on the correct place XD
never knew that but thanks letme try and learn it!
Gave +1 Creative Carma to @thick tangle (current: #170 - 9)
Extra steps....
@sly hawk saved the day. Thank you very much. Much respect for helping me.
Gave +1 Creative Carma to @sly hawk (current: #5 - 918)
Np if u still have problems with it u can show rulers I think its called a then wheel click + hold and then drag .... it Will put on ur artboard some guidelines by ur own "preferences"
I want the size of my brush to be constant, so I want to turn of the pen pressure for that.
I see toggle icons for opacity and flow and then an additional icon on the right that says it's for pen pressure size, but nothing changes, no matter if disabled or enabled. What can I do?

Can you check the settings of your specific brush and post a screenshot?
F5, brush settings tab

I would say it's drawn over with a vector based software like Illustrator.
You can try with a posterise effect in Photoshop (image>adjustment>posterise and choose a reduced number of colours) but you won't have that drawing quality you have here
So yes, my take is it's drawn by hand over the actual artwork
Hi, the guy doing our usual graphic is having surgery so im filling in, im trying to resize a batch of pngs, which is usually fine. If they are the same size. Using the action tool to record the resize. But these are images of products im trying to resize to a certain size while keeping the proportions. I know he does these in batches somehow but i cant seem to figure it out
did you make sure your constrain proportions was checked?
and are you able to even produce an action or do you need assistance with that
yeah but the problem is i want all the images in 368 x 204, but not all of them are the same size and proportions, doing it manually would be fine since i could create an empty layer and then just transform the image to fit
i think i get how to do the action
its just a bunch of sushi products so in reality they are kind of the same size already but for whatever reason the original sizes are not all the same
like these for example


so basically i just need for it to register the white space and change that to the right format iguess
ok you just will have to add in another step,
after resizing image to your wanted dimensions along with the constrained proportions. The add a new layer, fill with white, image > canvas resize, use the anchor point at the centered inage
image
this should take care of the any differences in certain sizing and make sure there is uniform sizing @celest nest
ahh okay ill try that out, thanks a bunch
yea np, lemme know if it works for you
Do i select the white fill for the canvas resize?
hello when i use the eraser it dosent delete what behind it paint
how can i change that plz ?

You need to unlock the layer... go to Layers Panel and click on 'Lock icon' on Background Layer to unlock.
thx i forgot that
Gave +1 Creative Carma to @shadow ridge (current: #888 - 1)
how to get more ctrl+z's? PS gives only 2 now for some reason wtf
Preferences→Performance (Edit→Preferences→Performance on a PC).
history states field willl be what u arre looking for

ok, history states should be ur number of undps
undos
try bringing up history from under windows, if you click on a previous state does it take you back at least
where can i find historystates

Is there a way to place image to fit a selection? blinking on it

there I go. thanks
Gave +1 Creative Carma to @ionic spoke (current: #339 - 4)
@stoic gyro welcome
Is it possible to make artwork spread across multiple artboards and not be bound to a single one? like you can do in illustrator
I try to install Photoshop. I only have Macbook pro 1,4 mhz processor. What shall I do?
smart objects is really only way
1.2GHz quad-core Intel Core i7?
I found the size jitter there, that was described in help forums I googled earlier. Turning it off solved my problem. I just couldn't find the menu but with the F5 key, you helped me a lot so thanks 😄
Gave +1 Creative Carma to @vapid flume (current: #8 - 641)
What shall I do??
what do you mean? Does it install, is there an error message?
Yes, New photoshop uses 2 ghz processor.
i see, looking at these new requirements online
But I have used very old computors earlier to photoshop. And 2020 would work, but where can I find the install file?
@granite sleet

I managed to run PS on macbook pro 2015 with i5 (2 cores)
Thankyou! Is it possible to install the old files?
that's what that will do
Thankyou very much! I will try that! 😃
i have this layer
and i want to change into this color
i want to make that red color into blue

sorry
it's ok, just use your quick select tool and select the 5, and fill it with ur blue


or adjust with a layer adjustment
how can i do that
im novice in photoshop

u may be on the wrong layer
well i can't see what your layers are so i have no way to know
no you will be able to select it
Hello, can someone help me? I want to make this fireworks to be as the first photo, but the problem is that I cant because they have like a grey thing arround


This are the fireworks
I would advise against modifying IDs, or any other forgery/manipulation
change blending
🙂
@river otter
How
I have these simple layer style effects that don't work when migrated over to the group folder but work on the layer below itself
the layer below is set to 0% opacity & the group to passthrough

Oh no, I closed the app with the file and didnt save it
it may be able to be recovered
@ionic spoke when i select layer adjusment and solid color it s turning all blue everything
Again, I am sorry if I did not make myself clear. I can not help you with illegal usage
it s not illegal usage
i just wana change some numbers
here you mean?

That would be trying to modify a government issued document/ID, not something I can help you with
Actually, it is
yes
There doesnt work
there is a grey thing
arround the firework

see?
yes one sec
you can try with blending


I mean

I need it with stroke
this destroys some of the image though
like this photo
which photo

Yea

if you were just trying to add a stroke to the one i sent before that's not going to work
Idk why it doesnt looks as the same
there's some leftover pixels from that gradient
probably it would be easier to recreate whole thing
or creating mask by hand
but this will take a lot of time as well
and still there would be some leftovers
as you have a lot of gradients
You could use a threshold adjustment as part of the masking to fix it.
It is one of my favourite keyboard shortcuts 🙂
Glad I was able to help!
How can I add a slight shadow behind the text like on the screenshot in photoshop?

Double-click on the Layer Thumbnail (in the Layers Panel) to open the Layer Styles window. Click on Drop Shadow and edit it for the desired effect.
Im tryna figure out some graphic idea for this picture, but im so lost. Any tips?

Did you manipulate this to its current state? Did you desaturate it and apply the colors to the cars?
Now u talkin to advanced
I removed all the colors except for the cars
Who made this image?
Me
OK. So apparently you had some reason to do that. What was it?
I still have another copy with all the colors, but i made this cus i just thought it would look cool. And even cooler for some kind of graphic design.
OK. So Red, yellow and blue are considered primary colors. Perhaps you can come up with some idea that centers around things that are "primary" or primary colors. Primary colors, primary sources, primary modes of transport, etc.
Some pun, idiom, play on words that might match the design.
You did give me an idea do
Super. Do it up! When you get a design cooking, post in #📝project-feedback
Gave +1 Creative Carma to @sly hawk (current: #5 - 919)
im able to use photoshop cos i have it with my college
but im assuming theyll cancel my license soon as ive finisehd the course
where can isee how long my account is up until?
If it doesn't show up on your Account page (https://account.adobe.com) then you'll need to ask the plan administrator at your school. If you don't know who that is, I suppose you'd have to contact Adobe Customer Care.
Manage your Adobe Account profile, password, security options, product and service subscriptions, privacy settings, and communication preferences.
@ripe quest Turned out okay, but do you know how to change the colors of the red lines?

Its 3 seperate layers
Put the Layers in a Group. Hold Shift and click on them in the Layer Panel and choose "New Group from Layers..."
Then use an Adjustment Layer on the Group.
Main menu: Layer > New Adjustment Layer > Hue/Saturation...
That will allow you to shift the color. However, it will be affecting everything so, right-click on the Adjustment Layer and choose "Create Clipping Mask"
That's probably how I would do it. :)
Not gonna lie, i had a hard time understanding that
If you're trying to change the color of each. Skip the part about the Group and just use the Adjustment Layer on each one.
Perhaps you'd benefit from doing the tutorials that Adobe ships with Photoshop.
You want to make the lines red, yellow and blue? Is that the goal?
Can anyone tell me why my photoshop has errors in the image and silhouette of the water boy when I zoom in?

"Errors?" - Choose a different Blend Mode or use a Layer Mask to remove those pixels from view.
Does it show up when you look at it the image at 100% or when you export the image?
View > 100%

Does it show up when you look at it the image at 100% or when you export the image? Main menu: View > 100%
100% is ok, but when zooming in and exporting png or jpeg files, the error still occurs
Also, this looks like an older version of Photoshop.
But it could be a GPU issue. Main menu: Help > GPU Compatibility...
is photoshop 2020
Good at what part?
I said, check: Main menu: Help > GPU Compatibility...

Yeah. Its too old and that feature isn't available in that old version.
Update Photoshop.
Does the device lag more when updating?
Configuration i7 th8 card 630 and p1000-32gb ram
System Requirements for Photoshop on the Desktop: https://helpx.adobe.com/photoshop/system-requirements.html
Thanks I found a fix


hey anyone can teach me how to mess with photoshop to get better
In what way?
trying to make better font pop out how to put pictures on a mock up and make it look nice and pop if that makes sense
^
do you mean extruded?
Unsure,
well so am i… @half ruin
if you could provide a reference or inspiration that would help a lot
Looks a little something like this

Like urm.
ugh idk the word for it
Movement lines
Like this
just use a round brush and erase while holding shift
@half ruin
that will make ur lines straight
i mean this would be easily done in illustrator too
I'm still confused.
On the video is says to select the back of the letter, and it should turn into a path but that is not working for me
Dispersion
that's it
That is what It's called
Please tell me where to post photos for people to comment on
i wanna remove the background of an image but i wanna keep an object inside the background in it. How do i do that? it keeps removing that object from it when using remove background.
So you want to remove the background but keep part of the background/
Use the quick selection tool on the area you want to keep and click layer mask
yes i just thought of it after i sent that message, ill try it out now but thanks anyways 😄
Gave +1 Creative Carma to @half ruin (current: #423 - 3)
How to you use brushes that got added into your personal library? I'm not seeing an option to install them or download the abr but they don't show up in PS
it worked thanks
No worries!
Double click the abr file and check your brushes. It should show 😄
Problem is that there is no abr file 😔
The page for the brushes did mention it, but when I clicked the button to add it they just showed up in my personal library with no option to do anything with them


Idk if I'm supposed to wait for them to appear in PS or something
I tried to but like I said, there's no download option. Only copying or deleting them from my CC library
Here's the link to the brushes if it helps
https://creativecloud.adobe.com/cc/discover/article/free-grunge-and-dust-brushes-for-photoshop?locale=en
Access Adobe Creative Cloud apps, services, file management, and more. Sign in to start creating.
I am not familliar with this system. Standby and see if anybody else is available. Apologies!
If you added brushes to your Library, open up that Panel. Window > Libraries...
Here are some brushes that I added to my Library...

I can use them here on the Desktop or on my iPad.
I just added that Grunge Brush Pack. If they don't sync automagically, you can force a sync by pressing the cloud icon on the bottom of the panel...

Thank you! That worked. Sorry for not responding immediately.
Gave +1 Creative Carma to @ripe quest (current: #3 - 2076)
It is a bit weird that they don't get added to the Brushes Panel immediately but they are still editable via Brush Settings. You can make changes and save the Brush and tool settings as a new preset.

The Library just gives you the freedom/ease of moving them around if you have other devices or whatever.
Are brushes added this way only accessible through the library menu or can they be added to normal brush groups?
They come in with their own settings. If you want them in the Brushes panel, you'd have to Save your own new preset.
See "Test" above? I saved a new preset using one of the Grunge Grush Brushes...
Grunge Grush Brushes... that's a tongue twister. The artist did that on purpose! :D
My pencil is always painting neighbouring pixels, how can i turn that off?

My feathering is at 0.1
You're using a selection. Just zoom in and paint on a pixel.
Don't do that.
Anyone know how to create a font in ps? Is it possible?
I need the selection to be green, I cannot paint pixel by pixel, it's too much and I need every pixel to have exactly one of the shown colours, no mixes
Also, uncheck "anti-aliasing."
Feathering and anti-aliasing is going to attempt to soften the edges. See the difference?

You probably wouldn't do that. You'd create each glyph as vector shapes. Its a whole process. Search Google about it.
Ah okay.
I mean, I suppose you could design them in Photoshop and use its vector tools but Adobe Illustrator would be much better for that job.
I see it in selection mode but not when I have my brush selected
ah, no I see it with the fill tool
Yeah. Because those options are for the Selection Tools. Not the Pencil. The Pencil has its own options.
And the Pencil isn't a brush.
Not like the Brush Tool anyways.
Geez this is insane, I'm spending 4 hours on colouring some properly ._.

So could you give me a tip, I have pixel where the different colours interfere but I need each pixel to be exactly one colour only
It serves as ID map in Substance Painter

You see those white dots on the armour, I want to get rid of them
Nope. Can't see any white dots 😭
I already did. If you're going to make selections, stop using feathering and anti-aliasing.
Or at least anti-aliasing.
can someone teach me the basics to make a mockup with pictures and cool tect that pops out
Sure.
So the first thing you want is to get a logo ready and a plain sweatshirt.
Got it?
its for a mylar bag
Get a photo of a mylar bag and the logo you want on it then.
I have no feathering and no antiliasing, it still paints over the selection. But it is surely my fault, having the need to paint a selection in a certain colour is quite an advanced task.
I'm gonna try with paint but thanks anyway ^-^
can someone tell me how to make the edges of a box like this in photoshop


how would i properly change the color on this helmet to be like the jersey

my biggest problem is that the helmets reflectiveness makes it look odd
had this problem for a long time
i get weird looking things like this

can someone possibly help me edit a pictures bluriness/sharpness
i need to edit a picture for my family's babyshop but i've forgotten all my photoshop knowledge from school lol
i can try to help
do u got any idea how to fix my problem?
great, ill share the picture 1 second
share in dms
maybe its just the metal look to it im not sure
id try out more of a matte color to match the jersey
how can i make the backround of this windscreen black?

So uh continuing on my previous question I kinda figured out what was done, except there's some slightly weird artefacts on the image which I'm not sure about why
The left image is what the person had modified, and the right one is what I did. It's basically a inversion and a level layer which got me that result. Aside from the artefacts and a very, very, slight difference in the brightness it's exactly the same.


These are the images by the way. The artefacts/jaggedness appears in mine only.


Context, I wanted to edit the original to by like what the other person had modifed to be like.
Hello guys, I'm a total beginner to photoshop and I'm trying to achieve a result like this

and the image i'm working with this is

other from the black and white, how should I blend it with the background so that I can get a similar result?
this is for a tshirt design
There's a new Adjustment Brush tool to make quick work of changing a color. Terry White gives a quick tutorial on five tools here; this one is the last tool he demos.
https://www.youtube.com/live/pPAykSvNw5c?si=U_kz_h8qzUhuHeAQ

Watch as Terry White shows off 5 Photoshop Tools and Techniques that every Photoshop user should know.Follow Terry on Social and check out his portfolio here...
The first design (the angel) seems to be blending into a hoodie, is that the result you want to achieve?
you cant come directly into photoshop as a beginner and say, Yes, i have to do this and want to know how to do it." First, learn the basics
Yes, ask away 🙂
ok so basically, I wanna add some rain effects, and for now, the only thing its doing is this, when I write "add rain effects" :


It depends what you have at the start, if you have a background, you need to remove that background (either by phusically deleting it , or by masking it, the latter being always recommended) and then save it in a file format that accepts transparency (ONG, .PSD, .TIFF etc, not JPEG)
Do you want to remove the background on that one?
wanna remove the background here

Try "rain overlay" (not sure it'll work) The issue is that gen fill will try to invent a new image instead of adding to the image. So you need somewhat to indicate it's an overlay on the initial image instead of a new image.
Personnaly I would find some rain overlay (Rain on black background) place it on top, and change the blending mode to "screen"
https://stock.adobe.com/uk/search/free?filters[content_type%3Aphoto]=1&filters[content_type%3Aillustration]=1&filters[content_type%3Azip_vector]=1&filters[content_type%3Avideo]=0&filters[content_type%3Atemplate]=0&filters[content_type%3A3d]=0&filters[content_type%3Aaudio]=0&filters[include_stock_enterprise]=0&filters[is_editorial]=0&filters[free_collection]=1&filters[content_type%3Aimage]=1&k=rain+overlay&order=relevance&safe_search=1&limit=100&search_page=1&search_type=pagination&load_type=page&get_facets=1&asset_id=232941873
See this one, not likely what you are looking for, but try to search one similar and see if it's easier than trying to generate one)
its transparent on google, not sure why it gets a black background in photoshop

What file format is it when you open it? Can you screenshot the whole Photoshop window? (with layer panel and all)

open what? the squid image? i copy pasted it into photoshop
Do i need to download it as png?
Any file format that accept transparencies. PNG is one. Jpeg is not one
If you save this file. Click file insert embedded and select this. It should be transparent.
Great! 🙌
hey, i've got a super annoying idk, bug?
Explain please 😄
Do you know how I can save the whole image?
my layers simply disappear when exporting, even if i do alt+ctrl+shift+e
im working on cmyk because its meant to be print so maybe thats the issue
ty, i'll ckeck that !
How are you exporting? If you want your layers you should be "save" or "save as"
If you export - say - in PNG or Jpeg, they don't retain the layers. You need a file format that accept layers (.PSD or .Tiff)
But maybe I misunderstood, just let me know what you are doing step by step and what is your desired outcome
Once everything is in place, go to file>save> and choose .PSD as your file format if you want to keep the layers
Any other file format except for .tiff will delete your layers and flatten everything
i'm doing some screenshots so i can explain it better, give me a moment
OK
first one is finished project, second one is the same but with merged all visible layers


the colors are changing and some layers are gone
and that happens after exporting to tiff, jpg, png and pdf
Was the project created in CMYK, or did you convert it afterwards?
created
text on the character disappears, its a rasterized text with some mixing settings
also every other layer which has custom mixing options is looking bleached and different
it looks like ps is ignoring it when merging everything or exporting
That PS ignores blending when merging, that's normal. But not when exporting.
Does it does that when you save as a PSD? If not, let me know which settings you have for say - TIFF, and also PNG
Forget exporting for now, use save as instead
it works fine when saving as psd
PSD 🔛 🔝
when i "export as" - color space settings don't change anything and its like that for every file type
ctrl+alt+shift+s also has that issue
and ctrl+p also
Exporting always change the image settings. THat's I (and many others) only reserve exporting for a quick save for social media
Don't use export as to deliver files for printing...
You should be good if you "save as" as a PDF for example. or a TIFF
too bad that its an university assignment and i have to provide a pdf file for the "college credit"
What is your printer asking in terms of specs?
A particular colour profile? what will be the printing technique? (off set?)
What happens if you save as PDF then?
if it's going wrong, what are your PDF settings? (They are quite technical generally and you need to double check everything)


Basically you need to check that those settings match what you want your PDF to look like
If it needs to be printed, the printer will give you all the settings they need. Sometimes just "PDF-X1" but you'll have to double check if the rest of the settings are OK too

Don't print to PDF! Save as a PDF
file > save as
Print as PDF will use your printer settings for the PDF, not Photoshop's
ohh
Try with a standard setting such as PDF 1.4 for now and if it goes well, ask your printer (the guy who prints your stuff not the machine!) what they want
If you print at home (or at university) from the PDF, you'll need to load your printer colour profile into your PSD file by going to "convert to profile"
Colour profile are set by the company (say Epson) for a ink/paper combo and try to ensure colour matching between screen and paper (It never goes 100% to plan though) Paper limitations
If you don't need to submit a printed poster and/or colour accuracy between print and screen is not a concern, then ignore that last step
it still gets rid of that text layer no matter the settings, i think the problem is about the layer mixing because im using "mix if grey" there
i saw somewhere on reddit that it might be a little problematic when using that
It could be possible. the blend if, and blending modes can affect it

Try this, just in case
ALT click on the eye of the layer that causes issues (the text layer) Now, only this one is displayed.
Then go CTRL+SHIFT +E , so you'll get a flat layer of just that one. (create a new layer first)
Now you need to hide the original layer and make all the others visible.
It should give you a flat layer with the effect, without having the effect applied, if that makes sense. If that doesn't work, you'll probbaly need to recreate the effect using another method
it doesn't work because the color of that layer is affected by the layers underneath it
yeah i will try to just recreate it
thanks for your help
Try to merge all those affected instead of just that one? Maybe that will help?
i never saw that you can save as pdf, i always used ctrl+p to do that haha
Everyday is a learning day 🙂
can someone help me edit text on photoshop
lookin for some feedback
If you'd like comments/suggestions, please post in the #📝project-feedback channel
oh sorry
What type of help do you need? You want to learn how to do something with Photoshop? Or you want someone to make something for you?
How can I remove the dark outlined shadows from here? If blend isnt giving a soft "glow" effect , i mean it does, but its not that soft

Hey I need help I have overlayed a picture on my iPhone and I don’t know how to make the picture brighter again? Could someone pls explain to me how to make it brighter again

Probably going to be difficult. You might have to rebuild them.
wrong image sorry, heres the original pic

I would but, theres a bunch of complicated colour combinations
I thought there would be a shortcut
On your phone? This server/channel is for questions related to using Photoshop.
that photoshop would have
Yes it is on photoshop
any ideas to get started? like removing shadows or making them less visible?
What "Photoshop" are you using on iPhone?
Adobe photoshop express
@bleak cedar - Please don't post the same question in multiple channels. You've already posted in #💬chat-general. You'll have to wait to see if anyone is interested in working on your project.
sorry fam
There are no "Layers" in Photoshop Express; it doesn't work the same way as it does on the desktop. I'm not sure what you did to arrive at this result.
Oh Okies I don’t know then this is what I have on it

Also, I don't have or use Ps Express on the iPhone so you'll have to wait to see if someone else is familiar with it.
Okies thank you
Gave +1 Creative Carma to @ripe quest (current: #3 - 2077)
There is no "Edit" feature on the Android version so that's interesting.
It’s on iPhone but that’s interesting
Yes. But I don't have an iPhone. I have an Android and there is no "Edit" option in that version.
Oh well I’m not sure then I have photoshop on desktop as well is there any chance you could explain my overlay situation as I have the same problem on desktop and I don’t know how to fix it
Open it on the desktop and post a screen shot with the Layers Panel open and that layer activated.
Okies
I’ll have to do it tomorrow I can’t get to my desktop right now
Check the Blend Mode for the Layer. It should probably be set to "Normal"
Ohhh I have been putting it on overlay mode
No. If the Advanced Blending > Blend If... feature doesn't work, then you'll have to paint on a Layer Mask to just rebuild the things yourself.
mk
How to make this?


Hello, I am a beginner at Photoshopping, I only use it for games, jokes and DND, in this case I have this Token Border which I want to use, I want to remove the black background while keeping the white token, Magic wand is inaccurate, Quick action remove background doesn't do a good job and I can't set it to lighten because I need it to be a PNG and the black borders would still exist, what do I do?

wym by black borders?

I need the white token to contain a picture within the thin circle line, placing the token on the other Picture and putting it on lighten works, but then I need it to be a png so I need to delete everything in the Underlying Picture except the encircled part
did you want it like this
Yeah
just a background remover
As in a website?
I don't usually rely on websites because they completely goof more complex backgrounds, but this isn't one and I don't know why I didn't just use one
Yeah I'd appreciate the link, thanks
remove.bg
Remove image backgrounds automatically in 5 seconds with just one click. Don't spend hours manually picking pixels. Upload your photo now & see the magic.
this the one i use
I am assuming you used it then did a couple passes with the magic brush right?
Because it didn't give me a clean result like the one you sent me on the first attempt
no
i just uploaded it and then downloaded the result
for me came out clean first try

How do I go about making some sort of frosted glass effect as the background of this little nameplate thing?


Didn't screen shot it, I have the downloaded image then I uploaded it
then you have to re download it fromt he site after you remove the background
The one I sent here was screenshotted though, the one I put into the remover wasn't
I wanna just apply a gaussian blur to the gray box behind the nameplates and also make it see-through, how do I do that?
Sorry, I am not sure where I am going wrong


I am confused
can you join vc and share your screen?
Sure
join community
What did I do wrong?
Yep
click that
And it's going to fix it?
Huh
yeah thats png now
I'll be damned, it does fix it
dont right click and save as just press the download button to get your png
Oh well, thanks for the help, much appreciated
ofc anytime 🙏
Anyone? Please?


i dont think theres anything behind the frame tho so there wont be anything behind when i lower the opacity


yes
i selected inside the border and outside the avatars and nameplates then just added a gaussian blur at about 25 pixels

heres the image if u wanna download it
I can't really get this to work
I've converted it to a smart object, magic wanded it
Another way to do this is to place a blurred copy of your background above a shape layer and right click on the blurred layer and choose create clipping mask.

Ohhh, that's actually smart, thank you
Gave +1 Creative Carma to @shadow ridge (current: #574 - 2)
Worked great, thank you

While I'm here, is there a way for me to properly do padding? I can tell the bottom has less space than the right

You can use the DIY WAY that is create an Shape like a Square, an use some copies to place as reference on the sides.
I like to work with GRIDS, I turn on the Grids at "View > Show > Grids"
And at EDIT > PREFERENCES > GUIDES, GRIDS AND SLICES, I adjust a grid space value that helps me to align and distribute my object.


I see, I've also just been using shapes to try line stuff up and wasn't super sure if it was a good way to go about it or not, thank you
Gave +1 Creative Carma to @shadow ridge (current: #423 - 3)
when im about to export and change the file name the image breaks and its basically nothing no file at all just a name, but when i dont the image exports succesfully
like this

i need help with changing colors on a reflective helmet to make it look right
go to Properties and check the file type. You might change the file type too?

hue/saturation... might work! try it. (don't forget to use a layer mask to change the color of a specific area)

r u able to help me in dms
hue saturation creates a odd look

comes out like this
when i need it to look like the swoosh on the helmet
i need the helmet to come out to more of a matte style like this

those two have different texture.
that's why it looks different
yeah ik
hold on


this is the same helmet
how does one take that super reflective silver helmet and change it to a flat color and make it look correct
almost like a matte
They might used Blending options
whats that


how would i use that for what im doing
How to make this


a youtube video might help! just search how to use blending options on YT
i cant find anything that helps with this specific thing tho
I have tried, and cant find any
like a helmet
it's about technique not object as when you will learn how to use tools ot won't make any difference what the object is
you're working on pixels no matter what object is
yeah i got no idea where to start
all of the videos are confusing or dont solve the problem
bc its most likely a combination of techniques and idk where to look
I am making a short video for you.
🙏
you also have have to remove all the shining manually to get a mate view. Use blending option get the most realistic result.
yeah ts mad confusing i just dont understand this yet
are the servers down right now? my creative cloud wont load up and generative fill is greyed out.
Not for me. Creative Cloud is working.
weird. my internet works..
GenFill is also working.
ohh it works now, that took 7 minutes of loading.
i think the servers were just very loaded or something
May have been a snag somewhere. ISP outage or backbone issues.
oh thats true as well. didnt even think about that. now with fiber internet i dont think about internet problems anymore XD
ISPs and data centers still can have connectivity issues from time to time. :)
yeah im aware. usually a rare case though.
i like how i can continue using generative fill even though im at 0 credits but ive used fill like over 100 times already after being at 0 credits.
Running out of credits doesn't mean you can't use it. It should still produce an image; it just may take a bit longer.
then whats the point of buying credits?
also that is really awesome, i thought you had to pay to continue using it.
You don't purchase credits, they are part of your subscription.
theres a section though where you can purchase credits for 6.99 a month
Then those plans don't provide GenAI credits as part of the plan.
I don't really know about every plan they offer.
All Apps and other plans come with a certain amount of credits that are like "preferred access" - I don't know what Adobe calls it.
although i think when i use it too much times, it throws me errors always after a while.
When you run out of credits in your plan, you can still use the feature, it just might be slower. This may change in the future so I wouldn't count on this always being the case.
ohh ok i see, thank you
Gave +1 Creative Carma to @ripe quest (current: #3 - 2078)

That one is better. :)
"Generate Image" in Photoshop.
lmfao backlighting looks sick in that picture 😄
oh and the monkey wearing the cool glasses
Hello, is there an efficient way to recreate the dual text color like in the image on left , I tried by duplicating the layer and then masking the part out , is there a specific blending mode for this ?


That's how I would do it. Duplicate, recolor and then add a Layer Mask and hide the portions that I didn't want to see.
Hello, whats the best technique for frequency
when dealing with color?
Good morning, how can I remove what is outside the text, to leave just the word in the other layers texture?

Hi
How can I recreate this style of glow like on this picture?

is there a way auto select all the white spots with magic wand instead picking every single one

No Magic Wand. Select > Color Range... Pick/click on a white area. Adjust fuzziness. With the selection active, add a Layer Mask to remove.
add white fill solid under this layer
Layer Style > Outer Glow...
thanks

If you're transforming the object, scaling, rotating, ...finish the transform operation first. Then add the Clipping Mask.
Show the Ps GUI with the Layers Panel open.
I apologise for my rudeness, but I require this for school tomorrow. Please and thank you
That's probably going to be a difficult selection and masking operation. You can start with the "Remove Background" operation. Then you'll probably have to paint on the Layer Mask to refine it.
Okay, thank you!
Show me the actual image. Not a screen shot. I'll try it.
I can already tell that this is going to be a lot of painting.

Some of those areas its difficult to tell what should be removed...
I have a slower way of doing it, but I hoped there was a quick command.
That means you'll have to manually paint on the mask.
Not with this. There is barely any contrast in some of these areas. And the lines are so thin, if you try to auto-remove, parts of the interior fill on the letters is going to be removed.
Good luck with it.
Actually, I have another question (not as urgently)
If i select a certain area, say with the object selection tool, how would i move that selection to another layer
I can't think of a proper way to explain it
Hi, I am currently working on an Aida64 SensorPanel design and have a question.
I have several layers (15) that I want to color, I know how to do that. 😄
But I want the layers to be superimposed later in the Aida sensorpanel depending on the state (it will be the load display for CPU and GPU), and if all layers are superimposed, a certain color results. so it is possible to divide a color (code) by 15, and if I put this color (codes) 15 times on top of each other, the original color code comes out again? 😅
Edit > Cut. Edit > Paste Special > Paste in Place, I guess...
Can you use the Opacity setting on each layer?
I don't know. Sorry.
in principle, i would just have to divide the saturation by 15...oh, i'm stupid. sorry
What is the way to make low quality image effect?
Most of these settings are integers; not floating point numbers. So if some feature has a 0 to 100 range, it won't divide by 15 evenly. 100/15=6.66666666
Export it out to JPEG with a quality setting of 1. Or feel free to describe what you mean by "low quality image effect"
I mean this effect
Idk how to translate this
But this effect often occurs when you make photo with bad phone low quality camera

but i don't know how to get this kind of overexposure
blur effect
ok what next?
next what? use blur fx and try different settings. i don't now what you final aim is / your project look like.
maybe whit a very slight fish eye fx
you can also check out the filter galery, which can also helps.
it was 98 and i use 14. the last layer would be gray. but it seems like my plan dosen't work.
when i use the liquify tool it doesn't show the changes until i confirm it, can i make it where it will show the change when the liquify window is still up instead of having to confirm it every time i do a change?
hey all!
I was wondering where you like to download your fonts from?
I was looking at envato as well as Adobe stock, but their prices are a bit high for someone who's just starting out.
Was wondering what else there is out there?
Thanks for your help!
Hello,
I edit the photo and in photoshop I can see it in bright colors, everything is fine, but when I export the photo itself and try to send it to my friends, it becomes pale and not so bright colors, but I can see it in the photos on my computer as it should be. It doesn't show well if I look at the same photo on my phone.
How to fix?
Which oone is better? Do i need to change or add something or its good?


i can make stars brighter to
and what do u think about some lightnign in the midle or something. it is for the middle shelf that folds in half
How do I make this Gif background transparent?

i think open the GIF with photoshop
and active the timeline
then select the background on the first frame
then select all the frames " and ensure that the background is selected " then mask it
then save the GIF with transparency
this may be due to your monitor color display settings, from what you are saying this could be an HDR thing, what monitor do you use?
honestly google fonts is my go to, all free. I also use RightFont on my mac to manage them all and source a download when needed. Even just looking up a few things on google can point you in a lot of great free places
how do i stop the auto hyphenation from happening

I have to use adjustment layers for the above project. Does anyone have ideas on how I could use them to improve it?

could someone pls help me learn how to overlay and put the brown and white horse behind the black and white horse?

Hello, I’d guess that the GPU acceleration got disabled, see: https://helpx.adobe.com/photoshop/kb/photoshop-cc-gpu-card-faq.html
Hi, without seeing your layers panel, it is difficult to help you: are both horses and the background on their own layers?
Hi, I have the problem copying perspective warped object (shadow/mirror).
Original

When I try to copy it to new project, this happens.

I can export it to like pdf and use, but i wonder whats wrong
Hi, is the warped object a smart object ? I’d try to duplicate, hide one copy, rasterize the other before you move it to a new project that has, I guess, a different size?
It is smart object, and, yes, different size projects.
I am copying facebook advertisement design stuff to rollup banner.
Hi, I don’t remember if there is an option in preferences >type or in the local hamburger menu of the character panel. You could remove the first hyphen of the list as you type other letters.
yes all on there on layers
Hi, perspective wise it needs to be lower in the image. You might need to select the barriers and jump (Ctrl+J) them on their own layer, so that the brown horse can be placed behind them.
i am having a trouble right now
this is the color i want to print

but when it is converted to cmyk it turns out like this

how can i do that ?
whats the problem here
they are different color spectrums
they might not have all the same colors
yeah i know but i want the same color
what do i do ?
well you want a guitar to sound like a drum
Hi, are you printing on a press or a desktop printer? If the latter, you do not need your convert to CYMK
fedex has the same color and they get nice printing whats your point ?
i am doing for a printer
They might be printing with spot colors.
yeah i just asked him since he said it like it was impossible
Desktop or commercial press, and even some commercial printers use digital presses that might accept RGB.
and they dynamically change it to cmyk as far as i know
He is right that some RGB colors can’t be printed in CYMK.
i see, I will contact with the local printers i know, thanks for responding
Gave +1 Creative Carma to @hushed niche (current: #20 - 102)
Yes, but they know which CMYK profile to use…
sure but i don t think that will solve the problem
If that’s the case, you need to ask which profile to use, the cost of spot colors… it’s for a run of how many prints?
The first one is that there are many CMYK profiles, and that a digital press might even use more colors…
as far as i know, there can t be a cmyk profile that contain this specific color

thanks mate
Gave +1 Creative Carma to @twin bronze (current: #27 - 77)
ok i will keep that in mind
Hello, I'm trying to remove the pink part of my image to replace it with the same shades of yellow that make a hair contour I tried the localized concealer but it gives me a bit weird results

Bonjour, et avec un pinceau en mode « couleur » ? (What about a paint brush in the « color » blend mode?
tu veux dire d'utilisez la pipette puis le pinceau ?
Le jaune est déjà sélectionné. Ou alors, avec le pinceau, un alt+clic sur la couleur jaune (raccourci pour la pipette) et dans la barre d’options d’outils, changer le « normal » en « couleur »
Sinon on peut utiliser le pinceau de remplacement de couleurs, ou d’autres techniques : https://helpx.adobe.com/be_fr/photoshop/using/replace-colors.html
anyone know how can i make character like this ?

That depends what you got at the start. A standard photo in colour?
It looks like a threshold adjustment layer right there

what level i need to put?
also here, it's better, non destructive

It depends on the original photo, you need to play with it. Depending if it's dark or light, the settings will be different
that is the defoult photo and i want to make like first

You absolutelyy need to test by yourself, only you know what is the effect you want. Use the second method as shown on this screenshot #❓ask-a-question message
So that way you can change your mind
Those sliders don't bite! feel free to test. Only you know what you want....
ok,thanks!
how do i make this disappear? it's not letting me edit the text while my cursor is in that area

does it dispear when you hit "esc"?
or try that one
(I didn't check if it works)
https://www.youtube.com/watch?v=as4LQRuwgO4
Quick and easy to follow tutorial, on how to disable the sometimes annoying Glyph Alternates pop-up in Photoshop!
🔗Links:
Twitter: https://twitter.com/ericr_
Twitch: https://www.twitch.tv/EricArts
Portfolio: https://www.behance.net/EricArtts
Steam: http://steamcommunity.com/id/EricArts/
🎵 Music:
NBHD Nick - One Direction (Instrumental)
https:/...
thanks
Gave +1 Creative Carma to @vapid flume (current: #8 - 643)
i was given this pixel art to fix. How do i best remove all pixels with less than 100% alpha?

Lotta artefacting cuz good image lol
use your color range selection, choose a transparent section, adjust your fuzziness to include all with varying degrees of transparency. Then go to select > modify and expand by a value of 1-2 then just delete
tyty

hello
can anyone please do me a favour and remove the background please
i really didn't know how
Imagine tarot card
np, did it work
do you have a better resolution?
?

Guys quick question
I have this circle and I want to put small dots in it all around the circuit ... whats the best way so theyre symmetrical and the fastest way? Cos manually it would take a lot of time...
Picture please, hard to know what you're talking about


Ah yes perfect thanks
The bigger the stroke, the bigger the dots
By clicking on "options" you can get the gaps the size you want


Click F to restore the right screen mode or choose view> standard screen mode

hit tab
If you've been working like that, it might have been difficult! 🙂
i just stucks on this step for 5 mins
LOL
don't worry, the rotation of the canvas by accidentally swiping in two different directions on a track pad stumps a lot of people usually
How can I make this thumbnail more interesting to click on without just adding white outlines or making it too cluttered?

any photoshop gods know how to change the size of a label in a mockup?
change the shape or the size of the label?
label?
Anybody here looking really easy paid work?
so in a mock up file there's a smart object for replacing the design but it's a specific size on the mockup and I'd like to change it to a bigger one is that possible or not really?
just resize the object
message me
Hello how can i get the background behind the card transparent like this


I do have a light box if that's of any help
Ohhh ok thank you
guys any graphic designers here?
im trying to make a happy doggy face logo (cockerspaniel) but idk im out of ideas how to make it cute/eye catching simple logo design

if someone has any ideas please let me know
im more into editing stuff ... not making up something out of my head....
Btw that's not what I meant I meant was if you look the card case is clear and you can see that it is on something that is black but in the example picture I posted behind the card is just clear
And he has his own custom background behind it
That's what I'm trying to achieve
Yes, i understand you will first need to have a clear lighting picture to do that, search up the video glass effect in 2 min on google for the cards design
ahh ok sorry
Would this be better ?

trying to but there are so many layers ill try again soon
hey photoshop users, i need some help identifying a font. can one of y'all help me out? i dont have photoshop rn, but i need to know what this font is
i tried looking for it on WhatTheFont but could'nt find it there
1 - Separate in one layer the labels and everything that is not transparent
2 - Make two copies of the original layer below the non transparent layer
3 - Set one to Screen and the other to multiply
4 - At Screen layer, right click and choose blending options - at blending options , on blend IF, Actual Layer (First gradient) hold ALT and drag de half of black into the middle of the gradient.
5 - At Multiply layer, right click and choose blending options - at blending options , on blend IF, Actual Layer (First gradient) hold ALT and drag de half of WHITE into the middle of the gradient.
Ps: Adjust the blend if in each layer until you like it. A better photo with a plain gray/white color without shadows gradient will be better.


I love you thank you so much for taking your time and doing this
Gave +1 Creative Carma to @shadow ridge (current: #339 - 4)
You're welcome, I'm here to help.
quick question though could I just replace the blue background with anything id like ?
Yes, you can place anything you want at background


Hey, could someone teach me how to take this PNG, change the 4.9/5 to 5/5, and how to add the Google icon to the left of it in Adobe PhotoShop or Illustrator?
ahhh okay thank you I took some better pictures to so that shadow won't be there
Gave +1 Creative Carma to @shadow ridge (current: #276 - 5)
I made a series of shapes with interesting blending modes/stroke fx that I want to make a motion graphic animation out of in Photoshop, however I would like to keep these blending mode settings and stroke/drop shadow effects in tact. is this possible to import someway in which it will look the same within After Effects?
I am looking to import (to After Effects) my PSD with all the layers seperate while also looking the same, but perhaps I'm thinking of this process improperly here.
kinda did it but background is still there

how can I get rid of background
you meant something like this right

think I got it just need to know how to get rid of the background now

Hi everyone! So I'm new to Photoshop. I've finished learning a big part of theory, but I don't know how to start with the practice. Does someone have tips? (:
use perspective warp to make ur card centered and then mask the background to hide it
what are you talking about?
I don't know how to start
ok. What do you mean theory?
The basics. Some tools and completed tutorials in-app
Ok did you try searching up “photoshop practice projects” or anything of the sorts?
@river otter

i just meant on google lol
Thanks man 🤝