#❓ask-a-question
1 messages · Page 4 of 1
Glad you got it figured out 😄
I need something little edited I’ll pay anyone who can do it for me
how can i recreate this kinda lighting effect? don't really care about the rest of the image just thought the lighting was cool

check dm
Whiole I think it might be one of the preserts (you can find the in ACR, either one you downloaded somewhere, or one already in photoshop)
By analysing the image we can see clearly how it's done
so the left side is over-saturated, increased contrast with magenta overall tint but lots of yellows in the reds, the right side is the opposite, blue in reds, lower contrast and desaturated. So you can have a go with both Curves and Hue/Saturations adjustment layers, with the mask on each side

which would make your layer stack look like that

(of course the mask will likely follow the shape of the face around the nose, since the nose likely acts as a screen to the lighing)
I think they try to replicate a left light with a gel (yellow/orange), although in "real life" it would look different.
so i made this illustration in ai which is 10ft x 20ft, then opened that file in photoshop to add some stuff. It seems to have changed the image size is 1ft x 2ft ;-; why does this happen?
It depends if you have exported it (and how) from Illustrator or saved it straight as an .ai file.
Illustrator export/save settings can sometimes be confusing.
What does it do when you create a new Photoshop file at the right size and copy and paste (or place) as a vector file within that new Photoshop document?
i saved straight as an .ai and opened in ps
maybe i messed up something while opening
It also depends what you want to do with that file once it's in Photoshop. Sometimes it's just simpler to save as a (flat) TIFF and work from there
Illustrator file don't really display resolutions for example, so the rasterisation settings can have an importance when you export them
When you copy/paste directly from AI to PS, you are pasting a "live" illustrator file, sometimes it's just simpler
When you copy/paste from illustrator you got a new-ish option that preserve layers

:O
so it's not entirely perfect but you should be able to manipulate your illustrator file within Photoshop. It doesn't happen when you open an .ai file with Photoshop.
If you get the chance, you can have a look at all the tutorials from DNKG
https://www.dkngstudios.com/
and
https://www.dkngstudios.com/learn
they run classes on Skillshare (that I recommend highly) and actually have a very good workflow for Illustrator/Photoshop, mainly to add textures on vector artwork, but also to create screenprint separations, which they make it really easy to understand

DKNG
Established in 2005, DKNG is a design studio based in Los Angeles, California with a focus on the music and entertainment industries.
DKNG
Skillshare is an online learning community with thousands of classes for creative and curious people, on topics including illustration, design, photography, video, freelancing, and more.
I know Skillshare isn't free, but sometimes they run promos and they even offer 1 month free with a code.
(If you're interested, let me know, I think I have a link for such codes)
hey i did recently return to photoshop after upgrading to really high end Desktop and while drawing any strokes or doing edits to canvas i feel like the PS does lag while processing its really disturbing for any art does anybody know some solutions / tweaks / reasons why it might have happen ?
It could be in input issue (most notable with a tablet, and some smoothing settings) or it could be a Graphic Card settings issue.
Depends what exactly happen
During covid i been using PS 2021 and things were really smooth and nice at my old PC with i7 7700k + GTX 1080 and 32 gb od ddr4 ram. Right now jumped up to new upgrade of Ryzen 9 7950x3d 64 gb of ram and RTX 4090 and it does lag miserably
its like can be seen / feelt the processing delay stutter
this might help as well
https://helpx.adobe.com/uk/photoshop/kb/optimize-photoshop-cc-performance.html
did try tweaking these and nothing did change
asking since maybe there are some acknowledged issues with some high end setups or that hybrid X3D cpus
When updating your NVidia Driver did you get the studio or the games option? did you set it to studio?
(not that it should make a massive difference)
Have you checked if your graphic card is recognized by Photoshop?
tested with both since i am an VFX artist in industry so these things were obvious 😄 and ya it does detect
OK, I maybe not the smartest person with hardware, so if you are a bit patient, one of the regular might be more useful in their answers
maybe @ripe quest but he's in the US so it may be a bit until he answers.
Maybe someone else! (I don't like tagging people, sorry!)
had to record with phone since sems screen recording doesnt catch it
in screen recording sems smooth even tho it feels like a delay
Stupid question is that with a mouse or a tablet?
both
did you test with both?
ya same results
Sorry messages crossed
its like a lag betwen PS and display maybe or something with really high refresh rates

hey, does someone knows why when i move an image it looks good but when i apply it, it makes it blur?


OK...
and testing at same settings with 1080p not some 4k or whatever :X
Let's see what others will say, sorry I can't help much
these canvas delay issues started when PS added these heal brushes and AI based stuff some time ago i think in 2022 or 2023
old versions work totally flawlessly
Did you try revert back to an earlier version? Just to test if it's a Photoshop version issue or a compatibility issue?
ya did test with 2020 and worked all normal
it smth with the latest releases and they do contain some tools i use for fixing things
Probably because the object isn't at the right size an resolution compared to the document it sits in. When you move the object, Photoshop does a "simulation" but when it's placed, it's the real thing
just that delay is so annoying to eyes after x hours spent next to pc
and how could i make it to looks clear?
I would personnaly file a bug report on the community forum, just so because Photoshop devs are active there (and aren't here)
https://community.adobe.com/t5/photoshop-ecosystem/ct-p/ct-photoshop
https://community.adobe.com
Master Photoshop with the help of our global community.
Find bigger elements to paste (or create them bigger). It's difficult to say since we only have a close up of your Photoshop doccument. You could have a very big document at 300 dpi, and try to paste very small, low resolution icons.
It would be useful to know how these elements were create and how big your document is to compare
It looks like it's re-rendering. Is it currently a smart object?
@warm badge ?
If so, try rasterising it and THEN moving it.
I dont think so... I'm new on it and i dont exactly know whats that
how could i do that


no, it have not
oh, so, if i just convert it on a smart object, it will let me do what i want? @sly hawk
and what exacly does that option?
No, don't bother converting to a smart object. It won't help.
Are you resizing it in any way? - even by a single pixel?
i've done it manually... but i would like to know how to do it automatically
done what manually?
draw it pixel by pixel
Looking again at your original image, It looks like you drew it, pixel by pixel, and then ENLARGED it by about 10%

nono, i imported the image from internet
aniway
i've done it
so don't worry
and thank you so muchh

How about this version using two gradients, one on the subject and on on the background?

hello just asking an advice, whenever i use gradiant tool its pixelated like this, wanna ask how to fix it?

Hmm, just seeing a black cat in a coal cellar here 😉
its like grainy or something
hers the full canvas

im not really sure if its just my monitor or what twt


Can you try to add a FULL screnshot of your photoshop doc?
with layers panels and all

i have a .psb file, how do i export it to pdf? Doesn't give me an option in Save As

Export > Export as >
Call me blind, but I still cannot see a gradient. But maybe it's a question of how your screen is calibrated? Mine is (with A spyder device) but yours could be set very very light, meaning you can see it and I can't
I see the gradient. barely. - I think your gradient is using NOISE.
If it's bigger than 2GB, you will not be able to save it as a .psd, it's not supported, that's why .psb are there
i see it too
Can you screenshot where you are editing the gradient?
its 0e0e13 > 14141d
TWT
i use gradient tool
yup yup, meant to ask about pdf tho
i dont know what you mean
if its this then here ya go

How big is your file?
in Gb I mean, sorry
2.33
The color in the stops look like black. Is that what you are trying to do?
is it more than 30000 x 30000 pixels? @old scroll
@sweet ridge - I see what you're doing:

wdym sorry
I would question the need for such a gigantic image, can you clarify why is it so big? @old scroll
These are your two colours. - on a 1920 x 1080 canvas
meaning? im a nutshell cant understand
hello does anyone here charge to do photo shop editing
Ask in #💬chat-general and see if someone wants to help!
i will pay money
Nothin' really 🙂
Do you see the 'dots' on my screengrab thought, or do you feel that mine is 'correct'?
needs to be printed on a 10ft z 20ft banner
What does the printer says? Do they want such a big file? they rarely do
oh wait
If the whole thing is a vector, it could be 10cm across and still print fine.
i do see the dots yes, but what does it mean?
in that case can it still be less than the actual size and work out?
Any large format printer would expect you to send artwork at perhaps 50% scale, or even 10% / 20% scale.
anyways, I think PDFs are limited to 30000 x 30000 pixels so something will have to give
:O
Have you talked to your printer first @old scroll
so i've been going through the pain of exporting a huge file for nothing
i don't have direct contact
First rule of the graphic designer
Before you start TALK TO YOUR PRINTER!
Speak to your printer and ask them what size file and scale they need for a 20ft banner.
so you should ask your client for infos, you need a full brief in order to start working
ok ok
I sometimes do book covers:
First question: size, page count and the printer they will use. And I need a name and email address
because if I need to discuss with the printer, I need to have direct contact
And I charge for the time I spend figuring out
damn ok
wait but how does it work? I thought because photoshop has raster images you'd need them close the true size
You need to cover your a**e in that job 🙂
wont you get a pixelated print otherwise?
Nobody prints at full size 300 dpi when you do billboards. Because nobody looks at them close
ohh
RIP time (the computer that controls the printer) cost time, time is money
You might want to call any random local printer and ask for a little bit of input.
Otherwise, this might help?
https://www.helloprint.co.uk/blog/how-to-set-up-a-file-for-a-large-banner/

File set-up for banners and large prints is different from that of flyers and posters. Learn how to design a large banner for print with these six steps.
and then you need to pay the employee and machine time to print something that will take half a day
i did refer to something similar, and it says to use the exact measurements

which is why i went with the actual size in the first place 🧍♂️
Yeah, I saw the same thing... - but watch how the resolution changes when change the PPI...
case in point, not all advice found online is GOOD advice 🙂
That's rough generalisation in there (and the file is larger bit is more than confusing!)
@mossy surge can you ask your client? because if you don't have the right info, then you're bound to fail. Imagine their printer wants something completely different or even that they can't deal with the size you are asked? (Don't trust clients with knowing what to do)
What I am saying is that imagine your image is wrong for them, you will likely either not be paid or having to do it all over again
@vapid flume out of interest, what PPI would you use for a 20ft banner?
I suppose you don't ven know the medium your banner is printed into and what it entails when it comes to colour? What is the colour profile they ask?, do they ask for bleed, particular marks? You don't know....
yup, im asking the client finally

The only one I had to do that was close was 150 dpi, but that was that printer who asked for that
Be it a lesson for your future projects. Don't worry, it's better to ask now than feel sorry later.
(presumably that meant that your PSD was at least 2-3GB)
I really think it's too big for a PDF
a tiff will be covered or a PSB
@old scroll be sure to come back with what the printer/client says, maybe you won't have to do it all over!
And if you got to save it for now, before you get the right info. Save it without any enlargement
(particularly that resampling option, the more you resample, the more it destroys how your file looks)
I think in short the two colors you are trying to make a gradient from are too dark and too close in color.
Yeah, looking at my PSD, I don't see any dots.
@old scroll that should give you a bit of perspective, in case you need more info
https://graphicdesign.stackexchange.com/questions/56292/large-format-pdf-cant-save

Graphic Design Stack Exchange
So I am building a 10' x 2' 300dpi sign for my buddies restaurant. I have never prepared anything that large for print (I'm mostly a web developer). I have my freaking huge psd, 120in by 24in, 300d...
AS always (and it applies also here to a certain extend) take everything that is said online with a pinch of salt. I look at tutorials for all kind of subjects (not necessarily graphic design) mainly on Youtube, and you have no idea the things people spout as thruth.
(a particular laugh matter of mine is youtube videos about the do's and don't when visiting my country of birth, given by people who evidently never been there)
What I mean is always try to compile multiple sources
this is pretty close but how do you recreate that?
I think I understand some of what you mean, i'll try that out
Like this. Take a look at the layers ~ gradients

Anyone know if there's something in photoshop that works kind of like best take on the pixel 8, or if there are any plans to implement something of the sort?
hello everyone ! I have cut the différent pieces of my sneakers with the pen tool but when we zoom on the différents pieces we can see that there is space that I don't want. If someone nice could help me to delete the space easily it would be a pleasure.


try healing brush
Nothing automated that I know of. How about this?
https://www.youtube.com/watch?v=9YFDOoM7I5Q

Face swapping in group photos can be challenging, especially when people have closed eyes or odd expressions. But with AI Generative Fill, it's now easier than ever to get perfect results!
In this tutorial, we'll show you how to use AI Generative Fill to swap faces in Photoshop, even in tricky areas like hair and overlaps. We'll also cover comm...
I've done face swap before as well, was trying to figure out how to do it on furry friends, like cats or dogs
oh wait, hmmm
The new remove tool with a small brush will do it 🙂

i'm sorry what's looks like " the new remove tool " ?
In your tool bar along with the other healing options

looked through the video, found what I need to fix things, generative fill fixing is bonkers!
thank ya
thank you it works but it takes a very long time to load the effect even though I have a good PC, is this normal?
Gave +1 Creative Carma to @lucid crane
It's the usual story of how big the image / resolution probably.
Do try using the "after every stroke" or not and see how that goes. ie. do an amount of strokes and then click the tick 🙂
Still the fastest method I think.
Okay I will test thanks !
Hi
my pc ryzen 5 5600x
Ram 32gb
Nvme 512
Gpu rtx 4060 msi ventx
Monitor 144hz 27 inch 1440p
My problem is this month iam change my gpu gigabyte gtx 1660super to Msi 4060
When iam working 4060 gpu photoshop 2024 i feel some lag my old gpu 1660 is fine. Please help for best solution
GeForce Drivers up-to-date? Check the Photoshop, Main Menu: Help > GPU Compatibility.... any errors or issues reported there?
No error showing. Now iam uncheck 30bit display and gpu compsite.
Iam already change all setting random but not fix 🥹
Are the Geforce Drivers up to date? Do you have Geforce Experience installed to check?
Firefly: is there a way to consistently create random faces with constraints, so that the results are essentially the same layout, lighting, angle, etc. ?

Today iam updated lateast vr.
Can you tell best gpu settings for Photoshop. And any changes nivida control pannel?
Just select the region around the face and GenFill over that area...

One way would be a very precise prompt and use the reference image option

If you're going to do this in the Firefly web app. I would upload that face to GenFill and try what I said above. If you're trying to reproduce that exact "layout"
THanks @ripe quest & @lucid crane - where can I get to that reference image option? Also, I want to be able to generate fairly diverse people, so I'd need to be able to change skin tone as well.
Gave +1 Creative Carma to @ripe quest

Would like to keep it in Photoshop, if possible - not sure what the AI generator within Photoshop is called... Firefly? 🙂
It's called "Generative Fill"
Firefly is a group web apps, e.g. Text-to-image, Generative Fill, Text Effects.
Thanks - been using that, just didn't know if it had a different name.
If the goal is to keep this exact layout but change the race, skin tone, etc. It's going to require some experimentation. Just a quick thought: you probably won't be able to do it in "one shot" it might require a couple of passes for different portions of the image. This is a quick example where I changed the face first and then the hair.

It will probably also require some "traditional" bitmap editing as well.
I'm having trouble just getting it to remove makeup... prompt: "different face, no makeup"
Result:

Is the reference image online only>
?
Photoshop doesn't have the same functionality as the Firefly web app. Also, the "Reference Image" doesn't necessarily keep the exact image shown in the reference. Its not like other tools you might have seen elsewhere.
You might find that some "hybrid workflow" will work for you. This isn't an exact science. It will require experimenting to identify a workflow that works for your project.
would anyone get me some tips on how to stop PS from lagging and delay the brush? thank you in advance
Turn down the "Smoothing" setting to less than 15%.
thank you!
A high value for Smoothing can really cause some delay when painting. :)
i had no knowledge of that. I was mostly reliing on my hardware and i was going to blame GPU 😆
I have a 3090Ti and its a beast. At 100% smoothing, Ps lags even for me. :)
right same here....im on a 4090 and 13900K and i was scratching my head
100$ software need a 6k system to run
It kinda maskes sense though because you're trying to smooth out the stroke. You have to wait a sec to see the smoothing. heh
ooooh ok now i see the light of the why
so doesnt matter how much power u have will just lag
At a really high value. Experiment with it to see where the lag starts. Then gauge your workflow based on the performance.
I don't find really high values of smoothing to be useful to me (most of the time).
But there are times where one would like to use it.
roger that....appreciate you help a lot! thank you sir!
Hi guys, does somebody know which font are the blue letters from and how do I make them look "sprayed" like that? 🥺

If you have a high enough resolution image you could try PS > Type > Match font and see what it finds.
The duplicated letters, C and P suggest it is a real font albeit originally hand drawn perhaps.
@solid cedar https://www.myfonts.com/pages/whatthefont
Identify any font with our font finder tool. Upload an image, and we’ll search our collection of over 133,000 fonts for the best match.
Thank you guys @vivid sable @lucid crane I tried already both methods but no chances of success in finding that font 😦
Gave +1 Creative Carma to @vivid sable

Hello! Is this the dedicated channel for asking technical questions regarding photoshop?
Or is there a better channel for this?
Hi. This is the right place.
Great!
So I'm aware of the fill content aware tool, but is there any way to choose what direction to pull it's content from?
Let's say you are close to an edge and there are several patterns, it'll pull everything around what I'm actually selecting
In the Content-Aware Fill interface, you should be able to "paint" over areas to define where you want to sample from.
draw the shape u want to to see and fill it with the command
if u want the shape on the right side, draw te shape on the right side
if u select everything will FILL everything
Hmm okay, that seems reasonable, thanks! 😄
Hello, I have a little question. How can I reduce the white on the whale ( ping me please, if you anyone answer ) ?

Le Rat:
I would create a squared selection around the whale, Select -> Color range-> and select Highlights from the dropdown, then CTRL+U and perhaps dragged down "Lightness" a bit.
Not a pro and might not work very good, but that's what I would try @pine elbow
Or CTRL+L and pull the sliders to see if it adjusted only the whites
Done it!
7/5!

WillyVodka is right, but it may look a bit jagged, you could also try this..
Thanks for yours answers !
Do you have a solution for make the whale shine ?

I assume you added as an extra layer. Add an 'outer glow' effect.
Have you watched some video guides?
it works sometimes
i do the exact same thing in a different file with different variables and it won't do anything
Hello!
Please help. I am really frustrated at this point. I made an design in photoshop, but posting on Instagram the design gets really blurry. First I made an design in photoshop, and it was even in photoshop hard to have good quality because when I looked at it on indesign it was way more sharp. However I exported it as a png on photoshop and it was quite okay. But then I wanted to post it on Instagram stories.
I’ve used Instagram dimensions but somehow it keeps getting insanely blurry. I wonder if it has something to do with the colours, I am using dark red and black, but still i wouldn’t understand because I am using the instagram dimensions…
Please help! I’ve added two pictures where you can see the difference before and after posting. I have never such bad quality when posting on Instagram stories, especially since I also used the 1080 x 1920 dimension. Below are 2 pictures of my design before posting and after
Even when posting it here on discord the left picture doesn’t get as blurry as on Instagram
they look the same
No the right one is definitely more blurry, check the letters where the 1798 is
Anyone have a tutorial on how to change background of a normal picture to look like a studio one?
Hello guys, I have a question I wanted to test Photoshop's AI, I saw a professor in a conference who showed me that generative filling is based on an image with a greater or less percentage of respect for the original image. He could change the percentage which influenced the AI. But I have no idea how to do this. Thx
I'm not sure if this is what you're describing but you might want to check this tutorial. There are some helpful usage tips in there. https://youtu.be/ZUJSIzCW5L4?si=KtqQBFrQiD9dganK

Little-known Trick to Generate objects with varying intensity using the Generative Fill in Photoshop!
Like and follow if you learn something new!
🎯 SUBSCRIBE to get more amazing Photoshop tutorials!
► https://hi.switchy.io/Subscribe-to-PTC
📘 INDEX - Change Intensity With The Generative Fill in Photoshop
00:00 - Introduction
00:11 - Create a Q...
https://www.youtube.com/watch?v=0P6W4Sih3oQ < - Free panel to achieve the above.

Get the TK GEN FILL PANEL Here: https://goodlight.us/panels-and-videos.html
Get 15% Off Tony Kuyper's TK9 PLUGIN For PHOTOSHOP and Videos by using PROMO Code DK15
In today’s video, I’ll be demystifying the functionality of the Percentage Buttons in the TK GEN FILL PANEL for you.
Affiliate Links for Software I use and recommend:
Topaz Affiliat...
(Along with illustrative example)
Hi guys, I want to make a folder to sell potcakes, someone has a video to send me about that? It would help me a lot 🙂 Thx (And sorry for my bad english, I am not english speaker
I assume you mean the dogs and it should be a Flyer?! If I'm right you can take a look at https://www.youtube.com/watch?v=UXOpXLmLMv8 if thats the kind of Flyer you are searching for.

Creative corporate flyer design | Photoshop Tutorial
....................................................................................
on the web:
—YouTube: https://goo.gl/Hj32GH
—Facebook: https://goo.gl/Hj32GH
Thanks for watching.
Any comments are welcome!
..........................................
So I'm doing a path blur photo, and on the preview it shows what I want, but when I hit ok it only blurs where the car was removed


When i open photoshop nothing will load, pretty sure its bc i have no space on my computer but i have a terabyte on a internal drive is there anyway i could put it on that or make it save to that?
what plugins do I need for photoshop animation?

why is it doing this
i need help : I import a image and then apply mask to it making the image smaller than it was before, but when free transforming, the blue outline box is still as big as the image was before masking, how to make the box fit the new edited image??
hey ya

any idea how i can make this screen glow?
like a glowing effect kinda thing? Tried looking at video and found nothin 😦 maybe i'm searching the wrong thing
Hi. The first image i have posted here are some flags someone else created. They have a very distinct "shine" or reflective shading to them, and makes them really pop out. The following 3 images are flags that I made. They look kind of flat and dull without the shine. How can I add that same "shine" on the flags that I made? Thank you for the help.


you can add a new black-to-white gradient layer, clip it, and set the blending mode to soft light/overlay/whatever else you'll find interesting to you
have you tried the outer glow layer style? exposure matching would also help to make it more realistic too, a real screen would be a bit overexposed on this photo. you can also duplicate your "screen" layer, blur it a bit and set its blending mode to screen to get that glow/bloom/halation effect
make the masked layer a smart object
well, everything you really need is already there. see a few tutorials on the timeline panel and try it yourself!
Ps needs free space to work with temporary files. you can change the scratch disk under Preferences>scratch Disks
with your tool set to path mode, you can change the pathfinding mode to whatever else you want in the options bar

make sure you're blurring the right layer
already tried that, only works sometimes
smart object will trim the contents of itself when being created the same way Image>Trim works. if your mask is incomplete, has gaps or stray pixels, this will not work
ah i see thanks
Gave +1 Creative Carma to @serene coral
when you say new black-to-white gradient layer, do you mean in the layer style of the image like this

yes, you can absolutely do this. Now, you can try reversing the gradient so it lightens the middle of the image and darkens the outside, just like your inpiration image
Thx D.Humann and Denyer 🦆
its hard for me to tell cause the difference is a bit subtle, but overall i think it worked. thank you.
btw just curious, what would be the other way to make the gradient layer? would i be able to move the gradient around how i want it? cause in this menu, im kind of stuck with having to choose between reflected, diamond, angle, radial, & linear.


Gave +1 Creative Carma to @serene coral
yeah, soft light blending mode is subtle, you can try other blending modes like overlay or linear light. make sure to play around with the opacity.
you can add gradient as a layer in Layer>New Fill Layer>Gradient or by through the button at the bottom of the layers panel

currently you can also simply press G to select the gradient tool and drag over your canvas to create a new, live gradient layer
Hello guys i have question i have photo with 2 person and i want remove the person that hide him and fill but AI not working its replace me with another person
yeah

the little girl with blue jacket i want to remove and fill the person behind her
You couldn't have picked a worse person to remove
lol sorry
the person behind her is dead and i want my my sister-in-law with him alone
i start with extra layer and magnetic lesso but its not what i expected

wow
Sorry to hear about your loss.
can you expain how you did it or its alot of expain?
it's fine, it was easy. I used the simple lasso tool and drew around the girl, then used the prompt 'remove person'. - It left some strange marks, so then I used the 'remove tool' to clean him up.
remove person with Ai?

sorry for diggin i just want to learn how do it cuz i did draw with magnetic lasso and try Ai but its keep replace it with another kid
i have the photo in good quality just not on me 😦
This version is now more vibrant, stronger colours and less washed out. - Also the sky was just WHITE and over-exposed, so I've brought some texture back there too.
but yeah, @sage quest - 'Remove person' worked well for me.
If it helps, this one here has the people wandering around in the background removed. - All using the generative fill and the remove tool. @sage quest

anyway... enjoy your day 🙂
Have you tried the automatic recolouring?
im speechless thanks alot
thank you @sly hawk!
Gave +1 Creative Carma to @sly hawk
thank you for the help 🙏
Gave +1 Creative Carma to @serene coral
so basicly no need more photoshop beta cuz reguler photoshop have AI?
btw afther getting into reguler photoshop its work in few try and did magic!
How can I add light to the trees, they are black so I can't change the Hue/saturation ?

add a new layer with linear dodge blending mode and paint it with your bright color using a low flow brush
How do I get the pantone colors from an image?
I don't think that's possible without the pantone connect app. But Pantone colours are inks mixes, so it makes sense up to a point. If you got colours from a screen, they are not necessarily made to transfer on a print with the same accuracy)
depends what you really need to do
Most pantone swatches have disapeared from Adobe products anyway (there are ways around that, and I could spend an hour talking about this decision is OK)
You can have approximations of Pantone colours, but it will never be the exact same
tbh I have no clue what pantone colors are haha, its just my manufacturer is asking for them for the product im making
OK. Makes sense
Pantone colours are primarily a print book
see here
https://www.pantone.com/uk/en/products/graphics/formula-guide-coated-uncoated
is the product you are working on a printed product?
no, it is a woven one with 12 colors. The image I provided my manufacturer with was reduced to 16
so it's printed then? I mean fabric, paper, cardboard etc... not a digital product?
yes its physical, but not printed. Its a woven patch, made with threads, which has 12 different colors
OK maybe not printed, but dyed, that falls into it
First you'll need to get the old pantone swatches from an old version of Photoshop
Do you know which Pantone system do you need? Can you share an example colour they gave you? (there are multiple systems)
I think I got a link somewehre where someone have uploaded the pantone swatched (They WILL NOT be up to date)
If I can't find it, I'll give you the way to retrieve them from earlier versions
I thought I was, when I used content aware to remove the car from the background, it should have been the background layer, which I should have been able to use the blur
Right?
no clue haha. Kind of hard to communicate with my manufacturer at times since english isnt their main language
if you're not sure which layer contains what, toggle the visibility so you can see it better. just click the eye icon next to a layer in the layers panel 
Can you explain in very detailled step by step what you need to do?
Did they give you pantone references like for example Pantone 7679U?
nope aha

If I get the reference I will know which system/book they are talking about. Pantone is a brand, and that brand have multiple systems. Glossy, matte, for fabrics, for plastics etc
in that case, that they say doesn't mean anything
I would hazard a guess they don't know what they are talking about 🙂 and only ask because someone told them to ask for it
Because since it's a woven/dyed product it calls for a very different system than the standrad one
I think they mainly do the business side of things
I mean whats the most commonly used for woven/sewn/embroidered with thread products?
If you want to cover your back an only give them an "accurate" but not necessarily relevant pantone colour, go there
https://github.com/Autocrit/Pantone-color-libraries
and download one of them (solid coated is one of the most used, but again, completely irrelevant for a dyed product. It's for paper)

GitHub
Pantone color libraries as .acb files for Photoshop etc - GitHub - Autocrit/Pantone-color-libraries: Pantone color libraries as .acb files for Photoshop etc
for fabric: cotton TCX, but I am not very versed in fabric printing/dyeing
That's a rough guess
You'll need to install those swatches into Photoshop
I mean I've found an rgb to pantone website.. That might be possible to use?
You'll then need to find the swatch closest to the imageyou are working with, you'll have to do that for all colours
RGB are very rough representation (for screens) of the (printed) pantone colours
I see
The aim of a pantone colour is NOT to be accurate on screen
Is to be able to tell the printer you want to use that colour
If you colour is accurate on screen that's a bonus
wait so how do i install this, never installed any addons before
Let me grab the help files
so I'm aiming for it to be the most accurate on screen...?

Not necessarily. Depends WHY they need a pantone match
When you open a pantone swatch (here is just an example)
step one is selecting the colour, and then clicking to "colour libraries"
Step 2 is finding the closest colour from the set you are trying to match


As I said, it will never be 100% accurate.
Generally, people woriking with Pantone colours for print/dye will own the proper book so they can compare colours
that said, given what they told you, I wouldn't really be concerned
I only own one book, the bog standard PLUS SERIES, because I only ever needed it for print
That's the textile book, if you are interested
https://www.pantone.com/uk/en/products/fashion-home-interiors/fashion-home-interiors-color-guide
It's actually cheaper than I thought
That's their app for colour matching
https://www.pantone.com/uk/en/pantone-connect
Personally, I think colour matching for only viewing on a digital screen is a complete farce anyway.
Screens are configured in sooo many different ways that things always look different on them
I bought my pantone book because once I worked with a retailer and he asked for hos products to be colour matched to a Pantone colour.
Upon nagging them it turned out:
- The retailer didn't have a book
- The manufacturer didn't have a book
- The retailer have been trying to match the colour of their items by visually matching the colour to those on the Pantone website
When I asked why he needed Pantone matching, he wasn't able to answer. Just that's "that's how it's done" 🤦♀️
So I bought a book (and I charged him for it) so I could show him "how it's done"....
Needless to say it only go out of its box - one I built myself because that stuff doesn't come in a box! - a couple of times per year.
And no, I won't be replacing it every year.
My sister's a screen-printer. SHE needs a pantone book!
I, and most people I know, don't

Where do you want a reflection? (I don't see any reflective surface there so it isn't clear)
On the lake.
Generally you just copy your subject, flip it verically so it reflects on the surface it needs to, blur it, possibly desaturate it and change the colour that of the surface it reflects into, and then if the reflective surface has any deformation such like wave on water or curved mirror, then you'll have to apply that deformation to the reflection
Thanks !
so in that case, just copy, flip vertically, correct the colours to fit the lake, and transform the perspective to that of the lake, and add some waves if you want (filter>distort>wave)

FORMATION GRATUITE DE 60 JOURS EN MONTAGE VIDÉO:
https://bit.ly/2zJ3kv8
^^^^^^^^^^^^^^^^
Tutoriel Retouche Photo !
Aujourd'hui, je vous explique comment créer une réflexion dans l'eau, un effet miroir sur une photo avec Photoshop !
Si tu veux réaliser l'effet miroir sur cette photo ou juste pratiquer la retouche de photo en général, on t'...
Maybe that'll help!
Thanks, I'm french so is perfect 😄.
Gave +1 Creative Carma to @vapid flume
How did I guess? 😂 (yes I'm the only one who read people's profiles!)
I read them too 😂.
I am not alooooooone!
are there any adobe devs here? @spark snow maybe?
t͡ʃ
the thing above simply does not render in illustrator, though strangely it does render in the font preview when choosing a font
in my case, i used noto
and it does render in photoshop, but it's possibly positioned incorrectly?
I have a image in my document, is it possible to find the file location of that image on my computer?
does anyone know a goofd effect to make a photo look like it is from the 70s?
Fonts don't always contain every possible glyph.
That depends on the object. Is it "embedded" or is it a "linked" object?
I assume you're looking for a photo filter. (?) Have you checked the Presets in the Camera Raw Filter?
noto 100% has that glyph
also it renders in photoshop. just not in illustrator
but also it renders incorrectly in photoshop
i asked the noto guys about this and they said photoshop has an opentype problem
You should post to the Illustrator Community Forum. Include the Plaform, app version and any other pertinent details, along with describing the issue. Then the dev team can address it.
where can i find that?
Here is the URL: https://community.adobe.com/t5/illustrator/ct-p/ct-illustrator?page=1&sort=latest_replies&lang=all&tabid=all
You might want to post under "bugs"
thanks
Why do the edits i've been working on look all pixelated now that i've come back to them? (on Lightroom but figured it'd be the same on ps)
could it be because the original isn't on my laptop? i would've thought it would save the full size image
hi guys! i am editing photos for a client - i would like to add light back into the model's eyes. any suggestions on a good way to do that?

How can I tell?
Smart Objects will have slightly different icons to differentiate between them. See: https://helpx.adobe.com/photoshop/using/create-smart-objects.html
It's a embedded object then
Can you double-click to enter the Smart Object? Perhaps there is some bit of the file name shown on the Layer (or in the tab for the SO)?
Sorry where am i double clicking?
In the Layers Panel. On the thumbnail for the Smart Object. That's how you get at it.
ok i think i did it? it opened a new window with the image im trying to locate in a .psb
im literally just trying to try and locate the image in my computer, i cant remember where i saved it but i just cant figure out how to make it give me the information
Are there any remnants of the file name or anything in there that you could use in a file search on the PC?
no because im pretty sure i renamed it inside photoshop


If not, then you'd just have to search the hard disk. Sorry.
ok that's a pain.. that's ok, i kinda have a second plan
part of the image is erased out and i tried to google how to use the history brush.. it because it seems so easy but that's not the case for me!
i try and click it and all i get is this - https://gyazo.com/76d1641b8e902b6d9105864a4ec6fe8b

This is why [most often] it's best to use a non-destructive workflow; use Smart Objects and Layer Masks to hide portions of layers rather than permanently deleting them.
ahhh, makes sense
is that it? the image ruined then?
Hopefully, you can find the original image on your hard disk. Or out on the web.
If parts of it have been "erased" then they are gone. You can't recover them.
Gotcha, alright
one last question, i promise!
i have another image here and im trying to use the different blending modes, but nothing is changing/happening to the photo. why could that be?
Blend Modes work because they interact with the layer(s) below them. They "blend" with those layers and create various visual effects. Depending on the Layer Stack, the layers beneath them and which blending mode, the results will change. For more on that, see: https://discord.com/channels/547473772727238676/1069342556783116420
That'll be why, I see
Thank you so much @ripe quest - you've been a great help and i really appreciate it!! 
Gave +1 Creative Carma to @ripe quest
No problem. Good luck with your project!
this is an issue i'm running into this entire photo set - for now i just painted in some highlights but it still looks... not great
is there another channel to ask for help to do with other adobe products
All of the [official] Adobe Discords can be found here: https://adobediscord.com/
there isnt one for the product i need help with :/
Which product?
acrobat dc
Oh. Probably best to post questions to the Community Forum on the web.
sorry do you mind sending the link to that
https://community.adobe.com/t5/acrobat/ct-p/ct-acrobat?page=1&sort=latest_replies&lang=all&tabid=all
ty
How to make the text looks like this same texture as the background?

hey guys you know how he got this result

its like kinda hdr effect, the white pops a lot, he drew the highlights
can anyone help with a photoshop q
right now when i want to zoom in i have to draw a box to the part where i want to zoom into
but thats not how i have been doing it before, which was holding Z key and scrolling up or down to zoom in or out
how do i get it back to that way
nvm i got it

Hello can someone help me how to create gradients along a path like in the macOS Sonoma Wallpaper?
Left image is my try, I created multiple rectangles with an angled gradient that goes along the edge but that isn't quiet it


Generally it goes with what HDR intails, meaning talking multiple shots (underexposed, well-exposed and over exposed so you can have a bigger dynamic range than one shot where the dynamic range of the film/sensor has a limit in stops. Of course you got to merge them together after and process them (most likely with Lightroom, or even ACR within Photoshop). The thing is, you can somewhat mimic an HDR effect without the multi-shoot, but a real HDR like this one seems to be is always dome by merging multiple exposures of the same image
ask in #💬chat-general for requests (unless you want to learn how to do it in Photoshop, and in that case you're in the right place)
We don't really have a request board though, so you may have better luck asking in the photoshop request sub-reddit (generally for a small fee)
THis honestly would look more like something done with Illustrator where you can have free form gradient which is not a possibility in Photoshop (but to be honest the wave at the bottom left make it seem more like a 3D shape)
See my friend Jan here
https://www.behance.net/gallery/174066551/2023-2-personal-3D-explorations
for example (done in Blender)

personal creations of 3D images, discovered and created by experimenting with textures, materials, lights and shapes in 3D.
Oh ok I'm good at Blender I thought that was made in Photoshop though. Thank you!
Gave +1 Creative Carma to @vapid flume
I have no doubt you can make it in Photoshop, but it'll have to be manual drawing!
interesting, do you know any tutorial gonna help me with that?
By the way do you know some tutorials covering that?
@stark idol With the shooting part or whith the merging and processing part?
Not really, I am trying Blender at the moment, but I hate it with a passion (I won't go into details on how the UI and logic is absolutely dreadful in this software 😂)
So for the moment I am learning the basic which takes way too long what what I planned to. I learned the basics of tthe Substance suite in a few days, that's how well the two compare for me.
Maybe you can drop Jan a line, and I'm sure he will be happy to answer... (don't forget to appreciate his behance projects if you like them, it always feel good)
Alright thanks! If you're looking for help with the Basics and how the UI works and all the shortcuts you can ask me if you want
Gave +1 Creative Carma to @vapid flume
Believe me I asked around and still no luck. It's not that I don't understand it, it's just that an old hippie on drugs might have built Blender from the remain of a DIY spacecraft. How do people navigate in this is still a mystery to me. But maybe that's just me.
I made a few projects already, merely following the tutorials from the Donut guy, works well, but like to think it would take 1/2 the time in a decently designed software (not everyone is an engineer, and other software prove it's possible to use a perfectly correct and still understandable jargon)
I also bought books (that's how commited I am) and still no luck... Very badly explained all over.
But I'll stop here 🙂
But I'll wait until I can change my computer and will transfer to the Subtance set of software which I am already acquainted to, that'll be better for my heart.
more the merging
Do you have just Photoshop or Lightroom as well? Because you can do in both (I guess most people would prefer Lr given the choice, but it's completely possible in Photoshop)
OK, see that one then
https://www.youtube.com/watch?v=6pPa4PUwN14
https://helpx.adobe.com/uk/photoshop/using/high-dynamic-range-images.html

👇
Start our FREE 30 Day Photography Course here (no card details required) - https://www.iphotography.com/free-photography-course/
🔗LINKS🔗
👩🏫 Join a Course - https://www.iphotography.com/
🏪 Buy EXCLUSIVE Flip Cards - https://www.iphotography.com/products/flip-cards/
📺 Free Photography Tutorials - https://www.iphotog...
the black logo is a png file i have in another layer over this yellow background. i want to turn all of the black into red. is there a way i can do all of that at once, instead of having to paint bucket each piece individually?

and also this one
https://www.youtube.com/watch?v=Chnof9JqOhw
about how to use "bracketiing" which is the process of creating (in camera) photos to merge after

Head to squarespace.com/james to save 10% off your first purchase of a website or domain using code JAMES .
Exposure bracketing is common practice in photography, but most people in my experience do it to blend exposures in Lightroom or Photoshop for a HDR look. While most cameras have this feature, and while I use it most if not all of the tim...
It's more an explanation of what bracketing is than anything to do with HDR, but you'll get the gist
Go to the layer styles and turn on color overlay. There you can change the color and everything
excellent. exactly what i was looking for. thank you soo much @merry phoenix
Gave +1 Creative Carma to @merry phoenix
Or if that result is a bit pixalated which could be the case in your image add a hue/saturation adjustment layer and click the checkmark "colorize"
If the black logo is on a single layer (or a group of layer, so group them first) you can easily colour them by applying a colour overlay effect
Just right click and choose "blending options on the layer or the group

its actually perfect, i just tried it out
and then choose "colour overlay

Great to hear that :)
Thank you @vapid flume i appreciate you helping as well
Gave +1 Creative Carma to @merry phoenix
hey, so i want to upscale this image and i don't know how. what can i do?

It's already a bit blurry but you can try the super zoom neural filter if you got a recent version of Photoshop
https://www.youtube.com/watch?v=bEZslKJbL_4
Upscaling will never produce sharp resulst so be prepared, but sometimes it's good enough
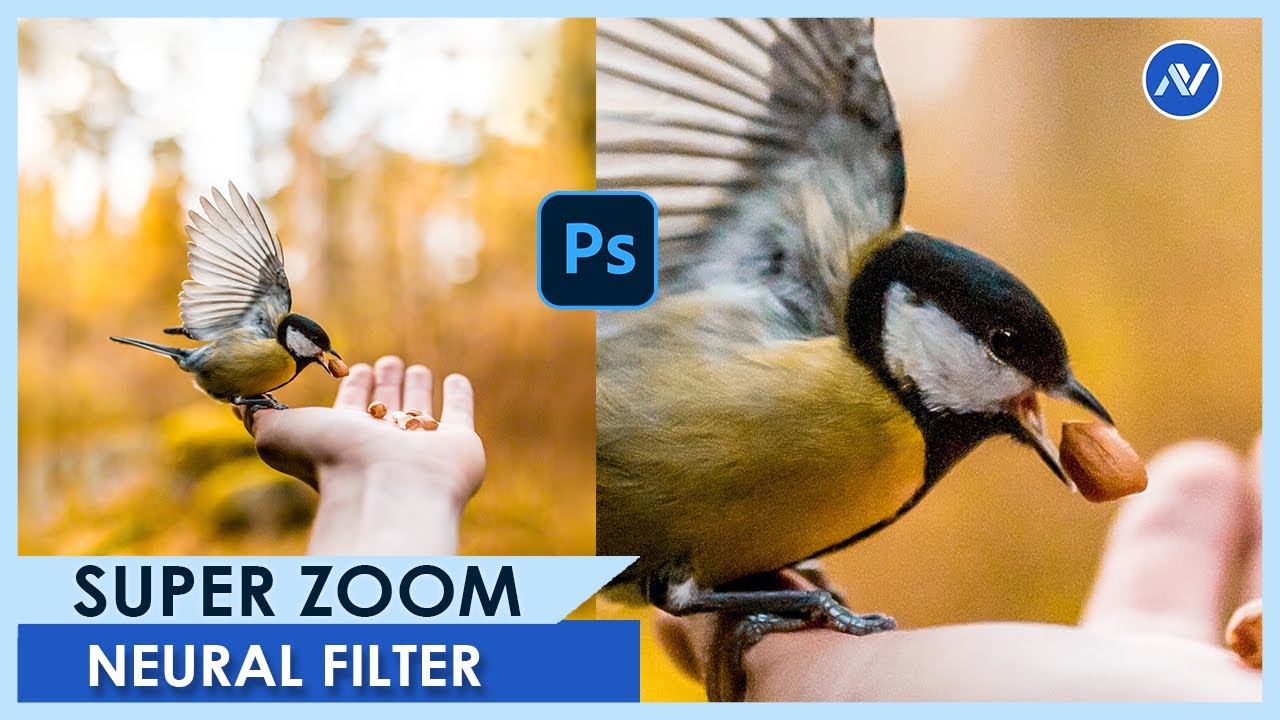
Hello everyone,
I'm Dav and In this video, you’re going to know exactly How to Enlarge photos without losing resolution in Photoshop. Photoshop Neural filters Super Zoom
👉 Watch his video till the end... I appreciate your LIKE / COMMENT/ SHARE !! 🙂
🎯 SUBSCRIBE to this YouTube channel to get more amazing Photoshop Effects Tutorials
https://www...
is there a way i can make it less blurry perhaps?
You can sharpen it afterwards (filter>sharpen>unsharp mask)
But I can guarantee it will not look very good. Excercise caution, and as in lots of things, less is more
This is one aspect where it's nigh impossible to correct. It probably will come at some point
Is it a scan? or a screenshot or something?
The best (bigger size, higher quality) you can get of the original, the better the result of the upscaling will be.
it's a screenshot, i have the full image though
So start from the highest quality you can, and avoid saving in jpeg at the end, everything you can to try to not destroy the image
gotcha
Once you get to the upscaling in the neural filter, check what you can do with "photo restoration", also a neural filter.
I cannot guarantee anything, but sometimes you can get pleasently suprised. (you can turn your image into a smart object before conducting any experiment so that way you can still remove any unwanted filter, even after you've saved)
https://helpx.adobe.com/uk/photoshop/using/create-smart-objects.html
it's good to conduct tests, without the hassle of saving multiple copies
Hey, I saw this picture on the Web, and now I'm asking me how I can do that in Photoshop. Does somebody have an idea or a tutorial for that? I thought I can do it with a second layer and blend them together with a decent cut-over.

You'd probably need two images. One of the person with the headgear and one without. Then you'd use a Layer Mask to softly transition one image to the other. It's a very simple technique to achieve technically. I think the most difficult part would be procuring the images.
Is there a offical name for this thebique? Or do you have an YouTube tutorial, because I'm not the best in Photoshop
You will need to have the fundamentals of working with Photoshop. If you don't have that, I would start with basic tutorials. With the fundamental understanding of Photoshop, its [more or less] just learning how to use Layer Masks. There are probably hundreds of tutorials about using Layer Masks as well as the documentation provided by Adobe. This is a quick example based off the image you provided.
Ah ok thx, I used layers in the past, but I'm not realy sure what filter I should use for the cut-over and how I can use them only on a small part of the picture
Its called a "Layer Mask" which is what I've just shown you. Did you watch the video?
Ah ok thx, I'll watch the Video later... thank you so much for your help
Hi actually i've been trying to resize this image with free transform tool (which was working a while ago) but suddenly this thing isn't working anymore, i tried shortcut keys reddit google everywhere there's no solution and this layer is not even background layer, nor it's locked, i can freely move it and do anything else but just can't transform, anyone got a solution about it? (make sure to ping me)

(im talking about that photo)
Let's see the Photoshop GUI with the Layers Panel open.

If selecting the Layer and using Edit > Transform > Scale doesn't work, then there must be some glitch somewhere. Save the file. Restart Photoshop. Open the file back up and try it again.
I'm sure it's just that "show transform controls" that was turned off.
You can also use a fancy brush or even another asset to make the 'cracks' in the mask.
Can I export as video including transparency? is that a thing?
It's possible but only on a (rather obscure) format, it won't work everywhere
Let me check, I have it jotted down somewhere
the most common is Apple Pro Res
See this preset in Adobe Media Encoder

You need to select the ones "with Alpha"
I don't know if they're available with Photoshop (I can't test right now, I'm on a project) but if they're not available, just save your .psd file (assuming it's for Photoshop) and convert it with Me
directly within Media encoder. I'm sure premiere can do that "in-house" (never opened Premiere so I wouldn't know 😉)
I see! thanks @vapid flume I'll explore it
Gave +1 Creative Carma to @vapid flume
https://pixelbakery.com/recipes/video-image-formats
Actually if you type "alpha" within Me list of presets, it will come up with all the available ones, but some are just too niche for most uses.
They are useful if you want to make overlays without necessarily go through the After Effects rigmarole
Pixel Bakery Design Studio
There's little info regarding alpha channels, so I wrote about it. This should be useful for Twitch streamers (stream overlays) and OBS/Streamlabs users.
"you no longer have access to this feature due to breaking tos" photoshop fill
Have you tried updating photoshop?
If you google it, there are loads of discussions and videos on it
Does anyone experience issues with the color window in the latest version? Mine does not match itself to the foreground color when I use the eyedroper
..and changin the hue does not change the saturarion preview
Its a known issue. Try dbl-clicking inside the color block. Then try single-clicking again. See if that works.
it works yes, at least a way to update it without manually changing the numbers
thanks
Gave +1 Creative Carma to @ripe quest
ohhh might be that
No. Probably not. If you have a layer active and 'Edit > Transform > Scale' is disabled/can't be selected, that is an application glitch; it has nothing to do with the Show Transform Controls checkbox.
How could I turn these clothes into white, I have attempted but failed miserably


Take a look at these techniques:
https://youtu.be/rSpx2s39Avs?si=xdpBU5xE7i_kbEVU
https://youtu.be/3Ce8f6rlkP0?si=Ae35XmAQvROSmw4l
Change Color of Anything to Anything in Photoshop! Learn how to selectively use the Hue/Saturation Adjustment Layer to Target and Change Colors easily.
Hope this video helps you. Thank you for watching :)
► DOWNLOADS:
- Sample Image: http://bit.ly/2BBitiy
- Finished PSD: http://bit.ly/2o14w3y (Only for our Patreon Family)
► HELP US CREATE M...
Learn How to Change Extreme Black Color with Very Little Detail to White with Photoshop! In this tutorial, we will use precise masking, Hue/Saturation, a ton of Curves, and most importantly; techniques to hide pixel breaking.
Whenever we are changing black to white, since black has very little details, making it brighter might learn to loss of ...
Thank you so much
Gave +1 Creative Carma to @ripe quest
Hey sorry for bothering you, have you the link for the tutorial ? Or the name of technic and I’m gonna do my own research’s
How do i make it so when i transform images i dont need to click enter to commit. I want so it auto commits.
The Transform operation needs to know when you're done transforming. What you're talking about it sounds like you want some kind of "event listener" that knows when you stop dragging. Thus, I don't think that is possible.
Can i take a photoshop edit over to lightroom (like when you press edit in photoshop on LR)
started editing in LR. moved to PS to replace the sky then realied i've still gotta edit another part of the pic in LR
You can edit in Camera Raw instead. The same controls exist in that interface.
yeah it usually goes to that when it opens in PS but it didn't this time
didn't thiuk there was a way to get to it apart from that
but i had masks on lightroom ready to go


See the links in my last message here
#❓ask-a-question message
Why do i get error code 113 whe ninstalling photoshop?
Error code 113 indicates that your device is not able to connect to Adobe servers, or the firewall settings on your device are interfering with the installation process
hello everyone, i've just discovered this kind of contents on tik tok

is anybody able to tell me which is the closest effect/technique used to realize this kind of noise/pointillism?
When focus stacking since the last update, I'm not getting xxxxxx.cr3 (merged) layer. Did I unintentionally change some setting? is there a fix for this?
is there an official server for lightroom?
and can i change what the auto mask has selected? It did a decent job with the car but the letters stand out way too much. Can i just remove them parts manually?


so im trying to place a pattern on the image instead of how it looks like now and dont know which way would be best
i want to remove the lines and replace them with arrows such as the ones posted
any help would be greatly appreciated


in ps or lr?
cut out the shape, place the arrows layer above and create a clipping mask
only issue with that method is getting the arrows to follow around doesnt really work with it
warp tool?
true, just alot of manual labour was hoping was an easier method with like paths and patterns
In LR
help, when I try to select a color, it will go to the box circled in blue. It doesn't go to the first box which is really annoying.

a question they ask people who boost the server-??
Help! How would I change the color balance of something like the below image to correspond to an RGB value? The color balance tool is 0-100 while RGB values are obviously 0-255.

In Photoshop, I'm trying to quickly create masks of the different elements of a face such as lips and eyebrows.
I noticed that we can create masks in Camera Raw however is it possible to do something like this and create layer masks inside Photoshop's layers rather than Camera Raw?
Is there a recommended way to quickly create these masks of the face?
I'm trying to make the background of the ammo count from resident evil 3 and this is the best i've made
But when i saved the file it's completily black i need help with this


this is my first time using photoshop
That's fine. - and it's probably NOT actually black
Sometimes the thumbnails don't render properly on the mac/PC finder/viewer. - Try dragging it into a different program like powerpoint, word, or even a web browser and you'll see how it 'really' looks.
Click the top box and try again.
How would you expect it to 'follow around' anyway?
Of wait... I see now
like bend the pattern to fit?
yeah, sorry I hadn't zoomed in and saw you wanted the STROKE filled. my mistake.
I think you'd probably need to manually do it in sections with puppetwarp...
Personally, I think the original way you did it looks cleaner anyway
I understand your concern (and yes somehow we should be able to change the units like on the colour picker) But the colour corrections adjustments layers are mostly, let's say, visual. Even Curves and levels have their own units and I think it's derived from the time when we actually worked with actual curves (computed from data exported from a spectro-colorimetre), none of which had any sense out of a printed material. Obviously you can do it for screens now, but the units aren't coordinated across the board.
One thing you could do, if that helps, is to set up colour samplers across your circle and open the info panel, and choose RGB as a unit

then "read" the values on the panel as you tweak the colour balance adjustment layer

You have up tp 10 colour samplers available so it should be enough... It's possible to change the units if they aren't in RGB here:


I don't have it in the top of my head, but it seems it have been reported as a bug in the latest version. Apparently you need to double click instead of single click (or go back one version)
ah I wish too!, But ACR (Camera Raw) is derived from Lightroom , it's the same module, and have this feature for a few versions now, and it isn't ported to Photoshop proper yet, but you can still select skin tones either in the "colour range" selection (select>color range)
and sometimes, the object selection tool with the object finder can be a contender too


Ahhh darn it. No worries at all. I really appreciate the colour range suggestion!! Thank you so much
Gave +1 Creative Carma to @vapid flume
Glad it helped!
You can also try the marketplace (in your CC app) for related plugin, sometimes you can find gems. Now I haven't tested this one but maybe if you got lots to do, it might help?
you can search for others by typing the search term in the left bar. (Tonatily Mask free is the name)

I have one that creates luminosity masks, and it helps a lot (but not based on colours obviously 🙂 )
oooo this is pretty neat. I'm pretty new to PS and I actually didn't know about the plugin store 🥰 . Thank you so much again! I'll definitely check it out
Gave +1 Creative Carma to @vapid flume
how can i obtain this serrated effect on the text?

I would expect it to be done in illustrator with the (effect "transform and distort" > "zigzag")
but maybe try wave in Photoshop? (or zig-zag too)
In illustrator it would work with live text, however you'll need to rasterise the text in Photoshop

It could be something else, the screenshot is a bit blurry so I don't know if they look like straight zig zag or more like a houndstooth pattern


In today's video I'm attempting to create a poster similar to those Hollywood produces. Using #Photoshop I make various different elements which I all put together into one final EPIC result! I'm quite satisfied with the result, and I hope you are too! As you all know my opinion about some recent posters is mixed. To me some are fantastic, and o...
At the 2:35 mark, benny puts on the metallic layer for the text, how does he get rid of the "excess" bits out when he moves it to the poster?
Like when its in overlay for the text and if you put it onto a bright background, you can still see the metallic layer vs a black one
Can someone that have acess to photoshop generative fill help me? It will be very easy and fast: could you open photoshop to use the generative fill for edit just the circle in this image? I would appreciate https://i.imgur.com/X8ZD8WL.png

does anyone notice any performance drops for the liquify in the latest version?
was doing it orignally with puppet warp but it was taking so long i just wanted to cry
Yo hello im new to photoshop and i have a question, basically i only bought photoshop cause im editing too and wanted to make a more advanced edit but for that i need something so i want to make a dollar with a custome picture and instead of The United States of America my Tiktok and Youtube Username, does anyone would be up to help me there?
im trying to use liquify, pucker, but ive realised that i don't want to radially pucker the area, i only want to do it horrizontally, contract the selection on the X axis only without altering y axis. how can i do this ?
I have a bunch of Letter/Number icons I've made for a game I'm working on. Is there a way for me to export them all automatically with the name changing based on what it is? Like Icon_A, Icon_B for example
Is it better to make birthday cards in Illustrator or photoshop?
He uses a Clipping Mask to do that. For context: https://discord.com/channels/547473772727238676/1081318392750940290
You can't import anything that even remotely looks like actual dollars/currency into Photoshop. You might have to use "monopoly money" or something similar.
I don't think you can make the Brush into an ellipse, if that's what you mean.
Name the Layers appropriately. Then try: File > Export > Layers to Files... Perhaps that will work for you.
Perhaps both but I suppose that depends on the content. Each app was designed for different purposes. Photoshop: raster/pixel-based graphics. Illustrator: vector graphics. If I were going to design cards with the goal of getting them printed, I would probably design the raster portions in Photoshop and then bring those elements into Illustrator and do the layout, design, typesetting. Then export to PDF from Illustrator for sending off to the print shop.
Oh I dont click the box to select the color I use alt to select it.
Wdym double click? Like what I'm trying to select?
Hi! So I'm making a graphic and I want the 100% to be in the same place for every and each of these cards

is there a way I can do it atomatically and so it's perfect for each card?
i tried to put this font through ai font detector and the fonts on detected are all paid. I want something similar to the above. I know it's from serif-family, but anything in particular that could replicate this?

Have you tried Adobe Fonts?
looks similar, and is included in your subscription 😉

A sans serif typeface with 16 styles, available from Adobe Fonts for sync and web use. Adobe Fonts is the easiest way to bring great type into your workflow, wherever you are.
Almaq seems good too

This may be a really off question but does photoshop have a manual you can buy online?
Like the other day I went to indigo and bought a manual for Microsoft Excell.
Not as an official manual like we did have in the olden days, but there are certainly books (Adobe has its own publishing outlet) that act like the official help.
Let me get you some links
Classroom in a book is intended for people who start from scratch. It's not a beginner series, it does go quite far
https://www.adobepress.com/store/adobe-photoshop-classroom-in-a-book-2024-release-9780138262525
Learn to create and edit images using Adobe PhotoshopAdobe Photoshop Classroom in a Book (2024 release) uses real-world, project-based learning to cover the basics and beyond, providing countless tips and techniques to help you become more productive with the program. For beginners and experienced users alike, you can follow the book from start ...
This series exist for all software
Then you have the cross apps books like this one
https://www.adobepress.com/store/adobe-photoshop-illustrator-and-indesign-collaboration-9780137908462
written by the well respected Bart Van de Wiele
Even if you're already comfortable with Photoshop, Illustrator, or InDesign, Adobe Creative Cloud now offers powerful opportunities for improving efficiency and collaboration that few design and marketing professionals are using
after closing an file and when it goes to your recent opened files does it show it on other computers?
like file history
Thank you so much. I will definitely take a look at these. I'm just starting out so have alot to learn going forward.
Gave +1 Creative Carma to @vapid flume
and when you clear your recently opened/ used files does it delete it across every computer using the same account?
@vapid flume
Hi, Does anyone know how to make like, a sort of dust outline for a window texture?
You know like when you park a car in a sandstorm and the windows get sand around the edges
You're welcome. If you have specific needs, there are some books more specilaised, like "Photoshop for Photographers" By Martin Evening (who passed away last year so likely that last release) or the series for Digital Photographers by Scott Kelby
Hi
I need assistance
May you help me
I have a question
after closing an file and when it goes to your recent opened files does it show it on other computers?
like file history
and when you clear your recently opened/ used files does it delete it across every computer using the same account?
I never really checked but it does on mine, on the "your file section", but recent files as in "file>recent files" are for each computer if that makes sense.
So your recent files won’t show on other computers?
In fact I just cheched. The recent files from the file menu is unique to each computer
the "your files" show synchronised cloud files, so may distributed acoss all the computers with the same Adobe account
NO, I just check on another one just now (I only have two computers)
Ohhh thank you so much
No worries 🙂
If you want to find your files on every computer, you'll need to save on the cloud. If you retouched some dubious images and don't want your co-worker to know about it, you're safe 😁
Does it auto save to cloud?
Or you must manually do it
My first port of call would try to find an image (like on Adobe stock) and see if I can composite this image onto mine:
like that one
https://stock.adobe.com/uk/images/sandstorm-disrupted-grunge-texture/506707465 it's free
But that's because I'm lazy.
You could try with some noise (filter>noise>add noise) on a painted layer, try to paint big areas of slightly different shades of beige/tan colour

Adobe Stock
Download Sandstorm Disrupted Grunge Texture Stock Illustration and explore similar illustrations at Adobe Stock.
You can do either. If you want it automatic, you need to set it in the preferences

Edit>preference>file handling
But you won't find them in the recent files on another computer.
You'll find them here instead:
"your files"

Did you get sorted?
I just made one row in a folder and copied it over and then did it 4x more times
Came out okay

Yeah. That works 🙂
this is kinda a dumb question but
i was trying to use lens blur, used it once, then did some work with text, and when i tried to go back to lens blur by clicking camera raw filter, the side panel didn't show up

this side panel that was there bfore

and i dont know how to get back to the side panel lol

can anyone help my transform tool doesnt work at all
Filters are destructive. If you're going to do that, I'd suggest first converting the layer to a Smart Object. Then add the Blur. Then the effect will be adjustable afterwards.
No. There isn't a "Frosted Glass" filter.
i see. how would you adjust it afterward?
i press cmd T then i cant even move it anymore until i get out of Transform 😭
Hello everyone if someone could help me; I want to Inlay the tribal symbol with a dark black color. I used the different modes including overlay, I tried to adjust the level or the curves but I can't manage to overlay it effectively in dark black.

Convert the Layer to a Smart Object. Then add the Filter. After that, it will show up in the Layers Panel on that Layer. You can click on it to edit the effect level.
@ripe quest can you help plz
Based on this description. I don't know what that issue is. Is that Layer "locked"?
nah cause when im not in transform i can move it and stuff
it works! thank you so much man :)
Gave +1 Creative Carma to @ripe quest
its with all my layers btw
the transform commands justr dont work
You have select the layer. Then Ctrl T. or Edit > Transform > Scale/Rotate, etc.
?
Then save the file and restart Photoshop.
Like a disintegrating filter
I don't know what you've tried thus far. Change the Opacity of the Layer or try Advanced Blending... Blend If.
thx it worked
Gave +1 Creative Carma to @ripe quest
which app is the best for logos
Adobe Illustrator
ty
Gave +1 Creative Carma to @ripe quest
got a question. how would you guys say its the best way to promote my graphic design skills and services? i got a discord server which is a shop basically and i would like to get more audience and build a comunity in it
Get on LinkedIn, Fiverr, Upwork, Behance.
yea i thought about that but then i also thought about the fact that those platforms are really popular and they already have a lot of graphic designers that i am sure 80% of them offer better services than me :/
You gotta start somewhere.
Maybe some combination of Blend Modes, Advanced Blending and Layer Masks...
This is just quick. Completely unplanned. I just grabbed this tribal graphic from image search. If I were actually doing this, I'd probaly make a design specifically to fit the shoe. Hopefully, it gives you some ideas to try.


Thanks a lot man sorry I didn't see your message; I wil try thank you very much !
Gave +1 Creative Carma to @ripe quest
Can y'all recommend some unique and cool plugins for working with photos? (I am an experimental photographer and try to make each photo have something unique).
I already have all basic plugins like boris fx type
how can i cut out the rest (the backround)? i am using illustrator

Best to ask on Illustrator questions on the Illustrator server.
why dont my generative expand button work, its greyed out
it worked like 5 mins ago lol
Hi, i can consider myself an intermediate towards advanced graphic editor and i started to realize things are getting a bit repetitive. Would you say i shoud watch some more advanced courses to boost my knowledge further?
Can someone point me in the right direction for taking photos of my products like this? I’m starting a jewellery company similar to the one I got these photos from and would just like to get some nice clean shots of my chains


Is anyone here good at photoshop? I'm struggling with a photoshop assignment and i'd appreciate a lot getting help
Hi does anyone know how to cut a picture into a selected shape?
does anyone know where i can make or find a pattern like this

I'm sorry for the late response but it's still the same

Can someone help me with this ?
Hey guys need some consulting. I’m creating an art piece for my girlfriend and our 4 year anniversary. Trying to make her some kind of digital art that I’ll eventually put on a poster and canvas , mainly using generative AI
I’d love some help, I’m pretty new and it’s hard to figure out. If anyone is willing to talk to me, that would be great.
I’m creating this very personal piece between me and her. A forest setting, with us as animals doing our hobbies with a bunch of extra details on it. I’d love to explain and try to paint the picture for you guys and hoping someone will help me. I’m trying to figure it out on my own, but again I’m having a lot of trouble and don’t know where else to look. This is very important to me
@everyone
So what this design is about is to say congratulations for competing in soccer, basketball and badminton competitions. Have any interesting ideas for my design? I looked everywhere for references but I'm still didn't feel right.

Hello! I've been trying for quite the time to find a way to select a color and then change it to whatever i want. This is a texture for a model, and it uses UV wrap so the model will use these colors on the image, i got told that i could change the colors by for example selecting and picking the green one and then changing it, but it has been really hard and not really practical

This is the original texture image and then this is the one that i've done, but it has quite some issues since some of the colors has some gradient and it makes it so hard to change the color

This is what i'm talking about, and the tool that i've used was going to Selection, and then "gamma of color" and picking the color, but it doesnt grab the gradient of the color, it's quite hard to explain but what i'm looking for, is how can i pick a color of the texture, and then change it for whatever i want?

In this example i've choosen the color pink, and select everything but there are these spots that are purple and wont select them

You can probably use the hue/saturation slider - but instead of changing the hie of EVERYTHING, you can define exactly what colour you want to adjust
Depends on your budget, but if it's scarce get yourself a light tent. And you'll need a decent camera (doesn't have to be hi-end) with a good not-wide angle lens (equi: 80 mm is very good)
Camera phones are almost all wide angles and never give good photos of small objects (distortion), also they aren't sharp enough compared to a proper camera:
Re: Cameras, second hand is a good way to get a nice one. You don't need gigantic resolutions if it's an online catalogue (gigantic resolutions are a hurdle unless you have a gigantic sensor to suit, as in an expensive camera) If you're on a budget, stick to lower resolution and put your money on a lens).
TDLR: Light -> get a light tent, camera -> invest in the lens.
If you need feedback on your design, there is a channel for that! #📝project-feedback
I can't really help you (I'm very bad at giving advice on creativity, it doesn't come easily for myself either 🙂 )
But what I can tell you is how I, personnaly, takcle it
1-Search for visual references: It can be: the composition, colour, the different elements
so imagine you want a forest setting with animals, research the general forest that visually appeal to you, the different animals in that forest, the colour scheme, mood, season, style etc
At first, you'll be looking at everything, but you can refine once you see something you think will fit what's in your head
I recommend Pinterest. Create a board, just search for - say - forest and illustration, and start to pin the things you like in this board. Pinterest will give you more of the same style, The algorithmn will feed on this...
If you see an artwork that looks good but also point to an article or a blog post about someone explaining their process or case study: Just don't pin it, read it too! It will help with further idea. If it's an artwork you like but points to a shop. Don't bother reading it, just pin it, you'll learn nothing from a s shop 🙂
Do that for every elements you are looking for. At the end of the day, You'll have a clear idea what you need
2- Draw a sketch of what you need based on your research. I suggest creating at least 6 "thumbnails" with different compositions to try. Explore composition with grids (rule of thirds etc)
3- Establish a colour scheme, something around this:
1 main colour (green for the forest?) + 5 other important colours + one other accent colour (to highlight one thing in particular), it ought to be very different and tonally and chromatically very distinct from your main colour. Say Light red VS dark green
Read a bit oabout colour theory if you need
I honestly don’t think I have the skills to do this successfully. I’m looking on fiver for someone to help do this for me. I don’t really know who to go for.
Illustration, mascots, poster…
Once you got that you can start "ideating" and ultimately creating and refining

WEll, I would try at least the first step, make some tentative shots and see what you like
If you really don't know you can hire artists on commission. There are many on websites like Ko-Fi for example. Just don't expect to pay a "fiver" though
Is fiverr not good?
You choose an artist based on the style you want, if you take a random person who has no style there will be a good chance this person is copying
I never tested it, but I would never set foot on it, based just on the name 🙂
But I’m worried it won’t work well for a canvas or poster. I’m not sure the different between jpeg and vectors. I want it to fit HD on a minimum 30 inch canvas. I wouldn’t know how to do that properly
It's very demeaning when you're an artist or a skilled professional to compete with $5 people (and keeping in mind that the platform takes fees on top of the measerly price)
If it's important for you, and you cannot do it, don't skimp on talent! (or learn to do it yourself if money is a concern, I get that)
Either you learn, either you hire a professional, and that professional will ask you the good questions like type of media, size and other stuff
It's both, I know some people charge higher, but for me when your selling point is the price there is something wrong about it. It doesn't have a very good reputation from the freelancing community (lots of clients scams etc)
That said, I have never set on foot on this
My going hourly rate is £40 up to £65, so it's fair to say that I'll never land any projects there
Oh I see. I never used it either, I have just heard of it. So you recommend ko-fi?
Would you be interested in a job like this?
Not specifically, KOFi, but I've seen good artists there
One other way is to contact people on Instagram etc you like the work of, and ask if they do commissions.
You can also see if you want to post a job on Behance, lots of good illustrators here
Basically everywhere you can find illustrators (art station etc)
Unfortunately, I can't draw to save my life 🙂 (I wish!)
So what’s the best way to do this you think? My budget is around 150 USD.
I need it to look good (obviously) fit this complex idea properly, and be able to be printed to the proper large size to fit a poster or canvas. And something decently quick.
I don’t have an Instagram unfortunately
Let's say on Ko-FI. Take an artist you like the style of (So you must do your research)
see what their commission page looks like
https://ko-fi.com/mujeeberry/commissions

Ko-fi
The Fifteen's Art Studio is creating illustrations, selling digital products, and offer commissions. ✨
on Art station: Same
https://www.artstation.com/andrea_buitrago
see the artist profile and contact them for a commission (You might need to create an account to do so)

On instagram, you don't need to create an account to "see" people, most people have a way to contact them on their profile
You need an account to post and use the DM functionality (I think)
for Behance, again select someone from their style and look for the "freelance project" button
On Behance some people are seasonned professionals, they might not want to take on the odd commision, while on KoFi or art-station there would be better chances.


The problem is people taking commissions will expect a bit of info about your project, the more info, the better communication, the best chance you get the results your want.
Or maybe give them a white card with just a few guidelines and let the magic happen.
Does anyone know how the text effect in the background is called or how is it done? I have no idea how to do that

Its called extrusion. https://youtu.be/Sse66PVFmoU?si=sowHcbmMfLAIYECr

📌 Get Photoshop on Adobe’s website: https://bit.ly/LSPV-Photoshop
📌 Get Photoshop on Amazon: https://amzn.to/3Tozpw9
📌 Try Photoshop FREE for 7 days: https://bit.ly/LSPV-Try-Photoshop
➖➖➖
⚡ Resources for you ⚡
1️⃣ Download FREE Graphics: https://www.learnsharephotovideo.com/shop
2️⃣ Visit my Amazon Store: https://www.amazon.com/shop/learnsharep...
Hi, i can consider myself an intermediate towards advanced graphic editor and i started to realize things are getting a bit repetitive. Would you say i shoud watch some more advanced courses to boost my knowledge further?
Difficult to answer that question just like that, but maybe you're taking it the wrong way? Do you achieve your goals at the moment or are you looking at doing more complicated things? Is it for work, and gaining more sellable skills, or is it to learn new things?
You can decide if you plan to watch tutorials when you have resolved the why... Maybe the answer is not more tutorials, maybe the answer is another software, another set of skills (3D, drawing etc...), or another kind of style. Only you know!
I am currently working in a 3D software as well becasue of what you jsut said, but yea, i guess i want to learn more sellable skills and overall unlock new abilities in photoshop becasue i know for sure that there are a lot of things i don't know but even the tutorials are just repetitive and no-one is teaching like really in depth if yk waht i mean
i feel so limited to the things I can do.. even tho i know if i could learn it from somewhere i could do more
i'm getting so dramatic damn😂
No, don't worry, If you didn't want to push yourself you'd be a dead brain. The fact it worries you is kinda healthy. But IMHO, you cannot decide what to do without a end goal to guide you
Because it could be anything you'll pan to learn and there would be no reason behind it. It's bound to fail
What do you do at the moment?
My initial goal is to make a sustainable career out of this
but like that's final, right now i have more goals that are like on levels
for example sell my first product on fiver or get more people to know abt my services
So if this is work related, than try to search an area where you can make better money by being maybe more creatively involved. Something that has to do with less pure skills maybe but more conceptual/artistic direction
Also try to reach more better paying platform than Fiver. Aim higher!
If you do the kind of things that everyone with an internet connection and a youtube account can do, then there are millions like you. Carve your niche and be the top of that niche. Better said than done of course
you can also look at the Adobe Creative Career Discord. There are specific Chanels who help to give career Advice https://discord.gg/acc
So i should focus on only one niche and become verry good at that perticular style?
thanks! i'll take a look
Gave +1 Creative Carma to @grand stump
That's what I would do. I don't think you can be very good at everything. That doesn't mean that you cannot enjoy things that you are less good at. It's how you advertise them and build your portfolio around them that's important
makes sense. but in order to promote my work would you say i should first make random samples so that people can see my work? or is that too much?
Hi! how do I change the white background to black here?

idk if it works but i would try using channels
already tried it, doesnt work
My personal advice would be to have top notch samples and a website (it can be a portfolio website you can do for free on Behance)
https://portfolio.adobe.com/
restrict to 10 samples, including maybe a case study of a project and make it VERY GOOD.
Study other's people Behance page, take your cue from the best. Presentation is very important.
Once you are happy with it, make sure the portfolio/website accompany you with your name (for example include it on your Discord profile) so people are never left searching for you

Quickly and simply build a personalized website to showcase your creative work with Adobe Portfolio. Now included free with any Creative Cloud subscription.
i tried it now, it is possible using the green channel as it has more contrast but when it hides the white, it hides the white parts from the caracter as well so idk
The issue is that is there is white in other parts than the background. If that wasn't the case I would use "blend if" with a black background layer underneath this layer. But all the highlights, the piano keys etc, will turn black too!
So I am afraid that there will be some manual masking involved there
So on the most basic level, selecting all the whites using for example select>color range> whites, then use this selection as a mask on the artwork layer. Place a solid black layer undermeath, and then manually paint back the white bits that are not part of the background, with a brush.
if you decrease the fuzziness it seems to cover some of the inside parts
Yes, there will need some trials and errors but worth trying!
also, can't you get rid of white fringes using minimal?
i tried it through color range, doesn't work

Seems quite OK for a start, you need to paint back the mask to get rid of the unwanted parts. You cannot expect it to work without minimal brush work
@inland creek yes, the minimum filter or the matte option in the layer menu
Matte is more for an artwork than a mask though
feel like if u use curves or color balance to match the subject to the darker background it would fit better
Just take a small brush with a white colour on the mask, and paint over all the little areas between the strands of hair etc. Maybe what you don't realise is that the hair etc is extremely detailed, there lots of small areas that an automatic method cannot take care of, there is some manual work involved
Why does the text space so much?


probably the leading settings in the character panel
Set it to "auto" and see what it does

Oh sorry, messages crossed!
I need to go anyway 🙂
Bye everyone!
thx !!!
noo, it's not my job i guess to answer sorry xD
i don't want to seem like that
This is extremely busy; there is no "automatic" way to do this. It will require some hand-painting on the Layer Mask to remove the white areas between some of the fine details.
It's everyone job in a sense, nobody is more qualified than the other!
Hey, I have a question about Adobe Portfolio, can anyone help me real quick ?
You are absolutely welcome (and more than welcome) to answer
oh ok 🙂
It's a community thing 🙂
i thought like for a second only mods and like qualified people from the server are allowed to answer to community people! 🙂
Just ask the question. If someone knows, they will probably answer. (And please don't post the same question multiple times/in multiple channels.)
Could anyone help me withthis
Ok sorry. New to discord to be honest.
I'd like to make home page with 3 different category that lead to pages when we can find my project.
Exemple :
Home page > Architectural / Portrait / Commercial
and when you click on one of these you can see all the different project in this them
I don't see any reason why you shouldn't be able to do that. Portfolio allows you to make galleries.
yes i can make gallery. But maybe i'm not clear enough. I want to make a page where you can see all the different galleries. And i cant find this.
how to design these type of own characters ? is it possible to do so in ps or any other app if u know
if yes then i there any tutorial or smth to help me learn it ?

Perhaps this will be helpful for what you're trying to do: https://youtu.be/QlJ0lWzSI-U?si=JDsuhlL0PwcwWpVk

In this video I will teach you to create hyper realistic face texture using real images for Gaming and Production
I worked on it and this is what happened. how can I improve the result

try going to curves - red channel and bring it down a little
like that?

is it possible to extract the "top level" scanner line and make it into a layer so i can put text under it

looks better to me but don't be limited just to that play around with color balance, curves, hue saturation and exposure levels and see how you can make the subject fit perfectly and then let me see the final image
restarted app and computer, uninstalled and reinstalled, closed all in task manager and re opened

help
Question, I made a drawing that is this size:

But I want to reduce it to pixel size that will be almost this size:

My question is, is there a way to preserve the fine details, without it becoming too unrecognizable?
whatsup guys. I would like to delete every black part of this image so it's essentially a transparent image with only the white outlines. This way I can print it on a black hoodie. Do you guys have any idea how to do this properly? A youtube tutorial perhaps? The ones I've watched weren't very helpful.

Damn that's beautiful
So, first of all, the two images are completely different aspect ratios; the images is going to be squashed if you're scaling the entire thing with image size. Second, you're removing most of the pixels from the image so you will not be able to retain the same level of detail with a reduction in size like that.
So no way to retain the same level of detail?
Cause I wated a few hours drawing the pic by hand
and would be a shame to lose it all
I thought if u resize good quality high image, it woud leave all the fine details untouched
So you're not starting with a "good quality image" as its only 72 ppi. That is the baseline. Also, you can't just expand resolution to a different ppi. You have to begin with a good resolution. The interpolation algorithm is just going to try and "fill in" pixels when attempting to upsample/downsameple. But then, you're also, reducing the image at the same time. What you're trying to do there doesn't really make a lot of sense.
hmm I kinda want the picture to fit in 58x25
I mean look at the beuty I redrew to pixelate:

If you want to get a better understanding about how bitmaps and interpolation work, then you might want to check this out and watch the video contained therein: https://discord.com/channels/547473772727238676/1073786013308170291
So you want to put this image on the middle of a black hoodie, is that correct?
Yes sir
Sure. Its pretty easy. One moment.
If I'm understanding properly, you should just be able to drop this on top of your hoodie image and set the Blend Mode to "Screen." I would convert that Layer to a Smart Object if your design will require you to rescale/manipulate it.
Thats perfect! Thank you very much!
I would remove that section of the image and put it on its own layer. Then you can assign a Blend Mode to it like "Multiply" or a similar one and possibly adjust the opacity. Then you should be able to put other things "under" that layer like text and/or other elements.
Hmm. Sign out of your Creative Cloud Account. Close the app. Then restart the computer. Then open the app and try to sign in again. If that doesn't work, then you'll probably have to contact Adobe Customer Care.
Welp, put in pixels myself with pencil tool:

keep messing with adjustments and camera raw
Can anyone tell me how I can make a picture of mine look like that (i mean the frozen/ice on the screen and not the guy)

if anyone has like 2 mins time to help me any chance someone calls me
Oh no i didnt mean how to make a texture lol i meant how can i make the eyes look like anakin's
and add bags
Hello pls can someone help me?

I’m confused what is 300 dpi?
Can I share my picture and you can take a look if it meet the requirements pls?
i reckon it's just an overlay with a different blending mode, try searching for "[anything] overlay" like "scratch overlay", "ice overlay" etc
dots per inch
i'm 99% sure it's the same as Pixels Per Inch, which is just how many pixels go into making one inch of an image

300 dpi is the standard for printing
yeah change 72 to 300
Oh so I need to change the 72 by 300 ok
yep 👍

Hi guys
JPEG 2000 is that jpeg? It’s strange it saved me as a jpf file
Thanks
Gave +1 Creative Carma to @forest glade
hi guys. does anyone know how i can get this exact same text effect? like the 'WALT' and also the 'junior'?

u mean the font or the actual effect on the text?
what do you mean
Please why I have only those saving file extensions options?

I need jpeg lol
why photoshop don’t want me to save as jpeg..
the actual effect like the shiny golden edges on the and also the metallic or qucksilver kind of look
File > Export as > JPEG...
Most of this can be done with Layer Styles.
so the walter one is fairly simple just write ur text and apply a gradient with 3 colors, (in this case its red, yellow, red) and for the metallic look you can just search a texture on google and clip it to the text.
like to make the eyes orange with a red ring around them and sclera red
or use layer styles yea xD

Either Clone Stamp from another image and/or paint them.
I'm having a weird problem in Photoshop
The selection is not fully deleting when I press the delete button. it's still keeping a small soft line shadow like thing Inside in the middle of the selection not borders. Please help guys😓🙏
can you show me how to clone stamp

I simply used object selection tool (lasso) to select the subject then I inversed the selection then I simply pressed delete but that didn't fully deleted the contents of the selection. I thought those things happen only in borders for fading purposes why it kept things literally in the middle of selection 😐

PHLEARN PRO Black Friday Sale! Save 30%!
https://phlearn.com/phlearn-black-friday
Over 200 in-depth courses, 800 creative downloads (Presets, LUTs & Actions), and guided Learning Paths! Only $69.99 for one year unlimited access and $8.99 for one month.
–
.
.
.
Today we show you how to remove anything from a photo with the Clone Stamp Too...
thanks a lot guys!
This is the original image btw

THNX is that u
in the youtube channel
No. That is Aaron Nace.
Any helpers guys?
Yes. One moment. 10 people are asking for help. heh


oh okay
This image is so busy that it is likely going to require various techniques to remove the unwanted elements. I would suggest using many of the Selection Tools and a Layer Mask to hide the pixels. With a Layer Mask you paint black to hide pixels and white to reveal hidden pixels. This is done instead of deleting or erasing. Then if you make a mistake, you can easily get the pixels back. Something like this...
More information about Layer Masks: https://discord.com/channels/547473772727238676/1045711257178738760
Thank you so much bro
Gave +1 Creative Carma to @ripe quest
By the way is the a way to tell the Photoshop to just delete my selection without leaving anything behind?
I noticed something else alwell
It's ripple deleting my selection
Like onion
"Leaving pixels behind." That will depend on the selection you make.
Is there a way to disable leaving pixels behind?
It only leaves pixels behind if they weren't selected to begin with.
Okay I literally selected that😐
Perhaps there is some feathering or some setting on the selection tool or on the selection.
It's literally in the middle of the selection
Sorry. I don't know what any of this means. If you make a selection, invert it, and hit the delete key... pixels get deleted. Thus, if things weren't selected properly, they don't get deleted. heh
Anyways deleting and erasing is a bad idea. Learn to use Layer Masks.
If I select a ball in the background & invert the selection, whole background will be selected ... Like duh
I think that you're assuming something is selected when its not.
Invert means selecting everything except my selection... Right?
I can send other examples... It happened with multiple images multiple times
Using Selection Tools aren't an exact method to select every pixel. There are tolerances. Sometimes edges are not selected. It really depends on how you're selecting them. Don't assume that just because you can "automatically" select something with Object Selection that EVERY pixel around that shape will be selected. This is why its smarter to use a Layer Mask. Masks can be refined afterwards. Pressing DELETE cannot be refined.

If you zoom in on the left side you'll see small line shadow like thing
Before deleting the selection

After deleting the selection

Check near the robots left leg
Where I clearly selected as you can see in the first image
It was selected then why it still keeping the pixels behind after deletion
Here's the results after layer masking the selection as well as you suggested

I don't know. What version of Photoshop is this? Perhaps there is a bug. Try updating to the latest version.
Okay


What camera lenses would you guys recommend to get photos like this? I have a canon 2000d
how do i remove lines in the background

Probably just drop the background and add a Color Fill Layer using that color.

ok thank u, can u just send me that picture u just made please?
Gave +1 Creative Carma to @ripe quest

thanks
Im sure that that's more than enough and the reflection of the golden chain is edited anyways so it souldn't be to hard to get good captures
Anyone know why Adobe is making my JPEG at 50% transparency? As you can see, the image on the left is much more vibrant, but when I insert it in photoshop it’s all washed out. I clicked on the layer and it says the opacity was still 100%. So why does it look like this?

Does anyone know how to make an effect like that?
