#💥┃post-processing
1 messages · Page 3 of 1
i can see that this effect works in the frame debugger but it isnt actually added ontop of my image or atleast you cant actually see it in the game


any reason why bloom wont work on mobile?
The most obvious one is that your mobile build uses a quality setting tier that disables post processing
It's also possible that your mobile platform doesn't support specific graphics APIs
Anybody know how to slow down the updates a render texture gets from a camera, aka lower it’s FPS
disable camera, call camera render manually
Hi, I have a problem where tonemapping is being applied in the scene view but not in game view
I have a problem with custom rendered features. When i need like a render of the whole game view in black for example i could render it in a solid color and then use it for whatever i want. But my problem is that im using open xr aka i have to render the scene with 2 cameras because its vr wich destroy every effect that need smth rendered as explained above. How can i fix this ? Can i render it twice for each eye or can i make the whole custm rendered feature run twice, once for each camera? If so, how ?
i added post processing to my quest 2 game. the effects i added were bloom, chromatic abberation, color grading. and now it lags really badly. is there anything i can do to avoid lag?
you could not use post processing 😛
post processing can be quite costly especially on mobile
if you insist on keeping post processing I would keep it as light as possible, so i.e. only keep color grading and bloom, but put the bloom ONLY on fast mode
and for color grading unity does have the option to where you can use a LUT, which I would recomend you use
if I recall I believe you can set or color a scene how you want with color grading using the many different tools in the color grading effect, and then you can generate a LUT. So when you build for mobile you just change the color grading to instead sample from that generated LUT and that should save on some processing
I have two cameras. One camera is for the main camera that has post processing effects. My second camera is to ignore some objects so post processing effects don't display on them. Issue is the camera that ignores post processing effects doesn't render fog for some reason, so the objects can be seen from a distance. Is there a script I can apply to the second camera to force fog onto those objects that ignore post processing?
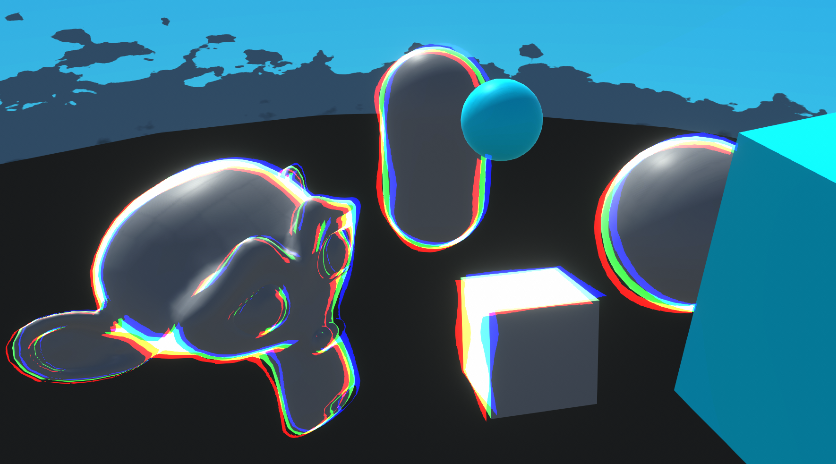
im new to post processing and have no idea what makes what better. what is better no PP or PP? left = no pp; right = pp


If the choice is between 'none' and 'everything is blue and blurry', then none 😅
haha i tried to add depth of feild and make it a bit more fantasy like
i bearly touched the things
Generally you might not need anything beyond Tonemapping, Bloom and Post-Exposure to taste
Don't mess with colors unless you're going for a very specific look I'd say
Bloom is good for that, especially when tuning down the Threshold
Maybe some DoF but go really easy on it
If your sky is blue and sun is warm, there's probably no need to tint the shadows, midtones or highlights in post process, though that's also an option
Too much haphazard post processing will detract from the asset art
Preferably
That threshold sounds okay, but it's up to your artistic eye
You can make a cataract simulator if you want to 
my artistic eye sucks. i barely touch stuff and it looks fake af for me less is more
haha
Then it's best to keep it minimal, and/or run it by someone as you make changes
i added a bit of bloom a tiny bit depth of feild so the backround trees are blurry and the tonemapping

generally for post processing if your happy with how your scene looks without then you don't need to add any PP despite what some might say
but if you want to the only ones I would recomend are just to use bloom and tonemapping
at the minimum using tonemapping with the netural preset
since tonemapping will take care of any clipped light/color values and soften them up
This is exactly what I am wanting to do and it was the first message I seen. How do I not add post-processing to certain items
Unless someone can tell me why the car wheels look like trash when I add motion blur
What kind of trash? Which render pipeline?
Selectively excluding things from post processing is tricky, and usually not the first option
Ive seen games have a faked radial blur on wheels, because motion vectors dont really support radial motion
Try turning off Motion Vectors in the MeshRenderer
Force no motion or Camera motion only
Is it heavy to change post processing values of an effect (more specifically of Vignette) at runtime? Because if I change some Vignette parameters while the game is running from the editor, it seems like it's going to die the computer
what do you mean by that
I normally have a black vignette applied as a post processing effect on my game. But when I use a freeze power up, I want it to become more azure/blue and make it slightly stronger, so I tried to find the right values changing them while I was in the editor and the computer was almost crashing
It's not particularly heavy from what I know
If you're modifying the volume override asset, you could try to instead have another volume for the blue effect and modify its weight at runtime
uhhh what pc do you have?
what method did you use? did you use loop?
Nono, I am modifying it from the editor manually (dragging around the sliders)
It's a laptop (HP Pavilion Laptop 15-eh0009nl)
mmh.. I need to understand how weight and priority works because I would prefer to have the blue effect volume contain only the modified vignette, and the other effects like bloom, tonemapping.. should still work
I would even like to fade between the normal black vignette and the blue one
Ok it seems like I can simply add another Global Volume with the blue vignette and make its priority higher to override the black vignette (without affecting bloom..). Now I need to create a fade effect and understand if the overriden black vignette time wastes time or if it gets skipped
Is there a way to disable bloom for vfx while keeping it on everything else?
Through changing the settings on the vfx without rendering it on a different layer
It looks like the one on the left with bloom on and I want it to look like the one on the right


Lowering the HDR or changing color modes just makes it muted and wispy
Only by rendering it on an overlay camera without bloom
The problem with that is the vfx gets rendered on top of everything, although fixing that would have been a better question to ask
Maybe you can composit the images by depth, though I'm not sure how that works exactly
Or use a depth fade / soft particle shader using the first camera's depth texture to get a similar effect
Though, it might work to just not have such a low Bloom Threshold that anything white glows, to avoid all the compositing trouble
Often HDR rendering and bloom threshold are used so that only surfaces brighter than "pure white" glow so you can still have reasonably bright surfaces without a lot of blooming
It's understandable if that's not an acceptable compromise also
Okay what in the genuine holygobsmackerey
Just turning off clear depth fixed the job
I swear it didn't the last 200 times I tried it
Broke again
nvm
how can i change the hueShfit of my color grading through code?
Hi guys! How can I make this rainbow with bloom effect? I don't know how to add Bloom to a Particle...


Don't crosspost please
why my bloom looks like this

Could be because of gamma color space, because of no HDR, because of no dithering on camera and/or because of limited color format if you're rendering to an RT texture
I was messing around with Motion Blur, and then my camera just went black. Now when ever my motion blur is active the camera is black. Same thing happened with Depth Of Field when I was messing around with it. I have restarted Unity multiple times and have tried removing and re-adding them, I get the same issue.

Are there any resources with how to get the Unity post processing stack to integrate with a custom render pipeline? I've been looking and haven't found any...
Any errors printing in your console?
Is there any way to get Multi-scale Volumetric Occlusion to ignore some objects? Changing their draw queue to 2501+ works but then it gets no shadows
"Solved" by placing the characters in another camera layer and drawing two cameras... I wonder how inefficient is that
Erm, just wondering if it's possible to add post processing in 2D urp to just 1 object, i.e. I want a specific object to glow
Not exactly, because post processing is full screen and works by visual brightness
You can however use a high bloom threshold and a high emission intensity to make only specific materials bright enough
Though 2D lit shaders do not implement emission maps or emission intensity, I think
May have to do that with Shader Graph
alright
If its only for one object, Id not use pp, instead putting transparent sprite on top of the object with additive blending could work nicely
Oh, sorry, I got it to work
Hi I'm trying to understand what's not working here
Using an orthographic camera, I'm trying to display the depth of objects in my scene and it works setting my camera's DepthTextureMode to Depth with this shader
fixed4 frag(v2f i) : SV_TARGET
{
    // return tex2D(_MainTex, i.uv);
    float depth = tex2D(_CameraDepthTexture, i.uv).r;
    return depth;
}
but when I'm trying to use information about the normals as well, I cannot decode the depth textures anymore ...
I'm switching the DepthTextureMode to DepthNormals and using the following fragment shader :
fixed4 frag(v2f i) : SV_TARGET
{
    float3 normal;
    float depth;
    float4 depthNormal = tex2D(_CameraDepthNormalsTexture, i.uv);

    DecodeDepthNormal(depthNormal, depth, normal);

    return float4(depth.xxx, 1);
}
To compare the result of simply using DepthTextureMode.Depth and using DepthTextureMode.DepthNormals here are two screenshots, so what am I doing wrong ?


why ssr looks wavy while moving
Are you totally sure that's SSR? It looks a bit more like a realtime reflection probe
Always check how the look of graphical effects through the game camera instead of scene view
Which render pipeline is it / which SSR?
there is no reflection probe in scene and im sure its ssr, built in renderer
same as game view
its post processing

I think the wobble is because of low SSR resolution
Visually it looks like what I'd expect from "downsampled" rather than "supersampled", which really doesn't match what we're seeing in the settings
I'd verify that there are no multiple post processing overrides acting on top of each other
even with overkill preset its resolution is low
Just as a sanity check, do the reflections disappear when you switch off the whole override?
If so, maybe there are global quality settings controlling its resolution somewhere
I'm not super familiar with PPv2 or BiRP unfortunately
maybe, thanks for your help
Whats the main way people apply post processing now?
I remember back in highschool we used post processing stack, which just had something you could drag on and easily change values, but its depreciated now
does anybody know how to make a smooth transition of a volume's weight from 0 to 1
Pp stack 2 on birp and the built in volume system on srps
I did download that one but i couldnt figure out how to actually attach the new stuff to the camera
Im guessing its handled differently
If you use URP or HDRP you get scene templates that implement them for you
If you use built-in render pipeline you can't use SRP volumes at all

Volumes are used for post post processing effects, but sharpen is not one that's supplied by default
You'd have to look into how to implement convolution matrices or unsharp masking as a post processing effect
(though in my personal opinion the sharpen filter really doesn't improve image quality or appearance)
Ok, thank you very much!
hi, how can I disable depthoffield or any other effect through scripts? (Post processing) I've tried but it never works
in case u ask
there is using UnityEngine.Rendering.PostProcessing;
public PostProcessVolume CC1;
I think the most straightforward and the most intended way is to get a reference ot the volume with the DoF and set its weight to 0
Anyone know how to make Unity just barely pixelated and/or dithered? Like OSRS. I tried some pixelate assets, but the effect was far too strong even at the lowest settings
edit: we talked about this a bit in #archived-shaders and discussed anti-aliasing among other things
Sorry I missed this message. No I am not
I got this error when I switched to webgl and it disabled my post processing ArgumentException: Kernel 'MultiScaleVODownsample1' not found. This is the most important part of the error cause else the error would block the whole screen/
Hi. Got a question about post-processing and can't wrap my mind around it.
I have two cameras. one that render the game, the other the UI. One is set to culling only on UI, and the other the rest of the layers.
I'm using URP, and the last cinemachine version. the game one is set to Base and the UI one to overlay, and then added to the base one using the standard method.
I then have two global volume for post-processing, one for each. the game one is set on default, the second one on UI layer. Only my UI is on the layer UI of course.
that sound great and it works just fine. I have separate bloom for both and I can disable them separatly no issue. However, the issue comes with Motion blur, it just does whatever it want and the main camera also receive the motion blur, which is not wanted.
I have no clue how to fix this. Is that because the UI layer comes after the default one? Does motion blur somehow work differently than bloom?
I was messing around with Motion Blur, and then my camera just went black. Now when ever my motion blur is active the camera is black. Same thing happened with Depth Of Field when I was messing around with it. I have restarted Unity multiple times and have tried removing and re-adding them, I get the same issue.

Hey, when using Post Processing V2's Bloom effect, i get "fireflies" in certain areas where random parts of the screen turn completely white
they're only there for one frame and pop up at random
anything I can do to fix this?


guys
im in URP
i'd like to have 2 post processing profiles:
1: The Camera Volume (Bloom, MotionBlur and Stuff)
2: The Scene Volume
it is possible?
like to blend overrides of different volumes in two separate volumes
It's exactly what the volume system and "overrides" are for
the one with the bigger priority
and it makes sense
and if i make them with the same priority it chooses one randomly
in the editor i have the first applied and on the build the second
If they have the exact same priority then it won't be clear which one should be overriding the other
How do you intend to blend overrides exactly
example:
Profile 1:
Color grading
Tonemapping
Profile 2:
Bloom
Motion Blur
Final result:
Color grading
Tonemapping
Bloom
Motion Blur
blend the two profiles
That's how it works out of the box when you have two volumes with different overrides
Only when they have both the same override will the priority matter
Anyone that has enough URP post-processing knowledge to help with that?
I'm not sure if I setup my layers correctly or if Bloom is the only thing that can actually be separated. All Full screen effect like motion blur, Lens distortion and vignette apply to the whole camera (screen)... Which if you think about vignette... does make sense.
Is only blur able to achieve that or would I be able to with motion blur somehow?
not sure if this goes in #✨┃vfx-and-particles instead, but
how can i add a radial blur to the camera, so that the edges of the screen are blurry and the middle of the screen is clear (please ping or reply, i have the server muted)
Is bloom or "glow" an expensive post processing effect ?
What is the time complexity of this effect. I am assuming as it has to be applied on every pixel it is O(N²)
But then I guess every other post processing effect is O (N²)?
The time complexity of per-pixel effects is O(m * n) * O(f) where m * n is the resolution of your image and f is any computations you perform per pixel. For bloom / glow you would need to perform (for example) a two-pass gaussian blur which is (optimally) a constant time operation per pixel. Assuming a constant kernel size of 32 for your blur, you'd be left with O(m * n) (or assuming a square image, O(n^2)
Oh thanks for the explanation
For a 1920 x 1080 resolution, for each frame you would need to do 2,073,600 computations. How does the computer achieve this and still maintain 144 fps even for the big games like valorant ?
Because GPUs do things in parallel 😉
Oh so if i have a low GPU then post processing will be the bottleneck and turning post processing off will regain the fps
Yeah it depends heavily on the hardware.
Though, of course, it's not just post-processing which may be executing on the GPU, so any other GPU-side computation will be slower given a worse GPU.
more gpu cores = more cores running at the same time to process each pixel
more gpu frequency = cores that exist are running faster so they can get to the next pixel faster
each core processes it’s own pixel
everything is done in parallel
post-processing can be pretty cheap, given bloom was first being used two decades ago 😛
though it of course depends on the algorithm you use
postprocessing like SSGI and SSAO is expensive simply because of how complex each algo is
I’d suggest something similar to bloom in a compute shader that uses a lower mip of the render + some math to determine if the current uv is near the edge of the screen, then blending between mip 0 and mip 1 where seen fit
because it’s for blurring, you could even run the compute at half-resolution for performance
if you want some more advanced blending (i.e. like some advanced DOF effect) then you could do some searching through GDC, SIGGRAPH, and even just through articles for topics on DOF and general postprocessing
Which is useful for a lot things, once i used it to scan a minecraft world seed for a specific bedrock pattern in the nether so i could find thier base as part of a puzzle
a true use of the GPU
Bloom effects feels very strong from far away, how can i reduce that?
Can you show an example
like from far away it looks like a bulb of light but when closer its how i want it


dont know if its supposed to be like that or nah
its hard to show example xd
Looks like there's an outline shader?
Yeah thats what im doing
with hdr colours
but the intensity is like way higher from further away than close
another example


is it normal or?
is it just how HDR works?
It may look like it is, but what I believe is happening here is that considering:
First that the bloom just "naively" blurs and blends additively any pixels on the rendered image that are above a certain brightness
Second that the outline shading appears to always draw outlines of a specific width and brightness
And third that while we expect visual brightness to diminish over distance and thus the bloom as well, that's not what all bright surfaces do and what we most commonly see is them just occupying less pixels, thus creating a smaller bloom
So I should just reduce the HDR values
But if the outline width and their brightness remain the same regardless of distance, it appears the bloom gets "more intense" relative to the object itself
Though in reality it remains the same
Yeah fair enough
That'd be my first option
Thanks for the explanation
If you can reduce the outline HDR brightness the further away the object is would help shrink the bloom together with the object
Though I'm not sure if many outline shaders have access to that kind of data
Haha im bit of beginner so I might just simply reduce HDR
not comfortable with shaders yet
Usually with outlines you may need some extra system for dealing with distances, or you risk objects becoming just a bundle of overlapping outlines
I mean I only use it for the tutorial so its not a big issue
But i see what you mean
i have no clue what anyathing you just said means, and looking it up tells me about some sort of directx style language, so is this something easy to learn? because its not something required for my project, is it worth the time learning it?
It's pretty advanced
Making shaders instead of compute shaders is way easier and may be enough here
If you look into how blur post process shaders work and how to mask post processing by distance from screen center, you could combine the two
Blurs by themselves are not from the easier end of shaders though
I’m assuming you found HLSL, which is the shader language unity mostly uses, you’ll wanna maybe learn some if you want to make your own postprocessing
^ what Spazi said
ok good to know thanks
ok also ghood to know
HLSL is the main language for writing shaders, with some different types of shader being for different tasks
you’re mostly looking for a “fullscreen triangle” or compute postprocessing shader
Please do not cross-post 🙂
When I toggle post effects, they are persistent after the game stops, how can I change this behaviour?
What do you mean by "game stops" precisely?
like if I stop it in the editor
havent tested a build yet
either way editor is still important because i need my workflow to not involve selecting my post processing volume every single game run
are you changing the values in the volume profile
if you use sharedProfile, you're gonna be changing the asset
I believe .profile instantiates a copy
much like material and sharedMaterial on renderers
oh right
you might be directly referencing the profile asset
if so, I would suggest switching to referencing the volume, and then accessing its profile through .profile
? lol
also
its returning null?
.profile i mean
nevermind, something else is wrong
you'll need to assign a profile to the volume first :p
well, that sounds like a separate issue
Question:
I am building a screen flash that is supposed to be shown when taking damage. There are two ways i can think of.
- as a full screen picture where the transparency is changed
- by changing a value in a post process effect
Is there anything i should know about changing PostProcessing-Volume settings at runtime?
quick question, I have been trying to make my UI have my Post Processing effects but dont know how to do it. Ive done research but dont understand how it works, any help?
is there way to blend between 2 volumes in timeline? even when i try to blend them using weighs, unity shows only effect of one of them for whole animation and second one only at last frame when it have weigh 1.
That's the correct way to do it, but some overrides cannot be blended
I think tonemapping is one such, and for some reason curves are too
thanks
I'm using URP and I have Global Volume with a Vignette and a Depth of Field Override. While the Vignette works perfectly fine the Depth of Field has no effect at all. What do you think I should do?
(Just for ILC2PP Build Error) Console says build fails because of post processing but I couldnt figure out why. There was no problem when I do the same thing in older versions 

hey guys, can someone help me
canva in the scene view is glowing but not in the game and i dont know why
(i tried to build the game to make sure its not just the game window problem)

Hello, I am trying to create a custom post processing effect with a shader in hlsl, It has no compiling errors, but Whenever I want to add my efect to aglobal volumen, I can´t find it, any ideas why this may be happening? 🤔
You cannot use shaders directly as post processing effects
Depending on the render pipeline you'll need to make a new post processing override for it first
I also created a script wich uses the hlsl shader, it derives from "PostProcessEffectRenderer"
using System;
using UnityEngine;
using UnityEngine.Rendering.PostProcessing;

[Serializable]
[PostProcess(typeof(PostProcessOutlineRenderer), PostProcessEvent.AfterStack, "Custom/OutlineShader")]
public sealed class PostProcessOutline : PostProcessEffectSettings
{
    public FloatParameter thickness = new FloatParameter {value = 1f};
    public FloatParameter depthMin = new FloatParameter {value = 1f};
    public FloatParameter depthMax = new FloatParameter {value = 1f};
}


public sealed class PostProcessOutlineRenderer : PostProcessEffectRenderer<PostProcessOutline>
{
    public override void Render(PostProcessRenderContext context)
    {
        PropertySheet sheet = context.propertySheets.Get(Shader.Find("Hidden/Outline"));
        sheet.properties.SetFloat("_Thickness", settings.thickness);
        sheet.properties.SetFloat("_MinDepht", settings.depthMin);
        sheet.properties.SetFloat("_MaxDepth", settings.depthMax);

        context.command.BlitFullscreenTriangle(context.source, context.destination, sheet, 0);
    }
}
but it does not appear in my overrides
Did you follow an up to date guide for how to make a new post processing override for your render pipeline's post processing system?
I followed a vid from 2022 which uses unity 2021.3.6, I´m using 2021.22, I think it should work but I don´t know how much things have changed, maybe I should look into that
Which render pipeline is your project on and are the instructions correct for it?
This is a crucial point of information I'm trying to nudge out of you
I´m in URP, and I do think the instructions are correct but i dunno, I created a core URP project, the normal post processing effects function well on the camera, And I added cinemachine and Post processing packages to my project
Since your project is on URP, double check that the tutorial is for it as well
The Post Processing package is not for URP which may mix things up so it's best to remove i t
Ok, thx, let me check it
is it possible to apply shader graph shaders as post processing effects on the camera?
depends, on the pipeline, if you wanna make custom post prossesing effects in srp, you can use Graphics.Blit, for doing that
in 2022.2 there is a new way to do this using renderer features in SRP and the fullscreen render target in shader graph
thanks will keep that in mind
was hoping it would be a simple process like using render textures and such
why would I want to use renderer features, for a simple post processing effect
using renderer features is pretty simple. its all in the editor
just create the shader graph, create a material with it, and assign that material to a new renderer feature
i forgot what the feature is called tho, probably fullscreen something
when you make a shader graph and set the target to fullscreen it gives you access to more specialized nodes which let you access the textures that the current frame produced
idk, kinda sounds retarded, what I if I change the cameras target buffers tho, is it gonna automatically update and use the appropriate buffers? If I want to change the properties in runtime the whole point of making it in editor is then being ruined anyways.
no need for the language. its up to you to choose whatever makes the most sense for your project. i was just giving an alternative to a scripting based approach
oh, I am sorry didn't mean to come across rude. I was just thinking if this new approach opens up new possibilities or if it just caps you in the customizability. Anyway I am still using 2021 for this project so I might try it out in my next one, can't hurt doing that
I've been working with post-processing and after experimenting with an extra effect, I've suddenly started getting a couple of problems. Bloom just gets brighter and brighter whereever background is visible and the 3d foreground objects are rendered in a trail/smeared onto the background as the camera moves around. Wondering how I fix this issue! Thanks.
the second issue sounds like you mightve changed the camera's clear flags settings
and what kind of skybox are you using?
Solid colour (black). Having come back after a break, I remembered that while tinkering with PP I changed from Forward to Deferred rendering. Switching back fixed the problem.
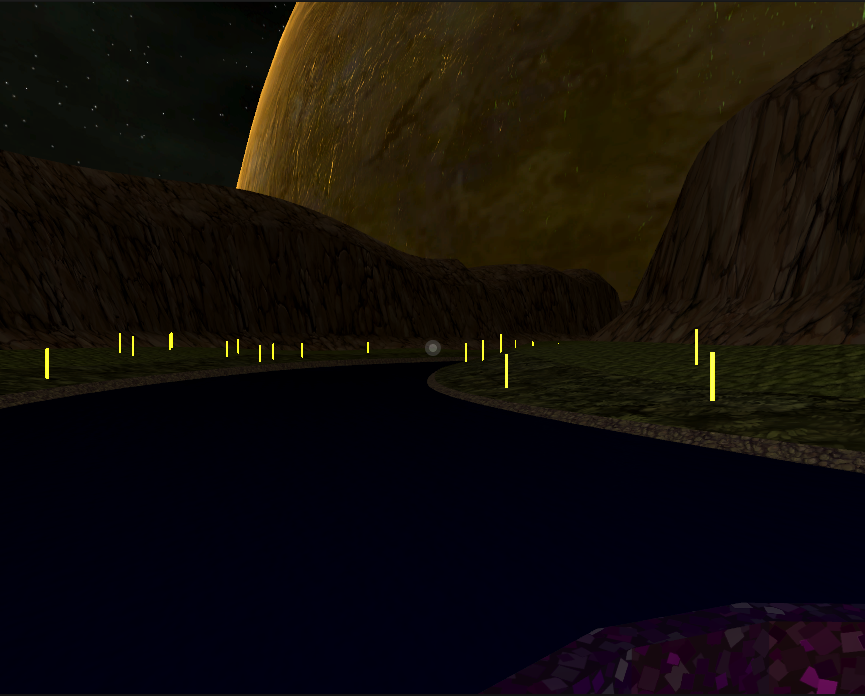
good afternoon guys. i am having a problem on my project. i can't figure out what it depends on. Basically I have two scenes: one used as Main Menu, the second one is a simulation of an art gallery all immersed in a city. That said, to the second scene I applied a Post Processing Volume. In fact, by starting this second scene directly, the Post processing is applied correctly. Whereas if I start from the first and then switch to the second scene, it is not fully active.
this is in game starting the second scene and then with post processing applied

this one instead when I start from the Main Menu (scene 1) and then go to scene 2 (the one in the image).

So I've had this issue a couple of days now and can't figure it out, when I enter play mode the bloom turns off.
I'm in HDRP
can anyone help me with an issue i have with post processing?

This is still doesn't describe anything what you did. Don't make people guess.
!learn is a good place to start. You need to learn basics about the engine to know what questions to ask.
🧑🏫 Unity Learn can offer you over 750 hours of free live and on-demand learning content for all levels of experience! Make sure to check it out at https://learn.unity.com/
Im Getting URP
Note that URP has built-in post processing, you should remove the package for the default one if you installed it previously, so it won't get confused. They have similarly named components.
so i need to delete post processing
Read again the last message.
oh
Hey, can i set up the "Depth of field" effect in a way that it tracks a specific object and keeps it in focus?
i already googled it but found nothing. it's just hard to imagine that something so basic (to me) wouldnt exist
I think the way to do that would be to use a script that calculates the target object's distance from camera and sets it as the distance for the PP DoF
oh boy Cinemachine 3.0 might have it

At the moment I believe this is HDRP only
how do i make post processing apply to my UI elements?
i tried making the canvas a screenspace camera and assigning the main camera to it but that didnt work
Screen space - camera and world space do work, from my experience
i have tried both, they dont work
They're supposed to, so the next step is to figure out why
And to confirm 100% if they work or not, such as by using an unmistakeable effect like vignette

This is the kind of visual confirmation I'd look for


If it still doesn't work, I'd check that the canvas is targeting the correct camera, as is the post processing

Excuse Discord's preview cropping
There aren't really additional steps to take or that I'd know to suggest, so I don't have better advice to just make sure everything checks out and that there's no extra cameras interfering with it


I'd expect to see the black vignette affecting some non-canvas parts of the screen, but what I'm seeing here seems to suggest it's not there at all
im really dumb
i didnt put the post processing volumes layer to post processing
damn
sorry for wasting your time man
It's a part of the process really ^^
Which is why it's important to double- and triple check everything and confirm things visually beyond a doubt
Most of my issues are "dumb" ones similarly
I fixed that. Simply in the editor this difference is noticeable. Then creating the build is all right.
But now I have another problem: on a powerful PC the application works great. On a less powerful pc it runs jerky. Could it be because of the post processing effects?
I feel like this is more active than Unity Forums, so i'm just gonna post my problem here
So apparently my scene just goes away to pure Unity dark when I turn on Post Processing effect in the menu. Before and afters posted below
(from #💻┃unity-talk)


Does Unity offer a tutorial based on URP Post process effects using code instead of using shader graph? https://docs.unity3d.com/Packages/com.unity.render-pipelines.universal@16.0/manual/post-processing/post-processing-custom-effect-low-code.html
I'm trying to display a shader I wrote, but it needs to capture the camera's information ( View parameters + Local to World Matrix coordination )
Can someone point me to a good resources on this?
SG is the only supported workflow for authoring URP shaders so there are no official tutorials for writing URP shader code
The suggested workaround for when you must write a shader is to create a shader graph that uses the nodes with the required functions and then copy the generated code into your shader
Should be able to make a shader based on the CoreBlit.shader (used by newer blit functions if no material is specified).
https://github.com/Unity-Technologies/Graphics/blob/master/Packages/com.unity.render-pipelines.universal/Shaders/Utils/CoreBlit.shader
It has multiple passes for each of the Blitter API methods but you probably just need Vert/VertQuad (depending if your blit method is drawing a triangle or quad) and FragNearest/FragBilinear.
idk if im here in the right place but how do i smoothen out the quality of this 2d game scene
it looks pixellated kinda

how could i smoothen out the edges
sounds like anti aliasing is what you are looking for
There's no AA for sprites, except with increased render scale or potentially with a custom shader like SmoothPixel
It's a tedious issue
Some of my notes about it here #archived-shaders message
theres no MSAA, sure. but since we are on #💥┃post-processing, I think they are looking for something like FXAA
FXAA does 'work' for textures unlike other types of AA (besides supersampling), but the result is terribly smudgy
The root of the problem is the total lack of image resampling, besides the pre-downsampling of mip maps
how would I go about making a dithering custom effect for the built in pipeline?
i'm looking at this and have no idea how to make it out in shaders
break down the equation and use the appropriate shadergraph nodes to represent the equation in graph form
I'm not using shadergraph
Hey wierd bug issue im having, this looks like the place to post about it. When im in my gameplay scene i have things blasted with a bunch of glow effect and it works/looks fine. however when i start the game from the main menu and get to the gameplay scene, some of the colors seem wonky/not working. any ideas?


left is normal if i load it from the game scene, right is wonky only when i load it from the main menu scene
Are they standard/lit shaders illuminated by 3D lighting in this case?
yeah they are lit by 3d lighting
oh wait i think i may have had my culling mask set incorrectly. 1st time doing this so its set up a little sloppy lol
Ambient lighting must be generated for each scene from the lighting window using the "generate" button
Also note that in the same window realtime GI and baked lightmapping should be disabled when you generate unless you specifically want to use those workflows
The editor generates temporary ambient lighting which is lost at runtime on scene change, causing ambient lighting to reset to black
ohh good to know i havent even done a deep dive into lighting yet, these were just placeholders for now. that'll be my next goal ty :)
I feel like I'm going mad - has anyone been able to get Bokeh depth of field working in URP 2022?
It seems like it now only works for perspective, but in 2021 it worked for Orthographic aswell
Are you quite sure? I've never heard or seen of DoF being functional in any ortho camera by default
What are some reasons that you might want to create a Custom Post Process instead of a CustomPass? For doing stuff that might require several operations / sub-passes, like Bloom typically does?
(I'm not looking to solve any specific problems, I'm just teaching a class on unity post-processing and my knowledge is about 8 years out of date so I'm getting myself familiar with the SRP stuff)
Is there a way to write custom image filtering modes? Im using a shader to downsample images in a really specific way, but if I could just use a filter mode with some custom behavior attributed to it it would simplify a lot of things
hey, what s wrong here? bc it don t shows any effect

Can you show the entire inspector of that gameobject / the camera gameobject
the camera have these 2 post process component, and the camera is on layer PostProcessing
I would prefer a screenshot of the whole thing
Not just to confirm the layer but render pipeline as well
oh bruh ok no sorry i saw the error ... AAA
What did you see?
the layer was not good i created two layers and it was not the same 😅
I hope that got it sorted!
It's always best to show too much rather than too little when screenshotting
yes thanks
That method replaces shaders of objects in the camera's view
I don't see why it would be the tool of choice here
What do you mean by object detection?
It sounds like you're trying to do much more than simply render a pixel
I don't quite understand what I'm looking at
If you want to render a crosshair I would use a canvas image
With "constant pixel size" scaling and "pixel perfect" enabled you should be able to render the crosshair image perfectly precisely
yes, I used it for 2019, 2020, 2021 - but 2022 it broke (sorry for late reply)
I think it might actually be a breaking change to LinearEyeDepth, but I haven't had a chance to look into it yet. I'll file a bug report when I do
Which render pipeline?
I never got it working with URP in 2021.
URP
Previously both Gaussian and Bokeh worked, now neither does, but I do think it's something broke in LinearEyeDepth which both use
My experience (and I thought conventional wisdom) was that you can get the screen to blur, but it won't match the actual distance at all
It definitely does match distance in earlier versions, and you can see in the frame debugger that the intermediate targets correctly represent depth
just checking if I have a video from before
see the background at the top of the screen: https://www.youtube.com/watch?v=5F7pcK8kTYc
Not having any luck with it
This too in 2021.3.


I have disabled some layers in Camera and I'm drawing them later with CustomPassVolume, so the elements will be drawn always on top without any kind of postprocessing. On the other hand, I've some fade-to-black Volume, and I want it to affect everything. I guess my approach here is wrong. What is the best way of making some elements visible on top of everything and being ignored by all postprocesses expect of 1?


Wrong post processing
URP doesn't use PPv2
Goddamnit man
It's because the focal depth parameters you are using are the same in ortho and perspective. For ortho I always found I had to turn it way down. You may also need to tweak near/far planes for the ortho projection
let me see if I can make an example
works fine in 2021


(2021.3.11f1)
I believe the difference in parameters for ortho v perspective just arise from the linear versus exponential depth mapping
Right, it does work with heavily cranked down clipping planes
tbf they don't actually have to be that cranked down, I usually use something like 300
you have to use closer planes anyway for ortho, otherwise you don't use the depth buffer resolution properly
ortho doesn't have a concept of 'near' or 'far' in terms of depth buffer resolution (or screen size)
but either way, it works in 2021 and doesn't work at all in 2022
This works so wonky it doesn't really feel intended
Though I don't know why it wouldn't be
I don't think it's that wonky? The parameters just have a different weighting in ortho
certainly the effect functioned and it was possible to get a very nice aesthetic
Would anyone here be willing to help me work out the kinks for a hypothetical custom Look-up-table implementation? Unity's inbuilt one doesn't allow you to use nearest-neighbor for 3D textures, making it useless for retro-rendering of hard color palettes, so I thought about making my own, but my experience with Unity's code-based shading/post-processing is... less than ideal.
The idea I had was basically to use my own custom 32x1024 sprite with my colors corrected as needed, and use some sort of code to check each pixel on the screen, using its HSV or RGB values as XYZ coordinates, where X is 0-32 on the x of the image, Y is 0-32 on the Y, and Z multiplies the value of the X by 32, effectively making it "skip" across the layers of the sprite to the left and right, acting as the false "Z" coordinate
So this sprite, would be checked for each pixel on screen, and the color of the pixel changed to match the one at the coordinates on this sprite
does that make any sense, or am I barking up the wrong tree?
I basically want a LUT, but for it to allow for crisp hard colors to force a palette, rather than smooth gradients.
I know what it is I'm after, but my experience with unity's code-based shaders/post-processing is... Very limited.
It really doesn't? I thought LUT textures used whatever filtering you set in the import settings but I'm probably wrong
LUT is the ONE exception in all of unity, as far as I can tell. 3D textures do not allow you to use nearest neighbor for texture filtering.
when importing LUTs
Does post processing have to sample them as 3D textures?
I don't really know how to solve this problem, but at least one option you have is to quantize the colors without relying on a LUT
Less convenient control but crisp colors for sure
Yes, to my knowledge.
Yeah, that's the thing, I'm not after crispness, but control.
Like, I want to be able to use a specific set palette
to mimic retro games which have very well thought out palettes for them
which means I need a LUT implementation if I want to do that cheaply and cleanly
I do have a brute force method, but it's very clunky, and relies on comparing every pixel's distance to a set of colors, in a very messy setup that barely works at all.
That does sounds ideal
Unity's LUT implementation and texture filtering methods especially have remained a bit of a mystery to me, so I'm not much any help but I'll be interested to hear if you find out something
Which render pipeline were you using?
I'd have to check, I'm just now getting back into game dev
I'm using HDRP, and yeah, as far as I can tell, point filtering on 3D Textures does absolutely nothing
Why doesn't my post processing work? I'm using URP, I've set my layers and enabled effects. Wtf?


URP doesn't use the Post Processing Stack package
Oh
Instructions in pinned
Yes
okie dokie

Local volumes affect cameras within their volume
Cameras must have post processing enabled on them
Scene viewport camera is not a reliable indicator of volume component influence
Local volumes affect cameras within their volume
Oooh this might be it
Hey do any of you guys know how to make the unity recorder give higher res renders
Hi there, is it possible to use the blend function in 2D? It seems only 3D colliders can be used
My first instinct is to just use a 3D collider
Since you likely won't be doing physics with the volume collider, it hardly matters if it's 2D or 3D
3D collider doesn't work
For what exactly?
for the post-processing volume
That's the normal way they work
In 2D?
There's no "2D" in Unity, except with 2D physics components
With a 3D volume you have to make sure the camera is not in front or behind it
Sound like 2D to me xD
What I assume is happening is that you're not seeing the depth difference of the camera and the volume collider
If I set the post-processing to global it works fine
The scene view has this button that lets you toggle 3D perspective
Then you must select the camera and the volume collider to see where they are in space
The camera must be within the volume collider to be affected by local volume overrides
Ah that fixed it
2D colliders have infinite depth, which you should be able to simulate by making the Z size of the 3D collider large enough to surround the camera regardless of where the camera moves
All 2D components are positioned somewhere in 3D space, which is important to keep track of for depth sorting and in case your gameobjects seem to disappear from the camera's view


I set up post processing for my VR camera but it doesnt update even though I did all the steps correctly, any ideas?
default pipeline
what's the purpose of the effects you're using? I notice some bloom on the yellow cube, which makes it feel important. the lens flare and vignette look nice to my eyes
I've got a question about edge detection. I'm trying to use the "edges only" setting to create an illustrated effect for character portaits.
Fiddling with the depth & normals sensitivity, I've gotten this far, but the eyes looks hollow & terrifying 😱
I've tried making the normal map of the eyes mesh more extreme, but no matter how I change the normal map, the edge detection doesn't change at all.
Does any one have any experience with normal maps & edge detection?

I updated unity and also HDRP and now i have this weird bug or whatever it is on the Depth of Field effect.
The Background is blurred, but if an object that is not blurred moves in front of the background the object leaves a trail behind and it takes a bit until the background is compleatly blurred again
I'm not sure about the specifics but "trailing" problems often implicate motion vectors and/or TAA in some way
setting Anti-aliasing to something else than TAA fixed it
TAA is required for many things in HDRP, such as shadow filtering and SSAO and SSR denoising, so getting it to work properly instead of removing it might be in your best interest
Hey! I need help with custom renderer feature for** Fog Of War functionality (URP 2D)**.
I got different objects on layer Masks. Masks should not be rendered by main camera, but I need to use their alpha (or any other channel, it's adjustable to use different channel) to render them on RTHandle or RenderTexture.
Then I can use this texture/property in shader to make operations outside of these Masks objects (like dimming/blurring everywhere other than inside masks).
In points:
1. Render objects on layer Masks into texture/property (masks should be not visible for player).
2. Use the result as texture in shader for dimming/blurring outside of masks objects as a fullscreen effect.
**Can you tell me how can I:
- Render specific objects on screen to RTHandle/RenderTexture to use later in shader.
- Render masks only for this specific texture, not for the main camera.**
I try to do this only with Renderer Feature, not with second camera.
This pink cone should not be visible by camera, but it should be rendered into a texture I could use later in shader.

This post should help - https://www.cyanilux.com/tutorials/custom-renderer-features/
Goes through examples of Renderer Features and explains how to write Custom Renderer Features and Scriptable Render Passes for Universal RP
I am not able to get a custom post processing effect to appear in the project settings list when following the steps on the official documentation? I ensured naming was correct for both the c# and the shader?
Do you know that I just found your post exactly yesterday and it helped me understand Renderer Features better? Really great post, especially since there is not much information on these topics on the internet! I even joined your server because I was thinking to ask there 😅😂. Today I also pasted a link on the company discord server and people appreciated it too ;p
I'll try to figure something out today, although I still don't know how to make it render objects to RT while not rendering them through the main camera. In Renderer2D there is no this option what you also described in the post:
If you only want to render once, you need to also remove the Layer(s) used in the Layer Mask from the default Opaque/Transparent Layer Mask at the top of the Universal Renderer. (The 2D Renderer seems to lack this, so not sure how to do it there...).
... And I don't really have an idea how can I achieve what I need.
Thanks for sharing, glad it helped 💙
Yeah, I noticed the 2D renderer doesn't have it. Not sure if there's a way to do it, might need to use a second camera instead :\
Currently, I'm wondering what exactly cullResults are and if I'm able to create them myself to somehow force the rendering of the "Masks" layer (I would then set on the camera to render all layers except "Masks").

Yeah, that's so upsetting. :/
Hmm maybe. I haven't looked into it, but you obtain the cullResults through ScriptableRenderContext.Cull - https://docs.unity3d.com/ScriptReference/Rendering.ScriptableRenderContext.Cull.html
There is something like:
ScriptableCullingParameters.cullingMask
I will try to modify that for a render pass, but it might not work
Hmm, I got recursive list in Frame Debugger

but I'm doing this:

which should prevent from that
What am I doing wrong?
Ok, I missed that part in a second custom pass.
anyone know where i can find the option to exclude a specific layer of the post processing effects?

None of Unity's included post processing systems offer that functionality
Post processing will always affect the whole rendered image, so to mask them by layer you'd have to render multiple images, apply post processing separately and then combine them, I believe
So i cant exclude a single object of the post processing effects?
didnt knew that
Hello, I am using a 2D urp project, and none of the post processing works..
@eager phoenix Manual in the pinned messages has guides on how to use one. Make sure you are not missing any steps.
And using correct one for the pipeline
Ill re go through them, and double check
Hello, I just switched from standard to UPR and probably my Post-processing is not working :c Can anyone help me, please?

Double check that you've followed the URP specific post processing setup exactly
Instructions in pinned
Iam having a very difficult time creating an outline to my cube where it is using parts of the sprites instead of outlining outside of it. I just want my border to get thicker and the inner area smaller.
I solved it by creating two sprites on top of each other and making one of them smaller to create an illusion of a border, but I would still like to know how to put things over the sprite using shader graph
I've created a custom pass that takes the color buffer from the previous pass and masks some areas. The output seems to work as intended when I set TargetColorBuffer to the Camera. Then I changed the TargetColorBuffer to Custom and added FullScreenCustomPass to read and process this value. Unfortunately, FullScreenCustomPass seems to sample color buffer from the first custom pass instead of the second one. Any idea why the second custom pass is ignored?


So i need some advice on post processing profiles/PP volumes. I have a battle royale game with this purple glowing circle. My goal is to have the player's screen turn purple with a PP profile when they LEAVE the circle. I've tried a few different things, but they havent worked so far in the mulitplayer setting I have. I'm now trying to have it so that I can hopefully attach a capsule collider volume to this zone so that when they hopefully LEAVE that collider (inside the circle) they will turn purple. I'm only seeing convex however, where I can have a capsule collider, BUT i want the OPPOSITE of a capsule collider. Any ideas? If that made any sense...

If i could somehow get a mesh collider volume instead of a convex one, that would also solve the problem
or somehow inverse the effect? where being IN the collider you have a normal screen, but leaving it you have a purple one
You could attach it to the player and change the intensity depending on their xz distance from the center. The intensity could be changed by moving the PostProcessVolume around the player or by changing it directly in the material instance.
Greatly appreciated, good idea! I actually ended up attaching a sphere volume on the players camera, then setting it to active/inactive when they’re in the zone. Weird work around but hey it works!
Is it possible to write this Fullscreen Render Pass (it's the official source code) with newer methods like ConfigureTarget ConfigureClear inside OnCameraSetup method?
I tried to use them instead of CoreUtils.SetRenderTarget but it doesn't work. :/
// RG friendly method
private static void ExecutePass(PassData passData, ref RenderingData renderingData, ref ScriptableRenderContext context)
{
    Material passMaterial = passData.effectMaterial;
    RTHandle copiedColor = passData.copiedColor;
    ProfilingSampler profilingSampler = passData.profilingSampler;

    CommandBuffer cmd = CommandBufferPool.Get(profilingSampler.name);
    CameraData cameraData = renderingData.cameraData;

    using ProfilingScope scope = new(cmd, profilingSampler);

    RTHandle source = cameraData.renderer.cameraColorTargetHandle;

    Blitter.BlitCameraTexture(cmd, source, copiedColor);
    passMaterial.SetTexture(BLIT_TEXTURE_SHADER_ID, copiedColor);

    CoreUtils.SetRenderTarget(cmd, cameraData.renderer.cameraColorTargetHandle);
    CoreUtils.DrawFullScreen(cmd, passMaterial);
    context.ExecuteCommandBuffer(cmd);
    cmd.Clear();
    CommandBufferPool.Release(cmd);
}
Ok, it took me a while. The solution works, but do you see any logical errors in the code? Is this code correct?
This code should work the same as the one above, but uses newer methods.
public override void OnCameraSetup(CommandBuffer cmd, ref RenderingData renderingData)
{
    RenderTextureDescriptor descriptor = renderingData.cameraData.cameraTargetDescriptor;
    descriptor.depthBufferBits = (int)DepthBits.None;

    RenderingUtils.ReAllocateIfNeeded(ref colorTextureHandle, descriptor, FilterMode.Point, TextureWrapMode.Clamp, name: "_Testing");

    ConfigureTarget(colorTextureHandle);
    ConfigureClear(ClearFlag.Color, Color.black);
}

public override void Execute(ScriptableRenderContext context, ref RenderingData renderingData)
{
    CommandBuffer cmd = CommandBufferPool.Get();

    using (new ProfilingScope(cmd, profilingSampler))
    {
        context.ExecuteCommandBuffer(cmd);
        cmd.Clear();

        CameraData cameraData = renderingData.cameraData;
        RTHandle source = cameraData.renderer.cameraColorTargetHandle;

        material.SetTexture(BLIT_TEXTURE_SHADER_ID, source);
        CoreUtils.DrawFullScreen(cmd, material);

        if (settings.IsTextureRendering)
        {
            cmd.SetGlobalTexture("_BlurGlobalTexture", colorTextureHandle);
        }
        else
        {
            Blitter.BlitCameraTexture(cmd, colorTextureHandle, source);
        }
    }

    context.ExecuteCommandBuffer(cmd);
    cmd.Clear();
    CommandBufferPool.Release(cmd);
}
Please do me a code review comparing these two snippets 😅
Hello so I'm trying to make a shockwave effect in URP that happens on a condition
The issue is that my gave has no light aside from the baked pointlights because I do not need them
So any tutorials I watched so far wont work
I'm looking for suggestions as how I could go about making it
It's a bit unclear what shockwaves have to do with lighting, or what either have to do with post processing
It sounds like you have a very specific effect in mind and facing difficulties related to that but they're not being conveyed here
yes well the tutorial I saw was on postprocessing this effect so I assumed you do it through post processing
There are countless types and styles of "shockwaves"
the issue is that I'm not sure how do I project distortion on the screen without using any lights because you can't really see any normals if the light isn't baked
I'm looking for a water ripple like effect
happening from the center of the camera
That seems like a design problem more than a technical one
If your player can't see anything, it'll be pretty hard to distort anything
I guess I'll look for a workaround
ended up settling for a light shockwave instead of a distortion one, still looks ok though
(since emission maps are literally the only thing visible in my levels)
bloom w the hard carry
What are the minimum system requirements for post processing shader loading thingy..?
What do you mean by "shader loading"?
I've got a functioning sobel shader, but I'm experiencing a major problem with it, specifically, I've been trying to think of a way to make it output a one pixel wide outline
but I'm not able to crack it.

My thought was that I could use the depth texture, so only outlines that are lower in depth than their neighbors are output, but I'm uncertain how I would do that, and I'm struggling to think if there's an easier way to handle it
I would just use ProPixelizer's per object outline shader, but I can't seem to get it to work at all with custom shaders, since any copies of it just brick and I can't figure out how to fix it
anyone know why depth of field dxoesn't work for me? im using URP in Unity 2021.3.23f1
other effects works fine
I can't get the post processing layer component to show up anywhere
or anything related to post processing
i am trying to make a layer not be affected by post processing but it does not work. I followed this video but it did not work https://www.youtube.com/watch?v=LAopDQDCwak

Remove objects from being affected by your post processing stack by using multiple cameras and layers. Very simple, very quick.
You can create complex visuals by separating your objects into layers and applying certain effects on each layer.
❤️ Become a Tarobro on Patreon: https://www.patreon.com/tarodev
=========
🔔 SUBSCRIBE: https://bit.l...
its like putting camera inside eachother
<@&502884371011731486>
!ban 845393659405795359 spam
?
 gato🐱#2732 was banned.
what a weirdo
Yeah
They get cranky before their afternoon naps.
faster than LIGHTNING @cobalt minnow
sodoes anyone know how to do this?
??
The instructions in the video are correct
The problem must lie elsewhere
the thing i want to be not post processed is being post proccesd
i dont know what i did wrong?
is it the render pipeline or something
Are you sure the tutorial's method is compatible with your project's render pipeline
how do i checkit?
Do you know what RP you have?
That means you have no scriptable render pipeline, so the tutorial should be compatible
Which means the problem is not obvious
hmmmm
so what do i do?
do i ownload a render pipeline
or do i keep it as nothing
No, at least not because of this
Unless someone else has guesses why the instructed steps simply do not work in your case, I recommend you practice more with overlayed cameras to gain an understanding how they work and hopefully find the exact issue
I've created a blur-based outline custom pass that allows selecting a color for each object individually. It colors the object pixels, then blurs the texture, masks the objects, and blends based on transparency. It's great because:
- edges are soft and don't have gaps
- edges have a huge width range to choose from
- includes transparency (e.g. blue block)
- includes dark colors (because it's not
One Oneblending) - since outlines are blending with each other, there is no need for layering them in some particular order
- the outline can be hardened by ceiling the alpha (like in the last screenshot)
Unfortunately, the ceiling kinda ruins the transparency of an outline, because the alpha channel becomes a mix of outline transparency and the distance from the object (4th screenshot). So I don't think I can have those 2 features at the same time, unless I made an additional texture with info about object transparency, blur it, and then harden the outline basing on the alpha from the second texture. All those operations seem quite excessive because it almost doubles the number of operations needed.
Since the transparency here is a "nice to have" feature, I'm considering abandoning it, but I'm curious if there is some kind of elegant way of adding that feature without losing much on performance.


Hello, guys. an apology, I don't know where to post this. A few days ago I have been experiencing a brutal performance drop in my game (in editing) and now I realize that at NO TIME has it used the graphics card. This is fucked up because slow editing is the worst. The graphics stays between 0 and 0.5% (ridiculous oajsdkjaskljd). What could I do to fix this?
Hey, I have created a CustomPass script in HDRP. I am getting the diffuse color texture using: RenderTexture diffuseTexture = ctx.hdCamera.GetCurrentFrameRT((int)HDCameraFrameHistoryType.ColorBufferMipChain);
Is it possible to write back the diffuse color on the Gbuffer after I manipulate it? I process this RenderTexture and I would like to inject it back before the rest of the processing happens to produce the final render. Is it possible? Thank you in advance.
not sure if this is the right channel to ask but... here goes.
So... my scene is meant to be in a desert... so it's well lit... my problem is, the shadows are too dark and I don't know where to adjust so objects and structures stop producing shadows that are too dark
Shadows are lit by ambient lighting, which can be set from the Lighting window
#archived-lighting is the best place for lighting questions
ty
⚠️ When asking questions please include which render pipeline you are using ⚠️
🗃️ Documentation
🤔 Troubleshooting
🗺️ Roadmap
does anyone know how the post processing colour temperature setting works behind the scenes

eg if 0 is 6500k, what is -100 and 100
is it accurate, or is it just blending between two colours
hi , is it possible to use apply custom post processing -/pass to specific objects /layers (built in rendering pipeline ) so that it can be visible even if the camera out of range without blending / making volume -bounding box )
something like this screenshot

No its not, the effect in the image is likely just fullscreen post processing effect that checks whether the pixel is within certain radius from some world space position (likely the position is reconstructed from the depth buffer and the distance calculated on the xz-plane), nothing more than that
hey all, I'm looking for a option called "Render Path" on a Camera object that has post processing layer attached to it but I can't find it. I'm on 2021.3
with the unity camera depth normals texture are object bump maps not utilized?
its just using object normals?
so the answer is no
but the depth normals texture is actually using a replacement shader which I can replace with my own

In scene view the UI is rendered by the scene view camera in world space (you can see it in the world) and therefore will be affected by the post processing that the scene view camera is affected by. Screen Space - Overlay canvas on the other hand gets overlayed on top of the screen at the end as the name suggests and is not drawn by any camera specifically therefore not getting affected by post processing which is all based on cameras that interact with the post processing volumes. If you want to get UI affected by pp, you must use the Screen Space - Camera or World Space mode, in this case the former one I assume. When you assign the Render Camera for the canvas, the UI will now be drawn by that camera and get all the effects from the camera
hey everyone I need some help... I have a project with URP and I have a gameobject with a volume on it for post processing. The problem is that it only shows up in the scene view but not in game view.. Ive looked and tried a bunch of things on google but nothing worked out for me..


Is there a special toggle or thing I have to do to capture post proccessing in a render texture?

The camera has 'post proccessing' checkmarked, but the render texture displaying what it's capturing doesnt have any of that PP in its texture
extreme bloom for testing purposes, only the mesh under it gets captured
what it looks like without the PP, the camera is othographic facing straight down

The main thing is that the render texture color format needs to have correct color depth for post processing to work, such as R16G16B16A16_SFLOAT

Chromatic aberration is not a PostProcessVolume, nor a component
Did you search for instructions how to modify post processing volume profiles?
Hello everyone, I'm trying to make glowing objects using URP. I only want to glow yellow coloured material which shown in screenshot. But also white material is glowing too. Emission field is checked only in yellow material. How can I fix this? I just want specific materials to glow and other's dont. Feel free to mention me if you answered it. Thanks in advance.

Your Bloom's Threshold is probably 1 or above, try setting it to something like 0.9 or lower.
Didn't works

Oh wait, maybe it works the other way around. Try setting it to above 1
If I set 1.5 a little bit works, but its so ridicilous. Can I make one specific material object to glow? If I remove material from any cube, default cube is not glowing. But if I assign any random material with no changes it's starting to glow.

Well, you can try to setting the threshold even higher and then increasing emission intensity on the material that should glow, or just following this tutorial https://youtu.be/XH--692TZz8

In this short tutorial you will learn how to exclude objects from Post Processing using Camera stacking(URP).
Make sure to like the video if it was helpful :D
That video solution worked, thank your for your attention and help ❤️
No problem
I didn't look for any instructions
Then how did you expect it to work? 
I want to code script so that it would increase chromatic aberration on collision
If you don't start by researching how to do it
How will you know how to do it?
There weren't much help on the internet
What do you get by googling "How to modify Post Processing Profiles in Script"
Make sure you have post processing checked on the camera
That might be it
I have a question guys, how does unity handle DrawCall ?
What do you exactly mean by this
I want ton know if it handles it like UnrealEngine handles it or if its different
Draw calls are just one part of the render pipeline
You could reasearch how it works internally in each render pipeline but that's rarely necessary
do you recommend me to have a global mesh that contains lot of stuff or duplicate the little details in several mesh ?
(imagine a library with shelf and books)
If you're using built-in render pipeline then it's almost always better to combine meshes and use as few as possible materials to limit the draw calls
If you're using URP or HDRP with SRP batching then draw calls are much cheaper, so you might not see much benefit from combining them like that
It depends on your specific scenario
More hands-on optimization reading here https://catlikecoding.com/unity/tutorials/basics/measuring-performance/
post-proccess/shader question, forgive the crap gif quality. Ill try to XY every single step:
The end goal is: **simulate phosphor burn-in on vector display arcade machines. **
I have a render texture that is capturing Post Proccessing Bloom to a texture.
For bloom to be written to a render texture, it has to be a D32 SFLOAT, and a texture of that size and depth is 160mb.
A texture half that size is only 40mb, but it looks very chunky and pixelated.
My question is: Are there cheap methods / things I can do to hide the low resolution of the render texture


It doesn't have to be crisp at all because the 'vectors' are polygons and this render texture is being used only to store temporal 'burn in' by multiply into itself 0.95~ every frame, to keep an afterimage of what WAS there that gradually fades to black. This image is 'glow-like' so it can be blurry as hell and suffice
anything I can do in here?

for example adding noise to the UV doesnt help much

trying to 'smudge/blur' this out while keeping it performant - writing to a screen sized texture every frame is NOT performant

Any idea what's causing this flicker, even in a brand new URP project?
This is a box with 1 face missing, looking into the box, which contains a volume, with blend distance of 1. As you approach and blend in/out, you get these yellow bands that will flicker momentarily (quite visibly/distractingly).

The only postpro effect in use is LiftGammaGain 
how fix

hwo fix
Seems like you have no SRP attatched, neither URP nor HDRP

Do you have the Post Processing package installed?
It's not supposed to be if you're using URP
Yes i do
So uninstall it
i should uninstall it?
Won't need the namespace either
A carton of milk if you're going to the grocery store
Alrighty orange juice coming right up
hehehehe
i have URP installed in the package thing
Thats not enough in itself. Follow the docs https://docs.unity3d.com/Packages/com.unity.render-pipelines.universal@16.0/manual/InstallURPIntoAProject.html
Hello, i have difficulties finding how to make de good fog to limit view distance. I'm trying to create a fog that start at 35 distance from player and totally block view at 40 distance, does someone know how to achieve that plz ?
I use HDRP 14.0.8, i tried to play with the volumetric fog settings but can't find anything good :/
HDRP doesn't have a linear fog, and volumetric fog cannot be used to limit view distance
HDRP only has some type of logarithmic fog I'm assuming because it's only bothered with real world accurate effects
@mighty stump mmh, thx for the info, then i need to find another way to achieve this :/
Hi everyone! I'm hoping someone can help me with Screen Space Reflections
I have added the post processing stack layer component to my camera, but I am not seeing a list of effects that is often referenced in online tutorials
This page indicated that I have to add SSR as an Override, but I'm not quite sure how to do that: https://learn.unity.com/tutorial/post-processing-effects-screen-space-reflections#603ca26cedbc2a597e58c3d7

Unity Learn
Screen Space Reflections are an easy way to depict wet, shiny, or mirrored surfaces. They’re commonly seen in science fiction art in the form of mirrored floors and rain puddles in wet asphalt. Screen Space Reflections are computationally expensive, so they’re a good fit for projects targeting desktop and console, but not mobile. They require th...
I'm using the built-in shader pipeline for a VRChat world, trying to get my river to reflect properly: https://i.imgur.com/XSKkTDJ.png
I got it to work a little better by making my reflection probe realtime and all that, but screen space reflection definitely seems like the way to go for my project
A-ha, I need to add a post process volume as well
hmm, I got 'vignette' and 'bloom' to work, but still no reflections. I have deferred rendering enabled on my camera...
dangit. now I somehow broke bloom and vignette too...
Well I managed to get bloom and vignette back, but still no SSR
It sounds like this will not be possible using post-processing, so I'm looking into alternative solutions now. Either shaders, reflection probes, or perhaps a second camera mirroring the player viewpoint underwater
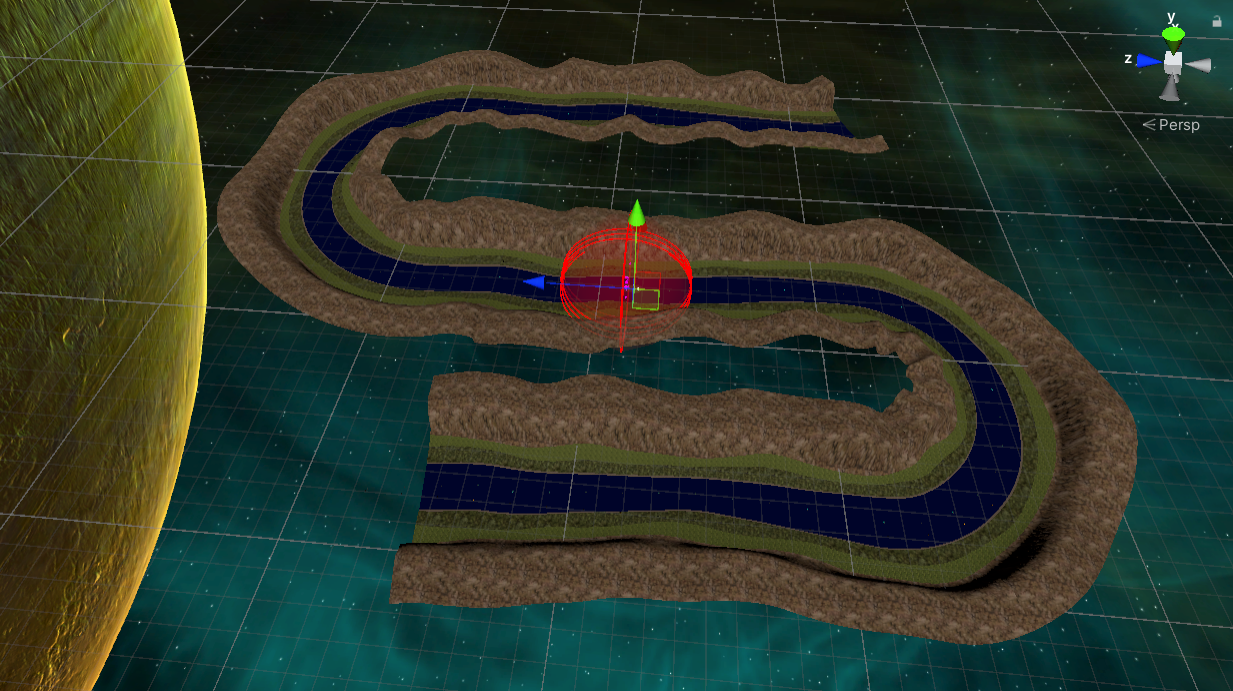
It's a procedurally generated world, this is a river raft that slowly floats down an endless river
The terrain is made of 5 segments, and when the boat moves from one to the next, it regenerates the oldest one and sticks it at the front of the path
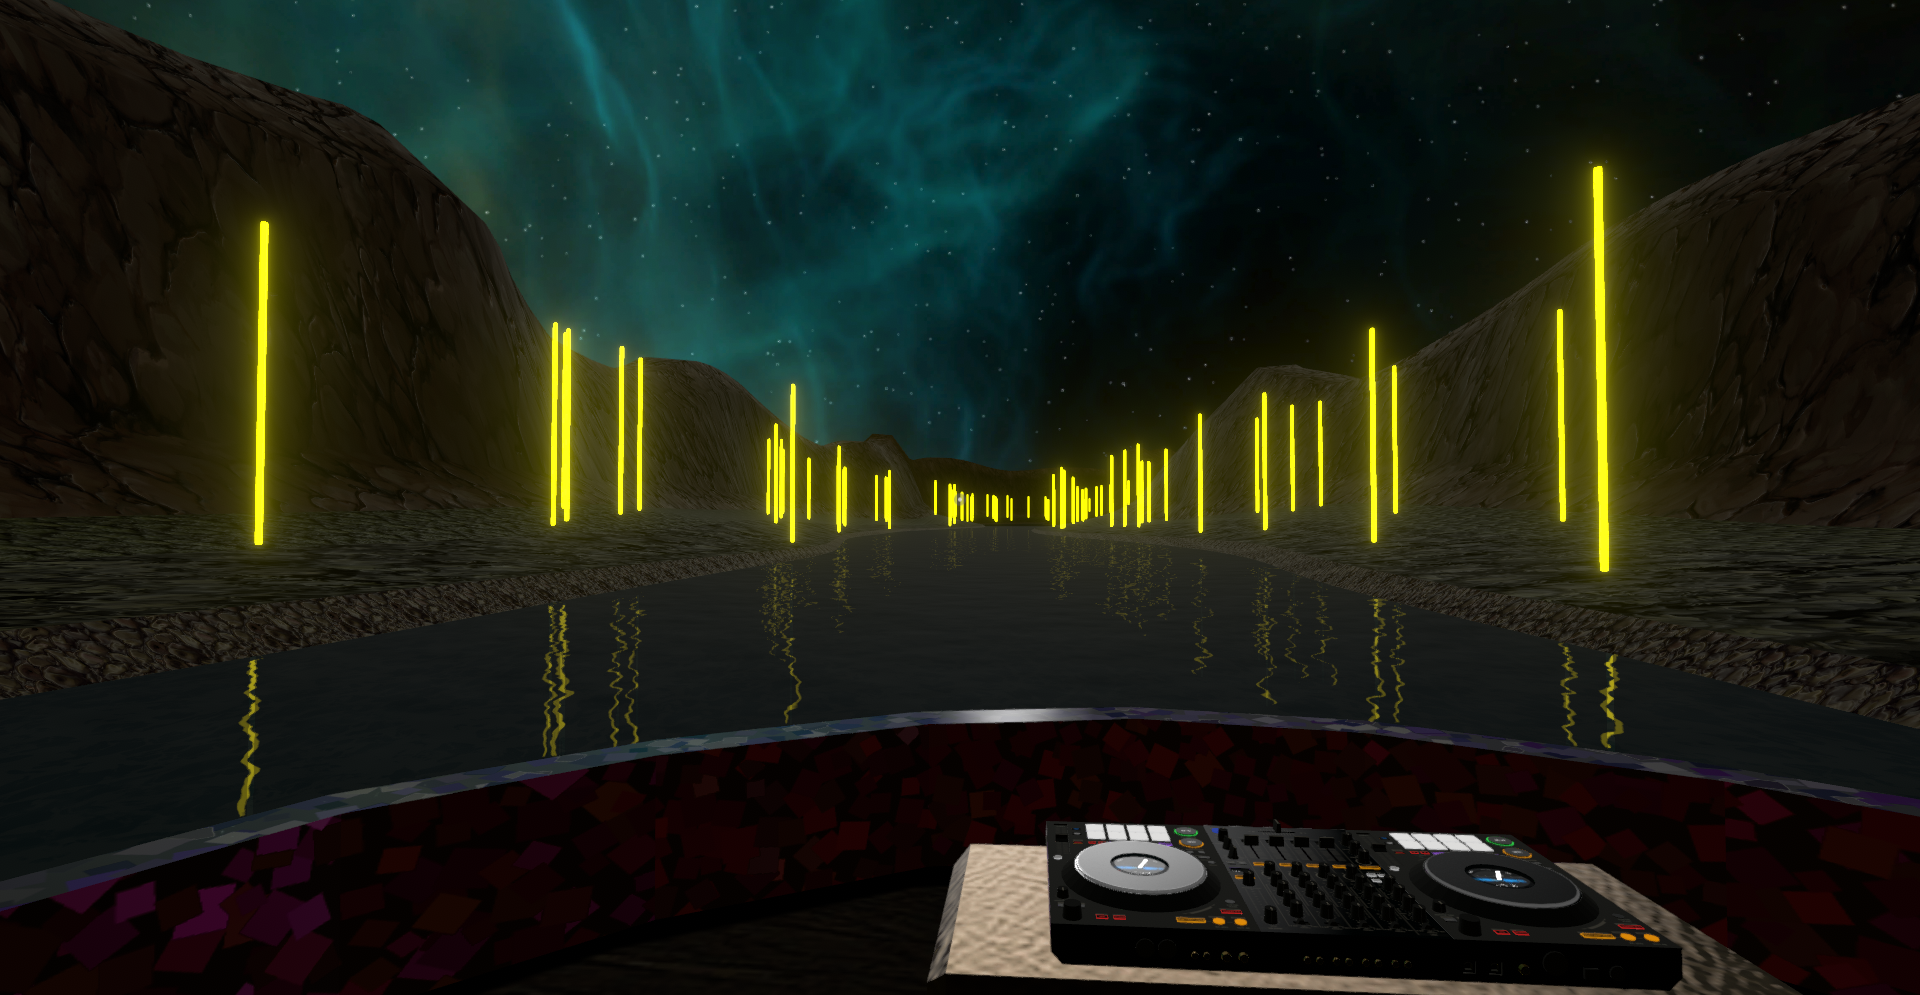
I'm making some progress by just generating a second copy of my lights mirrored about the river surface. It still needs some work, but looks promising so far: https://i.imgur.com/j5FwHE4.png

hi,sorry if this out of topic, but i want to know how to make my project can use nvidia freestyle? did i need to contact nvidia for it? or we can just acess it inside unity
use a flipped cubemap in river's shader and you're basically done
Hello everyone. I am currently working on an AR project and trying to mix together a realworld object with the AR counterpart. As the real world object consist partially of glass, I need to somehow filter out the things that would technically shine through the real world and mask them with a custom material to fake the transparency. To clarify, if I just use the current state, the rendered objects are obviously all above the realworld glass
I was trying to use a mix of the renderobjects feature, but somehow its not really working well on the masking and stencil replacement.
I got Screen Space Reflection working with Mochie's shader: https://github.com/MochiesCode/Mochies-Unity-Shaders

GitHub
Contribute to MochiesCode/Mochies-Unity-Shaders development by creating an account on GitHub.
but then decided I didn't like it after all 
For some reason, distant lights weren't reflecting, and even if I fixed that, the reflections look weird when part of the light goes out of the render frame, because of course, it only reflects what is rendered into screen space
So I'm going back to doubling up some of the geometry instead. It looks pretty nice and animates nicely with the ripples on the water: https://i.imgur.com/K3MiHYP.png
I am thinking of a cheap motion blur idea. To be honest my aim is to achieve a more smoother looking gameplay even if the fps is capped at 30. I have an idea in my mind, sorta an experiment to achieve something. This can actually give a cheap motion blur look or at least make stuffs smoother. So the idea is to smooth out the transition between two frames if possible using some full screen fx. Is it possible to blend the initial and the final frames, sorta fade between them to achieve a more smoother and consistent look? If yes, would it be performant or would be add in alot of extra overhead? I have never tried writing shaders or fullscreen camera effects
hey is there a way to add pp to my 3d game on the UI? ive been told before but I literally cant figue it out and im stuck

how could I make my sprites icon glow
is it possible to put camera shake on a canvas with "screen space - camera" settings
?
when the canvas is glued to the camera
Camera shake would be on the camera, so the Canvas would not be affected since it sticks to the camera
A world space Canvas however would be affected
Yeah but my post process effects wont work
They do work with camera space - overlay and world space canvases
@mighty stump thanks
ok @stray mountain ill make the thread here, thanks again
my line is not affected by post processing in unity, this was also happening with UI but I just made it be in the camera instead of overlay, how can I do this for the line?
2d
it's the very simple, built in thing
does webgl build work when im using post process
Yes
yo @mighty stump when the camera is the same size as canvas
i have trouble with a hover ui (IPointerEnter)
the hover ui is clipping
nvm i think i fixed it, the z axis is weird
@mighty stump Nah i didn't fixed it, idk why this is happening
this is not a post processing topic nor an issue that I'm involved in

I'll reply if I have something relevant to pitch in, in relevant channels
@mighty stump i'll pay you
I'm not doing tutorships right now and this isn't the channel for that either
post processing wont work at all in my 2D urp game. I followed all tutorials ive found and none worked. how can i fix this?
Could show screenshots of the post processing component and camera component
Hey everyone, the post processing stack v2 is just for the built in rendering pipeline right?
Yes
I’m not on my computer right now but I did have this one from yesterday

Wrong type of post processing
Follow instructions that match your render pipeline in the channel's pinned messages
Ok thanks
not sure if this should go here or somewhere else, but i have a very "abnormal" render texture issue that i cant seem to find anyone else asking about online
i have 2 cameras, one is base and the other is overlay, overlay is orthographic and handles 3D ui elements with an ortho perspective that makes them appear 2D and fit correctly within screen bounds
my main camera (base camera) is outputting to a render texture
heres what the settings look like

just a bit ago it WAS appearing correct but only in scene view
(i could even test it and in scene view it would be correct but in game view it woudl be incorrect)
it is appearing "incorrect" in the sense that it is appearing pitch black
no colors, nothing changes no matter where the camera is
and i know it has the ability to look correct because in scene view, even when the game is running, it will correctly display exactly how i want it to
i dont know if this IS post processing (i assume it is because it is taking the rendered image and processing things about it, like resolution, but its sort of stupid for me to assume im correct on that given i dont do anything related to what is commonly referred to as post processing) but it seems i dont know enough about post processing to know what is going on hre
if i had to make a surface level assumption, i would assume the camera is outputting correctly to the render texture, but might also be outputting the render texture rawimage in the canvas to the render texture, probably layering them twice over eachother and having nothing actually appear on screen
ive tried occluding the rawimage in the canvas from both culling masks on both the base and overlay cameras
didnt seem to do anything
Anyone have a clue on how to fix sorting priority on transparent objects in Unity (URP)? Looked around and tried for a few hours and can't find any fix. Basically the grass needs to set to the transparent mode so it dodges AO, and it's all one object for optimization. If it's not obvious what the problem is from the image, you can see all the grass blades through each other - which would make sense considering it's set to transparent, but they are still set to be opaque. It's like the further away it is the higher it's priority when it should be the opposite (but changing the sorting directly does nothing).
I've found a few things that make it slightly better, but there's quite a bit of grass and there's gunna be even more so I'd rather not do something scuffed that'll bite performance later. It's also not that noticeable in game I just would rather it be perfect obviously.

How do you get FullScreen ShaderGraph shaders to work exactly?
Made one that just apply a straight color, slapped in on a material, put that material in a "full screen renderer pass feature" in the Universal Renderer Data ... and it does nothing.
Camera has post-processing enabled, so I'm not sure what more need to be configured.
Do you maybe have different quality levels, with different URP assets and renderer features ?
Ah crap, I had forgotten about that >_<
Thanks.
Hey all, kind of a vague question, but just needing some direction. I am looking at Acerola's Anisotropic Kuwahara filter post processing shader, and I am curious in how to convert something like this written for BiRP, to HDRPs post processing shaders. It looks like this is a few passes, and im not sure what resources to tackle in the HDRP shading structure to convert this: https://github.com/GarrettGunnell/Post-Processing/blob/main/Assets/Kuwahara Filter/AnisotropicKuwahara.shader

GitHub
My Unity post processing pipeline and shaders. Contribute to GarrettGunnell/Post-Processing development by creating an account on GitHub.

You're going to want to write a custom blur shader, pass in a cursor position every frame, and calculate each fragment's distance to the cursor to control the influence of the effect.
I assume you're using BiRP since you mention post processing layers. I don't do much with the built in pipeline and don't know exactly how you would implement custom effects like that, but hopefully someone else can help you out with the specifics
ok I give up trying to Google this. None of the information I found is helping and the bug reports have been marked as resolved despite very literally being not resolved and occurring exactly as described. Ahem.
I have a project set to build for WebGL with the Post Processing package installed and a post processing layer and volume on the main camera. A few months ago I built this: https://problemecium.itch.io/bacilli, which makes heavy use of post processing, with no issue, but as of a few weeks ago, post processing doesn't appear in the Game view and I get the following log spam whenever the mouse moves over the Game view even when not playing:
UnityEngine.ComputeShader.FindKernel (System.String name) (at <58c4b21abcbb42d68edb49ddbd3aa71d>:0)
UnityEngine.Rendering.PostProcessing.LogHistogram.Generate (UnityEngine.Rendering.PostProcessing.PostProcessRenderContext context) (at ./Library/PackageCache/com.unity.postprocessing@3.2.2/PostProcessing/Runtime/Utils/LogHistogram.cs:25)
UnityEngine.Rendering.PostProcessing.PostProcessLayer.RenderBuiltins (UnityEngine.Rendering.PostProcessing.PostProcessRenderContext context, System.Boolean isFinalPass, System.Int32 releaseTargetAfterUse, System.Int32 eye) (at ./Library/PackageCache/com.unity.postprocessing@3.2.2/PostProcessing/Runtime/PostProcessLayer.cs:1248)
UnityEngine.Rendering.PostProcessing.PostProcessLayer.Render (UnityEngine.Rendering.PostProcessing.PostProcessRenderContext context) (at ./Library/PackageCache/com.unity.postprocessing@3.2.2/PostProcessing/Runtime/PostProcessLayer.cs:1085)
UnityEngine.Rendering.PostProcessing.PostProcessLayer.BuildCommandBuffers () (at ./Library/PackageCache/com.unity.postprocessing@3.2.2/PostProcessing/Runtime/PostProcessLayer.cs:693)
UnityEngine.Rendering.PostProcessing.PostProcessLayer.OnPreCull () (at ./Library/PackageCache/com.unity.postprocessing@3.2.2/PostProcessing/Runtime/PostProcessLayer.cs:487)
UnityEngine.GUIUtility:ProcessEvent(Int32, IntPtr, Boolean&)
I tried downgrading the package from 3.3 to 3.2.2 with no luck (as seen above, the same thing happens but with just a different version number).
Several online sources say post processing depends on a computer shader and that WebGL does not support computer shaders, but 3.2.2 was the version I used successfully before so I know this isn't the full explanation. I also found some advice about adding certain hidden shaders to the the Always Included Shaders list, but doing so changed nothing, which makes sense because this problem occurs not only in builds but in the Editor where which shaders are included in a build is irrelevant.
The package appears to be assuming the existence of a certain shader kernel provided to it as part of some kind of "rendering context" that isn't actually providing it. No code has changed in the package since it worked before, so I'm left wondering if something changed in the engine itself. Has anyone else been confronted with this issue?
It's also notable that the exception comes out of a LogHistogram class, whose name implies it should only be involved if I'm using the Post Processing Debug component, but I am not. Nothing involving a histogram is in use here. I even tried disabling and even removing all of the post processing effects attached to the profile in use, but the log spam persists.
Some further sleuthing suggests that it's related to the Auto Exposure effect, which relies upon AutoExposure.compute (which, being a compute shader, apparently isn't allowed in WebGL), but something remains sus because neither disabling nor removing the auto exposure effect from the stack makes the log spam stop. I seem to be able to tenuously voodoo it away if I create a fresh new profile that has never had auto exposure available, but any profile that has ever had it, even if it doesn't currently had it, is somehow cursed o_O
Even further investigation by heuristic analysis suggests this is two problems: one where the auto exposure effect isn't properly handled with regard to WebGL (it should be grayed out, automatically disabled or skipped in code, or replaced with a WewbGL-compatible fallback) and the other where the Inspector doesn't properly clear old data, which is a bug I've been seeing pop up a lot lately.
I have been trying to use the bloom post-processing effect to make certain parts of a sprite glow, but after finishing the shader and going into my scene, it appears that several parts of my emission map have been all overlayed onto the sprite. They also appear to be be very small, what could be causing this?
You can leave your grass shader in transparent queue, but with set ZWrite on
Ah, is that possible from just the art side of things? For the most part I'm just doing asset creation and am not familiar with C# or creating shaders. So I guess basically my question is - is your suggestion possible without knowledge of those things?
I tried looking into ZWriting before and everything I found seemed to be part of a script.
Simple solution is to use alpha clip/cutout instead of transparent
It is part of your grass shader. So, you need to modify shader code. But it is a subtle change.
Author said that he requires transparent: "Basically the grass needs to set to the transparent mode so it dodges AO"
Do you need AO?
Need to ask him 🙂 @undone notch
Yeah AO is definitely necessary, so alpha clipping unfortunately wouldn't help. And yeah like Spazi said, I'm thinking the optimal solution is shader related which is out of my knowledge base but I'll pass it on. If it is simple though like you said it'd probably only take a couple minutes to figure out with ChatGPT so might try that first.
There's some very scuffed ways I can think of "fixing" it but they're definitely not as effiecient as just having the sorting work properly.
And of course because it's Unity it acts slightly differently between the scene, running the game in editor, and running it built - so testing it has been a bit of a nightmare.
@mortal bluff @undone notch I think another fairly simple approach could be to make a shader graph for the transparent grass, force enable zwrite and enable alpha clipping from the graph settings


If you want to avoid zwrite or alpha clipping I think other options would be to draw the grass geometry fully procedurally with scripts so you can control its draw order
Ah hmmm yeah I'll try those out - thank you helping. Worse comes to worst and I just leave it since it should be pretty hard to actually see it happening from a standing height but hopefully the shadergraph works.
I am in 2D if that helps
How do I actually use DoF? It seems like no matter what parameters I pass in, either the entire scene is blurry, or nothing in the scene is blurry

both in bokeh and in gausian mode, I cant seem to get any actaul depth happening
focus distance is the range of blur, and focus length is where in world units to start?
or not that because none of those do what I expect or want
I am expecting a start and stop before and after the focus point but instead it seems to be a flat everything or nothing
Is your camera orthographic per chance?
Perspective, thankfully I knew it doesnt work on ortho 🤔 I am thinking maybe its my assets are too small is why its making it hard to control
the value ranges might be in like decimal places so im going to scale everything up to see if its that
It does work in ortho but in a weird way
Because ortho camera depth is not linear or something like that
but I don't think there was supposed to be anything complicated about it with perspective cameras
Oh interseting didnt know that

I am trying to get the circled area not blurry and the distant scribble very blurry

maybe the FOV is too high?
I was trying to make the distance appear more pronounced
Are those objects transparent? If they aren't writing to the depth buffer/texture the DoF won't know about them
Hm good question, they're freja's Shapes assets

added reference cubes, up close is still getting way too blurry to get far away blurry
If you decrease Focal Length or increase Aperture you should see a gradual reduction in the blur harshness
Might not need anything beyond Focal Length override at first when testing
Oh I didnt even notice that you could turn OFF the other parameters 👀 will try that now
Question:
I think about using the post-process vignette to create a "i got hit, screen is red"-effect.
I also use the vignette in the standard way.
Is there a way to stack effects of the same type? can i have two vignettes?
I don't believe so, unless calculate their compounded effect yourself
They can be blended though, as most volume overrides
Probably simpler to implement a custom post process shader for the damage effect to work in addition to the vignette
I just learned that it is possible to have two vignettes in one volume by setting the editor to debug mode and gain full access to the data structures. It's only one vignette shown though. This however will allow me to visually design the vignettes in the volume. and then lerp the active vignette to switch between standard and bloody vignette.
Update: After reloading, the editor does really not like multiple vignettes in one volume. So better not do that.
MSAA disables AmbientOcclusion. Is there a reason for that?
Which render pipeline?
Appears to work fine on URP
After posting here, i found out more. It's a certain combination of MSAA, Ambient Occlusions Source Setting und Depth Priming that makes AO disappear.
https://forum.unity.com/threads/msaa-ambientoclusion-depth-priming-once-of-eaches-settings-can-hide-ao.1456258/

Unity Forum
2022.3.3f1 LTS, URP 14.0.8
There seems to be an interaction between MSAA, Ambient Occlusions Source Setting und Depth Priming
MSAA -> On
DepthPriming...
Hi guys I have question a out rendering some skinned meshes. You know the frame debugger? Just wondering why it draws my characters white first then in colour. Is that required ? Also lets say I have 14 characters on screen each about 6k tris each, each time it draws the white one my total tris go up 6k, and then again with each of the colour versions. So 14 chars get drawn in white im using 84k tris, then after the colour ones another 84k tris so in total 168k tris. No shadows on. Does that sound right to you ?
Are you talking about the depth buffer? Greyscale image, logarithmic based on distance to camera? You can disable that in the URP pipeline asset ( or whatever its called ).
Yes i think i am. Im on the built in pipeline though, thanks will check
I'm usually using ChatGPT 4 the paid one, to ask him about these stuff, i will ask it for you , it usually works
`The stencil buffer is not directly accessible from within a shader running in the context of a typical high-level shading language like HLSL (High-Level Shading Language). Normally, the stencil buffer is used to control rendering to the color buffer, with the GPU handling the details behind the scenes.
However, if you still want to read the stencil buffer, one workaround is to use a multi-pass approach where you first render your scene normally but also set stencil values, then in a second pass, you can render again to a texture using a shader that colors pixels differently based on the stencil value. This texture could then be used in your post-processing shader. The stencil values could be output to a color buffer and read back into your post-processing shader.
In Unity, this is a typical two-pass approach:
Render your scene with a shader that also sets stencil values.
Then, render a full-screen quad with a shader that reads the stencil buffer, and writes to a color buffer.
The code would look something like this:`
`// Simple color shader that also writes to stencil buffer.
Shader "Custom/ColorWithStencil" {
SubShader {
Pass {
Stencil {
Ref 1
Comp always
Pass replace
}
CGPROGRAM
#pragma vertex vert
#pragma fragment frag
        struct appdata {
            float4 vertex : POSITION;
        };

        struct v2f {
            float4 vertex : SV_POSITION;
        };

        v2f vert (appdata v) {
            v2f o;
            o.vertex = UnityObjectToClipPos(v.vertex);
            return o;
        }

        fixed4 frag (v2f i) : SV_Target {
            // Return red color.
            return fixed4(1, 0, 0, 1);
        }
        ENDCG
    }
}
}`
pass2
`// Simple shader that renders to a texture based on the stencil buffer.
Shader "Custom/StencilToTexture" {
SubShader {
Pass {
Stencil {
Ref 1
Comp equal
}
CGPROGRAM
#pragma vertex vert
#pragma fragment frag
        struct appdata {
            float4 vertex : POSITION;
        };

        struct v2f {
            float4 vertex : SV_POSITION;
        };

        v2f vert (appdata v) {
            v2f o;
            o.vertex = UnityObjectToClipPos(v.vertex);
            return o;
        }

        fixed4 frag (v2f i) : SV_Target {
            // Render red color where stencil was 1.
            return fixed4(1, 0, 0, 1);
        }
        ENDCG
    }
}
}`
`The result of the second shader could then be used as an input texture to your post-processing shader. However, this approach isn't free and requires an additional full-screen pass, which may not be suitable for all applications.
Please note that the specific implementation can vary depending on the graphics API you're using, the specifics of your rendering pipeline, and the specific requirements of your project. The above shaders are written for Unity's built-in render pipeline and may need to be adjusted for other platforms or pipelines.`
hey anybody knows how to change parameters at runtime for posteffect volumes for URP?
using this one but doesnt seem to work
public static void ChangeVignetteTo(Color newColor) { Volume volume = FindObjectOfType<Volume>(); if (volume != null && volume.profile.TryGet(out UnityEngine.Rendering.Universal.Vignette vignette)) { instance.m_Vignette = vignette; } if (instance != null && instance.m_Vignette != null) { instance.m_Vignette.active = true; instance.m_Vignette.color.Override(newColor); // volume = PostProcessManager.instance.QuickVolume(0, 100f, instance.m_Vignette); instance.Invoke(nameof(ChangeVignetteToBlack), 1); } else { Debug.LogError("Instance or Vignette is not set!"); } }
how do i setup vfx now that the standard asset from the unity store has been deprecated?
Hi there, somebody now why postprocess effect seen different in a webgl version of my project? Im using global volume to set postpr effects and in my normal build seen nice but in my webgl is not the same
How is it different then?
In what way was were the standard assets necessary for vfx before and what do you mean by vfx in this context?
you would get the post processing components from the standard asset
and what i mena by vfx is post effects actually sorry for using the wrong terminology
I see, you could simply install and set up your post processing the normal way without it just as well
Despite being deprecated you can still get the starter package and use it as reference, though I'd do so in a project with an older editor version since the new ones produce a lot of errors with it
Was there something particularly special in there?
no, that was just the only way i could get the post effect system last time i looked it up
the post effect volume stack thing was discountinued but they included it in the starter asset pack
🤷♀️
It wasn't discontinued
If you're using Built-in Render Pipeline you use the Post Processing Stack v2 for post processing
Instructions in pinned messages of this channel
Hi i am in standard render pipeline(built in) and i installed the post processing package from package manager and i have applied the post processing stack to my camera and included the bloom and vignette effects but i still cannot see those effect
are there some additional steps that needs to be performed ?
ohk managed to figure it out
I didnt add the post processing layer so you need to add the post processing volume as well as the layer component to the camera
What are possible reasons why I can't see my game object in the scene if I change its layer? I can't see it in scene or in game view, even though my cameras have this layer set to render, and my layers roll out in the topright corner ALSO says show that layer

I am trying to do postproccessing with it but gets getting too much render data from sources so I am trying to isolate it to its own thing but it wont show at all on any layer except for Default
ah someone (probably past me) messed with the opaque layer

errors exists between screen and chair 🔥
I've seen this happen a few times before and I'm pretty sure there's some internal logic that causes some layers default to off
I am noticing that Scene view and Game view render post proccessing differently 🤔

left is scene and right is game, is there a known reason why scene and game don't display the same?
Perhaps a setting I set, or didn't set? Or because my scene has more than one camera?
the post proccessing volume is global and not local if that affects
what
if I turn off my second camera, now Scene view is even MORE powerful than game

Hmm
In URP, how do I exclude a layer from post processing?
I've tried all kinds of camera settings, renderer settings, culling masks, volume masks, I can't figure out how to exclude a layer/object/material from getting post proccessed
Not an option, even if it sounds intuitive
Post processing processes the whole rendered image, post-rendering, so there isn't an opportunity to pick and choose
With stacked cameras you have multiple rendered images and post processings, one for each camera, so there some limited ability to apply different post processing effects on each layer
How can I do that? Currently I have multiple cameras, one base and one overlay, but post-proccessing is getting applied to everything that both render, even though one of them isnt set to post proccess

the nuclear bright dots shouldn't be getting post processed as they're only seen by a camera that has no post processing applied
You can apply one set of post processing effects to the base camera's image
Then the overlay camera will render its stuff on top of that image, and apply its own post processing
Same goes for subsequent overlay cameras
Which means the PP will always affect what's below it, and be visible behind what's above it
Hence "limited"
Okay so turning ON post processing for the base camera somehow is now culling out the post proccessing that the overlay camera was doing to things only the base camera could see

Which... makes absolutely no sense to me at all, like shouldnt the bloom still be blowing out my eyeballs?
Definitely doesn't sound like making sense!

I am not crazy, see for yourself, turning on post proccessing for the base camera is somehow culling out the overlay camera's post proccessing
Ill poke arond in settings on each camera and the post proccessing volume??? because this is wild nonsense
So as far as I can tell, for every post proccessing volume and camera in my scene set to Post Proceess ON, the post processing-ness seems to be.. divided? between them? Maybe?
Like the more stuff I turn on PP, the bloom gets weaker and weaker
except if I add a NEW camera, and turn on PP on that new camera, PP gets stronger
even though turning it on other cameras made it get weaker
its.. complete madness
Right, this doesn't seem to line up with my experience of camera stacking and post processing
I'd believe it to be some kind of bug
Yeah that makes no sense to me, I am closing unity and restarting it to see if it continues to do this
because honestly I want it to be doing what its doing exactly right now, but if I can't figure out why its working or replicate why its working, thats less useful
major thunderstorm so im shutting down but ill try to export the scene later for you/anyone to poke at, maybe someone can diagnose wtf is going on
hello, I am creating custom post processing using image effect shaders and I want to include multiple effects
currently I am chaining them like this, using a render texture asset and materials for each effect

the problem is that for each new effect, I should create a new render texture asset and I was wondering if there is a more flexible way of doing this
so I dont have to create several render texture assets for each new effect I add
Guys Im trying to edit my post processing profile in a script
It works and I cans witch the values but I cannot change intensity in the HDR picker. If i give the rgb values to be 111 for example il get random numbers and intensity so i dont know how to fix

Is there anything in the playersettings or scrips that may be additive?
Unfortunately this didn’t work. I realized intensity is like a multiplier behind the scenes but could not find it’s equation. I made something that kinda works now but the Colors I tell it to choose are not exact
HDR color is just color * intensity
Theres no way I tried that. Let’s say I put a color of 100, 30, 60 and I want an intensity of 2
If I divide my hdr color to be normal so I can use it as my color filter it would not work and the intensity would@be all messed up
The only way thar@kinda worked was this complicated equation I found on a unity forum which almost accurately replicates it
Because I can only give the Color filter rgba values without intensity but in the picker I could technically choose intensity so I have to convert my wanted hdr color to a normal Color so unity can convert it back 🥲
Plain colors are 0-1 in each channel
1,0,0 is fully red
2,0,0 is even brighter HDR red
Don't know if that's the same as 2 intensity in the inspector color field, but you could check that by debug.logging the color value after setting it in inspector
Yeah I don’t know I’ll try some more, the solution used a weird logarithmic function to convert it 🤣
I assume you could convert any HDR color to non-hdr by dividing it by its brightest color channel, assuming it's over 1
In the Color picker you can choose values from 0-255 with an intensity at the bottom
Why do you need to do any converting at all, I missed that part
Basically let’s say I want a blue@Color with intensity .5
I can’t just tell it in the script to do that since intensity is not a parameter of the Color its a thing unity does@behind the scenes
It’s some kind of multiplier
Why do you need HDR intensity if the filter override doesn't use HDR intensity
So I need to somehow convert my 3 rgb values with intensity to be a normal rgb value that the editor will see and convert
Wdym
I only use the intensity that comes with the hdr Color picker
I see it does use HDR intensity
Color picker does tell you exactly what the color values end up as when you adjust the intensity

Oh I never used that setting of rgb but I dont think I can reference it in my script
Maybe I did something wrong but even by looking online people just give it normal 0-255 values in the script
And besides I don’t know even then how I would find the relationship@between the rgb values and intensity I don’t think it’s linear
That's the difference of Color and Color32
Interesting I tried that yesterday but it didn’t work but it has multiple upvotes so I guess I’ll try it again tonight
Color32 can't be above 255 for any channel, which would be required for HDR color
(or rather above 1 in terms of floating point color, 1 and 255 are equivalent in the different formats)
post proccess question, is there any way to blur out objects based on their world position? Or with depth texture?
Most of my assets are transparent however so preferable not based on depth 

maybe a setting on 'physical camera'?
stuff like depth of field blurs past or before specific point, but I think I am looking for like, a focus point that blurs both before and after if thats possible?
it doesnt look like you can add multiple DOFs though

Googling around it looks like I am looking for some kind of double-blur, not just near or far but both near and far?
I am not sure what the exact name of this effect is, camera focal point seems to be the closest thing
hm maybe I could cheat it with a plane that is sampling scene color and gausian blurring it
Bokeh instead of gaussian does that

Yes
I wasn't able to get the focal depth I wanted no matter how much I played with these values, is the problem maybe that because my meshes are transparent they're not writing to depth thus can't blur based on depth?
(assuming this is based on depth)
Ill put some non transparent in to test that specifically
Transparents don't write to depth buffer so they just take the blurriness of whatever opaque behind them
And if you're using an ortho camera, the "distance from camera" value of DoF is not linearly relative to physical space
Its perspective but with an extremely small FOV
hm which might also be part of the problem
Doesn't seem to me that a perspective camera's FoV has any effect on DoF, for better or worse
ah yeah bokeh totally works in perspective with a wide FOV


but the same parameters with small FOV blurs everything indiscriminately


What's the camera fov here?
You can keep Focal Length at max for testing, it only increases or decreases the blur amount
Aperture value of 1 can also make the blur more ...blurry
So you know precisely what it's affecting and what it isn't
You really should have opaque boxes at different depths
Otherwise it can be really hard to gauge what's happening
Also, what's the starry background? If it's something other than a sky shader it may get unpredictable blurs
0.2
Had to step away for an apointment, back now
that is a plane about 3000 units away in that direction

even selected its so far away you can't see the orange selection box
I do now, those grey boxes are opaque and at different depths

I believe the distance is the problem
If I the camera is even 1500 units away from the objects, their blur relative to each other will be minuscule even with the strongest possible blur settings
yeah to get the opaque cubes to blur I have to move them like +300

You'd have better luck getting it to work with an ortho camera
rats 🤔 I assume there's no way to clamp the affect over that distance
yeah its a little better with true ortho

but the issue here is that we need to switch between ortho and perspective on the fly seamlessly, thats why I had my weirdo setup
That's sorta possible, but a nightmare to make it work with DoF I'm sure
Yeah 😬

I dont suppose there is any way to see the unity code for the DoF override
or write my own new override?
I know unity has a github of its code but its always hard to find things in there for me
It's probably somewhere in there
That stuff is way beyond me though

same
Lunch hour for now, I will try to see if I can dig up their override code when I get back
appears to be a volume profile parameter thatll help google it

I am looking for a functional example of a new volume component
but so far all the ones ive found in github error when brought into unity for reasons I dont have the experience to know why
removing 'Universal' fixes the top error but the others persist

looks like this code might be old?
gotta find a working up to date example 🤔

tryfinally
You can create custom Volume Components to find a blended set of parameters determined by the camera’s position within the scene.
I found this tutorial but its confusing, they assume you know all kinds of things I dont know
starting to understand 👀

hrm or not, getting confused again, they're leaving out so much critical information to make anything work
all I really need is just a final finished working example that I can reverse engineer

hrm why cant I find anything in any unity repo
I'm struggling to convert a rendering feature from using RenderTextureHandle to RTHandle. This is functionally working... however I get the error:
RTHandle.Initialize should only be called once before allocating any Render Texture. This may be caused by an unreleased RTHandle resource.
I am struggling to find relevant documentation and examples online; the way in which you work with this seems to have changed so many times that it's super confusing :S
I've got an article that kinda has some examples - https://www.cyanilux.com/tutorials/custom-renderer-features/#rthandle
I'd basically suggest using RenderingUtils.ReAllocateIfNeeded rather than RTHandles.Alloc
Specifically I think your error might be because the Create() method can be called multiple times (so Setup() and allocating the same textures multiple times too). Some if (destinationColor == null) checks before allocating would avoid that, but using ReAllocateIfNeeded tends to be easier
@gritty folio thank you! that was exactly what I needed. Your article is brilliant! wish I had've found that sooner
😄 it basically makes a mask which I use in my outline full-screen shader to control which objects have outlines drawn around them:

the thiner line on the front cube is just because the depth threshold is too high; it can easily be the correct thickness
What's the smartest most flexible way to darker large groups of transparent elements in a scene?
Ideal use case would be able to 'select' a large number of unrelated elements and materials and just turn down the opacity on the entire group, figuratively

I am not experienced enough to know if this is a solved problem known workflow, is it possible to somehow dictate at runtime without blowing up clones of 100s of materials or stuff?
Like my main concern is its not ONE element that needs to be brighter/darker, its entire huge subsections of stuff, and managing what is bright/dark needs to be trivial and fail safe :x
@chrome swallow you could possibly use a global shader variable; eg. https://docs.unity3d.com/ScriptReference/Shader.SetGlobalFloat.html

Hmm how would I not global some of them but do global others though?
Like lets say there's 15 renderers I want bright and 60+ I want to darken
in pratice those numbers will definitely be in flux as well 😬
You could have a variable on the material as well; just multiply together to accept the global value or get 0.
Oh that's a good point
global everything -1, and +1 the things I want bright
if I use a material property block to pass in that 1 to all the materials I want bright, won't that make a ton of clones?
I am not super familiar with optimizing the render pipeline or its backend on how render batches and all that works
Well, another option is; you have a global float array
and in the material you have an int property which identifies which entry of the global float array to lookup and use
[0] can be one global control value, and [1] can be the other
If the material property just identifies which global value to use (be it with multiplication or with an array lookup) then the only thing that needs to change is the global value
the materials just stay as-is
I see Ill do some googling into making use of a float array in shader, hopefully wont be too hard
I'd have darkened and undarkened variants of the materials, and swap them on the renderers on the fly
If the darkening needs to be animated, handle a pool of material instances for those renderers that need to be actively darkened/undarkened
Material property blocks could be used in a bit simpler way to pass local changes to renderers, but URP doesn't support them without breaking SRP batching
Material instances are not terribly different in practice
@languid ingot https://docs.unity3d.com/Packages/com.unity.postprocessing@3.3/manual/Quick-start.html as per instructions here, specify a layer for the Post Process Layer component, then set your camera with the Post Process Volume's gameobject to the same layer
oh ok got it thanks
I was told. This is either physics or post processing so here goes: A box volume's colliders are interfering with a raycast. But if I set the volume layer to anything but default, the volume stops working. So I can't mask it.
"Fixed" it. I set the layer to "Ignore Raycast" at runtime. The box volume stop working if you change the layer in the editor so that's clearly a bug.
Weee! That's two hours of my life I'm not getting back!
Isn't that how most hours work
fyi, post proc from package not work when using urp/hdrp, you need to use their own post proc,called volume
I'm trying to set up a global post processing volume, so did a quick test by turning the saturation all the way down but nothing is changing in my game view

Is your project using URP?
hdrp
Uninstall the PPv2 package and set up post processing that's compatible with your render pipeline
Instructions in pinned
Hi, why i can't apply post processing to my game when using camera stacking? I have a camera for the UI and a camera for the game, however i can't apply a bloom/vignette on my game's camera, the only way i got it working is to apply the post processing on the UI camera, but then it applies the effect to the game's AND the UI's camera, not just the game/the UI
all i found while searching was this post:
https://forum.unity.com/threads/post-processing-with-multiple-cameras-is-currently-very-problematic.1028533/page-5
Unity Forum
Hello, any updates on this?
The fact that this isn't on the roadmap (even as 'under consideration' - extremely non-committal) after 3 years of pleading...
it's been 3 years since then
(layers and culling masks does not seems to do anything)
Post processing can be applied on both base and overlay cameras
The thread is about addressing the problem that cameras below in the stack cannot be excluded from post processing of the above layers, which you also noticed
But it doesn't seem to be the exact same issue
The feature was added to roadmap in april, and in the thread you linked there's a custom post processing utility that claims to solve the problem
But I can confirm that post processing on the base camera works and doesn't include overlay cameras' rendered image
it's exact the same issue
i tried all those custom processings in the thread, however it doesn't seems to work with newer unity versions
what i ended up doing to make it work was using 3 cameras, one act as the game camera, that follows the player, this camera outputs to a render texture, another one acts as a virtual camera, all it does is look at a quad with the render texture from the previous camera, and after all of that there's the UI camera
If I understood correctly issue number one is "can't apply a bloom/vignette on my game's camera", while number two is "but then it applies the effect to the game's AND the UI's camera"
not for me at least, unity version 2022 lts
for me it's only working the post processing on the overlay camera, but it applies to every other camera
a little video showcasing the bug