#🔀┃art-asset-workflow
1 messages · Page 28 of 1
I've googled around looking for examples without too much luck. This almost falls under modding, because were this to be possible, it would allow users to drag/drop spritemaps into a folder and have unity dynamically import them as new assets.
Which is something I also looked into without too much luck, heh
For example when I drag/drop a subset of frames into the editor to make an animation file - I don't know what APIs would be needed to handle that.
That's definitely possible. The editor api basically allows you to perform any manual operation via code. You just need to know what exactly should be done.
Good to know. I've been kind of surprised there aren't more resources or guides for modding type stuff, which would have clued me into this. Seems the preferred route is more... force folk to DL unity and use it to make asset packs for your game.
A custom editor class would allow hooking to various ui events related to it, like drag and drop. At which point you would be able to retrieve the selected or dropped objects, cast them to whatever type you're interested and retrieve data, create new objects, assets, etc...
It's modding. It's called editor scripts. And you'd basically look at the api docs for that.
Ok
Could start here I guess:
https://docs.unity3d.com/6000.2/Documentation/ScriptReference/Editor.html
Well I mean, I've written extensive editor expansions.
Proper gamedev studios usually have people specializing in editor scripting specifically for the purpose of creating such tools.
A map editor and I often batch-script other shortcuts like filling arrays and generating organized data.
I just don't know the APIs for sprite/animation manipulation well enough at this point.
Well, then you just need to look up this api in the docs. Either search through it manually, or ask AI chatbot for api that could be relevant, then look through it's docs.
Amazing. I guess ChatGPT got familiar with this since I last asked. It did the whole thing in seconds and it worked w/o needing to change a thing? We're so cooked lol
Even in my day job, I try to be judicious in my use of it. Figured it was still dumb regarding this. Apparently not.
Testing a WIP feature for my addon. Parallel COACD convex hull collision generation. It can work pretty well even for a building in a pinch, but you do need to split the building into alot of pieces first.
https://ultikynnys.github.io/Blender-CoACD-page/images/COACDExamples/Buildingex1.mp4
It definitely has sped up my workflow, I used to do most of my convex hull modeling by hand
Impressive but note that this channel is for questions and discussion about asset integration into Unity
There are showcase channels but they are for Unity stuff likewise
ah sorry, thanks for the clarification.
Hi, I'm trying to import a psb file with a bunch of sprites each in its own layer group so that I can use it like a sprite sheet. However, when imported into Unity using the psb importer, I'm unable to slice all my sprites into equal sizes because unity ignores the empty spaces. Is there a way to make them be equally spaced in the sprite editor or do I have to just them out into a sprite sheet in photoshop manually? Any help would be appreciated 🙂 (I'm using unity 6)


Do they need to be equal sizes?
In this case it likely only matters that the pivot is positioned correctly per slice to retain their original relative position
Got it working now, thanks!
Hi, I have a rigged and animated 3d asset made in blender and exported as an FBX into unity composed of different meshes. Is it possible to use the skinned meshes I have imported inside a prefab that already has the logic instead of adding the logic to the imported fbx?
for some reason I can only see the bones in the hierarchy and not in the project files
so i recently heard that mesh tessellation can optimize meshes by reducing the poly count in areas of your vision were u can't see the geometry in the first place but keeping the geometry at or near the silluette where u can see the sides of geometry high poly, now that sounds great but wouldn't that mess up the shading where the high and low poly geometry meet?
I don't think tessellation can reduce details. It can only add details or keep it unchanged.
If you mean it would cause seams between different tessellation levels as needs to be taken into account usually when implementing terrain chunking (with LODs) yourself, it seems to be taken into account already by the graphics api. Some example figures of tessellated geometry on Metal can be seen here: https://metalbyexample.com/tessellation/. Most likely other graphics apis uses the same or similar pattern
does unity have an easy way to render outlines for objects?
i followed a tutorial . but the mesh creates a double inverted mesh which will become expensive since i am using it on a slightly complex character.

there must a simpler alternative.
No
Well, you'll need to render it twice regardless. Even if you do screen space outlines, you need to render a mask.
Not really
Inverted hull is probably the simplest to implement
Or rather is the simplest if you don't consider grabbing an outline asset that does it with no extra steps on your part
Thankfully, you don't have to use a complex material for the second pass. So you're mostly paying in vertex shader time.
Vertices are relatively cheap
More likely you'd compare the cost of worse SRP batching due to swapping shaders from mesh to mesh during rendering versus rendering a wholly another pass and compositing it
Depends on how many objects there are
Probably the only way to avoid it, is screen space with stencil in your actual material. But it's still a second draw in screen space.
Yeah, I wouldn't worry about the cpu side at all if it's just a handful of outlines objects
the asset is slightly complex

and also the outline is kinda not working correctly
it seems to be scaling from the center of the character rather than the pivot. Is there a way to change it?
That is exactly what multiplying the object space coordinates do which only works for very primitive meshes like cubes or spheres. One other common way to offset the outline is to move each vertex along the normals. That often works decently well for more complex geometry, flat shaded geometry being an obvious exception. Moving along the normals would mean this: objSpacePos = objSpacePos + objSpaceNormal * thickness
i somewhat understand that statement. but i wish i understood how to implement this. i have 0 shader knowledge.
What you are currently doing is objSpacePos = objSpacePos * thickness (Outline Scale). The shader graphs are evaluated kind of backwards from right to left (the positioning of the nodes don't actually matter, only how you connect them). You are basically setting the position to a multiplication between the position and some outline scale variable. What you want to do instead is set the position instead to an addition between the position, and multiplication between Normal (https://docs.unity3d.com/Packages/com.unity.shadergraph@7.1/manual/Normal-Vector-Node.html) and some thickness variable.
so i tried adding obj.pos and obj.normal geo and then multiplying it with the scale


You have the right nodes, only the order is wrong now. Now you do objSpacePos = (objSpacePos + objSpaceNormal) * thickness. I should have probably used the parentheses there to make it more clear but basically the two nodes coming to Add are added together first in shader graph. It doesn't have any idea of the order of operations in the overall expression
Basically when you connect another node via line, only the value from the node on the left will be transferred through that line to the right. This means that the value of the node on the left (and any nodes that are connected to that node) must be evaluated before the node on the right is evaluated. The Add node for example takes in 2 lines, which means the values from the nodes these two lines come from are evaluated before the results are added up
@plush jolt this might be of interest to you https://ameye.dev/notes/easiest-outline-in-unity/ it should make the outline look a bit better. For a technical explanation on the shader I would recommend this article: https://www.videopoetics.com/tutorials/pixel-perfect-outline-shaders-unity/ or this one https://ameye.dev/notes/rendering-outlines/#vertex-extrusion
The geometry used for rendering the outline doesn't necessarily have to be the same as the character itself
If there's a lot of polygons that don't contribute to object silhouette, they could be dissolved from the outline mesh
Aside from those kind of polygons on the face area, it's relatively low poly
Hi, i am making a 2D game (not pixel art) but i am facing an issue. The outline of the image (a PNG file) once uploaded looks blurry. The image is created in Procreate and it's size is: 640W x 1280H (the idea is to downscale it to make it looks coherent with the game size). Once uploaded in Unity i have set the pixle size to 640 and set the compression to none, but stile the lines looks blurry. Can someone help try to understand how to properly export and import an image from Procreate into Unity?


Is that in game or scene view? Is it zoomed? Does changing the filter mode help?
Is the scene view, but also in the game view the problem is the same; i have tried it but nothing change
Are you atlasing it?
Is the actual image size larger than the max image size for your platform in quality settings?
hi all, is there a way to enable wireframe on objects with a hotkey?
Top right of the scene panel, you can enable wireframe
@fathom stag, two questions 1. Did you save the image after painting the texture? 2. What settings do you have in export? Can you show me a screenshot?
I was using Vertex Paint instead of Texture Paint


Hm, hm, hm. I haven't tried vertex painted materials, but maybe this will help:

In Unity there are those buttons to extract textures and materials, did you try to use them? For textures to show you need to use that, so maybe for your settings it will be similar?
I'll take a look right now
It doesn't help
I could only do this through a custom shader, but the problem is that I can't use it with the nature renderer.
Is there any reason you use vertex paint instead of texture paint?
As I understand it, in Terrain Paint Details, I can't put a model with 2 or more materials, so I decided to use vertex color to create a single shared material.
Maybe there are better ways, but I don't know about them.
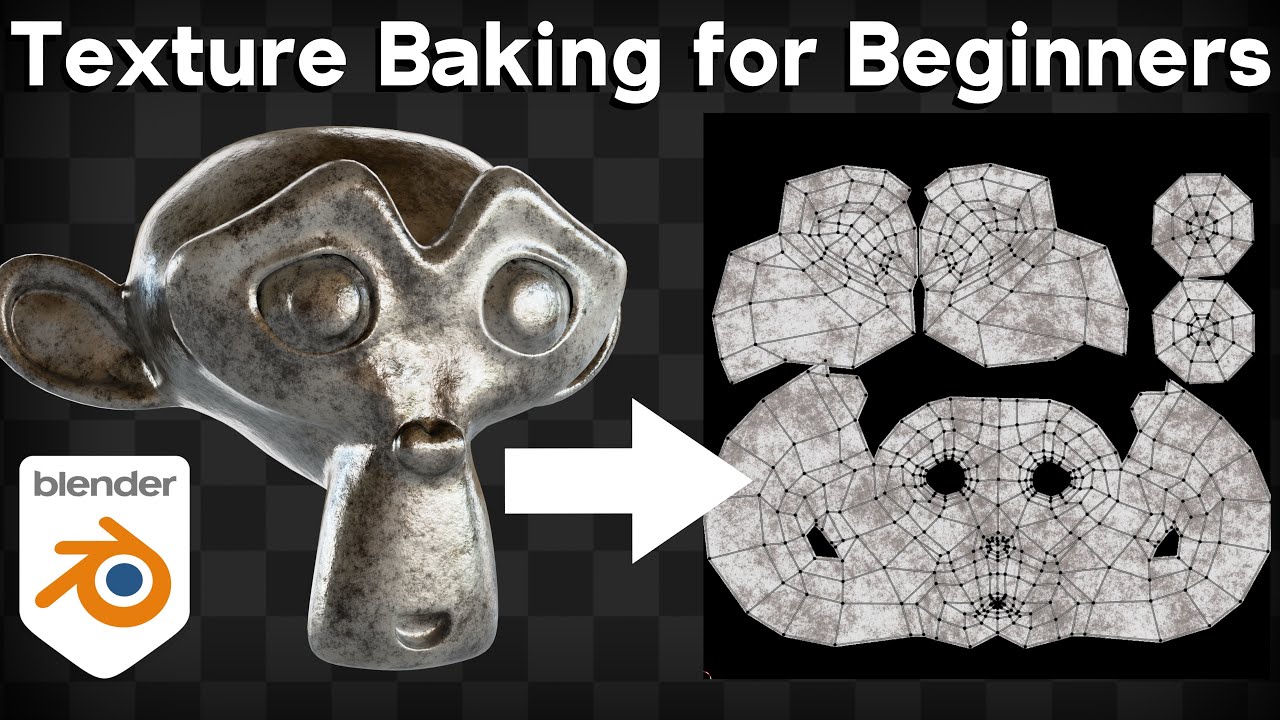
There is a process called 'baking textures', I am actually upset now with myself because I was going to make a video about it a while ago and I didn't do it. Basically it allows you to combine multiple materials into a single one.
https://www.youtube.com/watch?v=wG6ON8wZYLc - this is the video I initially learnt about it from years ago

𝗪𝗮𝘁𝗰𝗵 𝘁𝗵𝗲 𝗡𝗲𝘄 𝗨𝗽𝗱𝗮𝘁𝗲𝗱 𝗧𝘂𝘁𝗼𝗿𝗶𝗮𝗹: ➡️ https://youtu.be/eE7FedDW2AI
In this Blender tutorial, I will show you how to bake multiple materials to one texture map.
I forgot to mention in the tutorial: Before baking any texture maps that are not contributing to the base...
This still works, as I still use the same process, used that in fact over last weekend
I'll take a look right now
Alt+1/2/3/4 to go between the four modes in the toolbar
hey Ole good to see you here also
I'm everywhere 😄
Is there a way to make the Substance Painter viewport rendering look more similarly to Unity HDRP? Some materials (especially metals) look very different.
You're pretty limited in Painter tbh, I would say it's more worthwhile to have a quick export workflow so you can quickly tab into Unity to see the materials in context
Yeah, I personally use Substance preview more as a way to see if the maps have the right values. Then tweak the actual final look in-engine.
I'll do the same, thanks for answers
Anybody know what causes prefabs to just flicker like strobe lights?

these are straight up albedo, no pbr, no emission, default lit shader(urp), did not do this the past 10 hours of work, now random things just start strobing
seems to be random "dark matter" causing it, even in an empty scene. If i move the entire structure outside the area of influence of this bug, the flickering stops, if I move it closer, more of the structure flickers
I have a 2d sprite light that I'm trying to dynamically shape so it flows around objects.
I have a working mesh that wraps around the objects, but I'm struggling with applying it to the sprite light itself. Sprite lights don't take render textures. Is there any way I can dynamically alter the vertices of the 2d sprite light at runtime?
Think FOV/flashlight
Doesn't the 2D lighting system's shadowcasting do this already
It kind of does, but that doesn't solve the actual thing I'm struggling with. I already have an FOV thing that produces a neat greying-out effect that works okay. But the flashlight in the characters hands shows through tall objects

When I think about it, I guess my actual problem is that my lights aren't sorted correctly by Y axis.
Which, it seems like maybe I can't? I find posts from 2020 talking about wanting this / unity thinking about developing it, has it been made possible?
The issue is the lights aren't designed to consider isometric sprites, rather all shadow casters functionally extend "into" the camera infinitely, and normal mapping assumes the lights are between the sprite and the camera
It's a more involved issue to solve than just Y sorting the light, I expect
I don't necessarily need the shadow casting though
I'm mostly interested in resolving the see-through tall object effect
If the light appears as if it comes "under" the object that's less of a concern.
It would then seem to go through the wall under it
Yeah but the lights reach isn't very far so the effect would be milder
And when you move below the wall's pivot, the wall should swap from being fully in shadow to fully lit
I already kinda have that working with some aggressive normal mapping, it's just that specific flashlight effect that breaks
I might just have to block the player from walking behind tall objects, or not have tall objects like this to begin with, which would be a shame
Normal maps can sorta work like that, but not horizontally, and also not when the light is over the wall
Can't say if your proposed method would actually work, or how hard it'd be to implement really, but I know there's an asset that does the kind of lighting you're after
https://assetstore.unity.com/packages/tools/particles-effects/smart-lighting-2d-112535
Yeah any light that's "behind" the wall just becomes "on" the wall
I'll take a look at that asset, thanks
Increasing the normal angle in the normal map significantly also helped

i'm trying to figure out how to get a sort of "transmissive" effect like when you have light being magnified through glass. i followed some tutorial on refraction (as a starting point) and the setup i have works great when the whole object is using the effect... but what if I want to limit it to just one part of the texture atlas using a custom grayscale map? it seems to behave differently and i am kind of not sure where to go from here.
on the sphere it looks like it properly is warping the scene behind it, but on the lamp where i have a map telling it where to enable this effect, it only appears to draw the scene at an angle when i adjust the IOR. here's the demonstration, and the shader graph (transmission map is really "refraction map" for now, and forget the tiling and offset part, i thought that might have something to do with it but those don't do anything now


This is a #1390346776804069396 question
@maiden abyss you too next time
Was there a separate channel for general art/2d stuff before? I feel like the channels have become more confusing since last time I was here.
I wouldn't have guessed my request fit into "rendering"
Not for general art
There is #🖼️┃2d-tools which is technically fits, but because your question is primarily rendering related and second custom renderer feature or shader related, your odds of getting relevant advice in that channel are very small
I read the description as "ask anything related to 2d, 3d or audio asset integration", but now I assume the intent behind the wording is specifically about "2d/3d/audio asset integration"
Channel directory didn’t really specify where shaders go that I could find but ok
🫡
I have 2 complex materials (ShaderGraph) and I want to combine them into 1 (Like using Overlay node). Do u guys have any idea ?
i think im in the right channel to ask this question. so why does this issue happens?

Modeling programs don't stop you from giving zero weight vertex groups to bones, but I think usually you have a checkbox to strip those either on export or import
Whether that's an "issue" or not I suppose depends on whether that causes visual issues or happens unexpectedly
Shader questions are for the rendering channel like we just discussed above
To "combine" materials you have to make them into one shader, by copy pasting the nodes or making them into subgraphs
(Note for performance that shaders will have to calculate all nodes inside them, unless branched with a keyword which allows features to be split into separate shader variants)
idk if this fits in this channel, But I want to know why the number and the icon are blurry.
In the editor I see all ok.
The text is TextMeshPro.

It doesn't look blurry, more like stretched
That happens when your Game window has a non-integer zoom level
Make sure to set the resolution of the Game window to match the resolution you expect the game to be played at, and set zoom to 1x to see what the rendered image looks like without being upscaled or downscaled for preview purposes
#📲┃ui-ux is for UI
Oh we have a ui channel, sorry I dont see it, thanks
#1180170818983051344 or #🏆┃daily-win are for posting creations and progress
This channel is for questions about making assets work with Unity
Oh okay sorry about that
i hope this is the correct settings to export a rigged model

and also for the fact that theres an issue that doesnt exist at all

there is no other bones that are named head which im confused on why it says that
heres what im exporting just in case theres something wrong

You have a mesh called Head, and a bone called Head. Try changing the name of the mesh and try again
i cant really tell if thats the issue because im having this error keep popping up
whoops wrong error
yeah this one

That's not an error that's a warning
The question is whether the humanoid rig works as it should
Then you should probably be following a tutorial
i did specifically that
search youtube for "unity 6 humanoid rig"
alr
Don't recall off the top of my head if those are the "right" settings
I would use a script or a plugin to do the export right
https://polynook.com/learn/how-to-export-models-from-blender-to-unity
This page has specific instructions how to do it manually (though cloudflare is down now)
Most important is that you stick to a specific method that works well enough
You can always modify transforms and use parenting in Unity to use an imported mesh even if it isn't "correct" totally, but if you have meshes or particularly animation clips exported with different transforms they won't be compatible and can't effectively be used in the same animator
wow
If you have multiple different objects attached to an armature, I wouldn't export them together with the animations
FBX exporting attempts to create every action separately for every object, so you may end up with dozens or hundreds of junk animation clips
In Unity you want just one Animator Controller for the armature, and each mesh / skinned mesh attached to that armature
Not an individual Controller for every item as this kind of workflow would expect you to make
oh that makes so much sense because i have multiple body parts that are not joined

Maybe Blender's "bone parent" relationship can now be exported/imported through FBX but not sure
If not, you can try to make sure you have a default pose/position for all objects and parent them in Unity
With multiple armature deform parent relationships it may be more complicated, not sure
It could be the same process as importing a collection of separate objects, but instead of repareting you'd define the skinned mesh component to use the same armature in Unity
Could be some pitfalls on the way, like how Unity's importer expects an armature has to be attached to some specific skinned mesh primarily
Simplest workflow by far is to Join them and just export one armature and one skinned mesh
Warnings aren't errors
got it
So it doesn't mean the import process was interrupted
alr
In the case of excess clips you can delete them from a blender scene's file view
i dont even know how to find them since i dont see any clips
yeah nothing works
ive been having this issue for a month now, ill see if i can find any solutions if ic an
So im trying to add/overlay a png here in the shader but it works f¨perfectly in preview but in the actual game everything jsut turns white, this problem only happend when i add, or multiply with this png, ive tried to rexport the file and such. can anyone help?


You should show the whole graph, including the properties and how you're using the shader in scene
In #1390346776804069396 usually as that section is for shaders
ah alright
again sorry if this is the wrong place, having a moment and i think i'm losing my mind. i could've sworn i could make prefab variants of one another with different underlying fbx assets. i have these 3 variations of a rail track, they're quite literally the same mesh with different endcaps for the head/tail section. can i not have them be variants of the "section" one?


They are imported meshes so the "prefab" part is auto-generated
It doesn't make sense to try to make them into variants, as the relationships would break if you ever had to update or swap any of the meshes
i guess i'm not fully understanding the standard way of looking at these assets. would i make a variant of them all grouped together to form a single track group from 3 different prefabs made from the fbx models?
Makes more sense to make prefabs representing the gameobjects you're actually placing around the scene which can be variants of each other or contain other prefabs
The imported meshes would be inside their hierarchies
Because models might have / you may want them to have specific transform properties it makes sense to have them as children inside prefabs, and that makes them swappable as well
ah
Well, why do you want them to be variants or grouped otherwise? Prefabs and prefab variants are a tool for you to make level building and gameobject editing easier
i figured because they're so similar they should be variants. at least it sounds intuitive that way in my head
guess i'm mistaken on what they represent
each version of the track as an individual prefab so i can reuse them for other groups of prefabs makes sense
If they all contain just a mesh, and the mesh is different in each case, that would make them fully different
like i want the initial track section to be a reusable prefab as well, which comprises of a few copies of the track sections and a head/tail
but a different one for a ceiling track
i assume thats the way to use them
You can have prefabs of prefabs
yeah
So collections of track pieces would be prefabs
The track pieces inside them would be prefabs
The meshes inside the piece prefabs would be auto-generated import prefabs
right
A prefab variant is the same prefab but with additional overrides on top
right. ok i see now
so a different coloration of a monster for instance, with a material variant might be an example
i want them to share similar properties but have one scaled bigger
same base model
In my case I have a wall prefab that has colliders and some meshes every wall uses, like a shadow behind the wall, and a placeholder visual mesh
That prefab has variants that each replace the placeholder with different room types' wall meshes
Could also change the wall's physical material if needed
So if I want to change the original wall, every variant inherits the changes because they only override the visual mesh
For example yes
But note that "material variants" are a specific thing
Same principle as prefab variants though
They inherit everything which they don't override
yeah i think thats what i was thinking of that i'd worked with in the past not prefab variants.
are there any tools out there for level design?
It feels daunting imagining going from this to proper levels. Not sure where to start.

You can start from concepts
Or even before that from references and inspirational material
After concepts (or concurrently) you can do mock-ups by sketching, or with placeholders in or out of engine
Then you probably already have an idea what kind of level geometry or modules you need to build levels that your gameplay requires
I'm planning to implement a posterization style using posterized textures and for further post processing I'm planning to use Ooseykins QuickDither.
So for using this QuickDither there are two pipeline which seems to work as they claim -- URP and BRP. I'm planning to stay away from URP as we need to render the whole thing into a render texture and the workflow seems non intuitive.
I'm planning to go with the BRP pipeline. This QuickDither also seems to use the PostProcessingStackV2. Should I use a legacy version instead of Unity 6?
Hi all! I need some help with height maps in Unity HDRP (exported from Substance Painter). Basically, my height map in unity doesn't have a "default" value, or rather one that height DOESN'T affect, resulting in height being applied to all polygons of the mesh.
Since Substance exports a grey-like texture, I'm assuming the grey values should be 0 (no height), -1 should be negative height (dips), while +1 should be positive height (elevations). However, it doesn't appear to be working like that.
I tested clamping the value to exactly 0 in MinMax range (0 for no height, 1 for max height), but then it only gives me elevations, no dips. I'm kind of stuck, so any help is greatly appreciated!
Does anyone use Blender but have modified it to use a camera setup more like Unity's? Or at least not middle-mouse button. I don't think I can use such a different setup!
I'd recommend just getting used to it. The Unity editor is typically for navigating scenes, in Blender you'll work mostly on single objects so an orbit / pan camera works better.
That is true, although emulating a 3 button mouse may work better for me than using the middle button which is surprisingly clunky on my logitech mouse
use shift +` to fly walk
I just had a quick q for environment art practices - if you have a modular kit which is made up of several meshes, is it better practice to export it to engine as one fbx and split it up in engine, or to export it as individual pieces and then piece and snap it together in engine?
I'm asking as trying to keep things efficient in case you have to re-export the meshes later on and maybe the origin points changed or something.... then you pieces that are going to fly off everywhere as maybe the pivot on the object has changed, its happened to me before
I just changed my move rotate and pan to be like Maya's
@misty lantern (or anyone) since you are knowledgable with this stuff... that discussion on prefab variants the other day. am i doing this the right way?
i made a single material for this wall with 8 variations of texture using UV offset to have 8 variation possibilities of wall. now i'm building the actual hangar wall array and to keep some variation (it doesn' tneed to be dynamically variable).
i'm creating an empty root (pic #1)
Then creating a prefab variant but replacing or reordering where each panel is in the stack (pic #2)
Each tile is a prefab variant of the first one I made (pic #3) as shown, Hangar Wall 01-08
It's the same mesh but with 1 of the 8 material variants applied with the UV offset shifted by 0.25U at a time or 0.5V for the bottom half of the texture variant. (pic #4)
The material variants only difference is the UV Shift property value on my custom shader (pic #5)
am i understanding this system correctly?


feels very tedious putting this scene together, but probably will get faster as i reuse these prefabs
Hey artists. I'm pretty new to 3d modelling and have been working on 3d assets in Blender. Modelling, texturing, seeing how they look in Unity. I'm wondering how exactly you make an asset the correct size, for example if I were making a couch, how do I make it the exact size it would be in real life while modelling it? I tried throwing a bed model I made in Unity only to realize that the bed model was way to big.
You probably need to apply transformations in blender and check your export settings. There’s some differences in blender vs unity, namely the fact it’s XYZ in blender becomes XZY in Unity. There’s some settings typically required to translate correctly.
Should be -Z forward, Up is Y, make sure use space transforms or whatever (I forget but I have a custom exporter for Unity that does a lot of this without having tor remember)
Is there a reason you’re using Unity? Blender is already solid for mockups of furniture and architectural layout.
No what I mean is I'm using Blender for 3d modelling, and Unity as the game engine. I'm putting the models I made in Blender in Unity to see what it looks like in game.
Ah. Well it still stands what I said. There’s some conversions so you need to look up details on blender to Unity export settings. Also if you don’t apply transforms it’ll carry over to Unity because it reads the model exactly as you export it
If you have a 25x scale on the object it’ll blow it up 25x from the base size too.
Check your model after you import it. If it has inherent scaling applied to it it’s probably because of your export settings or your transforms aren’t applied.
If you do it right it should have a 1:1 scale match in Unity world units. In blender the default is meters. That should translate 1m = 1 unity world unit
Made these shaders, there all unlit and it's Unity 6.2
If you guys have any improvements or ideas on how to make it look better let me know!

Hey I'm trying to make a decal but I really don't understand what's happening, what's up with this barcode render. You can see in the material that my texture looks fine
I'm in URP, I've added the Decal Render feature

Here's the image importSettings also

.dds, .png or whatever, every single image I can find is rendered like that
The decal projection is at 90 degree angle compared to the surface (the white arrow)
Oh my god thank you, feeling dumb right now
why is my shader not working like in the tutorial?

this is the tut
this is mine

tut looks like this

mine looks like this


What exactly are supoosed to look at?? The sand?
Is that water? Foam? It's really hard to tell. Please be more explicit in your questions...
Also #1390346776804069396
Advertising is not allowed here, with the exception of #1080140002849214464 for your assets that are sold through the asset store
What is unclear?
No, "ask questions and discuss" is what the channel description says
Showcasing is only allowed on channels under Project Showcase category as per those channels' rules
Advertising paid assets is only permitted in #1080140002849214464, for assets you are selling through that site, as mentioned
Read the actual warning message and pinned posting rules where you are posting. The channel is Asset Store only.
Pinned in the Asset Store channel where you attempted to post, also post guidelines when you fill up the post and in #📖┃code-of-conduct
Again, that channel is for Asset Store links only. Stop spamming the channel.
!ban 940311776409567253 Bye.
 @markkaminari00 banned
Reason: Bye.
Duration: Permanent
Errors
DM not sent: User disabled DMs.
"Reason: Bye" lol
I have a 3d model asset, a cool animation assets for 3d models, and one character controller. How can I connect them all? Is there a good tutorial for this?
You should cover unity basics first
Search for an animator tutorial (for example) to learn how to "connect" animations
Is your controller a script or more than that? It should probably come with a readme file
That's assuming these are separate assets as otherwise they should probably be "connected" in the prefab

Turn on point filtering in the import settings.
I know the basics mostly animators etc. I used to make 2d games a lot so 3d is a first for me
Yes they are seperate assets
It really depends on the assets
If both character models and animations are made to use the Humanoid Avatar convention, you can use that system to make them work together
If only one of them is Humanoid or they're not designed for each other, then it's not practically possible
Character controller is separate from meshes and animation, visual objects can exist as its child and use whatever method necessary to translate movement into Animator parameters or whichever needed
thx
How deep and how much do yall abstract your prefabs/variants?
anyone got anything like a sample project showing a typical hierarchy of prefab derivatives? Do you go so far as to start with a basic empty object with a tag/static or non static and branch out from there? I’m trying to get a handle on an optimal way to structure my prefab trees and I’m just kind of winging it
Do you only go additive with nested objects or start with a tree and swap objects (overrides showing a bunch of deleted and adds for instance) or only make variants that add on to an empty parent?
Mainly thinking environmental objects - props etc
Pixel art character, sprite animation, pixel background for game. What's your take on these assets


Looks great! Really love the filter that you added to the background of the first one, makes it look so much alive
Wow, I'm glad to hear this from you, it motivates me to do more. Thanks 😊
This channel is for development, #1180170818983051344 or #🏆┃daily-win are for showcase and feedback
It all really depends on how you prefer to do it in a given project
But if working with a team you usually want to create standardized guidelines
My only rule universal of thumb is that prefab's root gameobject should not have any components that rely on Transform properties, unless there's a compelling reason to
Like character movement or rigidbody physics are such reasons
But meshes, colliders and effects I'd contain in an empty GO
The hierarchy and overrides are up to how you expect to want to modify them as you use them, and often that becomes clear only as you go
It’s only me for now.
So something like this isn’t excessively OCD’ish?
Environment Base (empty, has Environment tag) ->
Environment Static (empty), marked static) ->
Lamp Base (empty) ->
Array Lamp Base (empty) ->
Array Lamp 01 (adds array lamp mesh with LOD group and default Lit material on all renderers)
These next two both derive from “Array Lamp 01”
Array Lamp 01 (Blue) (changes material to the base material I made for it with blue emission)
Array Lamp 01 (White) (changes default material to a white material variant of array lamp with white emission)
I always set prefab root to default transform
The child objects may have displaced transforms tho
I dunno if it's necessary to have prefabs for containing environments, or gameobjects at all necessarily
Prefabs are for re-using gameobjects across multiple scenes or instantiating them procedurally
Also not sure what purpose Array Lamp Base serves in between the root and the visuals
But those are just nitpicks
When you use your convention you'll quickly discover what it needs
Or what seems unnecessary
environment is just my tag for "props" really
Then there's no need for it to be a prefab it seems
Nested prefabs quickly get confusing because it can be very ambiguous at which level you're applying overrides on
If you don't apply the overrides to a prefab it's not really doing anything
guess i'll find out soon enough
this seemed like an intuitive way to handle my current setup, but wasn't sure if it was too out there to go that route
Hello everyone, I have a question: can I use a graph shader in a trigger zone, for example to change the transparency of the object if it is outside of this zone?
Yes.
I have this shelf on my scene. But I use totally different materials, not the ones on the screenshot. Should I remove them? if I try to, then I'm getting 'cant delete soft reference'

These are part of the imported asset file. Unity does not let you modify the assets themselves by design.
You could maybe configure the asset import settings to not import materials, though I'm not sure if that would help removing them entirely.
If your goal is to use different materials, you can use the material remapping from import settings, or what I do typically is assign new materials in the prefab the mesh is being used in, which they typically will be
This is exactly what I've done.
Setting materials to not import avoids creating unnecessary material assets if they're bothersome
The file itself will still have them but they're trivially small and stripped from builds anyway
Textures work the same way, but can be very large so exporting meshes without them packed in the file becomes more important
how do i set up UDIM textures in unity?
does unity even support udims?
i found this on google https://discussions.unity.com/t/unity-has-udim-support-now/777848
why do you need them tho?
for a class we set up our chareacters with udims and i wanna try them out
I guess it depends on what you mean by "support"
UDIMs are a workflow
As is mentioned in the thread the simplest way to use them is to convert them into separate material slots, which Substance seems to do automatically
The core concept of UDIMs is that a material can use an arbitrary number of textures, which in realtime engines tends to break every typically used method of runtime rendering optimization
So there's little point in going through the trouble of implementing the whole feature, when you can just as well convert the meshes into a more common format


Write it to the alpha channel of your base map texture.
howd i do that, sry im kinda new
heres my base map texture

I think you can change the alpha source to point to your texture, but I'm not 100% sure.
Usually, you'd do that in an external image editor, like gimp or photoshop, not in unity.

idk cus i bought an asset and this is what it came with
So I guess you can't do it here.
What asset? From unity store?
nop
just some vegetation assets from here and there
so is the only solution to just manually edit all the textures?
Yes.
Sifferent engines and frameworks have different work flows for materials. Game engines usually have transparency as part of the color texture alpha.

Well, you could make a custom shader that would sample the alpha texture explicitly, but that's like worsening your game performance on purpose.
I've just told you to not inflate messages. Also you've left previous one hanging.
Again. Just don't inflate your messages with spaces.
It is quite obnoxious.
So, I need to shorten my message?
Hey! I need help with a dismemberment mechanic.
I want my monk character to lose an arm during combat.
Right now I’m not sure what’s the best workflow in Maya/Unity.
My idea was to make 3 versions of the model (full body, no left arm, no right arm) and switch them in Unity when the arm is cut. But I'm not sure if this is the correct approach, or if I should use separate meshes / bones for the arms instead.
How do you properly prepare a rigged character so that one arm can be removed during gameplay?
Any tips or recommended workflow would really help!
Thanks!
That is the correct approach, toggling on/off meshes based on the state of the character. The character would have the full arm, and then a dismembered (attached) version you toggle between. The actual limb that falls off would be a separate model you would launch with some physics.
You can see it here in this thing I made for someone's project.

thanks a lot!
Hi guys , I have some little problem
when I export FBX files from blender to unity and I do all setup exporting setting correct and the problem is texture is messing or not fit correctly


Applying transforms (scale mainly) and then if it still is messing around drag and dropping the texture in unity onto the object usually does the trick for me. I see on your screenshot "Apply transforms" is not checked. You can do it in project by ctrl + a I think? (muscle memory, idk keybind), if that warning is telling something scary.
Edit: Grammar
Edit02: If your leafs are made with nodes, apply scale only on original leaf should do it.
its not about scale
The blender material might not transfer to unity perfectly, setup a new material in unity and use the textures in there
Leaf texture not exportet correct
Is that an external texture file or did you generate it in blender somehow?
can you show the shader graph for the leaf texture?
if its a procedural material in blender you cant just export it into unity 1:1
from his screenshot it looks like its just texture image files
thats the tree bark
oh nvm

you baked it to 1 map?
yep
yeah but where the hell is your bsdf in blender?
when you bake something you typically bake it into like a diffuse, roughness and normal
youre plugging a texture straight into the surface
thats why it looks different in unity lol
im really confused and forget it
holymolly
thanks bro i got it
Hey, so the game I'm developing pretty much all revolves around fragment shaders. Most of the development effort is going into those shaders for results that I believe to be pretty unique.
I am wondering how feasible would it be to have the shaders decompiled (and how readable the results would be) if someone wanted to steal that code. And are there any extra steps I can take or configuration I can set to protect it better?
While it can definitely be decompiled, the code would be pretty unreadable, given compiler optimizations and lack of debug symbols.
I don't think there are any extra steps that you can take. The shaders binary code is exposed when used on the gpu.
They might be able to reuse the shader, though, probably not as is in unity.
I've heard of tools to decompile and recompile shaders from asset bundles (since VRC users trade those for notable sums of money), which might work for built applications if they're compiled the same way
But outside of that I can't imagine why anyone would want to go through the trouble
I don't know how super amazing your shader is, but people that can decompile and reuse it, probably can write as good of a shader themselves.
And would prefer to make their own
Yep. Using decompiled code in any a little bit serious project is unsustainable.
I see. I suspected decompiled HLSL would be pretty unreadable any way, thanks for confirming.
I believe there's no situation / platform in which the shaders don't get compiled in the release buids?
Debug(development) builds might include the source code in the debug symbols depending on the graphics api and platform. Just make sure your debug builds are not publically available.
Even the DXIL bytecode is fairly readable on its own, so it can definitely be stolen.
Take solace in the fact that there's nothing you could do about that.
Unless you are patenting it, not much you can do.
I'm making an armour equip system in my game. I'm currently doing it by swapping the mesh in pre-made skinned mesh renderers. But I want to make skirt/Cape physics.
I was thinking of rebuilding the system to swap entire skinned mesh renderers then rebind the skeleton and using skinned cloth for the physics. Is that a good way? My rig uses the humanoid skeleton and idk if I want to make a bunch of bones which will only be used by some armour pieces.
Would love to hear good ways to do this. Thanks.
i have these beer bottles with a liquid, glass/bottle and label mesh on them. they are urp lit materials set to specular and transparent. sometimes when looking at them from different angles the liquid will render overtop the glass or the labels will be under the glass. i tried using sorting priority but this causes some other issues, like in the photo where the label of the back bottles appears overtop the liquid of the bottle in front. i tried messing with render queues but i can only change it in the debugger and its not persistent. any tips for this sort of thing would be great

https://www.cyanilux.com/faq/#transparent-sorting
Give opaque parts an opaque shader, avoid both-sided rendering and if you've got self-containing semitransparent parts you could separate and rejoin them in a particular order so that internal vertex order can be used to sort them correctly
Objects with a transparent material are sorted against each other by their origin's distance to camera on a per-object basis, but internally their geometry is sorted in the order it's written into mesh data
okay, i set the labels as opaque and that looks good. i have to have my liquid and bottle as separate objects because i scale the liquid mesh at runtime based on how much is left in the bottle. would what you described be possible with my current setup?
i really like how the double transparency works when it actually does but its not consistent. its not the end of the world if i have to make the liquid opaque as well
Won't exactly be
Making the liquid opaque too would avoid this problem, and might look okay with some interesting shader
Or alternatively combine the mesh but scale the liquid part in a vertex shader, or with bone weights
A bit more involved but gives you a lot more control than plain scaling
I guess the simplest method would be a script that offsets the liquid a minuscule distance away from the camera relative to its starting position
Just enough to make the bottle always get prioritized in sorting
You can change render queue persistently in scripts too but I find that more cumbersome as now that object is sorted differently from everything else
You'd look for modeling advice and showcasing opportunities on Blender or art communities
This server is for Unity development strictly, and the channel for asset implementation into Unity
If you need advice using it in Unity this is the right channel
And once you do put it in Unity then I believe it qualifies for #1180170818983051344 or #🏆┃daily-win
alright thank you. i appreciate it. i might end up just making a shader for the liquids
Custom shader or no, the predicament and choice is the same
Not sure if this is the right place to ask but seems like it is. I got these assets from the fab store. I have imported them and done the following:
Generate Lightmap UVs ✔️
Created Materials and used the material tab to import the materials ✔️
Marked them as static in the editor ✔️
Tried flipping the normals ✔️
Tried different materials ✔️
The only thing I usually do different is tell the material creator mode that no materials are on the mesh, and I create and apply the material from unity itself, but because some of these meshes have got 3 materials on them, I need to use the import settings material tab


I think I foud the issue. The packed textures were packed for Unreal and not Unity . I am making the assumptoin that the packed RGB values do not map 1:1 from Unreal to Unity as I think the R G B maps that get packed are diffeernt for the 2 engines. Removing the Packed AORM map (AO Roughness and Matalic) from the material fixed the issue for me. so my best guess is the packing layout. I am guessing though
Confirmed!! the packing channels are different between Unreal and Unity:
Unreal:
R - AO
G - Roughness
B - Matalic
A - extra
Unity:
R - Roughness
G - AO
B - Metalic
The way Unreal materials work - can't you just decide this yourself?
Of course you can remap them in Unity too without much hassle.
correct. Remapping using the Swizzle
I also think Unity may be using smoothness, not roughness 😄
ehhh same same
So 1 - roughness
So, if you're talking about hdrp lit, that is not the channel layout
Red is metallic, for exampl3, and alpha is smoothness
urp.
If you're talking about urp, then the standard shader doesn't pack textures, they are separate samples
And if you're making a custom packing shader, then the layout doesn't matter because YOU choose it
URP does have packed maps though.. I have full control after just flipping the packed RGB maps .

If they were packed, they would be in one slot and called mask map
You're just inserting the same packed texture into different slots
oh ya, thought we were talkging about the same thing 😆 my bad
So if you wanna use it with the standard shader, you would need to extract the maps as separate textures in some external software.
faster would be to make your own shader that outputs the rgba channels to the layout your mask map texture uses
I mean,, would save me from adding the same map 3 times
And it would also work. What you're doing right now doesn't work as intended.
It just "accidentally works" as it's adding white values so you think it's working, but those are not the intended textures for those channels
I'm chasing down some very nitpicky issues involving mesh tangents. I'd love to be able to click on a vertex on a model and see its exact vertex attributes (position, normal, tangent, UVs, etc.)
Is there a tool that lets me do this, or should I just handroll something?
Hello, has anyone experienced a problem where static batching doesn't work with custom (shader graph) shaders?
I don't think shaders should matter here. Or rather, them being shader graph or not. Static batching has mainly 2 conditions: the objects are marked as static, and they are using the same material instance. Well, I guess there's also the condition of static batching being enabled in the project(iirc it's disabled in SRPs by default).
If all these conditions are true, I'd look at the frame debugger. I think it shows the reason why the object is not batched.
Has anyone ever made a Disney BRDF shader for unity URP? 🤔
Anyone knows why light objects are not working on 3d objects rendered on a 2d project?
Because 2d renderer doesn't do anything in terms of 3d lighting. Why would you even think that they should work.
im interested in working on a 2.5d project
and the universal 3d project does not read my 2d psb/psd files at all
actually, it just worked, i guess you were wrong and i chose a wrong light object last week
xD
There are definitely aspects of 3d rendering that don't work with a 2d renderer. I don't remember what exactly though. It might be that there would be more differences in the build too.
You should really use the 3d template(or rather 3d renderer) if you want to mix. As for psd files, you're likely just missing a package.
ill look into packages again >:P
when i added the occlusion map to my material, nothing happened to it

i tried adjusting the value but still no effect
heres the setting of the occlusion texture


im using unity 6 urp and ambient occlusion is turned on
What are you expecting to happen?
What kind of lighting does your scene have
Occlusion mapping is not related to ambient occlusion
Even though occlusion mapping occludes ambient light
When referring as "ambient occlusion" to either SSAO or lightmap AO
i want to be able to adjust the models occlusion
im not sure if thats what u call it
basically the higher the value, the stronger the shadowy bits are
it worked before in a different project
ah mb
Can you show screenshots of what it looks like and what you want it to look like?
That's roughly how it works
The map multiplies indirect light (so 0 value is dark), the slider lerps out the map's effectiveness (so 1 is the darkest value)
But only with indirect diffuse lighting specifically
Direct lighting and indirect reflections/specular aren't affected
<@&502884371011731486> some kind of sus file sharing.
?ban 1272792139914416168 suspicious uploads across multiple channels
 maunderscore_ was banned.
this is what it currently looks like. I have no idea if this is with AO on or off because removing/adding the map has no visible changes

so is my scene lacking light or indirect light or ??? sry im kinda new to this stuff ;-;
Can you show how it looks in blender? Or where did you get this asset and it's occlusion map? Surely there must be a reference somewhere of what it's supoosed to look like..?
lemme get back to u with what it looks like in substance painter
cus someone else makes the models, and i try to make it work in the game
Looks like it
Shadows are dark or even black, which would be lit by indirect lighting so there probably is no indirect lighting to occlude
Guys what you can recommend me to use global shader for 2 sided normals? Some of the faces are not visible from the back of the trees. Because of the normals.

You would want to enable double sided, sure. On the back faces I believe the normals to be flipped there so lighting won't look correct. You should use a shader that flips the normals for the backfaces (shader graph has Is Front Face Node which you can use to detect back faces in the fragment shader and flip the normals)
I recommend you duplicate the geometry of the leaves and flip their normals in the mesh itself, to avoid needing a custom shader
The forest is 200k in total, although it is lowpoly, it is still a good value that I can use for the forest, if I do as you say, the polygon value will increase even more. For now face both worked for me, I thought that setting was not in the default shader.
The "both" option causes incorrect lighting as AleksiH mentioned, because it calculates view angle for shading using negative values
And I may be wrong but afaik has a render cost comparable to just drawing another polygon, because even with double faces one of them would always be culled
But it would be more mesh data
I still have some questions about fog, I wonder what kind of thing I can do. I tried to add fog with volume but things didn't go exactly the way I wanted. I added a dithered effect, but it really messed up the look of the game, so I removed it because it wasn't what I wanted. I added environment fog in the render settings, which is actually nice, but it gives a weird glow effect to the whole map, and if I could add a dense procedural fog with a constant movement of the character, that would really help. Any thoughts?
I'm trying to get more of a silenthill, lethal company kind of ambience. The way it looks now is fine, but it's too clear, so the fog is really important.

So a custom shader that flips normals based on view angle is the best in that sense, but the downside is that alternating between shaders a lot within a scene can hinder batching
I haven't switched to the game's lighting yet, but if I have a problem I will definitely do as you say.
Can you rephrase the question?
We don't see the removed dithering effect so can't comment on it
Not sure what a "procedural fog" would be as opposed to environment fog
How exactly should I add the fog effect, what I want is actually 2 fog systems, one is something like noise moving on the ground at the foot level of the character, like white tiny clouds. One is a dense fog effect that prevents the character from seeing 15 meters ahead.
like this ones, noisy fog

Most games use environment fog, together with a skybox that is the same color or blends to the same color near the horizon
With environment fog it looks like this picture, it looks like it adds a little bit of shine.
These are large billboard particles, which can fade away by distance to camera and by distance to depth buffer to make them blend smoothly
Lethal Company uses HDRP's volumetric fog in addition to environment fog
How can I make the fog clouds moving around this character, I think it's something like a volume noise effect, right?
That's what I meant by procedural fog.
No, I think I misspelled the name, volumetric fog.
In Silent Hill 2's case they are billboard particles, and they are set to move as particles
There isn't technically anything volumetric about them beyond that they float in space
Oh, I thought it was something like volumetric fog, but I guess it would be easier to make it with particles.
ok then, thanks man
It's not easy to make billboard fog particles look like they're not separate floating chunks, but SH2's effect artists are skilled
What would you suggest me, what kind of effects do you think I should add for this game?
Volumetric effects tend to be more complex, usually using raymarching against voxels to determine how much of and how something exists in the space between the camera and geometry
This allows for the fog to be precisely illuminated by light sources, which is a big reason you might want volumetric fog
Hard to say on your behalf
I suggest trying out and seeing what particles can do and how HDRP's volumetric fog works to get understanding and familiarity to help you decide
What if I lower the opacity and make the objects that look like clouds fly around the character through particles. Do you think this would be similar to silenthill's in a shortcut?
I guess I can't use HDRP stuff because the game I'm making uses URP.
But thanks anyway, you've helped me find answers to a lot of things in my mind. I always thought volumetric fog was what I was looking for.
Well, particles are "objects" in the sense that they're geometry
They can be billboard quads or more complex meshes just as well
A particle system is just a tool for rendering and controlling many instances of geometry with simulated forces together
A mesh could give a cloud some depth, but it might make it look too solid too, depends on how you present it
did yall ever used TrenchBroom to create levels/maps for your Unity game?
Whats that?
a level editor for Quake, half life and other valve games
i saw it was used by some unity and godot devs, and because i need low poly maps i tought this was perfect for me but not sure how to take measures so im asking here
as google isnt useful
why would anyone use anything but hammer for levels in valve games though 
oh it only supports half life 1 "experimentally"
its also pretty pointless you might as well use blender at that point and import your level as model sized chunks
or the best option of course
probuilder
Hello everyone! I am working on a scene in Unity in which I additively load 3 floors of a house environment. Every floor has it's own Unity scene with a completely baked lighting set up. All scenes use the same lighting settings and set up, the only thing that might vary is the amount of lights, intensity, etc. Now everything seems to look fine except for this one part in my scene. In the editor, the lighting looks completely fine, but when I play and load all the scenes, you can see (2nd image) the look of the walls/trims change. Does anyone know how to fix this/why this is happening?


if youre additively loading the scenes you might be having some sort of lightmap conflicts
which might be causing issues
one floor could be indexing the lightmap of another for example
That seemed to be the case indeed. I split this mesh into two pieces and added the trim to the bottom floor (so a different scene) and it did pick up the correct lighting. However, I am still wondering if there is a better way to fix this or potentially a better way to set this up?
is there any reason each individual floor needs to be a seperate scene?
what is the goal with doing that? procedural house generation?
We're using fully baked lighting due to this being a web game so after doing some research I found this workflow and thought it would be useful to avoid light bleeding through the floors and also to keep things a bit more optimized
Baked lighting is per scene
There are methods to associate it with prefabs instead but it can get tricky especially together with light probes and has very few advantages
Light baking already deals with light bleeding through objects, and occlusion in general
#1390346776804069396 is for light and rendering related things
Is there a solution I can use in Unity for a custom texture roads that is shaped with the terrain? Currently, I am placing the roads using a Blender curve.
Also, I need a solution for the trees. I have two tree models which I scattered across the entire map using Geometry Nodes. However some end up floating. Even if I export it as a single mesh and import it into Unity, all the individual trees are selectable separately. How can I select all of them in Unity and place them precisely on the terrain without any gap between the tree trunk and the ground?

Hello, im having trouble importing objects from blender, some normals inverted once imported.
On blender all normals are good, i have the normals viewer, all modifiers are applied and all transforms too.
I export it as FBX with all the textures packaged etc. and some objects have the normals wrong.
the images are an example, but several more parts are like that


perhaps your object has negative scale
all transforms and modifiers are already applied, the scale is 1x1x1

This doesn't seem like an issue with normals, but rather the uvs or the way you sample textures.
i think is normals because if i go inside the object, i can see all the faces with their texture
Normals don't stretch or invert the faces textures. They only affect lighting.
The right side looks like alpha channel is ignored.
but if the normals are inverted, you only see the faces from the inside because the game render only renders faces facing the camera right?
Maybe makes sure you have alpha/transparency enabled on the imported texture.
ignore that, im using a PSX shader and i didnt apply the cutout alpha setting yet because im fighting the other thing
It depends on the shader/material. But then you wouldn't see anything at all, since back faces would be invisible.
In your case they seem visible(unless it's a bad screenshot), just not showing the correct texture laid out correctly.
what i see on the object is the faces on the back, the closest one being invisible, as its facing the other way
from the inside all tha faces are visible

Oh, okay, then this is a bad screenshot.
becasue theya re facing inwards
sorry lol
I that case the normals must be inverted.
Just to be safe, I'd check with a standard shader.
i tried importing and calculating the normals when importing the asset but made no difference
Or even urp lit, so that you can test with backface rendering.
I don't think that would help with all faces inverted. How is the engine gonna know if that's intended or not?
well, just letting you know, becasue i been fighting this the whole afternoon and i tried everuthing
Try what I suggested and share the results.
Share the face normals view of the mesh in blender too.
the screenshot i sent before already has the inverted normals painted red
I don't see that in any of the screenshots you shared recently.
just to prove it


because the normals are good in blender XD
Mm... That's not what I'm familiar with. From my memory, you should see ALL faces tinted in blue/red for forward/back faces accordingly.
i think its a new release thing

you can see "face orientation" is enabled

Does it apply to all the objects in the scene though? Or only the selected ones?
everything
Okay. Then the next thing to do is to confirm the face orientation in unity by using a default(ideally urp lit) shader.
on the scene editor its urp right? all the materials are standard too, didnt make them the PSX stuff i was talking about
sorry, this is my first Unity project haha
It depends on the template. The material should show what shader is being used.
yep, standard

just for clarity sake, applying the PSX material still renders it the same way, with the wrong normals
OK, well that means that the faces are inverted.
Id try exporting the meshes again from blender into a new directory and import them in unity again, to make sure you are not confusing anything. If that doesn't help, perhaps there's another issue.
i did that 100 times already haha, im going to do it again to show how im doing every step, give me a minute
Maybe record a video of the process.
I'm going to sleep though. Will have a look at it later if you share it.
okay, thanks for the help
well, i dont know what the issue is, but if i separate the objects with normal issues to a different blender file and import them separatedly they work fine...
anyone know a way in blender to export only the actions so if I want to add new actions I don't have to re-export the whole FBX every time?
Does anyone know how to create a really nice lookin outdoor environment and what to use? I have a reference image.

Hello just switched to a new laptop but got a model that has to exported with a tool could anyone help it will be too late if I wait for unity assets download to finish
skybox and volumetric fog
can you define enviroment here? are you talking about the entire thing buildings included or just the atmosphere and skybox?
Some buildings, the terrain, atmosphere and skybox. Doesn't have to be the whole city but I'd really like the ground with the puddles and detailing.
yeah i mean look up enviroment art guides and start from there
theres no like 1 tutorial that will show you something like this, this is a culmination of a lot of different skills being applied at once
if you want to know about something more specific like the post processing and that you can always ask but in terms of "knowing how to create a really nice looking enviroment" all you are going to have to do is study and learn!
Also do you have any suggestions for this? I'm working on this as a test at the moment

@fallow summit
well first identify the important elements first
oh wait
this is yours?
have you baked the lighting?
It's all realtime
yeah you can tell
And yes it is mine
i mean i can tell its realtime lighting lol
not that its nescessarily bad
but like you have almost no shadows in the scene
They are there lemme show you a diff angle
theres too much repetetion in certain textures like the snow and dirt near the water
the distant mountain skyline is also pretty monotonous without any variance in depth

everything i said still applies
It's really hard to find good textures
The ones I'm using are atually from unity
do it proceduraly using free textures online.
Also what water are you talking about
i assumed this was water

but now i see its just snow
the point still stands
anyways you really need to bake the lighting here if you want it to actually look nice
like thats step one
Do I just set my reflection probe to baked, and then bake the lighting or
anyways as for your textures a good way to break up repetetition is to blend certain textures together using custom shadders
you set static objects as static
and go to your lighting tab and bake the lighting
Do I need a reflection probe
yes they help a lot but are not nescessary to bake lighting itself
you need light probes if you want to mix realtime and baked lighting
I'll try baking it and letting you know how it looks after
anyways to return to this theres a ton of ways to use shader nodes to procedurally mix different textures and blend between them
also your transition from snow to dirt is too sudden and unnatural
I wasn't sure how to fix that
Should I use a different brush with less opactiy?
look at real life references at how snow transitions into dirt
most of the time its not a clear cut line like you have

heres a good example of what i mean
If I have tree animation shaders will it work for static baking
I see, I'll try using another brush for more detail
@fallow summit I don't think it's supposed to take this long... I started it when we last talked

depends on both your pc's strength and the settings you used
Well I just used default settings, if I have shaders would it take a lot longer?
not nescessarily but like i said it depends on your pc as well
if your pc is weaker then yes its gonna take a long time to bake lighting
realtime is never going to look half as good as baked or mixed
just saying
whats your gpu and cpu?
How do I check
are you using a laptop?
Yea
I think I might just use regular lighting cuz it doesn't look like garbage, and I'm not going for complete ultrarealism here
Also do you know how to do god rays from skybox source? @fallow summit

I'm not using a directional light, just skybox lighting for now
Also do you know much about blender?
Can we talk in DMs?
just ask here
Alright
So I'm trying to texture something to have like a worn metal look, with some scratches
As well as edge highlighting
Lemme show you
oh is this just a blender question in general?

you should probably just go to the blender discord for that
I mean if you know I may as well ask you, how about DMs?
ok just tell me what specifically you need help with here
setting up a material with scratches and edge highlighting and getting into unity?
Yes
Wrong reply but yes
I understand how materials work, and that you export them as a png into unity
But I don't know how to get the look I'm looking for
well you can create a procedural material in blender
and bake the textures and import it like that in unity
but if you need realtime control of the material within unity you need to recreate it with a custom shader node set up
I don't need realtime control
I just don't know what nodes to use for this
I also don't want it to look like a silly roblox texture
well you need to start off with some textures
for your metal and scratched off metal as well
https://www.youtube.com/watch?v=_wEXl3LncAc heres a good video on how to do edge wear

In this tutorial i'm making a texture that only appears on the edges of your model using the bevel node
image texture that i used: https://ambientcg.com/view?id=Plastic001
as for scratches its just a matter of applying some textures over your diffuse and roughness or using textures with scratches already on them
Thank you so much this is exactly what I was looking for
I assume it is just noise right? I could do some sort of stretched out noise?
And I can export a material from texture with all the proper maps to create a normal unity material? AO, height, normal, etc
youre going to need to bake any of the procedural materials from blender into texture sets, but yes
Do you have a tutorial or a simple set of instructions for that
you know not to sound too rude but you know you can google most of this stuff right?
In this Blender tutorial I will show you how to do texture baking for beginners.
⚡ Below are three Recommended Addons for Easy Fast Texture Baking.
⭐ Oven: (Affiliate Link)
• Purchase: https://superhivemarket.com/products/ovenbake/?ref=738
• Addon Review Video: https://youtu.be/ne2Z8OHiKX4
▶️ Auto Bake (Affiliate Link):
...
Sorry I've tried a lot and never found a solution
Is there easy workflow with Photoshop and MaskMap for HDRP? I want to add alpha channel for Smoothness but PS will only export alpha channel if it's applied to layers and then its on all channels not only alpha
You can add an explicit alpha channel in the channels panel.

I couldnt find any channel that was intuitive enough to post this question, so Im droping here, Im sorry if it isnt the right place.
Since polybursh is deprecated, what tool can I use to sculp scenario on Unity 6.3 ?
Even though it's deprecated you can still probably use it (though people seem to have had some trouble with it). You can look for alternatives on the asset store. Of course the traditional workflow would be to use any external 3D modelling software and import the models to unity
Hi there so i wanted to change the texture of an object to add more damages and change colors, is this done trough texturing or with a shader? I wanted to do it with substance designer, but i don't know if that would even translate the smart material properties, do i just export the damage masks created from the smart material to use it on a shader or thats not how things work?
I don't know the first thing about shaders so i don't know if i'm searching on the right spot, is there any tutorial on what i want to do?
you cant import smart materials from substance into unity and then adjust their properties
you can only bake them into textures
but this means you cant do any realtime changes
if you want a material in unity that has adjustable realtime damage and wear you are going to need to use a shader graph
DO NOT use the substance unity plugin imo
Bad idea
You can do these things via a shader and possibly decals if you wanna project some bullet holes, cuts, cracks, whatever
You could also just do it all with a shader
is it bad?
Iirc the plugin keeps the material "smart" even in Unity, which gives a whole lot of control but typically would be absolutely untenable for realtime performance in a game
So if i want to add more wear and tear to an armor the more damage it has taken should i make it with a shader or just swapping
textures?
it absolutely destroyed my performance when I tried it. The engine was dying.
Even after removing all materials. I had to deinstall the plugin to restore performance
yeah, you could possibly even lerp between the two textures for many levels of wear but essentially you'd probably want to do this with a shader
Both good options
The Lit shader also supports detail maps which may be helpful for overlaying generic wear textures over any material (which isn't using detail maps or detail normals already)
Is youtube good enough to learn about shaders?, because i've been finding some dead ends on some topics there
It depends. It should be good enough for general hlsl.
You're 100% right that it's a dead end on many topics
You may learn the basics and some general stuff
Also, for unity a lot of the tutorials are for shader graph specifically
If you are ok with that, then I recommend ben cloward, he has many, many useful videos
But you may struggle to learn skmething specific and are going to have to resort to asking around or blindly trying out for yourself
Youtube as a whole is terrible but you can often find good specific tutorials.
i need help exporting a humanoid model from blender to unity
the axes are always misaligned in at least one way
either on the mesh or on the bones

this mesh is misaligned, for example

and these leg bones are backwards
you applied all transforms inside of blender right?
show me your fbx export settings
i did, yeah
sorry, away from computer, one sec
i remember it though
primary bone axis is Y, secondary is X
forward is +Z
up is +Y
scaling is all correct
but i feel like i’ve tried all combinations of everything and every combination causes at least one issue
i think it might just be the nature of exporting so many individual meshes per character ig?
are you doing it before exporting or are you using the one in the export settings?
both
it could be altough im not positive
that some of the meshes had negative scale values in blender
and i think issues caused by that might persist even after you apply the scale
rig


blender export settings

unity import settings
each bone has a +Y tracking axis and a Z up axis
are you applying the scale on the armature* as well?
I have an equip system for different body parts but want to add physics to some clothing like skirts, waistcoats etc, is there a good way to do that? I know bones are the most efficient way but how do you add bones for unique clothing items?
I'm currently swapping meshes on skinnedmesh renderers for each body part and was going to look at skinned mesh physics but it theres a way i can do the bone based method thast'd be awesome
yeah bones would be the easiest way
a lot of people use the pretty famous "dynamic bone" asset just for that
i can testify its really good and saves a lot of time but its also nothing you couldnt create on your own given some effort and time

Use the Dynamic Bone tool from Will Hong on your next project. Find this & more animation tools on the Unity Asset Store.
Nice thanks, I'll take a look.
Would this mean I'd have to have for example, have all the skirt bones on the main character rig?
I'd like to avoid that if possible, for example if one armour piece has a unique flappy bit, I don't want to update the main rig just to accommodate that.
crazy example model
yeah he has a very particular obsession apparently
but you gotta give it to him
the asset is fire
I'll do some reading on that, it's my first time doing a more complex character setup with all the modular armour 😅
i'm gonna lose it this still isn't working
Ok, idea, but idk if it works like this. So I have a base character avatar, skinned mesh renderers for base body and the base humanoid rig.
For adding, let's say a skirt, could I add all the skirt bones in blender to the base rig, export the skirt into unity, then make a prefab with a skinned mesh renderer, add the skirt and set up dynamic bones.
Then when I'm equipping the skirt in game I instantiate the prefab, then retarget the base rig bones in the skinned mesh renderer to the base rig bones.
Would this work or am I missing something? I would try it but I can't access my PC rn
Hey, I was wondering how you can go about fixing these baked light issues?
I already let unity generate the lightmap, and attached my bake settings in case I am doing something wrong.
Please @ me and thanks in advance!


Are the steps single meshes? If yes, merge them. You will always have seems between Meshes
The stairs are a single mesh, it is multiple faces tho to avoid ngons.
And the thing is, I have 4 sets of stairs(8 sides), and only this one has the issue.
Is there a face "inside" the stairs, like between the steps that you only see when you look at it from inside?
Did you smooth the surface or are there the edges "made sharp"?
I don't have any faces inside, it's the same geo for all 8 sides as I use an array mod.
As for smoothing, yes, I use shade smooth and then have hard faces as seen in the image.

I don't have any faces inside, it's the
: is there anythign special u need to do to get mesh lod working in unity 6.2, i cant see it working
Well, you need the lod group component that manages the lods.
Basically the same as before 6.2
Is it feasable to create an environment made entire out of voxels with such lighting in unity? For instance this model in this sample image alone seems to have 40k faces. Are there any voxel based engines, which could optimize voxel based workflows?

40k is not that much. And for distant objects Lods could be used.
I was just thinking of a static farm top down environment and the plants/foliage rapidly keep changing.
That would easily be millions of polygons right? But maybe, instead of treating them as regular meshes, could they be treated in a more efficient form?
I know there are few voxel engines for this, but not sure if they work for these kinds of cases
With ray marching you wouldn't have to treat them as polygons at all.
See: https://github.com/Arlorean/RaymarchVoxels
wow, this is sweet
Just in case this does not workout are there any paid options which would do the job as well
Like the voxel play 2 for example, do they help in this case?
yo!
does anyone have workflow experience with Blockbench to unity? Im especially interested in stuff like scale.
Trying to avoid making big models I have to scale down in Unity itself, any resources yall can share? thx 🙂
1 unit in block bench is 6.25cm
in unity its 1m
in other words, 16 units in blockbench is 1 unit in unity
Cursed
I want to ask something about how to pack PBR for assets, is it the place to ask here?
I guess
thx!
I think because it keeps it to a 2^n ratio
Its why they chose it
I want to make assets to sell on unity asset store, is there any correct way to pack PBR maps that'd fit all three rendering pipelines?
I mean, I am not sure whether I should use mask maps, or whether I should pack smoothness into Alpha channel of metalness map, and leave other maps separate.
Or I should make separate PBR setup for each Rendering Pipeline?
It's usually done in a separate package
They use mostly the same setup
HDRP's "mask map" maps RGBA to metallic, occlusion, detail mask and smoothness
URP's "metallic map" is the same except for not using blue channel in favor of a separate detail mask map
Using base texture alpha for metallic map is probably the less standard method
Detail maps diverge more, as HDRP expects those packed also while URP has them separate
But because you can include .unitypackages inside the asset you can provide as many optional workflows as you want
So should I basically make Albedo, Normal, and Mask Map per asset for each Rendering Pipeline?
Not when it's redundant
As with metallic/mask maps
And not necessarily when it's optional
As with metallic from albedo alpha
Thanks.
It blows my mind that there still isn't a 'import all maps and it just packs as needed for your pipeline' option.
The image importer has most of the needed functionality but it is still a manual process
Anyone have a good workflow to get MagicaVoxel -> Unity?
as it turns out, Unity doesn't do well with MagicaVoxel OBJs, the pivot and anchor points are messed up, and you have to assign the material manually. Any clues?
Like mentioned before, this isn't a promotion channel
I'm just showcasing but not promoting. Do I have to take it down or not needed
My apologies for going against then
Per the rules you should
long term showcases #1180170818983051344
#1180170818983051344 for ongoing projects and #🏆┃daily-win for smaller one-off thigs, but the showcases should be using Unity in some relevant way
So a good opportunity to make the showcase interesting with a project
theres no casual/general or off topic here
every channel except those 2 is pretty much a help and questions channel
Ok thank you boss 🙏
Alright, noted and thanks 😊
Aiit, noted
why is unity auto divide my imported sprites? how do i stop it from doing this everytime i import new sprites into my projects

I had problem with a workflow where I have to 3D model around 800 houses in a low-poly style. I couldn't find assets or a fast workflow to make a lot of simple houses in Blender. So I'm developing a different kind of workflow of creating towns with unique houses, I've made this house editor: https://tistougames.itch.io/houseeditor
The idea is that the base mesh is created in this house editor, to get many different basic shapes, then initially use those in the game, and upgrade with adding normal maps etc.
In my specific case, I'm making a replica of a real town, the one I'm living in, and the houses doesn't really look the same, like I can't reuse houses for example. Each house needs to be fundamentally a little different.
I decided to share the tool for the public in case someone needs it.
What do you think? How would you solve a problem of creating a lot of simple houses?

This is not a self promo channel
Thanks, I'm doing self promo there but the post here is a genuine question. It's a new kind of workflow I'm experimenting with, the tool is just one example of a solution but might not be the best solution.
can anyone help i dont know how to export a animation as a fbx
what are you trying to export from? Blender?
This is automatic sprite slicing
You want to slice by sprite count or size
The importer cannot know how a texture should be sliced, so it defaults to automatic
That also means you cannot define importer presets or rules that would always know how to slice a sprite sheet
Unless your sprites are all the exact same size
Apologies, but I did not see a lighting channel so this makes the most logical sense.
I am getting these terrible seems between my modular pieces. Each piece does not have a UV2 and I allow unity to generate the lightmap UVs as it's simple squares.


Wouldn't a hard angle of 90 ish be more typical?
Lemi try! at ths point I am just messing with numbers
180 basically means no hard angles at all, which when you do have hard angles will almost always give you weird lighting issues like that because it will be trying to curve the normals around between the top and side.
If you imagine your modular meshes meeting like this, the red would be what a 180 degree smoothing angle is trying to represent.

Also, they inexplicably combined the lighting channel into #1390346776804069396, though I think that your problem does seem to be with the importer
Hi there. if i wanted to have a bottle with something inside should i model the bottle, the inside of the bottle and the contents?
If you want them modeled you probably should model them
What do you propose as the alternative?
I don't know, if there's a way to fake it so it looks the part and save on polygons
Hey, not sure if it's fine to post a forums help request here, let me know if I should delete the message.
I've been dealing with this issue for quite a bit and wasn't able to fix it, and the forum post has been inactive for over a day, so I thought I might aswell ask here too.
https://discussions.unity.com/t/broken-lightmap/1701522
There are lots of tricks for faking it, you need to break down precisely what you want
I've been working with 320x180 and 640x360 pixel art canvas sizes to get a feel for my game and assets. However, I feel like something right in the middle would be most suitable. 320 is too zoomed in, and 640 is too zoomed out. Anyone know how I can achieve something in the middle while still scaling to 720p, 1080p, etc. and not messing up pixel proportions?
Pixel perfect camera component can enforce pixel proportions, but not necessarily zoom or cropping
There are limited possible zoom levels for fitting pixel sprites into screen pixels without stretching
!collab
:loudspeaker: Collaborating and Job Posting
We do not accept job or collab posts on Discord.
Please, use Discussions to promote yourself as job-seeking, advertise commercial job offers, or look for non-commercial projects to participate in:
• ** Collaboration & Jobs**
unsure where to post this but this keeps on appearing with my render texture whenever im trying to get it to work


#1390346776804069396
Also provide more details about how you're trying to get it to work and how is it meant to work
Does anyone know some sites places to get free assets and textures from?
The Unity Asset store?
Is this enought geo to add some dynamics to this cape, i was planning to use magika cloth something, the character is kind of furthish away from the camera, the whole model would be at like a 1/6 of the screen in size

Depends on the kind of movement and fidelity you need
You probably will have to just test it
I'm not sure what magika prefers but most cloth prefers an even density triangle mesh
my mesh and rig works fine in blender but it doesnt work at all in unity... any tips?

this is what i get from trying the same pose in unity

the lower leg is not connected, the head is not connected, the arms arent connected and cant move, and the eyelids are not even close to the model
oh blender screenshot without bones just for reference

& heres what the armature looks like

If anyone can help me make something like this that would be great. Issue is that my textures look so flat and I don't know what I should do.

Honestly if someone were to just make it and send me the package I could learn how to make it myself after. But if anybody has any suggestions or ideas that would be great. Or any assets that might work
Can you show me what your scene looks like by comparison?
This is a pretty complex scene & if you're a beginner who hasn't done anything like this you should probably go for something simpler
Do you know how normal maps and PBR works?
Yes just about everything
I haven't tried remaking it yet
I'll try to whip something up that looks like it
try ur best! i can give you some tips
https://www.materialmaker.org/ @gloomy cairn heres a free and open source node based procedural PBR material software
Material Maker procedural textures authoring tool web page
this is what i use, its basically a free alternative to substance designer
its not perfect but it gets the job done
additionally, if you dont want to have to make materials yourself, this website contains a lot of free PBR materials! it doesnt have everything but it has a lot of stuff and is overall pretty solid!
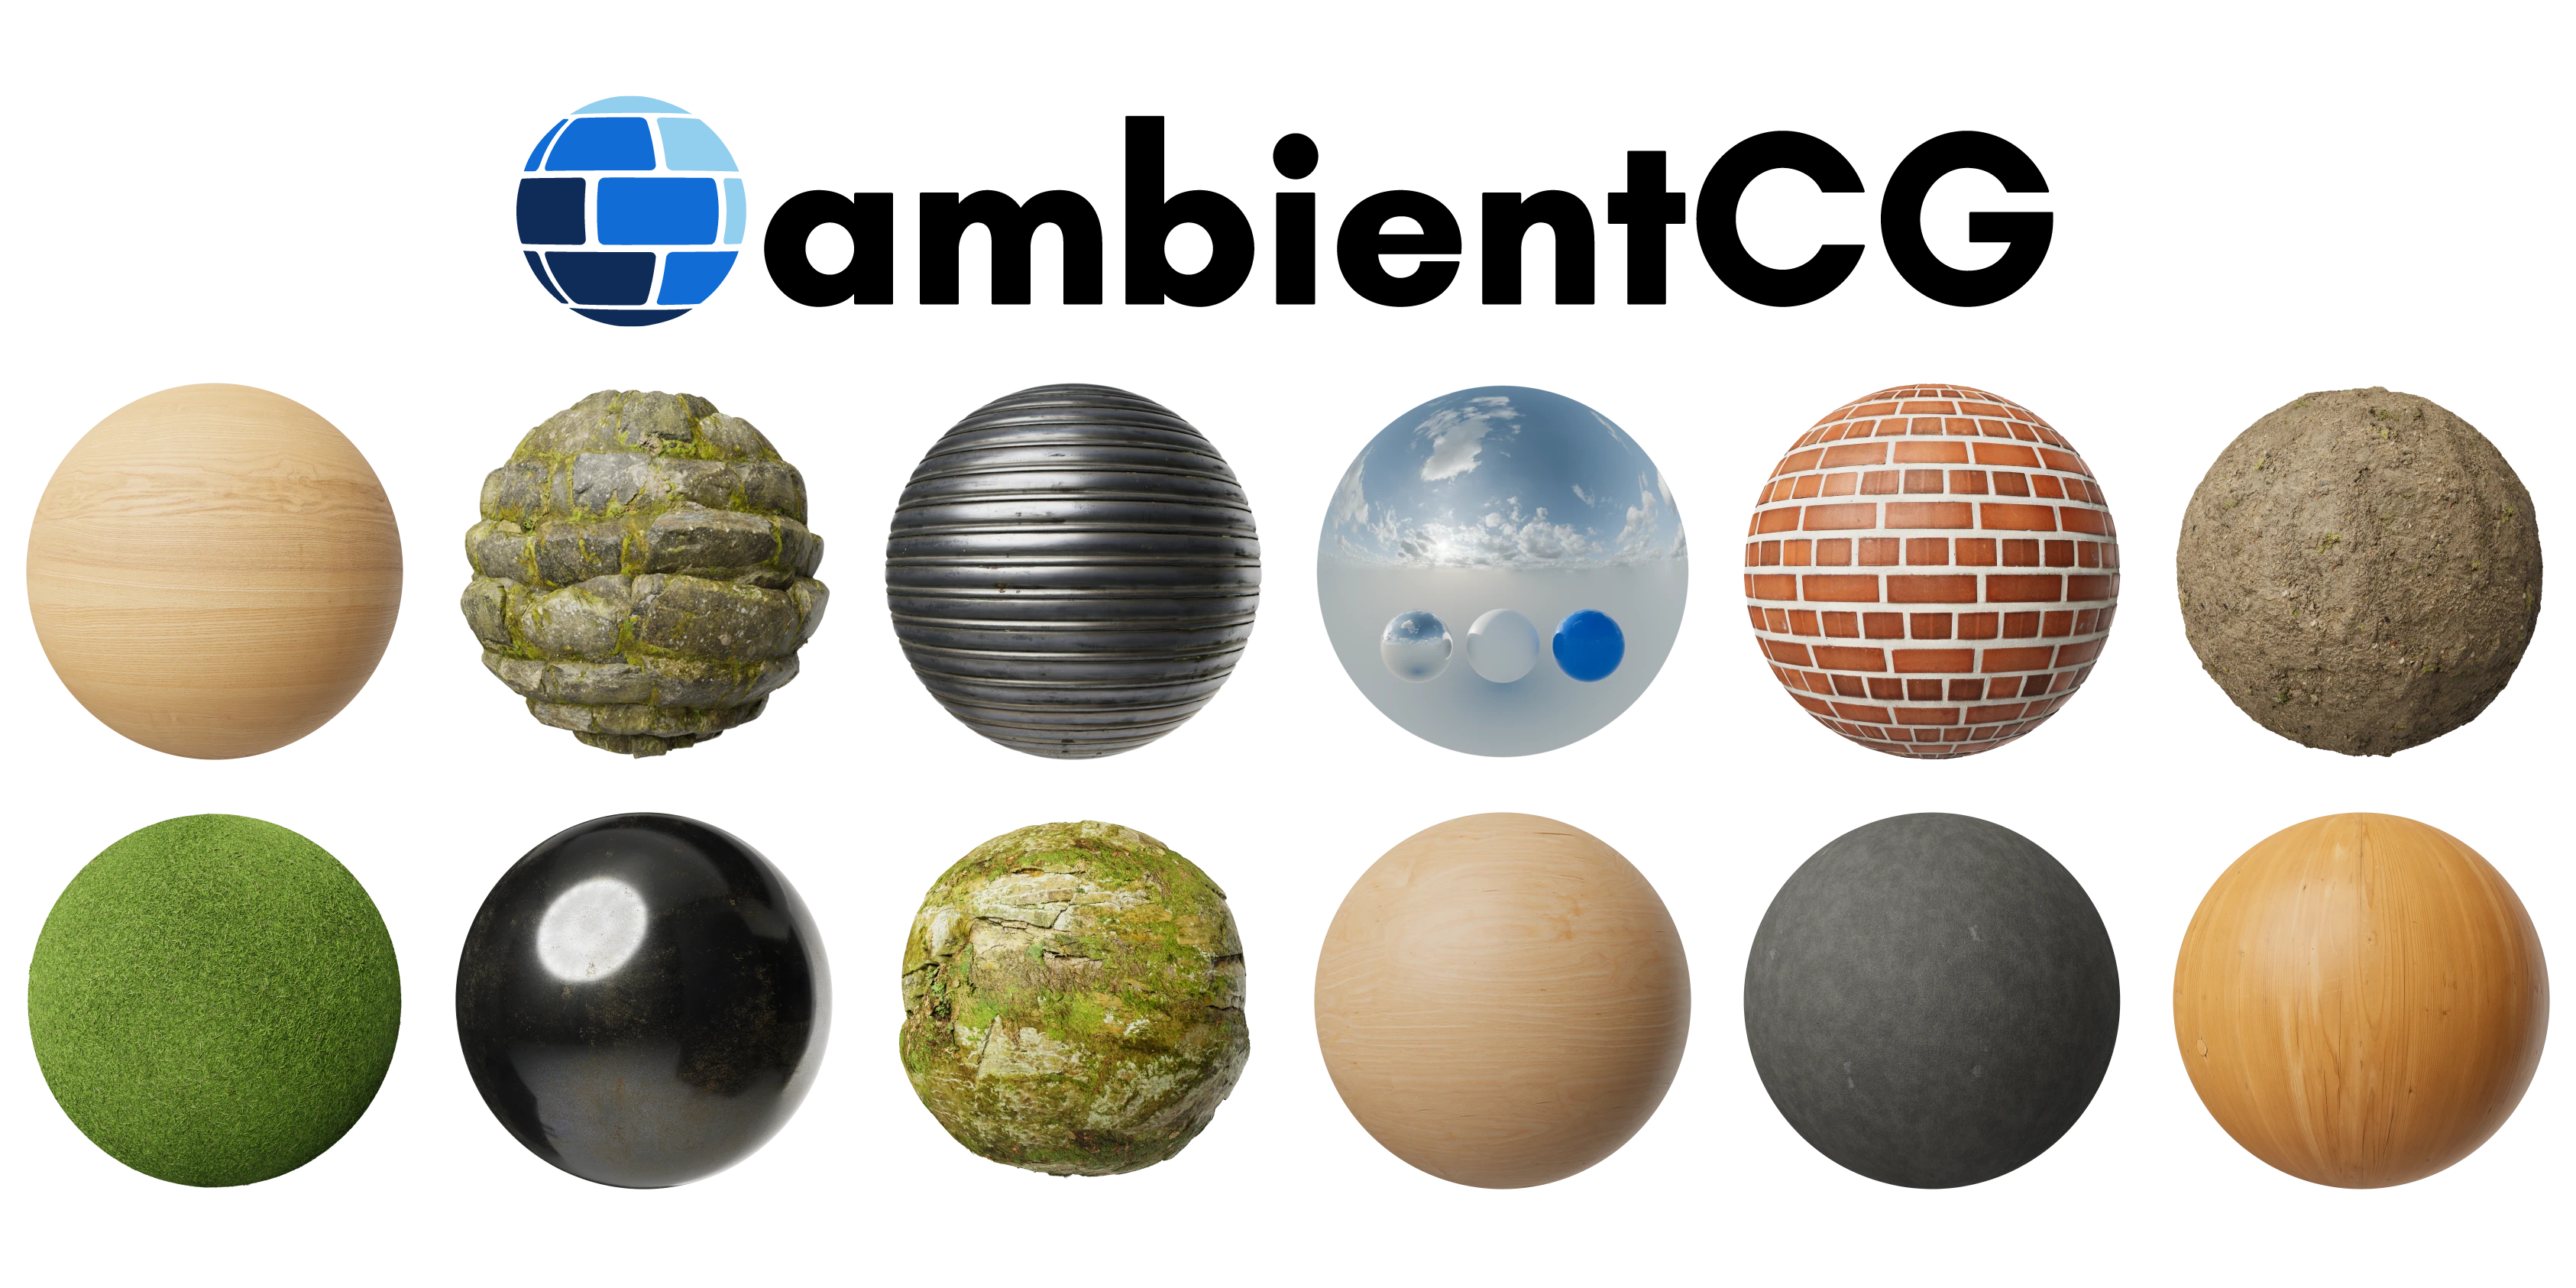
Free 3D Assets Never Looked This Good! Get 2000+ PBR Materials, HDRIs and more for free under the CC0 Public Domain license.
a lot of the assets in this image would pbe relatively easy to throw together in blender/probuilder as well
Thank you so much
I'll try it out and let you know
for the background mountains, what i personally would do is find a heightmap of a real mountain that looks kinda like it and use a displace modifier in blender to make a 3d model of it
good luck!!!
I need some help trying to setup a map like this.

I've taken my NavMesh, triangulated it to a mesh and then captured it to a render texture. Which gets me most of the way there. But how would I get outlines on something like this?
What is the recommended workflow for making it so you can customize colors/textures on your mesh? I know we can for example have several materials on the same mesh that we then color differently based on their assigned faces but I understand that is a lot of draw calls and expensive.
I can also make several "identical" texture atlases with color variations that we apply to the same mesh material.
I can also do multiple RGBA mask maps depending on amount of unique regions I want to color. But what is the standard or ”best” approach?
and probably 5 other methods of doing the same thing with pros and cons.
Anybody can give guidance?
Is your character made of separate objects, or non-mesh objects moreover
Simplest way to do it is to convert everything to mesh, join into one mesh and weight onto the armature as one object
i left them as seperate objects to make it easier to modify later if i need to
ill make a copy of the file and do that though. thanks
You can keep them as separate, but you have to parent them to appropriate bones in Unity, as the exporter isn't likely to repect object-bone parenting
And in my experience it usually generates a redundant copy of the animation clip for each object that's moving with the rig, which you may need to remove at import or prevent them from being created on export
can someone please help me. I'm trying to make a dream core/ backrooms kinda thing and this is what i want to make and i just don't know how can someone please help me?


I heard i havent been asking questions but I'm new and just want someone to guide me through it
okay so
its a tunnel
its icy so when you walk on it you fall into the hole thats at the bottom and it kind of looks like a tornado,
i need help making the thing
i think its called a mesh
well the tunnel itself would just be a simple rectangle
you can make a model for it
as for the material
it looks like it could be procedurally generated with some noise
its not just a rectangle its kinda complicated i think my friend has a video of what im talking about, ill see if i can show you
i mean at the end of the day creating the mesh itself is probably going to be the easiest concept here lol
do you have any experience in 3d modeling?
like at all
theres some fundamentals you should probably learn first
well i have made a very simple animation first but it wasnt anything crazy
like a few walls and thats about it
This is the whole thing
like what?
thanks

RoBuilder Discord
🏍️IamGolden (Vlog Channel!): https://www.youtube.com/channel/UC7Efo59VvoCCaDJsIyh3lXQ
- Thanks for watching!
this.
Anyways my main point is that this is a pretty simple challenge to overcome in general and you should be able to do it given you learn some basics
yeah im watching it now
here just to prove my point i did something similliar in a few mins in blender


mind you this video wont show you everything you will need for this
can u send me the pic or gif u used for the clouds?
but you need to start with the basics before you move onto stuff like procedural materials
your right thanks
there is no pic or gif.
its all procedural
no for the material
the good thing is that it gives you a lot of control in how certain things look and turn out
its very useful
how did you make that?
what keybind
Keybind?
yeah
extrude and rotate?
Oh you mean the tunnel?
Just a hollow cube with a a lot of loop cuts
And proximity rotation
yes
sorry to keep bothering you but what is this and how can i use it?
Any ideas or suggestions on this?
do you want to have an outline on the outer edges or the insides too? because i only know how to do it for the outside. and the simplest way for that is to do the inverted hull outline technique. since its 2d you can even do a simpler version of that
I've tried inverted hull, but the triangulated NavMesh does not have the topology to support that. It creates holes/gaps basically everywhere.
instead of an inverted hull try selecting all the edges in blender and just extrude (E) and thicken (alt+S)
Oh, I can't do that either sadly. My maps are procedurally generated and not static. That's why I've been going the NavMesh route.
I bake the NavMesh and triangulate it at runtime. Then project it to a render texture.
ah, what about an outline shader then? one that doesn't use the inverted hull technique. there are probably tutorials for how to make one but you have to make sure it doesnt use the inverted hull technique since it cant handle your mesh
I've been working at this for a few weeks now, and I've definitely tried a generic outline shader. But I can't remember what the issue was. I will whip up another one and then post the results.
How do I add a material to one specific thing like the floors instead of one texture going to the wall and the roof of my map? How do I use material slots?
Assuming you're using blender you'll have to look up tutorials for assigning material slots to your mesh with it
You will probably need to learn UV unwrapping after that
@fallow summit How did u make the clouds? you said it was like ai or smn how did u make it?
Research it. Look it up. Procedural and noise are very common concepts in gamedev.
You need to get into the habit of researching stuff yourself if you want to improve.
I looked it up and I wasn’t sure what he was talking about when he said procedural a noise or whatever, and so I wasn’t able to find an answer
My bad
I can see a lot of results that would help you start understanding it. There a lot of text results as well.

Mb, I also wasn’t quite sure what he was talking about I thought he used ai or some kinda code to do that, I’ll look more into it. Thanks ig
Code most likely, yes.
Or at least visual scripting/nodes.
Procedural basically means that you generate it with some algorithm in real time.
Procedural generation, you know.
Idk if this is the right channel, but I was thinking about faking movement on a mesh by having some sort of 360 camera project on to a render texture that is applied to an inverted sphere mesh that goes around the target gameobject.
I don't even know if this is possible in Unity. But the idea is that the target gameobject will stay stationary while the textures around it make it seem like it's moving around. Is this possible?
Sure. That's possible. If the texture is static, you could just rotate the uvs before sampling it in a shader.
In fact it was a total of 6 nodes in blender that created that effect
Its also relatively simple, just perlin noise fed into a color ramp, the other 4 nodes are the mapping, coordinate and a split node for the pixelization
I am trying to make a good looking environment for a group project but they all end up looking crap. Could someone help me?
The first scene is a dungeon so I was thiking making the 2nd scene an outer dungeon area but I have no idea where to start
How do I find inspiration
Would be better if you showed us what you created so far and what your references are
True. One sec
This the 2nd scene I was building before I scrapped it
And the first scene was just https://dkanese23.github.io/ecs657u-build/v0.3/index.html

And obviously the first scene is more poly like (mainly just assets) so I have no idea
Anyone?
Honestly i have no clue what you expect us to tell you
if i make a map in blender and i import it to unity is there a easy way to have a mesh collider?
You should not make the entire map in blender and import it in unity
Its not a good workflow
Greybox in unity, use blender to replace greyboxing with individual assets, replace in large logical chunks
if im understanding correctly that was what i was going to do in the ifrst place
just put it into unity and put a mesh collider on it. if there's multiple objects you can select them all and add a mesh collider to all of them at once
thanks! if i do that with a model like the photo will it work or will it act like a cube if that makes sense

ig ill find out
it doesnt have to be convex unless its a physics object, so yeah it will work 👍
I always start with the playable surfaces and adjust the terrain to fit instead of the other way around.
question how do i know if i need to check convex or not
never mind i think i got it
when im in side of my build my "box" is invisible and from the outside its normal can anyone help me fix this? i thought to flip normals but i cant

You can if you don't simply try to recalculate automatically
Face orientation view and flipping faces manually will solve it
Automatic recalculation only works if the object has clearly definable inside and outside with no discontinuities between them
I had to enable something in blender
Hi all. Can anyone recommend how i should organize my texture files?
I'm targeting webgl. I'll do pixel art texture for a 2.5D game, so the tex file can't be compressed
I considered having several 4k atlas. Diffuse, normal, smoothness
But first, maybe 2k is enough
Then, maybe no need for diffuse and just use vertex color for color. So the "shape" of the surface is entirely from the normal and smoothness map
Then i thought, texture atlas means gotta load everything? If i wanna work with addressables then better to have many smaller textures for specific objects, right?
Maybe a compromise is also, not like i'll have no atlas at all. But i'll have smaller size atlas, like a 256x256 for all wood, wood board, wood pattern, related
And maybe a 128x128 for all mechanical, nuts n bolts, atlas
Plastic kinda material might not need much, but they do have shapes and patterns, so maybe having a material with a general pattern atlas, and its own smoothness map of choice?
Also then i thought, maybe for smoothness i only need a small "smoothness gradient map" which consists of.. idk 10x1 pixel of greyscale level of smoothness
So this means, vertex color for color. 1 UV map for normal map mapping. 1 UV map for the smoothness mapping. Having several texture atlas for the same "family" of material surface
And then the rest is the smaller texture set for all the specific textures and unique objects, and these gotta be each individual textures to allow addressables
For the more experienced ones, please comment on my plan
Cheers!
What kind of materials/lighting and textures do you have if you can consider replacing albedo and smoothness both with vertex colors or gradient values
And what are you optimizing for
Atlasing, addressables, vertex colors, gradient/palette maps are all compromises for alleviating specific issues
Ooh ya i was also thinking of having VC.a for smoothness
But then how do i get alpha for cutout (which can't be VC and must be texture..)
Maybe from normal map's alpha?
So probably can achieve only having normal map
Webgl, and android. I don't think i need a super optimized, low texture file size kinda thing (it's not like i'm planning to have >1000s types of props/textures), but addressable is for load time
And... i guess asset organization too
If you want concrete advice you'll have to demonstrate a bit what you're working with
I have no idea how you plan to represent 'pixel art textures' with vertex colors
WebGL and Android includes a lot of different devices
Even if you knew exactly how to optimize, you would not know which optimizations to implement before you've found out what your real world bottlenecks will be
Will the batching benefit of atlases beat the memory and vram benefit of individual textures? Will it be worth it to replace textures with additional vertex streams? You cannot say for sure unless you have something to test on the target platform and graphics API
Sry i'm still being hypothetical for now. Gonna make the shader and test making barrel/crate tomorrow
I'm basically making octopath. Specifically this part
https://youtu.be/K6wW0pO08LE?t=1083
In there they're doing full pixel art texture on "bulging quads" kinda, instead of full 3D mesh. I wanna make a full 3D mesh instead (they'll be thrown around and spinning etc). So they can't be static batched
This is what my artist made, and i'll be going over it n figure out where to go from here

And anyways, i'm just not so experienced with graphics yet in general. Rather than trying to optimize early, my goal is to learn what kinda optimization and organization methods available, given my art style etc, so that i can work towards that
I just don't wanna end up with a workflow that goes against every existing possible standards/workflow
dont check it unless you want to put a rigidbody on it and turn it into a physics object. which you dont want to do for your map 😉
These have color so I don't know how the color could be represented with vertex colors
Unless every pixel was a whole quad with its own verts
@sacred grotto Whether to use atlasing or not is just one optimization decision out of many
And I understand it's hard to plan around optimized and effective workflows before having experience of actually optimizing performance issues
But there isn't really a shortcut around that, eventually you have to face the issues that appear and start treating them directly
Performance tests can get you to those issues quicker, to potentially avoid having to rework so many of the systems later
How do I make Unity use a specific UV for lightmapping my custom model? I've run into a problem where Im relying on smoothing and normals that I've set up by hand in Blender, and Unity's Generate Lightmap UV automatic functionality doesnt work (I'm smoothing angles that are more than 90 degrees, etc).
Im kinda drawing blanks everywhere. I know I can create multiple UVs in Blender, but how do I make Unity use anything other than UV0 for uuuuh lightmapping/lightbaking?

I have this environemnt ready in Blender and I'm gonna have to get this to Unity. There is no way, I could get the same quality of lighting on Unity right?

you can get close but yeah, not the same
is this eevee or cycles?
I tried recreating it on Unity, the lighting was ugly.
well it really depends on your approach lol
Although I have very little experience
getting good lighting in blender is far easier because performance is not really a factor compared to unity
Cycles
well yeah thats going to be tricky
That's right
are you on urp?
yes
you could get pretty similar stuff
I tried for about 6 hours! I'm ready to settle for a slightly different approach as well.
have you been using baked lighting?
did you try post processing
also this
tonemapping is pretty important
cycles uses agx by default, you can use aces in unity
No I haven't used baked lighting.
If its going to be baked, there is no way I can rapidly replace meshes in game
no you don't have to
yeah i was just asking
if you tried it
its not nescessary
imo the most important factor here is for you to nail your directional light and enviroment lighting first
that will have the most influence on your scene
Right
add a volume to the scene too
Volumes don't work in urp?
volumes is how you get post processing in urp...
youre thinking of volumetrics
and even then, it can be done
do right click>volume>global volume
I'm also fine with delegating this to someone with better knowledge. If you guys know someone lmk.
in the scene
Alright.
I'll try the volume
Bloom postprocess
and try tweaking the directional lighting
its always better to learn something even if you have to suffer through it
I suffered enough ig.
you never stop suffering when learning
lol
thats the name of the game
Sounds too optimistic. Is it even possible to get those soft shadows with reasonable performance?