#🔀┃art-asset-workflow
1 messages · Page 20 of 1
And would you say this is better than texturing UVs? It sounds like it will look higher res
Lol
What I mean is, it sounds superior
I'm guessing detail maps are triplanar too so they will never have exactly the same layout
It is for many purposes, but situational
The detail needs to be repeatable for one
With ground it usually is
Alright so just to be clear...the detail map is also a texture with a base map and others, right?
It's not just for bumps and stuff
Since you were mentioning pores
For all intents and purposes, it's a normal texture
Not exactly, detail albedo represents brighter and darker detail rather than color
https://docs.unity3d.com/Packages/com.unity.render-pipelines.high-definition@16.0/manual/Mask-Map-and-Detail-Map.html
More info about how detail mapping works more generally: https://docs.unity3d.com/Manual/StandardShaderMaterialParameterDetail.html
I was gonna look it up on yt anyway but thanks as always
Best would have been to make really high poly rocks but
That would have worked in ue I guess
What do you mean that you can 'see it in engine?' You were just complaining that you couldn't.
If the texture is larger than the maximum texture size you have set for your build target, unity will downscale it.
I mean I was downscaling for comparison and I noticed it
But I think it was 4k textures for something else
I am actually not sure if I checked these 8k textures
Good shout
I will check that
That would actually make a lot of sense because I can only see up to 4k in the substance painter viewport and it looks similar to that unity, if a bit worse
Could be that
project settings are at full res if that's what you asked
and the textures ARE 8k so that's not the problem
We don't allow job/collaboration posting on this server. You can use the !collab forums. Good luck finding someone who will work for free.
:loudspeaker: Collaborating and Job Posting
We do not accept job or collab posts on Discord.
Please, use Discussions to promote yourself as job-seeking, advertise commercial job offers, or look for non-commercial projects to participate in:
• Collaboration & Jobs
I apologize I wasn’t aware
If my character was sliced up into multiple separate meshes (arms, legs, torso, head, etc.) but all still shared the same skeleton and animator, would this be a substantial performance cost?
Trying to figure out a good workflow for modular characters.
well the vert count and tris count would be the exact same so it depends on how many verts and tris you have
Yeah, but it would be split into multiple skinned mesh renderers, so I imagine there is some cost to it, right?
Base model is around 30k tris
If you are not changing the tri and vert count you should be fine splitting it up
If any it would be negligible, so I wouldn't worry about it
note that skinned meshes dont batch, that means they can add at least the number of parts. (double that if using shadow)
like if you have 10 of them on screen and they cast shadow, you can expect to have at least 100 batch (if they consist of 5 parts)
I did notice this, yeah. Looking at Frame Debugger, they're combined in the SRP Batcher, but still 8 draw calls not including shadows (split into 8 parts).
How realistic is merging these meshes at runtime?
I'm not sure if it's possible at all 🤔
But I found this (havent try it yet)
https://github.com/joshcamas/fast-skinned-mesh-combiner
It's possible, Unity does have internal API for merging skinned meshes. I just don't know how practical it is for my use case haha
I will take a look at this though, thank you!
f I'm importing a model to unity from blender, is there a way I could like swap out the faces of a model? like could I change UV positions in unity towards different positions on the texture to change the face? or is that something I have to set up in blender
You can have different tiling and offset settings per material in Unity to use specific areas of the texture without having to change mesh UVs
As long as the face has its own material slot, since offsets are per-material
You can also swap those materials at runtime
that would work too, I was thinking of doing something like that
Is this a good place to ask questions about turning parts of a tile map into sprites?
Dont crosspost
I'd argue when figuring out where to post it would be valid?
Especially since I only went with two forums.
Thanks for moderating.
I'd argue it's best to start with the question itself in the one place you think it's most appropriate, so all of this could be skipped
and dont crosspost either way
Was also reprimanded for that last time I did it
where?
code-beginner
okay and your question was about?
Thank you for your interest. To avoid cross-posting #🖼️┃2d-tools message
ah sorry i was being a dingus over something so trivial, its the morning right now so i might need a drink 😅
All good, mate. Someone's gotta crack the whip when noobs step out of line.
Soon I'll learn the ways of Discord!
nono its not like that, i was just being a dingus is all. and im sure i dont want any sour feelings with anyone over something trivial like that 😄
you're all good, I was just being a dingus
Guys any Tips and suggestions on game art? Designwise? I know it needs to improve but im rly bad at design.
Here are some of assets I made...


(green ones are supposed to be trees, white ones are trees on snows, gray thing should be stone)
and a worst UI yall can ever imagine

(supposed to be inventory)
How to make my Pivot point to be default point for prefab. So scale would be 1,1,1 and pos 0,0,0?


im guessing you made this in blender, if so you have to move your item (in edit mode) to where your pivot point should be relative to world position or (0 , 0 , 0) and apply all transforms (for scale)
i hope that makes sense
No. It's not a blender. I downloaded an asset from marketplace and adjusted pivot
Pillars, gilyotine, cilinder are 3 separate things that are needed for animation controller
Unity does not have this functionality???
This is kinda weird because you always need to adjust for example for the world environment generation
what, not being able to adjust pivot point? thats solely on the model
Yeah. I can adjust pivot with a single model using ProBuilder
But what if it 3 models?
in one prefab
just do the same you did with probuilder
i have never heard of adjusting 3d models pivot point with probuilder before so this is pretty new to me

I have a wall
This is a single object
I'll try with my guillotine
What a hard word xD
Can't do this with ProBuilder. Because these are 3 meshes
I'll do it programatically. Nevermind...
you are trying to make all of their pivot points 0,0,0?


you cannot merge both of the points, if you wish to make the model have the same pivot and not use an empty gameobject then do as i said here #🔀┃art-asset-workflow message
each pivot point is for each model
unles you merge both of the models together, which i dont know if probuilder can do
how do i put the sliced tileset.png as palette?

The simplest way to modify pivots is to use a parent transform
Most prefabs will have one for practicality anyway, so the meshes can be at any position relative to the prefab root
Modifying the mesh pivot itself requires modifying the mesh vertex data, which is generally considered out of scope for the unity editor
is it better to make an huge tileset with everything on it or to make separeted tileset for things that have collision, things that dont. etc.?
Tilemap colliders are per tilemap gameobject
You can have multiple tile palettes
There's not really need to "separate tilesets"
Once the imported sprite sheet is separated into individual sprite slices those can be used for any purpose
should I export substance painter to unity or blender then unity?
Well, are you making your textures in substance?
I do blender > substance > unity
I was making them in blender but I just got substance painter so I think im gonna switch
so what you said
This is the way
Especially for HDRP
What are you working on? Which platforms are you targeting? And if you aren't using substance, why would you be exporting to and from it?
I'm trying to import my model with armature, I made and rigged it in Blender. I can't create an avatar due to the following error: "Invalid Avatar Rig Configuration. Missing or invalid transform: Required human bone "RightFoot" not found.
I changed my bone names to match this format, but still I get this same message. Can anybody please help?
pics here


So whenever I import my fbx into unity, only one material is there instead of the rest. What do I do?


Hey so I upgraded my project to Unity 2022 and post-processing fully stopped working, do you guys know what could be wrong? I already re-installed the package

As far as I can see its correctly set up, but the visuals just wont change in the slightest
hi somebody help me? i want put steering wheel model from blender to unity but in unity steering wheel get 89 rotation x

in unity

Unitys and Blenders axes are oriented different so you have to take extra measures to prevent that from happening. You may find tool like this useful: https://github.com/EdyJ/blender-to-unity-fbx-exporter?tab=readme-ov-file. I have been using it for a while and it sure enough takes care of rotations and scales nicely in cases I have needed it.
Does anybody know is camera culling object based or vertex based?
Meaning, if I have a large mesh, do I need to split it into more meshes in order to camera cull it effectively
Please if anyone is experienced in the Blender to Unity workflow, I'm losing my mind here. This is a multi-prong question.
Why is it when I export from Blender, my model appears to be facing down in the preview window? Blender export settings and Blender viewport in the first image attached. I export using Z forward and Y up, as this is how Unity handles axes.
My model appears standing upright in blender, but face down in the preview icon, as seen in the bottom of the first image I attached.
I set up an avatar, and import over an animation but then the animations instead cause my model to lie face-down and causes otherwise strange rotations. Additionally, you can see in the attached videos that these animations fling my model around and cause erratic movement rather than animating as expected. Can anybody answer why this happens and help me figure out how to solve this?


Culling happens per object but pixels outside the camera frustum are never rendered because in the end each triangle is clipped to the camera view. Individual objects also have their overhead so you don’t automatically want to split everything into small pieces. Vertex shader still needs to be done for each vertex afaik so it depends on the vertex count of the object and many other factors which object size would give the best performance
after using script


@hoary kindle
Can i download the fbx from a free asset I found on the unity asset store so i can use it in mixamo to re-import? I can only find "export package" which just gives me another unity package. Is there a way to just scrape the asset i want?
unity assets can be exported from unity by using the package manager packages to export them, but make sure you are allowed to use said unity asset like how you want it by checking the license agreement and such.
if you are allowed to use the asset such ways, you can import the asset into unity then export it via Unity Exporter, to wherever
stuipid question- where the hell do I go to edit the sorting later?


It’s not in the editor lol
how does yours look different? did they change it in the latest unity or is that urp/hdrp
I have no clue
I didn’t change any graphics
I think my unity is fucked as I’m also having other issues
hey everyone so in blender i smart uv unwrapped all my fingers into the same picture because they all use the same shader graph. then i imported into unity, put the normal and diffused map onto an material and drag and dropped it to the finger, now it looks like this. its just the bland baked texture image onto the model, what do i do ?

note that i was in blender, selected all the meshes and uv unwrapped them in the same place, since the fingers are sharing the same material and it would be easier to export that way. maybe thats the problem ? but i dont think so to be honest idk
thats what it looks like:

is the texture set up correctly?
if it all is.. then i would guess its the UV mapping
sorry if i confused u earlier.. this ^ was basically all i was getting at..
but to be honest i dont really know what you mean by the bland baked texture image..
i mean, is that the wrong material or texture for the object?
like what is missing, or not working in other words?
(is there supposed to be something more or different)
ok so maybe the word i used sounds wrong here. what i mean by bland baked texture image is that when i apply the texture to the finger you can see in the picture how unity doesnt really unfold my baked texture image onto the mesh like it should but instead just puts the image on the mesh. its hard to see because the textures are dark but if you look closely at the picture above you will see what i mean
and i think unity should automatically detect where things should go when the texture is applied to the model
Start with selecting your object and taking a screenshot of it's inspector, with the material visible.
i look at that image and no matter how hard i look i can't see anything i would term as fingers
OHHH.. yea w/ zoomed out u can see

Ok, next, take a screenshot both in blender and unity such that we can see the difference between them. Zoom in or make the scene brighter such that the difference is easy to spot


It doesn't seem like a normal map is applied to the blender model either, but I do see that the color texture is not mapped correctly.
Did you actually save the whole model and reimport it in unity?
do i need to always do that when i bake new textures ?
i mean its the same model
When you uv unwrap it, the new uvs data is saved to the mesh. If you still use the old model, it doesn't have that uv data.
oh well now ive learned something new then
ill do that wait
do i need to export anything other then the mesh ?
like in the export options i mean
here ?

Did it import as a new asset in unity or did you modify an existing file?
new asset
And you dropped it into the scene?
yes
Hmm... Something is weird then.
Instead of exporting as fbx, try just drag and dropping the blend file into unity and see if it's any different.
its loading reeeeeeaaally long
isnt this deprecated?
i thought it was for newer unitys
Depreciated as not recommended?
Or do you mean deprecated?
Is it? It would be weird to remove such an option, considering it worked well. Where do you have that info from?
same thing but with more lag
Okay. Then I guess there's some kind of issue with your blender setup.🤔
Do you have a lot of unapplied modifiers perhaps?
hmm I guess not, I thought I heard it was deprecated
never mind then
wait, i used a modifier to setup the textures, is that maybe the problem ? i drag and dropped textures onto the models. then i exported the fbx file but didnt tick the apply modifiers box
did you apply such modifers?
but that shouldnt be a problem since the modifier only creates a shader graph or not ?
if you are using a shader graph to make textures you have to make such shader graph textures a image since unity dos not understand blender's shader graph other than normal colors
It depends on the modifiers, but typically, modifiers are something only blender understands. When you apply them, the change is baked into the mesh data
unity does understand some blender modifers but not everything so thats most likely the issue
brother i did exactly that
look at the top of our conversation
i tried to export with modifiers but still bad results
are you using that image when UV unwrapping?
i couldnt think of anything else
ive never personally had this issue before
I guess at this point it's kinda hard to help you without seeing the blender project with our own eyes.
no bro, look, i selected all my fingers, every part of the finger is a seperate object, but they all share the same shader graph because its the same material, then i went into edit mode, clicked smart uv unwrap, let him bake it all into one picture, went into unity and did the thing everybody else does. i importet the normal / diffused map, put it into the material and just drag and dropped the material onto the mesh. and got the thing i sent at the beginning of the conversation
thats the thing im not sure about, if its ok to select multiple objects, bake it all into one picture, then import into unity, put it into materials and just drag and drop it onto every finger, which are all seperate objects, but only one picture
Yes, that should be fine normally
i mean in blender it does look fine. resolution a bit messed up but thats fixable later
idk man
really weird
Maybe take a screenshot of your material in blender


I understand what you did not sure why you need to reiterate it, so yes you did use the same image when UV unwrapping
well im not sure what it would be then
sorry if i sounded rude, i didnt know if you understood, im kinda new to this
ah you're okay, the only thing I have to mind is maybe its a problem with UV scale or model scale or something
other than that i have zero clue 😅
ill keep that in mind for tomorrow since i gotta sleep now, i have a feeling its some really stupid problem thats easily fixable, but anyways thank you guys for trying to help me out today
we will probably be here tommorow so if you dont fix it, you can come back and we will help
if we can
alr very grateful for that, then see you tomorrow if i dont fix it myself
Hey guys, i'm having some trouble with meshcollider convex, it over simplify my object. Would you have an idea from where the misstake might come from ?

the mesh might be too complex
I'd try using a decimated mesh for the collider
Oh okay shynx i will try that
If you need it to be a simple shape I would instead use a simple primitive instead of a convex meshcollider
If your importing materials from blender to an engine you can't use things like mix color, let node wrangler make the material for you CTRL+SHIFT +T do not edit it after
looks like for this you can just use a capsule collider no? Possibly cheaper than a mesh collider, I wouldn't expect the antenna to be super rigid?
alternatively 3 capsule colliders (lol) but maybe not great for automation if you have many many assets.
Hello, I have a Unity lighting question. I have been trying to set up baked lighting in a level. All assets in the level have lightmap UVs, which I created in Blender in a 2nd UV set. I checked the lightmap UVs in Blender and they don't have any overlapping faces, however when I try to bake my lighting in Unity, I keep getting errors about overlapping faces and I get weird shading artifcats. Does anyone know what could be causing this?

Making lightmap UVs manually can be tricky
Why not try unity's automatic lightmap UV generation first?
"Weird shading artifacts" can also be caused by other things than UV overlaps
I tried that too, but unfortunately it gives me the same error, so also the overlapping UV error
It sometimes does if the settings aren't right
https://docs.unity3d.com/Manual/ProgressiveLightmapper-UVOverlap.html
As mentioned there are other visual errors that can occur as well https://discussions.unity.com/t/lightmapping-troubleshooting-guide/895352
but mix color isnt being used anywhere ?
@night coyote how many UV maps do your models have in blender? Unity's shader uses only the first UV for main texture maps
and do they have modifiers?

this is from one object
the meshes themselfes dont have modifiers but the material applied to them is from a modifier i installed called blenderkit
There you go, appears blender is using the second UV map which doesn't show up in Unity
If you click the camera icon of the first one you'll see what Unity "sees"
But you'll probably just want to remove it from the list using the minus button
youre right that would cause problems in the future perhaps but thats still not the solution, give me a minute to provide screenshots
this is what unity sees.

and these are the uv maps in blender


the problem isnt that the texture doesnt look like the one in blender, the problem is that the material isnt applied correctly in unity
does this affect it maybe ?

well, probably
i have zero clue why a mesh wouldnt have normals though
try recalculating normals in blender again on the mesh
SHIFT + N, while in edit mode
i did, still getting these errors

man at this point im just confused, how can just putting materials in unity take me the most time its really irritating
i personally have never seen this issue before, try using the decimate modifier on your model, it says your model have overlapping vertices (probably from using the Boolean modifer) , and that might be deleting the normals?
but im not using any modifiers
my mesh doesnt even have that many vertices
I probably shouldn't have said boolean modifier, I should have said bevel modifier. I got a little mixed up but what happens when you go to far on a bevel on an edge or a vertex is 2 vertices will get stuck inside eachother. And may be causing this
Nvm it was talking about polygons, probably still applies though
You still have two UV maps in the list
You must remove the first one as I said
It wasn't fully clear if you had modifiers or not, but make sure they're all applied and that no addon features are actively modifying your mesh data
These are not errors, and should not be related to texturing or UVs
But they may be a clue that whatever you're using to generate the mesh didn't do a perfect job
Triangulate modifier should reveal or fix the self intersecting polygons, and could help with the warning about normals too
But it's more important to deal with the excess UV channels
omg it works now thanks bro
finally
i was about to go insane
ok so i always delete uvmap and let automap stay there ?
Yes
ok but where does uv map come from i mean what is its purpose ? maybe u already explained earlier sorry if i didnt catch that
not generally the term uv map but i mean the one above auto map, like why are there two
Mesh is made of vertices
Each vertex has information such as its position, but also it can have other data like normal vector, vertex color or UV coordinate
(Or multiple channels of UV coordinates)
When you UV unwrap a model you write a position coordinate to each vertice's UV data, this will determine what part of a texture is rendered at that vertex when the renderer does texture mapping
Either you made a second UV channel, or the "automap" thing you probably used did
Which UV channel is used for each texture is up to the shader, which blender and Unity handle separately
For example you saw previously in Unity's material that you can choose which UV map to use for the "detail map"
But other texture maps are hardcoded to use the first channel (UV0) in the shader
The second channel would be treated as the lightmap UV channel by the shader, if you were baking lighting
But you probably don't use either detail maps or baked lightmaps so they remain as tangential examples
If you make your own shaders (or materials in blender) you can choose to use specific UV maps, or multiple at once for different textures
That's why I said anything like mix color unity only supports a few nodes from blender, like the image texture
Node wrangler will setup the material that will work in unity,I only know this because I had to figure out why my material was white in unity, the reason was I tried connecting the ao texture
yeah it's not 1:1 transfer, but I must say shader graph is a really close workflow to what blender has
instead of mix color, blend
I am still struggling with overlapping UV errors. I keep gettting them whenever I bake my meshes. I triple checked my lightmaps in Blender which do NOT have any overlapping facing, however when I bake in the viewport, as you can see there are overlapping faces. I am also not sure why my baked lightmap looks like this (last image). Can someone please help me


I've already read through the Unity documentation and tried adjusting the settings they recommend, but nothing seems to help
hello everyone, ive baked my textures and now i want to ask if there is any faster way to apply these to all my objects without always creating the material, then applying normal and diffused map to material, then putting it on object, its taking up much time and it would be really exhausting in the future
i have this scene, what would be a smart way to go about texturing the terrain, without having enormous texture size and it also being a bit dynamic

It gives me it takes two vibes bc of the lighting and stuff

you could most likely use a shader material and just tile the texture
as long as it can be tiled, what i mean by that is, if you can see the texture repeating you should fix it
Tiling terrain that way isn't really an option. Triplanar is the correct way to do it.
so Triplanar node just does the same thing but more efficient?
I didn't know that existed, well I guess you learn something new everyday
lol
true
this not done using the node tho
ive heard its more efficient to do so tho oh well
It projects the texture in world space, so you don't have to UV anything, and it's applied evenly (ish) across the entire mesh. Triplanar refers to doing the same based on multiple textures/sides so you can have different ones for the sides and tops, and the blend them.
i just read the documentation about it
https://docs.unity3d.com/Packages/com.unity.shadergraph@6.9/manual/Triplanar-Node.html
oh neat

oh you can have different textures on it without UV'ing anything? thats actually pretty cool
cool beans
yup
Helo there, im trying to retopology a head that i made and i have some subdivisions on the nose to get it right, and now im going to the top of the head, and i dont want that many subdivisions, how can i make this ?

I tried converting all of them in one point, but it creates a pole on the center, is it the only way ?

You should probably ask in a !blender discord server as this is a unity server
A supportive community for Blender artists of all levels. Share your work, ask for help, and learn from others! https://discord.com/invite/blender
Anyone experience animations just showing as rest pose when importing to Unity from Blender? No keyframe data inside the animations. I don't know how to fix this.
its probably something with your export settings
Hey people. I am importing in Unity some sprites with complicated shadows+glow, exported from illustrator.At first I used PNG as usual, but I get some weird banding and artifacts, even if I don't compress and import as 32bit RGBA. However, I loaded the same PNG in photoshop (where it looked great) and exported as a TIF. And voila, it looked amazing. In the image, top text is TIF, bottom is PNG. I don't want to use TIF though because they're too large. Any ideas about export settings for the PNG files that can help me resolve the artifacts in Unity? Maybe I should use GIMP to export them again as PNG but with different settings since it has more options on export? EDIT: Eventually I used compressed TIFs which are decent in file size but I'd still like to know if there's a workaround for PNGs too (I tried different settings from GIMP but none helped)

Having trouble generating Lightmap UVs!
My .fbx is nothing crazy, but I'm stuck in loading purgatory whenever I tick "Generate Lighmap UVs", and apply, even after changing the "Min Lightmap Resolution" from 40 to 10
Anyone know what might be causing it to have so much trouble?

how big is the model? in width and height. that affects how long it takes

is that the same size inside unity? you could have exported the fbx wrong and made it huge
if you place it down in unity does it look normal sized and is the scale 1,1,1?
I applied all scalings in Blender before export,
And it looked the right size in Unity
(I'll check the size now, I just have to kill the program again)
25 min in and still no progress
I wondered if waiting longer would help but it seems not

u sure its normal size in unity? try placing a cube or something to compare. and can u show the transform of the gameobject?
Yup, it's to scale


are the bricks all fully modeled or is it a flat texture?
Fully modeled

oh wow. i guess that explains it. what games do is they make the wall flat and have a normal map that makes them look like they're modeled
Yeah, unfortunately I just used something I found online with a bunch of dungeon pieces
It said is was intended for game use, so I thought it was optimized in some way
Some things keep suggesting I generate the lightmap UV in the software before the model was imported into Unity, but I can't find any tutorials for generating Blender Lighmap UVs
I'd really like to figure out why it's not working or what I can do to fix it for Unity
I already have light probes set up, I'm just a bake and an environment script away from it being ready - it's just really flippin frustrating
How do you guys make your own Handrawn 2D Frame By Frame Animations for your games?
Rotoscoping and references? Or what else?
I’m planning to make frame by frame rate animations for my character, but right now I start with a simple idle animation.
what settings do i need to export something in blender and import it in unity?
my tank in blender has X forward so the front is the X+
in unity it needs Z-? I exported it like screenshot but it's still X+

since you followed the video it should be working. but, you mentioned that child meshes have different rotations? you would need to align them how they should be, and Apply the Rotations and Scales there in Blender @zenith pulsar
Every time I try to bake my lighting, everything turns black.
Anyone know how I can fix this?
Unity will convert the file to its internal format in the build, so the import filesize won't precisely line up to what you have in the final game.
#archived-lighting would be the place to ask
ah
I was sent here earlier
I'll head over there, thank you
this is what it is in blender and unity, the yellow is the forward of the object
Gizmos.color = Color.yellow;
            Vector3 forwardDirection = Vector3.Cross(transform.right, gravityDirection).normalized;
            Gizmos.DrawLine(transform.position, transform.position - forwardDirection * 10f);
            Gizmos.DrawSphere(transform.position - forwardDirection * 10f, 0.3f);


pretty sure Blue is Forward in Unity
but, did you apply rotations in Blender?
also, is that gizmo on Local or Global transform?
    void OnDrawGizmos()
    {
        if (planet != null)
        {
            Vector3 gravityDirection = (transform.position - planet.position).normalized;

            Gizmos.color = Color.blue;
            Gizmos.DrawLine(transform.position, transform.position - gravityDirection * 5f);
            Gizmos.DrawSphere(transform.position - gravityDirection * 5f, 0.3f);

            Vector3 localUp = -gravityDirection;

            // Calculate forward direction relative to the tank
            Gizmos.color = Color.yellow;
            Vector3 forwardDirection = Vector3.Cross(transform.right, gravityDirection).normalized;
            Gizmos.DrawLine(transform.position, transform.position - forwardDirection * 10f);
            Gizmos.DrawSphere(transform.position - forwardDirection * 10f, 0.3f);
        }
    }
ok.. at this point, i am not sure what is wrong, or what you are trying to accomplish.. you are changing the gizmo yourself
wdym?
I mean.. I'm just using the gizmo cause I drive the tank and it goes sideways

Ok, the Tank front should be facing -Y in blender
I see.. don't really know why but ok.. do you know of an easy way to rotate the entire thing completely? cause some of the meshes have their own origin
well, i mean, you can always just put it in an Empty in Unity, and rotate the whole thing.. But, for future reference, use -Y forward, then when you go Forward in Unity, it should be correct. it all requires a bit of planning, now that you see that. I'd do a quick test, and forget about the rest of the things. make a Cone or narrow an end of a Rectangle so it points to -Y, then see if that moves to Forward in Unity. (use the info from the video to make sure all else is correct) as far as the individual origins, maybe one of these could help? IDK for sure.. i try to plan from step one, so fixing later is not my area of expertise

I didn't have to do any of that mumbo jumbo in unreal ever so idk.. didn't expect to be needing to translate coordinates here
but thanks for your help
the turret is all messed up now but I'm sure I can fix it
yeah, it takes a minute, but once you learn it, it just is what it is
How do I stretch the material on the face of the object, but so that it does not affect other objects. I need to solve this problem somehow.

Chat died 
@cursive vector There's no advertising on the server.
hello everyone i wanted to reset the position of my mesh and now it looks like this in object mode :

and like this in edit mode

its probably because i rotated the hand in object mode rather then in pose mode but how do i fix this ?
This is more for !blender but you can reset the pose by right clicking and pressing "clear use transforms" in pose mode
A supportive community for Blender artists of all levels. Share your work, ask for help, and learn from others! https://discord.com/invite/blender
You should definitely take this to the blender discord though
lol it worked thx
hey so I am making a cave and I'm using a poly brush and when I am following this part of the video 1:02 and when I try to smooth it like in the video it doesn't work at all. I have to continually press random spot for it to work. https://www.youtube.com/watch?v=u2Z7KxnmmTc&t=74s&ab_channel=squiddingme2

- flip a probuilder cube's normals
- extrude it in sections so that we can subdivide it evenly later
- smooth and add deformations with polybrush (hold ctrl to carve when using the raise/lower tool)
a better way to line up the UVs for the rock texture would be nice, but when I do it to one section of the cube and then extrude a face, the UVs...
Is there a way to make prefabs show the sprite image attached to them?
Or do they have to be the 3d blue box?

I've discovered it's possible! But this happened automatically and I have no idea why. Can anyone please explain why?

is this a blender model or default unity cubes or what? if its the latter then use probuilder to make your stuff instead, its way better
Unity Cubes
definitely use probuilder instead, unity cubes sounds like a pain to build stuff with, and has problems like this.
probuilder is built in, you just have to get it from the package manager
Okay
Does anyone know why entities don't cast shadows? It's not the fault of their material, as a normal gameobject cube with the same material casts shadows as normal
2 gameobjects in this scene, everything else is an entity, can you guess which ones are gameobjects lmao

everything has the same material
is there any good algorithim to downscale higher resolution pixel art to 16x16? 32x32, 64x64, etc
nearest neighbor really messes it up
Heya, I'm a complete Unity beginner, just looking to use the tool to work with some 2D asset files quickly. I have a set of .asset files, as well as a texture atlas for those assets which I'd like to separate back into individual assets. I've managed to apply the textures to each asset file individually in the engine, but I can't seem to find anything online about exporting each separate asset as a PNG file. is there any chance anybody can point me in the right direction for which tool/process to use, please?
(while i'm asking too, I do have one texture atlas which won't seem to apply because it can't find the corresponding "filename.png 1"? has anybody had that before? I'm assuming the 1 after the png is why it's messing up? I'll try to find the error log in a second)
actually, it's probably more efficient for me to ask how to go about constructing things in-engine and doing it that way
the assets and texture atlases I have are parts of a sprite - one 'body' sprite with a blank face, and then several separate sprites for the eye and mouth expressions. I was trying to manually extract each asset so that I have all of the expressions as separate files, rather than as a big atlas, so I could manually attach them in a photo editor, but since these sprites are designed for use in unity I imagine it's probably going to be way easier and more efficient to have the engine automatically align everything for me. I'm just not quite sure how to do that
Downscaling pixel art keeping it as pixel art isn't really a thing
Nearest neighbor is the best you have, but you'll have to expect to clean it up by hand afterwards
How did you end up with .asset files?
sorry, I don't quite get the question I think
it's a set of visual novel sprites I want to compile for editing
If you're decompiling or modding we cannot really help is what I mean
Ahh, my mistake then, that makes sense
Solved!
Right click and hit refresh.
No universal one.
hey i have a question about importing animations to unity. In Blender I have a first person arm and the hands are holding a knife, and since that knife doesnt move much in that hand, i can just import the animation of the arm and then just make the knife a child of that arm in the unity hirarchy, place it in the right position and bam, it works just fine. Now how do approach making a animation where the hand does tricks with the knife ? Since the knife also needs to have its own animation then. Im asking this because i want to be able to pick up and drop weapons. has anybody ever dealt with this / has more experience
I have done this using blender by animating either an empty or a proxy object, and parenting the knife to that in unity.
mb if this has been asked multiple times but are there any new tools to help with the process of exporting from blender to unity (multiple models in a single file with varied node setup)
I can't figure out how to solve this problem with the material. How do I stretch the material on this object so that the stretch does not affect other objects?

The typical workflow is not to create stretched materials or to resize objects for making levels, at least not beyond initial blockouts
Usually you'd prefer to create new meshes and UV map them to display textures precisely as need be
ProBuilder can be used to do that but modeling programs like Blender are better in the long run
you can also make a triplanar or a tiling shader. there are techniques to mask the repetition too
question: why does my pixelart look messed up in the unity editor


the pixel resolution is very wrong
You may have some filtering on it. Check the sprite file inspector and then adjust the 'Filter' and 'Compression' settings to none.
*Do note that I am compressing the example do to my artistic choice.

I did... And i even set the pixel perfect camera and still when ever the player moves his sprite does that thing
I need some help with critias foliage.. I added it and everything appears to be working somewhat but I can't see the brush so can't paint
I'm trying to paint on an object that is not terrain tho I should say
I need to transfer a house that I made in blender to unity. But everytime I transfer it to Unity the walls have the color of the material, but dont have the texture. In the left image you can see, that the wall and the brick have the same textures, but they show up differently. I made a UV map for it, but it did not help. Can somebody help me?


didnt i already tell you to use probuilder? why are you asking the same thing again
right here
I don't understand which tool to use in ProBuilder. I don't understand how to implement this using ProBuilder.
luckily there are tutorials on youtube, even from the creator of probuilder himself (gabriel)
he's made multiple ones even
Hey all, my fbx imports looks weird in Unity and I'm not sure why. In blender, it looks as it should.


do u have any hidden objects in blender
and does importing the fbx into unity cause any errors or warnings into your console?
yes it says "[Worker4] ImportFBX Warnings: Mesh 'Ship Mesh_Baked' has 11368 (out of 19872) vertices with no weight and bone assigned (they will be assigned to bone #0 with weight 1). The list of vertices: 0, 1, 2, 3, 4, 5, 6, 7, 8, 9 and so on..."
so does that tell you anything? did you make the object
No, I didn't make it. From that I understand that Unity has auto set weights, but I still don't understand why on Blender it works well and how to fix it?
well i googled about auto weight and someone says "Auto-weight will create bone influence on bones that overlap the mesh." maybe thats why it isnt auto weighting it? anyways you can look up a blender weight painting tutorial or something and you'll be able to do it yourself on those vertices
copy, cheers for the help
Anyone have any clue why the legs are deforming like this in Unity?


I've tried every single possible export setting from Blender along with toying with some of the Unity import settings but nothing really changes it
Is MeshSync ever getting an update?
Or are there newer better tools?
Maybe Nvidia Omniverse?
Hey, got a Blender<-> Unity workflow question:
Backstory:
I'm making an FPS game, and wanted to separate creating weapon models from the player models, so I made your typical fps POV arms rig, and I've created a test weapon I want those hands to hold. I'm attaching the hands to the correct positions on the gun in Unity Animation rigging, basically telling the hand to go to a specific "Handle_X" bone, and it has some IK so it solves nicely. This worked until I wanted anything more intricate, like reloading. And making a separate hands reloading animation, synchronized with the weapons separate animation, combining that into something whole in unity sounds like a nightmare.
The most obvious solution would be to create entire animations (hands+weapon) inside blender, and just export them baked. I have 2 issues with this however:
I would have to switch entire rigs at runtime in unity, for the appropriate bone structure to exist and animate after switching the held weapon.
Changing anything about the arms rig would mean re-importing it into all animations of all weapons I have, to bake them again and re-import to unity.
So my questions are:
How the hell do you manage this efficiently? Is there a way to "reference and reimport" different exported fbx files into another blender project? So that, as long as the bone structure stays the same the animations will still work?
Is there another workflow allowing you for quick and efficient blender->unity jumping? If so, can you please share it?
Thanks!
Modifying a rig after making animations for it is often a considerable issue, do you really need to do that?
I guess the simplest way would be to make an arms rig that contains extra bones for gun parts, and then each gun's animation clip "assembles" the gun's moving parts using those bones
Yeah, I'm thinking of doing this the other way that way actually, since in-game the arms rig is gonna parent the guns at some point, so animating with guns in blender, exporting just their bones and hoping unity correctly maps them by name and hierarchy so the anim plays after reparenting the gun under the correct bone is my plan now
Or doing some custom whacky stuff to remap them somehow, we'll see. I guess the most work-intensive part is doing any sort of modifications along the way. Is it not a standard practice to "get something going" model and texture wise, rig it ASAP and iterate over it once setup?
I'm just starting to dip into this 3d anim world, but that's kind of surprising, so you usually have to pretty much do 100% of modeling, 100% rigging and only then doing animations? But so often you find out that the rig doesnt quite work with the animations you had in mind, so you just kinda start all over again?
I hope animators do get paid by the hour then lmao
hi i have this problem


when i look the flag from other side
looks like strips of spaguetti
you have one-sided planes and it correctly renders them from the side their normal points, that's how it looks like at least
oh
Look up <editing software of choice> 2-sided planes or something similar, that should get you somewhere
unless you also have some shader business applied to it, that's another animal, if it's just a baked cloth animation imported into unity then it's most likely the planes
If I had a three foot paintbrush stuck up my ass my knees might do that too... seriously, though, this isn't a server for ripping game assets.
the last time i asked, i was told "most likely Lighting and Shadow pass", so turning of shadow casting lights should lower that amount, to prove the concept
yeah i turned of receive shadows and changed rendering mode
when adding materials for some reasons it doubles the polycount
maybe reflection layer or transparency calculation? IDK, i thought i saw someone suggest that in a google search one time
Every material you add has to render those polygons over again.
daymn , optimizing scenes is getting hard is it only unity or xd
Is it possible to create an animated material purely using Shader Graph? Because I'm trying my damnedest to look up how to do so and everything I can find seems to animate the material using a script which I don't want to do.
you can scroll a texture using purely shader graph if thats what you are looking for
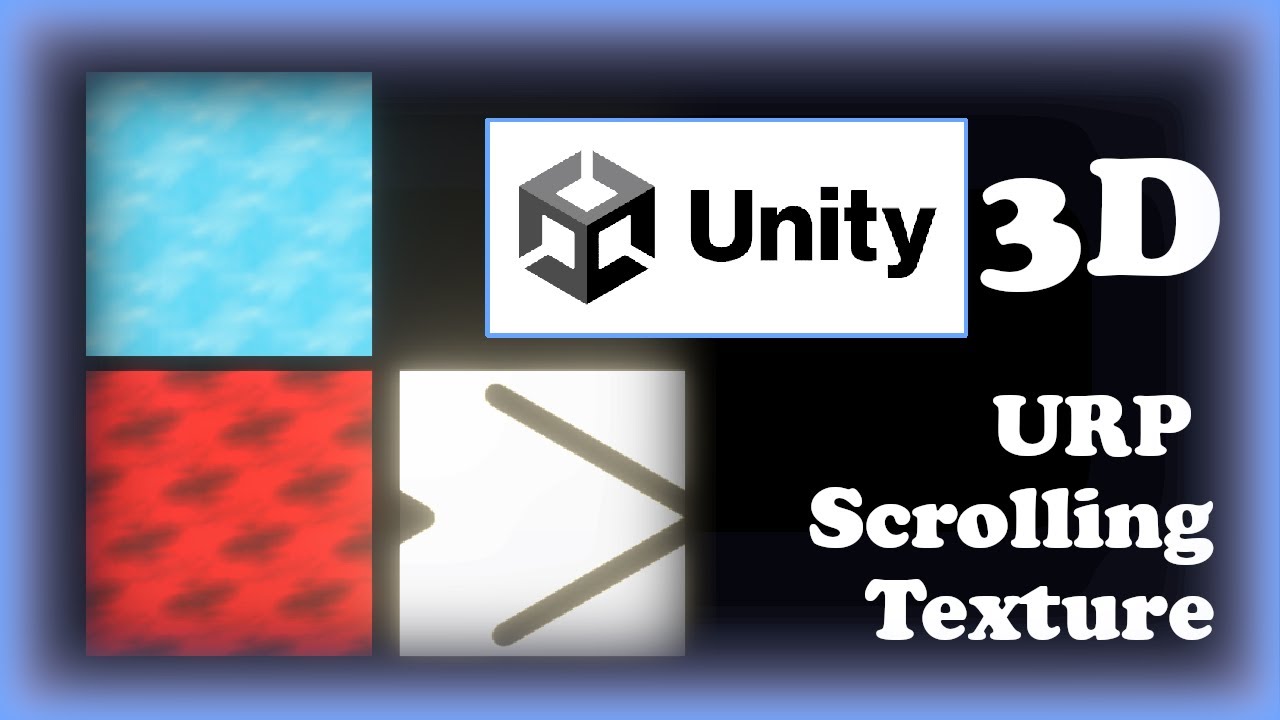
In this video I show how to create a scrolling texture shader using shader graph in Unity 3D.
#gamedev #unity #unity3d #shadergraph #unitytutorial #unitytutorialforbeginners
It's working, but it's not blinking fast enough and I completely forgot how to change the period of a cosine function
Does anyone know how I can import a .unity3d file into unity?
I used an online 3D model builder software, and exporting from that website gives me a .unity3d file
I'm trying to get the .obj or something from it
did you rip assets from a game? not sure .unity3d files are supposed to be opened
no its from HeroForge
if you purchase the digital download option, it gives you a .unity3d file
So I'm successfully able to get the material to blink, but it's not doing it consistently (as in it's clearly spending more time with one color than the other) and I have no idea why this is. How do I make the color transitions more even?
(Forgive the poor framerate. The software I used is kinda weird for some reason)

anyway to generate collision model after importing with unity gltfast?

use a mesh collider, or use primitives
yeah mesh collider is working but it would take time to add it every time i add a model into the scene

thats what you have to do its not hard to add it to a model, you can also make a script to do it for you but that would be way more work than pressing 1 button
Hi, not sure if this is the right place to ask, apologies if not. I am struggling hugely to import FBX from blender into unity and apply textures to it. I have read dozens of results from google and watched loads f videos, does anyone know of a good beginner help page or video for this?
which part are you struggling with? the UVs?
thanks for getting back to me... i did manage to get it working one one model following a tutorial i found, had a break, trying now on a second model and i can't replicate what i did before haha, gonna have another break, clear head and restart secodn model from scratch
How can i achieve this kind a look in unity with 3d? Do you guys know what to do? Is there any suggestion?

Lookup Cel shading
And outline shaders
FlatKit on the asset store can do something like this.
Hello guys ! I am working on my game. And I am learning to draw. Like character and top down environment.
But I am stalling.
Someone can help me ?
I am on Krita. I don’t do great line and I don’t know to make a no pixel art top down object without having weird blurred lines hahahah …
You probably should ask an art server, this channel is more for unity related issues
The single greatest secret to clean digital linework is to work WAY higher resolution than your target.
Hi there! I am preparing myself to transfer alembic hair to Unity, to be skinned on a mesh. Is there any maximum vertices of data that should be taken into consideration?
do u guys know why my 2d sprite look so bad. the texture is 4096*4096 , sprite size is 100 pixel

this is how it look in scene vs in source image


you're scaling the game view my guy
Graphics programs resample images in realtime when they're scaled up or down, which Unity or other 3D rendering engines don't
The alternative is to enable mipmap generation and bilinear or trilinear filtering
Trilinear is the better quality one, and increasing aniso level should help also
But due to limitations of mipmaps, you'll only get the sharpest image when scaling it down by halves so that you're looking at the mip levels at their native resolution
I have had this very exact problem when importing a sheep model that has a ton of haircards in Marmoset, so weight painting the offending vertices isn’t an option. Blender "understands" that non weight painted vertices should remain attached to whatever is closest I think. I’m looking for a solution and will try to reproduce this problem in Unity too. Will post updates on this.
For me the issue was that a part of the mesh was incorrectly weight painted so I had to fix the vertices giving me issues. This is my basic understanding, I had help fixing it
Hello! My Sprite Cuts itself in gamemode when colliding with a wall. Its not broken in scene mode tough. Pls Help me out!
when porting models from blender to unity, do you generally try to keep the models to scale as what they'd be in the actual game, do you export it at a different scale to what you intend it to be in game, or do you simply design it in a way thats most convenient and when you port it to unity, you resize it to the preferred size?
you would usually design the model, then import it into unity and resize it. you dont usually try and keep it to scale to unity since blender units are different from unitys
thanks
i was a bit unsure on how to go about it
They are the same units
Metres in both occasions
my few cents, i generally design it like the way i need it (same scale), but adjust in unity afterwards
Just need to be careful with animations, the directions are different in blender
I design/model everything at the exact scale it needs to be
No really point in creating scale inconsistencies between files
FBX export process may confuse the scale, usually rescaling by factor of 100 or 0.01
But that's only an issue with export settings, not a difference in units between programs, and can be fixed with correct export procedures (or scripts that handle them for you)
ah thats why it does that, I use FBX exporting which is why my models are either way to big or way to small
sorry for the confusion
https://polynook.com/learn/how-to-export-models-from-blender-to-unity Here's an article about all the intricacies of FBX exporting
I find this script to https://github.com/EdyJ/blender-to-unity-fbx-exporter/tree/master usually simply work for all that
thanks, I do appreciate this. I was wondering why my FBX models are all weird
hey, im a beginner, how can i switch the view of the scene ? im stuck like this :

i may have pressed a shortcut but idk wich
Click on Iso in the top right XYZ gizmo
Yo guys, i want to have hundreds of robots running around in my game (with lods, and animations managed by the unity mechanim humanoid animations)
Should i have 3 akinned mesh renderees for my 3 lod levels, or should i have 3 meshes for each limb on the robot, and then use gpu instancing, and the the srp gpu resident drawer and srp batching, on the my model?
I really need to dqueeze all the performance i can out of this, and skinned meshes arent doing well, so i thought indivitual meshes for each robots limb could work
Tldr:
Should i use 3 lod skinned meshes with my animator, or 3 normal mesh renderers for each limb, with my animator?
I don't know the answer, but I'm curious to find out. Do the robots need to use skinned mesh renderer? If not, I think using regular mesh renderer would perform better.
Yea but id need lots of mesh renderers because i want to use lods
And im not sure if that impacts performance
I am using gpu instancing on the material tho so maybe not? Because they will all be rendered in a single batch
Sorry if this is the wrong place, but I am trying to make sprites and import them with aseprite importer, but whenever I do.. theyre not centered in their frame. Is there anything i can do to fix this because its really messing with my particle systems and I dont know what to do about it...

Any help would be greatly appreciated!!!!
Do you have to use the aseprite importer?
Not really but it makes it super easy for my animations and stuff
I did find a workaround though
The sprite slice is centered, and its pivot likely is too
To use sprites with the particle system, you should enable "texture sheet animation" in sprite mode and have your sprites there
Otherwise it uses them like 3D materials ignoring any slice and pivot information
how do I make my monitor in this scene produce light on the environment around it?

or just look more glowy overall

here it is slightly better but without the image,
there's an emmission setting for each material, turn it on and fiddle with the settings
and also bloom
although it's a bit different depending on the pipeline, so google it according to your render pipeline if you can't find it
Anyway guys, why does anisotropic filtering not work for my textures? Does it not work with heightmaps or what?
today i rediscovered that Blender NLA tracks that are Blendshape Animations do not export to Unity. WTH BLender.
Since there’s no “export to unity” in blender, what are you exporting to?
Are you sure it’s being included in the export correctly
FBX., It is a known issue. amazes me it is though :/
https://www.youtube.com/watch?v=cffYL5SS5NY

Learn Blender fast 👉 https://polyfable.com
⬇see more⬇
In this tutorial, we will look at how to create shape keys via the action editor and export them into Unity from Blender.
#Tutorial #Blender #Unity
If it is a single Scene Animation with Blendshapes, it is fine. the issue comes in with Action Editor/NLA which would have made multiple animations easier. so now, i have to export each individually, and then remove the FBX from Unity later
interesting.. i don't do any blendshapes in Blender. Does it affect all export formats?
I wonder if it would be different in USD
i am not sure about usd or gtlf as i never really spent the time to get those working properly in Unity (Blender is slightly behind on those Export formats last time i checked. for plugin reasons, i am limited to Blender 3.6.x) But i am pretty sure it is a Blender side issue with the way NLA considers what is Animation data, and what is not. it prefers Armature data, so you Can set up Drivers based on Bones to be able to use NLA with Blendshapes, but that is so redundant it gives me a headache just considering that workflow
i hate the idea of being stuck to specific DCC versions
indeed
I enlarged the section of their USD importer that mentions blendshapes.

That's the old USD package. There's a new importer.
https://discussions.unity.com/t/new-openusd-packages-now-available/935041
https://docs.unity3d.com/Packages/com.unity.importer.usd@1.0/manual/index.html
I don't see anything about blendshapes on the known limitations page. There are several reference pages on blendshapes as well. Worth checking out.
It should say that. Foiled again by those inconsistent package documentation pages.
God I wish they just said "This is no longer supported new version here"
🤔 I have a hybrid rig with both driver based blend shapes (for facial animations) and bone based rig. It exports it right but i would have to test it for NLA editor. Iirc, I did manage to export multiple animations.
But again, I'd have to test it again
Idk if I managed to document all the export and import settings
Is there a standard you're working from?
Wait yea ur right I'm on urp
Ur talking about usd
Albeit isn't urp supported by usd?
Yes, there should be no issue with bone driven (driver) Blendshape Animations
so just blendshapes themselves are an issue if manually keyed
When put in NLA yes. they can be exported fine one at a time as a Scene animation
lol this video is everywhere when it comes to blendshape animations
Hey so when making a arms and hands in blender and when importing it to unity should it be a humanoid? I tried to make it humanoid and it doesnt work just errors
When you import a model as a Humanoid, Unity expects to find an entire humanoid skeleton
hips, spine, chest, neck, head, plus arms and legs
You could definitely make a full human skeleton (and then only have meshes for the arms and hands)
why might my anisotropic filtering not work on textures?
makes no difference on biliniar, triliniar, 1 or 0 or 8 with the anisotropic mult
and it's forced on in the settings
does it not work with heightmaps or something?
Hey so i have this model im trying to import into unity but the body texture is showing up weird, the eyes and hair textures show up fine
this happened on a past avatar i was working on and never ended up finding a fix, anyone know how to fix this??
vvv Blender vs Unity comparison vvv
I ENDED UP FIXING IT SO NVM LOL


Wait hold on...is it not supposed to work on near textures? Because it affects mipmaps which is irrelevant up close
Trilinear filtering blends transitions between mip map levels, so over a distance
Anisotropic filtering smooths out the transitions at sharp viewing angles, which rarely becomes relevant up close
Or rather rarely is noticeable in that situation, though it technically happens
Yeah ok so I got that straight
So, the only way to have a higher quality looking texture up close at angle is to simply use a higher res texture
Wait no so maybe I didn't get it straight
Does anisotropic filtering not have anything to do with mipmaps then? If you're looking at something very close at an extreme angle, does it "work"?
It is intended to remove texture smoothing errors that appear when trilinear filtering is doing its thing
I do not understand the question precisely
Ah nevermind, so it does work only for more distant textures
Does nothing to close textures
@cedar goblet #1180170818983051344
srry
hey, so what is the most efficient way to create materials for multiple base textures and apply them to their respective meshes? for example, if I have a scene with 50 different meshes that use 20 base textures (with 2-3 meshes sharing one base texture), what would be the best method to import and apply these materials to the meshes from blender?

my models are always on this level of quality
How can I make them look more gameready and finished?
I dont know how to add detail really

You either just add more details or accept a simple style, that's a fine option too
This is not Unity related so you should ask for modeling tips in a server meant for modeling
If your assets are using a shared texture atlas, there isn't really a practical way to make them use individually different textures
The idea of a texture atlas workflow is that you first design your every asset and every texture they need to use, then compile them together onto the atlas and not make more changes
But it's possible I misunderstand what you mean by "sharing textures"
At the end of the day you can just make a new texture, make a new material for that texture and assign to any mesh
aight ty
Hi I'm very new to Unity and am curious if there's any way at all to bring my roughness map into Unity as gloss map from my .Blend. The project has 100s of materials but the material I have to use in Unity only uses Gloss map, Basically I need the material in Unity to pull the Roughness map from the .Blend I import and put it in the gloss map instead of me having to import them manually 1 by 1. My normal and diffuse carry over jsut fine. Please help <3 this is killing me


Unity 2022.3. and newer have a "swizzle" section in texture import settings which can be used to flip color channels
Although you can select multiple textures and edit them en masse, I think asset processor scripts can also automate the process
If you don't have this option, you'll need an external tool for flipping the roughness for smoothness
I fix all my textures in photoshop quickly the issue is getting the material in unity to place my roughness into the gloss on import. Sadly I'm on Unity 2019
By default only the render pipeline's default materials can be created automatically
But assets of any kind including materials can be created via editor scripts if it seems worth the effort to automate it
I have 0 clue how to work any of that or write scripts :C
No, nothing to do with that
If the issue appears in motion it's a camera issue
Stay in the relevant channel
I already saw your video there but I could not see any jitter in it
Is there any decent workflow setup that artists can work on a duplicated scene from production scene
Then i can copy back what changes
Im facing the issue that when artists commit the change, i cannot apply all the changes, something always misses here and there
And due to the fact that they duplicate the scene tp work on, sometimes the script setup on that scene is broken
That means i cant also merge the change easily
The scenes could share prefabs, I suppose, so that the artist applies modifications to prefab assets rather than scene assets
i probably need or write a prefab tool for this. Because some prefabs might have a certain setup with script, reference
sometimes artist might make a mistake that breaks a reference with new assets
that means when it merges, i need to fix a lot of stuff
Whenever I try to get this asset into my game this happens, then when I do everything it brings me back to the same place I started does anyone know what to do


Do I have to do more then click yes
Supposedly not, but you can manually check that the dependency packages are installed and that the Input System backend is enabled
Not the correct channel, this is just a general #💻┃unity-talk topic
Or maybe #🖱️┃input-system if the issue only concerns that specific package
Hi all! I'm making a quick guide for students making their first character in Blender - I have some notes on best practices when it comes to creating character reference turnarounds, if anyone has any experience/advice please do share! I am a coding specialist so I imagine I have probably missed some info/ industry standards. Would really appreciate it ❤️
I would ask this in the !blender server, as this more related to 3D modeling
A supportive community for Blender artists of all levels. Share your work, ask for help, and learn from others! https://discord.com/invite/blender
Hey mates, I'm looking to make my low poly kitchen game feel cozy (although it will get stressfull as you play) any tips/books/resources you would recommend? I'm already working with this asset pack which feels cute and so https://kaylousberg.itch.io/restaurant-bits

itch.io
Low poly 3D cooking and food game assets for building kitchen and restaurant interiors
I'm new to unity and I have a few questions that have been siphoning my mental ability to work with the engine. For context I'm using unity 2019.4.39f1 peronal dx11 and am using it to make mods for Escape from Tarkov.
Question 1
The shader I'm supposed to work with for the game I'm modding is called Bumped Specular SMap which uses Gloss instead of Roughness and Specular inside the alpha of the Diffuse. The models I work with have up to 60+ materials with unique textures so setting them up one-by-one and manually in Unity takes up so much time, because I'm working with the Bumped Specular SMap using Gloss, when I place my .blend file into unity and extract the materials, the SMap shader retains my Diffuse/Specular and my Normal but not my Roughness in the Gloss map of the shader. Is there any way at all to get it to retain the roughness and place it into the Glossmap instead of doing it manually?
Question 2
I cannot for the life of me get my materials looking right, I don't understand it at all. I know it's something to do with how the game uses specular/gloss instead of rough/metal but there has to me something I can do to make it look how it does in blender. There's 0 extra shader setup going on in-blender as I've already "fixed" my textures so they're ready to be thrown in-game and in unity but it so rarely looks how I want it to. I'll provide examples below. Also is there a way to fix backface culling on it? I'm guessing the bright white issue is because the specular map is perfectly reflective so it's just reflecting 100% of whatever my relfection color is set to (grey in the images). If I turn specular to 0 or reflection color to black then it's too dark in-game.


- Maybe a custom asset postprocessor, or an editor script to automatically fill the material properties as I mentioned previously
- We don't know at all better than you do how the game's shaders and rendering are meant to work
Modding is not a topic for this server
Yeah I know I that's why I tried to contextualize as much as possible :C a script for the material would be amazing, I know noting about scripting and fought with gpt to get it to work but never could lol.
either way I appreciate any info
Anyone knows why the skinned mesh renderer doesnt get the bones array properly when instantiated on runtime? Any solution?
The goal is to change a mesh from a skinned mesh from another
Hey all,
My general question is, it is better to optimize on draw call or polycount ? Target platforms are PC, mobile and webgl.
For more details, I have an environment which uses single atlas (The atlas is made of so many colors and gradients like a palette). Also our buildings are using that atlas. So for example we have a floor for one the buildings which contains of 20 planks.
It is better to change the floor to single mesh with its own textures which contains wood and plank details or keep 20 meshes (planks) which uses atlas texture and same material like other modules in the environment ?
i want to import assets from fab, specifically the megascans ones. however it's a ton of work to import each model sepperatly, and each model pack has each model and texture seperatly, aka i need to make each material seperatly.
is there a way to speed this up/simplify it?
the one i'm trying to import is the 'unfinished building' pack.
What pipeline?
Urp
I tried downloading that kit. The FBX files don't reference the textures, so it all has to be done by hand. I imagine it will be the same in Unity. The quickest option is to probably download the Unreal project, open in Unreal, enable the Unreal USD Importer (includes USD export), export all assets in a USD file and then import that into your Unity project using the new USD Importer https://docs.unity3d.com/Packages/com.unity.importer.usd@1.0/manual/index.html
or write some kind of custom asset processing script in Unity
I'll take a look at this tomorrow, Thank you
Hello, I'm pretty new to Unity and really need some help/advice please! 🙂 I have been having issues with shading when applying materials. I am using a trimsheet to texture a small scene in version 2022.3.35f1 using URP.
If I export the models with the materials applied from blender it looks ok but if I assign the material created in Unity then things look very bad. Pic1 is the scene with the materials applied from Blender and Pic2 is with the Unity material assigned help would be very much appreciated!


Looks like there are no normal maps in the second image, and also the model's normals are wrong. You can have Unity recalculate the normals by setting them to Calculate in the model's import settings, but you should try to correct them in blender
I would check that the normal maps you're using are of type: normal map
There should be warnings on the materials if that's not the case
I have looked at the normals in blender and done recalculate outside. The normal map is set to Normal map and I have flipped the green channel to see if there was a difference but no luck. Maybe I'm missing something though

If it's the same mesh in both images but with different materials, the issue probably isn't with the mesh normals
I'd prefer to see the texture itself and the properties of the custom material, and optionally the embedded material since it seems to work
The tiny thumbnail kind of looks like green should inverted but a bit hard to tell
I've got screenshots of all the textures used and their inspector settings. The embedded is only using base coulor and normal and the packed texture is AO/Rough/Metal in the RGB. There is no additional setup with the embedded texture in blender it was just thrown on for the unwrap


Even if I remove the packed texture from the material and have just base colour and normal just like the embedded I still get the shading issue

Ah, I missed the part where the left was in unity and using the imported materials
A weapon pack consisting of 22 models that I prepared for a game: https://www.artstation.com/artwork/vbzWxa

Things like this go in #1179447338188673034 if freely available, or into #1080140002849214464 if you are selling them on the asset store. Make sure to read the #📖┃code-of-conduct and the #854851968446365696
if you are just showing off your work, then #1180170818983051344
@tawny oriole you can probably ensure you are downloading the Unity format. you may have to set up materials manually. You'll need to go through the Essentials pathway, and at least some of the Creative Core Pathway to get going. they're are on the !learn site
:teacher: Unity Learn ↗
Over 750 hours of free live and on-demand learning content for all levels of experience!
okay ill try that thanks
wait it literally has an fbx for unity option lol im gonna try that
🙂
yeah i chose fpx binary instead accidentally but u were right
Cool deal, now i know for sure for the future that that format does bring the Textures/Materials as well
well shoot. hmm, if i can recall my mixamo password, i will test to see what is going on
Click on the Model/FBX you imported to Unity. it should open up this

Click Extract Textures and Apply
i did that but it shot an error at me so im reimporting the character real quick
Probably has to do with Built in Render Pipeline VS URP
which one is it automatically assigning to? unity for me is using URP atm
URP
goodness golly gracious it worked
i selected the wrong folder to extract textures to lol
thanks
What's a good place to start with learning how to use quads or something else to build levels out of flat planes with sprites for textures? I'm looking to do something similar to Duke Nukem 3D.
is there maybe a smarter / more modern way of doing this?
why would you want sprites for textures? just use planes to make levels with probuilder or something along those lines then texture them accordingly using materials
if you want to go a step further you can export probuilder models to blender and UVunwrap them to make them even better
Mostly because this is going to be a one person project and I would like to as closely as I can emulate the style of games like Duke Nukem 3D and Star Wars Dark Forces. Those games used quads with sprites for each of the faces for building the levels then used 2D sprites that always face the camera for the characters and player.

In Duke Nukem for example there was a lot of math done to actually project these quads with sprites onto the screen but as I understand I should be able to avoid a lot of that side of the work through just using Unitys actual 3D system and maybe billboards.
use planes to make the level as they are quads then use sprites or billboards and face them to the player as enemies and such
probuilder would be good for this
I assume I can still apply sprites to the individual faces?
you can add materials to each wall and use a image as a source I believe, albeit to make Duke Nukem style graphics the image will have to be low quality
I haven't worked with sprites much but I believe they are just flat images
Finally found the sprite section in the docs for ProBuilder and like you said it looks like this is perfect for what I'm trying to do. Thank you so much!
Hey mates, I saw this Windblown new game and I really liked it's art style (how it look and feels while playing), does anybody know any of the techniques employed to look like it? I'd like to know more about it 🙂
Cartoon textures and a cartoon shader
Its mostly the textures and shader feel to make it look like that
How can i change UV position to swap out face plate textures? i want to be able to switch out textures to move the eyes and stuff

You need to seperate it from the rest of the texture, create a different one that contains the eyes and use a different material for those faces on the mesh.
No, they didn't. They raycasted against map sectors for the level geometry and used sprites for objects/characters.

GitHub
A repository about old school raycasting technology or "2.5D" used in games such as Wolfenstein 3D (matrix-based) or Doom (sector-based). - Xitog/raycasting
That won't be perfectly accurate for build engine but it at least gives an idea.
Im a bit confused as to what you're saying here because sprites were also used for the levels. We have entire sprites sheets for every level. Are you talking about how the world is displayed? As I understand the geometry loads in one vertical line of pixels at a time after calculating the angle it should show you the sprite.
I've recently seen a video breaking down this process and if I can remember which one it was I'll link it.
https://youtu.be/ErLhj5AWS5M?si=4k8nkfxQLpNSGFuS&t=194
This is timestamped
I'm a big fan of decino's Doom analytics. I took his style of narration, armed myself with material, and created this little video for you!
In the beginning, you can see the footage from the TV show "От Винта" and Duke Nukem 3D trailer by 3D Realms.
Point is that the actual map is just lines with top and bottom heights. I dunno the degree that you actually want to simulate the look compared to just having similar level geometry
oh tbh I wouldnt mind avoiding the limitations of Build since they had to hack together certain parts of it due to 3D limitations.
As i understand I can do something similar to the way they built the levels by using planes + probuilder
Or just extrude shapes and texture them.
Usung a bunch of separate planes will probably be a pain to manage.
what could be causing this? the mouth and eyes are seperate textures. they are very small but it has the point filter and no compression

Having issues with sprites looking very bad in game, I know that the small details need to go, but could the brush texture itself be causing issues

fixed it! it was this

hey guys i'm new to making 3d asset for game and i have some questions like if i made a door and if i want to animate let's say the handle moving and the door opening should the handle and the door be the same mesh or a seperated ?
guys, does anyone know how to add megascans to the scene now? They removed the ability to directly export to a Unity project from Bridge because they "have a new home"

it's better to have them separated. also look into creating joints (also called bones) and look into skinning your mesh to the bones so you can make door animations
okay and should i have a separated mesh for all the handle (all the yellow in the screnshot) or just the handle i guess everything

for your purposes, probably only the handle piece that needs to move
i see, maybe i just need to look at animation and i will understand everything
thanks for your help
no problem. it is possible to also just animate the mesh objects themselves without joints and export it into unity, but it is not my preferred way to do it.
^it works well for simple animations like a door though
yeah that's what i thought like if it's really easy why not try to make it work without going back to separate my 3D model but i will just keep this in mind for the future
you will need to separate the door handle if you want it to move
as long as you export the two objects together in the same fbx, they can remain separate meshes but they will still be the same object
you can make the handle mesh a child of the door mesh so it will move together
you can move the pivot points of the mesh objects to more easily animate them
ah yes i see okay thank will look into that
new question let's say i want to make a window what should i do in blender like leave the glass "open" or give it a face and then i can apply a material on it to make it transparent ? like what the method
how to use Quixel Bridge in the new FAB Era? My Bridge does not allow to download the items
claim the Quixel assets from FAB and download from FAB no? doesn't seam very much unity related issue though
Hey, I'm looking for a scale fbx of a model character to make sure the size of my game is correct.
what do you mean by this exactly?


Get the Starter Assets - ThirdPerson | Updates in new CharacterController package package from Unity Technologies and speed up your game development process. Find this & other Essentials options on the Unity Asset Store.
I wanna make sure my rooms are to scale.
Ok thank you I will check this out now
dang it needs me to sign in lol
the default unity cube is 1x1x1 meter though
and the default capsule is 2 meters tall
you can use those to check your stuff
Can you send me this
Also can I port that guy to say blender so I can build in blender then port to untiy
send you it? no, get it from the store
and yeah sure you can open the model in blender if you want
is it possible to have obj models not automatically create an empty parent?
i know its useful for rigged models or models with multiple parts, but all of mine are just single part models. i dont need the parent
I don't know if this is the channel or not. Hi. I have a problem with exporting from a 3d program to importing to Unity: Not all textures are transferred to Unity. There are no procedural textures in the 3d program (Blender) (I took the textures from the Internet). Everything shows fine in Blender, but after importing to Unity, some of the textures simply do not show and are not imported. I tried to find a solution to the problem on the Internet, but nothing worked.


There's no robust way to automatically import textures and generate materials from them, unless they are very basic
Better to import the textures separately and create the materials in unity yourself
Unity uses inverted roughness as smoothness so you'll have to swizzle that on import anyway
It's sad, of course. But thanks
USD exporter/importer should fix this workflow, in theory, though I don't know how far along it is
I recently updated to Unity 6 (6000.0.23f1), but whenever I try to bake lighting now, sometimes it works fine and sometimes it gets stuck halfway through the light baking (with the exact same baking settings) and if I try to cancel it, I get a pop-up message that just keeps loading forever. Does anyone know why this is happening?
Did they make changes to the lighting in that version?
I am now also struggling with the fact that everytime I bake my lighting with these settings, everything looks really grainy, but if I up any of the lighting setttings, it takes incredibely long to bake


Even when I make the direct, indirect and lightmap resolution alot higher, it still gives me the exact same grainy result
how long is incredibly long? a few hours? thats normal
unless you have a very good pc
I think I solved this issue, however I keep getting this grainy result even when I put all the sample like 3 times as high as they are right now. Do you know why that is happening?
I already tried increasing the lightmap size in the mesh, the mesh import settings and adding a filter in the light baking settings, but nothing gets rid of the grainy result after baking
Noise is not necessarily sample or size related
https://discussions.unity.com/t/lightmapping-troubleshooting-guide/895352/
Could be also filtering settings or denoising related
But I'd go through all the chapters that look relevant
Thank you for the reference, Ill go through itt!
Idk if this is visible in the image but my pixel art is like not like 'pixel art', some pixels are different sizes and its overall blurry, here are my settings


let me know how to fix it, thanks for the help guys
for reference, aseprite vs unity, you can tell the unity one is way more blurry


your game view is at 0.89x zoom, it won't reflect what you're seeing in a pixel-perfect setting
I've read through this entire page and tried everything that I thought might be relevant to my issue, but nothing helped. No mattter what change I make, whether it's in the mesh settings, lightmap mesh settings, lighting settings or anything else does not seem to change my baked lighting in any way. The only way I've found to get rid of the grain is to add a mixed light, but I really need baked lighting in this scene
Do you have any more suggestions?
I keep getting a result like the first picture, even though the mesh looks like this (2nd picture) without baked lighting


There's always some noise in baked lightmaps, and it becomes more apparent when the surface has little texture to conceal it
What I might do is try to produce an accurate as possible test bake in a new project using the latest LTS editor, with default cubes and default bake settings to start with
That might rule out any weirdness snuck into your settings, internal project files or your current editor version
Worth to note that different light sources generate different levels of noise
Bounce lighting, environmental lighting, area lights and emissive materials can stretch samples thin, so it's worth comparing those to direct and punctual light sources
What exactly is the LTS editor, just the lighting settings, or do you mean the latest version of Unity?
Im trying to set it up in a completely new scene now with default settings, but it seems to be giving me a similar result. A lot of noise and I completely lose the details in my textures.
(Still playing around with that a bit at the moment though)
Long Term Support editor is the most stable one
In this case I'd recommend the newest 2022.3. for testing
Unity 6 is an LTS now too apparently, but it's not been that stable or bug-free especially when it comes to baking
I'm suggesting making a new project with a specific editor version just to get the "purest" possible test environment
Good idea, I will try that and see what it does. Thank you for the help!
So with the old Unity version (2022.3) I get a lot better light baking results, however it's still a bit grainy when using my own material. When I put the default white material on, the light bake does not have this grain anymore. Could this have something to do with the shader I am using? I am using the Autodesk Interactive one that's in Unity, nothing custom.
Possibly, but not very likely
The lightmap being a prebaked texture there aren't that many ways for shaders to sample it
Especially not ways that would introduce noise
Usually they just multiply by it
With the baked lightmap debug view https://docs.unity3d.com/Manual/GIVis.html
You'll see only the lightmap, which should reveal whether there's noise or not
That looks like this

But as you can see, the difference between my material and a white material is quite big


Maybe it is the autodesk shader being problematic
I'd try your render pipeline's own Lit shader instead
That one is applied on the left image
I already switched to that to ensure that wasnt causing issues ;/
This is what it looks like when adding a mixed light in the scene. As you can see the chair texture looks a lot different

I need help importing materials from blender to unity, I have a huge map with at least a hundred materials and I've never even ported materials to unity. Is there any way I can port them all over (without dying in the process)?
UV unwrap your model(s) and import them with 1 texture which should be on a material
I have over 200 of them-
I already tried exporting it to usdc and then moving it to unity with the same results
:(
Using what importer in unity?
com.unity.formats.usd
so the experimental one
Because this one is now pre-release
Yeah new one is com.unity.importer.usd
I had no issues exporting most objects from an Unreal 5.4 scene and importing to unity. Pretty sure I’ve done same from Blender 4.2
I'll try exporting the map again in blender with textures and everything in usdc and import it with that new package in a test project

huh
Unity 2023+?

yes unwrap your model with all of the materials on it, and it should give you 1 texture to use
models...
200+ models? if they are not supposed to move just combine them in blender then unwrap them
if they are all supposed to move or be interactable in some way, afaik you are out of luck and have to do it manually
does anyone have any knowledge ambientcg?
About what?
@eager mist AmbientCG sure is a website many of us have used at some point but that's not really an information you likely needed so you could've just asked about the actual problem you faced assuming you did.
i cant figure out how to make the png materials actually transparent with an opacity mao that they provide, i need help with this
Is the opacity really provided as separate texture and not on the alpha channel of color?
its provided as a seperate texture, black and white color
and i'm using URP Simple Lit for all materials
You would have to combine the color texture with the alpha into one texture if you wanted to use the standard shader. You can do that in image manipulation of your choise or a texture channel packer extension made by someone else (asset store or elsewhere), I have used one of the free options myself but don’t remember which one
alright thank you mate, ill use the opacity map to trace out all the empty spots and remove them in krita
Definitely don’t do that by hand. Never used Krita but most image programs allows to manipulate the image per channel and just put the other texture as alpha channel
alrighty, thanks!
i used the Select from Color Range feature
How hard is it to make humanoid models? For a solo dev?
Depends how much money you want to spend. For a few hundred dollars, you can make your own AAA quality models fully rigged. For a little less, you can do them in Blender - not quite AAA but still good. Then there are likely some close to free options out there.
Free: https://github.com/makehumancommunity/mpfb2?tab=readme-ov-file
Paid: Human Generator Ultimate for Blender
Pay More: Reallusion Character Creator 4 (CC4)
Pay Even More: CC4 + premium add-on for skin/tattoos + Headshot (create a model from picture/photogrammetry) + Substance Painter + + + + you get the idea
GitHub
MPFB2 is a free and open source human generator for Blender - makehumancommunity/mpfb2
No, I mean how hard would it be to make them yourselve? I'd spend months on one if I needed to
Depends what kind of quality you're hoping to achieve. Suggest you try and find out.
Not immediately of course, but I want to make a game example with this style someday

its not completely realistic, but it is sorta

gotta spend some money and a lot of time to be able to do this if you want to make the model and textures from scratch. if you use substance painter for the textures then thats like 200 dollars for example
Oh you mean money just to buy substance?
I thought you meant I HAD to hire people
no you need to buy programs to be able to make this 😄 and also spend a very long time learning
where can i get free 3d models
https://www.fab.com/megascans-free claim before the end of the year for free
Fab.com
All Megascans are free for everyone under Fab’s Standard License until the end of 2024, for all engines and tools.
Thanks 🙏
Does anyone know how to create a Rim light like ( red arrow) in the picture for 2D Sprite in a 3D environment URP? I currently only have shadow and normal( Third Image) but I want the rim effect for the sprite too. Or maybe some article or shader... I have the rim image with only black and white but don't know how to use them together...


https://docs.unity3d.com/6000.0/Documentation/Manual/urp/SecondaryTextures.html
There's no trick to using them together
Set up your mask texture as instructed and then create lights that use one of the mask map's color channels for blending
As long as your secondary textures are correctly named, the lighting can utilize them
But I'm in 3D the light blending in Light 2D not visible for 3D
2D light blending requires the 2D Renderer
All 2D lighting components do
yeah, and I'm using the Universal Renderer one. Can't sure how they would act together...

2D renderer locks you out of all 3D lighting and some other 3D shaders
Universal Renderer doesn't have 2D lights, pixel perfect camera or custom 2D sprite sort axis
Off the top of my head
They can't "act together"
yeah, that's why I'm trying different ways using shader just to make use of the rim texture black and white to combine it with the one I already have above... and also re-acting with light too... But I'm dumb in Shader so it would take long time...
Your only options seem to be
Stick to 3D universal renderer, and optionally try to implement rim lighting and whatever 2D features you need by yourself
Switch to 2D renderer, and optionally implement whatever 3D lighting and features you need by yourself
yes I'm doing 3D with 2D sprite so I would stick to 3D Universal Renderer
2D renderer supports 3D meshes, but not the Lit shader
3D renderer supports sprites, but not 2D lighting
The choice is not obvious
Mine kinda like this...
https://youtu.be/EimYM1xxBys?t=439

Replaced game director Yura Zhdanovich walks you through three different gameplay segments from Sad Cat Studios' upcoming pixel-art cyberpunk side-scrolling 2.5D action-adventure that's due out for PC and Xbox Series X|S in 2025.
This is predominantly 3D
Which means the sprite lighting effects would have to be 100% custom
yeah
Hey guys
Any chance somebody could give an advice on handling "tile" assets to avoid gaps?
I figured problem is that tiles are snapped to 1.2 units, which is non-exact for fp32. Scaling to 1.25 fixes it (i think) but it does seem limiting. So... is there a way to have constructors without strictly following power of 2 sizes?


It seems the obvious solutions would be to build your system to snap to one-unit tiles instead, scale them up just a tiny bit, extend the geometry of the meshes / add a "buffer" face to prevent leakage, or to adjust the sky color so it won't be visible
None of them perfect solutions but is a perfect one necessary
Scaling up a little bit could result in Z fighting though
Adding a buffer face seems like a good idea also
Thank u ^^
It looks like it'd be a couple of pixels leakage vs a couple of pixels z-fighting
Assuming you only need so little to offset the floating point inaccuracy that's causing the leakage
I'd add the buffers to extend down/away in a 90 degree angle from the surface, like a lip
The only drawback is that those vertices might add up
But might not
I was thinking exactly that, yeah. I guess an insane solution would be custom vertex shader, if you mark edge vertices you can snap them to a grid in world space........ But this is a little excessive lol
It seems the alternatives would be less trouble
But then again if you have many objects that turn out to benefit from vertex snapping and they can share the shader, batching-wise it'll be basically free
you're right yeah. as it turns out just scaling tiles by 1.0001 or so is indeed enough
Z fighting on such little pixels is not visible , esp since there's no contrast
Indeed, the difference is minuscule
If you want to keep the transforms tidy, the walls could be extended by that distance at the mesh level
Or even just as an import scale factor
Does anyone know why shadows like this appear underneath some of the objects in my scene. For basically everything, my shadows look completely fine, but there are a few objects that have shadows that look like this

Texel invalidity
https://forum.unity.com/threads/lightmapping-troubleshooting-guide.1340936/
chapter 15
#archived-lighting next time
Thank you and will do!
Well, unity's 2d lighting isn't amazing so that tends to push the scale for me
If you use it the exact way it was intended then it's pretty good I think
But otherwise your mileage will vary
Even their example projects needed to extend it.
Hello, I was looking at the Time Ghost demo project character and noticed they used a Skin Attachment Mesh script to have the eyelashes and tear ducts follow the blendshapes used on the head
I’ve been trying to use it for my own character but can’t figure it out, when adding the eyelashes they constantly get put on the root bone when I click bake And I can’t find much about how to use this online
Can anyone perhaps explain how to use the Skin Attachment Mesh script or maybe have a tutorial or something?
Homestuck detected.
Did you assign the texture to a material, and the material to the model?
Also, Does your whole mesh only have one material?
Yes
uhghh idk
you don't assign textures to models
you assing textures to materials, and materials are assigned to models
do i have to fix this in blender or can i fix it in unity
In Unity
that's an unity-side issue

yeah
its a material
looks to be assigned corretly
so we go to the next probable problem
it's in the wrong UV channel
oh ok how do i fix tghat
the model does have 3 seperate texture photo thingys so maybe is that a reason
tyhe horns, model, and hair are all supposed to have diffrent textures, but the entire model is joined
You should show what's under this category
Chances are you have more than one material slot after all

Alright, so that means it's taking two materials
assign each texture to one material and switch them around until the model looks good enough
its still grey i dont think i understand
show your material in unity
Hey, I’m encountering an issue when importing a blender model into unity. my model in blender has around 500,000 vertices, but once I import it into unity, the vertex count jumps drastically (around 27 million)
When making the rooms/stages for a metroidvania, should i block in the level with basic boxes then build onto it with decorations?
usually people greybox then when it plays right they add decorations, baked lighting, etc
Thx
The earlier screenshot to me indicates that either the geometry we're seeing is not actually using the assigned material, or the first UV channel has all the vertices in the same spot which may happen if you've unwrapped it to one of the other UV channels instead
Blender counts a vertex as one even if it's split/sharp, even if in reality it may be three, four or more which is reflected by Unity's vertex counting
Additionally when rendered in scene, each light and shadow casting pass renders the mesh wholly again (in forward rendering path), multiplying the vertex count
Unity's vertex count is generally a closer reflection of how the GPU sees it, while blender's is more from a modeling perspective.
Does any one has suggestion for a high qaulity trees asset for HDRP and it gotta be optimised too
are there any tools to simulate the way sprite atlas packs sprites ?
im trying to create an automation sprite atlas generation tool that are assigning to atlas evenly to make sure the size content in each atlas are about the same.
has anybody used the asset FEEL for creating extra game feel.
i wanna create a effect where i stretch my ball while it is moving
If you need help with a specific asset, it's best to look for community / support channels of that asset
is there a trick to create a normal map from a texture?
Whats a good image format to export textures to? I've been using jpegs and pngs for years but somehow it only occured to me now that that's probably an awful idea
Png and tga are fine
Jpeg and other formats with lossy compression are bad
yeah jpeg I sort of figured was really bad, just wasn't sure how small png file sizes were. ig it gets compressed in the build anyways but doesn't hurt to keep your source small
Both png and tga are lossless
A bunch of people say tga is uncompressed, but technically it supports lossless compression likewise so I'm not sure
Main difference is how programs handle the formats, particularly with png steamrolling alpha data and color depth and profile information
But not so often with tga
Maybe those programs just don't tend to compress tga
Whether the compression is lighter or not there at all, in my experience big TGAs are quicker to decode for previewing and import compared to PNGs
yeah cause maybe you haven't assigned the texture to the material
in blender too?
Yes
and UVs are correct and in the right channel?
Itjhfjdjdh i think so idk what that is
can you show a screenshot of the material in blender and in unity?
Onw moment lemme get on my computer


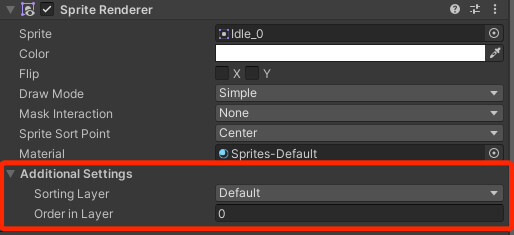
3 materials in blender, but only 2 in unity?
uh idk
wait leme figure this out
should i like idk redownload the blender file or somethinfg
have you dragged the third texture into unity and made a material for it
oh wait i donmt think i did one second
im trying to do that but it rem,oves every other matierial how do i fix that
press the +
maybe you need to do some beginner unity tutorials 😔
!learn has good tutorials if you want to
:teacher: Unity Learn ↗
Over 750 hours of free live and on-demand learning content for all levels of experience!
i figyured it out by myself i have a bit of basic knowledge
can you show a screenshot?

can you show that third material inside unity? click on it and open up its inspector

im sorry my com,puters beingf so slow
is that the same as the material named Meulin in blender? doesnt look like it
im pretty sure this is it

i just realized i went to that little arrow and saw a bunch of stuff idk how to explain it ill take a screenshot
could thuis have something to do with it

click on the model (BOOTYBU...) and in the inspector assign the textures you want there
i did and im pretty sure thats only used to mess withj like bones and stuff cus it doesnt l;et me do that
can i see it?
cus when i click it in the inspector it onlym says configure avatar and it wont let me drag stuff to it
ok

i think you have to click on Body instead?

the materials are differenbt im so confused now
u have to click it in thing below i can take a screnshot rq

wdym
you would UV unwrap them in blender and export the texture from the correct UV channel into unity
go into texture paint rq to make sure theyre not there

top tab
texture paint
o what the flip
refer to my other message
#🔀┃art-asset-workflow message
if you do not have the textures in blender, make them then export them
do u already have a material made that u can import or are you going to make a whole new one
idk i would probably go to materials, click yellow circle, image texture, then import a photo but if ur model doesnt have that wrap thjingy yer
oh
u do have the wrap thingy
that is the unwrap of the model
its still the wrong thing, did you try clicking on everything and seeing where it is? or just look up a tutorial on how to import blender models properly with textures because for me the textures automatically work without having to do anything
yes i did, ill go ahead and watch a tutorial though thank you
how do you do what? Unwrap it? export the materals?
well your model is already unwrapped it seems, what it your viewport shading on? it should be on "shaded"
so you can see your model's materials with not lighting in place
and to export it you just export the texture (should be a image) and model into unity and add the texture onto a material which is on the model
your main windows seems to be in the shading layout
put it back to layout
do you have the actual texture imported into blender?

works now?
select your model
then go to the matierals tab
which is near the checkboard near the bottom
did mixamo give you an image texture?
make a new material and under base color on that new material select "image texture" and select the browse image icon on the left of the "new" button then select your image if you have it which you should from here #🔀┃art-asset-workflow message
yes select the yellow circle
you did it correctly, I just now noticed your last material had a image on it already 😅
you would export the model as an FBX or OBJ and export the image from the model then just put them into unity

this is in the image editor
you just select your image and save it to your desktop
hey, any way to import a GLTF with rig to create an Avatar? Or maybe the best way to go about it? I’ve tried converting the GLTF character to FBX through Blender, but it always messes up the animations or bones.
far as I've researched, no plugin/addon is capable of doing this, is that correct yet?
I've not had any difficulty using gltf, except that it needed a third party package
using gltfFast?
I would like a plugin that has the function to create avatar in gltf
No idea if one exists but you can write an asset processor script to handle that
hi, what's a good way to deal with a bunch of line renderers?
What you need those for and about how many is that?
bullets that use raycasts though now that I honestly think about it I could probably just Emit() from a particle system
and the bullets are alot
the game is focused on a lotta projectiles and bullets
I'd like to know my options besides particles for the bullets at least
Well, if you know how many you need, you could use a ring array of line renderers.
is there a way to not break my prefab when modifying my 3d model and export to fbx file using blender? seems that any changes in number of vertices like subdividing the mesh tends to break the prefab
Break it in what way?
Like this, this is after I subdivide her hair

this is before subdivision

the clothing is unaffected as it's on different mesh
Did you try reloading the scene?
hi
@eager mist #🛠️┃probuilder message
why does my floor has no texture?

Did you confuse this channel with a Blender discord?
I was adviced to go to this channel
This is not Blender discord. You were directed where to ask after that message,
Anyone know if you can use unity asset store assets in unreal or other game engines?
Read the channel description. And those are Blender questions related to integration into unity. Not lazy questions about using Blender features.
You should be able to, yes. The license doesn't say anything about exclusivity.
to add on I believe Unreal sells unity assets as well