
#animation
1 messages · Page 161 of 1
The term is called pivoting, that way you can search for it easily
Thank you! You're a lifesaver <3
does anyone here know how to make my custom character (exported from blender) to not shrink after applying a blendspace
Check that the animations used in the blend space are additive
how exactly do you do that? (new to unreal)
find this setting in the asset details panel of the animations you are using for the blendspace

set them to either mesh space or local space
https://docs.unrealengine.com/4.26/en-US/AnimatingObjects/SkeletalMeshAnimation/AimOffset/ look under the mesh space section to see the difference
An Aim Offset is an asset that stores a blendable series of poses to help a character aim a weapon.
ok, thank you
now it just simply made all the models of skeletal mesh disappear whenever the blend space is applied
How do i make an animation sequence?


ty
i want my character to go to the fire animation when the fire function is called. How do i do this with this transition logic? i cant simply request a boolean like "is aiming" because its just a single action

Hard to tell without knowing your entire setup. But I would look into the basics of asset importing etc first so you can be sure that the assets themselves arent faulty.
I would suggest looking up the basics of how the ue4 animation tools work first and foremost. https://docs.unrealengine.com/4.26/en-US/AnimatingObjects/SkeletalMeshAnimation/Persona/ There are lots and lots of video tutorials too but should get you started. Also I personally think you shouldn't use UE5 for anything other than experimenting with the new features. There may be unexpected issues at the moment.
Editor for previewing and editing AnimBlueprints, AnimationSequences and other animation assets.
i'll check that out,thanks
hi, could someone give me advice, i am new to gamedev, is it possible to animate only a part of body, like for example reload animation of a gun with hands but the hands are conected to boddy, so if you look down while animation you still can see your legs for example doing walking animation? and would you suggest to do it in blender or in unreal engine 4?
Take a look at this. https://docs.unrealengine.com/4.26/en-US/AnimatingObjects/SkeletalMeshAnimation/AnimHowTo/AdditiveAnimations/ You would make your animations in the program of your choice and then you can layer them on top of each other with blend nodes in the anim graph.
Demonstrates how to blend animations together, in this case, a character that can move and fire a weapon at the same time.
@regal orchid for how long have you been making games?
thank you
Good question. I'm no expert by any means. I've just messed around with animations for years and worked a tiny bit in AAA.
Lots of ways to do things so don't take everything I say as the only way to do something.
it's pretty solid advice doe
Glad to help. 🙂
have you worked with synty assets by any chance
Only a tiny bit. They are like any other assets in the sense that there shouldn't be anything out of the ordinary when importing them.
the katana pisses me off doe, im trying to apply a unsheath anim and since theres no scabbard it does'nt work
but that's more modeling than anim
Yeah, can't help you with that. But you can probably solve that by making a model in blender or whatever.
most likely, thanks for everything btw
No problem.
a conduit is just a state without an animation right?
Hey community, I have a relatively green question to ask. I have a launchpad mechanic. In that mechanic, if you jump on the launchpad (detected by a negative z velocity at time of a box collision overlap), it calls "Launch Character" (using blueprints here). I'm also trying to retrigger the jump animation, but I can't seem to get it right. I can just call "Play Animation" after the "Launch Character" as a youtube video suggested but that seems to break my state machine as even when I land I never seem to leave the Jump state. So, I'm assuming that's not the proper way to do this and am reaching out for some guidance.
Also, first time posting in here, so my apologies if I'm not following proper etiquette.
Try playing the animation then getting the animInstance afterwards so it resets
doe not sure because animation ain't my strong suit
Is it possible to select multiples key frames and scale it?
I can't really figure out what I should use as a tool to stretch/scale the keys

Have you solved the issues if the animation export?
Your issue that to export animation to FBX, it needs to be Baked. In blender it can be baked on Export, and there are 2 parameters, "Sampling Rate" and "Simplify". If Simplify == 0, it will not remove any keys produced by "Sampling". Sampling rate is an **inverse **multiplier of the framerate of the timeline you have in blender (i.e. 30FPS * SR(0.5) = 60 keys per second)
@young urchin Thank you! But we've already found solution 🙂
I have a character that has multiple SkeletalMeshComponents. Now, when i call PlayAnimationMontage, its not working. I think it's not working because it does not know which mesh is supposed to play the animation. Can i specify it somehow? or should it know by itself based on the skeleton assigned to the montage
ooh i understand now, i have to use "SkeletalMesh->GetAnimInstance()->Montage_Play"
@formal minnow if You're using C++ you can use something better
https://docs.unrealengine.com/4.26/en-US/AnimatingObjects/SkeletalMeshAnimation/WorkingwithModularCharacters/
Describes the different methods you can use to create modular characters comprised of multiple Skeletal Meshes.
Best 3D animation tool
anyone know what causes this to happen? very new to all of this
Unless there is some weird root motion going on then I don't think it is caused by the animation itself.
Does the character stay in place when you view the animation in persona?
Persona?
Unreal's animation tools are collectively called persona
No, the animation is normal. It's just the character seems to not continuously perform the animation
How to use this plugin.. there is no documentation😩

make sure to have these settings in your animation settings

which you can find in this window

here is some info about it aswell: https://docs.unrealengine.com/4.26/en-US/AnimatingObjects/SkeletalMeshAnimation/RootMotion/
A look at how root-based animation is handled within Unreal Engine 4
I have a gun fire animation (left) and a gun walking animation (right) from mixamo. I would like to go from walking with gun to firing. However, both dont really line up, as you can see the left one has his arms stretched while the other one does not. However, i do want to transition from the walking animation to the firing. Is there like an easy way to sort of make the left one have the same starting pose as the right one, and then do its animation? probably not but i can only ask. If not, is the easiest way to get the firing animation: starting from the walking-aim animation in blender and making it myself?

or maybe there is another free animation website that actually lets you use the animations together without changing them?
The point is, i dont want to spend a lot of time animating
We've been having this issue for some time on a skeleton and I'm just wondering if anyone knows a fix or workaround?
Basically a bone has previously been scaled up and is set at 2.5 now and is causing issues in the game. Trying to set it back to 1 just results in seemingly random numbers being assigned?
https://gyazo.com/3ef4224efee6789fa0feeff5dec32dae

I'm not sure if this is the right place to ask! If not let me know the correct channel pls!
Say I want to add sunglasses or modify the head of the mannequin, must I export the entire mesh to Blender(for example)?
This is 2 separate questions/situations I just realised, sorry.
1)sunglasses
2)head modification
I'm totally new to working with the mannequin and couldn't find much info on modification.
Thanks in advance!!!!
i am trying retarget to my robot character from mannequin, but something goes wrong. Can someone help me pls about this.
Those options were turned off for each animation, but turning them on didn't seem to fix it
Hi all, where can I create a blend profile? Had a poke around the editor and I cannot find it anywhere
Anyone knows how to get control rig to autokey? I drag the CR into the level, pose the controls, the bones move and adjust as I would expect, no issues there, however it just doesn't want to autokey no matter the setting, having to scroll through the list of bones and key them one by one is a pain.
Key all the controls first.
Did that, keyed all controls in sequencer at frame 0 as initial pose, however going to for example frame 3 and moving controls about doesn't cause them to be keyed

Tried the different autokey settings too, but that didn't make a difference either
Could it be that my control hierarchy is separate from the skeletal hierarchy in CR? I noticed the UE4 example control rigs have controls and bones under the same hierarchy. I don't think this should be a problem but can't think of much else nevermind, ue4's example has separate controls too, and autokey works in that
Well I kinda solved it I guess, dragging a new instance of the CR into the level and animating on that caused autokey to start working. I guess something happened to the instances (I had 2, autokey didn't work on either) saved into my usual level
@regal orchid hey, i found out what it was, it shrinks my character, so how do you apply a transform to a mesh (i tried applying a uniform scale in the mesh itself and nothing happened)
The animations probably override any scaling that you do manually. But it is very hard to tell what is wrong from here. You just have to make sure that animations used in a blendspace/aim offset are set to be additive. That is step 1. Otherwise weird things like shrinking will happen.
very well, will check see if it works
so, post process was enabled i turned it off and it returned to the correct size
i fixed it, thanks so much!!
How do I add secondary weapons animation. My friend told me to use another state but I don't understand how. Need help thx
Can I make an object inherit position, but not rotation or scale in an animation?
in this animation I got here it seems like it plays 30 frames per second, but where does that get determined? is that something that came with the animation itself when it was imported? or can I set the playback rate somewhere in UE?

the asset in question is an animation sequence

@visual vapor play rate is 1.0 which is 30 fps
if you want to sync it up with movement, figure out how fast you're moving, multiply by the object's scale, then divide by the distance traveled in the animation
then set that as the play rate
does a playrate of 1.0 always mean 30fps for any imported animations? or can different animations have different frame rates with a playrate of 1.0?
pretty sure it's always 30
@visual vapor
if you want 60 just set your play rate to 2
hi, it is possible to control the level sequencer using the timeline?
Know how you can Manage Retarget Base Pose to change the results of anim retargetting? I'm using 4.26.2 and changing my pose is having no affect on the retarget result!
I've done this thousands of times and know exactly what i'm doing
i completely mangled it to check

retarget result from a mannequin anim still looks the same as if my retarget pose was a bind pose

is this just broken in 4.26.2 or?
(i of course made sure to select use pose)
I'm using a method of weapon kinematics where it exists as attached to the camera, and it's locationally and rotationally manipulated by a solver that figures where the weapon should be given the characters velocity, turn rate, impulses, etc; but I am unable to get the hand IK to stop lagging. I've tried changing tick groups and predicting it, but I can't get accurate results.
I'm using this method so it's synced reliably on client and server, and so I don't need skeletal simulation on the server for the muzzle to be accurate. Any tips?
How do i change the transition time from one animation to another? when i stop walking, the walking animation plays for 0.2 secs still (it sort of finishes first) and i dont want that
Does anyone know how to covnert a root-motion animation to an inplace anim?
Remove the data that is on the root joint. That is what drives the root motion generally.
Hi all. Does anyone have tips for a programmer on the easiest way to create my own custom animations for prototyping, even if they are quite shitty? Are there any ways to do this in UE4 itself or do I need to get something like Blender/Maya to do it?
I don't even need real animations even, just some keyframe poses to get the idea of new abilities I am programming.
This is just a personal learning project so I don't have any animators to work with.
Hi! By any chance does anyone know how to get the two capes to stop colliding with each other during simulation? I've got them set up through animdynamics currently and have been playing around with the rigidbody node, but it's still not working quite right. They're avoiding colliding with the body, which is perfect, but I can't get them to avoid colliding with each other
Is there a way to use ownmade shapes for collisions ?

i just found this:

but notting happed there
i want to add collisions to cloth simulation but i would like to use my own meshes for it:

Why not use Kawaii Physics?
Also, Anim Dynamics and Kawaii Physics are by no means real physics simulation. Self collisions weren't their strong suit nor intended results.
You just can't.
Cloth sim is expensive even in real-time, and for games it never going to be accurate down to the milimetres. The best you can do is just approximate the collisions around the skin part and generously apply to part that should flops around a lot.
I have naively tried this back in 2018.
I did come across Kawaii Physics, but I hadn’t tried it out yet. I figured there had to be some way to do it with the tools inside UE. I can look into kawaii physics and see if they have a way to do the cape collision
Spoiler alert: ||Self collisions aren't supported due to fake physics nature of either Anim Dynamics or Kawaii Physics.||
At least kawaii physics is easier to set up than Anim Dynamics
Anyone know any good up to date resource on using control rig with static meshes in blueprint without skeletal mesh? I was trying to search but pretty much everything is about skeletal meshes, though the UE documentation mentions it should work with non-skeletal meshes also
i dont see how installing a plugin can be more easy than anim dynamics 😛
I’m new to models/animating, so apologies if this is a noob question! I recently switched over the default third person player mannequin for another one and remapped the animations, etc. It seemed to work fine until I used ‘recursively set translation retargeting skeleton’ on all the bones. Now when I run the game, the character is ‘floating’ several inches off the ground. Any ideas how to fix this?
<@&213101288538374145> Seems like we got some fun spam.
:no_entry_sign: CHEMIST#3431 was banned.
Is the character also floating above the floor when you preview the animations or just ingame? Since if it is floating ingame, all you have to do is move it down a bit.
Anyone know how I can make my character immediately start running after holding W? Currently there is a small wide-up before running full speed.
Hello, i currently have two animation, "walking left" and "walking right", the right one is correct, but in the left one, the character walks left but backwards. The question is, can i mirror the "Walking right" animation to the left in unreal engine or should i use another software
?
@tawny fossil I reverse my animations in Blender to. Shift + C > Shift + Ctrl + V to post in reverse. But don't know if there is a better method in Unreal Engine. Sorry
Ty for the tip, its ok imma try that
If you are using a blendspace you can change the axes to be shorter so it blends 100% of the walk animation faster
or just delete the blendspace and use animations directly
has anyone here ever messed with control rigs? I was told to ask here
Yeah thanks, I did check the Ancient demo first because I knew it had to have static meshes for Nanite. But maybe what they mean in the doc also is that you still need skeletal mesh underneath for the bones on which to attach the meshes
Recently I ran to some problems with Automotive Materials and they work on static meshes but not on skeletals. So plan was to use simple skeletal mesh as base and attach all the parts to it as static meshes. I think you still need actual skeletal mesh to be there for the bones. Applying transparent material to this mesh still has shader cost though... or is there some way to just utilize the skeleton without wasting resources on skeletal mesh itself?
Then I saw on UE docs that control rig might work for this... so that's why I'm asking whether it can work without bones
I've been playing with control rigs for the last day or two, pretty sure you'd have to add at least one bone to the mesh to make it work with a control rig, don't quote me on that though
though I don't understand even the basic mechanics of this system, so my opinion is worth almost nothing
though if anyone has any tips about how to create a pole vector for fabrik/ccdik systems, I'd love to hear it
Hello people. I need a little help figuring out what's the best solution between Blend Spaces and Animation Montages. I've tried to figure that out by googling about it but, at the end of the day, the whole thing seems driving into absolute chaos. At a first look I can tell Blend Spaces are mostly used in shooters, with fire weapons, while Animation Montages are better suited for melee combat with a dodge and roll system but I might be completely wrong about that. Any clue? Can somebody give me the ultimate suggestion? I would greatly appreciate that. Thanks.
I finally worked out that there was a duplicate floor in p + sub level that the character was reacting to. Removed the sub level floor and that seems to have fixed it! 😁
Hey there, how can I fix that back and forth movement?

happens between these points

Check the interpolation, could be some weird curves between the keys.
or just delete the keys and redo that bit
Whats the point of extracting root motion animations into in-place animations? There's a free plugin for it, trying to figure out why i would use that?
If you're not using root motion but the anim sequence moves the root bone, it's an option.
What's the current state of the art on how to set up the blend file for UE4?
are we still setting blender scale to 0.01 or just doing that on export?
The former.
Blender doesn't change for UE4.
I already set scaling to 0.01 by default though
Hello everyone has anyone else been having issues with motion warping?
Every time I add a motion warp component to my character and set up anim montages with the motion warp notifies and save. When I re open the component is removed from my character and my motion warp notifies are regular notifies
Alright... let's try again... Blend Spaces vs Animation Montages... should I go and stick with just one of them or each has a different use and purpose? Hence... which one to choose and for what? I just need to create a unique system which is suitable for any kinda mobility and combat, from melee to firearms. Thanks...
They have totally different uses. I suggest you take a look at the documentation. Blendspaces blend multiple looping animations (generally) while animation montages are primarily used for one off animations.
Hi all, does anyone know if this is somehow possible in Unreal Engine? If there is any similar plugin or anyone can think of a way to achieve it? Thank you very much

The very basics of setting up a real-time procedural interaction.
UE4 has Control Rig, which allows you to drive animations with IK calculations.
I think he's looking specifically for hand posing?
I also would like to know if that's possible
(something like create a reference pose for the hand and make the skeleton adjust to it in runtime)
Again, Control Rig.
Hand IK and Foot IK isn't really different, apart from additional finger placements.
Hey guys. Does anyone have an idea how I can implement the empty gun slide back thing?
Like when you shoot a glock and it's empty the slide stays locked back.
How exactly do I do that? With animations (aka. doing everything 2x, once without the slide back and once with the slide back) or is there a way to do it in Unreal?
make a bool for "clipEmpty", if true, don't play the second part
what second part?
the slide forward part
yeah. but how exactly do I manage the animation? can't I keep the slide back blueprint wise or somehow?
You use animation blueprints for anything related to animation. (Generally) I would suggest looking up the basics of working with animations in unreal if you aren't already familiar.
yeah I know that already. It's just that I'm animating everything inside Blender and now I'm stuck at making them procedural. For example the slide staying back if there are no bullets.
Do I wanna do that via BP or can I combine different animations somehow?
have a state machine for the gun and keep it as a separate state that plays the slide being back as an animation
until the state machine moves on to something else
you can blend animations in the anim graph
so that the slide stays back while playing other animations
etc
many ways to do it
alright, thanks a lot!
So are people using Control Rig now over Anim BP's for runtime animation as well as rigging?
Can the same rig work for both?
I accidently closed my asset browser, how can i get it open again?
Window
wdym window?
the window button on top
oh thanks alot
np
Typically Anim BP and Control Rig goes hand in hand.
Control Rig is by no means replacement for Anim BP.
Control Rig can complement Anim BP and bring it to overpower with little to no tangible performance cost.
Can you give me any examples?
Hey all! I'm trying to merge two animations on a sequence I'm working on but I want only the head animation from one of them. Does anyone know how to do that?
What most likely inspired Control Rig to existence:
https://www.youtube.com/watch?v=KLjTU0yKS00
Early example use cases for Control Rig:
https://www.youtube.com/watch?v=TYSdxW2WHcI
Briefing to Control Rig:
https://www.youtube.com/watch?v=y2WzNvJZk0E
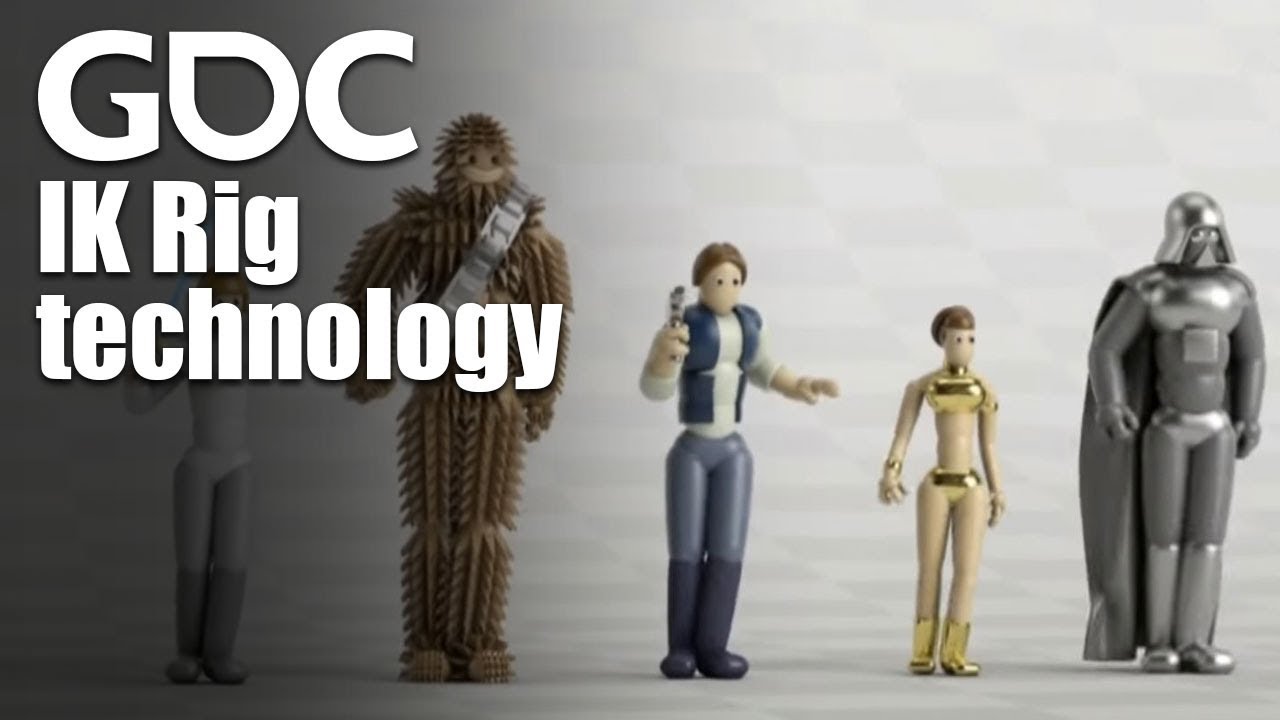
In this 2016 GDC talk, Ubisoft's Alexander Bereznyak breaks down the basics of IK Rig technology for animators, and explains how it can be used for everything from video games to feature films.
Register for GDC: http://ubm.io/2gk5KTU
Join the GDC mailing list: http://www.gdconf.com/subscribe
Follow GDC on Twitter: https://twitter.com/Officia...
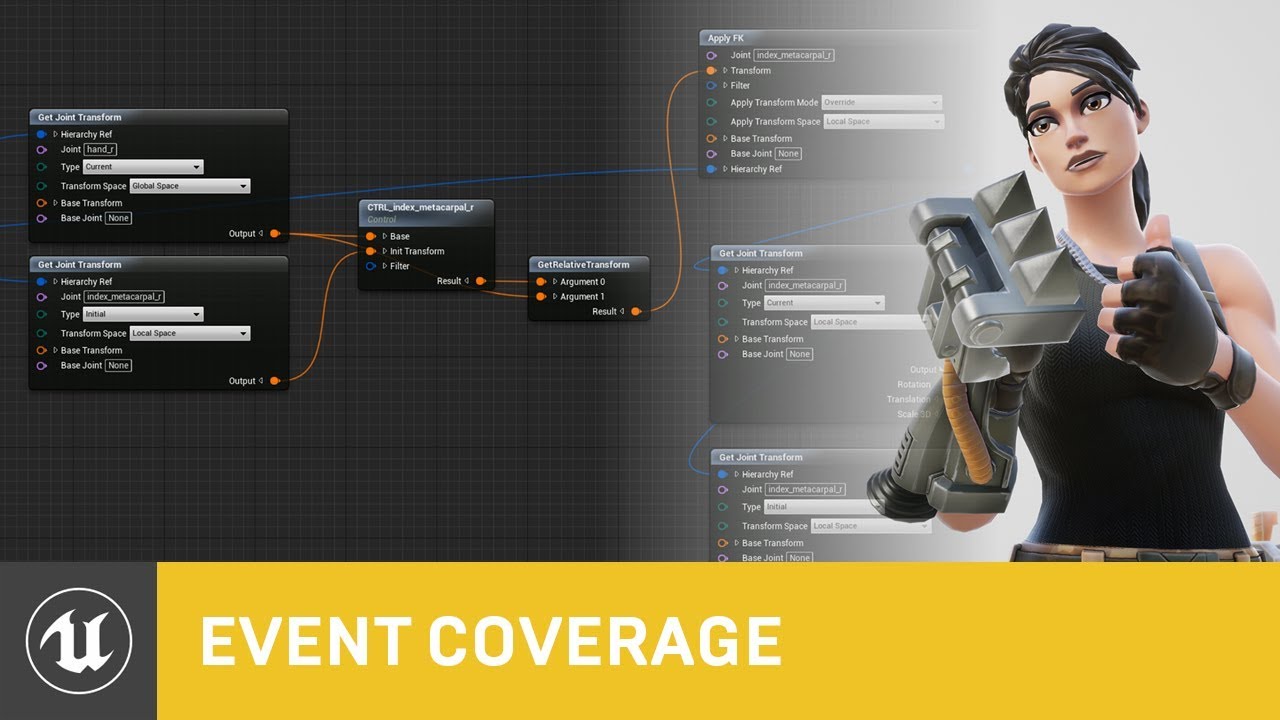
Control Rig is a highly flexible tool based on Blueprint that can be used to drive animation inside UE4. In this Unreal Engine Learning Theater session by Epic’s Wes Bunn during GDC 2019, you will get a look at the Control Rig system and learn how to set up a Control Rig Blueprint to drive and animate a Skeletal Mesh, illustrate how Control Rigs...

Until recently, creating character motion was the domain of expensive third party DCC apps. With the release of 4.26, Unreal Engine introduces further refinements to Control Rig: our suite of in editor rigging and animation tools. Whether you are authoring traditional style animation assets via keyframes or driving characters procedurally at run...
Look up for animation slots.
I know that this works on animation blueprints but for sequencers?

This "slot name" could be what I'm looking for?
Hello ladies,
I have a character that has two animations that I want to play independently, once, every time I press a key. What is the easiest way to do this? Anything in AnimBP seems geared towards mutually exclusive states
also, the animations seem to affect the whole skeleton, instead of only the bones that move in the animation
Thanks
Montages, and slots.
Thank you. I'll be investigating that, I'm new to working with skeletal meshes
I want to expor the current animation with the preview mesh. But if i load it into Blender there will only be bones visible and no meshes

And i m using the drop down menu with "Export preview mesh"

New to Animations - Trying to animate run Direction/speed of a human character. When I press D (right) he runs 45 degrees up to the right. When I press A (left) he runs 45 degrees down to the left. I've looked at everything I can think of and I can't see what's causing it. Does anybody have any ideas? I've put those little diamonds in the blendspace in the exact spots the tut told me to and they Make sense to me
did you change the values on the horizontal and vertical axis on the left? you want to be the vertical axis speed and the min value to be 0 and the max your max speed (check the character blueprint, on the movement componeng to see what your max speed is, or print your speed) and the horizontal to be your direction the min value to be -180 and the max 180, then you should increases your divisions (I don't remember how are.they called, is an option under max or min that increases the lines) and set your "diamonds" to be in the correct angles (when you hover a diamond there's a value that tells you which angle it is corresponding on what you have set on the direction horizontal axis) you want your left and right on -90 and 90 respectively, your front on 0 and your back twice one on -180 and again on 180
OK I'm looking for that spot now
OK ya Horizontal is -180 to 180 and vertical is 0 to 600. Like the course said. Those diamonds are on the same grid points as the course had them and they Make sense. 90 degrees to the right is run right and 90 degrees to the left is run left
any tip or resource of doing a turn animation when walking?
I am minding 45, 90 and 180 degrees, left & right
mine from stand to walk went fine, however the walk feels so overwhelm
I'm trying to export an animation to edit it but it won't export
Is this some attempt at piracy protection or something?
Never had issues exporting clips before
Nevermind
It exports from persona but no from the folder... weird
any idea why I can't expose a pin on my spring controller?
anyone around here has used the reallussion mocap pipeline in past or current productions?
interested in exchanging some perspective experience 🙂
Hello all
i am trying to import animation from maya to unreal but facial animation is not comming proper someting animation deform and sometime animation not work properly
How do i include crouching in my game, which can only affect the bones on the lower half of the body? I already have this setup. Do i include the crouching in the animation graph, or do i play a montage from code ? I think a montage ?

Crouch is a state. You should have a crouching equivalent to your locomotion blend space.
Okay, but my question is then, if it goes to the crouch state, i still want the other animation to play on the upper half of the bones (the one that was playing when i pressed crouch)
How would i do that?
@formal minnow you should have a state machine outputting the stand/crouch/prone blend space
oh making a new statemachine
i understand it ty
Something like this? I'm not sure which bones to put in the config panel though

i see that the lowerbody slot is not necessary but idk how to specify "Locomotion cache should affect all bones, but upperbody slot should override upperbody movements starting from the pelvis and the crouch cache should override lowerbody movements lower than the spine
actually now i realise that it makes no sense what i want
i just have to add the crouch to the Walk_Statemachine and done
Anyone know if its possible in sequencer to pause an animation of a character and transition into an idle waiting for player interaction, then resume the rest of the character animation sequence? The classic: Exposition -> Here take this adventurer -> Finish exposition, all in a single sequence? Or would this require more of a complex animation blueprint setup?
I have a bow weapon on the ik_hand_l bone. But when doing layered blend per bone, only the bow weapon does not blend properly. Anyone know how to fix this or whats wrong?

Hello, is it possible to import animations that involve skelletal animations and morphtargets?
Hi - I'm new to unreal
I'm following the RPG tutorial series by DevSquad https://youtu.be/a6ZPhld4Q5s
On this episode lots of people have been running into issues with the Calculate Direction node. I've went through all the comments and his updated video trying to fix the problem, but I'm still having weird issues.


We take a look at using the animation blueprint to finish up our player character, creating the logic to generate the player's direction, speed & feed it into our blendspace.
We also go over changing the mesh in the character blueprint.
Unreal Engine 4 Beginner Tutorial Series:
https://www.youtube.com/playlist?list=PLL0cLF8gjBpqDdMoeid6Vl5roMl...
My animations actually work when the model is for some reason floating off the ground on the stairs. But when my model is flat on the ground he just slides across the ground


Yeah your setup should be a state machine with 2 states and a layered blend to layer the upper body slot
State 1 being standing, state 2 being crouched
Anyone have any experience with gun ik bones in control rig?
i know there are a ton of tutorials on anim graph stuff but trying to handle gun ik for cinematic purposes in control rig / sequencer
happy to pay someone for helps
Hi guys i had a question. With UE live link for maya using a skeletal mesh is there no way to preview animation in editor mode? If i hit play yes the animation updates when i scrub animation in maya any way to do it without hitting the play button?

@slim token That’s a Cool character
I thought he’s one piece, did you fix his feet?
is there a site that provides lots of HQ animations? like kitbash but for anim
I’m not well versed in the animation tools of UE4, and I know they’ve developed a heap recently. Im looking to create a character animation system similar to the one found in the game Overgrowth. There’s a conference the dev did going over the methodology but I’m struggling with the finer details of translating the method over to practice in UE4
try adding a livelink skeletal animation component to the character blueprint. That should update it in editor without hitting play.
Hey everyone new to ue4, was making skill hud widget that translate into the screen then translate out when a button is pressed then gets destroyed but now i realise that it makes it so that when the button is spammed they dont get destroyed only the current one is there any work around? prob a way to delete those specific widgets after like 2 secs or sumn?
I got it working

got help from a guy called Rohit he was in one of my telegram groups 🙂
is it possible to make a ragdoll contract instead of completely letting loose?

i'd like the spider to resist any change when ragdolled around


I was doing Foot IK and it works with those values. But I don't understand where the values for primary and secondary axis come from? Can someone explain to me what they mean? How do I find correct values for different skeletons?
Hi guys - Can anyone explain the best process for cutscene and props animation - say I have a character with a walking stick - picks it up, uses it puts it down - maybe grabs something else - should the props all be rigged and put inside of the original character rig? I realise I can attatch them in unreal but id prefer to do all my animation + constraints in maya
PhysicalAnimation and create pose
Maybe there's a better solution, but the way i do it is all in Maya (or whatever 3D package), with extra bones (locators) for where the attached props go. Then i attach these props to the locators so i have a preview while animating, but i don't export them to unreal as part of the rig (since i attach them in unreal later on), i export the rig (including the locators) and the props separately. Those locators are convenient as well cause you can animate them, say if you want a character to throw an object in the air and catch it back (which you can't do with sockets).
Couldn't say why DevSquad is making you feed velocity and rotation through the cast. Is your character mesh lined up to the bottom of the capsule? A more common way of doing speed and direction is this ( no cast needed):

could you elaborate please?
🥄

Announce Post: https://forums.unrealengine.com/showthread.php?121376
The "Physical Animation Component" is a new feature in UE4 with a lot of applications. In this stream, Ian Shadden will walk through setting up a third person template character with the Physical Animation Component to help get your started with your own physics-affected chara...
thanks!
ok thats cool thanks, I guess that means considering this kinda stuff in advance and adding to the base rig - not easy with my way of working 😄
@errant violet

This is the way the Boolean is set up to cast a spell, which is similar to what you've posted (I think? I'm still new)
The problem I'm trying to solve now has to do with the particle emitter and making it follow the character after it's cast.
I was able to fix the casting problem it was actually something to do with how he set up the walking animations.
It's coming out fine at the correct location (socketed to the right foot of the skeleton) but it doesn't follow me. I'd like my game to have a more dynamic combat system where you can cast and move at the same time
In his example he kills the player movement on cast to fix this problem
can someone help me
my characters idle animation is just the running animation and idk how to change it
nvm
is there a way to set blendspace 1D value from blueprint of it's skeletal mesh without anim blueprint???
hi sorry noob question but I want help
how to fix this strange backward move? Interpolation won't fix this
https://i.gyazo.com/dfbfd6e9375b998bd70fdf5e371de5d4.mp4

@hallow elmuse blendspace
isn't this blend space???? what???
optimize it, it obviously happens when you press A or D while going backwards
no I don't
This issue will be caused only when I press "S"
so in a 3D model, how do I place a "shooting" point for a gun I made
and grip points, etc
SkeletonMesh imported from fbx, the Collision need to be modified, how?
anyone know why skin weight profiles would break the skin weights? I have a skin weight profile that is the exact same as the original except it reweights the head, but when I play animations with it, the body stretches weird, any suggestions?
Hey vk, so usually the primary axis is the one pointing down the bone, while the secondary should be the one pointing towards the PV. In your case this would be +1 for X axis and -1 for Y-axis, which are correct. Hope this helps 🙂
addForce addImpulse to Movement is invalid, not change the movement of the Character...
im completly new to animation. if i bought some premade skelton animations off the marketplace how hard would it be to tweak/modify them?
How do I adjust a bone socket for a chosen animation without changing the transform globally?
Normally I would adjust the bone, record the animation and save it to a new asset and the bones won't get modified globally. But that doesn't happen with Sockets.
hey guys, someone familiar with the control rig plugin who could give me a hand
yo
Hello everyone,i made a IK riged character in blender ,can someone help me with importing it in ue4 ? i have a few problems with it

i cant import it with ik points and ik doesn`t work in skeletal mesh window
Is it possible to change the orientation of the root from a root motion animation without changing the direction of the animation?
EG: I have a patrol walking animation which has root motion enabled. everything works fine inengine except when i want to perform a stealth kill from behind, because the characters root is reversed by 180 degree.
The IK constraints made in blender will not work in UE4, you'll have to setup a control rig in UE4 if you want to do that. However, animations made in blender will work when exported if all bones deformed bones are present however there are some nuances for exporting skeletons to game engines as in you normally only export the mesh with the deformation bones. Highly recommend checking a few tutorials from this guy over here https://www.youtube.com/channel/UCRSx63y-VPidCrycgDS-o_Q

YouTube
CG Dive offers in-depth CG education. We do “deep dives” into different topics related to computer graphics. We extract the important information. Then we deliver to you practical lessons that will speed up your workflow. To stay up to date with the latest updates make sure you subscribe and turn on notifications.
Make a blendsspace for going forwards and switch to another one when going backwards.
I have a rootmotion animation where the characters pivot (or in other words the roots pivot) is not alligned with the motions direction. How do I solve this?
This illustrates my problem. Please Help ❤️

after retargeting animations to my new skeleton and character, my forward movement is messed up, but my left and right movement is fine. Any ideas?

Can anyone recommend a marketplace add-on for Procedural Animation for non-human creatures? I traditionally rig and animate, but I've got some more otherworldly creatures that proc gen might be both easier and look better. I've seen a few add-ons that offer this. I"m wondering if anyone has one they recommend or particularly like using.
i dont know a lot about this, but do they have root motion checked?
yea they do, they were root motion before I retargeted and it looks like all the settings carried over
hello, is there a way to move bones to a certain position from an input? i'm trying to make a spring contract when player clicks a button
I saw a really cool short film made using the german shepherd asset recently, can't find it again, anyone know what it was?
@terse lagoon use anim blueprint and modify bone node
I have a houdini alembic, which is a child animated with the parent animated by a constraint de rivet. When I import the alembic into Maya or Blender it works perfectly, but in Unreal I only imports the child animation...
I have made bake in Maya and exported but the same thing happens. Does anyone know how to fix it?
hey, maybe anyone can point me to the right direction 😉 I have an animation that I play as dynamic montage on a slot where other, regular montages play fine. But for some reason dynamic montages don't. What should I check? I've already checked that the anim is playing in the correct slot (by checking what is under GetCurrentActiveMontage()), but a) notifies are not fired (added them for testing), b) in animinstance the slot node is not "stopping the flow" when the montage is active (as is in other cases) and no animation is really happening. What am I missing? :/
Not even sure what a dynamic montage is
it's a montage created on the fly from the animation
One message removed from a suspended account.
Live 2D? Flow map?
It's more of the latter than Live 2D (which is basically skeletal 2D image)
You could achieve that kind of effect with some UV transformation in the material, but that's a topic for #graphics
If you ever use Wallpaper Engine editor, you might familiar with it
Hi everyone, Hope you're all well. Tried this on the UE forums but no luck. Thought I'd try my luck here. Hopefully some kind person might help PLEASE?
So hoping that by some miracle one of you kind talented people might be able to help a total newb out with an issue (that’s probably really simple).
So I try to export out a fbx to upload to Mixamo but when I do that the model goes crazy. I’m sure I’m doing something stupid but any advice or help would be hugely appreciated.
I’m trying/failing to a personal project as a way of learning.
Thank you very much for reading and I would really appreciate any help or guidance!!

Arrrggghhh

I'm based in the UK so might be a delay in getting back to you if anyone helps out.
Thanks again!
Mixamo rig just doesn't compatible with Manny standard skeleton, and it's not lilke Adobe is still bothered to support Miamo in general anyway.
Though female Manny shipped with Mr Mannequin Tools and the Control RIg sample are slimmer than this 
So might be something's wrong with this model instead.
One message removed from a suspended account.
Hi there thank you for your response. The model I think I got from the marketplace with a bunch of animations - walk, run, jump
Okay, so Mixamo is the only thing left to blame.
I was wondering if it was my export settings from UE
Maybe there was a gotcha with that
Alternatively, you can just use the normal Manny (SK_Mannequin) instead. Most humanoid models in Marketplace are made to adhere to Manny standard (unless stated otherwise)
I just going to try that now and see if I get the same issue with the model. If that is the case then it's definitely me making the mistake
Thank you for your advise so far. Really appreciate it.
So the SK_mannequin loads correctly in Mixamo
Just found this info about the model:
"Rigged: Yes
Rigged to Epic skeleton: Yes
If rigged to the Epic skeleton, IK bones are included: Yes"
So does that mean using the normal Manny (SK_Mannequin) in Mixamo will work?
Thank you very much
Well, just hope that Mixamo don't screw up the rig.
Remember that Mixamo's rig doesn't adhere to Epic skeleton standard.
They used to have UE4 rig support, but somehow Adobe removed it sometime in 2017.
Ok thank you. I came across this while researching

Terribilis Studio make indie games and assets for developers.
Have you used this?
Nope, never used it.
I have distant myself from Mixamo for a long while, ever since Adobe half-heartedly supports it. Heck, Fuse is practically dead now, and it was used to tie-in to Mixamo.
Most of the time I make my own animations anyway.
I'd love to be able to do that but I don't have the skills. It's relatively simple stuff I need to achieve but beyond my knowledge so thought Mixamo might have to do
Does this " Rigged to Epic skeleton: Yes" mean rigged to the SK_Mannequin?
Apologies if these are very basic questions. I'm brand new to this stuff. Thank you
Hi Lorash, thank you for the info. Really appreciate the help. I've been looking at previous projects and migrating etc
What I'm trying to get my head round (which is hard because i'm very new to this) is if my model is "Rigged to Epic skeleton: Yes" does that mean that most animations will work? I'm trying to understand the basic principles if that makes sense? Thanks again
also says " Based on Epics UE4 mannequin and skeleton "
@ashen junco@misty dagger Thank you you 2. Really appreciate the guidance. I have managed to make it work. So happy. Thank you very much. Using Terribilis studios plug in and you info has solved it. THANK YOU!!!!
Thanks again
I'm not being pedantic, you're enforcing a rule that I see nowhere
It says Content Creation, I'm creating content to use in Persona
Are you a mod?
How do I give a static mesh a skeleton?
In a 3 d modeling application
Blender
Maya
3ds max
Only blender is free
Hi folks,
running into a fun issue with anim montages and multiplayer:
I created an anim montage with multiple sections, each have their "next" sections set to None. A custom anim notify state will update these sections to specify their "next" section (via AnimInstance->Montage_SetNextSection(AnimInstance->Montage_GetCurrentSection(), ComboSection);)
This works perfectly when I have only 1 player.
When I add a 2nd player and trigger this as the authoritative/server player, updating the "next" section does not work (output log says the "next" section is still None).
Are there tricks or specific things I need to configure when updating the "next" section in multiplayer scenarios? Let me know if I should post this to #multiplayer instead.
please help me...
Hi, guys!
Is it possible to check name of character animation(anim sequence) which play at the current moment?

Hey I have a question about optimization
Will the numbers of bones of skeleton affects something to memory or CPU?
I'm using merged skeleton with some extra bones, and I have to add many extra bones, so I wonder is it okay or not
It'll going to affect CPU (and could be GPU as well), which is why UE only support 75 bones max on mobile per skeleton.
Try not to go too much with the physics bones (which I assume you're currently working on, if not facial bones)
got it, thank you!
I try as less as possible
You could look at some 3D mobage or several MMD models for some examples/reference on healthy amount of physics bones. They rarely exceed 100 bones in total but still made convincing sway motions.
Actually I'm using MMD models and I merge their skeletons, but sometime I can't merge due to hierarchy, so I ask this question 🙂
Ah yes, the complications of MMD standard and Manny standard rigs. I'm almost too familiar with it 
this question prob gets asked everyday, but can you create first person animations using the control rig?
Yes.
Anyone here who can help with skill animation for anime characters to be used in a game
Hey guys, does anyone know how to change the play rate of a montage in real time? Example: I want an enemy attack animation to start slow and then make it fast in the middle of the animation. Is it possible to do this using curves and blueprints or do I have to adjust the speed in an external software?
#instructions on how to post to #freelance-jobs
Safest way would be either edit it in Control Rig or external DCC software.
I never used Maya (I mained Blender), and I'm not sure what "connection editor" supposed to refer, might be Maya exclusive thing.
Though recording screen capture of the symptoms in Unreal might give some idea about the issue.
Can anyone give me some advice? I'm working on a character/rig, and no matter what I seem to do, the shoulders/clavicles are bent backwards like a chicken dance when I import my character and the proportions look off


the topology/bone placement seems fine as far as I can tell

Hi. Can i modify an animation with different arm positions without a tool like 3DS Max or some other 3D editing tool?
I was able to fix my blend shape issue, I'll delete my messages from before
So I have a simple reach out and grab animation which i use when the player picks up an item. I have it as additive because I want it to play properly when he's running/swimming/etc. But it only looks right when the player is standing still. during the run and swimming animation, he reaches all wrong and the additive is just not set up right.
Well, you don't have to delete the messages, just follow up with what you do to fix it, or edit the message with [SOLVED] mark or something.
so here's when I'm picking up both standing still, and when I'm moving:
https://gyazo.com/20bac3c3a56779e0697649f819658c85
oh my bad, I already nuked them.. as far as the fix I just went back to an older version and took working ones from there, not sure what actually happened to cause the issue
hey is it possible to in ue4 to animate arbitrary groups of objects/scenecomponents inside an actor, and create animation clips like you would get from importing an animated fbx?
like the way Unity works, where you can just animate whatever properties you want without needing a skeleton
i'm just starting out learning unreal animation and every tutorial starts with a pre-animated fbx
Sequencer can animate any animatable properties.
doesn't that only work on the scene level? or am i mixing it up with something else
Well, yes, but Sequencer can also spawn objects on its own.
sure, but the resulting animations are things that you trigger for a level
but suppose I have an enemy AI and i want to animate my placeholder cubes for it so that I can continue developing their behaviour with placeholder animations, and then bring a real fbx in later when i've modeled and animated the real thing
it seems like I cannot do that, but that also seems kind of an absurd limitation to have
What's the hold up with Sequencer for that purpose?
Sequencer can use existing object in a level or spawn some on their own, and can be played in BP
eventually i want to be able to directly substitute a skeleton and its own animations,and that way I'd be animating my character in a totally different way and have to refactor it later if i want to subtitute it
From my view, it's the matter of changing a small part of BP node. Instead of playing a level sequence, replacing it for playing an animation sequence.
Anim sequences are only for skeletal meshes, not static meshes.
(reposting, as we're all more awake now 🙂 )
Hi folks,
running into a fun issue with anim montages and multiplayer:
I created an anim montage with multiple sections, each have their "next" sections set to None. A custom anim notify state will update these sections to specify their "next" section (via AnimInstance->Montage_SetNextSection(AnimInstance->Montage_GetCurrentSection(), ComboSection);)
This works perfectly when I have only 1 player.
When I add a 2nd player and trigger this as the authoritative/server player, updating the "next" section does not work (output log says the "next" section is still None).
Are there tricks or specific things I need to configure when updating the "next" section in multiplayer scenarios? Let me know if I should post this to #multiplayer instead.
Manny's animations really aren't meant for humans. He is a hunched over robot, so try making your own animations instead.
You can also modify the animation in engine by setting keys and moving the limbs, but again the manny animations are pretty awful when applied to anything but Manny. And it annoys me how many games keep using them for release.
It's kinda disorienting to adhere to manny standard when creating animation.
I had to use ALS mannequin which is more proportional.
Yeah exactly. I think Epic's choice has caused a lot of marketplace assets and whatnot to adapt to it and it really isn't good for proper humans.
Is power IK/Control Rig a good way of doing run-time pose adjusting? If I want to do sort of what was in the Unreal 5 demo for example of having the character's animation change so that when they reach out and grab a door handle it hits the right area?
Would be great if they could make a more normal figure!
The new female looks better from UE5 but I haven't inspected it too closely
You mean the character from their demo project? I wouldn't really use that either unless you are making a very similar character. I'm not good at modeling and rigging myself but I often use a character and skeleton from makehuman as a base. http://www.makehumancommunity.org/
Control rig can be used for stuff like that, yes.
Is it preferred to Anim BP or just depends?
I assume I can set a control rig Ctrl in a regular blueprint?
I havent used control rig a whole lot but the way I used it, I used it as a complement to the animbp.
I run the animation blueprint with all the state machines and stuff, then I feed the pose into the control rig which modifies the animation a bit and then brings it back to the animbp.
there is a control rig node you can use in the anim graph to interface with your control rig (sending variables etc)
Hey! I'm not sure if this is correct place to ask this but maybe someone has more knowledge here. On left character picture greystone is strafing left and looking front of him but when i play sword swing montage, he ofc swings direction he is running. I would like him to attack the way he is looking, so u could strafe around enemies pressing A or D and moving mouse. When i press Attack, montage would hit the enemy cause swing goes where character is looking, right now it just miss cause swing doesnt go faced location. Would it be hard to implement using greystone and how? Or is there name to functionality like that so i could try to google it. Sorry if explained little poorly. Thanks in advance if someone could bounce me to right direction!

Sorry guys - I have used my best google-fu but can't figure out a solution to this problem - I have a rig working fine in maya and ue5, I added forearm roll joints and now the skeleton is importing into Unreal broken (the same FBX file looks fine in maya) anyone have this issue or have any ideas of how to fix it? {SOLVED} In-case anyone is looking fir something similar - it was a bindPose issue, had multiple bindposes and I think my new forearm roll bones werent in them - so delete unessesary bindposes and create a new one

how do i play a specific section of an animation montage
Hey, anyone know the right joint name for importing a rig into Unreal using Maya?. As in, L_hand or Hand_L or Hand.l? I know for Blender it's .L but I'm new to Maya
Does this option enable by default in ue5? I basically can't find it

I keep getting this warning "SLOTNODE: 'XXX' in animation instance class YYY already exists. Remove duplicates from the animation graph for this class." I don't have any duplicates of that Slot in Anim Graph. I do have slots in various state machines (inside), but I also have Default Slot in the main anim graph and inside state machines - no warnings about that. Any ideas ?
You would play a specific section of the animation montage by calling it out in a node. For example I have here an animation that does a "Falling Kick" attack, however for this blueprint logic, I want to use the "Land" animation of the FallingKick anim montage so that my character will land whenever they reach the ground.
You would need to name your Montage sections correctly in order to call them out correctly.

Hello everyone, by any chance does someone know how to 'start' and 'stop' the AnimBP on a character?
I have a death mechanic in place that when the character dies, they have a death animation and collapse to the ground. But when teleporting them to a different location (and what will later be my respawn mechanic), they are still motionless flat on the ground as I move them around the place.
I changed the animation to a montage, which again will play the death animation properly, but then my character immediately pops right back up like nothing happened (not unlike my anim montages for combat already in place).
Ideally I'd like to have my character lay dead on the ground until they are teleported to their spawn location, then have them get up and resume normal animations/actions.
Is there something I am doing wrong in my approach?
So I have this weird issue, or maybe I'm just doing something stupid.
I duplicated the idle animation that comes with the 3rd person template, added a few key frames so the player seems to be throwing something, it sucks but anyways.
The thing is that when I play that animation I created I get the idle one, as if I never edited it.
I'm sure I'm playing the right animation because a notify I added is executed.
Is there any explanation for this?
how do I seamlessly blend the beginning and end of an animation?
Actually, I need more detail from this question. This is too broad.
i have a flying animation that's looping but it snaps when the animation ends
If you made the animation yourself, you should duplicate the first frame keys to the very end.
It's a general rule of thumb when making looped game animations. First frame should be exactly the same pose as the last frame.
i did it for every other animations idk why it didn't occur to me that i needed to do it for this one too
Make sure it starts and ends on the same pose but don't export the last frame of the looping animation. Otherwise you have two identical frames in sequence when the animation loops.
Which can look like a hitch
Not always noticeable but good practice to not include it
The Montage approach can work. In its properties, make sure it doesn’t blend out, there’s a tick box to make a montage wait forever on its last frame, until manually stopped. Then on your event that kicks off the teleport, make sure you manually stop the montage, so everything will resume in the anim bp.
So for animations, Im using blender to key frame some FPS arms with some guns. Same arm skeletal mesh, but different guns.
From what I understand, the gun's bones get parented to the Arms' bones, and then keyframed. Then the animation is exported as two pieces back into unreal?
Is this a valid way to approach it?
I know this may be a bit more blender specific but I was curious if anyone in here knew anything about it. Ive been sorta beating my head against it all day
Does anyone have any good tutorials for learning Unreal Engine 4?
Unreal Engine
Unreal Online Learning is a free learning platform that offers hands-on video courses and guided learning paths.
Thx so much!
Hi all, on ponytails physics simulation. I’ve tried a simple physics simulated bone chain, which works quite well when the character is walking or running, has collisions, but doesn’t look natural (especially if the character isn’t walking or running). I also tried a trail controller in the anim BP, which gives a more natural motion, but it doesn’t support collisions, and doesn’t look great when the character is walking or running (tends to just float in the air behind the head). I was wondering, is anyone here aware of a different approach? Or a way to get the best of both?
Use Anim Dynamics or Kawaii Physics.
Kawaii physics looks A-MA-ZING. Thanks for the tip 🙏
Why is it that I have animations with the ue4 mannequin mesh and skeleton and it’s rigged to the mannequin and scaled to it and it doesn’t let me use the animation on the ue4 mannequin
Sounds like you need to retarget those animations. Search for retargeting animations in google, many tutorials explain how to do this.
i know how to retarget anims but that doesnt seem what i need to do
hold on
this is what someone told me to do
If they same skeleton structure, but 2 skeleton assets, replace one with another by selecting both and doing a replace reference
would it work?
and im not sure how to replace reference
Sounds risky but you can try….
Select both skeletons in the content browser, right click > assets actions > replace references. Then select which skeleton you want to be the main one. After you finished this, you need to right click on the redirectos, and select fix redirector (or something like this)
Or search for a tutorial online on how to do this, there are plenty
Anyone good with Control Rig?
When I apply my custom character model (same bones structure as the default UE4 mannequin) to the control rig the character stretches and distorts to fit the mannequins last position.
My Question:
How can I use a custom character (same skeleton) but not have the custom character stretch and squash / morph to the last skeleton used by the Control Rig?
How do you do the retargeting in Control Rig?
Also can you screenshot the issue?
Why my animation is so messed up?
It should look like this. I play the animation montage with ABP
welp u were right it didnt work and i am restarting m prject now
but when i get back to the part i needed help with can you maybe go into a vc and help?
no worries if u cant
@ashen junco How do we re-target a control rig? What Am I missing here?
Hello, a part of my object's animation doesn't play while I'm holding it with physics collision but it works with query, I need the object to have physics so how can I make that part play on physics collision ?
So I have this weird issue, or maybe I'm just doing something stupid.
I duplicated the idle animation that comes with the 3rd person template, added a few key frames so the player seems to be throwing something, it sucks but anyways.
The thing is that when I play that animation within the game I get the idle one, as if I never edited it.
I'm sure I'm playing the right animation because a notify I added is executed.
If  double click the animation file in the editor I can see the changes I made.
Any idea what is going on here?
I can only think it's a cache issue but I already deleted binaries and the issue persists
Hard to tell from here but check your animation bp and make sure it isn't layering something else on top of the animation that could affect it.
@shell vault - Awesome thank you, with a few tweaks around what you mentioned, its working very nicely now. 🙂
Got another fun one while I continue working through getting more things set up. I've finally gotten rid of the mannequin and am using a modular asset (which seems to be a torso, legs and head) as seperate pieces. I have the torso set as the main skeletal mesh (as their own examples use) and set the other two as skeletal mesh children. Now by the example, none of them are connected to a socket, but all share the same animation BP for running.
If I perform an action that isn't in the animBP (such as an attack animation), the torso does what it needs to do but the other pieces dont. Do I need to repeat the animation for the head and legs as well? [Admittedly it is pretty funny watching my torso fly off on the ground during a death animation]
Is there a better way to handle this on a modularized mannequin?
Hey uhm, i kinda have a trail problem here.
My Character can equip many different swords, and in my "SwordSlash" animation i'd like to start the trail.
But since i'm in need of the start/end socket name for the trail i'm not sure how to do it cuz the "SwordSlash" animation itself doesn't know about the equipped sword start/end sockets, any idea here ? 😅
How should i implement different weapon hold animations? One bad solution would be use a boolean to detect which weapon and then go to another state inside the animation BP. Should i solve this with looping montages?
Or maybe implement like 3 types, one for pistol like, one for AR like and idk maybe an in between and then use an enum for the type
@formal minnow This is likely one of the worst ways of doing stuff, but it seems to work for me, somehow

That's a bit like this way
Doesn't seem too bad to me
Same for me, but i'm also not really experienced with this kind of system.
So there might be a better way, but i don't know it yet 😄
yeah i'm not too familiar with the whole animation possibilities aswell
Looks like I figured it out - https://docs.unrealengine.com/4.26/en-US/AnimatingObjects/SkeletalMeshAnimation/WorkingwithModularCharacters/ for those interested. I blended all my pieces together to the primary torso piece - everything lines up very smoothly now
Describes the different methods you can use to create modular characters comprised of multiple Skeletal Meshes.
Hey-o! I could use some help. But first let me preface this with a disclaimer: I am im pretty inexperienced 3D as a whole. and UE is the first "game engine" i've ever tried working with.
But anyway. I have a few questions about making a Control rig. At this point i've already made a functioning Control rig for a character and have animated that character directly in UE. But I want to add "facial controls" to the character and, quite frankly, I don't know what I need in the Graph to connect my Viewport control manipulators, to the Morph sliders.
I want this:

to control these:

but don't know if its even possible
(or if there's a way to just have the Curve sliders accessible when im in sequencer without needing the control rig, that'd be cool too)
I suppose the questions are......What Nodes do I need in the graph, and how many do you THINK i'd need? And is it possible for one Control to affect multiple sliders at once?
My joints are fucked? The weights works in maya as well as when i move it in-engine, but not when i play animations?

What could be causeing this?
hey guys i created a new animation via additive layers
but it won't show up ingame
looks perfectly fine in previews so did i forget to do a final action
nvm got it
how to make Kinect legs have collision with Simulated arms within one SkeletonMesh?
it seems that Kinect legs donot have collision with Simulated arms within one SkeletonMesh
hey guys anyone know how to import proper facial animation maya to unreal
Is there any reason to use control rig in ue5 for IK? I am currently using Power IK, would I gain in performance or what's the difference between these two methods? Thanks!
No difference in the long run.
If anything, it's also achievable with Control Rig in UE4. It's just that UE5 provide less hacky solution for full body as opposed to traditional IK stuff in built-in UE4's Control Rig nodes.
So there is no difference between Power Ik and control rig?
Power IK is an extension to Control Rig

i think you can make a animation that moves it the ways u want then have it play that anim when the character moves forward, back, left, or right and stop playing it when they release the movement keys
i could be wrong though
You can use animdynamics, spring controllers, etc. https://docs.unrealengine.com/4.26/en-US/AnimatingObjects/SkeletalMeshAnimation/NodeReference/SkeletalControls/AnimDynamics/
Describes how AnimDynamics can be used to provide physically based secondary animation.
I need help, i try to use controller rotation pitch on my character pawn so that the first person camera rotates with it, the problem is the whole skeletal mesh rotates with it aswell... How to fix it? Thanks
This is also possible but requires more work and won't look as nice in many cases. Team Fortress 2 does this for the Medic's coat etc for instance. They simulated it in Maya and baked it into the animation itself.
Thanks babe
I sort of remember adding keyframes between frames in sequencer
Anyone know how to do this?
derp
got it
just took snap off
Question, when making a rig in Maya, if I name it "Hand_l" in Maya it will auto change to "Hand.l" in unreal? Also, should I put the root bone on the floor at 0,0,0 location as well? In blender you have to name the bones with a .l or .r depending on which side it's on. Never used maya to make a rig before so I just want to know
No, unreal keeps underscores
Yes, keep the root at 0,0,0
Just look to the Unreal Mannequin as a guide @thorn tendon
Anyone good with Control Rig?
I'd like to use the Spring/Dampening feature and have that motion drive procedurally from a parent that the control rig attached to, is that easy enough to do?
Anyone have any good resources for understanding animation montages alongside c++?
I am trying make a basic 1-2-3 combo system and 95% of tutorials are BP focused and then some link multiple animation montages together while others use one to represent a "combo" with notifiers - almost all are pretty poorly explained.
Intuitively it would seem like you would want one anim montage to represent a combo instead of 2 or three but I'm not sure. Open to an advice or learning resources.
Oh I see thanks
I have a working version of my system in BP
Im just trying to improve my c++ skills
and calling anim montages with all the variables associated is quite difficuly haha
Hi, does anyone know how to fix this? When I import my fbx skeletal mesh from Maya to UE and activate its blendshapes, some of them -picture- appear black. I tried importing the same model but as a static mesh obj and it worked fine. Any ideas? Thanks in advance!
Do unreal animations reflect any sort of bone transforms?
Hello, I and my team made some animations for my first-person game in Maya. then created blueprints for the weapon and attached them to the character but the animation when played keeps flying above the character
is there a way i can animate individual bones directly in the sequencer?
Sorry dumb question
if i had to use both root motion animations and upper body animations on the same character how would i do the anim graph
Look for animation slots.
Not individual bones, but you can use Control Rig to animate in-editor.
I guess it's super popular question.. so hi guys) how I can delete this ghost ex-bone from skelet asset?

Reimport the skeletal mesh with said bone removed in the FBX.
I'm looking to create a simple first person melee attack animation, does anyone know of a decent tutorial on maya (preferably) to unreal, to walk through all the basics, how should one set up the skeleton, import and state machine? Basically whole pipleline simplified.
I'm not even sure if I need to rig entire skeleton or only arms for fpv, what's the norm and why
how do i set that up?
Hello everybody. I wonder why I get a request, from the editor, to reassign a skeleton to the character, if the skeleton used is perfectly at its own original place!? I find this quite annoying. Why does that happen? Is that something we can prevent somehow? thanks
Until recently, creating character motion was the domain of expensive third party DCC apps. With the release of 4.26, Unreal Engine introduces further refinements to Control Rig: our suite of in editor rigging and animation tools. Whether you are authoring traditional style animation assets via keyframes or driving characters procedurally at run...
Do you have errors about hierarchy mismatch?
It shouldn't have any, as far as I know
were all characters and parts I didn't touch at all, so there shouldn't have been any modification on the original assets
Can you screenshot said error?
Ain't an actual error really, rather a simple request...

What I don't get is why is saying I need to create a new skeleton if the skeleton is already where it should be
Have you even assign the skeleton?
Right click -> Assign Skeleton (or something along that line)
I did, after I got that message. The assets should have been ready to go.
Dunno if this has anything to do with the fact I moved the whole projects folder to another drive. I moved everything perfectly as it was.
Can I do 2 bone look at on the same Anim BP? the order doesn't matter right? (trying to get his hand to move up like his head is looking up, will probably have to offset the look at vector)


There's probably a sweet spot but I'm not seeing a change right now - the "look at" node functions similiar to the blueprint one in that it finds the correct rotation based on the relative location and sets the selected bone to that?
Ideas?
this one I"ve always had poor results using IK
seems just targeting the upper arm and using a smaller alpha gets the effect
@misty dagger is there anyway to rotate the bone on just one axis?

see how it's rotated out the wrong direction
so close

and yet so far lol

I'd love to know if there is a magical "stop this arm from twisting so GD much"
Don't worry, I didn't learn either

So I've got an issue where morph targets don't import from Blender, I've triple checked all my export settings and my UE settings, I don't know why they aren't importing, anyone have a clue?


apparently it was the skeleton mesh regeneration bugging out nvm
apparently I can't export subdivision surface and shape keys at the same time? that's stupid
I have an issue with skeletal mesh not playing whole animation when simulating physics, What are my options to solve this? I tried physical animation component but either my implementation is wrong or it doesn't work for my use case, thanks
nvm solved it
I imported a character from the marketplace into an existing project which is based on the Epic mannequin. The character is rigged to the Epic skeleton. However, the weapon my character uses now is in the wrong position. Where is the problem if my character is in fact rigged to the Epic skeleton and the gun looks right with the original mannequin? Thanks in advance for any help!
Would a head "look at" control be better built in AnimBP or Control Rig? My understanding is that Control Rig is lighter?
Is there any command to automatically apply symmetry in a skeleton after editing, for example, the right leg bones like in my case?
What I'm trying to do is to make a boss version of a creature so I'm editing the skeleton to change his proportions.
You're talking about modifying the bones in UE4 not your DCC?
basically yes
I guess you could create a function and do it the way it would be done usually in Maya, with prefix/suffixs
Replace Left with Right and apply Left's transform to right for example
Can anyone help me understand the difference between forward/backward solve in control rig?
I'm afraid that goes beyond my skills. I'm just used to Cinema 4D where I can simply work in symmetry in real time
Maybe I misunderstood sorry
How bout
Export the skeleton to C4D
Change it to your new proportions, export it as a single frame of animation
And add that pose on top of the base pose
Then all the animations should hopefully work
The trouble I have here is that when modifying an axis all axis get modified.
I know, it would be the first time I do it so I was just concerned about messing things up
When re-targeting skeletons I was curious if someone could help me identify which is the better route.
I have humanoid character and an animation pack that are both modeled after the mannequin, that said they use their own skeleton even if its very similar.
Is it better practice to merge the skeleton of the character to the animations or the animations to the skeleton of the character?
I managed to make it symmetrical enough and I only going to need to verify how the animations perform after these changes but, dunno why, the skeleton has been reset as the original despite I've refreshed and saved it several times. This is so annoying...
You probably just have to move the gun bone around depending on how different the character is from Manny.
Alright, I will do that, thank you @regal orchid
I have a camera that follows a spline. The player can press a key to poses the camera and follow it around the spline. The camera completes a circuit which has been set up in a blueprint with an animation.
Is there a way to assign keyframes for camera shake for various points as the camera travels the spline whenever the player poseses the camera?
Ok, so I exported both animations for a melee weapon and a set of hands. Does the melee weapon need to move independently in its own animation or does it just need to snap to the weapon socket
does the camera follow the circuit with a timeline? if so you can add an event track to that timeline, and shoot camera shakes from them
Anyone here worked with the Frank Climax animations?
Marketplace asset specific questions should be filed under its respective support channel.
gotcha, was just curious what people thought of the animations
That's completely unnecessary and too subjective. 
Anyone familiar with rigging in here? I have this homer model I need rigged to the epic skeleton. $500 for anyone who can do it, contact@reubs.io

posting here because job channel isnt working for me
Like lorash said you should take a look at the instructions channel. But either way step one would be to make it so the mesh's bind pose matches that of Manny. Your Homer model is in a T pose while the most common modern standard is the A pose.
Actually the T-pose isn't really necessary to iron out.
My models are in T-pose and the only problem is proportions compared to the tall and beefy Manny, because the main characters are female, which are shorter and slimmer.
Can I not add two virtual bones to the same root bone?
Actually, I can add two to pelvis but only one to root somehow

I assume you modified the retarget pose in-engine or something then?
That, and some Control Rig hack that I'm still developing and testing.
Ah alright
I saw there was a female mode in the Control Rig demo nodes, was that useful at all?
It was long before Miss Manny become canon.
And she's still taller than my character anyway (159 cm vs 180 cm)
But where's Non-Binary mannequin? Theyaquin
I'm calling the stop sign right there.
🛑
sorry :X
Hello, few days ago i asked this but im not sure if im in the right path, what i want to do is to modify an animation aising the arm vertically, someone said to work with the character rig to achieve that, may you guys confirm this? thanks in advance

If its not possible without max or maya to create a new animation that would be enough for me to keep moving forward
It's definitely possible with Control Rig but I'm still so new to it that I can't be of much help
Ok, will do, thx @misty dagger
Guys, after many hours I was able to rig my character to work with the default control rig setup logic. The last issue is that when I plug everything, the twist bones instantly are set to this weird positions, any ideas on how to fix this?

I'm exporting with 'send to unreal' plugin by epic, so I don't believe that's the issue. Also, the rig only gets deformed after I plug in control rig's logic that uses the twist bones.
I believe the issue relies within initial bone setup within control rig, but I can't find any information on how to edit that
I'm ignoring Send To Unreal entirely due to how it's required to separate meshes from the armature, which can get quite messy in the outliner for multiple/modular characters.
Hmm I see, I've tried with FBX export before, I'll give it another go and report back soon, thanks!
Heyya people, it's the first time I'm working with controls in Maya for my rig and them importing it into Unreal engine. When I do I keep getting the following errors:
https://i.imgur.com/ZX9GyUg.png
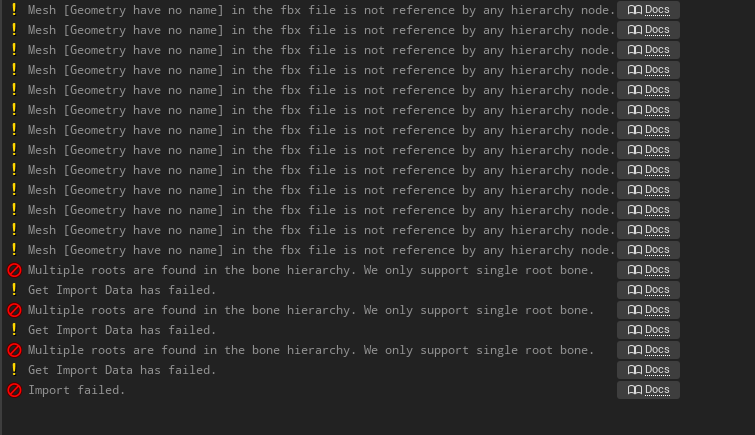
It's probably because Im using Curve controls for this one.

Is my hierarchy dogshit or something? Did I set up my controllers wrong?
Anyone?
Yeah, didn't work guys
Is that what you guys call her? The moment she was added I decided to call her Mandy. 😛
Manny and Mandy, the ultimate gamedev placeholder duo
Try making new Control Rig system from scratch using your model.
Doesn't have to be complete for testing purposes, just test on single basic IK node on one leg.
Great idea, I'll try it after lunch, thanks
Got the exactly same results, as soon as I get the control, the twist bones deform everything.
Anyone knows if there is a correct bone rotation needed in blender for the twist bones to work?

Works in my test run.

can you share your blender file please?
I can't, it's under NDA. Sorry.
ah sure, np, I'll show you mine and maybe you can tell me if there's something wrong with the bones?
Alright, sure. Just post it here.
just a sec, I have to roll back some changes
here you go
I'm sorry if something looks stupid, it's my first rig
hi, could someone tell me how I can change the animations of this skeleton

to this other skeleton

@somber knoll did you try to retarget? you could probably get away with dropping one of the limbs
i'm new to this, but ive been doing retargetting stuff also, found this video useful: https://www.youtube.com/watch?v=Io76DagpS-8

This video was voted for Patrons and YouTube Members. For those who voted, thank you!
Learn how to use the retargeting manager to copy the animations of one skeleton to another one. A common use for this is in conjunction with Mixamo assets. Learn how to retarget a Mixamo asset to the UE4 skeleton.
Support me on Patreon and get access to video...
Thanks for the help I don't understand so much what you tell me because I don't know English but, thanks for really helping me :3
np!
Can anyone help with this? I have the UE skeleton in Blender and im trying to scale the armature to match the mesh. A pose to T pose, shifting the legs a bit, etc.... Is there an easy method to preserve these changes for the base pose of the UE skeleton in UE before retargeting?
Create pose asset of the T-pose.
Does this work for any changes such as scaling and translation or just rotation?
it seems like if i can save all of my changes to use as the base pose, then retargetting shouldn't be necessary
Oh, that was used for retargetting BTW
?
sorry, do you mean i can use pose asset for the target in the retarget?
Yes, that's what I meant.
oh interesting, so i can leave the ue skeleton in A pose?
Yes, but can use the pose asset as the base for retargeting.
cool, thanks so much, ill give it a try
@ashen junco did you have a chance to check my blender file?
It's night time so can't check on it right now.
oh okay, thanks anyway!

Anyone know what kind of variable the Item is?
I am trying to follow the webinar they did and can't find that... sadly control rig doesn't let you drag off pins to create variables
Argh it was literally just called item, sorry 😦
isnt that deprecated in later versions?
I never plugged anything into item and "It just works"
@ashen junco Hey thanks got it working, but had to do two retargets, would have never figured it out without your help
Are skeletal meshes more expensive than static meshes even if they don't have any animation active or their bones aren't linked to vertices?
hi guys, how can I make the spider do a dying animation without it being knocked out by putting destroy actor

So I just realized (a-doy, I am a slow sometimes) like seriously only just grokked that it's way, way, WAY faster to rig in UE than in most DCC.
I'm going to feel like an utter and abject schlub for about, oooh, twenty-seven seconds or so. Then I'm going to start laughing diabolically, and might stop next Wednesday.
What a time to be alive.
Not sure if this is an easy fix, but if my character walks directly backwards their direction flickers between -180 and 180 which causes some weird jumpiness in the animation. Is there something I can do to smooth this out?

The points on the graph are (top row) run back, run left, forward left, forward, forward right, right, back. Bottom row are all the idle animation

Interpolation on the direction axis seems to have been the issue, setting it to 0 fixed the jitter for me
Hey folks. Quick question. Working with the new control rig system. Is there a good way to import Maya effectors/controls as controls in UE4/5?
anyone deal with this issue using the full body ik?

Hello guys, any idea as to why "bake to control rig" is empty here? (I do have a control rig for this character)

Why is my bones on my mesh always goddamn roatated when importing to UE4? How to fix it?


WTF is this? ALWAYS
sorry but it's goddamn annoying like why does it even rotate????
Is it blenders or unreals fault?
It's Blender's fault.
At least by default.
only forward for now
What are those retarded settings sorry they make no sense???? How do you even come up with those, the developer behind that export feature deserves to step on lego.
Chill out.
Im super chill bro
yes thanks ! My animator is on it 🙂
any documentation on backward solving @misty dagger
thanks

I'm really annoyed that using a single AND gate uses BP and creates warnings
To what extent should I be preprocessing my data to make this work fast?

Has anyone ever encountered an issue with bones "locking up" when rotating them? I'm rotating a bone according to my control rotation (which is tied to vertical mouse movement), but it often gets stuck and stops rotating. I've tried rotating the bone both via the animgraph with transform bone and via control rig, but it doesn't seem to matter. I have used accumulated time as a value inside CR as well to rule out that it was my rotation value being at fault, but the bone still locked up and refused to keep rotating at random. Weirder still it seems to happen more on some maps than others (even though at this stage they're just flat planes with a few blockout meshes), and it is much more frequent when looking up instead of down.
I also just noticed something else, it seems to ONLY happen in animations where no part of the mesh (or bone) is visible, as soon as I make a pose where the hand is in view of the camera, this behavior stops. Is there some sort of culling going on that I can disable? I can still see the mesh's shadow on the ground no problem however, and it has no issue transitioning to a different pose (where the arms are visible), even once the bone has locked up (which does result in it unlocking and moving again)
Spent 2 days trying to find the issue only to find it within 5 minutes of posting here but I've found the problem, that last option is by default (or was for me at least) set to always tick, but needs to be set to always tick and refresh bones, I'm guessing UE4 optimises away some stuff when the mesh isnt visible and my bone rotation was one of them. Leaving this here in case someone stumbles upon the same issue in the future

Hey fellas, looking for a little help.
I’m interested in making… a centaur. I have a pbr horse model + animations, and I’d like to use a paragon character as the human portion.
How would you glue them together?
That's more of a modeling question. You would need to merge them in a DCC and then also merge their skeletons.
merging animations would also need a lot more work since two skeletons need to be merged and have partial animations
hiya, I have an animation in an anim BP, I want to control the animation with a variable 0-1 that says that if the variable is 0, the animation is at the first frame, if 0.5 it's on the middle frame, if 1 it's on the last frame (but the variable changes continuously), how can I achieve this?
Is the animation just three static poses? If so you are better off just having three separate animation sequence files. But if you just want it to start playing at a different point there is a parameter for that, at least for montages you can easily set where in the animation it should start playing.
no it's a worm that bends. I want a variable to adjust how much it is bent. The animation is an entire bend from straight to very bent.
And the variable will continuously change.
you could use a blendspace for something like that
yes you are right I forgot about that.
Thanks, shoog. That’s basically where my mind went, wasn’t sure if there’d be a simpler workaround like making an invisible material for the top/bottom half of each then combining them in a bp and using curves to mute animations in the invisible zone.
hi i am trying to set up my character so when its idle, it is using the normal idle state but when i hold the right mouse button he enters an aiming mode ( using an aiming idle animation) and the same for when running. I am getting there with my blueprints i think but something isnt right. can someone help?
Anyone here experienced or at least has used rokoko suit for a render in unreal?
Was wondering how long it takes for a small cinematic the likes of something like the bathroom scene or intro classroom scene in Life is Strange?
IE just a couple minutes of 2-3 interacting actors?
Wondering if anybody could help, I have created an animation for a weapon inside the engine itself, The animation plays when previewing it on the skeletal mesh so I know the animation is working https://gyazo.com/a321623c496f1713054d1304ef04ecc2. But I am unable to get the animation to play in game no matter what I try, I have tried using just play animation nodes and also tried using an animation BP but the anim will just not play no matter what https://gyazo.com/66ec7d6e2a41801c711fe5bbc4fad575 any ideas where I am going wrong ?

I'd animate this by hand. though depending on the style, mocap can took about 20 minutes for shooting session, followed up by few hours of tweaking, retargeting, and clean-up.
I created another animation inside blender and imported that one. The animation from blender now works fine https://gyazo.com/6451fc33f307103df84e624faa8c9321, seems there is some issue with the animation that was created inside the engine.
Your question is too vague for us to help you properly. But you would most likely need a combination of state machines and layered blending in order to get what you want.
How to find out at what speed the animation was created for?
thanks for the reply @regal orchid i currently have 2 different blend spaces within my AnimBlueprint for my character. They are switched between each other when my variable of Aiming is true or false. I can manually change the variable to true or false and it DOES change properly but i cannot workout how to link a button press to change the variable. If that makes sense. Thankyou
blend poses by bool or something perhaps?
I currently have one of those yes, and when i toggle the Aiming variable it does correctly switch between the two. is there a way of adding the toggle of the varibable to a button press for example

you would just have to set the variable to try when you press a button using an input node
and then read the variable from your character
Any idea on how to setup the backward solver on a control rig? can't find any documentation

can figure out what nodes to get this walkright animations to work correctly
its for the strafing
The two characters used a 2.79 rig since 2.8 wasn't out at the time or was in beta and I want to rig future characters using the latest blender. As I am doing a game cutscene. All 5 character will interact with each other and have speaking roles. The Final cutscene will be in Unreal Engine. Control Rig was really usable only on Unreal engine 4.26+ and I am on 4.22. The problem is I can't bring rigged models from 2.79 to 2.9x. I do got auto rig pro for blender.
Where would I set the input node, within the animation blueprint or on the character blueprint etc. Thanks
character bp, you should take a look at some of the blueprint basics to get started if you haven't already. (You can also do it in c++ but that is up to you)
Thanks will take a look and get back to you. I have followed alot of tutorials and gotten a basic understanding of blueprint but for some reason this one is throwing me. Brb
Can you also bring camera movement from Blender to Unreal Engine ?
@regal orchid i think im getting somewhere here but it is still not activating the variable when i use the input.

You can either read the variable from inside your animation blueprint or you can send it over via an interface or similar.
Access your character via the animation blueprint and then read the variable and store it inside the animation blueprint. That is probably the simplest way.
Make sure to cast the character to the correct object. (Your specific character BP and not just the base character provided by unreal)
so the Get Player Character is not correct? let me check
It is, but you have to cast it. Like you did in that screenshot. But you need to do that inside your animation blueprint.
You can use "try get pawn owner" inside the animation blueprint instead.
To make sure you get the correct character
Here I just cast it to character but you would cast it to whatever you need and from there on you can access your bool inside the animation blueprint.

okay let me take a look, thanks for going to all this to teach me ha, i feel like i should know this
No problem. I would suggest looking up the official documentation on animation blueprints and whatnot. Lots of articles, and videos on youtube.
i have got it set up just like yours but instead of cast to character i have it cast to ThirdPersonCharacter as this is where i have all my key binding things. still not working,
Assuming you set it up correctly then all you have to do is read the variable you made in your character and feed it into your blend poses by bool node.
i am able to call the IsAiming? variable in my ThirdPersonCharacter which is great, i just cant seem to find the correct object reference for it

You're supposed to read the character from inside the animation blueprint
That way you can access the variable
I'm heading off to sleep now. But just make sure you are reading your bool off of the character from within the animation blueprint. That's all there is to it.
thanks for your help. i seem to be missing something simple and i apologise. Heres hoping i get it soon 🙂
No worries. Just take a break from it and look at some tutorials to get familiar with the basics. Best thing you can do right now I think. Good luck!
i know hes gone to bed now but just to say ive sorted it 🙂
guys i have a problem with a bone that just keeps falling inside the body
anyone know what causes that it's just strange
generated with and without constraints same thing occurs
ya looks as though the initial bone transform is wrong
inverted something like that
Hi, I'm relatively new to UE, I need some help.
I have a character who has head and body separated in two .fbx files.
The head is sharing some of the same joints on the body.
I have two animation files, one for the body, and one for the facial expressions.
I want to:
use the body animation for the body mesh AND the head mesh (the shared joints), and the facial animation for the head mesh.
I have tried to parent the head with the body in the Outliner, but I can only parent ONE joint, not all the shared ones.
Any help would be greatly appreciated
Here's a picture of my joints. The green ones are shared between the two .fbx files.

Hey! Nice to hear. 👍
Anyone have Movement animset pro pack and is it good for a beginner (not complicated) ?
I haven't used that exact pack but if it is just a collection of animations. Then it is more up to you how you chain them together using animation blueprints and whatnot.
:triangular_flag_on_post: mdrena#3736 received strike 1. As a result, they were muted for 10 minutes.
Hey, i've asked this already in #cpp, but i feel like i have a better chance in here.
I'm currently playing with the animation length.
So if the player doesn't have enough stamina for a sword swing the animation should play at max 50% slower.
My problem here is the AnimNotify which is used on the animation.
It tells if the player should do the melee trace or not. But if i'm playing the animation 50% slower than normal it will have a much longer melee trace time which leads to some weird gameplay.
Any idea how to avoid it ? 😅
How can I achieve the effect of the gun following camera with a little delayed in games like Resident Evil 7? For example, when I turn right, the gun tilts slightly to the left.
Hey, does anyone know if it's possible to animate virtual bones using the control rig?
I want to make an animation using the control rig but I need an additional bone, I want to use a virtual bone instead of exporting and changing the skeleton in maya or blender
ugh.. so I have modular skeletal mesh for my AI character. Skeleton has sockets to which weapon (static mesh component) is attached on anim notifies. I did that C++ stuff from Epic's docs to merge skeletal meshes into one before runtime. Works like a charm, except in shipping build the weapon is gone (in PIE everything works as expected). Any idea why it would happen with static mesh component that isn't even part of the master pose ?
like the merge strips sockets or something
hi all
I have a skeletal mesh of a snake, bought on the marketplace, and made up of many bones, I'd like to animate them following a path ..
Do you have any tips or a good tutorial to recommend?
like a train on a rail.. is it possible?
@spring kestrel probably not exactly what you want but take a look at how they did it https://www.youtube.com/watch?v=YRADRX8fYNo

Snake characters are tricky to set up for video games. Snakes have multiple contact points with the ground, so simply blending between an idle and a locomotion animation will look glitchy and result in a lot of sliding. In this video I present an alternative solution. This video demonstrates how I animated and set up our snake character for the ...
Please help, I have one fbx file with the body animation, and one with the face animation (same skeleton). I want to play both animations at the same time, but I can only assign one animation asset at the time. How can I play both?
Its not a playable character it's just a model with an animation
Make the face/head a separate skeletal mesh, but still using the same skeleton as the body.
sorry can you be more specific?
the head animation is part of the body animation, just the facial is separate
if I split and use the facial animation on the head, the head won't move anymore, only the face, because the neck/head movement are part of the body animation
Use either Set Master Pose Component node or in the head's anim BP, use Copy Pose From Mesh node. It's used to match up the pose from another skeleton if the bone name matches.
It's basically the same as making modular characters.
I don't have an animation blueprint, its not a playable character I just want to apply a loop animation to a model
You can create an anim BP containing that node, just for the head mesh, and apply the anim montage on the body.
Don't get too rigid about it.
can you assist me? I have no idea how to do this.
so, first I create an animation BP. its asking me to select a bunch of stuff, like Parent Class e target skeleton. I assume the skeleton is my character skeleton, but whats parent class?
That's if you want the animBP to be inherited from another anim BP
so I don't select anything there
ok so this is what I have now

do I create a Copy Pose From Mesh node?
Yes, and then make it copy the parent in the node's properties.
like this?

clearly something is wrong 😩

ugh.. so I have modular skeletal mesh for my AI character. Skeleton has sockets to which weapon (static mesh component) is attached on anim notifies. I did that C++ stuff from Epic's docs to merge skeletal meshes into one before runtime. Works like a charm, except in shipping build the weapon is gone (in PIE everything works as expected). Any idea why it would happen with static mesh component that isn't even part of the master pose ?
like the skel mesh merge strips sockets or something
@ashen junco I give up, I spent 2 hours on this, I can't get it to work. Using Copy Pose From Mesh just overwrites the face animation with the body animation, and I get no facial motion. I don't know what I'm doing wrong, I can't find tutorials that do what I need, every tutorial is basically just modular characters, but that's not what I want. I just want to apply the facial animation, but maintain the head animation from the body. It shouldn't be so difficult, yet I can't figure it out.
Is it possible to edit an animation in the control rig
Until recently, creating character motion was the domain of expensive third party DCC apps. With the release of 4.26, Unreal Engine introduces further refinements to Control Rig: our suite of in editor rigging and animation tools. Whether you are authoring traditional style animation assets via keyframes or driving characters procedurally at run...
thanks
@ashen junco https://youtu.be/y2WzNvJZk0E?t=1276
I did like here but animation is not playing
Until recently, creating character motion was the domain of expensive third party DCC apps. With the release of 4.26, Unreal Engine introduces further refinements to Control Rig: our suite of in editor rigging and animation tools. Whether you are authoring traditional style animation assets via keyframes or driving characters procedurally at run...

Hi everyone! I have a quick question because I'd like to know if I'm over complicating a problem I have. I have 3 types of animations. Full body, upper body and lower body. Is there a way to preserve a lower body position from a recently finished full body animation while an upper body animation is playing?
So far I'm playing a lower body animation with 0 rate that has this exact position I want but I was wondering if there was a way for an animation montage to not return to the default position while playing.
Basically when my full body does a step forward I want that step to actually be made and for the character to stand with that leg forward from now on
I only use montages for one off animations, for things that last longer I tend to use state machines. And if you want the character to stay a certain way indefinitely until something changes it then you probably also want a state machine. But it is hard to tell without seeing the full setup.
But how do I trigger a state machine change with for example an attack montage? You mean sort of a battle stance state machine?
Where if I perform an attack, I change some data and the basic animation switches?
Basically yes. You can use animation notifies to trigger any logic you want elsewhere in the animation blueprint.
I'm a programmer so I don't know much about setting up animations but I want to get better 😄 That's why I'm asking
So at frame X in the attack montage, the state machine changes
All good. I would suggest taking a look at the basic functionality of the animation blueprint, specifically the animation graph. How state machines work and how they can be controlled.
And animation notifies
I know the basics but all the advanced stuff is still new for me
Setting up IKs, the flow of cached poses and blending per-bone, that kind of stuff
Ah well, like I mentioned you can use animation notifies and whatnot to trigger logic.
That could work for you potentially
State machines don't use root motion animations, right?
That would kill it for me because I need root motion in there.
Never had to use root motion animations myself but to my knowledge root motion is baked into the animation itself.
Doesnt matter whether it is played via a montage or not
I saw somewhere an option that said "Root motion from Montages only"
So I guess there is a switch somewhere
https://docs.unrealengine.com/4.26/en-US/AnimatingObjects/SkeletalMeshAnimation/RootMotion/ take a look here
A look at how root-based animation is handled within Unreal Engine 4
they mention that a bit further down
Okay thanks mate 😄 That will help a lot
hey can anybody help me with this

Are you using IKs?
i tried
should i make a socket in ik bones and then attach gun
sorry actually i am new i dont know much about bones
The IK Effector is basically where your bone is going to try to get to
So you want your wrist to go in the spot where it makes your hand look like it's holding the right place
So yes, you can put a socket on the weapon, and get that location, pass it to your character's AnimBP and set the location of the effector
can u plz eloborate bcz i tried to do it i saw a tutorial in which we have to add a socket in wepan and connect our hand but that is not working
I think it's a bit too complicated to explain via text, probably easier to use tutorials to be honest
But... here's a quick try

- Add a skeletal mesh component for your gun in your character blueprint
- Add a socket for where you want your hand to go on the Gun's blueprint "HandSocket"
- Attach the gun to your character's "Item Socket" (there is one already on the ue4 mannequin)
- In your character's Anim BP, cast to the Character BP to get the location of the "HandSocket" from the gun, and put that location into your IK effector
Hard to read it but it looks similar, yeah
what's the issue you're having now? the wrist is twisted and it's not quite in the right spot?
yes i have done this only i take a sekleton mesh and character and add sockets locations
yes i want the wrist to attach to gun
i tried to make the hand l to that place but when i play it goes back to thet position again
I'll DM you
yeah i got it
This is why I hate Electric Nodes so much.
what is the fault of electronic nodes in this
I use it too, but I use the "manhattan" setting. Either way it is way cleaner than regular blueprint spaghetti to the point where I can't go back to using blueprints without it.
but the point is not electronic nodes
that too
I am still wondering if anyone who tried https://docs.unrealengine.com/4.26/en-US/AnimatingObjects/SkeletalMeshAnimation/WorkingwithModularCharacters/ figured out sockets stripping issue.
Describes the different methods you can use to create modular characters comprised of multiple Skeletal Meshes.
So I can pipe models and animations into Unreal with a blender addon. For guns, can I just have the skeleton mesh for the gun as a seperate component from the hands in the player BP moved to fit the hands and having the gun playing its own animations?

not bad I must say - stable 72 fps and no dropped frames
there is a moment when 2 NPCs charge toward player and then attack. Anims look like they are kinda in sync. Is there a way to avoid that ?
Does anyone know why I cant save my morph target values in the animation curve? Everytime I change their value they go back to the original position
More of an AI question in this case I think. Add some variation to how quickly they react to he player, that way they will be naturally out of sync with each other to some degree.
thanks
Can someone explain to me why its lagging like this? i just animated this character now it rubber bands every step
Did you accidentally move the root of the character while animating it?
Well double check to make sure that the character runs in place for starters.
It only shows the idle animation won’t show the others
Open the animation that you are using while recording that clip. Also move the camera out temporarily so you can see what the mesh is doing. Alternatively set the animation blueprint to preview the ingame character.
How to export a mannequin from unreal 4 to blender.
Why won't my blended pose override the base pose completely with a weight of 1 ? I have it set so that the upper body animation overrides the whole body one, but upper body still jumps because of the lower body animation
Any idea as to why my control rig inside the control rig is perfect and when dropped in a sequence it's messed up?
@nimble sonnet Hei. i made it to this channelö!
nice!
yeah from our discussion in #cpp i think there are some animation features which will do what you want
Ill try to put enum into char class, I am receiving input there. This I am doing in c++
then I will get that enum state in anim class
and that will change state
in blueprint
thing is
ok ill just try
ultimately the goal is to have your animation blueprint read off data from the character it's on, and use that data to animate itself. For most cases you shouldn't make the character aware or dependent on the animation blueprint
animation blueprint knows about character, character does not know about animation blueprint
@nimble sonnet Hei I got one more question about that animation. I didnt get chance to try yet but I wondering if I press button on characther and put it in "Attacking" then animation class puts itself to "Attacking", how / when do I change charatcer out of "Attacking" ? Lets say I wont press anything else after that, charatcer stays "Attacking" and once animation finishes playing attack it reads char is still attacking and stays in Attacking ?
@nimble sonnet dont I need to manually come out "Attacking" for characther if animation class is copying states from there ?
I think this is where my glitches come from
Well this is confusing AF
anyone use aimoffsets for ADS ?
how do you transition between hip and ADS without redoing all the states ?
Got a question about the Transition Rule's.
Usually i'm doing something like this here to "end" this animation state

But now i've found this here which seems to work pretty good
Should i just always use it when i'd anyways do this simple logic as above, or are there some downsides ?
I think for best results you just redo them for each pose. But you could try to do some additive pose work to avoid that
Not sure whats the difference between connecting the animation state machine directly to the output pose, or having it cached, anyone knows?
Other than just accessing it as a variable
so it's like a "promote to variable" way of working with it?


From what i've learned now; Caching the pose allows you to be way more flexible through your whole animationBP since you can get the cached pose at every place, basically. While you only have 1 point where you have access to it if you don't cache it
and by "cached pose" you mean whats your current pose?
Don't think it has to be the current pose since you can cache many many different states
But yeah, it could also be the current pose, as in your default state which contains the running, jumping ect.
I think the variable comparison is a good one... it stores your pose at that node, so that you can call upon the unmodified pose later in the graph
I'm mostly using it for masking areas of the body
Usually it's just the one you have selected, no?
I'm just starting to learn anim montages, they seem to do something similar to what blendspaces do, right?
Yes
You can use them to play animations from Blueprint on all or part of the body
You can also do some interactive editing with them (example from youtube is loading X number of bullets into a revolver)
[Control Rig] Is their a way to do a select ? instead of branching ?

So awhile ago I watched a tutorial that showed how to set up the AnimBP so that you could split animations between bones, IE you could play a reload animation on your upper half while still running on the lower half. Does anyone happen to remember what this is called? Can't remember the name for it.
this is called layered blend per bone

the -1 there is like a negation filter, so that the blended anim (upper body) stops affecting all bones at thigh and below
Yes there's a select node I'm pretty sure!
I used a minimize or maximize
I didn’t know how to use the select
Different than bp select
I think you just drag off the type you want it to end up
Control rig is a little weird for sure
Montage seems to not play on my character, even though I see no errors, and even the result shows a valid lenght, any ideas what I could look into?
This executes just fine:

and duration is 2.26 seconds
it just doesn't animate at all visually
I tried using Play Montage, and specifying the mesh, same result.
I've read something about "slots" that need to be connected or something like that, not sure if that's the reason, or how they work
well, if anyone knows ping me if you can.
Hi! I vaguely remember importing skeletal meshes from blender to UE4 being a nightmare. Anyone able to tell me if I need to combine all the meshes first, or can I keep objects separated as long as they're parented to the armature?
Has anyone ever had their character's pelvis be locked in place after downloading from Mixamo and importing the FBX into UE4? I have been working at this forever and cannot seem to figure out how to fix this. It's driving me nuts
I have set the retargeting on the pelvis to Animation and the rest to skeleton. Still nothing. Got the pose lined up correctly, automapped etc... Dunno what to do
Look into the pipeline add on for blender
Anyone have any input for animation montages vs animation state machines?
I am once again asking for some help. Not even sure if i'm using the right nodes here.
I have this a string trying to get my character to blink, but its not working. What am I doing wrong?

I know this is the right "curve"

I suggest you rename the morph target names to easier to read ones first. VRoid's stock names can be confusing to program with.
Though that aside, actually let me check my CR real quick
@indigo dirge Try setting up this way

Divide is optional; The negate note apply the reverse direction.
Alright, I'll give it a whirl (thanks for the earlier advice about changing the names btw)
out of curiosity, where is the second [negated] clamp connecting to?
no matter, Control Float didn't seem to work. And im getting a headache from things not working
quick question: is their a way to access a Control Rig variable trough the sequencer?

This above doesnt seem to work
That's odd. Does other controls work?
Not as of 4.26, but you can work around this by creating a "ghostly" control that is animatable but isn't directly controlling any bone.
Spoiler: ||It's what the official Control Rig samples do.||
I know how to apply the bone filter with the control rig

I could not get any Face control to affect a morph, elsewhere in the rig I was able to use a slider to control fingers (Distribute rotation) but none of the “curve” controls show’d any change within control rig.
the curves DO work in the Sk mesh, and SKEL_ windows though
[Control Rig]How do you make the weapon's magazine Rig follow the character's hand Rig and bake the animation?I saw someone do control mapping for the Control Rig Component in Actor, but using Actor with Control Rig in Sequence doesn't bake the animation correctly.
@indigo dirge It is difficult to explain, since i only did it once a while back, but you need to look towards Slots, if you are having trouble getting a Layered animation montage to play all the parts. I may have misunderstood what you are doing.
In a montage that contains combo moves etc etc, is there any drawback to making one massive montage containing several combo types in one single montage vs several montages ?
example;
light + heavy attack
vs
light + light attack
these would be different combos..
If you're using VRoid, I highly recommend process it in Blender first. Make sure the body, face, and hair mesh are exported as separate skelmeshes. Then you apply body control rig on the body skelmesh, and apply the facial control rig on the face skelmesh. Once that's done, make the face and hair skelmeshes copy the parent pose, which is going to be the body, and make an anim post process BP containing Anim Dynamics or Kawaii Physics nodes to drive the physics bones.
When my character fires a gun, i need it to do a little fire animation like pulling back his arms a little bc of the force. But, when the character is crouching or aiming, it is holding the gun in a different position, so then it needs a different fire animation for each crouching, crouching and aiming, normal standing, and aiming while standing animation. There is probably a better way to do this, but idk what it is. I'm sort of looking for an animation (for example: pulling back the arms a little), that executes relative to the current pose. So if my arm is at x: 0 y 0 z 0 and i do the fire animation it should go to x 0 y -10 z 0, and when i execute the animation in x 50 y 50 z 50 it should move to x 50 y 40 z 50 . Unless there is a different approach that also works
this is what i mean with the fact that i need different animations for different positions: if i play the fire animation while aiming, it will go back to the normal fire position and then fire the gun
Should i use procedural animation for this (changing the bones through code)?
i cant find a lot about procedural in ue4, anyone got a good link?
You could just translate right hand around with IK relative to where it currently is. So it shakes regardless of where it is currently positioned, aiming down sights or otherwise.
[CTRL RIG] So I'm putting override into my Ctrl rig, a bool that can say "I want to animate only my left arm.. or legs or head" . Problem is with the head if I disable the root (recursive from to root to Neck), my eyebrows/ jaw are fucked up.. what are you doing to do this? An external gizmo not attached to the mesh?
Hi!, Is there a way to blend an Animation Montage with a AnimGraph or something not sure if im asking the right question as Animation and stuff is still a bit confusing for me.
I would like the character to run and still be able to attack or just stop and swing the sword but the animation of his legs looks kinda weird when attacking.
You can use layered blend per bone nodes with slot animations as well.
Jesus, I finally figured it out, I had to select the slot for the animation in the slot manager for both states and montages could blend.
For a while now, I've been trying to get a control rig to properly work on my character, however her arms and legs get warped and distorted. I've tried following along the sample Control Rig Mannequin project but that didn't work either.
I don't know if my issue is with the control rig or with her model.
@regal orchid Thanks! i,ll look into that!
Check the joint orientations of your custom mesh. Chances are they are not the same as Manny's joints. Find out which of the three axes is the primary and secondary ones for joint rotations.
Once you know you can override them in the IK nodes that you appear to be using.
That's true, it's highly possible that the primary and secondary aren't the same, I'll take a look! Thanks!
These joints orientations things are set up in the 3D modeling software or inside UE?
Normally they're set up in the 3D modeling program, I don't think you can set them up in UE
hey guys animating a face in maya but only rotational movements seem to import
not translation
am i missing an option
ignore me i got it
retarget options on the mannequin
hello all, im trying to export my character's animations from Blender to ue4 but i cant.

this is what im trying to export

if anyone could share some insight that would be appreciated
im not sure what it means by transformation error
if you send me the file i could try something
Like @fresh shard said, you set them up in your DCC of choice when constructing the skeleton. To my knowledge you can't change them in unreal or any other game engine.
@formal minnow what do you mean
Hi all, I have a question on root motion, Is there any way where i can add extra displacement while a root motion is playing on a character?
Acknowledged, I'll Split up the model at my next attempt. RN I'mma just make another quick emotionless non-blinking short animation, cause I'm itching to use the model XD
Seriously though thank you so much for the help and insight, I appreciate the time out of your day.
Hey I need reference for body animation for this behaviors: https://i.imgur.com/qWEEloh.png
Do you know if there are some video reference out there?
Record your own.
Right! I'm not an actor I will check some movie
all those animation are for '' animation reaction"
Doesn't have to be an actor to record your own reference.
"body language" animation this is what I ned