#animation
1 messages · Page 183 of 1
hello is it possible to use negative allpha to get Y rotation to +13.787?

what do you guys use for 2d animation or creating sprites, (pixelated). I would prefer if it was free
I tried using piskel but I could figure out how to import it into unreal engine, I really like how piskel has its layout
Is there any problems of using a lot the command of "Play animation montage" on the **ThirdpersoncharacterBP **instead setting up animations on the animBP?
for example, I have lots of Attack animations inside the ThirdPersonBP
Further Animation Learning: http://bit.ly/2dleXfH
Full playlist: https://www.youtube.com/playlist?list=PL-bOh8btec4CXd2ya1NmSKpi92U_l6ZJd
(0:10) 1. Squash and Stretch
(2:07) 2. Anticipation
(4:14) 3. Staging
(6:33) 4. Straight Ahead/Pose to Pose
(9:14) 5. Follow Through & Overlapping Action
(11:17) 6. Slow In & Slow Out
(12:57) 7. Arcs
(14:38)...
None.
I fixed my issue, it was weight painting.
I there a way to fix this lag weird movement from the blendspace?
Hello, I need a little bit of help with this animation sequence I created. dragged and dropped the CR_Mannequin_Body to the level and with the sequencer interface I made the animation, then I created the animation montage. When I play this montage in the level, everything seems to work fine except for the feet, they don't move like it's set in the sequence, you can see the difference in both gifs (Manny is the right animation and Quinn has the issue with the feet).
- I would want to know what's going on and how to fix it
- Wanna know how to edit the Animation sequence, the only way I knew was to click the option
Edit in levelwhich would select theCR_Mannequin_Bodyand reopen the sequencer menu, but after restarting Unreal Engine that wasn't an option anymore


Is it possible to "step" / "evaluate" the animation system "by hand" ?
i.e. basically set input data, etc. and then ask the animation system to pose/evaluate the characters at a specific time
I suppose what i'm asking if it's possible to "programatically" (doesn't have to be from C++ technically) control the animation system so that i can set input parameters and then have it evaluate the current animation blueprint at a specific "time" to have it pose the character?
What are you trying to achieve? This sounds like XY Problem question
it's not, I'm trying to build a lag compensation system which allows me to evaluate animation poses to be identical on server and client at a specific point in time
basically an interpolation between state "A" and "B"
which represent a specific point in time on the server
doing that for normal things like position, rotation, etc. is easy of course, lerp(a, b, _time_), etc.
but perfectly replicating the animation on the client so they are identical to how they were on the server
is turning out to be quite the headscratcher
and im not finding any APIs in UE that allows such level of fine control over animation time
Hey I have a issue I have been trying to figure out for some time now maybe someone knows how to do it. I doing my animation inside Unreal with Control rig and when I animating a reload animation I want to attache the magazine to the hand holding it instead of the weapon rig. But using the snapping animation tool don't work it gets wrong translation. So maybe its a animation space think but I can only crate spaces related to its own rig and not get a space from a other rig. How is this done? Thanks
I grabbed the unreleased 5.1 and good news, Epic have already significantly updated the IK Retargeter and it lets you import a pose asset so you don't have to eyeball the "edit pose" mode 

Am i blind or is there a better way to view/edit the pose in the IK rig Retargeter? It's kinda hard to select specific small bones this way lol.
I hoped to use a pose made in the skeleton view in the retargeter but it looks like that's not an option either >_<.

I am absolutely blind. In the pose edit settings its Bone Draw Size..
And my second thing is clarified right above me. Sy xD
Guys how can I keyframe the location of metahumans? I can keyframe the position of the Control Rig in the Animation Mode just fine, but when I move the character he will perform whatever animation I keyframed in that new area. I want him to move during his walk cycle, but I cannot keyframe his location. What am I missing? I'm new to this whole 3D thing so forgive me if its a dumb question lol
If I have multiple skeleton pose assets, can I set a weight for each pose dynamically in blueprint and the result will be the additive merge of all of them? Am trying to control each finger of a hand mesh without having a static pose/animation for each combination 😅
PSA the AMA is on now with some UE dev team peeps 🙂
https://forums.unrealengine.com/t/ask-unreal-anything-animation-july-13-2022-at-11am-edt/598687/65

Unreal Engine Forums
You can set layers to blend with inertial blending: Requires an inertialization node in your main animbp
Hi!
If I move and edit a bone in the Skeletal mesh editor/ mesh viewer. Can I apply it to be the base pose?
Yes, it gets applied as is, right? Or you can extract the pose and edit it in its own file
Every time I save and reopen it, the pose is reset to the original
I just want to fix a bone rotation in the mesh editor
I mean the mesh viewer not editor 😄
IS there any kind of APPLY pose to default pose?
I simply wanna update the skeleton, I've just modified and angle of a bone, that's all
@rose prawn Looks so simple but yet there's no apply option :\
What view mode are you in? IIRC you can edit the base pose in the skeleton mode

Have you tried, in the Skeleton editor, Create Asset > Pose Asset?
@rose prawn It creates the new asset with a pose which is the same as the default one even if I changed it before generating the asset
Can you edit that pose and save it?
I haven't really used UE4, but I swear UE5 you can just save the tweaked skeleton.
If you mean the rest pose, no, but you can edit the reference pose for hard retargetting purposes
So I have to do it in the externale editor like Blender?
Pretty much, yeah.
Damn, that's bad
I mean I can do it but honestly should have added that as an option. I don't know why you can't ... seems just like they "forgot" to implement that
I've made a virtual Socket xD
works 😄
I'm a solo dev, and I'm looking to do small animations for attacks/etc. I know blender enough to model, but I have no animation experience. Should I just animate from within Unreal using Control Rig and Sequencer or is it better for me to learn and animate through Blender?
I'm guessing just using Control and Sequencer allows me to do everything in one spot without having to go between programs when I need to fudge things. I guess my question is more of what, if anything, am I missing if I focus on Control Rig + Sequencer instead of using Blender?
is there a way to make an animation out of an animations and only keep certain parts of it?
I have a roll animation and I'd like to split it into 3
you can record slices in the the editor
It's best to use both, Control Rig + Sequencer is still less straightforward for adjustable constraints
Thanks! That's what I've been kind of finding; they seem to complement each other more than replace one-another
Hey guys. I have a skirt that I need to rig on controlrig, but I'm struggling to find the right method and the right nodes.
The bones are all around her waist. How can I set a single control to not only move around the skirt horizontally, but also opening up everything?
I want to be able to control all the skirt bones with a single control. Can someone help me with that please?

I think that'd be best simulated with physics assets or anim dynamics outside of CR.
I just wanted to have some control to pose the skirt if I want to take some pictures
Not for ingame features
I could just place a single control in each skirt chain, but i think there is a way to use a single control that allow me to do that stuff
Perhaps I'm doing it wrong all this time, because I took one frame renders even with physically simulated skirt bones 
That wouldn't allow you to like place your character in the scene and move the rig around, would it?
I haven't done any physics simulation on her yet, but i'm fairly noob with control rig tbh
I can do that just fine with anim dynamics and physics assets, so, no?
lol oh well
I'll set the simulation them, if no luck I'll come back
But never managed to get anim dynamics working really. Every time I was using a 3rd party plugin Kawaii Physics for that
Is there any video/link you can share that shows me how to do that stuff on skirts properly @ashen junco ?
I can't recommend unofficial resources, there is one, but it's very old. Basics are applicable but UI change might be disorienting
https://youtube.com/playlist?list=PLZlv_N0_O1gaHlJrP4F12Px7ceHw3PDq-

YouTube
Video Tutorial Series Categories: Physics
Well, Kawaii Physics is altered anim dynamics
I'll difinetly take a look at it, thank you
I still need to know a little bit more about setting up the physics asset. Specially the constraints
When doing IK hand placement on a weapon. Is it correct just setting the effector location to the location where the hand must be place should work? I'm new to IK and just attempting it.
Yes, but you might need to adjust the pole vector if necessary
The pole vector?


Hello anyone know how to mirror control rig pose in sequencer? or do i have to do it manually (for walk cycle)
How do i make a quick n dirty animation blend loop for my bird? For example i want to play 1 glide animation after every 3 flap animation
heres my bootleg solution sofar

not really optimized according to unreal
uhm imporanted like several animations into ue5, but for the animation part i had like a animation sequence for each frame for each of my nla strip anim
some one pls help me how to solve this
Ermmm I think something might be a bit wack (im trying to make a control rig with my character and uhh

this is their skeletal structure in blender

control rig

Thoughts?
visual debug

Change the primary and secondary axis value.
To what? (Sorry if you cant tell im stupid and I've never made a control rig before lmao sry)
Just to clarify: "IK constraints" is just how the IK behaves, right?
got it to work kinda (it doesn't spaghettify from just existing in its normal pose)
Got this problem though when I try to move it, the feet stretch etc (and the portion above the knee isn't moving along side with it


Hello everyone! I am trying to import a alembic file into UE but seem to be getting the following error message - Failed to import Working files\C4D\Projects\Alembics\c4d_export_ue5_test.abc'. Failed to create asset '/Game/Alembics/c4d_export_ue5_test'.
Please see Output Log for details.
The output log however does not seem to give any further information. I can drag the .abc file into Cinema 4D for example no problem. Perhaps someone has some tips or suggestions?
does anyone know why my character is 180 noscoping when it runs off a ledge? this is the default top-down project template for ue5 https://www.dropbox.com/s/0g2ieiwtflwb6ul/UnrealEditor_fJeDPxp4la.mp4?dl=0

Why?
https://youtu.be/NJGQR9EQSgc
Has anyone tried using this software on a metahuman
I use this to take daz characters and wrap them to my own character models in blender, it works well
before I try it on a metahuman im curious if anyone else has attempted it
For example on my own characters I have to adjust the rig after importing the morph target from the wrap so the leg/arm bones are short/long enough during animation
Would this break metahumans rig? Or is control rig using something like skin clusters in maya where having shorter/longer limb proportions wont break anything
I know this is a bit of an advance inquiry but any info is helpful, hopefully someone professional sees this

i dont understand control rig and im wondering how much it can break by changing my characters size with morph targets
NEED HELP! I cannot make a new aim offset. When I drag any animations in they never drop into the blend space. I've tried restarting I've looked around for a solution. Is this a problem for everyone with the new update or just me?
How do I fix these errors?


Those points to different part of the graph, you can see these errors clearly where it points to

Yeah but they just get the values from the player variable

I don't think I can change anything there, can I?
Ouch, this is bad setup 
why? what's the proper way to do it? I mostly followed a video with a few deviations
Proper way to do it would be to access the variable directly in anim graph, no operations in between
This is bad setup because:
- It's not reliable
- Even if it works, it'll impact on performance due to lack of Fast Path.
oh so I should exclude any kind of calculation from anim blueprint?
and wdym by its not reliable?
I moved getting the pitch to the event graph

didn't even know that Fast Path is a thing, thanks man
How do you make the skeleton visible when viewing it in the editor?
can anyone explain why when i import my model into unreal all the bones are like...moved back by one?


That's because Unreal doesn't care about where the tail bones are located, only head bone transforms.
I have a pose snapshot struct that I want to use in an animbp

I feel like you used to be able to use the pose snapshot node to accomplish this, but maybe I'm forgetting something
oh, nvm. you have to expose the pin
I'm animating a model in blender and when I import the fbx I'm getting a ton of keyframes rather than one animated object, anyone know how to fix this?

it's also separating my two objects, anyone have a good video on animating in blender for UE?
So can you actually animate inside of unreal or can you only view animations that are baked into the file?
With Control Rig + Sequencer, you can animate in editor, but it's still rather limited compared to Blender or Maya, particularly when it comes to curve modifiers and constraints (e.g. for holding objects on hand)
If I animate in blender and bake the animation into the file will it create an animation sequence file in unreal when i import it?
Yes.
awesome thanks
I'd recommend using both for good measure. Personally I used CR + Sequencer for animating linear cutscenes, and Blender for gameplay anim
hey, just sent you a friend request to chat about animation real quick
Hi I recently started toying around with the Apple ARKit and recorded some takes. I can successfully replay them, but if I do that the facial animation gets applied to all characters in scene. How can I have a sequence only being played on one character?

I hoped I could build an animation library using ARKit 😦
Bonus question: Is it possible to blend from one sequence to another? Like I have a face idle sequence and one sequence for screaming I want to blend into
I think I found answers 🙂 https://www.youtube.com/watch?v=eDCwdriNuIY&t=7s
Link to my Discord: https://discord.gg/GehykCmvAB
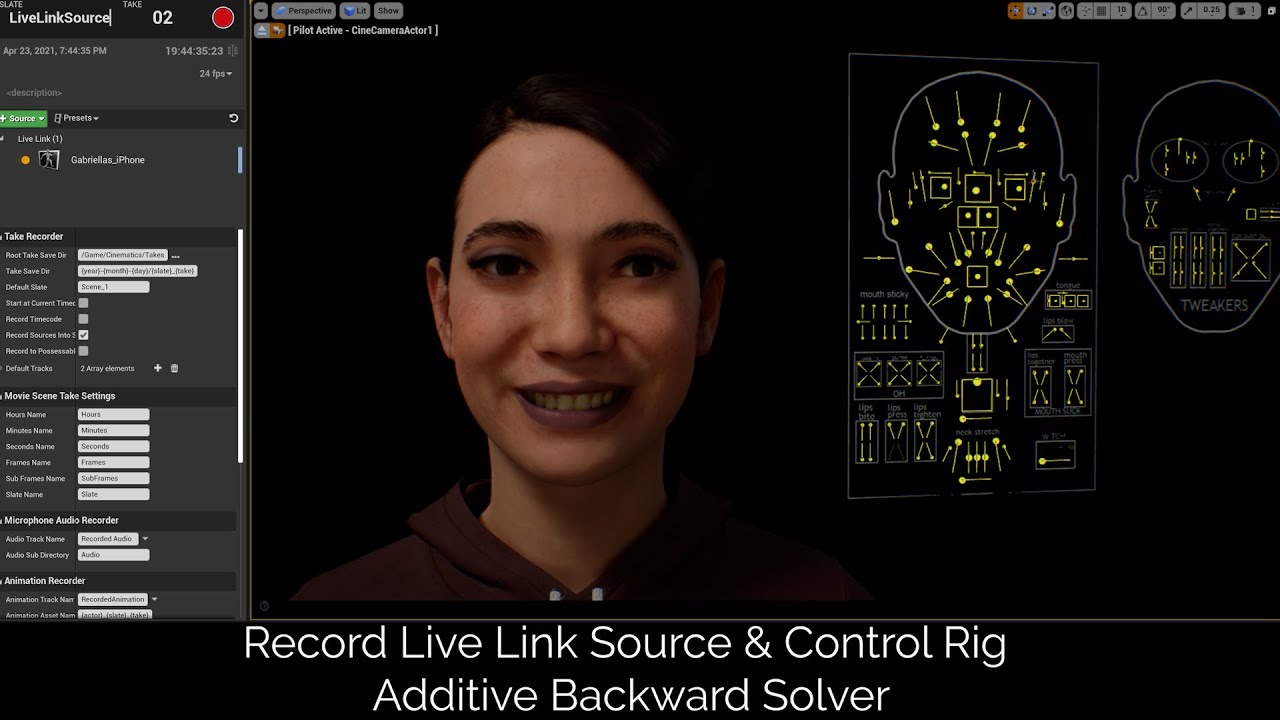
In this video, I go over how you can record your Live Link Source data from the UE Live Link Face in Take Recorder for cleaner facial motion capture data on the new Metahumans.
I also show you how you can use the new Control Rig Additive Backward Solver to either fine tune or add animations to ...
Does anyone know why a couple of the bones in my animation flip out on me?

I'm importing from maya, it looks fine in the fbx export. When I import into unreal it adds these random rotation errors in a few frames.
This is the first animation sequence this has happened to... I have 6 other animations on the same skeletal mesh that are perfectly fine. It's just this animation
I've tried changing retargeting modes, but no dice... any ideas on how to fix this?
I've also tried exporting the fbx from Unreal, then manually keying the rotation back to normal, then reimporting. still gives me the same result lol
FYI, found a reasonable solution for anyone with the same problem. It was something with the convert scene option and maya having z as the up coordinate. I changed the maya file back to Y+ and reimported without "convert scene" selected in the import options. Then I added an additive key in unreal to reorient the animation.
anyone know why my linear limits in the physics body are not being respected?

i feel like it bearly does anything
What's the matter?
it was basically a job offer
Alright.
[I know I've said this before but I'm going around looking for help anywhere so yeah sorry to repeat myself basically]
I am trying to get a control rig working for my fox model (I'm trying to make a control rig for the legs)
I can't seem to get it to work right. I have been searching for about an hour now (more if you count yesterday) and I can't seem to get my model control rigged right! The worst part is the control rig is the first step in the larger process I want to do but for some reason its just not working.
If anyone here has any leads or help that they'd be willing to share I'd love to hear. I literally can't seem to control rig it for the life of me.

Hello guys. I'm having a lot of trouble trying to make the LiveLink connection work. I do have a mesh that works with it and also got the node, but unreal is not finding the phone no matter what I do. I think it might be something related to the project, but not sure what. The phone has the correct IPV6 number too. If I open the Metahuman project it works just fine, but mine isn't for some reason. Anyone have any suggestions? 😢
check out the example project for the control rig in the ue4 mannequin it's in the ue marketplace for free.
when setting the control points up you want copy the bone it's for and paste the global position then right click and " set offset transform from current"
the location and rotation needs to be exact or it will break, if you want to then change the controls location you can now move it (after doing the first part) and right click and select 'select SHAPE transform from current"
this is a forwards solve for a basic arm or foot

backward solve

if it works for the meta human but not your custom skeletal mesh then you should check your animation bluprint make sure you connected the livelink node correctly and make sure the program you're livelinking from has a compatible skeleton
Hey guys,my character's sword always keep flashing and twitching when game is running.How can i fix that?
The engine version is 5.0.3,and the character resource is downloaded from unreal marketplace..
during animation of the sword? is it an attached actor or is it part of the mesh? if it is an attached actor what does the code/ blueprint look like? what is the render settings, tried increasing the render distance settings?
The sword is an attached actor,and the animation blueprint is unreal official third-person blueprint.
I didn't change any settings after I download this resource. : (
I will try to increase the render distance,thank u!
if anything try another mesh to troubleshoot and or message the creator of the pack
but yea increasing the render settings often fixes that , a common issue is if lets say the sword travels too far from the hilt during the animation it will all disappear or stutter due to low render distance settings within the actor bp
is UE5 Manny Skeleton Rigg IK or FK?
Or combinations of IK And FK?
Guys, hello. Animation for metahumana can be done only through animation retargeting? Or are there more methods?
Guys I need to make Additive 1 frame animations for AimOfsset, Is it possible to do this in Unreal or do I have to do that in Blender ? Cause I cant find an option to create animation sequence in UE
You can make one with Control Rig + Sequencer
Make one from scratch or mocap it
UE doc shows: ControlRig Sequence option under Animation tab but I cant see it
Nevermind, found it
https://www.youtube.com/watch?v=J3d2IvoeTEk
I figured this would be a relevant channel to post this. It's a tutorial about physanims, which is a new feature recently added for the dragonik plugin. It's similar to physical animations but better in many ways. It lets one quickly achieve hit reactions and clean physical animations for any skeletal mesh without much effort. It's already available for use in the 2.3.6 update of the plugin.

Physanim (short for physical animation) is a brand new feature added into the DragonIK plugin. It helps devs to bring awesome looking physical animation results easily to their characters, and it serves as a unique alternative to UE's default physical animation system.
This feature comes free with the DragonIK plugin.
DragonIK is available for...
Is it possible to render sequence as animation though ? I made my keyframes but it only shows bmp, exr, jpg, png, avi as render options
Right click on the skeletal mesh (if not the control rig), you should have the option to bake it to anim sequence
Thank you so much
It just seems to break instantly even without the pole vector :l
(Ima add the pole vector incase thats what keeps it from spaghettifying)


Nope :l why is the basic IK not working D:

Have you tried tweaking the primary and secondary axis?
It looks that way after I tweaked those. (I made it less bad, but its still spaghettifying)
this image is the best I could get if after messing with all the axis'

Up for this one, this will do justice over the default physical animations
Hopefully you like it. Looking forward to dev feedbacks on it.
is there any way to transfer a pose to another actor with the same mesh so I can use it as a ragdoll and destroy the original actor?
I've tried with FPoseSnapshot and it transfers the pose, but if I enable physics it always t poses
pls someone explain what the slots in a pose search database do
Pole vector should be in front of the knee and the effector should be on the foot, if the foot is deformed then the controls tranform is not = to the bone.
Sounds like you are trying to do a physical animation, you need to fiddle with the settings using the physical animation property config... Research physical animation
nah, I'm trying to spawn a ragdoll actor with the same pose when an enemy dies
instead of using the enemy's mesh for the ragdoll
Pose = animation + ragdoll = physics simulation. You need to configure physical animation if you doing something else you'll have to explain in detail
ok thanks. I'll look into it
Np
yeah its not physical animation
I'm just trying to pose the ragdoll before simulating
I found the problem is that the animation blueprint doesn't update the skeleton quick enough. If I add a delay the pose is correct before simulating physics
I can't seem to force it to update the mesh before simulating physics
    RagdollMesh->TickAnimation(1.f, true);
    RagdollMesh->TickPose(1.f, false);
    RagdollMesh->bIsAutonomousTickPose = false;
tried these but no luck
How to refresh Blendspace in animation blueprint?
hi guys i'm having a hell of a time trying to get this character to hold a sword correctly, what on earth could it be? i have added a socket to the skeleton and added the sword as a preview mesh then aligned it properly, and you can see that it looks good here during an animation:

but when i go to the character's viewport the sword is off:

feels like i messed with every damn property and it wont fix, what is the deal???
If it's fine during gameplay it's OK, it does that for some reason
its broken in game too
Normally you want to spawn these things during runtime and not from default, since typically you would want to change the weapon
i tried that as well, in Construct, attach to socket
Did you save the socket rotation in the skeleton file?
yeah i saved the skeleton after setting up the socket
Hmm idk, I'm attaching my actor in c++ try making a function using code
Maybe you rotated the weapon instead of the socket?
That's the only thing that could of happened
Hi. I have this crane that needs some physics probably. I want it to be able to move, but the wires need to expand at the same time. I don't know how to set this up... Can anyone help?


Thanks in advance
Hi
I don't understand why but I created a retarget asset and when I preview animations they look good but when I try use it to retarget the animations look weird
Use cable actors maybe
Is there a way to make child actor component follow the parents animation? Child actor has its own skeletal mesh
See set master pose component
**
Ofcourse. Thx
took me a while to figure out, lots of details, i had to set a preview animation because the T pose wasn't correct for aligning the socket, and then i realized the anims were originally targeted to Manny not Quinn, and i was trying to use Quinn with the Manny anims which worked up until trying to use a socket with it...guess i'm pretty n00b at this 😄
is there an anim graph node that does transform bone via a bonename at all?
wdym?
Theres a modify bone anim graph node, I was wondering if there is anything out there that does the same thing but allows you to call it with the bone ref as param
Dumb question, but where should I start if I want to bite the bullet and make the animation assets I need?
I've only heard of Maya and I know you can't really create assets in the engine, is there anything else that would be recommended or is Maya just the go-to?
You can make animation in engine with Control Rig + Sequencer (UE4.25 or newer only), but for DCC tools, you have options like Maya, Blender, Cascadeur, etc. Pick the one you're comfortable the most with.
Anybody knows why bulk doesn't work?

I think you can have a Control Rig and expose the bone name on Set Transform nodes (or other transform nodes) as editable variable, accessible when you use it in anim graph
hi all. is it possible to use animations with root motion in a level sequnce? i have a walk cycle that correctly uses root motion as an animation asset but once playing in the timeline as it loops its root motion does not carry it forward
I believe it was control rig that I heard about that has to reassemble every time it runs or something similar, killing performance compared to outside methods. Is that the case, and if so, how bad is it?
Wrong. Control Rig is pretty cheap, with its own lightweight virtual machine.
good idea ty
Oh, cool. I'll see what the work flow is like, but I might just go with that
@ashen junco as I look through the control rig documentation, I notice that it says to use a sequencer in the level BP on an instanced character. Is this not for typical animation assets, like you might see on a mesh's animgraph?
That's for making animations from the ground up.
I might be misunderstanding what it's called, then. I'm looking to create montages to be used in an animgraph, not a cinematic or anything like that

You can bake CR sequence into anim sequence.
thanks for responding, but I actually don't see anything about how to do that on the control rig docs
sorry, I'm more lost on this than I have been with anything else. The control rig is somewhat equivalent to a skeleton and you use it to generate poses, right? or do I create, edit, then bake a control right for each animation asset?
I'm trying to make a hitbox on the mesh im using or rather for the mesh, i have it parented in the player control and when my animation plays it does not move the hitbox accordingly... trying to figure out how to fix this or how to make the hitbox move in general when its on the player controller if anyone knows how to fix this plz lmk (doing the GMTK 2022 game jam also first game lmao)
Ig this goes under animation sorry if its the wrong channel
just started spawning hitboxes temporarily nvm ignore me
hi everyone, how would I add scripted animation to Control Rig controls? As example, waving a character's antenna with a dampening sine function?
I think verlet is what you're looking for.
Though I never did that in CR, I found doing it with anim dynamics is more straightforward
thank you I'll look it up. Another example that applies to my project is a spiralling motion, like golden ratio. Keyframing that in CR is quite fiddly, I figure some kind of motion scripting would be more efficient
Think of CR scripting is something you want to do every frame continuously, because, well, it runs every frame, going through Backwards Solve then Forwards Solve.
thanks for your responses. I'm mostly curious if it's even possible in Control Rig and if so, whether it's something I need to incorporate into my project. I'll do some research!
does anyone know a good tutorial for creating animation assets using a control rig? I haven't been able to find anything that covers the whole workflow
Make the animation in Level Sequencer with Control Rig, then bake it to animation sequence asset once you're done. The option is in the right click menu of the CR track in sequencer.
Pretty simple.
The root bone of my model isn't animated in unreal
The bone is keyd and it's moving in Blender and Noesis
But not in unreal and I have no idea why
*I haven't messed with any of the import settings or animation settings and it's still not moving when re importing or exporting from blender as a new file and importing it
You probably need to enable root motion.
https://docs.unrealengine.com/4.27/en-US/AnimatingObjects/SkeletalMeshAnimation/RootMotion/
I did
Enabling root motion only messes with the scale though somehow
This is the animation + model
No clue what's wrong since this worked with an earlier version of the animation
okay it looks like im just blind and dumb and the animation is just REALLYYY scaled down but I've actually no idea why because I didn't change the scale on the animation armature in blender
I also didn't key scale on the root bone
I tried scaling the armature and changing unit system and scale in Blender and it's still super tiny in unreal
blender
What about unit scale?
I changed unit scale and system but its still really small
Okay, so the bad news is that you need to have the animation also compensated for the new unit scaling
I'm scaling up the location on the root to see if scaling up the animation in UE works but idk if this would be a good solution to the problem
This isn't difficult if you adjust the unit scaling before making the animation, but it gets complicated if it's the other way around
I don't understand why the animation is so small now even though I didn't change scale and imported it with the character mesh
I didn't key scale for any of the bones though
Again, the animation isn't compensated for the scale, hence the small size
I don't think applying the transform isn't suffice
It really should be though because I never changed scale while animating
see
this is the old version
I only deleted two key frames in the hands on the new one
Have you applied the object transforms after compensating the unit scale?
yeah
Does the animation get screwed up after applying the transform?
I recall others having such issue
No not at all
It plays perfectly fine in Blender and Noesis just not in unreal
i scaled the animation and location of the root bone up in unreal but she's still kind of staying in one place
I don't really know anything else tbh
I always have the unit scale correct before doing any animation work
Now this only happened after I changed her armatures name from 'bayonetta' to 'armature' to get rid of the extra root bone (the armature itslef) that isn't a root bone so the animations with root bone keys would actualy work
this is from before I changed the armatures name
I did export the animation with the 'new' armature though so I don't see what the problem is
Like at all
I've found to get animations from blender to unreal I've had to scale the mesh and skeleton up by 100, apply scale to both, scale by .01 and apply scale to only the mesh
This has to be done before making any animation tho
Oh, I thought it was fine to do after animating, tho, only time I recall doing it was a bow where I had to just change the constraint distances so i could easily be wrong
The meshs scale is correct though
And all the other animations work just fine
when triggering death animations outside of state machines, do i need to manually "stop" the animation blueprint from controlling the mesh?
Hi guys
Is there any way to retarget a normal bone to a virtual bone
I need this because the skeleton source has an extra weapon bone that the target skeleton does not have
If its ragdoll, then no
If its a montage then ragdoll then no as well
If its just a montage then I think maybe
ah, currently i'm just doing montage only. i considered following it up with ragdoll but was trying to get it working alone first. so you're saying if i set physics to be simulated then the anim blueprint will stop for me?
Yes
ok i'll try that, thanks!. if i decide i don't want ragdoll, what is the proper way to stop the anim blueprint? i've seen bPauseAnims on the mesh component, but not sure if that's the correct method.

How would a bone I could add to the basic Unreal mannequin so that I can have a weapon bone like in the image and be able to retarget?
There's a setting for this in the montage on the left panel, untick
Blend Option | Enable Auto Blend Out
oh wow, great. tyvm
I did this earlier, I just made a chain on the manny IK rig for the weapon bones and added a virtual bone afterwards
wait, are you not using the default manny? mine has the weapon bones on the skeleton but not the mesh
Im using the Manny but I want to be able to just add new bones when I need them and use them to retarget to
.
do you not have the greyed out bones? all I've done to this skeleton is add a couple sockets but it has the weapon bones

i just had a look to see if there a setting, check if u got all bones showing or just mesh bones

Yeah the issue is, in the retargeter they don't show up
thats the main issue
I can use the weapon left bone but In the future I need more than 1 bone
so as I start animating using control rig, should I only be creating a keyframe for the bones that I change in a given animation? Should I keyframe all bones to a sort of "neutral" pose at frame zero? thanks
anything else to troubleshoot if the axes on the basic IK are definitely correct (and I've tried a bunch of different combinations)? it's working perfectly aside from this. pole vector is correct, knee bends forwards, but the mesh's knee (and ankle) are 90 degrees to the right. I can see that if i child the pole vector to it.

I have a quick question.
Is there a way to make a skeleton mesh continue playing its animations even when you aren't looking at it?
Currently I have a light attached to an enemy and when I look away from it, I can tell that the light stops moving/rotating to the movements of the enemy because it's not playing its animations anymore
okay so I fixed it sort of the animation plays how it should and scale is also fixed but when I enable root motion the animation stays in place
does the root maybe have to be named 'root'
cause my root is named bayonetta
You should keyframe all controls in the start of the pose for good measure.
If it's a problem it will tell you on import
Apply all transforms on the skeleton and mesh
Then
Scale both armature and mesh 100x, apply scale
Now shrink it to 0.01 scale but do NOT apply this time
You need to do this when you import your skeletal mesh if you did not do this you will need to re import your skeletal mesh.
I went mad when this happened to me for the first time as I normally use auto rig pro which does this automatically with scripts
You could use the Epic's addon for exporting Skeletal meshes/animations too. That way you won't need to do that scale thingy
Personally I found the addon breaks my tried and true workflow, especially since I'm working on modular characters, it's getting difficult to manage them all with the collections generated by the addons
Am I missing something, or did Unreal Engine 5 remove the ability to import animations on a static mesh from FBX format?
I don't use UE5, but I don't recall that is a thing in UE4 ever.
The documentation mentions it, but in UE5 all mentions of that are gone. Does this mean I need to recreate my non-skeletal animations in engine? Not the worst thing in the world, I just want to know for certain before putting time into that.
Which one?
I had it pulled up while I was still on my computer, one sec...
D'oh, I misunderstood. The import was for skeletal meshes without an included skeleton.
hi guys. i need explanation about this -play rate clamp- thank you.

Hey guys, I was trying to implement the 'mirrors edge like' true first person view and I need some help with how to handle turning.
I got an aimoffset for the standart head movements and I would like the legs to adjust the body when head exceeds 90 degrees from either side.
Can someone point me to some learning resources or something? There is so little stuff about this on the internet...
is it possible to speed up an animation procedurally so that the speed it is increased by is slower when the hand has more nuanced or rapid movement
i want to speed up a weapon reload but dont want to make the already fast parts look jarring
i am asking here because it is closest to my problem:
is there a way i can see my Groom(created for the character) in control rig editor ?
No (at least in 4.27)
ok
Groom asset isn't a skeletal mesh, so I won't expect it change in UE5
For reference, in the case of Modern Warfare 2019, Sleight of Hand anims are actually different set of animations, not merely sped up wholesale.
any chance you could help me Makoto ?😓
is it possible to reduce the time of an animation without cutting it?
these options cuts the animation, i just wanted to reduce the time

there's a playrate setting somewhere you can use
Set Play Rate
or an setting in animation?
it's a setting in the animation
i did not find anything about, other than that
damn
I have an Animation Blueprint with this condition where when you press E, you activate the attack animation and once you release it you go back to the idle animation. But for some reason the character only does the idle animation, even when E is pressed, does anyone know whats wrong with it? Is it a mistake in the blueprint?


Why not use montages instead? Far simpler than hacky state machine setup that isn't reliable for that purpose.
How? I removed the Animation BP and tried this instead but it doesnt work either, sorry Im a beginner

Make sure your anim BP uses the slot that your montage uses.
What do you put in the Animation BP then

Insert entry-points within your Anim Graph to play animation from using Slots.
So isnt this rather used to blend animations on different parts of the mesh? I dont see why/how I should use slots here... 🤔
Like, what should I put in the state machine? Because I already clarify in the blueprint that I want to activate the anim upon pressing E
Wrong, you're talking about layered blend per bone.
Slots is more or less entry point to play a montage.
Alright but then again I dont understand what I should put into the state machine in the anim BP, because I cant just connect the slot to the output pose like this

and yes the defaultslot is the one used in the montage
The Source can be whatever the animation is doing before the slot.
Like the Idle animation?
Omg it works
Holy shit thanks so much

If I’m using IK for almost every bone in my characters body is there any reason to use keyframed animation at all or should I just make every bone fully calculated
Why not use both?
Using both keyframed anims and runtime IK adjustment can make animations more reactive to environment while having artistic control on the animation
IK adjustments should supplement keyframed anims
Any tutorials on directional movement for UE5?
I went over few and there is usually always some issue.
https://gyazo.com/a20d84cbf6bdc1d6e5490134b73d064b
Animations also look a bit odd - I feel like its Control Rig, and or, some paramaters in Blend Space - its still a bit confusing for me.
I'd appreciate if someone could give me some learning path suggestions.
https://store.steampowered.com/app/1764050/Swordcery_Prologue/
Want movement like this - character is looking at mouse - directional movement is needed.
I just have everything done with IK already with no animations and I feel like adding them won’t do anything for me
Your call.
hey i have not been able to import ANYTHING reliably to just start chugging away on animations
i guess i have two paths im broken on right now and i should pick one for help
i would assume the Import issue first
well let me ask this: animations and 100x the size, like the animation itself is super large on import
i can get two ways to get a working model one breaks one way, another breaks another way (with the model)
both ways , one way gets empty animation the other one gets a 100x size animation
Character?
yes character sorry
custom or one of these meta human - character creator stuff ?

kinda trying ANYTHING at all
those actually work but i have to crank the character 90 degrees
if i shift to a different skeleton (compatible skeletons) the skeleton is apparently 100x the size (similar to blender exports)
ive got characters from 4 places, mixamo, some glb thing, also metahumans - i mean anything
well, to get the axis correct, you need to export with the correct axis settings.
ok so youre using a mixamo character. tell me which one and I'll import it and try
well im uploading my own through mixamo to get it converted for usability
i cant get anything at all working otherwise
i mean i have one under 8mb if you want
yeh thats fine i just i cant continue with my game
just bashing my head on the desk
been weeeeeeks
this is the closest ive got
when that loads into mixamo it cranks twice to position properly
so this is the model before any mixamo stuff?
yes
thats straight from GLB and blender import/export
with a Z up and Y forward export to apparently? work in mixamo
ooooh maybe its the y forward part

yes it does do that then adding animations is broke
tried buncha ways i cant get it working
ok, cool. got an anim for me to add ?
uh you can download off mixamo/
kk
you upload that to mixamo and download
uhm it might be 'convert scene' needs to be unclicked
testing that right now
need some help people wise people of internet. have some issues with control rig
then i do iktwo bone to make IK chain, my character knee goes to center a bit and becomes wonky.

IK works fine, so idk is something wrong with my bone setup in blender or something wrong adjusted in control rig.
@ruby wing
shes dancing
so, yes. The Asset/Mesh/Skeleton has some Y-up - Zup mixup. Mixamo will fix it for you, but not give it to you
mixamo will give you the animation with the original skeleton orientation. So, ur model skeleton is Z up and the Animation, is Y up
The fix...
Import the model and animation separately with the correct orientations box checked for each
for the model :

Convert Scene Unit Checked, rest unchecked
for the anim

will go over this once groceries are done
thank you
that sucks that i cant view that full screen
help?
hi! does anyone know where can i get more animations for my character in unreal engine? im tired of using the mixamo animations
Unreal Marketplace, Gumroad, Artstation marketplace, among others
hello, ue noob here.
is there an easy way to manipulate the play rate of a single animation, inside of the sequencer?
something like the "Time Dilation" Parameter but just for that one animation track.
thx in advance 🙂

How come things are greyed out in UE5 in this dialogue?

Used to be able to select any skeleton in UE4
Hi, I'm searching some mannequin idle animations to be used randomly on top of the standard idle animation when the character is standing . Example looking around a bit, tapping a feet, changing balance on each feet, etc... I cant find anything good in marketplace, anyone has some?
Question, is there anything that the control rig does that cannot be performed from within a basic animation blueprint?
Or is the control rig merely some sort of a visual syntactic sugar for doing bone transform and IK?
Is there any specific feature that the control rig exclusively provides for the editor?
Hi, I am having some issues with animations in a state machine So i have a variable "IsFiring" and I want to be able to play a animation of a pistol firing (This is the militart free pack from the marketplace) this works as expected but if the user presses the mouse button twice in quick succession it gets stuck in True state, I tried to use the Animation Sequence "Get Play Length" into a delay to prevent the user from being able to quick press the mouse but it still gets stuck in "true" instead of returning to false after the delay. Any ideas please?
I think you could work around most if not all of it, but it's supposed to be more efficient. It's definitely nicer to work with, more organised, and can be transferred more easily between different skeletons.
Actually control rig can also be used for in-editor animation & rigging so that's probably one feature that's unique to it.
It can be used for rigging?
You mean, rigging as in weight painting the mesh inside the editor?
No, the control handle side of rigging that enables you to animate, still need to skin bind in DCC
I'm trying to remember how to set the blend mode of animations in sequencer, anyone know?
Control rig is much better in my experience so far for a myriad of reasons.
This one?
https://docs.unrealengine.com/4.26/en-US/AnimatingObjects/Sequencer/HowTo/GameplayAnimBlending/

Illustrates how you can blend animation smoothly from gameplay into a Level Sequence based animation.
No, but thank you! You know, I think I realised it's the default behavior of just layering two anim tracks that I was trying to do
I thought it wasn't working but turned out to be a skinning problem that was confusing me
The jaw was rigged to the tongue making me think some animations were being combined wrongly
You're supposed to create the IK rig first and use it on the upper right side of the panel, I think, kinda forgot
Haven't been using UE5 that often.
Whats the easiest way to make foots unable to go under ground? Basically just under specific point as i understand, i think default ue5 mannequin has it, but its control rig is very complex to find whats exactly is doing it
Without the built-in ik on the third person control rig?
There's many ways I guess, either you adjust your walking animation by hand, or do a sole position/collision to your foot and do a custom process on your foot ik manually.
i want to make it via control rig, i guess its some type of ik, but what exactly is that "custom process"
Can't really say how if using control rig, I did it from the anim bp, but mostly just start your raycast/trace from the soles instead of the bones and do a quick enough position interp if you don't want the foot to sink/clip with the floor, assuming that is what you mean by "go under ground".
Try set ForceRootLock to true and EnableRootMotion to false in the anim editor of your animation.
Have you tried fiddling with the setting before?
I'm not sure I follow what you're trying to do, so does the root motion work with that setting?
Is it a sequence or a montage?
If I'm not mistaken, that red line indicates the position of the root from 0, 0, 0.
Have you tried whether it actually works on runtime?
Take a look at the Echo character, her control rig has some nice foot IK you can steal
The idea is basically shoot a line down from the foot, offset the hips, offset the feet
Work fine in runtime or editor?
As said before, my basic root motion setting is usually ForceRootLock true EnableRootMotion false, it might sound unintuitive, but it works.
I'm still not sure what your problem here actually, any video of the issue?
yeah it force the root bone to be locked even when root motion is enabled
have you tried with an animation that has root motion by default? maybe unreal doesnt like the additive keyframes on the root bone idk
Just confirming, how did you change the root bone location again?
From a 3d editor?
if it doesnt work then look into the anim instance, maybe you changed default settings there?
Ah, okay.
That might be where we differ, I never really do it that way, if I need to do root motion, I'll change it from a 3d editor like blender, not unreal editor
Export the anim out, edit it, import it back in.
Might have some bone problem when reimporting, so a retarget is done if things really go bad.
There's just quirks in unreal that often just doesn't go as expected, kinda learn to live with it and solve it using a different approach after awhile.
thats what ive asked above
Hello, I have a question , I have a rig and the model is holding a weapon in hand, what is the best way to go about setting a bone so then in unreal i can attatch a weapon to that bone so the position/rotation/scale wil match?
AttachToComponent, better use a socket if you want it to snap immediately, set the socket rotation in the skeleton editor.
So, export then reimport?
that i know,i was asking more or less on how to keep the same "pose" on both the weapon and the rig if not exported as a single object
You did move the root right?
Check if the reexported skeleton structure is the same if it doesn't work.
Root bone orientation correct? Try adding a movement to the right just to check?
Not doing much help actually, but glad you find a solution, good luck.
👍
Is there a limit on Morph Targets ?
I want to confirm if my idea is good or small brain, so I've been trying to model characters recently along with rigging them but a common problem is that when I rotate the arms too much for animations it deforms the body a lot and weight painting hasn't improved it by much so my idea is just making the arms separate from the main body and just moving the shoulder area inside the body, is this dumb or not?
If you can hide it well, go for it... if they have a shirt covering it or something
But you can also use corrective blendshapes or something, or just see if you can improve your rigging
@timber surge you can go with Control bones and shape morph targets
youre using blender ?
I see, I haven't dabbled with morph targets yet so I'll look it up
And yeah I'm using blender
I realize IK might work as well so I'll test that out
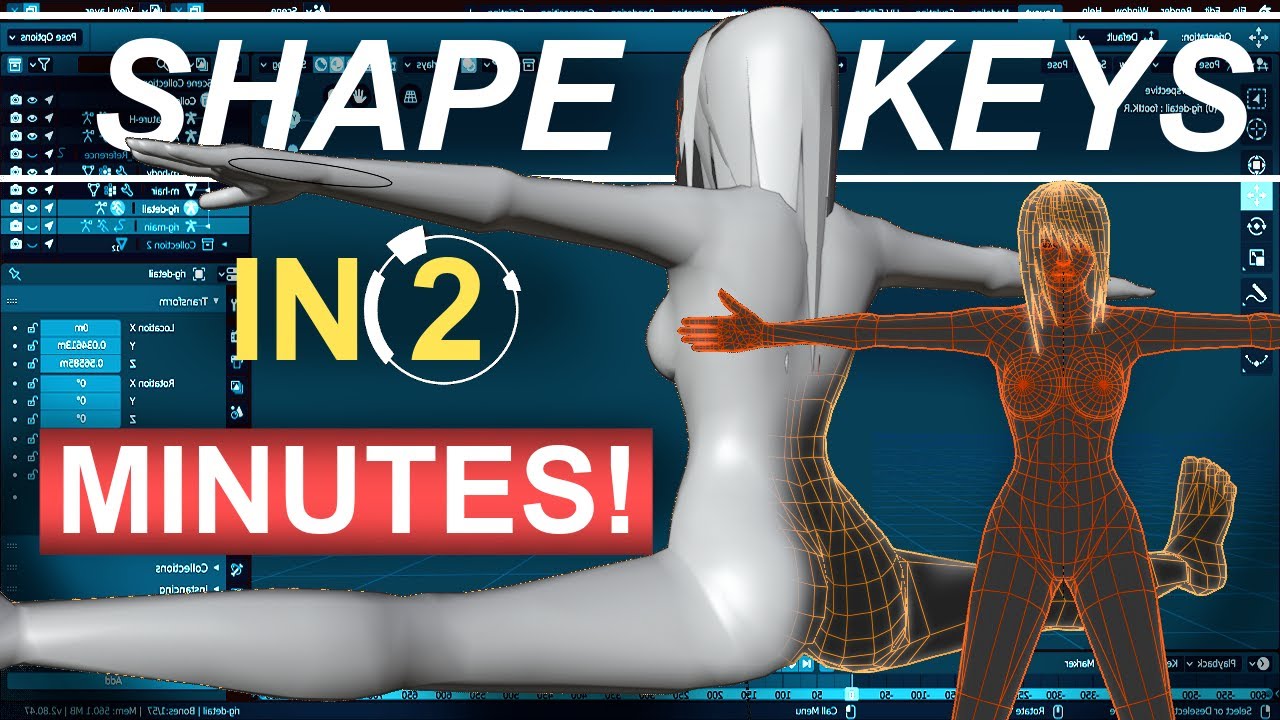
SOOO, I know it's been a while. but I've been preparing this series for a while! Everything from this point on is the icing on the rigging cake. Here is everything you need to start using shape keys to smooth out your bends!!!
Hope it helps :)
Exponential Driver Equation: (var/.03)*var**2
Female Body Model Link:
https://www.youtube.com/watch?v...
Ooo cool, thanks!
that guy made many many videos about rigging in blender
Shapekeys in blender = Morph targets in Unreal
you can make drivers as in blender in unreal with anim blueprint
Ohhhh, alright that explains things
.

For those of you who like those clean bends, you're gonna need a clean joint system! The double joint system is great way to accomplish that and is the system we will be using for the rest of the series. Hope it helps :)
X-Ray Footage from Noah Weiss:
https://www.youtube.com/watch?v=pOBCCrBymcM
https://www.youtube.com/watch?v=NDFlqyXurzc
Femal...
Alright, thanks very much!
Love royal's quick tutorials, not really sure about his latest sculpting videos however.
Not sure how well he'll be able to keep the usual quick pace nature of his tutorial with sculpts, it's a whole different category from his old ones.

Still mostly under 1 minutes I guess, that'll do~
"So, you wanna make a working rigged high poly character under 15 seconds! Not a problem!"
that describes his channel !
So shape keys are pretty cool, although for my case I think I'll use IK, good info for the future tho
Ok so can I get some help with this. I'm having an issue where I'm importing a blender with a mesh, skeleton, and baked animations. The mesh gets into the game just fine and when I make any adjustments the mesh changes accordingly, the skeleton also imports correctly, but any animation get's imported at a really small scale. I tried some recommendations that said to change the units and mess with the scale, no luck. I also tried something that was recommended a while back in this channel, which was to scale x100, apply scale, scale x.01 and then do the animation and then export and now the mesh in the animation file is the correct size but it's as if the location data was scaled down but the rotation stayed the same. What do i do?
This is a pretty complex issue, especially if you start up wrong. The basic guideline is this, use centimeters, make sure to apply all the mesh AND armature loc rot scale before exporting, do the animation afterwards, changing things after the animation is done take more time to fix.
You won't need to do the whole 100x scale if you start up right.
so do i export the mesh by itself and then export it with the animation after?
You can do either one you prefer.
On summary, the advice I'm giving you above is, if you do the scaling after the animation is done, it'll affect the mesh only, not the animation, you're going to have to adjust each frame one by one if that's the case, which is why it's a complex issue to solve if you start out wrong.
If i've applied scaling before animating do i just need to wipe all the keyframes and start over?
Start with the mesh scaled properly, then do the animation.
Or try doing a retarget to the animation using a non scaled armature.
If you scale before animating, there shouldn't be any keyframe to wipe wouldn't it?
hey all! I'm trying to retarget an animation from plask to a metahuman, and I'm getting some strange behavior where the hips seem to be locked in place. The rest of the animation seems to be mostly okay. I suspect it has to do with the retarget root but I've tried messing with that to no avail. Any insights? thanks 🙂
made this 5 mos ago see if it still works https://youtu.be/rEQcKQuWI0M
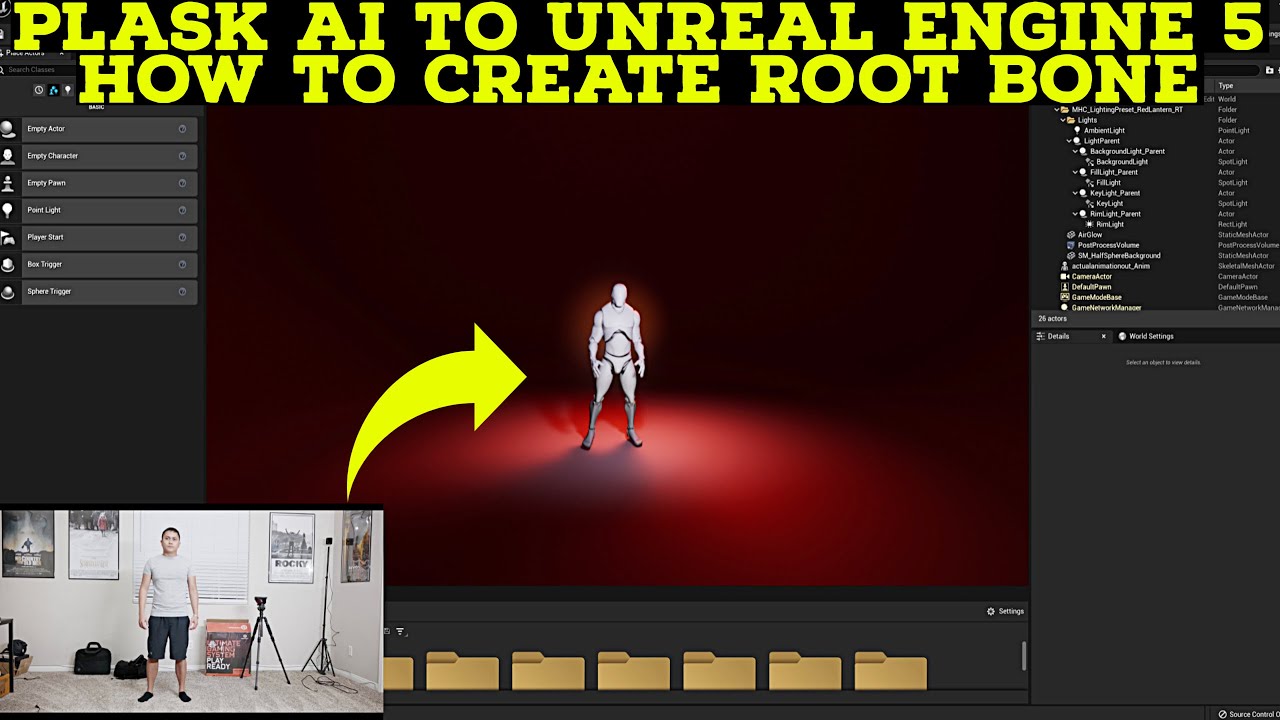
plask to unreal engine 5 tutorial
First 100 people gets discount on my UE5 Course
https://www.udemy.com/course/how-to-create-a-movie-in-unreal-engine-5-beginners-edition/?couponCode=15E90C71F87BAF32E4C8
Downloadable
Video: https://drive.google.com/file/d/1l-OVqPWCto2eXjr0ovvHXPdk8EnOYeZm/view?usp=sharing
Addon: https://github.com/enziop/mixamo...
i had looked at that video before, but I think the retargeting system has changed. I couldnt find the "retarget manager" panel at 7:55
I'll go through and try it again tho
got cha just follow up to adding rootbone
hey js
Looking for help if someone can help me please with my project
Try posting in one of the job boards channel, see #instructions
sup
@twin raptor since u were around 'thanks for the tutorials' haha
Guys where can I set the bone to blend in "layered blend per bone" ? I dont see the option in details panel

Hello! im pretty new to Unreal engine and i wanted to make a simple turret and i wanted to animate it but i dont know how i can create custom animations for a rigged mesh, i tried to create a Animation Montage but i couldnt keyframe the bones there and now im stuck and dont know how to make a simple keyframe animation, can somebody help me?
i think its layer setup
oh you are right thank you so much
np
You want to animate it in unreal ?
Kind of
is there something simmilar like the godot animation player node? ( if you know what i mean )
i dont
ok
there is a sequencer in unreal where you can keyframe
and you can bake it into animation sequence
i saw people open that in ue4 but i didnt find where to open the window in the ue5 ui
Click right on your skeletal mesh and press create control rig
Then draw the control rig into the viewport and it should automatically create sequencer for you
And in the sequencer you can just keyframe the animation
ok ill try it
and to bake it
you right click on the root of the sequencer and select Bake into animation sequence

where exactly should i right click?
on my picture: CR_Mannequin_Body hilighted in blue
i cant open the sequencer
you dragged the control rig into the scene ?
Is there a way to have UE4 ignore the Z-rotation/Yaw in the root for root motion? This setting in CharMoveComp doesn't work for me

i dont have this window where i can right click on the blue marked manny
but that is for exporting your finished keyframe
if you meant this
locate your skeletal mesh in content browser and there you can right click
theres no control rig option
Its in create section
in the create section it says this: Animation Blueprint, Animation Composite, Animation Montage
Blendspaces and aim offsets

Oh ok sorry i thought i should right click on the skeleton but if i rightclick on the skeletal mesh it works ok thanks
ok now i have a blueprint editor open
and now i can add controls to the bones
I recommend you watch youtube tutorial or read the documentation on how to add the controls
after you have all the controls you want for the keyframing drag it into level as I said and you can keyframe in the sequencer
ok nice
No problem bro you also helped me 😄
was stuck on the animation problem for 2 days until now 😄
you want some complex animations when you decided to keyframe it ?
Couldn't you just set that up in tick with some vector calcualtions and SetActorRotation ?
it also needs to shoot
well i could but i thought it would be more clean with animations
alright then, wish you happy animating ! 😁
thanks!
Hi, I'm trying to import alembic cloth from marvelous to unreal for a metahuman, but every time I click import alembic, unreal crashes. I tried different small and large files and all the same. Can somebody please tell me what could be the issue? I'm using version 5.0.3
Hello, I am trying to make a idle/fire animation for a hand rig, in blender the animations look ok(I am using constraints on the weapon to move with the hand rig) but then when I import to unreal the animations look desynced with the hands due to the fact that in blender I am using constranints on multiple bones but in unreal I am attaching the weapon to only one bone, what would be the way to solve this ?
Thanks!
i've tried a couple times and still am getting the same problem. I applied the scale,rot,loc to both the mesh and the armature with the units set to centimeters with a unit scale of 1 and the export scale also set to 1. It's still importing into unreal with the animation super tiny. What am I missing.
Yes, i wiped the old animations and made a simple new one after i applied the transforms
I honestly can't say for sure since I don't know the full details of your model nor workflow. However, you can try retargeting the animation you made to manny's skeleton. No guarantee it'll work, but it might auto rescale your anims, might.
the armature isn't humanoid
Quite a tough spot you're in 🤔
Why not have another bone constrained as the socket for the weapons?
both hands are constrained by the same socket
but i am still getting one of the hands out of sync
maybe this will make it easier to understand
my bad,didnt realise it was MKV
well,I am animating with this rig in blender, i have a constraint on the weapon to follow the right wrist and a constraint on the left wrist to follow the right wrist
new to animation so im not sure if thats the best way to do it
For the animation portion specifically, i always found it easier to parent both wrists to the gun and animate the gun
i tried that too,same result
What's the purpose of the IK's in retargeting?
Which IK, the extra IK bones?
Or the IK rig for UE5?

Haven't gone in depth with that one, but the IK chain system seems to be used to do the retarget without relying on exactly similar bone structure, hierarchy, amount, or name.
Then again, we've only been using used the RTG ones that epic provide on the examples, so not sure whether there's details that we missed on that one.
Yeah I'm confused... I mean it would seem that just creating the chains themselves don't require matching bone counts
So I'm wondering what the full body IK purpose is there. Possible to use it in motion warping I wonder?
Or perhaps it's necessary to fix important locations, such as hands on a gun
🤷

Not really sure about that, almost sound like they want everything to be IK based on the future, from limbs to spine, but who knows.
But when I deleted the IK solvers it seems nearly identical
Ironically it looks better without the IK solver
Which of those 2 without the IK?
2nd
https://docs.unrealengine.com/5.0/en-US/ik-rig-solvers-in-unreal-engine/ Looks like it just allows a lot more customization

Use Solvers to create different kinds of IK Rig setups.
is there a built in way to tell how much a root motion anim changes your character position?
Can you look at the animation curves maybe?
they're blank
can't have blank anim curves, just bake it to FK rig 😛
usually if you check simplify it will only show two keys for root, pretty simple equation
alternatively you could make nodes that print the location as the anim plays
1920 FPS?
Is there a way to use a locomotion rig (such as the advanced locomotion v4 rig) as a way to animate a character in editor? Looking for a way to quickly animate characters moving and looking around without having to use a control rig to keyframe. I imagine dropping a character blueprint into a scene and animating its location and heading and then the locomotion rig would take care of the animation for the most part. Any insight helps, thanks
Take Recorder
Oooo ok, sweet. I’m going to check that out
Hi, I'm new to UE5. I'm trying to import a character that I rigged in Maya (Claudia) and have it use Mixamo animations (Claire, breakdance) through IK Retargeting. I think I've done all the IKRig and retargeting correctly. However my character just won't animate. I know the pose is different and when I go edit the pose, I see that the Mesh doesn't follow the skeleton when I change the skeleton's pose.
What am I doing wrong and what do I need to do to solve this problem?


(UE4) Is there a way to migrate animations between two projects without migrating skeleton and preview mesh?
Copy the files manually in File Exolorer
||But you'll have easier time using the Migrate tool and assign them to different skeletons||
ugh but the cleanup afterwards
thanks!
layered blend per bone already does that, you can just add the default slot after it
oh no, wait probably you add the default slot before the BasePose pin
remove blend by bool and put the default slot just before the BasePose pin, so the base pose become the full body montage and the upper body montage blend using layered blend per bone

I'm having trouble retargeting animations. I try to duplicate and retarget them, and it hangs every time. Is there a bunch of reasons why this could happen?
nice
Can be frustrating. I was getting retarget crashes before 5.03 - clear sailing now. What skel are you trying to retarget from and what to?
just two identical shark skeletons
I can't just import the second mesh to use the first skeleton, it bitches and fails and breaks everything
it's a fucking joke
this is in 4.27
I can't believe it's this bad, nobody must have ever used it
nobody ever used animation retargeting?
Not even a sign of life in Task Manager?
it just looks like it's idling
I thought the editor freezes when retargetting
I never had the editor doing nothing when doing hard retargetting
guys can someone help me
How could I make the character turn faster so that it takes less
I would like to have some turns similar to the one that the soul saga has when you turn the character
Can I create a blend space between two animation sequences like the one in the third person example game for running and walking?
If so how?
what is the best way to implement turn in place animations?
hi guys, i'm trying to rig a mechanical arm with multiple joints inside of control rig , and i'm looking way to reposition/ offset the pivot of the end effector . the joints in green are controlled by the blue end effector control but i want to reposition its pivot to the one in red . with CCDIK i am able to use the red effector and getting a bit further by locking rotations but translation after some point still breaks the rig and i dont want to put hard limits on the z axis. and i guess sockets dont work inside control rig . am i missing something ?

Any idea on what the ideal settings are to make the physical animation less floppy

the 'project new parent' node might help you out here
Does anyone know why my skel mesh is looking like this when playing anims on it?

thanx @agile lodge this might be it, but i,m too stoopid to figure this out, just yet, should i use it before / after a basic ik with bones as child /parent or ccdik with controllers😳
as i understand it, it just calculates a new transform matrix (as if it was parented to a different part of the hierarchy). feed that transform into your effector
anyone here have experience with anima?
Hi, Im having an issue rendering motions with Rokoko. When recording live, things are fine.
When I playback the take in sequencer, the metahuman get stretch weirdly.
This seems to only apply to when I walk https://youtu.be/JhzEmfwiG4k
when I'm standing still it's ok. Have anyone had this problem?
https://youtu.be/7uqyTojNxXI


How do you get an animation blueprint thats needed for livelink face mocap to also play a animation in the sequencer for that character?
It can play a mix of face mocap and any body animation when done in the blueprint but as the blueprint is always running you can't exactly make proper sequences with like normal in sequencer.
Im doing some stuff with foot IK, but when ever the leg bends the foot dips into the ground. Anyone else get this issue?
I have an object that doesnt' have bones as we would just rotate one part of the mesh around its pivot, But in unreal its pivoting around the bottom of the base object. is there anyway to rotate it around itself?
@agile lodge i ,m able to get the position of the effector using the project to parent node , but it doesnt really work the way i want it to work, coming from maya where the ik solver still maintains the relationship between first two bones and only repositions the pivot of the effector . thanks again for the tip 🖖
Hello,I am trying to make a IK rig for a custom hand rig,however im running into some issues like so :
I have control for the wrist and one for the lower arm, I ve done the same thing on the default rig and it seem to be ok.
any ideas?

Anyone experienced with animating 2-handed weapons who can help me out here?
I'm currently testing a setup where I'm interpolating between 5-6 axe holding positions. The main hand interpolates fine, as expected due to the axe joint being parented to the hand joint. However the off hand interpolates wrong.
Video example: https://www.youtube.com/watch?v=JqtN1KSC3us
My first instincts were to look into IK overrides, where I found the Two bone IK node. However I struggle getting satisfactory results. I get the impressions it's designed to set permanent offsets to animations, rather than dynamically ensuring interpolation in an animation doesn't break the illusion of grip?
Anyone got advice on how to tackle this problem?
Thanks

Hey guys, I have a question here and I wonder if someone can help me. It looks simple really.
I have a IKTwobone node, but I want to attatch a control on the lowerarm like an offset. I've tried using Offset transform and set transsform but it won't attatch to the lowerarm. What do I do?

This should be what you're looking for https://zaggoth.wordpress.com/2019/01/26/ue4-tutorial-the-right-way-to-do-left-hand-weapon-ik/
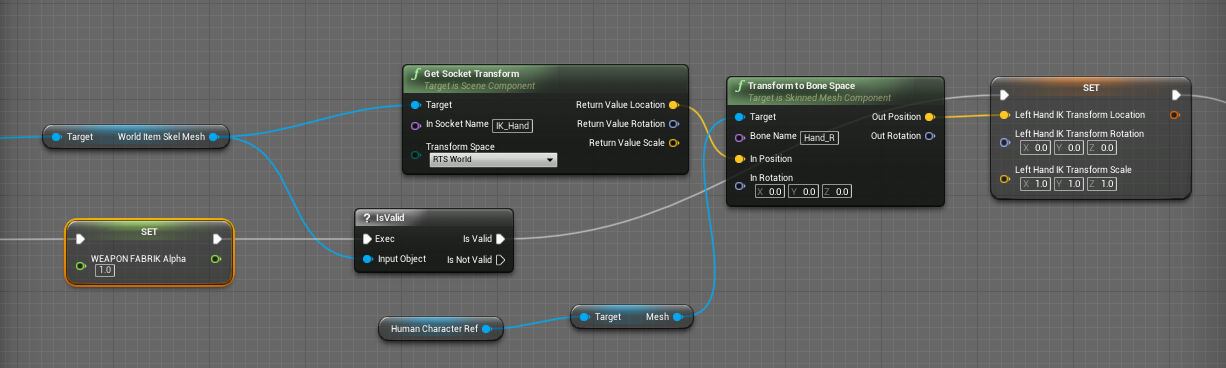
Everyone else on the internet is wrong. (Okay, not quite — though I spent a good many hours going through tutorials and not getting the results I wanted for left-hand IK. There are a LOT of t…
Bungie has stated in some gdc conferences that their weapon poses in games are designed to sort of taper off in screen space to draw a line towards the so-called "action zone" surrounding the reticle. Is that something that's done procedurally, or do you think they just adjust each pose until it's right?
Can you link one of them?
yeah, I'll find it
@ashen junco
https://youtu.be/CXFLu8cityA?t=602

In this 2015 GDC session, Bungie's David Helsby shows how Bungie creates high quality first-person animation that supports Destiny's cutting edge gameplay.
Update: Due to a technical error, the last portion of this talk is not currently available on YouTube or the GDC Vault. We do apologize for the inconvenience.
GDC talks cover a range of d...
I'm also a little bit lost on where I should be starting when creating fps weapon animations. I have the animation workflow down pretty well, but I'm having a hard time figuring out what to do first when it comes to positioning the weapon and creating poses for it. I find that a good 3rd person pose doesn't leave the weapon in a good screen space when compared to a first person pose, which conversely looks bad in 3p
I believe this would be somewhere that panini projection could come into play, so maybe I just need to look into that
this comment actually covers a couple of the problems I'm having, but instead of the shadows looking bad it would be the perspective of an outside player


How do I delete this bone that exists nowhere other than this skeleton and nothing references? Shouldn't UE5 be removing it since it's bound to nothing? I don't want to have to remake the skeleton asset and everything that references the skeleton just to get rid of it

Unfortunately that's the only way I think about. You'll have to reimport the skeleton without that bone and rebound everything you did to the new skeleton. Epic just doesn't like you messing with the skeleton in the slightest
That is actually absurd. I'm going to go find another way
Wont be the first time I've modified a skeleton uasset in C++
Got it
USkeletalMesh GetRefSkeleton().RemoveBonesByName
USkeleton RemoveBonesFromSkeleton
Does anyone know of some good tutorials on rigging for UE? I get the basics, but am having issues with IK for hand / foot not linking to the hand/foot bones, and issues with twists.
I use blender, have Auto Rig pro, but not knowing how things work is really causing issues learning how to fix this stuff.
Id love to be able to just apply the UE5 Manny skel to my charcter mesh but there does not seem to be any way to do tha
Im having a problem with my shooting animation where the gun recoils
I imported the aniomation from blender
in unreal, the animation only goes up the whole way if the animation is slow, I need it to be fast, but if I increase the play rate, the gun barely goes up
If loop is on, it works fine
but I dont want loop on
K i figured it out, it was the transition slowing it down
hello, this is my Thesis https://www.facebook.com/100072091849017/videos/2331528943668150
See posts, photos and more on Facebook.

Hello, this isn't a showcase channel
(also pls don't use Facebook)
Hello Group,
Could you advise on movie render queue.
We have hair made on cards and set physic that works great in sequencer, but new render doesn't render hair physic.
Old render "Movie scene capture" can make it, and physics is rendered.
In Anti-aliasing "Movie queue render" tempolar is set to 1, hair physic works, on 2 works badly but above 3 is not working at all.
Could you advise?
Try disabling AA and render in higher resolution than intended
We tried that
You should get the result you want then.

Well, I said:
Try disabling AA and render in higher resolution
Also this is more fitting on #cinematics really
the problem appears only when we are increasing temporal sampling

Ah, so you're already crossposted there already
Makoto it is disabled, do you see another solution?
The problem appears when temporal sampling is greater then 1
Hello,quick question, is there a way to set control rig values from code? if i make a float control for example,can i set it from code?
Yes, you can have a variable in CR.
ok,awesome,thanks!
Has anyone used Advance Time by Distance Matching and received the error "LogAnimDistanceMatchingLibrary: Warning: Failed to advance any distance after 5 loops on anim sequence"?
I can not debug what's going on for the life of me

The Full Body Inverse Kinematic (FBIK) feature in Unreal Engine 5 allows you to construct IK in Control Rig with a high degree of control and flexibility. In this feature video, we show you how to create a 100% procedural animated character with a highly modular setup.
anybody found this project or something similar
Is there a way to fix this? I am from a UE4 Mannequin to a MetaHuman and the animations are somewhat "squished". I'll attach a video example below...

You'll have to click the link to view this...
Hello guys... I am pretty much new to UE5 and I came across this problem which may be trivial but I spent hours searching for solution without success. I imported my rigged asset (from blender) which I would like to animate and render in unreal, I kind of figured out basics of animation in UE5 but the problem is that "playback range stop time" is set to 1 frame and I have no idea how to increase it. I cant click it or do anything else with it. I can animate the mechanical arm, but animation plays only 1 frame. Google search didnt help... everything I found were very basic tutorials. All ideas are welcome and appreciated!

Hey I’m curious to learn how animations between multiple actors works. Such as a throw which animates both skeletons differently. Is there some reading I can do on this subject?
I added a character to my scene from the Unreal Marketplace, and also purchased the Big Sitting Animations pack. However, I am unable to select any of those animations for my character in the Sequencer. It only shows the basic walk, run, jump, etc. How to I use the animations I purchased with the character, seeing as they all came from the Marketplace? (Sorry if this is basic. Fairly new)
if the skeleton is different then you probably need to retarget the animations.
you could potentially add the skeleton from the plugin as a compatible skeleton to which ever one you are trying to use
Any videos you know of that can teach me how to do that?
it can vary based on the skeleton. are you on ue5?
Yes.
this should be a good starting point. https://www.youtube.com/watch?v=N7WdyAeeDrw

Hey guys, in today's video I'm going to be showing you how to use the new animation retargeting system in Unreal Engine 5. This is using the IK rigs and retargeting. The example in this video is using a Mixamo character and animation, however this will work for any character, skeleton, and animation you want to use.
Mixamo To UE5: https://youtu...
Skeleton for both the sitting pack and my character appear to both be UE4_Mannequin. Will it still need retargeting?
maybe. it would be worth adding a compatible skeleton to your characters skeleton
If you go to the skeleton asset (not skeletal mesh). then look for the "Asset Details" tab. that should have the option to add a compatible skeleton. you'll select the skeleton that came with the animations
Thanks for your help as I'm super new to animation, having only done manual posing and whatnot in Cinema4D previously.
save all and check if the animations will play on your character sk
np. I'm certainly not super experienced but i've spent a lot of time bashing my head into the wall over retargeting animations
Last question... can you screenshot where the heck the Asset Details tab is? I double-clicked the skeleton asset to open it for editing, but can't find that.
ahh yeah. you need to go to the window menu at the top. you should see asset details in the drop-down
THANK YOU! That did it! I love this community!
Anybody know how to make an animation longer in length?
I tried it in a montage but when closed it doesn't save the value
I've run into an odd problem with sequencer when animating a control rig. The keyframe values are always double the value shown in the animation properties window, and what's stored in the poses. So if I enter 25 in the animation properties it shows as 50 on the timeline and curve values. And there seems to be some type of interpolation happening when values are entered in the animation properties rather than directly on the timeline.
For example if I'm changing from 0 to 100 in the properties view and refresh, it'll be 50, then 75, and keep getting closer to the entered value by half each time it's applied. This is making it so I can use the saved poses, as each time they are applied the proper value is not used.
We spent around 4 hours on stream trying to fix this the other night with no luck, and it's reproducible by other team members who load the same sequence, but does not happen if you recreate the sequence from scratch. We've tried to find every hidden setting, but with no luck. Any help would be greatly appreciated as we are not going to continue using sequencer until we know how it became corrupted and how to prevent/fix the issue.
Hi so this is my anim graph. I have an animation sequence separate from AnimStateMachine. I want to play montages as well but I am unable to do so with this method. Could someone please help me with the Layered Blend Per Bone settings? I am able to play montages if I switch the pin order for the blend poses but then the animation sequence doesn't play

Hi all. Noob question. Can anyone explain to me what is the purpose of using multiple Notify tracks in an animation / anim montage?
It seems like you can add overlapping notifies within a single track.
Looking at ActionRPG project they seem to do both. Sometimes overlapping notify on the same track, sometimes different tracks. Even both within the same animation (Anim_Blunt_Ground_Pound for example)


mm?
can i import animations that i made in blender in the action editor into ue5?
Yes.
good do i need have a special rig to import it to ue?
No.
ok thnx
I'm not sure if this would be the entirely correct channel, but it is need to work with animations so
Any reason, why a migrated skeleton would look like this in the skeleton tree?

That means the bone is present in the skeleton asset, but the skeletal mesh doesn't use it at all.
Oh shit haha
So I guess viewing the skeleton directly is normal like that 👀
Thanks for helping my smooth brain! 
Hey
im trying to attach my left hand to the under barrel of my gun. Im doing this in the anim bp using 2 bone ik and setting the hand location to the desires position but when the gun moves the hands movement is slightly delayed
is there any way to fix this?
When creating an additive animation, is it possible to exclude some bones for the final blend?
I have two animations, one for running and one that is a simple pose leaning to the side. The latter I have additive setting set to local space with the base pose type set as selected animation frame, with my running animation selected.
I set up two blend spaces, one to blend my characters running animation with walk, idle, etc, and another to blend between the directional additives for the running animation - i.e. lean left, right, etc.
I have the movement blend space set up with the lean blend space as an additive. It seems to work pretty well, but I want to exclude the lower body animation from the additive set up so only the torso leans.
Any advice?
anyone?
Use layered blend per bone
OK, thanks
Fixed it by setting my skeletal mesh tick group to "during physics"
hi. added keyframes on a sequence and now i realise that the master duration is 5s, where i needed it to be 60s. can i enlarge it ?
Should I add additional bones to a rig to account for weapons? Or is it enough for most weapons to attach it to a bone on a slot and call it a day? In particular I’m thinking about swords, bows, staves, etc. I’m wondering if I should extend the UE4 mannequin with more bones
Like for instance with a sword I can attach the actor to a socket and it looks fine for simple swings but how can I do bow strings and staves? Would I play the animation twice, once on the character and once on the weapon? I need to have different weapons equipped so I’m unsure how to achieve that
for a bow i would have a different animation blueprint
for swords and stuff its usually enough to use sockets, you could add some utility bones for more complicated stuff(such as a sheath for the sword)
i think i have the additional bones on the pelvis, hands and directly under root just for convenience but i dont think im actually using them at this point
i am usint the one parented directly to the root as a location for two characters animations but that was not the idea at all when ive made the skeleton
So I guess I just don’t animate the bowstrings?
I guess im failing to understand how a second anim blueprint would help me
The weapon itself should be its own skelmesh, at least that's how I do it
I can attach the bow and use different anims, that’s no issue
Ok interesting
So you animate the weapon with your base char
Then export that anim
Apply to the weapon skele
Use the same anim BP for both?
(I’m guessing)
Well, my workflow would be to animate them together in DCC, but export them as separate anim sequence, then play them simultaneously
Worked for reload animations.
this is like everyone asking questions and being ignored lol
but seriously my character with 1d blend space just stays in idle animations when moving
it plays the separate animation of jumping
but when i walk it just stays in idle pose
thats what i was trying to say, sorry if it was not clear
are actually providing the animation blueprint some speed? does it work in the animation blueprint preview? we cant fix an issue with no context
do you mean if the blend space is working well?
its separated well
1idle 2walking 3running
im asking if it works in the animation blueprint preview window
unplug your speed variable and supply a manual value
i want to rage so bad man
hey, control rig question: i had a rig with some animations on a sequence, some part of said rig were deleted, but now i have movement in parts where there's no keys (meaning, i assume, i have some phantom keys on the controls that don't exist anymore, yet no way to delete them because the control doesn't exist anymore) is there any way to delete/ignore/clean that? I assume if i add the blueprint and the control rig again into the sequence and paste all the visible keys it should, but perhaps there's an easier way?
I don't know if this works, but try right clicking on the actor track and find for "Remove Missing"
not finding that option, but maybe that's a me problem, still getting used to unreal 5, and unreal in general
anyway to angle the animation a bit more forward? I angled the pelvis bone which rotated everything nicely but it doesn't stick on save =/

figured out a cool trick, change the import rotation and reimport
I've been enjoying learning unreal and making a souls-like prototype in the engine. I'm trying to find animations (mostly for attacks) that would work well, having a hard time finding an array of animations that fit what I'm looking for.
Besides marketplace and mixamo, are there any resources I should be checking out?
how can I disable blending in a blendspace?
I want it to just switch poses once it reached a threshold
( blender has "constant interpolation" which is what I'm looking for in ue4 )
oh
i have a solution
just update your alpha male
to beta male
and then change the import rotation
to 90 degrees
reimport
ready
also
as you can see
male is still in beta
it can bug sometimes
but dont worry
it doenst happen all the time
what
just follow the instructions
so it's impossible?
at least I don't see any buttons
i feel like this should've been here because when my first person starts off with the arms for a shooter i want it to be holding a knife but i don't know how i would get that pose with the arm
xd
Hey there guys, question - what's the right approach to blending montages into animation blueprints? Is there some montage space I can pull a noodle from to feed it into regular nodes?
Slots
my animation lasts 1 frame and i can't find out how to make it longer
I just made a 1 sec loop of the exact same keyframes in blender
thanks!
Alright, so I got a montage getting called from an event in the Animation Blueprint event graph, its got a particular slot in it, and I'm now trying to get this info in a state machine.
I see a node that refers to a particular slot, but it expects a source. What should I select as the source in this case?

thanks in advance, the whole animation blueprint thing ended up being a little more tricky than I expected tbqf
The source would be whatever you're doing before overriden by the montage
oh ok! thank you

For all I know, this is intended on your end.
Where is Matinee in ue 4.7?
4.7? Why?
I didn't find matinee
Hello,how do u hadd a new track to a sequencer?

But 4.7 is so old 
Hi there! Can you you guys advise me some video\tutorial how i can make location transition in cinematic?
How do you get the control rig to respect limits when setting transform? It seems like the limits only apply when manually adjusting the gizmos
what is like the basic structure of an animation system for a player supposed to look like? you got the player characters blueprint, an animation blueprint and those 2 handle and manage everything from animation montages to IK and so on? or are there any other concepts for that?