#animation
1 messages · Page 36 of 1
That's always tricky. It's always a bit of a headache to make the transition from forward to backward movement look good without foot sliding.
Good to know!
do you know a decent tutorial showing me how i can get the most basic form of what my end goal is done? i figured i might just work from there
I haven't seen one. Sorry. 3D locomotion systems tend to be pretty elaborate, and don't usually fit into half-hour videos.
Yep, the nice thing is, most of your set up should be the same, so you'd need a speed and direction parameter to drive your blendspace.
One thing I would suggest is to break up your blend space into two blend spaces, one containing 180 degrees of movement for forward, and the other containing 180 degrees of movement for backpedaling.
You can then drive the two blend spaces with a bool. The reason i suggest this is it means you only need six animations for your locomotion, but it also helps with foot crashing when transitioning from forward to backward.
Compare these two videos.
That looks pretty good, but you do see the hinkiness when switching. You get substantial foot sliding, and a noticeable change in pose when switching between blendspaces.
If that is something you can live with, that's totally cool. I definitely seen games shipped with much worse.
But if you want to avoid that - it gets real complicated real fast.
gulping rn
Definitely, I tend to like this setup because it never sticks in a nasty blend. The switch is helped along with sync groups so the disconnect between clips isnt wayyy out 😅
ny goodness i’m so rusty
this makes a lot of sense, thanks
no longer at my pc now, but i’ll try to figure this out in the morning
Yeah, it's uh... this is one of those things where you can pour a lot of hours and technology into ironing out that switching artifact.
Or you can go build the rest of your game!
I agree, and when you're running at full speed you can forgive a lot so long as you get to the animation you want in a timely fashion. Anything but sluggish haha
Or you could just use motion matching lol
Yeah, I was going to say - motion matching does this stuff real well.
I still havent tried it out, but from those demos with only 12 assets, it's very tempting
Also, generally, strafing is a weird movement. Humans don't normally strafe for more than one step while accelerating. We turn into the direction of movement, so you can just not do this kind of blend space, and have the character rotate.
lol you're so right, filming reference for strafing always feels wrong. At this point I just anim layer the forward locomotion to get a left and a right
It tends to look better, but it is generally more complicated to setup then a simple blendspace.
ok wait random thought
is it worth it trying to construct a bootleg version of the als player character
yes absolutely, throw slopes in there too and you've got a real mess to solve
Probably not right away? Like - if your just starting your project, throw a simple blendspace in. You have so much more stuff to work on then making a refined basic locomotion system.
Like - this is something to work on when you have all your system working.
This is polish.
you’re right
it’s just i’m wondering if it might be easier starting with the character and building off from there, because i don’t want something involving creating the locomotion system to clash with another feature i gave it already, yk?
i guess really the simplest solution is to not really work much on my animations outside of the bare minimum until i have the features down?
Yeah, basically.
Don't buy yourself more work.
Never polish something you're not sure you're going to ship.
man, looks like i’m gonna be having to actually come up with a structured plan (vomit emoji) for this project
def gotta make sure it looks good, passion project for college lol
but yeah who knows how many times i’ll have to scrap everything and redo, so def saving that for last
this convo’s been helpful, i have much more of an idea of what i’m doing now, thanks for your time guys
np
👍

Hey everyone, I got a question for someone expert in animation blueprints (since I'm definitely NOT one): I have an animation blueprint with a State Machine inside, and I've set up some transition rules. What I'd like to do know is how to BLOCK the transition rule from being evaluated unless I'm in a specific time window of my animation. In other words, I'd like to prevent the animation from blending out in a random frame, and instead postpone the transition up until a certain section of the animation is reached.
What I've tried is something vaguely resembling a semaphore, which gets turned red outside of my desired section and green when inside. So far, so good.
Problem is, this semaphore gets triggered with animation Notify States , which, as far as I understand, get called also when the animation is blending out due to a change of state in the overarching state machine, which exposes me to a scenario in which the semaphore gets set to red while exiting the state and messes up the whole logic.
So, here's my question: how can I check if the animation sequence that I'm playing is blending out due to being within a state that is transitioning out?
Obviously, I'm aware that this might not be the optimal solution to get what I want (which, I repeat, is tunneling the state transitions to specific sections of the current animation playing), so I'd appreciate if you can show me a different approach to obtain the same result.
Thanks!
Yo Can Anyone Help
See My key Button Was Disabled So I Created Anim Monatage

For Ak47 To Make More Realastic
So Help Me
I Need To Create Track But There Is no Option
Hey folks, I have this simple book rig. A few bones and some corrective shapekeys/morphs.
For some reason when the animation is applied in Unreal, it's causing some heavy shadowing artifacts? Is anyone aware of what might be the cause of this.
Going from Blender > Unreal.

I'm sorry, I'm not sure.
You cannot set keyframes in an anim montage. You need to open the anim sequence to do that.
ok
so how to do that i mean i have ak 47 so i want to create anim so how to create anim sequence
Just add a boolean to your transition rules
and add an animation notify to your animation to trigger said boolean
also for reference:
https://dev.epicgames.com/documentation/en-us/unreal-engine/transition-rules-in-unreal-engine?application_version=5.3

Epic Developer Community
Blend between states in your State Machine using Transitions in Unreal Engine.
so the "specific moment" in your animation will trigger the animation notify > the notify sends a message to your Anim Blueprint > you can toggle the boolean variable on/off whenever you want > add the boolean logic to your transition rules with an AND, most likely.
Either in a DCC of your choice (e.g. Blender) or in Unreal using ControlRig & LevelSequence
Thanks mate, but I don't understand: how am I supposed to know that I'm transitioning OUT of an animation when the notify triggers? It's the same notification in both the animations, so how can I distinguish between the trigger being fired in the exiting animation and the same trigger being fired in the entering one? I'd like to avoid adding one specific boolean for every animation that uses this logic
if this still doesn't help, you may want to research blueprint logic for something called "pose matching". Basically the people who implement pose matching need the walking animation to be in a specific position before allowing the transition.
Okay, will check it out, thanks!
Hello everyone !
I'm looking for a way to dynamically scale/amplify a root motion applied to the player.
I for example tried looking into the CharacterMovementComponent but i'm too new to Unreal to hook myself in its root motion handling alone.
Anyone have any idea how to do that ?
you could toggle root motion half way through the animation and apply movement logic briefly, then turn it back on
for example, my dodge roll uses root motion animation for the first few and last frames, and in the middle of the animation i apply movement logic in blueprints depending on variables
maybe you can use the new motion matching system to apply a few different root motion animations playing for difference distances, but i dont think its a sliding scale type solution
@undone turtle
i would like to keep the root motion, it's hard to replicate a hand made root motion using movement logic
whats the animation
could you make an animation curve and modify the curve in code?
there is multiple case but for example a sword attack where the player start by walking forward then rush for a short time and slow down a lot to recover
but in some other case this might even be more complex, creating this from code is a way harder than with animation
i think curve data is exposed to blueprints
what about the animation do u want to amplify or scale
the forward distance
so u want them to dash further forward depending on speed or something
yes depending on the power they give to their attacks
are they sliding or jumping? or are they taking steps on the ground
sliding and walking, but not jumping yet (at least not in the root motion sense of it), i don't think jumping in root motion is really a good idea from what i've seen
do you mean, reading the root bone curves and giving it to the CMC yourself instead of auto ?
given how complex the native code is for the CMC to convert root motion to movement, i'm afraid by passing it would be prone to issues, the project is network replicated making this even more complicated to do
I wasnt thinking you touch the movement componenet at all
for this idea
so lets say you add an anim curve to the root bone which makes them slide forward more
that just adds forward translation to the root bone during the "slide" portion of the animation
then can you use blueprints to modify that amount
aren't anim curves just extra data curves not doing anything by default ?
in UE , you can add anim curve which changes the anim data, its not keyframe modification, but like extra logic on top of the animations data. I have anim curves i have added to my imported animations to tweak them to my liking
like i added an animation curve which made my character swing their sword slightly more straight in the direction i want
oh i didn't know that ! interesting
yeah check it out its easy to use and cool
but ive never modified curves in code. but im pretty sure you can!
and you can influence a static anim curve from a BP ?
ok i'll look into that
thanks for the hint
you probably need to set the value of the curve before you fire the animation
i'm having hard time imagining how you can edit an anim montage or sequence from code but i'll look for that
you wouldnt be editing the animation
isn't the curve part of the sequence asset ?
and you can edit montages
yes
so like layers
the core is the anim asset
then curves get added
then it goes to the montage
you cant modify the animation literally, you can modify the curves or montage arrangement
its additive, non destructive
i hope Unreal instanciate the asset, i wouldn't want to change the asset itself in code 😅
even if it's just the curve
youre not changing the asset on all. anim curves are just sprinkes on top
yes but the anim curves are authored out of runtime right ?
That one is real weird. Do other objects do that? Like, my initial assumption is that something is wrong beyond that book.
now, if you wanted to, you can export the animation with the curves involvement, and reimport if you want to make iterations
but you would have to intentionally do that, and its not simple
@undone turtle

- select bone to add anim curve to
- make desired transform changes
- +add key button will add the animation curve key
yeah but then what i meant is this curve gets added to the asset
yeah not the anim asset, the sequence asset on top
but i hope i can change this at runtime
yeah i guess
without changing the curve in the asset
yes youre not changing the whole asset
just adding a little extra animation logic on top of whatever you imported
that can be removed with 1 click
yeah but i need the curve to change only for one play
yes so here what u can do
i just hope if i can edit it at runtime it doesn't change the curve for the rest of the game
so you want it to beable to go back to "default" or normal whenever u want, thats easy
except if i play the same animation on two character and each needs a different curve
it sounds like it could become a bit complex
click on first frame in your anim sequence timeline
do step 1 and 3 in the picture without moving the root at all
click on the last frame in your anim sequence timeline
do step 1 and 3 in the picture without moving the root at all
i see what youre saying
maybe unreal can create copies of animation asset at runtime
there are ways im sure you can find one
if it was me, i would simply make a small array of animations with difference distances and not reverse engineer so much
rather than every float number between 1 - 10, i would program it as every int between 1-10.
yeah you might be right
especially if its a fast paced game. pogramming in all the tiny decimal differences might be a waste of time
using the same animation but with multiple curves to amplify it
and threshold to select the correct one
well i prolly chop the animation up a little bit
as long as i don't have to copy the attack in blender and can reuse the same one
i'm ok
is it multiplayer?
yes
ok so even more so against the case of sliding scale animation modification
well if the scale factor is replicated it could also work
people could get frustrated if the performance of their weapon is always hard to predict
like, do i expect my player to slide attack a distance of 9 or 9.2
could be annoying
but if i knew that my character only slid attack distances of 3 6 and 9, i might beable to plan better and understand everyones capabilities easier
yeah missing a target could be frustrating you're right
i might even add a little cue to when every threshold is reached
i'll try to implement it like that 🙂 i'll dig into those layered curved, thanks for your input
in Chivalry 1 , the character doesnt try to do the charge sword attack until you sprint for 5 seconds, then they start holding sword higher above their head, signaling to them and the enemy that they can do far dashing swing
good luck. i wouldnt even try modifying curves at run time, as in a multiplayer context that could get complicated. but you can modify the end location of the root bone > export > import > and save a hand full of animations that still have root motion but all have slightly different distances or styles
sure, you have to save multiple variations of the same animation, but thats one less thing you have to worry about
or do it in blender
whatever u do
i'm still iterating a lot on the animations so i'd prefer to avoid having to duplicate them for every scale possible
since i would have to recreate the copies every time i tweak an animation
yeah so then adding a simple anim curve to drag the root further forward might help. or be easier during the iteration process
might beable to do some montage magic too
those additive layer tracks are only in anim sequences, right ?
i don't think i can key a bone from a montage

correct
you can cut the anim into start, slide & end chunks if you want
might be useful depending on how it looks
and if you reimport the animation i think the montage should just fire away without much modification
options to try :)
mhhh yeah interesting approach with sections
most often used with jumping and airborne type logic but with a sliding sword attack idk
unless youre blink striking lol
but, at the start of every "slide loop" section, the root bone would reset right ?
are you sure the movement would be added to where it was at the end of the prev section ?
wouldn't it try to teleport the player back ?
well if its root motion, no?
i don't know, it's like if the root bone moved back instantly
i don't know how unreal handle that
if they are all root motion it should be fine as long as you keep the montage air tight
thats the magic of root motion
just make sure you turn it on/off correctly
it technically wouldnt be a loop
oh you would turn it off during the loops ?
i would just play the animation a single time,
i was wrong to type "loop" you would be making a loop in theory by adding the animations back to back
but none of those animations would be looped
yeah but the root bone position diff between end of "slide 1" and start of "slide 2" would be huge
wouldn't that make the applied motion weird ?
if slide 1 and slide 2 are the same parts
it would be weird ya lol
but it depends on ur animation
if im mid air holding a jump attack, it prolly look fine
but if im sliding across the floor it might look weird
you prolly be best off making a few different distances and just coding in decent thresholds
gg
💪 i'll try
I'm setting up a state machine and had a few questions if someone wouldn't mind helping:
I have an enum with my different states in my character bp and anim bp and was using those states in the anim blueprint state machine to drive the animation transitions (enum == x). What is the best way to set that state enum in this scenario? If I setup bools that meet the conditions based on the character's stats (vector length, velocity etc) is there an efficient way to set that state enum without doing dozens of if branches?
When the character's "is jumping" bool is on, whats the best way to translate that change to an enumerator that can scale well when any state is set?
I think you just have to do the logic. I don't think there's a clever way of skipping that, because the logic is going to be so context dependent on your game.
Hey super quick question. So in the City Sample when you hit play everything of course is moving - whether it be blueprints or else. Im trying to use the sequence to make a video and was wondering how I can make everything else move? Aplogies for the basic question im new. Thanks
Guys if I have a character with shoes, backpacks and other stuff changeable, like an actual customizable character where the backpack moves in a specific way based on the player animation, example when walking the shoe bends on the foot step and it does only change the visual, like I have different shoes but follow the same animation with the player, how do I do it?
Because I used to create sockets and apply skeletal meshes with the same animation of the player on them but I'm not sure it's the best way.
If you want to use skinned meshes for customization, you can use the 'Master Pose Component' system to have one mesh follow the animation of another.
If your customization object needs it's own animation graph, you can do that using 'Copy Pose From Mesh' in the animation blueprint.
In both cases, you need a subset of the character skeleton in the customization mesh.
Can I have a skelethal mesh made by more components like the base character the shoes the backpack etcc and just change the component that i want to swotch?
I mean this
Didnt understand it completely its more out of my knowledge area
The traditional method is to use multiple meshes all driven by one core mesh.
So you have your character's body mesh, which is the main mesh, and then their hat, their shoes, their backpack - all of those use either the Master Pose Component or the Copy Pose From Mesh node in their AnimBP.
Ok, Ill search for that, thanks
In my game, I'm planning on 60 different types of monsters. Each monster has the same set of animations (i.e. idle, walk, take damage, knock out, etc), but each animation is obviously specific to each monster so the idle animation for monster A is not the same as an idle animation for monster B. Is there a way in UE to setup some sort of reusable Animation Blueprint that can be used by all the monsters, but setup to play the associated animations for that specific monster?
Yes! You can create 'Child AnimBPs' which allow you to swap out the animations, but use the same graph and logic.
Not 100% sure what you mean, could you elaborate a bit more clearly?
Thats 240+ animations, hope you're ready 😄
Ok I was wondering if that would be the way or not. Thank you!
There are other ways of doing it, but that's the easiest!
I've switched to using gameplay tags as a way to tell the animbp which state the character is in and just made separate functions with branches in the character blueprint that tell it what tags can currently be added.
oh it's going to be a lot more than 240. lol. But it's a 5 year goal so I've got some time. lol
Make sure to reuse the same skeleton as much as you can and use retargeting whenever possible, save yourself some busywork 😉
I was having trouble understanding how one would typically set the logic up to tell the state machine what state to be in. Would you typically set the state after the event has happened individually? I.E. input event for movement > set state to running > when finished running set state to something else? I'm guessing that's better than doing all that state setting during event tick
Thanks for the tips! I'm trying to do a healthy amount of research before I dive in too deep so I can try to make everything as reusable as possible. lol.
If I understand you correctly: the typical way is to use "BlueprintUpdateAnimation" or "BlueprintThreadsafeUpdateAnimation" in your AnimBP to pull variables from your actor. Based on those variables you would make your anim state machine selection
If you happen to have another state machine using gameplay tags, then you just pull the current state and your anim BP state machine just becomes a copy of your logical state machine
So I have a bunch of these small functions setup to add tags, I assume it would make sense to have them setup in their respective events rather than event tick. Before when I was trying to use an enum state machine I was having trouble with setting the enum back to what it was previous (i.e. event movement input > movement logic > set state enum to "running" > enum is cast to animBP and is used to play animation > when event ends running keeps playing)

Hmm
sorry im not really asking much of a question now, there's definitely a lot of different ways ive read to set this up and what would be really helpful would be seeing a fully finished state machine and how it relates to a character's bp
I can show you my setup if you like? I do something similar
Yes please. Main thing I'm curious about is how you determine your character's different states in their own BP and how you use that info in your anim BP
I watched something saying gameplay tags are good because it keeps the info modular and to itself (not having to cast to the character in the animBP event graph)
I use StateTrees as plain state machines. Whenever a state is entered it builds an array of FNames on the StateTreeComponent, e.g. [Locomotion, Idle]. More or less the same thing you do, but hierarchically. What state is entered is determined by events (e.g. when the character equips a weapon) or on tick (e.g. check velocity on tick, if greater 0 then go to Walk state).
I then get that array and in my state machine I literally just ask if I am in X state.


Does anyone know of a project other than city sample that uses the Contextual Animation Plugin? Quite a bit has changed since 5.0 and it looks like the City Sample has not updated any of its integration of the Plugin in its releases for 5.1, 5.2 and 5.3. I am trying to use it with the Mass Framework as well.
Where's the Motion Warping?

Just to clarify State Trees are Behavior Trees, correct? What are the benefits of doing it hierarchically and like this?
And thank you btw for taking the time to screenshot and explain
Do you have the plugin enabled?
What plugin?
👍
Thank you
StateTrees are a relatively new plugin that is similar to BehaviorTrees. Basically state machines but for AI. They're agnostic enough to be used as generic state machines though. You don't have to use that and I'd advise against it right now because they're kinda buggy. Your tags will work, too.
The benefit of hierarchical state machines is flexibility and better organization. You can have a walk state, but you can also have a walk state while in combat state or whatever. In a flat structure you would have to manually create and manage Walk, WalkCombat, WalkCarryingItem etc.
You've been able to do hierarchical state machines with just AnimBPs for a while though.
You can nest state machines.
Sure, but those are exclusive to the AnimBP. I needed something that is queryable from anywhere
Okay then I'll stick to the gameplay tags route. Thanks for the info and the help, really appreciate it.
I am making a survival horror game, i want to make the character to play an animation under rules, for example if the monster appears, play animation of stumbling/falling/etc. Or if the character is near the monster while hiding, puts it’s hands on it’s mouth, etc.
is there a rule of thumb on whether additive hit react montages should be applied in local space or mesh space? or just whatever works for me?
Hello, thank you for answering, yes in that graph you can override the parent's anim graph but I want each child to have its own anim graph
I know right? It is still happening. The level is totally few (new level, just with the sun rotated). Never seen anything like it before...
Sorry, posting the video again in case anyone might know what is causing it
Whatever works is always the answer. That said, you might consider looking at Motion Warping. It's a relatively new plugin that seems designed for that kind of animation.
This kind of stuff is possible!
For the 'near the monster' stuff, there are a few ways of doing it. If there aren't many monsters (or only one), you can do a simple distance test. If there are lots of monsters, you want to look up collision volumes and how they can let you detect proximity to other kinds of creatures.
For the surprise reactions, you're probably dealing with a combination of ray tracing and collision shapes to determine if you can currently see the monster, as well as tracking a value that should determines if it's been long enough not seeing the monster, that a surprise reaction is warranted. The exact details of that kind of thing are exceedingly specific, and don't have a general formula. Some would be montages, some might be alternative run cycles. Etc.
Motion warping for additives?
Ah, if they're additives, probably not.
But if you want the character to turn towards the strike, and get pushed backwards, maybe yes?
That could be cool for full body hits yeah. I guess you'd need different anim pools for hits vs locomotion 🤷
I think whichever works/looks better like Squishy mentioned. Although Mesh Space will likely give you a more deterministic result in that if you have a react which is 90 degrees left, then the additive will maintain that angle. But since hit reacts are pretty quick you could use either.
Is there a way to animate specific bones rather than the rig in sequencer? I'm trying to test out the new animation pipeline in 5.4 but it seems like the only options available to me are related to the control rigs
What I'd like to do is animate the character using the rig, but then alter the weapon_r bone's location as needed in some situations, but that doesn't seem possible. I'm trying to avoid having to animate my weapon(s) and instead keep all the data on a single animation by driving weapon movement (when applicable) via the character's animation.
Motion matching looks both strong and flexible, and overwhelmingly complex... What are some resources you reccomend to gettin familiar with it in order get ready for the full release?
Ok I may have found a solution to this though I'm still trying to get it to work. I think if I make a new control in the control rig it will let me get the functionality I need as I can now parent to that control. I just need to get it to animate now 😅
thanks
Ok got it to work:
- Add a new bone to your mesh in the default position you want. By default the weapon_r bone does not work in control rig so you'll need to edit it via epic's new skeletal editor. If you just rename it it should appear in control rig after. This is the thing that took me the longest to realize, as the engine doesn't really communicate why a specific bone does or does not appear in the control rig hierarchy
- Add a new control for that bone and follow a standard setup.
- Parent your mesh on your actor BP to the aforementioned bone and animate it as needed. If you follow a good hierarchy you'll only ever need to touch it in edge cases -- which was my goal -- animating the hand should be fine in most cases.
Really simple but it too me forever to get working 
Just a hint, hope this helps:
ControlRig requires you to manually reimport the bone hierarchy (right-click -> refresh) whenever you make any change to a bone or add new ones.
Yep, that took me a bit to realize!
There's a pretty detailed doc page about it: https://dev.epicgames.com/documentation/en-us/unreal-engine/motion-matching-in-unreal-engine
There will be a sample project coming sometime this year.

Epic Developer Community
Use Motion Matching to create responsive animation systems, that select animation poses from a database, to match a dynamic system query at runtime in U...
hey guys, there is some weird behaviour using anim budget on clients . any idea why it freaks out on the client side?

Can anyone tell my why he is positioned differently based on the way im facing when i activate the montage?
This is the set location code i am using to make sure the anims line up.

I think "GetActorLocation" and "GetActorRotation" are in world space. When you add 60 units in X direction it's not taking into account the player's rotation.
This works but holy crap! Modifying the name of a bone in your main character's skeleton for a single cinematic is exceedingly dangerous in a large project, and likely to cause a truly vast quantity of problems. I would not adopt this method!
You're more likely to get a good result by just adding the weapon to the scene, and parenting it to the characters hand in the scene. You can then animate that object relative to the character's hand without requiring a modification to the character at all.
Mugenmelon is correct. The vector you're adding isn't relative to your character.
Your best bet is multiplying two transforms. Get the players transform, then multiply another transform with that offset in it. That way, the offset will always be relative to the players current position and rotation.
Speaking of multiplying transforms. Why is the "multiply transform" node in ControlRig giving me a completely different result than manually adding/rotating the components of the transform? I thought that's what "multiply transform" is supposed to do?
Variable "Target" comes from a static mesh socket and the static mesh is attached to bone "Prop_01". Is it because I'm using a virtual bone?

Is there an easier way to pose a character in ue5 orher than using the sequencer and dropping the control rig in it?
Anybody know why my EventBlueprintBeginPlay is not being hit? This is on my Animation Blueprint event graph, and even if I put a print string right after the event node, it doesn't print out. I'm not sure what the issue is.

Multiplying transforms together is similar to, but not the same as, adding translation and rotation together. Instead, it's like applying the two transforms in a hierarchy.
It's as though you're making one transform a child bone of the other.
So if you had Transform A at [0,0,0] with a 90 degree rotation on x, and Transform B at [100,0,0] with no rotation.
If you multiply A x B, the result would be B rotated by 90 degrees (so, [0,100,0]).
It's also important to note that multiplying B x A does not result in the same transform.
Makes my head hurt, but explains why my IK is flipping out when I use that node. Thanks.
So it's not "apply this offset to this transform" but rather "express this transform in the space of this other transform" right?
You're flipping who is parent and who is child, and you get a completely different result.
Yep!
Are you using that blueprint in your actor/pawn/character's skeletal mesh?
Yes. I know I am because the code on top is giving me errors when I run because the BP_Monster is null and it's trying to access it.
You can create additive keyframes in the editor for an animation sequence.
Your only other option is to export to a DCC (e.g. blender) and animate in there, then reimport to Unreal.
However, the control rig + sequencer workflow is really nice and about as simple as it gets.
I set the skeletal mesh at run time though so is it possible that's an issue? This is a character that the skeletal mesh can be swapped out on at different times, so I wonder if the begin play is not hitting for some reason because of that? Although... I still would think it would hit once the skeletal mesh is active.
Seems the update can be called before begin play. Maybe it error's out? Try to add an "is valid" in your update event.
Oh, yeah, if you set it at runtime you might be missing out on the begin play hook
Well I did disconnect that update to see if that was an issue and it did not fix it.
I remember having this issue with animBP's before.
It's been a while, but I definitely remember having to put a lot of my initialization code in a branch on update.
Ah I see. I was thinking making a function and calling it from the actor bp, but might be easier to just put it in a branch like that.
Yeah, I just had a bool value for like "Initialized", if it's false, go through and run the initialization code, otherwise skip it.
Nice, yea I think I'll just do that. Thanks to both of you!
So i want to create fps gun reload anim
so i have to export Fbx Character MESH AND GUN MESH In Blender And Start Crateing
?
Can Any One Tell ME
Yes
ANY OTHER WAY
Why are you shouting?
Yes, technically you can do it in UE if you want but Blenders tools are more specialized for animation.
I need to get a reference to a material instance in my animation blueprint so I can adjust a parameter value based on which animations are playing. From what I can find online it looks like I need to cast it to a material dynamic instance, but it's failing when I do that. After some more digging, it looks like maybe I need to actually create the material instance as a material dynamic instance, but I'm not really sure how that works? I mean I can do it, but do i need to be careful of managing this to not create a bunch of instances of these and then if I switch the mesh and thus switch the material, will I have a bunch of dead material dynamic instances lying around?
Hi. I want to run animation asset randomly to skeleton mesh on BP and I think I should make array for this but have no idea how to start with it . can anyone able to give me a clue how to solve this?

This is probably not the right place to post that.
You do have to create the dynamic instance - but that should be done in the construction script of the object that uses it, and you should save it into a variable of that object in it's blueprint.
There is a cost to doing this, but unless you're doing this to every object, and you have tons of objects, you're probably fine.
I would put it in #introductions personally.
ok
Great, thank you!
recruiting goes in the job channels, as per the #instructions
Ah, good catch.
Your best bet is probably to use a very simple animation BP, combined with playing animations as montages.
Montages can provide an event when they end.
So, your method would look like:
create a simple montage per animation
create a variable on your object BP that contains an Array of Montages, populate this variable with the montages you want to select randomly
create a very small animation BP for your skeletal mesh that uses the DefaultSlot node and a default animation
choose a montage at random by using "Random Integer In Range", with the "Max" value set to the length of your Array of Montages - 1 (you subtract 1, because arrays start at 0)
use the Play Montage function (ref: https://docs.unrealengine.com/4.26/en-US/AnimatingObjects/SkeletalMeshAnimation/AnimMontage/UserGuide/) to play your selected montage
using the 'On Completed' pin of your 'Play Montage' node to restart this process at the 'choose a montage at random' step
That should cause a skeletal mesh to play animations at random.
Note: This is not going to be synchronized over the network if your game is online.
I agree but this is for animation to be used in games (ie. Montages) not cinematics
That was why I was hesitant to try and play individual animations on both the player character and weapon at the same time.
Theoretically it could balloon out of scope but it was relatively easy to do now that I understand the premise
Hi, why do i get this error in control rig?
I am trying to create procedural animation for legs, this is tutorial i use (time code 4:20), and it does change transform to translation.
https://www.youtube.com/watch?v=vKiqs_h1WXM&ab_channel=LincolnMargison-GameDevelopment

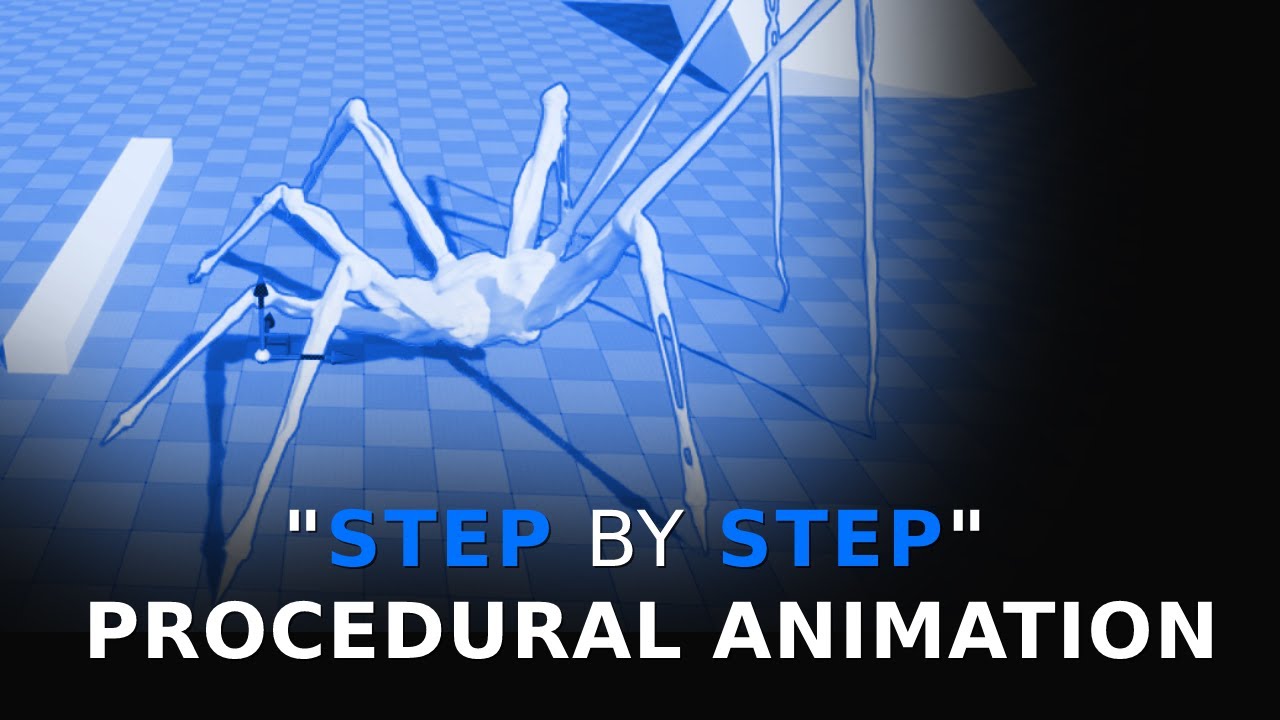
Full length course on procedural animation for human characters: https://www.udemy.com/course/procedural-animation/?referralCode=F8D7BF87E66A29B4942D
Discord server centred around procedural animation: https://discord.gg/YaEQ8DZWuv
Free download of the spider model: https://twitter.com/LincolnMargison
More coming soon, subscribe, follow, all ...
It looks like you're applying a transform to the same bone? You're getting the hips transform, then applying it to the hips bone?
Yep
So that wouldn't do anything.
I think that's probably why it's giving you the error.
Weird!
You sure it's applying the BONE transform to the bone and not a CONTROL transform that is called "hips"?
It looks like, in the video, that they just do this as an example?
The video is over a year old, so it might be a new error message.
hey guys i just have a question if you got to use dalle - 3 for free would to love to use it
??
Why ask that in an animation chat?
cause it's animation releted i guess
I wonder if the previous state machine system will stop getting support with motion matching... I feel for cases like 2.5D games it's better to use state machines, and they could use the upgrades over time.

Epic Developer Community
This is an overview of new IK Rig & IK Retargeting features that have been added to Unreal Engine 5.4. These include Auto Retargeting, Post Retarget...
I'm also curious about Motion Matching on actors that are not using the default Character class and Character Movement component...
Thx for this, Greg. Hearing good things about the 5.4 system.
We just upgraded to 5.2 a few weeks back, which unlocked a lot of capability for retargeting.
Though I am curious how well this new 5.4 systems works with custom skeletons. Meaning, is it worth the time to play with in order to use just for retargetting (and exporting to backport to our 5.2 build).
so with the new 5.4 fast control rig thing what do u need to do in blender for it to work? im a programmer and im just asking out of curiosity so pls assume i dont know anything.
u prolly want a base pose or something similar to the UE styles. i think A Pose is preferred but im sure T pose works just as well

Epic Developer Community
Use Motion Matching to create responsive animation systems, that select animation poses from a database, to match a dynamic system query at runtime in U...
Can anyone provide pointers on having an item move along a spline in a set amount of seconds?
(seconds being a public variable that I can set)
Anyone know a fix I have root motion enabled but its still moving
i hope that motion matching project epic promised relases soon
I think the process would look something like this:
- get the length of the spline using Get Spline Length and store it as a variable (SplineLength)
- create a variable called "TimeInSecondsToMoveDownSpline" and set it to how long you want it to take to move down the spline
- create a variable called "CurrentProgressDownSpline" and set it to zero
- create a variable called 'UnitsPerSecond' and set it to SplineLength / TimeInSecondsToMoveDownSpline
- in the object's tick, take DeltaSeconds and add it to 'CurrentProgressDownSpline'. This will accumulate how far down the spline you should be.
- use 'Get Location at Distance Along Spline' and 'Get Rotation At Distance Along Spline' to get the position and rotation for your object, put in 'UnitsPerSecond' multiplied by 'CurrentProgressDownSpline'
- you probably want to stop it from ticking when it reaches the end, I leave all that to you
Hey! I just changed the Jump and Landing animation of the UE5 Mannequin and i got it to work, but the landing animation is like doing a weird lean, and the leg kicks out far on jump, any ideas what it can be?
This would be a lot easier to debug if you had the skeleton visible.
Does the landing animation have a weird lean, and does the leg kick out really far in the jump?
Yeah
I mean, in the individual sequences.
Before you do that, check your root's rotation.
Specifically, check between the roots rotation on the normal mannequin animations, and your new animations.
hmmm, im not too sure what im looking for for that lol, im not the most experienced

When you double click on the sequence, you should be able to see the hierarchy.
When you click on the 'root' object, you should be able to see the current transform.
By 'the root object' I mean the top of your hierarchy.

OK, so the thing there called 'root' is the root object.
You don't want to look at the track names though, you want to look at the hierarchy.
It should look like a nested tree.

That's the one.
Ah nice
If you look at 'Details' you should be able to see the rotation.

Cool, so there doesn't appear to be any odd rotation on the root.
I would double check your other animations and compare them to the mannequin.
yea, ill send a quick video
I have to head to bed, but hopefully someone else will be along to help.
So I'm making a vehicle with fake vehicle physics, and I'm currently using a skeletal mesh for the vehicle, how do you do wheel rotation via anim BP?
Hmm, seeing this, this could be a blending issue. I really do have to head to bed. Look up 'Animation Node Pose Watching'. Using that, and putting it on nodes in your animation BP, you should be able to figure out what's going on.
sweet
does the motion matching work for non-biped? like dog, spider, alien stuff?
hi guys
i changed the bones rotaion in unreal but why is it reset every time i click on the skeleton and not changing at all and in skeletl mesh not changing
Thanks I will give this a try
hello, does anyone know why maya live link does not update synchronously in the UE editor viewport? Unreal5.2 maya 2022
it only updates after I release the mouse button
Hey everyone! I have a 5.4 motion matching question.
I'm trying it out, right now using the Lyra animations (4 jogs + start) with orientation warping.
My problem is when running diagonally - the underlying animation for the orientation warping is the last one that was playing, which makes sense. So, if I first run forward and then run left it looks good, but if I first run left and then run forward it looks stupid because of the run left animation itself, see in video.
Is there any way to tell motion matching to prefer a certain direction of movement? I imagine the schema can do it but I'm hoping someone could spare me rummaging through the documentation and/or waiting for the sample project.
Thanks!
Is there a good way to not hardcode bone names in an anim BP?
At least in ControlRig you get a dropdown of all the bones. Is there something similar in Anim BPs?
Also I guess that just adding diagonal animations I'm happy with would work, but since I can't animate to save my life I prefer to avoid that right now
Hi, can you do motion matching for non playable characters? I tried following 20 tutorials and I end up with my animation blueprint / character turning invisible.
I'd say I have a pretty good understanding on how to set it up now, but for some reason it doesn't work. obviously I've done all the root motion checks and everything
guys why my first person character isn't valid?

looks like we got it
Added a new visibility-based tick option to the skinned mesh component that forces ticking montages and refresh bones when a montage is being played.
use try get pawn owner instead
yes perfect thanks
ello...
Anyone play with the modular control rig in 5.4 yet?
I´m struggling to get it to work for my custom skeleton, thats not following the naming convention used in the modular control rig.
I´d like to avoid having to rename and reimport the original rig, as its referenced by a shit ton of skeletal meshes, so it wouldn´t just be a lot of work, but stuff also constantly breaks when renaming bones in my experience...
I already looked at some of the modules but couldn´t find where they are reading the bone names...
Documentation isn´t out yet for it either and I only have about 2 weeks left to figure this out before production starts...
I thought modular rig would be skeleton agnostic because you can configure the bones in each module's settings?
Yeah, no, not 100% as it seems.
I could get SOME stuff working, but for example the sockets aren´t displayed correctly.
Huh, good to know, I guess that rules out modular control rig for me, too :/
Like, if I drag in the spine onto my "hips" socket ("pelvis" by default) it doesn´t automatically show the sockets for the neck and arms as it should.

You can see here that the sockets aren´t connected to any of the bones, in comparison the "hips" socket seems to be placed correctly with the "Man_hips" bone
I guess I would expect some setting on the pelvis module to tell it where to look for the neck & arm slots... anything there? Or can you maybe just drag & drop the sockets inside of the hierarchy?
Although in principle it should already know based on spine end bone...
Where is the motion matching sample Epic promised with 5.4?
Yeah, no, you can´d do anything there, as its all set up by modules.
Oof, well hope it's just buggy..

Today we launched Unreal Engine 5.4 Preview 1 with the full release coming in late April. UE 5.4 introduces a number of rendering performance improvements, including major updates to Nanite, such as Nanite Tessellation that enables you to achieve far higher visual fidelity without making meshes larger on disk.
Check it out!: https://forums.unre...
Wheres the goods EPIC
Enjoying this new effector & cloner tools 😄
Hey people,
I am running into an issue with additive animations. I have an animation set-up in Maya with layers. When exporting the base animation and the layer (as offset). When applying the offset animation as an addative animation, I get a similar but not same result (see image, left pose is the exported animation with all layers applying in Maya and the right is additive being applied in Unreal).
Does anyone know how I get these animations to match?

Hey guys, is it possible to use the control rig in sequencer without it overriding the animation blueprint
Wana use slots to combine animations but as soon as I add the rig can no longer access the anim blueprint
hi guys why is add movement input working but my montage is not playing so if i add add movemet input the montage work and if im not it doesnt
Can't you combine the animations in sequencer?
Hi all
Anyone knows the difference between "Sampled Keys" and "Sampled Frames" please ?
I can, and then i can just bake them to a new animation
was just wondering if there was way to use the layered rig over the top without having to bake it first
I don't think so, but if you figure it out, be sure to come back and mention it.
aye will do
I think the reality is that, even with the layered rig introduced, if you wana do adjustments to an animation there is still plenty of places where baking is needed
Dunno about everyone else but attachment has gone to shit, both attaching objects to my character slots and attaching control rigs controls to objects
neither work at runtime
so gotta bake them
basicly swapped one set of problems for another haha
At 2m 30 seconds, see Motion matching: https://www.youtube.com/watch?v=vfY33rza9FI&t=267s&ab_channel=UnrealEngine
They say there will be a sample, does anyone know when / if already out where?
Today we launched Unreal Engine 5.4 Preview 1 with the full release coming in late April. UE 5.4 introduces a number of rendering performance improvements, including major updates to Nanite, such as Nanite Tessellation that enables you to achieve far higher visual fidelity without making meshes larger on disk.
Check it out!: https://forums.unre...
Have you considered using dynamic additives? I'm not sure where your problem is inside maya or the export, but using them dynamically would remove the issue.
With the intended pipeline, dynamic additives are sadly not an option
OK, not sure how good your python skills are, but you could use the FBX SDK to do the subtraction using two exported FBX's.
I've done that before. It's a bit messy, but it also works.
I have a "default" animation that needs 4 variations based on body type. With every body type come offsets on limbs and due to that there are other adjustments needed in the animation to match with non-player objects.
I don't think there's anything there that wouldn't work with dynamics, but also - why not just export finished versions of those four variants? Why make them additives?
we want to lerp between the 5 states (default and the 4 body types)
You could just blend between the states?
Is there a good workaround for virtual bones not allowing sockets?
I have an IK setup that uses virtual bones but the fact that you can't add sockets kind of bothers me. I was going to attach meshes of different proportions to that bone, so each would need a unique offset from that bone.
There's nothing special about additive animations that lets you blend between them.
How would you blend between several non-additive?
Using... blend... nodes?
I had a look at blendspaces, but they are not flexible enough.
Not blendspaces, the actual blend nodes.
TIL regular blend node, will give it a try 👌 thanks
👍
You probably want to look at 'Blend Poses by int', you can have a bunch of poses feed into that.
And you can cast an Enum to an Int.
Found it, cheers!
Any knows a good start to learn fps skeletal animations for UE5 skeletal mesh on blender?
Aren't virtual bones always driven by existing bones? Couldn't you attach a socket to something already in the skeleton?
I could, but that would move in a different space, right?
In short: I have a "hand_R" bone and a "VB spine_02_hand_R" virtual bone for IK. If I attach my weapon to a socket on "hand_R" I get all kinds of swimming with e.g. additive anims. Attaching to the virtual bone fixes that (cause it's in spine_02 space) but I cannot give the weapon an offset via sockets now..
Wouldn't you want the object attached to the socket to follow the hand?
Like that 'swimming' is movement of the hand, right?
So if the object is in the hand... then isn't that what you want?
I heard 5.4 came out yesterday.
Does this mean that 500+ animation pack epic promised came out as well?
anyone know where the link is to it?
guys, i create animations with blender and to make the animation syncronize between ue5 and blender i have a offset bone where i parent the skeletal mesh of the weapon. now idk why seems like my bone resets after importing in ue5, any fixes?


Do you have 'bake animation' on in your FBX export options in Blender?
yes
the animation works it's just that bone
Which means the animation doesn't work.
What is the offset on? Do you have all those gun bones in the biped skeleton?
Or are they in the gun skeleton?
the offset is attached to the hand
and i parent the root bone of the weapon to that offset bone, then, instead of moving the gun to the location, i move the offset bone so i have the location and rotation of the weapon in blender "hard-animated" in my arms
don't exactly know how to explain myself on how i am doing this, i just know that blender or ue5 are not working
OK, so you have a weapon bone attached to the player hand. You're using that as your socket when you attach the weapon to the player.
Neat.
Have you checked the values in Blender and Unreal on that bone.
Specifically the rotations?
Are they different?
This might sound silly, but there are several possibilities as to what is causing this. It's always good to check the actual numbers first.
omg, thanks
well the values are right
but on blender the bones were named differently
Aha!
yeah, i hate when simple problem become complicated
Is there any way to disable unreal engine from automatically blending my last frame with my first frame when importing an animation which needs to loop (I'm trying to make an escalator, the animation is perfect in the animation viewport, however while playing the last frame is smoothing with the first)
What kind of animation it is ? A montage ?
When you view this animation in the animation viewer, do you get the same error, or is it only when playing in game?
Hi, anybody noticed why the BoneMask and CopyMotion nodes were not shipped in 5.4?

In the editor it perfectly loops
Interesting. Are you using an animationbp or are you just applying a sequence to the mesh?
Neither I imported the the animation baked into the mesh
I think, mechanically, that's the same as applying a sequence directly.
Hmm, so nothing immediately leaps out at me as to why it would loop oddly. When you open the blueprint, and click on the skeletal mesh, there should be options under the Animation set of properties in the details menu. Double check those.
And when you say 'in the editor' do you mean 'When I double click on the sequence file in Unreal, and the window opens displaying the sequence'?
Yes that's what I mean
The only option that stood out to me was linear curve but that had no effect
Curious.
Consider trying an Animation BP.
A really simple one with just one sequence.
It might not fix the problem, but if it doesn't, that does give you more information.
That's a good idea I'll try that out
How do you make an animation blueprint for anything other than a character
Same way you do for a character. Right click on an empty space in the content browser, and choose 'Animation\Control Rig'. It will give you a list of skeletons. Choose your escalator skeleton, and you're off to the races.
Hi, how can i make so my skeletal mesh will not snap to higher ground, instead step to it?
Okay ty!
Does anyone know if there are settings on the control rig that cause the Right Clavicle to Pop while rotating?
I'm trying to create animations with the UE5 mannequin in a level sequence, The animation looks fine in the level sequence but as soon as i bake it to an animation sequence and play it in the animation sequencer window, it pops really bad.
Its been preventing me from animating, any help would be appreciated. thanks
Wrong place for this too my friend. You want to post this in #rev-share-jobs .
hi guys how do i fix this

Still need help 😦
Typically, one would use an animation.
?
You asked 'How could I make them step onto a ledge?'
Usually steps are done with animations.
Yeah, but like how to use them with Ik
There's a variety of ways, but usually using an animation blueprint.
Typically, the animation blueprint will have a walking animation, which can be adjusted using IK to create a step up.
Sometimes you get actual stair climbing animations, but that's unusual for highly dynamic characters, as stair climbing tends to awkwardly lock you into a specific orientation to the stairs.
So often it's just normal walking with some IK applied.
Lotta cheating with stairs.
Hm, i just wanted to use ik, and i am a bit noob, i have locomotion, but i really don't know how to implement animation into Control Rig
Usually it's done the other way around.
Your IK looks fine, all you need is a walking animation
Usually, you use an animation blueprint, and then you can put your control rig into that as a node.
I have it, but i am planning to add multiplayer, and it is not great i thing
Hm
I haven't checked
Multiplayer games definitely have animations.
They often run into problems if they use RootMotion on their player controller. It's often better to use strictly pawn movement in multiplayer.
I have animations
But they have animations.
Well they don't seem to be walking in your video.
Lol, ty, i haven't checket how it looks with anims, it is great 🙂
I'm kinda losing my mind over this, maybe someone here can clear things up:
I have hand IK that attaches the hands to a static mesh socket on an attached actor's static mesh. Everything works great, animating the attach bone (weapon bone) moves the weapon and both hands follow along perfectly with no delay.
But if I offset/rotate the socket that the weapon is attached to, the IK does not recognize this change.
Is there any space setting I can do on the "GetSocketTransform" node to make it take into account the attach parent socket transform? Or do I really have to do that calculation myself? Or am I overthinking things here and there's a simpler solution?
What are you using to do the handik?
Control Rig, no access to sockets there :/
OK, and how are you inputting their transforms?
Because GetSocketTransform should return the world space transform for the socket.
So all you have to do is get that into your IK system.
I pass in the bone name that the weapon attaches to and use that to get the bone transform. I also pass in the transform of the static mesh socket in component space.
I used world space before, but with world space I always had 1 frame lag between the IK and the actual socket world transform
Ah, yeah, that kind of stuff is prone to happen.
So yeah, if you have two transforms, then you have to combine them.
Now that I see it, StaticMeshComponent really does only provide World, Actor and Component space with that node.
You need the transform of the bone and the transform of the socket.
The node should be called 'Make Relative Transform' or something.
And now I'll kill my fast path by getting the socket transform, oof.
Have you considered just having two more bones in the skeleton?
That are child of the weapon bone.
And using them instead of sockets?
Good luck!
Hi, so i attached a third person character to a first person game template. By following a tutorial, now im having some problems with a gun reloading animation. As i parented the gun to the left like the video told me to. When i try and link it to the right hand, when shooting its all out of wack. I have done too much to restart. So basically if i parent it to the right hand, when i shoot the left hand moves away from the gun. But if i have it parented onto the left hand, when i try to add a reload animation it takes the entire gun with it. Can anyone help?
Would a millipede be expensive to animate?
In what way?
Lots of legs. Detailed skeleton. Either a bunch of keyframes, or more information per keyframe?
Expensive as in; if you have 2000 millipedes, will that impact framerate as opposed to 2000 mannies?
Yeah. Pretty much. I'm making some alien bugs. And was just wondering if I should avoid too many legs.
Generally, multileg critters like that tend to be controlled procedurally, so they tend not to be particularly expensive in terms of memory, but they can eat into evaluation time if you're not clever about how you handle the legs. You don't want to do 200 IK calculations per monster.
That makes sense. I've been avoiding IK for the main part of my swarm. Only using it for a couple of the bigger enemies.
But if memory is the main cost for regular animations, then that might be acceptable. Rest of my game doesn't use that much memory.
They're still not the cheapest things, lots of moving objects are lots of moving objects, but they're not prohibitively expensive for most games under most circumstances.
I'm trying to learn a bit more about how Unreal handles skeletal rigs exported from blender. This is specifically related to using any type of IK nodes in the Anim graph. I see a lot of rigging tutorials where people are setting up bone constraints and IK poles. Obviously these are useful for posing your character in blender and exporting the animations, but I'm curious whether Unreal respects any of these settings when the rig is imported. In other words, if I move the IK poles around in the Anim graph, will the skeleton behave the same as it would if I was posing it in blender? Are any of these settings/constraints lost in translation?
I think there has been some work to support a few constraints between packages, but as a general rule - all constraints are lost in the transfer between packages.
You can create unreal specific IK systems in the animation BP, the control rig, or the IK rig - but they will not work outside unreal, and they cannot use the ones defined in Blender.
I see. I'm making some full body character animation for VR and it looks like I'll need two separate systems then: animations exported from blender (mostly for leg locomotion) plus Anim graph IK logic. Was really hoping I could save time by combining the two
Sadly no! I wish there were more movement on a universal rigging language, but 3D programs can't agree which direction up is, so this is well beyond them.
@nimble torrent Curious if you might have any insight on this? #animation message
Not from what I can tell. Have you checked the values of the clavicle after you baked it? Does it stay stationary? Is there an offset?
Does it happen with another character? Does it happen if you try to create the sequence in another level?
Its persistant 5.4, 5.3.
Ive been trying with the UE5 Mannequin, Yea it seems that it somehow inherits location, Ive even tried to manually key the clavicle loc and rot to 0 to test it throughout the whole sequence, but upon baking it just pops. Only the right side as well
Have you tried it in multiple scenes?
yes even seperate projects
Its pretty easy, just bake any animation to the control rig, then bake it back into a sequence
Ive tried multiple animations as well from different packs throughout the market place, as well as custom
Can't replicate the problem.
I baked a sequence to the control rig, then baked it back onto the skeleton.
Looks like this:

is it moving though
Yes.
Yeah, tried it with another animation, no issues.
Aside from the fact I can't remember how to trim sequences properly.
So it's too longer.
the red line at the top if you move it changes the length of the sequence - in sequencer
Yeah, but isn't there a way of clicking on a clip and framing it?
Im not sure i follow lol
oh like you would in a timeline? maybe, im pretty new to animating


No shoulder issues so far:

Bake animation sequence (though it also works while creating linked sequences)


hmm
Try testing with Quinn? Maybe Manny has an issue.
Good call, ill give it a shot let you know.
Quinn Simple seems fine
SKM_Manny gives bad results

Manny Simple

Thanks Squishy
Weird!!
You're welcome!!
Were you using SKM_Quinn_Simple?
Can't remember! I went and grabbed one of the meshes and just tried it.

I was using regular manny by default because i figured it was the most advanced and used for animating meta humans.. lol
anyone know how to play an anim montage while still allowing motion?
I'm playing the montage through a slot that is bone blended to target arms, but how can I add this to whatever arm values are?
So you only want to blend the montage in a little?
Like, you want most of the animation to play normally, but you want some of the montage to be visible?
hi all - has anyone had difficulty importing a maya rig with blendshapes into unreal? mine don't seem to be importing
when exporting from maya, i have blendshapes and animation selected
How do you rotate the wheels of a skeletal mesh vehicle? I think the way is via anim BP but I can't get it to work
(using fake vehicle physics, btw)
the wheels are attached to the bone or properly weight painted?
Yeah, that's no issue
then it should be just a modify bone node and adding rotation on the bones forward axis
Hmm, might be doing something wrong then, I'll keep fiddling around with it
hi guys why is the animation that i played with its root doesnt reflect the changes back to blend space
Hi, so i attached a third person character to a first person game template. By following a tutorial, now im having some problems with a gun reloading animation. As i parented the gun to the left like the video told me to. When i try and link it to the right hand, when shooting its all out of wack. I have done too much to restart. So basically if i parent it to the right hand, when i shoot the left hand moves away from the gun. But if i have it parented onto the left hand, when i try to add a reload animation it takes the entire gun with it. Can anyone help? Ill attach a video of what happens when i try to reload, and what happens when i parent it to the right hand.
does anyone know why my custom anim slot doesnt show up on my other anim bp?
the option to open the slot manager isnt there for this 2nd abp either


pretty sure you just make a default slot and then you can select the correct name from the pull down

thats what i thought, but the dropdown isnt there for this new animbp

its just a text field, and inputting the same name as the other doesnt work
are you following the same naming scheme? DefaultGroup.(insert name here)
yeah it was identical
i just re-made the abp and it seems to be fine now, must have been a broken uasset
nope, regular abp
glad you sorted it, sorry i couldnt help
thanks for the assist anyway ❤️
in future might be worth checking the anim slot manager in the abp to see if they show up there
weirdly enough there was no option to show it in that abp, so i assume something was very wrong for the editor to not show the option to open the window
oh right, ya i know that it doesn't show up for abp templates, sounds like an unreal bug, again happy its sorted.
Hi, my Character bones Transforms change when the Dynamic Material Instance is being created (I'm doing dissolve animation, that's why I need dynamic material). Is there a way to fix it? Pose just changes randomly and it doesn't make any sense, it shouldn't store any bone data inside the material, it shouldn't behave like this
Bake to Control Rig is not supposed to give you back the original keyframes right?
you are correct, it will bake it out on ones (every frame)
do you have a screengrab of the blueprint logic where you create the dynamic material instance?
Found out it has something to do with my ragdoll. It works flawlessly if I disable ragdoll (animation only)
The sequence (simplified): animation -> 1 second -> ragdoll -> 1 second -> create material + it breaks (random bones movements are happening at this moment)
The code:
ragdoll:
DetachFromControllerPendingDestroy();
    const auto CapsuleComp = GetCapsuleComponent();
    CapsuleComp->SetCollisionEnabled(ECollisionEnabled::NoCollision);
    CapsuleComp->SetCollisionResponseToAllChannels(ECR_Ignore);
    GetMesh()->SetCollisionProfileName(TEXT("Ragdoll"));
    SetActorEnableCollision(true);
    GetMesh()->SetAllBodiesSimulatePhysics(true);
    GetMesh()->SetSimulatePhysics(true);
    GetMesh()->WakeAllRigidBodies();
    GetMesh()->bBlendPhysics = true;
    if(const auto& CharacterMovementComponent = Cast<UCharacterMovementComponent>(GetMovementComponent()))
    {
        CharacterMovementComponent->StopMovementImmediately();
        CharacterMovementComponent->DisableMovement();
        CharacterMovementComponent->SetComponentTickEnabled(false);
    }
material (parameters setters create material under the hood):
SkeletalMesh->SetVectorParameterValueOnMaterials(TEXT("EdgeColor"), FVector {ColorEdge} * ColorBoost);
I just can't get why SetVectorParameterValueOnMaterials has anything to do with my bones positions and why does it only break with ragdoll enabled
weird
Try switching these around

so in order to finish my little script, ive had to use a bunch of different new 5.3 python commands. its turning into a little swiss army knife cant wait to see if others get any use out of it. bone deletion, skin weight transferrence to other bones, LOD deletion, regeneration & modification. Makes testing skeletal mesh auto generated LODs so fast and accurate. the viewport always crashes when i try but in script it never crashes!
Might assist with art direction as well, by enforcing uniform LOD complexity on every skeletal mesh I import into the project.
Aren't random movements what you want from a ragdoll? Like, isn't that the point?
Obviously the ragdoll is going to move your character around, that's what it's for.
Its not physics-based, its teleporting that frame
Like, changing pose to a different one
Glitches out
When I change material
Hmm
Interesting!
I've always heard you should generate dynamic materials when you create the object. I've never seen someone generate one just before using it.
I mean SetVectorParameterValueOnMaterials has a specific code handling that runtime-generation thingy so why shouldn't I do it
Maybe 'cause it fucks everything up?
Like - it might not be that!
But that's what I'd try.
Not sure, more like a ragdoll problem
Could be.
But I mean - what's the harm in generating the material early as a test?
Also tried to move character corpse underground instead of dissolving, the same glitch
Did you generate the material during that test, or did you just try to move the ragdoll?
Nothing wrong, just didnt want to do it while the codebase is still changing
All right. Good luck!
Just tried to move it (disabled physics yada yada)
The same glitch, so I guess it has something to do with a ragdoll
Like e.g. any skeletal mesh interactions while the ragdoll is active will break it some Epic Games kind of stuff, you know
Hello hello, losing my mind with transforms here again.
I calculate the offset transform for my hand IK using a static mesh socket (transform A) on a weapon. But the skelmesh socket's transform that the weapon is attached to (transform B) was not included, so I added that. It works.
I just don't understand why I have to do A * B instead of B * A? I thought I first need to apply the skelmesh socket offset and only then the static mesh socket offset?

Welcome to the frustrating world of matrices!
Every package, and often every function will calculate things in a different order!
In my experience, you just have to try both ways to see which one works.
(I think, mathematically, it's 'child x parent' if you're building a hierarchy)
(not 'parent x child')
So multiple compositions would then be child x parent x grandparent?
I read somewhere that transform composition is calculated in reverse order and that confused the heck out of me
Yeah, I think so!
Ah, wait, then it would make sense because we move into parent space first and from there into child space...
I'll take your advice and just try both orders from now on, thanks so much!
It's not relevant to this chat but what is the GUI your using for blueprints?
Electronic nodes!
It's a good plugin! Tends to make blueprints a lot easier to read.
Hello has the motion matching sample project released? if so where can I find it? I want to check how they're handling jumping and climbing animations in it
It doesn't appear to have been released yet.
that's what I thought, thank you
Hey y'all! I downloaded the Animation Starter Pack from the Marketplace, and tried retargeting the animations from the UE4 Mannequin to the UE5 one. The only issue is, that this is what the animations look like, for some reason... Why?

It might have something to do with the rotation offset of the bones betweens SKMs, either that or somewhere in your retarget there were bones that mapped to the twist bones on the UE5 Mannequin. I don't remmeber if the heirarchy for each Skeleton is the same...
hey guys, is there any possibility to make an anim BP to chose randomly between different animations? I ask this because I am using a MassSpawner and I am trying all NPCs having different animations

Blend by integer would work
like this? It triggers the same animation

You would have to change the 'active child index' randomly when each animation finishes.
Alternatively, you could use a list of montages, like this:
thank you
Hey guys, sorry for my noob question please.
So, I've made an aniamtion in Maya where my "Attacker" is starting from the (0,0,0) and reaching to (x,y,z) whatever it is. BUT, the "Victim's" final position is not at (0,0,0).
My question is that if want to blend any animation to the Victim after this one is played out, will it be less effort work to blend the animations together ? or is it preferred that the person who made the animation should make sure that the Victim reaches back to (0,0,0) first.
does someone else have 5.4 constant error crashes after double clicking on already retargeted and saved animations?
"LoginId:8475703a43605d5250b8de8eef0f1d43
EpicAccountId:bb773973979749bc82e9ce6a3c327edd

Assertion failed: (Index >= 0) & (Index < ArrayNum) [File:D:\build\++UE5\Sync\Engine\Source\Runtime\Core\Public\Containers\Array.h] [Line: 758]
Array index out of bounds: 53 into an array of size 53"```Having exactly same problem with retargeting to Synty skeleton. UnrealEditor_DetailCustomizations!FAnimSequenceDetails::GenerateAnimationTrackNameArrayElementWidget() [D:\build++UE5\Sync\Engine\Source\Editor\DetailCustomizations\Private\AnimSequenceDetails.cpp:297] keeps crashing when opening animation.
For some reasons GenerateChildContent
ArrayProperty->GetNumElements returns number of elements that is inconsistent with number for elements in AnimationTrackNamesList inside FAnimSequenceDetails
For some reason it has number of tracks from source animations, say 101, or 86, but the array that it tries to read has only 56 tracks, since, probably Synty skeleton has less bones. The code in GenerateAnimationTrackNameArrayElementWidget was added in 5.4.
Also for some reasons, some animations which were retargeted in 5.3 are now upside down if you are able to open asset. But work fine in-game.

i hope we get a hotfix
guys i have a reload animation, to make it happen i have the animontage i play in the hands and the one i play on the weapon, idk why but the animontage of the weapon doesn't play
and another problem i have is that the animation of the hands somewhat lags when i import it to ue5
What are you using to play the animations.
play montage
This doesn't happen with using Manny Simple. There's something odd happening with the complex version.
Does your weapon have an animation BP?
no
Then it can't play a montage.
if i have multiple weapons, so skeletons, i can use a single animbp for every weapon or do i have to make a lot of animbp's?
Simple Version

With IK
Neat!
when i rotate
Looks like simple doesn't have twist bones.
But if you're retargeting, that doesn't matter.
so it doesn't matter either?
I would like someone with experience to advise :/
I would probably have to deepen my knowledge of the control rig to adjust it in my own way
but I'd rather not, I'd just like to animate
okay, so im am trying to use that and it works
but
the mesh gets resized and i don't know why
Check the scale on your root bone in your animation.
It's probably scaled up or down.
This is likely caused by an issue with the Blender FBX export.
Blender and Unreal like to argue about what a unit means.
is it normal for my animation blueprint to change name when selecting it for an actor? it adds a _C at the end of the name
That one seems to be something else.
I think that's just a bug in the inverse graph for that character. Not sure what's causing it.
Yeah, I think that's the compiled version? It's usually not a problem.
i am also having an issue implementing motion matching to my project, for some reason my animations stay in place in the previewer, and the actor is invisible in-game
if i import another set of animations, they move from standstill in the previewer, and the actor is visible, do you know why?
should i keyframe even the scale?
i keyframe just location and rotation
OK, that's interesting. And the weapon only changes in scale when you play an animation on it?
yeah
Well... I'd double check the scale in that animation!
Because the only way it makes sense for an animation to change the scale is if there is scale in that animation somewhere.
oh wait
i think i know why
the actual skeleton of the bone is 4.0 scaled
don't know why
I would bet it's either your unit scale in blender, or your export scale in the fbx exporter.
any way i can apply transform like in blender in ue5?
Not that I know of.
You shouldn't have to rerig it, just re-export it from Blender.
You apply the scale in Blender, then re-export it.
See if you can maybe fix the bone using the (relatively new) skeletal mesh editing tools plugin
Or yes fix it in blender too while you're at it
This won't help with the animations if they have more than one animation for the gun.
It's best to fix it in the original file.
Oops, didn't read the entire conversation
yeah thanks for the tip, but i am fixing in blender the scale
it crashes every damn time i open the animation... wth
It will crash as long as it opens details panel by default for problematic animation. If details panel is not open it will open animation, but will crash if you go to details panel. But I have no idea how to prevent it from opening details by default.
Im currently working on a third person character game where our character swings around Via grapple. I was wondering if there is a way to use IK to aim the hand towards the grapple point while the player is swinging around. Anyone have any tips?
Yep!
You should have access to the grapple point position, right?
Cool! Do you know how to get the vector between two points?
Would it be through calling the character actor in the AnimBP event graph?
Ah, kind of! It's a math thing.
If you have two vectors and subtract one from the other, the resulting vector is the direction from one point to the other.
So if you subtract the position of the grapple point from the position of your characters shoulder - you get the offset from the shoulder to grapple point.
Then, you can use what's called 'normalize' this converts a vector from one with a variable length to one whose length is exactly 1 unit long.
If you multiply that normalized vector by the length of your characters arm to their wrist, you get a point between their shoulder and the grapple point where you could put an IK effector.

Just curious, what if I already have a basic IK setup with the control rig?
Sure, but you need to know where to put the effector.
That's what you're generating with the math.
Where on the line between your shoulder and the grapple point you should put your IK effector.
You should do this math inside the Control Rig. If you do you it outside, you run the risk of getting the shoulder position from the previous frame.
The control rig has the current frame value, and that's what you should use.
Hey all, I am testing out the new modular rigs in 5.4 and editing animations. When I create a new modular rig on the UE5 Mannequin, pop it into the sequencer, and bake the MM_Run_Fwd Animation into it, it gets ** incredibly distorted**, but works fine when I bake it to the premade Control Rig for the UE5 Mannequin. Any thoughts here?
There certainly seems to be a few problems with them right now. I haven't tried them myself, but several people are having issues - mostly with custom skeletons.
I'm just testing the animation editing flow with the stock unreal skeletons, stock animations, and modular rigs as documented. Trying to eliminate all extra variables.
Good to know, at least I can use them additively to edit animations. This is what I would suggest until the animation baker is compatible with the modular rigs
Just curious how would I get these vectors into the control rig?
You only need the one, the grapple point. Your shoulder should easily be accessible inside the Control Rig.
Check the section here for 'Accessing Variables and Controls'.

Epic Developer Community
Procedurally affect your Control Rig by using it in Animation Blueprints.
I submitted bug report with reproduction video, and empty project with 100% repro. So I hope there will be a hotfix.
Do I get the character's arm length through subtracting vector from wrist to shoulder?
Sure, you could do that. I'd store it in a variable during the construction event though.
You don't need to be calculating it every frame.
By construction Event you mean the Event graph in the anim BP? or something else?
So basically with all the math I take the final vector, plug it into something that places the IK effector at that vectors location in global space
Yep!
what specifically would I plug it into and would this override my IK two bone set up?
IKEffectorTranslation = Normalize(GrapplePointPosition - ShoulderPosition) * LengthOfArm
IK requires you to have a place you are putting the IK Effector for IK to do anything, so you would be using the IK to move your arm into the correct position.
im actually going crazy, i don't know why but ue5 keeps messing my scale
when i import the main bone is 100 scale, if i change the scale in ue5 the model breaks, if i import it with universal scale down to 0.01 the whole model is smaller


You need to change the unit scale in Blender.
Blender things 1 unit = 1 meter by default.
Whereas unreal things 1 unit = 1 cm.
you'd want to apply the scale to the root bone too, is that right? I've done the blender to ue dance before but i cant remember anymore 😅
yeah i did it, it makes the whole model smaller
When you change the unit scale in Blender, it changes the unit scale, which means you need to scale the object up in Blender, then apply the scale.
This video goes through how to do it:

In this video I will show you how to correctly export a character from Blender to Unreal Engine 5.
Common mistakes include issues with the scale of the root, joint orientations and differences between bones and joints. In this video I will talk about everything you need to know to correctly export rigged characters that follow Unreal Engine sta...
After following to my best ability this is what I've got, I moved it itno its own function called Swing IK

Im extremely new to UE5 so sorry if its messy
You shouldn't need to set the Grapple Point to itself. That won't... do anything.
This is also likely to fuck up, because you're calculating the length of the arm continuously, so it will change as the character moves, and will create Undefined Behavior.
Then how do I get the grapple point from the character BP, its a separate BP where we track the grapple point
You want to measure once, during the construction event.
This:
Check the section here for 'Accessing Variables and Controls'.
https://dev.epicgames.com/documentation/en-us/unreal-engine/control-rig-in-animation-blueprints-in-unreal-engine
Epic Developer Community
Procedurally affect your Control Rig by using it in Animation Blueprints.
I already linked this to you.
You should be able to expose the variable.
You also probably don't want to modify the elbow control, unless you've given the IK effector a very odd name.
You want to move the effector that controls the wrist.
The one that moves the arm.
ah ok, when u said IK effector I thought u meant the elbow point in an IK two bone, I'll fix that
The one that controls where the elbow points is usually called the "pole vector"
Do you know if it's still required to name the armature object in Blender to "Armature" to ensure that it is ignored by the engine on import?
I think so, yeah.
I hope that's resolved someday, maybe with the rigging overhaul they're doing. Makes it a pain for root motion and multiple characters in a scene.
Interesting in that video, Daniel rotates the joints to change the joint orientation, when you can control that on export without having to adjust the rig. Having said that, I think that might only be a problem for a little while longer, from what i understand the rigging updates will allow you to influence joint orientation independently of bone orientation 🤞 or you could just rig in unreal now 😅
I beleive this is all in the Construction event already? I'm kinda confused what you mean by that still, let me send full ss of workspace
Yeah, that part was weird. I don't think they know you can change the orientation.
The construction event runs only one time. So you only want to measure the arm during the construction event.
You want to put the grapple point into the Forward Solve event thread.

And you want to make a branch, so that you only run that code if you've set the Grapple point.
if this isnt the construction event then where do I find it?
If you can't see it in your graph, you should be able to create it by right clicking and typing 'Construction' into the search bar. It should show something like 'Event: Construction'.
ok I've got it
Control Rigs have four main events:
Construction: Called once when the Control Rig is created.
Forward Solve: Called once per frame while the Control Rig is in control.
Backward Solve: Called once per frame while the skeleton is in control, such as when baking an animation onto the control rig.
Interaction: Called once per frame while clicking on or dragging a control rig object.
I'm working on creating a fire powered superhero, but I've ran into an issue, I'm not sure how to resolve it. the breasts become twisted after switching flight or walk modes, any suggestions ?
That depends entirely on what method you're using for jiggle physics.
Hey, at runtime, can I copy the animation from one character too another? I can read bone transforms in blueprints, but not set. From my reading I can only do this in an Animation BP? But I cant see how i can references bones from another character in an animtion bp. I might be going about this all wrong, open to suggestions.
Look up "Copy Pose From Mesh".
(it's a node for an animation bp)
You can also look up 'master pose component' for a different way of doing it.
cheers
Has anyone used the newer modular control rig yet? I imported a skeletal mesh, and in the modular rig it looks ok for the spine, but the sockets for adding legs or arms are stuck in the root for some reason. Anyone seen this?

Yeah, a lot of people are having trouble with this.
Can I see the names of your arms and legs?
And then when i add a leg and set the thigh and foot bones, it snaps weird

Huh, that seems pretty normal.
Pic of the leg snapping:

I haven't looked into how the modular rigs are targeted, but it seems like they're quite specific in how they're intended to be setup.
Yeah seems like
Well weird workaround for the sockets in the wrong spot, if i start the mesh as the mannequin, then switch to my mesh, the sockets are correct. Leg still twists weird but that is probably my bone orientation
@nimble torrent the jiggle is set by a DTL plugin for Daz Characters converted with the DTL plugin.

Then good luck. I have no idea how those work.
Ok so my team member and I have got it working kinda. The hand is infact point at the grapple point, but from the center of the character at the hips pretty much. Not sure as to why that happening. I'm waiting on a push from a team member then I'll send another ss
Nice job!
so actually I was mistaken. We had the ABP set up with a Locomotion State machine first with all the regular stuff, then an IK Rig for the foot placemet, and then another control rig for the hands, this second control rig was overriding all animation poitions to the regular tpose, We're now trying to use the IK twobone in the ABP and it is kinda working but we are unsure how to add a branch in the ABP
We're really sloppy rn because we're in a test build where we're trying everything
Anyone able to tell me the name of this idea? I know it's a thing, just can't find the right keyword to search lol
I'm making a custom AnimBP but want it to prioritize logical continuation. As to say, not skipping frames of an animation just because a different action was called (within reason).
A perfect example: character is walking straight and then input is given to go 90 degrees left. I'd like the character to use the next step as the transition into the next animation, not just blend between the two. Hopefully that makes sense.
Happy animating everyone!
I'm sure Squishy can jump in, but you can branch in the Control Rig itself so you're arm IK can have a branch to use the Grapple setup: #animation message
IIRC you could have your grapple as a separate control rig and then branch using a Blend Pose by Bool node in the animbp. If you cache your pose before your two branches can be:
Animation Cache > Normal Arm IK
Animation Cache > Grapple IK
Motion Matching?
I do believe that will do the trick. Perhaps I was thinking of something different.
Thanks for the prompt! I know Epic is releasing the project for motion matching later in the year. Are there guides out yet on implementation?
The documentation is pretty detailed: https://dev.epicgames.com/documentation/en-us/unreal-engine/motion-matching-in-unreal-engine
And people have made tutorials on youtube, and they're all pretty quick.
Epic Developer Community
Use Motion Matching to create responsive animation systems, that select animation poses from a database, to match a dynamic system query at runtime in U...
well the situation is I have a grenade throw animation, and when the player looks up, the arms need to move up with the grenade throw animation instead of being locked
Appreciate the resource!
Hmm - your best bet for that is probably a control rig?
Play the throw animation on the arm, then in the control rig, apply the same offset as the top spine bone to the IK effector of the hand, so the throw animation happens in 'spine space'.
how to make motion matching that's good (blending, no feet sliding, no snappy movements, etc.) and also motion matching for beyond just walking and running and stuff
Im trying to get Copy Pose From Mesh working, i have a variable (master) that I can set to copy the pose from, but how do I set it? The docs imply it should be exposed on the blueprint, but I cant see it.

In the variable definition on the left hand side of the blueprint window, there should be a little 'Eye' icon.
If it's closed, it means it's not exposed to blueprints.
Click on it to make it open, and it should work.
I checked the same doc you mentioned. There are two variables with the same name. One in AnimBP, the other is on the slave CharacterBP. Maybe, you may have confused it being a single var.
So, you don't have to expose it (only expose the reference in slave CharBP or use some sort of setter/getter). Instead, get the pawn owner in AnimBP (pawn owner = slave CharBP, which has exposed reference variable of master character), set the reference in AnimBP, use the animnode.
cheers, ill give that a go now
I've got the variable exposed for a class of my character(type target_charter), but even with mutiple blueprints in my scene with that character, nothing shows up. I thought the idea was I select my reference character this way

Sounds like an aim offset to me, look that up
Is there a list of skeletons supported by UE 5.4 Automatics Retargeting? Everywhere I see it says most of the Industry standard skeletons but specifically which skeletons is not given.
Doing retargeting in 5.3, any guess what I might be doing wrong?
I want to make a sitting animation

How to make your legs stay in place when turning?
some tutorial?
Should I even rotate this way?

Rotate body_offset_ctrl
someone?
what are you trying to rotate?
i mean like which parts of the body?
you would need to add the ability to set the parent of the ik feet controllers to some object that is above that controler your outlined
I want to rotate my whole body without legs, I have to make the character come to the seat and sit down
or just I select all points except the legs and rotate? just wondering if this is the correct solution
Just rotate pelvis instead?
What is causing this and how do I fix it ? I feel like it must be a root motion problem but why did it occur only on some bones and not all of them ? And did occur because of the retargeter bones options or because of the initial animation itself?
When you look at the original sequence, does the root move? It seems likely that, if you retargetted Quinn onto a character that lacked her IK setup, her IK's wouldn't follow correctly, because they have nothing to map too.
Are you trying to select them in the blueprint? That's not how it works. You would set the value on instance of your class in the level.
hey, is there any reason that this does not work anymore in ue5.4? it just removes my anim node in the layered function when I restart the engine (project is upgraded from 5.3)

Hey! I made a character model (its a robot) and an armature. I parented all the single bones to the according meshes via a plugin, but when i import it into unreal, it wants to create an actor for each part of the mesh and crashes. I tried merging all the parts of the meshes, but then the rigging does not work inside of blender (so i can only move the whole body on one bone)

In the original sequence, the root moves yeah.
And you're right about the missing IK bones, the ones that are not moving (beside the root) don't exist in the original sequence's skeleton. But what about the root tho, why didn't it move with like the original animation?
Is it only a matter of enabling/disabling the root motion check box ? I mean it should have copied the root bones transofrm anyway? Or am I wrong about this ?
I dunno! That's interesting! I imagine that the retargeter couldn't find the root properly.
In the original animation - did the root object have a weird name?
Sometimes they do!
What happens if you recreate the node?
Yeah I also tought of that but forgot to mention it, I have to check if in the retargeter, thhe option for the root bone would cause the issue.
No it's called root as well
Huh!
I parented all the single bones to the according meshes via a plugin
That's not how characters are normally made! Unreal's behavior is correct based on what you created.
Do you have a tutorial i could follow?
Ngl I might have caused the issue myself since I'm a beginner and trying all kind of thing with animation/rigs but this one is weird indeed.
Not right now, no. Why did you use that plugin? Why didn't you just skin your character to the armature normally?
Because the tutorial i follow said so 😅
These things happen! This is why it's important to always keep a copy of your source data. No matter what shenanigans happen to the derived files, if you keep the source data, you can always fix it.
Now that I look at it, no xD Propably only meant for blender ig
To be clear - it's still a weird thing to do in blender!
Okay, well you said to skin the character to the bones?
That's the normal way, yeah.
You make an armature object, you make a mesh, you attach the mesh to the armature.
Hmmm
so still parent, but just the complete mesh instead of the single ones?
Yeah, but...
OK, save a copy somewhere, so you don't break things following the instructions from some rando online (me).
But I think if you just merge all your meshes together - you should be able to import it into unreal as one mesh.
And keep the skinning data.
Hi guys, I hope this is the right place to ask this, but I'm fairly new at using UE5 and am trying to solve an issue that I'm running into. I have an animation montage that consists of three sword swings, I want to have it so that pressing the attack button will trigger one attack, but holding it will continue the combo. I've set up the sections on the animation montage itself, but am struggling to implement the logic for the pressed vs held part. Any advice would be great!

In the image I attached, the print string works as expected, showing up when the button is held and not showing when not held, but the next section of the animation is not playing
Nevermind, after an hour of headscratching I immediately worked it out hahaha I forgot to add the mesh
Although if anyone has any suggestions for making this code a bit cleaner I'd love the advice! Thanks
Not sure if this is the right channel for this, but anyways:
Looks like you're using enhanced input. Why not take advantage of that and instead make 2 input actions: IA_Attack and IA_Attack_Held. You can use an input trigger on the latter to ensure it only triggers when held for X amount of time.
No need to wrangle that sort of logic in blueprints
When i parent the gun to a characer using the right hand, the left hand moves through the gun with any animation i add. But if i parent it to the left hand it works fine, yet i cant use a reload animation, because the gun follows the reload animation.. please i really need help. ived looked everywhere for an answer
The reason people haven't answered you on this one is that it's both super specific to your reload animation, your gun, and your character setup - and because the solution for this kind of thing tends to be quite elaborate and complex.
For example: do you have a weapon bone?
Hadn't even considered that! Thank you!
no? how do i do that. Im really sorry this is my first time using animations
Right, this is why people are avoiding your question. It's not your fault, but you have a tricky one, especially for a newbie - and the solutions are pretty involved and will require several steps you may not be setup for.
Did you create the animations or skeleton yourself?
No I used a character and animations from a website called mixamo. My uni lecturer told us to use them.
Got a question - Anyone familiar with importing VRoid models into UE? Specifically trying to do it in UE 5.4, having issues with animations actually transferring to the vroid models though.
anyone able to help me with like the simplest task they have ever seen on this server? all i need to know is how to make a door move up and down when i press a button on my keyboard
OK. Like most things in game design, your problem has many possible solutions. None of them are correct, but many are incorrect.
The way that will result in the fewest problems were you working on a full game would involve adding a bone to your characters skeleton attached to the characters hand and calling that the 'weapon bone', then you would attach your weapon to that bone, so during the reload animation, the bone would animate away from the right hand, and with the left hand, without requiring you to change the parenting of the weapon.
We do this because changing parenting on the fly tends to result in shenanigans, and good development practice involves minimizing the amount of shenanigans as much as possible.
In your case, because you have a very small number of animations, and you didn't make them, and this is a school project and not a professional project - changing the parenting of your gun is a reasonable choice. The maximum amount of shenanigans this can cause is fairly low.