#Hades - Nebula255 #15
2661 messages · Page 3 of 3 (latest)
Paint did some running, not amazing but it works

I'll try to wet sand some of the high spots down that appeared due to dripping / runny paint, then scuff up a bit more and see if i can fix it up, will try it on a small test piece first instead of the actual wing to see if its feasible
lmk when you finish 4040 cad btw im probably gonna go w it too
might fill the extrusions
Saw some people got a nasty resonant frequency from it that reacted to 5032’s
5032?
Fans often used for chamber heaters
Gonna strip one cantilever wing of paint, and paint it properly later today, might attach beacon, belts and endstops aswell
Gonna start twisting up cables for my umbilical tomorrow night

i need to get rid of my can board for an umbilical on my stinger bro
can is just a pian
pain
Stepper motor frame connector, short cable from the stepper to this, then a longer twisted cable to the MCU

I got paint to finish things finally, painted a cantilever wing, gonna paint the main wing now and then the backplate, should all be done tomorrow ish, then ill let it try another day, get that installed, and finally carry on with this build.
Pretty deep in wiring, so far I've changed the locations of my 24v and 5v wago's, makes a lot more sense now that I got rid of the ESP i had to have the 24v closer and more accessible, while the 5v for the pi further away.

Just need to paint the backpanel now which I’ll get started on later


These both came out surprisingly good compared to my expectations, definitely a much better way to hold the wing
those look clean
is this the engine bay paint that turtle has recommended a few times?
Yeah, matte black engine paint
is that just in a spray can or do you need an airbrush?
Spray can, make sure to have it in some warm water or something to keep it to temp if you're doing it outside
all my cans were super fiddly with the pressure, so i had to buy a few more since i needed to re-paint a few of them
Isopropyl alcohol is pretty good at scrubbing the paint off
Thought I was smart using painters tape to mark off some already painted edges, ended up peeling off some paint, so I gotta re paint the middle wing now, pretty annoyed but should’ve seen it coming I guess
Keeping the paint warm helps a lot in a spray can. Let’s the viscosity thin out a bit and not spit blobs out, I use two part catalyst paint for cabinet touch ups and put the aerosol can and paint in a bucket warmer to get warm
yea mine was still kinda odd even after keeping it warm, but now i get to re-do it anyway because painters tape is also great for paint removal
I usually pull tape while paint is either wet or 100% cured
Other wise it will do that
yea it had been sitting for about 2 days so figured it'd be cured
But none the less still at the mercy of a paint can
but hey now i just get to scrub it clean, and if a tiny piece comes off the bottom, i get to repaint that aswell, no big deal (incredibly annoyed, it is a big deal)
Also how you had it taped if you taped and painted to the tape at a hard edge without letting the paint barely ride over the edge
will check if theres any scratches on the bottom, if there is, im dunking the whole thing in iso, peeling off the paint, and re-doing it
Wings came out beautifully, painted half of the top and back panel now and will finish it tomorrow, I’m also driving to Sweden to pick up some PIR


Got PIR for the build, gonna have this in the shed until I’m happy with the state of the gantry and cantilever

Finished painting the cantilever parts.
I will let them dry and cure until tomorrow night, then try to get it installed again.
While I wait for things to dry, I'll prepare my chamber heater, attaching the thermistors to it, and get more parts hooked onto the printer like my front tensioner plates, door hardware, etc. so i just need to belt it.
Got 48v and the pi hooked up, gonna do 24v, then handle the chamber heaters thermistors

I read that as "got 48v to the pi hooked up" 😂
with the amount of sleep i'm doing this wiring on, i'm not gonna rule that out as a possibility
Almost done re-wiring the SSR now, just need to crimp the molex, so today I've:
Painted cantilever parts for the final time
Picked up PIR in Sweden
Wired up 5v for the Pi, 24v for the MCU, and 48v for the motors, and 50% wired up the SSR
Remaining:
Install cantilever parts
Finish wiring SSR
Wire thermistors
Wire heater
Wire Z stepper
Wire Y Stepper
Wire XY Endstops
Wire Toolhead
Install and wire CPAP
Install panels + insulation

PT1000


Ballscrew is on


in true nick fashion i've ordered more stuff
nsk 635ZZ bearings for double shear
planning on excit3d max motors courtesy of @stiff jungle and others,
24 misumi brackets to keep this thing square,
looking at replacing the 7040 with a 9290 and probably also some new drivers
forgot to mute that ping, oops
panzar is handling the bearings and brackets, comes out to about 180usd for 2 bearings and 24 brackets
Also got a few toolheads I'll swap between to try, this will only commence once the printer has done atleast one benchy 😂
Finally got my shit together and spent 3 minutes crimping the last Y stepper cable that gets mounted to the frame, my z stepper arrives tomorrow* thought it was today, so will hopefully have the bed installed, and then i can start wiring shit up
Got my stepper and got it installed, time to install and wire the bed, again

Bed is fully wired now, thermistors are crimped, etc. just need to change pins in config


Gonna work more on making cables look nice tomorrow


Decided to try adding a thermistor to a stepper, kinda like the classifieds but more janky, i plan to run them hard so figured it could be beneficial.
opened up the 2504 s8 55 i had lying around, and added a glass bead thermistor in there then hooked it up to my v0 and energized the stepper (temp shown initially is the temp with no power or anything to the stepper)


Since its on my v0 on 2209's, I'm only giving it about 0.8a of run current
Got my belts installed and tensioned now, gonna wire up the X and Y endstops and see if i can get it moving
Actually that also requires me crimping the steppers.. we'll see if i dare turn it on..
To try to contain the scope of the project until it's running, I won't finish installing the thermistors until I have the toolhead installed and it's pushed plastic.. at this rate it'll never be finished, but these should be easy enough to add anyway later on.
I guess I gotta save some of the fun for later anyway
First power on test today, gonna check over all electronics to make sure there's no metal shavings.. forgot to cover them when i was working on stuff and stripping wires
WE GOT POWER
AND NOTHING BLEW UP
Y stepper moves fine, X has a cable pinned wrong
now i just need to connect the Y endstop, and i might run a speed_test for fun, if i can cheat my z to think its homed

I think you hotend might be to hot
Preheating
nuclear fusion heated hotend?

Fixing up the fiberglass sleeve on my hotend and hopefully getting that installed now, might see if I wanna wire it aswell
Getting started on the toolhead now.. the beacon cable is TIGHT, but does have some* movement

No fatigue on the connector, leaving it a bit of slack
need to see how I'm gonna route the goliath wires, but that'll likely all be tomorrow, my back needs a break
damn what toolhead is that?
Archetype breakneck, just without the duct
I have a few different ones I'm gonna be trying
Breakneck, Sphinx by @alpine lake, and UAP
sphinx with double cpap? 😄
thats what its designed for
Single ws9290 :P
I'm going with it mainly because it has a much more pleasant sound
more like a yell rather than a high pitch scream of the 7040
Lol my custom order motors reach 90c internal in like no time
no idea if thats good or bad
1.1 was letting me hit like 50c iirc?
the 80c internal was after 50 iterations of speed test at 600@25k
these motors whine high pitch AF and give off a vibration in my hand
idk how to test the motor while its not hooked up to the belts without homing
i just fake hit the end stops with the motor plugged in to my x
lol thought this was general chat
u can try force set kinematic position?
https://e-z.tools/4vv5x7kw.png
it more or less is

and damn this baby shakes at 600@25k
broke a strut on the hotend fan, ordered a new one, slightly annoying but that leaves more time for wiring i guess
these huge goliath wires are definitely something

thats fine
had mine slightly hotter

Is that outside or inside temp
classified thermistor, so inside
Getting real close to the absolute max
if that was on the outside the motors would probably be cooked
I’m assuming they did something similar to me, so coils are probably slightly hotter?
yeah it was an accident
Lmao
i havent opened them to look where the thermistor is
I’m glad I printed my archetype stuff in PPS, those Goliath heater wires are getting awfully close to stuff
Looks like it’s got great cable management options, just not for Goliath
why are they so thick lol

Got a big ass crimp thing from the normal wire going into the nichrome wire
I have to bend them so carefully to not just snap them
just switch to tricorn or chube lol
Tricorn is pretty likely, if it was chube I’d have to go for chube air which meh
If I was to go chube I’d want conduction
are there no nice metal toolheads you could go for?
I’d like to keep cpap, el fuego is the only one that comes to mind but it’s not originally designed for the stock Voron belt path, so that’s not something I want to mess with and fuck up the COM
It also has its own hotend iirc
Ah right, tricorn or chube but he wanted to make his own
Either way it’s not the stock Voron belt path and I don’t want to ruin the COM by swapping stuff
wait they're working????
in open loop
Misumi order won’t ship until the 24th sadly since some parts are coming from Japan, currently trying to slowly make my way through umbilical wiring


What design do u use for the belt clamps? Currently in the process of designing some
Archetype belt clips from their experimental branch on GitHub
The red thingies on my X rail


Ok tysm
How do u figure out how far forward they should be placed so the belt is parallel to the X beam?
Got the extruder and main toolhead ducts installed now, gonna need to take it apart tomorrow(?) to change the zipties in the belt clips out for some kanthal wire, they don’t have full movement range so aren’t fully parallel to the X axis yet, once I’ve handled that I’m gonna see if I can somehow give the beacon cable a bit more space to breathe in, it’s incredible right at current and it’s pretty sketchy to me.


I’ve never tried designing belt clips for myself, once I tension the belts these start aligning themselves with the X axis more, currently mine don’t because of some oversized zip ties
Yeah I love my Tyson plate, majority of the toolhead is printed in 3D4Makers PPS-CF

So, fun update.
Went to go fix my belts with the kanthal wire to hopefully fix them not being fully parallel to the X beam, turns out that wasn't the issue.
Airtac carriages are 3mm longer (1.5mm each side) than most other rail carriages, and the archetype clips are supposed to sit snug against the end of the carriage.
I've gone absolutely ape mode and just removed 1.5mm from each side that touches, hoping that's enough, and I'm now printing them at 8/8/8/80% hoping that it'll make up for it 😂
Time to order new rails, again?
Time to do some CAD! (and consider new rails.. i like new and shiny)
Rebuild #30 coming soon to a build log near you
I should start a rebuild counter in here 😂
I'm printing prototypes now, didn't take long to gorilla smash those belt clips into (hopefully) submission, if all goes well they'll work as is, i just have to replace the current clips which shouldn't take long, then i can re-belt it, and get the toolhead installed again
I'm also figuring out mammoth muffler mounting
Just update the title every time you start to rebuild again 😂
I've had to update my build log titles
Its been 0 days since Nick hasn’t rebuilt his printer
But hey good news, I think I solved my mammoth muffler mounting situation now
So I'm fairly sure of where I need to cut my precious panel

Needed to modify a few parts slightly
hiwins this time lol
I vote for schneeberger rails
Where would you source those lol
At Schneeberger
Or maybe through alchemy
I’ve already bought an IKO rail before through alchemy, never used it
Doing the extruder, hotend and thermistor cables today, then the only thing missing is my hotend fan, and cpap mounting..


Soooo…
Finishing up the wiring today, just need to terminate the ends of e cables with JST xh, then I’m only missing my hotend fan, in terms of toolhead stuff.
I also ended up ordering a ws9290-48v to replace my brand new ws7040, which should be here around the same time, current estimate is that I get my parts Tuesday and I’m ready to print on Thursday..
*This doesn’t mean I’m even close to being done on Thursday, will just be printing some parts my v0 can’t handle, before then continuing
Does that count as a rebuild? @tender haven
how much rework is involved in this change?
Just replacing the cpap blower, which isn’t even wired yet, so this is just an upgrade I guess, not a rebuild
And evidently I can’t keep my wallet closed for even 24hrs


Gonna attempt my beacon setup tomorrow, I’ll make sure to record and post it in #demolition_derby if my entire very brittle pps-cf toolhead decides to crack
I can't quite reach, i'm temporarily using shims below the springs and solid standoff, until i can get my hands on longer standoffs.
Pushed the bed up by around 5mm and it seems even further away now lol, almost sounds like the stepper stalls trying to go the last few mm
IT WORKS
Not sure what causes the belts to shift like that on the belt test, will have to watch some videos on this later


Belts looked weird bc a motor cable was hitting them lol, needs tension though..

Got all cables ran through my ducts, except for the hotend fan which I'm still missing, getting close to this stuff
Hotend thermistor does work atleast, might try to crank the heat to 50 without the hotend fan

You could go hotter, only issue without a fan would be heat creep causing a clog
Yeah this is just to make sure that the heater does work
Also how do you not have the fan yet
It was originally part of a large misumi order, Panza messaged me saying they still hadn’t shipped the rest of the parts
So I made it another order, got shipped today
heater and thermistor confirmed working now, just the extruder cable i need to test, and then i'm ready once i get my fan.
I can't wait to see this build in action, it's been so long in the works
Really glad to see it take off
Yeah haha same here, plan is to print on thursday if i get my fan
Gonna try to set up beacon contact today
We got FILAMENTTT

Contact is now set up, need to work on a start macro soon..
Print on Thursday does seem doable depending on how much motivation I’ve got, everything is wired up, except for the extruder, hotend fan (on the way) and cpap, both of which should be fairly fast

High temp tube also seems to be on the way slowly

dude charge your phone 😭
One day
lol
Extruder movement, just missing that hotend fan..
Also got some 1mm piano wire on the way to stiffen up the umbilical, the current steel cord stuff is very floppy lol
Seems I willed a delay into existence
Hades - Nebula255 #10
New milestone reached thanks to turtles definition of a rebuild
Open frame graphs: 150aph, 5scv


Structural panel graphs: (On both sides, no rear)
150aph, 5scv


Structural panels (sides + rear) 2.5a:


Using excite_freq, the only way I'm really getting a difference is pressing around on the toolhead, not sure what's really causing that peak at 125 but might dismount the toolhead just to rule that out..

Made the cable for my hotend fan, which is the last for my toolhead.
Not too happy with the final wire lengths of the extruder and hotend fan, but swapping extruder anyway so whatever.
Still missing the 1N4148 diode for the delta fan, so I’m not wiring up signal for now, will get it wired soon and then try to heat, then calibrate MPC
currently printing a small base for the cpap, so i can mount it, then double sided tape it to my table for now since i dont have my muffler assembled, and this thing tries to fly away at 25%
after that, i'll attempt PID tuning the bed and MPC tuning the hotend, if MPC gives me any issues I'll be switching to PID
Sounds like a jet engine
Running the dual loop pid calibration now, then I’ll go through a few more checks and I might try a print..
Pushing plastic for real this time!

Your motors are longer for more I can hear them saying please 🤣🤣
2.5a haha, I’ll up the speed when I figure out beacon and other stuff
Hades - Nebula255 #11
Sample spread issue on beacon with the merc, I suspect my Z might be binding slightly causing inconsistent readings, time for another rebuild!


Seeing some inconsistent beacon results even after the rebuild, I slightly suspect one rail binding a bit, I’m gonna replace both rails to be on the safe side (and to have them match), currently getting offers for some high quality ones..
been chasing issues both with the goliath and beacon;
had a heatbreak clog that took a while to figure out and clean out, i've since added thermal paste in the heatbreak
now I wonder how that clog happened in the first place, i have a delta 5v 2510 on both my v0 and my merc, my v0's tach reading is 14k, rock solid +-200rpm, while the merc goes from 11.7k down to 7.6k, unsure if its a faulty tachometer or if that fan really is all over the place, haven't noticed anything horrible out of place audibly.
After those issues, i started a print, it was going great, then about 95% through the print, i got a beacon disconnect.. which gave me an error ofcourse, which turned off my hotend fan, while the hotend was sitting at 270c mid print..
Only time I've had beacon disconnect was from poor cable management, strain on the connector
You can make it non critical, doesn't fix the issue but we'll keep it from killing a print
yea turns out the entire connector latch locking thing broke off at some point(?) so that'd explain it
went to wiggle the cable to see if that'd put it back to life and it just fell off lol
Opps
One never had that part fail on me... I did rip the plastic housing off of mine though 😂
with the amount of issues ive had this genuinely seems like some gameshow i dont know that im apart of, waiting for someone to blast through my door screaming its just a prank
2 heatbreak clogs, clogged nozzle, inconsistent beacon, and now a broken beacon cable
I can't recall if I ordered connectors for the cable side when I ordered them to change my beacon to normal profile
I probably should order some of i didn't before
I already have the other side from when i swapped from LP to normal profile
Ahh ok
gonna make my own cable so it know its the right length
Yeah I did order those when I converted mine
time to find a decent quality usb cable i can cut up 😂
I planned ahead 😂
You learn these lessons with age
at this point im about to hot glue it temporarily then swap out both connectors when i get the parts

Picture of connector?
as in, want a pic of how mine broke?
Yes
let me finish this order then ill get it


I guess you could just say f it and ca glue it until you get the parts 😂
You have spare housings
I’m seriously considering just hot gluing it
Exactly
😂
This is a certified turtle approved fix
glued it, will try a print tomorrow
^ should probably check that I didn’t clog or anything first, sigh
Today I’ve gotten:
my 2 new buildplates
3dlac
New extruder motor for when I swap toolhead
Graviflex magnetic sheet
Black coated steel DIN rails
I’m missing:
high temp CPAP tube
New 1000w bed heater
My spacers for the ballscrew vary from 3.7-3.02mm, gonna grab some sandpaper later and try to lap them flat on both sides.
Got it down to about 0.2mm variance across both spacers with a file, lapping them flat later with sandpaper
Hades - Nebula255 #13
Rebuilt toolhead and cantilever, adding to the rebuild counter
how many rebuilds till done?
A lot
Wasn't it still 11 this morning? What happened to 12? 😂
Toolhead rebuild, then cantilever rebuild
I checked with calipers, cantilever extrusions are within 0.2mm of the other reference point I set, the rails are parallel to the extrusions, and the BK/BF spacers are 12.5mm away on each side from the inner rail face
So that should all be fine
Installing rear skirt, then the bottom drag chain mount, then the cantilever
Wonder what the count will reach by the end of the year
Eventually the rebuilds slow down to once or twice a year 😂
with how long you wait on new parts you surely make more than you spend right?
Well for most people they slow down to that rate
I haven’t had a job since may 😂
oh
Hence to much free time 😂
I do still make more than I spend though
that explains how you have time for so many rebuilds
I still do some voice acting / voiceovers on the side + a few things, which keep some money coming in
nice
are you looking for a new job, or do you want to keep rebuilding your printer all day? xD
how is the job market for your profession?
Looking pretty good, cybersecurity and network infrastructure
yeah ok, atleast the physical side of networking infrastructure wont be easily replaced with ai
And security historically hasn’t gone very well either lol
But yea, rebuild almost done again
Not putting back panel on just yet
Bed is mounted, small break then ill plug everything in, and turn it on, then heat bed to 100c to hot tighten and level it, and that'll also test the beacon
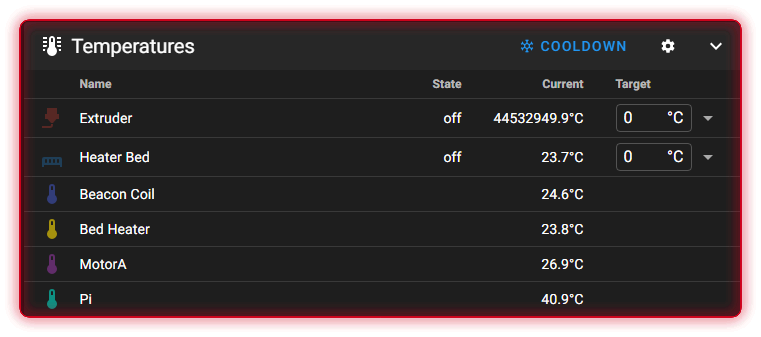
good news is that the beacon works, bad news is that the hotend thermistor reads 60c when it should be reading 24-26 lol
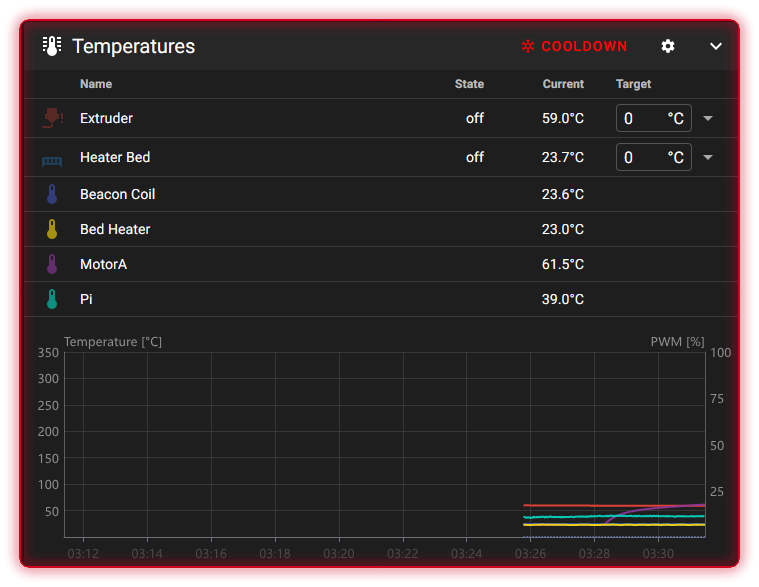
Quick update:
Thermistor still broken, im just running with it for now.
Trying PET-CF with 3dlac on my cryogrip plate at 60c bed at "340c" hotend (could be anywhere from 200 to 400 idfk with this thermistor)
Doing initial calibrations of the filament now out of the dryer, then gonna start printing the things for my muffler, and spare parts for my current toolhead because i really don't wanna mess with that later.
This is with the printer actually assembled, the previous graphs posted at some point were without cpap hose, without the full toolhead, and the umbilical.
Tested at 150ApH up to 200HZ with the max accel in shaper_calibrate.py removed
This is also after adding basic chopper parameters to my drivers, going off of trinamics tmc5160_caluclations sheet, will be testing them further tomorrow to see if i can find something they like more.

Yikes

Swapped the goliath to a temporary NTC100k 3950, 3do just restocked the goliath PT1000's so ordered a few, and i still have a "higher" quality one on the way, should be here end of may..
I need to calibrate shrinkage on my PET, and retraction, after that I can start printing parts for my CPAP muffler, and ultimately once i've test fitted it, cut out my backpanel to fit the CPAP and filament inlet.
Also reached out to Panza to hear if he could ship the rest of my order separately from the max motors lol
more more more updates! always fun lol
Today I swapped to one of the temporary PT1000's that just arrived thanks to 3do,
Panza shipped everything but the max motors, since they aren't in stock just yet. And I suggested that the wire type be switched from PVC to PTFE/FEP in the max motors in future batches.
I ran chopper tuning for a few hours and ended up with some results that sound pretty decent, and don't create a lot of heat.
I also found a max flowrate test for my extruder, uses TMC Stallguard to automatically detect it which is cool, will be testing that tomorrow, and also printing some parts in PET-CF for the muffler after I get the shrinkage dialed in
And got the ZeroG orca preset set up with a few different nozzle types that I own, very nice quality of life feature lol
https://e-z.tools/vi7vl1e1.png

Excited for more printing
Ready for a print, but in my infinite wisdom i accidentally got rid of my filament preset lol.. time to re-do flow, pa and retraction and then i can figure out shrinkage
that umbilical/cpap/filament tube looks like itd mess with your is
The umbilical is fine for now, the cpap and filament tube I'd agree with, can't do much about it until i cut out my backpanel, and before I do that I need to print my ws9290 muffler
ah gotcha
It's a temporary solution, hoping to print more parts tomorrow but we'll see how the filament feels
Gotta figure out shrinkage, new em, new pa, and new retraction for the PET-CF, and get an annealing process down without any warping
Hopefully the panza package is here either tomorrow, or saturday so I can get some corner brackets installed
After drying it some more, its behaving way better with the retraction, re-running EM now, then I'll print the Calilantern by Vez3D to get XY skew, and XYZ shrinkage for when i anneal the part... its gonna be a lot of salt
fun stuff happening, currently annealing PET-CF, got my misumi corner brackets and hardware for max motors, and im on a testing list for some TMC5262's, so i got an octopus pro v1.1 on the way aswell


nice
next up is to wait for the annealing to finish so i can dial in my shrinkage % for the PET-CF,
Then I gotta wait for the correct mounting hardware for those corner brackets.. oops
Install some PIR on the back shown in that image
Print parts for CPAP mounting and cut a hole in the backpanel for it
Reached out to hear about my ThermEx board, with the new octo i ordered, I can install that instead and get a whole bunch of thermistors installed aswell.. might be a blessing in disguise
I didn't realize the motor mounts moved for cantilever
They don’t
🤔 mine don't sit flush with the rear of the frame though?
Do you have a v1 or v2 fmg set
There's a v2?
Yea, changed double shear bearing spec
i habe v2 set
I thought they both went to the back, let me check files lol
My memory isn't great, but I drilled out standoffs for the rear bolt hole not long ago so I know there's some room behind mine
i did the v2 4th bolt mod
Im pretty sure theres about 5mm behind my v1 stepper towers
They look similar in cad
I think mine are bolted to a y extrusion and the hydra extrusion on both
The one that goes across the top
Weird
Does cantilever move the x beam further back?
No it stays the same
Whatever, I'm telling myself the motion system is fine on mine now
Although reading through your posts is making me want to measure and shim everything
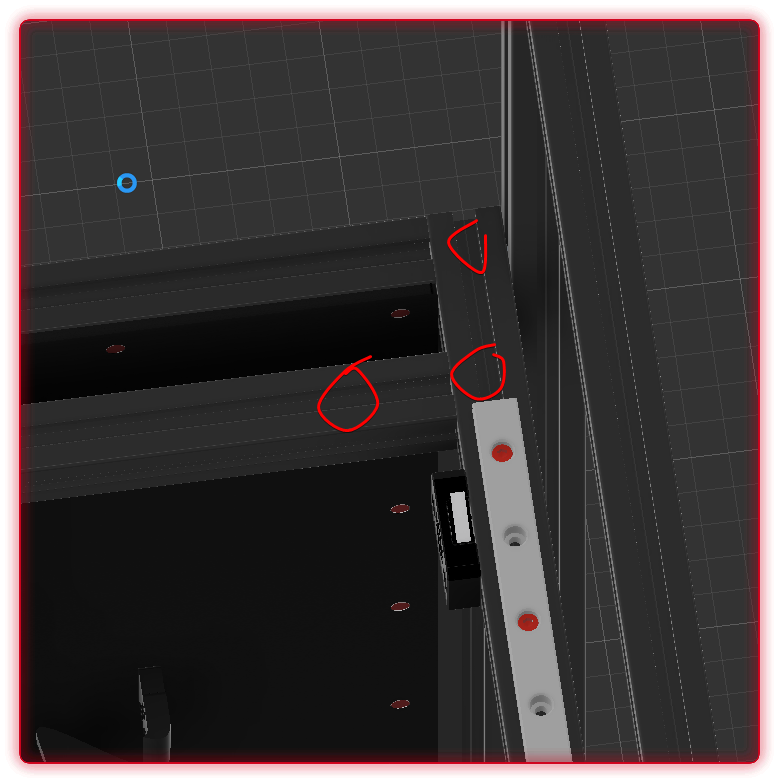

maybe it looks different to yall since i dont have the rear hydra extrusion, and i have an extra extrusion on the rear to brace the steel plate
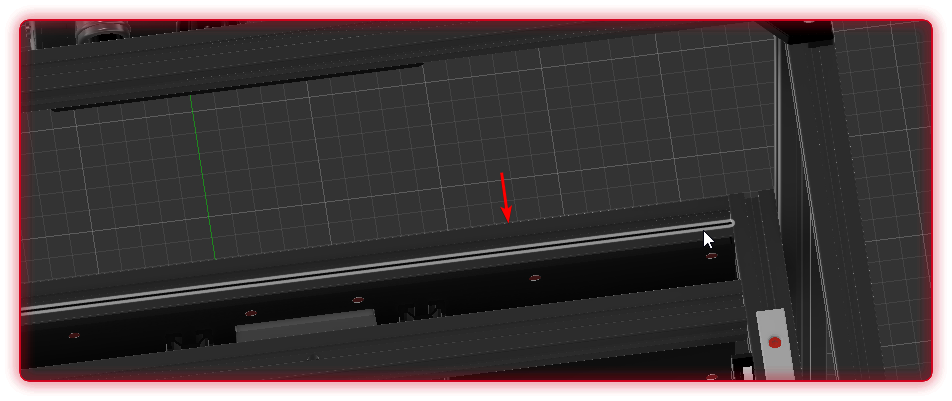
ill take a better picture for u tonight @feral pumice
255 vs 370 frame offset
Installed brackets fully now and DAMN that took a while, won’t get to run the printer tonight so I’ll see what else I can do with it, might cut a test sheet of PIR for the back.
Gonna add 2 more for the fun of it, if I can find some more m5 t nuts lol, think I had just enough
First IS run with new brackets on, will we-do at 200ApH in a second to test it up to 40k accel


Sunlord 🔥
😂
Nice, is this with panels on too?
Even though I'm going to buy new panels anyway, I still want the corner brackets lol
I wonder if its my CPAP and reverse bowden thats capping my Y
What kit is it? File for the cover?
That’s archetype Breakneck, it only fits front mount toolheads, so you’ll need different XY joints than stock
Are you planning on going with sphinx toolhead?
Yup, testing the belt path for Riley today
Oh lmao
Still waiting on some 5262’s, might be a while before they get here though
There is for older versions, but the new one is still in testing
I got something in the other day, the 4a motors


The sovol with long shaft
Diodeking is gonna test them for me because I don’t have a printer rn but if they work well you could probably get them pretty easily for your printer
Nicee, got a 36v psu for them?
I’ve got some max motors on order
Yup
Gotcha
Interesting, according to trinamic they’ll create excess heat above 36v
I just got them from the supplier lol
If they’re similar to the max motors
Due to chopping
Dk and I just paid for expedited shipping
Oh interesting
I’m sure he’ll find out
It’s the same motor
They’ll still run, but it’s the same deal as with 2804’s
Like the exact same motor
Interesting
Did you also get the wires changed to FEP/PTFE?
I wonder if Vexs drivers will help with that at all
Yeah
It’s literally the exact same product
From the supplier
Just no excite logo
But the max motors don’t have fep / ptfe..
So you’re still on PVC
Then it’s whatever the max motors have lol
Sub optimal, I asked bgoat if they could ask their supplier to add fep or ptfe next batch
Doubt, they’re similar to 5160’s, no? In trinamics baseline datasheet it’s based off of nominal voltage

36v max to avoid excess chopping heat, probably 24-28v for less vfa
Same case for every low inductance motor
Real world is gonna be dictated more by inductance than the resistance which trinamic goes by, so this is all just by their data sheet, not real world, it’s there to give a baseline for chopping parameters etc
For proper testing id need an oscilloscope, and mine won’t be here for a while
Trinamic/Analog Devices QSH4218-47-28-040
Thats what the 2804’s a clone of, I think they have some resources for tuning them
Oh gotcha
Should be a similar-ish-but-maybe-not kinda thing for the max since they’re both low inductance
Bought too many brackets lol

It honestly didn’t occur to me that Ldos were clones too
But it did push my X to 25k, and hoping sphinx will fix my Y
Blind joints plus those or just those
Also had this thing sounding like a fucking motorcycle taking off at 200ApH
Just those alone will square it, but I still have blind joints
I think it’s vex? Who runs an entire frame on brackets, no blind joints
I think so yeah
They’re machined perpendicular
Nah, initial testing in ASA if it doesn’t warp, then in PET-CF
Do you have a heated chamber in the merc?
I will, but for now I need to have an open top for the cpap and filament entry

Will you cut into the panel for mammoth?
Yup
Modified mammoth to fit the ws9290b though

Mammoth? Nah, printing it in PET so it all needs annealing
Where’d you source that 9290?
Panzar had one lying around, this is the 48v version
Vs 24v?
Damn
Had to sell my merc but someday we’ll be back
I’ll probably go voron tho ngl
Just cause I want monolith
Feels traitorous icl
Yeah fair, think slimohan is adding sheet metal mono to a nebula frame
Hahah, build what you want, don’t feel stuck to one printer design
I find mono cool and I’m a member in there because it’s a sick project, and they have some nice findings, but I doubt I’d build one, unless it’s a m0
Yeah, I don’t think I would’ve either but since I’m essentially restarting i think I’ll go that path
I’ll probably be a lot more intentional with what I do though lol
Instead of just seeing something cool and throwing it on only to get rid of it in the next month
Don’t go through this build log
That’s more or less my life philosophy
‘Ooh shiny’
Ah it’s fun to see others do it though lmao
I’m excited to try the 5262 drivers
Plus yours essentially panned out how you planned it
What’s different about those?
Should be 4.25a rms on them
Buncha cool stuff, except I’m not sure how much of it got included in the stepsticks lol
Who sells them lol
I just asked to try some, they got released by trinamic like March 16th so they’re pretty new
No one
Yea they released like 2 months ago, saw them and just dmd him asking to test for him lol
Bought an Octo pro to try them, when they get here
Wow
That’s sick that they’re letting you test them
Octo pro is so goated
I have a manta in my lh stinger
I have an Octo max ez currently so it’s kinda bittersweet
It was incredibly annoying
Basically bought the same board twice just to try new drivers
Yeah, I also need some voltage to pwm converter so I can get finer control of my cpap
Thing starts at 13%
Dude I gotta go to bed it’s 4am
Fall asleep to the sound of this 😂
Your build is sick bro lmk when you start running sphinx
I kinda didn’t like the looks but it’s growing on me
Will do, gonna hopefully have it tested and tensioned later today
Depending on how the ASA wants to act
Sweet
Do you know if thats for stepsticks too?
yep, idk how much the stepstick sockets can take though, doubt its much more than 3a
https://e-z.tools/3cek8gpx.png
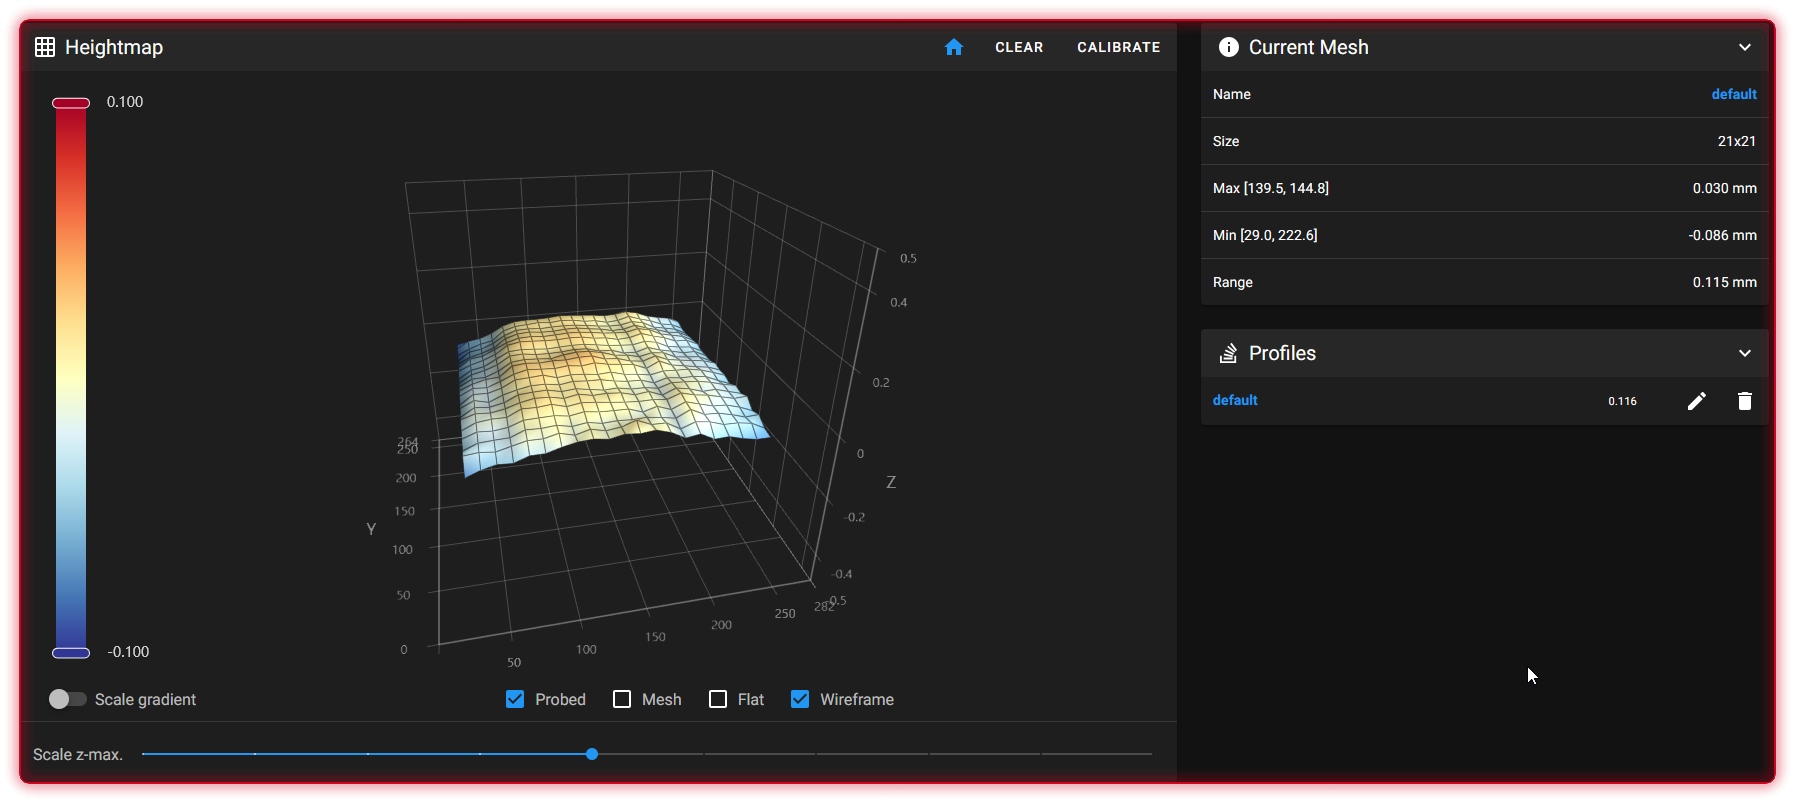
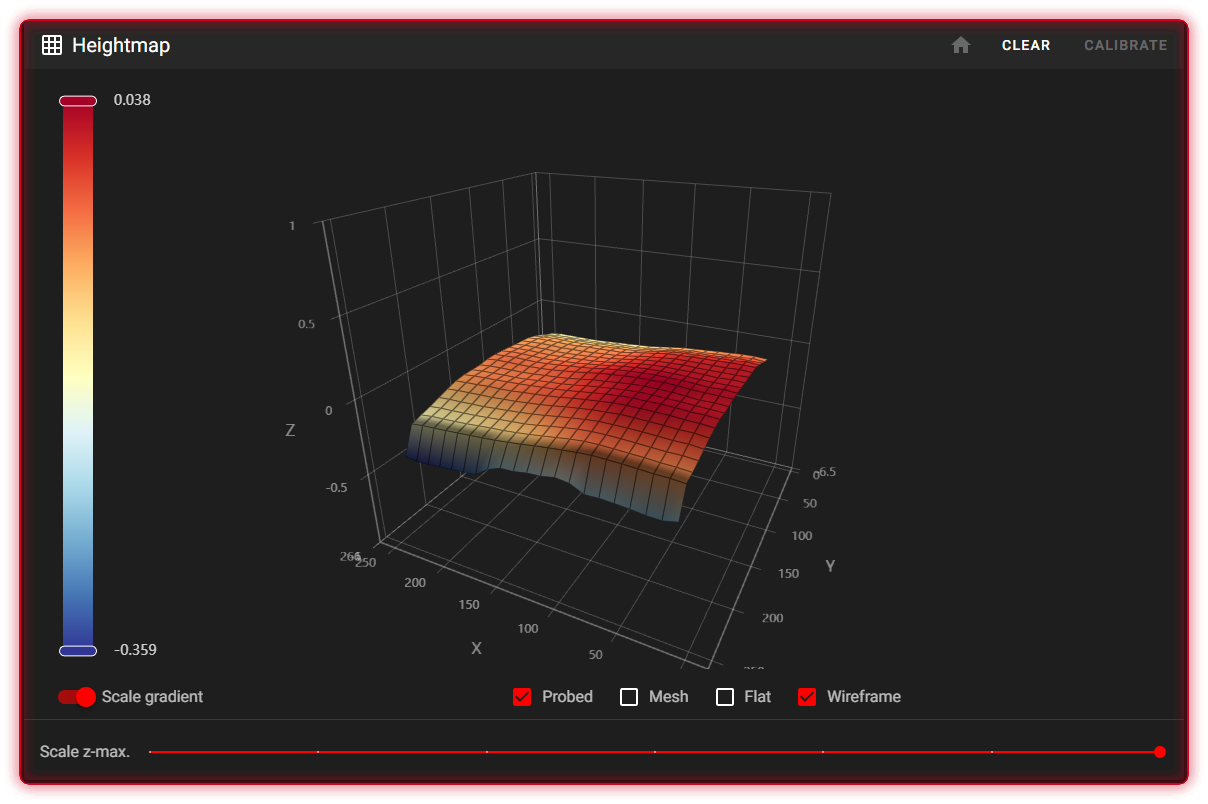
Moved my Y endstop and set the same offset to my bed mesh, SLIGHT suspicion im too close to the edge of the bed 😂
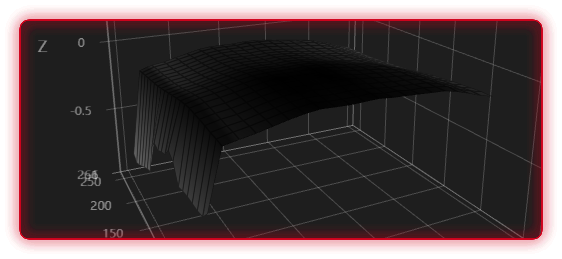

Why don't you run the color mesh, the gray scale is so hard to see what it's doing 😂
On Mobile at least
I basically never check my mesh on mobile, i just haven't bothered to change it 😂

Yes
i'm glad, every print i'm just slowly removing 1mm from the max Y until the waterfall stops 😂
You know you can run mesh from the mesh page, right?
Yeah but that takes time and i wanna print
its easier to just print since it doesnt affect the prints anyway
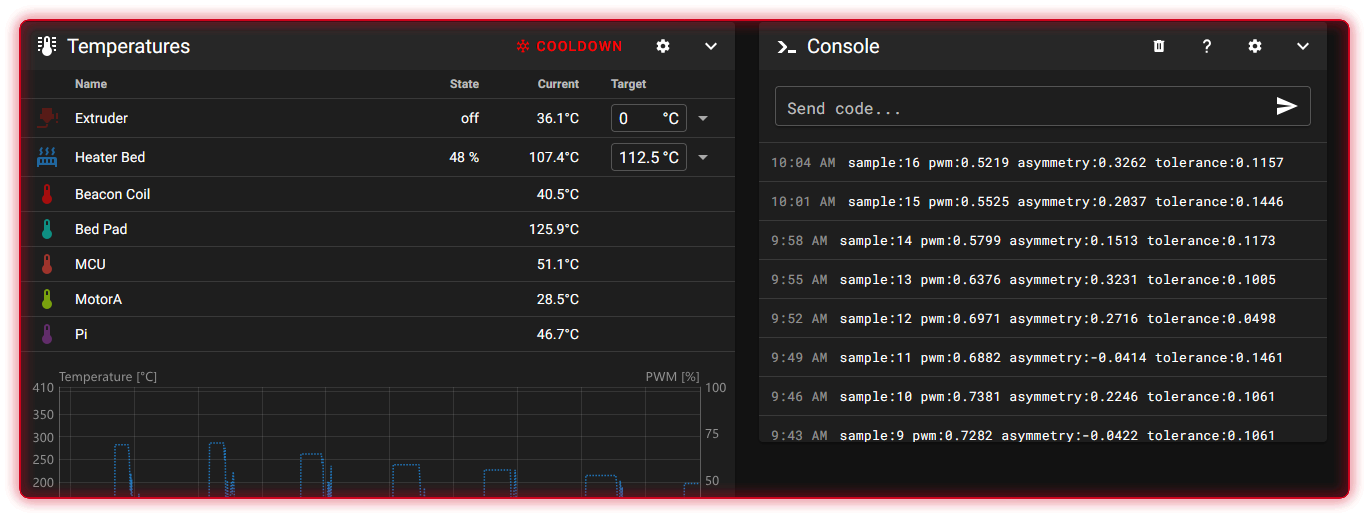
So.. print fail because the bed couldnt get back to temp, unsure if my CPAP cooled my bed too much
Yup... does seem like thats the issue
Might be because of the rear thermistor in the bed, maybe some heatshrink over it?
or re pid tune bed with cpap on
Heater pad is already maxing out at 130c, it’s because the rear thermistor sticks out 1-2mm so I can actually remove it
ok
So.. even with a layer of kapton tape and 2 layers of heatshrink over it, it seems that it just can't handle 20% CPAP.
At 15% it can just barely keep up. I hope that the new JLC heater either handles it better, or I'll have to switch back to normal PID rather than Dual Loop.
Love this thing.
Sending a large PET-CF print tomorrow (10hrs ish), so I can test fit the CPAP muffler.
If that runs nicely I’ll start marking out where id have to cut my backpanel.

nice
With the 0.016 beacon offset to account for hotend thermal expansion, first layers are perfect, everytime.
Prints are fast, reliable, and fun to watch zoom by, can’t wait to run a different toolhead and start pushing speeds more
im hopping after my living rooms done ill get my printer finished
JLC’s thermistors for their heat pads only go up to 125c, ( @celest temple this might interest u)
That’s too low for me as I run dual loop PID, so I’ll likely get a higher rated glassbead NTC100K and RTV that to the back of the silicone pad, temp difference shouldn’t be too much compared to their own thermistors, but I should be able to hit the 140c goal. Somehow missed the 125c limit initially, should’ve bought one without a thermistor.
damn
i dont see myself going above 110 but 125 seems like a low margin
I might include a hole in the middle for a thermistor in the dxf then
Yeah, my issue with it is that I run dual loop PID, so it uses 2 thermistors to get temp, one from the heat pads, the other embedded in the bed itself, so that lets the pad heat up further (with its own limit) compared to the bed, since we usually need a bit higher temp on pads vs beds
Fx. 130c pad results in about 110c bed in my case
I guess I’ll do some testing to see the difference between the thermistor in the pad, vs the thermistor I plan to add to the pad, so I can set custom datapoints and offset the thermistor I plan to add
i'm not sure if i should commit to that or just go with one threaded thermistor embedded in the bed
i'm also wary of a cold spot for the hole that'd have to be cut in the heating pad for that
You do need one in the pad itself aswell
Otherwise the pad will just keep heating itself up until the bed finally catches up, my pad quickly rose to like 170c lol
Let it heat soak for a bit and there won’t be any cold spots

Embedded in bed or heat pad
I already have an embedded one in the bed, drilled a hole in the rear
embedded in bed, i assume heatpad just gets it from the bottom?
or do you put it inbetween the bed and the heat pad
Should have dried my filament, walls look like shit and theres some stringing, but it'll do for now
Old vs new muffler setup
Drying the filament now for a few hours, will be printing Sphinx and other parts tomorrow, then test fit the CPAP muffler (assemble it without mounting) to see if i screwed something up

Had to modify a few parts (mainly to do with endstop location) Printing the test piece now, then will get the rear duct done, and hopefully also the main body today.
I'm printing everything out of PET-CF, at 320c hotend, 60c bed, open chamber,
Will be annealing it at a slow ramp up to 120c for 10hrs, and every part is printed with 6 perimeters, 6 top/bottom, and 60% infill
Printed the Sherpa Mount, and I’m now printing the rear duct
The main body itself needs some work for the belt clips, but I’m happy waiting

clean

I would assume 50% is comparable to 100% on a 7040
75% sounds about like my 7040 full blast
I imagine that when its attached to the chamber and enclosed, both the inlet and outlet will be pointed at the chamber and that'll take some of the noise
At a much lower pitch, right?
i can get a measuring tape and a decibel measuring app on my phone 😂 , noise normalized 1 meter away
because that was pretty close to it, and right infront of the inlet
7040 has almost a whistle to it at 100%


Kapton to temporarily hold the wires down, and a lot of kapton to fasten the thermistor itself, if that ends up somehow peeling, I’ll rip it out and place it in a bead of kapton, would just have a slower thermal response in that case.
Sphinx parts minus main body, will likely attach the new magnet for the bed today, then get the new heater installed tomorrow

will you insulate the bottom
Gotta see how the chamber handles it first, if the bottom gets toasty I’ll get an alu deck panel, and insulate that
After hours of scrubbing with acetone, new Graviflex magnet is attached, and I’m currently pressing down the new JLCFH heater


Enjoy the very hastily made press to attach the heater lol
Lemme get one of those white monsters please
cheers

My man!

Time to get this bad boy wired up and try it
Just gonna heat it up and see which temps I can hold for today, no printing
Very impressed, I was skeptical of the PT1000 I kapton taped to the surface, thought it would’ve lacked behind, but it seems to update even better than the embedded NTC100K.
I’ll now swap them, so I can try the plate thermistor and the new PT1000 surface mount thermistor, and run some dual loop PID
Previously I couldn't even go above 108c with a 130c pad, now I've hit 117c during a dual loop PID calibration 😂
Finally got dual loop running lol, had a bunch of issues with re-calibrating it but had to change the previous PID values to something different.
Mounted the gasket for my CPAP and printed a new passthrough, so I’m just waiting for a time to cut the panel and install it.
I’m looking at messing around with preflight slicer for a bit, then trying to source a new bottom panel, and top panel
Hades - Nebula255 #15
Plan is now to draw up some plans to cut out my rear panel soon, once I've confirmed the new inlet fitment, i'm hoping to get it done in this coming week
Got my octopus pro 1.1 a few days ago, just missing the 5262 stepsticks.
I’ve also ordered the frame and controller board for my nightowl enclosure for the mmu, that’ll be for the v0 though

Hoping to get started on drilling / cutting the panel once I’ve checked fitment a few times, would rather not fuck that up
Got started on cutting the panel today, hoping to finish and test fit it tomorrow.
If all goes well, that means I can enclose it once I have the right filament fitting
nice have same board i ordered 2209 driver tbis mkrning for mine goi gntonuse that one in in my stealth changer voron build

Just waiting for the m10 pneumatic tube and to attach the cpap hose

Then we’re fully enclosed.. wow
WE ARE ENCLOSED, THE TOP PANEL NEEDS A HEAVY WIPEDOWN

nice
just need to add my chamber heater, and a fuck tonne of insulation for when i get the alu top and bottom panels
then when i get my externals ill clean up the ebay wiring and finalize motor lengths (the wires you can see at the bottom lol)
Sphinx is close to being installed, just need to anneal it


nice
That’s bigger than I thought it’d be
Yeah the main body was like a 4hr print at 6/6/6/60
huge thanks to riley for actually making a voron belt compatible version, gonna be fun to compare it to breakneck
I like that the hotend fan is rear mounted, i get to show off the goliath heatshield
com optomised voron beltpath is sick
yea im waitting till trident r2 files come out to start printing them
Trident r2?
yes theres been a revission to the xyz on trident
Any updates on sphinx? I’m living vicariously through you with this printer stuff rn lol
Yeah printed and annealed, but it warped slightly lol forgot to update in here, trying to find the time to re print and re anneal
Yup, takes so long to anneal😂 and since I don’t have my lab oven yet, it’s a very involved task since I have to reset the timer
Total it’s probably around 14-15hrs
July😂
I’ll get it done in the weekend though messing around with PA smooth time a bit since my corners are a bit funky