#❓ask-a-question
1 messages · Page 149 of 1
Im not using substance though.
Everything im doing is in Photoshop
Yes, but they are experienced in modifying textures for 3D objects…
Hi, I have a couple of newbie questions that I've been confused on.
1: Can I click on both the layer underneath and the mask when clicking on a clipping mask?
2: How do I move a layer and a clipping mask at the same time (so the gradient moves with the layer?)
3: How can I make a layer with a clipping mask, clipping mask another layer?
Put both Layers in a Group. Then they will move as a Group.
Doesn't seem to work :c
The gradient still stays in place
ignore the prompt this is me just trying to get the notification. does anyone know why I can not use AI

Hi! Please show a fullscreen screenshot. Tell us what kid of license you have. Education? A work account?
Hello! Did you shift-select both layers to place them in a layer group?
And did you try linking them?
education but on my laptop it lets me generate but on my pc i can not

This seems like something extremely basic, but I'm not sure why my photoshop has suddenly started not selecting the anti-aliasing. Just a few days ago, I'm sure hitting CTRL+Clicking on the layer thumbnail would select every available pixel without consideration for anti-aliasing, but it's as if that got switched off. I don't know if I mashed some random key when my keyboard was falling out of my lap for the hundredth time, but is this a relatively well known little thing to fix?

Your layer is hidden. Click on its eye, or target another layer.
Hi! Right-click the tool icon in the horizontal option bar, and select reset tool.
Hello! Would it be possible to circle or point more explicitly to what you mean? I'm not sure which the tool icon is, or which horizontal option bar.
It’s the very first icon in your cropped screenshot (don’t crop when you ask for help, as relevant info might be shown at the edges.)
Get acquainted with the proper terms:
The option bar sits under the menu bar, and has the options for the current tool. You want to right-click on the magic wand icon.
The toolbar is the vertical bar with tools that sure by default on the left side.
The contextual task bar floats on your image and offers options and tools you might want to use next.
At the bottom left of your interface you’ll see a zoom setting, and right next to it is the status bar that gives you relevant info about the current document, or shows info about the GPU, efficiency.
On the right side are the multiple panels.

Learn all about the Photoshop interface and its features. Topics include the Document window, the Toolbar, the Options Bar, Menu Bar, panels and workspaces.
Hello everybody, I wanted to add threshold to a single layer, but when I clicked on Adjustments -> Threshold it covered the entire project with threshold. If i want to connect it to one singular layer what should I do?
Put the threshold layer above the layer you want to affect in the layer pile then right click beside the threshold thumbnail and choose "create clipping mask".
AMAZING
thank you so much
and i've got one more question
if i want to take that threshold effect on the image and input another photo into those black parts, how would I go about that?

like this
i think i found out :)
sorry for the amount of questions i'm asking, i'm new to the whole Photoshop thing.
When i group image 1, the flag behind the character goes across the whole screen. I want to merge the two layers so that I cease to have this issue, but when I group or merge it, it just goes to the background as well. How can I prevent this so that I can have a separate background?
The swedish flag has no blending mode on.
The american flag+leopard pattern (merged) have lighten blending.
The character has no blending, but has threshold on.


When you post screenshots, it's best that you post the whole interface and not just the image. It's best because we can point you to specific areas of your artwork, and also crucially, the layers panel as well
i have, i believe it's just been shrunk down. If you click on the image it gives you the whole interface
On top of that, the rest of the interface (menus, file size etc) can offer glimpse of what may go wrong
Sorry, I missed that bit
No worries :)
OK, as a general rule, think of layers as a stack of paper all of the same size:
You will have blank paper, transparent paper, paper with a drawing on it, and also paper that is clipped with another.
On top of that you can have paper with holes in them. Those holes will let you see what's underneath: They are called masks.
Try to visualise layers as they would be in real life at the start...
So in your case, if your flag isn't masked, or clipped, it's normal that it goes across the canvas, since the artwork isn't cut out by anything
So was the only thing I needed to do was mask the flag?
If you want some areas of your thresholded figure to be transparent, you need to either change the blending mode (say multiply) or use wha's called "blend if", meaning that only parts of the artwork will blend (the white parts, the black parts, any coloured parts, you choose)
Or you can mask the white areas so they become transparent.
There are 100s ways to achieve the same result with Photoshop, choosing one of them depends on your preference, the level of accuracy needed, and sometimes specific outcome
Now, if you want tutorials on specific ways to make stuff, you can click on the magnifying glass icon, top right, and type in the term in the pop up panel. IMHO, the tricky bit is to know the right terms
The mask avenue will be the one that lets you tweak the shape (you basically paint black to block from view)
Other methods will rely on the actual tones in your artwork, and will work best if you don't want to deviate from that
In any case, what you need to do for your issue, is turn the white area of your figure from white to transparent so they are see-through
how might I do that?
Mask, blend if, blending modes, as stated above
Any mask with require a selection first, so if you go that route, you need to find a way to select only the white parts of the figure. One easy way is to use the magic wand and click on a white area of that layer. You can also choose to go to the select menu entry and go to color range) and choose "highlights" in the drop down menu...
The magic wand

The color range option


Whites are called highlights (in reference of how we name lighter areas in Photography)
The important thing, whatever the method you choose, is to have the right layer highlighted
No problem!
Hi! Does anyone know the best way I could mold the cardboard layer to the edges of the paper layer while still preserving the cardboard's edge texture(?) ? Anything helps lol

You could "shape" it with the warp feature
https://helpx.adobe.com/photoshop/desktop/effects-filters/artistic-stylize-filters/reshape-and-distort-images-with-transform-warp.html
There is also a possibility to play with the liquify filter but I don't think you'll get suitable results
"puppet warp" is also worth a look at, again, not necessarily for your example)


There is also the time warp, but it's only for the New Year's eve celebrations 😂
Cool tysm!
Well no that’s because I was working on something else it doesn’t effect the use of the generative ai
How to remove color mixing in gradient? Smth like this

You can use rectangular selections and color them separately. Or you can use a technique that I generally refer to as “hard gradient.” With this technique, one color of the gradient ends at exactly the same position where the next color begins.
e.g., starting point of first color position 1; ending point of first color position 35; starting point of second color position 35; ending point of second color ...
and so on
Works, thanks! I thought I can get it with posterize, whatever
Gave +1 Creative Carma to @tame cape (current: #14 - 264)
You're welcome.
As is often the case, there are various options, but the two mentioned above allow you to define the areas relatively well and evenly.
why photoshop server dont have discord tag
Can I have 2 viewers at the same screen, but to one of them doesn't change with the other
split view?

Yeah, but they both changed
Select all layers add them into a group and lock them. so they won't change. (even without lock, it shouldn't change)
are those two different projects?
I don’t really use this feature much. I’m not sure if there’s a shortcut key for it. For me I just do it like this.
and you can switch the active window by pressing Ctrl+Tab
hello sorry for bad english, but how do i cut the rectangle with the sphere?

Are those shapes? Or pixels? Is everything on the same layer?
Can you please show a screenshot with the layers panel open?
i got a question, i js used the select subject tool, and i need the selected to be more refined, the blue part is where i want it to be selected, can anybody help me out?

im trying to use the pen tool and trace out the lines, i js dont know how to make it where the selection conforms to the pen lines
Hi, in the path panel (Windows>path) there is a button to convert your closed path to a selection.
Do you mean two views of the same file?
When you say doesn't change with the other what do you mean?
You can have two views of the same file by choosing "new window for...) see Photoshoper's screenshot. But if anything changes (ie, you work on that file) then it will change as well
If you don't want it to change and only reflect one stage of the process, you need to use the snapshop feature in the history panel
That means it will create a new document based on a stage of the history, and you will be able to show two versions (one you are working on, and one from a particular state in the history) side by side, using @fierce hornet screenshot and the menu enties they highlighted

This icon will open a new tab with the state of history as filename, you can then consolidate it.
The snapshot icon (the camera next to it) creates a snapshot that gets stored at the top of the history panel, where you can go back to it (allows to try things non linearily and go back and forth to different versions. You can also go and click on each snapshot, click click and open them as new documents from there.
As you may imagine, it's super useful when you try things out and whant to see what works best
A word of caution, the .psd does not retain snapshots when you close the file and open it again

Hey everybody does anybody know how to make these kind of images or send a link that explains it

Any vector art effect with photoshop YT tutorial should make the job like this one https://youtu.be/uIs0_p2CnTM?si=UR6PAXWi06xdITVu

Photoshop vector art effect | vector styled illustration | Watch till end to learn photoshop action
Today we are going to learn how to turn any portrait photo into vector styled illustration in photoshop, without using any plugin or action. Rather we are going to learn how to create new action that will save your time for next images.
Photos...
Hiya Specialists, Quite a Newbie here, I need some guides on making this effect, I mean the bottom right blue light which makes the halo there and the border gradient, TIA! 🙏

<@&548221840750018590> image spam
Thanks
Gave +1 Creative Carma to @ivory rampart (current: #24 - 96)
not photoshop but rather lrc, is it just me or the for some reason the point colour's range seems to be too small for all the skin tones on the subject's face? Even though they don't look too different imo. In essence I'm trying to make the skin lighter by increasing luminance of the skin, but since the range is too small, it's not affecting the area at the chin and in between the eyebrows


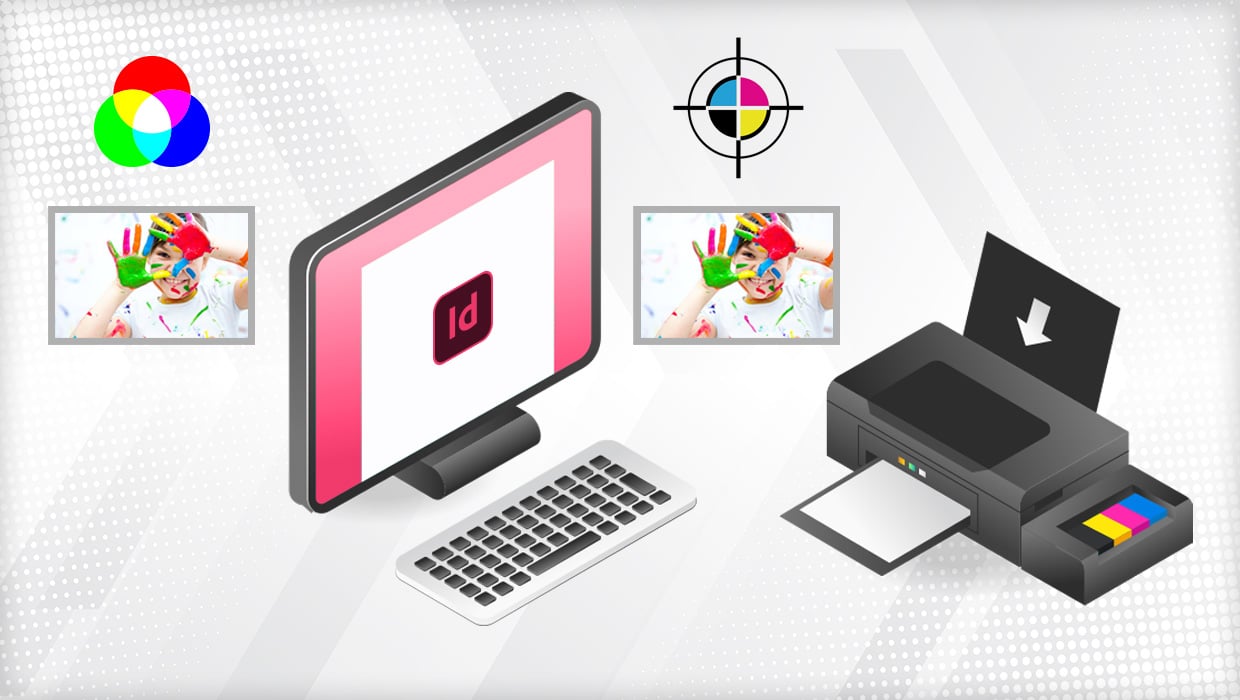
hello guys, im doing a flyers for a concert but when i tried to print it at home to check if the layout is correct, the colors don't stand out as they do in Photoshop. I'd like to know if you have a technique to visualize how the colors might appear after a professional printout?
did u use CMJN colors when working in photoshop
CMJN = COLORS FOR PRINT
RGB are for web
You mean cmyk?
Learn layer style + ( bevel & emboss), gradient , glass effect, strokes , outer glow
Ooh, I had totally forgotten that feature, thanks, Sandrine!
Gave +1 Creative Carma to @vapid flume (current: #6 - 1106)
Yes, it’s the French version.
@mighty zealot
One big caveat, CYMK is for printing on a press, not on a desktop printer. Now (opening can of worms) did you color manage your document? Did you use the correct profile for the paper you chosed? How will the final flyer be tinted? Offset, or a digital press?
-# it's Julien's question, not mine btw
You can approximate/visualise, by downloading the printer profile and loading it into Photoshop, so photoshop can alter the way it displays the image to match the print.
The profiles are a paper/ink combo file. If you go to a printer's website, you will find the progfiles in the download section
See example below:

Those are called ICC profiles

Learn how to add an ICC profile to Photoshop with this simple guide to ensure precise colour reproduction in your artwork.
@pallid mortar could use layer styles, but one might need to mask the shape with a very large mask, and have the mask shaping the layer style with “layer mask hides effects”
The thing is that Photoshop will show the image as it will be printed (or close enough) so you will be able to take colour decisions based on the screen display. You will notice that the colours that may have been showing vibrant and dense will now appear a bit wash out. It's because print (in CMJK or CMYK) cannot reproduce accurately with inks the density and vibrance of those on a screen (light based). It's something you will have to accept.
There are ways to add more vibrant colours, but it's a more complex process, generally reserved for specific prints (called spot colours)
I concur wholeheartedly with Sandrine: do not convert to CYMK, but preview it with proof preview (Ctrl+Y)
See: https://creativepro.com/rgb-workflow-from-photoshop-to-final-pdf/
And https://creativepro.com/import-rgb-images-indesign-convert-cmyk-export/

Do you remember what your mom used to say when you’d insist, “all my other friends are doing it”? She’d reply, “if they all jumped off a bridge, would you follow them?” And it's the same when we consider the question of RGB workflow in a CMYK printing process. For whenever someone insists that they should convert
Yes, we know you probably learned to convert images to CMYK in Photoshop before placing them in InDesign. And yes, we know that you’ve been doing this since 1989 with PageMaker 2. But you know what? This is the 21st century now and it’s time to wake up, smell the coffee, and change your ways for
Correct 👍🏼
You might need to use a copy of the shape with 0 fill, to have only the effects.and might need to use a group to mask it
No unfortunately, because I don't know where but I see on the web to convert after. Big mistake because when I try to convert my document from RGB to cmjn, the colors are awful and I can't see my layers just the complete document convert in one image
Yes I know that. I have try on my desktop printer to see proportion on a paper. I do it for my friends so I just send them the files and they just print them online. I didn't know that there is that much parameters for printing
Again, Julien, please read what I linked. Ask your printer which technique he’ll use, some digital presses can print from RGB/RVB.
Gonna do that tomorrow, ty for your advice, I will find a solution. We learn by making mistakes
Gave +1 Creative Carma to @hushed niche (current: #12 - 345)
From now on, open a new tab for your document and use the proof on that copy (IF you know which profile the printer uses). You can show them side my side. Make sure as well to show the zoom at 100%, Ctrl+1
Excellent thought process!
Ok, thanks everybody for your advice, have a good day
Bonne soirée if you are in Europe
any way to stop the z key from automatically selecting the zoom tool? I can't seem to find the bind in the keyboard shortcuts
im not using photoshop, but does anyone know how i can fix this transition to black in the middle? it is not supposed to look like this...

what tools can i use? i dont have 1 app that i use, just anything free
you want to a black circle start to get big from the middle of screen and fill it?
Hi @quasi aurora
Personally, I don't think it makes sense to change such shortcuts —
but this is how you can do it.

i want it to look the same as the bottom left one. without removing the 3 lines though

it interferes with my undo command and I already use a different command for zooming. Thanks 🙂
Gave +1 Creative Carma to @tame cape (current: #14 - 266)
like this?

yes! how can i do that? i need the original resolution. This is what it originally looked like, maybe it is easier to do it on this one? i just want the smiley gone, but not messing up the glow effect

send me the file, will do it for you
Hi, if I wanted to give a company that makes shirts a logo, how would I convert my image I made in Photoshop to vector files for best quality?
you should use vector app like adobe ai or Corel draw to convert it to vector
Good logos are designed as vector graphics from the beginning. If it's not, you should consider recreating a proper vector graphics logo.
(And if you're using Adobe Creative Cloud apps, then Adobe Illustrator would be the correct tool for that)
talking abouit vector i wanna make thiusb the name for my website ijn the hero section but everytime i do it looks blurry and not fully rendered what do i have to do? vector it?

Yes. If it's your logo, that you will use for various different things (hundreds of times) then it's probably worth it to create a perfect, clean version of it.
That means a vector version of the art that can be (re)scaled without worry of quality loss.
this is the perfect clean version of it
its just when i uplaoded to lovable that it kinda bugs out
hi everyone i want to start a photography social media account i cannot think of a name can anyone help me im also new to this server and i do not know whats a appropriate channel to send this in
Hi everyone - literally no experience in photoshop - does anyone know how I can remove the white background of this art and have just the charcoal artwork ?

the automatic remove background button doesn't work for it
The z key vould be seen as a duplicate for cmd/ctrl or opt/alt+spacebar
Hello!
You could start with a luminosity mask, then use levels to target the white.

Split your photos into tonal regions with Luminosity Masks in Photoshop 2022. What are luminosity masks? How to make Luma masks and use luminosity masks to make your photos look better.
► Photoshop 2022 For Digital Photographers: https://photoshopcafe.com/shop/photoshop-2022-for-digital-photographers-the-best-way-to-learn-photoshop/
► Sav...
Hey, I installed dds plugin for photoshop.
everytime I am opening a .dds file it is opening with black background.
at first it asked me if I want it 8 channel, transparency and more.
does anyone knows how can I restart the settings I made?
<@&548221840750018590>
Image spam
Thanks
Gave +1 Creative Carma to @tame cape (current: #14 - 267)
Thanks to the fastest Valdair
Gave +1 Creative Carma to @wind narwhal (current: #3 - 2675)
how can i make my photoshop the orginal layout i didnt mean to do this

Have you saved your workspace?
If not, which workspace (menu: Window -> Workspace -> ?? ) are you using?
Switch to a different workspace and then back again.
Hey, I installed dds plugin for photoshop.
everytime I am opening a .dds file it is opening with black background.
at first it asked me if I want it 8 channel, transparency and more.
does anyone knows how can I restart the settings I made?
Quick question, As a user coming from clip studio, Is it possible to have the rotate tool go back to its original tool after using it, such as if im rotating my canvas to paint at a certain angle and then after relasing the keybind for the rotate tool, it'll go back to its original brush
@paper cobalt do it like this to connect them.
and yea I’d be happy to help. If you get stuck somewhere, just ask here.
shading a bit off tho

try copying from a good area. and use the soft round brush to fade.
there will be that kind of shading because half of your frame have it.
copy a good area. then ctrl+t and Stretch it. and again use soft brush on the edges.
hey y'all can I get some help with the perspective warp tool? I'm not too sure how to use it and googling it has only yielded results on how to select it, not so much use it.
ah nevermind, got it :)
just had to click a few more buttons than I thought
Does anyone know how to split a gradient?

what if
i dont have photoshop
Can't really help with other software. I just use Photoshop.
How do you want to split it? something like this?

Hmm, can you elaborate sorry, is there like a one click button or something?
You can use Image trace in Adobe Illustrator. with just few clicks. https://www.youtube.com/watch?v=gyEVUB6UMT8&pp=ygUdY29udmVydCB0byB2ZWN0b3IgaWxsdXN0cmF0b3LSBwkJTQoBhyohjO8%3D

In this tutorial I’ll show you how to convert a PNG file to a vector in Adobe Illustrator. Learn how to use the Image Trace feature to transform raster graphics into scalable vector artwork, ideal for resizing without quality loss. We’ll also cover exporting your final vector file as an AI, SVG, or EPS format for use across different projects.
I got it nevermind.

Thanks, by the way, do you know anything about embroidering on shirt regarding logos? How would that work with a png file or vector?
Gave +1 Creative Carma to @fierce hornet (current: #28 - 83)
Hi, instead of clicking the shortcut, real as and rotate, hold the shortcut, rotate, then release, it’ll go back to the previous tool.
Thank you!
Hi! It depends of the machine, some works with bitmap files, others need vectors
Could you show the image? Is it a simple two tones image? Do you have illustrator? There are ways to convert selections to paths in Photoshop.
Did you try different files? Does the website program rescale files or compress them?
Does it come with documentation?is it this one? There is a reset button in the second window…
Before I touched it's setting, every time when I'm dragging an .dds file it was asking me if I want to open it on transparency and more
There is a way to reset the plug in setting?
any know how to transfrom this to this. cant wrap my head around it


Have you tried "perspective warp"?
Under edit> transform>perspective
why cant i use patterns?

Can you show more of your interface? It may have to do with colour profile or bit depth, but we can only see it with the full window

i changed to 16 bits and color profile is rgb
I can't remember exactly for patterns , but many things only work in 8bits
could it be a cpu thing? like more recently ive been getting the pop up "scratch disks are full"
I don't think so.
But scratch disks are different than CPU. Scratch disks are the hard disk drives where memory needs are offloaded to when your RAM is full
I'm simplifying
If your scrtach disks are full, you will have Photoshop running slowly and possibly crash.
But if you want me to investigate, it's better if I can see the full window. (As a genral rule, always share the full thing, it helps immensely, because otherwise it looks like we're trying to pull teeths out of people. If you don't want to share, there's a possibility you will never have a correct answer)


Which version do you have? Seems like an older version...
yeah 2022! im proud to still be using this version, why would some features just stop working if this has been working as advertised since the start?
I just tested and it works on my end.
Let me see if I can find something
I'm not on a Mac, so I'm not sure if it's specific
I honestly never had that as a bug, that's why I asked about other possibilities
oh okay, thank you for trying to help!

https://community.adobe.com
my photoshop updated today and suddenly I do not have the option for a pattern adjustment layer from the menu. I can still create one by dragging and dropping from my patterns view but not from the menu. Any idea why this is happening?
see if that helps. It's probably because you don't have any patterns anymore. Try to re-install some patterns and see if that fixes it
It can happen if you updated versions and forgot to tick "yes" when the CC App asked to transfer preferences
thank you! it fixed itsself after i saved a new pattern
Gave +1 Creative Carma to @vapid flume (current: #6 - 1109)
Great to hear!
Folks I have a question, whenever I cut a layer with CTRL+J the new layer it's named layer 1 instead of using the name of the layer as reference, mapter in my case so it should be mapter1
Anyone knows what could it be? I'm using automated actions but if I do it manually it also does the same
It could be how your action is set up. Did you build it yourself?
Can you show the steps in the action?
Sometimes you need to use specific steps when you record an action, instead of the usual ones. For example, you can have difficulties to access the right layer, if the base layer isn't named as it was on the document that have been used to record the action. In that cse, instead of recording the steps by clicking on the layer, you can record the step by using KB shortcuts (such as CTRL+[ or CTRL+] to move up or down in the stack)
that way the action doesn't take into account the name of the layer, but the end result, whichever layer it starts from. I hope it makes sense
Not here
It could also be an issue with the preferences since you're seeing it when you don't perform an action
I think it's that because it also names it as layer 1 when I copy
And when I copy a whole layer it just names it as the layer but without copy or a number or anything, where can I edit that? I ticked the option on layer/panel options but it does nothing
Did you try to reset your preferences, just in case?
I will thanks
Edit>preferences, in general click on "reset preferences on quit"
and then close PS and open it again.
I am not sure what it could be, maybe someone else has a better idea?
I did it and it happens the same way, I don't know, I'll do it manually for now but it's weird because the last time it renamed the layers perfectly, I don't know if I can edit the suffix or prefix I think i did that but for exporting
At least if I can batch rename it could be great
If I could keep the number🤣
Also is there any way that I can make my action rename the layer +1, i got it to name them mapter via action but I can't figure out to add an increasing number behind
You can batch rename by using Bridge (shipped free with Photoshop)
Not using Bridge? tututut

Don't worry I'm doing it in Clip Studio now but thanks a lot anyway!!!
Gave +1 Creative Carma to @vapid flume (current: #6 - 1110)
hey guys, do u know about when PS neural filter gonna be okay?>
They are working fine
What are you experiencing? They are working fine on my end (I've been using Color transfer and harmonisation on Sunday)
Yep, I have Illlustrator, but I've never used it before. This is the image.

It looks like an AI generated image. There's lots of details in there, whatever you decide, I think it will be hard to retain all the little elements, even in Illustrator
I any case, I think it's out of Photoshop's abilities
You can check that for Illustrator

New Year Sale, Save 30% off your membership: https://byol.com/ny26yt
Get 10% off a BYOL membership & unlimited access to all of our Illustrator Courses & so much more: https://BYOL.com/vt24sub
Check out the Full Illustrator Essentials Course here: https://byol.com/vt24
Check out the Full Illustrator Advanced Course here: https://byol.com/vt24av
...
You have a dedicated Illustrator server if you need more info
You'll see that vectorising often means simplifying stuff
https://www.discord.gg/adobeillustrator
Ouch, it will be very complicated as an embroidery… U thought it was a logo, this is an image, that might look terrible at small sizes, and unfit to be converted to single color.
If you run a business, I’d suggest contacting a graphic artist that could create a true logo, delivered both in vector or in raster format. You should be able to deduct it from your taxes as an expense.
You could try to use adobe sampler it has embroidery feature so it can give you rough idea how it will look
You also got that one in Photoshop!
@hushed niche will share how to open the parametric filters because I got it thanks to him 😉
Gave +1 Creative Carma to @ivory rampart (current: #24 - 97)
Gave +1 Creative Carma to @hushed niche (current: #12 - 346)

This is what it shows. I don't see it working as an embroidery (if it does, it may be quite expensve as it will need to have at least 4 colours to work properly, and the more colours you need, the trickier it is)
It's a case here where you need a proper graphic designer to build the thing with skills: Having elements separated by an even gap (not the case at all as of now)

Hello! Are there any recommended courses a beginner graphic designer can take to get basic design knowledge?
I took the CalArts "introduction to graphic design" (via Coursera) which while still a foundation is a very comprehensive course for beginners
It's quite long: No 2 minutes hacks there... It is real stuff
You start from the base and you end up creating a brand manual

Coursera
Offered by California Institute of the Arts. Make Compelling Design. Learn and apply the principles of graphic design towards a ... Enroll for free.
There are probably other stuff, including ressources available directly on Behance (Adobe)
Which are a bit different, more business oriented
https://www.behance.net/resources/guides
@vapid flume Alright, thanks a lot will go through these 👍🏻
Gave +1 Creative Carma to @vapid flume (current: #6 - 1112)
Maybe others will add to the list!
But graphic design means a lot of stuff, so after learning the fundamentals, you'll need to choose a particular trade.
Don't forget that you have a lot of very thourough courses on LinkedIn as well
Here are a few examples among a truck load of really good stuff
https://www.linkedin.com/learning/introduction-to-graphic-design-4/welcome
https://www.linkedin.com/learning/font-secrets-elevate-your-typographic-game/finding-the-hidden-treasures-in-your-fonts
https://www.linkedin.com/learning/learning-print-production-photoshop-illustrator-and-indesign/introduction-to-building-your-artwork-for-print

LinkedIn
Learn the core concepts that every designer and anyone working with designers needs to know.

LinkedIn
There's a lot more to your fonts than meets the eye. But OpenType features are buried and frequently misunderstood and many graphic designers are unaware of the many different kinds of fonts and font technologies that are available. This video provides an overview of the scope of the course.

LinkedIn
In this video, Claudia McCue briefly recaps concepts from the Learning Print Production course and introduces this second course which focuses on the tools you use to build your jobs.
@ivory rampart if they do not show up, search for them in the discover panel.
tbh I never looked into parametric filters properly
hey y'all, I'm working on some band fanart and I was wondering if there was a way to "flip" colors without selecting them and painting over the object? I want to change that little sun figure on the casket to white, and change the glasses lenses to green. Is there a way I can do this?

It depends if the sun artwork is on its own layer. But "flip" won't really work as you think it does. But you can easily assign the colours once you have them saved (as swatches for example)
In any case you will need to create a selection of some sort, it can be an automatic one, something easy. That depends how your file is built.
that's like really low quality image, but you can play with hue/sat filter

you just have to mask parts you want to change colors
guys i hev this image here and i nead a red outline of the eagle and the mic, how i can do that?
i would start with removing the background, then selecting the eagle then adding a stroke
like this maybe? @radiant socket


Just bought the new PS after admittedly using a cracked version which broke. Now all a sudden my PS says my graphics card is not compatible even though i have a 4060 ? Any idea why
Have you cleaned all files of cracked ps?
yeah, there gone. It was even doing it on the cracked version though hence why i thought it was just broke as it was cracked but the issue has came over to the real PS which has me more confused lol, its only started hapening since upgrading to a double monitor setup

this is what its saying
I presume you have latest drivers
how can i flip this image so it's still facing the same vertical direction but swaps it's horizontal direction
basicallly how do i make the character look to the other side without her being upside down


Oh i didn't see it, sorry
also follow up as i am sitll v new to this, how did you put the image in without the huge black background it always adds to images without one?

ah, got it
yeah I just took a screenshot of the album cover art, being this, so I didn’t have very good grounds to work with from the start 😅

as i said you can change color with hue/sat
it should be a bit easier
as there's more pixels to work with
I would select the gear and the goggles, then add a gradient map adjustment layer where you sample both colors, then invert their positions.
Hi, maybe when you plugged the second screen it was on an integrated GPU?
https://helpx.adobe.com/camera-raw/kb/acr-gpu-faq.html
but I would try first to use the https://helpx.adobe.com/creative-cloud/apps/troubleshoot/diagnostics-repair-tools/run-creative-cloud-cleaner-tool.html
i fixed itr thanks people. tuirns out my studio drivers were 7 months ood
Been experiencing Photoshop lagging lately always when moving through the artboard using the hand tool, is it a known bug or..?
You'll find a better version here. Now, be mindful, this image is copyrighted (as it should be) it's probably OK for personal use, but that's just about it.

yeah I was just gonna make a phone wallpaper out of it, I did that with just the band text. I didn’t have any intentions on sharing it.
thank you tho :)
hi everyone!! hope it's ok to ask this here, but I've been playing around with photoshop (mostly camera raw filter, colour balance, artistic cutout etc.) to edit my bg3 game shots, but I feel like I'm missing the mark with specific aspects. Would anyone happen to have any advice / feedback? tysm!!


I would work on adding some shadows underneath the character to ground them and make them part of the scene.
Feels like they're floating.
In my opinion your edit has a great punchy atmosphere, but the highlights on the character are a bit blown out, losing detail in the textures. Try lowering the Highlights and Whites in Camera Raw, and use a Layer Mask to keep the vibrant pink/red in the background while keeping the character's skin tones more natural.
And ofc as @ripe quest said working on the shadows to make the character more naturally standing
Also, it seems like the lighting is not consistent between the background and the character. Light emanating from the center on the background. Light from the left on the character. There is a mismatch that creates a feeling that the viewer can't reconcile.
Maybe use the Harmonize feature, it will give you a clear idea and start
I would start with the light and shadows first. Once you have those things nailed down, then consider tweaking, brightness, contrast, color grading, etc. The latter are fundamental to the success of the image.
You could use Harmonize to weld the scene together or try Gen Fill > Gemini and ask it to recreate the scene with "perfectly matched light and shadow" and see what it comes up with.
thank you for all of your advice! I went ahead and took a look at the harmonize feature to try and mask the shine of the lighting on the left side, as well as adjusted some of the highlights, whites, and overall colouring. I wasn't too sure how to adjust the shadows in the rest of the scene, so for now I just shaded in the area under her left foot. However, I now feel like I've taken away the subject's centrality a little bit. Do you think I dimmed it down too much?

No. However, the background is predominantly red and you'll likely have to color grade the character to pick up some of those red hues to make it look... 'natural' and part of the background.
this looks BEAUTIFUL in photoshop, thank you.
Gave +1 Creative Carma to @vapid flume (current: #6 - 1114)
successfully finished the project 😌

hello guys. may i know if there are any free websites that you can recommend for someone to start making portfolio with? thank you!
https://behance.net from Adobe

Behance is the world's largest creative network for showcasing and discovering creative work
thank you!
Gave +1 Creative Carma to @ripe quest (current: #2 - 3205)
Hello! I was wondering the best ways to create the shading and effects this header has

All my neural filter not working like that guys, anyone having the same problem?

There was a bug that was fixed in recent versions of Photoshop. Basically you need to get Photoshop 2026 to have it reinstated.
Update using your CC App and it should work (It certainly works on my end)

https://community.adobe.com
Tried to use this feature today (worked fin in previous version of PS) and today, after upgrading to ver 27, I get the "We've temporarily disable this feature because of an error" message. Of course I don't know what that error is, but pretty sure it's an error. Running Windows 11 25H2 build 262...


Gotcha thanks
Hi,
Could someone help me with an issue involving adjustments in Photoshop? When I export my poster with effects applied, like Brightness/Contrast for example, those effects don’t export with my work. Same problem when I create a stamped layer using Cmd + Option + Shift + E, my adjustment layers aren’t taken into account.
Can you show the full window (with layer stack) as a screenshot? I'm asking as there could be some settings that prevent an export to happen
Also can you share how you export exactly (which steps) and the final file format
Does it do the same when you Save as (jpeg for example) as opposite to export as (jpeg)


When i "save as" or "export as", i have the same result (my poster without adjustments)
So these aren't adjustments but more overlays
Can you adjust the maginification from 16.6% to 100% and let me know how you see the result
And crucially if the result at 100% looks like the exports
Oh yeah sorry no it was for ajustements first then i touched it and now it's that but i had the same problem with ajustments

Check how it looks visually at 100% and let me know if it looks different than what you have exported


Like that ?

Yes. I am trying to assert if it's a visualisation issue. With overlays like noise, or that kind of things, the "real" stuff is showing when viewed at 100%, it's the same wihen you're applying more exotic blending modes
That means that the result of an export ill look like when viewed at 100%, but you're ssing something diffrent, within Photoshop, if you're looking at smaller magnification
The real result is always that viewed at 100%, that's why it's always recommended to check a file at 100%
I can clearly see that the 100% result is similar to the one you are exporting, and not the 16.16% viewing result
the 16.16% viewing result is not the real result, 100% is
Yeah we can clearly see it there
Your screen recording exactly demonstrates that
Okay so i should edit that with the 100% so it'll be accurate ?
So when you are doing any adjustment that involves those kind of overlays and blends, always de tham at 100%. It doesn't happen for everything, but those sort of gritty textures are particularly prone to it
Okay thank you so much !
Moirés are another example
It all falls down to the same phenomenons called interferences, and it will happen with any similar software
https://en.wikipedia.org/wiki/Moiré_pattern

In mathematics, physics, and art, moiré patterns (UK: MWAH-ray, US: mwah-RAY, French: [mwaʁe] ) or moiré fringes are large-scale interference patterns that can be produced when a partially opaque ruled pattern with transparent gaps is overlaid on another similar pattern. For the moiré interference pattern to appear, the two patterns must n...
No problem! Good luck!
Okay but there's no other way for me to have the result i want ? like what i see at 16% ?
Trial and error. What you can do is open two instances of your file
Window > Arrange > New window for "poster....."
And have one at 100% on which you will be worked on, and one at 16.16 as a reference

You can have them displlayed side by side by going to
Window> workspace >2 up vertical

Okayy got it
There is no other way to calculate that, because first Wave interferences are a tricky mathematical subject which honestly goes way over my head, and because the software approximates the magification in order to give you performance gains.
So for now there's nothing to do for my adjustments, i have to do something similar but on 100%
Okay, again, thank you sm
It's something to keep in mind for next time you will have to work on something similar. It also helps to have a bigger screen if you can (One of the main reason that it's tricky to work in retouching with only a laptop, as those glitches can happen when you work on noisy pictures as well)
No "working from the beach" for us! 🙂
Yes, exactly
OKAY !
Regarding Photoshop magnification approximations, sometimes it helps (but not always) to keep things at 25%, 50% and so on. You want to avoid rounding if you can
Noted !
Hello ! just learned about smart filters/liquify that it seems when I flip the canvas, the smart filter isn't applied anymore ?


I seems to remember there was a bug at some point that go resolved... Are you on the latest version?
That's the latest

You can check it by going to Help > about Photoshop
I seem to remember that it was an older version that got the issue.
Ah ?
I would say try first to rest the preferences and if it doesn't work, I would file a bug report on the forums
But of course, first try the update!
https://community.adobe.com
Master Photoshop with the help of our global community.
It's where bug reports are made official
Have you tried without flipping the canvas? Or flipping the canvas on the embedded file?
(Double click on the smart object, it will open the embedded file in a new tab, flip this newly opened file, save and close and you will see it updated in the main document)
Be sure you save it otherwise it doesn't update
Ok resetting the preferences worked it seems
Cool! It's the best trick when things start to go awry 🙂
Uh, no actually it didn't. that was weird
It worked when I reopened it, flipped it, used the liquify to do something flip it back.
Then I reverted, deleted the smart filter, recreated it, did some liquify, and flipped it, and it didn't apply it on that flipped side
Ok but I did find a way, if i convert the smart object with the smart liquify filter into a smart object itself, then flipping it works 100%
Not practical though
Ok, now it does work for all the next smart object I create. so there is some issue in the cache somehow
hello there, do anyone know if there is a Lightroom Adobe discord ? I can't find it (a friend of mine has a technical issue)
Hi, there’s none, ask here!
Ok thanks !
But did you update to 27.2?
No after all I haven't yet. BUt I shouldn't need to.
Hi ! My friend has kind of "photos melting bug" in lightroom, when she copy/paste (or sometimes just when she goes from a photo to another), the current photo and the previous one are melting. She tried to make a new catalog, reimport raw and stuff, nothing seems to work (reseting development works sometimes, sometimes not at all), anyone had the same issue ? (last lightroom classic version on a macbook)
Hi, if you are French speaking, I would ask on the utiliser-Lightroom forum, Gilles has the most experience!
They seem to merge, not melt. Which operations are done on the image?
Does it stick on export?
Did they try to reset preferences?
https://helpx.adobe.com/fr/lightroom-classic/help/reset-preferences.html
Yes I'm french, sorry for my english ! It sticks on export, she modified the preferences but she didn't reset the whole thing I think, I'll tell her to try and to post on the forum if that does not work ! Thanks !
Yes, you should, look at the number of fixed issues for 27.1 and 27.2: https://helpx.adobe.com/photoshop/desktop/whats-new/photoshop-on-desktop-release-notes.html
Well of course you can post here!
I suggested UL for the ease of the language, but your English is very good…
(Take the habit to reply to a post so we can follow up)
Is the MacBook an apple silicon one?
(Or does it use an Intel processor?)
Btw, are those the images of your friend’s family or some of their customers? You might want to anonymize them…
Thanks for your reply, it's a silicon one (Macbook M1)
Gave +1 Creative Carma to @hushed niche (current: #12 - 347)
You're right, I'll post a anonymized one on the forum, thanks
I've been following this tutorial (linked below) for wrapping text around an image. I have created a path around the thing I want it to warp around, but nothing happens when I click the text box.
https://www.youtube.com/watch?v=fCFEDVMw9q4

Easily Wrap Text Around Any Object, Image, or Shape with Photoshop!
🚀 Join PiXimperfect Pro - The Ultimate Photoshop Training Course: https://pix.live/pro
Learn how to draw a custom path using the pen tool and confine the text within. Hope this tutorial helps. Thank you for watching :)
► DOWNLOADS:
- Sample Image: http://bit.ly/2E7K4aD
...
Also, why the hell is it so hard to make a STRAIGHT path connection between 2 points?
Hi @hybrid sedge
It seems you have used the Curvature Pen tool. Try to use the "normal" Pen tool instead.

Thank you. Now how to I make this text it's own layer?

Gave +1 Creative Carma to @tame cape (current: #14 - 268)
Please always show your layers panel (unfolded) too

But now I can't change the color of the text.
It's not clear from this small excerpt. Could you please show a full-screen video – something like this:
Here, sorry
Please press Q key one time. Then try it again …
It worked, thank you! But, out of curiosuty, could you please explain what happnedd?
Gave +1 Creative Carma to @tame cape (current: #14 - 269)
You were in Quick Mask mode – you probably pressed the Q key by mistake (that's the shortcut for this mode).
Glad we could help.
😊
If you work with text and images, InDesign might be more suited.
when i fade out the image at the front the one behind can be seen, how can i make sure its not like i decreased the opacity and obi wan behind can still hide behind the first image in front

nvm figured it out, yes im learning and getting a hang of this photoshop
where can i find the cmyk option when creating a file
File > New... New Document UI > Color Mode dropdown menu....

it only has the rgb for me
perhaps because the resolution was set to 300 and 16 bit?
No. That's not it.
how can i change one color only in photoshop
it says go to hue and then masters and click it but i cant seem to find the masters option.
Who says "masters"?
Use the eyedropper and select the colour you want to change in the canvas
That's the eyedropper (occasionnally called "stapled finger accident icon" IYKYK) 🙂

you see in my screenshot that the reds are selected
Wait wait hold on I'ma try that
I did but it changed everything
But I wanna change one color only
@vapid flume
You should show your whole interface, it will be easier. You say one colour... If your image is all red and you change red, it will change the whole image.
oh nvm this was the case, lol. thank you so much sandrinee!
Gave +1 Creative Carma to @vapid flume (current: #6 - 1115)
in that case you need to mask the area prior to change the colour.
The H/S adjustment layer only discriminates by colour, you need to create a selection and mask if you need a restriction by shape or any other type
im having a hard time getting that, i mean i know how to mask, i just havent done that part
You just need to select the area you want to change... Depending on the shape and details of it, you may use different methods, from a simple stroke of the magic wand, to automated selections, to using the pen tool when something is highly detailed or difficult to make out from the background.
For example, in the Darth Vader image you posted previously, since the guy is black on a black background, automatic selections may not work (You can still try select> select subject)... In that case, the pen tool will prove handy
Honestly, sometimes it takes less time to do it properly by hand than try 100s of other solutions that don't work
Again, it depends on the context you're in. There is no one foolproof solution to everything.
Hi guys, are there any options in Photoshop, like the After Effects feature called "Shy", which hides layers without removing them
To hide a layer in Photoshop, the quickest method is clicking the eyeball icon next to the layer in the Layers Panel; for a keyboard shortcut, use Ctrl + , (Windows) or Cmd + , (Mac) to toggle selected layer visibility, or Alt + Click (Win) / Option + Click (Mac) the eyeball to temporarily hide all other layers, showing just the one you clicked.
how can i change the sky color, i tried the hue thing but it was complicated here

or should i do masking
Color mask and then use hue
color mask? how can i do thay
If i remember Unmesh had a nice tutorial about color masks
► Join PiXimperfect Pro - The Ultimate Photoshop Training Course: https://pix.live/pro
Make Your Images Vibrant and Make the Colors Come to Life Using Saturation Masks in Photoshop! Learn how to enhance colors and still keep it all natural in Just One Minute!
Hope this tutorial helps. Thank you for watching :)
► DOWNLOADS:
Sample Image: h...

You could also try sky replacement maybe it will work better 🤔
Photoshop's Sky Replacement tool is an AI-powered feature (Edit > Sky Replacement) that automatically detects and swaps a dull or unwanted sky with a new one from built-in presets or your own images, offering sliders to adjust the new sky's position, scale, brightness, and temperature, plus foreground adjustments for realistic color blending, creating a natural composite by adding a new sky layer and masks for easy editing.

I know it's been sent here already but a long time ago, does anyone have a video they would recommend that I can watch regarding masking so I can improve more to it. Thank you so much

It doesn’t look like someone tried to hide watermark so it might be faulty sensor
thats shot on my camera
it doesnt happen throughout the video
but for a split second that happens
Is that phone sensor?


If it’s under warranty I would send it for check
As it might be something wrong with it
How can I create this chain like illusion that's makes the chain look connected

You can try this. But there could be more easy easy.
Thanks bro your a life saver
Gave +1 Creative Carma to @fierce hornet (current: #28 - 84)
The app lags for hlaf a minute every time i use the hand tool to move on through the workspace
https://helpx.adobe.com/photoshop/desktop/get-started/technical-requirements-installation/adobe-photoshop-on-desktop-technical-requirements.html
check in the status bar if the GPU is working: https://helpx.adobe.com/photoshop/desktop/get-started/technical-requirements-installation/photoshop-and-graphics-processor-gpu-card-usage.html
Hi 👋, Do u know what “Shy” does in after effects !
Cause it sounds like u didn’t understand my Qs
No worries thank tho 
Gave +1 Creative Carma to @ivory rampart (current: #24 - 99)
how do they fix the background so well?

Color range
by going to select > color range
Or split blend if sliders.
what does that mean?
Hi! In the advanced blending (double click on the layer in the layers panel you can see sliders, that are use to make some tones transparent; alt-click on the pointer to create a gradual transition, as explained in https://www.youtube.com/watch?v=-6YJiTbx1SM

Discover Photoshop's hidden gem—the "Blend If" feature! In just minutes, learn how to blend layers based on luminosity and color for professional-level edits that will wow your audience.
Get access to Jesús' free Blend If Photoshop practice file:
https://adobe.ly/blendif
This video is part of an 8-part Photoshop series with professional pho...
thank you!
Gave +1 Creative Carma to @hushed niche (current: #12 - 349)
Hello Fellows! I been doing some Icons for Roblox, and can somone help how can I make the Backpack Rainbow like in the first picture without making him fully rainbow : )


i presume backpack is on separate layer, i would create new layer place gradient and use layer with backpack to mask shape and change blending to orverlay
@crisp herald

thank you for answering!
Do u mean like that? I dont know I did with thebackpack but its works in a way?

yeah
you can mask buttons if you want to keep them with old color
also you can play with different blend mode and change transparency
aight! Thank you!
Hello! So I was working and I went into my keyboard shortcuts and accidentally deleted one that was super vital to my workflow, I tried resetting the shortcut menu but it did not restore it
i need help for a thumbnail is anyone up to help me
if it's only one then you can just reassign it.
instead If you explain exactly what you need help with, you’ll get help faster.
how do i remove that circle thing

i was planning to use the marquee tool but i just cant find the exact spot
nvm figured it out
Yo does anyone know a good after effects discord server
There's Adobe video server which cover Premiere pro and After effects. But I can see you are already there.
Guys my photoshop just idk blew up or something
I went to cut a shape and then accidentally cropped and then I undod out of that mess now my whole file and everything I make is pixelated so much
😞pls help
Like when I zoom in to how I would zoom in previously I can see all the pores it’s disgusting
At 100% zoom it’s normal and looks alright but when I did it differently it just idk what I did pls help me
Hi, I need help adding realistic transparent water droplets / thin liquid film on skin (photorealistic, not glass skin).
I already have a clean studio portrait.
I do NOT want AI regeneration or face change.
Just a Photoshop workflow or texture method.
If anyone can explain:
- how to add droplets
- blending modes
- brushes / overlays
- displacement or lighting tricks
Free help only, thank you.
Hi...… were I can share my work?
Also u can get feedback right here https://discord.com/channels/547473772727238676/601848427541692447
thank you🙂
Gave +1 Creative Carma to @pseudo frigate (current: #134 - 13)
Careful selecting and using retouching tools to fill-in the area, or using GenAI... I really think that image should be available on the Fossil website without any markings, but I'll let you search
It's really super specific, and I don't think you'll get the whole package from anyone
A few pointers would be to "how to make things look wet in Photoshop)
https://www.youtube.com/results?search_query=make+something+look+wet+in+photoshop
You can also use that kind of seemingly unrelated one
https://www.youtube.com/watch?v=vKUbE9kyvOc
Enjoy the videos and music you love, upload original content, and share it all with friends, family, and the world on YouTube.

#Shorts #photoshop #tutorial #art #arts #artist #graphic #creative
Instagram:
https://www.instagram.com/artloverjv/
Then adapt it using displacement maps etc.
There are countless tutorials about displacement maps (including in the help files) so the rest is mostly trial and error....
It's good to have a nice reference image to check if the effect looks relatic. What I do when I can is I create a 3D model, mostly for lighting, and use that as a reference (Or take a photo in similar conditions - it doesn't have to be perfect - so you can check the realistic refelections, diffractions etc)
Because of the diffraction of water, I suppose not everything will be achieved by using pre-mede brushes, but that you'll have to draw things realistically instead
Or course you can also ue stock photography (Adobe Stock, Istock etc)

I think Kyle's brushes contain water drops ones, but they will only give you: softness, opacity and shape, the refelections/diffractions will be up to you to draw
https://www.adobe.com/products/photoshop/photoshop-brushes.html?promoid=XKMMHH6G&mv=other

Find the exact brush you need to elevate your digital art with custom drawing brushes or preset Photoshop brushes. Let your creativity flow today.
It would be best with screenshot Before/after if you can: Also a screenshot of your history panel so it shows your exact steps.
It's possible that by cropping you've changed the size/resolution, and in that case, all you need is go back to the state prior using the cropping tool (Just move up the the history panel))
You can also learn to use the snapshot feature in the history panel to be able to save copies of different states so you can perform what you need, even on an earlier state of the imge
https://www.youtube.com/watch?v=GCBv-rQSq_4

In this video tutorial, Julieanne reveals seven techniques that help make the most of Photoshop's History panel including how to enable non-linear history, work with snapshots, and recover from an accidental save.
Additional tips, tricks, and tutorials from Julieanne Kost can be found on her blog: https://jkost.com/blog
Facebook: https://facebo...
If you save regularly, and didn't save after your mistake, you can still close Photoshop (choose "don't save" on quiting) and it will not keep the state after the last save...
Anyone else on Photoshop Beta 27.3 experiencing instant crashes when using Alt + Drag to duplicate layers?
Windows 11, GPU enabled. Happens 100% of the time. Looking for a confirmed workaround ?
hey is there a way to fix the layers that you can't move cause a mask is on ? i'm sure i didn't have this problem back then it's really annoying
could u share a screenshot ?
@pseudo frigate can u help with this ?
I'm sorry, but I don't use the Beta version
Hi! Im new to this photoshop thing and i wanted to replace text but i dont know how so im just wondering if someone could do it for me or show me how. Anything helps! thanks
If you want to be shown how, stay here, if you want someone doing it for you, ask in #💬chat-general
Post a screenshot of the whole interface of Photoshop (it helps a lot with identifying issues without asking lots of questions)
Particularly having the layers panel visible helps a lot!
if you want someone doing it for you, someone will probably contact you in DMs... However, be street-wise with DMs. Lots of shady activities in there.
I
i would rather just send it to one person and its only 9 little things i need to do. so if anyone wants to help me please dm me. i think it would take you max 5 minutes
The most derogatory thing you can say to someone working on that kind of things, is saying it will only take 5 minutes.
You don't know, clearly...
In that case, plese post in #💬chat-general
yes but is it that hard to replace a text?
it can, if the text is not editable and the background is complex
its white text on black background
Also, if you want to replace text on something you don't want to show, people will assume it's forgery
i get that but i dont want to share my location on where i live in that photo
the person who will help you through DM will know where you live 🙂
And you don't know them!
yes but i will need to trust them somehow
Better learn to do it yourself!
and one person is better than idk how many
And if it's forgery, at least you won't involve somebody else
As I said, lots of shady activities in DM... But you do you!
well can you tell me how to do it?
first thing, and why I asked for a screenshot, is that figuring out if your text is editable, on its own layer
Don't answer to my posts straight away, it can be some time untill I give you all the instructions.
It will be a long thread, if you are a beginner
can i dm you?
So first of all, identify if it's an editable layer or not
Open the layers panel and see if there's a separate layer with a big T as a thumbnail. That is a text layer. If you have that, it will be easy, just take the Text tool (big T tool) and type your new text
Alternatively, click on the magnifying glass icon on the top right of the interface, and you will be presented with the in-app help.
You can type any term you don't understand there and you'll get some tutorials or help files


my software is in french saddly ..

"a deformation transformation has been applied to your dynamic object, the deformations aren't allowed to dynamic objects"
but this wasn't like this before, i'm sure about the fact that I could've moved my dynamic objects with mask on before..
You need to disconect the mask and the layer
la petite chaine entre le calque et le masque

If you do that, it will work
just click once on it to make it go "grey"
The reason being that only the layer is "smart" (dynamique) not the mask. If you unlink it, you will only transform the smart object, and not the mask
but i dont wanna do that, i want the whole group moving with the mask
did u try CTRL+T and Move ?
when i press ctrl T i got this message
i'm sure i could do that before
try convert it to smart object again and try CTRL+T
and since some updates i couldn't do it
u can put it inside a group and try
Or you can duplicate it and resterize it, then move it
I've never had that issue before
In that case you need to embed the smart object+mask in another smart object, move/transform and then convert it again into a normal layer to retrieve the original smart object.
As far as I know, it has always worked like that

it's supposed to be an issue with warps though, not standard transforms
It's possible that you never had to apply warp transforms (just standard transforms) on a masked smart object. I've been at it since smart objects are a thing, and it's always been a restriction.
it's working fine on my end, but I can't use sky replacement filter 🤷♂️

hi, im new to photoshop and i need help on a project
i am following a tutorial, for something related to a game and the tutorial tells me to "put the clipping mask (i created a clipping mask on the copy of my picture) on the text"
and i dont know what they mean by this
when i try to move the orders of the gradient mask and the picture, the colors change and wont revert unless i use the ctrl + z keybind

i followed them step by step and in the tutorial (they use a different example) the background is back to normal

but it isnt in mine
nvm i think i got it lol
how do i mask this, there are too many

Is your PS updated ? Or your on old version of beta
you can try blend if. https://www.youtube.com/watch?v=Ooit8OPqgco
But if you want layer mask.
object selection might work.
also you can try color range. select > color range.

The simplest photoshop tool for cutting out solid colored backgrounds! 📝 GET THE FREE PHOTOSHOP PRO EBOOK here 👉 https://www.bwillcreative.com/photoshop-pro-ebook/
Understand Blend-If In Photoshop: https://www.youtube.com/watch?v=NDew4j_gkUQ
😄 TRY PHOTOSHOP FOR FREE: https://prf.hn/l/0e9YJxb/
—
🤓 ***JOIN MY BEGINNER ...
i need to study this color range thingy
it's pretty easy once you know. you can look for some videos explaining color range for better understanding. then try it yourself.
i was able to atleast do it but it feels like the quality is being affected of some sort
it should not. try with different values.
this method is also good. will work perfectly on your image i guess.
i tried it with a different one and it looked like this

the removed part was white/black? ones you make the selection go to select and mask. make some adjustments from there.
ooooo, i seee
but is this okay?
yea it looks good to me. you can add a solid color or your preferred background behind to see if your getting exactly what you are looking for.
alright, thank you mann!
Gave +1 Creative Carma to @fierce hornet (current: #28 - 85)
Hallo, remember to share the solution to your problem, was it the adjustments?
Blend if ❤️
Remember the built in learning tools: hit Ctrl+F, then type “color range”
If you want the windows to be transparent, yes. Remember that you can paint on a mask: white reveals, black hides.
i still cant get all the white out

oooo, ima need to learn that, for now i learned how mask complex stuff but not fully
how do i mask out the little white thing
or is the image damaged or something
i was able to cut it, but it always look like that
or it is not meant for black background
Did you use blend-if?
i have not heard of that yet
Did you split the sliders with alt?
im not familiar with that but, all i did was turn the image black, using black and white then the levels, and proceeded with the color range
What Photoshoper shown you: #❓ask-a-question message
if you use color range to select. you're not using select and mask then. inside that you will get some sliders to play with to hide those white lines that you have on you image.

i think the image comes with those things...

where did you find that lol sorry
well i learned the blend if, the complex mask and now the select and mask i wanna learn that brb
found the select and mask though'
Was it a JPEG? Might be a compression artifact.
Also, it might have been touched up or sharpened.
touched up? sharpened?
The image you started with might have been modified to look more appealing, but its contrast was maybe too strong, plus, some elements might be translucent at the edges.
Sharpening is the act of adding fake perceived sharpness.
Remember that you can use the discover panel in Photoshop: Ctrl+F plus the term you do not know, you’ll be able to search for the meaning of a term, and locate a tool /function on the interface, and it also acts as a super fast launcher of tools.
suddenly i dont have the eydropper tool thing when in the color page
Are you on the mask, or the image? Using the adjustment layer or the regular adjustment?

im using an adjustment i think
tool
You’re using the regular color range function on a levels adjustment layer. , and you are targeting the shadows, in the top drop-down…
hello guys
from where should i learn adobe photoshop for free
Hi, hit Ctrl+F and start learning… see: #❓ask-a-question message

Plus there’s lots of good sites like Photoshopessentials, and YT channels like Photoshopcafe, phlearn, piximperfect, Photoshop training channel…
piximperfect is good
Invert it, the last button in your screenshot. Then you can use the feather to soften the edges
By using the select and mask?
Look at your last screenshot: click on invert, then use the feather slider…
it looks like this

hmm what do you think
well theres still some small whites left but i did the smart object thing for blend if
GOT ITT
thanks man! thank you bothh @hushed niche @fierce hornet
Gave +1 Creative Carma to @hushed niche (current: #12 - 350)
Gave +1 Creative Carma to @fierce hornet (current: #28 - 86)
how could i get rid of the white spots on the car and could i make the background transparent?


you could try masking the car to remove the background and is for the white text hmm
you can try a selection tool to mask it
im thinking of buying photoshop just for casual, fun use not for anything serious, which plan should i get if i just want to make art?
what do you mean by spots? the white text! you can use the remove tool to remove it.
you can use pen tool to manually mask. for auto selection use quick selection or object selection tool. Then use 'select and mask'.
Wait you can use a pen tool for masking?
I thought it was just for drawing
I never used the remove tool, I might try that
yes you can. It was most popular way. people still love it for accurate selection. But auto selection is so much better now in Photoshop.
there are white spots

photography plan would be better i guess. you'll get Photoshop plus Lightroom. 1 tb storage. You can access them via your computer, web or mobile. But if you want other adobe software too then you have to choose other plan.
how much is that?
just use the remove tool
and does that give desktop photoshop?
$19.99. Price might change based on your country
https://www.adobe.com/products/photoshop/plans.html

Explore Photoshop Single App, the Photography plan, and, the Creative Cloud Pro plan with 20+ creative apps. Compare, pricing and features to find the plan that’s right for, you.
oh yeah that’s perfect thanks
Gave +1 Creative Carma to @fierce hornet (current: #28 - 87)
how is that less expensive than just the photoshop plan?
yes. desktop version+web version+ mobile version.
it's gives you less generative credits(ai). But you get 1 tb storage compare to 100gb
ah yeah well i dont need ai so that works great
thank you
happy to help
i have a question, when i want to select sujet in jpg it's doesn't work so it's only work on png image?
No, it should work with any type of photos Photoshop supports.
You do not need to use a smart object for blend if

even if convert in object dynamic
Im on latest version of beta
Hello/salut, smart objects /objets dynamiques are not needed. Which tool did you try? Is it the most recent version?
I think he did not choose any tools. you have to choose quick selection or object selection tool then click on select subject.
selection sujet

this what i'm doing
And if you try remove background?
can't

I've not saw anything like that before. you can try resetting Photoshop preference or maybe disable GPU acceleration temporarily. then try
okay i put on cloud and that work really thanks you that maybe because bad pc XD

Gave +1 Creative Carma to @fierce hornet (current: #28 - 88)
Yes, it uses a better model, and is more powerful
alrightt thanks
Gave +1 Creative Carma to @hushed niche (current: #12 - 351)
Bon apprentissage !
yea thx
Gave +1 Creative Carma to @fierce hornet (current: #28 - 89)
I have a single psd project with many groups and sub groups for each character drawn there, and in each of them a specific layer I use for shading.
I would like to tweak the hue/saturation of ALL these same layers at once without merging them, is there any way to do this ?
See the two layers selected below as an example.

Add adjustment layers above the group you want to affect then right click beside the adjustement layer thumbnail in the layer panel and choose "create a clipping mask" (Alt+Ctrl+G)
The adjustment layer(s) will only affect the group to which it is clipped.
@mystic tartan : here is a short video to illustrate what I mean...
Thank you - I tried and saw what it can do, but I still cannot affect multiple layers found in different groups at the same time. I guess I should put all my shading in one groupe, but I'm not used to it
I am getting into pixel art however i am sunning into an issue where everytime I input a pixel part of it bleeds into another pixel which then slightly changes the color it bleeds into. how do i prevent this from happening?
If you are "painting" your pixel art, I would suggest you to use Pencil tool rather Brush tool to do so.
Square tips from default brush set should allow you to paint real pixel art (with no anti-aliasing effect).
ty
Gave +1 Creative Carma to @viral palm (current: #7 - 1036)
dm me if you have canva/photoshop expierence need help desigining a minimalistic project 20 pages buisness plan
Why dm, start a thread, and describe exactly what you struggle with…
Unless if by “help” you mean that you want someone else to do the work…
It is working, same issue

Click on the Stop on the Top Left and set the Opacity to 0%

thank you 👍
Gave +1 Creative Carma to @ripe quest (current: #2 - 3208)
How can I do this arrow?

@ripe quest
why are you pinging mods?
Please don’t abuse the moderator role.
To create this arrow in Photoshop, select the Line Tool and click the gear icon in the top options bar to enable an Arrowhead at the end. Set the Concavity value to around 20% to achieve that sharp, swept-back arrowhead shape, then draw your line and use Free Transform to warp or curve the shaft if desired.
It is better to create this in Illustrator because it uses vectors, ensuring the graphic remains crisp and unpixelated at any size. Illustrator also offers superior control over the line's appearance, including a specific Width Tool that allows you to easily taper the stroke or customize the arrowhead design far more precisely than Photoshop allows.
Then I would post in the official forums, as a bug: https://community.adobe.com/t5/photoshop-ecosystem/ct-p/ct-photoshop?page=1&sort=latest_replies&filter=all&lang=all&tabid=bugs
https://community.adobe.com
Master Photoshop with the help of our global community.
Ok thanks
Gave +1 Creative Carma to @last turret (current: #105 - 18)
i still cant get hold of cutting out the white edges on the leafs

i was able to cut it but, there is still white edges
It happens, particular ly if the image is not huge (It needs some details to operate)
What method have you used?
A mask? or delete it?
i made it black and white, used color range to fully select everything and then masked it, after that i adjusted the feathers and shift edges
I would recommend a mask as you can run operations (like contract the mask) on it to remove the pixels and that is not possible as a selection without operating by trial and error
How big is the image? (In pixels)
oh wait where can i see that
Post a full screenshot of the PS interface and I'll show you
736 x 736 and the canvas is 1080 x 1080

im having a hard time studying how to mask complex objects like this one
i mean i was able to mask it, good but i just need more
It maybe too small for this kind of details. If you cannot get a bigger one, a quick way to remove edges pixels is to go Filter> Other> maximum, and try to put the smallest amount possible
oooo, ill try that
then i should repeat the same process?
here

If it doesn't work, you can still create a new empty layer on top, clip it to the original (so it's constrained to the original mask)
and fill in the white bits with green you picked up from the neighboring areas
Sorry, I wasn't clear. Run the filter on the mask, not the layer. My bad!
If it's not enough, run it another time (You can see what it does in real time if "preview" is ticked

If it's too much go to Edit>fade, and move the slider to tone down the effect of the last action
Run it another time (CTRL+ALT+F to rerun the same filter twice), or go to the filter menu and click on the top of the list where you have a reminder of the 3 or 4 last filters used

It has to be the last action. If you've done soemthing else after the filter, the fade is greyed out since some actions cannot be faded
You have to do it immediately after the filter
If you use it often, learn the keyboard shortcut so you can do it without pressing anything else: CTRL+SHIFT+F
Hard, but accurate! 🙂
hell yea, ima study that again
Then if there are still areas of concern, you can still zoom in real big and correct the mask with a brush
that is gonna take a long time..
As a rule of thumb, the biggest the image and the sharpest, the more accurate the filters and automatic selectiions are. If you can get hold of a bigger, sharper image, you could even get away with an object selection tool run
for the fade, should it be lowest or highest
Nobody said it was a quick job... That's part of the trade!
so the problem is with the image, it is not sharp and big enough?
Probably not big enough. It's not really a problem perse, it's just that you can't rely on automatic selections if the details are too small
i thin its not too big and not too small, or should i be having a pic bigger than the canvas?
The canvas have nothing to do with it. If the image the tool tries to get a selection from is too small, you could have a 2 km wide canvas and the details will still be too small
Sometimes you have to do things by hand, and that's OK. Most professionals are paid to do this. I mean that's part of the job. I've recently spend two hours on a interior images where I had to manually mask a gigantic tree in a pot
i guess ill have to do this manually...

now i cant use the eyedropper

oh im selecting mask'
Or find a bigger image. I mean unless you need that specific one, there could be 12's of similar images, even on free websites
https://unsplash.com/s/photos/palm-tree-leaves
or
https://stock.adobe.com/uk/search/free?k=palm+tree+leaves&search_type=usertyped
Some of them are already cut-out, for your convenience
You're most welcome!
so i just download it and put it in the photoshop and it wont have any bg i have to cut?
If it's a PNG, then not... If it's a JPEG it will likely have a white background. But since they are way bigger, you'll have better result with an automatic method
You could also try the method called "calculations" if you want to add that string to your bow. the result highly depends on the original background.
https://www.youtube.com/watch?v=SVqJOny0FyQ
Learn the power of Calculations in Adobe Photoshop to mask a busy background with intricate detail.
I hope that you learn a lot from this video!
🎯 SUBSCRIBE to get more amazing Photoshop tutorials!
► https://bit.ly/Subscribe-To-PTC
📘 INDEX - Masking Using Photoshop Calculations
00:00 - Introduction
00:10 - Sky Replacement Mask Example...
if you want a transparent background, you need a PNG (or PSD, if it's a Photoshop template), JPEG don't accept transparency.
It tells you what it is before you download (On the Adobe Stock website at least)
can i do this to the leaf i was trying to mask earlier?
You can try. The caveats about size will be the same. However you may have better results from the get go. IMHO, you will still have to retouch manually, but hopefully there will be less of it
I mean, even with a JPEG from one of the links I shared earlier, with a white background, the fact they will be bigger will make the tools work better. You can mask them on their own, save the file and then embed the file in your current 1200 px canvas. That way you will have a perfectly crisp image to start with. Of course the size im Mb will be way larger, but HDDs are cheap! 🙂
Of course, what I'm saying is if your goal is to learn how to do things properly. If it's supposed to be a quick sloppy job then of course you can take shortcuts.
HELL YEA

I DID THE SAME PROCESS BUT WAS ABBLE TO MASK IT AND WHEN i adjusted the feathers and stuff, it worked better
oh im getting images from adobe stock now
i just got the previous one from pinterest lol
i placed it here but i cant scale it hmm

oh nvm
figured it out
how do i darken that part

marque tool and then gradient?
Painting over (on a separete layer, clipped) with a brus? The new layer could be set in "colour, overlay, or another msuitable blending mode)
Hi I want to put this effect in a circle you notice what I circled that yellow ray of light behind this coin how can I put this effect behind a circle pls

Or a levels/curved layer masked. However, you may need to add colour if the area is too white, so it could be with a gradient, brush strokes or any other means. Levels/curves don't work if there's no details to darken...
Draw a circle in vector with the pen tool (a stroke as a shape) and add a glow effect and use the opacity and fill sliders: Leave the opacity at 100% and lowe the fill to hide the original shape, leaving the glow effect only
That said, I think that kind of things are meant to be done in Illustrator rather than photoshop, although of course, it's possible to do in Photoshop (just less intuitive)
So I should use a marque tool to select the areas I want to darken and then use a brush?
Opacity Versus Fill slider

Yes
I will need to go now... Work awaits me!
Alright Sandrine! Thank you so much for the helpp! Goodluck!
Gave +1 Creative Carma to @vapid flume (current: #6 - 1119)
My pleasure!
Draw a circle in vector with the pen tool
I don't know that part pls
Here are some links that will help
https://www.adobe.com/products/photoshop/pen-tool.html

Discover the power of the Pen tool in Photoshop and learn how to use the Pen tool for various applications like drawing lines, curves, shapes, and paths.

Learn the Pen Tool in Photoshop in just 5 minutes! 📝 GET MY FREE PEN TOOL CHEAT SHEET 👉 https://bwillcreative.ck.page/pen-tool-cheat-sheet
👨🏫 JOIN MY ONLINE PHOTOSHOP COURSE: https://learn.bwillcreative.com/21-day-photoshop-expert-course1693338440926
🌐 VISIT MY WEBSITE for 800+ free Photoshop & Lightroom guides: http...
In your case, it will look more or less like this, before applying the effect

and then, once the effect is applied: Check my settings as a guide (exact number will depend on the exact effect and image size)
In my case, I didn't even had to modify the fill amount

The thing is to understand how it works in broad terms and trial and error once you know who does what
https://www.youtube.com/watch?v=y3ylA7o0BfU
Some extra videos, not necessarily directly related to what you want to do, but good to get a hang of what's possible

In this tutorial, we'll check out ten ways to elevate your standard Photoshop layer effects. We'll also take a look at a few common problems you might run into and how to solve them, plus a couple of bonus tips! Thanks for watching, I'm always happy to answer any questions or comments below!
CHECK OUT THE CHANNEL FOR MORE CONTENT:
https://www....
As I said at the start, it's way more straightforward in Illustrator!
how can i make this have a reflection here

is this where i should be using uhm vanishing point?
I know this in unrelated to PS but does anyone know a good discord server for adobe after effects? The only one I was able to find was in Arabic, which I don't speak
I would suggest you to try Adobe Video server ( that supports Premiere Pro and After Effect): https://discord.gg/adobepremiere
Oh, thank you. This looks promisiong
Gave +1 Creative Carma to @viral palm (current: #7 - 1037)
@quasi pilot what?
Remember that Photoshop come with the discover panel: hit Ctrl+F, then “pen tool” and find where the pen tool is located, or tutorials about it. It works with filters tools, etc.
So im not familiar with editing, but need a quick logo which i generated with AI, its like 90% finished but cant seem tonget it the way i want. Anyone here who can help me make a smalle change (if possible)
If you asking for someone to make something for you then please post the request in #💬chat-general
I should add: its for a proof of concept so its not like the finished product
Okay ty
Gave +1 Creative Carma to @ripe quest (current: #2 - 3210)
This channel is generally for helping people to learn/use Photoshop. Not requests.
Can someone tell me an anime character for my next photoshop project.
hello!
So, ive been working in photoshop for a while now. and i've been having an issue
i'm trying to paste a pixel art image in a high resolution, but the anti aliasing settings keep making it blurry, and I cant find a way to fix it


San Gohan
Yes, use nearest neighbor when scaling, and prefer power of two scales.
Alr thanks
Gave +1 Creative Carma to @hushed niche (current: #12 - 352)
is this possible in potoshop? https://vxtwitter.com/jesiccaesthetic/status/2010702978441761079

Partially: There is a command called transform again (SHIFT+CTRL+T) that performs the same transformation as the previous one. The copying of the elements will still have to be manual in Photoshop.

Photoshop : How to apply a transform such as a rotate and repeat it to create all kinds of circular
Ring effect https://youtu.be/fvOBtKYV7uI
#photoshop
#photoshoptutorial
Illustrator uses a specific transform panel (in "appearances", that can live-scale, rotate and copy, in a completely non destructive manner) That's not possible in Photoshop.
ty
<@&548221840750018590> spam
Thanks
Gave +1 Creative Carma to @pseudo frigate (current: #127 - 14)
how come when I insert this image into photoshop it becomes a lot more pixelated?


first pic is image embedded straight into photoshop second is same image in windows photos
Trying to emulate one of my spriters text for update artwork so I can make it when they're not available. 2 questions I need help with:
- How can I get an outline with corners?
- How can I emulate a 0 feather (?) drop shadow?

this problem is resolved when i use a different size canvas, but im only inserting the image without changing anything about it in each size canvas, whats going on?
ok i figured out that photoshop is automatically resizing the image to fit the canvas, is there any way to stop this
Drag and drop the photo into a new tab (so it opens itself) and then take that layer and drag and drop it into the tab/workspace you want it in
Haha i actually solved it by opening the image directly in photoshop, i was opening a new file and then embedding the image which is what was causing it
no clue why i was doing it that way
The files were probably in different resolutions. Perhaps same size, different PPI.
If you mean, using the Drop Shadow Layer Style effect, I don't think you can. Its going to interpolate and soften the edges a bit.
You'd likely have to paint the layer the way you want it, then make it a Smart Object. Then you'd use a copy of the Smart Object, assign a specific dark color (probably using a Color Overlay Layer Style), put that layer underneath, etc.
It would be maintaining two [2] layers but if you made changes to the original Smart Object, the copy would pick up those changes. Hopefully, that makes sense.
Hello, could someone help me out with a question?
Im trying to recreate this effect for a class assignment and iv got not clue how to do it (Tried clipping mask but im just getting lost)
anyone got any tips? 😅

I have a photo already in mind that I want to use. I made a rectangle box to have the image "clear" while the rest (outside of the box) would be blurred/noisy. Im just not sure how to tackle it
One moment.

yea like that in a sense! how would I do that
This is one way...
Probably a bunch of different ways to approach it. Really just depends on what you're most comfortable with.
well @ripe quest made great video how to
oh wow thank you both! That's alot easier than I thought. @ivory rampart @ripe quest ❤️
Gave +1 Creative Carma to @ivory rampart (current: #23 - 101)
Gave +1 Creative Carma to @ripe quest (current: #2 - 3211)
There is probably a better way if it needs to be easier to edit where the unblurred portion of the image is. Like if you want to move it around.
But might be slightly more complicated
I don't think I need to have the unblurred portion moved, just need do basically do what you showed and add a + sign in the middle and noise the image a bit. thank youuu, you saviour 😂 ❤️
google + youtube didnt really understand what I was going for and I thought I lost my ability to describe things lol so im so glad this discord exists
not sure if you can move mask wiith smart filters don't play with those too often, but normal mask and filters can be moved with mask if needed


If you want to do it like that, I would use a Shallow Knockout Layer instead. Then you can drag the whole box around. Just a bit more complex for beginners to wrap their head around (maybe).
oh interesting never got myself to work with smart filters as i can do most of my tasks with filters
but i might actually look into it
Its a Knockout so that shape "punches through" and you can see the unblurred layer underneath. Nice effect. I just didn't want to confuse the OP. :)

Much nicer for this. More editable. But you have to understand the Knockout. Group the Layers. Blah blah. :D
Anyways...

how can i skew text upwards instead of like to the right or left so the text is like pulling down and how can i achieve this type of text with blending or


can someone help me with my drag and drop it genuinely just wont work
whats wrong
im trying to drag a photo from google onto my canvas and it just shows the Red circle signifying it wont work
i tried the run as administrator, ive tried un checking it in properties do i need to redownload
Drag and drop or download to the desktop or folder first. Then drag it into Photoshop.
You can't drag from the browser in to Photoshop. If you can right-click and copy an image, you can paste into Photoshop.
For others: it is in the vector tools like rectangle, circle, custom shapes…
<@&548221840750018590>
Image spam
is there a way to put a backgroundless PNG in photoshop without the empty space filling in black? the file is saved to my desktop


Where the PNG comes from?
- Save the PNG (do not !! Copy & Paste from browser)
- Open the PNG in Photoshop and drag the layer (from layers panel) from the opened PNG File to your destination file
it came from a wiki BUT i then saved it to my desktop
i then copied it from the file destination in my folders
i'll try dragging tho

i did not know it saved as webp so i'll convert it
thanks
Dragging the webp file should work....
weird,it didn't work as a webp but worked as a PNG
Is your Photoshop up to date?
Adobe Photoshop added native support for WebP files starting with Photoshop version 23.2, released in February 2022.
Yes, if you want WebP native support you'll have to do so.
what is "spring loaded tool shortcut?

This is a separate way to summon the tool by holding the key instead of pressing it shortly. Some people find it easier when they manage a lot of texts and it interfere with the tools when they type the text
I see. Is it okay if i disable it? Photoshop shows a delayed response in registering my keyboard shortcuts.
Ig this would be taking up some ram right?
I dont really use this feature and am fine without it
I have it disabled, I want my tools straight away
same!
I want to be able to press "b" and "e" to quickly switch between them and not having to keep holding the button
It's up to you how you manage those selections. Everyone's preferences are different. you have the choice so make it yours!
any other things I can do for reducing this delay?
I did do all the basic stuff to make photoshop faster in general like allotting more ram , clearing cache etc. Just asking if there are any more keyboard shortcut specific optimizations?
Not really, as far as I know. I have some of the tools I use most as separate keys on my grpahic tablet so I don't have to reach for the keyboard, you can also have specific devices like a logitech creative console or something similar
I use keyboard + the buttons on the stylus of my graphic tablet for shortcuts.
ya well the lag is the same on both devices.
Do you have express keys + a roller on your graphic tablet?
It is a keyboard shortcut input delay. if i use mouse to input it works finne
I have express keys but I dont use them. Just the keyboard and stylus pen keys.
There shouldn't be any delay, honestly
Despite disabling this
It's probably a computer issue more likely
Not sure, because I did operate on fairly old computers and I never had a noticeable delay to speak of
I see. Ya i do have a decent hardware.
I'm not really hardware knowledgeable, maybe someone else have an idea!
ok
Don't know if you've already tried/checked all these possible causes... If you didn't, I think it worth a try...
Note: Be aware point 4 will delete all your custom preferences and reset them to the default (workspace, tool settings....etc)... I would suggest you to try this after all the other.
1- Active Tool Conflicts: If a tool like Free Transform is active (you see a box in the toolbar), shortcuts won't work. Press Esc or Enter to exit the current operation.
2- Spring-Loaded Tool Shortcuts: This feature allows temporary tool switching (e.g., holding V for Move Tool).
Fix: Go to Photoshop > Preferences > Tools (or Edit > Preferences > Tools on Windows) and uncheck "Spring-Loaded Tool Shortcuts".
3- System Language/Keyboard Issues: Windows/macOS language settings can hijack shortcuts.
Fix: Ensure your OS keyboard language matches your physical keyboard and disable system-level shortcut conflicts (check taskbar language icon).
4- Corrupted Preferences: A common fix for many issues.
Fix: Hold Ctrl+Alt+Shift (Windows) or Cmd+Option+Shift (Mac) immediately after launching Photoshop and confirm to reset preferences.
5- Graphics Processor (GPU): Incompatible or outdated GPU drivers can cause lag.
Fix: Update your graphics drivers. In Photoshop, check Edit > Preferences > Performance and potentially disable "Use Graphics Processor" to test.
6- External Software Conflicts: Other apps (like gaming overlays, drivers) can interfere.
Fix: Close other applications or unplug unnecessary peripherals.
tried all these except 3. how to do that?
this is what would be the language settings of my software ig. how do i check if my graphic pen tablet and keyboard (both externally attached and the keyboard of my laptop itself) match.
ig the keyboard on the laptop is configured to match this.

TBH I don't know for the graphic tablet but if your physical keyboard is English(India) and your OS language is set to English (India) keyboard shortcuts should work correctly... What's your photoshop version? Updating to V27.2 could help...
...Sorry but I'm running out of idea... Perhaps someone else could help...
ya I am on the latest ver and this issue has been there for a few months - from october if i remember. was there on all versions. I updated to latest versions, went to old versions
As I said I'm running out of idea and TBH I'm not even sure the problem comes from photoshop itself...
Sounds more like Hardware/OS settings issue....Sorry I can't be more helpful.
<@&548221840750018590>
Image spam across a few channels
Thanks ☺️
Gave +1 Creative Carma to @tame cape (current: #14 - 271)
Thank you too.
Question: What are the comparative and superlative forms of ‘quick’?
quick -> quicker -> Valdair
🤠
Gave +1 Creative Carma to @wind narwhal (current: #3 - 2676)
LOVED IT 😂
Always there. Lurking in the shadows. Ready to pounce. Like Batman.
You shine the Bat Signal at the sky and BOOM.
Hey all! I just joined the server to ask this question.
I'm working on making a custom tshirt and will be printing the graphic for the shirt with my local print company. When I asked them what their requirements were one of them was having the whites in my image be 1% black. I'm not sure how to go about it in Photoshop unless the whites need to be an off white?
Any help is greatly appreciated 🙂
Is it for screen printing with a given number of inks?
I have no idea, their website doesn't say and I forgot to ask them over the phone so that's on me. The other requirement was having in the image in CMYK color format
I'm still working on the design of the shirt, and then I'm gonna reach back out to them for printing and all that good stuff. I'm just wondering if this is something I can do during the design process or is this an export setting thing?
CMYK is the most used mode for printing... How many colors are used in your design? Is it a drawing or a photo? What's the file type you need to send (JPG,PNG,PSD...etc)?
First go to: Image => Mode => and choose CMYK colors.
Now if you're drawing with colors, When you paint whites simply make sure your white is 1% Black. To do so click on the foreground color (1) to open the Color picker window and set CMY value to 0% and K to 1% (2)

saving all this, the print company wants the image in a PDF file which I thought was weird, but I guess that's how they do it 🤷♀️ . I'm working with a photo here so I don't have any indivisual layers to work with
Sorry, I'm not very familiar with print process.... I usely work on digital project so I only have basic knowledge.
I know there are some people more familiar with printing process in this server but the are in the European Time zone. Perhaps they'll can jump in the thread and help you later. Good luck!
is there a way to quickly implement this lightning looking as an border for objects?
i see a dude with many design having this feature i doubt he did them manually
thank you so much, I'm not familiar with it either, but I have some graphic design knowledge where I know the lingo. I'm just trying to figure all this out since this is my first time making something for a shirt I'll be wearing 🙂 .
Again, I appreciate all the help ❤️
Gave +1 Creative Carma to @viral palm (current: #7 - 1040)
its okay thankyou tho.
hey so same issue was there in krita so yes it could be an issue of my system itself. Dont know how to troubleshoot that
hi. i would like to know the prompt i need to write so the guy is facing towards the lady he is playing paddle ball with?
Thank You
Using Nano Banana 3 inside PSD

just expain naturally as you did here. that should work.
i tried camera left.
looking towards the lady etc.
kept producing results like above
where he was looking at in the original image?
Hi, to me, it looks like the results of the saber after effects plugin. It might be possible to replicate it with a glow, rendering to layers, then distorting it with displace, waves, etc.
@undone spear If I may suggest instead to work in RGB, to keep all the tools and functionality, but to preview in the correct CYMK profile, it provided by the print company Ctrl+Y to proof preview.
And at the end, export and convert to the correct profile
See: https://creativepro.com/rgb-workflow-from-photoshop-to-final-pdf/
Do you remember what your mom used to say when you’d insist, “all my other friends are doing it”? She’d reply, “if they all jumped off a bridge, would you follow them?” And it's the same when we consider the question of RGB workflow in a CMYK printing process. For whenever someone insists that they should convert
I would do like this: the man with dark gray white shirt looking at the women.
or looking to right/left.
if still doesn't works. try different models.
PDF makes sense: it can keep the vectors vectors, work in RGB or CMYK, color profiles.
Hi, you could also look for a free stock image of the player in the correct orientation then harmonize it in…
Should my photoshop scratch disks be in the same disk as my work files?
Like looking to boost performance and ram usage
also could i split it between two disks? how does that work
You can use more than one scratch disk
You just have to tick drive that you want to use
As scratch disk
ok how will that affect my photoshop performance
Tbh i have no idea
I use 1tb nvme as scratch disk so never actually measured difference between disks
Just use fastest drive as scratch disk if you want to be sure
I have no particular performance report but a Photoshop scratch disk is a hard drive space used as temporary virtual memory when your computer's RAM runs out, storing data for history states, cache, and large files to prevent crashes, with fast SSDs and ample free space (50GB+) on a dedicated drive being ideal for performance.
Also, the performance highly depends of your disks properties (SSD Main Drive and Scratch disk will improve performance Vs old HardDisk will reduce performance)
Thanks for sharing this with us!
Gave +1 Creative Carma to @hushed niche (current: #12 - 353)
Hi I've heard when trying to learn photshop of YouTube videos. You should only watch ones thst are from certified photoshop trainers rather then just some, random youtuber like bog.
That way you receive reliable sources and not false information no?
That’s first time i actually hear something like this, if author is able to start and finish work using their method it means it works
Most of time you will probably find two or more approaches to problem
There are many content creators or professionals who are not certified but are capable of teaching or explaining Photoshop satisfactorily.
Some people have skills and knowledge to share, but have never taken the time or spent the money to obtain certification.
With certified people, you have certain guarantees, but that doesn't mean that non-certified people can't teach you anything.🤔
oh
I've been working in RGB at the start of the project and have plans to convert everything to CMYK. I will definitely save this as well, thank you so much 🙂
Gave +1 Creative Carma to @hushed niche (current: #12 - 354)
If you have NVME SSDs, almost no difference. Spinning hard drives, yes, split OS, scratch and work files.
it is ssd i think
yes it is nvme ssd
so should i dedicate more drives to photoshop scratch disks?
I don’t think it would make a meaningful difference.
Invest in RAM or backup strategies instead.
Unless you are space constrained, no.
so my laptop issue is I have 16gb ram and photoshop can no longer run on it?
even tho it did earlier
@hushed niche when I did the custom preview as mentioned in the article it was set to the default of Working CMYK - U.S Web Coated. So I assume that it should be okay. I did take it into Indesign and I've got some issues so I'll have to look at that later when I get back from work. But again, thank you for sending that
Gave +1 Creative Carma to @hushed niche (current: #12 - 355)