#❓ask-a-question
1 messages · Page 111 of 1


thx pro ❤️ ❤️
If you make a new brush group, intending to make a group for the most used ones, can you undo it later?
You can always rename the folder, move them out, move to a different folder, delete the folder.
Okay, thanks for the heads up. I wasn't about to commit if I didn't know I could delete it afterwards
Gave +1 Creative Carma to @ripe quest (current: #2 - 2712)
hey does anyone have experience with removing text from gifs
Can you share the gif? Curious. Doable if only small. I'd import it as frames into ps, edit with content aware reexpprt
sure add me and ill show you my problem
I can't help for a couple days sorry! If you haven't had help by then I'd be more than happy to look though.
yeah sure if your just looking its fine
ill also take suggestions on how to remove it aswell
I dont want to send the gif here not because its graphic just not for this server
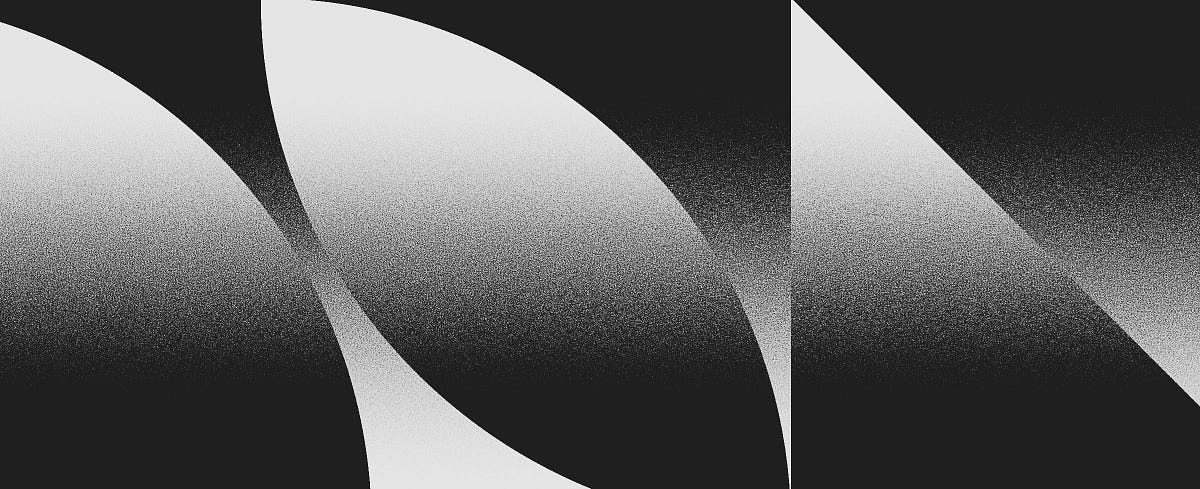
how can i make this gradient with dots?

can someone help me, i am having a hard time with PS for the web to save consistently. it might save once or twice then i start to get errors when i try to export or save to the cloud, any sugestions?
Hey all, having a heck of a time trying to find out how to remove these lines within a logo i am doing, any step by step help would be great !

the white lines around the black ones
Hi, are the colors on different layers? If not, sampling the dark yellow and paint in darker mode , but I see a darker outline still. It looks like the image has been over sharpened.
Medium
Originally published at Stefan Hürlemann — Designer.
Yea, i sharpened it
they are the same layer
I'd take it into illustrator and use the auto-trace
I cannot answer specifically for @ripe quest but it's more likely studying the principles of perspective.
Like architecture drawing etc.
1, 2 and 3 point perspective. You don't have to be good at drawing (although it never hurts) but just undestanding vanishing points, horizon lines (vantage point) etc

For example, personnaly when I have to create a composite, after the sketch phase (pen on paper) so I know where to position the elements, I will create a blank layer in Photoshop and draw my perspective lines with a simple fine line black brush. That will allow me to place the elements according to their natural perspective, matching the camera lens coverage (and possibly distortion) and vantage point.
A good exercise if you want to, is to use the perspective grid tool in Illustrator. With it you can build all your perspective planes and lines and place elements within it (it's an exercise so it can be just basic shapes like rectangles and circles)
Adobe Fresco (a free drawing app available on Windows and Ipad) also have a perspective aid tool to help with drawing in perspective and will be a good exercise to understand the principles
Gave +1 Creative Carma to @vapid flume (current: #7 - 907)
You're welcome!
Can you show a screenshot? there are different methods but it depnds on how it looks like
i still havent sorted this issue if someone can help
I assume you mean you've clipped something out, and it's showing some edging still
uhh i have problem so i want to make a sticker but it's blur . how to fix this?

You're viewing this at 300% from a very small image (look at the dimensions). If it's not blurry at 100%, then it's all good
100% is what it will look like, so what's what you need to check it at
but this is for sticker 10:6
it is for a printed sticker? a digital one?
It's not going to work, what are the dimensions of that sticker? (In cm, mm, inches whatever)
when printed
283pxl 170pxl
Not in pixels, in physical units (mm or inches
You are not going to print in pixels!
When you choose a sticker printer, you get asked what's the size of your sticker. This is where you should start

Width 10cm height 6cm
This one
OK, hear me out
Go to photoshop, create a new image with those settings, at 300 ppi

that will be your file from where you will start designing your sticker
With the dimensions and the resolution you got at present, your sticker will print smaller than a stamp
And will be blurry
This is what you got now
and this is what you need

Another question I have the same design but bigger, how do I make a small version?
Without blur
go to image> image size
Resizing without blur depends on the size when you start, compared to the size when you resized, if there is too much difference, you will get blur
So I can't copy 100% without blur
what do you got as a size as a starting point?
and what do you want it resized to?
Wait
this is why people who want to create designs that needs to be scaled up and down while preserving quality, do so in a vector program (vectors aren't size dependient)
Like in Illustrator
As soon as you manipulate pixels, any transformation will affect the quality
my first size


Get to know the two main image file types — raster and vector. Learn about the main features and differences between raster and vector to make sure you use the right one.
second one

Then what will be the end size?
In any case, you can test yourself and see how it goes. If it's blurry, that means it's too far to resize nicely
The only way you can find out is to test it
Your interpolation (resample) setting is alright, but you can test others like "preseve details" and see if it looks better. It's a matter of trial and error
Resizing pixels is never without consequences, some you can live with, some will drastically decrease the quality.
I'll leave you wiuth that, I need to go! Be sure to read the link I shared, it's actually Design 101, something EVERYONE needs to know.
Thanks once again! Ive tried the easiest solution for me, which was simply using the Neural filters - super zoom (2x) and messing a bit with the Noise reduction and Strenght (Noise - 5, strenght - 10) And it for sure looks **better **now 😄
Gave +1 Creative Carma to @vapid flume (current: #7 - 908)
is there a discord for Lighting Room Classic and Lighting Room at all yet?
i dont just need photshop i also need the Lighting room Classic and reg for help wise as well
There is no dedicated server for Lightroom or Lightroom Classic. You can ask questions here and if someone knows the answer(s), they might reply.
ok thanks for the suggest i appreciate it
Gave +1 Creative Carma to @ripe quest (current: #2 - 2713)
@vapid flume could you help me out please
Hi, the DPI is irrelevant, try to export a copy at 2000px wide, or 1000px. But you will lose details.
Do not ping mods, ask your question and whoever is available will help.
can someone help me im new ??
Answered in general chat.
why some of my texts have this sign? what does it mean and how to get rid of it

hi how to make scale down photo without making it blury
like to make pixels NOT mix up together
bóbr
hell yeah
hello can i borrow somebody who can change the color of one color to another
idk how 🤣
The font might not be installed on your computer. Try Type->Update All Text Layers
For pixel art, select nearest neighbor: https://www.photoshopessentials.com/basics/how-to-resize-pixel-art-in-photoshop/
Learn the best way to resize pixel art and keep those blocky shapes looking crisp and sharp with Photoshop!
how do I get these fonts to always be on my pc (and is it recommended do to it)? i only have them on adobe fonts
Just one search away: https://helpx.adobe.com/fonts/kb/add-fonts-desktop.html
yo guys so i have this logo. they darker color on the outside is transparent but how do i make them 100% opaque whilst keeping that same shade of grey/white

using threshold just makes everything 1 color and look weird
if i use threshold

i could do paint the darker colors in manually but i just know theres a quicker way to do it
Hi, I would stamp everything to a new layer: Ctrl+shift+alt+E and then select the black with 1% tolerance and delete it.
wont that still keep the transparency thats on the outisde
lemme try tho
If the background is opaque stamping everything to a new layer should forego any transparency. You can also remove the black via the blend ifs.
??

idk what settings to use
or did you mean magic eraser
Just the magic wand lowest setting. Or blend if, or whichever method you prefer.
had to experiment with the tolerance but it worked overall. thanks
Gave +1 Creative Carma to @hushed niche (current: #15 - 157)
For your next question, use nearest neighbor to scale it and avoid fuzziness.
thanks
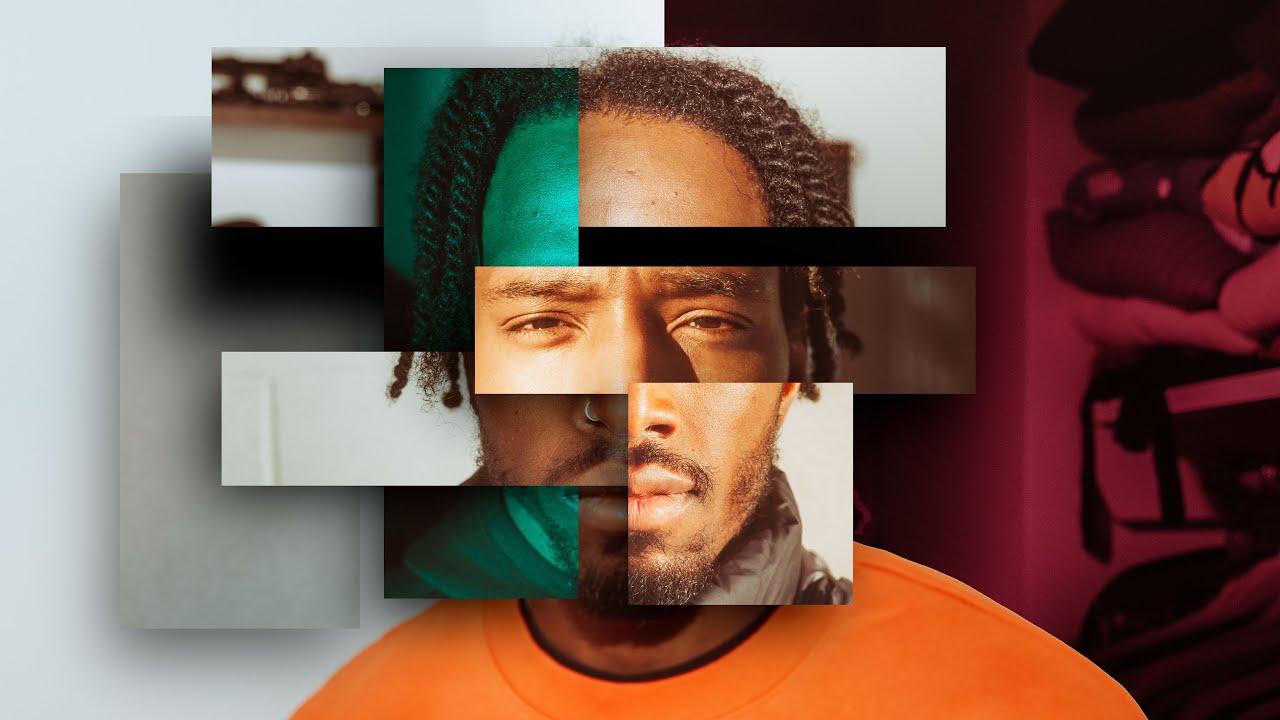
Interested to hear some takes here. Want to re-create this artwork with the face popping through the grid mesh. It'll be an Illustrator x Photoshop job but short of adding a tonne of points to the grid and manually and tracing the image, does anybody know an easier way? I assume there's no kind of auto mesh tracer unless you use a 3D software?

replying for when you get an answer. would like to learn as well
hopefully anyone can help and ignore the slice job but i am trying "flatten" this pillow to make it into a pattern and fit on the entire canvas. Does anyone know a tutorial or have the time to briefly walk me through it?

hi, is it here I should ask for help ?
thx
I would like to use generative I think but im not sure its t he right tool, the goal is to change de behind of this image and the text at the bottom and bottom right

my text wont snap to center of image/guides, how do i fix it? i have snap on and all options selected.
I want to create some curved text but the option on the toolbar is greyed out for some reason. I do have the text layer selected and have tried with the text tool and selection tool.
What am I doing wrong?
Double click on the Text layer...
Are you sure Snap and Snap to guide are on? It should work.
I think the easiest way is to make your own pattern by copying the crosses pattern rather than try to get a repeatable flat pattern from a pillow picture.
I've done this in few minutes so you could redo the same or use it freely...

Hi @pallid perch
My English is not good enough to explain the complete procedure to you. Unfortunately, ‘quick and dirty’ doesn't work here. You have to invest a lot of time and patience to achieve a decent result. And that only works with a ‘rebuild’.
Fortunately, there is a tileable pattern. Unfortunately, the pattern tile is quite large.
Start by creating a grid (new guide layout). Then find a reasonably symmetrical single element and complete it axisymmetrically. Both are basic requirements. Only then can you start creating the desired pattern.


Hi @viral palm
😆
There can't really be such coincidences ...
result

is this threshold effect? because it doesnt look flat at all

but its really high contrast
I think it's just a picture turned in Black and white with a levels Adjustment Layer with Black and white outputs pushed inward the level curve.
Perhaps a Noise filter to add grain (if the original picture doesn't already have some)
Then a gradient map applied on the subject (Black to Highly saturated Pink)...
Nice job!
Yours too!
Hi guys! Just recently got photoshop on my iPad, and mainly got it for Photoshop’s text features. I figured out how to add outlines, but is the “arch text” feature in the mobile version? If so, I can’t find it. Can someone help me? Thanks! <3
Those Warp Transforms don't exist in the iPad. Sorry.
Well, are there any alternatives. Do you think it may be added as a future update ;w;
Do you have Photoshop on the Desktop?
I do not. I am too broke for that I fear 💔

I'm confused. How did you get Photoshop for iPad without a Photoshop subscription? Or you don't have a PC?
or are you using the free Photoshop Express app?
I... used the mobile app. On Ipad its only $10 a month
Oh. I didn't realize they had that.
(also i do all my editing stuff on mobile lol)
Nah its fine. Im js a senior in HS anyways. I hope I can get a job soon enough haha 😅
Anyways
I am assuming there's no known alternatives for mobile?
🤔
You could get a deal on Adobe apps since you're a student. They have a student discount.
For high school? I suppose I could try. 🤔
I don't think there is any way to warp text like that on the iPad. If I can think of anything, I'll let you know.
Ah ok ok. Thanks anyways! ❤️
Gave +1 Creative Carma to @ripe quest (current: #2 - 2714)
How about trying Liquify? You’ll have to rasterize the text layer. You can’t edit it again but maybe you can get close to the effect you’re after.
It's not ideal but maybe it's a way to experiment with. :)
Hm, how do I rasterize the text? 🤔
It's at 0:04 in the video. You choose "Flatten Layer"
It somewhat works! It's an okay alternative for now! Again, tysm!!
Glad I could help. :)

how do i make my face look to be less quality and more blurry idk the term but like will smith and the surrounding lol
Convert the Layer to a Smart Object. Then add a Gaussian Blur filter. Just a tiny amount.
wow ty! well i dont have gaussian blur or any custom filters for that matter. How do i get that?
Gave +1 Creative Carma to @ripe quest (current: #2 - 2715)
You should have them. Share a screenshot of Photoshop with the Layers Panel open.
nvm i found it but it wasnt on blur just some steps down

can anyone help give me a tip ? i want to scale the image inside this card but if i pull it manually it stretches and looks ugly

i made 4 shapes with the pen tool but was wondering if i could select all of them in one click and remove background in one click or do i have to select each one then erase background and go 1by1?

@ripe quest i dont have the things
around my screen
which u drag
how do i make them visible like urs ?
Main menu: View > Rulers or Ctrl R on the keyboard.
Open up the Paths Panel. Window > Paths...
If its one path, you should be able to Ctrl Click on the Path Thumbnail (Work Path) in the Panel. That should make a selection.
there seperate paths

im guessing i just have to select them one by 1
No. Hang on a sec.
Hmm how come i only have 1 work path?

Just hold the Ctrl key down and Click on the Path Thumbnail.
@ripe quest you are awesome
if u can just tell me how to make my photoshop to save images automaticlly as jpg file
not to make it save it as jpg manually everytime
i usually save it with ctrl s
but i always have to click on jpg first
its annoying
Files with Layers have to be saved as Photoshop Format. But you can just do File > Export > Quick Export...
gotchu thanks
Gave +1 Creative Carma to @ripe quest (current: #2 - 2716)
You might want to save your Photoshop Files with Layers. You might want to go back and edit them again later.
@ripe quest and last question for today , how do i cut a piece of image in photoshop and then save the image itself
without an empty space on the image itself
i tried but it comes white
the place i ve cut
How can I make this look more real. I feel like the angle/portportions arent right. is the skew bad?

Hi, the skeleton looks very bright, despite being in the shade.
was thinking that too, i feel very off about the top grass and the rip sign i feel like the angle isnt how it would look irl... or maybe im crazy lol
If initial image has transparency how to fill it with 100% transparency?

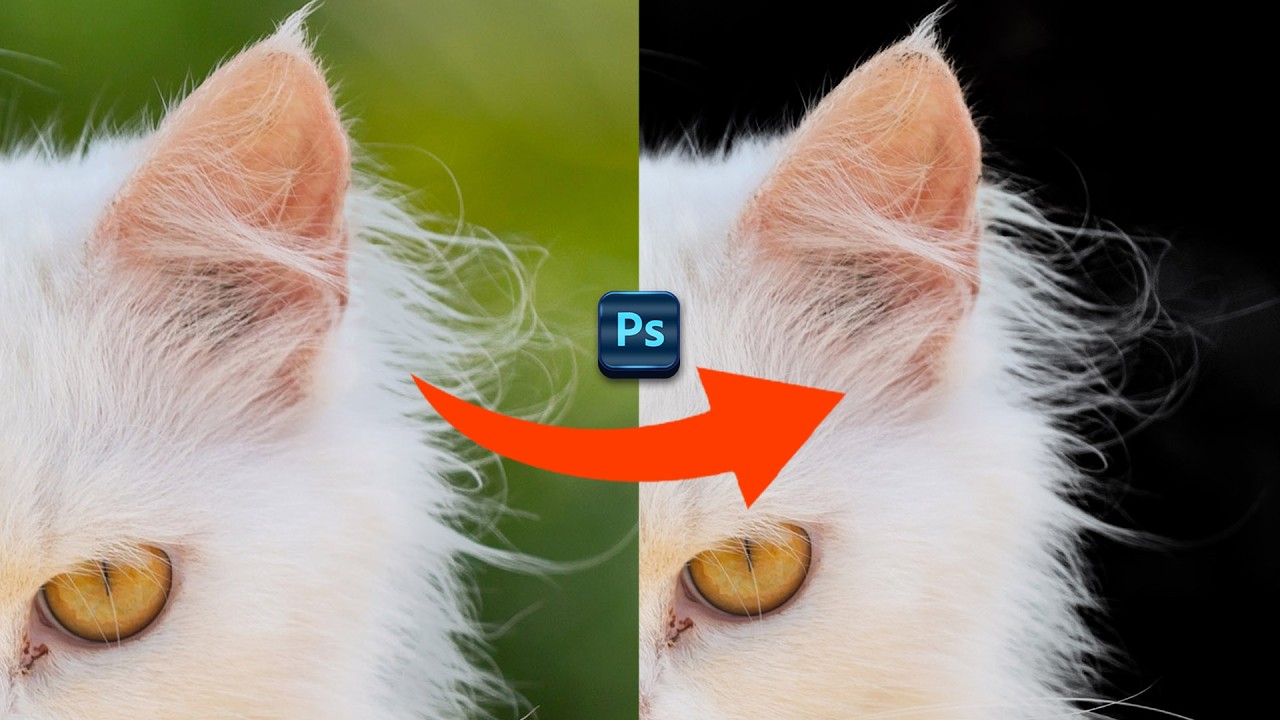
Hi, how can I get a super clean image after removing the background? There are tiny white spots around the edges which I want to remove
Hi guess you mean 100% opacity. Target the layer, and create several copies (CTRL+J), then go to the top one and hit Ctrl+E to merge.
Hi, select and mask is a good start:
https://www.youtube.com/watch?v=J93ARHHx51g
https://www.adobe.com/learn/photoshop/web/make-precise-selections-in-select-mask

How to cut out hair and fur in Photoshop, with perfect edges. Colin Smith completely explains Select and Mask in this Photoshop Masterclass. Part 1 of 2.
00:00 INTRO
00:34 Cutout, bringing into Select and Mask
01:34 Viewing Modes
02:58 Awareness Modes
03:33 How Select and Mask Works
05:29 Best Way to refine hair selections
07:31 Fixing Jaggies...
Sign into Adobe Creative Cloud to access your favorite Creative Cloud apps, services, file management, and more. Log in to start creating.
Discover how the new Select and Mask dedicated “taskspace” in Photoshop CC makes creating selections and masks easier, more exact, and more efficient than ever before.
Subscribe to Adobe Photoshop: https://adobe.ly/3vWtAiy
Learn More About Adobe Photoshop: https://adobe.ly/4bUzQbh
Try Adobe Photoshop: https://adobe.ly/3womKm8
About ...

Here are 25 of my favorite tips and shortcuts for creating selections in Photoshop!
Its still challenging to achieve 100% opacity; in addition to that it adds additional stroke which looks bad
I forgot to thank you for this, solved my problem instantly thank you
Gave +1 Creative Carma to @hushed niche (current: #15 - 158)
Oh, I am glad to hear this, thanks for the heads up, please stick around and help others when you can!
Gave +1 Creative Carma to @craggy lark (current: #970 - 1)
If you do not get 100% opacity, repeat the process.
The stroke might mean that there is more that what can be seen, leftover pixels.
I am wondering if it would be possible to select the transparency via a Ctrl+click on the layer thumbnail, then converting to a layer mask, where levels could be applied, and cleaning of the edges, in addition to the stacking.
was it a masking or clipping layer?
when you select a thing (a coffe mug for example) and change the contrast or something like that?
No masking refere to the action of hiding parts of layer (or group of layers), with either a layer mask (raster) or a vector mask

i think i've been using it wrong then
A clipping is the action of creating a new layer where the content of that new layer will only appear where the layer it's clipped on to isn't transparent

That's clipped layers (see the angled arrow?)
"noise" and "extra grit" will only apply to the content of the base layer
If you want to change the lighting, contrast etc, that's called colour correction (and sometimes "grading")
is there a separate tool for that or is this it?
picture of sky for refrence

Right click on the layer and you'll find the menu

thats what i've been using for color correction (i think thats what im doing)
But it's a function that can be applied to anything on a layer, it's not specific to colour correction. In my screenshot it was used to add noise and splatter style brush strokes to an image to make it look worn out
oh
now im curious what photoshop's noise looks like
Like film grain, basically

is it like that when you first apply it or did you change the opacity / saturation?
I didn't change the opacity and saturation there
As I said, it's completely independent
I just added grain and brush strokes to a "clean" photo
ah
Grain makes the photo look more organic, like taken with a real camera. For example when you create realistic scenes in a 3D software, most people will add organic grain/noise, so the scene looks even more realistic
They will do that in Photoshop
These are techniques use in what is called "compositing", when you go beyong retouching and grading, and combine multiple photos together, sometimes from completely different sources
https://www.youtube.com/watch?v=g3qe4rDw1XU

Learn how to create composite images and explore photo manipulation in Photoshop by using these 10 steps that will get you on track creating great composites of your own! We will cover lighting, color, shadows, perspective, and much, much more in this Photoshop tutorial.
Get a free 7-day trial for Envato Elements here: https://1.envato.market/...
Adding contrast and changing lighting is only a very small portion of what people do with Photoshop (but it's still a very important part, sometimes neglected and that can win an image or completely kill it)
ooh


Could anyone assist me in recreating this text. I cant get the gradient right on my end
Hi! Copy the layer, then blur>motion blur, or blur gallery>path blur. Then ply with opacity and blending modes.
Hi, you’need to create a gradient that goes yellow>almostwhite>dark yellow>yellow. Similar to a chrome gradient, but all yellow tones. https://youtu.be/CFynG3wIn-8?si=d46y02TCXaBrxjyg

Create hyper-stylized 1980’s chrome text and logos with a few versatile techniques in Adobe Photoshop! In this tutorial, we’ll cover the basic process of how to set up a chrome reflection that can be customized for infinite different looks, plus a few extra details to give the image some hyper-realistic radness. Download the gradient presets, st...
Hi, is it possible for someone to help me figure out something about Photoshop's text tool? I've posted this question in the Adobe Community, but I figured it would probably be quicker and easier to request some help here.
If it's ok, I'll just copy and paste what I posted on the community. ❤️

I think there might be more than one layer here, tbh. Something like that maybe... Also, its possible this could be done with Adobe Illustrator where there is better support for Path Offsets.
I can’t think how to replicate this. You usually position your text black and fill it top to bottom. But switch to the move tool and reposition it.
How can I get the layer mask by itself?
"Get?"

I don't think you want JUST the layer mask

turn the layer into a smart object
Is there not a way to make this happen, or a way to mimic it? Maybe not exactly, but similar?
I wish to create some social media templates for some of my friends to use, to help me with my project, but they're absolute beginners, so it's a bit hard for me to ask them to position the text in the exact place every single time.
That's just vertical alignment isn't it?
How can I take 1 of the individual ones?
Could I possibly send you a private message? I don't want to clutter this chat too much.
Annoyingly Photoshop doesn't have the vertical alignment tools that Adobe Indesign, or canva, or even PowerPoint come with.
I see, at least now I know the name of what I was looking for. Is it not possible to work around this, or perhaps find a plugin, you think?
Is there a way I can change just 1 color from the same layer?
Like if there is a green & white in the same layer
And I want the green to be a blue now
How would I do that
@loud coyote - I've got 15 mins before a conference call. - You up for a quick call/screenshare?
Sure I dont have a mic tho
umm. ok. Scratch that then 🙂
alright
Hue/Sat Adjustment Layer...
Can you perhaps show how painting black over that adjustment mask means that you could make just ONE of those blue?
Alt-click between the adjustment layer and the green layer to create a clipping mask. https://www.photoshopessentials.com/basics/clipping-masks-essentials/

Learn how to create and use clipping masks in Photoshop to hide parts of a layer and fit your images into shapes!
I created a big-enough box for the area that I want the text to be in, then made it 0 opacity, and just aligned the text like shown. It's obviously not perfect, but good enough for a work-around for the headache. Thanks!
I already showed how to isolate one of them.
(I'll back out of the @callmek convo, #TooManyCooks
Did not notice there was more than you, thought you had a call!
@hushed niche @sly hawk I've never used InDesign, as I've just become a member for Creative Cloud and all it's apps. But is this similar to how Canva works? As in, you are able to create easy-to-modify templates for social media, and be able to share them with other people?
Because if that's the case, then this is basically what I needed, but I was doing it in Photoshop. So maybe using InDesign might be the solution instead.
Please let me know, thank you very much for your time!
Gave +1 Creative Carma to @hushed niche (current: #15 - 159)
I am brand new to this site and a brand new user of Photoshop, Lightroom. I want to copy the Comment data on a photo to the Caption section. I thought Lightroom could do that BUT, the Comment section, which I created in Preview, is not showing in the Info section on Lightroom? Can anyone offer any suggestions - much appreciated by this noob.
For social media, I’d rather look at Adobe Express. InDesign is originally meant for long documents and desktop publishing
Hi, and welcome! I am not familiar with where in metadata is the comments section. Did you check in Adobe Bridge? There is an all metadata field called Raw Data. https://helpx.adobe.com/bridge/using/metadata-adobe-bridge.html
(You could even check in Photoshop in file>File info CTRL+Shift+Alt+I if I remember correctly )
Tysm!
I wonder if there's a way to save discord messages?
Tried both Adobe Express and Adobe Bridge; looks like adding to the "Comment" section while in Preview does not create a field that can be accessed by any commercial software. Looks like I will have to open each photo in two apps and then copy and paste into one of the fields that the various apps can actually read ☹️
Thank you, I got it now!
Gave +1 Creative Carma to @hushed niche (current: #15 - 160)
What about all the colors
I answered your question in the forum and even provided a video: https://discord.com/channels/547473772727238676/1342504706752118856
For future reference, please don't post the same question(s) multiple times/in multiple places.
I cannot paste anything into the mask of my smart filter. I am trying to special paste a UI element into the mask of a blur smart filter, so that the background smart element is only blurred where that UI element is. I copy the UI element's layer, enter mask view for the smart filter mask, and paste special, but nothing happens.
how can i make something like this or close to it, i tried using patterns but don't know how

Oops
@fervent lintel
I have just replied to you in the Adobe forum and have just read that you have asked the same question here (and have already received replies).
https://community.adobe.com/t5/photoshop-ecosystem-discussions/anchor-end-on-text/m-p/15169494#M854652
And I am now relatively certain that I have completely misunderstood your question. 🤔
Did you mean the functions (see screenshot of InDesign):
Align text at the top of the text field and/or
Align text in the centre of the text field and/or
Align text in the text field below
These are available in InDesign. However, InDesign is more print-orientated.

The Adobe express recommendation was not addressed to you; so you found nothing in raw data? It seems that finder’s comments it is Mac only: https://discussions.apple.com/thread/7617525?sortBy=rank
Al+ click the mask to make it active and editable.
Yup, already did that. Didn't improve anything.
Please post a screenshot of, the full interface as it is the default procedure.
To me, it seems done with a third party filter or another app. Like a photomosaic one.
do you know the name of the effect, i am trying to atleast find something close to it
Photomosaic is the closest I can think of.
ok…
how to do this typa title?

The "edit by" part?
You can do that manually but there are fonts like that. I think its called "Ransom Note"
and how to do the text below the edit by thing
The bottom part someone copied and pasted from an actual movie poster.
alr ty
"Bullet to the Head" is a real movie
Yes that looks pretty close. Would i by chance be able to get a .psd from you?
Im on an old portable photoshop so i dont have illustrator unfortunately
Sorry. Deleted.
Darn
I do have the Style I was playing with though.
Drag and drop that into your Styles Panel (to load it). Main menu: Window > Styles...
Then drag and drop it from the Styles Panel to the Text Layer.

Ill give it a shot here in a sec
Sounds great. Good luck with it.
Could anyone help me or give me a rundown of how to flip this logo please? Mainly struggling with getting that 3d effect on the O & E. Thank you 🙏
Oh just remake it
but with my own text
@ripe quest hello again, sorry for bothering u
i have another question
i saw ur last video yesterday, about the cutting thing
but i just want to do a straight square cut
not make outlines
like very basic cut
Looks like 3D shapes. I would probably do this with Adobe Illustrator 3D Extrude.
I don't know what you're referring to. Sorry. I make a lot of videos everyday.
I have no clue why smoothing is slightly greyed out and just won't work when I click on it.

Nevermind, I have no idea why but after selecting another brush it magically started working for all of them
Turn it on in Brush Settings... Then it becomes active for that Brush
I will look into it, thank you
Gave +1 Creative Carma to @ripe quest (current: #2 - 2717)
Thanks, I'll remember that for next time. This time around it seemed to fix itself in a slap the crt tv kind of manner
Gave +1 Creative Carma to @ripe quest (current: #2 - 2718)
I need help/advice. I'm a young sports graphic designer. Been at it for 1 year now and I'd say I'm alright but not at the level I want to be. Any tips to develop? Buy online lessons, courses, any good youtube channels? Any help is appreciated 😁
Send some stuff

@hushed niche
@grand stump hey I have a question
Please do not ping! If someone is available, they answer…
Hi! Get the move tool, Select all (Ctrl+A) and use the align functions in the option bar.
Ooops sorry about that
So I’m doing this currently would you know how to do any of these effects

Like the Stars and gradient color on the sides

The gradients could be gradient maps with a layer mask. The stars have some perspective in them and it looks like they have a motion/path/radial blur applied. The same one on all the star layer.
Can anybody help a bro out? https://discord.com/channels/547473772727238676/1342715201782546462
If I sent like a psd file or something could you display an example ?
Of the stars to be exact
Away from the computer this weekend. Create a star, angle it by around 10° clockwise, make multiple copies at different scales, copy the layer, hide one, rasterize the other. Then use blur>radial blur, or the blur gallery. If you do not wanna experiment and learn, maybe AI?
Comrades
I have a problem.
when I try to move the program, it returns to its original location.
PS 2023
the problem appeared recently.
reinstalling does not help
how do i make a layer(100 opacity) under another layer(50 opacity) not show through the 50 percent opacity layer infront of it
(half solved) I disabled this feature and now the window can be dragged at least like this


I'm new to photoshop, but what do I do if I'm trying to perfectly trim out something and selecting it with the lasso tool isn't working how I want it?
As in my designs?
You click on its eye to hide it , if the goal is to position the top layer?
Even blending modes would not work given the 50% The idea of 50% opacity is to give 50% transparency. Explain your goal exactly.
50 opacity text layer over a 100 opacity text layer with different text but i dont want the 100 opacity to overlap the 50 opacity
Is this what in Win 11? It might help for others trying to help.
Not sure if you un-full screened first.
What did you come up with so far?
I figured it out. Turns out there was a very simple soultion to my problem lmfao
Oops missed it. Care to share your solution for others?
Guy how do I use Content Aware Fill but everytime I crop out the image, it gives me the transparent fill? It sets the transparent fill to default so its not like I don't wanna use content aware fill, its just that I can't. Anyone got any ideas?
How large a crop are you doing? Did you try to reset the crop tool (right-click on its icon in the option bar)
Change the option here... to "Content-Aware Fill"

It does nothing when I click on it

You change the option. Then do the Crop Operation.
However, Content-Aware Fill is probably not going to create new portions of that face.
You'd have to use Generative Expand for that.
Wdym option? If it's what the other guy said about "right-clicking on its icon in the option bar" Then a different outcome occured on my part where it doesn't give me an option to reset/ change the crop tool. Instead it gives me other tools like perspective crop tool and yadayada. Also what's Crop Operation and how to I access it?
You have the "CROP TOOL" and you're attempting to CROP the image to a new aspect ratio. Correct? Also, within that context, you asked about using Content-Aware Fill. Thus, you select the Crop Tool. Change the FILL OPTION to "Content-Aware Fill" and then you CROP the image. That is the CROP OPERATION. Actually doing the crop.

So are you now referring to something different? Because I'm at a loss for what the question actually is here.
okay finally I found a channel for this
I like to edit images in my free time on my phone
But
I use ibis paint x for it
I want to try adobe ps
but I'm not sure if what I do, is rly considered editing
I can show you some of it
Yeah idk what I did differently but content aware fill is now available while generative expand works half the time

This is a Crop operation with the Content-Aware Fill option selected @sullen current
Photoshop was designed for the creation and editing of raster (pixel-based) images. That is its purpose.
If you want to try Photoshop, you'll have to set up an Adobe Account. Request the 7-day free trial. Download and install Photoshop on your computer.
Can you please write your questions on one line? Why do you keep hitting enter after every couple words?
You wonder if you can do what? Photoshop is a professional-level image editing app. You can be fairly confident that whatever you're doing in MS Paint or whatever app you're using can be done in Photoshop.
You right clicked in the toolbar. The option bar is the one below the Menubar
I understand it now
I thought the tool bar and the option bar are but one thing
I am wondering if the other adjustment layers did not interfere.
No problem! It might be useful to learn the proper name of everything, you’ll be able to request and get help better: https://www.photoshopessentials.com/basics/getting-know-photoshop-interface/

Learn all about the Photoshop interface and its features. Topics include the Document window, the Toolbar, the Options Bar, Menu Bar, panels and workspaces.
Hi, this section is to ask Photoshop questions. You can post your work for critique in there: https://discord.com/channels/547473772727238676/601848427541692447
That wasn't their question. They're using some other paint program and they want to know if they can accomplish the same thing(s) in Photoshop. What those "things" actually are have not been clarified.
OMG 😭 Thank you I needed this
Gave +1 Creative Carma to @hushed niche (current: #15 - 162)
You are very welcome, there is also: https://helpx.adobe.com/photoshop/using/workspace-basics.html but I find Photoshop essentials very easy to read.
Learn how to navigate and use the Adobe Photoshop workspace.
Ah ok, thanks, it wasn’t clear, especially with their formatting.
Gave +1 Creative Carma to @ripe quest (current: #2 - 2719)
it is a ps question
I'm asking abt certain tools being available
I don't know anything about the app you're using but I've attempted to answer it. You can always go on YouTube and look for Photoshop Tutorials so you can see people using the tools. Watch a bunch of them.
Perhaps that will give you a better idea of what the capabilities are.
how does proof colors work?
so it only shows how the project will look printed?
Hi! does anyone know how do I make this kind of pattern?

I recognize that it's some sort of halftone pattern but I just can't wrap my head around on how to recreate it
Hi, it is called compositing, see: https://www.youtube.com/watch?v=g3qe4rDw1XU
Learn how to create composite images and explore photo manipulation in Photoshop by using these 10 steps that will get you on track creating great composites of your own! We will cover lighting, color, shadows, perspective, and much, much more in this Photoshop tutorial.
Get a free 7-day trial for Envato Elements here: https://1.envato.market/...
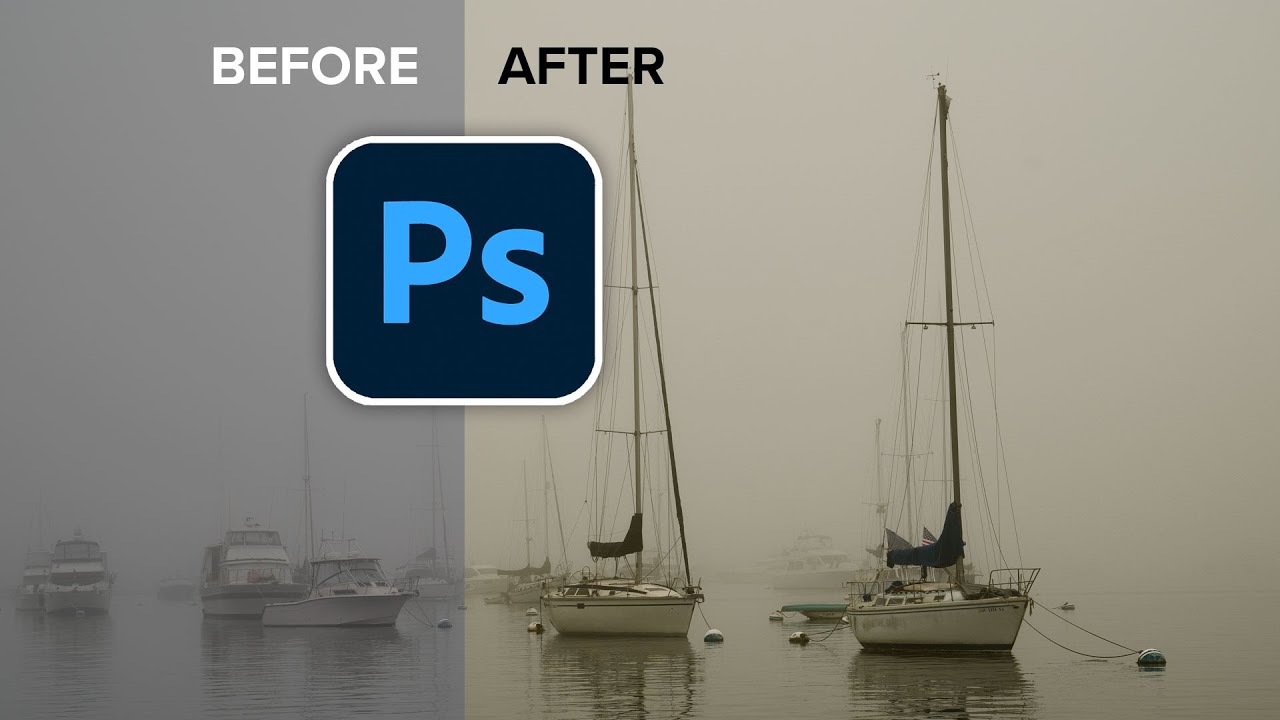
It can simulate many things, including daltonism, or can be used to assess values when doing digital painting: https://threadreaderapp.com/thread/1251763478177644544.html
Thread by @timsoret: All my life I've seen pro painters talk about "values" by desaturating in Photoshop, and turns out it's one of the most ead mistake: this is the wrong way to assume values, as the maths are wrong, and let me show you why: Desaturatin…
Hello! To me it looks like dots with a bevel, but might be done in a 3D program.
Seems like you can define a pretty basic pattern. I would do it in greyscale so that I could make it whatever color later on. I've attached the simple pattern I made. You're free to try it out, experiment, use it... Drag-n-drop the .pat file into your Patterns Panel to load it. Then drop it onto the Canvas to use it in the document.

how to make whole wall smooth and flat white?

Photoshop is the main pixel editor, and most other editors copied its features. Some innovate, but it is the verb some use when it is about editing a picture.
Hi, what did you try so far? Clone tool? Patch tool? Generate image with no prompt?
I selected the whole wall, added layer + picked flat white color + overlay + and played with levels
but its to white

Yes, white is overkill, you lose all details. Why didn’t you sample the wall color?
Thanks! I'll try this out later :0
I've got a weird sort of question. Up until yesterday, I have never encountered this, but when I open up a psd file, it has some of these weird grey marks on some of the layers (As shown in the screenshot.) I didn't willingly put in on there, they just showed up randomly. Is there a reason behind this? I tried googling it, but this seems like a rather specific issue that I can't figure out on my own

Looks like some sort of pattern. Perhaps there was as a Pattern Fill layer added to your document by accident. (?)
I'll take a look into that
Could also be a Pattern Overlay Layer Style
It was neither. It honestly just feels like a weird glitch that happens at random. I can fix it by copying the layer and pasting it over and over again until the grey marks fade away, but that still doesn't explain why it happens in the first place. It's a very odd thing because if I copy and paste it, that implies that the layer exists without the grey marks, but when I paste it, the grey marks remain there
Doesn't make a lot of sense. Feel free to share a screenshot of the Photoshop GUI with the Layers Panel open and clearly visible.
Here's how it looks

Main menu: Help > GPU Compatibility... any errors or issues reported there?
Oh. Wait. This is MacOS.
You're also using an old version of Photoshop. How about updating to the current version?
I can't, not with the Mac I have. It doesn't support newer versions. That could be the main issue I'm looking at. May have to upgrade
The word you search is artifact. It seems to be file corruption. Is it on its own layer?
There’s a way to force newer MacOS versions to install, but it’s not official.
It is it's own layer, it likely is corruption
I used the magnetic lasso to create a rough outline of what I wanted to separate into another layer, then used the regular lasso tool to touch it up and the magic wand to auto select it.
I do have a question about how to color match/ blend the colors better. Trying to smudge them isn't really working.

does anyone knows the fix to this? i tried everything it does not work. I spent 5+ hours on working on this psd.

Hello, yes, you need the actual file, see: https://www.youtube.com/watch?v=uX5ayTjDoPs
Learn how to use LUTS in Photoshop. Powerful color grades in a click. Learn how to install LUTS so they stay in the menu. How to apply and modify LUTS and download LUTS and more for free from the Photoshop Vault.
► FREE LUTS + More here: https://photoshopcafe.com/vault
0:00 Intro What to expect
0:37 What is a LUT?
2:29 Using Custom LUTs
4:01...
Hi, what is its size? Did you save a version under a different name? Do you have windows file history on? https://support.microsoft.com/en-us/windows/backup-and-restore-with-file-history-7bf065bf-f1ea-0a78-c1cf-7dcf51cc8bfc
Learn how to configure File History and how to recover files and folders that have been deleted or accidentally changed.
22mb, i did not save with a different name, i don't think i have windows history on too, i'll check
Not sure, I saw an online LUT creator . From Photoshop , you convert adjustments layers into a LUT:, not from a file. https://helpx.adobe.com/photoshop/using/export-color-lookup-tables.html
You could try yo open a flat copy, to see if part of the file is recoverable: hold Ctrl+Shift+alt as you try to open it.
You have to create the LUT. Convert to .CUBE and then you can load it/use it in Photoshop.
This looks like a neutral LUT. Like the base file. Let me see what it does.
I think this is "neutral." Where did you get this?
If there is any difference, it is barely noticeable.
For comparison: Left is Neutral LUT. Right an Edited LUT

Do you have any idea what the images is supposed to look like when you use it?

I was wondering how i could reset the image size box?

Does photoshop recover crashed files?
If Photoshop has crashed while you were working on a file, you should have a recovered file when you reopen it.
But if by crashed file you mean corrupted file the answer is no.
Make your "masked" layer to a Smart Object. The bounding box should fit snugly around the masked character.
Know most if not all will ask why would someone want this effect, after watching someone an idea came to mind and wanted to try. How does one achieve this banding effect when you use airbrush?

Looks like it could be achieved with the posterize effect, but not sure how the airbrush would play into it
Does anybody have any suggestions?
I skewed an image in Photoshop, and then I added another image that has the same width and height. How can I make the newly added image match the same skew as the one I modified earlier?
I keep downloading mockups for business cards, but I can't see it as a mockup like I used to? Has something changed in photoshop that I don't know about?

trying to generate a design with photoshop and it pulls this up, anyone know what im doing wrong?
Could be some connection issue or outage at the data center. Try it again.
it happens whenever i try to generate anything, both Generative Fill and Generate Image.
Are you signed in to your Adobe Account?
Yes
I just tried the service and its working
Maybe its your prompt or something on the canvas it doesn't like...
I guess it just does not like the shape of the thing im trying to generative fill lol. Thanks for your help!
Gave +1 Creative Carma to @ripe quest (current: #2 - 2721)
Nothing has changed... But it's difficult to answer because we don't know what “I can't see it as a mockup like I used to” means...
Perhaps if you gave a good description of your problem, we could help you...
I skewed an image in Photoshop, and then I added another image that has the same width and height. How can I make the newly added image match the same skew as the one I modified earlier?
Hello guys can i ask if theres an a ai app or site where i can make my edit realistic like its a figurine
how to color change to a bright white color without losing image detail?
Does anyone know why Photoshop adds this random blue to the image where the pink and green meet? They're on different layers, so it can't be that they mix.

could someone whos played minecraft dm me
Is it the case when you check at 100% zoom are both layer full opacity?
Hi, unless you wrote down the settings or did the first one as a smart object, then you could duplicate it and change its contents for the second one.
► Join PiXimperfect Pro - The Ultimate Photoshop Training Course: https://pix.live/pro
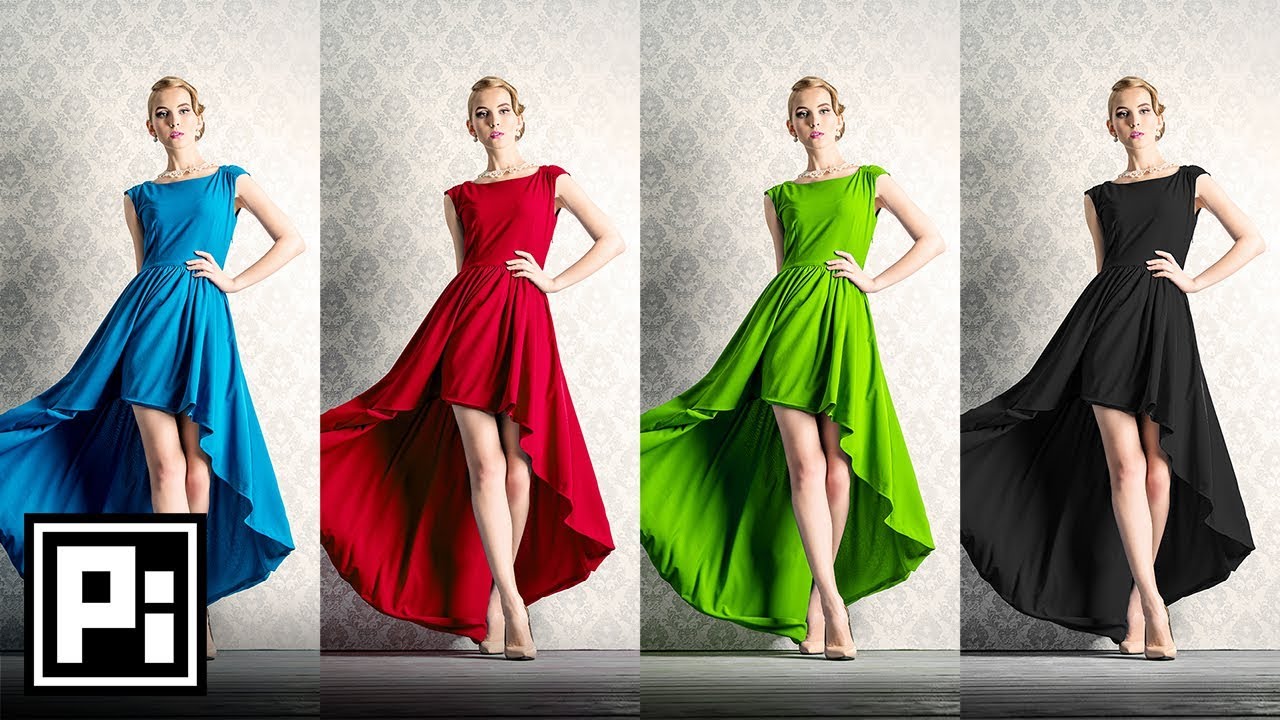
Change Color of Anything to Anything in Photoshop! Learn how to selectively use the Hue/Saturation Adjustment Layer to Target and Change Colors easily.
Hope this video helps you. Thank you for watching :)
► DOWNLOADS:
- Sample Image: http://bit.ly/2BBitiy
...
They indeed are both 100% opacity. The blue doesn't show up if I have either the green or the pink alone.
You did not change the gamma blend setting? https://gregbenzphotography.com/photoshop/how-to-convert-rgb-color-space-in-photoshop/ are you looking at 100% zoom? (CTRL+1)

If you've every tried to change color space in Photoshop (such as when preparing an image for print), you may have received a notice from Photoshop to flatten the image. It's also an option built right into the conversion dialog (Edit / Convert to Profile). This is a warning you should definitely pay attention to.
I changed no setting. I have it a bit zoomed in.
I’ll ask again … (forgot the word zoom the first time) How does it look at 100% magnification?
The same.

That rules off a bad quantisation And none of the edges pixels are semi transparent?
Nope. Here's a very close up to show the pixels themselves.

As @hushed niche has already surmised. Semi-transparent pixels overlap at these points (keyword: anti-aliasing). This creates these ‘colour fringes’.
Weird, though I already flattened the image so that should be no issue.
You can flatten and still have the anti aliasing playing up
The two aren't related
I had to reinstall Photoshop and now I do not find the place to use Photoshop Beta. I love it and am wondering if anyone has a link for me to get it again plz?

Its in the Creative Cloud app under Beta
Yeah. Its possible.
then how do i do it
do you have link for it please?
I wrote a script to do that. Hang on.
There's no link. Open the CC app. Apps section. BETA
I do not know what the CC app is though, sooo sorry
The Creative Cloud app is how you install all Adobe apps.
It’s not a website. It’s an app that you install on your computer. Are you asking for some pirated version of it or something? Because these questions are extraordinary.
no I just do not know what the cloud is, I do not use pirated things
I pay for my adobe things
Then why don’t you have the Creative Cloud app installed?
I do not know what it is sooo sorry
but I will go try to figure it out
ty for trying to help me
The Creative Cloud app is how you install all of the Adobe Apps. If you have Adobe apps installed without that, how did you do it?
Access Adobe Creative Cloud apps, services, file management, and more. Sign in to start creating.
I just went to the website where I purchased my subscriptions and installed it there
my adobe photoshop app and my substance painter app, subscriptions
Sign in to your Adobe Account. Navigate to this page: https://creativecloud.adobe.com/apps/download/creative-cloud and download/install the Creative Cloud app
Access Adobe Creative Cloud apps, services, file management, and more. Sign in to start creating.
ok ty will do that, huggies
Sounds like you already have it. I'm not sure how you would've installed Photoshop or Substance 3D without it...
I did not have it but i do now, It just installed from my account before, but never used the cloud
I just installed the cloud now
ty for your help and I see the beta too
Use this Action. Drag and drop it into the Actions Panel and play it.
so i tried opening it again and it worked but it looks weird and i don't think i can export any images, nor save the file

thank you
Gave +1 Creative Carma to @ripe quest (current: #2 - 2722)
also, how can i make an outline like this? i mean 3d or something like that. using stroke and shadow doesnt look as good

i cant play it
How can I make the slash effect with rotation like on these images


Your Action is set up to stop at each stage in the script. Click that box next to the check mark to switch that off.
If you want to watch what its doing, then you can leave it on and hit "OK" on each operation until it stops.
Not sure what this question means.
You can draw Shapes in Photoshop.
I mean how can I split to images like this
Draw the Shape and "clip" the image to the Shape using the Clipping Mask feature.
Hello there, sorry for the distraction, can you help me find what this font might be?

Thank you!!
Gave +1 Creative Carma to @ripe quest (current: #2 - 2723)
Hi @thin meteor
Flattening, anti-aliasing and semi-transparency are all related to the same topic - but they are different.
Your example is recreated here: With more extreme semi-transparency to illustrate the principle of superimposition.


Hi @river otter
It should be sufficient to drag both pixel layers into the group (in the hierarchy below the two adjustment layers.

why my gradients look like this?

Does adobe photoshop doesnt lose quality like adobe AI?
I see a black image. Do you have black both at the start and end of the gradient?
If you have the default Gradient selected (Foreground to Background color) and you Foreground and background colors set to black that's what you'll get...

that's not what i meant, if you click on that image maybe you'll see
just realized its really dark
but sometimes my gradients are very low quality, like stripes connected together, but not blurred
why does this happen?

im losing my mind
don't use artboards if you don't have to
what if i have to
try using Ps beta, it's fixed there
Now it's night.
And now I can actually recognise a difference.
🧐
This is the so-called banding in gradient with low tonal ranges. It can't be prevented. You can sometimes reduce it a little (e.g. 16 bit and noise) - there's plenty of information on the web.
Then you need to add some noise. https://www.youtube.com/watch?v=E4GqsnjeoBY

Discover 3 simple steps to entirely eliminate color banding or gradient banding in your photos with Photoshop! In this lesson, we’ll learn how to use the right bit-depth to avoid banding in the first place, and then explore several filters to dissolve the banding and add texture. I hope this video helps you. Thank you so much for watching :)
► ...
thank you
oh, the right image is the mockup I want to download. But when I open it in photoshop it shows up differently than what is on the preview. Was this always the case?


hi guys, can someone please help me to make the wave pattern like this ai generated image

please help me
Left image is a PSD file with artboards, Right image is probably a preview of what you can do with the psd file... Not sure you're downloading a real mockup
hey i for some reason cant remove a really simple object in ps, generative fill doesnt work for some reasonand the fill thing and delete thing doesnt work

literally struggle with this
want to remove the green character?
Yep
Ooh okay thnx man
Why not masking him rather trying to remove. Once you mask him you can try to generate the "left shoulder" of the giant.
I hope the tansparency grid is not a part of the image you're trying to fix..
umm so what now

nvm got it tysmn

Just invert the msk
You can use generative fill to complete the shoulder (if needed)

isn't there any alternatives?
Since the area is small you could paint it or use clone stamp to do so...
tysm man really apperciate you
another question lol how do i extend the legs length

tutorials on youtube doesnt really help my case


If you don<t want to use generative fill functions there are few way to do it...
Paint it by yourself (if you have skills - which I don<t) or Split at knees and feet, move parts appart and use clone stamp tool to create longer legs... No warranty on the final result...😔
ur way is amazing but gen AI doesnt work😅
ur way seem amazing but how do i move the parts away?
like the first step how do i do it?
Just draw a box around the foot, then CUT and PASTE the layer
then move it into position
As @sly hawk said: use lasso tool to draw a selection then Right click on it and choose new layer via cut. Use move tool (V) to move parts.
I made this using your guidance, is not perfect but I'm happy n.n thank you
Gave +1 Creative Carma to @viral palm (current: #9 - 708)
Honnestly the generated waves aren't well defined (poor quality) so it hard to reproduce exactly the same.
I would suggest you use them as “guides” and use the pen tool (in shape mode) to redraw the waves yourself.
Great job!
Happy to help!
how do i make layers options menu big like yours

Just drag the windows/bars around as you need to
hover over the edges and you'll see the cursor change
Panel option
Hiii! I’m kinda starting to use ps and I have this problem, I want to expand my background but as u can see my model’s shadow is just at the end of the image and that’s the spot in which I want to expand my photo but I don’t know how to do it, when I try to the shadow becomes distorted and it expands, I want the shadow to look natural but I don’t know how to do it😅 if someone out there is so kind to explain I’ll be so thankful !!!

I suggest you to try generative expand first. It's available when your Crop tool (C) is activated.

how do i make the body's color (not including parts) match the darkness of the left arm?
Good Evening...this is a very novice user with a quick qstn. I have an image with number characters. How do i identify the font? Something about a Rectangular Marquee Tool (that i can't find) MANY THANKS!!!

if i wanted to mix gifs together how would I go about that? I tried to drag the mcdonalds one to the left one but it's only one frame instead of the whole thing


I was using AI to make some mockup designs and I like the style of this logo, does anyone know a font similar to the "Zommis" text?

No quick way to get this but easy to do with shape tool.
Set a grid and activate snap to grid option.
Trace your shape, add number then group your shape and text layers (CTRL+G)
Copy the group1 (CTRL+J) and move it down> change 1 for 2... Repeat the process for each number...
You could start with a Layer Style combining Bevel and Emboss Fx with a Stroke Fx... (see the settings used in the first video)
Then use a Layer Mask and paint black on it to add chip effect... (second video).
Note: you may have to change settings depending your image resolution
Yo I've been importing my photos into Lightroom classic and when I do, my RAW files in my actual folders get either moved or deleted, even though I'm not deleting them. Does anyone know what's going on? Can I recover my RAW files? How do I stop lightroom CC from deleting my RAW photos?
You can't "superposed" animated gif in photoshop.
I would suggest you to render a video of each GIF then open the mp4 file of McDo character.
Drag Particles video over the canvas> Set its blending mode to "Screen".
Since the 2 files haven't the same lenght you'll have to duplicate McDo ones (CTRL+J)
If you want a GIF file you'll need to use File/Export/Save for web (legacy)...

It gives you a huge 18MB GIF
this is super embaresing, that was like a week ago :(, i wanna say i was MIA but no i just didn tget around to replying, thanks for the response tho.
Anyway looking at it now the issue still persists, i had a look at 100%(ctrl/cmd + 1) and yeh the image IN photoshop looks the way i designed, but the one one on export, and when exported is different.
Gave +1 Creative Carma to @hushed niche (current: #15 - 163)
These products i'm creating are for POD, and looking around it may be something to do with the colour mode im in and how when i export it it is converted to a differnet one, i shall look further.
Did you export at a different pixel size?
Can you send a copy of this ?
Wait nvm
thank you! but 18? I tried to optimizing it with ezgif and all I got was down to about 12.4mb~ is it a fools errand to try to make two gifs look decent while at a low size? I'm trying to get it down to 5mb
Gave +1 Creative Carma to @viral palm (current: #9 - 709)
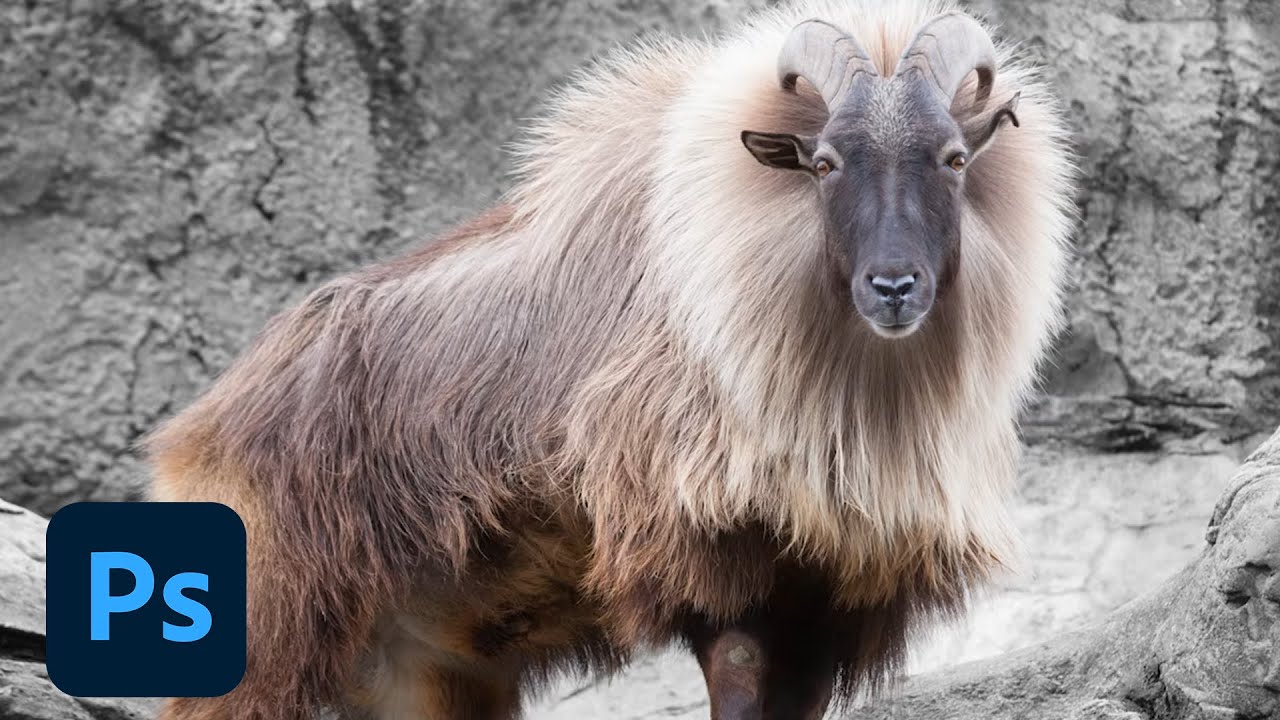
is it possible to get the left image to look like a sketch line like the image on the right? tried thresholding but didnt get the same effect


Howdy! With that many tones, gifs do not compress so well, hence the many sites that switched to video for that.
Hi, this is done by showing polygons in a 3D app.maybe a combo of low poly and find edges?

Photoshop CC 2021 tutorial showing how to create beautiful low poly face portraits of animals and people.
Lion head photo: https://1drv.ms/u/s!ArAEPhCK6XBWgecbfosYGZotbGTmsQ?e=MFjxFP
Royalty-Free Music provided by http://www.beatsuite.com
High quality, copyright-free music for YouTube.
Music track: "Dub Tek 808"
Become a Channel member an...
interesting
so is there a way to make it under 5mb or should I look for other options for customization?
It depends if the place where you intend to use it supports mp4 or other video formats.
unfortunately not, just gifs, pngs, and jpgs
Any idea on how to fix this ?

Create a new neutral grey layer, apply noise, switch to overlay blending mode. https://creativecloud.adobe.com/discover/article/the-unlock-how-to-add-noise-in-adobe-photoshop#
Remember to share full screenshots as you force us to guess if we do not see everything
This worked thank you for the help
Gave +1 Creative Carma to @hushed niche (current: #15 - 164)
As always
thank you so much my dear friend
Gave +1 Creative Carma to @viral palm (current: #9 - 710)
hey so i was wondering if someone could edit a black and white picture to colored for me?
Hi, ask in general chat this channel is for those who want to learn Photoshop
hello I'm looking for something where I can get png files for my thumbnails for youtube is there a tool?
is it just me ? or anybody else having the same exp when using Generative Fill

.
use curves adjustment layer and layer mask to target specific area
the thing is i already did that to turn some specefic parts to black, the pronlem thing they really dont match. heres the original image if it helps with anything

This tutorial dives into advanced editing techniques, featuring inspiration from Cole Bennett's work with top artists. I’ll guide you through crafting visually stunning transitions, offering insights for both novices and experienced editors. Expect practical, easy-to-follow instructions on creating transitions that keep your audience glued to th...
how do you do what this guy did at 2:15 in the vid?
adding the circle and changing the res to fit
right clicking on a photo in lightroom or painting a red circle?
adding the circle and resizing the background to fit it
he has red dot on a separate layer and is resizing only images
the dot stays the same size
this is the curves u meant right?

i mean like adjusting the scale without changing the resolution
You select the Layer or thing on the Layer and use Edit > Transform > Scale... or Ctrl T
You can hold Shift and Alt to zoom from the center of the object.
I have just updated Photoshop Beta 26.5 and now cannot open Photoshop. What should I do? Thanks
I'm updating it now. Let me try it out.
thanks
Gave +1 Creative Carma to @ripe quest (current: #2 - 2724)
@viral palm yo bro how are you. can you help me to make also this text style? if its possible in photoshop

Thank you
Gave +1 Creative Carma to @ripe quest (current: #2 - 2725)
It seems to be working for me. I'm on Windows.
I am Windows too. Thanks anyway. Might try uninstalling and installing again. Appreciate your help
Before you do that, you can try resetting the Preferences
Hold down Shift Ctrl Alt and launch Ps Beta. A screen should appear asking to reset it.
Okay, thank you very much
Gave +1 Creative Carma to @ripe quest (current: #2 - 2726)
How to make this shape in photoshop?
For example, I have this as a regular, but want to recreate it and add more edges.

The Polygon Tool. Try the similar settings to what I've used...
This might be easier and more controllable/editable using Adobe Illustrator.
Thanks!!
@ripe quest is it possible to make this text style in photoshop?

(frank helps me sometimes on this topic but he's offline so i asked you)
It might be possible to do this with Layer Styles.

What’s the easiest/best way for me to make the white background match the blue/black one?
1.) Generative Fill. 2.) Paint it. 3.) Both. Use Generative Fill and paint the areas where Gen Fill doesn't work out as expected.
i cant recolor these brown lines


How can i make text like this, or atleast find a somewhat similar mockup?


I'd mockup the letters in Photoshop. Then use that as a Composition Reference in Adobe Firefly.

This is a quick demo showing how to create a simple text effect using Adobe Photoshop and Adobe Firefly.
I've seen this technique several times recently. However, all of those examples used a Blend Object in Adobe Illustrator. While that is definitely a more flexible approach, it also requires a bit of extra work. Thus, I wanted to try this us...
A selective Hue/Saturation adjustment could do it
then mask away anything you don't want affected.

Unfortunately that didn't work. So I uninstalled and installed again. Everything works okay until I use Camera Raw, when I try to edit "Effects" it freezes and I have to restart computer. Maybe just my computer. Thanks for your help though
Gave +1 Creative Carma to @ripe quest (current: #2 - 2727)
Did you try to update/reinstall Camera Raw? That is a separate app that apps like Bridge and Photoshop can "host"
Will give that a go but I think Camera Raw was part of the update. Thanks
OK. If there isn't an update for it, never mind.
but that means i cant make the planks more black right?
Yeah, you could
Oh wow that looks so good, ty I’ll try that
Gave +1 Creative Carma to @sly hawk (current: #5 - 1119)

How would one achieve this BG texture?

Especially this one composed of circles decreasing in size
If it's better to ask in the Illustrator Discord I will, I just don't know what tool to use haha
Thank you! Is there some sort of archive or library where I can learn more about these different patterns? I'm trying to improve my backgrounds
Gave +1 Creative Carma to @sly hawk (current: #5 - 1120)
Yeah one moment
You'll have to play around with the size/sliders etc, but this is a good start
So good!!!
Thank you again 💙
I didn't know you could do that trick with the colors
It can also be done in illustator (possibly better) - Here's an old post: https://jpostdesign.wordpress.com/2011/03/09/three-illustrator-halftone-effects-part-1/
Bookmarked
I think THIS would be better for you:
https://we.graphics/blog/how-to-make-a-vector-halftone-in-illustrator/

Step 1
Open Illustrator and make a new file at any size you want. In this case, I will make mine at 1800 x 1200 px.
Step 2
Select the Ellipse Tool (L) and be sure to have the stroke set to "none" in the toolbar.
Step 3
Click once over the ar...
B/c I'm new? haha

This one does look certainly clean & easy to execute, yeah
@sly hawk thanks again !!
Gave +1 Creative Carma to @sly hawk (current: #5 - 1121)
I'll try all of them out probably
No It just genuinely looked better/cleaner and closer to what you were trying to achieve. I'd have supplied the same link even if you were a full on pro 🙂
Ah, my bad hehe
^^
how do I get a kinda charry effect kinda like the glow on the ball

Can you explain a little more about what you mean by charry? You could add noise/grain if that's what you are talking about. if you are talking about the glow, that would be a different story

did you attempt to reverse image search? I found a bunch. You can make it as well, it's a very easy shape to create.

well cant find a 3d one
The image you sent is 2D from appearance. I am not sure exactly what you are looking for. There is a slight bend in symmetry possibly giving it that 3d appearance. Is that what you are referring to?
tbh im not sure how to explain
maybe what i want is 3d, i iwll show you where i want to put it so u have an idea
Ok
i wanna put in the middle of this, and i want to look like an actual part of the machine

then you will need to adjust the heart to match a perspective. It seems like you are wanting to use the adobe asset:

I can help you with this, but if you sent this in higher quality it would greatly help me
the machine?
Yes
ight so i just send the save file?
sure
sorry things might be messy here im so new to this

No worries, let me take a look
@wanton geyser ok so your goal is to put the heart on to the chest? Do you want it to span the entire chest?

resizing from 4000* 2416 to 1000*604
What is your DPI set at?
nope not the entire chest,
maybe like the wideness of the middle plank or smth similar
72
if you are using the Image>resize, make sure to uncheck resample if you only want to change resolution without altering pixel data
got it
something like this?

the position is perfect, but i wanted the heart to be a part coming out from the chest not just drawn, but i acc can work with this if 3d aint possible
3d is possbile but you will have to apply styles to make it look like it, one sec
@wanton geyser

oh this one better can definitely work with it
but like why arent the both halfs matching in sice?
with shadow

well your middle chest plate is not symmetrical, so i spanned it to create the full width
if its because u wanted it to match EXACTLY the pank's width, well then it didnt have to be exact
ok i can change that, i just didn't know the style in which you wanted it to be applied @wanton geyser

Now that you know what is possible, let me walk you through how you can achieve the same thing with your desired output. Because your plank is a strange perpsective, I opted to use Transform w/ Distort, and perpective
The 3D effects were made by applying a Bevel Emboss, Inner Shadow, and a Drop Shadow
Hello all! fairly new to Photoshop and hoping for some guidance on an issue I currently have that I sadly cant seem to find a fix on Youtube, I'm assuming it will be a super easy one and I'm just pressing one or two options wrong.
Basically I take my image onto Photoshop and after I remove the background and crop it I then export it in the size I want and format it as a GIF, but then I always seem to have a white ouline around it (I believe its known as a fringe?) but annoyingly I dont seem to have it while on Photoshop editing my photo? so essentially the tutorials to remove it are hard to follow when the outline doesn't appear to show until after i export, hopefully I've explained it well enough for someone to know the issue potentially 😄 thanks! I put both images are reference, one on Photoshop and one outside after its exported


I have attached the version I created, hopefully this will get you going:

man ur the best tyyysmmm really apperciate you
Can you show a picture of the export? My apologies, I see it, in the corner. If you could show the full layer view on your PSD, you may have transparent/white space if you resized. I don't see all the FX in the first picture.
You are very welcome!
Please make project requests in the #💬chat-general channel.
oh ok my bad

Thanks for sending, I misinterpreted your original question. I edited my message to better get an understanding of what's going on. i'd like to see the intermediate composition of where you are putting this head
Gave +1 Creative Carma to @astral lion (current: #970 - 1)
When i watch a video like this on youtube, and copy the exact steps, for some reason mine is not working, do you guys know why
In this video you will learn how to easily remove complex backgrounds using adobe Photoshop in just few secounds.
Ai Tutorails: https://www.youtube.com/channel/UC6mb11rIetYInn8CD_JlZqA
• My favorite ai too all in on...
btw can i change the heart color using hue saturation without ruining the picture's image?
either use a layer mask with an adjustment, or just make sure you select ONLY the pixels on your heart layer, then adjust
@wanton geyser

Hi! They gave you the PSD; if the heart is on its own layer, alt-click between the adjustment and the heart, to create a clipping mask. https://helpx.adobe.com/photoshop-elements/using/clipping-masks.html

see how it kinda looksa certain way
Im not talking about the glow but it just has a certain char type effect
I understand it looks a 'certain way' but there are multiple things going on there, can you be more descriptive?
Is there an illustator discord or does anyone know how to invert a clipping mask.
Clipping mask of one item for one face of a cube but wanting the opposite side aswell for the other side of cube
like a rough drawing made with cheap materials
thats what the ball looks like
in a good way
You mean from this:
To This:


of course you are able to modify in your own variation
yes kinda but more intense
How exactly would I do this?
yea u just need to repeat the effect again

I'll I am doing is just adding noise
I see
So you have your character cut out right? Where do you place that to have it be with all the other stuff on the final gif?
did that answer your question?
Yes, Thank you
Gave +1 Creative Carma to @ionic spoke (current: #103 - 17)
Yes, so i take the character (png) onto Photoshop - select and mask to remove background - crop the image to "zoom it in" - then I export -> save for web -> change format to GIF and reduce image size (150x150) and this is how it looks in the final image preview in export

can you disable transparency on the righthand so I can see a little more?

ok when you go to your character cut out, select the pixels, then go to selection: modify: contract
and then make sure you are selecting and masking out any of that white border
@delicate compass
Sorry, would this be on the export screen?
No, this is when you are editing your character or cutting him out in the first place
Hmm my modify option seems to be "greyed out" making me unable to select it
You will first have to select pixels on your character layer than you can
Should I tick the box? any tips on a good medium for amount of px?

If you would like me to better assist, if you could send your PSD I could help.
That depends on your size of image and PPI, try and play around with it
Yes, that might be a more straight forward solution if you dont mind, of course
I tried to run a .jpg photo through Camera Raw and got this message:
"The ICC color profile of this document is not compativle with the camera raw filter.
Convert the document to another profile to apply the Camera Raw filter."
It ABSOLUTELY depends on the pixel resolution of the image...
if you're working on a 8,000 px image, 10px might be fine....
if it's an 800px image, 10px would be an AWFUL choice!
Just have a bit of trial and error
If you're trying to 'clip off' a bit of fuzz around a masked image, you might instead do it a different way anyway
You think that might be what's causing the white outline? I did realise when exporting I changed the Matte option to "None" drastically made the outline much less visible
Which step are you getting to, before it doesn't work?
Is your version so old that it doesn't have the same tools?
HI! What if the profile of that image? Go to edit>convert to profile and pick either sRGB, AdobeRGB, ProphotoRGB.
For WAY MORE info about color management, see: https://www.computer-darkroom.com/ps19_colour/ps19_1.htm
Sweet, thanks that worked!
Gave +1 Creative Carma to @hushed niche (current: #15 - 166)
Gave +1 Creative Carma to @sly hawk (current: #5 - 1122)
can you help me? (im not profesional u know) sorry idk english well
Its the refine brush tool that doesn,t work
How the tool works in his video, is nothing like how it works for me
And the weird thing is that it works in every single tutorial for them, but when I try my tool does the opposite thing 🤔
If it does the opposite be sure the + icon is on...

sorry I#m AFK

on the heart? just go into the layer styles and change your value to black
the 3d thing is apparently done, i just dont like how the heart is placed🙂
it doesnt look centred tbh

try rotating or moving
does someone know how to combine normal maps. By combine I mean cutting part of one and pasting it in place of the other, sort of like a puzzle piece, whenever I try this I get a dark line in place of where I cut and it doesnt look "full"
how can i make it smaller?
just shrink it witha resise
honest question, I like need anymoney income of the pc and yall think photoshopping is a good investment?
wdym resie?

Hi guys, I have a strange problem, I bought the photographer combo, but when I go to install photoshop it appears that my requirements are not sufficient, the strange thing is that I already installed it once and it was normal. I am from Brazil
How long ago did you install it?
Requirements for software are of course always increasing. Especially if you're on a mac.
Maybe just use the clone tool.
yo how do i make so the hue saturations changes doesnt effect a certain layer?
the hue saturation effect all layers the problem is i want one certain layer not to be effected by it

thank you, this worked very well :)
Gave +1 Creative Carma to @viral palm (current: #9 - 711)
How could I erase only the parts of the text that are overlapping with the blue behind it?

Would I do some trick with clipping masks?
Make a selection from the Blue shape layer then make the layer mask active and fill the selection with black.
I would recommand you to make a copy of your text layer with the original layer mask... Just in case something goes wrong when you fill the layer mask
for some reason when using smudge tool (IM USING ROUNDED BRUSH 43%) theres always some weird color distortion. Is there any fix?

The color is just a shade of gray smudged
or is it some problem with my gpu
thanks itworks
Gave +1 Creative Carma to @sly hawk (current: #5 - 1123)
Hi, create a clipping mask with the layers you want to have affected by hue-/sat https://www.photoshopessentials.com/basics/clipping-masks-essentials/
Learn how to create and use clipping masks in Photoshop to hide parts of a layer and fit your images into shapes!
How can I fix the yellowish hue on the canvas?

hi, just recently photosohp started doing this thing where it saves a png with the date and time of the initial psd creation, -not- the date and time of the png creation. Its a huge pain, is there any workaround
it leads tos tuff like this, multiple pngs being save dwith the exact same date and time. If the psd is a template from the past, it will save it as being in the wrong -year-

while Ima skign questions is there a way to jsut use liquify like a brush that doesnt go tot he like, liquify menu screen?
Set a good color profile for your monitor and a good one for your working space.
https://www.computer-darkroom.com/ps19_colour/ps19_1.htm
Hit D for default black and white.
There is the smudge tool, but it does not act the same way:
https://helpx.adobe.com/photoshop/using/tool-techniques/smudge-tool.html
https://www.photoshopessentials.com/basics/photoshop-tools-toolbar-overview/
Learn how to smooth and blend colors

Learn all about Photoshop's tools and the toolbar, including a complete summary of the nearly 70 tools available as of Photoshop 2025.
You set that up on your operating system, showing the date modified column.
Are you exporting or using save as, save a copy, save for web…
Hello, is there anyone who could help me with this issue? I used the Filter Gallery perfectly yesterday in Photoshop and today it won't show any filters anymore. I tried to look it up online and refresh Photoshop and my laptop as well. This is just a random picture and whenever I click any filter, nothing changes.

godeend thank you
Gave +1 Creative Carma to @hushed niche (current: #14 - 167)
Where it says "reticulation" in the lower right
To the left of "Reticulation" can you click ?

@old locust
OK, I just checked, just in case and mine shows as intended. Can you confirm that the dancer photo is not yours? (when you say random photo).
If that's the case that would be a bug and needs to be reported in the official space (the Adobe community Forum bug report)
Can you show your image before you try to apply the effect on? (with the layer you want to apply the effect on highlighted? (and preferably with whole interface showing, layer panel, tools on the left, document tab at the top... the lot)
If you have to log the bug, you will need them anyway.
Alternatively you can do a video capture of you applying the filter and share it here.
Just trying to see if I can find clues in the screenshots/video
They jsut need to click the space where the eye is
To turn on the preview
it's Adobe's bloody awful UI degredation / disintegration.
I tell you they need to stop adding stuff and tidy the hell up.
When I hide the effect I don't have a "random image" (and never has)
Maybe I misread
Unless it's a Mac specific stuff
I thought they were suggesting with "Any random image" they don't see the filter showing up.
And that would be because the preview eyeball is turned off.
But if it's loading a random image, that's very weird and I'll go away again 😂
Maybe I misread too. Now I am re-reading
No, you're probably right. In that case, yes, just show the damn filter!
It's adobe's fautl for giving NO INDICATION AT ALL that there's something missing / to click there.
I hate modern UI design it's just awful.
Light/Dim the icons, or have an empty box. Don't just vanish the icon and leave the user with no idea that there's a clickable zone there.
😢
It's clear enough for me TBH. You got these hide/show indicators everywhere, it's pretty consistent across the UI. I mean for me, and while I would maybe tweak one or two things in the UI, consistency is more important
I'd like to see a dim eye, and a solid eye.
I would tweak the whole of Illustrator's UI
Just leaving it blank is madness.


I agree with Denyer that photoshop is probably not built with an intuative UI as it's main focus.
They just make a new one up every damn time.
Every time they add something they do a new UI.UX on it, it's baffling.

It wasn't really appreciative of how much time and effort people put into UI/UX until recently when a friend told me he literally organised a 3 day workshop for about 14 people to discuss and plan the UI for some hospital admissions system.
(He works in a software dev company)

Honestly if Adobe did nothing for 12 months other than address bugs and fix the UI, I think they'd be carried through the streets like war heroes.
I suppose this is the ask a question channel, so I should ask a question 😂

😉
how do i know if my photoshop license has expired
will photoshop tell me or will i get an email
it will tell you on opening, you can check your account in the creative cloud app, click on your avatar top right
You should get an email telling you about renewal in advance
ah, ty
how do i auto blend layers
i selected them both
but when i go into edit, it doesn’t work

don’t mind the subject matter
do you mean blend one layer with the one below using opacity/blend mode or merge them?
I would use a mask to smooth the edges and then blend mode and adjust colour to match the face below
hold on
Learn how to do the Photoshop face swap technique in just 10 easy steps. Swap faces and make the most of your photography investments.
Adobe has a simple one https://www.adobe.com/creativecloud/photography/discover/face-swap.html

Whether you’re having fun on social media or fixing a group photo, follow these 5 quick steps to make a basic face swap using Adobe Photoshop.

Are you looking for a photo editing, photo retouching,
manipulation, art work and more tutorials in photoshop?
You are at the right place!
#photoshop #photoediting #photomanipulation #photoshoptutorial
More tutos :
Glow effect photo editing in photoshop
https://youtube.com/shorts/JyogqfAL4Yg
Auto blend layers - swap photo in photoshop
http...
i was following this

You can't retouch on a smart object layer. You need to create a blank layer and apply your retouches there, or open the smart object and retouch on the embedded file or, rasterise the layer so it's no longer a smart object
I suggest the first option, it's the one where you can erase your retouches without touching the original

this makes so much sense
oh my god thank you
wait so how do i remove smart layer

it automatically becomes one
i’m confused
Why do you want to remove it? add a new layer instead!
suppose i take coke a cola product photoshoot and replace their can with my other clients product can for mockups is it legal?
like with the same picture?
Nope, you are infringing on the Photographer work
sorry if this is slightly infuriating btw it’s my first time using photoshop 😭
you guys are very helpful
i appreciate it
okay thanks
Gave +1 Creative Carma to @vapid flume (current: #7 - 910)
Well, when you place an image or drag and drop it, it automatically becomes a smart object, it can be tweaked in the preferences
If you want to navigate Photoshop, and before trying to do anything, you need to learn the basics. This is litterally the basics
Sogo to help > hand on tutorials > and choose beginner in the drop down menu
You are not expected to be able to do anything before at least a couple of hours of learning how layer types work, masks etc.
Unless you follow a tutorial for complete newbies, and fortunately Photoshop itself has you sorted!


You can use mock ups from copyright free sources (meaning that the creator has relinquished their copyrights, it doesn't mean that they are free, but sometimes they are)
ya.. cuz someone in my agency took other products photoshoot and placed our client product as to make realistic mockups
so i had this doubt

That they can do it doesn't mean that they should