
#❓ask-a-question
1 messages · Page 44 of 1

Hey guys i just wanna ask if someone here can spot the edited part in a picture?
I need this 😭😭
Someone gonna di*e bcz of lying
Any one..?
To clarify, did you use invert, or a difference blending mode? What does your layer stack look like?
Hi, what do you mean by « how to get » how to get the effec? (A simple offset it seems), or identify this font, tell me where one can purchase it?
what name of this font
I could Ctrl+click on the thumbnail of its layer, then go in select and mask, and work with the sliders to « eat into » the selection.
did i got muted or smth? can't post images in #📝project-feedback

Difficult to tell as none of the letters are complete, so the websites to ID a font would not work… That said, It might be possible to replicate it with a rectangular/calligraphy brush, and some practice.
or just find one on dafont (faster)
how..?,surf all the 999+ fonts...?
Did you try to filter: Marker, graffiti, calligraphy, urban…
Search on dafont...?


Sorry about that. Not sure what happened there but you should be good to go now.
yup, now its working, thank you!
Gave +1 Creative Carma to @ripe quest (current: #3 - 1880)
any ideas how to replicate this effect?
i feel like these are kind of double exposure with gradient map + one of those wallpaper effects


and a lil glitch effect

vignette?
maybe just manually draw it over the layers with soft brush with 5-10% flow?
It'll look drawn
Use a Gradient Layer. Set the Blend Mode to Multiply and make it transition from opaque to transparent.
See
The doctor had to intervene
did you just recommend him the same vignette technique but using smarter words?
Alternatively, you could create a solid black Color Layer, move it below the hero shot and then use a Layer Mask to transition the image to transparent on top. Either would provide a similar effect.
bump
Not entirely sure what is going on here. Perhaps a shape with a Clipping Mask to let the texture fill the silhouette. The glitch part might be done in a "second pass."
Jesus Christ
Perhaps something like this...
yeah surely i will do the glitch effect afterwards, but the main wavy effect, i don't even know, it looks like a mess consisted of clouds, abstract liquids and ... and other mess but it just works for him
(i've been looking at those 2 images for past 2 years trying to figure out what he did there)

It could be a combination of layers with masks and/or blending modes where certain portions of the layer come through.
There seem to be some paint splatter brushes, or sampling from actual paint splatter used on masks; some inks mixed in soapy water, clouds, maybe some liquify
You have to reply directly to a post with "thanks" for Creative Carma to work.
thanks
Gave +1 Creative Carma to @ripe quest (current: #3 - 1881)
well, you're out of luck bud
There is a slight cool down period between CC awards. Otherwise, people could spam the channel all day. :)
yeah i understand
Thanks @hushed niche
Gave +1 Creative Carma to @hushed niche (current: #28 - 64)
Thank you for trying!
Gave +1 Creative Carma to @lunar hollow (current: #327 - 4)
i give up
Give it a few mins. :)
It’s ok if I don’t have my internet points today 😉
oh okay, sorry😭
You still get points in spirit and in other places. :D
is it possible to download original image from insta without compression?...
I don't think so.
Once you upload it, the algo from Meta munches it to reduce file size.
unsplash is the way for me then
how do i use Stamp tool in a way that it doesn't move together with my mouse? i want to get a sample of certain texture and just draw with it
tried unchecking "Alighned", didn't help
You need to capture the pattern, then use it as a layer style, then you paint to reveal that layer.
Hello,
Do you know how to do this in Photoshop?
Best ragrads

I'd like to browse a bunch of raw image files via Camera RAW, open several of them as objects in photoshop, then close Camera RAW when I'm done opening all the ones I want. However, any time I "Open" a raw image, it completely closes out of Camera RAW and I have to drop all of the raw images back in to see them again. Is there a better way around this?
You just want to scan the RAW file and see what they look like? If so, try Adobe Bridge. You can quickly scan them there without having to load up each one. When you're previewing in Bridge, you can right-click and choose to open in Camera Raw (hosted by Bridge) or open with Photoshop.
AH! That's exactly what I needed. Thank you!
Thanks
Gave +1 Creative Carma to @ripe quest (current: #3 - 1882)
When I click the bounding box to enter transform mode, the transformation (width, height, or corner stretch, depending where I click on the box) is now stuck on as I drag my mouse until I click again. Is this an intended behavior and is there a way to turn it off?
I keep Bridge open all the time, just for the quick previewing of Adobe file formats. Its like a hidden gem in the Creative Suite that a lot of people don't seem to know about. :)
It always seemed like an extra annoying step between me and my files. Like, I already have something for browsing files and opening them, it's called Windows. but this makes a lot of sense
True. But Windows can't give you a good preview of proprietary formats like PSD, AI, etc. You just see the file icon. Bridge will let you preview those file types without opening the native app.
Also, RAW, DNG, and more.
Bridge does other nice things as well. Run scripts, make contact sheets. All sorts of stuff.
What version of Photoshop is this?
25.6.0
I'm running that version right now and I can't reproduce this. Windows or MacOS?
Windows. I'm glad it's not a new feature. Could just be something weird then, I will check again after I'm able to reboot
MIght be a glitch. Restart Photoshop and see if it persists. If it does continue, perhaps we need to make a bug report. :)
does anyone know how to make the owl like a crome or diamond texture

by finding a white owl picture and adjusting it's hue, gamma, saturation
Please don't post the same thing multiple times / in multiple channels.
@half ruin, for feedback/suggestions, please post in the #📝project-feedback channel.
You could try to use Generative Fill or Adobe Firefly using the owl image as a Structure Reference.
Whats easiest way to make distance between selected guides x px/inches/mm etc.?
"make distance"? Do you mean "measure the distance"?
I've got an eclipse picture that I'd like to set a curve so the white parts are 100% white, and the black parts are 100% black (OLED black), Obviously I'm going to have to tune a curve to define how close to #FFFFFF gets rounded up, and how close to #000000 gets rounded down. What techniques should I be looking at. Last time I considered myself really good at Photoshop was CS3
Hey, does anyone know how to activate the tiles stylize feature in photoshop?
Preferences + rulers and/or grids. Last I checked. There's also a ruler tool. Alt or shift snaps guides to the grid.
I already have that in document.
I created guide layout with 200px margin.
Now I want one more custom place with two guides, and between them to be exactly 200px.
That is what I ask.
You could always draw a Marquee Selection using a Fixed Size (i.e. 200x200)

Levels Adjustment Layer?
"tiles stylize" feature? Not sure what that is.
I figured it out. It only works with certain file types.
Would you mind telling me what it is that you're referring to?

Oh. The Filter. Got it.
Was working on a cover art for a band and saw this a while ago and it gave me and idea but I had to convert to a jpg first
Yeah. I spaced it for a second. Filter > Stylize > Tiles...
Yeah! I knew where it was but it wasn’t selectable. Then I tried different file types and figured it only worked with certain ones.
Yep. I forgot about that effect. I think you just have to activate the layer in the Layers Panel. Then apply the filter to that layer...

Are you able to do yours with raw files?
Well, no. Raw pixel data would first have to be converted. Then you can load it up into Photoshop.
Yeah, that’s what I did wrong. I had an image open in Lr and then just pressed edit in ps and couldn’t get it, I then went and saved it as a jpg and it worked. I appreciate it!
I'll check later, Friend needs their machine back. Thanks, that sounds right though
invert with normal blending, I can send my psd file here if anyone wants to check

Any advice for making textures for my resource pack for Minecraft? I want to make a realistic horror texture pack and I am not sure how to make some textures for specific blocks.
You'd have to look into any documentation that Minecraft might have for third-party mods.
Or what specifically are you asking about?
Is there a sort of symmetrical move tool?
Not really. Say more about the goal.
I want to move 2 things on opposite sides of the image away from each other
And you're concerned about the spacing/margins, etc?
What about setting up some Guides?
I do not know what those are
Oh, actually spacing isn't an issue, this is pixel art
I want good textures for blocks that I change with a resource pack, but I can not figure out how to make good textures.
Are you looking for this?

No, that's the brush. I want to use the move tool or something similar for that
I just think it's a bit tedious to do one than the other
are you making the most of the alignment tools?
Making great tileable textures is a skill. It can require quite a bit of work.
Yeah
Pixel art surely isn't done by drawing lots of boxes and nudging them around is it?
Couldn't you take any texture and turn it into a 'minecraft texture'?
Not always, but the project I am doing that with is taking a while
- Like... what are the specs for it to qualify as a minecraft texture?
Do you mind sharing a screenshot of what you're up to?
Move these further apart without having to do it manually. I know it looks small but I have to do this a lot depending on what I am and am not satisfied with

Well for one, he/she is using adobe illustrator. Not photoshop.
sorry about that, but i couldn't find a place to ask questions for illustrator
There is an Adobe Discord server for Illustrator: https://www.discord.gg/adobeillustrator
Unless I'm missing something, pretty much anything you find can be turned into a minecraft texture?
ty
Gave +1 Creative Carma to @ripe quest (current: #3 - 1883)
I know that already but I need specific kind of textures I can't find so I will have to figure out how to make them.
From a quick glance, a minecraft texture seems to be 1024 x 1024 px, but turned into a 16x16 grid.
I know that already...
You can change that though
to any resolution
so.... what possible texture would you like, but can't make?
I want to make some blocks for my resource pack that makes the game spooky. In a 256x resolution. I want to make some blocks like a old cracked and some blood on a hospital floor tiles and stone like walls, log bark, and more. And I want to try to make it realistic looking.
Is thee a way to remove all but one specific colour from an image?
this is the image and i just want to have the red outline and nothing else

Yes. "Select > Colour Range"
thank you so much
i was about to do it manually on mspaint glad i thought about asking here lol
No Problem. - I'm about to head to bed. Any other burning questions? 🙂
not for now thank you
Thanks, James!
Gave +1 Creative Carma to @sly hawk (current: #6 - 855)
I made a banner for my Youtube channel the other year by following a guide on Youtube, but I never saved it. It used masks to essentially layer images. I'm wanting to make a thumbnail for a video about completing 3 different games, and I want to have 2 diagonal lines splitting the thumbnail into thirds, with each section having an image relating to the different games. What is the specific method of masking called, if that makes sense to anyone? This is what my banner looks like for reference.

I would probably do that with Clipping Masks. Create those shapes; they're basically just skewed rectangles. Then clip each image to a shape. See: #1081318392750940290 message
Oh awesome, yes that makes sense. Perfect, thank you.
Gave +1 Creative Carma to @ripe quest (current: #3 - 1884)

You're right; they're a bit inconsistent about it. :)


yah, i'm sure there's a ton of pages out there, lot to try to update & keep consistant
i do have a lightroom classic question, i looked around on forums, and checked to see if there was a LrC / Lr discord, but did not see one
but, i upgraded to a 1440p monitor recently, photoshop scaled everything perfectly
and visually the icons text and everything appear perfectly scaled
however
in LrC everything is still tiney
i tried increasing the font size to 200% in preferances & thats the only size related thing i see in there
if anyone has a solution i'd apreciate it
(idealy one that does not require me to make my entire PC be 200% in size)
Hello everyone! I need some quick help, how would I go about recreating this effect?

do you have a photo you'd like to do this with already?
Yes I do

In this video i will show you how to create 3d pop our in Photoshop. This tutorial is for beginner.
Don't forget to like and subscribe my channel.
Visit my site: https://graphicguru.com.pk/
Download Free fonts: https://graphicguru.com.pk/product-category/fonts/
Download Photoshop Presets: https://graphicguru.com.pk/product-category/photoshop-pr...
this video shows something similar
look up something along the lines of "pop out effect"
ask questions if you get stuck along the way
any good windows pc with good batery life
Hello, can anyone help me fix this photo? I kinda want to tone it down. Like make it look a "normal" photo (basically remove that aesthetic looking filter from the camera)

Thank you in advance.
If ever, what are the steps that I can do? Like what settings should I play with?
Is anyone familiar with the IPAD version of Adobe photoshop? I need help locating the "Find Edges" filter on the ipad version T_T
did you shoot this on a phone or camera?
From a Digicam
ahh ok
not much you can do as far as the exposure of the photo goes since its not a RAW
if you press ctrl + shift + A in photoshop
camera raw will open up and it will give you a dedicated photo editing window
you can mess with the exposure there, whites & highlights and see if you can get it to be a bit cleaner
i dont think you can denoise JPGs unfortunatly
Find Edges isn't available on iPad.
Okay, thank you!
Hello @lunar belfry ,here is my current progress. Do you have any idea how can I fix the clothing face skin tone? Thanks!
Gave +1 Creative Carma to @lunar belfry (current: #74 - 23)

No worries
I think this is good
I don’t think the dress can change too mich
Is there a name for these things? I always want to use them in my designs but idk the name of it

Like the fill up stuff
@hushed niche hi, sorry for the ping, hope I'm not bugging you up much. but whenever you can take a look, can you let me know what's up?
Also, I exported quick pngs out of those, and the original gave me a 5mb file vs mine came out, idk what's the dithering happening for, but it seems like a frigging dithered image for some reason 😅 that image was just ~700kb
I’m not in front of a computer right now. Could you explain what you are trying to achieve, what you struggle with?
Ok, this seems to be the start. Couldn’t a curve simply work to brighten the image?
"abstract geometric digital elements" That would be my search term if I ever wanted to search in a stock website
Sometimes when I don't know the name of waht I am looking for but I have an image, I upload it on Adobe stock (using the visual search) and look at the reults that come closer, then inspect the keywords the creator put into them (The choice of keywords is key to success on these platforms, so creators pay attention to this)
You can do the same with google lens and see what comes up and check titles and keywords used
hey i need help i used to make guides from pulling the edges of the canvas
i formatted my pc and this setting is gone
Do you mean you can't see the rulers anymore, or pulling them doesn't work?
the ruler isn't showing
Do you manage to make them appear with the menu instead of pulling them?
rulers
wdym
view>guides?
OK, otherwise, check CTRL+R to make the rulers visible
Rulers aren't necessarily visible by default, you need to show them and then they will show if you save your workspace like it
If you format your PC and reinstall, you will be given the default Photoshop behaviour (that's why it's important to save your workspace so you don't have to customise Photoshop all over again)
Eh, well, I have an image and someone else did some inversion in gimp. So, left is the original and right is the one someone made. I'm trying to get the left one the same as right.


It genuinely just looks inverted
(try CTRL+I) in the layer
A simple inversion does not give the same result.
while working with pen tool, if i did an extremly curve point before and need to keep working with the same path but continue with a straight line next, how do i achieve that?
jez the way i formulated that sentence is so screwed
Since all the dark areas semms to be now light - and vice versa, I would try an inverted curve
Something around those lines

like that

@fluid wasp Now the exact numbers will need trial and error. Take the colour sampler tool, open the info panel, place strategically a few samplers on your reference and at the same place in your target document and tweak the curve until it fits

Don't mind the sample, I took the first image I had

okay i found the answer
Cool! Don't forget to use the node modifiers ALT, SHIFT, and Control
They alter the way one half of the curve behaves
Otherwise you can use the convert point tool, but I find it cumbersome to switch while I can use ALT instead

My image is grayscale, I only have a K with a % as a measurement since there's no RGB channel at all.
Same thing?
You can set it to RGB, it's in the info panel settings (hamburger menu)
Unless your image is in CMYK, or grayscale (but why would it be)
If you want to share the full window I'll show you
hamburger menu> info panel options> first reading colour mode

image>mode to check your document colour mode
The numbers in the info panel are according how the info panel is set up, not the document colour profile

You may want to read CMYK numbers on a RGB document if you wanted to
I did not know it had reverse image search, thank you for the info!
Gave +1 Creative Carma to @vapid flume (current: #8 - 577)
Did you try with a gradient map?
Yes, it's not entirely straightforward to understand as an icon 🙂

as @hushed niche says. I gave you the color samplers trick, and I used an inverted curve, but whatever works for you, and a gradient map could be the solution too. You can still use the color samplers to check if the numbers are correct between your reference and the target
I would determine the lightest grey and the darkest grey, and put each of them at each end of the gradient map
How so? He mentioned he just played with the colors 🤷♂️ haha.
There are 1000s ways to do the same thing in Photoshop. I think the best way to do exactly what he done, if that's you want to achieve, is to directly ask him, because now, right off the bat, we can only give pointers.
I suspect most workflows done in Gimp will be reproductible in Photoshop one way or the other
I mean you're not wrong. With your suggestions I got pretty close with a curve and brightness layers. But, there's still some sort of slight brightness which is something idk how? The layers are affecting the entire image. Yet there are parts that slightly seem way brighter when I simply use the curves/levels even.
You could still mask the areas concerned and apply the masks to new adjustments layers
You may end up with one main layer, one main adjustment, and a couple of other masked adjustments
Yeah I guess I'll just wait for the person in question to show me what he's been doing
That would look like that where only a bit of the image is concerned by the adjustments layers

Yeah ik how to work with masks 🙂
No idea how it works in Gimp, but once you got the workflow he's been using, I guess it will be quite straightforward to reproduce
Yeah
I’m wondering if a 50% grey in difference mode would not work, or if setting your invert layer to 50% opacity is not what you are after.
Sandrine gave a good suggestion, to sample the lightest and darkest colors for your gradient. https://www.photoshopessentials.com/photo-effects/gradient-map/

Learn how to add complex colorizing effects to images in Photoshop using a Gradient Map, including a look at how to create your own custom gradients!
I was doing that and I got pretty close, very close.
Yet there was a difference in brightness as in the whites were still stronger
extreme photoshop noob here, how would i be able to delete just the inner black park of this?

magic wand tool
just select with it then mask/delete
It will delete everything as the sparkles outlines connect the outside edges.
i didnt see properly on my phone
Me too…
then erase those parts wich are 'connetced' with the outer line then u can magic wand
The black full screen background is not useful 😄


A quick way to try would be to add an Adjustment Layer to the Group. Hue/Saturation + Colorize and choose that same green.
I will try that but I also saw a fix on instagram but I forgot to save it, the person created a mask and then used the pick color tool, after that he brushed with the color. But I'm not sure exactly.
What I suggested doesn't require any painting.

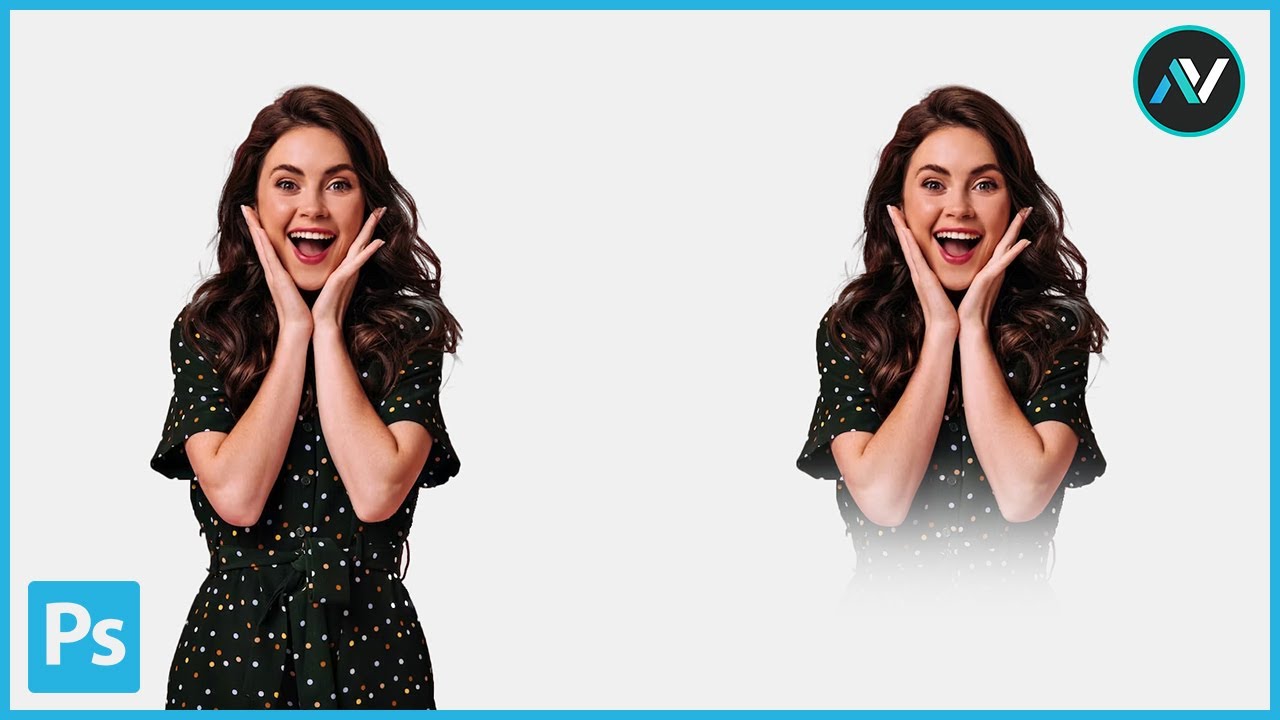
how would I separate the plants from the background in this pic? (Ideally I'd like them to have black bg)
I tried multiple things (like the duplicate blue channel thing or playing with filters) but to no avail

Excellent, did you do as described earlier? Remove connections, then magic wand?
Thanks for the help! None of the videos I found helped, so I went to good ol' trial and error 😁 finally got it

Gave +1 Creative Carma to @lunar belfry (current: #71 - 24)
yup
oh nice, looking good
try to get all of their foot in fame if its possible
looks a bit odd with it masked out
good job overall 
Yeah, but they are in grass

ahhhh i see
It's fine, it will be printed small on a flyer, not on the web 🙂
i assumed something of the sort
i'll make one more suggestion, try leaving in a bit of the grass by the foot, so it shows thats why its missing
hmm.... I will try that!
if you're going to print it - don't forget about using 300 ppi, that going to make the image sharper and less pixalated, even tho its just a small flyer
Yeah, I know that. I have a 1200 PPI printer, but no ink because cartridges are so expensive!
What is the way to upscale 10x without waiting hours just to tell me that “Scratch Disk Is Full”?
@tropic apex - Nope.
upscale it in the online editor like pixlr and then export it?
upscale PSD online to 20GB?
I don't think anyone will offer single human 300+ GB scratch disk.
? you just merge all the layers you got, export it and then put on the online editor, i don't think after merging the image will weight 20gb
Will be blurry.
yeah it's raster, you can't upscale it without losing quality
and even in psd file itself, without merging the layers, if you upscale it, you'd still get a blurry outcome
Please describe what "10x" means. Because you cannot endlessly upscale bitmaps without consequences. 1000 pixels to 10,000 pixels?
I have PSD with canvas 40x30 cm, I need to print it in 400x300 cm
well well well... that might be a little headache
if it's not too complicated... the easiest and surest way is to recreate it on a bigger canvas...
I have no NASA PC either. 😄
400 cm is roughly 13 feet. Yes. If you don't have enough RAM and scratch disk space to hold that in memory, you're going to have problems.
And how exactly are you "printing" something that is 13 feet long? I assume you're taking this to a professional print shop? I would discuss this with whomever is doing the printing. They will have strategies for doing this.
I do have contact, but they are not that smart to think about ideas and upscaling, they just print what you give.
That is why I have problems.
maybe I should open PSD in Illustrator and upscale.
will not work, psd is raster itself
Illustrator isn't going to help you unless the graphics are all vector art.
anything with .jpg and .png is also raster, you can't upscale it by putting in illustrator
i hope one day we will improve our screens to the point when we could endlessly upscale raster with it remaining sharp
Yeah, this is indeed a big problem.
At least for people that dislike Illustrator, and rather use Photoshop.
Its not the "tool" per se. Its the strategy of creating the layout. One should use the most appropriate tool for the project or for the desired output. If you're trying to print an enormous banner, then you'd probably do a majority of the construction in Illustrator. Only the raster portions of the thing would be created/edited with Photoshop and those assets would be placed into the Illustrator document.
If only Illustrator had normal guides and normal tools.
I've been responsible for many tradeshow banners and signage and have had to learn this the hard way.
I will clear 300GB on HDD this time.
I have no plan designing two banners from zero.
dont
you will have to if you want a good quality
jokes on you if you do it
upscaling it in photoshop 10x times wont keep the quality
it will on photoshop elements, like color, text etc.
pretty sure you'd have to find a new stock images also, since for a bigger project you need a better quality of the stock images to work with
Even if I did it in illustrator, i have image that is 1000x1000px to work with and place it in banner.
Problem is in those that want work done with such images.
maybe you could recreate that image using vector if it's not.. uhm.. colorful?

they want the building image or the gates also?
yup, see yu there
Building.
well the building is not that hard to replicate in vector, it has a simple geometry
also it's black which means no huge color difference
If they pay me 5000$ I would. I am doing this like for 100$
hey guys whats up my name is NTS JAC a versitle brand designer any tips on getting internships?
buddy i was doing that back in the collage when studying graphic design, we had to replicate a COLORFUL image, and we had to do that in 1:30 hours, and so we did...
it's not that hard, you got it
i just got into one myself, just called them, told them who i am, came to show the portfolio and here i am working for them...
also #🤷career-advice for this
also you don't need to do that in illistartor like we did, just upscale it in ps and draw over it
And then "Why it looks cartoonish"?
🤣
You probably never dealt with people that imagine what they imagine.
If I do that, first strike would be why is building alone, where is road, where are cars, where are trees, why is building having no shade, no gradient coloring (they would use other words for it), and so on...
well yeah i haven't, you're right, but thats your only option
Why are windows looking like this, why is logo roof color more red then it should be...
What is my opinnion?
See.
Your way would not fit to this banner.
How would you put drawing in upper right corner and present it as a real photo?
Not everything is done by Illustrator, there are real photo shots, larger then 10 metters.
Pro cameras, good computers, but I bet they still have the way to uspcale things.

yeah... or they told their clients that their stock image is bad and they need to use real camera to capture what they want to see in the graphic
Do they draw Christiano Ronaldo in illustrator, i have seen his posters over building that are probably 50 meters and more tall.
There is no such camera either.
There is a way to upscale well.
but you don't look at the image of 50m from 5m range, because you look at it from afar, it appears in better quality
I should just upscale png.
No one is gonna look this from close either.
also this is not centimiters

Next time I will work in illustrator just because I don't need scratch disk.
That's mockup.
First time I worked 800x200 cm in Illustrator.
It was a nightmare to work on that project.
First thing I realized I should work in 80x20, and then uspcale, but, as I use photos, once I down it to something like 5cm, returning banner to 800x200 later will make image more blurry then it was originaly, because Illustrator has no Smart Objects.
I am guessing this, I am not sure, I have to try it.
FYI: Illustrator also uses scratch disks.
I did not know that.
Probably less then PS, so I never had a problem, because it's a vector files in it.
pretty sure rasterized images would still take as much space as they would've in ps
I upscaled PSD.
It is 20GB file.
Is this a layered document? Many layers?
Yeah.
Why don't you create a flattened copy? (No layers) Then upscale it.
Create a merged copy of all the layers first. Duplicate it to a new document.
So I am able to make changes in office, boss would want to change text probably.
I need to add some more details too.
I am designing home, ending it will be in office.
And, of course, I don't have 300GB on laptop for resizing there.
Thank you!
For example I have a slide on a PowerPoint that Has a tilted computer screen, and I need the information on that computer screen, but it has to be warped and I’m not sure how
Hi! The main question you need to ask yourself is the viewing distance. 300ppi is needed for viewing at arms’ length. If it is further away, you need less resolution.
I hope that you saved it as a PSB…
Hi, you need to transform the corners in distort mode: https://www.photoshopessentials.com/basics/free-transform/
In this Photoshop Basics tutorial, learn how to use the Free Transform command to resize, reshape, rotate and move images!
Yup, it auto goes to PSB when file is big.
But is it a document that will be looked at closely, or something high, seen from a distance?
Billboard.
I’m afraid that you’ve upscaled for nothing. https://blog.fiverr.com/post/how-to-take-and-print-large-scale-images#:~:text=Most billboards are printed at,and intended viewing distance increase.
How do you create massive high-quality images? Here are some tips for generating large-scale images for billboards and advertisements.
IF I have photo 40x30 cm and 300ppi, how do I calculate ppi lost for upscaling to 400x300 cm
no matter what color i use, it shows up as this weird pink
why?
nevermind im dumb
95.29 ppi
my photoshop is traking forever to do anything..
i keep getting this

Check the doument size. Image > Image Size... A common error is setting the wrong unit type, e.g. centimeters instead of pixels. 2000 pixels, OK. 2000 centimeters, your PC might be unresponsive.
i think thats what i did... 


how do i make it so it goes on the car but with a different color

nvm i did it
moved the text up and changed the blend mode to exclusion
Im working with veryy high document file sizes
and saving takes ages
but i dont have any lag issues with task manager or anything
just saving taking a long ass time
is there anyway to optimize it
takes at least 5 minutes to do one save

neither is it like something very crazy

It's normal.
back again, this time i would to know if theres is a way to make all of x colour turn into y colour?
to be specific i want to make all the red outline black

One way is using a Hue/Saturation Adjustment...
brilliant thank you
I'm trying make a lowtiergod version of my friend but I'm kind of an amateur at photoshop, can someone lmk tricks to add the lightning around the person like the original image and just give me overall tips for this project?

i got this colorful and finished one and i dont know how to make mine like that (the blank one) please dm me if you can help


if u can help or do it i would love it ❤️
Hello. i need help with something. I need to add horizontal noise to a texture. If you look at the following image. I need to make the smooth purple in the top left and right look like the fabric purple (highlighted in red). I would imagine I need add horizontal noise, but am totally open to whatever technique gets the job done.

what specs you have for your machine??
For the past few days, holding down alt while scaling a layer no longer does anything
The only way to scale something without affecting its aspect ratio is using shift
Any idea why alt doesn't work? How can I fix it?

is it the same color as the background?
all good man
mhm ty
i've used threshold on this subject and it's not using 100% black, is that because i'm in CMYK or is it another problem? i would really appreciate your help

hey, i'd like to move these points but i can't, how am i supposed to do it ?

It's something I have on illustrator a lot too, but u should probably just change the lighting completely black on the layer or something.. that's what I do, probably not the best way but it works
Does anyone know why my Photoshop is so dark? I pressed a key combination yesterday and it turned a lot darker. Illustrator is the 2nd image, it's a lot, lighter, like normal


Couldn't find anything on the interwebs
It's the same after a restart
try holding ctrl

i wanted to ask
why
i cant see the outlines when i click select and mask
outllines like these

i think i clicked on smth but im not sure on what
nvm solved
i had 0 issues with any parts of my pc
alr said that
it was ps that was lagging
nothing else
my pc wasnt even at 60% on task manager
48 gigs of ram
so it shouldnt affect much
I have tried many times to remove the background but it always removes some parts from the front
Can someone help me?


thank you 🙇♀️
Gave +1 Creative Carma to @ripe quest (current: #3 - 1885)
how to remove this lines

Main menu: View > Guides > Clear Guides...
Thank You!
Gave +1 Creative Carma to @ripe quest (current: #3 - 1886)
can anyone help with this?
Edit > Preferences > General... "Use Legacy Free Transform"
thanks man
Gave +1 Creative Carma to @ripe quest (current: #3 - 1888)
i got this colorful and finished one and i dont know how to make mine like that (the blank one) please dm me if you can help


Sorry. I can't help you with Photopea. You'll have to check the Photopea documentation.
i have photoshop it was just a base picture showing layers
Then double-click on the Layer Thumbnail for the Smart Object to open the SO in a new window and add your artwork.
i dont know how doi do the background or the logos or make it fit to my object, like the text will look wierd
Then I'd suggest doing the tutorials that come with Photoshop. Then you can develop the skills necessary to be effective. Start with the "Beginner" Level ones and work your way up. Main menu: Help > Hands-on Tutorials...
im not trying to sit through an hour of videos for a 15 minute project
Well, I can't teach you every command and technique that's required to rebuild those layouts. You need to have some prerequisite knowledge and experience.
im in a photoshop class i understand some of it i just need to know how to add a picture/text and it not looking wierd bc its not streched to the smart object
My point exactly... These are basic techniques: "how to add an image to a project", "how to work with Smart Objects", etc etc
so if i add an image to say the front of the box and it is a smart object, it will stretch to it right
The idea is that you open the Smart Object and create the layout inside that canvas at that aspect ratio.
ngl idk what open the smart object means
If you're trying to rescale artwork to fit a different aspect ratio, for instance by scaling it disproportionately, its going to be stretched or squashed.
A Smart Object is basically a document embedded into parent document. It is somewhat independent of the parent and can be edited separately.
then how would the person i got the finished photo from get it to look that good
But again. Its easier if you do the Beginner tutorials and learn these concepts one by one.
Probably because they took the time to learn Photoshop.
meh ill just pay someone
Sounds good. Good luck with it!
nevermind i gave up on that
how do i add the picutre to the front of the box
it wont let me add it as a smart object
Those layers with the generic layouts in them are most likely already Smart Objects. As I said above, you dbl-click on the Layer Thumbnail for the Smart Object to open that into a new tab. Then you work in there. Save it and go back to the parent/main document. This page in the User Guide discusses Smart Objects, what they are and how they work: https://helpx.adobe.com/photoshop/using/create-smart-objects.html
any places to get a mentor, something where people help with my direct issues
One-on-one guidance... as in someone to teach you about every topic you'll need to learn? I don't know. You'd probably have to pay someone for that. Alternatively, you could do the tutorials that Adobe provides and learn how to use the app.
i really just need help with this not every topic
I've tried to help you but you don't understand basic techniques. Thus, why I suggested that you do the lessons that come with Photoshop. They're designed to teach you the basics of working in the app.
i understand some of the basics but i dont know how to add it, i got it to the menu and it looks wierd, ive never done it before
Can anyone give advice on how could I achieve an effect like this on a render to look like it has those drawing line strokes effect?, as if it was drawn by pencil not sure how to call it.

Perhaps by creating a seamless/tile-able pattern that looks like strokes. Then filling selections with said pattern. However, creating a seamless pattern like that isn't necessarily trivial.
Also, someone may have already created something like that. It would require digging around. Maybe at Texture Labs: https://texturelabs.org/
that helps thank you
You might be able to put black and white line art on a layer. Then set its Blend Mode to "Multiply" so the white drops out. Then put the stroke pattern layers "underneath" it in the Layer Stack. (That's probably how I would do it.)
Hi, There is a pencil-like filter. Do Ctrl+f for the search/discover tool, and type “pencil” it should list the pencil tool but also the pencil filter. It might be pencil daubs? I do not remember.
Hi, Which error message did you get? Did you try double clicking the smart object in the layers panel, as @ripe quest kindly directed you? Did it open another document? Did you place the wanted picture (with similar proportions)
it opens it do a new tab called rectangle.png
Yes. Paste, or drag your image in that document. Save and Close it. It’ll appear on the box, as explained in the help documentation listed above. (Forgot save step)
how do i close it
i got the picture into it
and i click x and it says i will lose saved progress
Sorry, file>Save
Can anyone give advice on how could I
i just gotta find a purple storm photo i like and thats large enough
i saved it
now what
@hushed niche
I tried with Human's and your method too, I think both end up with really convincing results. Thank you!


Gave +1 Creative Carma to @hushed niche (current: #28 - 65)
guys how can I get these?

Main menu: Window... each of those is a Panel that you can open. Then you can "dock" those panels in whatever order you want.
how do i change a picture with color to have a background color. Smth like this:

photoshop keeps crashing when trying to save in image>mode>indexed
how to fix this ?
thx
Gave +1 Creative Carma to @ripe quest (current: #3 - 1889)
i do not understand
What version of Photoshop is installed?
CC 2019
Try updating to a current version of the app.
Do you want to remove the current background and place the subject on a plain background with a texture? Or do you want to have just two colors, like your image?
Did you place the image you wanted in the “rectangle.png” document?
yes
what color picture exactly? fully colored or black and white or ?
And what happened in the other document? The image isn’t on the box?
AI not working ever since I got PS itself

Maybe posting some screenshots of both documents would help us help you.
Hi, is Ps up to date? Are you properly connected in your creative cloud account? did you accept the generative fill terms and conditions? Not sure if it is still needed, but did you enter your birthdate in Behance? https://www.zdnet.com/article/what-to-do-if-generative-fill-is-grayed-out-in-your-adobe-photoshop-ai-beta/

ZDNET
Adobe is heavily promoting its new Generative Fill AI feature, but for some folks there's nothing but disappointment. Here's how to enable the feature if it's grayed out on your computer.
i need to include mockups for my graphics project, and what i need to include onto a mockup is a logo i have made
but what can i put it on
the projects theme is me making my own dessert cookbook
hey, i'd like to change the colors after i hit liquify to make multiple themes

Hello, gradient maps does wonders for experiments in color. See: https://helpx.adobe.com/photoshop/discover/six-free-gradient-maps-for-photoshop.html
Hi, Did you design the cover of your cookbook yet? Or you could use your logo on a plate? Or on a wooden serving board ?
thank you
Gave +1 Creative Carma to @hushed niche (current: #27 - 66)
in the pictures folder on my pc my PSD's have lost their photoshop logo and now bring this menu up, and pressing that top option doesn't open anything? all files still open if i open photoshop first though

Click on more apps, does Photoshop show up? Any way to search for it?
seems like it, where should the correct file be located (windows)
never mind sorted.
thanks
Hi all. Is there a mappable keyboard shortcut for when you CTRL Left Mouse Click on a Layer to load that layer as a selection? I've been poking around in Keyboard Shortcuts but so far I haven't found it and I'm not 100% what it would be called.
The closest thing is Select > Load Selection... However, from "Channel > Layer Transparency" must be triggered by another click event. Thus, I'm not sure that workflow is available from one keystroke.
So this logo is a seperate stage (stage 1) and my front covers stage 3, I’ll try the ideas of the chopping board and plates though thanks for those ideas 🙏
Gave +1 Creative Carma to @hushed niche (current: #27 - 67)
Okay, all good. Thanks for the response. Was building a macro but I can still do the rest after I load the selection.
Gave +1 Creative Carma to @ripe quest (current: #3 - 1890)
You could create an Action that will do it. However, there is a caveat. I think that would only work if the Layer is a "pixel" layer. In other words, I don't think that will work with Shape Layers, Type, etc.

I could be wrong about that so you might want to experiment with that.
Hmm okay I will experiment, thank you!
looking to make a cool style fan art like this. how would i achieve the blue glow on the characters and the fade at the bottom of their body?


An Adjustment Layer with a Layer Mask. Hue/Saturation + Colorize.... Choose "blue" and fade the effect to 0 using the Layer Mask.
tryna magic wand tool a white background out and it gives me this..


You either have to rasterize the layer to convert it into pixels. Or you have to open the Smart Object and edit it as a separate document. Dbl-click on the layer for the Smart Object to open it.
raterizering worked, thanks
Gave +1 Creative Carma to @ripe quest (current: #3 - 1891)
im gonna give your example on how do to the fade on stewie
when you say "0 using the Layer Mask" what am i setting to 0 exactly?
Layer Masks when painted completely black mean complete/full transparency.
You use a gradient (white to black) to softly transition from completely opaque to completely transparent.
like this?

https://www.youtube.com/watch?v=O0jl9crUTlM&ab_channel=ShortcutsAcademy found another video that demonstrates, when they open the "gradient editor" mine does not open.. any idea why?

Learn an easy quick way in a simple fast tutorial for how to create a transparent fading gradient effect on an object/person or layer by mask using Photoshop in less than 2 minutes for beginners, intermediate and professional people for faster editing of designs.
First, this person is using an old version of Photoshop so there are going to be differences between this and current versions of Photoshop. Next, you can access the Gradient Editor by clicking on the gradient swatch in the top bar or in the Properties Panel.
I don't know what you're doing; I can't see the process or steps you're taking so its difficult for me to know.
Alright I see thanks
Gave +1 Creative Carma to @simple belfry (current: #556 - 2)
thanks
all is good
works as intended
https://www.youtube.com/watch?v=bsbaWS7Cq2s&ab_channel=AdobeVibes trying this tutorial, but get this result instead of the same one in the video

Hello everyone,
I'm Dav and In this video, you’re going to know exactly How To Add Gradient Fading Transparent on any image In Photoshop | Photoshop Tutorial 2024.
👉 Watch his video till the end... I appreciate your LIKE / COMMENT/ SHARE !! 🙂
🎯 SUBSCRIBE to this YouTube channel to get more amazing Photoshop Effects Tutorials
https://www.youtub...
Invert the direction of the gradient. Black is transparent. White is opaque.
Hello, I'm having issues with my .cr2 images from a canon 60d being a lot darker in camera raw than the jpg... i shoot both a jpg and a cr2 and they look normal on the camera and in jpg form but in raw it looks severly underexposed... am I getting a setting incorrect?
jpg example:

vs how it appears in raw

RAW files can and often do look different than their JPEG counterparts.
The point of using RAW pixel data is that the pixels aren't being changed in the camera. The exposure, levels, and other things can be modified after the fact. With JPEG, the pixels have potentially been subject to various changes inside the camera. This includes but is not limited to the compression that Canon has imposed when their filter saved the file.
Thank you. Are there any ways I can make my images reflect more how I originally took them? I prefer it more that way
Technically speaking, the RAW file is "how you originally took it." Its just not being manipulated by Canon like other file formats.


I also have the same problem but worse with my 70d, it changes the color hue of the image to a more warmer tone, compare the sky and the green color between the 2, top being original
What edits could I make to make the images more like the real-life look?
I bring RAW files into Adobe Camera Raw and make edits there.
You could also use Lightroom.
I've tried to adjust the temperature on my 70d images before, but the color is still washed out compared to jpg
That's what i usually do
So I suppose the image that camera raw shows me is the true "look" of the image, you could say?
It should be closer to what the sensor is actually recording. The JPEG could be seen as the corrupted one, since its being converted to a particular RGB color space and then compressed as JPEG. The compression alone could be messing with the color.
But if you like the JPEG better, you could just make sure they are saving at FULL quality. (No compression)
I like the color of the jpg better, but I like to maintain control over shadows and exposure
Does it capture/will it save the file in any other formats?
It will probably only do RAW/JPEG side-by-side. I wasn't thinking it through.
Never mind.
Yeah, I only do raw and jpg
Hi, you can change the default rendering https://helpx.adobe.com/camera-raw/kb/acr-raw-defaults.html of your images in camera raw: setup a different profile https://helpx.adobe.com/camera-raw/using/adjust-color-rendering-camera-camera.html (camera vivid, for instance?) I auto-remove chromatic aberration, but prefer Camera Neutral. I use Bridge a lot after a shoot to cull images, tag them, input metadata, rename, etc. To get a punchier starting point, some use the auto button, then adjust from there.
And to work faster in camera raw, use its shortcuts . (I love the alt+double click on crop to auto-straighten) https://jkost.com/blog/wp-content/uploads/2022/10/2022_ACR_v15_Shortcuts-2.pdf
does anyone know any font that would look wayyyy better than this one? (school assignment but i dont like the font i picked out)

a way to resize brush with trackpad? (not a macbook)
https://community.adobe.com
Is it possible to change brush size/hardness with trackpad? I really like the mouse up/down, left/right shortcut, but with macbook trackpad it's not working. {Thread title edited by Moderator}
doesn't work for me
i also couldn't find the resize option in keyboard shortcuts settings
you can use [ and ] on your keyboard. about the trackpad, it could be a Mac-only feature
okay at least that works
thanks
Trying to identify this font, no luck so far.
Anyone can do it?

?

ah the M is different
well the numbers are the same

I would like this paper texture to fill all the vector objects of the image on the right. How can I do this quickly?

On a pc: ALT + Right click + Drag Horizontally
you're defo going to have to size this texture up
then change the blending mode
to something suitable
overlay could work well
and there you have it
@compact blade
Hi, the texture seems big compared to the image. Do you intend to have every shape filled individually? The fastest is to copy the texture on top of each layer, switch the blending mode to your taste, then, alt+click between them.
As @hushed niche already suggested, if you want to cover the whole room in the paper texture, since EVERYTHING is technically a vector object, you could just overlay it, set the blend mode to multiply and job done.
anyone got any tricks for managing brushes? over the years i've downloaded loads of packs and struggle to keep track of which i use etc
@lucid crane Would you recommend a particular lens within the micro 4/3 ecosystem (I am assuming they're all compatible within brands) if I want a big aperture (the sensor is tiny) and still want the capability of a transtandard zoom, but not too keen on having ultra wide angles (I have a 24 mm equivalent right now, and it's more than enough)
We can make it a thread!
hello everyone
I'm trying to select text non-consecutively but I can't find any control to do it like shif and rigth click on Word for example
I don't think that's ever worked in ANY software.
oh wait! - wow you can.

I've been using MS word for 30+ years and never tried/did that
ctrl + shift and rigth click on word sorry
but i can't do the same on photoshop if anyone has a solution
I don't think SHIFT needs to be pressed? (In MS word at least)
- yeah, I don't think photoshop does it though.
Looking online, I'm not seeing anything to suggest otherwise.
I do wonder how much text you're adding in your PSD to warrant the need for this ability. If you're making a whole booklet / page / brochure etc, there are probably better suited tools like Adobe Indesign.
I'm making a restaurant menu and I lost 15 hours of work with a PSB file that no longer opens , I'm going to try Adobe InDesign, that would be better ?
Thank you for your answer
arf
sorry to hear you lost it all!
if it was a PSB, that suggests it was MASSIVE.
I do wonder why a simple menu would result in such a large file
x) ok so i leave this place
See you in the **Illustrator **server then! since Indesign doesn't have its own discord server. - Or Better still:
https://community.adobe.com/t5/indesign/ct-p/ct-indesign?page=1&sort=latest_replies&filter=all&lang=all&tabid=discussions
not so massive 38 Mo
I don't know
yesterday I turned off my PC and this morning I no longer had any recent files the only thing I was able to recover using software was a psb file
I'm not sure if you're doing this as homework, coursework or an actual business but it's always worth checking out menu templates on Envato:

Literally 1,000's on there
This one for example is created for both Photoshop and Ilustrator.

Ironically, NOT indesign 🙂
thx , i'm going to watch this , i open a restaurant , i'm not a graphist at all
Does anyone know what this style of lettering is called? Sorry for the lack of terminology not sure if it’s a “font” or what. But I like the general look/idea of it.

They usually call that a 'fish eye' effect.

Would I just use an eclipse tool to then get the circle on the outside? (Once again I’m bad with terminology I’m used to just clicking buttons and dragging on photoshop)
Or "Inflate"
One sec
I’m assuming the font on top vs in the circle is also different
Are u like the founder of photoshop? I was expecting to get a unhelpful response but instead got a STEP BY STEP tutorial
Thank you so much

No problem. Glad I could help.

Is that just a flat layer right now?
however the solid colour layer doesn't work
(With transparency of course)
yes, with a contrast and brightness added onto it
because its a really light gray without it
Can you share the PSD?
You did more then help I can’t thank u enough
Gave +1 Creative Carma to @sly hawk (current: #6 - 857)
the file?
No problem @latent flare . - Good luck in your project.
thank you!
hmm now I have another problem...
everytime I import the file into my indesign file it mutes the colours


I googled it and it seems common throughout most adobe software so how do i fix this?
@sly hawk is their some fonts similar to "Helvetica Neue" that I can use on photoshop
I assume it's because your indd file is setup to use CMYK colour?
Yes. - Honestly if you google "Helvetica Neue Alternatives" you'll find some great suggestions.
huh, how do I change that?
or how could I check?
Inter (go-to recommendation)
Roboto
Arimo

In this Photoshop tutorial, I will show you a handy way to use Adobe Preset Manager to organise Photoshop brushes. Take a look!
am i missing something lol

its not a pre-loaded font
What's the end goal though? If you're going to print it anyway, you'll never be able to generate that nice vibrant pink from a normal printer
ohhh ig ive only used pre loaded fonts, thanks
Gave +1 Creative Carma to @latent flare (current: #196 - 7)
well I need it to be handed in with a draft print

Why only CMYK and not RGB can be used for print? Is it ever possible for a printer to have RGB colors and print naturally? Why RGB has to be converted to CMYK before printing? All this and more in this episode.
In this episode, we'll go in depth about two color spaces: RGB and CMYK and why one is used for screen and the other for print. First o...
I don't think the print is THAT needed.. maybe
so does that mean i export my pink as cymk?
So you’re trying to create your beautiful document in InDesign, only to see that the colours of everything you’ve imported looks awful. Knowing a lot about document profiles, you realise this is probably due to the colour profile being set for printing as CMYK - as this is the default InDesign colour profile. Except you can’t seem to find where ...
I got it
Installing extra fonts is super easy
Google Fonts
Inter is a variable font family carefully crafted & designed for computer screens. Inter features a tall x-height to aid in readability of mixed-case and lower-
my problem I believe, is that when I do export the file digitally, the colours stay washed out which is not what I want, does this mean I have to rechange the colours to fit?
Just click "Get Font" top right. Save it to your deskop, open it and click INSTALL.
I assume that whatever you're exporting them TO is changing their colour profile - perhaps back into a dull (but safer for print) CMYK mix.
ah, if I were to export it in pdf it would restore the originals colours/
gosh I didnt realize how many styles of a specific font their is, i guess ill use inter - black and just experiment
welcome to the world of graphic design
LOL
you have millions of fonts and you'll probably just default to futura
Helvetica Neue is crazy:

bebas neue is similar
yeah pretty much
This gave me a headache
There's always the old favourite:
https://www.tiktok.com/@mrrobertmayhew/video/7355466130963631392

(I had 3 large, national clients all switch their brand font to **Poppins **in the same 3 month span) #HowOriginal 🙂
so how would I fix this importing problem? Do I have to export the photoshop file as a cymk?
No. - I wouldn't have thought so. - If you save your PSD in the usual RGB setting first...
I imagine you could just open/import it into indesign and as long as you follow the short guide above/below, it would work wouldn't it?
its more odd than that, all the other files I have opened in indesign haven't faded the colours like this
this is the first time it's happening
unless I didn't pay attention
oh wait no it does it for all of them :V that sucks
A lot of the time you might not even notice the difference

yea by changing it to rgb
but everything looked fine in cymk, its just these colours HATE the image
guess I just have to deal with it...
welp thanks for the lesson James
Hi, the files in recent are saved on your hard drive, those are just links to the latest files you’ve worked on…
@sly hawk what do I click in windows pull down to access this
the grid and warp
options
hi thx , yes but where are the files saved ?
Gave +1 Creative Carma to @hushed niche (current: #27 - 70)
Greetings, I don't know if this is exactly related to Photoshop, but I was wondering if anyone is familiar with Error Level Analysis, just thought there may be overlap in expertise here. Was trying to get into it but seems a bit more difficult to find guides for it.
Create a new file, hit save, and see where it defaults. But YOU select where it saves, usually in the my documents folder.
Ctrl+T Edit>Transform. then warp Or is it Image>transform
I had to google it: https://fotoforensics.com/tutorial-ela.php
Yeah I have already used that website, but I am having questions and I didn't really find a discord or subreddit or web forum for it. Seems to be a bit niche but I thought it relates a bit to Photoshop (maybe not). I am generally trying to find fake/manipulated imaged that are usually manipulated by photoshop or Paint I guess. I am not always sure what Ia m looking at though.
I remember this plugin: http://www.reindeergraphics.com/fid.html by John Russ, that used to visit the official Adobe forums.
Reindeer Graphics creates state-of-the art image processing and image analysis software. We also provide consulting services.
Hi there! I am new to Photoshop and I would like to know how to adapt this t-shirt on the red background: Thank you very much

Hi, I would try puppet warp on a copy of the layer, but expect major distortion. I would use copies of the elements and to rotate them in position.
Seems to be out of service, I will check out the pdf though, thanks. Still gotta find someone that has worked with it to fully understand what I am looking at though I think. 🙂
Gave +1 Creative Carma to @hushed niche (current: #27 - 71)
Do you know if there is a video or guide doing this? I'm searching on YouTube Spain but all the videos about this are on flat surfaces where it is quite easy to place it without deforming
There is a book but old, out of print and $$$$: https://www.amazon.com/Image-Processing-Handbook-Seventh/dp/149874026X#byline_secondary_view_div_1713196402445 search image forensics

The Image Processing Handbook
Some made long videos on the topic: https://m.youtube.com/watch?v=xRGt7byhS50

Learn everything you need to know about Photoshop's most POWERFUL photo manipulation tool!
The Puppet Warp can be very useful for distortions, such as shaping hair and repositioning body parts.
🎯 SUBSCRIBE to get more amazing Photoshop tutorials!
► https://www.youtube.com/user/photoshoptrainingch?sub_confirmation=1
📘 INDEX - Mastering the Pu...
Thank you! I'll see how it goes
Yeah I have seen it as well, but it is a bit pricy. I am totally doing it on a amateur level, not professional. Just trying to analyse verification pictures as nowadays photoshop, face apps, and A.I generated pictures are very common and fake accounts seem to be ubiquitous. Wasn't trying to become ane xpert just understand the pictures better. 🙂
Just sometimes I get very mixed results and don't understand why the ELA does what it does between different images and it's hard to find the answer oon google or a book I guess, would have to ask someone with experience. But this seems to be a very niche topic.
how do i save a file as a object (in this case a logo) so I can drag it and put it onto other images to download
how do i make a line that goes straight through the entire canvas given two points?
You mean with transparency? Save a copy as a PNG, and the main document as a psd if it has layers.
Hi, with a brush tool, Click on the first point, hold shift, click on the second point
it didnt go through the entire canvas it only went between the two points
Yes, that’s how it works; I thought that the points were on opposite parts of the canvas.
Ok, are they vertically or horizontally aligned? You could place a guide, then do the same procedure I told you, from the intersection of the guide and the edges of the canvas. If they aren’t, get the line tool, trace a path on those points, then scale the path so that it covers the entire image?
scaling the path moves the line
I am trying to understand onionskinning in photoshop and for some reason when I move my image, it is "erasing" the onion skin from the previous frame
Not if you scale it proportionally, and from the center. Hold alt, then click on a corner, and hold shift alt as you scale, alt for scaling from both ends, and shift to scaleproportionally.
Hi, is your GPU driver up to date? Check in Help>GPU information
I think it is all good

Ok, on a Mac, the drivers are current. I would recommend to ask on the Adobe forums.
will do, thanks 👍

trying to use AI denoise in Camera Raw 16.2
this is a popup i've never seen before
any suggestions?
u can also remove noise in filter then noise
Hey guys, is there anyone who can help me with indesign?
Hi! There might be more Id experts in the illustrator discord… https://discord.gg/adobeillustrator
You could still ask here, one never knows, or there is an Id forum in the Adobe community: https://community.adobe.com/t5/indesign/ct-p/ct-indesign
Ah, thank you friend, I'll call the people there so they can help me!!
Hello, I never encountered this error, I’d ask in the ACR forum, I found some threads on the topic: https://community.adobe.com/t5/photoshop-ecosystem-discussions/ai-denoiser-camera-raw-error-writing-dng-file/m-p/13873326
https://community.adobe.com
I get the same error, but I am saving to my hard drive. PS also turns off my grapic acceleration "for this session."
https://community.adobe.com
Hi I was able to use the denoise AI at first (and it worked great), but now every time I use it, it starts to process and then then about half way it pops up an error message (see screen grab), before it can generate the dng.It has also crashed and restarted my machine a few times. My machine is fa...


ok thanks
i tried using my desktop instead of my SD card but same deal
i will try a folder, maybe it does not like the desktop either
i'll read that second forum as well
its better in my opinion
gradient overlay not doing anything no matter what I change
I had this problem in the past too but I forgot how I fixed it 😅

Does anyone know how to make this image more detailed? (such as adding shadows to it with noise speckles)

because the suit is all white even tho theres some shadows and some
folds in the oriiginal pict
Not if that's the actual flat image. Any previous details have now been lost.

hey
I've got a question for scratch disk purposes
I have my photoshop on my D drive
however when working my C drive is the one still becoming full
when working with files
why's that the case?
Hey, how do i edit the elliptical marquee tool after i used it?
I'm trying to open a document that I was shared with but this shows up on the cloud icon

How do I fix it? Please I need an assigment to hand in tomorrow!!
Check your firewall settings im guessing
or reload cloud if you haven't already
i remember having that problem and it wasn't too bad to fix i dont think
How do I do that?
settings ---> firewall and network settings ---> allow a app through firewall?
Hello, the install partition has nothing that do with where the scratch disk is located. This is set in edit>preferences>scratch disks
What do you mean by edit? Properties lets you feather it. You can add and remove to a selection with shift and alt.
Dont worry bro, i sorta shithoused it and i've got a couple more todo and have lost the will to do it, thanks tho
Gave +1 Creative Carma to @hushed niche (current: #27 - 72)
Hmm I don't see the settings or firewall settings anywhere
@quaint ledge
Ohhh those settings
yeah, the physical windows ones
Hmmm they're all grayed out

The 1st one is the one u told to me press
i reckon so
but dont quote me (especially as it's in spanish)
just tryna help cuz i've also got a assignment tomorrow aswell (10 hour exam)
Says Adobe has permission?

Maybe
but isnt cloud stopped being supported?
Hm?


Try signing out of Creative Cloud. Restart it. Sign back in and then try to sync the Libraries.
Yea, listen to the competent person ^^^^
You could also reboot the machine but I would just try refreshing the CC app first.
Thanks for trying to help. We appreciate it. :)
Gave +1 Creative Carma to @neat quarry (current: #866 - 1)
Didn't work :(
Still shows the page icon
When I open it in photoshop it says it's downloading but it doesn't seem it's gonna be completed anytime soon
Are you sure that you have access to that file?
Yup, i shared it with myself on a different device
What about toggling the Sync function?
Open the Creative Cloud desktop app. Select the Cloud activity icon in the upper right. Select the Pause button to pause syncing. Then select the Resume button to resume.
Done
What was that supposed to do though?
It was one of the things suggested by Adobe. To see if you could "force" library sync.
Its so weird because all my documents from my separate device show up on my pc except the one I was working on
Yeah. That's strange. Did you make it on iPad and saved as PSDC format?
Yes...?
Can you open it on the iPad?
It's in the school
But I remember it did show up in cloud app, but it too appeared blank om the ipad
It could be a file issue. Like a corrupt file. The problem is difficult to diagnose.
Another weird thing, yesterday the file appeared on my pc but it was version of the file for when it was created
I started it last Monday, so the file only showed the file version of Monday even though I was days ahead if it
yes i understand but lets say for example
ill give you a good example
im using D as my scratch disk
when i open large file sizes
my C drive gets capped to max GB
even though my D drive is my main scratch disk
when i close photoshop, it'll go back to normal
In Photoshop, on the Home Screen, under "Files > Your Files" ... Can you see the file there?
How much storage is left on the C drive? If you get too close to full on the OS disk, you could have performance issues just generally with Windows but also with Photoshop.
Nope
it caps even with 25 gigs of free space
thats exactly why
my D drive
is my scratch disk
but even with D being my scratch disk
why is my C one filling up
What about: Files > Shared with you?
when changing scratch disks
im assuming all the memory while working in photoshop
will be stored
on that certain drive
so then why is ps deciding to still use my C
It says I have none
@simple belfry - Can you please type your responses on one line?
sure mb im used to typing words lmfao
Also. I don't know what any of this means. Is your C drive the disk with the Operating System on it? If so, how much storage is available. I'm not asking about the scratch disk right now. Just free space on C.
C is indeed my main drive, On my main drive after closing photoshop I'll have about 15 gigs of free space.
However C shouldnt be used in the first place.
This is why. You cannot let C get that full. Windows needs virtual memory to run. If you get below 20GB of free space, you're likely going to have problems... just, in general. But also with Photoshop.
Damn so this applies even when the scratch disk isnt being used?
im going to struggle to get 20 gigs free, my main drive is so weird for no reason. It says i have 121 gigs worth of apps on it but when counting it only comes out to about 40 gigs
Windows uses free space on C for "Virtual Memory" and its constantly trying to manage this. When free space gets too low on the OS drive, you can and probably will have performance-related issues. This has nothing to do with Photoshop's Scratch Disk assignment.
yeah it gets scary, i even reach 0MB on the drive in photoshop
hoping my pc doesnt break apart
Photoshop needs the scratch disk to store data so that it doesn't have to store everything in RAM.
But that is a separate issue from Windows and the Windows Paging File (Virtual Memory).
The minimum and maximum size of the Pagefile can be 1.5 times and up to 4 times the physical memory (RAM) that your computer has.
How do I fix Photoshop being laggy? I feel like I have 1 fps on a game
Specifically when I transform anything
What is the size of the document? Image > Image Size... and the unit type? A common error is that people choose the wrong units when creating a new document. 2000 pixels, OK. 2000 centimeters, that's like 65 feet wide. You'll probably have performance issues.
512x512
another thing
what is this tool? im trying to follow a tutorial and cannot seem to figure out what that is
or find it
That is the Polygonal Lasso tool. Its for making selections. Its probably under the [regular] Lasso Tool. Long press and hold on the tool icon and a flyout should appear revealing other tools.
ok thanks
last thing
how do i make something directy editable?
nvm figured it out
Is it a Smart Object? Look in the Layers Panel. Smart Objects are denoted by a little file icon on the bottom right of the thumbnail.
yea had to rasterize it
if u cant tell i dont do this often but thanks for answering my questions
how do i remove the hard edges on the bat signal shadow?

Which is a better value photoshop for Ipad or canva for Ipad?
Greetings photoshopians. I have never touched photoshop a day in my life and was wondering if it's worth the high-ish cost. money's tight but I really want to get into it
Are you on desktop or mobile like Ipad, Iphone, android, etc
desktop, windows
idk if the os matters or not
why was my request removed?
@crude ether - Please don't ask for help with forgery/cheating here.
There's features not on Ipad compared to desktop. It also depends what you want to do with it. There's a free trial of photoshop you could try first. You get it for 30 days
Of course, Photoshop is worth it.
I just wanna make funny stuff, like funny phrases in the sky, or maybe add me into pictures and stuff
Try the free trial first
I will, is it hard to learn?
There's a complete tutorial on it. You'll get the hang of it!
Thanks
Gave +1 Creative Carma to @true basin (current: #866 - 1)
NOT promoting other products*** but there's also Canva that's free to do the same thing as well
How much "value" something has, only you can determine that. It really depends on what you're trying to create.
Appreciate it. i like the generational fill on the Ipad version. I'm also using the free trial.
I'm a “Ai Coach” for athletes and business brands. i work with people who want to learn Ai or want to do better like for instance learning new skills in diving. So I make graphics explaining all things Ai for new and present clients. The value is all based on what I can create through that
Hello! I'm trying to write a photoshop js script hat toggle visibility on every group that is color tagged Yellow.

but i dont know what attribute to ask? Does anyone know (i tried the naive group.color)
Or you can use photopea
https://developer.adobe.com/photoshop/uxp/2022/ps_reference/objects/createoptions/grouplayercreateoptions/ here it says group colors are referenced as LabelColors. Maybe you can try assigning the layers to a list using for and try if coloredLayers.LabelColors != NONE or false
uxp documentation makes me jump out of a window really
assuming you are using UXP
oh thanks, i ended up just using group names instead. And in the default documentation color doesnt exist lol
Gave +1 Creative Carma to @twin bronze (current: #28 - 67)
nah im not using UXP, how hard is it to setup?