#❓ask-a-question
1 messages · Page 34 of 1
and can anyone tell me how to make this type of smoke/fog?
Could you explain a little bit more, I'm new🙏🏾
A Layer Mask is essentially way to remove pixels without actually deleting them permanently. It is referred to as a "non-destructive" workflow. Thus, you can always get those pixels back if you make a mistake or change your mind. You paint black to hide the pixels. Paint white to reveal them. The levels of grey in between are varying degrees of opacity.
After you paint on the mask and hide the pixels, you can apply the mask and that will permanently remove them from the layer.
Im sorry is there a video your could reference going more into detail?
You just right-click on the Layer Mask and choose "Apply Layer Mask"
That permanently removes the pixels and deletes the mask.
what if i'll install an older version of photoshop? i'm just trying to recreate this effect, not sure if it's posible now that 3d suppord has been dismissed

I really don't know. I can't speak to the performance of that integrated GPU when using the 3D tools in old versions of Photoshop. I have no frame of reference on how well it works (or doesn't).
Please post this sort of thing in #📝project-feedback.
okay
Ohk then I can apply another one?
You could make a mask, paint on it and apply it. Then repeat the process over again at your leisure.
Any body tell me all shortcuts in photoshop
Hi everyone, I have a request.
Can anyone please help me heal a photo of myself?
There's a shadow line underneath my nose and I'd like to take that out
If anyone of you could help remove that shadow, I would greatly appreciate it.
Hello, I am making a logo and struggling with how to implement what I want to do through photoshop to then create it, any tips would be helpful, Dm me or reply to this if you can give some times, ty 🙂
Can anyone help me fix this error?

hey guys! i have a question
how can i improve this?
it looks weird on the sky background
What exactly are you doing?
Please use the #📝project-feedback channel for comments/suggestions
hey guys, how can I turn off these "guide purple lines" when using move tool?

View > Show > Smart Guides.... to toggle those on/off
Tell you? :) Main menu: Edit > Keyboard Shortcuts... or check out this reference from the Ps User Guide: https://helpx.adobe.com/photoshop/using/default-keyboard-shortcuts.html
<@&548221840750018590>
Thanks!
Gave +1 Creative Carma to @ivory rampart (current: #128 - 11)
So
I have this curious question about needing to batch crop images from a large repository of images that have slightly different positions


example of what I need to crop
I know macros could somewhat do it but they are in slightly different positions and I need to do around 250 pages
Yes?
how to find out what font people use

hello friends, How can I make the purple and blue parts glow?


copy your layer(ctrl+j) -> select black area with magic wand -> layer style glow
you probably could do better than that
OK, thank you very much for your answer
Gave +1 Creative Carma to @ivory rampart (current: #118 - 12)
you can change glow colour to match better
does anyone know why my stroke is all pixelated


only vectors will be always smoothen, raster brush will be always pixelated
is there anyway to add an outline around it then that isn’t pixelated?
without a stroke?
you could convert strokes to path this should smooth lines
▽ FOLLOW
Instagram ► https://www.instagram.com/obaedakorani/
Facebook ► https://www.facebook.com/obaeda.koranii
TikTok ► tiktok.com/@obaedakorani?lang=ar
▽ PLAYLIST
Latest Video ► https://youtu.be/YVdr7OFWoAQ
Thanks for watching.
Any comments are welcome!
#Photoshop_2022 #Design #Short_Tutorial #Tutorial #Short_Tutorial
Can I use a brush for glow?
how do i remove anti aliasing from the clone stamp?
What a beautiful word, I agree with you, but the problem is that when I use the brush, it is like this for glow, but it was not like this when I used it before.

do you paint on separate layer? if yes maybe you had different blending mode? 
Yes, I used solid color

The problem I have with it is that I like the parts that are blue to be bright, but the problem is that it becomes pixelated and the middle is dim, the emitting light is brighter than itself.
even when changing blending mode of layer?
yes
hmm not gonna lie you might wait for someone smarter than me
Please don't talk to yourself like that, you helped me a lot, I was able to get other opinions from your words.
I meant you need someone with more experience than me, as i reached max in that case
OK, thank you very much for your time
Gave +1 Creative Carma to @ivory rampart (current: #108 - 13)
np hopefully you will find solution
Any helpful tips on how I might manipulate a chain around a lung to look as if it is squeezing/constraining it on photoshop? I’m not necessarily new to photoshop but I don’t remember much in the app so nothing too complex if possible 

why does lightroom takes up so much ram?
it takes 10gb of ram when i use lens blur features
If anybody is interested in a job or business partnership DM me!
Hi, Im decently new to photoshop and was wondering if someone could send me on the right track to try to create something similar to this but with different text.

im curios how he did the light spots ont he text as well as the reflection. Im also wondering how I create the transitions form the glassy floor to the mosty black dark backround
how do i make this moon red?

Probably brush strokes on separate layer, as for mirror text was duplicated and mirrored with mask and gradient
solid color with blending set to multiply or overlay

y does my filter gallery go black when im editing something
and when i click done the whole design turns black
how can i fade half of my image and make that part slowly become transparent?
it's a picture of a mountain
Add a Layer Mask. Then use a Black to White Gradient on the Mask.
you mean layer mask > reveal all?
Start with that. Then use a Gradient on that new mask.
so, basically clip that gradient to the mask?
Select the mask and then use the Gradient Tool on the mask.
oh i was mistaking gradient map with that
Difficult to diagnose based on just this description.
Is the moon on a separate layer?
wha other description can i give
An Adjustment Layer > Hue/Saturation + Colorize is a quick way to do it...
I don't know. What's on the layer?

thank u so much! yes it was on another layer
Gave +1 Creative Carma to @ripe quest (current: #3 - 1729)
Perhaps try to adjust the Light/Dark Balance... Unless there is more going on here that I'm not seeing. Or you're not activating the proper layer. I don't really know.

na it ain do nun n i am on right layer
the layer was merged w the black backround tho
It works for me. The settings might be different for you if your document is a different size. I really don't know. Sorry.
You need an app for screen recording. Try ShareX.
thank you!
Gave +1 Creative Carma to @ripe quest (current: #3 - 1730)

do you know how can i make the gradient apply only to the bottom edge of the image?


maybe i should make a selection for that?
arent these crt scan lines how can i get them to be so small

You can paint it with a brush. With a layer mask: black hides pixels. White reveals pixels.
thank youu!
Gave +1 Creative Carma to @ripe quest (current: #3 - 1731)
Not sure its CRT lines. It actually looks like some sort of texture.
I can't see what is going on here.
whatchu want me to show u gng
I've already said, "I don't know what is happening here." And you're just showing parts of the screen. I can't tell what the problem is. Try this on a different image and see if it still occurs.
Some filters don't work well with certain types of images. You'll just have to experiment with them to see how they affect the layer.
honestly, it looks like someone took a photo of this photo on a computer screen, notice how the lines align with slight pixelation
I'm new to PS and just installed it yesterday.
I'm currently having a problem with changing the scratch disk to other ones as my C drive is full but the app doesn't see D drive.
Both drive are NTFS.
Can other apps see your D drive? Is Photoshop the only one that can't?
is there an aftereffects discord
Hello, I'm a newcomer and I liked something about a creator, or rather, I liked the rounded edges. I wanted to ask how it's possible to make them like that. Could you send me a video or tutorial?

yes i mean the white corners
Mask your image -> create new layer with fill colour -> move layer with background below image

Discover what Layer Masks are and jump straight into real-world examples to learn the best ways to use them in Photoshop! Starting from basic concepts to fundamental techniques and best practices, this lesson covers every aspect of Layer Masking for beginners. I hope you enjoy this tutorial. Thank you so much for watching :)
► TIMESTAMPS:
00:00...
thank you for the advice, I appreciate it, unfortunately I didn't quite understand it, could you somehow make a tutorial for me, I don't want to be annoying or I just want to know the basics
Gave +1 Creative Carma to @ivory rampart (current: #102 - 14)
Im not best tutor and im at work atm
I understand, maybe one will help me if there is someone as willing as you
Have you tried the in-app tutorials?
They're tutorials where you can follow the step by step directly in Photoshop. It tells you waht to do depeding on what you are trying to do.
For example you can type-in mask in the serch bar and it will tell you how to create a mask
you can use this workflow to get rounded corners for any layer. I believe this is the best way to do this as this approach is non-destructive, meaning you can get back to any element of your project and edit it anyhow you like https://youtu.be/q34kz4HuwTo

Learn the best way to round the corners of your image with Photoshop. Plus how to add a border around the image after rounding the corners, and how to save your image and keep the corners transparent so it will look great on any background.
► Written tutorial on my website: https://www.photoshopessentials.com/photo-effects/how-to-round-corner...
Go to the help menu and lauch the hands on tutorials

yet, for this Image I would try creating corner shapes to place above your design
If you type "mask" and then "all results for mask" you'll get this hand on tutorial ("get to know layer masks")
It's really easy to follow

once you've done it, you will understand all the YouTube tutorials better because you've done it before
thank you all for your help❤️
why i cant draw on photoshop on my drawing screen and i can draw on ms paint and paint sai?
What happens when you try to do it? (I can confirm it works on my end) Is it a proper graphic tablet with a screen, or is it a touch screen? (as in integrated in a laptop)
a screen drawing tablet Aka graphic tablet with a screen
OK, I got one too. It is supposed to work. Can you explain what happens?
i can select options on photoshop fine like brush and bucket tool. But , when i try to draw with brush or any options it wont work at all
Can you send a screenshot of the whole PS window (with the layers panel, file tab... everything) while you are trying to draw? Make sure the graphic tablet is connected (but you can send a screenshot of the computer ie: duplicated screens)
i will try

here it is

ok

Because I can't really what's happening and also I don't necessarily need a video
First of all your layer is locked, you can't draw on that
have you tried on a new layer?
See my screenshot
yes
Have you checked the settings for Photoshop? in your graphic tablet?
Here are mine

any thing bizarre there, like Window ink not ticked etc?

no because i cant make it work for some reason

Maybe it's something to do with the tablet then
Some programs are optimised for a tablet (Photoshop is one) other programs aren't and use the tablet like a regular mouse (MsPaint is one)
You'll need to download the newest drivers for the tablet and make sure you have access to the settings
What is the make/model of your tablet?

I am not super familiar with them, but I am pretty sure it's supposed to work. In your message it says it doesn't recognised as plugged in. So if that's the case, you need to resolve that with them first, because it's definitely not normal
If it's a Bluethooth connection, try to plug in with a cable instead and see if it works better,
Ceratin options in Photoshop work with pressure, and some not. For example brushes work with pressure, and selections don't. That's means that it seems to be a pen issue, more than a tablet issue, it looks like the pressure isn't recognised
it is not bluetooth connected
You need to put it forward Ugee first if it says it's not connected
There is definitely an issue there that has nothing to do with Photoshop.
Scene: Emma and Jake walk hand in hand, symbolizing their journey of growth and love.
ctrl+;
Hey! Does anyone have tips for cleaning up an image like this?

I tried vectorizing it but really didnt like how it looked (because it rounded the edges), is there any other way of doing it?
Thanks a bunch in advance! ❤️
"Remove JPEG Artifacts" Neural Filter is actually pretty good - I think you should try it!
you could also make a color range selection (given your shape/icon/logo is black and white and turn selection into a path, but you said you tried to vectorize it already?
Yeah, vectorizing sorta worked for me, like I said it rounded the edges which are meant to be sharp
Filter>Neural Filters>JPEG Artifacts Removal
And manually going through all of my images (I have like 50+) would be a headache
How exactly did you approach vectorizing? There is no direct tool to do this in Photoshop...
Another question would be: do you want to get a vector file out of this?
Yeah, I did it via illustrator, also I tried using https://vectormagic.com/ which basically does the same thing

Easily convert JPG, PNG, BMP, GIF bitmap images to SVG, EPS, PDF, AI, DXF vector images with real full-color tracing, online or using the desktop app!
The end goal is that, yes, but I believe due to the jpeg artifacts and the low res of my initial image the vectorization algo doesnt pick up the sharp edges, so my plan was to use Photoshop to enhance the image quality and then vectorize
can you drop a sample of image you want to vectorize?

ok so I got quite a nice result in Illustrator. I picked the black and white preset and in advanced settings I moved paths and corners sliders to 80-90%. Still needs some manual cleanup but it's there!

Wow, this looks great!
I'll try it myself in a bit
Just to be clear, which part(s) need manual clean up in this example?
From the screenshot you shared everything looks perfect
in my case, there are some stray points and the rounded corner at the top could be smoother. easy to do manually
Can anyone help? How can I edit these two pictures to have the same lighting source?

can anyone tell me how to make this smoke?

hello, can someone give quick tip how do cut out these parts? i typed "Test" and now i want to cut it half in some way. I have tried in my way but didnt work as i wanted. Maybe you guys are more educated and creative to help me out.

Either find an image of smoke and composite it or paint. (Or a bit of both.)
Add a Layer Mask and paint with black on the mask. Main menu: Layer > Layer Mask > Reveal All. Select the mask and then the Brush Tool. Paint on it with black to hide pixels. Paint with white to bring them back.
Is there any way to move only selected parts of an image across all layers instead of everything being moved at the same time?
Say more.
Share screen shots. Describe the goal.
Any ideas to make mussolini's suit more suitable (darker) so it is similar to the other great figures?

Adjustment Layers... Levels, Hue/Saturation, etc etc.
Thanksz it worked
I've got a Smart Object which consists of a text layer set to Multiply blending mode w/ some layer styles applied. Unfortunately, this is making the Smart Object also set to Multiply blending mode. Is there any way to get it to apply a separate blending mode to the entire object without rasterizing the contents?
uhh hey
is there a way tix his hair and seperate it from that collision with the background

This is what's inside the object!

I figured it out. Adding a layer below the text for it to multiply onto removes the need for the Smart Object to get its color values from comparing the layer below (thus necessitating it is also in Multiply)
composite paint?

Does anyone know any tips on how to place an object in someone’s hands making it look realistic
I want to add a box into someone’s empty hands
For example I want to add this Rolex box into this man’s hands making it look realistic and the lighting etc

Where can I find my saves. Like if I save a project and want to go back to the latest save where do I find it
Previous saves
unles you were creating separate files i don't think you can revert to previous ver
i think PS stores undo in psd files but that's limited to what your system can handle
Versioning is only available when you save PSDC (cloud format) and save in the cloud. Otherwise, you're responsible for saving iterations.
The first thing you'd need to do is find assets that are similar perspective. While lighting/shadows can be more easily "faked", perspective is much more challenging. At least with something like this.
how can I achieve a similar effect as this?

it looks like every line of text was blurred
probably text was converted to image and every line has higher amount of blur
And keep it easily editable? Proabably tough. It looks like each line has a different Layer Style > Stroke... with a different Stroke Size applied.
yo so im trying to make it so one of the buttons on my pen does undo on photoshop but it also registers as the "move" tool
is there any way to make it so it only undoes the stuff im trynna do
Perfect. I'll try to convert lines of text to an image and blur them to achieve a similar result.
Not sure a Blur is going to do it. I think you're going to need a different Stroke Weight for each line (getting larger as it moves down to the bottom)
Ok that make sense let me try it now
So I'm working on this photo and so far I'm really happy with it except for the smoke trailer, it doesn't look good with the photo but I'm not sure how to improve the smoke trail, I used generative fill but should I find some png's of smoke trails that might make it look better?

I removed the fire part since it didnt look that great
What about growing selection and using blur within selection
The other thing comes to my head is bleeding edges
Old ways of creating game textures
Were you had to bleed edges cause otherwise you had artefacts
uhh hey
is there a way tix his hair and seperate it from that collision with the background

how do i remove the black background?

i would like to make a png with just the traces in black and white, someone can show me how?

Find the original and make an easier background...
But at that point, you may as well just remake it using a threshold layer
Kinda tough to isolate that...

something like this would work:
But @ripe quest's result was way better! 🙂
You know we'll suggest Generative fill....

Either that or remove the top of his head entirely and give him a new haircut
...or hand draw/fix it.
Yeah it looks a little bit thick, like santas' beard! I'd just run the gen fill again and find something a little lighter
Alright, do you think it would look better if the smoke was more darker or lighter?
Or is the current shade good enough?
Just less thick...

Ty if im not abusing how would u change the name from victor heitor to vitor elves
Gave +1 Creative Carma to @ripe quest (current: #3 - 1733)
Learn a lot from this ty ❤️ ❤️
I'd suggest you delete the existing text and re-write the title.
okki doki
again, this sort of logic
Done ty very much guys
alr
Same as the last time I answered you:
#❓ask-a-question message
Oh alr, thanks for the help 👍
Gave +1 Creative Carma to @sly hawk (current: #7 - 800)
That's very amazing
THANK YOU JAMES! ❤️
Gave +1 Creative Carma to @sly hawk (current: #7 - 801)
If i wanted to cut the hair in the front part on his face
It won't be very hard
Either generative fill or manually somehow
You done the hardest part
Thank you
how do i slow down the animation i made in the export
Why can't I choose what I grouped?
When I select one item, it becomes the entire group.
Anyone know how I can achieve this worn cardboard look around the edges of a picture?

And also if anyone has any suggestions for textures that kinda mimic the whole vintage look
hello guy's i try to get a free photoshop program any way to get ?.
There is a 7-day free trial at adobe.com
Hey, could you show me the SS example of your problem, so far i could only think you might have missed or messed something up in layer selection, layer order, locks and visibility, group properties and layer mask.
and if you want to select one item you could just use the move tool (V) it will allow you to hopefully select and move individual layers within a group without ungrouping
Also check if its a smart object or not
well thats all the things i could think about without seeing the image you are trying to do, hope that helps.
is that the same image you are trying to apply a vintage look upon?
create a new layer above the current image, fill it with a base color that matches the cardboard color, add a texture and blend it to (i think multiply or overlay in the blending mode), and then just use eraser tool to simply erase and just leave the un-erased parts around the edges.
Once that is all done you can have something similar to the image you sent here, you could edit the stuff later on and polishing it according to your likings in blending modes by changing the blend or color or lighting etc etc.
thats the easiest and fastest way i could think of.
Thanks, anything in particular you’d recommend searching for as far as textures?
Gave +1 Creative Carma to @native shard (current: #850 - 1)
if i could see the image you are trying to apply it to, i could give a suggestion that might match it
unless its a private work i dont mind
Cool one sec I’ll send it
alright
I still have a lot I wanna work on but as far as sci fi vintage vhs vibes here’s where I’m at

Ik the text looks bad rn that’s just my first attempt 😭
woah, i dont know what could go along with white and brown at the same time
for your first attempt thats a pretty well custom made text, dont sweat it.
so you wanna apply on the entire image or just the small part of the image?
Mainly just make the edges look worn down, and then if there’s a different texture I can apply to the rest of the actual image I’d be down to apply that too
Yea I’m more just trying to figure out composition, like where to put it and what color and stuff. But i imagine I’ll figure that out if I give it enough time
i think black would go the best for this, here is a image i got from google that you could try directly and apply

Sick thanks
or just try and make your own black one if this doesnt look good
after all you might as well practice the steps i mentioned earlier
feel free to ping me if anything else!
I went a little grunge but I think it works

Had a question to see if anyone else is experiencing this issue (non beta) related, i've already submitted the request using the in-app feedback, but seems as if photoshop freezes for a little bit when first opening it / when opening a file, i'd say for a good 2-5 mins maybe a little less.
oh, i see, you seem to have changed the font too, is that what you want as for the borders? or are you just not getting it? (i can try it too if you want, using the same image i sent you)
I haven't had it, but I would say sometimes Photoshop takes quite a long time to load, particularly if you got a crazy amount of patterns, brushes etc. Particularly if those patterns and brushes are big (in size)
So sometimes, it can feel like it freezes but actually it's just loading things. Maybe what you got is a real issue, difficult to say now
yeah i was thinking it could've been that, but i really don't have a whole lot, it's almost a fresh install since i just got back into it like 2 months ago.
Otherwise, I have had very little frezes and crashes using photoshop, particularly with the recent versions. It has become extremely rare for me for at leat a couple of years
I work a lot with interior design companies, and I create a lot of patterns from artual artwork. Sometimes that artwork can be something around 4000 px wide and in a collection of colourway. You see where it's going.
Brushes (I'm a hoader) is another issue for me, but while I always take the extra step of cleaning my patterns folder at the end of a project, I am prepared to live with the downside of having a ridiculous amount of brushes. 🙂
All those things (the presets) can be downloaded and reloaded later, if you want to test things.
The isue now is that in previous versions of Photoshop, everything was located in the preset manager, so it was easy to keep tabs, but now, those presets are scattered all over the place
right right, yeah it makes sense.
Anyway, not saying that it's your issue, but it's a common issue.
right right, yeah i just got back into design 2 months ago, after having a family and buying a house and it became my full-time job just recently, and it particually only opens the moment i go to open whatever image/psd/ folder etc
Other stuff to take into consideration are your performance settings (in edit>preferences>performance) particularly the GPU settings, and the use of scratch disk, also in preferences
Like exactly right when this module opens

but once it unfreezes it doesn't do it anymore unless i close PS as a whole and reopen it again at a later time.
It seems like a disk access?
any of these opens it happens with, don't mean to clutter the chat I'll delete if need be just specifying which it occurs with

See that link, it's always very helpful
https://helpx.adobe.com/uk/photoshop/kb/optimize-photoshop-cc-performance.html
and
https://helpx.adobe.com/uk/photoshop/using/performance-preferences.html
another one is the performance troubleshooting link:
I'll take a look at them, thank you for sending those. used PS for many years before my break and this is the first time this has ever occured.
To be fair, Photoshop has become a behemoth as well, and while it can run on a fairly modest computer, you still need that extra oomph
and i thought it might've been a PC ISSUE but wasn't that either, literally last week upgraded everything about it, so kinda confused me a little
If you keep up with all the versions, there are generally improvements upon a new big version addressing exactly those issues as well, so make sure you don't skip those "in-between" versions
And it's OK to clutter the chat, it's what's it's for!
Right, using the latest version as we speak. it's on auto-update as well.
it wouldn't be a scratch disk issue would it 🤔
I could be a consideration! I have mine on SSD disks as they're faster than standard disks (also external disks are always slower)

hmm, so weird. cause mine is on the same thing.
Any good site to get free images to use for photoshop no royalties, being able to use for comercial purpouse too like everything free no string attached?
Hello, does anybody know how to do this distortion/spikes in ps?


i can provide more examples
around the arms here


is it about the reddish glow or aberration?
anything specific about what you are doing or your canvas? when does this happen?
nonono the distortion
around the character

@serene coral you can see it better in the bathory album cover
I'm not sure if I see it but to me it looks like a displacement map or liquifying with a small brush
oh okay
Hello, can someone help me? I updated my Photoshop today from 2023 to 2024 and since then the normal map generation has simply stopped working and I've already tried everything but I keep getting this error code even though it is activated. Strangely enough, it always happens with the 2023 Photoshop functions
error code: For 3D FUNCTIONS, ´´Use graphics processor´´ must be activated in the performance preferences. The graphics card must meet the minimum requirements and, if necessary, check whether it is working properly


For printing, i need a white border around this poster of a certain amount of millimeters, but no matter what i do it only measures in pixels. Does anyone here know how to put it in millimeters?

Hey, maybe Reset Photoshop Preferences or Test/Verify Graphics Card Compatibility
right click on the ruler and select the measure you need
Hey, open this poster in a new document, and then click on millimeters

or just do what wertos says
the Test/Verify Graphics Card Compatibility says that

its says compatible
and did you resent preferences?
yes and still not working
i question too a friend and be him working too not
do you happen to have any plugins that is of 2023 or something
dang, well thats all i could think of
but i think adobe has says 2023 always does the 3D options got deactivated but no more infos because when is down i dont know
Whats the issue you're having?
not me, zomy does
OK. Please don't ping the staff. People can ask questions and when someone is available to answer, we will reply.
okayyy
well i dont know that, i barely did any projects on those
i usually work on product photography and adverts (and then do some random hobbies which i put on insta lol)
The 3D functionality has been discontinued from Photoshop and Adobe has transitioned to the Substance 3D Suite of tools.
because i was using the normal map generator in photoshop alot because i make some hobby 3d modeling dirtbikes and i made always my normal maps in photoshop and i dont know other normal map generators was so good to others
so no more normal map or bump map creating in photoshop? right
uff :<
2D images can still be created with Photoshop. If you're looking to visualize these items in 3D, I'd suggest checking out Substance 3D (or other similar apps).
The 3D functionality in Ps was never really as robust as other, standard 3D editors; effective use required a lot of other tools. Building all of those things into Photoshop didn't really make sense. Thus, Substance 3D.
because i made this hole normal map in photoshop and on the 3d modeling bike looks realy good

I have nothing further to add other than what I've said.
ye ye i understand
here you can see a bike from me with a photoshop norm creator #🎨share-your-work-archive message
whats the best way to extend a person's coat/hair/hands ?
do yk how i could replicate it
meaning?
yea according to geforce exp its already updated
So i want to use the image of a person, but the hair is cut off, also one hand is cut off and a piece of clothing is cut off.
I have the Hair, Hand and clothes fully visibly on different pictures but from different angles.. I want to ask what's the best way to approach this
When select my object and invert it to clear the background I get this line appearing, I don't know why? There is no feathering.

well, so is the current person facing forward? and the other picture of that same person also facing forward?
i was thinking perhaps you could end up using object selection tool to select the fingers and CTRL+C and CTRL+V and paste them accordingly and make sure it looks as logical as possible, and then using the pencil tool for the touches.
Could do the same for that piece of clothing (assuming thats the same piece of clothing in your picture-2), as for the hair....i think adjusting that using Object selection tool and copy/paste could give you something good if not perfect
with enough given time you could:
- Zoom in for re-touching
- Blending options
- Brush tool in small size to add some touches on the hair for example
- Free transform multiple times to see which size looks the most logical and best fit.
so mostly copy-pasting, and then retouching ?
which line are you referring to?
ye, selecting the certain parts and copy/paste
because its a 2D image, its not like you can rotate a finger 😂
and suddenly magically bring out the behind part of the hand which wasnt even showing in the first place.
@native shard can we jump in dm's ?
umm
ok
although i feel like someone later on might benefit from this

also will i get banned for taking these things to dms? 😂
oh, could you show me what the original image looks like?
lol im not sure maybe we can ask someone lol
hi, please anyone have an idea how to cfreate this glowing edges watercolor/semi transparent effect? the original piece is somehow edited photo. i tried to recreate how this look can be achieved and i cannot get in any way that white glowing edge. the first image is reference and second is what i recreated


just to confirm
first you use object selection tool
after that what exactly did you do?
i went round all the edges fixing up what the selection missed
inverted the selection
and then deleted it
I tried black borders but couldn’t get it to look good
Okay since all "free to use" stockimages sites have either hidden agendas or bad photos.
Is there a site you sunscribe to qhere you cannuse all their images in commercial use like once you paid you dont have to worry off royalties oe licenses etc?
Im willing to pay as l8ng as I dont have to fiddle
Good afternoon guys! Does anybody have a anwser to this? My GC Is enabled, drivers updated, checked at preferences, but this still happening! NVIDIA GeFoerce RTX 3070

<@&548221840750018590> can we remove this spam
it looks like you're trying to create bumpmap/normal map
those features been discontinued
Really? Still shows on my filters!
WOW, bummer!!! Thank you for the help
Gave +1 Creative Carma to @ivory rampart (current: #97 - 15)
if you need to create normalmap/bumpmap from picture you can use substance suite if you have it, or krita/gimp (free)
completely forgot about Nvidia plugin for PS https://developer.nvidia.com/nvidia-texture-tools-exporter

NVIDIA Developer
Allows users to create highly compressed texture files from image sources.
Interesting, I'll look into it, thank you
What spam?
it's been sorted
how is this pop out text effect done?

What stockimages sites has the least hassle? I'm willing to pay subscription. All theese free sites seem to have hidden rules.
Hassle? What does this mean? Take a look at Adobe Stock.
Hassle=struggle/problems
Yeah. Well, I think that's directly proportional to use case. The amount of stock assets you need, the costs of that investment, and final output will likely all potentially affect the situation. If your intent is to use the assets to mass produce merchandise, I think you're going to run into hurdles, hassles, problems and limitations.
You're essentially licensing people's IP to use in a certain way and regardless of the service you use, you should carefully review the license agreement to see if it fits with your use case.
If you don't want any limitations. Make your own images. :)
anyone know what these type of pictures are called?

Probably a "collage" but this seems pretty messy. Barely coherent.
Perhaps something like this can get you started...
I would love too but I don't have the best camera.
Well there has to be somewhere people get imagea from qince everyone uses photoshop
Do tou atleast know any site qhere I can either free or pay to use the photos on social media...I wanna photoshop imgaes and then show people on instagram tumblr etc..and I dont wanna have to pay royalties per image or like tag the people who made the imagw its such a hazze to do that per image. I rather pay l7ke 10-20$ per month to just download as many pics I want and use them, edit, play around, put them on my instagram etc.
If you just want to use stock to make image composites and such, any of the royalty free services would be adequate. Adobe Stock, Pexels, Pixabay, Unsplash, Freepik. However, just realize that thousands of people use this stuff to make comps and certain images are "overused." But regardless of that, I don't think you'd run into hassles with just basic usage to make your own layouts.
Version 25.4.0 lags horribly after a minute or two. Why is that? (I'm just using earlier versions.)
Hi. I need some help. On the latest version of Photoshop my external drive doesn't show up in the scratch disk preferences page, and Photoshop can't open since I don't have enough storage on my main drive. How can I fix this? It was working perfectly on older versions

how to check what font people use
It's always on. Make a selection and then go to Edit > Generative Fill... or open the Contextual Task Bar. Window > Contextual Task Bar...
Its not always possible. You can try the tool inside Photoshop. Main menu: Type > Match Font... and make a selection around the text. Or upload an image to scan at https://fonts.adobe.com
uber random question, there someone or a community in discord that helps with label designs lol
Describe "helps with..." label designs. Do you mean someone who can make something for you?
Well looking for creative insirption really. I have made some, want to modernise them tho.
If you post your designs to #📝project-feedback, you can get comments and suggestions from Community Experts and other community members.
Hello, I need help to do something stupid and I can't do it haha.
I just want to take my day off the 9th and put it empty without it looking visually horrible. Someone can help me, I tried some things but it didn't come out well

does it have to be using Adobe?
You're in the Photoshop server so most of the people are going to suggest things from creating with Photoshop.
If you're looking for technical help that is program-specific, you might be better off posting elsewhere. Such as in the server for the app that you're using.
Not really sure what this means but if you're trying to remove something, try the Remove Tool.
Okay so, this is something thats sounds really simple, but i cant figure it out. i need to switch the color of the trees from the black into a forest green (duhh) but when using hue and saturation its not quite right. the color isnt consistent and not the desired color i want. i cant seem to figure it out and im not sure if coloring it with a brush myself is the only way

Photoshop won't let me draw, it happens approximately every hour and I need to wait about a minute before I can draw. I've checked select area and brush opacity, they are not the reason. It really annoys me, can anyone help me?
It won't let me edit the text.
try filling it using color overlay layer style in normal mode, hue saturation is not the best way to manipulate black pixels
are rest of your apps or OS running fine when that happens?
Hey I need help rq. Im gonna sound really really stupid but i gotta ask cuz im really unsure. Why cant i change the size of the image in Photo Shop. When i click on it the image dosnt show the points in the corners of the image to resize it.
Ive never had this issue before but im just stumped
enable "show transform controls" in the option bar with the move tool selected 
oh i found the problem. i was zoomed in to much and didnt see the corner points. stupid me. srry
and ty
can someone pls make the background black

you'll have to mask the subject manually - the difference between the white sleeve and white background is not big enough to do it automatically
i don’t have the thing downloaded so any chance you can do it and send it to me pls
oh thank you
is this your image?
i sent you a DM, check
no
While I’m learning photoshop should I just learn the specific thing I’m wanting to do e.g sports posters. Or should I watch like a 3 hour video explaining the basics of everything revolving photoshop?
Personnaly, it's good to know what the software can do, even if you feel that it's useless, because you don't what you will eventually. You may concentrate on sport posters until someone asks you to make one with a retro feel and you don't know if Photoshop can create halftone textures or not, because you only learned about doing composites.
That said, you only need to know that it can do these things, and not necessarily study them in details. Once you know your onions, you'll know how to search for things. You'll never stop searching and learning, but knowing that you can do things with a software or another will help you looking for the right information
So I would take a full course first, and then concentrate on the aspects of your specific craft later
and 3 hours of video is really peanuts in the grand scheme of things. If you can get away with Learning Photoshop in 3 hours, please share your secret! 🙂
Yeah true because eventually I’ll might want to expand and do other things but then because I’ve only learnt how to do sports posters I won’t know how to go about doing it whereas watching a video that explains the software as a whole I’ll have an idea exactly like you said thank you 👍
Gave +1 Creative Carma to @vapid flume (current: #8 - 530)
Hi everyone. I want to make this drawing in to a vector and isolate it so that I can put it on a t-shirt. Does anyone have any ideas on best way to do this?

Just take it in photoshop and crop extra background then straight the image so that only that green board is visible
You can also make that black and white just to try how that suites if it's dull use smart filter to enhance the looks and quality
Then go to shop where tshirt printing work is being done or give order online with custom photo
According to me it will look good on Black or white tshirt depending how it's looking after editing
hey guys does anyone know why my 3D thing stopped working?
like before it used to be ok and i could make stuff like 3d text but now when i try to make a 3d text it doesnt work at all
and when i try making it 3d using other method it gives me this error

it says i have to use gpu for it to work or make sure it meets the minimum requirements
(i didnt update adobe photoshop since the time it worked)
What's your Gpu specifications
Do Ctrl+K if photoshop if opening and select the drive which have maximum storage


ok
In scratch disk select the drive which have maximum storage


Probably this will fix the issue
the one that has the most storage in general or the one with the most free storage?
Free storage
Just try what you were doing
Yes
Using laptop or desktop
desktop
Do you have GPU in your system
yes
Is that powerful
not really but it can handle games like red dead redemption 2 and atomic heart at minimum settings
Ok so in windows Search Graphic Settings
next?


ok
Then try keeping it high performance
Or else go to Nvidia control panel

In nvidia control panel go to Manage 3D settings
Then find photoshop and in that find settings of GPU keep high performance and check all settings are correct
Did it worked ? @unique burrow
sorry i was updating drivers and it cloesd all of my apps
didnt try yet im waiting for it to finish updating
ok im going to try it now
ok photoshop started a little bit faster than usual
good start i guess
Hmm
Yes
If that Don't work Mod only can help 😞 because these all things solved my problem
Really Sorry
Or search online something post of Reddit or Medium
Do you have cracked version of photoshop ? 🤔
creative cloud
Means not cracked one
i downloaded it from creative cloud
Try if it worked ?
nope it didnt
Hey @unique burrow !!
If that Don't work Mod only can help 😞 because these all things solved my problem
Really Sorry
Search online something post of Reddit or Medium
what mod?
Moderator
oh
Man i've been messing with this for like 2 hours and i cannot figure it out. Is this where i ask how to do something in pgotoshop?
I'm trying to make a mothersday card
It's a slot machine that says "You're my jackpot"
And on the reels which i've cleared i want it to say M O M, but i cannot for the life of me figure out how to correctly bend the letters so they look like thay're actually on the reels
I've tried distort, puppet warp, regular warp, i can almost get it looking right, but not quite
There's gotta be something im missing or an easier way, any tips would be awesome
That's actually a phenominal tutorial and i really appreciate the time you've taken to put this here for me
Unfortunately my perspective is a bit wonky, leme share a screenshot of what i've got so far
Trying to get that M to bend on that slanted reel

This is as close as i've gotten but it looks off and sloppy 😦

because you are working with low resolutions, look for files with better resolution...
Hello, could anyone help me a little bit? I need to make a stickman thats falling, but upwards, or like ascending up and i cant make it look right... Im rlly bad when it comes to shapes etc.

Does anyone know how i can make him look like hes actually going up instead of going weirdly down?
This wouldn't be a technical problem, it's a matter of studying and training...
Thats why im here lol
I dont know why it looks so weird, what specifically needs to be changed there
It would be more appropriate to ask in a drawing or cartoon animation group...
read walt disney books
Is there an Adobe discord for that or should i go somewhere completely else
Im not gonna make a career out of this and i dont enjoy this, im just trying to make a quick design and never come back to it
take an image of the pose, leave it faded, and trace over it,
just reflect it vertically and slighly rotate head and arms...

Thanks, Franck!
Gave +1 Creative Carma to @viral palm (current: #9 - 482)
Hi all, I am trying to take a stroked path over to a blank A0 canvas - I am getting scratch disks full - surely a basic outline can not be using my 16gb of RAM and 300gb of SSD?
Check the size of your document. You might have the units set incorrectly (2000 centimeters, instead of 2000 pixels). That's the most common issue.
I've done CM not MM
hahahahaha jesus
So i've been trialing windows on ARM and have gone from being cheesed off with it to thoroughly impressed now!
I want to know how to blur the image more so you cant tell what it is
please help
Filter > Blur... Choose a type of blur.
thank you
Is there a way to select a photoshop group the same way you can do CTRL+LClick on a layer like the image?

I can convert the group to smart object, then select that object and save the selection using Select > Save selection... but when I undo, it removes the saved selection.
Well basically if i am correct in trying to understand what you want to do with Hair shadow
First right click on the group in the layers panel and choose "Convert to Smart Object".
Click the "Add Layer Mask" icon at the bottom of the Layers panel.
Go to the "Select" menu and choose "Load Selection".
In the box, select "Layer Mask" from the menu and choose the layer mask.
Save the selection by going to "Select" > "Save Selection".
(i think thats the order of each, i will check in photoshop if incase you are not getting it)
Right, that's a somewhat more complicated way than converting to a smart object and then just doing Ctrl+LClick on the newly created Smart Object, then problem is, after I save the selection using Select > Save Selection... that action gets stored in the history of moves, so when I want to undo and go back to the groups, it removes the saved selection, does that make sense?

oh okay, that makes sense
Basically, undoing back to the Convert to Smart Object command will remove the Save Selection
i remember something called an alpha channel, although i dont have experience in it
i think what you are trying to get towards is most likely creating an alpha channel
true
did you try creating an alpha channel?
What I did was Convert > Select > Save and then opening a new empty document, loading the selection there, saving it on the temporary document using Select > Save Selection..., and then undoing on the original project, and whenever that selection was needed, I can reference it from tmp.psd but it's a duct tape fix, cause any changes to the document can't be dynamically updated on tmp.psd
Not familiar with this, give me a moment to search
hmm, i havent worked much on .psd documents, but maybe you could try paths? like after selecting the group you can click on paths and save it as a path....but i dont know how it will work after that.
perhaps alpha channel might be the solution
I searched for it, and are alpha channels just what masking something creates? The black/white/grey values that define what part of the image is shown, hidden or slightly transparent?
Creating these still seems to require converting a group to a smart object, and then making the alpha channel which will be added to the History of commands and therefore removed as I rollback to undo the smart object creation?
oh okay, i thought alpha channel would help with that, didnt know it would just make things strange, i think you could then try the path method
Yea path would work, but it requires me to manually select the path using the pen tool no? That's why I asked if the automatic selection of Ctrl+LClick on a layer could work the same way for Photoshop groups.
Thanks for the help, seems like my Duct tape fix, although definitely not perfect might be my best option. (Mostly because I'm lazy lol)
i understand the lazy part 

in photoshop is there a key input where it restricts the brush tool to angle degree increments?
ik holding shift restricts it to 90 degree angles but im wondering if i can make it shorter like 15 or 30 degree angles
mine actually rotates 15 degrees when I hold shift, interesting
could guidelines being present in the artboard effect it?
even if i dont touch the guidelines
I don t know but sounds unlikely, how are your guides placed exactly?

oh
wait
am I not supposed to be continually drawing the line
but clicking where point A and point B will be
Window > Brush Settings... Select a brush. Locate the Angle field... to adjust it manually. Then on the keyboard: left arrow, and right arrow should rotate the angle. Hold Shift while using the arrow keys to increase the rotation.

wait, are you saying you are able to rotate the brush tip while putting a stroke?
like manually?
i am probably misunderstanding that is not possible (manually)
Click once, press-hold Shift and then move the mouse, and click again; this will automatically draw a straight line between two points.
oh wait
you mean the stroke angle not the brush angle
no it can only be vertical or horizontal, you can use the line tool to draw diagonal lines in any angle
sorry my misunderstanding of your question
uh, why is my cat gone 😦
Because I deleted it.
that makes sense, have a nice day
The Brush Tool will "Snap to Guides" if you have that toggled on. View > Snap.... and View > Snap to....
Can someone help me?
I have a photo of a friend and he looks into the camera the same way frank ocean does here
I want the image to look just like that
I already set the contrast etc so the colors match
how can I make the same perfect effect so that it looks like it was taken on older cameras? any help would be appreciated


its not there g
Then you'll need to update to a current version of Photoshop.
oh ye ty
You'll also need to be signed in to an Adobe Account for it work.


You'd just flip and mirror the image and paint on a Layer Mask to hide half of the image.
Hi I have painted an elavation map, but I have ended up with a 1 pixel wide line of white pixels in my border, is there a way to get rid of those without going and handpainting over each of them one by one?

this is how it looks up close

Like can I do a border select but only inwards?
can u send me the full photo tho?
cuz i cant use generative fill, sorry...
why is this wallpaper not deleting? or why can't i even change it?
How can I get the drop shadow to acknowledge the outline like in the second image?


What would I look up on youtube as a tutorial? Sorry I am new to PS lol
Looking for advice on a replacement MacBook with a budget of around $1000. What specs should I be prioritizing?
stroke, tranform to smart object , drop shadow
save the background PSD to the desktop, right click on the layer, relink file
You may have lost the link, the smart objects are in a temporary folder, so it's best to save them together with the main PSD
you also need to press crtl + s to update the SO
this sentence right here was the solution
thank you so much
im dumb
Someone else in another server told me to change the shadow's spread and size settings and it worked, thanks anyway though
Gave +1 Creative Carma to @mental kiln (current: #103 - 14)
you need to work with higher resolution files, or redraw in shapes
hello guys,
i have a little problem with the new photoshop.
if i close photoshop before "export as png" finished. The photoshop just cancel the export.
its kinda different with old photoshop (maybe 2022/2023), where it will wait the process of export. is there a way / settings to set it?
bcs I did this behavior since photoshop cs2, so its kinda annoying now
yooo can someone help me switch a background from white to black on one picture, i tried doing it but it always is so buggy, if u can help me dm me ill send apic
Guys, pls help, Photoshop isn't letting me use the transformation tool, It says is an error of the program...
Save your file and restart the app.
Already did, it's been like this for two weeks now
What version? Help > About Photoshop...
It won't let me check
You can't access the main menu... ?
Try to uninstall/reinstall.
Nope, sorry to bother btw
Open the Creative Cloud app and remove Photoshop. Reboot the machine. Launch the CC App and reinstall Photoshop.
Oki Doki, ty
Gave +1 Creative Carma to @ripe quest (current: #3 - 1740)
You could try deleting the Preferences first...
How can I do that?
Edit > Preferences... But if you can't use the main menu, you'll probably have to start Photoshop and hold down Shift Ctrl Alt as its starting. It will ask you to reset.
Oh wait, I was able to open the system info
24.1.0 20221206.r.166 be4691b x64
Just open the CC app and do the update.
See if that fixes it.
Oki Doki
It says "updates have been disabled for this computer" why does that happen?
Am I banned or smth?
No idea. You should just be able to update the app.
Damn:( I'll have to look for another way to finish my project, but tysm mr/ms Humann!
Does anyone know how I can recreate the look of this? I've been experimenting for hours and no result comes close. I'm a beginner

I'm so frustrated
I wrote some text with a cool gradient, but it got messed up when I used it as a clipping mask. The gradient looks good without the mask, but I don't like that it turns the whole background black with the mask. Can you help me fix it?
With Clipping Mask

Without Clipping Mask

but without it makes the whole bg black
but it makes the text look good
I hate photoshop and it's tools
I'm talking specfically about the invidivual images, I'm struggling to get that negative colorless look and I know its not a simple levels adjustment, any tips?
you can achieve a similar look by applying noise in smaller sizes and upscaling it using hard edges algorithm, (or maybe using half tones but not sure if it would be the same) then use the curves to increase the contrast a lot, decrease the midtones, but I think that the strong look they provide are from the photographs themselves, not the vfx
I recommend also posting your layers, showing how you created that gradient etc. for further clarity, I personally can' t understand where that black bg comes from based on this information
I am having an issue making a circle. I made my vertical and horizontal guides. I have the elipse tool choosen. My problem is when I start int eh center of my project and hold shift and pull it doesn't pull from the center out to make a perfect circle, it pulls from the end. Here is a picture
https://gyazo.com/7417d1bff267e28139964dd7fe2f7306
Can anyone tell me what I am doing wrong. Here are my settings
https://gyazo.com/155ca3df0e8925520f4f6325269ba07d

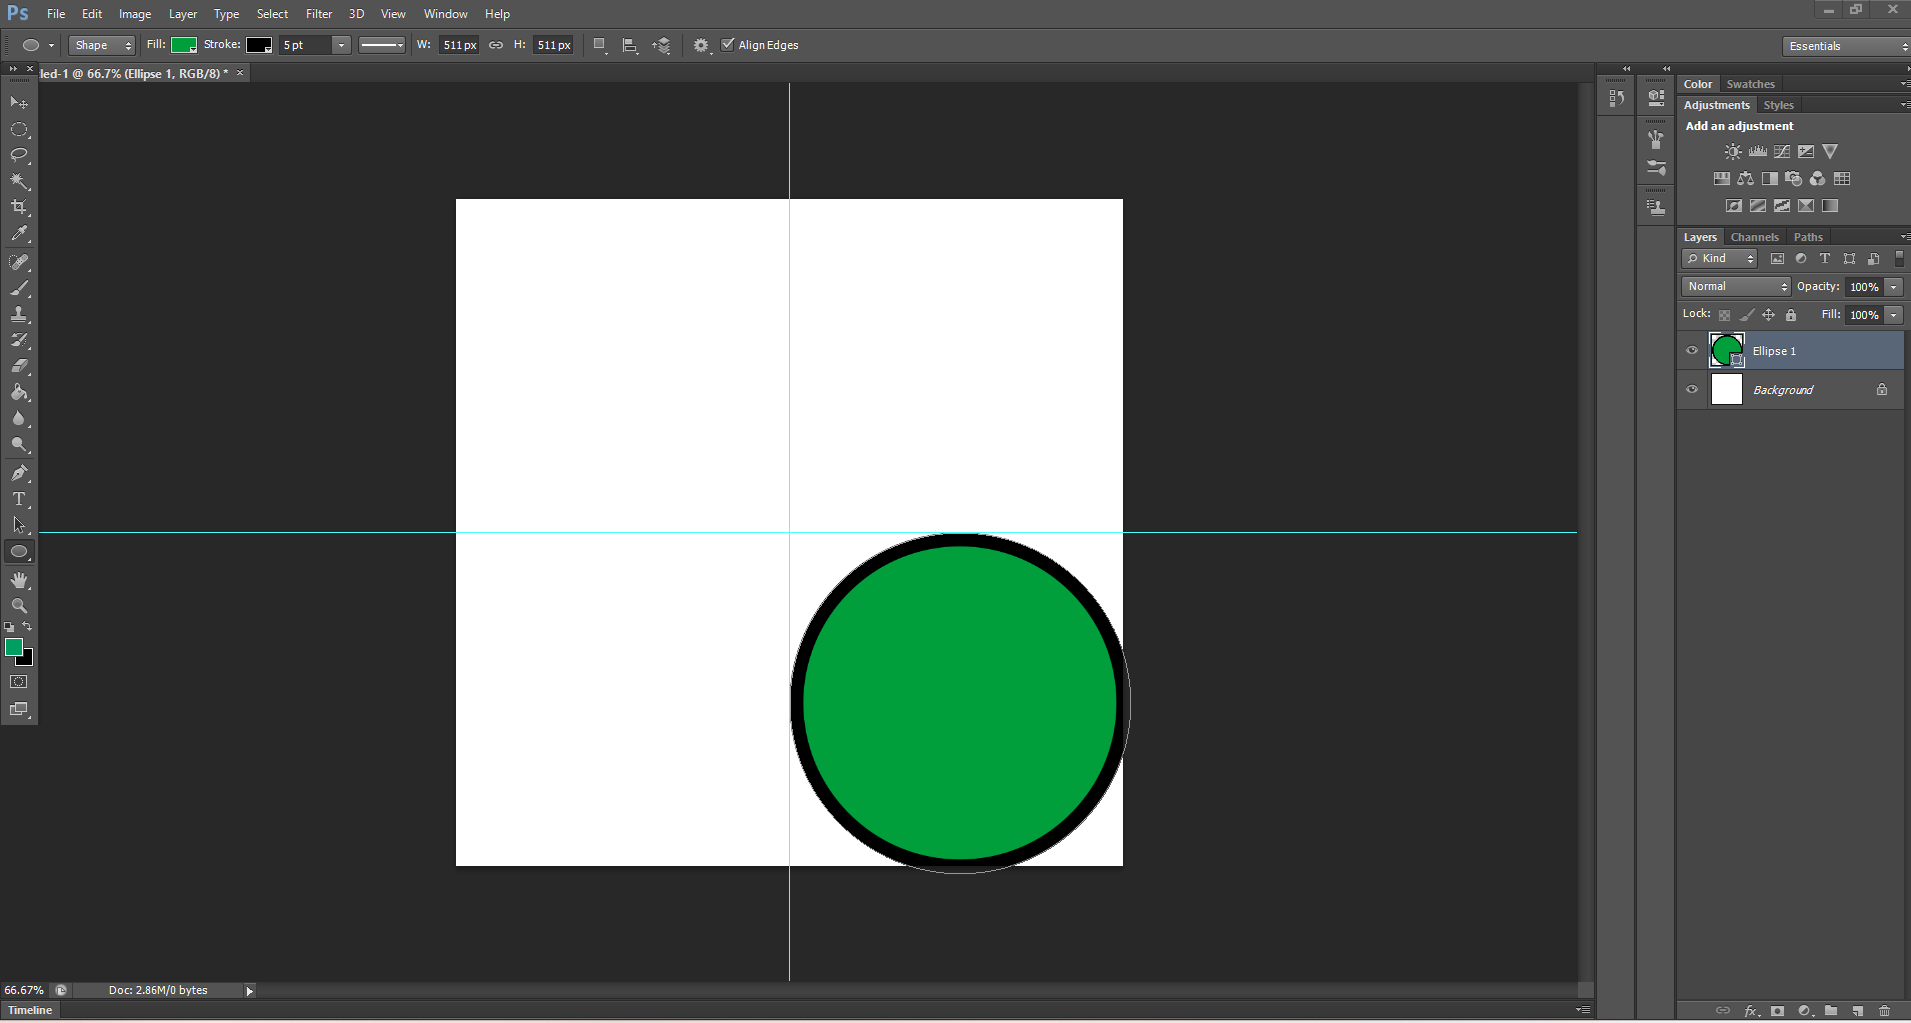
try alt+shift+drag
how do I use the hardedges algorithim?
I got you


I think I now understand what is going on, gradient map naturally samples every layer below it to apply its effects, including your background. What happens when you duplicate your gradient map and clip it to both your text layers?
like this

it gives me this ugly yellow blur

I almost want to end myself because of it
can you upload the psd if it is not a problem, maybe its just my brain not working, my ps reflexes may be able to solve it
I'll dm it to you cause I dont want people stealing my work
okay
Hi
hey man, pretty cool work you did so far
why wont photoshop allow me to set my custom resolution

I never had it, but I found that
https://helpx.adobe.com/uk/photoshop/kb/invalid-numeric-entry-integer-96-8-required-photoshop.html
are you on the latest version?
I know it's not the exact same error, but I couldn't find one with the exact same error as yours.
yup
Did you add a plug-in or other software that could hvave messed up with the registry?
Maybe this one helps more?
https://community.adobe.com/t5/photoshop-ecosystem-discussions/ps-video-render-problem-document-size-with-render-size-doesn-t-same/td-p/12566171

https://community.adobe.com
My document size is 1792x3000 but when i want to render a video, it shows me 1792x2304 and when i change it as 1792x3000, showing me warning dialog it says " An integer between 16 and 2304 is required. Closest value inserted." What is this? is this too much big for working on PS video?
Apparently it has to do with the maximum height and width of the video codec you are trying to use
I didn't know that (I never tried to render a really big video though!)
Hi guys and girls.
I'm allowed to choose a new laptop for about 2k.
My choices are:
Microsoft Surface Laptop Studio 2 - i7/16GB/
512GB/GeForce RTX 4050
Vs
Microsoft Surface Laptop 5 15" i7/32GB/1TB
BLACK (onboard Intelx graphics card)
I'm hoping someone can help me choose either 32 gb no gpu or 16 ram with 4050 gpu
hey thank you so much man
Gave +1 Creative Carma to @vapid flume (current: #8 - 531)
I am not techie enough to advise on a computer, but as a general rule I would always opt for a "real" graphic card rather than an integrated one. as an an Nvidia in tha case.
GPU in Photoshop is critical but not as much as when you use - say - after effects/ Premiere, or a 3D program. However, the more you can have the better. Fast memory, Fast (and fat) drives are also important (as you'll be relying on scratch disks as well)
That said, that depends what you want to do, apart from Photoshop. If you are a light Photoshop user and an Illustrator user as well, I would say RAM is more important than GPU (within reason), if you're a video or 3D user, GPU is crucial...But I may be rebuked by someone better versed than me on this one 🙂
J
Just for info: here are the requirements for Photoshop
https://helpx.adobe.com/uk/photoshop/system-requirements.html
You'll probably want to have a look at the "recommended" in your case...
Wauw. Your amazing 🙂 thanks! Im a light user I suppose. Touchups etc so nothing dramatic (yet). That's why I was wondering
If I were you, I'll wait to have more advice from other people (You may want to ask again on a week day, there are more people available)
I have an old-ish quite powerful laptop, and have no issue with Photoshop really.
Processor Intel(R) Core(TM) i7-10700K CPU @ 3.80GHz 3.79 GHz
Installed RAM 64.0 GB (63.9 GB usable)
Graphic Card: NVidia GeForce RTX 2700, 8GB RAM
But I feel the blunt when I'm doing 3D
I would absolutely go for an Nvidia versus an integrated GPU though...
Okay thank you so much. Been helpful 🙂 I like to do some blender aswell so I think I'm going for the 4050 Surface studio 2
Regarding Blender, I analysed the situation, and know that only certain functions depend on the GPU (like rendering) but not all.
That means you can reliably model even on an entry level computer, but rendering will be a nightmare. Other 3D software rely on a GPU for most of their function, so do software like After Effects.
Something I would look into is what others say about the models you are looking at regarding ventilation etc (powerful fans?)
Honestly for 2K I wouldn't be too concerned, but know that while Surfaces are very nice machines, they also tend to be on the pricey side.
see if it helps
https://www.youtube.com/watch?v=zPhT1YqrLSw

This video discusses the different options available for and tries to assess the best computer for blender.
Chapters
00:00
00:25 - What budget is a low/mid budget machine?
01:23 - minimum spec for Blender?
01:58 - Blender on very slow machines
02:21 - What to do if you can't afford a decent machine
03:33 - Main Components
03:50 - CPU central...
https://community.adobe.com
I think you need a bigger budget. Puget Systems makes power machines for serious Photoshop users. They also test & compare top rated equipment. https://www.pugetsystems.com/solutions/photo-editing-workstations/adobe-photoshop/ https://www.pugetsystems.com/solutions/photo-editing-workstations/adob...
does anyone know how to make this type of distortion?


@serene coral could you please specify on how i can make it you said its displacement map
Hey guys! do you have any tips to achieve this look (not for the grain, there is other things i believe) thanks!

I was talking about the first image only. I can't see anything common about all 3 images you sent?
im not sure if you can see it but theres a distortion of some kind
if you view the first one here you can clearly see it around the head & arms
the photo is blurry and messy in general, you can achieve it in Ps by applying blur of your choice and use overlays
yes and I believe this was achieved by using a displacement map
so i create a mask and use displacement map?
or do i use a pen tool
ima try it in after effects see if i can do it there
also, is there a way to recreate the redish glow in the second image
maybe try researching how displacement maps work first, it will make everything much easier
essentially, you want the red overlay on black parts of the image so it gives you the idea what the proper blending mode for this is. I would duplicate the image, blur it a bit and make it a duotone using your preferred method
Why are the tools not working on one photo but i switch and they work perfectly fine? I have hand selected and it shows the normal cursor
on PS
nevermind i think it transferred back to lightroom..
obviously did that accidentally so how do i do it on purpose next time if i need to take it back to lightroom before exporting?
Hi
hi, please anyone knows how to achieve this edit from a photo? sending the original vs edit


you are trying to achieve which one?
left to right
or right to left?
please give more details, if its right to left then it seems using the blur tool
i am trying to achieve left from the right
and changing color saturation
yuh
then just try that
although i am not sure you will get the exact results
(although you are just ruining the photo, idk why you would do that lol)
well i am trying to make an abstract art from it, im just trying to figure out how this effect can be achieved. i want to use it for my own art. here is the final result of person who created it.

here is what i got so far... however there is no way i can achieve the final effect... something must be with the blending options which i do not get


can anyone do little work for me it will take legit 2 minutes
maybe try emboss
emboss might give that same effect
in the head area, over here
from the middle step ive sent above it looks like that the person on the picture was not cut out and placed on the background. to me it seems like the picture was edited as whole. but i might be wrong
definitely the picture is duplicated and one layer is distorted with wave, the bottom one is kinda semi-transparent
i realized that here in the edited picture you are trying to achieve, there is borders on the boy and his head especially, white ones to be specific
and its like his bulky hair was never there


i believe it was achieved with median
see the difference?
this is very strange to me, im starting to think he didnt do the blur effect directly
it is a median.. i have the same, but after that point i am stuck
and did something before it was achieved
oh
sorry man i cant think of anything, i have never tried to technically destroy an image like this in order to know how it must be done

anyways thanks for replying at least:) i am absolutely desperate about this 😄 working on it for 2 days already
Gave +1 Creative Carma to @native shard (current: #403 - 3)
Hi guys, does anyone have experience using Lightroom or Photoshop on iPad? Is the overheating issue effecting all the models? I want to buy an iPad, but heard that many people struggle with the overheat after 2 minutes even only viewing images. My friend has the latest version of iPad pro 12" and latest version of os and has the same issue. Screen dims to 50% to prevent cpu after 2 minutes.
I would by the iPad for using lightroom so would be crucial to know, but I can't test it beforehand
Any idea how I can add creases/folds like these into my art?

if theres a brush or something I can use for this, that would be helpful
Is it possible to achieve this shape by using Polygon Tool? If so, how?

google > tissue/paper overlay > multiply layer
photoshop only allows rounded corners in the rectangular shape, ideally it would be done in illustrator which allows you, but you can use some tricks like blurring and then choke using levels, it won't look similar....
but you can simply redraw over it using the pen, that's what I do most
Will that work for cloth material too?
Sort of like a fabric
yep
I was wondering if anyone could help me with this. So i want too make a glow on the edges of the svreen so i can have it asa glow effect on my stream i have made this but i want it too be thwe same on all sides

how do i do it
Could someone help me fix the necks in this photo?

stamp tool
gradient tool
How can i make these tail lights look real? i drew them in to be how i wanted but they look obviously fake

how to fix that? Just downloaded, and now i have this problem

overlay blured brushs
reset workspace

Not work
reinstall the software
Ok
i have tried but then it is almost just like a circle in the middle of the screen while i want it as a glow like a square instead of a circle
i do that, but i have the same problem
radial gradient
sorry I don't know how to help
how do i add that
but now it is just a circle i want it to be in a square
hello, why can't i delete a selection with the lasso here ? using delete key or backspace doesnt work

you are using a smart object, it does not allow this action until you rasterize, select your layer mask and paint
It's a Smart Object. An embedded file. You would need to enter the SO and edit it directly. Double-click on the layer thumbnail and it will open up in the new tab.
ty rasterize worked
Gave +1 Creative Carma to @mental kiln (current: #97 - 15)
Rasterizing the layer isn't always the wisest option but that's fine.
It really depends on the workflow.
okk I see ty
Don't 'delete'. Use a layer mask. - Maybe make the gun a smart object before applying a the 'new' mask to it.
wdym
Holy crap thank you so much that was very detailed
james for the win
I was able to make it perfectly how i wanted @sly hawk your amazing

Thank you
@sly hawk would i be able to go in a vc and get some very specific real time help?
I may not be able to help. Can you explain loosely what you're trying to do?
Sure thing
So im trying to get these headlight housings on the left image and i have been able to crop them out and put them over it but i cant transform them to make them look real


I did a drawing of what it will look like just trying to make it look real

This was the drawing over a different image
And this is where im at but i cant seem to transform its shape properly

Are you holding CNTRL and when dragging the edges of the light around to 'skew' it?
I am not
Ive gotten two corners to match up pretty good but i just wish i could make the layer transparent and cut a piece off

Oh okay sweet thank you again james lol
I did manage to find another way of doing it but both work

i turned the opacity down on the headlight i plopped on there and then lined up two opposing corners and lasso'd the sides to fit
now i can make the bulbs from another picture after the other side!
Thanks James!
Yeah, I can see the difficultly in it.
For sure
Im getting that body kit in that color so i had to figure out how to change the color realistically, then make those custom lights i have a friend making lol
just trynna see what the finished product will look like before i spend 15k on it

Not bad. - Do you need to make the inside Blue?

@river otter - This can be done with a 'gradient mask'
How could I make this selection "straight"? I got it from ctrl clicking on the layer

I actually wanted it black lol
I just finished
Final product vs drawing


Thank you again james, lowkey could not have done that if u didnt help lmao
Draw a negative selection box to 'chop off' the messy bits.
Woahhhh
Gave +1 Creative Carma to @sly hawk (current: #7 - 803)
So what are ya making anyway?
Cool. It should be easy enough to swap the actual lightbulbs if you want to...
I animate these car stereos, ripped a jpg from the internet and I'm just prepping it for animating, AI upscaling etc

An old one but thats one example
Oh fancy. Looking good.
My lasso and select/transform border is yellow for some reason. Why? It's never done this


oh its just dark bg +a different version im used to nevermind
how would I put an image in the black area of this

图片放在这个黑色图层上面,右击,有一个嵌入模式,就可以了
Put the image on top of this black layer, right click, there's an embed mode, and that's it
hi
alr ty

Use a Clipping Mask.
how would I go about that
Its probably just a gradient background.
dont suppose you would know which one?
if not, do you know what i could search up to find a video?
ty <3
A Gradient Layer is just a type of object that can be added. You add it and choose colors for it.
is that one of these?

Then other things can be put on top of it, I suppose. Like other graphics and text.
Yeah. The half-filled in circle...

is it just me or the Generative fill has gotten worse in the 2024 version?
like I can't understand how it became so bad

srsly?
Photoshop is still using the older model. Try Firefly. Its using the newer model (Model 2). It should provide better results. https://firefly.adobe.com/

anyone know how to put a image over a mask like this
like i want the image to only show in the white
how do i open a object and place it
yo guys i want to make a party invite
whats the best way to make it
and what software
can you clarify your question? you can place an image in your project by dragging and dropping it
I think you should use Adobe Express, it has many templates
I looked over that video it doesn’t go over the question I have
is it true that there is no dashed line in photoshop?
Can you clarify your question then?
You can set the shape outline mode to dashed, you can even customize it to your liking

Rate my art 10/0 ?


The water that you see it is my water mark !
what?
which channel?
If you specifically want feedback on a project you've done, I was suggesting you post it to #📝project-feedback/
this is what I have so far but I want the logo to basically look something like this


and also like angled so it looks like it is floating in a sense
ok. So put it on a layer behind the subject, then change the blending mode and opacity around a bit 🙂
thank you !!!

Maybe paint in another brown background between the shapes and the buildings too... - maybe 80% opacity:

@crystal flower
Thank you very much for the help I will do this now
is there a way to select out of a selected area in photoshop?
like I want to do a Color range select but only in a small rectangle
I suppse i can do it by masking everything else first but is there an easier way?
Basically I’m trying to apply a texture to that image but it’s ontop a background image


I presume you tried it and accidentally turned the whole page brown instead of just the text?
Hi all! I'm really hoping someone can help, as I can't find any appropriate solutions online. I have a set of droplets for image resizing, and for watermarking that I've used for a number of years now, with no issue. For some reason, this particular one no longer works, and throws up these "command not currently available" error messages. I can't understand why? Does anyone have any advice at all?


nah bro Im trying to turn the whole page brown instead of the text
but every time I try to turn it brown
it doesnt turn brown
Scripts - Image Processor is way faster way to resize loads of images.
i am willing to buy a no screen graphics tablet...can anyone assist me to choose ?? kindly DM me please...thank you in advance ❤️
don't panic. This is usually because in the action/steps, the file isn't actually open.
It's like trying to resize an image before you've opened it. The option is just greyed out...

https://community.adobe.com
An action for resizing images and setting the resolution to 72 doesn't work anymore for batches. If I close all images and try to do a batch process, it will tell me that The command “Image Size” is not currently available. And whatever other commands I've used aren't available. If I have an imag...
I'm guessing that 'open' isn't in your list of actions @zinc kiln
Well in the screenshot above you a have a selction around the shape.
remove the selection (Cntrl + D)
and try again
Oh!... That is correct, 'open isn't in my list of actions. Thank you for sending over the link, I'll have a read through, now! 🙂
Gave +1 Creative Carma to @sly hawk (current: #7 - 805)
oh shi yeah HAHAHA ty again bro
or go to background layer and thee EDIT > FILL
I got it now tysm man
https://www.youtube.com/watch?v=-HvZFRFsG08
Just watching it, and I simply don't know why people do not use Image Processor instead.
This is way too complicated.
If you are creating a media-rich website with lots of still images for articles and blogs, You can automate the resizing process, using Photoshop "Droplets". Follow along as we show you the process of creating and using Droplets in Photoshop. Once you have created these amazing little wonders, resizing an image to any defined size you want will ...
They're resizing AND adding a watermark
Aaaaaa
Also,,,, I'd use the Image Processor Pro extension.