
#❓ask-a-question
1 messages · Page 25 of 1
Can also use a hue/saturation adjustment layer with a rough mask
Or a solid colour layer on colour or hue blend mode
@cursive mantle what can I do to the font and color of Desire…looks a bit dull imo compared to the rest of the image
Bevel and Emboss at the top of the layer styles panel
Maybe add a glitter texture
Hey every1 m new 2 d photoshop. Currently I can't afford to buy the jingsketch brushes for free for photoshop, so is there any other similar type of brushes available for free? So would u plz like to guide me by sharing the alternative of those brushes link?
I told you earlier: check out the Brushes provided by Adobe and Kyle Webster. These brush packs contain almost every brush you'll probably ever need: https://www.adobe.com/products/photoshop/brushes.html
In addition to adding some effects, you might want to adjust the brightness/contrast of the background so that the text stands out a bit more.
How is that?

having major issue with my pen not completing my stroke
is this a hardware issue?
its like the faster i try to be the worse it is. i have to really hold and drag my pen for it to accurately draw the line were my cursor starts or else it just draws the line with a gap
better video
Maybe check the sensitivity / pressure curve on your tablet.
Open up the settings for your tablet and try adjusting the pressure sensitivity and velocity curve.
does pressure sens affect your lines thought it seems like the tablet itself isnt even recongizing my stroke at all
Have you ever adjusted those settings for the way that you draw?
like once but it only affects how hard you press
not if its regiestering your stroke

like my settings is on a light touch than default anyways
so its not like im not pressing down hard enougj
"Light touch"? Maybe that's why. I don't know.
the term light touch means you jsut need a lighter touch with your pen to increase the thickness
the firmer the touich more you have to press down
so its not lke im not pressing down hard enough
I don't know. My Wacom works fine with Photoshop (and everything else).
maybe its a hardware issue
like the tablet itself or the cord possibly idk i just got a new cord like 3 months ago
I did it….thx @ripe quest n @cursive mantle …. Printing it on a T-Shirt


Hey folks, I know this is "all things photoshop, but I figure most folks here would also know Lightroom.
I'm new to the world of photo editing. I'm getting started with Astrophotography as a hobby. I've taken a set of photos as FITS images, processed them in Astro Pixel Processor, and saved the results as a 16-bit Integer-based TIFF file. For some reason, when I load this in Lightroom, even though the preview looks as it does in Astro Pixel processor, the actual image in Lightroom looks extremely washed out. I've been googling on this, but to no avail. Can anyone offer any suggestions?
Here's what the photos look like side by side leaving Astro Pixel Processor and entering Lightroom. I have been pulling my hair out about this for two days and am at a loss.


Are the images assigned a color profile? If not, different programs could be assuming different profiles which could explain the different appearances.
They are not.
At this point I've done nothing more than installed PS and Lightroom, and opened the images in Lightroom
Oh do you mean when exporting from Astro Pixel Processor? The ICC Profile thing?
I've tried it with every option, from sRGB v2 to Adobe RGB to Pro Photo RGB or what have you
Exactly. Does your Astro program embed a profile into the images?
In the lower left corner of Photoshop, click on the arrow and choose Document Profile.

Yes, but I've tried every one and the reuslt is the same
Just because a program is using a particular profile, doesn’t mean that profile is necessarily embedded in an image export. For example, in Export As in Photoshop, the “Embed Color Profile” checkbox needs to be on.
I have a noob question, but I have a logo that I do not have the original PSD file anymore. Is it possible to give it to a designer so they can make the logo into a PSD file as a new source file. What is that process called? Vectorizing?
basically I want to have a source file for that logo again, how do I go about doing it?
They may have to rebuild the logo from scratch. Can you post the image so we can better guide you?
yea i dont mind if they do it from scratch, I am just trying to understand what I need to say 😅
1 moment I will link the file
@nocturne cairnthats the logo
Generally a logo should be built using vector tools. Such a vector file can be scaled to any size. While Photoshop has numerous great vector tools, logo construction would generally be done in Illustrator.
so what do i tell a designer? I want you to give me a vector file of this logo?
and to give it to me in AI and PSD?
“Can you create a vector version of this logo and give it to me an either an Illustrator file or a PDF?”
thanks 🙂
The graphics in this logo could easily be traced in either Photoshop or Illustrator.
and then once I have the vector file, I can use it for anything else I want in the future such as an animation, poster, etc?
The text could also be relatively easily traced. However, it would be easier if you knew the exact font that was used. Text in Photoshop or Illustrator can be easily converted to vectors.
No worries. Thank you.
Gave +1 Creative Carma to @fallen wing (current: #838 - 1)
Exactly. Vector files can be scaled to any size.
awesome
yea i dont have access to the source file now 😦
so i am looking to recreating it
While it would be easier to know the font that was used it's not absolutely required for you to get your vector based logo.
no way i know the font, it was done 14 years ago
Fair enough 😉
I'm signing off mate. Best of luck with the project.
thank you
I'm having a small issue here
I'm doing some changes with the curve/levels and when I hit apply, the result is different then what I see on the preview


see for example. the left how it looks and then the right after I hit apply

hey, how do I make the photo lay on the ground (on the place of the black rectangle) realistically?

Yeah, Defo Calibri. - But some satanist stretched and pulled it out of proportions.... when cough-- designing --cough it.

Does anyone know if there's a tiling hexagon pattern in the Photoshop presets for Patterns and I'm just missing it, and failing that know where to get one?
Like this?

Gave +1 Creative Carma to @sly hawk (current: #7 - 732)
Yes, is there one in photoshop patterns already though? But yes that.
Not that I'm aware,... I just downloaded these:
https://www.shapes4free.com/downloads/70426991/2011/07/hexagon-photoshop-patterns.zip
and they worked pretty well...
Oddly I tried downloading those Shapes4Free last night when I searched for them, and the page just looped to something else. Thanks for the direct link, that's what I wanted yesterday 🙂

Yeah, I found that. I tried removing the '#' in the URL and only then did it actually work.
I didn't even seen that, but then again I was looking at 3am. My more rationale mind thought "I'll ask on Discord in the morning"
Does it help if you view the images at 100%? Are you possibly zoomed in or out when making these changes?
Hi so question: I have not used photoshop in yeeears. Not even sure which version it was. It was back in windows xp days haha.
So I am fairly interested in getting back into some photo editing and things of that nature. Now I have clearly noticed there are many options that do various features.
So here are my interests, it would be things such as regular photo editing, rendering. I run a gaming community and the fella that was doing all the artwork recently due to health had to step away. So I would like to be able to create things such as banners, logos, if possible emojis for discord, maybe some animated artwork. Now my first question would be is which would be the best option to suite what i am trying to accomplish ?
Also: back then, you were able to buy photoshop at a fixed price rather than subscription. Does this still exist as an option? Or is it only subscription via monthly/yearly?
-thanks
I did attempt to search google about my subscription question. I could not find much other than Photoshop Elements. I am unsure what that is in comparison to the others.
how do i remove the shadow of my hand?

excuse me, I really cant work with the warp tool and I'm getting frustrated, can I please send u the file to place it lay on the rocks?
One way is to paint highlights on shadow area.
Create an adjustment layer of Brightness/Curves/Exposure.
Then make it bright.
Then add mask to it and paint only the shadowy area.
what does it mean to paint highlights on the area?
the shadow isnt very uniform
If you paint highlights on shadow area, it will become as white as the brighter area, You can change flow and opacity
is highlights a tool?
No, its called Painting highlights and shadow. You might want to search adjustments layer and this
theres no such thing here

there are exposure, brightness and curves there.
you can chose any of them
ok
how do i make it so it doesnt become blue? @rapid obsidian

this is the best i could do but the shadow is still there

It is because there is slight blue on the paper.
You can desaturate(take out colors so that only black and white remains).
You will need to create hue saturation adjustment layer this time.
Also you if do you actually mind the image.
And just care about
Black (the music signs).
Then you can get a Print like image.
The way to do it is little tricky so i doubt it.
Do you want to try?
yes
Ok.
So we will take out the Blacks out from this image.
The DARK blacks.
So that we get only music signs.
But there are different intensities of black.
So we will need to duplicate the layer several times.
One -for darkes
- Two - for less dark
Three - for last dark.
So duplicate layer like 4-5 times.
Then select one of them.
Then on the top of screen.
You will see like File Image Layers etc.
Click on Image > Adjustments > threshold.
Then adjust slider.
Get one tone of blacks.
Then repeat it again
Until you cover all like..tone/tolerance.
At last combine them all by erasing and joining.
You will get a pure black and white image.
how do i "get one tone of blacks"?
Just adjust the slider in threshold panel.
so i do like 30 60 90 and so on?
One time get the script from Brightest part.
Then second time get from shadow.
Yeah. Slide it to what does the best.
now how do i combine them?

You thresholded the shadow too.
Do not adjust value to where you see the hand.
Only adjust where you see the notes.


im slowly erasing each layer where the shadow can be seen
If you are satisfied with whole image.
And do not have large part of shadow on image
Only dots remain.
Then click all layers and press CTRL + E.
To combine them.
It will become 1 layer.
But do not do before you clean big shadows.
ok but i kinda have to remove the dots since i need to use a program to read what is written
and the little dots impair the vision
Yes.
Combine it into one image.
Then hit CTRL + SHIFT + A.
For camera raw filter.
what is camera raw filter?
We will remove dots from image there.
Then in camera raw.
You will see different panels.
You want to,
Go to Details.
And slide denoise to full.
Also,
In basic panel.
Slide texture to low.
And clarity as well. According to how it looks.
oh thank you so much
Is it done?
im almost done but i have to go now, if i have any problems ill tag you later but i dont think ill have any
Great. Bye.
Hey 🙂
I didn't even save it, but if you can send me your file (not the dodgy screengrab I worked from before), I don't mind doing it for you.
@rapid obsidian @steel acorn - That looked like an almost impossible task! I'd be interested to see how you got on.
Thanks.
Great to see you again DJ.


does anyone have any good border concept for these
I want stuff outside of the actual window to have a border, simply gui modding

this is what the base game is, i want to have a border that fit perfectly with this so it doesnt look bad

I would add Golden border.
How to Remove White Background in Photoshop?
Select any selection tool.
On top panels you should see 'Select subject'.
Also, there is an Object selection tool.
Thank you
I don't understand... is the 2nd image the CURRENT base game? It's literally different proportions?
yeah sure, I'd be more than grateful if you could do it.
i just added a rock with generative fill because i thought it would look more natural for the picture to lean on it. I've also added how I imagine it being placed


This image is really sad..

Feel free to tweak the warped image accordingly. - It's a smart object so can be adjusted back and forth without turning into a pixelated mess.
@timid minnow
thanks a lot!
Gave +1 Creative Carma to @sly hawk (current: #7 - 734)
thanks 🙂
Gave +1 Creative Carma to @sly hawk (current: #7 - 735)
chat idk why but ive forgotten how to like stretch the image so your basically forcing a smile or weird eyes etc
reference photo:

@weary cairn = You can ask specific questions here. Mods and Community Experts will do their best to provide answers/solutions. Along with the questions, please post any relevant screen shots.
You can try: Filter > Liquify...
did i mention i love you?
Okay Thank you i just thought it is simpler to talk thats why i joind the vc sorry
Gave +1 Creative Carma to @ripe quest (current: #3 - 1622)
This was a reply to someone else.
That's fine. People who answer questions and offer help in this server are generally working and generally don't have time to sit in VC. It's easier if you post questions here. Then people can read and answer as time is available.
Oaky Thanks for th
@weary cairn - Also, if you have specific questions about Adobe InDesign, you may want to join the Adobe Illustrator server. There may be more ID users there.
Adobe Illustrator - https://www.discord.gg/adobeillustrator
Regarding the issue of making the images larger, you may want to start by using an AI Upscaler to increase the physical size of the images you have. However, there are various limitations and these apps won't necessarily improve the quality of the image.
The best way is to capture larger, better quality images from the start.
I will try that but youre right i have to do the next fotos with a camara who can do a better job
Thank you for youre Advice i appreciate that very much (:
Hey, can sb help me? I want to remove everything that is in this greenish gray, but I just can't do it, if I select it with Hue/Saturation it says it's yellows


Is that the original image?
Or is that a few layers placed over one another in your photoshop project @winged copper ?
If its a flattened image, its probably going to be difficult.
You could try the Remove Tool...

However, if this is a repeating pattern / tile image, the edges could be a problem. :)
I have no idea what you're trying to achieve, but a gradient map may be relevant too:


i cant find any of these options
actually i found texture and clarity but i cant find denoise
This person is no longer in the server. You're using the Camera Raw Filter, I assume?
yes, it didnt remove all the dots as they told me, it doesnt matter now though i managed to remove them manually enough
is there a quicker method to removing the background smalls rocks (keepign the rail and concrete) as opposed to zooming in and selecting like this


super small question, I've noticed my layers on the layers docker are much...thinner? than before? google pointed me to changing the thumbnail size but that doesn't quite bring them to normal. Any idea what I did?

Why does it not do the entire picture when I click select subject

And I can’t put the text behind the image anymore
Bc of this
Layers Panel. Hamburger Menu... Panel Options.

"Select Subject" happens automatically based on algorithms. You might need to make a more custom/defined selection. I'm not really sure what you mean with the rest of what you're saying...
Sorry. I don't understand the goal here.
apparently it was "thumbnail contents" set to "entire document" instead of "layer bounds", thanks for the help
Gave +1 Creative Carma to @ripe quest (current: #3 - 1623)
there must've been a shortcut to do that because I definitely did not do that on purpose lmao
If there is a shortcut for that, I don't know what it is. :)
you see that there are small rocks and then there are two rails and then concrete blocks where the rails sit on
i need to remove the rocks from the background, basically making the rails and concrete blcoks a seperate texture with no rocks
should be phrased better lol
so for example like this, just wondering if there is a quick way of doing that


I would make a copy of the layer and hide it. Then I would make a rectangular selection where the tracks are and try use Gen Fill and the Remove Tool to make that "all rocks". Then, on the copy, I would use a Layer Mask and paint out all of the rocks. Then you have the two layers separated. It will take a little work, but I think it shouldn't be that tough.
n/a found it
With the Healing Tools...

alright ,thanks 👍
Sorry. I haven't experienced this. Perhaps something specific with this document? Is there something to "scroll" down to?
If you suspect that then maybe just save the project and restart the app (or possibly restart your computer).
I would first try just restarting InDesign.
It could be a bug. Perhaps you could post to the InDesign Community Forum on the web. Include the particulars about your computer (platform, os version) and version of InDesign installed. https://community.adobe.com/t5/indesign/ct-p/ct-indesign?page=1&sort=latest_replies&lang=all&tabid=all
Hey guys I hope all is well. I'm trying to make my picture transparent but i needed to crop out some things so I masked it and took out what I needed to. Since the whole picture is being used as a mask do you guys know how I can make it transparent without having the cropped out parts come back?
Yeah. Probably. Can you DM me the image?
So, I'm trying to make a tcg using photoshop. Problem I have is pathing, by that I mean-- let's say I wanted to make a frame, but they are not mismatched, here's a better example:

the lines are not perfectly the same. Probably this is due to my OCD-- but is there a type of system I can try to make both sides the same?
Question, how do you make a stroke/outline around an image?
Thanks!
Gave +1 Creative Carma to @sly hawk (current: #7 - 736)
Hello 👋 idk If i can ask Here about this i have See a YouTube Thumbnail which i Like and i want know how can do the too IS IT allow to Post the Image ?
Sure. You can post it. As long as it doesn't violate any standards, is "safe for work", etc.
Yes Its a typic Gaming Thumbnail
I Would Like to make a Thumbnail Like this but idk how the have create It any a Idea?

It appears to be an image composite, made up of various elements, e.g. background plate, character layer, logo, etc.
It seems fairly straight-forward from a Photoshop compositing standpoint.
You would have to either create or locate the pieces you would need and put them together in Photoshop.
Ah and how increess i the Strength of colors?
I think the first concern would be finding or creating the elements you're going to need to build this layout.
"Strength of colors" is something to consider after you figure what you're going to build.
Do you want to rebuild this exact thing or something similar to this using your own character, background, etc?
Similar Like Not exactly
You could begin by creating or finding the images that you want to use for the foreground (character) and the background. And roughly composite them in Photoshop... The work out whatever logo that you need.

If you own game you could always create screenshot and use it
Thx May i ask can Do you recommend YouTube channels for Photoshop tips?
Gave +1 Creative Carma to @ripe quest (current: #3 - 1625)
There are a lot of learning materials and tutorials on YouTube.
Alright 👍
hey i think u sent me a message but i fell asleep how can i find it
Perhaps it was this one: #❓ask-a-question message
Yeah. Your time is probably better spent helping someone else. :)
Some people only come here to troll.
Ye I only engaged to try to keep their attention focused instead of them continuing to ping folks, tis a normal Monday
Thanks. I appreciate it!
Gave +1 Creative Carma to @patent gyro (current: #316 - 4)
@ripe quest back with a new project...I need to enhance a screenshot I took of a video that was playing on a desktop, but sadly it's not the best quality, but it's imperative that I am able to enhance it. I'm trying to rasterize it but I don't see it on my right side when I click on the layer
If the "rasterize" option is not there, then its probably already pixels.
I applied the raw filter and played with the different options...couldn't improve it...this sucks 😢
@ripe quest can I send u a DM?
Hello! I wondering does anyone know why this person brushes shape look differnt to mine? So I downloaded this brush set from someone this is the photo. And my brushes look different but its the same brush pack is there a reason for this?


The second picture is mine
I am having difficulty selecting the background so I can make it transparent. The quick selection and magic wand tool will select both the white background and the white rope. How can I select and remove just the background without doing a polygonal lasso all the way around the rope?


hey guys! if you look at the left ear on the photo (his right ear), the background is slightly over the ear, i cant seem to find how to change the shift edge of the background. someone pls help. pls n htnaks
pls ping me with answers <3
It's possible that it might be impossible to do it in an automatic way as Photoshop has no way of recognising objects, (except if you're using Select>subject) since it's relatively simple shapes, I would, for the ribbon use a manaual method (painting a mask manually, or creating a path with the pen tool and turn it into a selction to then be masked)
The text can be dealt with separately with - say, the wand tool, although it may look a bit jagged, so I thinkink it won't be too much effort simply erasing them (masking them) and rewrite the text on top of the now transparent background
In short
Try select>subject, invert the selection, mask the background using the selection, you'll probably have to paint on the mask manually to refine the mask
or if that's not working: select manually the ribbon with any of the selection tools, or more realistically use the pen tool to draw a path around the ribbon and wand, once there, turn your path into a slecetion and use it to create a mask (see step above)
You can select the mask and apply a minmum filter on it (filter>other>minimum) since you got a slight fringe all around, but if you want to concern yourself with just the ear, you'll have to correct it with a brush and painting black direcly over the remaining background here. Also IMHO I would add a bit of feather (you'll find it by slecting the mask and showing your properties panel)
I guess it comes with how your brushes are displayed copered to theirs, which you can find here in the hamberger menu of the brushes panel

Mine are displayed like that, irrespective of what I might download and install. That's your choice. Although in your case, I don't see much of a difference between yours and theirs

@sterile grove It's possible that it's that option that's involved

Anyone be willing to help me with enhancing and identifying a blurred license plate through my dashcam I don’t know how to use PS and need the plate asap for insurance and police.
We could help you triy to do it yourself, but know that if you really cannot see it yourself, Photoshop will not help. The best it will be able to do is enhanced something that is already visible, but maybe a bit blurry
not the full-on blur
I have 5 layers in the image above and i want to select the layer on the red rectangle and use it to make the other 3 layers straight below it however when i use the focus area on it i dont get the area selected - hope that makes sence


Can you show the whole window? Particularly the layers panel...

Focus select will only work on photos with a depth of field
this is not a photo. For Photoshop, everything is in focus here... there is no blurry parts
Can you clarify exactly what you want to do with all these layers? Do you want to align them with each others?
side note: If you want to select/highliht a layer when you click on it, you need to have this option ticked in the move tool top menu

ive tried moving the layer below the other 3 but no luck.
Im using it to hide the white and green so i can get access to the dark red at the back


just don't use that "select in focus" option here
it will be useless is what I'm saying
it is used to select the sharp plane in an image that has a depth of field, which is not the case here
What you can do is select the pixel content of you red layer and use that selection to hide the white and green with a mask
If you click on a layer thumbnail, in the layer panel, while holding CTRL, you will select the content of this layer. I think that's the important thing....


What would be the best for adobe photoshop, a windows based computer or a mac based computer for around 1000 euros
React with crown for windowsand sunshine with mac
And mabye a explantion why.
Tyyyyy
I really couldn't advise you on that, as it's really down to a matter of prefrence, my preference will be Windows based, but that's just me.
You need to compare the specs that Photoshop needs
https://www.adobe.com/uk/products/photoshop-elements/tech-specs.html
particularly when in comes to graphic cards etc (which Photoshop tend to depend on if you use complex filters or big files)
VS your purchasing power, which I suspect will not be much if you're considering a Mac
But it also depends on whch one you are most comfortable with, compatibility with other devices you have, etc...
One thing to consider is which skils you'd want to add alongside Photoshop. If you plan to use 3D, I would strongly recommend a PC. If you plan to become a graphic designer in an agency, choosing a Mac (or be comfortable around Macs) will not harm. Altough switching from one to the other is not a big deal if you're using the agencies Macs while having a PC at home
Thanks for your in depth explanation, im telling my colleague all of this haha
No worries!
When Creative Cloud disappears from the Adobe programs will all files saved to Creative Cloud get deleted? Should we download all files from cloud that we wanna save?
They never said that the creative cloud files will disapear from your Adobe Programs. Are you referering to the Cloud sync folder?
If that so, re-read the announcement carefully
Alrighty tnx!! Where do I find the announcement? I've only heard fellow classmates talking about it
it's about the discountinuation of the synced files. Synced files are files that are synced in a special folder in your computer
You can access it in the CC app by clicking here (for the time being)

and it's visible on your computer here

In short, when the deadline comes in, these files will be deleted from the Cloud, but will stay on your computer. If you are not sure, better back-up the synced files from the cloud, otherwise they will always be in that folder (but no longer synced)
All the rest is unchnaged, no changes of files saved on the cloud from Photoshop, Illustrator or Fresco

Adobe Creative Cloud Synced Files are ending on February 1st, 2024. This discontinuation of Creative Cloud Files is causing much confusion! Which files are Creative Cloud Synced Files? What's happening to Libraries? What about those lovely Fresco, Photoshop or Illustrator files happily saved to Creative Cloud?
Here's your essential guide to th...
Thank u so much for the help, I appreciate it!
No problem! I cannot blame you, they made it very confusing 🙂

whenever I try to paint, these blocky white pixels cover and follow it, and when i turn the layer on and off, they go away
im not sure how to tackle this problem
What happens if you are seeing those blocks and just save the image (or export it as a jpeg for example)
do you see those blocks in the export?
Trying to find if it's a GPU glitch/display issue or something from the brush tool
for some reason its not doing it now
if it happens again, ill test that
thank you!
could anybody tell me how can i make image from left to right?


ok so when i exported it the blocky pixels are gone
in the jpg
So you probably have an issue with the GPU
You can see if that helps
https://helpx.adobe.com/uk/photoshop/kb/troubleshoot-gpu-graphics-card.html
you can use the camera raw filter from smart filters
yeah im practically making a concept example, the borders are good in that image, my image has no borders but i want to have a good border
also another question to anyone out there
does photoshop have a feature where you can see the colors in your map
i am modding something and it seems i have rouge colors that is only 1 pixel big

and i want to remove such pixels
thank you, but could you tell me in more detail?
Gave +1 Creative Carma to @narrow heron (current: #838 - 1)
you can increase the vibrance and the contrast by a little bit
thank you very much. but new image is not same as right one.
is it possible to edit the left image as right one?
Gave +1 Creative Carma to @narrow heron (current: #539 - 2)
if I understood what you want to do, just increasing the vibrance and contrast a little bit would get you the same results
thank you very much.
np bro
Is there a way to copy and paste transparent picture from google into photoshop? When I paste it, it shows like black background.
Go to preferences, click on advanced under gpu, and untick GPU composting.
Whats difference between minimum, maximum and contract?
I always use contract.
Contract is for selections, minimum is to work, as filters, on pixels (masks or images)
Maximum is the same with "expand"
if I get a picture like this, is there anyway to easily replicate the shadow so that I could put a picture in the frame, and still have the shadow over the picture so it looks like it belongs/blends in?
https://media.discordapp.net/ephemeral-attachments/1194442153670230056/1201863774731255908/killavolt_a_blank_mockup_picture_with_a_thin_frame_in_a_horizo_adb06893-3e10-4bf9-80ce-764b2a02d5a2.png?ex=65cb5ddd&is=65b8e8dd&hm=3be0b506fd1af0e2f1a9af7cb4b4f53d603b796c310fea620446d706926995c9&=&format=webp&quality=lossless&width=663&height=663
what if you mask the part over it, and use blending modes to keep the shadow?
wait lemme try it
I don't know how to do any of that, should've specified, I'm a total beginner and still using CS6 lol.
but I have a series of pictures like that, if it's not too hard I want to be able to put the shadows, or say the leaf of a plant next to it, over the image that I insert
What I generally do, is place the image within the frame and change the blending mode from "normal" to "multiply"
It will work 99% of the times. Unless your image is actually darker than the shadow.

is this good enough?

here's the psd file
I masked it so there's one version of the outside of the frame, and another layer with only the inside of it
so I set the blending mode of the one of the inside to Soft Light
and put my image between the 2 layers
Honestly try with "multiply", and see if you still need that extra layer
the image I used was too dark for it
the shadows barely showed
but ig that would work for a lighter pic
let me try

yeah this works really well
Yes, it's maybe the only time where it won't work. If that's the case your solution is the best. Also you can use the shadow on top but darkened (use levels or curves), you can eliminate any white either by setting the blending mode in "darken" or using blend if

Discover the Magic of Blend If in Photoshop! Learn how "Blend If" works and explore the amazing effects you can create with it. In this video, we'll dive deep into the mechanics of what "Blend If" controls and go through real-world applications, from masking to special effects, and even retouching. I hope this video helps you. Thank you so much ...
the option is available is CS6
You might have to tweak to suit that older version
there will be many images, a lot could be darker.
I'm going to have to spend some time figuring out how to do that, because I'll also have stuff like this where there's like a plant covering some of it.
It doesn't have to be perfect by means, just has to look like it does fit in and wasn't crudely pasted in.

You'll need to create a proper mask, but you'll have to do it just once. Working with smart objects and layer comps, it can actually be automated a great deal (search those terms on Youtube for tutorials)
I generally use the pen tool to create accurate masks, so they are easy to tweak if needed. Also adding a little bit of feather to vector mask make them a bit more realistic
can you recommend any good videos on it, I don't pickup stuff very well sometimes,
Let me find some
Julianne Kost always have very well explained tutorials
https://www.youtube.com/watch?v=hA_SFUcZTpg
you can check the help files a well
https://helpx.adobe.com/uk/photoshop/using/layer-comps.html
Anything by the Photoshop Training Channel (PTC with Jesus Ramirez) is genrally very good
https://www.youtube.com/@PhotoshopTrainingChannel
3, 2, 1… Photoshop! In this tutorial, Adobe Evangelist, Julieanne Kost shares important tips for using and managing Layer Comps.
Subscribe to Adobe Photoshop: https://www.youtube.com/adobephotosho...
Try Adobe Photoshop: https://adobe.ly/46TB5o1
Get Photoshop CC: http://adobe.ly/10ekpOA
Adobe Customer Care: https://helpx.adobe.com/contact
...

YouTube
Photoshop Tutorials for beginners.
Hi, I'm Jesus Ramirez! I'm here to help you learn Adobe Photoshop and Lightroom!
The Photoshop Training Channel (PTC) has been around since 2012. You will find professional Adobe Photoshop Tutorials for photo manipulation, compositing, retouching, text effects, and much more.
I keep the tutorials concise, ...
Thank you for that, I didn't know blend if could do that much stuff
Gave +1 Creative Carma to @vapid flume (current: #8 - 502)
You're most welcome!
will this stuff stil work in CS6? I know it's ancient....
I guess you'll have to adapt
The best bet is to read the help files, or try the old tutorials from Adobe
https://helpx.adobe.com/photoshop/photoshop-cs6-tutorials.html
here is the PDF reference
you take it, you save it, you back it up, because there is a possibility you won't find it next week 🙂
anyone have a wacom tablet and can do a test on levels of pen pressure?
I have an XP pen, so I'm out 🙂
got my new pen but i dont think pen pressure seems to be working. cause i get a slightly thinner line if i press down SUPER light but tbh im not seeing any levels of pressure
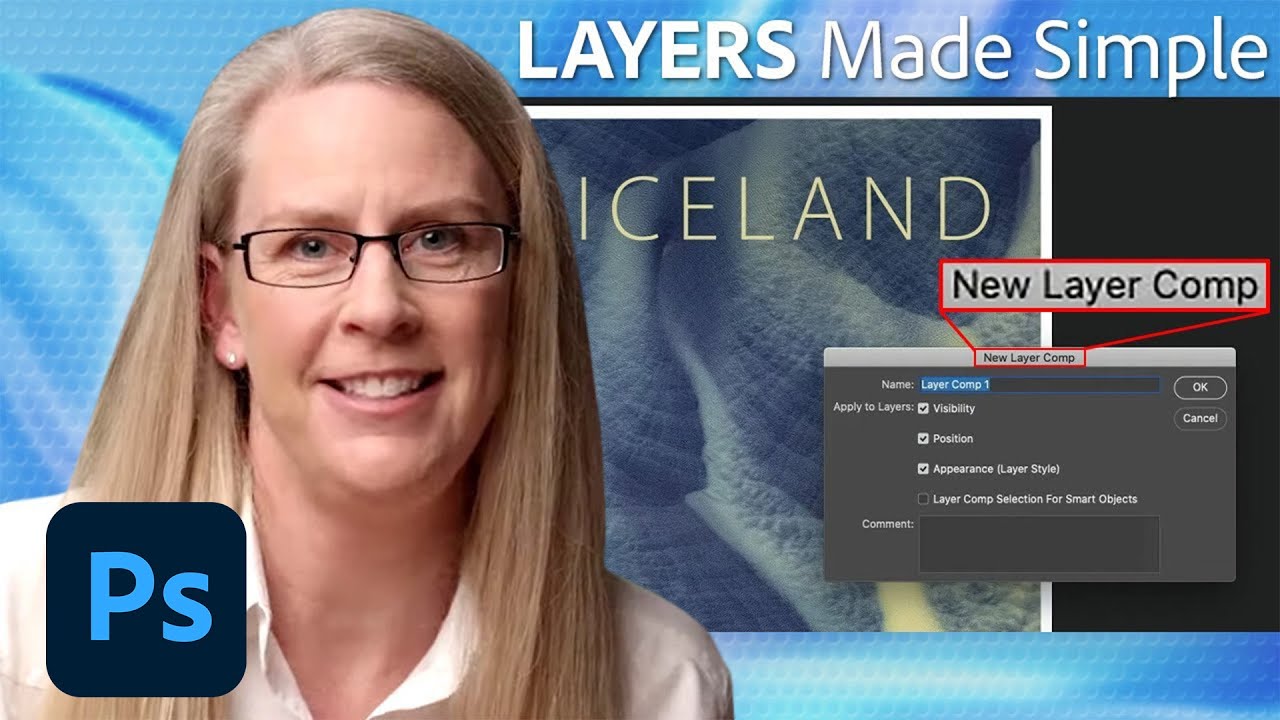
ok.... im lost. The video is short, that's great.... I've made a layer comp......no idea what I'm doing now
You need to create as many layer comps as there are different posters. When you export the files you can export all your posters in one go without actually have them as layers
look at the help files for that bit

Photoshop tutorial showing you how to use Layer Comps alongside Smart Objects.
► Subscribe to My Channel Here: http://www.youtube.com/channel/UCdQ_ZkYaMe6qPoueUyPQgpQ?sub_confirmation=1
If you have any questions, please leave them below
or head over to this tutorial's page on our website:
➜ https://photoshoptrainingchannel.com/
👍 Subscribe +...
I can read help files all day, it won't help me because I don't learn things by reading.
I try to always give short tutorials because the attention span is not the best among discord users, but feel free to seek longer tutorials.
If you're up to hear me talking for 90 minutes I actually made a stream about that very subject a while ago
but I won't share if you feel it's too long
like I'm really lost now because I don't understand what the layer comp is, why I need it, or how any of it applies to what I'm doing
I'm honestly kind of f****** stupid
I might be autistic, but we haven't figured that part out yet
We all have different approaches to learning. Personnally I don't learn with short videos because I need to understand what's behind the whole stuff. So reading is my prefered approach, there is no "good" or "bad" way to learn
Do you learn by "doing" and "repeating" what you are doing, and it stucks over time?
I learn by doing yes, doesn't always need to be repetitive, but I need to understand things in the context of what I need to do with them.
I've got, or will have a bunch of these mockup pictures, but will mainly only be using a few.... but each one of the mockup images will have a ton of different "real" images placed into the frames.
I just need to make each one look like the picture on the wall is actually there physically in the room. so just things like putting the shadow over it, or the plant that's in front of the picture.
automating it would be awesome lol
but in the end I'm going to have to make other things, like mugs, shirts, etc
Layer comp is nothing special.
Saves what layers are visible at the time.
I would have smart object in perspective and just change it per wish and export.
The thing I was trying to explain is that.
If you have several images to put into the same frame, then the layer comps will allow a smart object to be exported automatically. Even if this smart object contains a bumch of images.
The way you do this is
1- you build your layer, you add a smart object to your whole image that will contain all the images you need to add to the frame. This smart object will be masked to only show the visible frame, so far, so normal.
2- Now you open that smart object and you will place all your images (the ones that need to go into the frames). You make sure they are all the same size so you can automate them..
3- You create a layer comp for each of the image in this embeded smart object
4- Back to the main image, in the layer comp panel, you will have a list of all the images you will be able to place in the frame (remember you have masked it ....just once), name them how you'd want them to be called at the end
5- You choose export> export layer comps as files, you will have end files (say a JPEG) saved with a different image on each one. In a folder, with a filename that suits you. You can have 1000 images, you will have 1000 jpegs at the end, automatically
the only leg work is to create a proper mask of that frame (removing the plant leaves), adding images onto the smart object (easy enough) and naming the different layer comps so the filename of the end jpeg (can be other files format) is respected

Shawn will be hosting Sandrine Bascouert making mock ups in Adobe Photoshop. https://www.behance.net/ImaginerieJoin Shawn's Discord: https://bit.ly/shawndiscordShawn is an Adobe Express Ambassador.Check outAdobe Express: https://express.adobe.com/
you may want to skip the first 30 minutes where I talk about artboard and random stuff
My demo with this stream is to create different images showing postcards, from a mock up I created myself so it's entirely relevant for someone who uses - say - print on demand for mugs, prints, tee shirts etc
ill check it out when I get a bit of time

There are some lines that don’t align with the rest, what can I do to blend them? Or make it seamless
Here's some guidance...
I've automated that process, since I have done the same for 100's of mock-ups in one 'batch'
Easiest way is to use a photoshop plugin called https://www.bulkmockup.com/
Automatic Mockup Generator that creates product mockups in Bulk/Batch. Capable of generating 100 mockups within 40 seconds. Tshirt | Frame | Cases | Mugs | etc.
(In fact, that reminds me! I think I'm still paying for this subscription! I haven't used it in months)
anone now how to do such a design i need it for ma clothing...

Its difficult to even see it. What is it?
Looks like a chrome blob?
its like images inside and kinda liquid effect wit a slight touch of chrome effect
I opened a pdf color illustration in Photoshop and it is showing as black and brown. How can I see the true color image?

Can you screenshot how it should look like? Is the pdf layered? Have you tried opening it in Illustrator?
It looks fine in InDesign and PDF. Also, not layered.

if it wasn't a subscription I might jump on .... really hating the subscription model of everything now
Oddly, a pdf can have two color modes in the same file. What happens if you select CMYK in the mode menu on the right of the import PDF dialog box?
thanks for the video that is awesome
Gave +1 Creative Carma to @sly hawk (current: #7 - 737)
Same result.
@gilded crane Do you have illustrator?
yes
What happens when you open it in Illustrator?
I have to step into a meeting so I'm going to try get ahead of this if I can: if it opens up with the expectec colors in Illustrator, save it as an .ai file and try again in Photoshop. If it doesn't, switch the color mode in File > Document Color Mode and then switch it back. Then save if as an .ai file and try again in Photoshop. 🤞🏼
Do you create any written tutorials @vapid flume ?
I have the PSD of these individually, but how could I put these 3 images together in a 1588x1588px image, and have them be readable, look nice, and not like it was made in 1996 by guy whos graphical ability never left 1996

still looks the same
2 of the 3 parts could be smaller im sure.... just not sure how and to still convery the same information
someone please help me
First get this chrome/tatto image.
Then put it over hand. And using Liquify.
Ctrl + shift + x
Sometimes, yes, but not huge ones, little 8/9 slides for instagram...
I never really attempted to write anything bigger, except a few things for clients (How to use creative cloud storage and share/comments options in app (PS, AI and InDesign) and also best practice for scanning documents.
how do i make it go from only one side so not all of it is gonna small

is this Illustrator?

Finally happened my G's, first YouTube tutorial, I have a lot more on the way.
I'm open to your feedback please let me know what do you think and what other tutorials would you like.
DOWNLOAD THE FREE TEMPLATE HERE:
https://designsyndrome.gumroad.com/l/chrometut
🞸 DESIGN RESOURCES:
⊹ GRAPHIC DESIGN ASSETS : https://www.design-syndrome.co/
⊹ FR...
what do you mean>
like make it smaller from only one way
you can make it small by transforming it.
just take your cursor to a point. click and drag the point.
Have you seen https://www.guidde.com/? Looks like a cool program to help with that. I'm wondering if I should try it for some of my work (corporate training)

Guidde lets you capture instant step-by-step videos and documents for anyone to create.
Hi, is there anyone who can install solar panels to cover the roof for free?

I could have a look but honestly, I am focused on my business right now, and while I would have no problem with expanding in other directions, I'm always wary to spend a lot of time learning something just to make for a couple of videos. Now, if someone is interested in me doing it, of course, that's another story.
PS: I am a serial learner 🙂 I don't mind learning new things (I'm well into 3D at the moment), so I will definitely have a look. Particularly if it can ease with animation/video which is someting I have always struggled with.
I'm a serial new product user 🥲 lol I can't help but want to find a new tool and use it. I gotta quit that, I admire your boundaries.
I'm a little confused as to why 1 seems to be a mobile screen and the others are desktop?
I definitely have boundaries around using new products. I'm a bit nerdy sometimes, and I really like knowing things inside and out. Well, inside and out is rarely possible, but I do my best 😂
I think you asked in the #💬chat-general already, so if no-one took your offer it may be because no-one is interested. Now I don't mind you posting it multiple times, but also keep in mind it's people using their time to do something for free and you're not guaranteed a response. In any case, the actual place to ask, is definitely in #💬chat-general
depends how the pattern is built, is it a simple image or is it an actual "real" repeat pattern? Because those don't act the same way. Try to hold SHIFT while you resize it, and see if it works. It's the non-proportional transformation. If it doesn't work, then that means it's something else and more info will be needed
I'm happy to try and help, but I don't actually understand what you want.
i was testing something. so yeah , i gotchu

I'm impressed 🙂
how do i make the line like go trough the a letter? it would look cool if it like it connected or sum or the a letter would seem like the line goes trough it

ty ty
Gave +1 Creative Carma to @sly hawk (current: #7 - 738)
Add a simple mask.
to the line or to the a letter?
just make a copy of line and put it above a.
Then erase half part from Bottom a , and other half from top a
its not that simple because its a picture whole picture of a road
cut out the yellow line.

draw yellow on A

i appreciate the explanation but i think i just gotta draw it really, my point was like so it
goes trough like
only the line and it like connects
idk how to explain really but i hope you get the point ;d
if u mean like this, then i just drew yellow on a
something like this but the top of the a letter
is also yellow
like a line in the middle of the a letter
and it connects

...just rasterize the text and erase what you want to erase
yeah something like that
something or exactly this?
Gave +1 Creative Carma to @sly hawk (current: #7 - 739)
yeah close to that, so i gotta just take a brush?
and draw?

Do you mean something like this?
no. wait i should record too 😅
where is my obs studio
yeah both explanations are something like that ill try out both thanks anyway
Gave +1 Creative Carma to @sly hawk (current: #7 - 740)
one more question what is the easiest way to cut out a object from an picture person car things like that?
it depends, one is object select tool.
second erasing using magic wand tool selections.

What i most do is, if background is white. i select magic wand tool and press delete
in such image, where you have background like this, do not select subject (money)
select the background ( white in this case) with magic wand tool
and hit delete,
its fastest way
change its tolerance in settings on top
but if it still cutouts some parts
is there a way to like
bring some parts back with a brush?
reverse selection
yes there is,
for that we use Masks.
We can use layer mask instead of Delete. You might want to watch a tutorial on it.
oh okay ill do that
great good luck.
thanks :D
Gave +1 Creative Carma to @rapid obsidian (current: #101 - 14)
hi guys I'm kind of new to the photoshop

I want to place a different picture in this
how do I do it
I thought of coloring it and then I have another layer

but I can't fit my other image in it
select blue color and select letters, then invert selection and mask picture you want to remove
I did color range but it didn't fully select 100 all of the red


now I have this red layer

and I selected it and it's empty
how can I insert an image there that will fit there perfectly
never mind I did it
thanks
can anyone mentor me?
Hey all, quick question for you... Is there a way to change the labels of smart filters?
With what I'm working on, sometimes I'll have a bunch of different displace or liquify filters, and it would be great to be able to label them to see which is doing what

Currently what I'm working on is making small tweaks to a face, and doing it with separate instances of liquify so that I can mix and match which are active at once to get the most possible mileage out of making different expressions. It would be great to be able to label them, haha
Can anyone telle what to fix?

do you have problem with anything specific? you can post your problem here and we will try to help
is adobe fonts/login down? im having difficulty accessing it
the adobe status page has nothing of use

works fine on my end


That didn't work either. This really has me stumped. It blinks full color when switching color modes.
Glad you were able toget it working!
thank you!!
"tiny planet" I think?
I could be wrong, but I think I remember seeing a thing on them at one point and they called it taht
Do any of you guys happen to know anything about this, though? Can you add labels to your filters, or am I hoping for the impossible here?
I doubt there is a specific name for this "design/layout"
Okay, so I changed it from 8 bit to 16 bit and then inverted. Finally, it's full color.
You can't rename the Smart Filters.
Crap. That's too bad. Thanks a bunch for letting me know, though
Gave +1 Creative Carma to @ripe quest (current: #3 - 1626)
Can someone please assist me?
There are some lines that don’t align with the rest of the image, what can I do to blend them? Or make it seamless
You're going to have to help us out here... post your image/problem
Hi! I have trouble using the pen tool. I'm trying to use the pen tool to select a color, but it keeps making a blue dot.

The Pen Tool doesn't "select" colors. Its for drawing paths and shapes. The Eyedropper is for selecting/sampling colors.
yo does anyone know how to add a image and make it like its smoking/fading down? like here:

Sorry, I meant you could make a selection based on color using the pen tool!
The Pen Tool is for drawing paths and shapes. You could draw a shape and use it to make a selection but not for a specific color unless you're drawing around an area that contains a color.

This is what he says tho
I would have to see the whole tutorial. Not some random frame.
perspective warp and desaturate colors, as for fading you probably could use mask with some gradient
He starts around at 5:20. https://youtu.be/jBCDKCpsmso?si=9HlMPVJzUhDwjH8R

► Take back creative control with Storyblocks' unlimited royalty-free stock library and tools today: https://storyblocks.com/PiXimperfect
Master the art of Selections in Photoshop and get a solid grasp of what selections are, and learn the fundamental methods to create them. In this tutorial, we will use real-world examples to learn the right w...
It doesn't seem like they know a lot about Photoshop so these terms are probably going to be confusing to them.
pen tool dont do that just like d human said.
Select layer, In top panels click on Select, then Color range, and pick the color and adjust fuzziness
yo does anyone know how to add a image and make it like its smoking/fading down? like here:
Bild

first get this chrome/metallic image and then use liquify filter on it. and smudge it there
He is not using the Pen Tool to select a color. He is just describing different way to make selections. He just happens to have the Pen Tool selected during the video.
Please stop asking the same question.
smudge it? and where do i find liguify filter
oh...then do you know what tool he used to select the color?
thought its a askin channel
In filters panel on top.
Or hit ctrl + shift + x after selecting a layer
then select first (smudge) brush from top right, and move around
thanks!
Gave +1 Creative Carma to @rapid obsidian (current: #95 - 15)
If you're trying to make an image softly fade off from opaque to transparent, you could use a Layer Mask. But I think you should get familiar with the basic tools and operations first.
u maybe have a tutorial bout that?
Yes.
could u send me the yt vid?
I would do the beginner tutotials that come with Photoshop. Main menu: Help > Hands-on tutorials... get familiar with the basic tools and operations first.
I would suggest the same thing for you. Perhaps do the Beginner Level tutorials that come with Photoshop.
More complex operations won't make much sense until you know the basics.
oh I am watching a beginner level tutorial, but I'm just irked that he didn't show the tool that selected a color. It was like a five second clip.
He does not select a color. He is talking about making "selections" in the video. They are completely different things. The many ways to select sections of pixels.
Select layer, In top panels click on Select, then Color range, and pick the color and adjust fuzziness
Which isn't going to make much sense until you understand how to work with selections...
yeah i'm following the video which is explaining about selections
Select > Color Range is about 22 minutes into Unmesh's tutorial.
Understand what selections are first.
is there a known bug list for the latest photoshop?
There is "Known Issues." - https://helpx.adobe.com/photoshop/kb/known-issues.html
A bug list is a moving target and you'd probably have to sort through the Ps Community Forum.

Sorry, the image never sent I don’t know why
There are some lines that don’t align with the rest of the image, what can I do to blend them? Or make it seamless
cheers, appreciated! managed to solve my Open GL crashing issue by downgrading to 25.3.1
what dots dont align with what?
I'm not really sure what you're talking about. What doesn't align?
This image is not great quality and there are a lot of "lines" in there.
I have no idea what I'm looking at. It looks real rough? - What is it?
we will never know

This is the whole image
It’s low quality because I zoomed in
So is that the original photo?
There is a lot of ISO noise in the image.
I’m gonna try to point them out better but I think I’m noticing it more bc I like worked with the image
What are you you trying to do with the image anyway?
Yea it was intentional
The image was a stock image, I only further modified it
I think he is trying to line those gazebos  in paralel
I used ai to generate the “tunnel” seen in the zoomed in image, and while messing with it I noticed that generated area doesn’t quite align with the part that it meets with the actual image, which is what I mean by aligning or seamless
Hold on 😭

The green line is the area im talking about, if you look at the image without the green lines you will see that the area where the green line was, looks off, as the area doesn’t blend(idk the word) into the rest of the image
So you mean it is tilted.
I guess? Yea, that’s one way to put it
maybe just erase that pipe/cylinder
They just don’t match up and I’m unsure how to blend it so the “seams”/“lines” disappear

It’s not just that, the whole green line doesn’t look right
Like the whole area where the green line occupies looks off
You said you used AI, then i think just select the part you want to get rid of
then inpaint/erase /fill with ai
OR
In photshop you can use the Spot healing tool
or the Clone stamp tool to get rid of every element you do not like
I Alr tried that, just makes it worse
When you say to use the ai, is that to use without giving it the parameters of what you want in it?
And what does this mean?
So, in short,
you want to get rid of two straight green lines in this image
thats it?
Those green lines or not IN the image but I put them there to signify what I was referring to
;-;
I said that earlier
maybe select the area, and cut it
then rotate it
What I am seeing is, it seems like the angle is little tilted. it is not 180 degrees. so you are trying to fix the rotation.
And make it perfectly 180.
For that I am saying to first get rid of the angled pipe, then fix others things if there is any.
If you think it looks such a mess, have you considered just regenerating the generative fill to something else?

ye
@celest delta

I don’t know if there’s a Lightroom discord does anyone know if you can create a new Lightroom catalog, add photos back into it and then denoise the edited JPGS? Basically I didn’t denoise the RAWs when I originally had them in Lightroom, exported them and got halfway through editing and decided I want them denoise r before delivering to clients
Is there a support channel I'm dealing with an annoying bug
You can report bugs here: https://community.adobe.com/t5/photoshop-ecosystem/ct-p/ct-photoshop?page=1&sort=latest_replies&filter=all&lang=all&tabid=bugs
https://community.adobe.com
Master Photoshop with the help of our global community.
i have 3 layers im editing with, and with the first and last i want there to be no saturation
but i want the middle layer to have color
how do i do that?
hopefully you can see who im referencing, but im trying to get that person to have color while the rest of the photo stays black&white

one way would be to create a hue/saturation adjustment layer, desaturate the entire image, then click on the mask and using the brush tool, paint with black over the area you don't want to be desaturated.

not sure if understand, but when i paint over it with black... its just black

@untold lynx
click on the mask itself (the white square)

.
ill see if i can record a video
I’ll appreciate that, just tryna get use to this 😂 sad thing is I know how to use after effect perfectly but this is something else😭
Anyone know where I can find a plain backdrop for headshots online? It is for a conference photographing area
How can I make a sunburst but its like transparent for one of the colors instead of black
and not lowering transparancy
didnt have the same effect
Yea, when I did generate it I looked at all the different things it made, but I’m new to the generative full so I’m kinda learning it. Wasn’t really sure what else I would generate tho, whatever you generated looks cool tho, the first image
thank you so much
Gave +1 Creative Carma to @untold lynx (current: #839 - 1)
Why can't I use overlay on this layer

What's on the layer? Also, check the color mode and bit depth of your image. Image > Mode... Blend Modes won't work on a 32-bit image.
oh yeah its 32 bit, should I change it to 16 bit or 8 bit? what's the difference?
8 is probably fine.
The Ps User Guide explains bit depth in detail: https://helpx.adobe.com/photoshop/using/bit-depth.html
This explains a method to make a vector shape follow a path: https://www.youtube.com/watch?v=VoRMDjvedAg

Photoshop - Bend and Scale Objects along a Path
Learn to make objects that will bend and scale along a path using Photoshop. You will see how to use shapes and also photos for this technique. It's fun do do and quicker and easier than you might imagine.
SKILLSHARE AND UDEMY COUPONS
Skillshare.com (all classes) ► https://www.skillshare.com/r/u...
This explains a method in Illustrator: https://youtu.be/litg9RqMmK8?si=JOG6ZfsOjJ7B8S_S

In this tutorial, we can learn about repeating any shapes along any path using illustrator. This is a simple and easy way to repeat a shape alone any path. In this video we also can know about the blending techniques as well. This Illustrator tutorial is the easy way to repeat or duplicate objects around any paths.
TUTORIALS
How to...
There have to hundreds online. Have you searched for them. Looked on stock photo sites? You could probably even use Firefly or Gen FIll to make one.
Say more. Do you have an example of whatever it is that you're trying to create?
I am searching now but i didn't know if there was a specific termology. What does firefly and gen fill do, can I create a backdrop myself and order it or something?
No. You can just generate the pixels.
You could do something like this:

Or you could generate it right in Photoshop with Generative Fill...

Oh! okay thank you! @ripe quest
Gave +1 Creative Carma to @ripe quest (current: #3 - 1628)
The only thing is I will have to have a physical stand to photograph with.
Oh. You want an actual/physical backdrop for a photography studio?
yeah I resorted to this although it's a reflector

you can find those at the usual online shops like bhphotovideo. com, etc. just scroll through the backdrop section. It also depends on what the size should be (only portraits, full-body, etc.) and maybe the material (vinyl, paper, Fabric, etc.). Do you also need the Background Support System.
You can find at e.g. https://www.bhphotovideo.com/c/browse/Background-Materials-Equipment/ci/1175/N/4037060750 all kinds of stuff. Have fun.
Thank you!
Hi guys, I'd like to ask why do Photoshop often does this ya whenever I'm trying to apply some filter through masking with my brush ?

orginally it looks like this

For me it looks like a temporary glitch (happened to another user yesterday and checking GPU drivers is the first port of call)
To check if it's a display issue or a brush issue, save the file and open it again, or save as a JPEG and see if any of the saved files display this
if not, this is a display, therefore a GPU issue
If not, then it maye be worth resetting the preferences (edit>preferences>general>reset preferences on quit)
Luckily, the finished image doesn't have the white blocks covering it
whenever I zoom out, the white squares dissapears, but if I try zooming back in, it comes back as well
I see...
So this is defintely a GPU problem
You can follow those steps to find a solution
https://helpx.adobe.com/uk/photoshop/kb/troubleshoot-gpu-graphics-card.html
Resetting the preferences will likely solve nothing, so no need to go there, although it doesn't really hurt
okay I'll check this one out after im done with my edits. Thanks a lot @vapid flume !
Gave +1 Creative Carma to @vapid flume (current: #8 - 503)
this could be the bug with artboards that makes Ps render white squares. This issue is fixed in the beta so if artboards are crucial for your workflow I would suggest switching to it
Oh good to know! thanks 🙂
Gave +1 Creative Carma to @serene coral (current: #6 - 795)
You're almost there, you're missing one minor step..... - I'll send a recording.

In past. when i used mixer brush tool.
it automatically used to wash the color every time I release mouse button.

I guess one of these settings is wrong, do i need to disable first one

What should I do, so that i do not need to clean it everytime by pressing m.
https://helpx.adobe.com/uk/photoshop/using/painting-mixer-brush.html
Not sure, the help files don't mention an auto clean, so I guess it disapeared?
It has permanently grabbed this orange color from the photo, and after each stroke I have to tell it to pick different color. As long as I hold the mouse, it works with the colors I am mixing, then returns to its Orange color.
Even when I do not have this skin color chose, it chooses it in every project i open
It has nothing to do with versions, because same happened before upating ps.
Honestly, I'm not really a painter so I can't tell you
If you think it's a bug, you can put it to the attention of the team in the Adobe forum
That's where bugs reports need to be put forward (do a search on the forum before, in case someone had the same problem and a solution has been found)
https://community.adobe.com/t5/photoshop-ecosystem/ct-p/ct-photoshop?page=1&sort=latest_replies&lang=all&tabid=all
https://community.adobe.com
Master Photoshop with the help of our global community.
Does not look like a bug, i just messed up settings.
guys, i finished my firefly trial... and i want to generate something in a pic
what do i use
Midjourney?There are many AI models available.
Firefly is supposed to be free so I don't know what trial means. Do you mean you are running out of generative credits?
that doesnt offer trials anymore
and i want to edit something in a pic
yes, monthly credits
lexica
You can still run prompts even without credits, as I understand it, except it's very long.
Let me check that
Otherwise you can buy credits!
Let me grab the explanation
oh
i dont mind if it takes long

it doesnt work
OK, my bad, if you're not on a paying plan (full CC, photoshop etc) then you will not be able to use it until next month

i see
but you will still be able to enter prompts (even if they take longer) if you're on a paid plan
Do you have a paid subscription of any sort? Like Photoshop, or the Photography plan?
nope, i guess i will look for alternatives
OK, fair enough...
this is how you want it to be set
Finally back to normal.thanks
Im making text that has the distressing etc, I add the wording and everything, and add the "texture" layer on top to "screen" on top of it and it looks good but I wanted the whole thing transparent, so I remove the background layer and it only shows the "texture" layer

how do I make it so that this doesnt show? this is supposed to be "screen" ontop of text

If you mean there is a text and you are putting this texture onto it. Using screen mode. Then yes it will only show text.
yes, this is meant to be ontop of the text
i want this to be transparent but once I remove the background layer it shows the previous image

I want this image to have a transparent background
Select the texture layer and hit CTRL + SHIFT + G. Then you can bring back background.
This is called clipping mask. It makes top layer cover only opaque parts of layer below

Blending modes (like scren) only react if there's a layer behind them. If you have a single layer with a blending mode other than "normal" (and a couple of others) you will not see anything because there's is nothing the blending mode is reacting to
Could you provide snapshot of layers too
Would you mind showing exactly how your layers panel look? In fact it would be better if you should the whole window
It's easier to see what goes wrong

Delete the threshold layer if that is not intended.
where is screen applied?
the screen is applied to the 3rd layer, which is combined with the text layer
the 3rd layer is a star so I combined it with the text layer to create 1 layer
Again, more useful if you show the whole inteface, like that

You could apply the threashol adjustment to the gma spray paint (as a smart object) and change its blending mode in the smart object settings
The same way you applied the gaussian blur to the pngwin layer
That way you can control the opacity and blending mode of the threshold without it interfering with the BG layer, if that helps
You could also try to apply a colour overlay (say white) to the text layer (pngwin, I suppose) via layer styles, so it gives ground for the top blending mode to work

Just throwing ideas here
the problem here is how the threshold adjustment works. by hiding the background you'll get entirely different result as you remove the base for the threshold to work properly. the 'proper' workflow would be to remove the white background from the finished design. that is pretty easy with color range masking
what seems to be the problem?

hello
i was wondering how i could change his right eye colour to blue with the glowing around it
like change it to blue instead of yellow
Image > Adjustment > Color Replace, or use hue color and mask....
thats for the eye yes, but what about the glowing around it
that yellow glowing
ok and what problem did you encounter?
You can see in the image, my shapes are crooked along the path
invert the mascara and paint, use low intensities
CTRL + I invert the mask color
An easy way to repeat any shape along any path using the "Replace Spine" option.
TUTORIALS
Adobe Illustrator: https://goo.gl/DeaKFe
Adobe Illustrator Christmas Edition https://www.youtube.com/playlist?list=PLSQcxS0ygkS6h1NA9imACy5MJjZ05chsl
Adobe Photoshop: https://goo.gl/rYq4mX
BECOME A PATRON
As a patron...
no like
how did you even create that mask with his eye only
ok, this seems to work for circles or simple shapes, more for maintaining a cut saw shape, it doesn't seem to work
bro, search YouTube for the basics about masks, I just created and painted them
https://youtu.be/izOhe8w-PPE
you might have more luck with this method, it should give you more control over spacing

In Illustrator, it's really easy to make pattern brushes that you can apply to any path. You can even draw with the pattern using the brush tool!
Join our FREE Illustrator Facebook Group: https://www.facebook.com/groups/adobeillustratorusershelp
Get your first month of Skillshare FREE: https://bit.ly/3LSFlvz
Get a great deal on Adobe Creative ...

How did you get it aligned, can you send me the .ai?
I literally created a new shape, dropped it to brushes, set as pattern brush, messed around with settings and used brush to paint it
can you send the .ai?
reapply the color of the shape
not sure where did you get this shape from but it seems somehow corrupted for Ai. I have 'changed' the color (to black) and it worked
yep there you go
I was gonna say, if you're REALLY STRUGGLING, you could maybe just warp some smart objects a bit.... 🙂
Ok, cool. Continue with the 'proper' way suggested by Wertos then 🙂 - Good luck
Hello james,
I tried hue and saturation on this but it didn't go so perfectly
How do I change the right eye colour ( alongside the glowing next to it ) to dark blue

I searched on YouTube for masking tutorials but didn't find any that tells me how to change the colour and grade it from part to part
you can use a soft brush in hue or color blending mode
You should only tweak the yellows in the H/S dropdown menu

Oh
So that's what it's for
I've never tried colour blending before 😅
So you can mask the eyes roughly, apply a feather onto it so the mask is blurred and only change the Hue in the yellow part. That way you don't touch the skin colour
Will this grade the colour intensity even when i turn it to blue?
You can tweak with "colourise" or using the rainbow band at the bottom for a more targetted colour change
Just one question, what do you mean by "grade"?
Just try it for yourself, see if that works, I cannot tell really 100% as I don't have your file.
I want to change the eye colour to blue
And for the light yellow around the iris I want it to be blue
With the same degree
I know you know how to change eye colours! 🙂 - You've done it before after seeing my previous videos 🙂
I know for the eye yes
But what about the area around it
Like... There's a light yellow glow
If you set the circle in your mask wide enough, it will affect all the yellows in your image
contrained by the white in your mask
Why not try it for yourself and see if it works?
I'll try blending brush first
As i avoid masks methods as much as i could because it seems complicated
I'll also try to grade the hue and saturation
The in-app tutorials have great tips for mask, you should try them
I think you are mistaking what "grade" means 🙂

That's where you can find the in-app tutorials
Probably....
What i mean is the colour intensity
I'd try this approach to start things off....
That's way more accurate and better than what i used to do
Trust James 🙂 If he tells it works, it works!
Yeah... Every time he amazes me with new better methods
(I will mention that most of my image retouching is used for digital, very little ends up on a 20ft wide billboard) - so I can afford be a little 'slap-dash' with my fixes!)
They're still soo good
Thank you both!
Honestly, try those tutorials in the help files I told you about. Best way to learn
Yeah, sure will do
hi, I joined this server because I need help recovering a damaged file. can anyone help?
It's not my own, it's my boyfriend's. Was 3 days of sleepless work on a graphic design project. I'm partially accountable for the issue.
its a heavy file but it looks like this rn. I've stepped away from the computer but I'll show later, it says something about gradient file issue


im doing a gradient map but pressed some wrong button and now my colors are messed up like this
how do i solve this?
i just want a normal color picker where the color is just one color with black and white
click here

thanks a lot!
i dont know if this goes here but im working on a roblox game logo right now and i dont understand, how would i replicate this shadow design? i did try manually resizing the letter by duplicating it but it doesnt give it that 3d effect

someone recommended using online converter but i need help still because i have no idea what works and i have a data limit on my internet because I'm only connecting it to my phone rn
tldr broken/corrupted(?) Ps file
basically im trying to replicate that on the 2021 text but i dont know how to

In some cases it works to use the Photopea.com website, but it seems that your file has been damaged too much, it is almost impossible to recover now
search on YT, basic 3d text extrusion, illustrator

the photopea.com site, is there at least a trial for it or do i have to pay to access entirely?
just access it, but as I said, your file seems very corrupted, it will be difficult to recover it
or you can use ready-made templates, they are smart objects that are very easy to use

yeah thanks, i found out how to make it
Gave +1 Creative Carma to @mental kiln (current: #839 - 1)
Can you explain...
4- Back to the main image, in the layer comp panel, you will have a list of all the images you will be able to place in the frame (remember you have masked it ....just once), name them how you'd want them to be called at the end
5- You choose export> export layer comps as files, you will have end files (say a JPEG) saved with a different image on each one. In a folder, with a filename that suits you. You can have 1000 images, you will have 1000 jpegs at the end, automatically
In my case this does not work.
Layer comps panel of main project is empty and greyed out export layer comps.
Why does camera raw looks different when applied separate on layers?
Is it normal behaviour?
I guess it is, as it is looking for dark and white plaaces in new image (layer).
How do i export this image just the way it is?

Every single time I try to export it, it's just the original unedited image. I wanna keep this one that I edited
Do i have to do something before selecting export?
This is the image that is exported

ello guys is there any option for removing(not changing) specific pixel colour. I have little black dots on my logo's corners and i want to select all of them and delete them ?

This image is perfect!...except it’s the wrong color. What do you do when you want certain elements in an image to be a different color than what they
Have you tried saving in PNG? lol
The Windows viewer will fill in the transparency, but it will still be there to use when you need it!
someone recommended wondershare repairit. im worried bc the corrupted file is at about 800mb right now. is that normal? or should is still be the file size it originally was even corrupted with a chance to get back?
or is that a normal file size?
again, it is almost impossible for you to recover this file, it rasterized all the layers, see you only have a black screen, it will be impossible
Regardless of size, it doesn't mean anything
though i just checked the older file that still works its about 680mb. was expecting the file to be heavier. then again he usually deals 3d and this one is graphic
almost impossible isnt yet impossible aha
Image > Adjudment > Color Replace, however the best option is to remove it manually
upload the file without changes to wetransfer I'll see if I can help you
ok
I did that 7 times
Saving it as png should produce this as an image right?

yep, export PNG

Did you pay attention to what I said here?
import it into the PS you will see that the transparency is still there
this will take a bit to upload as I'm stuck on 2.4 wifi but i'll send a link here
Hi there! Pinging @grand stump @sly hawk @bold cloak and @plush stirrup just because you folks are the mods online!
I'm a Curator at an inclusive platform for digital artists called HUG who is hosting an Open Call for AI Artists to get a chance to be paid and fly to speak at an event with L'Oreal and am wondering if there is a place on this server to share the opportunity! (The gig is for 3 AI Artists to fly to LA all expenses paid and get a chance to share their practice and talk about AI to a room of beauty industry professionals!)
Wondering if you folks have a place where I can share about this opportunity! I read through the rules and want to be respectful of any guidelines there are, so wanted to check in with a mod before I post anywhere without approval.
Hoping to put this opportunity in front of more AI Artists 😄
We don't really have a place to post "opportunities" like this.
Artist and AI , don't even fit in the same sentence
All good -- thanks for the info!
Gave +1 Creative Carma to @ripe quest (current: #3 - 1629)
You may want to ask on the Adobe Creative Careers server : https://discord.gg/acc
ACC might have a better venue to promote this sort of thing.
I have two images with the same dimensions, i've resized one smaller, and I want the other to be the same size. How do I resize the bigger one so that it snaps in place to match the smaller one?
Are they the same aspect ratio?
If so, you should just be able to resize it with Image > Image Size and give it the same dimensions.
yeaa
thanks is that the only way to do it?
or can i turn on some snap to place thingy
If they are both layers in the same document, you can transform it and type in the values. If they are separate files, you could also drag and drop the image into the resized doc. Then depending on your import prefs, it might already just resize to the canvas.
Edit > Preferences > General... Resize Image During Place

that's already turned on
So then if you drag the larger doc into the smaller one, it should automatically resize to fit the canvas. Assuming they are the same aspect ratio, it should fit perfectly.
oh i think we're misunderstanding each other. I mean when I have two images on the canvas already and am trying to resize it even smaller, I want it to be easy to resize both to the exact same size
which yea i can just type it in instead
If you know the values, its easier to just enter the dimensions. I wouldn't trust "eyeballing it" (even using Guides and Snap To).
yeaa i understand. I tried the image > image size but its right in front of my face in the transform properties section lol
Its easy to get the dimensions of the pixels on a layer by Ctrl clicking on the layer thumbnail to select all of the pixels and then look at the Info Panel.
(If you don't already know the pixel dimensions, that is.)
how to create a custom cursive colorful lines like this?

here's the file. sorry took an hour
1 file sent via WeTransfer, the simplest way to send your files around the world
i tried to do a few sites and it wass very naive of me to think a trial and actually getting the file would be possible aha. i have like 30 bucks to my name right now and can't buy a subscription to repair a file
no chance, these sites/software only recover a few sessions, your file is very corrupt, it corrupted the base

Unfortunately, it has happened to me several times, and I had to redo everything, until I learned how to save duplicate files
when the power goes out, and the PC turns off with PS open, sometimes the file corrupts
But in your case, you can start redoing it because you won't be able to recover it.

thanks for giving me a solid answer on whether it was possible to fix
Gave +1 Creative Carma to @mental kiln (current: #539 - 2)
Does anyone have a high quality mock up of the back and front of an oversize tee ?
lots and lots of free models, in fact there are so many free sites
iran?
Say more. Is there a specific question?
Are you sorted/realised now?
That image, if you saved it as a PNG ....it IS transparent already. Just that most file viewers will put a colour behind the preview. - hence the reason it looks black.

can someon help me please
had this problem along time ago and it went away now its back


and my stuff is on so im lost
have you checked advanced option

bout to check now

desktop
it did it along time ago left and now its back i work from this so i need help asap if you can brother


change it to high performance


are your gpu drivers up to date?
yes like i said ive been using for like 6 months no issue now it just happened again today for the first time
@ivory rampart
did you updated you gpu driver recently?
how do i do that im pretty sure it do it automacticly
if i remember amd have it's own app for updates