#❓ask-a-question
1 messages · Page 10 of 1
@river otter What you show here is a physical thing. I think it could have been done with an alternative technique such as sun prints or even possibly screenprint. Actually I could tell you more if you'd like to share the link as well.
How to reproduce that in Photoshop would be easy since I suppose there is alot of tutorials that tell you how to mimic ancient processing technique (cyanotype, Callotype, Gum Dichromate prints, or reproduction techniques such as screenprints) but it would help to know a bit more which result you are really looking into
I think that's what "explain" means but I could be mistaken 😉

Fred Aldous
Sunography - Solar powered photography.Place any object or transparency on the sunography fabric, expose in bright sunlight, and rinse with water to reveal a rich blue print over assorted colours of fabric. Sunography fabric is 100% cotton archival watercolour paper, light sensitive on both sides for two sided prints.
Just to mention, whilst any certification or qualifications are awesome, it's not the be-all and end-all. Not all agencies are like this:
#🤷career-advice message
why is it that whenever i select something in one layer and try to copy in another layer it just makes a new layer instead of pasting it in the selected layer?🤔
Because that’s how it’s supposed to work
It’s way better lol
It’s why layers exist
normally i wouldnt mind but im working with the timeline and when its making a new layer instead of pasting it in the one selected it messes up the frames
it makes a 5 sec long layer and pushes everything away
Dawg what are you doing on photoshop
U should probably be using a different adobe app for video
They got like 10 to pick from
Hi, im doing an assignment for school where i have to restore color from an old photograph. I've ran into a problem where when i try to color it in it doens't show it getting color but i can see stuff changing in my layers. Anybody know how i could fix this?
i do use animate for the actual animation but now i gotta do an animatic and i like more the brush settings in photoshop
the pencil brush is the main reason im using ps
After you've pasted and it creates a new layer, select both the one it just created alongside the one you wanted the pasting to happen and hit CTRL+ALT+E (you can change the shortcut to a simpler one if you want)
It will merge both layers and you'll end up with just one
That's how PS is supposed to work, to minimise mistakes, it creates a new layer so you can easily tweak separately from the rest of the design
not the best solution cuz the issue is that the new layer is way longer than the rest and after merge the layers are still offset in the timeline and i have to arrange them correctly
when i started this ps project i was able to paste into layer
Where do the "copy comes from?
idk why it doesnt do that anymore
do you copy from another PS document?
other layers in the same group
Let me think...
If you duplicate instead of copy and pasting does it help? (CTRL+J duplicates)
so you can select using your standard selection method, highlight the layer where you want the selection to "copy", hit CTRL+J, and it creates a duplicate of just the selected area
Basically that's it

it still makes a long layer
before

after

and for some reason i cant even merge them lol wtf
The issue is that I'm not well versed in Photoshop video features. I barely use it so While I can tell you for standard stuff, I'm not sure it applies to video. Let's see if someone else is more conversant in Video editing.
thanks for help though
No problem, see if it helps. If not you can also ask your question in the forum, maybe there's someone that will help!
https://community.adobe.com/t5/photoshop-ecosystem-discussions/copy-and-paste-selection-in-animation-timeline-of-photoshop-cc/m-p/9790161
https://community.adobe.com
Hi everyone! I have some trouble with the animation. I make a hand-drawing animation in Photoshop and would like to copy one frame and paste it to next or previous frame without creating new layer. my Photoshop made it first time (I select with Lasso part of frame and just copy it and paste to previ...
ok will try that
How can i remove the white to my line? I cannot select subject for some reason

Use any other method of selection
There’s like 8 tools for a reason lol
how can i keep the quality of an image when downscaling it?
Pen tool would probably work
Did you figure it out?
this is super useful thankyou 🙂
what's the best way to turn this white crest into blue?

color range select
and then choose your color and brush over it
Hey guys, I was wondering how I could make this cloud effect on pictures?

Just not too sure how to blend it like that

@half kettle try using a a bigger soft round brush (with the hardness set to 0) and paind black on a layer mask. If you want an organic edge you might try a cloud brush instead of a soft round brush to paint on the edges in order to mask it
hope this helps
Is the crest on it's own layer? What resolution is the image?
I have an 5975 x 3361 size image and im trying to crop it into 1920 by 1080 size image
but after cropping the image gets cropped but when i check the image details it shows that the image is still the original size
What to do?

This is my original image

After cropping it it still shows the original size
I did, its been happening for 2 days for me
I mean you can just change it when your export also
I dont get it, im new to photoshop
When u export at end you can pick the resolution scale
can someone help me with a thingy
it will not affect my image quality will it ?
Ur always going to lose quality the smaller the image
If you want full image quality you don’t change resolution
but like im trying to crop the image shouldnt that keep the quality?
isnt cropping different than resizing the image?
i think its just resizing without making the image smaller and cutting out the other stuff that isnt in the resize
🥲 im sorry, what?

its cropping it but not making it smaller as in your cutting out what you didnt crop within the original image
now
can someone help me with this
trying to make the banana joe be like the same colour scheme as the backround

like make him the dude instead of the normal one
broo
lol
how do i do this
Where is tint
Hue
So if i’m to get this do I get a refund or additional storage space on my cloud?

Well why not
Did you pay for it?
I have school that pays for me
Then download it
one second
How do I get the option to free transform text that I can make it curvy like that?
This person made Text, convertet it into a shape and used free transform but I can only move the edges

this

Try rastorizing it
What device are you using
computer
Looks like it’s unsupported
The layer or can I do that with only the text?
premier pro too
how I fix?
This person does it here but it is so fast I can't figure out what exactly he is doing
https://youtu.be/S3UpkqGAgGk?t=10

Maybe update it
I try
thank you bro
Gave +1 Creative Carma to @strange hull
Ah I think i found it
Edit > transform > the 7th option.
Idk how to translate. Deform?

Wyou did
You*
What what did you lol lmao
You painted?
Try smudge tool

lol
Does anyone use Canva & ps?
I’m trying to export my psd file to be used in Canva but it doesn’t seem to retain the frame
I have never used photoshop
That is fine, but in your first try you're trolling. 🤣

@dusky sandal
guh
@river otter he don’t need anything lol
I wanted to make it look really cinematic. 🤣

sent you a message request
ok
No it's a completely flat png file
240px by 240px
Then it's going to be very difficult to get a clean result due to the aliasing of the text into the background.
Gotcha, alright
I can try in a bit I’m just busy with family right now
It's the Metropolitan Police Crest isn't it?
Just get a fresh version 🙂

Yeah it is, I have a white version of it but it looks very off
Yea was just gonna say that
i tried throwing the blue version ontop but it doesnt look right
Does anybody here know alot about fonts?
Do you know what font this can be?

who ddeleted my question?
see what i mean? just cant get it right

???/???
Just get a different backing image
Do you know or no? @strange hull
Me.
Please don't discuss piracy here on the official, Adobe owned Discord Servers.
oh sshit
It's really akward trying to layer it over the top, so it's better to just remove it entirely and replace it 🙂
Why’s it gone again?
sory
It's all good! 🙂
what do you mean?
yea
It was Gold Extra Black
Thank you !
What's the end goal anyway. Is it for a website or presentation or something?
Can someone please tell me what Gesture drawing is, and how it look?
Gave +1 Creative Carma to @sly hawk
discord server icon lol
Have this if it helps 🙂

Down with the homies.
rpc
What resolution should I use for a mobile wallpaper?
Hi there, would anyone know how I can get the first image to blend into the second?
Essentially cartoonize the first in the same style as the second


Any help would be appreciated :)

Egyptian slate black. 😁
I need help with how to make my text in my movie poster pop more. Any ideas possibly with vector shapes to put in for the text.


Just add a stoke
Or a shadow
Or use white text
😂
Surely there's some platform which can cartoonify it
But that'd be outside of Ps
Probably the best I can do

Probably a dumb question - but I have a bunch of Canvas Presets saved and can't for the life of me figure out how to remove them. Any tips on where they're located or how to remove them?
Does anyone know how to make a gradient like this one?

This is easiest in Illustrator with either adding gradient to a mesh or using the freeform gradient tool.
like this?

ill make a quick vid if so
Thank you!
Gave +1 Creative Carma to @strange hull
What is the best way to keep quality in your images. I make textures for game development and want to know how to keep the highest level of quality in my work. All work has to be set to 2048 by 2048 and sometimes that means scaling down images from 4096 to like 512 to fit the texture. I know you can turn on smart object to help when downscaling images but is there any other way to keeep quality in work as much as possible. Would appreciate any help chur
Found the Solution on my own.
C:\Users\...\Roaming\Adobe\Adobe Photoshop 2024\Adobe Photoshop 2024 Settings there's a file called MRU New Doc Sizes.json
All the saved document sizes are stored there in JSON format, and can be removed easily. Just make sure not to mess up the syntax and you're good.
Ooooh! Another texture artist.
Inside of PS specifically, they should be all down sampling the same whether you use transform or smart object. Depending on your engine of choice - you may be able to also downscale there as well. If you're using tools like Substance Designer or Painter, it may be better just to export them directly in the desired scale. Alternatively, if you're using something like Nvidia Texture Tools (standalone) - you should be able to export in the desired output size anyways, but NTT also has a Photoshop Plugin as well that might be worth exploring.
Ultimately, your quality is going to be diminished by Block Compression more than the actual scale of the image itself in most cases.
For my college class assignment we're making a caricatature of famous people. I am trying to copy paste an ear onto a new layer however it is giving everything but the ear.

Is there a setting somewhere I'm missing that could be causing this?
Layers and paths if that means anything here.


Thats more modelling no?
If you’re referring to the face in your image I’d reccomend getting into blender
Oh is there any tutorials
And do i have to start making face on ps and then blender? Or how does it work
yes. Search for "Blender Tutorial" on YT.
you can do it on both.
Could someone help me figure out how to use depth maps to make things like these album covers? I did find this Reddit post explaining that depth maps and noise maps were used but I’m not too familiar with either and none of the tutorials I’ve found illustrate things like these. I messed around with the depth blur neural filter but feel far off


If someone could even help me with figuring out some keywords to be googling to learn more about it that would be greatly appreciated
Hi!
Depth maps are 3D componenets that shows, generally in two colours, the depth of a 3D scene. You can do that in Photoshop, but 3D features are slowly retiring from Photoshop so I wouldn't advise starting to learn using photoshop because you run the risk of it not working as intended.
You won't find any depth map options within the standard UI of Photoshop but in the 3D workspace, if it's still there. (I personnally made the conscious decission to drop any attempts to work in 3D with PS since they announced the phasing out a few years ago, 3D is already complicated, I don't need that in my life 🙂 )
Do you have a 3D software?
My PS still shows all the 3D workspace stuff, but I agree it seems overly complicated and if they’re phasing it out then no point in learning now.
I have the rest of adobe creative cloud, and used to do cinema4d autoCAD and some other 3d modeling apps and could relearn the basics if I had to.
I guess my hope was that there was an easy way of making this effect just in photoshop as that’s what I use the most and my old MacBook has trouble with 3d stuff
If there’s no easy way to get that look in photoshop though (especially the type of thing in the first image) then I can just try to create it in a different software
you may have that showing if you're trying

Yea I hit OK and messed around with different 3d stuff for a bit but wasn’t sure if I was on the right path in creating what I wanted to so I came here
The thing is "depth map" means you need to build a model first. That modeling, I doubt you will be abl to do it in PS. You need Substance modeler, Blender, or even Illustrator for simple object. Because you need to create that fabric shape in the first place
There is a more controllable version of Lens Blur with depth sensing within Camera Raw

Once you've built your model (an .obj) then you need to put it in a scene, with a camera, camera having a depth of firld and the 3D software will generate a depth map from it
A depth map is generally a black and white PNG file
When opened from a subtance pacakage rendered in PSD and opened in Photoshop, it can show as a separate layer in colour
There are lots of tutorials that say "how to create a depth map in Photoshop"
But you need an object within a scene first
I guess what I don’t really get is what step the depth map does in achieving the end result. Like is the 3d object the same look as the final result and the depth map just adds color or is the colored version of the depth map itself the final result?
Let's be honest, me neither, I suspect people in the reddit channel are using "depth map" in a different way than I am
It doesn't make sense to me (But I am not saying I'm right). Maybe usage have changed
I just can’t find other examples of people using depth maps to get this kinda art outside of the artist that does it
My accepted understanding of the depth map is that it is used with whatever software to extract the depth of field for you to work on a limited area, for example, use the depth map in Photoshop as a mask to apply fog. But you need that scene first! 🙂
Perhaps they are just using lots of layers with differing amounts of blur added to simulate depth
It's often referred to as adding parallax depth - often used in AE on stills to animate a dolly move
That's possible
Ahh maybe
Can't you reach to the people who answered on Reddit and ask to clarify?
I guess so yeah
See that tutorial (even if you don't understand the steps) to see what I mean by depth maps
https://www.youtube.com/watch?v=35cD7nHBh7U
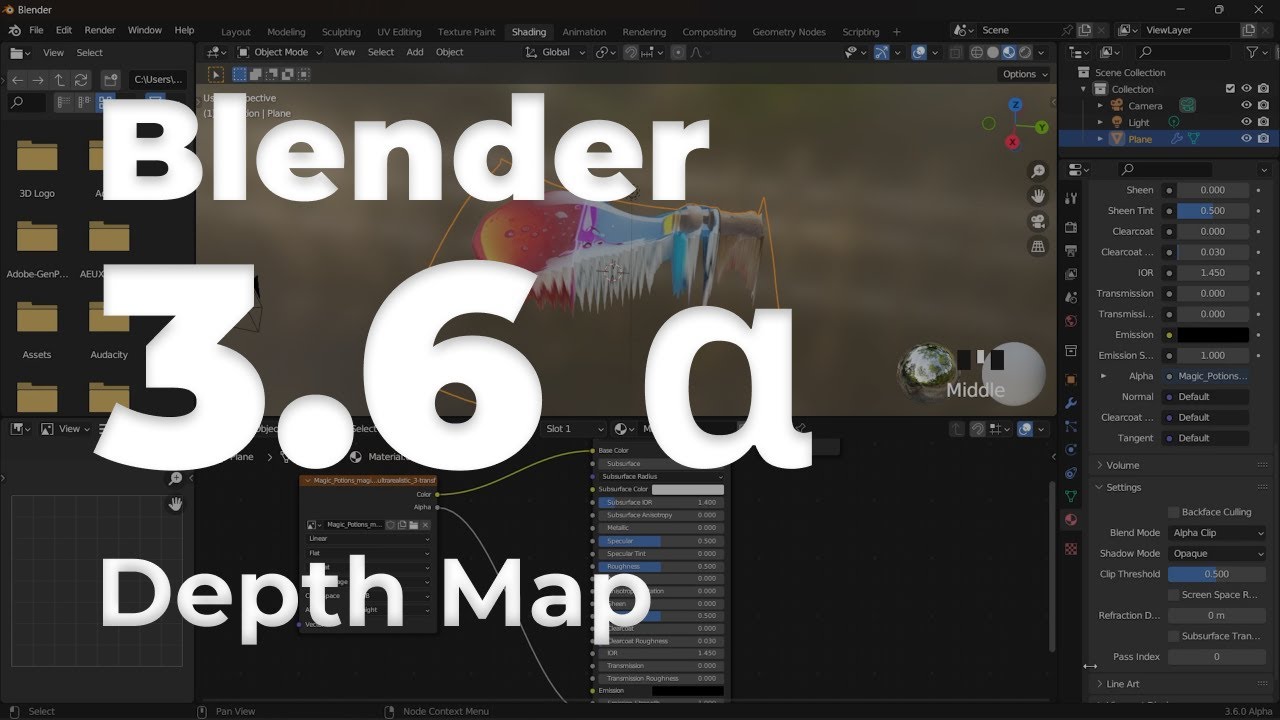
In this video you will see with Blender 3.6 Alpha how to generate depth map from 2D images to 3D object by using different AI Image Tool.
The first tool we're gonna use is called leonardo ai and it is an AI Image Generator Tool that allow to use different prompts and different model to generate a final image. Here you can find the link:
https:/...
I think I’m just gonna 3d model some stuff and mess with the depths, I’m just hoping the learning curve won’t be too terrible in getting it to look like that first image once in photoshop
In photoshop: https://www.youtube.com/watch?v=XdYEzui3Ttc

In today's Adobe Photoshop video tutorial I'll take you through the process of creating an interesting effect that takes a static photograph and brings it to life with subtle movement, often referred to as 2.5D, or the parallax effect.
📺 WATCH NEXT: How To Animate a Still Photo in Adobe Photoshop - https://youtu.be/kw07wyP3qm4
📦 Join my mailin...
What kind of object do you want to model?
I kinda just want to make a trippy looking distorted sky for an image I’m editing, the inspo comes from the sky on this album cover

So as of now I don’t really know what the object will be more so that it will just have depth that allows me to make the sky look like it’s opening up into a bunch of different dimensions like that😂
I would have suggested Illustrator for simple, non organic shapes but I guess that won't do it
Welcome back to Instagram. Sign in to check out what your friends, family & interests have been capturing & sharing around the world.
that kind of stuff?
Ooooh that would be really cool too
It's done in Blender, a 3D software
Yea I’m familiar I’ve just been pushing back the day that I learn blender 😂
Don't tell me about it!, I'm still on my second attempt at the Donut guy 🙂
Is this getting there?

This software is insane, I much prefer substance, but my computer disagrees with me
Similar yeah
Just in case you have the opportinity and you want to start over with a much simpler interface than Blender's you can see that (provided that you have loads of GPU power at your disposal)
https://www.youtube.com/watch?v=kUuLwAw1HsY

Introducing Substance 3D Modeler, an intuitive new tool for shaping 3D designs as if working with virtual clay in an immersive VR environment or on the desktop. Modeler has been designed for artists and product designers looking to quickly explore concepts and represent their ideas in 3D.
http://www.adobe.com/products/substance3d-modeler.html
...
Your inspo pic reminded me of this: https://www.iis.fraunhofer.de/en/ff/sse/affective-computing/ims/tech/inline-glasspannungsinspektion.html
Fraunhofer Institute for Integrated Circuits IIS
Using the data of polarization cameras, our software library generates stress images and displays precise magnitude and orientation that help you determine the retardation and position of any potential residual stresses.
Woah that looks cool
I keep sharing Jan's profile with people who want to do that kind of things, and I think he should do a course on Blender (that guy is so young and talented!)
Give him a like or two on his insta posts! (say Auntie Sandrine made you do it 😂)
Lol will do
You can do something similar in PS using curves on a cloud image then blur.

True
Or I guess any surface with texture and depth
I’ll mess around with that too
I’m gonna go to bed but I’ll try my hand at this through 3d modeling that curves method but if anyone sees this later on and has ideas on how to create something like the sky in this pic, I’m all ears!
Does anyone have any idea?
Can you share the whole of your Photoshop window? particularly the panels, like layers panels etc, as yours is not really helping here

like that
Oh yeah sure one sec.

Where do you take the ear from?
She had us cut it out with the pen tool and copy it from the paths
So you need the same ear as this guy placed onto the same guy?
So the issue here is that your path is inverted, your ear is grey on the path visualisation while it should be white like the outline is
do you see what I mean?
so basically if you use that path (ear) as a selection or vector mask, it will result in everything but the ear showing, you need to invert the mask
Oh simple enough
The thing is, are you using the path as a selection to be used as a standard mask or as a vector mask directly?
because the ways to invert it will be different depending
in the originals folder you use the outline as a selection, but you can apply the vector path directly as a mask
That depnds what you have been asked to do
I will be honest, I dont really know the difference between the two so I will explain what I was doing.
I was right clicking off the paths layer and making a new selection that way
Then would make a new layer using control J.
Idk if thats helpful or not but


OK, so do as you've done in the past, create the selection from the path, then apply it as a mask (you won't see anything) yhen select the mask go to select>invert selection (CTRL+I)

First before inverting, and then after inverting
You want it to look like the ear is in white (not black)
"Black conceals, white reveals" That's the mantra


In the video example each body part was a new layer. It wouldn't be possible to make that mask a new layer would it?
Video example here

Yes, make a selection of the part you want (using the path as selection) and selecting the original layer (keep the selection active), hit CTRL+J (copy from layer)

That might be beneficial
https://www.youtube.com/watch?v=mqqVmGxvHaY
honestly, if your aim is to learn, try to keep it with masks instead of cutting the layers. Masks make it possible to correct, or finesse the selection while cutting directly from a layer is considered a bit barbaric 🙂
Using mask is the more efficient way to do it

Masking is the granddaddy of skills in Photoshop. Master masking and you're well on your way to conquering Photoshop. In graphic and web design as well as photograph retouching, masking is the fastest and easiest way to erase layers without actually erasing them. This allows you to fine tune your adjustments and graphics down to the pixel withou...
Thank you
i had to build a house model & insert it into photoshop, now idk how to edit it so it doesn't look so fake haha, any suggestions?...

thanks in advance xD
first, correct the exposure
or use levels/ curve
adjusment
whichever you are comfortable with
anyone can tell how do i start learning photoshop
you can do a course on youtube

any suggestions?
there's alot of different ones , whats your preffered length?
Anyone knows whats happening here
anyone that teaches in detail, so maybe 30 minutes for single vid
you can use any basic course for that, after doing a basic cource (usually vids of 3-6 hours) you can do specific courses, like color grading or graphic design... gimme a min ill send you a link on dm of a youtube course i did
Okay , thanks for helping out
here's the one i did

Learn Adobe Photoshop with this amazing FREE course. Go from beginner to pro in 23 lessons exploring all the essential Photoshop tools and techniques. You'll start at the beginning and work quickly into more exciting techniques. Learn how to use Photoshop layer styles, how to change color levels, how to retouch and manipulate images, and much mo...
Hey, I feel silly for asking this, but how on each do I make my trace on the right... look like the image on the left?

like the pencil brush effect?
The shape on the right is currently a SHAPE and not a PATH
oh, ok. - found it.
I can't do it until I literally make my own matching PATH from the shape.

which application (free) for drawing is best?
I am having trouble in merging a logo on a clicked image, I have tried perspective warp and puppet warp, auto blend etc, but I can't. Can someone help me with this and tell me how to do this?
Does anyone know why my smart object layer won't update in the main project?


What do you think about this gesture drawing, is it good? what can i do to improve

im not that good in drawing or anything but i feel the necks to big? also the legs feel kinda same, maybe add some prespective to the left leg
Because you have effects on it.
Click the Smart Object with effects and again make Smart Object, try after that.
I had the same problem few days ago.
photoshop 3d printing was abandoned years ago
What is the difference between the 3 with purpose to highlight some areas more:
- Adding exsposure or vibrance, layer mask, and brush parts to highlight them.
- Use dodge tool.
- Add 50% grey layer and use dodge tool on it.
I want to make a good and clean thumbnail for this Lethal Company video.
And my idea for the thumbnail is to make this guy do like a shush sign with the hands though i dont know how to do that and make it look like the character is actually doing that

@strange hull u stinky
Anyone know if there is an easy and somewhat cheap cloud based option for using Adobe products? My pc can’t handle photoshop and illustrator well.
How could i put my architectural render in a context photo?
Doesn’t adobe have a cloud version
What
For storage not sure if there is a browser based or software option
what about this

Adobe Express
That’s not the same as photoshop and illustrator it’s just a simplified mobile version
Anyone have experience renting a cloud based pc and using it for Adobe CC?
Well ofc it’s not
If your pc can’t handle photoshop your out of luck
You gotta either get a better device or compromise with express
I have good internet and there are ways to rent virtual machines or cloud based pc through aws and Microsoft but I’m not familiar with it at all was hoping someone else would be.
Help
Where do i put the hex code to a color in photoshop
I go to the normal place in the latest version but i cant find it


LEMME OUT
im on latest also
how to invert colors fast?

command + i on mac
somthing plus i on windows

wow so fast ty
that dont look right
Gave +1 Creative Carma to @strange hull
If you're looking to return to the "normal" color picker you're used to, you should check the image mode and make sure it's set to 8-bit or 16-bit, depending on what your normal workflow is. Look for an option in your image editing software to change the image mode, which is often found under the 'Image' menu, in the 'Mode' submenu.
from chat got
ur in wack ass color mode pretty much
So, I have a question that's more Creative Cloud generic than Photoshop specifically. I want to change where CC apps get installed to an SD Card (I'm on a laptop, and storage is very limited), but it says I can't install to a removable drive. I understand why this is, because moving to another computer with it could cause issues, but I don't intend to move to any other computers, it's just because of storage limitations for my C: drive. Does anyone know how I can bypass this limitation somehow?
@gentle bough

you dont want photoshop on s SD card 💀 💀
thats not the solution
Hmm, any reason in particular you say that?
I'm fine with slow, my pc already barely meets minimum specs (integrated graphics)...
and prob not evven wsupported
just move other stuff to the sd card
use photoshop on harddrive
Alrighty, well what about a USB connected SSD (which I do have), it's 1.5 terabytes, as opposed to my C: drives 128 gigabytes of storage. It's USB 3.2 (so it's got some speed to it), Cretive Cloud errors with that. Any idea with using it on that?
🤷♂️
Alright, final question. Does uninstalling any Adobe apps mess with what's saved to Cloud Storage, or saved locally?
(Project wise I mean)
if its saved in cloud u can delete localy
I want to uninstall the apps, but don't want to mess up my Cloud Saved or Locally Saved projects, is what I meant.
Could be worth reaching out directly to Adobe - they have offline installers that might not have that limitation. Not 100% sure whether it does or not, so worth a try. Definitely give Adobe support a hoot anyways.
So, I actually got it to work. Basically, when you create the partition, you can set it up so it mounts as a folder on the C: drive, which tricks Creative Cloud into working.
Would anyone know how I could remove all of the white corners surrounding the circle?
Trying to remove the background for everything but the circle and text...


I would think using the magic wand tool to select the circle and then control x to cut and control v to make a new layer with the circle, then delete the old layer
The old layer should just be the corners
Tried that and it said "Could not use the magic wand because the target is a group."
Wait got it working
But it's just selecting different parts inside the circle
Hm
Solved it, just selected the white parts and cut them out
👍
No better feeling than solving a Ps problem
So it’s all good then?
Yep, thanks for the help 👍
Although I do have a new problem
How would I smoothen the edges of this?

is this the full size image?
so tiny
I think I made the canvas too big
whole things too small
how can i make a cat on photoshop
no
thats a little vague
@wide wadi lol
Oh wow u pulled a cat out of thin air when did adobe go ai
cat with pope hat and puffer jacket with aviator’s sunglasses and a dior scarf
I need to make this white text on a light background into black text on a near-white background, but I don't know how
typically I'd used hue shift but since the main issue here is lightness it doesn't work as I can't make one part darker without doing the same to the other

Hey is there anyone who can help me on a funny edit on a picture we all have bets on the best one and need some8who knows more that I do

Hello, I'm wondering how Youtubers get such high quality images of streamers (especially when enlarged) on their thumbnails.
I have tried just screenshotting the webcam, but it turns out in low quality (especially when enlarged). Any ideas? Thanks.

If I remember well, there is a still extraction function in OBS?... Not a screenshot but a still extraction from the .mkv file. Otherwise I would expect Premiere to have that kind of stuff.
Maybe someone more acquainted will clarify. Screenshots are dependent on your screen resolution and "quality". Also not everyone streams with a webcam. I live streamed once and in tests phases, I tried both my camera and webcam and the camera was way ahead in terms of quality (Even if my webcam's not bad). The only reason I didn't use my camera was that the HDMI converter started to generate heat in way that I didn't see it being safe for more than 1 hour.
But I had a very bog standard gear and accessories and since I didn't intend to stream again, unless asked, then I didn't want to invest.
There is the texture of paper, that you can find about everywhere
On stock websites, scanning your own old books or taking old books from websites like internet archive and extracting the blank pages at the start of the books, in order to overlay them onto your drawing etc.
https://stock.adobe.com/uk/search/free?k=paper+texture&search_type=usertyped
concerning the texture/style of the drawing, I would think it's coming from either the paper texture as placed on a top layer, and/or a specific type of brush with some texture added in the brush settings.
You could simply "invert" the content of the layer because given the low resolution of the text I doubt you'd be able to extract the text only from the rest of the image (image>adjustment>invert)
Or personnally, if I knew the font of the text, I would delete it and type it again with the right font and colour, that would be the best way
I tried that, this issue is even if I get the text black i can't change the overall lightness difference between it and the background
I did find a way to get around that through making it greyscale and messing with the brightness and contrast, though
But what I ultimately ended up doing was closer to this, albeit not as elegantly lol
Yes it's tricky, with larger text and less jagged edges you could easily select and extract the text from the rest and work on each layer independently,. From what I see here it would be difficult.
I don't know what font is it, but it looks like that from the close up 🙂
https://opengameart.org/content/bitscript-true-type-font

OpenGameArt.org
I removed all the properties on the font to get rid of my name but I'm the original TTF maker. http://opengameart.org/content/bitscript-a-low-res-handwriting-font
The ambiguous pixels make it hard, cause even if I did extract it into another layer there's still the issue that I need the blue-white pixels to become a mix of the new two colours
I can get them half black or half the other, but idk how I'd do it for both
If only I could like, turn the blueness into transparency
So the bluer the pixel the less opaque it becomes
Then it'd be easy lol
I could only see selecting them pixel by pixel and tweak the opcity accordingly, but noone is going to do that! 🙂
You could try blend if
https://www.youtube.com/watch?v=DZ9oEwhAfKY


–
Day 14 of 30 Days of Photoshop is all about Blend If! Learn how to make a layer visible in just the highlights, mid-tones, or shadows, allowing you to recover information and color tone your images.
Download the Sample Image:
https://phlearn.com/30-days-day-blend-if-yt00-desc
Sign Up for 30 Days of Photoshop:
https://phlearn.com/30-days-of-p...
Basically you tell one colour to appear transparent and you choose the amount of transparency by moving the sliders
Your blue isn't a straight blue there so I'm not sure it will work
I would really redo it, I know know why it is important to you to keep such jagged lines (They don't make for either an easy reading, nor an aesthetically pleasing type)
At the end of the day, unless you are forging a document 😂 a beatufiful result is what counts best!
https://www.youtube.com/watch?v=dHU03kD6Q90
This one too
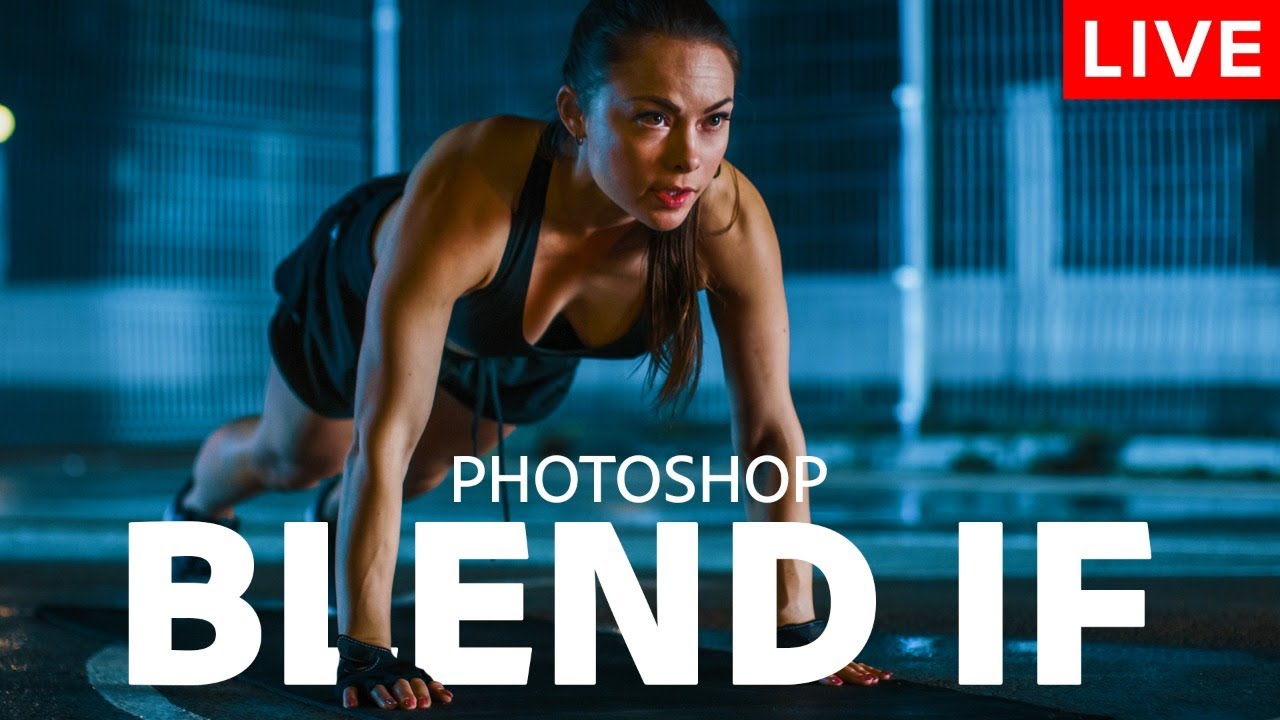
In this episode of the Photoshop Training Hour, you will learn everything you need to know about "Blend If."
With the techniques that you will learn in this stream, you will be able to make fast and easy sky replacements, apply textures to text, create cool special effects, and much more.
This live stream is sponsored by MSI!
My MSI equipment...
This is what I ended up with

I just got a decoding of this awful cursive and redid it with solid colours as faithfully as I could lol
Yes, there was an anti aliasing on the type so as to mimic soft edges and that mades it difficult to select or tweak
Anti-aliasing my beloathèd
I can't even decide if it's a mix or roman letters and Japanese Iragana, or something else entirely
That's what I was thinking! That second last one is meant to be a T but I swear it's a hiragana lmao
Hi. I'm trying to make a sunburst like effect with polar coordinates.

But it's pixelated and the center isn't exactly center-y

like it isn't perfectly dot in center
The issue is that you get straight lines and they are transformed into angled lines. If your original isn't at a large resolution that will happen (to be honest, it will happen even at large resolution, but you can circumvent it by adding a bit of blur to imitate anti aliassing). What is the pixel size of your original?
As for the center, From my recollection, if your layer/canvas is square, it should be centered, so maybe there is a little discrepency between height and width?
At the end of the day, this is a filter, not something that deal with vectors that are mathematically exact. If you need an exact sunburst, I would do it with vector shapes (relatively easy, although longer than a one-click filter)
do you have a tutorial for doing it with vector shapes?
I'd like it to be perfectly in terms of angles I don't want to eyeball it
I will try to find one. That something that could be automated with Illustrator (via the transform function or by building a radial pattern) but these functions do not exist in Photoshop, so it has to be done manually
ok, thank yo uvery much!
try using illustrator im sure its much more straightforward there
You can absolutely work in vectors in Photoshop but there are less functions than in Illustrator. It's still possible ans as long as you export in a vctor format (.svg, eps etc) the result will be similar
I know, just suggesting
I couldn't find a specific tutorial for a sunbeam using vector shapes, but first of all you can read that
https://helpx.adobe.com/uk/photoshop/using/drawing-shapes.html
when you're comfortable working ith vector shapes, and in order to to create it remember a few things
thank a lot! i will take a look
1- clearly mark your center using guides, because you will need to place your centre of rotation in the center of your canvas
2- create your triangle, compute how many triangles you need to make your sunbeam. Divide 360 (degrees) by this number it will give you the rotation angle of each triangle compared to the previous one
3- Copy your triangle once and move to rotation centre to the intersection of the two guides you set up in #1
4- once done go to the properties and type + the number you found in #2
in the case 0+angle (type in the mathematical , logical equation directly in the field)

so imagine you need 10 triangles to make your sunbeam, you'll need a 360 degrees/ 10 triangles to compute the rotation: 36 degees. So in our rotation field we will type in whatever number there is + 36 (0+36 in the screenshot)
You'll see that second layer rotating by 36 degrees from the centre (since you moved the rotation point) and the first layer not moving
5- repeat by copying the second layer, move the rotation point if needed, and add our angle to the number displayed (36 +36 in our case)
6- rince and repeat 7 other times to make 10 layers or whatever number you decided in #2
It's because not everyone has illustrator, not if you're on the base standard Photoshop subscription, so we have to make it work for Photoshop! But agree it would be way simpler in Illustrator.
So now, you'll have exact lines that will not get jagged if you enlarge them. Just a caveat, we are dependent to the resolution and quality of our screens, so sometimes vector lines can appear a bit jagged, but that's because screens will still have a limitation. If you save the resulting sunbeam in a vector format, then it will be mathematically correct and will display, print or project at the best possible quality that the output device can do. Internally, the file is 100% mathematically correct. Which is absolutely not the case when you create something in raster format (like when you use the filter)
hey
im sorry but the issue i was having that day still isnt fixed for me, can someone help please
My cropped image isnt changing dimensions
Can you recap what you are doing (which tools are used to crop etc) alongside a FULL screenshot of your UI?
like that

yes a sec
No problem


I'm still not seeing your entire screen, that's important 🙂 Screenshot it with the crop tool selected

Also, do you change the image size as well, or was it just to show me the dimensions?
i mention the dimensions 1920 by 1080
it was just to show the original image dimensions
here now after clicking on crop tool i input the dimensions 1920 by 1080
OK
So you are changing an image that is 5600 pixels approx to one that is 1920 approx

is that right?
That's how it should work as you indicate that you want to change the size 🙂

Yes that's what you asks it do do with the crop tool
now since i have cropped y image
shoudlnt
it also change my dimensions

but my image dimensions still remain the same
So you want it at 1920, with the 16:9 ratio on?
yeah i want the image cropped, and after cropping the image dimensions will change automatically
correct
?

if you want to change the dimensions: type in 1920 x 1080 x 72 dpi in the WxHx resolution panel
if you select ratio, it only takes the ratio into account and not the dimensions
No worries. If you use the same crop a lot, consider making it a preset

that way it will appear in the list
Yes, since you change its size, there is always a loss when you upscale or downscale. It's less visible when you downscale but it will make you lose some
The methods in which Photoshop "invent" or "cull" the extra pixels are called interpolation. That's what you see in your "image size" menu next to "resample"
Automatic is OK, it decides based on what the image will end up at
ohh understood, thanks again 🙏🏼
If you want to change it as PS level, you need to go to "preferences>general" and change it there. I always put bicubic automatic, but I guess automatic is the same

You're welcome! 🙂

hello guys i'm new here and i wanna some help please i didn't found it on ytb (Decreasing mask)
i want to put a flag into a logo and both of them look like one logo
i wanna put the moroccan flag into the white logo

You can easily by using clipping masks
You will have your base layer (the logo + possibly the text) onto which you will clip the flag.
Check that explanation
https://www.youtube.com/watch?v=JyWplm5X-lU

Learn how to create a clipping mask in photoshop while making a quick scrapbook inspired image! A clipping mask, or photoshop mask, in the simplest way, is a layer clipped inside of another layer or group. A clipped layer will only be visible within the boundaries of the layer it's clipped into, also known as the "base" layer. A layer will becom...
In your case, I would group both the text and logo and clip the flag onto the group, so it will look like that

thanks Valdair, It helped a lot!
Gave +1 Creative Carma to @wind narwhal
Hello. Is there something i can do to make the the brush in liquify tool not lag when i change its size? Like 10% of the time it works smoothly, but the other 90% of the time when i press alt+right click to change its size it wont budge until i move my mouse a lot to the size, when it will jump up or down in size way past the point i want. Its very frustrating.
My Gpu is a 3090 and its drivers are up 2 date. So is photoshop. This has been an issue for me through 2-3 years now in all patches of photoshop.

hii im new to PS and I need help with gradient maps
So basically, I want to apply a gradient map to 1 layer (the layer is some rasterized text that has iris blur around the edges, the colour is white.) Whenever I use clipping mask on my adjustment layer to the text layer, the colours from the gradient map disappear. The gradient map's colours only appear if the adjustment is applied to every single layer (its not on clipping mask).
How do I apply the gradient map to that one text layer without the colours disappearing?
Another thing is I want the gradient to be independent of the background, because it only works on a black background. When I remove the background, the gradient goes away.
TL;DR:
- I want the gradient map to be on 1 layer, however it keeps disappearing when I make it a clipping mask
- I want the gradient map to work even on a transparent background, because currently it only works on a black background, and disappears if its transparent.
why does the gradient map work fine when its just a solid colour + some blur, but only when its not in a clipping mask?
I feel like ive done something really dumb here and that the solution is easy as, but please lmk 😛
can anyone help me?
how to exactly copy this format

Hello,
I recently purchased and installed Photoshop (version 25.1). When I launch it, whether through Creative Cloud, the .exe file, or as an administrator, I get the same error message, and then it closes.
I uninstalled all Adobe files from my PC and reinstalled Photoshop from Creative Cloud. I disabled Windows firewall, reinstalled graphics drivers, and even tried installing an older version (22.2), but nothing is working so far :/
Configuration :
Windows 10 Family
Nvidia RTX 2060 Super
Ryzen 7 3700X 8-Core 3.59 GHz
B450 Steel Legend
48.0 GB DDR4 RAM
Please help me.

Sign out and sign in back to the Adobe app
if that fails
Search for Command Prompt in the Windows search box.
Run the following command:
for /F "tokens=1,* delims= " %G in ('cmdkey /list ^| findstr /c:"Adobe App "') do cmdkey /delete %H
It clears the Credential Manager storage for all the Adobe apps.
(i just googled the code it gave you btw)
Yo!
So I have this logo and I want this gradient to be like the colour overlay if you get me? Do you know how to?


What if it's not a text layer?
I have a question, I'm trying to remove the visible flash on photo one, around the face. I attempted something on image two using Lightroom, but I'm not sure if I'm using the right software or how to do it exactly. Can you help me?


You can do it by applying a gradient as layer style
https://www.youtube.com/watch?v=KDO1NAGfRzA
Check this video for more info!

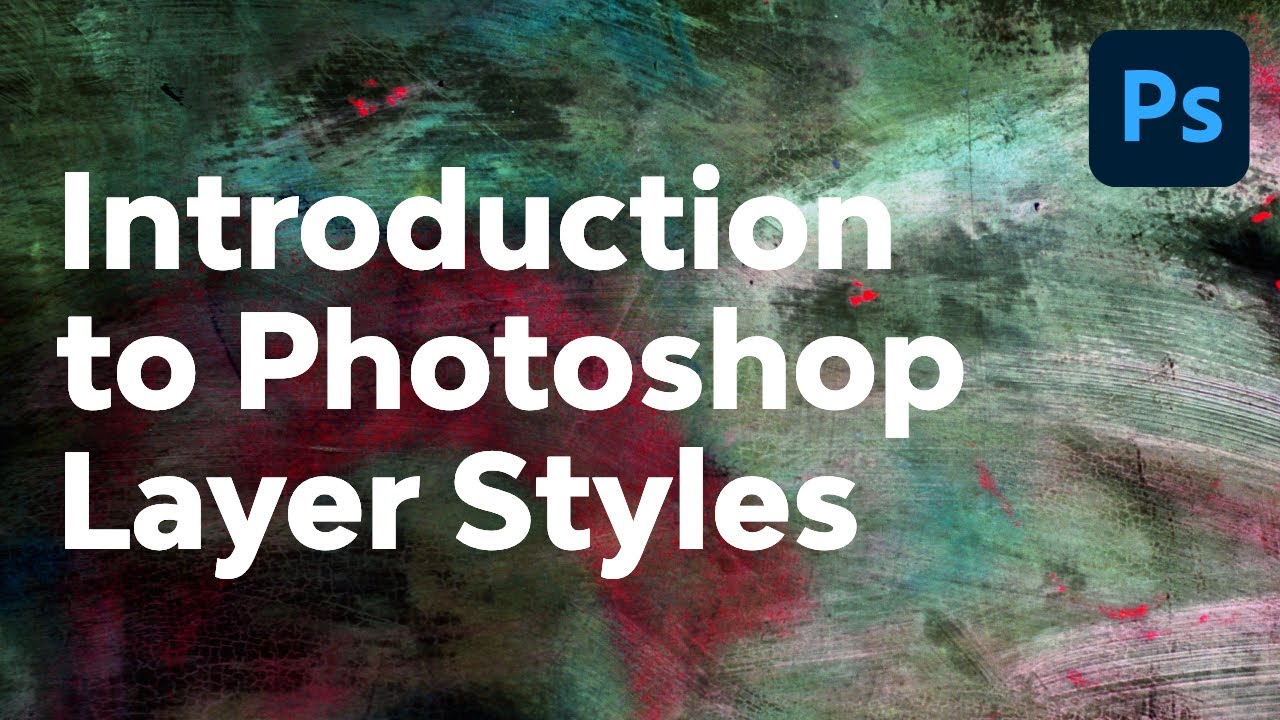
► Check out our amazing new FREE course, Photoshop for Beginners: https://youtu.be/IyR_uYsRdPs
Photoshop layer styles are a popular way to add effects, such as drop shadows and strokes, to layers in a non-destructive way. With the right knowledge and experience, any effect can be achieved. Whether it's a Photoshop metal layer style, a Photoshop...
works! thanks!
Gave +1 Creative Carma to @vapid flume
This one is hard because there is probably nothing to recover, no details, so Lightroom won't help much, and a levels/curve layer in Photsohop neither. So you'll need to create the lost details by either overlapping the area from another image, or even try a generative AI fill by selecting the area and ask Photoshop to replace it by something else

You're welcome!
does anyone know what particles those are i rlly need them

they arent from the gfame
its from the editing software
Thank you for your response, I figured miracles weren't possible, but that's okay. It will allow me to learn a bit about how to use the software. Thanks for this idea, I will try to apply it.
Gave +1 Creative Carma to @vapid flume
You're welcome. Lightroom would have helped if the image was in Raw format and there was still some details to recover. If it happen again and in order to make the most of lightroom, you can make sure you shoot in Raw format, and also take a few underexporsed pictures so you can recover some details
I've seen similar stuff in After effects, but your image is so small it's difficult to get any details really
Okay, I take note of this information, thank you 🙂
Gave +1 Creative Carma to @vapid flume
hopefully thats a little better however do you know anything similar to this

i just need somthing similar on photoshop

what do you mean?
those arent from the game but from the software they used
i was hoping you guys know anything similar to that

It's exactly the same size 🙂
yes


appreciate it
See if that can help you start something by yourself.
https://www.youtube.com/watch?v=WfMuzvuyoVs

I Guarantee I Can Teach You to Master Photoshop. Learn How: https://phlearn.com/aaronwillteachyou
In today's episode we create dust from scratch in Photoshop using a custom brush. The key to creating "dust" is to make particles that seem completely random.
Using a custom brush is a great way to create dust because it will take care of scatter...
this is using a brush
can anyone help me?
i dont understand
thank you, but it still doesn't work 😭
Gave +1 Creative Carma to @strange hull
can anyone help me get the circle affect shown in the image.
what do you mean??
Hello! How do I make this manga panel lighter? So it's not so much in the shadow, I've tried googling but it's giving me resutls for photographs which I don't need

like this?

Yeah!
i just selected the photo part with quick select tool, then used dodge tool
i did like 2 layers of it
really how should I tackle this?
so your just trying to remove the particle's right?
well there's a lot
but the first thing I should ask is
if i rasterize the layer will it lose quality
I got jpg's back from my designer and then I had to convert to a png in order to lose the black background
the difference


little confused on what your goal is
because it looks like you wanted that design to begin with
I actually cleaned up the image on my own using the before method to this


the problem is,
I realize that this was a big error because I rotated it some desgrees and it took a part a way from the brand to "move forward" because as you can see it looks still
I also isolated the leg and arm as you can see so it changed the place it was in
so even if I were to rotate it back it still looks funny
i mean i guess just erasing/masking some would work
but theres probably a easyer way out there
@hardy maple this is what i got just deleting some of the particles

not sure if thats the goal
great for legs
upper body a mess
particles needed because spefically this design has it
this is the one with less particles

but its crooked, not "moving forward"


another problem is that their legs aren't one in the same
there's gaps
why dont you just design one
then change colors
so they are all the same
anyways i gtg, gl
That's what I wanted to do but if you look closely you'll see there all made up of different graphics
like one has a high contrast than the other whereas this one is black with a white hue behind it
hello I resolved my problem thank you.
Gave +1 Creative Carma to @strange hull
I had low space
Oh so I was kinda right lol
thank you sigma🔥🔥🔥
alpha man
high level testosterone

Hey bro why there is nothing
@strange hull
Hello, i'm all new, and i don't understand what's up
You gotta agree to rules lol
i've done that
ok, how will i go about it. please
where bro
Bro you gotta use your eyes, I can’t do it for you lol
ohh did it
I’m already past it
Good lol
So, i learnt, there is an Only daily challenge??
How do i go about it
@devout igloo
i don't know, i new in this serveur

i think brown
Tysm ♥️♥️ I really appreciate your help ♥️

can someone help pls
Yellow
the colour is Anzac

kk


Tysm everyone ♥️✨

is there any way to make the selection tool work like in gimp? so i can move the selection around before making it final
need some help here with something
opening a file and i get could not complete your request because of a program error
anyone got software that can either repair the file or fix it
its for an animated series i am working on
Is firefly down?
Working fine here
Let me check
any help?
does it work for you?
Working fine
lol, I cant access it, tried with diffrent browsers
reset on quit
booting up now
nope
still saying could not complete your request because of a program error for that file only
I checked with the team, the servers are all working, maybe there’s something with your connection
Oh, so this specific file might be damaged
i tried on my phone, there it works
strange lmao
Odd, is it a jpeg?
I cant even access the website on desktop, its like a blackscreen infinite loading screen
its a psd file
does anyone have repair software
or anything to help me
its screwed
so done
Try downloading an older version of Photoshop. Sometimes it might be a compatibility issue or just a bug
does anyone have repair software, i can send the file if you want
its for an animated series
I need an Graphic Designer and i am High Paying. If interested DM me. Quick job
excuse me, is there any way to make the selection tool work like in gimp? so i can move the selection around before making it final
i dont have the pc space to do that
its screwed
can someone help pls
i just selected around a image with the pen tool and i want to keep that part and delete the background what do i press
Right click in middle
Add to selection
Then inverse the selection
And delete
Or mask
Pleased don't post jobs here. We do not have a job board. Consider contacting freelance designers there https://www.behance.net/hire
where there is a payment system in place
Discover, connect with, and hire the world’s best design talent on Behance
If you apply a gradient map, it takes its cue from the highlights and shadows of the file it's attached to. in your case the text is white and there is no shadows, just highlight. Consider using a standard gradient instead of a gradient map. They are two different things
if you switch from the move tool to the selection tool (any of them you'll be able to move the selection area, if you use the move tool, you'll cut this area (and the layer content that is highlighted in the layer panel).
you need to turn your path into a selection (right click on the canvas with your path selected and you'll find the option) and hit SHIFT+CTRL+J to cut that part and paste it in another, new layer. It's the same as Layer>new layer via cut
you'll have now two layers. One with the area you want to keep and one with the rest only (and a hole where he area should be). You can delete that later one
No, but I can teach you how to do it!
On my phone? 😬 all I have
Sorry, but no (You can have a simplified version of Photoshop on your phone BTW)
Ask in #💬chat-general maybe someone will accept to do it?
Has anyone seen the issue where you change the colour on a layer and it doesnt change on the image.
Edit
Found the issue - I had a style on the folder as well as the layer
Please do anyone have a video recommendation on how to make someone hold a paper on photoshop

Your already holding it
Depends what you are starting with and assuming that the photo you shared is your end result. Clarification would help here 🙂
Not sure what he’s asking g if he’s already holding the paper
A selfie of a person then make him or her hold a paper
Easy if it’s just flat paper no creases or anything
Yea a video can help please can you recommend one for me
You still didn't answer the question 🙂
what are starting from? a Photo? do you want to write something on the paper that isn't in the original photo?
Please be clear with what you want, and we'll find a video. I am not a mind-reader!
Just a clear selfie of someone, then make the person hold a white paper in the selfie that’s all I ask for
So you don't have a photo? so you need to find an image first, I suggest going to a stock website like Adobe stock
see
https://stock.adobe.com/uk/search/free?k=holding+a+paper&search_type=usertyped
Unless you use generative AI for that Photoshop works when you already have an image. It's a Photo manipulation software, so basically you need to start with a photo 🙂
Then if that's what you want we can find a video to explain how to put a text on the paper

Then you need to find a photo on a stock website, Photoshop will not create it for you
Looks like David Beckam by the way
yeah it's written on the photo 🙂 🤦♂️
Sorry about that
No need to be sorry, the face palm was directed at myself 🙂 . You just make it a bit tedious to be helped, if you don't have the selfie, then you need to find a photo elsewhere, but Photoshop won't help you finding a photo.
You need to have an idea of what kind of person you want to be in the photo and type in your request in the search bar of a Stock Photo website
Photoshop will help you place a text, or a piece of paper into the hands of someone, but you need to have that someone's photo in the first place.
Okay I’m searching for one now
OK
It's best you find someone already holding a piece of paper if you're a beginner, because adding hands, a piece of paper etc, is not a beginners' job.
And a video won't help if you don't know your way around photoshop
But adding some text onto a blank sheet of paper is relatively easy
Again, it helps if you know the basic functions

OK, so you'll need to add a piece of paper (so you need a pice of paper to start with and composite it into the image
To add the text, check this
https://www.youtube.com/watch?v=5y7sOoNLwRU

Learn how to create the cool effect of making text look like it's been printed onto a piece of paper. Watch the tutorial to learn how!
00:00 (Intro) Make Text Look Printed on Paper
00:22 Open Canvas and Type Text
0:42 Set Layer Style Settings
01:10 Create New layer with Threshold Settings
01:28 Add Background Textures
01:50 Final Result
Backgr...
Once you found your piece of paper you can follow this tutorial
https://www.youtube.com/watch?v=fgB_oO4xt1A
and place the text on the paper once you've done this

In this Photoshop tutorial, you will learn how to blend images together and create realistic composites in Photoshop.
You will learn three techniques to easily match luminosity, saturation, and color.
📘 INDEX
00:00 - Introduction
02:36 - Step One: How To Match Luminosity
07:56 - Step Two: How To Match Saturations
11:19 - Step Three: How To Mat...
Okay thanks so much
You're welcome!
Ask in #💬chat-general , this is the appriopriate channel for this (although we do not host a job board here, so...)
Hi, I'm making a menu pack for my Minecraft server. I need a lot of menus, but I don't know why, Photoshop makes me some kind of gradients on the sides of my images. When I save, everything is pixelated with the gradients on the sides. How can I solve this problem? Here's a video showing the problem.https://youtu.be/xKquE6KdbHI
It's because you are resizing the image within photoshop - so it's aliasing the edges. If you look at those edges before resizing you'll see they look ok.
I can't stop it?
however, when I use the same 2 images in paint.net, the image is directly the right size, without having to change its size. But the problem is that in paint.net, I don't have the layers with the writing etc...

I'm sorry, I'm not familiar with paint.net Somewhere the sizes are different.
I need syllabus for Photoshop to learn
Whats the best way to keep quality as much as possible when downscaling a image? I have a 5000x5000 image that needs to be downsized to like 512 below and the problem is when i do that the image turns to really bad qual, I have smart object on that helps a bit but im wondering surely theres a better way to keep the quality in my work when I have to scale it down
hi, it moves the selected image, in gimp it only moves the selection
@vapid flume the red one is photoshop, the black one is gimp (how i want it in photoshop)


In that case, go to select>transform selection

If you do it often, just assign a shortcut key to it
Anyone know good websites to find really nice textures. Looking for a diamond leather stitching texture and a snake skin type texture
🤣
how do i make a brush like this in photoshop

how do i go about making an pircture look old like this picture (attachement)

black and white +add noise
- mess around with curves
it is also kinda blurry in some areas
If you look at your example image you’ll see that it has a quite restricted contrast range. There are no real whites or blacks. The blurriness that you mention is due to camera and lens that took the picture. You can simulate this in the camera raw filter using the lens blur beta. When adding noise be gentle 🙂
HEY ANSWER ME FIRST!!!!!!!!!!!
If you look in the PS brush library, I think you’ll find one to suit. There is also an option in there to get more brushes. I doubt you’ll have to make one 🙂
oh thanks!!
We are all volunteers here, not paid employees. We do it to help out. Being demanding and using shouty caps will not go down well.
For the line tool
I cant change the color and when i use it it created a new layer
I need to draw perspective grid someone pls help
i have problem with adobe indesign, is this the correct place to ask?
I don't know how to change the color. after saving the project try reopen the program.
give a screenshot if possible
Ok thanks ill take a ss at home
Gave +1 Creative Carma to @fierce hornet
People I need help with photshop
my photshop is broken everytime i open it say sorry photshop has occured an error and needs to be closed
so sent the repor and after that it says photshop has found an soloution for my recent erroe and it still doesnt work after I follow it
this started this friday
before this it was working completly fine
i need phtoshop for makijg and animation for school work
can anyone help?
@here
Why are you doing animations in photoshop
schoo work
I have to make a gif animation
wait I made my backgrounds in illustrator is it possible to make the animation is after effects?
but my teacher posted the tutorial on photoshop
someone help this is due in 3 days for me
you don't know how to use Photohsop?
Then you should hire someone. It's not a 1 or 2 min work I guess.
Hello, i got a Question. So in Adobe photoshop i want to cut out in a picture the Phone screen and replace it with a diffrent Picture. How exactly do i do that?
no clue
share more details about the work. If I can do. I will do it for you.
Let him do his school work lol
I´d like to cut the white part out and put in a diffrent picture so it looks like the Picture is on the phone. Is that possible?

yes
yes
PS crashes when I open a project file I downloaded from the internet, I wonder what is the problem with this

Photopea

Right now PS seems to be working but I can't use my latest PS version
How can i do that?
Thank you
I use some shortcut. First CTRL+J to select the area
second CTRL+I to invert the mask.
Help me 😦
i dont have an older version and i've reset prefrences
I'm using RTX3060Ti but still such problem
if anyone else does i can send the file? Its screwed
did you face this problem before?
No, I only experience it when I open a project
If I send you the project file, can you also try it, do you have the same problem?
what inside the project? and how big the file size.
can i potentially send you my file too to see if you can fix the problem I am having
did you tried to reset everything. then restarting Photoshop?
yes

Payhip
This pack will inclue everything you will need to make a bangin 2d minecraft thumbnail
This file
try this https://www.howtogeek.com/724968/how-to-reset-adobe-photoshop-preferences/ . Aslo I suggest you to restart your computer once.

How-To Geek
Fix problems or go back to the purest form of Adobe Photoshop.
what's the problem?
Hey everyone I need help, so i want to get rid of the red orb hes holding and make it where the backgroud is his clothes. I plan on puttin subsribe in his hand for my yt banner but i dont know how to do this 😭

@fierce hornetMy problem is not solved 😦
I want to design a YouTube cover photo but I can't do it
is photoshop showing any error?
no
It freezes I can't do anything
If you want, you can download the file and give it a try and see if the same will happen for you.
If anyone can take this picture and give it a shot and share it here please do
Can I know your system specification?
I can try from my another computer. but can't do rn.
AMD Ryzen 5 5600 CPU
NVIDIA RTX3060Ti 8GB
2x8 16GB DDR4 Memory
500GB - 1000GB SSD
640GB HDD
that link want me to put my gmail there. give me a direct link.
You can enter my e-mail, can I give it to you?
dm me

How would I go about reversing an image, without reversing text?
send the image

so what are you trying to do?
Reverse it, but not reverse the text
so just moving the logo?
Shifting things around too
Is there a feature that does it or do I have to do it manually?
@fierce hornetHave you tried it yet?
Cut each element onto its own layer and move them around over a white background layer
How? I'm finding it difficult alligning things correctly
like this?

not yet.
yeah, how'd you do that?


already tried restarting yesterday
didnt work
problem is open a specific PSD file and it says could not complete your request because of a program error

▶ In This Video You Will Find How To Fix Could not complete your request because of a program error on Adobe Photoshop ✔️.
▶️ ▶️ ▶️ 𝐌𝐎𝐑𝐄 𝐑𝐄𝐋𝐀𝐓𝐄𝐃 𝐏𝐇𝐎𝐓𝐎𝐒𝐇𝐎𝐏 𝐕𝐈𝐃𝐄𝐎𝐒 👉 : https://www.youtube.com/playlist?list=PLFStktVg2e4n8AbDxZtqZ_u86pM0C1flg
▶️ ▶️ ▶️ 𝐌𝐎𝐑𝐄 𝐑𝐄𝐋𝐀𝐓𝐄𝐃 𝐖𝐈𝐍𝐃𝐎𝐖𝐒 𝟏𝟏 𝐕𝐈𝐃𝐄𝐎𝐒 👉 : https://www.youtube.com/playlist?list=PLFStktVg2e4lzGCbhRYBPh...
already unticked use graphics processor
didnt work
what gpu do you use?
thats it right?
it seems more like a file issue hence why i asked if i could send it
its for an animated series i am making
just like the backgrounds ect
I am working now. I will try later and let you know. I got you in DM.
How do I fix PS making one of my layers black and white when I export
I was about to export this project assuming it would export the same way I edited it. But when I go into the export tab it shows one of the layers as black and white. I clicked Embed colour profile. I waited a few minutes in the window to see if it was fixed, but nothing happened. I exported it and checked the image; the layer was still black and white.


hello how would i get this half tone border effect on the inside of this shape (instead of having an image inside and halftoning the edges of that image)?
i've tried using circular gradients, diamond gradients then using Filter > Pixelate > Color Halftone but it's not giving the results i want which is the first image


also tried masked layers + brushing using half tone brushes but i feel it's not the right solution and i couldn't find brushes that are applicable to the shape at all lol
post a screenshot of it.


everything seems good here.
then idk whats happening
yeah i tried
the layer is black and white but i have a gradient map adjussment later

"lotus copy" is the layer that shows up black and white

but there is a gradient map above it
Select all layer. Press CTRL+J
then Press CTRL+ALT+E
after the try to export

Hey everyone I need help, so i want to get rid of the red orb hes holding and make it where the backgroud is his clothes. I plan on puttin subsribe in his hand for my yt banner but i dont know how to do this 😭

You're probably going to have to redraw it from scratch. You could try the generative fill feature, but I doubt it'll be able to figure it out very well.
ah okay thanks man
fr
- in the school work i nede my face in it
I aint sharing a picture of me with u stranger
Try this: delete the orb leaving the glove.
Put the glove on its own higher layer
Copy the right shoulder, flip side to side and put behind the hand and glove. Some sizing and repairing will be necessary.
Alright I’ll try it, I’m very new to photo shop I mean I just started today so not sure if I’ll be able to do it but I’ll try my best
It's kinda like this.... but spend more than 3 mins on it!
Ah ok thanks very much man