#✂challenges-feedback
1 messages · Page 110 of 1
Gave +1 Creative Carma to @eternal mica
Day 2 - Glow Effect (V.2)
Tweaked light and color grading

Hi Charles, I had no problem to download or open the starter file, but I have a fiber 500 Mb/s to internet
Glow Effect Challenge.


for today PS DCC #06 Photo Compostion

Updated version used spot healing to remove that distant ocean line and increased the visibility of the reflecting neon shines on the whale and water. I might need more pink neon color on the water...., Thanks for feedback.

One more attempt. I think this is better.


DCC #06 Photo Compostion, I posted this for the first time, if the sections are wrong, sorry 😄 ... Edit : Ouuu, this is really bad quality..Discord..


Challenge #06: Photo Composition. May all force be with you. Thanks tо Pinsky a lot I learn some new things today. He is very well organized, has got an excellent microphone and a clear pronunciation. He is professional!

@eternal mica Thank you for your review. I made some changes. What do you think?

Gave +1 Creative Carma to @eternal mica
Day 4 | Stylized text

This challenge was fun! Thanks, Howard. Do you think my lighting sells?

@bleak fossil Thank you for your review. I clean it up. What do you think?

Gave +1 Creative Carma to @bleak fossil
I like it a lot better. Its a much more powerful design than your first pass. Try pushing the reflective glow a bit more. Do you like it better?
Great job with the tweaks. Looks great. Do you like it better?
Mercury meals delivers an out of this world MEAL 😂

Had to tweak it a little

well he needed a delivery vehicle

The human face controls do not work with animals yet in liquify... But it is still fun to play around with liquify on a cat! What do you think? Two options.


Day 4 - Stylized text

@eternal mica Like that?

Yes, thats more realistic. The face might be a bit too much, but the glow on the clothes looks good. Very well done.
Reflections on Turning 49

@craggy lake Nice job with your stylized text. The color palette works real well. The circular layers create a nice sense of motion. The bevel, the stroke, the fill you added created a cool effect. I like the tan shadow you added. My only tweak would be to play with it to balance the size from left to right. It looks a bit disorienting that the right side is smaller than the left.


@young junco Awesome work with the liquify filter. The outsized body looks just real to be believed. I particularly like the shoes. Your work on the waves really sells the whole image. I love it.
@wary swan Is it good or bad if I say your image is believable?? LOL. Well done. You manipulated the liquify just enough to make the viewer take a second look. Good work, friend!!!
@high mesa When I was thinking about what to do for this exercise I decided early on my grandkids would love me to use on their photos but their parents would destroy me. You proved them right. This boy is too adorable to have this done to him!!! But you did a super job with the liquify. The eyes look great. The reshaped mouth looks like he's really got something evil planned. The sepia is a good touch. Through it all, he's still too cute!!!
@young karma Very creative Glow Effect design. I like the color palette. You did a good masking the circle and the glow. It would have been cool to see the circle a little smaller, or maybe an additional shape, something closer to the model, so there could be reflective glow added to the design.
@old pelican Real solid work with the Composite image. I like that you utilized three of the assets. The reflective shadow on the inside of the window is a cool effect. Tiny tiny nit pick would be that the light source is off to the right, and your reflection and light inside the window is more dead center. But like Isaid, thats a tiny nit pick. Well done.
@young karma OOOH I like this a lot. One suggestion off the bat. When submitting a composite for review, its a big help for everyone to see the assets you used so everyone can appreciate your creativity. The concept is awesome. The execution is really top notch. The B&W BG makes the image fly off the screen even more. What would you say about making the book cover tan to make it clearly part of the colored portion of your design? Small nit picks: theres a tiny spot on the top center of the left page that should probably be masked out, and theres a white border along the top of the left page that could be eliminated. 💯
@dusky wave Well done. Real fantasy design. The selecting of the objects for your image is well done, though there a few places on the astronaut that can be cleaned up. I especially like the rim light you added to the girl in the window. The streaks you added across the window give a very real look . One question Id ask is why you eliminated all the detail from the astronaut except the steel objects?
@lucid plover Very well done, friend. You did a great job altering the entire landscape. At first glance it looked to me like you only added a lit bit of new elements. But knowing you as I do, I kept looking. Little by little the complexity of what you did revealed itself. Its a terrific job. My only suggestion would be to darken the lower left corner a tad. Its a bit too bright for the lighting in the rest of the design.
thank you @eternal mica
Gave +1 Creative Carma to @eternal mica
@young karma Is this your first submission? Welcome. We're happy you decided to join us. If you have any questions or need any help, let us know. We're here to help. Nice whimsical composite design. You did a good job selecting out the elements for your design. I like the shading you applied to the inner frame of the window. It would be nice to see some of that same glow on the girl also.
@dusky swallow Good work on both designs. The liquify is subtle but noticeable. The composite is really nice. I like how you positioned the astronaut, so the light source and the brightness of his suit are in synch. It might have been nice to work some of that lighting effect onto the right side of the girl as well.
@copper moss Good work. You did a good job selecting the objects. I like how you created by depth by increasing the size of the girl in the foreground. The streaks you added across the window are cool. My one suggestion would be to darken the inside of the left side of the window. There doesnt seem to be any light source for that.
@normal gale Is this a GoT thing??? Nice work creating interesting text and an interesting design to surround it. The cartoon character is a cute addition. I tried to open your image so I could examine it more closely, but wasnt able to.
@hushed spade Do or Do Not. There is No Try!! Nice job selecting the objects for your design. For the lighting, I think the left of the astronaut could be more in sync with the main light source coming towards him. And likewise, you could flip Yoda so the right side of his head, which is highlighted, will be towards the light. Last, you might want to add some rim light to the girl to give some effect to the light hitting her.
Great tweaks
@quiet ridge Loving this one. Really good work. I actually like the second one best. A few comments: The girl could use a little rim light to really sell the image. The light direction is inconsistent. It seems to be from the rear center. The space ship needs depth of field to really work. The streaks across the window really look great. The astronaut could use a bit of Gaussian blur to add to his realism. Hes a bit too digital. Solid effort.
Thanks Ted! Will try.
Gave +1 Creative Carma to @eternal mica
@low garnet Good work with the liquify. the effects you manipulated are noticeable. It would be cool to see the original source image. How'd you get the cat to sit still for that picture??
@eternal mica Thank you man I really like you input
Gave +1 Creative Carma to @eternal mica
@young karma Nice lively stylized text. The whole design really works. I like the flipped gradient for the text fill. The additional shapes you added also work well. Well done.
Thats very kind of you. Im learning as I go. I appreciate the encouragement.
@grave moss A beautiful ode to yourself. Thank you for showing the assets. One general comment. The grey slate water is a wonderful mirror to the birds and the sun. I suggest you create the same reflections for the little girl and for the raft. Also, the birds in the back are blurred and a bit foggy. You might add a bit of blur, a bit of fog, to the little girl to add realism to the depth of field for her too. And HAPPY BIRTHDAY!!!!!
Gave +1 Creative Carma to @grave moss

Undead Dressing is an old university project I. have been revisiting. Yes, you are right the text is too small. I will have to revise it.
@normal gale Im not sure what format and image size you uploaded the image, but even when I opened the original, it was pretty small on my screen.
The shadow is supposed to belong to another astronaut
Day 5 - Liquify - Starter file
Picture from AdobeStock(Free) : #73243959

Day 5 - Liquify ("Cartooned" with Liquify Filter)

Day 5 - Liquify (Cartoon version aged with Neural Filter)

@bleak fossil Ps DCC 2021-09 06 Photo Compositing Ode to 2001: A Space Odyssey

Does this lower opacity better convey the reflection of the text off the glass?

challenge 4 stylized text

Challenge #6
Any feedback?

@bleak fossil Sam, thanks for you comments on this. I had an insane day today and didnt get a chance to get back to you and thank you for the advice. I think I did what you suggested. Does this work better?

Gave +1 Creative Carma to @bleak fossil

Thanks for the feedback Ted, I'm appreciate very much!
Gave +1 Creative Carma to @eternal mica
I am late but here is my glow 🙂

@grave moss Very cool, nice job with all the different elements! The background photo has a very foggy look to it, so I think you could make the rest of the images fit a bit more by desaturating them to make the colors a bit less vibrant, and maybe darkening down the log a bit with an Exposure layer to make it fit the darker scene a bit more. Nice job!
@young karma Really nice job with the masking and glow effects! I'm not sure what blending mode you're using for the light on her face, but I'd try a few and see if any have a more realistic light effect. Perhaps soft or hard light might work well. The Day 4 text challenge looks great, really loving the stylized look and the background colors and design fit the text well. Nice work!
@low garnet Very nice! Yep, you can always do the effect with animals manually, I like the big eyes you added to this one. This colors make for a really interesting look too 👍
@quiet ridge Nice job with the masking of all these different elements in the space image! My main suggestions might be to increase the deepness of the darks on the girl, and decrease the darks a touch on the astronaut to make the contrast between them more consistent. Usually objects further away, or obscured by things like atmosphere/fog/glare on glass will have darks that aren't quite as deep as elements in the foreground. Making the spaceship's colors a touch less saturated might help it seem like it fits in the scene a bit more too. Looks good!
@hushed spade Very nice, this came out really well! I think the deep contrast between both the girl and astronaut has a consistent and realistic look between them, especially with the position of the sun. The out of focus/blur effect is working very nicely as well. Well done!
@normal gale Cool text and logo for this Day 4 design! I like how the sharpness of the design contrasts the softer background quite a bit. Perhaps the text and logo could be scaled up to fill the frame a bit more? Nice work!
@copper moss Nicely done! Nice work with the masking in this, and the close up crop gives it an impactful feeling. The composition of the shapes and how they overlap is looking good and add some nice depth as well. 👍
@dusky swallow Challenge 5 and 6 came out nicely! I like the blue tint to the Day 6 challenge, it gives it a cinematic feel and the masking came out nicely too. Nice edits with the Day 5 challenge as well, it's always fun how liquify can give edits a clean and realistic look. Nice work!
@young karma Very cool, welcome in! Nice job masking all the different elements in this Day 6 design. I like the addition of the glowing jellyfish. The color and contrast along with the jellyfish give it a sort of surreal/dream-like feeling. Nice work!
@lucid plover Very cool, the final image seems to have a really seamless transition between the landscape and the sky. It all fits naturally together in terms of color and contrast. Well done!
@split pier Very nice job with the masking in the challenge with the whale and the neon ring! I like the addition of the pink coloration in the water. I think you could probably even increase it with some more pink on the left side to really sell the feeling of it reflecting off the water. The color contrast in this design gives it a nice strong impact, looks good!
@old pelican Very cool! I love the subtleties in this design with the faint alien face in the helmet and the waving shadow on the ground of what I assume is a droid based on the head. The contrast and masking is looking really good in this as well, everything fits together nicely.
@young karma This is a great image for this glow effect challenge! The ring fits in nicely with the whimsical feel of the image, and the warm yellow contrasts the cool colors in the image in a neat way. Nice job on the masking as well!
@young karma Very cool design with the challenge of the volcano in the book! The intense color pops nicely against the desaturated background. Perhaps trying some different blending modes on the volcano image to show a little bit of the lighting and texture from the book pages underneath might give it a more realistic look. Nice job!
@dusky wave Nice job adding and masking all the different elements for the Day 6 challenge! My main suggestion might be to try a blending mode for the glass glare effect that doesn’t darken the astronaut so much, and also maybe put the layer beneath the girl so it doesn’t overlap her too. Looking good!
@high mesa Hah, nicely done, it’s funny how quickly the liquify effects can give images a creepy look. Even with such drastic changes the image still has a clean, seamless look. Well done!
@wary swan Nice job with the liquify and neural filter effects! Very cool with how much it can change a facial expression. My main suggestions might be to mask away the neural filter layer around the left and right side of the beard where the edge gets a little strange to reveal the original layer’s clean edge, and maybe to apply a bit of a sharpening filter around the eyes so they don’t look so soft when compared to the nose. Well done!
Thx a lot. And yes the shadow belongs to a droid/weirdly shaped alien
Gave +1 Creative Carma to @bleak fossil
Thank you Sam
Gave +1 Creative Carma to @bleak fossil
PS DCC 2021-9 Challenge 6 Photo Compositing Bonus
This is a different type of compositing one image two program DN and PS the only way to do 3d in latest version of Photoshop 22.5 the only hope to do this in later PS is that Adobe not canceling DN (Dimension) Creative Cloud sweeten 🙋♂️

Can anyone give any feedback for this?
You have done great work with the bottle, maybe you should done something a bout background to get the bottle shine
Alr ty!
Thanks for the feedback Sam, it was a fast job so I missed that you suggested
Gave +1 Creative Carma to @bleak fossil
Challenge #6 Compositing

@bleak fossil Thanks 😄
Gave +1 Creative Carma to @bleak fossil
@eternal mica Thanks, Girl have little of this effect, but on Discord cant see him..But thanks for suggestions, that my first work after 7-8 month break 😄
Gave +1 Creative Carma to @eternal mica
Thanks, Sam! 🥳
Gave +1 Creative Carma to @bleak fossil
@eternal mica @bleak fossil Thanks for the feedback; really appreciate your comments and my son is now speaking to me again!
Gave +1 Creative Carma to @eternal mica
PS DCC 2021 Challenge #6 Photo Compositing 8-31-2021


Thank you! ☺️
Gave +1 Creative Carma to @eternal mica
You made a great compositing job on this one! Just to go further I might suggest you add shadows under the bottle to enhance realism of your image. And (It's a personal thought) you could place the island a little higher in the bottle (unless the current placement is intended to convey a message). Last point adding glass reflections in front of your island could improve the feeling of island inside a bottle (there's a lot of tutorial on the internet)... Just ideas... Anyway you did a really great Job 👍
Thank you 🙂 The truth is that I saw this issue after I upload it 😄
Gave +1 Creative Carma to @eternal mica
Thank you so much for the feedback! I will definitely make the changes
Gave +1 Creative Carma to @hollow yarrow
@young karma Following on what @hollow yarrow suggested, the liquid mask you painted has a few spots you missed, and others where it doesnt sync with the bottle. An easier way to make the "water" fill the bottle might be to create a shape layer over the bottle where you want the liquid to be. Then add a blue color layer above that to be the liquid. Clip that layer to the layer below. Also, as Franck pointed out, occlusion shadows and cast shadows really help sell an image like this. Good effort. If you choose to go back and tweak the image, please make sure to repost.
Wow! Awesome composition work! I love the idaea of family photography.
The astronaut is well added in the picture and on the background your tubular structure masking is impressive.
Unfortunately the source of light on the astronaut (coming from left) does not match that of the family photo (coming from right)... Lot of work to fix that...
I think adding cast shadows below models might improve the realism of your image. Beautiful work! 👍
Day 6 challenge

Alright. Thank you very much! I will definitely find time to do it, hopefully when my exams end😅
Gave +1 Creative Carma to @eternal mica

Yes, you are right. I realized halfway through that it was all a bit too small. I will fix that in a future version. Thanks Sam!!
Gave +1 Creative Carma to @bleak fossil
#✂challenges-feedback Made this outer space composition using rust iron or metal image and couple of blue sky image...

@lunar copper Great concept great execution. The color palette sells the whole image. Your selecting and masking is spot on. The shadows you added add so much realism, although Im not sure you captured the light source exactly. But thats a small nit pick in such a terrific effort. Did you use Blend If to select out the GeoDome frame?
@vocal halo Cool Glow Effort. I think you can use more of the reflective glow, especially against the white objects that are underneath or touching the triangle. The masking of the triangle in the lower left could be tweaked. I cant tell if you have it against the table or the shadow. You'll have to check the original image.
Thanks so much! I didn’t use Blend If, but now I will go find out what that is. I tried a few things, but what worked in the end was going into the Select and Mask view and just hand painting the frame out, playing connect-the-dots with the points where the beams joined.
Oh my. That was a tedious task. You did it beautifully. Blend If is in the center of the Layer Styles panel. It is a good way to take two layers and blend the images, using aspects of one with aspects of the other.


–
Day 14 of 30 Days of Photoshop is all about Blend If! Learn how to make a layer visible in just the highlights, mid-tones, or shadows, allowing you to recover information and color tone your images.
Download the Sample Image:
https://phlearn.com/30-days-day-blend-if-yt00-desc
Sign Up for 30 Days of Photoshop:
https://phlearn.com/30-days-of-p...
@wraith tinsel I always get confused. Which Ninja Turtle is this one? Loving the composite. It would be awesome to see the assets you used. Nice work on the double light source and shadows on the ninja. I almost missed the mother ship in the clouds. Great job.
Thanks! I appreciate it! Here are the images I used and a before and after once I got all the pieces where I wanted them.


Gave +1 Creative Carma to @eternal mica
@wary swan I really like your "up close and personal" space composite. Reflecting the astronaut onto the face mask is a cool idea. It doesnt really jive with the other objects being reflected, but its a good fantasy image anyway. It looks like you painted over the girl. Did you?
Oh, and this on is Raph.
Thank you! I will definitely want to learn that one :)
@broken birch Are you new to the Discord chat? If so, welcome. You started off with a BANG!! If you need any help, which it doesnt appear you will, just reach out. We're happy to have you join us. Terrific fantasy composite images. This is obviously not your first design effort. Youve incorporated so many elements into each design. As I just pointed out above, it would be awesome for us to see the assets you used so we can better appreciate your creativity and effort. I really like the second image. Its a little less fantastic, which is good for a guy my age!! 🤣 🤣 And the lightning shark really grabs me.
Thank you so much.
I really appreaciate it.
Gave +1 Creative Carma to @bleak fossil
I was so focused on your image, I neglected to welcome you to the DCC and Discord chat. I hope you stick around and keep posting. If you have any questions, just ask. We're here to help.
Animated GIF made with my Day5 images
Howard @true plaza , I swear there is no hidden strategy to post now ... I only do it out of my working hours and right now I'm on my lunch break.😉

Gave +1 Creative Carma to @eternal mica
Thank you so much.
I really appreaciate it.
Will redo it and work on the reflective glow on the model.
🙂
@deft cedar Very well done composite. You blended the images nicely. It would be cool to see the assets you used to create your design. The way you blended the left hand is especially well done. Perhaps there should be a purple glow to the mini crystal ball to create the light source for the glow effect on the hand.
Day 6 Challenge - Bubbles- a work in progress


@night maple I hope he's still your friend after he says what you did to him!! Good work with the liquify. The second image is pretty believable and even the third is not that out of the realm of believability. Adding the fantasy BG helps sell the fantasy face. (Its good you blacked out the name)
I forgot to remove the name in the original, bit peeved at myself for that.
@tribal mango Welcome. This is your first post in our DCC/Discord chat. We're happy to have you join us. Hopefully you'll keep posting your designs. Nice work on the space composite. The textures you added to the orbs looks great. The rim light on the smaller planet looks really good.
Thats what the eraser and repost is for.
Day 5 challenge-My friend


Thanks for the feedback Ted, I had no astronaut from behind so I did a selection of the girl and inverse it filled with a backgrund color then painted over that, maybe could be be a better painting but that's not my strong side
Gave +1 Creative Carma to @eternal mica
PsDCC with Howard Pinsky Day 7 -
This one is for you, @ruby panther

This started off in a totally different direction, the original is just the woman on the rocks, the penguins were added and for some reason I thought it a good idea to add a great white

@bleak fossil Ps DCC 2021-09 07 Icons & Badges
I’m STUNNED! I didn’t think you had it in you. Great work!
@ruby panther @pliant comet Dogs Cats everywhere with you two!!!!
Can you give me a feedback guys please?

OMG!😯
... A dog?😉
sus

for today's challenge

The updated version.
It was difficult for me to create the glow effect on the model I have to say.
Did my best at this stage of my Photoshop journey 🙂
Also, I'm loving this and thank you.

Gave +1 Creative Carma to @eternal mica

With a stag

Now I have to go and make at least three cat related items to set the universe back in balance.

<@&548221840750018590> ^
Thanks for the heads up, @quartz bear 🙂
Gave +1 Creative Carma to @quartz bear
My first Badge
snazzy
snazzy
I tried to get Sam's suggestions worked in I hope this is better

@bleak fossil & @eternal mica 😎
Yes, we both were thinking along a similar line of thought relative to the space ship. (You could still add a bit of Gaussian Blur to it.) We forget to factor into our designs that the human eye is so much more intelligent than even Ps. It creates focus, depth of field, blur, etc in nano seconds, that helps us see what we want to see in the world around us. When we create composites, we need to recreate all those effects ourselves, all the while directing the focus on the focal point of the design. Your focal point believe it or not is the lunch box!!! Thats what tells the story of the design.
@eternal mica The focal point is why i left the glow around the lunch box 🙂
Since you added the spaceship late in the game, try this: add a Mercury Meals logo to the spaceship!!!

Thats what I get paid for!!!! 🤣 😜 🤣 😜
Also moved the ship more off canvas
@hollow yarrow Super GIF.!!! enuf said!!
@night maple I cant wait to see the final Bubbles design!!! The WIP is awesome enough. You really nailed it. The light is exploding all over picture, adding so many highlights. Great concept. Great execution.
@pliant comet Well if its not a cat, its a dog. Real good layer styles applied to the outer shape. Very realistic highlights created also. I would just suggest a tiny tweak to get the back of the dog out of the black gradient thats hiding it.
Okay this will be the last one for Mercury Meals lol 😶🌫️

@high mesa "youre going to need a bigger boat" https://www.youtube.com/watch?v=2I91DJZKRxs Always good to have a great white around when you need one. Really well done composite. The lady and the penguins look great. The penguins could use a bit more cast shadows. The shark could use a bit of shadowing especially inside the mouth.

Jaws movie clips: http://j.mp/1uu4l18
BUY THE MOVIE: https://www.fandangonow.com/details/movie/jaws-1975/1MVa171c4b69f851a36586f541ba67570b9?cmp=Movieclips_YT_Description
Don't miss the HOTTEST NEW TRAILERS: http://bit.ly/1u2y6pr
CLIP DESCRIPTION:
The crew gets their first face-to-face look at the massive shark.
FILM DESCRIPTION:
Based on Pete...
@pliant depot Nice work with the Icon/Badge. You created nice depth on the bevels. Im not sure if you intended it, but the smallest center shape is not centered. You can fix that by clicking on that layer then Ctrl A > Align tools. I think the design would work better if you incorporated the gold stars inside the pentagon rather than outside. But thats just me.
Oke, I will rework it and tmrw send again. Thanks for feedback
Gave +1 Creative Carma to @eternal mica
@young karma Nice work creating the bevels and contours. The design is crisp clean and bright. A BG might add additional pop.
Just a heads up. We try to comment to every submission. We normally respond when we have a block of time so as to allow us to comment on many posts in one sitting. We normally do not comment on individual posts as they are posted.
@dusky wave Nice work on the 2 designs. I think I like the bevel and contours on the blue one, but I like the bright color scheme on the red one. Interesting shapes; interesting designs. Good work.
Ye, ik it would be impossible to answer every submission solo 😄
@tired turret Very well done Icon/Badge design. The multiple shapes create a lot of interest. The fill and Gradient BG all add to the interest in the design. I realize you went for the navy/black color palette, and its really powerful. My only minor tweak would be to brighten up the badge itself a bit to increase the contrast with the BG and to allow all the intricacies of the design to be seen clearly.
Super job with the tweaks. This design is IMHO is a lot more interesting than the first. You really captured the idea of the glow and the reflective glow. This is the main idea of the DCC and the Discord chat. To submit works; receive critiques; rework the designs; learn; have fun. Well Done.
@last mica Good work with the bevels and emboss and contours. The color palette looks great. My only tweak would be to enlarge the design to take up a much more significant portion of your canvass, and to increase the star/stag to take up more of the center of the badge.
Thank you!!!! Im laughing out loud. You gave me my belly laugh for the day!!!
Gave +1 Creative Carma to @pliant comet
@quiet ridge This looks like a magic decoder ring!!! The star in the center looks great. The little touch of the rainbow is a cool addition. The layers of bevel/emboss/contours create real depth. There seems to be a shadow shape behind the star. Is that supposed to be there?
I liked your feedback 😃 Since then, I've been learning glow effect. This is a newer version. First, I reduced the glow effect. Then, I separated the dancer from the background, and added a new background. But, I too am not happy with the contrast.

Frankly, the small stag was running over my mind as well. Thanks.👍
Great tweaks. This in my view is a dramatic improvement over your first effort. The entire image is so much more pleasing to the eye and interesting. There are still aspects to improve. But our goal is Progress not Perfection.
I see what you mean. As there are a number of ways to lighten, which would you suggest if it were yours? I also thought about lightening up the background as well
Do you know how to work with curves adjustment layers? I would convert the entire badge design into a SO and then use a clipped curves adjustment layer to brighten the badge. Having a dark BG to offset from will be a plus.

I’ll try it! Thanks
Gave +1 Creative Carma to @eternal mica
Photoshop Challenge -Stylised Text and Liquify. I never thought I would use Liquify on myself but this was fun. Thanks @true plaza

@eternal mica - Awww man, thanks for the props and video clip. Jaws is a cool film
Gave +1 Creative Carma to @eternal mica


really nice
So I applied and messed around with the curves and its looks 10x's better. Thanks!

Gave +1 Creative Carma to @eternal mica
Does anyone use the iPad apps and do you find yourself jumping between it and the desktop version, I seem to do it all the time.
Wow, great tweaks. Super design. Well done.
Thank you so much for the feedback @bleak fossil. I will add more pink to the left prior to uploading to my behance. Thanks again for the feedback!!
Gave +1 Creative Carma to @bleak fossil
Day 7 - Badge

creative challenge liquify

Revised.

@bronze bluff Nice job with the liquify edits! The blue color grading also pushes that effect that he's been turned into something not quite human, hah. Almost looks like he's been frozen. Nice work!
@night maple Very cool, really nice sense of lighting and dimension! I like the colorful center and the way you warped the L so it appears to be on a curved surface. Nicely done!
@tired turret The adjustments are looking good, it really helps separate the design from the background more this way. I like the center shape you created as well as the striped ribbons. Nice job!
Thanks! It was a really fun challenge
Gave +1 Creative Carma to @bleak fossil
@meager mauve Very nicely done, you composited all of the elements together very well! The only thing that really stands out to me is the man and his son seem to be slightly transparent, unless you were going for a ghost-like look of course. Really nice work on this design!
@wooden bloom Hah, liquify can certainly be a lot of fun. I like how far you pushed this image, the ski goggles kind of look like a hat now. Maybe making the black text a color from the design (maybe the purple/blue from the googles?) could help unify it together a bit more. Nice work!
@grave moss The badges are looking good! I like the shape and color variation between these two designs. I especually like the pattern and metallic look of the yellow illustrator badge. Cool idea!
@last mica Really nice job with the masking and all the overlapping shapes! I like how you added some of that neon look into the sections of bold color on the dancer. The neon shapes stand out nicely against the darker blue background too. Looks good!
@last mica Nice sense of dimension with this! I like the metallic look of the badge, and the shadow under the badge on the ribbon is a great touch. I feel like the center shape (especially on the version with the stag) could be a bit bigger to fill more of the center space and have a stronger read. Nicely done!
Photo compositing challenge

@quiet ridge Very cool, nice work on all the different effects and layer styles you added to these shapes. I like the metallic look of the star, and the rainbow effect is a neat touch. 👍
Thank you @bleak fossil
Gave +1 Creative Carma to @bleak fossil
@dusky wave Cool to see you trying two different badge designs! I like how you varied the shape and color to give them distinctly different looks. The bevel and emboss came out well. It might be nice to choose a brighter golden color for the star in the center to make it stand out from the background and pop a bit more. Looks good!
@young karma Nicely done, I like the little center line design you added, and the red stands out nicely from the bright yellow background. I feel like it might help to use a curves or levels adjustment to darken the darks a bit more just to make the bevel and emboss effect a bit more apparent at a glance. Nice job!
@pliant depot Nice work! I really like the sense of dimension you got with the shadow under these shapes, and the bit of a reflective look we get on the left side. My main comment is there seems to be a bit of a dark line next to each star. I feel like it could also be nice to see some color on this badge since it's currently a bit overpowered by the yellow stars at the moment. But this came out well, nicely done!
@eternal mica Very cool! I like the bold fiery colors, and the metallic look on the bevel and emboss are looking really nice. I wonder if toning down the saturation of the background or making it a more simple gradient might help balance the image so not everything is so bold and intense? It might also help the ribbon match the style and dimension of the badge if you add a little shadow underneath. Here's a quick example I did with a multiply layer, though this is a pretty subtle change overall.
(Click the image then click "Open Original" for best quality)

@bronze bluff Cool idea! I really like how you handled the masking in this too. What if you gave the monster a bit more of a cool tint overall, and some glowing warmth on the left side next to the sun to make him fit the environment more? Here's a quick example with a multiply layer used for the shadow and a color dodge for the light. Nice work!
(Click the image then click "Open Original" for best quality)

LOL, How did I know you would suggest to tone down the BG?? And I already did!!! Just not enough. I'll tone it down more. One of these days I'll get it right on my own. I'll add the shadow under the badge. Thanks for the help. Appreciated as always.
Gave +1 Creative Carma to @bleak fossil
@eternal mica Hah, of course these are always just my personal opinions and design tendencies. There might be some situations where you want to keep everything bold, just depends on what you're going for.
@high mesa Always a good idea to add a giant great white! The lighting seems to match quite nicely on all these elements and you did a really nice job of masking the shark into the water. Looks good!
Ive told you so many times, when either you or @coral stone tell me "jump" I say "how high?" I respect your "opinions and design tendencies" more than I can say.
oh thats a cool idea right there ill mess around with the glow effect. Thanks for the tip.✊
Gave +1 Creative Carma to @bleak fossil
Day 5 | Liquify - Oh this poor, poor man.

Sounds about right! 🤣
Day 6 | Compositing

#❓ask-a-question message
I had this issue with my image being too big for a cover to my behance project. I couldn't just make it smaller because then my effects were getting distorted, so @eternal mica suggested I convert the layers into a smart object, which I did, and now the effects don't get messed up. I didn't like how the new size interacted with the text though, but after A LOT of trial and error I finally got it to a size that fits and still looks the way I want it to. I used the clone stamp tools and techniques from the Day 3 video to extend the background. Does it look too fake?

this ⬇️ is how it was originally, but wouldn't fit as a behance cover image without getting cropped

Day5 Liquify

Challenge #07: Icons and Badges. I used here Ai illustrations from my Vikings concept. Badge for Odin - his scepter for sovereignty to rule in Valhalla - and Floki - gifted ship builder warrior. Other versions are in below, where the right badge has background color and different blend modes I have variations of colors.


thanks man for the feedback and about the man and his yes it was a ghost-look to add some dramatic to the work
Gave +1 Creative Carma to @bleak fossil
PS DCC 2021-9 Challenge #7 Icons & Badges 9-1-2021

Contour for the satin that overlying tree pattern in background

Your canvas extension looks good.👍
@normal gale Good work with the liquify exercise. You applied the technique, yet kept the image within the realm of the believable. Solid effort. Your Composite presentation is awesome. Very creative concept. Beautiful execution. With the images flashing by so quickly, I cant really evaluate the details, but in this image, I dont think it matters.
@candid cape Good job with liquify exercise. As I just noted to another post above, you kept the image believable but applied the technique definitively. Well done.
Challenge #7 badges and icons 1st Try

Hello guys, I need to create a banner for my YouTube channel can anyone create one for me this is not a paid work but I can mention the artist. DM me for yes
@meager mauve can you pls help me
Challenge #7 badges and icons 2nd Try

@copper moss Really cool Icons & Badges for Odin and Floki. The bevels and contours worked very well. I love the font. What is it called? I especially like the Odin one, except Im not so sure I like the Odin text in reverse. It looks a bit strange to me to be on a badge/coin.
@wary swan I love your icons & badges. It has a primitive and yet childish look. Very interesting to look at. Lots of elements to attract ones attention. The multiple textures and gradients are really well done. I would make one tiny tweak. I would remove the smile from the character, leaving the eyes and nose. i think it would make the design even more enigmatic. Great job
@meager mauve I really like the concept of your original design, although I think the presentation is too dark to appreciate fully. I would love to see you repost it after you apply a curves adjustment to the badge, leaving the BG as it is. The bevels and contours on your second design are also interesting. The lighting of this design is, to me, better than the first. Good work.
thanx sir , i did make it brighter with the curves i hope its better

In my opinion, its much better. What do you think?
yeah i see that thank you sir
Gave +1 Creative Carma to @eternal mica
Im happy to help out. (We're all friends here. No need for "sir". "Ted" works fine for me. )
wanted to go for a shooter game, medal type badge. Think it worked out ok

My attempt on PS challenge 3- Photo Editing
I don't know if I did good or not lol
Thanks :)

Thanks for the feedback Ted, I will try your suggestion
Gave +1 Creative Carma to @eternal mica
I did what I liked to do. Odin´s name reverse looks fine. I do not understand what is strange about it? I exercise on free style badges for my new concept.
Thats perfect. It is your design. You should only do what you like.
racist
u should make the background smoother, I can see little blotches here and there. other than that, its pretty good 😄 I suggest u just take a new layer, put it in background, assuming that u masked out the characters, then fill the layer with the same color as the background
Been working on my bubbles

Maybe that's cuz of sky
It was blue sky with big white clouds? I wanted to keep it like that actually
But thanks for ur suggestion :)
Gave +1 Creative Carma to @marsh niche
ah, i see, i just couldn't see the clouds lol. but u should assume that the background of the other characters isn't just clouds, i think that'll make it unatural
Very interesting texture on the main rectangle. You did bevel and emboss without fill, do not you?
Ohh yeah that's true
I'll try a plain white background maybe?
yes! do a plain background, same color as OG background. then put a little cloud texture on the top where the characters used to be. just don't make it too noticeable. i suggest u lower the opacity assuming your using a brush
Ohh yes, that's a nice idea!!! Will surely do that! Thank u so much :D
Gave +1 Creative Carma to @marsh niche
PS DCC 2021-9 Challenge #7 Icons & Badges 9-1-2021 version 2

Went for a kind of bottle top design

welcome 😄
Background layer single color on the layer, Bevel&Emboss style Pillow Emboss Technich Smooth, 3X Gradient Overlay different angles, Inner Glow Soft light, Texture Tree, Snap to Origin, Satin Pinlight 45deg own Contour.
Thanks a lot!
Gave +1 Creative Carma to @wary swan


challenge #8 Device mockups using my previous design and a big screen

Thank you!
Gave +1 Creative Carma to @hollow yarrow
Decided to drop my Twitter banner on Piccadilly Circus.

Day 8 Challenge

@bleak fossil Ps DCC 2021-09 08 Device Mockups

Just a little nudibranch app using my underwater photography.

And a more detailed website about nudibranchs.

Day 7 - Icons & Badges
Busy day and evening not enough time to do more...
(for the replay weeks maybe...)😅
@bleak fossil Ps DCC 2021-09 08 Device Mockups V3 Adobe Hits Times Square . This is V3. I got it now.

Photo Compositing Challenge. This made me use my skills to the max. Took me a lot of time but determination wins. Very enjoyable. @true plaza

PS DCC 2021-9 Challenge #8 Device Mockups 9-2-2021
I have reuse some of my images I done in AI DCC 2021-8 Challenge #2 and #5


now I regret not putting my face on a magic card 🤔
Challenge #08: Device Mockups. I used here my own designs I did for Ai spring challenges. Photo edit for my Vikings concept and Emojis with speech bubbles.


#5 PSdcc Liquify, melting flowers

original

#5 PSdcc Liquify, like to use it for patterns


Cool ideas


morning everyone! heres my take on the icons and badges challenge


V nice
I'm having trouble with the xD part, so I will post once I figure that out. Here's my art - I want Thor's Well to come up as the 'Adventure Awaits' wording appears. Source photos are from 3 different parts of the world.

Source pic 1

Source pic 2

Source Pic 3

Device Mockups - The desktop site is real, it's my sister's site. The phone app is made up, based on an app my daughter wants to make. 🍦


such a creative family, good luck for your daughter, seems cool
@lunar copper Very nice! These mockups are both looking really solid! I really like the design for the app too, and the perspective to match with the phone looks great. My only real tiny nitpick is the design feels a bit close to the edge of the phone's frame, specifically around the T in Treat. Nice work with these!
@lunar copper These badges came out great! I love the red design against the golden color. The design variations are cool to see too.
@grave moss Cool images! Really interesting to see these all combined together. My main suggestion might be to have the seam between the sky and water a bit sharper like we see in the horizon of the original ocean image. It might also help to try applying something like a warming Photo Filter over the dolphin and water image to match the warmth and colors in the sky. Nice job!
@meager mauve Some good Inception mock up design going on there. Nicely done, the perspective matches very well! It can also be tricky to get mockups looking right when there's a big depth of field effect like that, looks good!
Icon and badges Challenge
@winter root Cool idea! You really got a convincing frame looking effect with those settings. I like the addition of the recessed deer shape in the center too.
@queen dew Hah, nice work with the liquify effect on the hair. Nice job with the removal of the background person too. I'm not sure what tool you used for the ocean but it might help to use something that doesn't quite make such a uniform pattern. Maybe the Patch tool or cloning stamping the right side of the ocean to vary up the texture? Looks good!
@queen dew Very cool, the liquify effect on the flowers came out great!
@copper moss Cool to see you using your own designs on these! The perspective of the mockup is looking really nice and the presentation of both designs came out well 👍
@wary swan Nice job with all the mockup images, cool to see you using your own designs too! My only minor nitpick is I feel like the perspective warp on the bottom phone design could be pushed a bit more so that the horizontal lines of the shapes at the top closer match the alignment of the top frame of the phone. Nice job!
@wooden bloom That's great to hear! The compositing image looks good, nice job with all these different elements. The masking looks good. My main suggestion would be to do a levels or curves adjustment on the girl in the hat to boost the darks a bit more to make it better match the contrast of the rest of the image. Looks good!
@eternal mica Very cool! Really cool to see this design applied to an animated mockup. Especially an image with two point perspective like this, well done! If you wanted to push the realism any more it could even soften everything slightly and/or apply a slight grain to make it match the rest of the image. Of course that's getting into nitpick territory, hah. Nice work!
@bronze bluff This Icon/badge challenge came out well! It has a cool stylized look to it while still having a nice sense of dimension. I like the upbeat bright colors too, and the yellow/green gradient in the center adds some nice interest. Looks good!
@hollow yarrow This Day 7 challenge is looking killer! I love how much rich depth you got with the gradients and shadow that you used. The boldness of the shadow tones really help that metal read as a vibrant material. Even the subtle background gradient adds to the depth. You nailed it, great work!
d8

Thanks for the help.👍
Gave +1 Creative Carma to @bleak fossil
Thanks for the feedback Sam, I will look in to that
Gave +1 Creative Carma to @bleak fossil
PS DCC 2021-9 Challenge #9 Parallax Website protyped with XD 9-4-2021,
<iframe width="1920" height="1080" src="https://xd.adobe.com/embed/105a2d78-b084-4465-bd6a-13877bd034c0-4509/" frameborder="0" allowfullscreen></iframe>


Hi I had self trouble with share the result from XD. Here is what did I selected all the art boards how was in the animation, then clicked on the share icon over the first artboard, wait to XD have render the object, then copying the Embedding Code. I past that code direct in my post at Discord it will look something like above
Glad, I was able. Pinsky used other method on depicting images onto mockup. I liked his part in these challenges - serious designer with a name. One more question: were we supposed to do parallax effect in Ps and discord out here with the last challenge. Or do it in Xd?
@wary swan I believe you should be able to export the animation as a video, which is done slightly differently depending on whether you're on PC or Mac I believe. But your animation turned out great! The parallax effect came out nicely and the animation is nice and smooth. Very nice work on the masking as well!
@young karma Cool idea for mocking up this Day 8 design! I feel like you could even make the design a bit bigger overall to fill the pin more, but this is looking good 👍
@night maple Cool idea for the Day 8 mockup! This design fills the small screen of the watch nicely for a clear read, and I really like the design against the black screen background. Nice job with matching the design to the perspective of the mockup image too!
@slow totem Very cool! Nice job with this image and applying it to a more complex, curved shape. Looks nice and natural in this image!
Here is a short tutorial to share your XD Prototype to Discord. in 4 steps

@meager mauve This mockup image looks good! Nice job matching the design to the angle of the screen. I feel like the design could even be a touch brighter, but it has a very convincing look regardless. Nice work!
@dusky wave The mockups are looking good! Very nice work on matching the perspective of the design to the phone image too, it has a very convincing look to it.
Thanks for the feedback Sam,I add a XD tutorial how to make a link to share on Discord I think this version is faster and better for Discord than a video, I have never don it before
Gave +1 Creative Carma to @bleak fossil
Thnx for the feedback Sam , and I just make a new design as a movie poster I hope u take a look at it in design others
Thank you Sam 😊
Gave +1 Creative Carma to @bleak fossil
thanks SamPetersonArt for the comment, I don't use the liquify tool that much, interesting option next to Patch and cloning tool!
Gave +1 Creative Carma to @bleak fossil
PSdcc #6 photocompositing, work in progress, part of a new series about Imaginary Landscapes

hmm look like natural
Someone please review my work. (Text Style Challenge)

Day 7 | Badges. This one was tricky.
That looks really good the colors stand out.
catching up from this weeks challenges.... this was four source pics all from adobe stock

on the desktop one i changed the biggest picture and on the other one i changed everything.

Sam, I tried adding Camera Raw>Grain to only the mockup layers all the way up to 100%. It didnt see any effect. Then I tried it only on the red text. Also no effect. Am I doing something wrong?

PS DCC 2021-9 Coverimage

Photoshop Daily Creative Challenge - Parallax Website
I have just publish projekt PSDCC 2021-9 on Bêhance
https://www.behance.net/gallery/126794961/Ps-DCC-2021-9-With-Howard-Pinsky-Aug-23-Sep-17

Behance
Ps DCC 2021-9 With Howard Pinsky Aug 23 - Sep 17
common this is an ez technique good luck with next one
good job
Thanks!
Gave +1 Creative Carma to @bronze bluff
Thanks!
Day 8 | Mockups AKA a Abra fell asleep on my foot.

Day 6 - Photo Composition....

Day 9 | Parallax
Glow.... Select, mask, glow, curves, clipping mask, filters and blending.

someone please my work
PS Challenge 4 and 5
I tried webs for the word Spidey but ig it didn't work well, I would love to get advice on it and about wanda too
Thank you :)


@bleak fossil Howard didnt really finish off explaining the Xd transition. I created the parallax file. Its 41MB how do I shrink it down in Xd while retaining the animation?
Its not a nice workflow to extract a video from Xd, but it is what it is


PS Challenge 6- Photo composition
I don't know how I did with the lighting
I would love to get advice, thank you :)


Challenge #4 #📣creative-challenges


Photo Composition


Hi, here my challenge 2

Here my challenge 4

Here my challenge 8 mockup desktop

challenge 8 mockup telephone

here my challenge 7 without shadow

and the same (challenge 7) with shadow

Here challenge 3 before

and after

here challenge 3 beach before

and after

Parallax Challenge! Here is the link to my animation in XD. https://xd.adobe.com/view/88cf6b1e-2fce-46bc-95c1-163b1ce8dcc3-dd9c/

3 Screens, Published on Sep 08, 2021 17:34 GMT
#7 PSdcc Badges, trying to catch up with the challenges 😉

Day5 Liquify

better late than never! I learnt about adjustment layers. Neat stuff @eternal mica

what I used to create my image


These are amazing @limber thistle
Ur work on challenge 2 is amazing! The blue and purple shades really go well! You did an amazing job there in challenge 3, it really feels like the beach is kinda empty haha, I also liked ur mockups and liked how u put ur designs in both the devices! Your badges look great too! And I think the one without the shadow looks good...
Nice work :)
hey @agile jacinth I see you really want some feedback and it's nice you're trying to be part of things, so I didn't want to leave you hanging. This is personal opinion stuff so don't take it too harsh.
I think you used a inner glow or shadow on Arrow, but I feel a colour overlay would have fit better. You could then further finish it up by making the bow and arrow a lighter shade than him. I also feel the background is slightly too blurred.
Overall decent job though 🙂
ohh i didn't really use any glow or shadow, tbh i actually forgot there is an arrow lol, i only use gradient overlay and used brushes, and yea i would make the bg less blurred, thanks for your advice 🙂
Gave +1 Creative Carma to @slow totem
challenge #2

Here my challenge 1

my challenge 6

here my challenge 5 (the first one is the original, the middle one has the "liquify" effect and the last one on the right has the liquify + neural filter)

I feel like this design kind of fits in with the Day 4 challenge. Had fun with it.
Photo Composition Challenge

Icons and badges challenge

Doing some pictures for one of my groups... thought I'd share .

<iframe width="1920" height="1080" src="https://xd.adobe.com/embed/b070b3b9-e9b0-439a-b39a-450bb3accfe8-e523/" frameborder="0" allowfullscreen></iframe>
Ps DCC 2021-09 Parallax Website

My composition

CURATIVE WINGS. So many choices in colors. But these are the ones I went with. Seemed to highlight the multiple facets of the wings. Thank you all for this opportunity!

Day 7

PS Challenge 7- Icons and Badges
I experimented with layer styles especially contours and satin overlay


@queen dew Interesting concept for the day 6 composite design. In order to sell the composition, I would suggest focusing on the light source of the design, and the cast shadows of the objects you placed into the design. Without attending to those aspects of the design, the objects get a "digital" pasted on look. I might also create some depth by blurring the foreground and background images to give a clearly defined focal point to the design. (the pyramid, I guess???)
@red chasm Fun happy design for the Stylized Text challenge. Your color palette has a cohesive feel to it. My one suggestion would be, since its a challenge about "text", to increase the text to take up more of the canvas, make it more prominent in the design. Nice effort.
@normal gale Cool design for the badge challenge. The bevel has a nice look to it. I like the shadow you added at the top part of the badge. I would suggest you add a bit of the that cast shadow to the area under the star and to the area under the badge onto the ribbon. It will make the design look more realistic.
@tired turret Which challenge is your puzzle design for?
@bronze bluff Nice work on the mock up challenge. I like both designs. Im not sure if the original car designs show the full cars, but you might want to scale the top two images down so the full cars show in the mock up screen, as the bottom car does. The hamburger icon gives a realistic look to the design.
@hearty nymph Which challenge is the airplane video for?
I believe it was #6 Adjustment layers.
@tired turret Got it. Powerful image. I like the way you handled the rim light all around the earth. The BG also works well. I might have made the puzzle layer a bit more distinct, given the piece edges more depth, to sell the idea that its a real puzzle. (Its weird. We did an exercise with VDV in the last series that would be perfect to get the effect here!!) And Id love to see what a version would look like with the left side of the design brighter so theres more contrast. Not sure, but I think it would improve the image. Very well done.
🤗 Thank you very much. I’ll look into that series and see what I can do with it. I love learning anything to improve my PS skills.
Gave +1 Creative Carma to @eternal mica
@tired turret Check out the session called Poster Design where VDV teaches how to create depth around shapes using shadows and negative space. I think it might apply to the puzzle pieces.
@stiff bough Very well done Parallax design. I found this to be a difficult exercise. I think you handled it really well.
Thank you! 🙏
Gave +1 Creative Carma to @eternal mica
@wary swan Nice work with your Behance portfolio. You really put in some solid efforts during this challenge. Its always great to have you participating every step of the way.
@normal gale haha, cool mock up image. Nice work, especially at the rounded corners on top edge. I would add some cast shadow to your little imp to make the composite insert image more realistic.
@blissful wolf Nice job with the Photo Composite. You selected out the elements well. I might tweak the lighting in the image a bit to increase the light source effect more on the left of the astronaut, and as a rim light effect around the girl, especially her hand and the right side of her hat.
@eternal mica , thank you for your feedback. I will try your tips
Gave +1 Creative Carma to @eternal mica
@normal gale Very well done Parallax challenge. You really got the effect to work smoothly.
Thank you Ted!
Gave +1 Creative Carma to @eternal mica
@tired turret You gotta be kidding!! LOL. I sound like a broken record, but this has to be from one of our earlier challenges with VDV!!! We did this exact concept with her on April 29. So much fun!!!! I like your concept. One small tweak Id make, and I think its personal preference, I would move the sparkles to behind the door and the wing. They seem a bit distracting on top of those parts of the design.
@red chasm Nice work with the badge challenge. I like the work you did with the bevel effect. I would tweak the design a bit to make the light source more consistent throughout. You have a strong shadow on the inside left of the bevel, but the outside of the bevel also seems to be in a shadow. It would also work, if you created some sort of cast shadow onto the ribbon below the badge. Last, you have a very interesting lion icon in the middle of the badge. I would increase the size of the badge quite a bit. The canvas can surely handle it, and the lion will show much more clearly.
@agile jacinth On your stylized text, I think you have a cool idea. I like the framing you created around the letters. I think if you made it wider, it would add pop. What color was the web texture that you clipped in? I think if it was black, it would show better. The gradient red fill looks good. I really like what you did with the liquify. It is just subtle enough to be real, but weird enough to be evil. Nice work.
@high mesa Cool idea with the Parallax exercise, though I think the objects move in the opposite direction from what Howard described. But you got an interesting result.
@hollow yarrow Your Photo Editing image could be an add for an acne skin cream!!! That was a lot of work!!!
@agile jacinth Very well done Photo Composition. In fact, I like your design better than the original, which I think looks pretty digital!! Your blurred BG adds much more realism than the original, which has no depth at all. I think you could add more contrast to the face and to the weapon to create even more pop to the design.
@dapper wind Very nice work on the glow effects design. The concept and execution are well done. You did a really good job selecting out your dancer. You could touch up the masking of the triangle a bit to get it closer to the model at the points the arm and the legs intersect the shape. And you could add reflective magenta glow to the dancer, in more places than just the face. For your composite design, it would be interesting to see the assets you used to create the composite. I like the concept. The whale is added in nicely, and has a blurred effect to add to the watery effect of the image. I think the surfer could use some shadow/blur to make him look more realistic. And the red reflection of him on the wave seems too solid and consistent, and doesnt jive with the light source.
@lunar copper Very well done Parallax Design. The motion flows seamlessly and definitely creates the movement Howard explained in his stream. Great job
@queen dew Interesting shape for your badge design. Good work with the beveling. A few areas to tweak: some of the layer sequences and BMs need to be adjusted to eliminate the places where layers show through where they shouldnt. E.g., the ribbon shouldnt show through the badge. The light source in the middle on the sun is from the top left. That should be consistent throughout.
So I messed with some light and darks on the two pics... first the world before....

After

@eternal mica then the wings which were a design I was playing with for Supernatural edits... Before

and after.... I really like this one better.

I was thinking about putting a blue haze in the black void but this feels more angelic to me I guess. Either way.... thank you for your amazing input on these... off to do some more tutorials!
@gaunt veldt Lots to look at. The Stylized Text design is adorable. The blue/green go well together. My one comment is since the exercise was to develop a stylized text, your text should be more prominent. Even after opening the image full size plus, its difficult to see the work you did on the text. Id suggest you go overblown size for the sword just as you did with the baby's head and show off the text. The cartoon style can handle it. Your Liquify is well done. Your impact on the image is dramatic enough to be discernible, but soft enough to be believable. I really like your Photo Composite, especially since youve given us the assets so we can appreciate your design fully. The concept is strong and the execution is well done. The colors work great. The enhanced lighting on the hoodie is a great addition. Your selection of the skull is well done. And the BG fits the image. I would make one tweak. (It seems the sword is tilted just enough to get away with this.) I would use the same light source that is highlighting the hoodie to highlight the front of the sword so that it becomes part of the focal point (hoodie, skull, sword) and the text pops off the screen. Really solid work on all three posts.
I really like your tweak of removing the sparkles. Less is definitely more here.
Thank you so much! Your critic is very comprehensive and I appreciate the honesty. I have to absolutely be more prominent with "textualizing" (I dont think that is a word but I am going to use it). I like the focal points (hoodie skull, sword) I honestly thought that the skull was too highlighted but I do like the exercises to help grow my skillset. Thank you!
@limber thistle Whoa, a whole series of designs all at once. OK. here we go. Glow Effect: Good work with the shapes around the model. There are f ew points where you can tighten up the mask closer to the object its intersecting with (the blue shape at the top of the guitar, e.g.). You have a nice reflective glow pretty much throughout. Perhaps a bit more on the wall BG to tone down the bright wall, and add more of an overall blue/magenta feel to the whole design. Stlized Text: very good work. Your text has an almost 3D acrylic look to it. You did really nice work with the multiple layer effects. The drop shadow is very effective. The gradient BG meshes well with all the gradient fills colors. Nice job. Mock Ups: I love how you used your Behance portfolio page (which I follow and love) as the image for the devices. The phone is really well done. Icon & Badge: The shadow is a must. It makes your design more realistic. However, your light source is coming from the top. The different edges should be in synch with that. Having even an occlusion shadow along the top edge might not be needed. Perhaps a stronger shadow along the bottom edge on top of the ribbon to match the top bevel-cast shadow. And the bright yellow on both sides would look better on top two edges. Photo Editing: WOW, Your street scene is awesome. In full image blow up, I could not tell a single spot to touch up. The beach is also excellent. Select & Mask: Nice work. There are a few spots where I would suggest you mask out the pattern, as it goes from one part of the arm to another and doesnt really make sense. Photo Compositing: Good work with the space image. I would enhance the effect of the light source by adding some rim light to the girl and maybe highlighting the left side of the astronaut.
@limber thistle Liquify: So cool to see the variations. Your liquify was just enough to make the image funny without making it grotesque.
@limber thistle @wary swan did a great job posting on 09/04 a short tutorial to share your XD Prototype to Discord in 4 steps. Check it out above. If you need more help, let me know. Or else just post the link.
Whoa @bleak fossil posts a design for us!!!! YESSSS!!!!! I get to critique Sam for once. I love the font. Whats it called? I think the kerning is inconsistent, sometimes letters are on top of each other, and sometimes theres a space between them. I dont know if thats an aspect of the font itself or not. It looks like you used two different gradient fills. I think for cohesion, one would look better. (I like the top one.) Thanks for posting for us.
Gave +1 Creative Carma to @bleak fossil
@chilly hawk Very well done space Photo Composite. Your selection of the objects is crisp and sharp. I might cover the whole dog's face in shadow, as the light source is behind the helmet. A rim light around the right side of the girl would be a nice touch. The badge is great. I love the color palette. You did a good job with the bevels. The shape in the center has nice depth and character to it. One tweak Id make is to add a shadow to the bottom edge that overlaps the pink ribbon. Good work.
@raven gate This is a beautiful design. is it for one of the DCC challenges we just completed? Which one?
@tropic knoll Wonderful Badge design. So much to like about it. The brown outer frame has an almost 3D rounded look to it. The inner bevel on the hexagon ha sgood depth. The icon in the middle is very interesting. Perhaps it could have used a bevel or shadow to add depth to it too. A shadow around the bottom edges over he ribbon could add realism. the ellipse label is a cool touch and came out very well.
@blissful wolf Being a bow tie guy myself, I LOVE this badge design!!! You did a fine job with the bevels. You are consistent with the light/dark edges which really sells the image. My one nit pick would be to give the bow tie ribbon a cast shadow, even a bit stronger one than the one you gave the badge. It will add more depth and realism to the design.
@agile jacinth very cool idea to create the variations on a theme of these images with different layer styles. It shows how one click can change a look dramatically. I think theyre each very well done. Which do you like best?
@stiff pasture Good work with the select and mask design. You did a great job selecting out all these objects. The different shaped text boxes add interest. Id make one small suggestion. Some of the embroidered flowers are lost with the BM you used. You might get a better result with a different BM.
I appreciate the feedback!
Good job on this one. One little question, how did you do to export your work from xd to discord, please ?
@limber thistle scroll up and you'll find Kajrov posted instructions how to do it. Mine didnt work because my image was way too big and I didnt know how to shrink it down in Xd so I just posted a link.
OK I found it thank you, I will try it.
Gave +1 Creative Carma to @eternal mica
Challenge #4 Stylized text

Because I can't just leave it there all by itself. This was a fun tutorial. I enjoyed diving into the emboss styles.

I am on a Mac computer. I am not sure how to do the same thing on a PC. When you are in prototype mode (or really in any mode) in the top right corner there is a play button called "desktop preview". When you select the play button and you can see the "record video" button in the top right corner. You will need to add a delay to your video to give you time to hit the record button. Record the video and when the animation is complete you hit the record button again. It will give you the option to save your video clip. Save the video, then open the video clip in Quicktime. In Quicktime got to File > Export As > 480P. This will make a short video clip with not a lot of animation small enough to upload into Discord.
Yeah the color of the web texture was white, maybe that's why It doesn't really look good haha, thank you for ur feedback :)
Gave +1 Creative Carma to @eternal mica
Yes, I wanted to try more but I hit my creative block haha, I really like the 3rd one because it kinda gives that materialistic look ig, thanks for ur feedback :)
@eternal mica , thank you! I know that the the bow was missing something and now I will try what you advised....
Gave +1 Creative Carma to @eternal mica
Thank you. I did it and it worked.
Gave +1 Creative Carma to @normal gale
I followed meagan.m (emlnemesis) and it worked and I will try to upload on discord
That is great to hear!

@eternal mica That's a good point! Thanks for the feedback. I think the kerning may have been more noticeable once I added embossing and strokes to the point where some letters touch. I might have to go back and see if I can adjust that to get the spacing right. I believe all the gradient fills are the same, but now that you mention it... I wonder if I accidentally made the base text a different color for one of them which might affect that. Good eye!
Gave +1 Creative Carma to @eternal mica
@limber thistle Well done! The parallax effect looks good and the animation is nice and smooth. The text and icon read really well against the background too, nice work!
@tired turret Really interesting interesting style and font to this design! Nice use of texture and warp in the second image too. Glad you had fun with it! There's some great possibilities with layer styles and text.
@stiff pasture Excellent work with all the masking on this! This is certainly a lot of things to cut out, and they're all looking really solid. I wonder if double clicking the layer with the flowers and leaves to add a drop shadow layer style might help it stand out from the background a touch more. Looks good!
@agile jacinth Really great use for these effects! I like how you tried out different settings and effects on this design. I think the top two are my favorite with that strong metallic look, especially the top left. Very nice work!
@blissful wolf Great sense of dimension on the Day 7 badge challenge! The shadow and embossing is looking solid. I like the striped bow tie as well, hah. My only nitpick is that I think the lighting angle might be different between the triangle and star? It appears as though the star is being lit from the top left, where the triangle appears to be lit from the top right. Just an observation. Nicely done!
I was taught by the Master 😉 😉 . I would try creating each of the letters as a separate layer and then move the letters after I applied all the layer styles.
Whoa, I haven't thought of that! Thanks for the feedback!
Gave +1 Creative Carma to @bleak fossil
@tropic knoll This Curative Wings design is looking excellent! Really nice dimension on it, and I love how the center seems to be glowing like the inside lights up. That effect works really well with the center wings design too. Loving the texture around the frame as well. Very nice!
@raven gate Very cool! I love how far you took this design with the horns and the red and green lighting that corresponds to the halo. Great effect!
@eternal mica Ooh, I love the parallax effect on the Judean Desert challenge! While it's definitely more work, I think cutting out the foreground palms from the midground layer would really help sell the effect a bit more. I wonder if content aware fill would do a good enough job to make it look fairly natural. As for the foreground palms, I wonder if another selection method could help do it more cleanly. Object selection tool, color range, the quick selection tool along with the Refine Edge Brush tool all seem like possible techniques to try for that situation. Terry actually did a whole masterclass last Friday on different selection methods for different situations, and those 3 methods I mentioned are all timestamped on this video: https://www.youtube.com/watch?v=8PpWTXFouyQ
I also feel like Blend-if might be worth a shot. Skip to around the end (07:40) of this video for more info: https://www.youtube.com/watch?v=yAMXBYx0r5g
@bleak fossil , thank you very much! I'll check the lighting
Gave +1 Creative Carma to @bleak fossil
I love that photo. I took it a number of years ago. And I wanted to use for the exercise. I absolutely drove myself crazy with the palms. The selection on the front layer wasnt complicated. I couldnt figure how to make the selection work on the second layer once I changed the positions to create the parallax effect. I realized I didnt have it right. I just couldnt figure other things to try. Thank you for the suggestions. Im going to go back and try some of the things you suggest. 👍
Gave +1 Creative Carma to @bleak fossil
Day 2 Neon effects. I used my "hybrid animal" from Sam Peterson's last PSDCC.

Day 3 Photo editing


Thank you @bleak fossil for your kind and enthusiastic words!
Gave +1 Creative Carma to @bleak fossil
Thank you so much!
Gave +1 Creative Carma to @eternal mica
Day 4 Stylized Text. Kind of a 60's theme.

Thanks Ted B for the comment, much appreciated
Gave +1 Creative Carma to @eternal mica
Thanks, have to work on composite design abit more ;-))
Day 5 Liquify. Making clowns just a little bit creepier than they already are

Finding new place

Challenge 8- Device Mockups
Ik it was a device mockup challenge but I wanted to do something fun haha
Thank you :)

We all need to work on our skill set. And there's no better place to do it than right here. That's why we're in this group!!!
@agile jacinth Very nicely done! The perspective on this Challenge 8 design is looking solid! I like the small addition of the corner highlight too. This is a subtle suggestion, but really helps sell the realism: Since this image is slightly low resolution, especially around the left side background where it gets a bit more fuzzy, you could make your graphic fit in with the photo more but giving it a subtle blur. You can get this effect where an object blurs more as it goes into the background by using something like a tilt shift blur, or even just making the layer a smart object, applying a gaussian blur, and them masking it out with a soft round brush on the area you want to be more in focus, to get a smooth shift between blurred and in-focus. Just a thought, nice work!
@surreal oasis Coll effect! nice job matching the lighting of the background to the hand. It could be really neat to see a subtle pink coloration on the thumb and one or two of the fingertips as if the lighting from the jellyfish are affecting the hand too. Looks good!
@compact pecan Haha, very nice, you went all out on this Day 5 challenge. I really like the head shape you created with the liquify effect. Was the makeup already part of this image or was that something you added? Either way it's thoroughly creepy, the Day 2-4 challenges are looking solid as well. I like that you used the Hybrid animal from the previous DCC for your Day 2 design. Nicely done!
@chilly hawk Very nice work on the Icon and Badge challenge! I like how the border, inner shape, and center design all have a nice clear contrast. The texture and sort of satin/reflective look add some really nice depth to it. The Photo composite challenge turned out nicely, I like the overlapping shapes with the window and astronaut to really make them feel like part of the same scene. Perhaps the lighting on the child’s face would be a touch brighter from the light coming through the window? Nice job!
@limber thistle Nice work with the Day 5 challenge! Cool to see the different versions, it's wild how much simple changes (between the first 2) on the human face can give a drastically different impression. I feel like these get progressively creepier with each effect, hah. Challenge 1 and 6 came out nicely as well. They’re all looking good!
@young karma Cool lighting/color tinting with this image! Gives it an interesting mood.
Ohh wow that's actually a nice idea! Yeah I mean ofc if we are trying to make realistic, we need to take all points into consideration, in nature things far away are usually blurry so that's an awesome idea! Thanks Sam :)
Gave +1 Creative Carma to @bleak fossil
Haha, the clown makeup was already there, but not too long ago, I had “made a clown” when VDV did a PSDCC to put/enhance makeup.
Challenge #7
This is awesome!


Liquify challenge

I absolutely love this concept
Thnx man
@tired turret Oh wow, cool take on the Liquify challenge! I really like the magic-like effect the swirly liquify tool has on this. If you made other edits to this image too it might be nice to see the original to compare what was done. Nice work!
@meager mauve I really like all the graphic elements and how they interact in the Simography Design image. Also really cool how you played with scale so strongly in the cupcake design. Perhaps using color balance to give the babies a slightly more red (and less yellow) tint could help fit them into the scene even more seamlessly? Nicely done.
@gaunt veldt Really great masking on the virus image in the center! It took me a second to realize what it was, perhaps making the bars a little thinner could make it more clear? Then again that might involve further adjusting of the masking. Nice job with the bevel and emboss effect here, that along with the drop shadows add some nice depth!
Thank you @bleak fossil
Gave +1 Creative Carma to @bleak fossil


thnx and here is the results

PS Challenge 6


Day 8

Day 8 Device challenge Billboard

Used to make the scene for the ad... original pics on the rt created the one on the left for the ad...

wow i havent been in here for ages and now i have time i have to remember it all; my scratchy attempt at challenge 1 but i have to go back and watch it again as it wouldn't behave lol - anyway hi ( gonna try do them all over weekend as one from here on in )

@gaunt veldt Cool job on the device mock up. Thanks for posting your assets. Thats always interesting to see. Your choice to place the book into a phone screen is unusual. It may work better to bring the book into proportion on the top 2/3 of the screen and then put a keyboard on the lower 1/3 of the screen. The perspective on the laptop original is also a bit unusual. The left side would seem to be the far aawy side. But the way the laptop is situated, that side is closer to the front. I think you can stress that a bit more in how you placed your insert.
Gave +1 Creative Carma to @gaunt veldt
Very well done with the tweaks
@rocky kite Nice work on the Day 6 Photo Compositing. I like the shadow/light effect on the astronaut. I like the light streaks on the window. You might have a better effect if you used straight shapes with that. I would like to see more of the rim light around the girl especially on the top right, middle right of her body, and her arm. Your desktop mockup looks good. The images are well placed. On your phone mock up, the edges of the screen have some areas that can be cleaned up. It would also add realism if the text on the screen were not cut off. How did you create the shape layer?
can anyone make me for free I need a
Food delivery app logo
Name : Aayo
@tired turret Nice job on the perspective in the device mockup. The text and image all look very natural. I like the composite you created. One suggestion on that, the lower left area is a bit too bright, even allowing for the overhead spotlight. Good work
@onyx field This series of challenges ends over the weekend. We'll be starting with a new Welcome session on Monday for a whole new set of challenges. Get in as many designs as you can.
Paul's livestreaming is going on, Is it the repeadted stream????
Chat isn't available? There?
@onyx field Very cool! Glad to hear you have some more time. Nice job putting these together, it could be cool to make the inner ring of the black Rock logo the same green as the background. Might be a neat way to tie the design together, of course that's up to personal preference. Nice job 👍
@tired turret Nicely done! The perspective on the mockup is looking good. This is a really minor nitpick, but I think the bottom left corner could be raised up just a touch to better fit the metal frame. Looks good, nice work with the image composite!
@blissful wolf Well done, the design fits the phone frame nicely and has a convincing look!
@rocky kite Nice job masking the designs to fit within the frame of the mockups! My only suggestion is that the design within the phone frame could use a perspective warp to make it match the perspective of the phone. A good guide is to try to match the horizontal lines of the top and bottom of the phone frame with the horizontal lines in the design. Here's an example of what I mean, the red is the phone's perspective, the blue is the design's perspective. Hopefully that makes sense. Nice work!

@bleak fossil , thank you!!!
Gave +1 Creative Carma to @bleak fossil

monochromatic poster
using blending mode and gradient map

original photos from unsplash

Thank you to @eternal mica and @bleak fossil for the review and feedback and thank you to Howard Pinski for this month's challenge. Here my Behance project https://www.behance.net/gallery/127052379/PSDCC-SEPT-2021
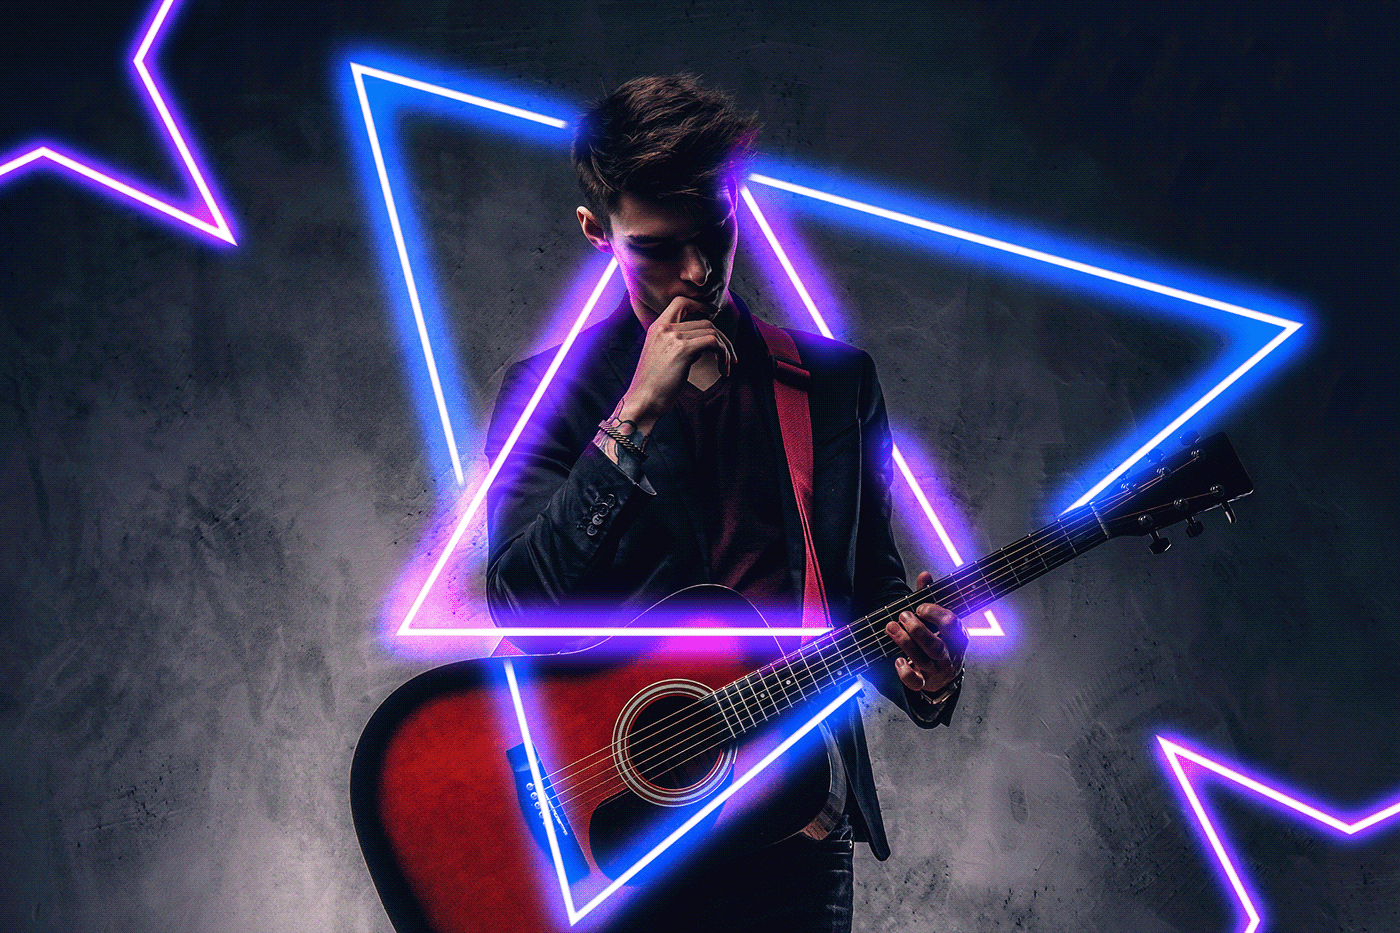
@meager mauve are these submissions for any of the challenges?
@limber thistle Your Behance portfolio looks great. Very well done presentation. Your work during this series was solid from start to finish. Thank you for posting.
Gave +1 Creative Carma to @limber thistle
fabulous fun !! DCC04

#dailycreativechallenge

PS Challenge 9- Parallax Website
I kinda ruined the grass because it was difficult to mask out the grass :p
I'm super happy I finally completed all the 9 challenges and I seriously so many things! Tbh I never knew that we could freely warp pictures by clicking ctrl key and mouse together lol (it was the basis thing and I didn't know that lol) I'm glad I got to know so much! Thank you everyone :)
damn
So apparently I cannot export video from XD yet… need to upgrade 🤷🏽♀️ anyway here is the link to see it in XD format: https://xd.adobe.com/view/6c7d583d-6a3c-40c0-b4ad-db04e9e50a8e-392e/?fullscreen
and here is the video I captured of it:
7 Screens, Published on Sep 19, 2021 23:24 GMT
I really enjoyed this one, tho I had to watch the video like a hundred times... ok well a few times really. Now.... do I upgrade or not.... that is the question.
Anyone else do covers?

wow Howard is right that you can play around all day - about an hour process to get to here, which isn't much ( was a self-portrait of DB that someone criticised, and after some tweaking ( bringing forhead in by a layer etc ) used liquify face on it, which it recognised as a face; anyhow the photo composite tut is a bit complicated so betta get a move on...

Still going through HP's tut again .. making notes to play with later ..

DCC 07 and 08 lol
My take on the August 25 Glow Effects Challenge: https://www.behance.net/gallery/127738821/Lightning-Chess-(Photoshop-Creative-Challenge)

Behance
Lightning Chess (Photoshop Creative Challenge)
Great job playing with the light, @pallid sonnet! I like how the rim light throughout the pieces edges helps it to differentiate from the background. Usually, you don't want areas 100% white on the compositions but I think that in this case really helps selling the shining material of the piece, especially because you added colors to the areas that are not so bright. Excellent work!
Hey @onyx field! Really cool compositions! The colorful letters give a nice and fun look to the yellow background and the bevel & emboss also worked out very nicely!
The liquify challenge also produced some great results, I'm just being a nitpicker here, but I believe that you might give a blur to the right top edge of the portrait, since the other edges are a bit blurred, this will bring some consistency to your work.
You did a great job masking the subject and adding the text with the same color as the background, it gives almost a metallic look for the composition. Well done! 🙂
Loved the textures of your cover, @tired turret! I think this helps standing out on the Behance Feed! The only suggestion I'd have would be to remove that dark spot in the middle, 👇 it will help to improve the readability of the letters. Great job with the framing!

Welcome in to a new PS DCC everyone! Excited to see what everyone creates these next two weeks. First challenge starts tomorrow!
Here's the Behance project cover image I created on today's welcome stream.

Great to have @bleak fossil back in the saddle for the next two week series, and welcome back to the one and only @coral stone who will be mentoring this series. This should be a real blast!!!!
If anyone missed the Welcome stream with @bleak fossil , or wants to rewatch it, here is the link. I'll also pin it up in the pinned files above. https://www.behance.net/live/videos/13301/Photoshop-Daily-Creative-Challenge-Welcome?tracking_source=to_replay&from_row=What's_New
Join your host Sam Peterson each morning at 9:00am PT to learn how to approach each challenge using Photoshop. Complete 9 challenges by Friday, October 1st and you’ll be on your way to sharpening your skills. Get your questions answered, see what the community is creating and get feedback on your work!Download the starter file here: https://bit....
Thanks a lot, Sam! You showed a very comprehensive approach in cutting, dividing and masking types and making them look prominent. I have brought an image of the sea as a background.

@copper moss Ooh, cool application of this! Looks like a book cover, and I like how the yellow in the boat is mirrored in the center text. The top "brave" text also has a really cool paper cut out type of feel, I feel like that font strengthens that effect. Perhaps a subtle drop shadow on the Vikings text could give it a bit more of a prominent read against the lighter background colors of that area? Looks great!
@pallid sonnet Nicely done! The neon shapes stand out clearly against the dark background, and I like how you added in the coloration from them into the chess piece. The masking looks solid and adds some nice depth too. Well done!
@onyx field I like the creative masking you did on this image for the Day 7 and 8 challenge! This icon has a nice sense of dimension and fits well into the shirt and hands. Nice work!
Day 0

@last mica Very cool! Great sense of depth with the masking and shadow effects. I also really like the addition of the whale from a previous challenge. That pop of blue colors work well with the white text. It could be nice to scale up the whale a touch so we see a little more of the in the bottom word. Nicely done!
@tired turret Really neat graphic with the white background shape! I like the pop of color the text provides as well. This is really just personal preference, but removing the dark shape in the center might give the text a clearer and stronger read. Nice work!
@agile jacinth Grass can definitely be tricky, but I think you did a nice job with it. It's very subtle and not distracting. Nice job with the parallax effect and animation, looks good!
Thank you!

Gave +1 Creative Carma to @bleak fossil
Here is my Behance header for this series of challnges

Nice one, @dusky wave! I like how the effect on the "Daily Challenge reminds me of a glitch effect. It might help with the readability of the text, if you darken the red tones on the second line, since the red and the yellow on the background has some similar light values, it's doesn't give as much contrast as it should. Another way of adjusting that would be adding some shadows. Just some ideas. Nicely done!
Thanks, Sam! I loved your today presentation in which is a new touch on type stuffs. Yes, I will improve the top word shadowing.
Gave +1 Creative Carma to @bleak fossil
Amazing posters, @meager mauve! I dig your typefaces choices, they add a personality to your designs and speaks great with the overall elements. Gradient map was an excellent touch. 💯
I did wake up at 2.30am, which is when the live stream ended in this time zone ! It's all very interesting ( and complicated at present ) but am challenged !!! so that's a good thing ... oh i went back to sleep lol

@cloud briar Nice job with the masking and off setting of the text! The background color and red of the text are such similar values currently, perhaps lightening the color of the background could help separate them a bit more? Maybe even making the red a touch deeper along with that. Just a thought, nice work!
@onyx field I like the dimension you got with the green text, very cool! The "daily" text has a neat effect as well. If you wanted to get more of a shadow effect on "Challenge" try using a slightly larger brush size with a soft round brush for that soft gradient look. And of course feel free to ask me any questions if you're finding any particular step complicated. Nice work!
Thanks Sam yes I spent about an hour ( going over and over that part of the video ! ) trying to work out why my 'challenge' wasn't working, and it was only then that i saw you had each word in a different layer ( doh ! ) .... I liked my first try better, but the file froze on 'creative' when i disobeyed pshop when it said there was a new 3D tool use that and went ahead anyway. It's also a case of 'that'll do' or 'cheat and put the first try on challenge over the top of this one ' instead of 'ok have a break then go back' !! thanks Sam looking forward to this DCC as have always tried to use illustrator mentality on pshop which doesn't work 😂 .. this is the earlier one before i ballsed the rest of the file up ...

Gave +1 Creative Carma to @bleak fossil
After looking it over I did some serious tweeking and with the advice from here and a few adjustments I really like what it looks like now.... Thanks! Looking forward to this weeks Challenges

Gave +1 Creative Carma to @bleak fossil
My cover for this week's creative challenge with Sam Peterson.

My Attempt

Loved you choice of colors for this one, @midnight bone! Blue and orange go very well together, and I like the way you kept the contrast against the background. The texture on the word Daily adds a cool touch for it as well, did you made it with Dissolve or using a specific brush? Looks great!
Wow, bringing a theme to the challenge is always a cool idea, @sullen oasis! You managed the textures very well on each letter and I like the way that there are some organic edges on each letter, I think this adds many context to the word as well. Good job!
Joined a bit late. But love the first challenge.😀

Great colors for your cover, @celest stratus! I like that you chose a subtle gradient for the background and allowed all white and red elements to stand out with contrast. The effect on the frame also looks very on point. Very well done!
Thank you🏅
Hello👋

Hi @tulip epoch! Great job on the cover, the subtlety of the shadows on the word daily is a very nice touch to make each letter look separated but still keeping their consistency. It was an excellent design decision because you need a shadow but not as dark as your background. Also, you managed the contrast on the other effects very nicely. Keep it up!!
PSDCC 2021-10 Cover Image 9-20-2021
This time have I paint the background with a soft colordynamic brush

@wary swan great to see you!! Loved the way you played with the effects and the colors, I think that they add a nice and fun mood to the cover. The background has this context as well, great job!
Took a few liberties with it

This is awesome, @waxen tangle! I like the warped style of the text, the effect of the edges add a nice 3D feel to each letter. Loved the fill that you added for the word Creative! 💯
Thanks for the feedback Valdair. I will be back to PSDCC on the encore this time will I do AIDCC first
Gave +1 Creative Carma to @coral stone
Thank you! 🙂
Thank you!
I used dissolve for daily you are right. Thanks for your review 😀
Gave +1 Creative Carma to @coral stone
Challenge #1! Perspective Match

Repost to update my Behance project header

My project for today PS DCC on Perspective Match

Challenge #01: Perspective match. Great! I did my own shape. Found fonts suitable and worn the shape with a Kyle shunky charcoal brush. Thanks, everything what Sam showed was clear and definite. I like you guys.

Photoshop creative challenge


Today's Challenge attempt

#challenge - Perspective

Challenge #1

Photoshop daily challenge by Sam Peterson

@dusky wave nice update on your cover, I like the 3D bevel & emboss that you added and the red tones definitely have more contrast now. For challenge 1, you managed the perspective very well, especially for the area on the front. My only suggestion would be to tweak a bit more the third perspective, you can use the transformations handles to adjust the red lines to match the cyans in the example. Let me know if you have any questions 🙂

Great idea using the brushes @copper moss! I think this really helps to sell the effect, the perspectives also worked out great in your composition. I'm just being a nitpicker here, but if you want you might adjust the right side of the "handle with caution" a bit up, to match a little more the perspective, a subtle edit will be enough. Very well done!

Hi @rocky kite! Nice to see you! Really cool work on the perspective challenge, the only suggestion I'd have, would be to adjust this text here 👇 to make it follow the original perspective of the boxes. Overall I like the way you blended the text with the materials they are placed on. Nicely done!

Loved your cover, @dusky swallow, especially the 3D styles of the ornaments, they create a nice focal point for the whole composition. You did a very nice job with the textures and shadow as well. The perspective challenge is looking very spot on, especially on the text from the right side of the main box. Great job!

@dusky wave Very cool! A whole warehouse full of robots, hah, looking good. I think you nailed the perspective of the text on the top part, but I think the left end of Caution could be raised just a touch, though that is fairly minor. I also think the top of the word "fragile" and the bottom of the robot's feet could be matched a bit more to the perspective of the crate for the middle box. For that middle box, you can actually mark the vanishing point where they all meet in the image to use as a guide. Here's a quick visual example to explain what I mean. Very nice work!

@sullen oasis Cool effect! I like the added dimension the bevel and emboss gives the text. The textures adds a lot to it as well 👍
@midnight bone Nice job with the different effects here! I especially like the strong contrast between the blue and orange text, kind of feels like it could be used for a football team with those colors or something. Looks good!
@celest stratus You're just in time! We have just begun. This looks great, really nice sense of shadow and overlapping shapes here. I like how you added that offset effect on the border too, nice touch!
@tulip epoch Very nice work on the cover image! You really nailed these effects, they have a convincing depth and overlapping look to them. Well done!
@wary swan Looking good! I like how much you played with the different types of masking and ways of overlapping the text. The background makes for a really cool affect and gives the text a nice strong contrast. Very cool!
@waxen tangle That's the best way to do it, these challenges are always a great opportunity to play around. I really love the sort of jagged and cracked direction you went with it. The sort of chromatic abberation effect adds an interesting touch of color too. Looks great!
@copper moss Hah, I like this take on it. The shape and texture you added looks great, and the stencil font really helps it look natural. Looks like you nailed the perspective too. If I had to nitpick, I think the text on the right in the more extreme perspective could be "squished" just a bit more to have a slightly more foreshortened look so it's not touching the edges of the box as much. Nice job!
@rocky kite Very cool! Nice job on both sides of the box. My main suggestion would be to try and make the text on the right side of the box slope downward (from left to right) rather than slope upward to better match the perspective of that side of the box. 👍
@dusky swallow Oooh, loving that texture and how you used color in this one! Really great visual balance, and I like how you took that paper cut-out feel this technique can give and ran with it even more. Very nice work on the shadows too. The perspective on Challenge 1 looks great, I like the addition of the mechanical arm on the box in the back. Well done!
@midnight bone That perspective is working quite nicely. Good job 👍
@quiet fern You nailed the perspective with this text, even the foreshortening of the text on the right side is looking solid. Well done!
@tulip epoch Very well done, the perspective is looking really convincing on both sides. The foreshortening on the right side came out very well too. My only nitpick if I had to find one, is I think the robot graphic on the right side could be lowered in opacity juuuust a tiny amount to better match the level of darkness the glass symbol to the top left of it has. Currently the robot is even darker than that black paint. That way they will fit together even more realistically. Hopefully that makes sense. Great job!
Okayy! Thank you
Gave +1 Creative Carma to @bleak fossil
I manage social media for a vintage business in Kansas City. Probably no surprise that I have to have a Chiefs themed post ready for each weekend during football season. I thought I would use this old timer and say something about game time so added the Chiefs logo embellished with some of the company's branding elements in perspective on the clock⏰🏈
I like the style of you cover and how the highlights gives a nice 3D sense for each letter, @quiet ridge! The levels of contrast are working great and all the words are legible, I also dig how subtle the frames and strokes are allowing a great hierarchy throughout the cover. Well done!
@coral stone Thank you
Gave +1 Creative Carma to @coral stone
Super cool work, Kim! I loved the way you managed the perspective, it looks very realistic! The way you managed the lights and textures to appear through the background layer and the shadow of the pointer also help to sell the realism. Great job!
Just in honour of @bleak fossil really...

#day1

@last mica Excellent job with the perspectives, the graphics are matching very nicely to the perspective of each side of the boxes. I loved the headless robot on the lower right area, it looks like it has escaped from one of the boxes. 😂 Making some lighting edits was also a great idea to add a focal point and visual hierarchy for the whole picture. Awesome job!
Very nice, @waxen tangle! The perspectives are looking very on point, and I like the spatters that you added to the graphics, nicely done! 😉
#day1

Looking very nice, @versed umbra! I like the blending work of the graphics on the boxes' surface. The placements of them looks great, I can see the elements follow the perspective lines very nicely. Well done!


Thank you! Couldn't have done it w/o all these PS DCCs 😊
Gave +1 Creative Carma to @coral stone
Beautiful works @quasi pollen ! I like the pastel colors that you have chosen for the cover. The shadows produces a nice metallic look for the middle area of the word Creative. The perspective challenge is looking great as well, you manage the placement of the graphics very nicely! 💯
I used my own photo (as usual). It's called 'Private Time at Seljalandsfoss.

Original Shot

Thanks a lot. I will squish the right type. Glad I managed with perspective.
Gave +1 Creative Carma to @bleak fossil
Ok, I will do what is in question. Thanks! Nice to hear from you again.
Gave +1 Creative Carma to @coral stone
Hey, tried the first challenge. Hopefully you'll like it 🙂

Very creative approach, @grave moss! I like the saturation edits you applied to match the saturated tones from the piece of fabric. Well done and congrats for the beautiful photo! 🙂
Great work managing the perspective @young karma in both sides! I like the slanted font that you chose for the text as well I think it has that technological style that matches with the robot!
Thanks a lot! 🙂
Gave +1 Creative Carma to @coral stone
Day 1

Day 1 Perspective. I included air holes so the dingos could breathe.

Awesome idea and awesome results!! I think Sam needs to make an emoji like Paul and Terry.
Nice works @quiet ridge! Loved the way you blended the little robot to all the sides, my only suggestion would be to make some tweaks to the texts, especially the "Handle with care", you can do the exact same thing as you did for the robots, following the same lines. Keep it up!
Wow this turned out awesome, @compact pecan, excellent idea adding the air holes. The perspective and the blending worked great together. Amazing job my friend 🙂
Thank You @coral stone I might play with it more later. Going to give my eyes a break for a bit. Again thank you for your input
Gave +1 Creative Carma to @coral stone
No problem 🙂
Thank you, @coral stone!
Gave +1 Creative Carma to @coral stone
I think this is a bit better

Catching up ! Cover for this set....


Beautiful cover, @tired turret! I like the dots you added as a frame and how you kept the colors consistent preserving the contrast. Great job!
The perspective worked out great in both sides, @rotund mountain! I like the rusty look of the text and the robot, it's merging very nicely to the surface of the box. Excellent job!
thnx for the feedback i appreciate it
today's challenge i used my posters in this challenge

with color lookup it looks like horror movie :p

Original photo

My submission for perspective challenge.

Perspective matching challenge

Hi designers/ here is my first attempt at the perspective challenge. i'll continue to work on it . Thank you.

I hope this is mylast post on this image lol


don't be so hurtful with yourself... As I see flying pigs are closer than they appear. Great job!

i had a hard time blending stuff with the wood so i kinda winged it but sometimes it looks good
Late night attempt

My first challenge ever 😆

Perspective match challenge. Re-send image.
Thank you 😊
Gave +1 Creative Carma to @hollow yarrow
Perspective Challenge

Thank you 🙏🏽
Gave +1 Creative Carma to @coral stone
your design is clean and neat so far. I love it!
Day 0

First time uploading a daily challenge here

.. for all of your boxes !!!

#✂challenges-feedback
Unlearning & Relearning. Would love to learn more from your feedbacks. Still learning #✍how-to-discord

#1 challenge

Very nice job 😍
#✂challenges-feedback first time trying perspective! never thought it will be this tough

Thank you!
Gave +1 Creative Carma to @waxen tangle
This came out great, @tiny breach! I like the way you managed the perspective especially on the right side, because since the robot's head is irregular, it could be tricky to made it look realistic. You nailed it 🙂
This turned out really great, @upbeat cradle! The text and icon are following the perspective very nicely, and I like the subtle rectangle you placed behind the text. It goes very well together with it. Nicely done!
Thankss a lot!!
Beautiful job, @rancid hornet! I like the approach you took for the challenge. I can see that the directions of all the texts are following the same perspective, which in this case brought a nice and consistent touch for the whole image. I loved the effect on the word reflection and your attention to the details as well, making a reflection on the water. Excellent work!
Lovely! All the 3 markings fit well with perspectives. Love the message and the choice of red color is awesome. Impressive work!
@onyx field Oh wow! This is looking super cool. The perspective worked out great for both sides of the truck, and I dig your font choice as well, it gives a nice context and realism to the truck. Great job!
Welcome in! Great start!
Welcome to the community, @somber harness! Playing with a vignette was a great idea! I love how it gives a focal point to the compositions. The perspective of both sides is working very well, and if I had one thing to nitpick would be to place the text of the right side a little more to the right. This way, it will be positioned in the center of the wooden edges of the box.

so many thanks to your kind words
Gave +1 Creative Carma to @hollow yarrow
Excellent use of the textures on your cover, @candid cape! I loved the way you preserved the edges with bevel & emboss and still managed the contrast of each word. Very nicely done!
Hi, @chilly hawk! Very cool work with the fonts and the blending, I also like the different colors you played for the text. The perspective is working very nicely as well. The only thing I'd recommend would be to adjust a touch the graphic of the right side of the main box. With the transformations handles enabled, click on the middle point of the handles of the right with ctrl or command and drag a little bit up. It will help the graphics to follow even more the perspective lines. Let me know if you have any questions 🙂
I agree 100% with Franck, @coarse isle! All three graphics are looking very well placed. The blending is also working nicely, it gives that realistic touch for the boxes. Excellent work!
Very nice work, @livid cypress! I like the way you blended the text to the surface of the boxes. The only point of feedback would be to fine-tune the graphic of the right, the perspective seems a little off, one trick that you can take advantage of is using the "This side up" and "This side down" texts as a reference for you to position and distort the middle text. Well done!

I don't want to be the person that receives the second box, @pastel vessel 😂😂 . I like that you played with different illustrations for the challenge. The only consideration I'd have would be to adjust the "And we love you", by pushing its right side a little higher (you can do that by clicking and dragging the middle handle of the right a little higher, just a small edit will be enough. Great work!
It's always amazing to see your works, @hollow yarrow! The perspective is working on all the sides, and I loved the effect on the frame and how there is a repetition of those gaps in the robot as well. Your typeface choice was very spot on too. Excellent work! 🙂
Thanks! Happy to see you back with us Valdair😀
Gave +1 Creative Carma to @coral stone
Super cool work, @vivid tulip! I loved the effect on the text, did you use liquify for that? It looks great! The perspective is working very well, especially on the robot. I like the way you blended it to the surface. Well done!
Hello @simple idol! Very nice job! I like that you played with a different color to the word caution to add a hierarchy of the text. The only point of feedback I'd have would be to adjust the perspective of the text, especially the one on the right side of the box. You can use the "This side up" and "This side down" as a reference, and try to place it following the same lines as them. 🙂
Very creative approach, @lunar copper! Loved the edits on the colors and the shadows that you added, it really gives a realistic touch for the composition. Awesome job!
Now that's a message with impact, @sullen oasis hahah! Great job putting all the texts in perspective, the pigs look very cool, did you add the wings to them? If so the masking is looking great! Well done!
Wow this is amazing, @meager mauve. I loved the clean-up job you made, really took the image to the next level. The perspectives are looking very spot-on as well! 💯
Great job managing the perspective, @snow sigil! It looks very consistent both for the icons and the text. 💯
Loved the way you blended the graphics with the surface, @azure shale! I'm a big fan of this kind of texture. The perspective is looking very good too. Well done!
Thanks @bleak fossil for the inspiring challenge about perspective👍 💯
Gave +1 Creative Carma to @bleak fossil
PSdcc #1 My first rough, playing with 1pp, distortion and collage

so glad to hear you like it
Very creative and interesting approach, @queen dew! Loved the way that you played with the floor, the walls, it all looks great!
Thank you! I was curious how a circular shape would read, and it was fun. 😁
Gave +1 Creative Carma to @coral stone
Hey everyone, been a while since I have done PS DCC properly. Here is my Day 1 Perspective challenge PS Edit, "Robot Alleyway". Hope you like!

Cover Image

Cool image choice for the challenge, @jovial ether! I like the way you blended the graphics to the surfaces. This is a tip in case if you want to take a step further, but you might add a small amount of blur to the graphics placed in the foreground to match the levels of blur on the surface. 👇 This will add a depth of field effect and increase the realism of your composition. Well done!

@coral stone Very much appreciate the feedback, will look to add that blur to the graphics as you said so I can see the difference from the compositions. I will also make sure to take note of the tip for future comps 🙂
My pleasure! 🙂


Thank you so much. Truly appreciate you noticed the reflection.
Gave +1 Creative Carma to @coral stone
So today challenge is similar to toonme challenge that happened last year😍 I loved that challenge.
Hi, @buoyant nova! Great to see you! I loved your cover, the cyan ton has a cool neon look with the black background. The effects on the letters worked out great!
Thanks Valdair
Gave +1 Creative Carma to @coral stone
here is what i made for the perspective challenge, feedback?

i tried going with blending modes to make it look more realistic
@coral stone here is the re touch of the objects in the photo with blur. Which "blur" options are the go to for compositions like this so I know for future references?

To create a transition of the blurred areas to sharp areas you might use the Tilt-Shift. I'll give you this link with the exact time where the technique is about, and how Aaron matched the blurred areas of the reflection 🙂 https://youtu.be/jsmg4a9n1hk?t=594

Watch Advanced Compositing with Stock Images Free on PHLEARN PRO through 10/4! Create a fantasy landscape from scratch using only free stock images and some Photoshop magic:
https://phlearn.com/free-course-advanced-compositing
Today we show you how to add your own text and logos to a sign in Photoshop! Learn how to remove existing graphics fro...
Thank you again, will watch with intrigue!
Gave +1 Creative Carma to @coral stone
can i get some feedback on that?
I think you matched the perspective lines very well in the box, @young karma, I like the way the surface of the box appears through the shadow of the emoji (?) haha. I wonder if changing the blend mode to Multiply would increase the blending effect and allow more of the texture of the box to appear through the graphic!
thanks! ill note that
Gave +1 Creative Carma to @coral stone
Great job with the perspectives, @dry thistle! I think the robots look very well according to each face of the box. My only suggestion would be to fine tune this text here 👇, especially in the right area, you can use the transform handles to make it follow the same perspective lines as the box and even the robot 🙂

thank u for the review sir i will make it better
Gave +1 Creative Carma to @coral stone
i used the vanishing point for the perspective
Sorry to post late, literally just finished it

Thank you. Yes, I added the wings. The selection could have been even better. In the smaller version of the image I’m getting away with imperfections. Also I tried change the color of the wings to match the pigs. Couldn’t get it to my satisfaction because I don’t know the best technique to do that.
Gave +1 Creative Carma to @coral stone
I see, @sullen oasis! In this case adding some adjustment layers like Levels or Curves will help you to match the luminosity values and then with Gradient Maps, Color Balance or even Hue/Saturation. Also, there is some check layer that might help you to be more precise in these edits. Here's an example to show what I mean, hope this helps 🙂 https://www.youtube.com/watch?v=DT-4wbjFYHQ

Unlock the Amazing Power of Check Layers to Precisely Match Color while Making Composites in Photoshop! Whether you are into photo manipulation or simply changing backgrounds, Check Layers allow you to accurately blend the images by matching the color, saturation, and lighting, by looking at the different parameters of the image separately.
In ...
Challenge 2, Cartoon Yourself!

this looks great!
Have got no idea what is happening😩 .Please help

Challenge 1 - Perspective

My day one challenge:

Hi, @dusky wave! Did you have any filter previously set when you entered in the Filter Gallery?
You can check it in the lower right area. If so you just need to select it and click on the trash icon 🙂

Feel free to send me your PSD in DM if this doesn't work
that looks amazing!
thank you so much 🙏
Gave +1 Creative Carma to @azure root
can i suggest a challenge? add a shiny metal badge with scratch marks on the box, it will look so cool
That's a super cool suggestion @young karma! If you want you can share it in the #challenge-suggestions channels 🙂
How do I send yo my PSD
I'll send you a direct message, then you just need to upload the file
Ok great
I learned so much! Thank you.

#DailyChallenge0

@dusky wave It looks like you may be at the step where you turn the "Lines" layer to a Multiply Layer blending mode. If you're having an issue with too much black spots and lines then the Poster Edges and Threshold steps are where that is taken care of, and you may have to play around with the settings to get it right for your image. Also it helps if you image is at a smaller size like mine was at 1000 pixels in height.
@mental sphinx Very nice! The perspective is looking great on the graphics you added to this box. It has a very convincing look 👍
@young karma Looking good! Nice work with the perspective effect on both side of the boxes. This is a really minor note, but it seems like the text on the right side of the box is almost "sloping" the wrong way, as in the text appears like it might be larger on the right side rather than the left, when it should be getting smaller on the right side as it moves further off into the background. It's a very subtle thing, but it might help sell the effect even more. Nice job!
@elder chasm Awesome, glad to hear it! This is looking really good, you nailed the perspective and the foreshortening on the right side of the box. The Stencil font and texture really help sell the effect too. Nicely done!
@quiet fern This came out great! I love the jumbled arrangement of the top word, and the cracked masking of the middle word with the orange peeking out from behind it. The border is a great touch too. Really nice sense of depth on these!
Thank You! I always try to be "different" 😉
Gave +1 Creative Carma to @bleak fossil
@high mesa Very cool, the lighting from those insets in the wall matches the glasses really nicely. Well done 👍
thank you for the comment, love the challenges!!
Gave +1 Creative Carma to @coral stone
@young karma This look great, the perspective is matching very nicely. I might try using an Exposure or Levels adjustment layer on the smiley face on the left side to darken it down to make it match the lighting of that side of the box a touch more. Nice job!
Gave +1 Creative Carma to @strong tree
@dry thistle Great work on the perspective in this image! The texture is looking good too. I really like how you gave the text and graphic an overlapping effect on the second box for more realism. My only minor suggestion would be to use a hard edge masking on the robot on that back box. It looks like you might have used a soft brush to mask it? Perhaps something like the polygonal lasso tool could allow you to select an accurate and clean/hard edge instead. Nice work!
@buoyant nova You nailed the cover image! Nice work with the overlapping shapes, the sense of depth is working well. I like the pop of blue color to this design too!
Thanks Sam
Gave +1 Creative Carma to @bleak fossil
@jovial ether Very cool use of this challenge! What blending mode are you using for the graphics? I wonder if Multiply might work a bit better and match the lighting of the image more. My only other suggestion would be that I think the "Robo's" text on the right side could be adjusted to match the angle of the line created by the overhang right above it. Basically so that the right end of the text is raised a little bit more, if that makes sense. Nice work!
Thanks Sam for the input on my image
Challenge #02: Cartoon Sam Peterson. We love animals.

What threw me on the perspective at first was I made guide lines top and bottom of the box, out to the vanishing point, then I lined my text up with that. The problem is , as illustrated at the begining of the video, the perspective lines change as you go down the front of the box, so I had to make a few other lines closer to the text to make it line out. Once I got that in my head it came together.
Great work!
Thanks @coral stone !
Gave +1 Creative Carma to @coral stone
thank you Sam
Gave +1 Creative Carma to @bleak fossil
thank you Leonardo
I just love your stencil. Very creative!
You got some awesome results, @copper moss! Loved how consistent the effect is and the way you blended the dog's image on the background. The textures were a super cool choice as well. Great job!
Thanks, Valdair! ☺️
Gave +1 Creative Carma to @coral stone
Thanks! I appreciate!
Gave +1 Creative Carma to @candid cape
Day 2 Challenge

#ChallengeCartoonMe

Finished my submission for today - special thanks to @coral stone your help was really appreciated to @bleak fossil

Gave +1 Creative Carma to @coral stone
just thought I'd follow along 🙂

#challengecartoonme - completed! Super Kevin at he beach. Thanks @bleak fossil - I learned alot today!

Gave +1 Creative Carma to @bleak fossil
Day 2 Cartoon yourself

Super cool results in your cartoon effect, @mental sphinx! I like how you let the contrast of your original image determine the outlines of the cartoon. I also dig the gradient in the background. Nicely done! 🙂
I like the colors you chose for the illustration @quiet fern! It has a nice comic book style, I can almost see this with a halftone effect. Excellent work with the outlines and fine-tuning the details 💯
Glad it worked out @dusky wave! I like the colored background and the way that you kept some details of your original image. Well done!
I loved the cartoon effect on the shirt, it turned out amazing! The colors and the details are looking very nice as well, images with these lightings can be a bit tricky to achieve results like this, you did a great job!
the original material was way too dark, but fiddling with the levels helped 🙂 .. I kind of like this cartoon version of me better

Super cool work with the textured details, @robust marsh! Perhaps fine-tuning the threshold or maybe the levels adjustment layer might recover some details from the head and cap area, but that's just a nitpick. Great job with the colors and the mask, it all worked out awesome!
was a really good practice in adjustment layers though, which is something I never work with
Excellent use of the effect, @dusky swallow! I really like how you kept the levels of the colors and the details, especially for the head. Your choice of colors for the background plays very well with the original adding a great touch of contrast!
thanks for this challenge learn a lot

That's great, @slow totem! And once you start combining them, you start to get some great results
The perspective is working very well in both sides, especially for the text. The faded effect on it was also a cool touch. Keep it up!
Thank you Leonardo, maybe a more playful image would have helped, but in this world of selfies and portraits I had problems to find one of myself...🤪
Gave +1 Creative Carma to @coral stone
Hey, done my second challenge! This was a lot of fun 🙂

Challenge #2

Day 0 -cover. Lots of experimentation with light shadow and textures

Day 2

Very cool effect, @young karma! Loved the pastel gradients in the background and the level of the details is very well balanced with the colors. The mask also worked out great. Well done!
Awesome cuts, @versed umbra! I like the movement mood that the diagonal mask brought. The details are very spot on and I like the contrast between both backgrounds. Excellent work!
@forest aspen great to see your works again! Loved the textures you added to the cover, the colors are playing very nice together especially with the subtlety of the gradients and the shadows. 💯
I like the comic book style of your cartoon effect, @quiet ridge! You were able to extract some nice details from the original image, especially on the area of the shirt. If you want you might fine tune the threshold just a touch more to recover some details of the face, that, if the original image allows. Very well done!!
Thank you @coral stone I will play around with that
Gave +1 Creative Carma to @coral stone
@coral stone used a low opacity masked layer of my face on this one

Great improvement, @quiet ridge! 💯
I have to agree
Day 1: Adding objects in perspective

Done! had so much fun doing it.

Day 1 Perspective

Challenge Perspective. I've been working on creating tables and counter tops.... figured I could throw it in with these...


these are what I used plus filters and clipping masks.


challenge 2

i didnt quite get the effect i might have forgot something but it doesnt look too bad although i got a different look.
version 2

Gave +1 Creative Carma to @coral stone
Great feedback - thank you!
Here is my attempt at cartooning daily challenge.

FABULOUS lesson but have done my eyes in for today; not used to it ! .. really understand how the filters work more now .. still 'comprehending' masks etc lol .. cool though thanks for all that info

my submission for challenge #2

challenge 1 perspective

A poster of my favorite footballer - Leo Messi. A welcome for him after his arriving to PSG from his former club Barcelona. I photoshop him to change the shirt too.

thanks! sorry it took me time to respond i was sleeping haha, i will remember your suggestion next time 🙂
Gave +1 Creative Carma to @bleak fossil
thanks sir for the review . I used soft brush for masking . I will try to correct it using hard brush
Gave +1 Creative Carma to @bleak fossil
Bringing back the ruffles for @bleak fossil

it turned out better then i expected! what do you guys think?

i just made him cartoon🙂

Thank you for the feedback, the blend mode i thought worked well at the time is soft light with a change in opacity a few fx effects and a blur. Will try the Multiply effect and see how it turns out + will look to adjust the robo text to the angle you said 🙂
Gave +1 Creative Carma to @bleak fossil
#2 Cartooning I was looking for a challenging picture to try this on and what better then a cat with stripes....

Here I tweeked the cartoon side a bit with oil painting

Challenge #2

Challenge 2

Excellent job with the perspectives, @forest aspen! I loved the way you blended the illustrations and added the little boy, and with the shadow, it really looks like he's part of the scene. Awesome work!
Both sides are playing very nice together, @vivid tulip! I loved that you were able to preserve the details of the original image for the illustration, it helps to sell the effect and keeps the expression of the face consistent. Nicely done!
You managed the perspective very well, @young karma! The text and the icons are looking very consistent through the converging lines. I also liked the textures you added to the graphics to make it a touch more realistic. Well done!
You definitely took the challenge to the next level @tired turret! Thank you so much for sharing the assets, this way I could see the work you have done with them. Did you create that pattern? It looks awesome! I loved that you matched the perspectives to each side of the cubes, and even composited them by adding a ground plane and some shadows. Amazing work!
Gave +1 Creative Carma to @tired turret
Challenge 1

Very nice choice of colors, grey goes very well with the yellow tones, @pastel vessel! Loved the textures of the cartoon effect, I think it produced some very interesting details almost like a noise. The masking is looking very spot on! Nicely done!
@bronze bluff There are some super cool textures going on in your image, I loved the lines that you added to the text. I like that you created a kind of an italic effect for the text on the right side. Very nice effect on day 2 as well, I see what you mean, I believe that this is because of the original lighting of the dog, that's why there weren't so many details, but you can try fine-tuning them with the threshold and the Levels adjustment layer. I loved the details on the paws and its head
I loved you version 2, @quiet ridge, especially the details of the beard and the cap, it turned out really great 💯
@sullen oasis Wow great idea playing with the heart shapes, I think this is an excellent idea for enhancing the message of the original image. The cartoon effect worked out really nicely as well and I loved your colors choice!
Excellent use of the filter to different assets, @onyx field! I like the way that you made them cohesive with the cartoon effect. The details are also looking very nice! Well done!
What amazing results you got, @willow idol! The effect on the fur and the way you were able to preserve its details made the whole work turn out really awesome! Loved the geometric style of the as well. Awesome!
👋 challenge 2

Super cool effect with the perspective, @hearty quiver, all three posters look very consistent to the vanishing point and the converging lines. The only suggestion I'd have is not about the perspective, but the subject looks a bit stretched, if you want to sell the effect that he makes part of that scene you might scale it proportionally so nothing would look like it was distorted, just an idea 😉 Well done!
@coarse isle wow this is awesome, loved the font choice and the signature that you included as well. The color palette looks very consistent with the original image and the cartoon effect turned out super cool. Keep it up!
DCC Day 2 of "cartoon yourself". Real fun way to do it and to learn it! Hope you like it!

It's so great to see your works, @ruby panther! The cartoon effect is looking very spot on, the details of the fabric, the color of the eye built a great composition. Excellent work as always 🙂
@young karma nice one! I like that you sliced the image in three to create this effect. The style feels very consistent and I like the lighting results of the cartoon, especially on the blue area. Well done!
thanks 🙂
Gave +1 Creative Carma to @coral stone
Cool work, @dry thistle! I like the effect on the hair. If you want a more cartoonish effect, you might consider using the oil paint and the cutout filter, but that just comes to be a personal preference, of course 😉 Well done!
Another super cool work, @tired turret! I loved the saturated orange and the details of the fur on the cartoon area, it enhances the dramatic style of the original image. Excellent results with the details too!
thanks leo for your review 🙂
Gave +1 Creative Carma to @coral stone
@upbeat cradle nice results! I like that there is a little bit of invasion of the background colors through the subject, it really creates an atmosphere for the cartoon. The contrast of each side is looking very spot-on as well!
Great choice of color for the background, @candid cape, I like how the cartoon reminds me a little of a watercolor effect. The details are looking very nice, especially in the eyes area. Nicely done!
The perspective challenge looks very nice as well. The only suggestion I have would be to fine-tune the graphics on the right side of the main box, you can use the "This side down" as a reference for you to match the converging lines and make the transformations.
