
#🔀┃art-asset-workflow
1 messages · Page 31 of 1
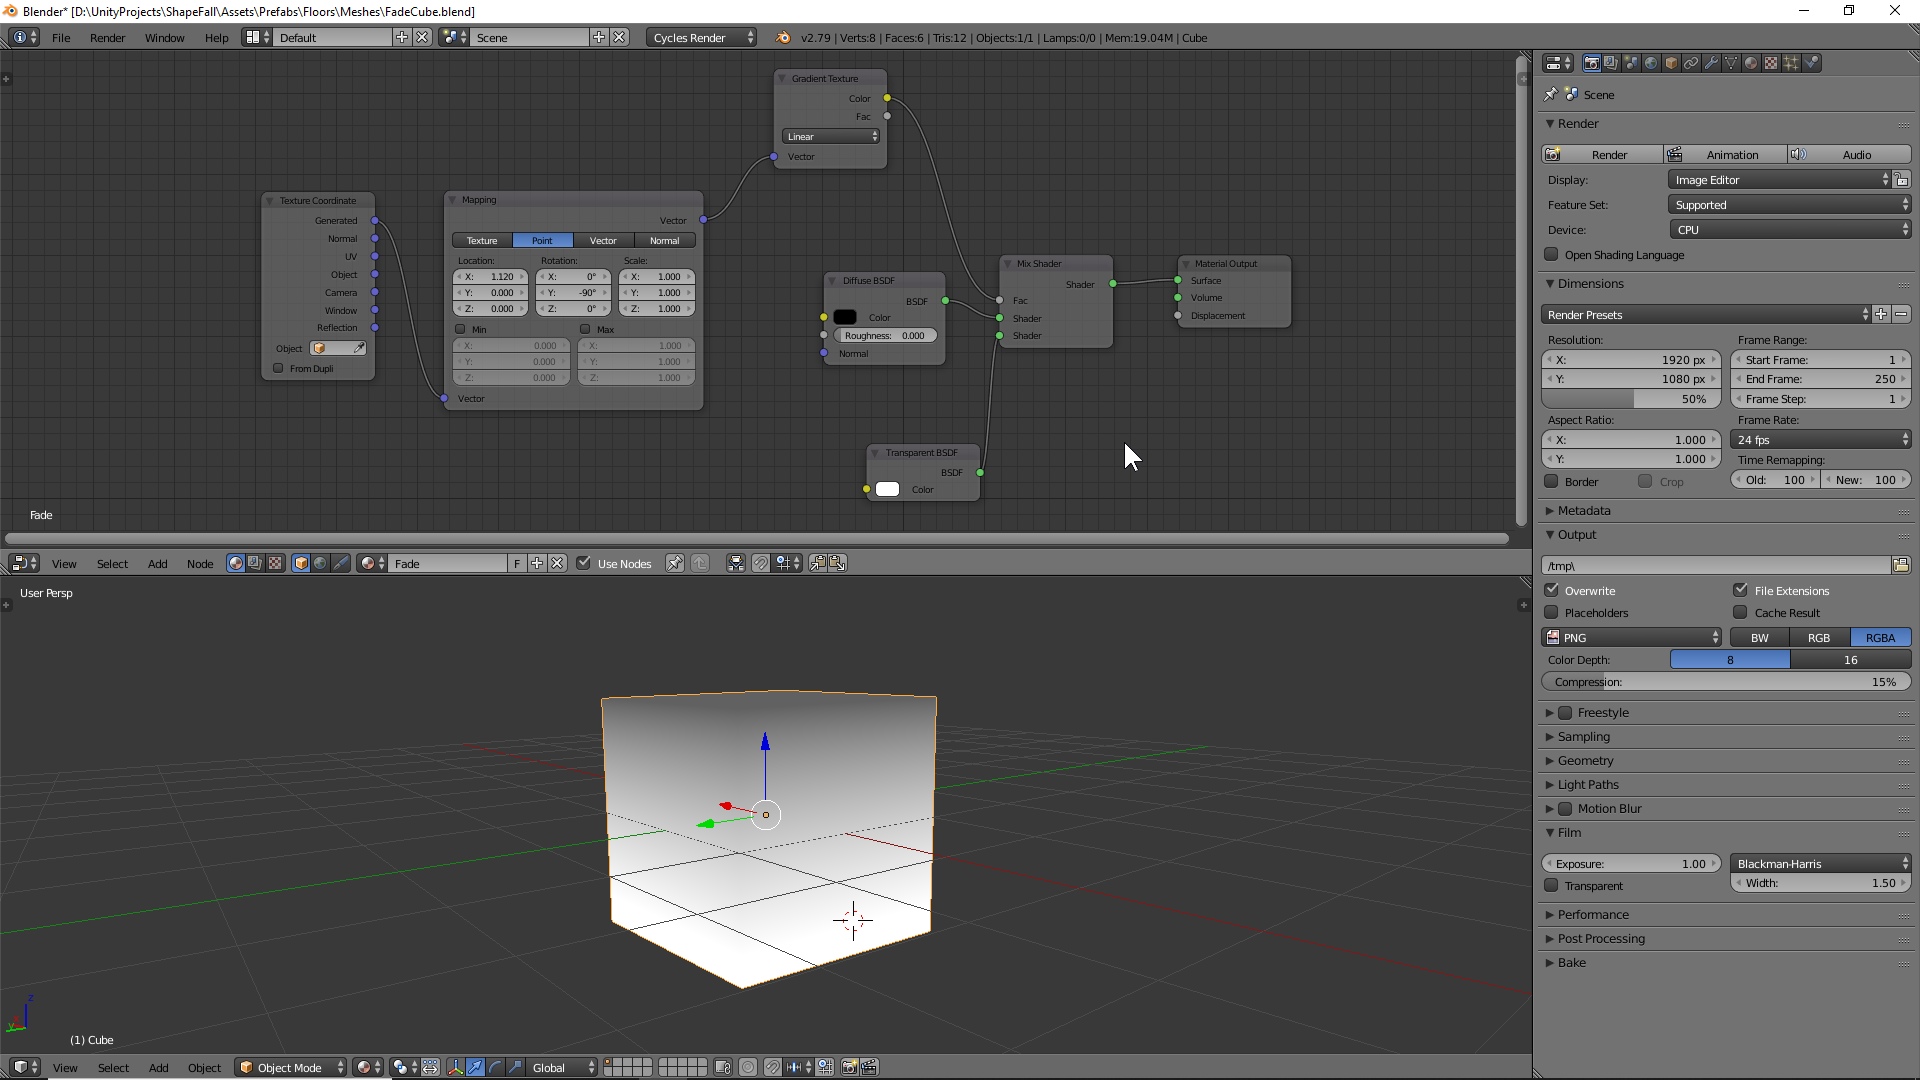
Change surface mode from transparent to opaque while keeping alpha clipping on
You probably shouldn't have the color texture as the Occlusion map
you're probably right but i basically have no idea what im doing.
also thank you so much, it finally looks right
Ah! I fell for that one before. It's useful for wacky effects. But It does tend to point people into thinking it's the same as the alpha cutoff/clipping.
Can someone please help me real quick? I just want to make the shadows smaller. Unfortunately I can't move the lights further away because there's a room above the ceiling. (Well there's going to be)

You could rotate them a way a bit or tone down their intensity. Or both.
Do you have / have the ability to use baked indirect lighting?
This is a help channel. #1180170818983051344
Sorry, My bad.
use an area light
Could anyone point me into direction i should approach this situation? I want to create wall like this from reference image in my game. I am using URP. This is only room that game will be held in so it doesnt need to be most efficient option, i need best possible looks. I was thinking: wall with plaster texture with hole in it for bricks, other wall object underneath with brick texture and somehow decals for painting peeling off. Is it the best option for realism and what would be industry approach if this was only one of x rooms in the game?

i would create all of the textures for this in an external tool like blender and simply bake them and import them into unity
save yourself the hassle
especially if the entire game is just one this room
theres also tons of tutorials on how to achieve exactly what you sought out to do in blender
so i will have to use multiple uvs to create 1 object (4 walls) in order to get right texel density everywhere?
better yet keep the room as 6 objects, treat each wall individually + floor and ceiling
if this is really the entire game, just that room, go all out in my opinion
well this is an interesting approach
i could also do some sculpting this way and add extra detail
No need to make multiple
One UV map can have variable texel density
right but to get high texel density + peel painting in certain areas and bricks showing off all being unique i would have to use multiple uvs?
Decals are useful because they can be dynamically placed on anything
But since the room is pre-made, you can make all geometry and textures specifically for it for maximum control
Not necessary
Different polygons can use the same UV map area for textures
Look into "trim sheets" as an example
And conversely different materials assigned to different parts of the mesh can use the same UV channel for different textures
Such methods are often used for optimization
But it's up to you if you want to utilize them
Sometimes using optimized workflows also makes the work more efficient, sometimes less
hmmm i see, will check it out
The biggest part that carries the scene is the soft indirect lighting
You can get that with baked lightmapping
Also good quality materials and textures are important, as well as HDR tonemapping and post processing
How do I give the mirror actual correct dimensions, please?

thanks everybody that tried to help I appreciate it but I'll probably just leave it alone for now cause nothing I've tried is working very well.
Ended up deciding to just forego the room above for now and I drew my own solid cookies for the three spotlights. It's not perfect but it's not bad, right? I'm no lighting expert but I'm learning. slowly.


The mirror camera's position and rotation should always match the main camera, but mirrored across the reflection plane
I couldn't really help because you didn't say if you can use baked indirect lighting when I asked about it
gonna be honest, I don't know much about lighting so I didn't really have an answer to that one, sorry.
And I put the player camera in front of it to test and it's just kinda off

That checks out
The image of the reflection is only correct for the camera that is being mirrored
Whichever camera you are looking at the scene through is the one that the mirror's camera should copy flipped
Welp, I did it lol

Seems like an improvement, but the right capsule looks way different size in the mirror
I know, and I don't know what to do. And this one still isn't lined up.

You don't line up the reflection camera just once
It has to mirror the transform of the currently active camera, and keep doing it constantly whenever the active camera moves or rotates
And it has to have the same field of view
The only things different are the things that actually make it mirror.


Are you moving and rotating the mirror camera when the active camera moves and rotates?
If not, the setup fundamentally cannot work correctly
Otherwise the effect you get is of a monitor screen
If you can bake lightmaps, you can simulate softly and naturally reflecting indirect lighting like this:

The only typical reason you would not be able to use baked lightmapping is if your scene is dynamic, as baking is static only
The lighting through the grate is static, so I can bake that. Most of the other lights are realtime though
Not sure the best place to post this, but is there a way to have a timeline run at higher than 60fps?
I use the recorder track in timeline a lot so my clips are always the same length, thus recording from the recorder outside of timeline isn't ideal for my workflow. However recording using a timeline track forces the recording to 60 fps. I'd like to be able to record at 120 fps constant to help with the physics, cloth clipping through dresses etc.

do you think I should be doing it the camera way or do you think it would be better to use a realtime probe instead? I'm really trying to go for a realistic approach
I was hoping you'd give an answer to that question you replied to
Realtime probes capture a 360° view, so it's not nearly as simple to match the fov and rotation of the camera, not to mention how wasteful it is to capture a lot of what cannot be seen
So you have only one correct option here practically
If you don't understand something, don't avoid the topic but ask
In that case, I would say I'm trying to but having a hard time so I thought I'd try another way sorry
And if that's what's goin on then I guess I'll abandon that idea then for now and keep trying to do the camera option
I'm trying to import a handful of .obj and matching .mtl files (pieces of a building my wife designed in Sweet Home 3D), and one single one is refusing to generate the correct materials from the .mtl.
All other objs contain the proper 'stone', 'marble', etc materials from the .mtl and apply them as they should. But a single one instead creates an (untextured) material for every mesh inside it, called [part]Mat ('stair_left'Mat, 'railingMat', 'small_columnMat', and so on), completely ignoring the materials defined in the .mtl.
I triple checked that the file names are correct, what other reason could there be for it not reading the .mtl file?
In that case, I would say I'm trying to
Pretty sure mtl just stores a path to the texture(not sure if it's relative or absolute), so if the path is wrong or doesn't point to the right texture, unity would not find it.
Also, I'm not even sure if unity uses the mtl files at all. Need to check. It seems like unity would try to import it.
You can open the mtl with a text editor and see what that specific broken material references.
Hello! I updated my unity to the latest version and now the tile palette preview is black. The tiles work perfectly fine when I lay them on the map. And this only seems to happen in maps with global lighting--I've tried boosting the values of said lighting to no avail. Any suggestions?

We checked, the file names are all correct, and if my wife reimports it back into SH3D, everything works. The weird thing is that all the other .obj and .mtl pairs from the project work, it's just this one that does nothing.
Well, there's not much we can do to help without you sharing more info.
I know this might sound stupid, but is there a way to multiply shaders? so like if I have 2 "urp lit" shaders, I would have a shader that is the multiply of the output of basecolor / other properties of those 2 shaders.
Depends what you mean by that
A mesh renderer can be assigned additional material slots, which causes the mesh to be rendered again with another material/shader
If you set the second material to be transparent and have the multiply blend mode, then their outputs would be multiplied together, but not the material properties
https://docs.unity3d.com/ScriptReference/Material.Lerp.html this method can blend two materials with the same shader for a new material that has a weighted average of the material properties
Beyond these the ideal way to blend shaders is to have one shader that has the functionality of both and the ability to blend them within it
By the way #1390346776804069396 is for shader questions
perfect thank you!!
Any recommendations for realistic characters (for VR) that are rigged and have facial rigging for lip sync?
Hi i have just created an Mouth in Blender and now i wanted to import it to unity but i ONLY want the Facetexture to be seen not the Background of the material any ideas? 
Hi, I provided two images in which you can see that the same panel is not straight, but I dont know why. I modeld both in blender and both the wall and the panel are straight. Also the transform is normal. But somehow it isnt straight. I use the same panel on the floor and an the floor everything is perfect.


what can causes this? importing issues?, the models are normal .blend files made to a prefab
Okay, when I type the same rotation again I get the result I want, but why does 90 degrees doesnt always = 90 degrees, Rounding issues?
I also dont get how the y coordinate can go from 0.2499 -> -3.278 and the to -0.25. How is that possible, I only moved the object down. (Global)


The -3.278... is probably just a very small value near zero
Scientific notation
The number ends with something like E-05 but the full value is not visible (which makes it confusing)
oh yeah, -1.192093e-07. I didnt saw this ending. But do you also know why my 90 degrees werent 90 although the inspecoter said 90?
Wdym 90 isnt 90?
So I had a plane rotated 90 degrees on the X axis thats what the inspecor said too. But wehn I alinged it with other object I had a tiny gap on one side. when I typed 90 again it rotate a bit again and then it was fitting.
in the post before I got images
i know godot has the ability to import .blend files as models and can update to changes made in blender in real time. is there any way to do a similar thing in unity, even with a plug-in of some sort? would be insanely helpful for my workflow
you can import blend files directly in unity
i've heard unity automatically converts .blend files to .fbx on import, is that true? are real-time updates still possible?
any other reason not to do it that way?
godot works the same way, it detects a change then exports it
each time you save and switch back to unity it will only take half a sec or so and it will refresh in unity
a huge downside of this workflow is collobration, since using blend files means everyone working on the project requires the correct version of blender to be installed
if you save the .blend file into unity and then change something in blender and hit ctrl+S (to save your changes), then it immediately changes inside unity too
people typically dont use that .blend file workflow for a lot of reasons
its far better to just export whatever you need as fbx and import into unity
exporting is pretty fast and easy especially if just write a script to do it
what reasons are those?
just wondering as avoiding having to reimport every time sounds like a major plus
especially considering my models normally have to have import settings tweaked each time
a big reason is if its blend files you now require anyone opening the project to have blender
also a other good reason is if you export you get to choose what in the scene goes to unity
i often have lots of stuff in my blender scenes i do not want in unity that is there for workflow purposes
more stable imports (no dependency on blender being installed or changing versions)
faster reimport times in unity
cleaner project structure with one asset per file
better source control and team collaboration
more control over export settings (scale, rigging, animations, normals, etc.)
industry standard workflow compatible with other tools and pipelines
the blend files in project i feel is only viable for like single dev wears all the hats type projects and not great for teams
even then i do not think its great
gotcha, wish there was a way to have all this and real-time changes, alas
this is a project i am working on (thus far) entirely by myself
its good to build good habits early
is there a way to mass-change all .blend files to .fbxs later on down the line?
even if you are working alone
dont think so
no built in way that is
keep what is .blend for now
cheers for the help
i have had to automate the change before was given a legacy project with .ma files in it
was a huge pita, but more or less exported over the files, then fixed the name of the meta file so the references would not be broken
to make doing changes faster i would just looking for a blender plugin for managing export or writing a bit of python in blender that will export how you want with 1 press
if they would change the internal pipeline when using .blends from .fbx to .glb it will be wonderful. no more 'my material didn't carry over', or a bunch of other 'WTH was that!' moments
i was able to automate those problems away for the most part, but yeah good GLB and USD stupport would be great
the FBX exporter of blender is pretty rubbish and never will be feature complete compared to other fbx exporters like mayas
@harsh cypress a material contains a texture
I want to like remove the color of the material (currently in the background)
Yes because in Blender it works by using an Colorramp but when i export it into unity it doesnt work and i searched accros the Internet but found nothing 
So the lighter part is the material and i dont wanna see that only the texutre
your wording is very unclear to me, but I am guessing you are referring to lighting or to the smoothness of the material
try turning it down to 0 and see if that does it
Okay i will explain it agian
I have an Texture on this Material (the Lighter one) and i wanna REMOVE the color of the Material so it only shows the material. Like make the material Transparent but not the texture

it is already turned down
oh I think I got you.
in the texture import properties set the alpha source to "From Grayscale" instead of input alpha.
Then, in your material settings (image you shared) -> put the Surface type to transparent.
you can undo the smoothness changes
though your texture might be reversed.
The white areas are what Unity keeps,
the black areas would be transparent.
use this for reference


YOUR AN LIVE SAVER
@eternal cypress THANK YOU 

It works
Awesome
How can I remove those light leaking edges when I bake my lights? I already tried to set another margin and to change the lightmaping resolution, but this only helped a little bit. I also used this doc by unity. On this spot two separate planes are meeting each other


hello! can anyone tell me why my tileset looks all jumbled up in the tile palette window? 2nd picture has my slice settings and what it's supposed to look like


anyone have a good website wherei can search for textures i like making dumb assets but im not into texturing

made this kinda and i need to texture it like that lol
it reminds me of non polished glass rocks idk how to emulate that though
i tried to conert built-in to URP but still same issue all Models n Materials are like that

Seems like you're using an asset with its own shaders, those won't update with the converter. Either the asset creator has a converstion setup, or you have to do it yourself
Oh thanks
@gaunt pike You need to create a Devlog in #1180170818983051344 to ask about stylistic choices, etc. This is a channel for questions about Unity asset workflow.
ah ok sorry ill move it
where's the prefab for the bouncy ball gun in the vr multiplayer template? i wanna replace the balls with a particle effect
Bump!
If it doesn't import in the order you want you can press edit button and rearrange them.
What is causing that strange noise when I am importing models from Blender to Unity? It's just flat white material.
Its shaded smooth.


The normals/smoothing looks very wrong (even in your Blender picture, you would likely want some of those edges sharp). The barely noticeable noise on the surface looks like SSAO though
It is SSAO, which in some circumstances appears on flat unoccluded surfaces
The normal artifacts are due to poor triangulation combined with smooth shading
Improving the topology would help, and one simple method is to select the non-bevel faces and use Set From Faces from Normals menu
Gonna work on topology then.
hi guys, I am confused about what Unity docs are talking about when they say we can source clips using @ in our FBX names

I thought this meant the base FBX should populate with specified clips
I have tried this at various points in the past decade, Unity's docs about this have never changed, but i also never got it to actually work
is it supposed to automatically populate this list on the base FBX? Because it doesn't seem to, and I'd like it to

Or am i meant to still refer to clips from the additional FBX files? In which case I am not sure what the @ symbol is meant to achieve exactly?
Or does it only enforce a matching avatar?
The docs aren't clear on what I should be seeing if the @ symbol worked
Or is the main purpose of the @ symbol to make this Update reference clips button work?

it seems to automate the naming of the contained clip, that's one thing I noticed.
Anyone have a more comprehensive understanding of this?
It combines animations from multiple sources into the same prefab, and names the added clips based on the file names.
I thought something along those lines, but I'm not seeing the combined result anywhere. I thought it'd appear as some form of externally sourced clips on the base FBX under the animation tab, that's not the case.
given a prefab does not necessarily exist during the FBX import stage, what prefab is that referring to exactly? It doesn't seem to generate one or did you mean the base FBX (model)?
The prefab of the base model created by the importer.
ah right, for clarity, you mean this FBX file right?

cos the importer doesn't generate a prefab, for that you'd have to right-click the FBX/model file and tell it to create a Prefab Variant
only then it would produce a prefab

unless I am missing something, in which case the importer is definitely not making a prefab from my files on import... is it meant to?
Well, the imported model. So if you unfold it you should see the animations listed under it as if they were imported on that model.
@fallow summit


that black part is the leather?
yes
transparent part *
transparency is the same as black lol
its seethrough and how did you telling me it was black fix the shinyness issue?

i dont get whats funny also if you would use a alpha map then yes you could say its black but its not
damn dont read too much into people saying "lol" online, anyways i think you might have a missconception about what it means to pack the roughness map into an alpha channel
ok what am i mistaken about?
this is your roughness map right?
mettalness
Dude..
ive said roughness like 30 times already, told you to send the roughness texture
and you didnt think of correcting me at a single point?
THERE IS NO ROUGNESS MAP
you cannot put a rougness map into materials in older versions (idk if you can in newer) so you have to pack the rougness as aplha into the medalness or into base
so its just your metallic map?
yes
you have to pack the roughness
which is exactly what im telling you to send me
that packed roughness map lol
calm down
IN
THE
HEAD
first of all, learn to behave
second of all
im asking you to show me that roughness map you packed
i just want to see the roughness

you packed this into the alpha channel right?
yes
screenshot me your import settings for the texture

i mean regardless of it fixes your current issue the correct workflow is to disable that for metallic/roughness and normal maps
:loudspeaker: Collaborating and Job Posting
We do not accept job or collab posts on Discord.
Please, use Discussions to promote yourself as job-seeking, advertise commercial job offers, or look for non-commercial projects to participate in:
• ** Collaboration & Jobs**
where's the toy gun prefab in the vr multiplayer template?
how do i bake blender texture? its not giving me correct textures


What does baking a texture mean to you in this context?
If you're referring to the tiling of the texture on your wall, that's not "baking" anything. You need to use a world projected (triplanar) shader on the material so that it just repeats normally.
If textures that were procedurally created in blender are being baked here, they should be baked into a tilable pattern
The whole map is likely too big and inefficient to bake, and the UVs don't look proper for that
Lighting can be baked for the whole level, but should be baked in Unity because it has workflows for that
Hey there, anyone here uses blender? I want to ask them something about their workflow...
i'm sure there's plenty of people here who use blender
just ask the question 😘
just want to ask, when you export your fbx and put it in your asset brower folder in unity, now while working in unity you find some issues with the model
do you edit your blend file, export the fbx again, then paste the fbx in the asset folder again then in unity it refreshes
I made an addon for myself which saves the fbx directly in the game folder, while also saving the .blend file in the native folder, and it can export in different formats too in different locations at the same time.
But I thought maybe i am doing it the hard way, that's why I wanted to know if there was other way people do it?
"do you edit your blend file, export the fbx again, then paste the fbx in the asset folder again then in unity it refreshes"
Pretty much yes
I see thanks!
!collab
:loudspeaker: Collaborating and Job Posting
We do not accept job or collab posts on Discord.
Please, use Discussions to promote yourself as job-seeking, advertise commercial job offers, or look for non-commercial projects to participate in:
• ** Collaboration & Jobs**
@hexed lily Read #📖┃code-of-conduct don't spam help channels.
How can make an collider mesh in blender and import it into Unity? Sort of like how Godot lets you add _col to the object name to add a collider when you import it.
You don't, you just make a normal mesh, import it as a normal model, give it a mesh collider and turn off its renderer.
Oh ok
or you can just drag the mesh which you would like to use as a collider into the object's mesh collider's "mesh" property
Okay thanks!
you could create a custom editor tool for this too if you want to automate it kinda how godot does it
Possibly
Hi, does anyone know why UVs get completely messed up when exporting from Unity to Blender?

Hi, does anyone have a good free house pack they could give me? I want something even more realistic.
Hi, I applyed one material for a ll the character but it doen't come out as my texture image


Hard to tell how it came out when the character is nearly entirely in darkness
Anyway, a common issue is to use some other UV channel in blender than the first which Unity's shaders use, or to use nodes like Mapping which won't carry over
<@&502884371011731486> advertisement
it's a yellowish. I used the correct mapping, and I didn't put the node Mapping
I want to make water in Unity, but the tutorials I found are really confusing. Is water creation related to shaders???? Every tutorial seems to use something called Shader Graph ... i am beginner
My chance to be the first post 
started to learn blender, so far all I can do is extrude, add edge loops, fill gaps between edges, but its good enough!
started as prototypes and kind of evolved into an art style that I really love
Making this arena city to destroy explore.

@young pawn I too have dabbled in the tic tac model space. https://mdjustin.xyz/tic-tacs
It was actually purposeful warping :D, still doesn't look particularly right though.
I think it's that jag when it wraps around that is the big thing
you have to do a lot of model and UV tricks to keep that from happening on low poly models with pixels that size
Yes, I've had to do so in many other places around the pistol. I was trying to get some proper wrap effect along the grip but anything I do either looks incorrect or just perspectively wrong.
I think the easiest solution will simply be restricting it to the front or sides.
you can do a lot more pure planar mapping and try not to keep the UV's connected as much
especially around corners and bends
It's too dark. Can't see anything really.
@stray stone I have to agree.
Bloom is also too high, in my opinion.
hmm ~ You cant see the floppy?
You can see it. Just.
You should always have some light and never go full black, it's unnatural.
Also is that the Atari logo I spot? A copyrighted logo? 👀
Yeis - and I will gladly remove the project if they ever contact me regarding the project, However the project was never published and there is only images of it
But yeah. The scene is too dark. I can't even see the right side of the keyboard, there also aren't any highlights.
The right side of the keyboard? The part which is outside the camera?
Well it just faxed to black, so didn't even know that.
I'm on about the whole unit.
I assume it's an Atari 500?
 oh brb
back ~ are you sure it isnt your discord theme or computer brightness causing the image to look darker?
@dry crescent I turned my screen to full brightness and I could just about make out the image.
I had two others look at it and they could see it 
I guess next time it should get a brightness slider
It's a neccessity to make the thing you're presenting clear, though I guess it depends on the theme you're going for.
Horror for that one
I have my monitors colour balanced to perfection, I shouldn't have to adjust them to see the image.
I'm viewing true colour. Adjusting my brightness (Already on full by the way) Defeats the point of trying to create a visual style.
Viewing on my computer, I can make out the other side of the amiga, but on my phone which I first viewed it on, it was pitch black on the right side.
99% or more of the general user/player base will not have adjusted their screens at all really... maybe once in the beginning and that's it... :)
digital design has to work around not knowing the hardware on the other end (sadly) so yeah... if a good portion of people have difficulties, you have to compromise the "art" portion for the usability
i personally can make out most stuff on all screens i checked on (if i didn't miss anything important i guess) but light is everywhere anyway... so might as well give the viewer less strain on the eyes and make sure
Using Blender to test my homemade prototyping textures. The planes were unwrapped prior to transforming. Materials are flat shaded, mapping coordinates are set to Object. When the grey material is extruded up, it creates this white bar. Why is it doing this?
@frosty steppe the extrusion created new polygons, which have not been properly uv-mapped yet, their UV is just occupying a tiny space near where the extrusion started from. I'm guessing they where right inside a white line from the grid, so it's essentially stretching that white line
it's not like in hammer where new polys are uv-mapped in planar automatically
@mortal wing Is there a way to make it so that it automatically maps it a certain way?
hmm
uv-mapping is usually a final step after modeling, I haven't seen a way to do it in such a way that it's constantly uv-mapping in the manner you'd expect as the mesh is edited. I don't know, maybe there's a command/plugin out there to do it that I'm not aware of
@mortal wing I found an addon called Level Buddy, which does have some helpful tools for modelling rooms. Problem is the textures aren't showing up.
just googled it, wow, it looks neat
@mortal wing Especially for Doom levels, and potentially Half-Life 1 levels.
so if the textures don't show up, what does get shown? just pink?
maybe you need to assign the texture or something?
I abandoned the last thing and now I'm trying Level Buddy. It's quite handy. I think it baked lighting for the scene, but it's now showing the actual textures. So I decided to re-apply textures. For the floor, I went top view orthographic and did a smart uv project.
I done this, but it's still finnicky.
Do you have a source to backup those numbers Minerva? 
Also why didnt you say you were on a phone in the first place mdj
Which programs do you guys use to paint textures with?
Blender has some built in texture tools which allows you to handpaint textures if you would like to use that
Let me take a look :3
And if I want to have a bit 'sharper' textures than hand drawn, should I then just export the UV image to something like photoshop?
Yupp, you use Blender?
Yes
You can export the UV map itself and use that to edit the image with
Alright, thanks for your time 🙂
Np happy to help! 
There's also Krita too.
Is Krita any better than Blender it's texture painting, @frosty steppe ?
It does seem a bit better at least on video's.
But can it also paint it on a 3d model, or only on a UV map?
I prefer substance tools (paid) but then again this depends a lot on what kind of things you do here
they aren't overly expensive for indie tier and do save a ton of time but I totally understand that people may want to search for completely free tools as well
(they also have free student versions)
these are also pretty much industry standard on texturing right now
Pmuch
I'll try the trial period then 😛
if you try it, make sure to watch their intro videos, they are really well structured and get you going way faster
Hey... we need opinions, we are making a runner game in the different scenes (e.g: a forest), should we use unity's terrain, start with that and then use a 3D tool, or a 3D tool from the start????
More context Shini
Basically the main character will go running through big sections (levels are long) and most of them are in nature (forrest, moutains, etc.). On that surface there will be decorations and also obstacles. Yet, teh ground/ surface /terrain object, is it a good idea to use Unity's terrain modelling tools or should we create the terrain with a 3D modelling tool (e.g: blender)
3d modelling tool or liberary
Afaik I dont think Blender is the best for nature levels
it probably will just for the surface, since other objects like for example trees will be added afterwards as separate gameobjects
for the surface eh?
Let me discuss this with a fellow developer one sec
After much discussion we came to a consesus
Houdini wins, However houdini is a complex and difficult piece of software. Mastered, it will give you the results you want
I'm not entirly sure will need top quality fidelity but thanks for the tip
i'll look into it : ))
Good luck, I am sure you will be able to find the tool that suits your needs the best 

my first thing that doesnt look shitty, should learn texturing at one point, all i can do still is extrude, add loop cuts 
@hoary silo That's actually rather good!
If it's meant to be a replica of the thing in the reference image, I'd recommend shortening the length of the obelisk (the long thing).
dont wanna get sued 👀
jk, i think its fine like that, i dont want to make it 1 to 1
and thanks x3
@hoary silo Thanks. It's one of the first time I just used the box modeling method instead of retopologizing.
thats why i stick to cube-y things 😂
huh
Yes.
I added a Bezier curve, increased the depth, then shrunk one end.
Oh, and mirrored it too.
Then I converted the bezier to a mesh when finished (Alt+C)

I haven’t read everything you posted here yet...but are you working on a dinosaur PvP game...?
@wanton snow Who is? 😮
@wanton snow Oh! I can explain:
The triceratops was for fun. The arena was for a game I'd like to make, though I don't write code I've been drawing concept art, modelling prototype levels and writing the story.
oh lol
@wanton snow Hope that clears things up. Your guess wasn't too far off, actually.
this is oddly satisfying
Render test.
Anyone got any good resources on making the optimal use of Circular objects in scenes? How many edge devides and what technices/formulas and shaders can be used to decrease edges without decreasing detail/looks?
For 2D: Signed Distance Field rendering techniques are good, and tessellated shaders would be your friend for 3D I guess.
If you're not sure about your frame budgets
@dry crescent yeah i separate most parts makes it easier for colour id maps and suc has well as i try to think of it like making a gun in real life where each part is separate
I get that, Imo as long as its parts being seperated and not Just Blocks put inside blocks its guud
yeah i always remove the hidden faces
Have you soon the way the Elite Dangerous team does it?
No, how?
Makes box -> moves box -> makes New box -> move box into box ~\○●○~ rinse repeat
So, I had heard that using the subdivision modifier in Blender isn't really a good way to make models for games. Anyone who could tell me more about that?
@quiet tiger it's not a good way to go because the subdivision modifier quadruples your mesh to make it smoother. A quick to to make lower polycounts smoother is to shade them smooth. Which is an option on the left side, or when you press Z with pie menu's.
It's ok if you keep a close eye on it when modelling. But it's generally just good to not use it and model as you want the shape to be. You can always manually subdivid it more if you want.
and i present you first wip of colors 😄
Looks nice. How did ya do the hair?
yep 😄

ArtStation
3D model based on this beautiful Loish's illustration: http://fav.me/d8ox528
Loish's website: http://loish.net/gumdrop/
I was streaming first part of the sculpting in Zbrush and you can watch the VOD on the twitch here: https://www.twitch.tv/videos/213932366
end product from another project
Interesting. I've been playing with curve tools for hair. Which has been an Interesting exploration
I know how it works. Haha.
I was just saying what I've been trying. I've done a lot of hair stuff.
Trying to find the balance in my work.
do you have any examples of you wrok in curve tools?
I'll let ya know when I get home. On bus currently.
sure 😄
https://i.gyazo.com/c8b8a2edc6b0d288398ca27a76610de2.mp4
https://i.gyazo.com/f149492349a4c53bfb25bada68459904.mp4
https://i.gyazo.com/5fbba0b8070e3501350c8f24f754f2f4.png
@abstract island Hay, here are my older experiments with the curve tool method I have been using. It gives a better cartoon look overal which fits the anime/cartoon style nicely, and can still remain relatively low poly, but I trade teh ability for super detailed hair textures with it. My next experiments are going to be trying to get some of this back while still retaining this method because it allows for some great flexibility.
yeah, true
never tried this method
its not my style, but who knows, maybe in future
I'll let you know with the new idea i have for it. It should look much more like what you have, but still keep that flexibility I want.
I then also have my non game hair systems. which is dynamic hair strands, but these are for film.
@quiet tiger So Subdiv modif is mostly used for animation but I belive some use it for games aswell by baking the mesh normalmap from the subdivided modell and applying the modell to a lower poly modell - so far I have only baked a single sculpt though¨
I made this sculpt of a blob monster months ago. I went crazy with the brush alphas, hence why it kinda looks like it's made of rock in some parts.
hehe, it looks better than my blob monsters! I can.. only make blob monsters
and coral
The rock on the bottom is cool
@keen steeple Thank you. My intention was to make it look like ooze squishing up and being pulled out, and possibly bubbling too.
https://i.imgur.com/KZjOlSf.png anyone know how to get this material into Unity? Nothing online seems to help
Put simply : you can't
You can only export materials with a simple setup of texture matching to predefined slots (diffuse/normal/metallic ...)
If you want to have the EXACT same material with the same functionalities in Unity, you will have to re-create it with shader code, or a nodal shader editor

Blender Stack Exchange
I created a interior scene and i don't know how to bake a texture using cycles bake.
This perhaps? @wary torrent

Nice!
Recreated the look of Zbrush in Blender 2.8. I don't know what it is, but the matcaps always put me in the mood for sculpting.
Lol reminds me of this tweet
Created a plug-in for Unity that makes it look you're using Unreal by adding a "lighting has to be rebuilt" text in the corner. The plug-in is open source, free to use and will fool any gamer. https://t.co/cyJnsYSzrX #gamedev #indiedev (i'm deeply sorry <3 both)
Retweets
508
Likes
1648

New Work I did in Blender with EEVEE

I did this isometric style one using #Blender3d with realtime rendering eevee
#artistsontwitter #gamedev #indiedev #3d #b3d #gameart #artstation #blender https://t.co/XRYilqbhpx
I love that, very sweet

@quiet tiger subdivision is all good if your making a low poly and highpoly and baking mesh maps
Looks like I'm coming back to Unity for a project.. In terms of art style which one would you go for? Nothing but a quick mockup but one takes a lot more effort than the other and this ain't a small game for a small team..
is this a trick question
No, why?
because it doesn't really seem like all that different in art style at all
other just lacks all the detail and polish and good lighting
Cool, well the top one is more stylised but it's far lighter on performance and can be accurately reproduced constantly whereas the bottom one was just made to be as good as it could. Which makes everything more difficult like a domino effect.
bottom looks like half finished tbh
Even better.
It'll save me about <Insert massive amount of time> baking at silly texel amounts.
Top

Google Docs
What kind of 3D models would you like to see for free on the asset store pick one from each section (your most preferred one).
Thoughts?
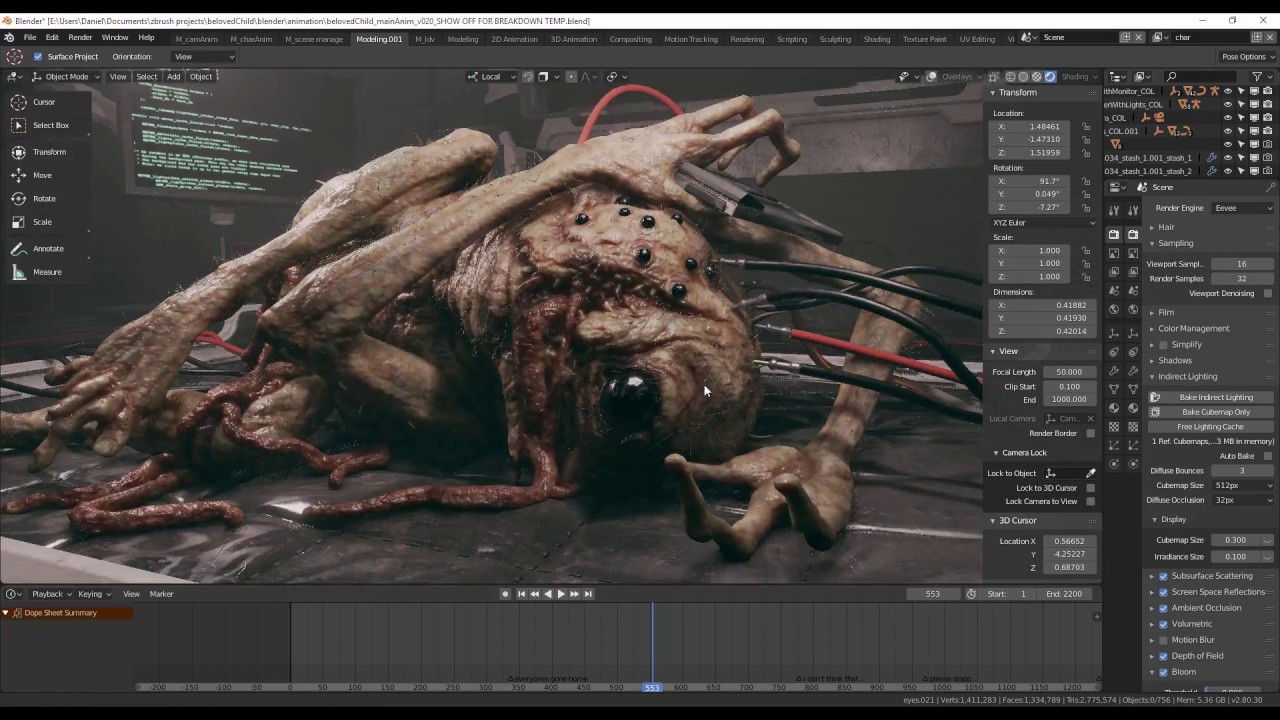
Hard to say because its no where near finished
Only thing I recognize are the eyes and teeth, I have no idea what the rest is supposed to be atm
Out of curiosity, what program are you using btw?
Blender 2.8?
Yep.
Oh nice, how's sculpting in 2.8 in comparison to older versions?
If they even changed anything at all
It feels a little different. It's took some getting used to.
The one thing that annoys me is trying to find how to change the mouse click input from right to left.
Another thing driving me mad is the fact the transform gizmo is invisible.
Might try it out sometime, I love blender for everything but I just cant sculpt in that program
Yeah the sculpting tools are quite primitive in comparison to Zbrush's.
That being said, I'm sticking with Blender 2.79 until 2.8 officially releases.
Much better now
Still early to judge but since you asked, I feel like the lower stomach is a bit thin for such a beast
That was intentional. The creature is meant to look somewhat starved, but it also makes the front area of the creature very large and imposing.
Ah ok
@frosty steppe while I get the idea of doing something unique at the top teeth, that's not how any animal would have their teeths setup, it kinda breaks the immersion even for a fantasy one
@abstract ridge So, I should remove them?
I think he means the way theyre connected to the head
In your sculpt theyre connected to the eyebrow but top teeth are usually inside the mouth
^
I understand now. I was making random strokes and tried to make something look weird but interesting.
Since I'm not fully comfortable with 2.8 I'm going to switch back to 2.79 to continue sculpting.
Nevermind, I guess I won't. Blender 2.79 crashes when I try to import it, haha.
Oh, I can append the mesh from the file! No problem.
This silhouette addon is handy.
Big change to the head.
Modelled a Super Mario 64-style tree.
Did a lighting and shader test with HDRP w/ an arch viz pack.
Not bad.!
Still some kinks to work out but looking forward to using it in a game context.
Here's my custom Zbrush theme, for Blender 2.8.
Awesome monkey head dude
Not sure if irony or ignorance :D
The monkey head didn't have to be added, but I did. Makes it feel more Zbrush-ish.
Used the skin modifier to create individual body parts to boolean together.
poor suzanne
It's like godzilla got attacked by a rainbow. Interested to see where it goes..!
@spring niche Thank you. I used the Sculpt Toolkit addon. It randomizes the colours of each item so you know which mesh is in where. Like how Blender 2.8 does it normally.
allegorithmic joining adobe ppl
we talked about it briefly at #497872469911404564
Retopoflow 2.0.2 is so good. What an amazing and free retopology tool.
I did all this in a fraction of the usual retopology time.
Did this animated sequence with Blender using realtime renderer Eevee

This is the updated realtime #Blender3d sequence I did using eevee. It is pretty nice and fast. ✅https://t.co/iTVhVZaKHa
#artistsontwitter #gamedev #indiedev #gameart #b3d #blender
#animation #ArtStationHQ #3d https://t.co/q3pp8OFKXG
finished my parking kiosk model: https://i.imgur.com/pXp11Bn.png

for some reason Iray doesn't like transparency, it's black around the P
@craggy wadi You can get it through there github, but you won't get support for it, unless you participate within the github.
Gj ceebee
I made this rail. It was very easy to model.
I don't see many of these pipe-shaped flashlight models.
After recieving feedback, I reworked the head.
I like how you go from a simple lowpoly model to a complex zombie sculpture
"burple"
What happened to your creature?
Stopped working on it or just stopped posting progress?
@visual meadow I made it months ago, then abandoned it for a while. I was advised to change how the torn flesh looked, and honestly the critique helped me a lot.
Ah
Coming back to old work can be great, since you come back with new knowledge, or a different opinion.
A problem i often have is that when i look at the same sculpt for a long time i dont see obvious mistakes
Mainly proportions
Idk if thats just me or if other people have this as well
And then someone mentions a part that is obviously disproportioned and im like wtf how did i not see this
I feel the same way.
Testings Crystal Material Realtime

Testing some crystal materials realtime
#artistsontwitter #gameart #gamedev #indiedev #b3d #Blender3d #blender #3d https://t.co/7DYmquAivD
I do a model change(mesh and bone) in an FBX model inside a prefab. Every time I do that, the mesh will get skewed or disappear from the model in the prefab. If I drag the FBX into the scene right next to the prefab with the exact same model in it the FBX has the mesh that was changed, but the prefab just will not get the new mesh/bone changes. The way to fix a prefab like that is to take the model and drag it in under the same model in the prefab, zero it, drag it out right next to the model, delete the old model and keep the new.
I can't believe this is still a problem in Unity. How does devs circumvent this?
nice
Looks like me
So kissable
❤
Some sculpting fun.
I like how you've managed to make blenders' viewport look like Zbrush. XD
@stray stone Ha thank you. I changed the background, the FOV to 100, and imported one of Zbrush' matcaps.
Changed the proportions.
does anyone have any animal cube meshes + materials
@glossy lichen Animal cube meshes? Like voxel models?
yes something like that
I don't, though there should be a free voxel-making piece of software for building custom voxel models.
MagicaVoxel Official Website
An ottoman.
That is indeed an ottoman.
been having fun with substance designer today. forgot how much fun it can be.
neat 😃
I haven't seen many ottoman assets on the Unity Asset store so I thought to give making one a try.
I'm looking for a good free rig to animate with, any ideas?
something with basic handles
@abstract ember on the blender cloud, there are a bunch of free rigs. The best one there is Vincent, he'll match the most to a production rig in animation.
thanks I'm using maya though, I suppose I could try animating in blender one of these days 🤔
Kinked you should check out Hoodini, it has some noice node editing for textures and terrain generation
Soon kink will leave unity having made millions from his 60fps LWRP civ-lite awesomeness
Well my art pipeline experiments arent going very well so dont hold your breath 😛
What’s some good software for concept art
Not sure if I need concept art but it might help a bit
I mean I’m sure any software would work but which would you recommend
@wanton snow I use Krita for concepting. Recently 2.8's grease pencil tools are improving to the point drawing concept art in it is possible. Also Alchemy.
okay
Alchemy is an open drawing project aimed at exploring how we can sketch, draw, and create on computers in new ways.
Oops I forgot to mention! Blender 2.8.
The standard basic brush is fine.
Sometimes I use a textured pencil brush if I'm feeling it.
There's also a lasso drawing tool, similar to Alchemy's.
So I'm making a game using unity what should I use for 3d modelling software I have an extremely low budget so if prefer something free. Is there any good free software besides blender? I've tried using it but its so hard to learn and get used to.
try blender 2.8
neat
m-mom?!
very kawaii
I imagine the screams of such a thing were you god and it of flesh
uguu
doesnt work in blender
while it does work in other things
oh its shift control z
ehh is this cute
last art test of the day
WOW
I love that!
it's basically fortnite quality done on the cheap using the power of sneaky art
looks in his wallet and spies a lone moth fluttering out
can't afford to hire ol' kink
Also kinda reminds me of this game called Legend of Zelda: Wind Waker
And also uh... for me usually 3D modeling only takes maybe half an hour to an hour and a half, maybe a bit more or less. But I’m usually just doing smaller models
What is the longest time it took you to do a model (not including textures or anything like that)
a single model?
best part of a week i guess?
complicated vehicles and stuff
also depends, at work itll keep going through feedback loops, can take a month or so to finish a character 😛
Oh yeah that reminds me I probably need a model for my character, at least the hands
Yeah pixar has a nice rule for feedback
its between 25% and 75% that pixar allow and encourage feedback with the idea that before 25% done, it's too soon for change, and after 75% it's too expensive to change.
And it really works, at least it works on every single film they make so I guess feeding back and having changes for half of the process, with the least pain on the artist is a very good compromise.
If unity doesn't do that, they should learn from the best.
Thats a really cool "rule", didnt know they had that set.
Idk how our demo teams work, but Unity is a complex organism 😛
Look like ! 30 staff member on this discord connected right now. How many are you working for unity ? 😮
does anyone know where I can get a free rig that's setup correctly for mecanim? 😃
I tried using the makehuman unity skeleton
with maya's humanik
the fingers were really bad
Dunno... Bought myself a rigged character and it doesn't work on unity aswell, i'll have to redo it too
@abstract ember you may want to learn how to fix the skeleton and weights if you really need that, fingers tend to be messed up on almost all generators (you can also try Mixamo's autorigger but in my experience it doesn't even do fingers right with their own character meshes )
knowing how this stuff works will help you in the long run more than trying to find item x that does what you want
well I'm trying to make some animations
Some plants I made in Blender

I made some plants using #blender3d 🌿
#artistsontwitter #b3d #realtime #gameart #indiedev #gamedev #succulents #3d #blender https://t.co/XPjoUFoqfY
Likes
175
cute 😃
neat 😃
the left half of my creature has bones
is there a way to quickly flip the bones over the x axis? (in blender)
I made a short Crystal Effect Tutorial in Blender. Thank you for viewing.

Hello everyone, In this tutorial, I have shared some of the main steps to create the crystal effect in Blender 2.8 using Eevee. I hope you like it. I am will...
Thank you @abstract ember
I am testing it now, it will be close one. Hopefully I can share results soon but blender eevee is sure powerful 😊
WIP bead maze.
Hi! What’s a good, reliable way to integrate a Netflix player into a Unity PC-based app so I can have users watch shows and movies while in my VR experience?
Netflix doesn't have a public API anymore, so you'd have to interface with it via a web browser for authentication.
which means you'd need to first find a way to have a web browser inside the game
there's some assets that are made to do that, but I can't vouch for how well any of them work, or how good of an experience they would provide playing video (if they even can)
it would be no small feat to do what you're asking.
Just wanted to say hi to my fellow 3D folks :) Can't wait to share and learn from one another, have a great day!
I’d like to have a lot of variation with every piece or coral in my coral reef, would I just have to create a lot of individual meshes or could I do something else?
I'd Recommend Blendshapes/Shape keys.
What exactly are those?
Procedurally generate the coral? :3
Hi everyone, I'm pretty new to 3D modeling and created some low poly props, like trees and bushes. Now I am wondering whether it's "better" to have multiple material slots e.g. on the tree for wood and leaves or have one material and then do the coloring via textures.
What would be the recommended way here? Performance wise I guess I should go with a texture for colors.
I am targeting mobile hardware
Maybe 1 Texture, And a few materials to be recolored?
Sorry, I am not sure what you mean?
Basically Leaves and Bark textures would be white, But you can make more materials with the same textures with diffrent color.
Ah I see. Well that could be useful! Thanks.
I use blender @eager mist
@wanton snow
This way you can add settings to make a Mesh change! This way you can have about hundreds of uniqne Corals with only 1 mesh!
You'll add a Basis, and Keys
When editing a model, Make sure you're on the key
Basis = Original Mesh
Key 1 = Deformation
When you modified it, You can now change the Value!
@wanton snow
So kinda like you can select from one
Yep?
I tend to do .fbx
yeah it seems like obj removes some stuff
Yep.
Ok
Thanks
Oh and also is there a way to have a mesh that like connects to others in unity so I could create like structures
Kinda like a metaball...
If not it’s ok but just asking
I'm not exactly sure myself... I'm sorry.
Ok
do you want the two structures to have corresponding meshes so that there could be like a walkway that connects the two?
You could write a script that detects when two objects are close enough together to dynamically create a mesh between them
with the shape keys
the keys dont appear
i have 6 keys but the thing is empty
you can see the keys in the drop down but not in that panel thing
any help...?

@wanton snow were you trying to have a base shape and then have a couple different modifications?
if you want you can describe what you would like / send the file and we could work it out
Ideally I think that blendshapes never changes geometry, it just changes either the position scale or rotation of the mesh.
which is why its usually used for poses and face shapes.
Post when it's finish, no ?
I could.
It reminds me a lot of Frampt from Dark Souls.
You just need a nice mustache tentacle thing.
I want to be able to make graphics that resemble these: https://www.youtube.com/watch?v=MdjAcB-bDt8 (of course I won't be that good probably). I played around with blender already a few times and I can make some small stuff but I never get it reduced that good and everything fitting so well as I am seeing in a lot of games and the one above especially

https://www.gog.com/game/kingdoms_castles Kingdoms and Castles is a game about growing a kingdom from a tiny hamlet to a sprawling city and imposing castle. ...
where does one start to learn about that?
both
I guess more the all together
I have a feeling that I could not make stuff that fits so well together in style
@dim laurel You could totally make these! Just start super small 😃 Go into it with the mindset that you aren't creating a windmill, just that you are going to create 4 rectangles first for the blades and so on. I find for things like this it's easy to grab a piece of paper and just draw the shapes that I see. "I'll need this many rectangles and this many squares, etc". Slowly building my own Ikea instructions then it just a matter of playing Lego and placing them where they need to go. Eventually you'll pick up an eye for it and you won't need to draw it out. I know that I'm making it seem really easy but I just want you to know that there is process out there that might for for you. Piece by piece! 😄
@alpine monolith haha thanks man that is a very nice answer. But I also meant how to do stuff like that yourself, I don't want to just copy their style... but maybe I could start by trying to copy a few buildings and getting a feeling of how I would then do it myself
But yeah maybe trying to see the pieces and puzzling could work well 😃
That's exactly it! Find a couple different examples that you like and just copy, copy, copy! Eventually you will find tips and trick that you love and your own style will emerge as a combination of the things you use for influence. Don't be afraid to copy, it's how everyone learns 😄
thanks!
This is just the beginning of a wheel before a vehicle, what do you think?
@faint plank smooth
Are you familiar with the "mark sharp" and auto smooth features in blender? @faint plank
It might help you out with some smoothing groups for your rims there if that is what you're looking for.
(it does look great though :) )
Hey, im looking for some 3D artist to help create the game my team is working on. If you are interested, please dm me, thx
In case anyone is interested! We just announced a new 3D art contest, "Inside the Vault". You can see more info in our blog, but I'm curious to know your thoughts! Will you be participating? https://blogs.unity3d.com/2019/02/15/show-us-what-is-inside-the-yggdrasil-vault/
Always a bit sceptical of comps like this. Feels like Unity is getting more benefit that than the artists.
I'm surprised the Unity Blog Bot hasn't picked up on the blog post, did it go Awol?
The idea is cute, I'm curious to see what people come up with. I don't have the bandwidth to participate though.
You want to know whats inside my ancestors tree?
I dont remember anything being inside yggdrasil in any of the lore or stories I read 
@zealous stream I see it in #497866432277643275 🤔 Maybe it just took a bit to get sent over?
@keen steeple I'd be curious to know more! How does a challenge like this differ from something like us hosting a game jam or similar? Tag me over in #497872469911404564 if you want to chat about it so we can move out of the 3D space.
oh hmm, yeah i think discord is being a little funny with me today. I've noticed some channels take time to load
@eternal cosmos It feels different because
- It's not teamwork, which jams are good for
- it's for a Unity project, maybe they should just pay someone to make their stuff?
- People's work goes on the asset store, which profits Unity.
It's a bit suss, after the last debacle Unity hosted were people were to make in game art :S
But, I do know people who entered that other comp, because they had the time to do what was essentially a free art/design test
So, I guess it's good for people who have time to do free stuff.
Totally understand! If there wasn't a clause to upload it to the Asset Store, would it come off a bit better? While I see what you're saying regarding teamwork, challenges like this can be a driving point for someone who wants to work on their own skillset and have a common driving point around other people doing the same. I'll be passing the feedback along to our teams to see how we can do better if that's alright!
no worries :)
Yes, perhaps also a focus on community feedback too. Maybe they could come here and give feedback to eachother. Maybe someone from Substance could host an online workshop on Twitch. More focus on empowering these artists, and less on what Unity gets from them?
 friendly and constructive conversation
 Boo.
I'd watch that.
Wah, are there eyes in that nose!
Looks like that to me.
That would hurt to pick XD
Wasn't that the medieval dude who predicted 9/11?
Nosetradamus
Can I like turn my sun into a 360 degree directional light or something
no, it's called directional for a reason 😃
but you can adjust the ambient lighting of a scene in the Lighting panel
ambient is like 'global' brightness
well i could possibly make two directional lights
i was just testing out scripts for orbiting and stuff
it's pretty cool with how when a planet spins and orbits you can see the moon phases happen just... not any script I've done... just the way the sun lights up part of the moon
i want to make it real-time but i dont think anyone is going to wait 365 days just for a planet to orbit around a sun in a simulation
I'm not sure. There was a screensaver jam a few years ago, so there's definitely info out there
some good info here: https://itch.io/jam/screensaverjam/community
itch.io
unity.exe has stopped working
oof
maybe it has something to do with the extremely large scale of the planets?
not sure about making a screensaver, but I've I've had this on my wishlist for awhile: https://store.steampowered.com/app/431960/

Wallpaper Engine enables you to use live wallpapers on your Windows desktop. Various types of animated wallpapers are supported, including 3D and 2D animations, websites, videos and even certain applications. Choose an existing wallpaper or create your own and share it on Ste...
Price
$3.99
Recommendations
57733
i thought it would be neat to turn a unity scene into an active wallpaper
Hello everybody! I just started learning blender (the donut tutorial of course) and I'd like to ask about materials: in the tutorial you assign diffuse and gloss with solid color via mixed shader to the objects - these are blender specific shaders, aren't they? If you imported model now to the unity, you would have to create materials from the ground up again in Unity using Unity's own shaders right? Meaning when exporting and importing materials from blender to Unity, you can only import models, their textures and texture uvs?
I believe so. You can drag and drop the model and textures into a folder into Unity.
Apply material to uv map and save the image - drag image into Unity and drag onto modell -> should work but I dont remember
looking for a link or advice on adjoining any adjacent quads into one mesh/material before rendering
I just swapped from a sprite tiled background to quads to finish my pure ECS migration
and the background moves fast so I need to limit draw calls, would it be better to find someway to map the tiles to a large quad or something? I'm never worked with 3d
so all vertices would be on the same z-axis or whatever
Whenever I try to paint textures in blender the quality is terrible
I can't figure a way to get my texture to render with mip maps using il2cpp compilation
but I was having to render a lot of sprites to keep up with the ships acceleration in low gravity, I need the most efficient way to render quads like this
@wanton snow You can adjust the size of the image you are painting unto to higher resolution
Depends on How you are painting
You can export the image and add the noise in PS or Gimp aswell I guess
when I paint textures in blender, I use it to lay down colors and I perfect it later in photoshop.
Yea I’ll try that
Table.
are the legs separate objects or are those ngons
Ay boios, what software is best for organic enviorments? Or flesh enviorments I guess
I would say you keep to blender for that one tbh, or try and make bits and pieces with zbrush
oh hello karseth
👋
you have any example projects doing that?
I dont unfortunately : /
Are you thinking of sculpting/modelling it, or more in the terms of "generating" it?
modelling and sculpting - if I were to generate it I would get into Hoodini
Cause you have this example in terms of fleshy and organic, while not an environment, this still shows a good example of it:
Music credit: Last willow leaf & White Atlantis by Sergey Cheremisinov http://freemusicarchive.org/music/Sergey_Cheremisinov/ Artstation: https://www.artstat...
hmm yeah
That Blender UI is looking fresh
@abstract ember So sorry for not answering. The legs are separate.
@dry crescent check out a trial of 3dcoat its free-form voxel sculpting is a good alt to zbrush for organic env
@nocturne shadow @dry crescent It's also cheaper licence-wise.
Allright thanks I Will check it out
3d coat is great all around tool but my issue on it was that I didnt like the sculpting feel one bit
Discord theme for Blender 2.79.
why does he sink away into the ground upon spawning 😭
Wait is the rendering separating from the collider.
Root motion issue?
Did you select humanoid rigg? @hasty granite
capsule collider is off
Hello

i am planing to make game like tha
t
should i make movement and hits with physic or transform
Which one will be better ?
If it s relates to ‘forces’ use Rigidbody movement, elsewhere transform.translate could do the trick
ultimate noob question
I tried making a higher polygon sphere in blender
its on the left and the basic unity sphere is on the right
the thing is that I can see the individual lines on the blender one
what did I do wrong>
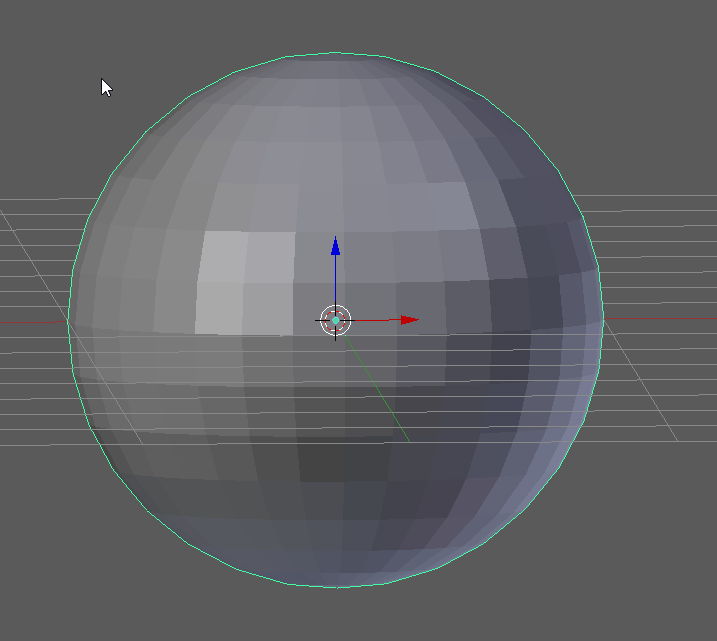
blender doesn't apply smoothing by default, you have to set the faces smooth

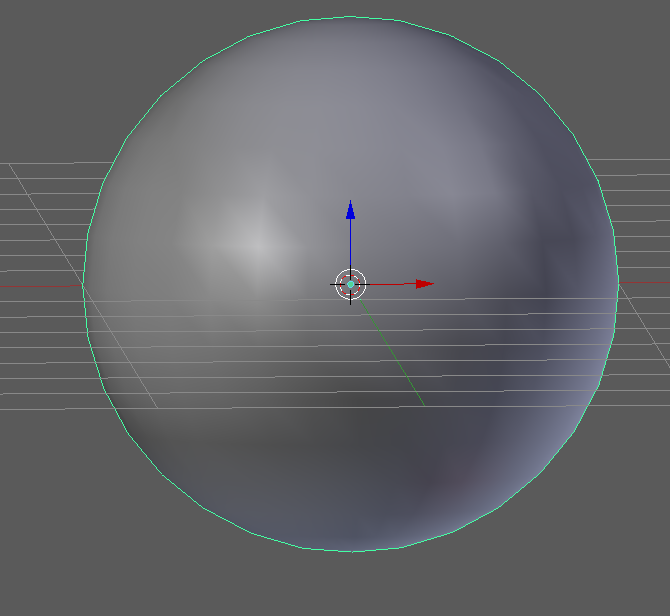
and voila
Ooooh ty ty
Hey there, any Blender user around that can answer a quick question? I'm coming from 3ds Max and in it when you scale, you can't really make a negative scale(<0) and it's useful for aligning vertexes along an axis. Is there any way to replicate this limitation in Blender? A google search has yield no answers. I'm on 2.8 btw.
Some 3d food art I made using Blender and with Eevee. Thank you for viewing :)

Some #3d food art, I prepared in #Blender3d and with realtime Eevee #b3d
#artistsontwitter #gamedev #indiedev #screenshotsaturday #blender #gameart
#animation #realtime https://t.co/A5GCb45xfO
Edit: Figured it out. Neutral value is 256 white, and you can only displace down. I brought the maps into Photoshop, used Auto Contrast to get the full range of values, then changed the black point output to 0.5 to keep the normals from turning 180 degrees.
Hey, I'm having some issue with using Detail Map in the Lit Shader. I have the Y and X normals in the green and alpha channels respectively.According to the info box showing up when hovering over Detail Map: 0.5 is the neutral value, but 0.5 changes the normal of the surface I'm trying to apply it on. Is there another neutral value now? What am I missing?
@hexed matrix if your just wanting to align selected vertices to an axis. You can just press S, press the corresponding axis letter. And then press 0 on the numpad. It would then along all these onto that axis. Hope this helps.
I made a Nacelle
if I want to have a modular 3d wall, is it best to build as such?
or should I just build symmetrically, and have the models intersecting?
@stray stone thanks for your help, it worked 😉
No Problem.
@ember frigate You should check this tutorial, it goes trough the whole process of creating modular assets http://www.thiagoklafke.com/v4/modularenvironments.html
Digital portfolio and personal website of environment artist Thiago Klafke.
You want the edges to to fit inside a 1x1 square so you can easily align them in Unity, mix and match
I don't think you want intersection at all, since that causes z-fighting.
Awesome! Thanks for the resource. I'll take a look as soon as I get back on my pc
What is a good 3d modeler other than blender that is cheap or free? I have messed around with several modeling programs but so far I like Probuilder the best, but it is lacking in features and slightly buggy.
if you like probuilder, you might like something like AC3D
AC3D - 3D Software - View, Edit and Design great 3D graphics with ease. Free trial downloads for Windows, Mac and Linux. Widely used for Second Life and X-Plane.
it's pretty cheap.
you can try the demo and see what you think
Also SabreCSG which is now open source, too
https://assetstore.unity.com/packages/tools/modeling/sabrecsg-level-design-tools-47418

IMPORTANT: THIS VERSION IS NOW OUT OF DATE! SabreCSG is now open source and is now maintained at Github where you can find the latest version .
SabreCSG is a set of level design tools for building complex levels quickly inside Unity. Using Constructive Solid Geometry t...
yeah I saw that on GitHub awhile back
never have tried it
it's a bit like old Quake right? making shapes by cutting out of a volume?
It's the first tool I tried because my partner is friends with the dev. I really like it
You can do that, yeah.
It uses "additive" and "subtractive" brushes hehe
but yeah, it's a lot easier to make holes in things than probuilder hahaha
yep, I know some love that style of building mesh
Thanks guys these look great for layouts/prototyping but they do not seem to be used for anything else like character modeling. Do you happen to know of anything in that area off the top of your head?
yeah, I think we were going off your mentioning of Probuilder rather than Blender..
I don't think there ARE many free alternatives to blender..
yeah for characters, i'd say blender 100%, but that's me
I've been using blender since 2010
AlternativeTo
Popular Alternatives to Blender for Windows, Mac, Linux, Web, iPad and more. Explore 25+ apps like Blender, all suggested and ranked by the AlternativeTo user community.
Wings and Make Human sound interesting
I was afraid of that. My biggest problem with blender is probably the camera is is awful. 
Makehuman isn't 3d software though, it's just a character creator
you could see if people have made alternate cameras for you to use in Blender? It takes plugins, right?
if all you want to do is make characters, then it would do the trick I guess
Is educational max or maya not an option?
but you'd still need 3d software to make clothing etc
there's a character creator that works inside blender as well
Sai it is currently but I am looking in to selling my work later. Soo not certain if I want to go down that path.
oh hell, it's over 😦
ahhhhh gotcha 😦
it was a really impressive tool, I wonder what happened...
i think i still have a copy on my HD somewhere
Make sure you use the github version of SabreCSG
since the asset store one is outdated for like 2 years
I fixed the camera  shift+f = FPS right/left click save/cancel shift move faster.
trying to freshen up my 3d skills here.
When creating a character, do I make a base mesh, and then armor on top?
Or is armor part of the base mesh? Thank you!
i'd say it's completely up to how your game is going to be.
if your character is never going to change clothes or be naked, there's no need to make the body first, unless you're just wanting to use it as some reference for scale while creating.
but if ti's something like skyrim where people will be taking clothes on and off and looking at their underwear, then you'd need a body, sure.
even games where characters wear several outfits, like Tomb Raider, every outfit is just a body replacement, there's no real 'nekkid' body underneath. ;P
awesome, thank you @zealous stream
I knew the answer was going to be some version of "it depends", but yours is pretty damn clear. 😃
no problem
primarily it comes down to, "if you can't see some triangles/mesh, you probably don't need it"
it's just more work for the GPU
makes sense!
next question, is it possible to keep flat shading in mixamo? everytime I upload a low poly/flat shaded model, it always ends up shading it smooth
This is another alternative 3D tool with a free version available:
@ember frigate There's probably no way to prevent them from applying smooth shading, they assume most want that (and probably 99% of devs do). but you can simply modify their result in the 3d editor you use and return it to flat shading.
Hello All. I'm New to this game making scene. I have a basic cube player built. I have started to construct a game level in unity. I was going to use cubes, then started to use the plane to build the level. I saw that the plane has loads of the poly things compared to the cube and they scale different as well. My game is a simple 20 lvl fps, The room shape and size will be the same each lvl, I will just have the walls and doors in different place's. The walls will be cube to give them depth and I will only have colours in game instead of any real textures. Right now the floor, walls and ceiling are all made of the plane 3d object. Its about x10.y2.z50. Will the amount of poly things going to be a problem for me or is there a way to reduce the amout with out coding.
forgot to add pic
i'ts unlikely this will be a problem. You'd usually have to have millions of polys before it becomes a problem.
it doesn't sound like you'll have anywhere near that many
Cool Thanks
Hey, I'm wondering if there's a way to make reflection probes pay some more correct attention to roughness maps. This doesn't look much like a cardboard surface with this reflection :s
that's not a problem with your reflection probes, but with your cardboard material. try turning metallic to 0, and smoothness way down, like the 0.2 range or lower
and if you're using metal/roughness maps, they need some range adjustment
I think the maps are fine, the values are about what you said, and they look great with regular lights, as well as in Substance. Btw I'm using HDRP. Let me get a shot of it with an actual light source
Here's just a point light from the camera angle
Try the box projection for your probe ? Also if it's too powerful you can decrease its intensity.
@iron flare
Both box and infinite projection have this, but at different angles. I seem to recall box projection doing a pretty good job in the regular 3D pipe, but it may not be doing so hot in HDRP yet.
ok yes, a UV sphere
and yeah probably more triangles than you need
but assuming you make a new UV sphere... this is how to UV map it
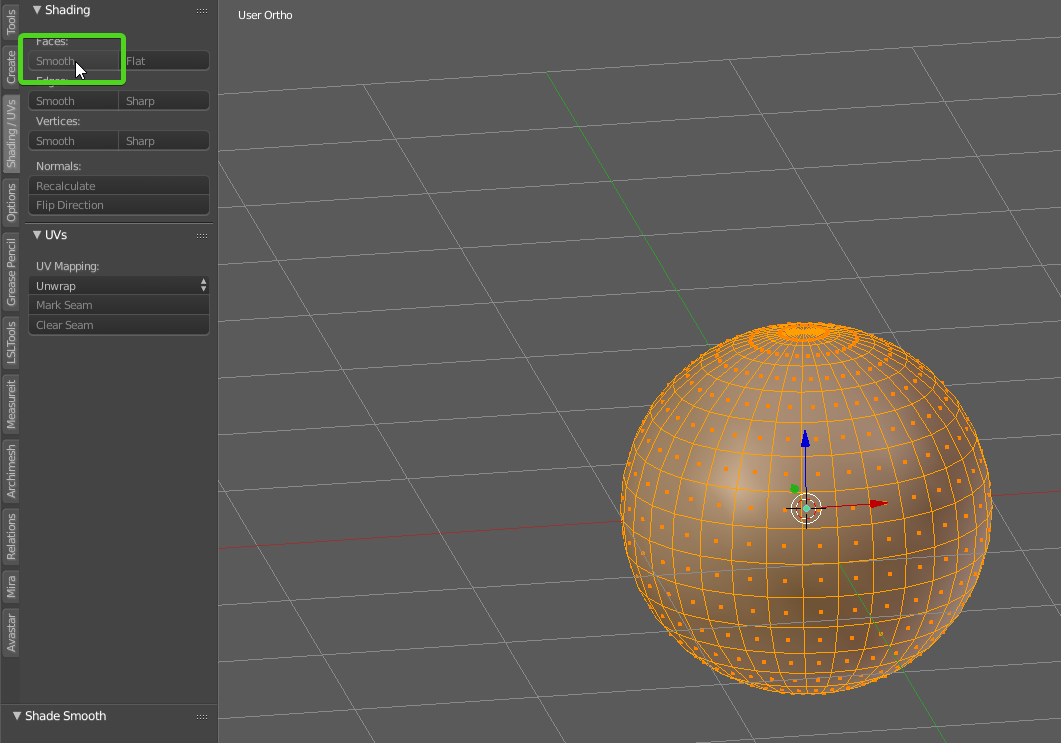
obviously make the faces smooth first 😛
press A to deselect everything

change to edge select mode
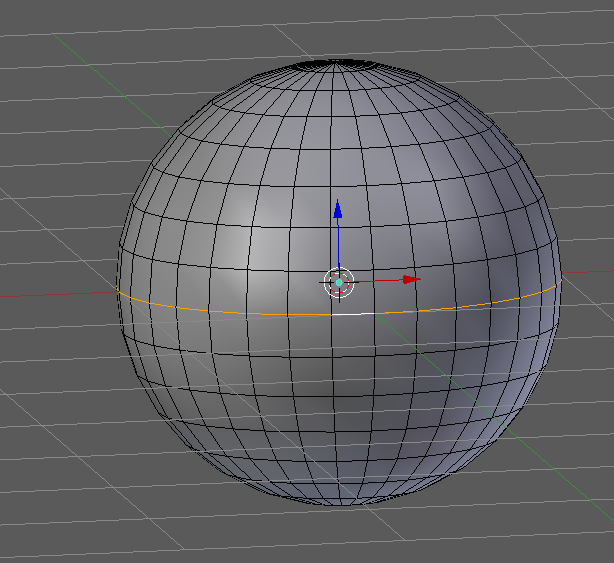
find the center line and Alt-Right Click it
this will select the whole loop, all the way around
i'm pretty sure yes
so it basically only uses 1 pixel of your shader for the whole surface
why everything looks smooth
ooof
after you select the center line
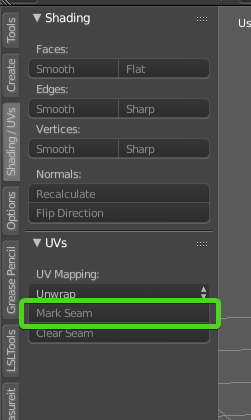
mark seam, that tells the UV mapper where to do a split
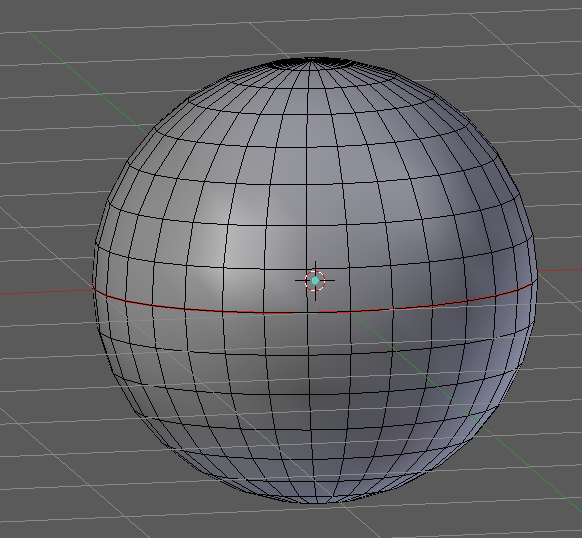
press A and you should see the loop is red now
now press A again to select everything
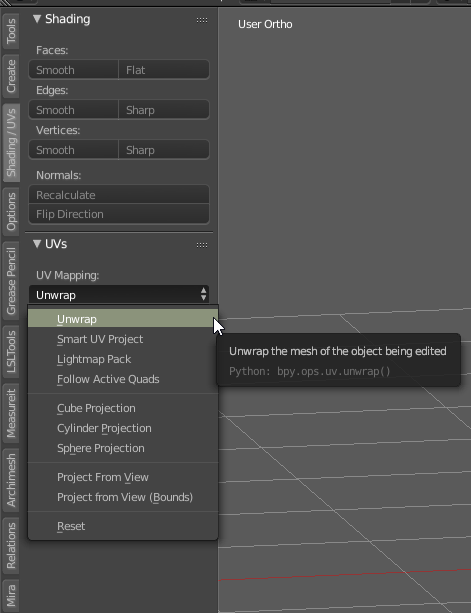
go back over and on the Unwrap dropdown, choose Unwrap
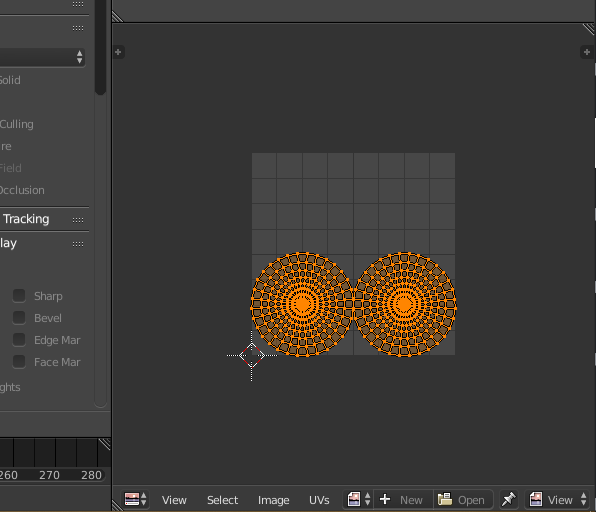
if you have a texture/UV window open, you'll see your new UV map there
it's not optimal, but it will get you started
you may want to watch some Blender tutorials on UV mapping to learn more about it

really unwrapping a sphere is never optimal heh
no matter how you try to arrange it
but you could always use the extra space for other objects or more complex items down the road
now the object has it's 'map' of what pixels on the texture go to what spots on the mesh. that's what the UV map is for
could you by any chance... toss me this sphere >_>
100% go through the process myself
but I just want to try something specific atm
I'd just like it to have a decent amount of triangle more than the base unity sphere
because good god
that think is shit
hmm unity's sphere always seemed fine to me

I guess it is slightly bumpy up close
they seem to have actualy taken a cube and morphed it into a sphere
very odd triangle arrangement
yeah for what you're doing you'd need UV mapping that would work with tilable textures
which is MUCH harder to do
what I would suggest doing in this case, is export Unity's Sphere to FBX, using their FBX export tool
and modify it in blender
maybe hit subdivide on it once
then sent it back to unity
that way you can preserve their UV mapping
save you all the work of trying to make tile-friendly UV mapping on a sphere
trust me it would be easier heh
ty for your help though
np
oi
when you got something circular like that you also have to make an additional seam just to break the circle so the uv map doesnt stretch
yeah, this was just a beginner tutorial, I didn't want to get too complicated 😃
Aighty
Learned how to use the polygon fill tool to add stained steel and dry rubber to a flipchart, Substance Painter. The flipchart's not mine; I just modified a pre-existing model.
I can't seem to find the naming convention for custom made colliders, anyone know it?
it's just that they are cut at specific size intervals, like, every piece is exactly 3 meters wide, or 1 meter wide, or 2 meters wide