#🔀┃art-asset-workflow
1 messages · Page 12 of 1
Hey someone knows why my object's walls are transparent in Unity and not in Blender ?


inverted normals, check the pins
The problem is you discussing ripped assets in here 
In don't find in the pins what i have to do to solve my problem
There's a link in the pins called Inverted Normals 🤷♂️
Oh yes i found it thank you
I read a post recently that mentioned a tool for converting textures into low res textures. Does anyone have any idea what it’s called?
Kinda hard to know with that vague description
Usually shrinking the texture using nearest neighbor would get you an okay result
I spent all day researching how best to make a texture projection painlessly on a complex mesh.
What I need is a tool in 3dsMax or Blender where the image I am trying to replicate with geometry is constantly projected, like a film projector, aimed at my mesh. That way I can just worry about editing the geometry and don't need to mess with the UVs, which breaks my workflow and causes the source of all the pain in this process.
I haven't found any realtime texture projection tools out there, in any program. Definitely made a day of it looking for such a tool.
Has anyone ever heard of such a tool before? One that projects an image onto whatever underlying geometry is there in realtime, like a spotlight?


You can see that my best guess geometry isn't great, and makes a bit of a mess.
If I didn't have to go into the UVW Unwrap and try to project again, that would be a huge workflow benefit.
This might be what you’re looking for? https://docs.blender.org/manual/en/latest/modeling/modifiers/modify/uv_project.html
That looks like it's pretty close
I could use a tutorial on how to set it up. I'm a Max user by default, and blender feels a bit like using jello to control my modelling. :p
The example project I have open -- where is the texture source on this camera object?

I am not sure if this is what you want, but it's a similar workflow that I believe you might get some worth out of watching regardless https://www.youtube.com/watch?v=gG7ZoP3fd1w

Part 2 of our series on how to replicate the stylized look of the Arcane animated series in Blender.
This tutorial was done using Blender 3.0 and the EEVEE rendering engine.
Watch Part 1 here : https://youtu.be/FXuReln3XD0
To purchase the Lightning Boy Shader check out our Gumroad page : https://lightningboystudio.gumroad.com/#aYbiH
Tidal Bla...
Oh yeah, that video was really inspiring. Watched it a bit ago.
It's primarily for video rather than realtime but it's defcool.
Doesn't have a solution I need but it's a master level of what we're doing with Projections.
Can you use decals
In unity sure but in max or blender?
I'm essential starting from a rectangle and extruding geometry into shape. In that process UVs get very warped.
Where do you actually want to use the final result?
Unity.
so how are you planning to get the final texture into unity?
seems pretty inefficient if you want to use decals to texture environment assets like this
This is what we're doing.
Projecting 2d isometric sprites onto 3d geometry.


Pivoting from 2d to 3d to take advantage of lighting and sorting.
No decals required.
To get the geometry of things like cliffs, I need to manually create a mesh that fits the rough shape of the sprite. That isn't easy when I can't see the results in realtime, only after projecting the UVs.
oh interesting, how are you doing the projection in unity?
It's baked into the UV of the mesh.
how are you doing the baking?
After doing this step of projecting the sprite onto the geometry I simply build a highpoly cage and bake into the much cleaner low ploy UVs. Simply to clean up.
I may eliminate that step totally for some assets and simply leave them projected as is. The camera never moves rotates after all, and the mesh only exists to derive normals for lighting, Collison, water levels, and depth sorting.
Something 2D sprites could never achieve.
so for your current assets you've just done it by going back and forth between blender and unity?
The final export to Unity is one way. That's for delivery.
The sprites were drawn for our vertical slice in a pure 2D environment, also in Unity.
These meshes are made in 3DsMax and exported to OBJ, and the sprites are used as their material in Unity.


In 2D the game looked like this. Which is FINE but realtime 3d lighting and post effects, eliminating layer sorting for real z depth, all that is way way better than sticking to traditional 2D, constantly hitting g rendering and sorting problems, lighting looks terrible, and needing bespoke solutions for pathing and colliders.

Some assets like our buildings went fully 3d. That's easy.
What's difficult is when I have a sprite that will interact with water or collision in complex ways, such as cliffs. That demands geometry that mimics the exact shape of the sprite.
For simple sprites that is trivial. Jist make your best guess on the geometry.
But for cliffs where accurate meshes are important, it's a lot tougher.


I feel like at that point you should just use the traditional 3d art pipeline instead of trying to retrofit it into a sprite
We'd prefer to stick to what we have. It's great for the underlying gameplay and looks.
I tried a round of out cliffs in 3d traditionally sculpted and hand painted, ams it just didn't fit what we're going for.
Also will be much harder for modders to add to later on.
well currently modders would still run into the art pipeline issue you have right now
a lot of them would probably just use a regular 3d model since your game technically supports it
imo just taking a cursory glance at your cliffs I feel like creating a 3d model close to the look you want is more achievable than trying to come up with a custom projection solution
Simple assets take 5-10 minutes max.
Cliffs are only difficult because I don't have realtime projection onto the geometry. If I can find that it will eb trivially easy.
well thats a big if isn't it 😅
if you have someone that can write blender scripts you might just have to build a custom tool
That is possible.
This is super close
If I can get that solution to work tomorrow it'll be ideal.
I am not a blender user main though. Pretty much only use it for specific clients in the past with their custom export plugins.
Use max primarily. So if anyone can explain how to use that projector from object I'd appreciate it.
might want to check out the max discord then
Is there some mobile friendly dynamic sky plugin or asset on the store?
I don't need anything more than basic scrolling clouds. Could be some bitmap panning, could be some blob volumetric noise. All the lighting will be just direct + ambient light, no need for any light or shadow funtionality.
Thanks for the info
I feel like you might be better off making the meshes and then drawing a sprite over it; that way it will just match
You could also do it in unity directly
You can sort the positions of the mesh vertices in screen space and make a 2d bounding box based on the minimum and maximum positions in that array.
Blender's UV project modifier that was brought up earlier seems to be precisely what's being asked for
Don't know of a good tutorial for it though
That will give you a screenspace rectangle you can apply your texture to
We already create a generic cube for most sprites like you're saying. Even begun making a custom tool to define the cube and offset the sprite within it.

But for complex interaction with large environment assets, such as cliffs, we need meshes. And those meshes need to be reasonably accurate.
Especially since cliffs not only have crevices for collision with particles and characters going there for cover, but water height when we fill a z-level with water. Which is a map resource and an obstacle.

I think the projector is what I'm looking for exactly. Just need time to sit and really work on getting the setup right.
getting hair into unity from blender is such a pain it never looks normal. And im using haircards
hello!
Hair is complicated, as is transparent geometry in general
If you can demonstrate what the not-normality looks like we may be able to offer some tips
Hi im a noob trying to make a grid based game but accidentally added an isometric grid (confused it with rectangular grid) and now I don't know how to go back from isometric view...

What you're looking at is not an "isometric view", the grid squares are just squashed because it's an isometric grid
oooh that makes a whole lore more sense, I got the tiles to work again but now I can't see the outline of my camera or my grid
Well what did you ...do?
just add an isometric tilemap and then undo and redo a bunch trying to get rid of it
This button toggles gizmo visibility and iirc includes grid
This button when blue means you're in 2D view, otherwise stuff may look weird
Oh I must have pressed that accidentally, thanks!
how would you guys go about a length of chain with physics? i think using a cloth component would make each chain link kinda "deflate" like fabric right?
i drew a tree
it looked messy so i drew it again
any advice so i can redraw it a third time?

Draw at least a few pieces of entirely different assets before coming back to the three
You can't expect to improve much if you keep making the same thing without varied excercise
heh yeah that's a good idea
I suggest you to get references from other images

(for example)
I think you need to work on "color palette"

@swift aspen I don't know how can I explain but I hope you can understand it from this
oh yeah for sure my color palette is sucky
sadly i couldn't get my color palette proper
because my friend who's supposed to be doing the art still hasn't decided what color the grass should be
he likes drawing characters too much heh
I am just starting out learning 3D modeling/blender.
I made a "model" in blender. It is currently a collection of objects (planes), floor and walls, each with their own image texture material.
Some posts recommend making sure the origin is set to the bottom-center of the object before importing to Unity, especially if its an environmental asset. But in Blender I don't have one object I have a collection of them that make one "model" I want to import. Do I need to combine these into one object, change the origin to the bottom-center before exporting?
Can anyone recommend a simple workflow to get blender models (with textures) into Unity? I am not making anything complicated or detailed, basically just flat surfaces with image textures.
They at least need to be child objects of one singular object
I'm still pretty new to blender. What would this entail? Do I need to make an empty object and set that origin to the origin of the whole collection which makes up the "model"?
ahh okay so here's my recommendation after doing this for 10ish years.
learn Blender first
THEN learn how it works for Unity
Yes, great rec. Not sure what I'm doing trying to learn blender by asking others who have more experience. Silly me.
Nice sarcasm. Will definitely get you lots of help and really quickly.
What mean is - you're going to need to take a course
and do a mega-ton of tutorials
because few people are going to want to walk you through EVERYTHING little thing you need to learn, and you're starting from teh ground up
https://www.udemy.com/user/alex-cordebard/ This guy does pretty good courses and there's often a sale

Udemy
Alex Cordebard is a Udemy instructor with educational courses available for enrollment. Check out the latest courses taught by Alex Cordebard
ten bucks - go through the course - learn the lingo
The question was not some broad one asking for someone to teach me blender. This is the Unity discord. I asked something specific relating to exporting-importing into Unity.
I've gone through several courses and tutorials, hence how I am making anything to begin with.
Fine. Then go into blender, and group your sub-objects under a single object, so it exports as one "mesh".
Then make sure you reset your transforms
make sure your normals are set properly
make sure you've reduced multi-textures as much as possible. Don't have spare mat slots that aren't applied to anything
don't have n-gons
don't have invisible faces
If you have animations on your object, make sure you've got a root to parent them too
https://www.youtube.com/watch?v=sZ8lvoUtGYg This vid is relatively new

In this video, learn two ways to import Blender files into Unity with textures!
LINKS
UNITY ASSET STORE
http://www.therealtimeessentials.com/assetstore
Disclaimers: All opinions are my own, sponsors are acknowledged. Product Links in the description are typically affiliate links that let you help support the channel at no extra cost.
The Uni...
should be of help
how to make this good?
Step 1: define what "good art" is
Step 2: do it gooder
i can replace the character
1- i want it pixel art
2- i want it white cartoonish thing
i mean look good
like you think its cool
I think it is cool ^^
I think what you're asking for is kind of an impossible conundrum
There is no "better" art really
Art can be good if someone enjoys it for any reason, or if it fulfills the artistic goals you set for it
Most artists don't think deeply about that
They just feel their art looks better when it more closely resembles art they like
Even if there'd be no quantifiable reason why they like a specific art
ok thanks for the advice
Just a quick question here. What is the best way to create 3D assets for my game?
Use a program that specializes in making 3D assets seems like an obvious solution
Yea, I use blender currently but its annoying at times with the materials
But I did find a pretty good video on it
Right, well seems like you know the answer to your question then.
Yea haha, I literally just found a good video on it😂
Hey 👋 I am by no means an artist but I wanted to work on some stuff on blender. I wanted to make the workflow fast and have the .blend file directly within the project. I can't seem to be able to fix the objects being rotated 90 degrees however :( It rotates the prefab it imports but I was hoping to use the mesh directly and can't figure out how to rotate the actual mesh itself.
As an example, yes due to the -90 rotation on the imported object this cone looks fine in the scene, but if I try to use the mesh directly, it wouldn't work.

is there a way to exempt a probuilder asset from texture filtering
like if you want to use extremely low res textures on large objects for a pixel art style effect
like a 32x32x32 meter cube with a 32x32 px texture
seems like it defaults to bilinear or something
found it
its in the texture specific setting
so click the texture or material and change the filter type to point
This is because Blender uses Z as up, while Unity uses Z as forward. You'll either need to rotate the mesh in Unity or in Blender to account for it.
Rotating the mesh in blender seems to not affect the imported mesh. It instead seems to report the imported object it has. I was trying to find a way to rotate the mesh itself.
You might have to apply the rotation in blender.
I'm not sure how it works with .blend files. The normal workflow is usually to convert and export to FBX
:( I tried rotating the object in blender but sadly it doesn't rotate the mesh, it rotates the imported object unity creates.
I guess I can live with it :p
Just rotate it in Unity then I suppose
@trail laurel https://polynook.com/learn/how-to-export-models-from-blender-to-unity Here's a detailed guide about how the axial systems are different and how to work with them
My advice is to find a script that does the necessary transform changes before export or find fbx export settings that work well enough
As long as your mesh is getting imported with the correct scale, the rotation doesn't matter much since you can (and probably should) use meshes always as child gameobjects where you can fix the rotation
https://mrven.gumroad.com/l/hPXIh?layout=profile&recommended_by=library
this free addon solves ur problems

Gumroad
UPDATE Asset Creation Toolset 2023.1 (Blender 3.6.1 and higher) (20 Aug, 2023):Full info about update (GitHub)[New] New Export Algorithm for Unity (Fix Flip orientation, Linked Objects Support, Animation Support)[New] Added feature "Origin to Middle Point" from mokalux[New] Added feature "Collection Name -> Obj Name" from Oxicid[New] Added Repla...
Is it possible to use the LOD Group but instead of using single meshes for each LOD, it uses a hierarchy of meshes for each LOD?
Do you use the latest version of this? I've jsut updated to latest and finding that the scaling between Unity and Blender isn't working correctly, but it was before I updated.
rolled back to the previous version and scale works correctly again. guess I'll submit a bug report
I have no experience in Unity but I am trying to remove the hat from this character model (fbx) but it won't let me and is seemingly greyed out. Why is this/how can I get around this and delete the hat?

It could be set to "disabled" in the hierarchy under the arrow here
Using the checkbox at the top of the inspector when selected
Can someone help me understand the components of a .fbx file on this screenshot:

The right most node is the mesh, but what are the middle and left nodes called?
The middle one rotates the mesh to be upright, and connects a material
@lunar knot Here is a page on importing models
https://docs.unity3d.com/Manual/ImportingModelFiles.html
What kind of model is it? (Like, filetype. Or is it from the asset store?)

Asset store
You have to use the Package Manager to import it
The thing labeled C will filter what's shown. You want MyAssets (which will show anything purchased in the asset store)
The rightmost asset is the mesh data itself, containing the vertices and polygons
That raw data alone isn't very useful, so Unity generates a prefab on import (the middle asset) that has the necessary renderer components to make it visible together with materials and armature deformation
Since it has armature deformation it also requires a hierarchy of bone transforms, which is the leftmost asset
That one doesn't look like much in the project window but in scene you should be able to find many transforms under it
For developing models - is creating them in Blender then importing into Unity fine, or is there a better/more seemless workflow for bringing custom models into Unity (or even creating them within Unity?)?
I watched some tutorials on importing belnder models, but it looked a bit awkward with having to created texture maps and stuff. Seems like for two massive platforms like Unity and Blender there should be a better way, and if there isnt - is that because people do it differently?
Not really any one good way
If Blender is installed into your system Unity supports auto-importing .blend files, but that gives you less control over the asset and feels a bit messy, and Unity is in the process of deprecating that functionality
Usually you'd export and import an .fbx file, which requires a lot tweaking (or a script to make it smoother)
Both Unity and Blender are implementing Universal Scene Descriptor (.usd) format that should put all these issues to rest for good
The package is out already but I haven't had a chance to try it
Oh nice! So I don't need to worry about learning blender to make my models for Unity?
You do still need to make them in Blender or in another modeling program
Unity has ProBuilder and PolyBrush which can do some modeling, but are quite limited
Sorry what I meant by that was worrying about making a mistake by learning blender for my models, but it seems like a valid path which is great
Hi guys
I had a question about the textures. I want to output for the Android platform. What is the best type of compression that does not lose much quality?
Until now, I used to choose ASTC 4x4, it gives good quality with medium volume, but I don't know much about the difference from the others

I was trying to export my enemy model into unity from blender, but for some reason the avatar thing I need isn't included in the model in Unity.


Could anyone help me with this?
how do people great spa/sph and normal maps?
i downloaded material maker and materialize but i find the learning curve kinda difficult. so i started learning blender nodes to make all my textures, materials and so on using nodes
i'm more confused than ever. what do people normally use to streamline the process of making texture and making the normal maps and spa/sph's to go with them?
avatar thing?
I've never heard of an /spa/sph map. But normal maps you usually have to go through a "baking" process.
i think spa's and sph are older and predate normal maps
You know the thing you use for those animation controllers.
The "Pos Rot" controls?
they used to be black and white maps for deciding where color went. some toon shaders use them
Wait.
idk how one would do that
Let me find an example.
or with what program
these days we call those "Color Mask" maps.
oh, thats news to me coolio
This thing, the thing in the right corner.

looks like an avatar mask
i'm a person that uses MMD so the models in that animation software and in VR chat still occassionally use spa and sph
I've seen a bunch of others import models just like mine and they get that avatar mask built in, but whenever I import it it doesn't give me it.
for normal maps and color channel maps, etc, those usually have to be "baked" into the model.
I don't make things for VR chat so can't help you cmopare and contrast.
what are the import settings for your avatar rig?
in general i just wanna know how to make and bake them. ive tried using photoshop to make some for my models to add shine but it just looks crusty
One second.


The general process for baking things like a normal map is complicated in Blender.
You usually have two models - a low-poly, and a high-poly. You create a cage, and you "bake" the high-poly onto your low-poly.
There is a learning curve.

In this Blender tutorial I will show you how to texture bake normal maps.
● Texture Baking for Beginners: https://youtu.be/Se8GdHptD4A
● Texture baking Tutorial Playlist: https://www.youtube.com/playlist?list=PLsGl9GczcgBvJPh7D_ITafvmTW7ZzQTEr
● Procedural Solar Panels Tutorial: https://youtu.be/le1NElRwLg0
● UV Unwrapping for Beginners: https:/...
If you want the easy way out, considering picking up Substance Painter (there's an indie license), and baking onto the low-poly UVs
hese are the "export" settings. How Blender is exporting the model
mk, cause what i have now in photoshop is dog

Avatar masks appear to be a Unity thing - something you create and assign in Unity. When Unity sees your model, it should show you the import settings.
How do I add them tho, they seem to be added automatically for others.
I legit have no idea what I am doing and this is very confusing.
Just an FYI - Unity and VR Chat's asset pipelines are incredibly different. Things that wokr in VR chat will not be the same in Unity
learning the asset pipeline for unity is not an overnight process. We'll take it one step at a time.
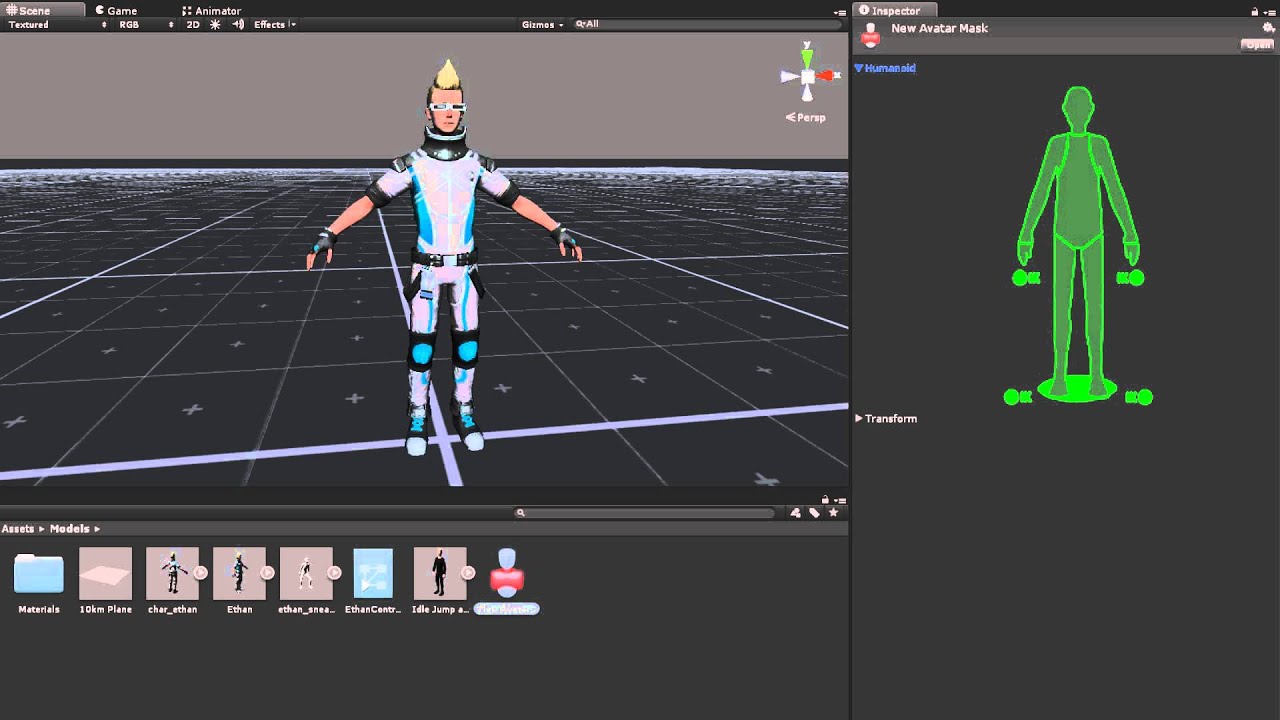
Watch this video in context on Unity's learning pages here - http://unity3d.com/learn/tutorials/modules/beginner/animation/avatar-masks
Avatar Masks allow you to isolate parts of a model's anatomy, allowing the rest to ignore an animation. This game be useful when you want to layer or combine multiple animations. In this video you will learn abo...
make sure that your import settings for your rig are set to humanoid
Alright thanks, I'll look into it, still kinda weird to be honest. I hope I don't have any further issues. I've been trying to convert this combat system I made a while ago from 2D to 3D, but since I've only been using 2D for the past months this is all really weird and new for me.
yes 3D is a lot more complex. It's not easy to convert over
I can't find the avatar mask option, in the tutorial he simply right clicks and it's there.


dang. i think i understand this. doesnt seem like theres one specifically for sph and spa but those are really just shadows and shine so i think i know which ones those might be
now that i know this i'm gonna go look through his pbr videos, tysm
well Unity doesn't really use those file types anyways.
Where can I find the avatar mask option?
interesting. Maybe you're missing a package. I haven't ran into that issue before though
Weird.
Any missing packages?

I don't have taht version, but mine has it
Try making a new, from scratch project. And see if it's in there.
I've been stuck on this simple problem for 3 hours.
Make sure you're right clicking in the project
Also do animations work without animation masks.
welcome to dev life
I've had experience with it before.
I've been trying to do a WebGL build for three hours. Ordinarily a simple process. Which I've also done before. And for some reason it's acting up
But usually it was just big calculus level formulas that got me stuck for that long.
also I'm a professional Unity Developer
trust me
dev life
but for your problem - start a new project and see if Avatar Mask can be created in there. Or anothe rproject
Can I just use no avatar.
if it can - something is wrong with your project
yeah Animation/Avatar Masks are there to make your life easier
but I haven't really used them myself
Could I just ignore that stupid avatar value?

I've ignored it before.
I mean if you're making a shooter game or something I guess I'd make sense to use them right?
depends on what you're doing
I tend to make simulators and such
Oh, so I've basically been worrying about nothing?
Alright.
Making custom characters for enemies and shit never took so long within Roblox.
Don't know why they made it such a big hell in unity.
7 Fucking hours to have an egg in my game.
Why is my animation read only, how do I import that animation...

I'm dying from literal brain damage.
How can I actually edit this animation.
You can't edit imported assets, you need to instance them and edit that.
And don't cross-post, please.
Thanks, I just made an idle animation but it's not looping for some reason. #🏃┃animation
The "sph/spa" thing does not exist outside of MMD so it was hard to just find out what they are
The closest equivalent for them elsewhere are matcaps
like channel ids?
in max?
Matcaps, those reflection maps that always face the viewer that you often find in sculpt programs
OH
unity rendering/shader sorta type question  you can prevent a transparent shader from writing over itself by first stencil buffering (at the performance cost of rendering the object twice)
Is there a way to extend this same effect across multiple meshes/shaders?
Prooobably without combining them, but if combination is the only way thats acceptable if there is no other way


inregards to the above, the output I would imagine is this (mockup)

hm I guess I sorta have that already except Im bumping into the ol' unsolved problem of sorting transparencies

adding a sorting group to the inner part fixed it, though I am not really sure why

is there a way to clean up the underside of hair or is fine to leave it like this?

Hi all i currently have my weapon asset seprate to my character (as i plan to have many different weapons), rather than being a part of my animations. This is a 2D side scrolling combat platformer. I currently have issues with my weapon not being always properly positioned, as my players orientation is obviosuly different when jumping, running etc. Is there any way I should go about fixing this, or would you really recommend i implement the weapon as a part of every animation? I would like to be able to shoot regardless if im jumping, running, idle etc
If it's not something the players will usually see, it's preferrable NOT to put a random underside in.
i wanna make a game that uses only these colours

Go for it?
Old games used less colours, so there's nothing stopping you from keeping to a palette like this.
how can I remove this shadow from my cylinder?

@frail hedge Fix vertex normals on your mesh in the 3D app, or there are some import options to recompute normals in the model import inspector.
thanks, but it wasn't that simple xd
No way, I think it worked!
I had to set the normals in my model to calculate
now I hope it works with my texture
This is the problem I had:
https://forum.unity.com/threads/blender-models-look-strange-strange-shadows.50905/
Does someone know how to fix the problem directly from blender?
I tried recalculating my normals but I still have weird shadows if I don't calculate the normals in unity

Unity Forum
Hi together !
Models made in blender (2.49) have a strange look:
How can this be?
It doesnt matter witch shader i use, same problem.
I...
Hello. if there's a mesh in Unity stored as a .asset file, is there any way to renable the read/write enabled flag? I believe it was generated using Houdini, but re-building it isn't really an option.
in this case it looks like the flag is read only by the inspector.

You can try changing it in the meta file
No dice, not an option in the file, and manually transplanting it from another one also doesn't work.
Might need an asset preprocesser script to set that, not sure.
Or you can maybe make a readable copy of the mesh (in editor only) using MeshUtility.AcquireReadOnlyMeshData and save that as a new asset.
this is my blender model

vs my unity model with that weird diagonal shadow

and when I apply calculate normals from unity it changes into a normal shadow (I think) but it messes up the mesh

@frail hedge Please watch some blender tutorials on smoothing angle, smooth/crease edges and how to export the model with normal modifier.
The most suitable option in this situation might be to do a bevel (B) operation on the circular cap edges with "harden normals" enabled (H during bevel operation)
why i can't extract texture?

Maybe it's not packed in the mesh
You might just as well import the texture separately
Packing it into the mesh and then unpacking it doesn't save any clicks
But why does it look good on my blender file? At this point I'm really confused about how to get it right 😦
Here you can see how your vertex normals are facing

Thats how they Should look like on 90° angles.

You see that you have no weird shading anymore?
you will never get good results if you dont understand smoothing groups ^^
Different lightsources are the only difference between the two
Blender's material preview defaults to a very smooth HDRi
Should I pick a Specular Workflow for Wood, and Metallic Workflow for Metal ?

rn using 0.2 and 0.2 metallic workflow for wood
probably doing it wrong
Did some reading and it seems for wood I should use: 0.0 metallic slider, and between 0.0(for rough)-0.4(for smooth) smoothness slider
No
Both workflows can be used to represent all kinds of materials
With metallic you'd use metallic value 0 for nonmetals and metallic value 1 for metals
After a while of trying to import an fbx, and it looking mangled, i checked what im exporting, by reimporting in 3d software, does anyone know what could be causing this issue? I cannot find anything similar by Googling

this is a simple fbx with just the mesh and armature, normals are unaffected
i created some hair using this method but im just wondering is there a way to easily clean it up maybe like the remesh thing for sculpting?

Looks like the material is set to use alpha blending instead of being opaque
Probably not
thank you, that was it
i guess you have to retopo it
Do you know how to export a mesh from 3dsmax to Unity and retain its blendshapes?
https://docs.unity3d.com/Manual/BlendShapes.html
the documentation implies that it just works™️ but my imported fbx has none of the blend shapes or any reference to blend shapes in it (the export was set to YES retain blend morph targets)


am I looking in the wrong place for the blend shapes?


here's the fbx if you can double check if it even has blend shapes inside of it
re-importing that fbx into 3dsmax itself, the blend shapes are there
so it looks like Unity is the problem, not the fbx or 3dsmax
I was looking in the wrong place, they were here in this drop down that I did not initially notice

Hey i have a question whenever i combine meshes in unity using mesh baker or any other tool then batches reduce by 50% but tries and verts counts increase by 2x of amount i assume this is because the entire combined mesh is drawn at once? Is there any way to reduce the verts count of combined meshes?
I would combine meshes in Blender and optimize them.
Any video tutorial how to do? I’ll be thankful
when i import my blender file into unity, it looks very weird. how can i fix this? If someone is kind enough, can they walk me through it? If not its fine though. (The issues is the weirdly positioned legs, which are stretched too.


Do you know why I cant reference any of these meshes in my scene?


cant click and drag, dont show up in the inspector
because you want a "mesh filter", and "juiceIcon1" is type "Mesh"
(i think?)
This is a common issue with flipped normals. There's a guide about it pinned to this channel.
But if you turn on face orientation in Blender, you'll see the faces are likely red (backwards). You need to flip them.
A face in 3D has a normal, that is, the direction that is "up" (the way it faces)
Unity hides the back side of a face for performance reasons. You can turn it on so it renders the back side of the face, but the proper fix here is to make those faces face outwards.
It's as simple as select them and flipping the normals in Blender.
You want to make the Cup red and the top white?
well. there are several possibilities 😄
you want the easiest or the correct way?
not recommended for a newbie ^^
Ok, so you go in blender, select all the faces of the lid
go to material, klick on plus, klick on new

you can only select faces in edit mode
how does the mesh look like?
show screenshot
i see
You can export the fbx directly from a blend file, no need to go through obj
Is this the right place to talk version control, and more precisely Plastic? Can't see a channel that seems related to devops matters.
Whats the question?
Not generally unless it's also relevant to art assets
I have quite a bit of files that I do want to track and version but that keep on showing as changed when the files are identical (more son non art files).
that sounds like you've got .asset files and other related things changing. That's more a coding/unity question then an art question.

Hey there, i have sprite sheet animations that has a freezing problem but can't figure out how to solve this issue
basically i have a player character with sprite sheet set attack animations that i play using Animator.Crossfade, but when setting up the animations i have this weird invisible frame at the end that i can't edit or remove and that causes the animation to freeze on the last frame, any ideas why this happens or how to remove this last ghost frame?
also i'm pretty sure the sprite sheets are set correctly since they don't have an extra invisible frame (i checked multiple times)

Don't crosspost please
sorry i didn't find anyone in the other channel so i thought this one would have someone active
So currently I am using materials for URP with the URP Lit shader. A friend of mine now installed a Blender addon: https://blendermarket.com/products/better-fbx-importer--exporter
He exported that FBX so he can "reuse" blender shader graphs in Unity. It worked.
However I can see that those materials are using some new shader (see screenshot).
Now using URP I wonder if this will "screw up" anything related to the Universal Render Pipeline or is it safe to use?

If it works out and nothing is pink, it’s fine. I don’t know how the performance is of this shader, but normally that won’t be a problem
ok great thanks!
However then for some reason I don't really understand how URP is being used if it's not by using the URP specific shaders?
URP has several specific limitations compared to HDRP, that increase performance on low end devices.
Like light limitations.
I am currently trying to make some voxel assets in MagicaVoxel. I have created 2 mountains and imported them into Unity. However by having just 4 of these in the scene I am expiriencing huge performance loss. I am not entirely sure what is causing this but my suspicion is huge amount of polygons per mountain. Wanted to ask if someone has any tips for working with voxels in Unity? What software to use? (MagicaVoxel, Qubicle, Goxel). Are there any Unity packages that may help?
Ah ok so it's more of the overall rendering setup. I thought it's just shader specific stuff
Get a video, audio file from Google Drive, and Play the file directly. You can choose a video, audio file to play from Google Drive and local computer. Supports formats: mp4, m4v, webm, flv, ogv, mov, mp3, ogg, opus, wav, m4a, flac, mkv.
I imported a model from Blender, even if it has 1 material on it, on Unity it has 2 material slots, why?

That suggests it did have more than one material slot on the blender side
If you make those two materials distinctly different, do you see any part of the mesh sticking out?
Yes the 2nd slot has few faces
But as you can see on Blender it has only 1 material

Found the issue
On the mesh import settings in Unity, I had to turn OFF "Keep Quads"


They are contextual to what you're editing
I just restarted blender and it worked again. But now i get how it works
hi, I've been painting in Substance Painter and exported a map out with Metallic, Roughness and AO (AO should be in the green channel.) However when placing the AO map in the AO slot of the standard shader, it has no contribution. Has this changed or doesn't work anymore?
In Unity an AO map only occludes ambient light, whereas some other programs don't treat light from different sources differently in PBR shading
IDK if this is the right area to post - sorry. I have a large pixel art sprite, however using point and zero compression, the quality is a bit blurry. I have a solution for importing the sprite as sections but I want to know whether there is a way for it to be done on unity instead
How big is it?
It's around 200x900
It's a single sprite used as the ground - it's not a tile set or any repeating sections
Show import settings

Sorry for the wait - had to load the project
Wait, it's fine, I found my solution - thank you though
what color picker you are using it has cute ui
I want to generate terrain with mapmagic (or similar) and use Substance textures, but I need stochastic tiling (a.k.a non-repetitive). Is this combo possible with paid assets? I have a hard time finding assets that work together. PS: I am using HDRP. And substance isn't 100% needed but it would be great as I want tessellation
I know its not the best picture but how can i improve my power up container, i feel like the red base is too dull, i have a PS glowing around it but some still feels off about it, or if anyone has an improvements for anyting else

Hello folks,
Importing this Mixamo character, editing it in Blender and exporting it back results in Blender adding in this 'Armature' GameObject to the model, any idea how I can stop this from happening?

Using a Mask Component on a 2D Image


Works perfectly fine, except for when two different ones overlap
then it turns black
I have an issue where I put a very nice gradient material on a sphere but the blend of the colors are glitched or colored lines i dont want visible
but the horizontal lines are what im concerned about

the lines are there
its supposed to be blended
Try setting texture compression to none
If that doesn't help, you may be running into the fundamental limit of working with only 16 million colors that our machines can put out
A workaround to that is to use a shader-generated gradient and dithering (which is a camera component feature if using URP)
so basically my game has 2 or 3 styles mixed and it doesnt look too good
- character is high poly realistic
- buildings are medium poly stylized
- world is medium poly stylized
and im not sure what to do. i either need to replace world assets, or character assets.
performance-wise id aim at medium-poly
asset-wise id aim at high poly cause i have a good character asset and there are no similar medium poly assets
One message removed from a suspended account.
did you create big enough margin between UV islands ?
One message removed from a suspended account.
One message removed from a suspended account.
The color has to extend (or "bleed") outside of the UV islands
You have a bleed setting in the brush if you're painting the textures in blender, or you can extend them manually
When viewed from further away the texture resolution is reduced to smooth it out and reduce rendering cost
This effectively blurs the texture so pixels outside of the UV islands can spill in
Hello all! I have a mesh with a texture that has a single transparent circle in it. When I set the material to Transparent (HDRP), it makes the entire mesh kinda see-through and I can see behind it even in the opaque areas. Any solutions?
All i want to do is make a clickable 2d triangle in a 2d game but that is not a shape option and everything I am finding online is super complicated when i feel like I am merely just missing what i am actually supposed to use, some people say to use meshes but afaik that's a 3d thing right?
use a sprite
yeah
is there a way to get a simple triangle as a sprite without making it myself in gimp then importing the picture
Haven't seen one that would be quicker than making one or importing from google
getting a
UnityEngine.GUIUtility:ProcessEvent (int,intptr,bool&)```half of the textures are present
they probably have been removed
since of that thing
Ping me then
rip
Do you have a question? The warning gives quite specific info
How would I make so that stuff does show
Don't try to export with self-intersecting polygons
Triangulating them before exporting may help, but usually if you get that error you have geometry that's some kind of weird or twisty
yeah, how should I fix this
Identify the problematic polygons and clean them up, or recreate them entirely
Yeah
You generally shouldn't be importing meshes with that much detail into a game engine
If there's millions of problem polygons it may well be unsalvageable
Is there a way to allow a sprite to have there color changed in unity (I have a character and want to have the hair and skin change colour without having to draw each differnent skin color)
You'd probably want to do it with shaders
thx
I recall you could do that efficiently by sampling a gradient texture using the main texture as its UV coordinates
Just change the sprite renderer color, if they are separate sprites
I have an fbx used in a prefab and have things like particles inside so I can play them during animations.
When I update the fbx to one where I've added a few new bones it disappears, do I need to delete the model in the prefab and copy the new one while transferring the empties and particles to their same points in the hierarchy?
Was just wondering if there's a nicer way to do it automatically or not
Since it's a mesh with bones I don't think there's any smooth or nondestructive way to replace it in the prefab hierarchy
If it didn't have bones you could simply change the mesh reference of the Mesh Filter used in the prefab to a newer one
Although if the bone hierarchy didn't change, I guess you could keep the old hierarchy as transforms in the prefab, but you may need to "unpack" the mesh gameobject
Never tried keeping the hierarchy intact though
If you have particles or other gameobjects you'd like to have parented inside the bone hierarchy, one option to make that process less painful is to keep them outside of the hierarchy but attach them using Parent Constraint components
nah, luckily they dont have to be in the bones, just in the top level so I can key them in animation clips
got it working though, just copied the new fbx into it and moved any particles or whatnot over
It's not usually too bad to take the old one out and plop the new one in, but it depends how tightly you need to weave it with other gameobjects or components
yeah, since everything is just top level it was nice and simple
Hey anyone knows the best resources for free assets for unity game development and also for commercial use . Please let me know . Any leads will be helpful
The unity asset store
This just started happening, but I'm working in Maya with units set to meters, but when I import into Unity the fbx scale is 0.01 but the object is the proper "size" in the scene.
The object is probably set to 100 scale on the transform. You can modify this scale factor on the fbx import itself so you can keep the transform at 1


Jus tput the scale factor to 100 and then reset your transforms to 1,1,1 scale.
That had the complete opposite effect. at 0.1 they objects are HUGE
setting the scale factor to 0.01 does have the intended effect, but I'd rather figure out why its not 1:1
If anyone can give me feed back why my scale is off from Maya to unity, I'd appreciate it. Maya units are set to meter and transforms are frozen before export.
Is there any references or workflows I can look at for optimizing clothing for characters/NPCs? I'd like to have a bunch of different clothing pieces for my characters to wear. Having a simple base mesh that's wrapped in clothing is the easiest but seems wasteful in terms of performance. I'd like to have the unseen polygons underneath the clothing removed but I'm not sure the best way to handle that.
Does anyone have any experience with "Animate Custom Properties" in the fbx importer? the lack of documentation is a pain and I'm currently unable to get mine to appear when exporting from blender and I'm unsure if it's a unity issue or blender one
End goal here btw is to get keyed Custom Properties on bones in blender into Unity, they don't have to be on bones though, just so long as they're keyable in blender and readable in unity
I don't think they just appear, you have to add them in the animator with the exact name/case you used when you created them in blender.
heres a link for how to do it with maya... it should be the same for blender. https://www.techarthub.com/how-to-import-custom-properties-from-maya-into-unity/
techarthub
A short guide to creating animated custom properties using Maya and bringing them into Unity via the fbx format.
yeah this is one of the few pieces of info I found on it however I wasn't able to get it working, there was also this part for checking whether they were keyed and mine only have pos/rot/scale but none for the custom properties, I've tried with an animator with properties using the same names and no animator too but no results either way:

I've tried sorting this with some folks over on the blender discord but nada. Shapekeys driven by custom properties work fine, however the custom properties never display themselves inside the Animation View:

is anyone able to get this working using blender, or send me an fbx file created by another software which does work?
i need help with an issue i'm having with a mesh i decided to modify to fit a situation on my thesis, i have no idea why but the mesh itself refuses to show up despite putting materials in the mesh renderer

I'm mildly confused by this because the prefab view looks just fine

yet the in scene object refuses to render
seems like in my case it was actually an issue where my mesh was being scaled, and it didnt need to be
You're on a different unity version to me so it looks slightly different but is the dropdown menu to the left of 2D set to wireframe rather than shaded?
it seems to appear in game view in the bottom right

Otherwise it looks like it's a prefab so it could disappear if you changed the original mesh's hierarchy but I don't see why that would be done so doubt it
an update on this: no solution found yet and made a thread on it, for the meantime i'll use a hacky fix to read bone positions but if anyone does know it'd be greatly appreciated!
https://forum.unity.com/threads/animated-custom-properties-not-working-with-fbx-exported-from-blender.1500431/
Unity Forum
I have been attempting to get a Custom Property from Blender into Unity using "Animated Custom Properties" in the Animation tab of the FBX Importer,...
hi my question is how to set the pivot point of a 3D object which I made in blender to the center of the object in unity
You don't
It's best to set the origin correctly before exporting from Blender
But in a pinch you can parent your mesh to a gameobject, so the parent transform acts as the pivot point
I set the origin to the center in blender but its on top of the fuse of the bomb
anyways ty the gameobject wasa a good idea o.o
Furthermore there are two ways to manipulate transforms in Unity, either using the origin as the pivot, or the center
Also toggleable with Z key

tysm o.o
Hi, I made this selector in blender. The cube in Unity is 1,1,1 in scale. The indicator in blender is also 1,1,1 but it occupies 4 units in Unity. How can I make the grids the same size?


The grids look to be the same size
Note that "scale" is an object level multiplier to the size of the geometry, it doesn't actually tell you the size
The default cube in Blender is 2x2x2 meters
Using Blender's N key menu you can view the "dimensions" of an object which tells you the actual size
Ah I see, thank you very much! I am very new to this so sorry if it was a dumb question.
Worry not, this kind of info is not made obvious at all, though it should be
does anybody know of a good tutorial that they would recommend for making anime eyes / faces like this?

Hey, any tips on how to import a PSB file without losing image quality?
It's important to note that every layer (and frame, if those are supported?) in a PSB file is compiled into a sprite sheet with the images in the layers stacked in a grid
This very easily runs up against the max texture size defined in import settings or the absolute max texture size allowed by platforms
This means you shouldn't use that store a lot of empty space or semitransparent pixels, or layers at all when it's not necessary
The importer works best when each layer has an isolated part of a character, so those parts can be packed together tightly when the importer compiles the sprite sheet
Gotcha. Thanks a lot for explaining!
Also, is it possible to solve the problem that whenever I apply changes in the skinning editor, I get this:

If you figure out how, please let Unity know 
😢
I want to make text appear on this box here but when i add the whole stupid canvas element it formats to the whole screen and not the scale of the parent element

my end goal is to just make a different number display on each white box within the gray box there
Heyo, i found this pack on itch and would like to use it temporarily while i work on other art (https://jpcu.itch.io/isometric-kitchen-sprites)
Is there a way to figure out the appropriate grid size? or do i need to eyeball it
Does anyone have a good idea on how I can implement this kind of art into Unity?
I am thinkg specificily the light with the half-transparent walls

Would a tilemap be most efficent for this and then just doing a second one without a collider for the 3d effect?
yeah I think that could work
as for the glow, I think it's a shader
I feel like I don’t know how to make good, texturally varied environments. I have good ideas for locations and areas, but they all have like the same textures. It’s metal. Rock. Concrete ground. There’s some blood, some lava, some mars rock, but I don’t really want to be reusing textures all the time. Do I just make a bunch of variations of the same thing?
The game I’m heavily inspired by is Doom Eternal, obviously, which has absolutely beautiful environments and textures.
How tf do they manage? (I’m doing pixelated textures by the way, Doom isn’t)
Try looking at other games that have a similar artstyle to yours and see how they do it. There are lots of ways to texture a rock
For a PC game (action rpg in iso perspective) with stylyzed characters, what's a rough polygon range to aim for (naked character). Like, is 10k ok? Can it be higher?
Completely depends on your game. Whether you have 1 character or 100 characters on screen makes a difference
I'd might consider multiplayer, but it wont be an MMO, think more of a survival style game. so most of the time, only the palyer plus some animals/monsters, maybe a small group of players
is there any way to convert this to a humanoid avatar to use it for mixamo animations?

It's humanoid enough for animations. Mixamo requires a human rig, that means, a certain set of bones present in your model. If the model is a robot or a human or an alien does not matter, as long as the important bones are present.
Do you have bones and which format comes is the file of your model?
Don't know but u can try it and also i am into stuff like this i create anime characters
Imported as a humanoid like this. It's missing shoulders and isn't 1 mesh, it's a bunch of separate parts attatched to a skeleton is that fine? no heatmapping

Its missing head and hands, but it should work. Is it a FBX file? You have to create an avatar in Unity and check if the bones are allocated correctly. Check the documentation or youtube maybe on how to find the menu in unity. I do not use unity anymore since their pricing change
I have two meshes my artist just gave me. On one of the meshes, in the inspector, I have the option for 'on demand remap' of the materials. But, on the other, I don't. Why would this be? On the wierd one, I can still drag into scene and change the materials, but why can't i do it directly to the mesh in the project folder?
Perhaps it was created without any material slots
Just that it implicitly has to have at least one
when i drag it into the scene though, it has a unity default material...is that just getting created by unity because it has a renderer?
I assume so
Hey guys! Not sure if this is the right place to be asking this, but a friend of mine is looking to start making a 3d game. They wanted to ask about the workflow for a 3d Artist, namely how many hours they'd typically put in a week to create assets for an environment. Or how many hours a character model/avatar artist would spend. They're really not sure where to start with it and I thought to ask here just in case.
You spend the time you must or the time you have
There isn't really much of an answer to that question
mmm then how about how much does a 3d artist get paid in average?
This varies wildly by region, experience, field and project
OTL i shall wish my friend luck then
If they're making their own game, then they have to measure their own pace and relate the that to the number and complexity of assets that are required by the project within the allotted time
Reduce number and complexity of assets as needed
In that situation they don't really need to compare themselves to others, unless the projections indicate that it'd be much more efficient to hire someone else who can work at a brisk pace
If they're trying to sell their own commissions they need to determine how many hours they can spend working and how much they need to be paid at least for it to be profitable, and see if someone is willing to buy their work at that rate
It's definitely the former and they have zero experience in the entire thing so I want to caution them on their planning. But I don't know anything about art, just programming 💀, so I want to be able to relay a potential estimate that they can bank on. Like-- I'm ignorant about the process but something tells me that their estimate of a 3d artist working 15hrs a week to help make a demo in 6 months feels... low?
Like even the most experienced people can't possibly whip up environmental assets and customization options in only 15 hours a week right?
Hours per week doesn't tell anything to us without knowing the number and complexity of the meshes required, or how quick the artist works individually
Nobody can make that estimate except the artist, and only once they've done it enough to have a sample size to make estimates from
If they have zero experience it's impossible to make any estimate
They can't even start by working, they have to start by learning and studying
Beginners also hit unforeseen roadblocks all the time
If 15 hours a week feels like a doable time investment, that's good
If 6 months feels like a good goal, that's good as well
But it's not an estimate and they have to be ready to change their course and update their goals as soon as they get indications about how realistic the goal seems
man yeah that's solid advice. Okay thank you I'll let my friend know!
I think this is the right channel for this. I'm trying to export some assets as Assetbundles (in order to import then into Tabletop Simulator). I've followed a guide but I can't seem to actually get things to work.
You might have better luck asking the tabletop sim community if it involves a specific pipeline
thats quite fair
Look at the original doom? 😄
hey guys
anyone know how to import fbx animation
as i tried but the animation isnt playing?
Show us the "Animation" tab of the inspector with the model asset selected

Okay, so it does have valid animation data
And if you hit the play button at the bottom, does it show an animation?
Assuming it does, this asset should be producing two generic animation clips
assuming you haven't messed with the Rig tab
If you drag the model asset into the scene, you should get an object with an Animator component on it.
I don't think it will have an animator controller, though.
So it won't be playing an animation.
If you aren't familiar with how animators work, you should read the docs about them -- https://docs.unity3d.com/Manual/AnimatorControllers.html
Ik im a few hours late sry also that was the problem it didnt even show the animation there
@winged obsidian
You can't normally scale bones for Humanoid rigs, correct? Is that also true for tail bones? I'd like my characters to have adjust tail lengths.
Just want to make sure my workflow is correct before I deep dive into rigging.
You cannot for humanoid bones. I believe you can for additional bones, but best to check.
Hi everyone! 🙂 I am not familiar with Unity at all and now I am participating in a project which uses Unity. We have a level and my task is to make textures for it. Could you please share some manual or video or tutorial (if there are any) about optimal ways of texturing levels and tools which Unity provides for that? I mean using additional UV sets, decals, tiles and so. Or maybe someone could explain me in personal about that?
Thank you in advance!
You're generally expected to author assets, including levels, in tools outside of Unity such as Blender
There's the official tool ProBuilder that can do that but it's not very robust so it's recommended only for greyboxing and placeholder levels, although it can do many kinds of mesh and UV editing
A project can use one of many render pipelines (Built-in Render Pipeline, Universal Render Pipeline and High-Definition Render Pipeline), there's some differences to look out for with the graphical features
For example each one of them has their own decal system
When exporting meshes with materials to Unity, note that the PBR standard is used and only materials that use texture maps, solid colors or values can be imported
Which means more advanced sahders/materials made for example using Blender's material editor will be lost on export
Although Unity does technically support a lot of the same features such as with the Shader Graph tool, they're not interchangeable and must be re-implemented
Of course I know that I should make assets outside the Unity. ))) But i need a complex guideline how to organize textures in optimal way and which features are supported by Unity. There is freakin amount of such tutorials about Unreal but I haven't found anything complex about Unity.
Hmm I'm not sure I get what you mean by "organize textures"
Features are changing so rapidly, especially across render pipelines that information about them is scattered across documentations for different versions
The best way to get information about specific features is probably to ask here, or in the channel of the render pipeline your project is using
I'll give the same reply as I did to someone else last week
Essentially, there's no incentive for tutorial makers to make art related tutorials for Unity, because within a single years it's going to be outdated. Unity's scriptable render pipeline development has been so chaotic and volatile that it's been hopeless to make tutorials for it
If you're used to UE standards of learning content, you're going to be disappointed

anyone know why i have this error
it doesnt affect my animation or anything like that (at the moment) but its annoying i have no idea why its there
The first thing you need to do is ask your team what render pipeline they are using, and which version of unity. Because that will greatly affect the answers.
Also, if you want to use decals find out whether they are using deferred, forward, or forward+ rendering.
Unity themselves put out ebooks for each of the pipelines a while back; I don't have a link handy for them but I believe they were on the unity blog.
I can tell you that unity supports up to eight UV channels, but the second and third channels(uv1 and uv2 in shader) are reserved for baked and realtime lightmapping respectively.
Performance budgeting is dependent on a long list of factors
If you're making a column simulator I'm sure it's fine
i understand this,what i'm asking more specifically,is how much is too much,at an average,.
I' trying to build a portofolio for my 3d works to find a job in the industry.
This for example have 45k quads,and a single piece have 11k


50K triangles for a portfolio piece is not particularly much, but they won't be looking at polycounts primarily
Rather how efficiently you've made the geometry and avoided wasting vertices
If you make game assets you'll be making them at whatever polycount the performance budget dictates, and LOD models for them on top of that
So efficiency and flexibility is what matters
If those details on the column seem like they could've been baked to texture and normal maps cutting the polycount by 90%, then it may be seen as a negative that you didn't
What about the other clip? I see that you have two clips there.
I already found out why and yes it was the other clip
I want to make a material that resembles the visual style of the bullets from HEAVY BULLETS, but I don't know where to start since I can't import my material from Blender

I'm new at doing this sort of thing
What is the visual style of bullets from heavy bullets?
@lapis elk Oh I meant I want to imitate this kind of look
Can anyone else help me how to create that kind of material/shader for my models?
No idea where to put this cause there isn't a #video channel.
I'm loading in a video into videoplayer at runtime using a path to a file supplied by script.
That's all well and good.
Until it loops. When we hit the end of the loop (it's only a 4s video), we lag before restarting.
Looking at the profiler, our pre-buffered frames hit 0 when we hit the end of the loop.
The video file is a smooth 60fps as far as I can tell.
why the bones of my blender objects are not imported?
Dumb question, can I use xref within Unity?
Supposedly the FBX file supports it according to this forum: https://forum.unity.com/threads/xref-clones-and-3ds-max.32047/
Just wondering if anyone has had luck with it
Unity Forum
Hi,
Does anyone know if Unity supports XRef objects / materials export from 3DS max? We use xref's extensively to allow our artists to develop...
What on earth are you using that many vertices for on that thing?
Like, it is a single cylinder with a slight bevel. It doesn't even seem to have a visible relief.
It looks like the look in that picture is mostly due to hard normals in the mesh combined with a cubemap or matcap.
Unless you're actually adding relief details to it, it is hard to imagine what you're using so much geometry for. For most applications this would be overkill for such a simple shape unless you're gonna be getting really close to it.
It is true that at the moment geometry is relatively cheap; it is often better to add a few hundred verts than an extra texture map. That doesn't seem to be what's happening here, though. Like Spazi said, you could probably make the same result with 10% of the polycount, especially since you seem to be using textures anyway- especially here where that pattern on the surface seems to be repeating.

@wide wasp What assets do I need to prepare and what settings to change for my meshes to achieve that look then?
If you're using geometry for the relief details, you can learn about baking to turn them into textures on a low-poly mesh
Are shaders or material scripting going to be involved?
No
Ok. I'll have to take a look because I know nothing about them
@misty lantern Any good resources to find and look into for a start?
There's countless tutorials and guides for high poly to low poly baking on the internets
Just pick one that looks the best
Then try another if it actually wasn't the best
That's how it usually goes
"baking the internets"? What does that mean?
Oops I missed a word there
Instructions can be found online is what I'm saying
Hey guys, I'm realitively new to all this. These questions probably seem stupid but i need some advice. What is the proper approach for using multiple materials on different parts of a single player model? Should I export them from blender as separate meshes? Would doing that change how the armature interacts with the model? Maybe there is another approach i'm not seeing yet.
i know that you'd generally just use a uv map if you want an aspect of your material's shader to not affect the entire model but that just seems like a lot of work for one gameobject
If your mesh has multiple materials you can simply export it and the material slots carry over
Not something you even have to think about a lot of the time
its that seamless? for .fbx and .blend files?
Yes
It's generally better for optimization to use UV unwrapped meshes that only use one material slot
But in a lot of situations it might not make any practical difference
yeah i suppose so, in my case i was wanting to give a full-bright glow to only part of the mesh . good to know I can just use my existing materials. i appreciate the answers!
I think you're replying to the wrong person; @oblique crater was trying for a low poly matcap look. It was @strong nova who was trying to make the textured pillar. 😄
Shaders, yes, but you probably won't need to make one yourself; the specific steps will depend on which pipeline you are using but there should be suitable premade options for that. The most important thing will be preparing your mesh and texture.
I see that's what happened!
@oblique crater Disregard my previous advice
@strong nova Regard this advice
@oblique crater this is an example of the sort of shader you'll want. https://assetstore.unity.com/packages/vfx/shaders/free-matcap-shaders-8221

Add depth to your next project with Free MatCap Shaders from Jean Moreno. Find this & more VFX Shaders on the Unity Asset Store.
Where you basically paint a sphere texture with the stylized lighting that you want. The faceted look is created by calculating the normals of the mesh with no softening when you import it(or make all the edges hard in your modeling software).
I'm not sure about the steps inside Blender, but unity can definitely import a single mesh with multiple materials applied.
For a repeating pattern like that, if that is really carved into the mesh, I'd do a single copy of the pattern on a flat plane and make a texture out of it and then tile that over the pillar.
Wow! Thanks!


does anyone know of good tools to work on isometric pixel art? to make isometric tilesets easier to draw, for example (seamless wrapping)
currently only using Aseprite
#archived-art-asset-showcase is for feedback, this is for technical questions
Oh sorry I'll do that
Hi! I've been interested in making 2D pixel art assets to put up on the asset store but I really don't know where to start. Are there any basic guides on what all is needed for a clean and well functioning asset pack? Like, what all is needed for a basic tilemap, how modular everything should be (down to saving a separate file for the eye or hair layer), sizes, should I be making rotated versions of every movable object so the pixels dont get jagged, etc etc.
Tl;dr I know how to make pixel art but I don't know how to make it usable for games. Are there any good resources for this? because everything i've found so far is for the people USING the assets
Is it bad for performance to have objects moving in your unity scene? Would it be better for performance to animate them in a 3rd party program like blender instead?
Depends on the details.
Generally speaking, performance is just one metric and you'll usually have other reasons (gameplay) to choose one or the other.
There is some overhead to using the animator, so for extremely simple animation it is cheaper to animate via script but after a certain (fairly low) point of complexity the animator usually becomes more efficient. But for many situations the difference won't meaningfully affect your choice.
Thanks for the detailed response 🙂
Got fed up with my programmer art. AI does it far better than I could. Here's some of my favorite pixel art outputs


I think i've somehow got two copies of the same mesh in each other, any ideas how to separate them?

Midjourney?
ComfyUI's Stable Diffusion. It's pretty nice to run 200 batches overnight. Last night I tried some icon prompts for spells. Here's a few, honestly these are great and I can refine them myself to be usable.


There is a bit of strange thing happening when I am selecting the bones I see no colour, and when I select headbone I see red colour, and when I am trying to paint nothing is changing. I am expecting different colours on other bones as well
Are you sure you're weighing the mesh to the rig generated from the metarig, instead of the metarig?
You'll probably want to start by parenting with automatic weights, and then fine tune manually
Remember that the deform bones of a rigify rig are hidden on the deform bone layer, and to weight paint you must have selected the armature first, then the mesh as the active object
These are plagued by nonsense shapes and don't even stick to the pixel grid
I'm sure you could do better than that even if you were a beginner, and I'd vastly prefer bad art over soulless mass produced art
Why would I bother looking at it if nobody bothered to create it?
Yeah I've been thinking the same, to use AI to generate some base images and just refine the details myself. at least for the more boring spritework
I'm using it as a tool to generate unique shapes and designs that I don't have to time or skills to do efficiently. If it can create something overnight that I can refine later cutting down an enormous amount of time, I see no problems. You don't have to like art, man made or artifical but there's no excuse for that kind of hostility for just using a tool.
If i want to work with multiple UV maps in Unity, do i need to make my own custom shader in Amplify to do this, or can I do this with the BiRP standard shader as well?
depends on what are you adding on the other UV spaces, you mean multiple UVs for the same mesh or a mesh with several parts with their own UVs for each?
basically, i have a 'wall piece' that uses a shader which has a material with a set of textures, i want to basically use the same mesh, but with new UV maps
like im using a trim sheet
and want the wall to use different UV's for another variant
in Amplify Editor, i see "UV Set" with a drop down 0-8
it would be nice to be able to get that value from the material somehow, or like a drop down in the UI to pick
without having to make a 'new shader' for each UV map
how different are going to be the UVs for that wall? wouldn't a texture fix is not enough?

i just wanna be able to have UV Set a exposed dropdown outside the editor

sorta like how the "standard" Unity shader does it
yeah ok I think I get what you want, in that case you have to do it through your shader editor, the standard shader is not prepared to do that
I'd create a custom function and have it called into the graph, there should be a node for that as it's available in unity's shader graph
yah im not seeing that, wish there was like a example somewhere i can just rip or use as a helper reference
this is the node in shadergraph

and there you can attach any HLSL script, you could just ask for it to chatgpt
why when i put bones to my blender model when i import it to unity the project is imported correctly but the bones not?
Screenshot or a recording to show what exactly is happening would probably help
I don't think you can make a dropdown like that for a shader, but you could get the same effect with an int property that's passed into a bunch of branch nodes, each deciding between a different UV input for the sample texture node
I'm not hostile towards you, but the erosion of art and meaning in our beloved medium, and not inexcusably so
My disdain is also an indicator how your graphics will be received by some players if the "generated" look and flaws persist into the release
Hi I have Problem with making my character humenoid, which channel should I post it?
Here is good or its related to another channel?
I post it to animation and physic but no one answered me! 😢
Where should it discus it??
Animation
It seems Humanoid users have a lot of questions but don't stick around to help each other
thank you!
it seems like it!
unfortunately im a noob , i just start to learn for my uni project or else i would have stick around to help 😁 😅
Amplify Guys helped me, you can.
http://paste.amplify.pt/view/raw/3f1f1334

Might be that nobody knows the answer.
Though it looks like you might be trying to copy an avatar from a mismatched object?
No I tried to humenoid an animation for my character based on its avatar but I get this error, i downloaded the character from asset store.
I even tried it with mixamo character and got the same error but for neck.
here its but idk if i have something after the import in blender (sorry for late response)


<@&502884371011731486>
Vulgar trolling
Im trying to open 3d models but nothing comes up on my screen and when I look at other videos on how to it just seems like it automatically comes up for others
Anyone know how I could get the Unity URP template in Substance Painter 3d? I tried this solution but the templates still don't show up after moving the files over


Post only to one relevant channel at a time please
I've said it twice that it would be cleaned up. Your attitude was just to hate AI and have this odd belief that just because it was made through artificial means invalidates it. I'm sure there are those who hate CSG and believe real canvas is "true" art as the way you are describing how you feel about anything created through AI tools. Like I said, you don't have to like it but getting upset over a tool like a paintbrush is just an odd thing to do.
Does anyone know some good app for game design where I can plan my ideas and add pictures?
Miro. Milanote. Trello.
making icons for spells, multi arrow, first attempt yesterday and second today, thoughts ?


The issue was that some unnecessary verts present in the scene which prevented the weight paint to work correctly, Now it is working fine. I am able to paint but it makes no difference on bones. They are not influencing the structure
is there any tutorial about how to convert your character from Built in render to Upr/Hdrp and somehow save it correctly in your scene so it can be used in asset store?(so customers could switch to them)
I saw videos where u just convert your materials from one render Built in to Urp or Hdrp but there was no info about how to correctly save your different render stuff (Urp Hdrp)?
top left > Edit > render Pipeline (down in the option) > URP > Upgrade project or selected as you want
yeah, thats I get, I dont understand how I can save properly the Urp or hdrp file with updated materials, because in built in Im using some shaders/material that is becoming pink in URP and I then in URP render pipeline change the shader in materials that supports URP. how can I save that one URP where I change shaders in materials so it will be in default for other users when they open my scene with character and switch from built in to URP (I mean so they do not have a need to change the shader in materials by them?
like I understand how to switch from one render pipeline to other, I dont get how to correctly save Render pipelines with material settings ready that I fixed
i don't really understand that essay you sent, sorry
Im sorry, its hard for me to describe it properly, my bad
I mean, I know how to change from Built in to URP in the scene. But how can I create a file with UPR package (where I have all materials with fixed shaders in) so this file can be imported in scene.
So then the procedure could be like this when you open scene with character: you open and import the URP package -> it applies, everything pink -> you change in project settings the render pipeline asset and chose URP -> done
Idk if this is the right channel for this question but should i keep all my textures the same size for example 32x32 or does it not matter if i have some that are 16x16 for example
because currently my player and all of his animations are 32x32 but my tiles are 16x16 and im wondering if i should do everything else as 32x32 or 16x16
or if i should even redraw my tileset
what about putting it in URP with the render pipepline, saving and then right click > export ?
oh god you might really saved me now!!!! thank you so much my noob heart in unity 
try it and you'll tell me
I just checked it and it worked! thank you very much
my pleasure, have a good day/night
Which is better, using singles or sprite sheets for furniture? And in the case of using sprite sheets, use 16x16 pieces in objects that are a little larger, or cut it so that it is a single sprite (32x16)?
I am worried that since the spritesheets are so large, they will have to be loaded when loading the scene, when I will only be using 3 objects from that spritesheet. What do they say?
Does anyone here have experience with PSB import and getting different sized images appearing correctly in the resolver? After slicing, the positions are lost (IE: different sizes beards and weapons no longer appear in the correct position when toggling between them in the resolver)
Hi chaps, I have this leaf texture I wanted to apply to a simple mesh, however it comes out not as fully transparent but with white background, anyone know what might cause this?
material is set to transparent
smoothness and everything else set to 0
and the texture preview seems correct, as in not having any white weirdness...


Also, when I get closer to the tree, it is perfectly transparent
I tried disabling mipmap but it seems still white in editor
Although the image is too cropped for me to see much anything I'd guess this is a transparency sorting issue
The blue haze you have there might be a transparent material and the trees could be showing the sky through it
It only occurs at a distance
blue is the sky
that is not an issue haha
basically when I get closer to the tree it is perfectly transparent and normal
and I disabled the mipmap generation ,yet same issue still
Does anyone know why my ground is moving when the character interacts with it? It only has a 2D box collider on it.
The ground moves when the character jumps on it which makes it shake and when the character tries to continue to move when it hits a wall it moves the ground like u can see in this last image.


I can also provide the settings for anything if you need that info, just ask
Hmm I'm not sure I have more guesses but you could show the material properties of the branch, and an uncropped screenshot where the issue happens


I would try out "fade" and "cutout" instead of transparent
Transparent renders light and reflections even on the transparent parts iirc
cutout seems to work
I am such a noob haha
let me build the thing and see if it work!
Perfections, works like a charm. Thank you so much!
How can I stop the shape node from repeating at the top, in the left image. I want it to be like in this image on the right.


Substance designer btw
hey everyone, im new to pixel art and i made a character for my game (i think it is 24x24 or 16x16) anwyay how can i make the backround cuz obvously it wont be 16x16 but i dont want the pixels to be like bigger if yk what i mean
and this is prob a dumb question but i genuinly dont know
Post only to one relevant channel
ok mb
Set it to clamp?
not sure if this is the right channel but is there a good way to duplicate and attach gameobjects like walls? So if I want my wall to be longer I have to duplicate and move by hand but I want that it automatically attaches to make the wall longer
This probably isn't the channel
It sounds like you want to make an in-editor level building tool?
I see, yeah kind of, just thought there is maybe some kind of duplicate and attach to current gameobject option. Like I have a piece of wall thats 2 width, if i duplicate it the new one is inside the old one, what i want is that it attaches to the other wall so that my total wall is 4 long
You can hold ctrl when dragging to snap to grid increments, or V to grab mesh vertices and keep holding V to snap from vertices to vertices of other meshes
Parenting is a way to "attach" gameobjects together but they will inherit transform scales in that situation
Oh that already sounds good, thanks im gonna try snapping!
When I make a shader / with a normal. I use it on a wall and then I use it on this other 3d part of the wall (seperate object) and it looks like this...

if i change the normal inport to something else, it looks like this

which is correct
but why do i need to change the normal to RGBAFloat in import for it to work? its just a normal texture....
a normal normal
seems weird right?
changed from Auto to RGBAFloat
it works on RG Float, RGB 16bit and RGBAFlooat.. does that mean its borked somehow?
also, if i import the SBSAR file from Substance Designer.. the normal looks like this...

which is totally wonky
does that mean its like texture packed or something?
and i dont want all the channels
that might explain it
looks like the B channel is completely black
Normal maps store normalized 3D vectors in each pixel, so you also need valid data in the blue channel
Or alternatively a shader that reconstructs the third value from the other two, I'd guess
- I have 2 images, they are both circles. Circle1 is 128x128 and Circle2 is 256x256.
- I set the import type to Sprite (2D an UI) for both circles
- I set the Pixels Per Unit to 128 for both circles
- I set the Max Size to 128 for both circles
- Both sprites are reported to be 128x128 inside the inspector
- I place both circles in a scene as using a SpriteRenderer with a scale of 1
- Circle2 is 2x as big as Circle1, even though I set the Max Size to 128.
Why is it like this? Shouldn't both circles be the exact same size visually because they are now treated as 128x128 by the engine?
If it did that, it would break the intended purpose of the max size setting.
It limits the resolution but in all other ways(or at least, most ways) it is treated as if it was the original dimensions. This is so that if you use the same sprite in builds for two different platforms with different max size settings, the sprite doesn't show up as half the size in one build.
(So you can use the same asset for your mobile, web, and desktop versions, for instance.)
Then why does the sprites report 128x128 inspector when I select them?
It's so confusing and unintuitive.
Is there a way to tell if a particle from a VFX graph is on the screen or not?
I need to apply a certain operation to the particle, but only if its on the screen
within the camera's view
Or better yet, can someone just help me with my VFX lel
bet there should be a better solution for my problem
im very new to the vfx graph
You could describe the root problem in vfx channel
Oh i didnt see there is one, thanks!
i got a bit distracted so i couldnt describe what my problem was
Any ideas why this Ghost I've made of individual Sprite parts looks different in-game than it does in the Scene view?


The zoom in the scene view, maybe?
There are two components to a Sprite- the texture and the recttransform. The max size affects the texture resolution, the rect size is based on the original pixel size.
Via the ppu
You've nailed it! Changing it to 1920x1080 fixed it. I guess my thinking was just to make a low resolution game.
Just remember that zooming the view won't affect the zoom when you actually build/publish your game.
You can look into the pixel perfect camera for making a deliberately lowres game.
In Maya, I set my prefs to 1 unit == 1 meter, and everytime I bring it in to unity it's scale is off... is it something in the fbx exporter settings I'm missing?
Check the model import settings to see if the scale is correct
Hi guys, how to achieve this material in unity? In blender it is nice, however in unity its shite even with normal and metalness maps


I have these settings

Bake some reflection probes so it actually reflects something meaningful
Or just change your skybox to the same one as you use in blender
Hi Guys
what are pros and cons of Modular workflow in game industry
especially for mobile games
Cons: it takes planning.
takes planning? what that means?
i know making modular assets is little bit tricky
but once u know the workflow and keep using the assets
i think it is easier then
but i want to know, if it is optimized and inteligent workflow for large city area if we want to show it in our game or should we just make a whole building in 3d tool and export it
with Modular approach u have to just import modular pieces and u can make alot of versions of building
but it increases the batches
It makes sense to do, yes. It just takes more planning (which is a bit tricky, as you said)
It's up to you to optimize your workflow. It isn't inherently more or less optimized
but the overall size imported in the unity would be small compared to all those buildings which u just made with those pieces (prefabs)
let me explain the background
it will help us in judging the whole scenario
I am making a city of about 4x4 km size in unity with alot of buildings
does anyone know what these 2 errors are? They keep appearing whenever I extract materials and textures from exported fbxs

we have to drive in the game for civil service duties
but i want to let the user enjoy the real feel of cities, not just cubes with building textures on it
so thats why i was thinking to use Modular approach for better results
but in mean time, we dont want to put burdern on mobile devices
Yo so I am making a back room game and need help with the lighting and textures cause I just imported it from blender to unity and now it's all messed up can someone help please
Hears the blender and unity screenshots


Idk but adding some post preccessing will improve the look
Shaders made in Blender's material editor aren't compatible with Unity, in case you're using those
Normally you'd bake them to texture maps using mesh UV coordinates
hello, so I have mutliple uv maps that I have made in blender, I imported the model to unity but there doesn't seem to be any option for using uvs
and in case you are wondering why I need those uvs, is because I am layering different textures on top of each other and their position in the uv spaces are all different
is it possible to have multiple uvs in unity or will I just have to find a workaround?
you'll need a custom shader to disaply those uvs
Unity supports up to 8 uvs with custom shaders. The second and third sets are typically reserved for lightmapping in the default shaders and the others unused.
guys i have a problem, bottom image is before importing to unity, while top image is in unity. the image viewer in unity has same gray spot above the eyes like in upper part of the image

i dont know why this happens..
fixed idk why

Texture compression causes blotches of color as it compresses the texture data
definetly touched the compression settings
Heya everyone! im a bit unsure where to ask, but i need some help with 3D
im using blender
im working on a 2D game, but i need a custom mesh for it
and the easiest way to make one is to just model one, as far as i know
its really simple, i just need around 32 quads in a line
but im not sure how to make it in blender
and im not sure how exactly blender units convert into unity units
i'd prefer if this whole mesh took exactly 1 unity unit in both dimensions

Something like that basically
but in a shape of a square
instead of a rectangle
What's the custom mesh for? That may help us give an idea
Reflective water
i'm gonna put a render texture on it, and i have a shader to make it wave
32 quads in a line, with each one shaped like a square or their combined shape a square?
Combined into a square
So the square would practically be divided into thin strips
so far i made it work with a simple quad mesh, but i cant really get many waves like that, since there's only 4 vertecies
You can make a new "plane" in Blender, use ctrl+R for the loop cut operation and define 31 cuts for 32 faces

Hmm, thanks, i'll try
If you want it 1x1 you'd have to also scale the geometry by 0.5
As Blender uses 2x2 cubes, planes, etc as default
If you have "Apply Scalings: FBX All" and "Apply Unit" set in FBX export settings it should import with the correct scale

For some reason it turned out really really tiny

Here's how it looks with x100 scale compared to a 1x1 tile
Besides that, it works really well
The most common scale confusion (and probably the only one) when converting between model formats is whether the file format treats units as meters or centimeters
Correct FBX export settings will fix it but you also have the scale factor settings in mesh import settings

I use "FBX All" as I mentioned previously
And the "apply unit" checkbox in case you missed that
Oh right, that went right over my head
Use Space Transform and Apply Transform checkboxes can also help, but I keep forgetting what each of them does precisely
Mesh import settings where you can find the additional scale factor is on Unity's end
Okay, that fixed it, thanks a lot!
i'll keep that in mind if i'll need a mesh in the future
how do I properly export from blender to unity, keep in mind I have an armature id like to keep functioning, and I will later down the line need to export multiple different animations
I’m having millions of issues every step of the way
Main things are
Your animation preview framerate in Blender must not be low, set it to like 60
Animations per-object or per-armature, so you can't have one clip with multiple separate animations moving together
I'd mark the actions with the shield icon or "fake user"
The scale of the mesh and armature should be applied
In FBX export settings "Apply Transform", "Add Leaf Bones" and Force Start/End Keying should not be checked, but Only Deform Bones should be
If you're using Rigify generated rigs, you should be using GameRigs instead
animations arnt there right now I’m not worrying about them
apply transformation shouldn’t be checked alright, because everyone tells me to check that and make sure my axis are done right
(Additionally if you're making Avatar configurations I can't help you
If you're making vrchat or vtuber characters or modding or using decompiled assets, no one here can help you)
Except by linking you to the vrchat server 😛
Transforms should be applied, but "Apply Transform" option should not be checked
They're 100% different things pretty much
hm alright
Hence the warning here

I’m just using an armature to handle things like wheels being able to rotate and the turret and all
I KNEW it would cause issues
God
Why does everyone contradict each other here
Here? 
Yes in this server
I’ve had a week of issues with wheel colliders and I finally fixed one and realized the other now
and every other person basically was trying to get me to fix my axis’ in Unity and all for my objects
Which never ended up fixing my issues
Well, it is hard to avoid. Everyone has their own workflow, using different versions of unity and different versions of blender, and are doing different things with them. Spazi's suggestions are generally good guidelines for animated characters using the current versions.
Wheel colliders have been a nightmare to work with for almost a decade now, last time I checked.
my major issue is I’ve figured out
Is that my wheels are their own mesh
Which makes it a hell scape
Yeah but it’s utterly horrible to be the recipient of all this contradiction
What about my mesh’s that are parented to bones
It doesn’t seem those translate to Unity
Except like only a couple of my mesh’s
Hmm I don't recall being contradicted!
I can probably find the message where they told me to turn on apply transformations Lmfao
I don't think bone parenting is directly exportable, as Blender only treats the armature as one object, whereas Unity treats each bone as an independent transform
Oh god
I have my mesh’s parented to my individual bones as you normally have
Then I have all my other bones that arnt connected directly to my main bone parented to the main bone
But when I export to Unity it seems to be all in the same armature
Like it just doesn’t do anything with the mesh’s properly
The bones are all properly parented it looks like
I haven't had the opportunity to explore a good workflow to do doll or robot type characters with separate object parts connected to armature bones
But the easiest might be to export them all in a reference position, then parent the mesh objects to bones when you make it a gameobject in Unity
and how the hell do I manage to do that now
Skinning a mesh to armature's bones is the smoothest way to export mesh with animation
But due to how blender's weight painting works it's actually super slow to weight individual parts to individual bones
that went through one ear and forced itself out the other, so what now
I’m confused as shit right now
I’m not very experienced with this shit
Not sure, I don't know how your stuff is set up so my advice is all kind of generic
Would it be better if I can send screenshots?
Navarone has generally good advice but I think they also admitted to not having used blender armatures there
it’ll be like 10-20 mins till I can
I havnt had luck with them
They gave up on me and sent me to google, which as most people know is absolutely useless for most shit
Sure, anything helps
Alright I’ll send some of how my armature is set up
Gimme a bit I’m at lunch
I do but don’t have a split period, it’s weird
I wouldn't say that, googling is like 80% of all problem solving in this trade
Trying to give keywords to google for is better than nothing and in many cases the thing that ultimately solves the problem
I tried being as specific as I could with google
And I ended getting the same bullshit with like rigify or just general export
Or specifically only animations when didn’t even mention animations in my search
I tired google bing and yahoo
Animations and exporting are just a lot of steps and pitfalls so most of it is just practice and figuring out what not to do

This is my model with my armature selected
You seem to think that the blender way of doing things is 'normal,' when it actually does a lot of stuff that flies in the face of general convention. There are a lot of things where there is no single right way to do something, just 'the way x software does it'
It does some things weirdly but alot of it makes sense, plus I’m just not a fan of unity in general especially with the pricing thing
Well, Spazi and I don't work for Unity, we're just animation nerds trying to help randos on the internet. So please don't take your frustrations with your school and some corporation out on us. 😄
Not trying to, sorry if it came off that way
Haha nerd /lh /j
lmao
Unity is awesome, just a matter of learning the workflow of things is all
not at all
but anyways, what are some of the issues you're facing with exporting from blender to unity? can you provide any specifics?
It would take me a while to list and explain them all and I honestly don’t have for patience or time rn to do that on mobile
im not asking for all of them
what's the biggest issue here? is your armature/skeleton not working? as in not being able to rotate the wheels properly?
my meshes parents to the bones arnt actually like transferring over
Plus I’m having issues with wheel colliders
And all that
I'll admit i never used Wheel colliders so i may not be able to help there, but i would like ot think im p. good at blender and unity and the interactions between them
your meshes are the children of the bones?
do you have a way to show your blender heirachy?

I can't see any clues here why it wouldn't work, but I don't see any glaring issues either
You're probably using a curve modifier for animating the treads, which will be lost (or rather applied) on export
If you have persistently rotating objects like wheels, it seems unintuitive to use animations for them
Well I know what will happen with the tracks that’s something different
I’m not even in the realm of tracks yet
I just did a lot of my modeling first for one of my tanks
Anyway since they're parented parts they're not expected to remain parented when imported
The animations on the bone transforms should still work though
ye
@strange loom also make sure that you aren't stripping out 'unused' bones/bone animations. Because when it says used it means 'skinned.'
Since bones are expensive, they typically strip out bones that aren't skinned to anything.
Has anyone here ever used Sketchfab before?
I want to import an assets that has a standard license on it into my scene. This legal?
The legality of that would be detailed in the standard license itself
yeah all of my bones have mesh’s attached to them
"Attached" probably isn't enough if it specifically looks for the skinned mesh /armature modifier
uh
I confuse
I attached it via the like you select both go into pose and parent the mesh to the bone
Yeah, not that
then how do I do it 💀
Like I mentioned earlier skinning the mesh to the armature with weight painting is the smoothest / most standard workflow for attaching a mesh to an armature and will work when imported
But it also just kinda sucks to do for mechanical parts