#3d-modeling
1 messages · Page 133 of 1
 mystic bridge
 tough plover
you can just put your model into a T pose in blender, apply that as the rest pose
mystic bridge
tough plover
you can just put your model into a T pose in blender, apply that as the rest pos...
See, I tried that and it is still telling me the same thing
I don't know what the hell is going on
tough plover
when you make armature changes and re-export to Unity, you need to go to your FBX's rig config and click Pose > Reset pose
mystic bridge
Let me get back after my coffee break then i'll check
 uncut imp
Yea that takes whatever pose it's in and moves it to tpose. Or so you mean actually adding the bones to the model you've made in blender?
mystic bridge
uncut imp
Yea that takes whatever pose it's in and moves it to tpose. Or so you mean actua...
Let me start from the top. I am trying to put in a very simple rig, doesn't sound hard. Except for some reason CATS doesn't wanna work on Mac now and all my simple and easy ways of fixing things are out the window. So now I am back in blender trying to manually convert a model to a T-pose in which I did not design it to go that way. I know you can use armatures to make it "pose" in blender but I haven't really done that without cats so now I am trying to relearn vanilla blender basically.
uncut imp
Have you put the armature on it and weighted everything to it first?
 uncut imp
Right. So the way forward I see would be to create a base armature, I believe there's a few add-ons to add an empty armature or there might be on set up sepxifically for VRC that someone has made which would be great. Then you line that up with your model where the bones should be and apply that to the mesh
From there you can pose it into whatever pose you like
mystic bridge
Well right so heres what I ended up doing
Right so I moved them back down

But when I port it over to unity, unity has a shit fit and tells me it is all wrong and that it isn't the right armature
mystic bridge
Now it is telling me I have missing components
My whole right arm is now missing what the hell is going on
Imma just make a new armature at this point
uncut imp
Are the bones all named correctly?
tough plover
did you even go through the Weight painting process?
mystic bridge
Well no... my friend who taught me told me it was pointless as long as I use rigify
tough plover
Weight painting is literally how you get your mesh to move with an armature. Rigify is a semi automated solution, but it's only to help you get started, not something you should use as an end product
uncut imp
I haven't used rigidy so can't comment on that
mystic bridge
tough plover
Weight painting is literally how you get your mesh to move with an armature. Rig...
Yeah I know and I am paying for it right now lol
 surreal lance
Dont you have to use this armature for VR chat?
 spiral sigil
its not a fbx its a prefab @tough plover
tough plover
where did you get it from?
tough plover
.-.
could you not just grab the drive from your old PC and slap it into your new one
 indigo sapphire
But when I port it over to unity, unity has a shit fit and tells me it is all wrong and that it isn't the right armature
@mystic bridge you need to import models with CATS blender plugin for VRChat
And export with CATS too
Otherwise Unity has a seizure. And even then using CATS makes Unity spaz out too sometimes it is all bloated and counterintuitive
mystic bridge
indigo sapphire
Otherwise Unity has a seizure. And even then using CATS makes Unity spaz out too...
Two things:
- I passed out on my phone thanks for waking me up
- CATS is being strange on my Mac so imma try to fix it tomorrow
 safe sapphire
indigo sapphire
Make sure you use Blender 2.93
safe sapphire
indigo sapphire
Make sure you use Blender 2.93
Actually it's just a few errors in the python script.
if you know coding you can manually fix the 2 errors the program works fine
it's just 2 bad only a small percentage actually know how to do that.
but using an older version is better.
indigo sapphire
yeah, I prefer to use tested and confirmed versions - CATS is tricky enough as it is. I don't want to deal with extra version incompatibilities.
 zenith cloak
So, after what happened several weeks ago I went on a little journey of self-discovery and self-improvement. Redrew and remade everything from scratch.
Here's my progress. I'm so freaking nervous. If only I could be more confident in my work, it would've probably taken just one week. (EDIT: Maybe even less than a week.)

 naive bolt
How are 4 legged avatars rigged for full body?
tough plover
@naive bolt there's a couple ways, depending on the look you're going for/amount of effort you want to put into it
- rotation constraints to copy movement of front legs
- custom animations based on Velocity parameters
- (best imo) procedurally animated using Final IK grounders and LimbIK
if the rear legs are digitigrade, you can also use Dragonskyrunner's guide to rig those
 ashen stag
Final Ik is the best method, no I am not biased
naive bolt
Interesting, thanks!
 solar ocean
wip!

 peak wedge
solar ocean
wip!
peak wedge
solar ocean
wip!
That looks awesome!!!
 frigid glade
proud of dis hair

 sharp grove
https://cdn.discordapp.com/attachments/931698158927491172/969435275237421156/unknown.png
Been working on this model and happy with how it's turned out, but I'm wondering if there's a more efficient way to create the translucent effect with 2 layers I've got going on (the outer layer being slightly transparent)
Right now I've just duplicated and shrunk the mesh just to test it which does work but bumps it up to 44k polygons which is gross lol
Anyone have any ideas??

Glow is also temporary btw it looks kinda obnoxious as is
Just wanted to get a feel for it in blender
 quaint jasper
Poiyomi shader can do that 
 spice pewter

 tepid hare
Here's a base I tried to make for one of my friends avatars.
 tepid hare

 covert river
 sharp grove
first pass on that poiyomi shader thing, not sure if i've replicated the transparent/second layer effect with the rim lighting enough but
 quaint jasper
Looks good !
sharp grove
thank
sharp grove
not sure if this is the right channel but i'm a bit stuck - my bounding boxes are/seem to be rotated, i've never come across this before

not really sure what to do about it
tough plover
sharp grove
not sure if this is the right channel but i'm a bit stuck - my bounding boxes ar...
make sure all transforms are applied in blender before you export
click on your meshes and do ctrl + A > All transforms
sharp grove
i have done, didn't seem to do anything :(
tough plover
then do the same for the armature
also, do you really need to have those 2 meshes separate?
 icy creek
Are the VRCEmote, VRCFaceBlendH, and VRCFaceBlendV used for anything?
I'm wondering why they are there and if used for important purposes

 devout scroll
spiral sigil
devout scroll
spiral sigil
Working on a world made fully from scratch.
 indigo sapphire
spiral sigil
Working on a world made fully from scratch.
indigo sapphire
spiral sigil
Working on a world made fully from scratch.
cute! but I hope the skybox is temporary, it seems to completely not fit the artstyle you are going for lol
spiral sigil
indigo sapphire
cute! but I hope the skybox is temporary, it seems to completely not fit the art...
It is


 steady zealot

 trail python
steady zealot
trail python
steady zealot
its perfect, i love that.
 unborn acorn
sum hair texturing
 somber urchin
i have a model all sculpted up and everything in blender, but theres some stuff that needs to be done, im just not sure exactly what, is there anybody that would be available to walk me through it?
 fluid spear
oh is this where i should have been asking my questions? not sure how i missed this channel...probably because i was already in help and it felt like a continuation from what i was discussing previously... >.<
https://www.youtube.com/watch?v=GtuVV2waX4M << so i linked this video in the other channel before realizing it wasn't quite the right one. i'm wondering how he does that sweep to select everything at 5:22.

Series playlist: https://www.youtube.com/playlist?list=PLhiuav2SCuvdEAbUzJxSqp61fNiPTFfwb
A beginner friendly video series that shows how to export a model from the game Koikatsu to Blender. This part shows mesh and armature fixes.
Chapters:
0:00 Small warning
0:23 Armature info and mods
4:46 Mesh info and fixes
trail python
fluid spear
https://www.youtube.com/watch?v=GtuVV2waX4M << so i linked this video in the oth...
C in edit mode
trail python
select mesh not armature
fluid spear
where is that selection?
trail python
you right click
well crap, it might be left click for you. i use old blender settings but the body in your scene for example
fluid spear
i am blind or doing it wrong. sorry

i might have to start over. at some point i made my character a wireframe and don't know how i did it.
 lapis smelt
I have an issue
trail python
fluid spear
i am blind or doing it wrong. sorry
no, it should be in the upper right. something like this but itll be a little different for your set up
 lapis smelt
My 3d viewport is going fast when I use my mouse, how can I fix this???
fluid spear
 trail python
yeah
fluid spear
also is there a reason your bra is separate?
trail python
oh, its a toggle
fluid spear
ohh so you can have bra or no bra? that makes sense.
trail python
yes
fluid spear
ok so i clicked on body, hit c then did the swipe and it still didn't select any of the mesh.
trail python
go into edit mode first
fluid spear
also figured out how to hide the bones which is nice.
if you mean this than i already am.
 trail python
mmm only thing i can think of is hit 1 on your keyboard to go into vertex select or maybe seeing the model might jog something
fluid spear
gonna restart and get back to that point so i don't have something weird that might break stuff later like not knowing how i got into wireframe.
fluid spear
what's that do? (i already closed sadly)
trail python
its a shortcut for your shading mode

you can change it in the upper right corner too
 fluid spear
oh shoot i bet i clicked those.
since i'm at this step again, how do you decide what meshes other than hair to separate out?
i've just been doing hair cause i don't know if something else like the headband or hte glasses would be worth separating out.
trail python
i guess it would depend on what you wanted to toggle in unity? thats what ive done so far
i know more about it with world building lol
fluid spear
ahh. so if i don't want her taking stuff off don't separate it? why do we separate the hair out then? never wanna toggle that.
trail python
separation makes things a lot easier to edit in blender
fluid spear
my model after cats 1a.
 trail python
im not gonna lie, i only use cats for the viseme generation
fluid spear
as far as i know it's the only way to import my PMX files...
trail python
but when you want the hair to be on, you go out of edit mode, select the hair first and then the body, then ctrl+j
fluid spear
huh i tried selecting the headband here but the hair kept it's orange outline...hrm.
figured that bit out. i was being dumb there.
fluid spear
it's cause i had the hair selected in the upper right box. so kinda dumb. 😛
holy crap is this headband a pain to select with all the ripples...
oh wait wasn't there a way to click a vertice and have it show in the bottom right menu?
oh that's so much easier than the c thing. though the c thing would be cool on a flatter object. 😛
trail python
fluid spear
holy crap is this headband a pain to select with all the ripples...
i think you might be looking for alt+z in edit mode
not sure about vertices showing up in the bottom right?
fluid spear
material viewer
when you click the vertice with material viewer open it highlights the material that is on apparently.
spice pewter
 fluid spear
should glasses be on the head vertex group or is there a face one that is better?
fluid spear
ended up putting them on the head. we'll see if that borks it.
ok now to cull these superfluous bones. i'm guessing i do that from blender?
uncut imp
Indeed
spiral sigil
So I am trying to get the half of the finger to be set on to the missing part of the hand so I can continue sizing., how would I reconnect the two?
 lapis smelt
how can i remove the shadow from those spots?
 uncut imp
lapis smelt
how can i remove the shadow from those spots?
uncut imp
lapis smelt
how can i remove the shadow from those spots?
Something with your normals or geometry is screwed up
Have you got the normals set to smooth?
And what does the mesh itself look like
lapis smelt
here
 lapis smelt
uncut imp
Have you got the normals set to smooth?
lapis smelt
uncut imp
Have you got the normals set to smooth?
how can i do that?
uncut imp
There a big hole there, you can see the mesh on the other side through it
lapis smelt
i see no hole...
trail python
i can't tell if its a hole or normals issue so recalculate the normals first
 lapis smelt
FIXED IT
uncut imp
trail python
i can't tell if its a hole or normals issue so recalculate the normals first
There's still a whole bunch of edges that disappear off to the side and don't connect to anything else along the edge of it.
Everything else is very nice quads so I doubt this one little face would be full of ngons

Actually some of the other joins have ngons too so maybe 🤷♂️
trail python
i must be blinder than i thought i was lmao
uncut imp
Turn on face orientation and that'll show if it's the inside of the other side or not
spiral sigil
So idk if this is the channel to post this but how do I apply a mesh collider to a map so I stop falling through and going through walls
I’ve watched tons of videos and I can’t figure it out
quaint jasper
Don't use mesh colliders, use primitive planes and cubes, and remove their mesh renderer component in the inspector instead
 nimble glade
Do VRChat weapons need to have a Amature or anything?
spiral sigil
@nimble glade might help if your trying to make like a super complicated foldin animation
but otherwise not really
nimble glade
spiral sigil
<@396350952661188608> might help if your trying to make like a super complicate...
Ah, Thank you so much Xx
spiral sigil
ive been working onthis scene for a while and dont really know what else I want to do with it anyone got any ideas?
 nimble glade
spiral sigil
ive been working onthis scene for a while and dont really know what else I want ...
nimble glade
spiral sigil
ive been working onthis scene for a while and dont really know what else I want ...
Maybe adding a few other smaller rocks here and there around the grass?
spiral sigil
actually yeh
that would help xD
i was an idiot and made high fidelity leafs for each tree so its 16m polys for the renders
nimble glade
Ouch, must be lagging like mad 💦
 manic vault
spiral sigil
ive been working onthis scene for a while and dont really know what else I want ...
manic vault
spiral sigil
ive been working onthis scene for a while and dont really know what else I want ...
Not the best suggestion but maybe have it so they're injecting the heart with something? Like infected blue viens where the class are inserted?
spiral sigil
i was gonna do that but animation would take too much time and turn in for the project is soon xD
manic vault
Ah, well it looks really cool so far
spiral sigil
W.I.P bon jovi thoughts?

 supple fable
Realtime VS Baked lights
to much bouncing light indirect intensity at chrome surface
another example of baked indirect bouncing lights and shadow
 proud pilot
Hey guys, I've been trying to make my own 3d model in blender from scratch and add it to VR chat, I'm following this guide and basically it says to rig the model I need these parts.
but I'm really confused about how I'd rig the hips.

I've tried figuring it out in my head and I imagine there'd be two ways one being correct and the other not correct.

which one would be correct?
my model uses a cone for the body

it's super basic, I've never used blender before and I achieved most of what I've done by just going through the user manual.
not an ideal model, but idc if it looks goofy cuz I made it lol.
I guess the 3rd option would be, since the hips are already part of the "Hips,spine,chest" I don't actually need to make new ones for each leg
 thin shadow
proud pilot
which one would be correct?
thin shadow
proud pilot
which one would be correct?
 spiral sigil
So I am wondering how long I should have my fingers for a female avatar? and the main finger shape is intended. (I am going to copy and paste the rest from the pointer)

an animeish female avatar in specific
uncut imp
spiral sigil
an animeish female avatar in specific
That's really down to just whatever you think looks right and your preferences.
Maybe place a plane with an image of the outline of a hand behind it Aude use that as a guide?
 elfin sequoia
does anyone know of any software like substance painter for free?
uncut imp
Someone actually mentioned something like that few days ago
@elfin sequoia
I havent tried it out myself though.
elfin sequoia
ill check it out thank you
tough plover
there's 3 I can think of:
- armor paint
- quixel mixer
- Procreate (on ipad)
you can get substance for free for a year if you sign up as a student
 obsidian jungle
not even sure if this is even the right channel for this but
this gives me the chills looking at. this very, very small open area on the inside of the eye, was noticable when i jump in vrchat. i think physbones is to blame because ive never seen this before on this fbx avatar
on the outside it doesnt appear material 19 makes it blend in with the eye, so i have no idea what caused it
just gonna replace the entire fbx and see if that work
uncut imp
You dont have physbones in your eye so i dont see how that would be related
unless you have some crewed up weight painting from something else affecting a stray vert in the eye
tough plover
your issue aside, what is it with all of those materials? sheeesh
elfin sequoia
tough plover
there's 3 I can think of:
- armor paint
- quixel mixer
- Procreate (on ipad)
i have procreate i just dont know how to import my 3d model into it
 shell oyster
Yo anyone here know how to do furry rex models well, i have someone that’s gonna make me an avatar and doesn’t know how to do rex models well, if someone knows how to do them professionally pls dm me, then I’ll make a group chat with us three so we can get this to work.
 chilly turtle
Not really for VRChat (for now) but wanted to share

 dreamy falcon
so im wanting to append this head to the body in blender but when i go to do that it comes up with all this and im not sure what to do 😓 if i just select it all it comes up with

this and then nothing happens

would someone be willing to attach the head to the body for me? i can send u all the files this is just stumping me
tough plover
@dreamy falcon "Append" probably isn't what you want to do here. that is how you grab a certain resource from another blender file
dreamy falcon
ohhh i was just going off what google said
tough plover
you want to delete the head from your current body, aswell as the bones for it. then, import the FBX for your new model, remove everything but the head, then align it.
you'll also need to merge the armature of the new head to the main armature, and fix the bone hierarchy (parent neck bone of new head to chest bone). then, parent the new head to your armature, and join the mesh to your main body mesh
dreamy falcon
ill try and work that out
this is the first time ive done something like this so its all new
 mystic tangle
this is a stupid question probably but where tf is this button in the latest Blender version? I can't find it

it's literally just not there for me

 cinder cradle
enter edit mode
 obsidian nova

Created with Polycam - LiDAR 3D scanner app.
 vapid tangle
anyone here good at 3d modeling stuff? :3 I was thinking of making in a theme of 1800s
like steam trains etc with underground civilisation
but dwarven industrial age
but the model estque looks like skyrim vibe
Blender <-
quaint jasper
vapid tangle
anyone here good at 3d modeling stuff? :3 I was thinking of making in a theme of...

VRChat Ask
Post about commissions for worlds in this category. Requests are not permitted, we only permit posts from those providing services.
mystic tangle
I had the mirror on but the new cuts weren't copied on the other thigh and I'm malding so hard what did I do wrong


does it not take effect in edit mode or sm??
ok I still don't know why it didn't mirror but I figured out how to to symmetrize the edits
quaint jasper
mystic tangle
I had the mirror on but the new cuts weren't copied on the other thigh and I'm m...
Cuts don't mirror no, mirror is for displacing geometry, you would want to use a mirror modifier for other types of edits
mystic tangle
ah okay
 supple garnet
 pseudo token
I need some help with something. Anyone here?
pseudo token
I need some help with something. Anyone here?
 pseudo token
mh'. I'm looking for someone to do a professional scaly avatar from scratch. I'm willing to pay. Does anyone know any good avatar developers?
supple garnet
check out the vrc traders discord
pseudo token
I don't have any 3d development experience
trail python
vrc traders discord in #community-servers-old
easily a few hundred dollars for a model from scratch
pseudo token
trail python
vrc traders discord in <#407970838294560769>
oh jeez as soon as I tried to join I got auto banned
I went to type ;verify but I think I clicked "Join" instead and got auto-banned just now 😦
trail python
not sure. their bots are weird as hell
trail python
might be because your account is new
pseudo token
 trail python
they have an extreme amount of security l0l
pseudo token
it is... it's mostly to preserve anonymity
but I'm 100% serious, I do need an avatar and I have money to spend.
mystic tangle
screenshotted my message in a diff server because I'm too lazy to retype ✨
 supple garnet
mystic tangle
screenshotted my message in a diff server because I'm too lazy to retype ✨
supple garnet
mystic tangle
screenshotted my message in a diff server because I'm too lazy to retype ✨
You could probably remesh now or later, probably more of a preference thing; however, you wanna make sure you don't increase the poly count too much before re-meshing because it becomes a lot more work.
mystic tangle
alright
 worn cairn
mystic tangle
worn cairn
mystic tangle
how do I fix this arm nipple
 quaint jasper
remesh/smooth or fix in edit mode
mystic tangle
ok ty
spiral sigil
1.7 meters is a good avatar height?
thin shadow
Depends. That's very subjective.
 misty valley
Is it easy to add a backface to surfaces in blender?
supple garnet
misty valley
Is it easy to add a backface to surfaces in blender?
This should be a shader thing, unless you are trying to make something "thick," in which case you could use the solidify modifier
misty valley
supple garnet
This should be a shader thing, unless you are trying to make something "thick," ...
what if i wanted to use shaders that dont support that tho
but oki ill try the solid thingie
supple garnet
misty valley
what if i wanted to use shaders that dont support that tho
uhh... it is pretty easy to add it in iirc,
but if it doesn't and you don't wanna edit the shader, the solidify would prolly work
misty valley
supple garnet
uhh... it is pretty easy to add it in iirc,
but if it doesn't and you don't wann...
yeah id love to have it work without showing my trusted rank and also for ppl on quest / using custom safeties to hide shaders
supple garnet
ohh, so you are using the unity standard shader then?
 misty valley
yip yip
fps go nyooom
i hate bloat and extra work for different platforms and safety groups
supple garnet
xD, I mean, I respect not wanting to constantly change shaders to make quest, but in reality, adding a lot of polygons is going to be worse on performance than a changing the cull mode of a shader, although I understand the quest cause they don't allow it
misty valley
also i dont wanna lag myself out more than i need to or rely on potentially outdated shaders, those always break after a few weeks, months or years and in some maps or situation setups
supple garnet
Fair, but I mean, something like poiyomi isn't going to be any more out of date than the mobile shaders for very simple stuff like what you seem to be doing
misty valley
id need to do at least 3 material setups then and check each of them in a ton of situations
no thx
supple garnet
¯_(ツ)_/¯
misty valley
and theyd still look, react and behave different
supple garnet
you can likely tweak them to look identical, but idk how bad the standard shader murders the look of stuff as fallback cause I don't use it xD
misty valley
i use a modified matcaplit setup with custom properties and a shading fix
standard is not supported on quest
supple garnet
but I believe pc falls back to standard, yes?
I really need to look into matcaps soon
misty valley
supple garnet
but I believe pc falls back to standard, yes?
I really need to look into matcaps...
mayhaps
supple garnet
also, I checked and adding Cull Off to the pass of the shader enables backfaces (just to be informational)
misty valley
might actually work on matcaplit idk
it can process some material keywords or what they are
misty valley
f
supple garnet
Maybe they will update the quest shaders at some point, changing cull mode shouldn't hurt performance terribly much
misty valley
supple garnet
Maybe they will update the quest shaders at some point, changing cull mode shoul...
can transparency be done in blender btw
bc transparency isnt supported on quest by vrc
supple garnet
misty valley
can transparency be done in blender btw
you just have to cut out the mesh you want to be transparent.........
not really a great option but also not much you can do about it. Another workaround that eats into the benefits of the restrictions
not sure how much extra polys vs transparency affects performance on quest though, so I won't comment any more on that
 tribal monolith
so, I have begun my own little journey into blender, with the hope of eventually 3-d modeling characters I already have, and possibly porting them into vr-chat.
Just wanted to know if anybody had some advice for somebody starting out from literal scratch with no experience.
I already know of a couple tutorials i want to take a peek at immediately but other than that lol
 atomic leaf

 uncut imp
misty valley
Is it easy to add a backface to surfaces in blender?
uncut imp
misty valley
Is it easy to add a backface to surfaces in blender?
Yes just select the faces you want to be double sided, duplicate them and flip the normals
misty valley
:o
 onyx juniper
Who's that pokemon?

 azure rain
Earthworm Jim
uncut imp
 tough isle
Tbh I can barley tell what the picture is.
The same as what you've made but just longer and a little curved?
 tame dock
so i got a hat on a model and i want to use physbones to grab the hat and take it off like you would, i also have hair and a tail that needs to stretch when pulled and not just moved using physbones how do i do that?
tough isle
uncut imp
Tbh I can barley tell what the picture is.
The same as what you've made but just...
Not exactly, i just want to have it scaled to what it looks like in the second image
 glossy belfry
does anyone know how to fix this in blender like
can anyone provide me a resource

im using a vroid model and it has clipping issues
i want to fix this and i think it may be possible in blender but
i have no idea how to
 quick thunder
looks like a weight paint issue
gonna wanna research tutorials for that, as many of us hate weight painting
glossy belfry
quick thunder
gonna wanna research tutorials for that, as many of us hate weight painting
Would it be expensive to pay someone to fix it?
Might have to import the jacket as a separate asset and then fix it accordingly like that like when people buy clothing assets and then fit them to their models but im sure that involves weight painting too
azure rain
glossy belfry
i have no idea how to
you could use the inflate or grab sculpting brush to move the jacket a little bit forward
glossy belfry
Would i have to import that asset separate from the layers under?
cause i think if i pull or use the grab brush itll affect my model itself if i export into blender but im not sure ive just started using blender more this year
azure rain
you could separate them in blender

A short tutorial on how to separate a mesh in Blender.
🛠️ Equipment I use: (Mic, PC Components, etc.)
https://www.techy.how/equipment
Wallpaper from this video:
https://www.wallpaperengine.space/collections
Leave a comment if you have any questions.
Disclaimer:
The information contained herein should NOT be used as a substitute for the advi...
glossy belfry
Thank you ill try that and see if it works, its only 1 layer so it hopefully should
mystic tangle
hmst


 naive slate
idrk where to post this but what do yall think?
 spiral sigil
should I have stuff like tails and other things extruding from the body separate from the main body mesh?
 solar fossil
It really depends on the type, like, it would make more sense to have a thick tail be actually attached to the body, would be easier to work on it while separate and than merge it back with the body later, just make sure you have the right amount of loops for easy merging
 sweet cairn
omg that 10 pack tho
uncut imp
unborn acorn
Daym that boi is jacked
spiral sigil
solar fossil
It really depends on the type, like, it would make more sense to have a thick ta...
The tail in question is going to be a rounded tube
shape
 quaint jasper
Using some references ?
 fallow osprey
quaint jasper
Using some references ?
fallow osprey
quaint jasper
Using some references ?
Yes I have a few
The only issue I have is knowing how to apply clothing that doesn't clip
dreamy falcon
i think i have inverted normals how do i fix these?

 jagged moat
In blender, use Alt+N to bring up the option to flip normals.
dreamy falcon
it isnt doing anything even when i have the model selected
 autumn marten
anyone know why it keeps freezing at this point while importing the latest sdk?
 supple garnet
fallow osprey
The only issue I have is knowing how to apply clothing that doesn't clip
supple garnet
fallow osprey
The only issue I have is knowing how to apply clothing that doesn't clip
you can use a data transfer modifier set to vertex groups with nearest face interpolated to hackily steal the weight painting of the base model. Then manual tweaking till it looks good. You can also use a blendshape to make the parts that clip small and toggle that with clothing (or just delete the unecessary faces if it is not going to be toggled.)
spiral sigil
Eevee can be kinda cool sometimes

 odd flare
dreamy falcon
it isnt doing anything even when i have the model selected
odd flare
dreamy falcon
it isnt doing anything even when i have the model selected
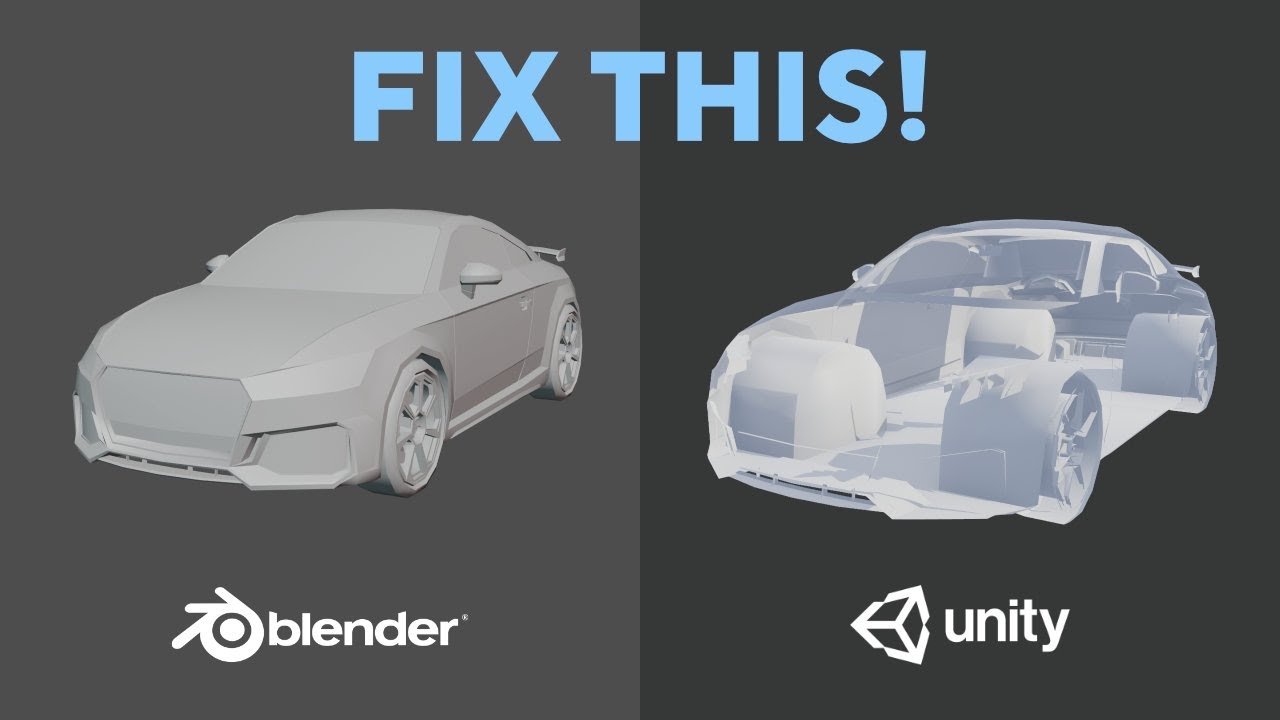
Sometimes when you import the game asset mesh from Blender to Unity, it looks like the mesh normals are flipped inside-out. Follow this video tutorial to learn why it happens and how to fix it!
Tutorial post on my website:
https://www.lmhpoly.com/tutorials/how-to-fix-flipped-normals-in-blender-unity
👉Subscribe to my channel: https://bit.ly/32a...
Is there any place I could find a free base model for an anime avatar that is compatible with quest 2
;
thin shadow
odd flare
Is there any place I could find a free base model for an anime avatar that is co...
vroid
fallow osprey
supple garnet
you can use a data transfer modifier set to vertex groups with nearest face inte...
Thanks a lot for the tip ^_^
supple garnet
mmhm!
 pine raft


 bright steppe
Any recs for resources (tutorials or videos or courses or anything) to learn to model clothes and ears and tails and stuff? I'm pretty ok at more geometric modeling but I'd love to learn the more artistic side of things
bright steppe
spiral sigil
Need suggestions really
Looks awesome! You could maybe add some depth with some normal maps on the gold, make it look engraved maybe?
 supple garnet
bright steppe
Any recs for resources (tutorials or videos or courses or anything) to learn to ...
supple garnet
bright steppe
Any recs for resources (tutorials or videos or courses or anything) to learn to ...
Look at a lot of references and have a clear idea of what you are trying to make in your head (or draw it it out if you can). For tails and ears, you can use bezier curves for ears and tails as a starting point and then add sticking up hairs /splits later in edit or sculpt mode. For clothing, a lot of times you can duplicate your base mesh, move it around a bit, and then have clothes. This is not necessary though, as some clothes really cannot be done this way. Cloth simulations are another way to make clothes, you can look it up and find a bit of information online about how to do that. You say you are good at geometric modeling. Does that mean you haven't done much in sculpt mode? If not, sculpt mode is really helpful for moving around meshes. I am just learning that myself, but switching between the different modes when it works best is good practice and leads to better models. Really just playing around and figuring out what works best for what (pretty much learning the tools you are using). Another thing I like to do is look at other models and see how other people did what, although I find a lot of free models are kinda bad xD
supple garnet
bright steppe
Any recs for resources (tutorials or videos or courses or anything) to learn to ...
One video I found informative on clothes was this one: https://www.youtube.com/watch?v=LFW6iq74WpA A lot of mapping information that I need to play around with one day

Game Character Modelling - Blender 2.9
Patron: https://www.patreon.com/flycat
Gumroad: https://gumroad.com/flycatfly
Artstation: https://www.artstation.com/thoredant
Twitter: https://twitter.com/NguyenThor
FB: https://www.facebook.com/blenderflycat/?modal=admin_todo_tour
#Blender #3Dmodeling, #modeling
bright steppe
supple garnet
Look at a lot of references and have a clear idea of what you are trying to make...
Thank you for the wonderful thought out response and video reference friend~ ❤️ I found a neat tutorial for cat ears with bezier curves so I may give it a shot! I should try that move-it-around method for some simple clothes. I wonder about the cloth sim? I saw there's specialised programs meant to do that, I wonder if it's worth trying?
Geometric is perhaps the wrong way to word it - but I have very little skill (like negative skill lol) with painting, drawing, and sculpting - and I've not put enough practice into it. I want to get better at it! Hopefully I can improve 😄
supple garnet
bright steppe
Thank you for the wonderful thought out response and video reference friend~ ❤️ ...
Never tried the Marvelous Designer (the clothing program), but I expect it would be pretty good as I often hear about it when looking at resources. Personally I am going to stick to blender cause it is free and I like the program a lot, but if you make money off of 3D design, it would probably pay itself off (as it is not on a subscription iirc). Good luck on your modeling!
 winter vale
First time actually doing topology- .. I'll have to learn more about it because it still kinda unoptimized 😭

 crimson junco
 vague leaf
winter vale
First time actually doing topology- .. I'll have to learn more about it because ...
vague leaf
winter vale
First time actually doing topology- .. I'll have to learn more about it because ...
Not bad for a first go at it.
 cobalt tiger
 spiral sigil
Does CATS have a T-Pose button? Or is there a way to T-Pose an armature in Blender?
quaint jasper
Manually
spiral sigil
was just doing so🥲
tough plover
one way to do it is to enable Auto IK and X mirror, setting the chain length to 3 (mousewheel), grabbing the wrist, and just pulling it in the X direction like 1000 meters
and then manually re-adding the elbow bend
spiral sigil
tough plover
one way to do it is to enable Auto IK and X mirror, setting the chain length to ...
so I turned those on, I just don't see how to get the chain length to more than one bone, also there's no wrist bone unfortunately...

 tough plover
spiral sigil
so I turned those on, I just don't see how to get the chain length to more than ...
tough plover
spiral sigil
so I turned those on, I just don't see how to get the chain length to more than ...
you probably still want a wrist bone to be able to actually move your arms at all
if you don't do that, I don't think your model can be considered humanoid
spiral sigil
Oh! I do have a Humanoid armature, I'm just trying to T-Pose this one before merging them together...

What I'm having issues with is when moving a bone, the parents of it do not follow
Oh, never-mind... I just had to check off this Connected option in edit mode

Does it matter if I leave it off? Or should be ON on a humanoid armature?
tough plover
depends on the bones. the shoulder bones should not be connected to the chest
but the wrist, forearm and arm should be connected
spiral sigil
I see, thanks
tepid hare
So I've got the basics down, but how do I link them together? (I know I'm not done with the model but I need to link some together right now)
 jagged moat
Select them all and press J to make them into one object
tepid hare
Tyyy
jagged moat
np
spice pewter

 glossy oracle
My pc cant run blender I need someone to do something for me if anyone can
glossy oracle
I need help with optimizing a avatar for quest since my pc cant handle blender otherwise I would have done it myself
onyx juniper
It would kill me not to use Hannah-Barbera/Filmation eye coloring, but maybe it would be for the best


 worthy kindle
Making goku 😄
 onyx juniper
worthy kindle
Making goku 😄
onyx juniper
worthy kindle
Making goku 😄
If you intended more anatomical structure and details in the face than the source material then I heartily approve
 narrow star
anyone know how to un solidify a tape wrap? i rather have it two d since it adds way too many poly gons
\
 quaint jasper
Select the inside or outside edge loop, ctrl + and delete
narrow star
gotta love 60% keyboards
can't do + properly
yep sorry i can't do + without holding shift which changes the command
narrow star
quaint jasper
Select the inside or outside edge loop, ctrl + and delete
perhaps there is another alternative? other than remapping my keyboard
 worthy kindle
Damn I see what you mean. I've tried reducing the anatomical and structural detail to look less like average steve and more unrealistic. I'm not too sure about the nose and struggle with approaching the eyes. I'm trying to follow FighterZ's goku
 quaint jasper
Larger irises would go a long way
Nose is tough if you're not already planning for a toon shader
narrow star
quaint jasper
<:RuuuThunk:660008559886729226>
i appreciate it i had a save of the object prior to applying the solidify so i just copy and pasted :)!
from 8k polys

to 700
just from that
 lone blaze
Finished this in Maya for my class


 prime zenith
Guys, how do I please fix this so it looks like a flat surface with metallics ?
I tried :
- All faces are the same side, front
- recalculate outside
- shade flat
- weighted normal (keep sharps)

Talking about the weird effects on the dial
tough plover
@prime zenith mark the outlines of the circles as sharp, same for the outer edge of the watch face, then select the whole thing and do alt + N > reset vectors
prime zenith
tough plover
<@178139607370694658> mark the outlines of the circles as sharp, same for the ou...
I do have the sharps, tried the reset vectors, it fixed a lot but not the lower part
 tough plover
are there any n-gons?
prime zenith
Yeah
tough plover
that's your problem
tough plover
triangulate them or make them quads
prime zenith
tough plover
triangulate them or make them quads
Did not help though. Not it's like this
 tough plover
can you show it in blender
prime zenith
 tough plover
can you show your FBX import settings
prime zenith
 tough plover
enable Read/Write, set Blend Shape normals to Import, and increase the smoothing angle to like 120
prime zenith
No change
tough plover
can you select the whole white part in blender and do alt + N > Set from faces
also, that thing is 1 material right?
...right?
 tough plover
so you're telling me that every color is a separate material?
tough plover
okay
prime zenith
The dial definitely be separate
tough plover
it doesn't need to be though
if you wanted to easily have different designs, you could use Poiyomi decals
or a Flipbook
prime zenith
I am definitely not going to use mettalic material on the hands
Not important currently. I need to fix the dial
tough plover
can you try doing a merge by distance?
prime zenith
Removed 0 vertices
prime zenith
tough plover
can you try doing a merge by distance?
If I apply the armature modifier it suddenly shades everything correctly
tough plover
oh yea could have been a shape key issue aswell
applying the armature modifier fixes that
tough plover
odd
try making that whole section disconnected
select that whole white part, separate the mesh, and join it back
you should apply that weighed normal modifier
prime zenith
tough plover
select that whole white part, separate the mesh, and join it back
Does not fix it
I have no shape keys on the mesh btw
This is obscure. I don't understand how an armature modifier messes up shading
prime zenith
tough plover
you should apply that weighed normal modifier
I fixed it. I scaled my armature to 1,1,1 (it was bigger than that) and I did CTRL + A and Rotation & Scale
 split dust
Hey
I need some help
I’m trying to make a model in blender

Uhh
Guys
Anyone?
 daring lichen
Can someone help me pls. I am trying to build and test my world but it won't let me. Each time I try to it just load for a quick sec and stops and nothing happens. No red errors are in my console btw.
quaint jasper
split dust
I need some help
Which specific step ?
quaint jasper
Are you following any tutorial ?
quaint jasper
Find any for model creation and follow along with the steps
quaint jasper
daring lichen
Can someone help me pls. I am trying to build and test my world but it won't let...
Does the console show anything at all ?
split dust
I’m trying to model my own thing
quaint jasper
Yeah that doesn't matter, the steps are the same for all models
 pearl condor
srry to join and be that guy but
split dust
Hm
pearl condor
 split dust
Nice
pearl condor
rigs a little fucked but looks fine on mixamo ig
split dust
Is that on blender
quaint jasper
Smoothing some of it and enabling the auto smooth for normals would help a lot
split dust
So I need help mr djuan
pearl condor
just need help texturing and fixing the rig
quaint jasper
Texture paint works fine, you just need to set it up correctly
pearl condor
im learning myself too
split dust
How do I add
pearl condor
add...
 pearl condor
oh a light?? I havent messed w any of that
 pearl condor
What are you asking?
quaint jasper

Rain sensei here, ask me as many questions as you need, we’re making a head out of a cube.
btw that cube was 2m by 2m I had a slip up don't fight me.
I'm using blender 2.9
I’m sure you’ve seen a lot of people who get perfect circles and start pulling here and pushing there, and in no time they’ve got a pretty face. That’s sculpting, if you want...
Start with that
split dust
 quaint jasper
You're not gonna go anywhere by trying random stuff
pearl condor

In this Blender 2.92 Tutorial I'll show you how to take a 2D drawing and make it into a 3D model!
This is Part 1/2 of this video. In this one I show you some quick basics and how to model your character. In the next part I'll teach you how to UV unwrap, texture, light and render your character.
✷MORE TUTORIALS✷
2D Drawing to 3D Model Tutorial ...
pearl condor
I used this, it helps alot
Few tips
makes sure the reference you use, the arms are out, and the hands, they face palm down
helps later w rigging
split dust
Ok
pearl condor
Not that I know anything about that w how much its messing up for me


 devout scroll
weight paint the sticking out bit to the bone it should belong to
looks like it needs to be weighted to the upper arm
spiral sigil
Full weight?
devout scroll
yeah
spiral sigil
alrighty
devout scroll
if it looks weird you can weight a bit of it to the wrist
spiral sigil
i'll try it out

it's currently weight painted as such but idk what's goin on
whenever it's weight painted the sleeves will go backwards instead of where i want it to be
split dust
I’m doing pretty good!
 split dust
I finished modeling how do I rig
 split dust
Ok but is it done I gave it megarig
 devout scroll
if you can't follow one you can try another
tepid hare
I started to make a hatsune miku avatar, first with the base and yeh

blender is so hard to usee
quaint jasper
Much easier with tutorials !
spiral sigil
if I were to have an electrical cable that is going to be moving along with two hard surfaces should I have the cable be separated from the base and object that will be "powered", like how would I go about it?
specifically for an avatar
 hushed gyro
spiral sigil
if I were to have an electrical cable that is going to be moving along with two ...
hushed gyro
spiral sigil
if I were to have an electrical cable that is going to be moving along with two ...
gonna need to see what you're working on
spiral sigil
hushed gyro
gonna need to see what you're working on
okay give me a sec
spiral sigil
hushed gyro
gonna need to see what you're working on
there and with an example of the "cable"

 untold schooner
spiral sigil
there and with an example of the "cable"
untold schooner
spiral sigil
there and with an example of the "cable"
theres an included addon for that if you still havent done it
untold schooner
spiral sigil
if I were to have an electrical cable that is going to be moving along with two ...
i think its in the extra objects for curves if i recall
 unreal gyro
Hey, does anyone know any good resources on modelling clothing on top of a base model? Mostly on transferring weight paints, since I hear that's a good method of helping with it tremendously - since I don't really know how I'd go about doing custom clothing efficiently. (FYI: I use Blender, like most people here)
 hearty kindle
A similar question, is there a good, simple model to look at for modeling/weight painting around the hips? I can't seem to figure out what the edge flow and weighting should look like
spiral sigil
untold schooner
i think its in the extra objects for curves if i recall
I can put bones into the curve so they can flop around and move along with the moving objects?
untold schooner
spiral sigil
I can put bones into the curve so they can flop around and move along with the m...
yeah i don’t see why not
 wispy dome
How do I add something to appear on my avatar when i mute my mic
tough plover
wispy dome
How do I add something to appear on my avatar when i mute my mic
add the MuteSelf parameter in your FX controller as a Bool, and make a toggle using it
 mint zephyr
unreal gyro
Hey, does anyone know any good resources on modelling clothing on top of a base ...
mint zephyr
unreal gyro
Hey, does anyone know any good resources on modelling clothing on top of a base ...
Do you mean putting an asset onto an already rigged base model? Like a gumroad asset someone made to something like Pandaabase? Renipuff has a recent tutorial for doing so! If you don't have CATS already I definitely suggest it for merging armatures. There's a "cheap" auto weight painting method for after the armatures/objects are parented. You can use the data transfer modifier to do most of the weight paint work after parenting the piece of clothing to the main armature.
wispy dome
tough plover
add the `MuteSelf` parameter in your FX controller as a Bool, and make a toggle ...
 wispy dome
explain more please i have brain damage
 gloomy dove
oh god I have a shirt I really like but its not weight painted, is anyone able to help maybe?
untold schooner
so you see, what you want to do here is weight paint it
should fix your problems
 slim shale
Hello, i am redoing my model from scrach. this model has been made by a friend of mine some time ago. And when i click on the head collider it shows the "hitbox?" of it.
But since i made a new project, ia cant see that view when i click to edit the collider. any idea what could be wrong ?

this is what i see on the new project(nothing)
 spiral sigil
idk if this is even possible but is there a way i can export everything from blender into a unity project because it dosnt take image files with it
xD
tough plover
spiral sigil
idk if this is even possible but is there a way i can export everything from ble...
that is good, you do not want the images to come along
you should be importing those into unity separately
if the images were to be packed with the FBX, it would blow up the file size for no reason
spiral sigil
ah
 iron geode
working on different model atm this is just my template do you guys know if there are any good resources on how I would go about rigging this to work in vrchat, any videos or reading would be nice.
 devout scroll

A lot has changed since I made this one last year. Thought now would be a good time to bring it up to speed. Learned a few new tricks this time too~ Hope it helps :)
Big thanks to all the amazing helpful comments from the last Rigging Video to help find shortcuts for this one~!
Female Body Model Link:
https://www.youtube.com/watch?v=_XfvLpLyul...
manic vault

Hoi there, Rain sensei here, this video is a recap of my 3D modelling series Parts 12 to 13, covering rigging your model.
if at any point you feel as if you need a more thorough explaination, seek out the relevant episode and scrub through it to find what you are looking for, I will slowly explain things in those videos, so please check the ori...
Actually the other is bettee
devout scroll
well, you can just watch both, the first one is 1:30 minutes
there's also the common bone names and hierarchy you can find pinned in #avatar-rigging
iron geode
I have a rig already made. Sorry I should've specified just wondering if if there is anything I should change to make it compatible with vrchat or some way to test that it would work

 devout scroll
you want hips, spine and a chest bone
so just subdivide your big body bone into 3
also the thigh diagonal bones aren't needed
 steel crane
would anybody who's experienced w modeling want to take a look at my models edgeflow n stuff sometime soon? kinda dont wanna post it publicly and could use some advice for things like the elbows and knees
also it is an anthro with hind legs so
 silent cargo
does anyone know what type of lines are this in the edges?
they are not seams lines or sharp edge lines or crease lines
 steel crane
hmm
looks like there are doubles
might wanna select all, do ctrl m and merge by distance .0001 or .001
somethin like that
devout scroll
weird color
there's seams, sharps, bevel weights, creases
not sure about what else colors edges
steel crane
steel crane
would anybody who's experienced w modeling want to take a look at my models edge...
also ping if ur interested
steel crane
mystic tangle
hmst
hoooh teach me....
silent cargo
devout scroll
there's seams, sharps, bevel weights, creases
thanks it was an automaticaly genereted bevel weight using the solidify modifier
wispy dome
tough plover
do you know how to set up a normal toggle?
so i make a bool toggle and name it muteself?
tough plover
make new layer in FX controller, make 2 states, have transitions between them use the MuteSelf condition
devout scroll
I think you guys should discuss this in the correct channel 
why did I not know about this
wispy dome
tough plover
make new layer in FX controller, make 2 states, have transitions between them us...
Thank you I got it to work
lapis smelt
can someone give me tips on how to make the eyes?

 crystal steppe
so this is tangentially related to 3d modeling, but I want to model a log cabin for a world but I'm too lazy to come up with my own floor plan, but most of the floor plans for them online I'm finding are thousands of dollars, which is a little out of my budget...
does anyone know where I can find good public domain floor plans for log cabins/housing in general that I could use to make models out of?
nvm, found one
 silk sage
@crystal steppe if you still need another one of the floor plan creator, there a site called floorplancreator.net which allow you to make a floor plan and see it in 3D and export it as a model.
 crystal steppe
oo that looks nice, thank you. I just started the process in blender and that looks like it'll be much less tedious
silk sage
I believe you get one free plan at the start, but then it like $11 per 10 plans, but if you just trying to make a simple room all you need is a ruler and piece of paper and blender, good luck
 crystal steppe
thanks!
steady zealot
Working on a huge pack of Low Poly Prop Models for Worlds/Avatars! My Progress so far!

 night trout
currently experimenting with just subdividing my model (minus horns n stuff) completely because why not
 jagged moat
night trout
currently experimenting with just subdividing my model (minus horns n stuff) com...
jagged moat
night trout
currently experimenting with just subdividing my model (minus horns n stuff) com...
Performance
night trout
i mean
it is just an experiment lol
night trout
besides
here's the tris before subdivving
 night trout
also going back to the unsubdivved one and trying to improve the shapekeys

 craggy crag
Firts time trying modeling with blender. Takes some time to learn but it´s really fun! Still so much to learn!


 winter palm
I finished modelling my avatar, but I want to seperate my head and put it on a different base mesh for clothes. Is it possible to just seperate the head and the body to be two different objects, or do I have to merge the head vertices onto the new base mesh?
steady zealot
winter palm
I finished modelling my avatar, but I want to seperate my head and put it on a d...
Depends on how clean you want it. You can have them be two separate Meshes that don't match perfectly, but if the neck is visible, it might not look great unless the vertices are aligned.
winter palm
Alright, gotcha. I have been trying to attach the head that has a 96 vertice edge on it with a body mesh that is way less than that. Are there any tips or tricks on how I could attach merge vertices without having the neck look jagged?
(This is what the head looks like btw)
 devout scroll
you need to uh.. step down (?) the topology flow

polycount
I thought that in this thread, we should share with eachother how Edge flow works and how you can change it. Mainly because I Suck at controlling edge flow.
dunno how good of a resource it is but i remember looking at this one from somewhere else
 iron geode
devout scroll
so just subdivide your big body bone into 3
iron geode
devout scroll
so just subdivide your big body bone into 3
referring to this piece of advice should I separate my chest piece into multiple parts for the bones
 iron geode
referring to this piece of advice should I separate my chest piece into multiple...
iron geode
iron geode
referring to this piece of advice should I separate my chest piece into multiple...
@devout scroll sorry to ping u directly but youve been very helpful need your advice on this
devout scroll
not necessarily but you could add some more loop cuts around where the bones would bend
iron geode
thanks
 hollow thistle
So on my cats plugin, I can't use the atlas texture optimatzation. and when I click to the linked site, it doesn't exist. I use 2.8a Blender
 kindred zephyr
Hello, how can I make a horizontal edge loop like in this picture? to make windows, they always come out vertical for me.
 uncut imp
Oh dam it's been a while since I used probuilder.
Does it let you select two edges and creat an adge between them? You could put them on manually that way
kindred zephyr
uncut imp
Oh dam it's been a while since I used probuilder.
is probuilder like an ancient thing?
kindred zephyr
uncut imp
Does it let you select two edges and creat an adge between them? You could put t...
ok I will try that, I somehow accidently closed my work without saving
kindred zephyr
uncut imp
Does it let you select two edges and creat an adge between them? You could put t...
it looks like it did create it but when I try to move it, it extends the wall itself.
devout scroll
it cuts based on what you have selected i think
if you select a perpendicular edge and press loop cut it might do what you want
kindred zephyr
devout scroll
if you select a perpendicular edge and press loop cut it might do what you want
loop cut? where can I find that options
devout scroll
or whatever the setting that adds a loop is
kindred zephyr
alright
uncut imp
kindred zephyr
is probuilder like an ancient thing?
The standard way people make models is generally in blender, and then import it to unity.
kindred zephyr
uncut imp
The standard way people make models is generally in blender, and then import it ...
alright, I might have to try that way
uncut imp
Not that there is anything wrong with probuilder. It's good for creating simple things but blender just has a much larger toolset and allows you to make much more complicated things more efficiently.
kindred zephyr
uncut imp
Not that there is anything wrong with probuilder. It's good for creating simple ...
I see, thanks for the help
uncut imp
Np
lapis smelt
thoughts on the model?
 uncut imp
lapis smelt
thoughts on the model?
uncut imp
lapis smelt
thoughts on the model?
Topology looks clean enough.
The shape is ... Interesting XD
uncut imp
There's way too much thigh gap for that thichness
uncut imp
And? You can still make the thigh gap smaller with the mirror
Just if your trying to look semi realistic for the thickness ofc. You can make it look however you like 😊
lapis smelt
Can't do that rn, just closed blender, the head is supposed to look a bit like an anthro shark
uncut imp
Bruh why are all the sharks I see so thicc. Hahaha
lapis smelt
And that hole u see in the mouth is supposed to be a metal jaw
uncut imp
Where's the petite sharks
lapis smelt
Is it worth making separate meshes for the details in the base model.
 fallow plume
Hi! I'm new here and I'm not sure if this is the place to ask but I've been searching for someone to import a model from Koikatsu to Blender and rigging the model as well.
uncut imp
lapis smelt
Is it worth making separate meshes for the details in the base model.
Hmmm. Depends on the details I guess. Night make it easier to work with them if they're seperate
lapis smelt
But can u also merge them?
uncut imp
Yup once your done just merge them at the end
uncut imp
fallow plume
Hi! I'm new here and I'm not sure if this is the place to ask but I've been sear...
Looks like there's a plugin called KK Blender porter pack that does most of the work of exporting / importing to blender and rigging all for you
lapis smelt
What are the collection things supposed to be called??
Where u have the cube, lamp and camera.
uncut imp
Depends what sort of collection I guess
The default stuff? You can just delete all that.
But those folders of things in the outliner are actually just called collections
fallow plume
uncut imp
Looks like there's a plugin called KK Blender porter pack that does most of the ...
You are correct. However, I cannot seem to get it to work. I've spent about almost a week figuring out what the issue could be and I'm not sure what I've been doing wrong I just can't get my model export correctly. The file will appear to after I had export it but it won't open in Blender it has literally been hell working on this and I had already given up. So I am asking for help if someone can do it for me.
uncut imp
Does blender give you an error when you try import?
They normally display on the bottom bar
fallow plume
Nothing happens
The file is there for me to select when I am on Blender and nothing happens. I thought maybe a file was corrupted in Blender I've uninstalled it and reinstalled Blender and nothing changes.
It is literally the most confusing processes of moving a model.
uncut imp
Blender errors aren't displayed super obvious. When you import the fbx check along the bottom bar to see if there's a little yellow or red error message
fallow plume
I'm not super savvy about this so my knowledge is pretty limited
I don't remember if there was anything down there. Recently, I have to wipe my whole computer and I don't have enough time to go through the whole process. I would have to reinstall a couple mods for exporting.
uncut imp
Ahk
fallow plume
I'm just looking for someone to export it for me if that's possible. From there I'll use model in VR chat.
uncut imp
Fair. Maybe you'll find someone kind enough to give ya a hand with it. Might be more likely to get someone if you offer a few $$ for their time.
Not I to I'm am too low on spare time as it is 😅
fallow plume
Well
The process isn't hard. I just couldn't figure out what the issue was is all. I've uninstalled and reinstalled everything and I still run in to the same issue. I just need the model exported and rigged or whatever and that's it. I'll move my avatar to my quest 2 on my own.
If you got time to do it for me I'll happily throw some green paper at ya 
fallow plume
I have everything installed back and this time I got an error
What should I be looking at
?
uncut imp
Screenshot and post it. Or Google search it first and there an answer for it already
fallow plume
it gave me a box
uncut imp
The error that is
Tbh google searching your error message before posting it should be a requirement XD
It solves so many issue
fallow plume

I'm using Blender version 3.0 btw
I could google it but I don't wanna. I would rather get a direct answer from someone
trail python
kind of wasting peoples time if you don't want to bother even looking it up lol
cats plugin has a discord server so you could check there and look at the faq
uncut imp
Yeah looks like a cat's error. Idk any more without googling it so that's up to you 😋
fallow plume
Alright
thin shadow
fallow plume
have you tried blender 2.93.x? Cats plugin page does not have any indication of supporting 3.x. yet
fallow plume
I was able to import my model in but it seems like cats isn't importing everything on my model so right now I am trying to find my way around it. If the problem persists then I will use 2.93 version if anything changes.
 copper hedge
i usually don't ask for help with blender since i have.. thousands of hours of experience, but something's not behaving right.
i wanna do a 360° turntable animation, so i set the first keyframe to 0 and the second to 360.
When i keyframe the second rotation, it stays orange and doesnt get set. it's as if it sets keyframes based on the visual appearance of the model, not the coordinates/rotation
if i set it to 359° it rotates -1°
if i click the lil diamond to set a keyframe it stays unset

ok so i may be fucking stupid
the object was parented to an armature
you learn something new every day. damn.
lapis smelt
does the model look better in an A pose?
 lapis smelt
how can i fix this?

 foggy granite
lapis smelt
does the model look better in an A pose?
foggy granite
lapis smelt
does the model look better in an A pose?
thats not really an a pose thats more of i pose
since the arms are directly parallel to the body
a pose is more releaxed
something like this
 lapis smelt
OH OK
lapis smelt
foggy granite
thats not really an a pose thats more of i pose
better?
 foggy granite
can you show the front view
lapis smelt
lemme dm u it
foggy granite
alright
 atomic hamlet
Everyone says to model in t-pose, but you don't HAVE to if you prefer a different workflow. You can configure it into a t-pose manually in Unity when you are setting it up as a humanoid.
trail python
ive never had a single issue with using A pose lol
tough plover
I typically recommend using a T pose since it's easier to account for the arms going straight up over the head, and since you can simply move stuff along the X axis to move it along the length of the arm
devout scroll
Model in a pose so the shoulders don't look weird, rig then pose into tpose
lapis smelt
devout scroll
Model in a pose so the shoulders don't look weird, rig then pose into tpose
So t pose is recommended if it's for rigging purposes?
devout scroll
It's preference, but if you're modelling the body I hear A pose is more natural
You can always switch from one to another anyway after you're done righing
lapis smelt
devout scroll
You can always switch from one to another anyway after you're done righing
I did the t pose instead, late reply anyway
 midnight valley
I would like to fix a spiderman suit to the mesh of my body. how do i go about doing this without it looking weird?
lapis smelt
thoughts?
 quaint jasper
What is your reference/goal ?
quick thunder
lapis smelt
thoughts?
what creature is this based off
foggy granite
lapis smelt
thoughts?
looks good, my main sugesstion is working on the collarbone, feetm and the rib cage if you plan of have those area expose

 thin shadow
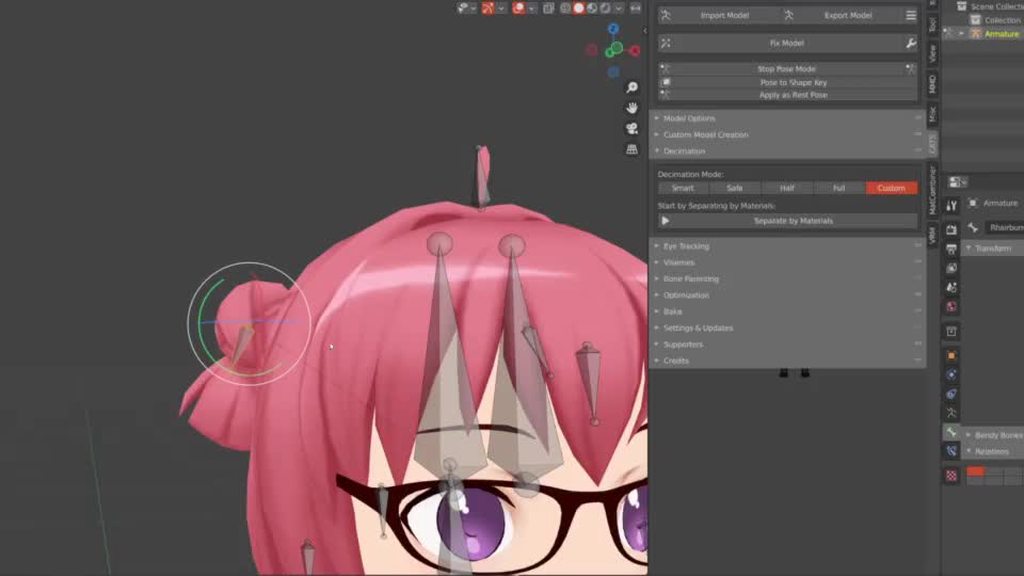
what is it that i missed in weight painting that i cannot reproduce the same result twice
in the 1st part, that's the 2nd time i weight painted the hair buns, it's squished when rotated.
in the 2nd part, that's the 1st time i did that and i want to achieve that. No squishes. Just rotation of the buns.
lapis smelt
quick thunder
what creature is this based off
It's based off a character I have, mind if I can show you?
devout scroll
thin shadow
what is it that i missed in weight painting that i cannot reproduce the same res...
if stuff squashes then you got weights on more bones that add up to more than 100%
so 100% head, 100% bun
you can check by going into edit mode and selecting a vertex on the bun
then in the item panel top right you can see the weights table
for that vertex
when weight painting enable auto normalize. it will prevent this from happening. if you're assigning weights through the vertex groups then you'll need to either remove it manually from the other group (head i this case i'm guessing), or go to weights > normalize
 spiral juniper
hey im looking for someone that can make me a vr chat skin (dm me)
 lapis smelt
foggy granite
looks good, my main sugesstion is working on the collarbone, feetm and the rib c...
lapis smelt
foggy granite
looks good, my main sugesstion is working on the collarbone, feetm and the rib c...
collarbone?
foggy granite
lapis smelt
collarbone?

the collarbone is one of those more sudile features to add for a more detail body it makes a nice noticeable transitions sepreating the torso from the neck
solar fossil
spiral juniper
hey im looking for someone that can make me a vr chat skin (dm me)
Would have taken you on that, but than seen that the socks have to be toggleable, so no can do
 indigo stirrup
Is there a way to have smooth normals on a face mesh without it breaking with shapekeys?
shapekey without applying the modifier, what I wish would happen

what happens when you apply the modifier first

basically, can you set normals per shapekey? and can you automate it?
unborn acorn
indigo stirrup
basically, can you set normals per shapekey? and can you automate it?
no but you can the edges around the mouth sharp and that would solve it
lapis smelt
some stuff for the head
 naive slate
Could someone teach me how to use blender? I’m starting to get really stressed out with practicing and it’s really confusing for me
thin shadow
devout scroll
if stuff squashes then you got weights on more bones that add up to more than 10...
Thanks for the input. I found out that with this modifier i can subtract the weight data of that particular bone from the head.

so manual unpainting works, but this modifier is much more accurate and free from human error
 past cloak
still need to do the full outfit but it's looking promising so far

 warm moss
I made this dress for the rex avatar and added some starry textures to it

 viscid salmon
can any blender folk help a blender noob with whats prob a pretty simple issue
viscid salmon
Nevermind, wasnt workin no matter what i tried so i made a new file and it worked, cant explain it but i wont question it
warm moss
sometimes thats how it be
 near gale
Does anyone know how I could fix it?
 trail python
move the UV maps
near gale
trail python
move the UV maps
How might I do that?
trail python
"uv editing" at the top

it will open two windows split vertically, one side is your model and the other side is the uv map
yours will look different from mine ofc but entering edit mode and then using L on a hair part will highlight its UVs
 obsidian nova
trail python
yours will look different from mine ofc but entering edit mode and then using L ...
obsidian nova
trail python
yours will look different from mine ofc but entering edit mode and then using L ...
That hair model is ❤️🔥
quaint jasper
warm moss
I made this dress for the rex avatar and added some starry textures to it
Super pretty !
warm moss
quaint jasper
Super pretty !
Thank you 
unborn acorn
gobbo
quaint jasper
Really nice shading !

 devout scroll
make the scarf use a new bone parented to neck instead of directly using neck
then in unity create an animation that scales the new bone to 0
then create a new layer in your FX controller and use the IsLocal parameter to transition to that new animation
 serene oyster
can i get some general help on how to even model in blender? i only really know how to resize and adjust stuff (i use it to visualize splatoon outfits lol and that's it)
if you're down, dming me would be super
thin shadow
 winter dagger
alternatively, delete the inside mesh, leave the outside. Then in the shader setting, turn on backface culling.
serene oyster
@thin shadow is it ok if i dm you? i've been needing some help with making a vrc avatar as me the big dumb and doesn't know how to 3d model
sorry if this is sounding needy... (kind of is)
thin shadow
no
serene oyster
👍
jagged moat
There are hundreds of tutorials online you can watch
serene oyster
then i'll do exactly that
thin shadow
one advice that i can tell from watching the videos is that,
don't follow the tutorials as it is, instead, absorb the knowledge of each videos, shape them into your own need
 bitter sierra
making an avatar is decently advanced, just a general Blender tutorial (like the classic donut tutorial) should be a big step in the right direction of understanding the controls. If you only want to use Blender for VRChat you can skip the later stuff on rendering and whatnot
serene oyster
bitter sierra
making an avatar is decently advanced, just a general Blender tutorial *(like th...
Blender tutorial series showing you how to use the most common features, like modelling, lighting, materials, geometry nodes and rendering - whilst making a donut.
Download the Blender Shortcut Hotkey PDF: https://www.dropbox.com/s/jg4fs4i8zw5bxt7/Blender 3.0 Shortcuts v1.2.pdf?dl=0
Google Doc version: https://docs.google.com/document/d/1...
oh, there's actually 2
bitter sierra
attaboy
serene oyster
time to learn
 surreal wave
sniff snoff

 surreal wave
serene oyster
now how would i do the powdered sugar on top?
surreal wave
serene oyster
now how would i do the powdered sugar on top?
I usually use grease pencil or just uv paint tho
kindred zephyr
Hello, in blender, if I want to mirror an object but the mirror is not landing where I want it to be, how can I fix it?
quaint jasper
Apply your transforms with Ctrl+A
 crude trail
Anyone know how I can import animations (actions) from a blend directly into Unity? I've got 2 actions but only one animation shows up in Unity.
I'd rather avoid exporting as FBX if I can
 oak hatch
3 hours of my avatar creation speedrun. I'll maybe do the rest Tues or Wednesday.

Goal is good-rated/fallback quest avii.
Pain.peko
 winter silo
progress on my first attempt at a furry-ish avatar o__o

 winter silo
expressions so far :V
 oak hatch
https://twitter.com/AlfonsoHegao/status/1528586684312571904?s=20&t=mIQXSpej-pfdUUs2sAtTtA
Speedrun video.


 obsidian nova
winter silo
expressions so far :V
obsidian nova
winter silo
expressions so far :V
This is phenomenal stuff. Do you take modelling commisions?
winter silo
obsidian nova
This is phenomenal stuff. Do you take modelling commisions?
i don't ;w; my quality of work isn't good enough to consider selling anything or doing comms yet i think, but thank you sm !!!
obsidian nova
winter silo
i don't ;w; my quality of work isn't good enough to consider selling anything or...
I disagree, but I understand how you feel! Dm me if ever you’re interested in starting!
surreal wave
e

 heady apex


 limpid quarry
Hey , i really dont know where else to ask
While trying to export and avatar from blender with cats plugin i run into this error:

I have tried using all sorts of blender versions already but im kinda clueless by now
quaint jasper
limpid quarry
Hey , i really dont know where else to ask
While trying to export and avatar f...
Does cats support 3.2 ?
limpid quarry
I have previously used older versions like 2.93 but after getting this error updated to see if that fixes it
sadly it did not
trail python
limpid quarry
I have previously used older versions like 2.93 but after getting this error upd...
cats discord has a help channel and faq about the versions, might have better luck in there
can find the invite link on the github page
fluid spear
so could someone tlel me what i'm doing wrong in my attempts to merge bones? i've tried selecting the two bones and hitting altM and ctrlX and neither seemed to do anything.
tough plover
fluid spear
so could someone tlel me what i'm doing wrong in my attempts to merge bones? i'v...
you need to use CATS
fluid spear
hrm why's google say those two key combos work then? i'm very confused...anyway. ok what part of cats...i saw bone parenting but no button to merge...
i should be able to eliminate 28 bones if i make every chain of skirt bust and hair into just the base bone, so should be able to make a skirted fallback actually.
tough plover
 fluid spear
oh merge weight deletes the bone...is that it? the bone doesn't grow any though.
tough plover
it will delete the bone and add the weights to another group
if you hit To parents, it'll add the weights to the group of the parent bone
if you hit To active, it'll add the weight(s) to the active bone
fluid spear
erm...on the last 2 chains it stopped working...
tough plover
also, make sure you have X mirror disabled
fluid spear
where is that?
tough plover
top right of viewport
fluid spear
yeah it's off..
still can't merge those bones though.
oh somehow keep merged bones got enabled.
ok i got it down to 79 bones. which is good enough for good.
guess i'll target good anyway since that'll allow me to have physbones and that's apparently good enough for fallback.
if i'm targeting good is it worth targeting 10k polys in bake?
 warped talon
This is my first avatar design. I just started the game a couple days ago and really liked the idea of making my own creation. So I'm learning a little bit by bit. Am going for a demon with one arm bitten off, will add torn wings, and more. What are your thoughts so far? I have a lot more detailing to do on these bits, but I'm going to finish up the body before going into full detail.
 midnight valley
i want to make a uv map that doesn't cause all this distortion and cutting of the texture. does anyone know how to do that?
 quaint jasper
midnight valley
i want to make a uv map that doesn't cause all this distortion and cutting of th...
quaint jasper
midnight valley
i want to make a uv map that doesn't cause all this distortion and cutting of th...
You'd probably want to have the sole of the foot be its own uv island
You'll most likely still have some stretching though
quaint jasper
warped talon
This is my first avatar design. I just started the game a couple days ago and re...
It's good to learn as you're going but I'd still recommend watching any of the model tutorials on youtube to get accustomed to the tools, as well as using references where you can
midnight valley
quaint jasper
You'd probably want to have the sole of the foot be its own uv island
gotcha! thanks
 placid raptor
Can u send me this if this still exist?
fluid spear
is there a reason that blender should be showing less bones than unity?
oh end bones...welp that might explain it. i can't safely get rid of those can i?
so in blender i've got 14 hair bones and 2 bust bones plus a root for each...which should give me 18 phys bones...that's still 2 over what is allowed but unity says i've got 30 i guess because of the end bones? so what's the best way to cut that number in half and still have descent physbones?
tough plover
fluid spear
oh end bones...welp that might explain it. i can't safely get rid of those can i...
uncheck Add leaf bones in your export settings
fluid spear
where's that at. and what are leaf bones?
i feel blind for not seeing it. doesn't help that my eyes are totally out of focus looking at such tiny text.

found it and it's already unchecked? weird
wow exporting again fixxed it. how odd.
ok now i have to get rid of 2...how bad would it be to just merge some of the bones on the bangs?
ok got it down to good by just ignoring 2 bones. this should be enough to shut up the questies.
naive bolt
warped talon
This is my first avatar design. I just started the game a couple days ago and re...
idk if it's just me but the face is like silco from arcane lol
warped talon
Ooooo I can see that hahaha
 nocturne steeple
Brain really said "hey so you've never made a vrchat model from scratch right? Make your Transformers OC then"

literally took a break from making furry models because I decided I wanted to suffer more i guess LOL
this is the dude in question for a point of reference


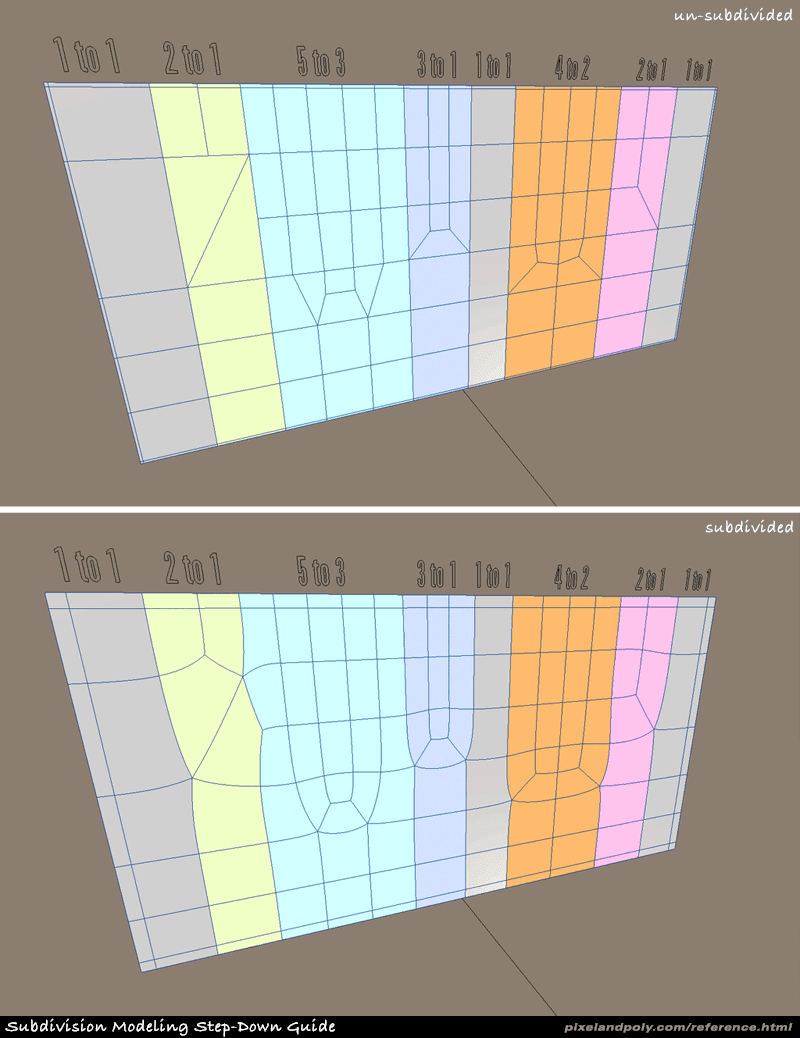 fluid spear
i don't suppose anyone knows what i should be setting this first line to to target the active material?
 devout scroll
probably object.materials[object.active_material_index]
depends on what your object is
actually no, you can just do object.active_material
provided that your object is an object from bpy.context.active_object or is from bpy.context.selected_objects[]
near gale
How can I blend that in? or fix it?
 devout scroll
delete it, the bottom piece's neck clearly doesn't need to go that far
 pallid apex
trying to export my model with textures, except the textures arent working properly.
It SHOULD look like this \/


it comes out as this instead^
what am i doing wrong here?
 naive pagoda
I'm learning blender for the sake of a creative outlet and making my own models for VRchat. Are there any specific modifiers, tools, or workflows that complicate porting to unity/VRchat? I want to figure out the best way to go about modeling without blasting my polygons over 90000, or breaking everything when porting.
I ported my donut from the donut tutorial to see what happens, and the sprinkles disappeared. it worries me that my hard work/learned skills won't apply to vrchat.
thin shadow
you can skip the shaders and rendering part of the donut tutorial since those are ported differently in unity. cats plugin can automate a few things, although manual interventions are sometimes needed in some cases.
devout scroll
pallid apex
Materials don't export. even if the textures get packed in the fbx and show up you'll still need to change shader settings
thin shadow
shading is done on unity end, other than that, in blender
devout scroll
So just import the the textures separately, select the fbx and extract materials from the inspector
pallid apex
devout scroll
So just import the the textures separately, select the fbx and extract materials...
also tried that and it still came out weird
devout scroll
you have to do that if you want to edit the materials
and you will need to because nothing really carries over from blender
pallid apex
devout scroll
you have to do that if you want to edit the materials
question then
how would i export a procedural material in blender as a texture?
devout scroll
you'll have to bake it to a texture
it's a fairly simple process but a bit tedious to setup
there should be videos on it on youtube tho

In this Blender tutorial, I will show you how to texture bake Procedural Materials.
Procedural Material Packs: https://ryankingart.gumroad.com/?query=procedural material pack&sort=newest
Procedural Material Tutorial Playlist: https://youtube.com/playlist?list=PLsGl9GczcgBs6TtApKKK-L_0Nm6fovNPk
Other Tutorials I Mentioned:
How to Bake Metall...
pallid apex
thanks
naive pagoda
this chat is already more valuable for learning than google.
pallid apex
ok so i baked it and imported it to unity

what and why does it look like that
on the right is semi-normal but on the left its just stretched to hell
thin shadow
maybe the uv wrapping does not look like what you wanted it to be
pallid apex
yea im messing around with the uv wrapping rn but idk what could be wrong with it
looks
good ig
pallid apex
devout scroll
you'll have to bake it to a texture
so when baking the texture, why does the baked texture not match the scale of the texture on the object?

see what i mean?
trail python
cant you adjust the tiling on the material properties
pallid apex
i could, but its a little weird

theres a black border on the material and i cant figure out why
plus if i use tiling, it doesnt look right
so i want to make the baked image scale match the one on the floor in blender
devout scroll
you bake it to a texture but the uvs and tiling still need to be adjusted
pallid apex
devout scroll
you bake it to a texture but the uvs and tiling still need to be adjusted
how should i adjust them? I already baked the texture
and why is it when i bake the texture, it generates a black border?
devout scroll
i don't know
pallid apex
odd
pallid apex
devout scroll
try getting a premade material for wooden flooring
nvm about it
i got it working
i had to do some weird downsizing of the image size, move the uvs around, and tile it weirdly in unity but it looks good now
lapis smelt
i have an issue that when i subdivide the meshes, some meshes dont subdivide.
 tough plover
lapis smelt
i have an issue that when i subdivide the meshes, some meshes dont subdivide.
tough plover
lapis smelt
i have an issue that when i subdivide the meshes, some meshes dont subdivide.
for something that looks smoother, try using the Subdivision surface modifier. also, try to always work with quads whenever possible. those shapes have more than 4 vertices
near gale
does someone know how I could fit some underwear to a model?
lapis smelt
tough plover
for something that looks smoother, try using the Subdivision surface modifier. a...
Wait, how does the subdivision surface modif have to do with this?
tough plover
try it and you'll see
tough plover
it subdivides each face, and basically averages out the position of the new vertices to be smoother
what did you want exactly? because if you're going to have large flat surfaces, I don't see the point of subdividing
do you already know about loop cuts?
pallid apex
bro what am i doing wrong here
i cant for the life of me figure out what is going on with these floors
nothing is wrong with the uvs, shapes or anything else
uncut imp
How are you baking the textures?
tough plover
lapis smelt
The problem is that some faces don't loop cut, just the vertex
you can't put loop cuts through anything that is not a quad
tri's don't work, and n-gon's don't work either
you'll only be able to cut one edge into 2
consider re-working your topology to use all quads
pallid apex
uncut imp
How are you baking the textures?
https://www.youtube.com/watch?v=AioskAgcU2U
this link was sent to me
In this Blender tutorial, I will show you how to texture bake Procedural Materials.
Procedural Material Packs: https://ryankingart.gumroad.com/?query=procedural material pack&sort=newest
Procedural Material Tutorial Playlist: https://youtube.com/playlist?list=PLsGl9GczcgBs6TtApKKK-L_0Nm6fovNPk
Other Tutorials I Mentioned:
How to Bake Metall...
uncut imp
Ah so soley in blender. Ok.
pallid apex
yea
lapis smelt
thoughts on the amount of polygons?
 uncut imp
A lot more than you'll need in some areas id think. Depending on how you want things to bend? That is if you are keeping the faces flat like that.
quaint jasper
Limited dissolve would probably remove 90% of the geometry
lapis smelt
Where is limited dissolve?
quaint jasper
In the command menu
lapis smelt
Imma do it tomorrow
devout scroll
Whenever you don't know where something is hit F3 to bring out search and call it from there
 cerulean shoal
WIP WIP
 unborn acorn
pallid apex
unborn acorn
pallid apex
Its uvs are prob not unwrapped