#3d-modeling
1 messages · Page 115 of 1
 tough plover
 hollow ermine
I'm gonna check this out in a minute- I gotta dip
tough plover
aight
 thin shadow
how do i fix uv wrap shifted / transformed when using material combiner

i use mineways to export minecraft world
uv wrapping looks good with 69 materials, but when i combine it, i notice some pixel bleeding on the model
before

after

 azure rain
I would suggest moving the uv for like the flowers so they're not so close to the edge
 quaint jasper
UV padding might be necessary because pixel color bleeding is inevitable
azure rain
especially considering how low resolution Minecraft textures are
 dusty heron
Also disable texture filtering, that'll make it more minecraft-like
thin shadow
i dont know how to turn off filtering in blender yet, but i did turn it off in unity. Looks better when being close to the texture, but aniso will still mess it up if seen from far enough distance

 snow fern
there are MIP settings inside the importer that might help you
one makes everything more gray as it gets farther away, but that effect is really obvious if you pick that MIP up close, e.g. at a corner
Unity (at least 2018, haven't checked 2019) always makes a full MIP chain and you can't stop it, but you can prevent it from using the higher mips if you write your own shader
or are using a custom shader you can modify
the only other solution is bigger islands between textures, which should be an option when you're building the atlas
and/or you can try to manually arrange the atlas to put similar things next to each other (e.g. wood, dirt, and keep all alpha clip stuff like flowers next to other alpha clip stuff so their transparent edges match)
 exotic obsidian
Sorry if this isn't the right channel for this, but I wanted to see what other people think before I model this

I'll probably add fingers btw
 foggy granite
It good
exotic obsidian
thx
 spiral sigil
exotic obsidian
Sorry if this isn't the right channel for this, but I wanted to see what other p...
spiral sigil
exotic obsidian
Sorry if this isn't the right channel for this, but I wanted to see what other p...
make sure u hav an agryyyy face on it
for a gesture or something
exotic obsidian
ye
spiral sigil
:(((
 languid fog
exotic obsidian
Sorry if this isn't the right channel for this, but I wanted to see what other p...
languid fog
exotic obsidian
Sorry if this isn't the right channel for this, but I wanted to see what other p...
thats a cool model
exotic obsidian
thx
 oak kindle
can someone help me add my fursona into vr chat i is dum but i wil paey muneys
 neat viper
oak kindle
can someone help me add my fursona into vr chat i is dum but i wil paey muneys
neat viper
oak kindle
can someone help me add my fursona into vr chat i is dum but i wil paey muneys
Might want to check out VRCTraders or the VRChat forums instead c:
<#community-servers-old message>
https://ask.vrchat.com/c/commissions/avatar-commissions/35
 zenith cloak
exotic obsidian
Sorry if this isn't the right channel for this, but I wanted to see what other p...
zenith cloak
exotic obsidian
Sorry if this isn't the right channel for this, but I wanted to see what other p...
Sure looks fine. Kinda reminds me of a model I tried to make several weeks ago. Too bad I don't know how to make a proper hooded pullover.
 lean hedge
I tried 3d modeling once, made this piece of artwork that i'll call 'chewed piece of gum'

lmao
 outer pawn
this is the furthest ive ever gotten in zbrush

 languid galleon
hey, first time using substance painter for anything avatar related and i was wondering how to in apply the texture i already have onto my model?
i have the texture in substance now but its applying as a paintbrush rather than onto the whole model?
tough plover
languid galleon
hey, first time using substance painter for anything avatar related and i was wo...
you could add a Fill layer and set the texture as the base color for that layer
but you can't really edit that
languid galleon
crap
languid galleon
i really wanna redo the jacket i have on this avatar
tough plover
then go for it 👍
languid galleon
but its attached to a shirt which i dont wanna mess with
tough plover
separate them then?
zenith cloak
Sorry for barging in, but, speaking of textures, is there a way to make something good-looking without Substance Painter? (I'm kinda low on funds right now)
tough plover
zenith cloak
Sorry for barging in, but, speaking of textures, is there a way to make somethin...
you can get substance for free if you sign up as a student
you could try Quixel Mixer, an alternative, but resources and people with knowledge to help may be harder to find'
tough plover
languid galleon
i havent used substance in ages
you would do that in blender
zenith cloak
Are you sure about signing up as a student? It might not be possible because of my region.
zenith cloak
This page doesn't open for me
Say, there is actually a way to draw textures in Krita (which is my primary drawing app) by drawing directly on the UV maps. Too bad I always fail at making those UV maps...
 tough plover
odd
outer pawn
so if i wanna make parts move.. like say the nose do i have to create a separate entity or can i just mold it all from same source

 thorny ivy
Time for me to pop in here again.
Why do anime-style models (like those originating from Vroid) tend use shapekeys for the teeth movement as opposed to having dedicated bones?
I feel like you'd get more natural-looking movement and deforms with proper jaw bones + weight painting.
azure rain
as far as like Vroid because until relatively recently it was blendshapes was your only choice for mouth movement that's not Muppet jaw flapping up and down
quaint jasper
outer pawn
so if i wanna make parts move.. like say the nose do i have to create a separate...
All from the same source, bones will make parts move
 merry vault
@outer pawn do you think you could help me export something? I've been meaning to find someone who uses zbrush for a while lol.
outer pawn
im a complete newb at zbrush lol wish i could
even though ive owned it for years its hard to use so i keep giving up lol
snow fern
outer pawn
so if i wanna make parts move.. like say the nose do i have to create a separate...
When you sculpt like that you are not making the final in-game model. After you do your high-res sculpt you do something called "retopology" which is where you build a nice mesh over the soup of polygons you made from sculpting. Then that will be animated.
zenith cloak
When I said yesterday that I made Four, I really meant it. How do you like it? Anyway, the only problem I have is with the face. If I were just animating it in Blender, I would use Grease Pencil to imitate the hand-drawn style, but, sadly, GP does not import to Unity. Can somebody help me please?

 devout scroll
bake your faces to a texture or draw them onto it
then there's a bunch of ways you can go about animating it in unity
zenith cloak
devout scroll
bake your faces to a texture or draw them onto it
Interesting. But how exactly will that work? I don't really know of any ways of animating, other than through bones, or blendshapes.
 valid terrace


HELP:
in blender (up), al the surfaces are facing outside, but when imported to Unity (down), some faces are missing, how to fix it ?
zenith cloak
valid terrace
Well, first, what in the world is this? Second, that's a problem with normals.
valid terrace
this is a mesh, all the normals are facing outside
devout scroll
zenith cloak
Interesting. But how exactly will that work? I don't really know of any ways of ...
in unity you can change any parameter in an animation so you could use a shader that flips through frames and animate the frame counter, or you could have an texture atlas and animate the offset value of the texture
then with avatar 3.0 you can check the viseme parameter and play the appropriate animation for the face
valid terrace
I have "face orientation" overlay turned on, that is why it is blue in blender, the faces should show up in Unity, but in Unity, that faces are not even there
zenith cloak
devout scroll
in unity you can change any parameter in an animation so you could use a shader ...
I understand, I'm just bothered by the fact that shaders are automatically disabled for most users and they will just see faceless Four walking around.
valid terrace
if In Unity I can see the faces from the other side, then I know is face orientation problems, but this monster here, I can't even see it from both sides
zenith cloak
valid terrace
if In Unity I can see the faces from the other side, then I know is face orienta...
Do you know that when you export a model from Blender to Unity all quads become tris?
valid terrace
what is that ?
zenith cloak
valid terrace
what is that ?
As in rectangles get sliced into triangles
zenith cloak
valid terrace
what is that ?
This conversion process can mess up some geometry
valid terrace
so why will those part become missing ? and how to fix it ?
zenith cloak
valid terrace
so why will those part become missing ? and how to fix it ?
Well, the geometry of whatever that is you are trying to import is pretty bizarre, so I don't quite know how to fix this.
valid terrace
like by turning them into tri surfaces ?
zenith cloak
valid terrace
like by turning them into tri surfaces ?
Dunno, try it.
valid terrace
it's actually like a tube forming a "tree"
 devout scroll
zenith cloak
I understand, I'm just bothered by the fact that shaders are automatically disab...
devout scroll
zenith cloak
I understand, I'm just bothered by the fact that shaders are automatically disab...
Use a default shader. If none support texture offsets then replace the material in an animation
If you're bothered by animations being disabled then you're kinda out of luck. Though you could make blendshapes using face plates but that looks kinda janky
And is what people used for 2d facial expressions and animations before 3.0
zenith cloak
devout scroll
Use a default shader. If none support texture offsets then replace the material ...
I am currently watching a video about how to pull this off.
Thanks anyway.
quaint jasper
 wispy verge
hamburger helper
 wispy verge
please dont steal my hamburger helper oc
spiral sigil
Too late I already cloned and favorited and ripped
wispy verge
oh no
 oak hatch
Lmao
When y'all make stuff, do you ever like...block out the shapes with a mesh?
I'm noticing I do that a lot, get the general shapes in with one set of meshes and then actually model it based on that.
 quick egret
So i have a problem. If i put eye tracking on my avatar on blender, the eyes go correctly left and right, and up and down. But, if i blink test it ...Only 1 eye closes. Does anyone know why?
devout scroll
Make a blenshape that blinks both eyes
quick egret
nvm fixed the eye problem, now it is the brow actualy removes itself form the face when the eyes blink lol
quaint jasper
oak hatch
When y'all make stuff, do you ever like...block out the shapes with a mesh?
I'm ...
I personally start with a basic mesh, sphere or spherical cube depending on the topology I'm gonna need, and modify that in sculpt mode
 foggy granite
 burnt drum
You gonna have to give it a custom animations since it not using an humanoid rig
burnt drum
thank you
tough plover
burnt drum
Anyone know how to make reverse facing legs work for vrchat?
hm, that's interesting
I suppose you could use trhe same technique used for making articulated digitigrade legs
which consists of having 2 bone chains per leg
the one that actually follows the leg, with the meshed weighed to it
and another which is of the standard humanoid shape
the standard humanoid ones get mapped in the rig config
then you use constraints to make the other set follow it
burnt drum
Thats an interesting idea as well... Just gotta figure out how exactly to do that now haha
foggy granite
tough plover
I suppose you could use trhe same technique used for making articulated digitigr...
So kinda of having a puppet effect
tough plover
sort of
it's basically just guiding one bone chain using another
for this use case, constraints would probably do the trick
but maybe not
in which case, FinalIK would need to be used
foggy granite
I can see it working it just be funky to set up
I’m pretty interesting in seeing how it would look once setup
 white moth
quaint jasper
white moth
quaint jasper
Put that thing back where it came from or so help me
 onyx juniper
Weird, why wouldn't anyone just make digitigrade legs with an elongated foot with a raised heel like the real thing?
tough plover
onyx juniper
Weird, why wouldn't anyone just make digitigrade legs with an elongated foot wit...
that's how most furry models are
this is how it's typically rigged

notice how the digi ankle cannot bend here
this is the easy way though, it doesn't require any special setup, because in reality, it's just a humanoid rig
and this is the fancy way

requires FinalIK and constraints to work
onyx juniper
When I was talking about elongated feet with raised heels, I was talking about the bones and not the mesh.
Why can't it be done like that without the fancy stuff?
tough plover
because then the game's IK wouldn't like it
onyx juniper
Is it a problem for full body tracking?
tough plover
or, if you weren't using full body, you'd need to make custom animations
yes
the method I showed above doesn't require any of that
it works the same in full body and in half body/desktop
because in the end, it's based on a standard humanoid rig driving the properly rigged legs
white moth
onyx juniper
Weird, why wouldn't anyone just make digitigrade legs with an elongated foot wit...
You can do that, but it’s more complicated to set up if you still want to be able to play humanoid animations correctly.
It’s outside the skill of most novice creators
They do look much better, though.
when it is set up it works fine in fullbody, there are no downsides
 lament pond
 tough plover
very nice 👍
 pseudo storm
so... Material Combiner refuses to work on me, there doesn't seem to be any real fix around, I assume CATS plugin doesn't have its own built-in solution, right?
 narrow halo
like the atlas optimizer?
 inland skiff
I have a pre-existing 3D character model that I could turn into an avatar if not for the hair. How could I possible model curly hair?
devout scroll
Look at curves for hair modelling
Stylized hair is always done the same way
There's also hair cards if you want the hair to be more fluffy and less chunky
 lapis herald
@quaint jasper My buddy ONI messaged you about me, i have a problem with my uvs when i uwrap these shoes, the uvs look wavy and stretched even tho my topology isnt stretched, do you know why?
 quaint jasper
lapis herald
<@!97980768323633152> My buddy ONI messaged you about me, i have a problem with ...
quaint jasper
lapis herald
<@!97980768323633152> My buddy ONI messaged you about me, i have a problem with ...
Did you apply your transforms before unwrapping ?
lapis herald
Under modifiers? there were no transforms in the first place
unless that is something else
foggy granite
Mind showing your topology and uvs seams
foggy granite
Bruh autocorrect is horrible


 foggy granite
https://github.com/Radivarig/UvSquares this should help other are you gonna have manually adjust the uvs

GitHub
Blender addon for reshaping UV selection into grid. - GitHub - Radivarig/UvSquares: Blender addon for reshaping UV selection into grid.
Do you know how t add the addon
foggy granite
That’s should help with clean up your uvs
devout scroll
lapis herald
unless that is something else
Applying transformations usually just means applying scale. If your scale isn't uniform (from scaling in object mode) it affects how modifiers and some tools work
ctrl+A your mesh in object mode and apply scale to make your current scale be the new 1,1,1 , rotations are a good idea to apply as well usually
you can also apply position but it's usually not desired
since moving an object in object mode and applying position would basically do the same thing as opening edit mode and moving all the mesh in it
devout scroll
When you go into edit mode you're usually warned scale is not uniform
That should be the first thing you check when something doesn't behave how you expect
devout scroll
👍🏻
lapis herald
Another question, kinda new to the whole optimization scene, i was getting rid of unneeded vertices and now when it comes to texturing, the normals are kinda goofed up any ideas on how to fix them?

 quaint jasper
That's a result of overlapping UVs
lapis herald
I see
devout scroll
Topology, marking edges sharp, turning on smooth normals in the mesh tab
Wait is it overlapping uvs?
quaint jasper
In this case i'm fairly certain
lapis herald
It was, yeah i had one seem not marked correctly so they were overlapping each other
merry vault
outer pawn
even though ive owned it for years its hard to use so i keep giving up lol
Figuring out how to export stuff shouldn't be too difficult, since that's basically all I need someone to do. I have the files so I can send them over if you want to try.
 lethal wave
ive got a model with a bunch of different copies of the same mesh w/ different textures, to be used as eye/mouth animations

my main experience is with mmds that come with these types of things already configured as shapekeys, how would i go about making that happen?
devout scroll
depends on if you want to keep doing it with shape keys or if you want to do it with a shader
shape keys were needed for face plates in sdk2 but you can do custom animators with sdk 3 and just slide around an atlas texture's offset
if you want to do it with shape keys you gotta hide them inside the head, create a new shape key, select it and in edit mode move them to where they're supposed to be
spiral sigil
Probably best to go with shapekeys if you want it to function on quest
with the very strict shader limitations on quest avatars
devout scroll
That's fair
tough plover
man that rig is not going to work very well lol
spiral sigil
Maybeeee with enough FinalIK magic it can workk??
devout scroll
No shaders but finalIK 
tough plover
na, you'd still need a proper rig to drive this rig with IK
lethal wave
i got the faceplates working w shapekeys
but i tried using one of them as a jaw flap blendshape and it doesnt work in game
 craggy lintel
Okay so
Substance won’t answer my ticket rn and this is due tomorrow.
Maybe I can get an answer here

So my thing is, I plugging in my custom camera Luts into the substance camera (REC.709)
and added effects and lens corrections
Basically; I used my irl job and color scienced the shit out of substance’s camera... now it won’t show during Iray
Any idea why it’s not popping up in I-ray?
 tame harbor
anyone knows what retopology means?
and how to apply it to my model? i've been working on it for the past week, i'm still new to modeling
i can share it if needed
quaint jasper
tame harbor
anyone knows what retopology means?
Retopology means redoing the geometry of your model by adjusting/removing/creating edge loops so that the topology fits better for deformation and is more optimized as in poly count
tame harbor
ooh
okay 0.0
also when is okay to use triangles in my model? last time i showed the mesh to someone, someone pointed out that doing that on the head (face specifically) was a bad idea
i assume he was mentioning that in therms of topology
i'll... just ask later then..😅
craggy lintel
Nahh triangles no good
It’s just sloppy topo
watch videos on Pixar topology and you’ll get why
Here you can take a look at this for example
 azure rain
there's a time and a place for triangles but yeah probably not something to use as a amateur
craggy lintel
azure rain
there's a time and a place for triangles but yeah probably not something to use...
True yes, but like he said it really just depends on where you utilize them
azure rain
like what I've seen with game models is using them to like change the amount of edge Loops something takes up so like for example the back of the head would be more low-poly than the face
snow fern
tame harbor
and how to apply it to my model? i've been working on it for the past week, i'm ...
if by working you've been sculpting and so on, then you will need retopology to make a good mesh. if by working you've been carefully pushing vertexes around with subdivision surfaces, you might be okay without
craggy lintel
It’s best to watch how topo moves when rigged to understand why this is the best way

And yes check out loop patches for arms n stuff that stuff is great
not reaaaallly necessary for VRC models really but it’s just... great to know and do
azure rain
snow fern
if by working you've been sculpting and so on, then you will need retopology to ...
yeah if you're going subdivided approach you can probably just dissolve Edge loops
tame harbor
yeah i'm doing subdivision to the model before but also i'm just trying to avoid making a triangle at any moment possible like the plague as i merge and make new lines on the mesh
azure rain
yeah probably for the best it would take some skill to know when triangles are actually helpful and typically that's on retopology that they're handy as triangles cause problems in subdivision
snow fern
the idea of retopology as an independent step is to ignore all that, go nuts, use dyntopo all over, make a complete soup of vertices and triangles and stuff. THEN after you're happy, you shrinkwrap a new nice (lower poly) topology on that. and then you can use the high res one to bake normals and other details
trying to be creative WHILE maintaining good topology is just going to be more work. plus you won't have any of those sculpted details to bake from if that's your goal
kind of a middle ground would be to use blender's multiresolution modifier, which lets you work at multiple levels of subdivision at once
azure rain
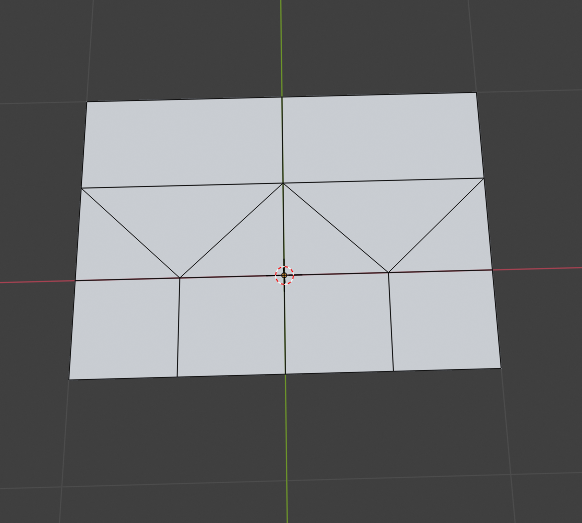
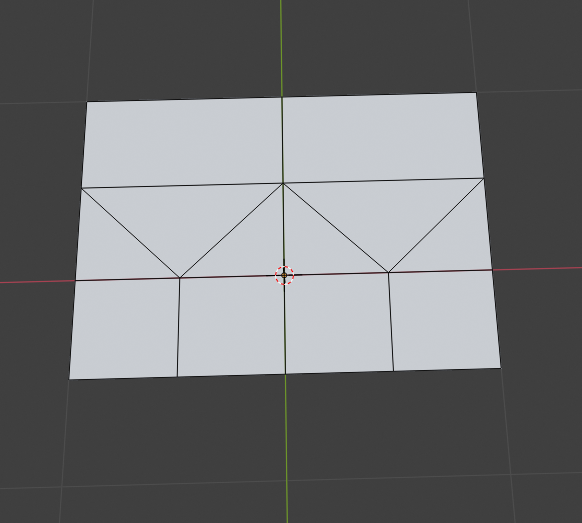
an example of somewhere where a triangle could be handy in a retopology
but that's probably more relevant if you were trying to make like a quest Avatar
tame harbor
give me a second, trying to understand here i only discovered all of this about a month ago. 😅
snow fern
if you want to understand retopology, watch a tutorial on retopoflow. it's a really neat blender add-on
tame harbor
snow fern
if you want to understand retopology, watch a tutorial on retopoflow. it's a rea...
okay
snow fern
there are plain blender tuts too, but the plugin tutorial will give you the flavor much faster because it avoids a bunch of setup and stuff
azure rain
https://pbs.twimg.com/media/E8232nJX0AU5VHX?format=jpg&name=4096x4096 found this handy picture that shows a retopology to make a quest build
 snow fern
for an example of someone actually building with good topology right from the start (but using hand drawn references instead of sculpted references): https://youtu.be/5d1vca8R43A
tame harbor
okay, i'll watch it tomorrow, not that i don't want to (i actually really want to) but it's because i'm nearly done with basic shape of the model and i really want to get it done. but i'll be wanting to animate it as well for 3D animation (but first this because slow and steady rather than jumping from session to session randomly 😅 )
plus, this is allot 0.0
azure rain
of course 3D modelling is a complicated skill to learn
tame harbor
snow fern
the idea of retopology as an independent step is to ignore all that, go nuts, us...
so, just go wild with my model?
snow fern
it just depends on how you want to work. but if you knew nothing about topology when you started, and you are willing to learn, then you might as well go nuts now and then retopo later
if you had some idea about topo before but are having trouble keeping it straight as you make creative changes, watch that long video I linked, and apply those ideas
tame harbor
craggy lintel
watch videos on Pixar topology and you’ll get why
i'll give it a watch as well
snow fern
a "real" 3d modelling workflow has a bunch of steps that take much smaller leaps than you'd expect as an amateur. each of the steps is kind of a specialized skill
azure rain
gamedev it's split up to five different jobs
snow fern
so you would have a concept artist come up with ideas, and a character artist refine those (all in 2d) and then someone good at sculpting would make a base mesh (which would be unusable in production but looks nice) and then someone would retopo that to make a usable mesh for posing/game/etc
tame harbor
snow fern
it just depends on how you want to work. but if you knew nothing about topology ...
got it, so go to town with it, then later go back to it with retopo
snow fern
whereas you probably opened blender and made a quad for the tip of the nose right off
azure rain
and then probably another person would do the rigging and another texture it
snow fern
and another person would animate it (and/or another group would mocap it)
tame harbor
i see
snow fern
so as a one-man-band you can decide to combine any of those steps
tame harbor
well damn, my journey as barely begun!
azure rain
yup
snow fern
there's also something to be said for not worrying about making your first effort perfect
just try not to make it 1 million triangles and you'll be fine for your first avatar
like who cares if the face shading gets wonky when your mouth moves. it's amazing that the mouth can move at all
tame harbor
snow fern
so as a one-man-band you can decide to combine any of those steps
i do have a set idea what i want to do, specifically under 3D modeling. so i'm trying to follow that path but that's for another day.
tame harbor
snow fern
just try not to make it 1 million triangles and you'll be fine for your first av...
right something i did on the ears... oops 😅
snow fern
put on some headphones, delete the ears, solved
tame harbor
okay
well... got the basic shape done! another friend of mine showed me a tip on how to get the shape of the body. (that's all he showed me... that's all)
it's just now missing eyes looks way too hollow and... creepy
but i will be going back to these messages to write down points, so thank you tons @snow fern, @azure rain, @craggy lintel and Ruuubick. i'll be diffidently be trying to learn as much as possible.
azure rain
glad to be of help
 devout sedge
bruh
spiral sigil
lol
 civic depot
stop
 lyric mauve
what
 wary thorn
Stfu
spiral sigil
ban chump?
devout sedge
ayy finally that nerd got smoked
 vernal otter
Tf?
 river pond
Oh god, here they come 👀
 desert whale
🤡
 craggy grove
Te flying fuck
 umbral elk
I was wondering why I was getting pinged
 misty valley
6 pings
 fallen carbon
omg
misty valley
wat
wary thorn
Stfu 😑
 analog galleon

 spiral sigil
💩
river pond
this channel is getting slowmode, im calling it
 regal basin
nothing special
 royal river
👀
analog galleon
river pond
*this channel is getting slowmode, im calling it*

umbral elk
river pond
*this channel is getting slowmode, im calling it*
Same here, I'm betting on slowmode
spiral sigil
I would rather learn making a avatar the buying one my opinion 
analog galleon
i hope so
spiral sigil
funny.exe
misty valley
you almost broke my new selfbot 😠
vernal otter

craggy grove

 crisp barn
Tf did i get 8 pings from
 twilit dawn
what just happened
river pond
You didn't see anythin here, go back to vrc peps 
umbral elk
crisp barn
Tf did i get 8 pings from
A spammer
spiral sigil


analog galleon
crisp barn
Tf did i get 8 pings from
random troll bot
misty valley
paypal money glitch lmao
spiral sigil

misty valley
thats what it said
umbral elk
You know what else is annoying?
Those scam nitro links that you get in DMs
 mystic kiln
Holy pings.
 feral veldt
??? Where did the pings come from?
 nimble shuttle
what the pings doin?
umbral elk
feral veldt
??? Where did the pings come from?
A troll bot
feral veldt
Oof
umbral elk
Yeah, it was a mass mention
nimble shuttle
it's been taken care of, feel free to go back to sleep or return to whatever y'all have been doing before 
misty valley
there will be more ppl asking tho
umbral elk
They'll probably scroll up to find out what happened
 fossil oak

spiral sigil
 snow osprey
Me wakes up: sees ping in 3d modeling and gets terrified as I can model shit.. looks and realizes it was s troll.. anyhow back to sleep now
devout scroll
derailed 
spiral sigil
I will get all the roles and all the pings !!
spiral sigil
idk where to put this but ill put it here
everytime i edit an fbx file.. it imports to unity ok but when i upload it it turns into a collapsed mess
any help?
tough plover
@spiral sigil you might have messed up shape keys
tough plover
well check if that's the issue first
spiral sigil
oh
spiral sigil
ill show you in a sec, im checking shapekeys
shapekeys arent the issue
ill reimport the rig and show you
 tough plover
not exactly what I mean but that also seems fine
what does the rig look like
in blender
 tough plover
oh wtf
uh
so first off
you always need to disable Add leaf bones under armature when exporting
spiral sigil
oops
tough plover
to not need to do that manually, export using CATS
spiral sigil
i use cats
spiral sigil
where do i find that
tough plover
in cats
 spiral sigil
neat viper
<https://github.com/Xiexe/RGBSubPixelDisplay-Shader>
spiral sigil
neat viper
<https://github.com/Xiexe/RGBSubPixelDisplay-Shader>
thank uuu ^-^
craggy lintel
Guys im panicking
can you update your files on gumroad if you need to make an adjustment!?
 full ice
craggy lintel
can you update your files on gumroad if you need to make an adjustment!?
full ice
craggy lintel
can you update your files on gumroad if you need to make an adjustment!?
can you not just upload again to the same product ?
craggy lintel
Idk!
 jolly shuttle
I have no idea where to go to ask about general avatar creation in it's entirety, I suppose since I don't have a model for Unity SDK3 I need to make one or find one but I can't find anything that looks appropriate or similar to what i'm going for and am internally panicking yet again over small details. . . . quesitons?
Should I be looking for any model that I can modify physically within blender afterwards because I have no idea what kind of things I might need to edit within blender for appropriate segments, documents talking about bones and blendshapes and nothing to help me get started because I have no idea where to start.
Internal Panicking is causing frustration and since I haven't used either Unity or Blender, I have no idea what specific parts of anything go to which area, ignoring that I don't know how either system works in the first place beyond Blender for 3D Modeling and Unity for programming
 late glacier
Does anyone know an easy way to make bones for a pre-existing model? Like not rigging it with armature, making actual 3D bones from a pre-existing model

I’ve already made the rib cage and a partial bit of the spine and shoulder-blades
thorny ivy
jolly shuttle
I have no idea where to go to ask about general avatar creation in it's entirety...
One step at a time, mate.
First, figure out what you want your avatar to roughly look like.
Second, features and details.
Third, find bases/free assets you can use. As long as you're not repackaging stuff to sell, most are game for personal use.
Four, figure out how to combine them all. Easier said then done for some depending on how much of your model is kitbashed/what parts.
Five, test and refine the model. Don't try to make it perfect right off the bad, just focus on getting a rough draft/mock-up done first and go from there.
Custom parts + personalized details are obviously gonna be more ideal then purely repurposed assets but for a complete beginner, that's putting a lot on your plate if you already don't know how to make or modify meshes + textures yet.
There's countless tutorials that can walk you through the process, just need to tackle one thing at a time and have patience.
We're happy to help how we can but don't think anyone here is inclined to 1-on-1 teaching and explaining every detail so some autonomy is expected.
jolly shuttle
I have an idea within my head that I want my avatar to look like, Discord Avatar actually, even a basic idea of clothing and anatomy in terms of Limbs, but I have no idea how to get it to physically onto blender, not even quite sure WHAT i'm supposed to be putting together because as far as I know, it's just a single detailed shape that I have 0 idea how to actually modify or get towards.
I'm not even sure where to look for models given that everywhere I look has nothing similar that could be used as a baseline or are a bit too costly to purchase given that i'm not planning on actually using them
Checklist is nice to have however, even though I understand the words as being accurate terms for blender, I can't make sense of what differences are between some of them . . . googling based of the checklist at random i guess
thorny ivy
Well, guess the simpliest path is finding a furry-type fox avatar and just texturing it to be black. From there, trim off or modify parts of the mesh you don't like to make it more fitting.
 split aspen

 tawdry agate
ok this might sounds stupid but i need help can anyone help me get hair on a model in blender with cats plugin?
oak hatch
tawdry agate
ok this might sounds stupid but i need help can anyone help me get hair on a mod...
Do you already have the hair model?
white moth
craggy lintel
can you update your files on gumroad if you need to make an adjustment!?
Yeah you can push an update whenever but people will have access to the old version I believe
craggy lintel
Aight we good
white moth
You can also spam out email notifications to everyone who’s bought it that there’s an update but I don’t recommend it lol
tawdry agate
oak hatch
Do you already have the hair model?
This would be my first model so I don't think so
oak hatch
tawdry agate
This would be my first model so I don't think so
So, you will need to make hair, and add it to an existing model, correct?
tawdry agate
oak hatch
So, you will need to make hair, and add it to an existing model, correct?
I dont know how to make the hair is the thing I have the model
oak hatch
What kind of hair do you want to add?
jolly shuttle
Many tutorials and I still can't figure out how to sculpt a head
foggy granite
Are you using a good reference
I can seen you one where it shows the topology and have both a front and side view of topology so you can model then use the sculpt tools tp adjust the topology
jolly shuttle
I'm new to blender and the only reference for what I want to make is my Discord Avatar
I know what I want in my head but I have no clue how to use Blender to actually make it, and I really don't want to have to pay someone else to do it for me
tough plover
jolly shuttle
I'm new to blender and the only reference for what I want to make is my Discord ...
you could probably use a Rex model as your base
one sec

Gumroad
Rexouium is a made up species and the name meaning Rex=king and ouium=Care taker․ They are the king care takers of their world․ They are rather tall species usually reaching to 7ft tall. They know how to climb well and got strong legs for speed and jumping.if you have any questions or require assistance, you can message me on Twitter @RezilloArt...
oak hatch
Yeah, even if you used it as a armature and overmeshed.
tough plover
paid base though
oak hatch
I do that a lot, I have a few base bodies and I remesh/retopo to suit.
jolly shuttle
Useful I presume, assuming I knew how to actually modify anything without screwing the entire thing up -_-,
tough plover
modifying a base is definitely a good learning experience
tough plover
I recommend doing that before trying to make something from scratch
oak hatch
^^^
jolly shuttle
I've seen Armature mentioned in blender on other models but nothing I observe when selecting it makes any sense
oak hatch
What knowledge, if any, do you have of 3D modeling
jolly shuttle
I've figured out how to make pre-existing models into what looks like a bunch of polygons thrown through a blender, with little to show for it. I don't even know if I'm being negatively pessimistic about any of this or if I'm just this much of an idiot
oak hatch
Also, how "techy" are you?
jolly shuttle
I did basic blender years ago, remember nothing
oak hatch
That's better than 90% of folks
Lmao
If I were you, I'd look into Flipped Normals on YouTube, they have great tutorials on modelling at all skill levels
Get comfortable with the program before you go ham.
jolly shuttle
given how much blender has updated and the different variations of basically any tool out of the many options that overwhelm me, I don't know how
oak hatch
Use the latest version of blender.
oak hatch

Building on the success of the 2.8x series, Blender 2.90 continues to polish the user experience.
Boop
oak hatch
Some helpful tricks, number one, use the incremental save feature (Ctrl+shift+s) and click the little plus button.
Nah
2.8 and 2.9 are very similar.
jolly shuttle
not like I have anything I can call progress TO save'
oak hatch
It's not the program, and it's idiosyncrasies, almost all the knowledge you need for modelling is conceptual.
jolly shuttle
I have other models tha ti've downloaded
oak hatch
Like, knowing what a vertex is
jolly shuttle
but I have no idea how any of the model actually works and messing around with anything just tells me how to break it which in my mind teaches me nothing
oak hatch
Loops, polygons, ngons and where to use them, what vertex weights and weight paints actually do.
That's the big deal, IMHO
jolly shuttle
And we've entered the realm of confusion and the understanding that I don't understand anything
oak hatch
Ah. Yeah, that's a big wall to climb.
jolly shuttle
FlippedNormals you said?
oak hatch

In this 3D modeling tutorial, we show you how you can approach modeling everything in 3D. Here we're using Blender but the concepts translate to all 3D software.
Support us by checking out our merch!
https://teespring.com/stores/flippednormals
Subscribe now!
https://www.youtube.com/c/FlippedNormals?sub_confirmation=1
Website - https://flipped...
Yes.
There, that
Watch that, consume that, dream about it.
thorny ivy
Tutorials and experimenting seems to be the best combo for learning something advanced like 3D modeling.
Even if you don't use whatever you end up making, be it a simple item, a specific part of something larger, etc, you'll at least have more experience then before.
Also, don't be afraid to do small elements + combine them with pre-existing assets.
IE: making and rigging some claws for an avatar which didn't have them before, jewelry, various accessories.
jolly shuttle
I can't tell if I'm an idiot or not, I don't know if I am or am not missing simple concepts that other people seem to know plenty about, I don't know these tools to modify basic shapes or how to use them, I don't know what you mean by rigging, I don't know what Armature is, And yet I keep being forwarded towards tutorials that talk about using yet more things that I hadn't even heard of yet let alone any that actually teach anything to help, feels like an endless ring of mockery, either teaching me the most simple things that I already know like how to pan the godamn camera, or skipping over what i'm looking for and teaching things that use tools that everyone/thing seems to think I should know exactly what they're for.
Video above is nice to know how you could get to make other shapes, but it speaks of tools to do so while i'm trying to figure out if it's going to actually talk about how you even find the tools, let alone actually use them.
I apologize for ranting, I apologize for wasting your time, since apparently I'm not finding the middle ground for what I actually need to learn myself
neat viper
Literally nobody started out being great at Blender lol, and it can definitely be frustrating at times, but I'd vv much recommend just messing around in the program and watching some tutorials! Searching online for where certain things is fine, and it can be vv helpful too, especially considering Blender's UI choices lol
don't be ashamed of learning c:
oak hatch
Ye
thorny ivy
jolly shuttle
I can't tell if I'm an idiot or not, I don't know if I am or am not missing simp...
Search up "Blender 2.9 modeling 101", "Beginner Blender 2.9", stuff like that.
You're kinda jumping straight into the deep-end by wanting to make an avatar without any real modeling experience so things are gonna feel pretty daunting/confusing at first.
Like the others said, its a long road but every journey starts with a single step.
quaint jasper
Took me a couple months to make something i was happy with, and another year to be really happy with it 
thorny ivy
I've only gotten relatively adept at modeling in Blender after a year+, started out with model bashing and doing practically everything by hand because I didn't know how to mirror, what modifiers did, or use anything other then the basic X/Y/Z tool.
tough plover
yea, learning how to manipulate geometry/selecting stuff more efficiently rather than vertex by vertex is really important
oak hatch
As are how to abuse modifiers, see my voidscythe model that uses literally two ribbons of polygons and abuses bevel/solidify.
 gaunt abyss
I just started off by modifying models from other games, then I eventually started to learn other skills through tutorials as I needed them. With something like modeling it's usually best to learn at your own pace rather than diving in head first. In my case, I just found tutorials for specific things that I needed to do at that point in time. Still not good at rigging though, so I still use Mixamo for that.
jolly shuttle
I can just tell a lot of irritation is going to be in my future, tutorials to learn blender, so that I can do basic stuff and eventually work my way up to making my own avatar, just so that I can prompty be confused and at square one when i get to the SDK3 and Unity. I'll probably have a VR Set by then at least
foggy granite
Trust me it better to mess around and take breaks then forcing your self to finish a project just make sure you make some progress
 keen tulip
I'm trying to give this character two animations which are Facial animation and body animation and combing them together into one animation file. Problem is I'm so lost with what I need to do to do that. Any suggestions?

 stable imp
Any experienced Blender users here? I did a major screw up, I was making modifications to an avatar and somewhere in the process I lost all the vertex groups somehow… now the animations don’t work anymore… is there any way to cope the groups over from an older version of the mesh before I made the changes (95% percent of the topology are the same ) or any other way to recover the groups?
foggy granite
stable imp
Any experienced Blender users here? I did a major screw up, I was making modific...
You can check your autosave and go to a previous version
late glacier
Any suggestions or changes I should make to this?

 fringe notch
been trying to import an outfit i got off booth into blender but i keep getting errors. it works fine in unity, what can i do?
 foggy granite
Not really much you can do to try to verify your file
 bold jewel
stable imp
Any experienced Blender users here? I did a major screw up, I was making modific...
bold jewel
stable imp
Any experienced Blender users here? I did a major screw up, I was making modific...
Transfer Mesh Data
which is also useful to create weights for clothing on characters or anything that has to move with another mesh
white moth
jolly shuttle
2.8 right?
If you have steam I just recommend installing Blender from steam so it auto updates
Otherwise just keep it updated so you don’t end up with the people who are still trapped in 2015
spiral sigil
made this rig for this model, and for some reason no bones move with the mesh, no matter what i parent it to and no mater how i weight paint the mesh, does anyone know how to fix this? also i tried with automatic weights and it just keeps saying bone heat weighting failed.
 stable imp
bold jewel
Transfer Mesh Data
stable imp
bold jewel
Transfer Mesh Data
Ah thank you, this worked quite good, I had to do some clean up but I got it almost right now… I only have one weird phenomenon that I cannot explain
The vertex groups for the ears are symmetrical but when animating them in unity one ear works fine the other one pulls half the face with it… any idea what might cause this?


 dreamy epoch
Vertex groups may look symmetrical, but weightpainting on them might be completely different.
Also I don't think ear bones should affect face area at all.
stable imp
you are totally right!
the wp for the ear is way too strong, gonna fix this... (damn issues with amd cards make it look so weird... havent found a solution for this yet)
 zenith cloak
Now I wonder how furry avatars are made. I kinda want one now, however the prices on Gumroad are just too much for me to afford (that, and I spent all my money anyway).
oak hatch
zenith cloak
Now I wonder how furry avatars are made. I kinda want one now, however the price...
Same way as any avatar, honestly.
zenith cloak
I was actually asking for things like how to better do things like eyes, legs and other such things.
oak hatch
stable imp
the wp for the ear is way too strong, gonna fix this... (damn issues with amd ca...
Pro tip for weight painting. Make a custom gradient for the weight paint display, set 0 weight to gray, and 0.0001 weight to blue. It'll always show where you aren't weighted. Saves so much pain.
oak hatch
zenith cloak
I was actually asking for things like how to better do things like eyes, legs an...
It really depends on your level of experience with 3D modelling and art in general. A good tip is to work from a reference image, that will make most of the work go by faster and easier.
Even if you make """parts""" of a head (eyes and ears separate) using different references, you can combine them into one after the fact.
Super helpful.
zenith cloak
Well that's kinda reassuring.
oak hatch
Yeye. Literally go find some art with parts you like, drop them in as an image in blender, and model them.
Experiment with subdivision and bevel modifiers.
Subdivision, Grid Fill, and Bevel are the most beefy tools for modelling, IMHO.
zenith cloak
I have some art to reference, but what bothers me on some models is the 3-dimensional fur strands. How exactly are they done?
oak hatch
Oh, I just did that for my Collab.
The way I did it is, I made the main """volume""" of the fur, then I selected a vertex and beveled it.
Make sure the bevel tool is beveling by vertex, with one segment.
Delete the face that's made, select the loop, and grid fill.
It'll make a x shaped set of polys.
zenith cloak
No
oak hatch
If not, I'm gonna-hoo be ready to have your mind exploded.
Go into preferences and change your space bar from "Play/Pause" to "Search"
At any time, you can press space, and type something and it will find any command with that word in its name.
Space>"Grid" will show you grid fill, no menus needed.
It will only show you tools you can currently use in the mode you are in.
Also, set your Orbit to be keybound to Mouse 4, and your pan to Mouse 3.
Now you can navigate much more quickly.
You can control the camera with one hand, and punch commands in with the other without any weirdness. Behold, workflow.
zenith cloak
Mouse 4 and Mouse 3. What are those?
oak hatch
Mouse 3 is middle mouse.
Mouse 4 is the extra button on every mouse that isn't like...100% normie.
zenith cloak
I'm using a Razer Viper Mini and it has those two buttons on the side.
oak hatch
Middle mouse becomes pan, zoom (scroll) and M4 is orbit, it's-yes those.
One of those is M4 and the other is M5.
zenith cloak
Okay, thanks
oak hatch
As soon as you get used to that, you'll be very angry at any program that doesn't do it.
Lmao
zenith cloak
Like what program?
zenith cloak
I don't even know what that is.
zenith cloak
Oh okay
 zenith cloak
Kinda looks like that interface that Main Assembly game uses to build vehicles
oak hatch
Also, if you're mega new to blender, check flipped normals YouTube channel. They have an intro video that's 10/10
zenith cloak
I've heard of them, but never delved deeper
white moth
oak hatch
Mouse 4 is the extra button on every mouse that isn't like...100% normie.
Mouse 4 is the back button (thumb) and mouse 5 is forward (pinky)
And mouse 3 is middle mouse button or clicking down on scroll wheel
oak hatch
Ye
 ashen stag
It depends entirely on your mouse, but they should be labeled hopefully, at least in your mouses software if not physically
except 3, 3 is always middle mouse click
 glacial estuary
Is there an easy way for me to only select the hair vertexes?
 quaint jasper
L with your cursor on the vertex
or if it's using a single material, select a face, Shift + G > Material
foggy granite
I thought the key bind was ctrl-L to select linked vertex
lapis herald
So i imported my model into unity and it went from 43k polys up to 2.1 billion, what can cause that? i already checked to see if anything was off the model and i also clicked the legacy blend shape normals thing
foggy granite
Did you forgot to get rid of a subdivision modifyer
oak hatch
lapis herald
So i imported my model into unity and it went from 43k polys up to 2.1 billion, ...
Import settings. Read/write.
We had the same issue with another avii earlier.
lapis herald
Is there a way to fix it?
oak hatch
Ues
2,147,483,647 is the integer limit, if you see that then read/write is disabled on your mesh and the SDK assumes the literal worst
oak hatch
Lord knows. I only know it's an issue because I saw that as an issue earlier.
lapis herald
damn
oak hatch
lapis herald
damn
in unity check your import settings on the fbx, enable -> read/write enabled
Boop
Behold the power of GOOGLE
 tawdry urchin
i wanted to try and make a audio gesture on a freddy character from fnaf but im not to sure where to download models does anyone know where you can find a fnaf model to edit
spiral sigil
i find it funny how everyone feels safety by simply being in their own home
 oak hatch
Gonna model this today.

 wispy verge
its the guy from


 muted raven
 onyx juniper
spiral sigil
i find it funny how everyone feels safety by simply being in their own home
onyx juniper
spiral sigil
i find it funny how everyone feels safety by simply being in their own home
Delicious!
 spiral ledge
Total noob question: All the tutorials I've found simply are "Step 1: Do the Thing" type.
How do you import the ActorDescriptior thing? I've created a new Unity Project, and imported the SDK3 package into it.
languid fog
spiral ledge
Total noob question: All the tutorials I've found simply are "Step 1: Do the Thi...
I dont think thats the right chat for that
Ok, thats my first time doing a hair like this, any tips?

 astral frost
hey guys i stuck with a face i cant modify the mouth any idea?
 lapis herald
Any idea why some vertices show in blender but not in unity? its not the normals, the material has backface culling off


 onyx crane
languid fog
Ok, thats my first time doing a hair like this, any tips?
onyx crane
languid fog
Ok, thats my first time doing a hair like this, any tips?
This tutorial by YanSculpts is great for creating anime-styled hair. It's much slower than modifying existing wigs or using VRoid, but you have a lot more control over your results. https://www.youtube.com/watch?v=BqWYgrXw7Jk
onyx crane
astral frost
hey guys i stuck with a face i cant modify the mouth any idea?
Your avatar is missing the mouth shapekeys entirely -- you'd need to either remake them from scratch or do a face transplant (similar to adding clothing but using a face)
languid fog
onyx crane
This tutorial by YanSculpts is great for creating anime-styled hair. It's much s...
he teach a way to do a specific type of hair, you can see on the print the hair is different from the "normal"

i cant use that technique
onyx crane
languid fog
i cant use that technique
I think what I would do in your case is the following:
- Use a simple bowl shape (it looks like you have one there) to create a simplified version of the hairstyle (it will be ugly, that's okay)
- Use Yansculpt's hair technique to build the tufts
- Join all shapes together
- Go into sculpt mode and use the Remesh tool with a very, very small voxel size (.001?) so that the hair all sticks together and forms an actual 'wig'
- Use the plugin QuadRemesh to optimize this shape into a more reasonable amount of vertices
- Manually weight paint the hair as desired.
languid fog
yeah i was thinking about smth like that too, but the Remesh tool is new for me, i will study about it thx
onyx crane
It's pretty simple to use -- if you end up with a horrible 'spiderweb' looking shape when you try to remesh, it means you have a hole somewhere in your mesh that you need to patch.
onyx crane
np gl!
quaint jasper
I'd suggest press I to inset any face, moving those edges up, extruding, scaling down, moving up, and eventually you get a tuft, you can give it a slight rotation/angle, and do that everywhere you want
it might not look right until you get some toon shading in blender though
onyx crane
quaint jasper
I'd suggest press I to inset any face, moving those edges up, extruding, scaling...
This too. I mean, you're basically building a soft 'spiky ball', might help to think of it that way
languid fog
noted too
astral frost
onyx crane
Your avatar is missing the mouth shapekeys entirely -- you'd need to either rema...
no i dont thing you understand
the mounth is like locked when i try to edit his vertex its drag all the face
quaint jasper
Can you show your blender screen ?
astral frost
onyx crane
Your avatar is missing the mouth shapekeys entirely -- you'd need to either rema...
how i can preform that face transplant
snow fern
making your own shapekeys isn't that hard. pretty much all you have to make are a few for the eye (eyes closed, look up, look down) and a few for the mouth (there are 3 that CATS will make a whole set from). For the mouth shapes it helps to rig a jaw bone (which you will not use in actual vrchat upload) to get the mouth to open smoothly.
I would say face transplant is more technically and artistically challenging overall
maybe a head transplant less so, but even skin matching can be tricky
snow fern
to quickly judge how hard the shapekeys will be: around the eyes, make sure there is enough geometry for the lids that you can close them without it looking blocky or smearing texture details like eyeliner. if the model ever had closing eyes, it should be fine. around the mouth, make sure the mouth is open (not sealed shut accidentally by "merge verts") and connected to an inside-the-mouth shape.
astral frost
if that what you mean?
snow fern
cats will make the big list of visemes from a smaller set of 3, but you still have to make those
 snow fern
no, under "visemes" where it says AA OO CH
if you make AA, OO, CH, and set them in there, and click "create visemes" it will make the full set of 14
snow fern
"you make AA, OO, CH" is how you get more than basis there
do you know what shapekeys/blendshapes/visemes are in general?
astral frost
offcurse
the blendshape is not the problem for me
the problem is mainly the to do it one the mouth
AA , OO , CH wont work unless i can figrout how to fix the mount
snow fern
did it get welded shut?
the first thing I would check is the original model, before you ever touched it with CATS. if you merged nearby verts with CATS it might have welded the mouth shut even though the original was fine
astral frost
well i have to go , once i back i will show you a video
maybe its will explain a bit better then i can
foggy granite
astral frost
Them bones for limbs need to be changed if you plan to use the standard humanoid animation for varchar
astral frost
limbs is not a ik bones?
foggy granite
i said limbs since im refreing to bones of arms and legs they need to be adjusted
astral frost
ok thanks @foggy granite
 cyan plover
hey guys so I have a question regarding topology
I'm trying to make a feather like effect and found that this looks good

but I was wondering if it might become an issue when rigging later on, and if so, is there a better way to achive this effect or a similar one?
foggy granite
No it shouldn't cause any problems at all
thorny ivy
So, I've been modifying one of the common anime-esque head models but because of the changes, the visemes are all wonky now.
Any tips for updating/replacing them?
tough plover
thorny ivy
So, I've been modifying one of the common anime-esque head models but because of...
whenever you do edits to a mesh that has shape keys, always create a new shape key, activate it, and edit on that
then you can just apply it to the basis afterwards
thorny ivy
tough plover
then you can just apply it to the basis afterwards
...and if we've been making edits to the basis from the start?
tough plover
then that's a little tougher lol
craggy lintel
 tough plover
so did I but I'm not posting here lol
tough plover
@thorny ivy create a new shape key, select everything, Vertex > Blend from shape
in the pop up in the bottom left, select Basis with "Add" disabled
then apply that key to basis
snow fern
thorny ivy
So, I've been modifying one of the common anime-esque head models but because of...
I think someone was talking about having just added a tool to fix that to CATS
tough plover
(I have no idea if this works, but try it)
^ I did also hear about that, but I think that's still in the dev branch
craggy lintel
Cats eats keys like candy tbh
craggy lintel
Okay I just want to say this to any beginner to anything. DO NOT LISTEN to people who tell you stuff is too hard. You can do it. Everything you see is more than doable.
They just want to kill the hobby for newcomers. Don't listen to them!
spiral sigil
Hey, I am trying to extrude a point on the curve to achieve this, but everytime I do it does this weird looping thing. I think it has to do with being in the middle of the line and not at the very top or bottom. If anyone has an idea on what to do so it just makes a single normal curve and not a loop that would be great since I can't find anything on google.

 foggy granite
unfortunately that just curves you can model the branches individually using curves then just connect the vertex after
 obsidian nova
thorny ivy
Any tips for updating/replacing them?
obsidian nova
thorny ivy
Any tips for updating/replacing them?
Yo, Cina, going to make a tutorial re: how to fix broken shape keys soon, but in the meantime, feel free to write me on Discord if you're still having the issue.
quaint jasper
Didn't feilen make a tool to fix that instantly ?
"heya! If you grab the development version of CATS I've added the algorithm as an option under Model Options->Show More Options->Repair Broken Shapekeys"
late glacier
Trying to fix these “non bone hands”
 spiral sigil
trying to UV map this in blender but it's only affecting one side and from the front it makes half the mask invisible with the texture on the wrong side, does anyone know how to fix that?
 spiral sigil
i started of mirrored then made it two separate pieces, and i have no clue how to flip normals to where they should be XD
spiral sigil
@quaint jasper thanks very much, that was driving me nuts! XD
 heady vortex

 dreamy epoch
Update your VRCSDK and apply autofixes that it provides.
There should be one mentioning meshes imported with mesh read/write setting being incorrect.
spiral sigil
trying to make shape keys for mouth movement but i run into a problem, this is the model without the cat's plugin auto fixing it in any way.

clicking on a single point on the mouth clicks the entire face and i'm wondering how can i move the mouth if it's connected to the entire face, it's the same for the eyelids.

and if i were to try proportional editing then clicking one point moves ALL of the model, i dunno what the heck is going on with this.
neat viper
Try changing the proportional editing size? either by using the scroll wheel, or in the menu at the bottom-left after you finish moving something
devout scroll
Why are you doing select linked?
spiral sigil
oh because that's how i'm seeing it done in tutorials but it's clearly not working for me...
quaint jasper
Might want to reset your blender settings, cause that's not default behavior
spiral sigil
i did that, i still can't select the upper lip and lower lip separately, the best way i can describe the problem is that the mouth is welded shut
quaint jasper
Then you need to disconnect the edges that form the mouth hole with V
spiral sigil
thanks for the tip, man, never have i ever had so much problems with one model before lol
 finite yacht
Hello. Everytime when i want to import FBX model to blender 2.79 i have mixed shape keys. How to properly import it? I dont want to use CATS because it breaking everything other.
quaint jasper
Do you use 2.79 for a specific reason ?
finite yacht
i dont ask about it.
ashen stag
Is the randomization of shape keys fixed in the newer blenders? I havent tested that specifically
quaint jasper
Never heard of shape key randomization, what does that do ?
spiral sigil
if you made the model yourself from scratch, and made it an fbx, and you know you made it an fbx, get this little addon in blender to import it, if you found the model somewhere else, 99% of the time you HAVE to use the CATS plug-in...even if it's annoying.

as for the randomized shape-keys, i have never encountered that either on any model i ever altered or worked on 🤨
at the worst case scenario you might have to delete all the shape-keys the model has and remake every single one of them in edit mode, and let me tell ya, dependent on model that can be a bitch and a half.
 ashen stag
Could just manually create the bands with vertices and then color those
 naive helm
is that tedious?
ashen stag
Seeing as how its a simple design, no
naive helm
Oke
ashen stag
at least not anymore tedious than texturing the bands, but that depends on your UV
naive helm
is the model I'm making cursed btw lol
ashen stag
Do you really need to ask that
naive helm
lol
naive helm
ashen stag
Could just manually create the bands with vertices and then color those
I'm not sure how to go about this btw

I'm pretty new to modeling
I think I might have an idea
actually I have no clue lol
quaint jasper
Ah if you don't have the topology it's a bit more difficult, but if you create a seam in the back and unwrap, you might be able to use texture paint
naive helm
It keeps saying missing textures detected in texture paint

here was the unwrap in uv editing
 proper wyvern
naive helm
proper wyvern
naive helm
Made you something nice 💖
 naive helm
:0
proper wyvern
Makes you a better circle for UVs
naive helm
Idk if you remember me but thishelped so much
proper wyvern
Youre that TV cat person. I remember. Helped you last time. 🙂
naive helm
Awwwwwe thank you
proper wyvern
Good luck ✌🏻
azure rain
proper wyvern
Made you something nice 💖
yeah that would be a lot better topology
proper wyvern
azure rain
yeah that would be a lot better topology
Depends how detailed they want it to be. ✌🏻
azure rain
of course more Loops could be added if need be but definitely flows better than the square grid
proper wyvern
Id most likely go lower than that but thats only because I aim for Quest medium - poor on avatar polys.
azure rain
but on the nice note it's easier to dissolve Edge loops to make the quest versions compared to that square grid
proper wyvern
 lapis herald
My mind is blown trying to figure out this thing, i have both meshes with the correct normals facing out, and lined up with each other, but my high poly bake is just messed up

With a cage and everything
As you can see they are overlapping each other so idk why its only messing up the soles
 proper wyvern
naive helm
Awwwwwe thank you
proper wyvern
naive helm
Awwwwwe thank you
Also another thing. To make this simply go to canva, play with elements, count the stripes, make them and put them all around the circle. Underneath the elements add a grey square. There are other ways but I prefer canva since it was taught to me in school and those are simple shapes.
 naive helm
i dont really understand 😅
proper wyvern
naive helm
i dont really understand 😅
Make something like this once you have the UVs. Then replace the image texture with it and atlas/place UV map nicely on texture. I obviously drew this since im on phone now but you get it.

If youre really smart you port the UV to canva, make it transparent and then place textures on current UV, then delete the UV from canva and port texture to Blender.
 lapis herald

Welp i guess i found another problem, about the faces I subdivided to show what the problem is with the faces. They are like, there but not there, how do i fix something like this, ive had it happen before and idk what causes it
 naive helm
proper wyvern
If youre really smart you port the UV to canva, make it transparent and then pla...
naive helm
proper wyvern
If youre really smart you port the UV to canva, make it transparent and then pla...
You're being too helpful for a project im not even sure I can finish ,_, so sweet
azure rain
even if you don't finish the project is helpful knowledge for next time
naive helm
yeahh it is
tough plover
lapis herald
Welp i guess i found another problem, about the faces I subdivided to show what ...
those are N-gons
you cannot subdivide ngons
should probably make a cut through them to either make one tri and one quad, or two quads
proper wyvern
naive helm
You're being too helpful for a project im not even sure I can finish ,_, so swee...
Thats what im good at. Working on other peoples projects instead of my own. You friended me so you will finish this one. As long as your motivation holds since im personally too depressed to bother whipping people to work on their things these days.
naive helm
proper wyvern
Thats what im good at. Working on other peoples projects instead of my own. You ...
oh my god im tearing up, you're way too sweet omg
 vagrant nimbus
does vrchat support gltf ?
because im working with blockbench and i find a pain in the ass having to unwrap everything in blender.
proper wyvern
naive helm
oh my god im tearing up, you're way too sweet omg
Ill invite you to a server. Im hanging there almost every day/night working on things so if any questions come about just ask me there and screenshare or screenshot. No need to tear up tho. Im not made of onions even though some MIGHT be vampires and to them I might be made of garlic. 🥴
azure rain
vagrant nimbus
does vrchat support gltf ?
https://github.com/Siccity/GLTFUtility there's various plugins you can install to have Unity open those

GitHub
Simple GLTF importer for Unity. Contribute to Siccity/GLTFUtility development by creating an account on GitHub.
 peak basin
hi guys, i've been working my way down the endless list of mistakes that people usually make while trying to learn avatar creation. i've read a bunch of documentation, stackexchange pages and i've searched a bit of this discord but i've run into an issue that probably has multiple solutions or i might be missing something super simple:
i bought an avatar which comes with 50+ shape keys. i made several edits to the body, some of which involved deleting parts, and the vertex order got messed up. so now i have an exploding shape key problem.
i found bartoszstyperek's "Transfer the vertex order," as many have linked here before, but unfortunately it doesn't fix the problem. copying vertex order based on proximity sounds like exactly what i want, but i assume i've deleted vertices that were early in the order and the add-on doesn't fill those gaps in the indices the way i expect. the original mesh and the edited one aren't the same, anyways, so this add-on wasn't really designed to work here. i also tried the experimental CATS "Repair broken shape keys," and while this does change the vertex order, it doesn't fix the problem.
i'm trying to figure out what i can do to salavge the mesh changes, if at all possible. stuff i'm considering:
- remake all of the shape keys. i didn't make them in the first place, and there are a lot of them, so this would be super time consuming.
- start from the base avatar again and try to copy as much of my mesh work over, but this time, avoid deleting vertices in the original model so the vertex order never changes to begin with. this is probably the most certain path i have right now but it feels ugly, since there will be useless vertices.
- write a modified version of "Transfer vert ID by vert proximity" which ensures that all overlapping vertices ALWAYS maintain the same vertex order between two models. and i would have to make it so index gaps i created in the original mesh are filled with other vertices on the modified mesh. i know some python but nothing about how coding for blender will look. there's a ton of bugfixing and ugly code to be written here but this is a possibility.
- is there a way to copy a shape key by proximity? something that would change which vertex indices are being changed by the shape key? i see people talk about "parenting out" the parts of the mesh that explode, or even using Blend from Shape, but i haven't gotten a clear enough description of the steps to perform it properly.
 ashen forge
A wip of a commission I'm working on for a friend, gonna make the outfits next.


All done from scratch
snow fern
peak basin
i'm trying to figure out what i can do to salavge the mesh changes, if at all po...
you should be able to take the original model, select the part with blendshapes (i.e. the face) and separate by selection and then remove the equivalent part from the mesh you've been working on and then stick them back together. be sure to delete all blendshapes from the working mesh part that's not supposed to have any
if you changed the face itself a lot one crazy idea would be to try to shrinkwrap the original face onto the new face
peak basin
ah yeah that is a totally reasonable compromise i hadn't considered, the vast majority of the shape keys are visemes or head changes, and fortunately i haven't edited the head. i think 2 or 3 might involve changes to the parts that i've already altered, but those alone would take far less time to remake. a question off the top of my head though, if the shape keys on my edited version cause the body to distort due to the vertex order change, then would pulling the head off of the original model and moving those blend shapes over still cause the body to explode?
snow fern
that's why you delete the shapekeys from the body before recombining
otherwise it will merge them by name I think. like other vertex data
bold jewel
lapis herald
Welp i guess i found another problem, about the faces I subdivided to show what ...

Quick #gameart tip: if you set your vertex normals to display a negative distance, they show you how your baking will align.
Retweets
224
Likes
1327

 Twitter
·
peak basin
Twitter
·
peak basin
oh of course, the shape keys from the original will just lose reference to all of the body vertices, so they wouldn't move anything but the mesh i copy over. okay, that's a great idea, thank you. i've been trying to consider what i could have done differently to avoid this problem altogether but it seems like blender's control over vertex indices is intentionally limited. "editing a mesh with shape keys already on it" feels like a fairly common problem, but hopefully in the future i just notice it before i put several hours of work into messing shape keys up
bold jewel
lapis herald
With a cage and everything
if the shoes share the same UVs and overlap (i.e. the shoes are mirrored and you don't flip and move the UVs) then the normals will be baked twice, once per shoe
in this case you would bake only one shoe
finite yacht
ashen stag
Is the randomization of shape keys fixed in the newer blenders? I havent tested ...
I dont know. I didnt test it. When i said randomization i mean that sequence of shape keys. Cats fix this, but break everything other.
lapis herald
bold jewel
https://twitter.com/delaneykingrox/status/1381064455597871110
Ah, i see, thank you
 hollow lagoon
Hi, can i write here a question about avatars for vrchat? 0 з0
oak hatch
Sure.
hollow lagoon
Oh, ok, I have a difficult situation - I'm making a custom model and I need to do physics for the ears and tail. I don't understand - do I need to buy dynamic bone, configure them and send the project, or does the customer have to do all this?
 misty frost
Question, sorry if this is the wrong place to ask, I have hopefully small issue my characters pinky acting like this in-game and was wondering if someone knew of a way to fix it? Or could at least direct me to somewhere/something to fix it?

 tardy rapids


 neat viper
hollow lagoon
Oh, ok, I have a difficult situation - I'm making a custom model and I need to d...
neat viper
hollow lagoon
Oh, ok, I have a difficult situation - I'm making a custom model and I need to d...
That'd be something more for #avatar-help if you're using SDK3, or #avatars-2-general for SDK2 - you'd need to buy dynamic bones and configure them in Unity, then send the finished .unitypackage to the customer
Do not include dynamic bones in the .unitypackage though, just include the scripts on the avatar, your client will have to have their own copy of dynamic bones o:
hollow lagoon
neat viper
That'd be something more for <#730948173379535022> if you're using SDK3, or <#36...
Oh, ok, I'll try to do it, thank you very much!
neat viper
yw! hope everything works out c:
 obsidian sorrel
Question: How difficult is modeling, it's basically building your character from the ground up right?
neat viper
depends on your prior experience, but character modelling can be pretty difficult to start
I'd recommend looking into Blender tutorials and working on hard-face models first (i.e non-organics, stuff like cups, cabinets, tools, etc) and get comfortable with that first, to learn the tools, shortcuts and etc c:
obsidian sorrel
I have zero experience modeling, so I will practice by making tools and stuff like you said
languid fog
onyx crane
I think what I would do in your case is the following:
1. Use a simple bowl sh...
(srry for the ping)
Idk if this is what you're was thinking, but i ended up doing this sketch, i think that's the best way to do a hair like this one
 obsidian sorrel
It will be awesome to make a unique character that no one else has
onyx crane
languid fog
(srry for the ping)
Idk if this is what you're was thinking, but i ended up doi...
I would say this is a pretty solid way to do it, that's the way Ruuubick was originally thinking of doing it
neat viper
obsidian sorrel
It will be awesome to make a unique character that no one else has
yus! Good luck, and keep in mind that nobody started out being great at modelling, so don't beat yourself up over that. Practice helps c:
languid fog
obsidian sorrel
Question: How difficult is modeling, it's basically building your character from...
I don't think someone can answer that question 100%, learning is something that fluctuate by person, some people learn way faster than others, but one thing i 100% sure is practice is the best way to get into it.

 tough plover
b u f f
foggy granite
Jesus how many abs do you need
languid fog
foggy granite
Jesus how many abs do you need
yes
 small valve
random blender tips
the item tab when selecting anything will display its dimensions

typing in any number followed by a unit of measure (in, inch, inches, cm, centimeters, meters, m, etc.) in any blender textbox regarding size or scale works
you can also perform math inside of any blender textbox, so you can add or subtract or multiply or divide any metric (if you need to double the size of a new image which may start at 1024px, instead of manually typing in 2048 you can just go to the end of the default value and append 1024***2**)
 foggy granite
Texture might off imported Improperly
naive helm
also a bit off topic but pretty related
why do i always lose motivation in 3d modeling
devout scroll
because 3d isn't easy and you can burn out if you get too ambitious and start having issues


 slow hound
Try putting you avatar descriptor on the root of the avatar "untitled" instead of putting it on the left leg.
 eternal tusk
Thank you! but I think an other problem still there..
 devout scroll
 neat phoenix
Is there a guide on how to make an avatar from scratch?
 open dew
Hello. I got this problem with the mesh being see-through. How do i fix it. i tried to enable/disable backface culling but it didnt work.


 unborn acorn
open dew
unborn acorn
open dew
Its just the material being weird, you can dix this by making a new one and adding the texture to it and you shouldnt have any issues afterthat, if thatt dont work then go into edit mode select all, then shift+n
open dew
The Shift+N worked. thank you very much.
unborn acorn
No problem
thin shadow
how do i fix the texture front face culling even though it's already in correct orientation?
 thin shadow
ok so I changed to eevee and the blend mode to opaque instead of alpha blend. But when combining material, the texture goes white, and does not include in the atlas.

 unborn acorn
thin shadow
ok so I changed to eevee and the blend mode to opaque instead of alpha blend. Bu...
unborn acorn
thin shadow
ok so I changed to eevee and the blend mode to opaque instead of alpha blend. Bu...
all the mats have to be blender default mat, they cant be anything special and all have to be the same
languid fog
well, @onyx crane and Ruuubick thx again, you guys helped me a lot here, thats the sketch after 6hours
(srry for the ping again ;-;)


 cyan plover
open dew
Hello. I got this problem with the mesh being see-through. How do i fix it. i tr...
cyan plover
open dew
Hello. I got this problem with the mesh being see-through. How do i fix it. i tr...
Hey, usually it's either material or Normals
Sometimes the normals flip (aka the from side of the faces) so see if you need to reverse your normals
I don't know how to reverse that in Blender tho since I work with Maya...
quaint jasper
languid fog
well, <@!541496819142623242> and Ruuubick thx again, you guys helped me a lot he...
Looks perfect !
lament pond
Wip
 tame harbor
lament pond
Wip
tame harbor
lament pond
Wip
Looks nice so far o.o
lament pond
Thanks, rigging it is gonna be interesting since I wanna try to get the arms to bend like a rubberhose cartoon
 dapper stirrup
thought i solved my issue but i was wrong, whenever i apply subsurface to my model it does... this. anyone know how to fix? (backface culling is off here, its not the cause of this)
 quaint jasper
Your vertices aren't merged ?
dapper stirrup
they are merged, i checked that first and it made it look better but then its not merged
found out what was wrong, there was some weird extra vertices there that should not have been there
thin shadow
unborn acorn
all the mats have to be blender default mat, they cant be anything special and a...
it's already the default shader, principle BSDF
spiral sigil
what da blender doin
thin shadow

still happening. normals already outside but the front face culling still there
the result of material combine

 unborn acorn
thin shadow
the result of material combine
unborn acorn
thin shadow
the result of material combine
Strange, you can just go into a image edit program and just drag on the white spot and there ya go
thin shadow
also that sounds like evading the problem, not solving
small valve
neat phoenix
Is there a guide on how to make an avatar from scratch?
yes and no. making an avatar from scratch is less of a "how do i make an avatar for vrchat" question and more of a "how do i become a(n organic) 3d modeler, how do i texture and rig 3d characters, and how do i make them game-ready?" you're going to have to learn each part separately, and before you can even begin to do that you also need to have some level of confidence in the tools youre working in (blender and unity), even if its beginner-tier confidence
some good resources are grant abbit to get you up on the basics of blender, and then i would reccommend going through Royal Skies' yt channel since he has god tier advice for both beginner and advanced parts of the software especially when it comes to character creation. after words i would watch a lot of timelapses from people who make characters to see how they actually model, and go from there
that's what i did, anyway
 lavish bear
Hey everyone I'm stumped here. I've amalgamated 3 v3 models from pmx to blender to unity for use in the MMDs world. The only problem I have is getting the music lip sync to work with the models. The lips move when I talk and even during a song, which would be cool if it was MMD Karaoke, but I'm looking for automatic lip movement with the song. All my visemes are accurate in both blender and unity.
snow fern
lavish bear
Hey everyone I'm stumped here. I've amalgamated 3 v3 models from pmx to blender ...
I have no idea about any of that, but have you tried using the tracking behavior to turn off the visemes?
 coral island
Will learning blender from scratch take a while if all I’m trying to do is make a simple model?
dusty heron
Yes, blender takes a long time to learn.
dusty heron
There are a lot of learning resources though, so that should help.
 spiral sigil
lol
So basically I am knifing out the wings (because right now its a black background texture for alpha or whatever and that doesnt work on quest mobile shaders) and the weightpaint messes up really bad in the sections I carved. Is there anyway to fix this besides manually repainting?


also if anyone happens to know a way to automate this PLEASE do tell
azure rain
Never waste your time re-painting a new character ever again. In the next 60 seconds, you'll learn everything you need to transfer your Rig's weight painting from one character to another under a minute!!! Hope it helps :)
Free Female Base Rig Download:
https://www.youtube.com/watch?v=_XfvLpLyulI
Sayuri Artsy Weight Paint Transfer Video:
http...
 thorn cradle
hey so im new to making vrchat avatars and i just made my first one but i ran into a problem can sumone plsss help me?
 quaint jasper
Love the hair !

 sick mulch
Does anyone here have ANY idea on how to use the xfbin_parser tool?
Or at least know how to get their hands on textures from xfbin files without the need to use Noesis? Noesis renames stuff, so I'd rather not use that.
thin shadow
is there a way to auto cut a face that has transparent texture?

 open moth
spiral sigil
open moth
spiral sigil
Looks great so far 
spiral sigil
thanks
quaint jasper
Are you sculpting on top of a reference ?
 swift pier
does anyone know where i can find an avatar of this model
 keen tulip
Uhhh so, did Blender stop working for anyone?
quaint jasper

keen tulip
Program stops responding on startup
keen tulip
No I know, but I was wondering if anyone else had gotten this?
quaint jasper
Are you opening something specific ?
keen tulip
Nope, just clicking the blender button for me to open it
quaint jasper
which version ?
keen tulip
2.9
quaint jasper
you tried 2.92 ?
 quaint jasper
worth a try
coral island
Bro how do I show the floor grid again, it just randomly disappeared... cant have shit in Detroit

its just gone
dusty heron
coral island
its just gone
In the top right, there should be something like this. Make sure that the viewport overlays are enabled, and that floor and the x and y axes are too
 devout scroll
I want to make a giant floating island for a world and am wondering what's a good approach to do it..
I want to sculpt it in blender since unity terrain is square only.
I want it to be a floating island but have an underwater section to it. Do I just sculpt it out of a giant midpoly piece?
Do I split it into the top and the bottom objects and then place rock props on the edges to hide the seam?
Do I sculpt a giant detailed terrain then cut it into chunks and split them as different objects for optimization?
This is what I currently have but it's kinda hard to work on one piece like this

I was thinking to paint it with vertex colors and use a shader to blend between multiple materials based on them
I seriously can't find any workflow on this for a game engine that would be both optimized and detailed while being big
All I see on youtube is small and low poly floating islands
thorny ivy
devout scroll
I want to make a giant floating island for a world and am wondering what's a goo...
From what I know about terrain (which is admittedly little), think the general process is this:
subdivide to get a fair number of polys
sculpt into general desire shape
refine as desired, adding additional elements like rocks, trees, etc
decimate but not to the point where the quality drop is noticable
cyan plover
coral island
what I think my donut will look like
cyan plover
devout scroll
https://puu.sh/I8SUN/4762dcf743.png
what it ends up looking like
foggy granite
devout scroll
https://puu.sh/I8SUN/4762dcf743.png
Gather a lot eference images of island then try to block out with some simple shapes to get a rough idea and then use muti res modifier to sculpt and get the details in
Reference image is king make sure you have plenty because diving in blind is not the way even for the most experience folks
 thorny ivy
Any suggestions on making the mouth look more... proper? Feel like the lower jaw is far back.

 outer saddle
If you want it look less monkey, then yeah
But don’t look at it in side. Check it 1/3rd view. Maybe it look good in turnaround.
exotic obsidian
can someone help me out? the texture only does this when I'm in Unity and Solid shading (Backface culling and all that is disabled)

But it's fine when it's on Material Preview
nvm it was a normals problem
thorny ivy
After a few hours of work (and getting distracted), got the mouth + lips to look a way I'm rather pleased with.

No more monke lips and a more realistic/natural jaw shape as well.
Proper headshots for those who might be interested in seeing how the whole thing looks


 dapper cobalt
foggy granite
Reference image is king make sure you have plenty because diving in blind is not...
dapper cobalt
foggy granite
Reference image is king make sure you have plenty because diving in blind is not...
i don't understand why anyone would need or want reference images for an original fantasy floating island....
curious about the best solution for this problem though
foggy granite
dapper cobalt
i don't understand why anyone would need or want reference images for an origina...
Reference images are there to help you get an ideas/inspiration as use all over in art and not only that it also help block out your ideas into more fuller forms so I don’t get where you come form
Are you saying people who use reference are not original
Because that’s the vibe I get from that
If so a majority of artist and modelers will like to have a word with you
dapper cobalt
thats fine if you do things that way but you completely ignored the question that was asked... inspiration comes from life and experiences
foggy granite
Inspiration can come from anything but I didn’t avoid the question I gave a process is the best method no but it generally would help with process
But I generally don’t see how I skip over the question
spiral sigil
dapper cobalt
thats fine if you do things that way but you completely ignored the question tha...
Let me just go visit my local floating islands to get some experience then
-_- Some things that aren't tangiable in reality kinda need you to use references, at least at the start
as you do it more often sure, you should use your reference much less often and go on your own basis
but you need to start somewhere
Heck I need some floating island references I need to rewatch some SkyFactory 4 Ssundee and Crainer videos
dapper cobalt
meanwhile pumkin asked a technucal question, not #artadvice
foggy granite
foggy granite
Gather a lot eference images of island then try to block out with some simple s...
Did you not read this
Like legit I gave him a process of doing it then an explanation on the reference part nothing wrong with that
But I feel like this can go over more smoothly if pumpkin was here
dapper cobalt
maybe u should ping them
spiral sigil
PUMPkiENnn
devout scroll
foggy granite
Welp no cigar
Let me sleep 
A bit of both actually. Reference helps, which in this case is artwork, but i was asking more from a technical aspect yeah
Still, any advice is helpful I guess
And I think in the end I'll use multires for details that I'll cut up into chunks that have LODs
outer saddle
thorny ivy
Look good 🙂
spiral sigil
Does anyone know why weight paint symmetry isn't working? My mesh is completely symmetrical
 snow fern
spiral sigil
Does anyone know why weight paint symmetry isn't working? My mesh is completely ...
snow fern
spiral sigil
Does anyone know why weight paint symmetry isn't working? My mesh is completely ...
there are two kinds of symmetry. one makes your painting symmetric for the current bone (so paint left arm, get weights on left and right arm for left!! bone). the other makes your painting mirrored across bones (so paint left arm, get weights on left arm/left bone and right arm/right bone)
spiral sigil
i figured it out
snow fern
the big obvious symmetry button is the wrong one
spiral sigil
Sadly the way I weight paint doesn't support symmetry
snow fern
you can probably also use a data transfer modifier with some shenanigans to copy the weights
like if you're "almost" symmetric
 snow fern
isn't that just gradient paint?
spiral sigil
Yes
coral island
Would you eat this?
 azure rain
not currently because it looks like it's made out of modeling clay
spiral sigil
congrats on following that tutorial that far, when I first started I already quit
foggy granite
I almost gave up on the cup handle part it was so annoying trying to use the spin tool then after coupled days I realize I could just use extrude to do it
 ionic sail
i never watched that tutorial my first tutorial I did a sword tutorial channel was called cg-fast track or something like that