#3d-modeling
1 messages · Page 16 of 1
 noble bough
 jagged moat
Interesting, could you post another screenshot?
noble bough
but it still annoys me
jagged moat
Tbh I'm still pretty interested in why it's not working xd
noble bough
 jagged moat
If you skip the green channel inversion and just go from texture->Normal Map->BSDF does that look right?
 jagged moat
Ah, you still need to swap this to the bottom instead
 noble bough
huh
i dont have to change anything
look at the screen
its fixed
i just had to plug it in normally with the normal map thing between
jagged moat
Oh, did you keep that in?
 jagged moat
Oh yeah, I meant that it was the subtract order that looks like it was causing the issue for future reference. Though if it's the right way round you're good to go
jagged moat
np, gl with the rest of the setup
noble bough
X_x
 jovial seal
i wanna apply a new pose as the rest pose (adjusting my hand) but THEN it screws up EVERYTHING else in my blendshapes
easy way to do this?
noble bough
made some lashes for this cutie today

 tawny pollen
see I'm trying to make an Anakin Skywalker lightsaber and every time I model in details, it gets funky


and this is where the nightmare began
noble bough
ok what exactly is the problem there ? cant really tell what's wrong, cause of the render @tawny pollen
tawny pollen
I'll show you what went wrong
well this is the solution


and that was the problem
noble bough
ok can you atleast say what is wrong. the picture without any context is not very helpful xd
 astral pond
what
astral pond
noble bough
made some lashes for this cutie today
this gives me crazy smug vibes
i love it

 astral pond
noble bough
astral pond
noble bough
i beg you to put a burger king crown on it
tawny pollen
noble bough
ok can you atleast say what is wrong. the picture without any context is not ver...
Aren't you a visual learner?
noble bough
If I get a shown a picture of mesh with textures on it with no context whatsoever and no obvious errors ?
tawny pollen
noble bough
If I get a shown a picture of mesh with textures on it with no context whatsoeve...
The error itself is in the mesh but like I said I already fixed that
noble bough
all good then, sorry if I didnt get what was wrong xdd
tawny pollen
It's okay
jovial seal
finally decided to model clothes for my character first outfit done

next up is repurposing my cibernetic armour lol
jovial seal

 lofty violet
Six can you help me model a fox avatar from scratch please I need help to move and do it in blender
Can anyone help me please
noble bough
lofty violet
Six can you help me model a fox avatar from scratch please I need help to move a...
what exactly do you need help with
do you have any experience modeling in 3d ?
lofty violet
I don't have it, it's my first time messing with 3d
noble bough
lofty violet
I don't have it, it's my first time messing with 3d
ok the first thing I would advise you to do, is getting to know blender with some tutorials. there are a lot of good ones online to get you started. you should really learn the basics of blender before you try to tackle an entire 3d character for vr chat. there is not really a "fast road" here, you sadly have to endure the beginning, but once you got it nailed down, its really easy
noble bough
lofty violet
Six can you help me model a fox avatar from scratch please I need help to move a...
btw who is this six you mentioned here
 cobalt tiger
Anyone know how to 3d model in hair tufts? its my first furry model (retopo and sculpt)

 noble bough
cobalt tiger
Anyone know how to 3d model in hair tufts? its my first furry model (retopo and ...
noble bough
cobalt tiger
Anyone know how to 3d model in hair tufts? its my first furry model (retopo and ...
Do you mean the hair on the sides in the 2nd pic?
cobalt tiger
yeah but nvm i got it
noble bough
How did you solve it
noble bough
You got a picture? Not familiar with that
cobalt tiger
im working on it rn but theres a video on it

A super quick tutorial on how to blend your fur, feathers or other sticky out bits into a mesh without spending hours blending your topology. This has pained me for a while now so I hope this offers you the help it did for me!
noble bough
cobalt tiger
Anyone know how to 3d model in hair tufts? its my first furry model (retopo and ...
one more thing that I just noticed: how many subdiv levels are on the head ? in the picture the head has 10k tris, which is quite a lot for a head
cobalt tiger
its the whole body
 noble bough
now as i see the entire model, the proportion is a bit off
the legs part is too long
legs and torso should be equally high
cobalt tiger
i followed a reference

the arms should be corrrect too since i posed them
i never heard of a torso being equally long as legs??
thats some short legs imo
unless youre in a low proportion percentile
theres this anthro stats resource thing
then again, it was taken by the us military
noble bough
yeah i wrote it wrong, i meant that the upper body and lower body ( if divided on waist are equal
and that is not the case here weirdly

they are almost exact halves
cobalt tiger
ahh i see
maybe loin/groin area instead of waist
waist is thinnest part of upper body
typically
on fit person
easily adjustable though
noble bough
you get what i mean
noble bough
yeah true
cobalt tiger
do you have an artstation?
im surprised you would put a real name on here if you play vrchat. If you play vrchat 0.o
i couldnt google search John Coleman 3d artist though
theres too many w same name XD
noble bough
not even artsation linked
cobalt tiger
why dont you make up a username?
just a suggestion
unless its your collegues
ooooh nice
hi predox!
do you know 3d stuff and vrchat setup?
noble bough
scammer i guess
cobalt tiger
lol
noble bough
no professional writes that they are
noble bough
and no artstation is dead giveaway
cobalt tiger
yep
i better put my artstation instead then! lol idk i use carrd which links to my artstation
carrd has all my links
but its unclear since u have to click an image to go there
or an icon
i suck at websites even if its a template
cobalt tiger
noble bough
and no artstation is dead giveaway
do you know how to export blender render animations?
im struggling to do it
all it says is to export as png
i did render as animation
but i just got a billion images in my temp folder
which i dont want to turn into an animation... i just want a high res video
cobalt tiger
what do u use if i may ask?
cobalt tiger
ah
noble bough
i forgor to mention, that I also haven't really done any animations lately
have you fixed the proportion problem ?
 hushed leaf
ffmpeg -f image2 -i img%04d.png -vcodec libx264 (and other options) output.mp4
 spiral sigil
oh is this the blender chat
spiral sigil
What weight should I use for weight painting
cobalt tiger
spiral sigil
What weight should I use for weight painting
weight everything to the specific bone to 1/ red then blend to 0/blue where you dont want it to effect
cobalt tiger
spiral sigil
Ummmmmmmmm

The first 500 people to use my link will get a 1 month free trial of Skillshare!
https://skl.sh/royalskies01241
Here are ALL the tricks I use to weight-paint new character easily and FAST-!!
If you enjoyed this video, please consider becoming a Member :)
https://www.youtube.com/@TheRoyalSkies/join
Or joining the Patreon Squad directly:
https://...
tawny pollen
 noble bough
how would you go about modeling teeth like these ? one mesh to get the silhouette and then paint the shadows on it, or model each tooth seperately

idk whats more efficient for vr chat
hushed leaf
end with one mesh for the whole head regardless of how you build it, and of course minimal polygons is better, assuming it looks right.
Could do a high-poly model then bake normals into a low-poly version.
noble bough
hushed leaf
end with one mesh for the whole head regardless of how you build it, and of cour...
with one mesh do you mean one connected mesh or one mesh that consists of several meshes
hushed leaf
oh I mean one mesh object, doesn't matter what parts you have in there for VRChat purposes
 faint bronze
One mesh but with the curves, then texture
noble bough
faint bronze
One mesh but with the curves, then texture
huh what curves
faint bronze
I just meant the curves of the teeth. How teeth naturally curve
To model that, but keep it one mesh
hushed leaf
one actual mesh or one mesh object?
 keen sierra
id do one mesh and make a normal map for the gap indicators - this ways youre saving on polys that would just overlap each other in between teeth
 pallid cradle
i am dreading unwrapping this

 azure rain
trying to make a low poly furry and for some reason the neck area with the render is having a very noticeable seam and being very metallic any of y'all have an idea why that might be
https://cdn.discordapp.com/attachments/751549138184700146/1337640285621981245/image.png?ex=67a82e18&is=67a6dc98&hm=eb27c4f3e3798673c096e47c0b5f16d8f153172360ebee731bca701e03a58b00&

 exotic obsidian
azure rain
trying to make a low poly furry and for some reason the neck area with the rend...
exotic obsidian
azure rain
trying to make a low poly furry and for some reason the neck area with the rend...
Try selecting all the vertices/faces then pressing Shift+N to recalculate normals?
azure rain
yeah that ended up fixing it
exotic obsidian
Ah, okay
 timber bay
hello i wanted to export a sign i made to sketchfab but it only has texture on one side, pictures related


 rapid spade

 faint bronze
timber bay
faint bronze
timber bay
Are you sure everything is UVd the way you want it?
I would double check that
 candid thistle
Hey can someone help me with like exporting
I’m planning to buy an avatar, but right now I’m testing with a free model on how to export stuff.
After I get the model, do I export it into blender, then to Unity, then to vrchat?
And if so can someone please give me a good video or tell me how.
 devout orchid
if its ready to use avatar, blender part may be skipped, blender is for modifying/kitbashing/adding etc
 prime bridge
anyone got a tool that helps me mirror armature and mesh together? I got a wing done rigged, and I wish to mirror it with proper naming convetion i tried Easy weight but doesnt work on my version of blender
 carmine pagoda
prime bridge
anyone got a tool that helps me mirror armature and mesh together? I got a wing ...
carmine pagoda
prime bridge
anyone got a tool that helps me mirror armature and mesh together? I got a wing ...
You could use a blender mirror modifier.
Unless that won’t work for some reason
 fast wedge
Do yall have any tips or suggestions on making 3D model rigging more efficient, especially when it comes to face rigging?
carmine pagoda
Im trying to make a texture. I have a few problems, I cant paint on the picture on the left and i cant figure out how to get it on my lamp. Suggestions are greatly appreciated.
 rapid spade
I don't know if I can improve it

 past steppe
sup, im using blender for the first time, but i dont know what to do. shuld i like set a goal like, trying to make a world or avatar first as i learn how to use it or shuld i just start by learnig how to use it,but the thing is that having a goal(as for making a world or avatar) could make it easier for me to learn it, but i dont know im kinda lost
faint bronze
rapid spade
I don't know if I can improve it
looks pretty great! How's the edgeflow?
faint bronze
past steppe
sup, im using blender for the first time, but i dont know what to do. shuld i li...
start with the blender donut tutorial on youtube. it'll teach you all the basics
 heady hill
Henlo. Wondering if someone could help me UV unwrap a model so I can print it 2d?
My PC is down currently and I can't figure out PaperMaker
hushed leaf
past steppe
sup, im using blender for the first time, but i dont know what to do. shuld i li...
maybe make a donut
rapid spade
faint bronze
looks pretty great! How's the edgeflow?
I don't quite understand your question
faint bronze
rapid spade
I don't quite understand your question
Your topology
 tough plover
faint bronze
Your topology
tough plover
faint bronze
Your topology
it looks like a sculpt, topology doesn't really matter at this stage
rapid spade
faint bronze
Your topology
I understand now, I haven't done the retopology yet
faint bronze
I gotcha. I was just curious. Looks like a great sculpt though!
jovial seal
im starting to feel like front facing eyes on a furry model are impossible lol

 swift jolt
azure rain
yeah that ended up fixing it
swift jolt
azure rain
yeah that ended up fixing it
yea half the model was inside out... shading like that usualy appears were it is connecting inside out faces to outside in faces... :D
pallid cradle
 rapid spade


 modest widget
What if UModeler X had been by your side while creating the 'door animation' in Unity?
Let me show you now! 🔍


 jaunty zealot
I feel like I just watched an advert
 raven ridge
Because it is
spiral sigil

pallid cradle
Lasor shotgen
 noble bough
I haven't shared my last big project here yet, I believe. This was modeled after the concept I found online in the 3rd picture.


 green rampart
sasha design: @/Nymphicus_hcus on X
pomni design: @/_bunthing on instagram

 swift jolt
modest widget
What if UModeler X had been by your side while creating the 'door animation' in ...
swift jolt
modest widget
What if UModeler X had been by your side while creating the 'door animation' in ...
Na, blender is easier to learn
 ripe herald
I created the world Radiant Nights. It’s published


It’s a bar club with music and games. I’ll be adding an additional floor by end of next month. I’m Waffles, the owner of Radiant Nights. I hope you enjoy it
swift jolt
first time ever trying to model a head from scratch... didnt know i knew how to... just kinda freeballed it
 hushed leaf
well it certainly looks like a head!
jagged moat
swift jolt
first time ever trying to model a head from scratch... didnt know i knew how to....


 dull willow
Drift motorcycle physics and collider rig
 spiral sigil
 orchid phoenix
i think im actually going to die

 white jay
** I need tutorials **
Okay, time to face facts and accept throwing myself into the deep-end of avatar creation was a very bad idea. It's time I learnt this properly. I need tutorials. Starting with blender, how to use, and moving onto the basics of creating a character. I've the day off today and it's 11AM. I'd like to be able to show off a (probably ugly as hell) human looking, closer to cartoony than photorealistic, person in this channel later tonight and maybe be able to move on to refining it over the weekend. Who can point me to a good tutorial set, ideally free but if you think you know of a miracle working paid course that I could get started on, I'm all ears 🙂
And don't worry, I am well aware this is going to be a long journey, but I also need to feel some sense of achievement early on in the process 🙂
For context, my 3D modeling experience to date is pretty much 100% using OpenScad to write javascript like code to build rigid bodies for my 3D Printer. Things like tools and fixings, nothing organic like us fleshy meat sacks 😅
 solar fossil
white jay
** I need tutorials **
Okay, time to face facts and accept throwing myself into ...
solar fossil
white jay
** I need tutorials **
Okay, time to face facts and accept throwing myself into ...
Its on an older version of blender, but still a very good tutorial series
https://youtu.be/F1CTfis1TEg

This video is the 1st part of 40 in this very detailed tutorial series about modeling. I'll take you through all the steps of anime style character creation in the 3d software called 'Blender' and without any time lapse.
If you haven't watched it already make sure to go through part 0! In that video I'll show you the final result and tell you a...
 empty gazelle
My friend passed me a novabeast blend file and told me to port an outfit to it
I'm concerned why it actually looks decent

 mint silo
anyone know why shade smooth doesnt work for an object in blender? some parts of the object work, but some still look like they are shaded flat
tough plover
mint silo
anyone know why shade smooth doesnt work for an object in blender? some parts of...
the mesh might be split at those spots, or there are faces on the inside
mint silo
tough plover
the mesh might be split at those spots, or there are faces on the inside
i thought that too, but no, i already merged all the vectors by distance, removed the vectors, and it didnt change a thing
tough plover
can you screenshot what it looks like in edit mode
mint silo
oh i found the problem, i enabled "keep sharpness"
jagged moat
God I've slept on the cloth filter brush for so long
 hushed leaf
ooh those look great
jagged moat
thxthx
 pseudo knoll
hot take but blender would be 400% more fun if it had the interactive ui sound design and chill musical vibes of balatro
 cerulean latch
pseudo knoll
hot take but blender would be 400% more fun if it had the interactive ui sound d...
cerulean latch
pseudo knoll
hot take but blender would be 400% more fun if it had the interactive ui sound d...
yea SERIOUSLY. why can't more things be whimsical like that
modern desktop software not having any UI sounds at all is such a miss. i want to make my work feel gamey
solar fossil
Huh, wonder if one could make a plugin for that
hushed leaf
having made a plugin recently, I think probably, yeah.
devout orchid
subway surfers area integrated in workspace
 wild sequoia
zbrush sculpt for new avatar
 faint bronze
wild sequoia
zbrush sculpt for new avatar
faint bronze
wild sequoia
zbrush sculpt for new avatar
omg
I'm not usually a fan of furry models but this is fantastic
wild sequoia
faint bronze
I'm not usually a fan of furry models but this is fantastic
thanks! I'm trying to land somewhere between furry and the more japanese style kemono models
dull willow
hitboxes for the projectiles


 tulip verge
whats a recommeneded version of blender to use to edit avatars w cats plugin without it breaking? Im having sm trouble
tough plover
tulip verge
whats a recommeneded version of blender to use to edit avatars w cats plugin wit...
the CATS plugin is not required for general avatar creation. if you are trying to work with MMD models, then it can be useful to apply certain fixes. it does have a lot of extra utilities that may be useful still. use this to find the appropriate version for your blender version https://catsblenderplugin.xyz/

Home of Cats Blender Plugin for Blender. an tool designed to shorten steps needed to import and optimize models into VRChat.
I would recommend using the latest LTS blender version.
tulip verge
ty!!
 royal cobalt
Hey, is there anyone experienced with this model base? I want to use it to make something, but anything 3D modelling scares me and I know absolutely nothing about it. I'm happy to pay for edits
https://skip4d.gumroad.com/l/chibi?&referrer=https%3A%2F%2Fwww.vrcarena.com

Gumroad
💖 ✨ 🐾 Be who YOU want to be with this ultra-customizable chibi mega base 🐾 ✨ 💖This is a HUGE base for PC and Quest! With over 30,000,000 possible customization combinations. This is meant to be a small, cute toon-y base to fill your little gremlin needs! Solo developed by me, I spent well over 100 hours making this base across several months. It...
green rampart
Salad Fingers for Devil's Dawn (@/DEVILSDAWNRBLX on X)
 noble bough
doing a kayuza print for a friend

 thin mesa
for a game I'm developing in the fture


 mild nimbus
I know this is prrob a very basic question but
Lets say I make a outfit for the Selestia base.
The heel shapekey is not steep enough for the kinda heels im looking for.
If i model the heels any steeper it will go through the floor (I cannot touch the body)
What should I even do in that situation? Just let the person playspace it to correct it?
or use a alpha texture to hide the feet and just add my custom stockings that come with the heels.
which will have its own leg height
Tbh I just said my solution anyway but any insight is appreciated.
Oh wait I cant just animate the hipbone upwards on toggle nvm
lol
jagged moat
swift jolt
Sick texture job!
 wild briar
I like the tiki torches
wild briar
royal cobalt
Hey, is there anyone experienced with this model base? I want to use it to make ...
I can help with edits if youd like.
royal cobalt
No longer necessary, but appreciated
 mint lark
How do I shape 3D letters in blender?

Making that text match the ref imagine below it ^
faint bronze
I would just make the camera be straight down and quad draw (or whatever the tool is called in blender) over the reference, then extrude up
mint lark
Okay
hushed leaf
you could do a fun thing with displacement where you literally turn the 2D image into a 3D model. Make the image black/white then this is a decent guide:
https://realityfakers.net/tutorials/2d-image-to-3d-model/
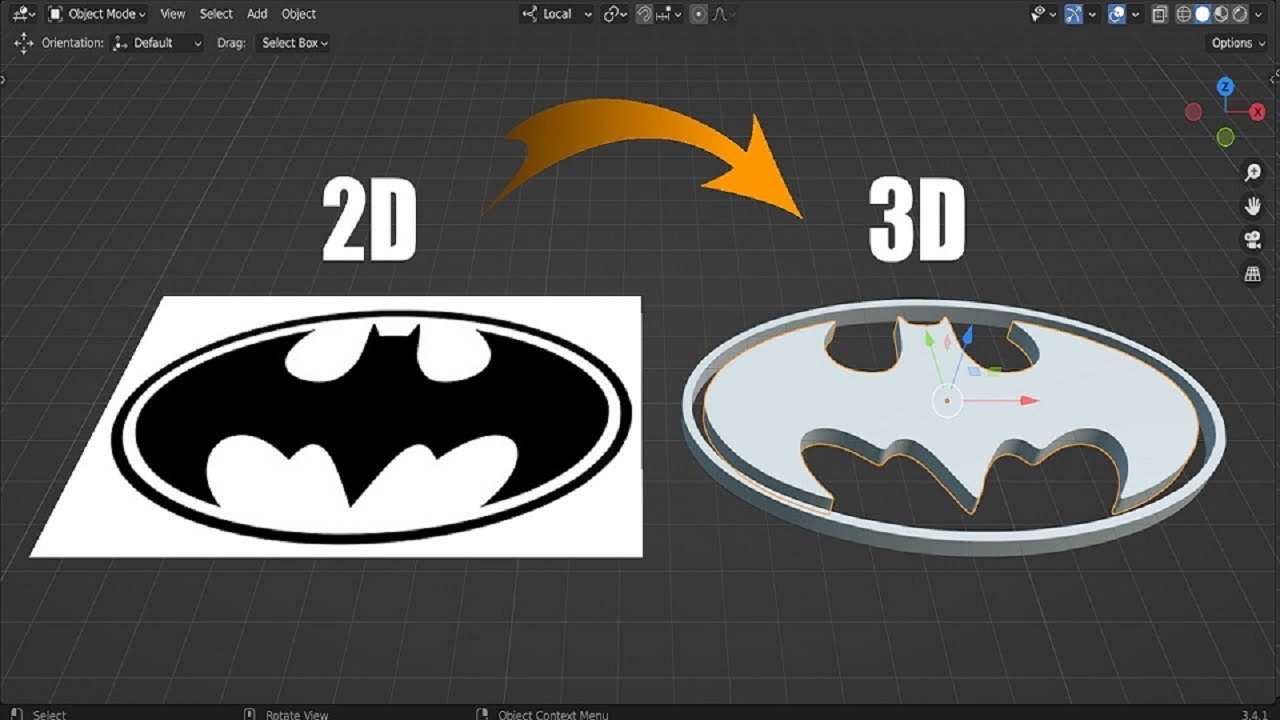
Learn how to transform any image into a 3D mesh in Blender with this step-by-step tutorial. Perfect for beginners and advanced users alike.
devout orchid
and blender also can work with fonts
mint lark
Thanks for the help
hushed leaf
devout orchid
and blender also can work with fonts
I keep forgetting this!
faint bronze
wild sequoia
zbrush sculpt for new avatar
When you finish this, will you be selling the base/avatar anywhere?
Or is it personal
wild sequoia
faint bronze
When you finish this, will you be selling the base/avatar anywhere?
yes, probably in 1 or 2 weeks. I don't know if I'm allowed to advertise here but I'll post about it on bsky / twitter and at least post a screenshot of the final model here
faint bronze
I found your gumroad on your Twitter so I'll be checking it periodically (:
faint bronze
lil room modeling and render I did in a day for ideation for a short film

 green rampart
design by _bunthing on instagram
 mint lark
I'm new to blender, this is a plane that I imported to unity but only one side shows. How do I make it an object that will show both sides?

 winter iron
duplicate the entire thing then flip faces
 viscid birch
flip faces is under Mesh > Normals > Flip
mint lark
Thx
swift jolt
mint lark
I'm new to blender, this is a plane that I imported to unity but only one side s...
faces only have one side... so if you want both sides you have to duplicate and flip or make it thicker
 unkempt gale
mint lark
I'm new to blender, this is a plane that I imported to unity but only one side s...
unkempt gale
mint lark
I'm new to blender, this is a plane that I imported to unity but only one side s...
Okay so do you want two different sides like a front and back or do you not care if its the same on both sides?
There are shaders like poiyomi that will turn off the face culling to save on polygons so you dont have to dupe it. However the draw back is it will be the same image on both sides. If you want two unique basically a front and a back you will have to duplicate and flip normals.
tough plover
unkempt gale
There are shaders like poiyomi that will turn off the face culling to save on po...
Poiyomi lets you specify a separate texture (and mask basically any effect) to front or back faces
unkempt gale
tough plover
Poiyomi lets you specify a separate texture (and mask basically any effect) to f...
Oooh i didnt know that o .o
mint lark
unkempt gale
Okay so do you want two different sides like a front and back or do you not care...
I was wanting it to show both sides of that object
tough plover
mint lark
I was wanting it to show both sides of that object
then your options are:
- use a shader that lets you turn Backface culling off, such as Poi's (but many others can also, if you're making this for a world, use Silent's Filamented or something)
- duplicate the mesh and do alt + N > Flip to flip the normals for the duplicated mesh
 fair mason
i really like the n64 promotional mario art

 cobalt crag
Anyone here has experiences with making shields in general?
hushed leaf
what do you consider a "shield" here?
cobalt crag
hushed leaf
what do you consider a "shield" here?
like... one of those typical shields you'd see knights carrying and stuff.
i just had a question that i do have some reference pics but they're kind of curvey like bowing outward so i'm kinda of struggling to get them "flatten" in perspective so i can make a model in blender off it
just sort of like asking for advices on how to do it
hushed leaf
ahh, got it. I'd probably make a large cylinder then cut out a section of it. To get the curve.
Or you could make it flat, then subdivide then select the middle and move it out with proportional editing on so it starts to curve.
cobalt crag
i actually made the first model flat off it but some of the details and the edges around it was distorted because of the curve on shield, so it feel like it's fighting my brain and i've been struggling to get it right since then
I mostly got the front center porportions somewhat right but not the edges of it
hushed leaf
or... you could make the model flat, then shrinkwrap it to a cylinder
cobalt crag
yeah but i'm just asking for advices to get the details of it "un-distorted" if that make sense
if not, it's ok! i appreciate you giving some suggestions anyway in terms of putting model on cylinder
hushed leaf
not sure what to tell you without seeing what you mean by distorted
cobalt crag
Look at the outside edges of it, that's the slight distorted details for me because they're curved back
i know the most of center on it is somewhat flat and that's the part i managed to get it modelled
hushed leaf
sorry, which edge?
yeah I'm not sure what specifically you're referring to as distorted, I guess.
is this an actual model?
cobalt crag
it's a video game model thing, it's God Eater Resurrection
and no i'm not going to rip the model out of it, i'm not comfortable doing that.
I just wanted to replicate it into a model on blender
azure rain
cobalt crag
and no i'm not going to rip the model out of it, i'm not comfortable doing that....
as far as like copyright infringement would be concerned that's functionally equivalent
azure rain
like feel free to try to make the shield just be aware that it's not going to sidestep the aspect of using someone else's IP
 royal canyon
for self-use shouldnt it be ok?
azure rain
royal canyon
for self-use shouldnt it be ok?
still copyright infringement just unlikely to be enforced
fanart legally speaking is not legal it's just tolerated by corporations
 azure mountain
Hi, I'm having difficulty subtracting weight paint from a specific bone or vertex group. I either select the vertex group item or I ctrl shift select a bone from front bone view, either way, when I click and drag the curser around the effected area of the mesh, the subtract doesn't affect the area. Accumulated is unchecked, Auto Normalized is unchecked, Draw is the only option that works with subtract. Note: Just as I can't subtract weight, I can't add weight either. What am I doing wrong? I've adjusted the Radius, Strength, Weight toggles, everything, nothing is working.
Blender

 atomic wigeon
 orchid phoenix
wild sequoia
zbrush sculpt for new avatar
orchid phoenix
wild sequoia
zbrush sculpt for new avatar
godd i need to learn z brush
 cursive summit
I was trying to import a .pmx file using the MMD tools addon but they keep showing up like this

I switched to Blender 4.2 and it STILL does it
nvm, I had version v2.10.3 and not the latest v4.3.1
 hushed leaf
that's what makes them good
noble bough
im also pretty happy with how these turned out
jagged moat
noble bough
finger
Lookin good!
noble bough
9/10 dentists recommend using what he uses

 thorn yarrow
Does anyone know where to get a Sea of Thieves galleon model? I cant find one
noble bough
i dont think you will find the exact sea of thieves model. there are 100% free galleon models out there tho
mint silo
im having so much trouble baking textures, can someone help me? my texture keeps turning black
hushed leaf
mint silo
im having so much trouble baking textures, can someone help me? my texture keeps...
what's your process?
mint silo
hushed leaf
what's your process?
process?
mint silo
hushed leaf
so how are you doing this now

idk if it helps, but in the material preview, the face is all black
hushed leaf
hmm nothing there looks out of the ordinary
mint silo
hushed leaf
hmm nothing there looks out of the ordinary
no matter what i try, it keeps turning black
not only that, but it changes another texture intergrated in the shader
hushed leaf
These days I do this using SimpleBake
possibly you don't have the right image node selected when you're doing it?
mint silo
i select the faceDiffuse image texture you see
hushed leaf
hmm do you need to be doing this with cycles? I haven't done it manually in a while
mint silo
yes
however hold on
let me show you something
this has multiple nodes inside of it, containing a texture
 hushed leaf
huh I have no idea what that is 🙂
mint silo
this is how it looks like

in fact, the "Plastic001_1K_Roughness.jpg" texture node also turns black when baking the textures
orchid phoenix
ouppy


 runic pebble
can someone explain why this is glossy. just exported it from blender as an FBX and dropped it in unity it has no materials aswell.

 small slate
smoked cheese cookie wip
 winter iron
runic pebble
winter iron
runic pebble
Change the material
runic pebble
winter iron
Change the material
I've tried putting a new mat on, but it always has the gloss on it.
faint bronze
runic pebble
I've tried putting a new mat on, but it always has the gloss on it.
It's probably the normals
Try recalculating? Or turning off blender's auto smooth feature
runic pebble
faint bronze
Try recalculating? Or turning off blender's auto smooth feature
I've tried the recalculating, but the other one i have no it would be overe here right
 jagged moat
runic pebble
I've tried the recalculating, but the other one i have no it would be overe here...
jagged moat
runic pebble
I've tried the recalculating, but the other one i have no it would be overe here...
If you apply a new material with just the standard shader do you still get that look? Kinda looks like it's partially metallic
runic pebble
jagged moat
If you apply a new material with just the standard shader do you still get that ...
yes get the same look
jagged moat
runic pebble
yes get the same look
In edit mode in blender, select all the faces and do alt+n -> reset vectors
runic pebble
still is glossy
jagged moat
Could you give a screenshot of the inspector tab in Unity with the trouser mesh selected?

 jagged moat
Smoothness on that material is at 0.5 which could give that look
runic pebble
i noticed that to, but even when switching it out for a new mat it still has the gloss
jagged moat
a new material with the metallic / smoothness set to zero?
 jagged moat
In this tab, does it say 'Clear Custom Split Normals Data' with the trousers selected??
 runic pebble
yes it does
jagged moat
Hit clear and reimport
runic pebble
still glossy
jagged moat
do you have any modifiers in blender?
runic pebble
just the armature modifiers
i did use mirror, sub divided, and Shrink wrap when making them
jagged moat
In blender do you have backface culling enabled in the viewport?
 jagged moat
On the dropdown in solid view
 runic pebble
i did not have it on
jagged moat
After enabling it do any of the faces go invisible?

 jagged moat
Yk, I'm starting to think that's how it's meant to look when it's lit by a realtime directional light as opposed to light probes. though I might just be gaslighting myself
runic pebble
i have no clue
jagged moat
Amma boot up a project and check for myself xd
runic pebble
all right lol
jagged moat
I'm invested in this now xd
runic pebble
this happens all the time when i make clothes its frustrating
could it be something with normals or auto smoothing
jagged moat
If you don't have an auto smooth modifier and you hit clear custom split normals data auto smoothing shouldn't be enabled
runic pebble
jagged moat
If you don't have an auto smooth modifier and you hit clear custom split normals...
okay
Just going down the checklist at this point
jagged moat
I could take a look at the model if you're okay with sharing it?
jagged moat
runic pebble
please
Figured it out, the scale wasn't applied in blender so the shading was getting messed up

 runic pebble
is that a setting when export
jagged moat
With the trousers selected, ctrl+a -> scale
runic pebble
thank you
jagged moat
np
runic pebble
 so many hours of work
jagged moat
That's 3d for ya xd
runic pebble
Seriously lol
jagged moat
yeah, it's likely that it was calculating the shading at this size and then applying it to the normal shaped model. That's my current theory
 noble bough
 faint bronze
Amazing work
noble bough
thanks, still wip tho, but will give it my all
mint silo
so, i was doing edge wear on textures using this tutorial, but i was wondering if there is a way to create edge wear based off of the normal map of an object, if so, how would i do that?https://www.youtube.com/watch?v=_wEXl3LncAc&t=2s

In this tutorial i'm making a texture that only appears on the edges of your model using the bevel node
image texture that i used: https://ambientcg.com/view?id=Plastic001
 grave coyote
I created this models based on the first image as requested by my Client
What do you guys think?


 noble bough
grave coyote
I created this models based on the first image as requested by my Client
What do...
noble bough
grave coyote
I created this models based on the first image as requested by my Client
What do...
can you show the wireframe
noble bough
grave coyote
I created this models based on the first image as requested by my Client
What do...
also the blade part here is wrong. they are all split, but yours on his right hand is just one
cant really tell much, cause white material and those angles you took make it hard to tell 😄
grave coyote
noble bough
can you show the wireframe
I will update here when I'm done
grave coyote
noble bough
would there be a problem ?
Not a problem but I'm busy
I'll update when I'm done
faint bronze
Could be zbrush
hushed leaf
that was my guess
 nocturne quiver
I'm the worst at 3D modeling.... I need to fill in these eyelids so they're not hollow like this. What's the best way to do this?
 azure rain
your geometry also seems like it needs a lot of work as it seems to have no sense of Edge Loops whatsoever https://blenderartists.org/uploads/default/original/3X/4/b/4bd01a89c31ff2fc919702ca33279d51f5ece318.jpg so it would be kind of difficult for you to make facial animations with it being just that teeny tiny grid of squares
 hushed leaf
probably are still doing sculpting and haven't done a retopo yet
solar fossil
^ This man right here is about to have so many scammers in his DMs
grave coyote
solar fossil
^ This man right here is about to have so many scammers in his DMs
😂😂😂😂
You're probably right
 violet pecan
solar fossil
^ This man right here is about to have so many scammers in his DMs
violet pecan
solar fossil
^ This man right here is about to have so many scammers in his DMs
Owww damn thanks Hahaha didn't think of that
solar fossil
Check out the VRCTraders discord server, there the artists actually get verified before they are allowed to take on commissions
 golden raptor
What would be the best way to weight paint this? im having some trouble


 noble bough
golden raptor
What would be the best way to weight paint this? im having some trouble
noble bough
golden raptor
What would be the best way to weight paint this? im having some trouble
well first off, where are the hips for that char ? if you go by the picture on the bottom right, the hips are pretty high up and the legs of the onesie are too far down (meaning that the separation between each leg is way too low. thats also the reason why the clipping occurs on the bottom picture, cause the fabric wouldnt normally stretch that much, if the size was accurate. that is no problem tho.
you should try to either fix the size issue I mentioned or, which is optimal if that is the only outfit, you could just simply deleted the mesh below the clothes. it wouldnt be shown anyway and you would save precious triangles. you would have to readjust the rig obviously.
hope that helps, if you have questions, just ask 🙂
grave coyote
What do you guys think....
A 3D Character I was commissioned by @allure.swan
 noble bough
grave coyote
What do you guys think....
A 3D Character I was commissioned by @allure.swan
noble bough
grave coyote
What do you guys think....
A 3D Character I was commissioned by @allure.swan
I mean it looks alright. You could definitely improve it by a lot if you spend more time in the texturing or even the modeling part, cause some parts like the feet, chest or face look off. Other than that great work. What are the stats on this one ? (triangles, textures, etc. )
Btw how did you make this model ? did you use blender, zbrush ? @grave coyote
grave coyote
noble bough
I mean it looks alright. You could definitely improve it by a lot if you spend m...
Blender
Thanks for the review
I'm just a beginner so I'm just trying my best since I want to make my first commissioned project epic
@noble bough
noble bough
grave coyote
Blender
Thanks for the review
I'm just a beginner so I'm just trying my best si...
For your next project or commission you should definitely focus on the shapes and overall appeal. You got good basics in modeling, but some parts that I mentioned definitely need some more work. I recommend using more references for your models ( which I think you did for gotou)
grave coyote
Yeah, wow
This is the reference image
 noble bough
well that is not the only shot of him obviously
I am a bit confused because here, his arms are singular blades, but in yours, they are connected between

 grave coyote
noble bough
I am a bit confused because here, his arms are singular blades, but in yours, th...
grave coyote
noble bough
I am a bit confused because here, his arms are singular blades, but in yours, th...
I also made some adjustments since my client actually wants it to be real ugly since it's supposed to be a monster
noble bough
grave coyote
I also made some adjustments since my client actually wants it to be real ugly s...
adjustments like ?
noble bough
grave coyote
Yeah, wow
This is the reference image
I mean this design is terrifying, replicating that would be definition of monster
grave coyote
I didn't even bother checking the internet for it
I didn't know about him originally, that's what my client gave me
grave coyote
noble bough
you should
Rookie mistake😅
grave coyote
noble bough
gather references find more information about it
I learnt my mistake
Not commiting them anymore
noble bough
always gather references, makes it easier to know what you want to create, because you can actually see it, and not just in your mind
have you sent your client this already ?
grave coyote
noble bough
always gather references, makes it easier to know what you want to create, becau...
Okay
I really appreciate
grave coyote
noble bough
have you sent your client this already ?
Yeah
noble bough
response ?
noble bough
just out of curiosity, no need to answer, how much is he paying you for it
for what exactly ? the fully rigged model ?
grave coyote
noble bough
for what exactly ? the fully rigged model ?
Yh
noble bough
if it is really only 75, i want to be honest with you. you are getting ripped off
grave coyote
noble bough
if it is really only 75, i want to be honest with you. you are getting ripped o...
Ouch
It's my first time and I don't know much about the pricing
noble bough
its ok, lets make some calculations so you get what I mean
how many hours have you used already for this project?
approximately
grave coyote
noble bough
how many hours have you used already for this project?
Approx 8-10 hrs
I did it throughout the entire night
Then did the texture during the day
noble bough
ok so lets say you have the texturing done to simplify what I mean. you still need to rig the model and make it ready in unity
thats also another couple of hours
lets say in the end you have 15 hours of work
would you agreee ?
grave coyote
noble bough
would you agreee ?
Yes
noble bough
if you now divide your hours by the amount you are getting paid for it, you know your hourly wage
which would be 5 dollars / euros
which is WAAAY to low
noble bough
you have to approach it from the other side
how much would you consider paying for 1 hour of your labour/work ?
grave coyote
I didn't know how to calculate pricing
noble bough
10 dollars, 15 dollars, 20 ?
grave coyote
noble bough
how much would you consider paying for 1 hour of your labour/work ?
I will say $20
noble bough
ok lets take 20
grave coyote
grave coyote
I will say $20
That's what I would say if I'm asked directly
grave coyote
noble bough
thats 300
Oh
I now understand what you mean
noble bough
yeah
grave coyote
So I am getting only 25%
noble bough
im still not doing commissions, because I feel like I wouldnt be happy with the works myself. but if I would, I would take atleast 30-40 an hour
you have to know your value
otherwise you would be getting ripped off
how exactly did you get your commision ?
did you get messaged ?
and did he make the price ?
grave coyote
noble bough
and did he make the price ?
I said the price because he said that's around what his budget is
grave coyote
noble bough
you shouldnt have done it then, if I were you
I didn't know
It is my first time doing commission
noble bough
you have to imagine, that your customer is getting a one of a kind model
that no one else has
thats why prices can get so high
paying 1000 for a model is not uncommon, but many customers wouldnt probably know that
cause they dont know the time it takes to make one
grave coyote
noble bough
paying 1000 for a model is not uncommon, but many customers wouldnt probably kno...
Really
That's mind-blowing
noble bough
I would advise you to still do the commission, to atleast satisfy the customer and get some reputation maybe, but for the next commission, think of the pricing
grave coyote
noble bough
I would advise you to still do the commission, to atleast satisfy the customer a...
Yeah, that's what I will do
Since I already agreed on the price
noble bough
grave coyote
Really
That's mind-blowing
it really isnt if you think about it. if I take 30-40 bucks an hours and need around 30 hours for a fully fleshed out model, that comes to around 900-1200 dollars
grave coyote
But the issue is most client's won't be ready to pay
noble bough
grave coyote
But the issue is most client's won't be ready to pay
if the clients cant pay for what you are actually worth, they shouldnt even think about getting custom models
easy as that
you dont have to adjust to the customers budget
they have to
of course you could think : " if I lower my prices a lot, I would get more customers." , but in reality you would be wasting tons of hours of underpaid work
grave coyote
noble bough
you dont have to adjust to the customers budget
Thanks
I learnt a lot
grave coyote
noble bough
of course you could think : " if I lower my prices a lot, I would get more custo...
Okay
Thanks a lot
noble bough
Im glad I could help you in several aspects today haha 😄 . its important to know your worth, even if you are still a beginner
if you keep at it, you can make some banger models in the future, I believe it
grave coyote
noble bough
Im glad I could help you in several aspects today haha 😄 . its important to kno...
I really appreciate it man
grave coyote
noble bough
if you keep at it, you can make some banger models in the future, I believe it
Thanks
noble bough
you're welcome
grave coyote
Thank you do much
You can't understand what this means to me
I appreciate you
noble bough
well dont want another artist to get ripped off
grave coyote
Can I send you a friend request
Incase I do face a problem
noble bough
sure thing
grave coyote
noble bough
well dont want another artist to get ripped off
Thanks bro
 hot sundial
As this is not discord for comms, that would be best.
noble bough
hot sundial
As this is not discord for comms, that would be best.
roger 🫡
grave coyote
hot sundial
As this is not discord for comms, that would be best.
Sorry if we broke any rules😅
hot sundial
grave coyote
Sorry if we broke any rules😅
nah, it's not like looking kind of post so it's fine but just hope you don't get scammer client from those talk instead.
grave coyote
hot sundial
nah, it's not like looking kind of post so it's fine but just hope you don't get...
Discord still has the blocking and reporting feature
That sure works for them😊
hot sundial
one day....yeah
noble bough
still at sculpting the shapes 😮💨

 unique galleon
noble bough
still at sculpting the shapes 😮💨
unique galleon
noble bough
still at sculpting the shapes 😮💨
shit that looks so good
 flat kelp
 noble bough
soon there

 pure apex
Uh I'm trying to make accessories for my bf for his oc but I dunno where to start in blender... 😞
hushed leaf
donut tutorial! or some other "intro to blender" one
 void bay
My second model ever made, the first one is an older/uglier version of this.


Made it today.
noble bough
Its nice. It certainly is cursed with that face, but I think thats weirdly fitting
royal canyon
1991 vibes
void bay
Furry SM64 base model by me


Textured like my main sona
Third model btw
-# unfortunately the app i use, the texture editor sucks ass
noble bough
void bay
Furry SM64 base model by me
what even is that program, if you dont mind me asking
void bay
noble bough
what even is that program, if you dont mind me asking
A mobile app simply called 3D Modeling App
 eager mural
Why does changing Brownian from zero to any number make my particles go crazy long? When i follow guides on youtube, no one seems to have this issue.
 hushed leaf
whatever that is, it looks really cool 🙂
unique galleon
eager mural
Why does changing Brownian from zero to any number make my particles go crazy lo...
Are you able to see the blender version used in the tutorials? Have you checked if this issue occurs on their version too?
eager mural
unique galleon
Are you able to see the blender version used in the tutorials? Have you checked ...
I believe it could be a blender version issue. I might have to try installing an older version of blender to see if there is a difference
noble bough
i hate cloths
 swift jolt
noble bough
i hate cloths
swift jolt
noble bough
i hate cloths
that looks amazing! but i imagine if i was to willingly model cloth that complicated i would also hate cloth forever HAHAHAH
 karmic echo
Fur wip~

 faint bronze
WIP I did today of ENA
 swift jolt
 faint bronze
wild sequoia
zbrush sculpt for new avatar
faint bronze
wild sequoia
zbrush sculpt for new avatar
Hi, just wondering if you plan on throwing this on your gumroad any time soon? 
azure rain
swift jolt
Very nice start of a European style Street
swift jolt
azure rain
Very nice start of a European style Street
Thanks! Started recreating the area around my hometowns plaza
 cursive rune
anyone got any idea why trying to preview a models physics in play mode wont work
swift jolt
cursive rune
anyone got any idea why trying to preview a models physics in play mode wont wor...
I used to have that issue for ages. Works now. No idea why it started working… sooooooo goodluck
cursive rune
swift jolt
I used to have that issue for ages. Works now. No idea why it started working… s...
lol thats disapointing
azure rain
swift jolt
Thanks! Started recreating the area around my hometowns plaza
Definitely excited to see more of it as it continues
wild sequoia
faint bronze
Hi, just wondering if you plan on throwing this on your gumroad any time soon? <...
yeah it's all finished and I just have to make some marketing material for the gumroad page, but life has gotten in the way the past few weeks. I think at the latest it should be up on gumroad in two weeks but I'll see if I can get everything ready before this weekend
noble bough
todays study


 faint bronze
Oh that's something lmao
 faint bronze
Protogen
 gaunt summit
jovial seal
gaunt summit
jovial seal
someone gonna eat ram wink wink
thorn yarrow
When running my models in unity, the texture dies that weird see through thing, how do i fix?
hushed leaf
thorn yarrow
When running my models in unity, the texture dies that weird see through thing, ...
might have to see it, but if you're posting in here you probably have it in blender, so make sure all the faces are oriented the right way. You might be seeing through the backsides.
thorn yarrow
I have a cannonball, but i see the inside of it, not the outside..
On no other software that happens
Idk whats going on with it in unity
hushed leaf
yep, probably faces are flipped inside-out
jovial seal
jovial seal
WHAT THE HELL WAS I SMOKING WITH THIS GOD AWFUL TOPOLOGY TwT
noble bough
monokuma

 sweet kraken
wasnt sure where to ask but anyone knows how to reduce the radius to the sphere radius in particle system? ive played with alot of settings but no luck , thank you in advance!
hushed leaf
but which radius is that?
I'd guess you mean the emitter?
probably this is more of an #avatar-help thing too, it's not 3D modeling 🙂
rapid spade
It should be a little blacker, I guess it's because of the HDRI.


 unique galleon
rapid spade
It should be a little blacker, I guess it's because of the HDRI.
unique galleon
rapid spade
It should be a little blacker, I guess it's because of the HDRI.
that is so cute!! I understand he's a big scary but he's adorable
Mythological creatures as avatars are just so darn cute smh
rapid spade
unique galleon
that is so cute!! I understand he's a big scary but he's *adorable*
I don't know if it's scary, but I still find it adorable XD, although I finally managed to make it look darker.
 unique galleon
looks great!
You make me want to share 💜 I've been doing some low-poly level design for the past few days!
 rapid spade
unique galleon
looks great!
rapid spade
unique galleon
looks great!
I'm still finishing, I'm missing their weapons, some Khopesh
unique galleon
ooo that'll work really nice with that design
what do you consider the race? Is it a naga?
Egyptian Naga 🤔
hushed leaf
huh, first time I've ever seen this in Blender before: got an object with 7 UV maps, the first 3 are fine, but the last 4 the outline of the UV islands is in a different place than the actual islands, though I can select faces just fine. It seems to be just the visual display.
If I re-order, still the first 3 are fine, no matter which I put there.
oh it seems that for UVs 4+ the outline is UV3's
how strange
 wide forum
I was thinking about how I could cull the vertixes here outside of the view to save on triangles, but when I delete them, it just creates a void. What should I do to merge the vertixes next to the selected ring together?
 wide forum
Hmm, but that creates this strange artifact where the loop gets closed. Why?
 hushed leaf
I'd probably try dissolving the edge, not the vertices
wide forum
How do I select the edge?
hushed leaf
I think in vertex mode it's not understanding the geometry and tries to merge together in the center
wide forum
Sorry, new to Blender
hushed leaf
go into edge mode
hotkey is '2'
you're in vertex select mode now ('1')
if you prefer to poke buttons, they're at the upper left
wide forum
Thanks, that worked :)
 hushed leaf
excellent
this is "edge loop dissolving", an extremely effective way of polygon reduction
wide forum
Indeed, just the tool I wanted
hushed leaf
hushed leaf
huh, first time I've ever seen this in Blender before: got an object with 7 UV m...
this seems to have been a bug in Blender 4.4.0 - it's not present in 4.4.3.
 mint glade
 hot sundial
mint glade
https://tenor.com/view/doctor-who-doctor-who-lux-mr-ring-a-ding-take-a-guess-gif...
hot sundial
mint glade
https://tenor.com/view/doctor-who-doctor-who-lux-mr-ring-a-ding-take-a-guess-gif...
?Tag scam
 split graniteBOT
Hey ho 👋 I see you're looking for commissions.
You will probably receive DM's or friend requests from scammers now (or later) that will try to offer you their services. 😖
🚫 Absolutely DO NOT engage with those, regardless of how competent they might seem or their excuse to why they contact you.
This is unsafe practice used by scammers, and also breaks this Discord's rules. 👮
If you seek a creator, check out VRCTraders and follow their protocols strictly 🥺
(You will get DM from bot to verify your account upon join.)
🌠 It's extremely important to always DEEPLY investigate the account and social media of the person you plan to commission.
Is their social media linked in Discord? Is it legitimate? Are the references stolen? (Try to reverse image search posts to check.) 👀
The quality of fake profiles out there can be crazy good, be aware of that and NEVER engage with DM or friend requests that originate from the artist.
When in the slightest doubt, do not commission them and contact the moderators of the involved communities. 😱
 jagged briar
Can someone help me figure out why my fluid simulation is just...
not working?
Images: Everything, Liquid settings and Bounding settings


every time i bake the liquid, it just does nothing after playing
without the cup model

is it cause it's parented to the camera or something?
 gaunt sonnet
So I fused two meshes together to maintain symmetry, and now there's a hideous seam in Sculpt Mode. How can I go about fixing it?
 hushed leaf
ooh I've not done that in sculpt mode, but if you go into mesh edit mode, select all those faces and do mesh -> normals -> reset vectors, that ought to handle it
gaunt sonnet
hushed leaf
ooh I've not done that in sculpt mode, but if you go into mesh edit mode, select...
hmm! Ok I'll give it a go
gaunt sonnet
hushed leaf
ooh I've not done that in sculpt mode, but if you go into mesh edit mode, select...
ah, sadly didn't seem to do anything, seam still there
hushed leaf
is there something weird about the join? is it actually a join?
you don't have one side with flipped faces or something?
gaunt sonnet
hushed leaf
you don't have one side with flipped faces or something?
now that I think about it, I did duplicate one side and mirrored it, so what would happen in that scenario?
gaunt sonnet
hushed leaf
you could use the mirror modifier, it does this merge cleanly
where's that?
tough plover
gaunt sonnet
now that I think about it, I did duplicate one side and mirrored it, so what wou...
did you mirror it by scaling it by -1 on the X axis?
gaunt sonnet
tough plover
did you mirror it by scaling it by -1 on the X axis?
hmm I did not
hushed leaf
you can check the face orientation, it's one of the options in "viewport overlays" at the top right
gaunt sonnet
tough plover
how *did* you go about mirroring it?
I selected one side, duplicated it, then clicked Mirror under Mesh and went across the X-axis.
tough plover
ok, so it's possible the normals got flipped as well
hushed leaf
the modifier has a "clip" option which will merge the seam cleanly, I suggest that unless you have shape keys
gaunt sonnet
hushed leaf
you can check the face orientation, it's one of the options in "viewport overlay...
oh crap I see it. The duped side is red
hushed leaf
that's why that seam didn't seam cleanly then, y ep
tough plover
select everything in edit mode and do alt + N > Recalculate outside
might also need to do Reset Vectors after
gaunt sonnet
hushed leaf
that's why that seam didn't seam cleanly then, y ep
I'm kinda dumb, I can't find the mirror modifier 😭
gaunt sonnet
tough plover
select everything in edit mode and do alt + N > Recalculate outside
I'll try this too on my newer model, I'll use Kazins on an older one
hushed leaf
gaunt sonnet
I'm kinda dumb, I can't find the mirror modifier 😭
wrench icon in the properties box for a mesh object
gaunt sonnet
hushed leaf
wrench icon in the properties box for a mesh object
thank u
hushed leaf
where all modifiers live
swift jolt
jagged briar
nice
jagged briar
jagged briar
Can someone help me figure out why my fluid simulation is just...
not working?
I...
I've checked the Normal maps, they are correct (if that matters)
I've tried changing the parenting
I can't really figure it out
 wild sequoia
faint bronze
Hi, just wondering if you plan on throwing this on your gumroad any time soon? <...
wild sequoia
faint bronze
Hi, just wondering if you plan on throwing this on your gumroad any time soon? <...
I just published the avatar on gumroad and jinxxy 👍
faint bronze
:0
noble bough
Forgor to post this here. Working one a printable figure of matt from Epic battle fantasy


 gritty junco
swift jolt
gritty junco
swift jolt
that’s looks super great! very official and high professional look! good job 👍🏻👍🏻
 wispy tide
Cynder Hoodie for the Nardoragon.

 inland hull
wispy tide
Cynder Hoodie for the Nardoragon.
inland hull
wispy tide
Cynder Hoodie for the Nardoragon.
oooh nice!
wispy tide
Did i just make my first base model?
 noble bough
where the arms tho
swift jolt
noble bough
where the arms tho
Then can Get some cool robo arms
noble bough
some rad mantis-blade arms
hushed leaf
hell yeah
wispy tide
noble bough
where the arms tho
might get ur wish.. hands are hard tho
 wispy tide
noble bough
where the arms tho
wispy tide
noble bough
where the arms tho
My 1st base model, lets goo
 noble bough
wispy tide
My 1st base model, lets goo
noble bough
wispy tide
My 1st base model, lets goo
both look good, the arms as well 🙃
wispy tide
noble bough
both look good, the arms as well 🙃
Very impressed with myself considering this is the result of my first time trying
noble bough
can you like show the wireframe
wispy tide
No 
noble bough
sadge
 noble bough
it cant be that bad
the textured shot looks pretty good, so it cant be a wreck
haha
wispy tide
Let's just say I've learnt 0 retropology this far.
noble bough
come on just show me, i can tell you what to improve. you dont have to be embarassed haha
wispy tide
noble bough
come on just show me, i can tell you what to improve. you dont have to be embara...
When i regain access to pc I will I've re-posted that last second of having to go
wispy tide
noble bough
come on just show me, i can tell you what to improve. you dont have to be embara...

 noble bough
wispy tide
<a:D_lmao:864065910175301653>
noble bough
wispy tide
<a:D_lmao:864065910175301653>
if you can go a bit closer, only show faces and dont select them (so that they are not orange)
cause I cant make anything of that screenshot rn x)
 noble bough
so the main body is already decimated ?
hushed leaf
ooh that topo is going to be annoying to deal with weight painting
noble bough
and for a first model, its better than my first model ever xdd
hushed leaf
haha yeah I've still not done one, I keep failing to make faces. done a lot of props and clothing though
noble bough
wait
you are telling me you never made a char
I thought I saw character related stuff of yours, if I'm not mistaken. mhh
hushed leaf
nope!
hushed leaf
lots of edits, lots of props, some in-progress worlds
noble bough
well then get to it haha
hushed leaf
on it!
wispy tide
noble bough
well then get to it haha
 noble bough
wispy tide
noble bough
wispy tide
looking seriously great !
is that gonna be a perma-nude dragon or are they gonna get some clothes tho haha
noble bough
wispy tide
one thing I can see is the clipping of the foot talons.
wispy tide
noble bough
is that gonna be a perma-nude dragon or are they gonna get some clothes tho haha
not sure, i'm havinging to re-rig the thing cause apparently i didn't add enough bones to vrchats liking..
noble bough
how are deformations looking ? can you pose them alright ?
noble bough
well if you dont want to burden yourself with manual retopo this time, you can probably let it slip for now i guess. but you should definitely try it with your next char
its kinda necessary to know how to do it
last thing. how many tris is the char right now
 noble bough
oof
wispy tide
noble bough
oof
ikr
noble bough
doesnt it say tris count somewhere in blender or unity explicitly ?
ok nvm, they are exactly the same
yeah thats a bit too high to be honest, it should be around a quarter of that
especially if the char doesn't even have any accessories or clothes
to be honest, you will have to go for retopo I believe, cause vrchat wont be able to handle that I guess
wispy tide
noble bough
to be honest, you will have to go for retopo I believe, cause vrchat wont be abl...
know any good starting things for retro?
noble bough
starting things you mean like practice or where to start at your model ?
if you mean your model, then you should start with the parts that have the highest mesh density first, like the face
when looking at the face, you can clearly tell, that the horns are way too dense

when your entire head has around the density of the nose part, than its good to go
when you do retopo, its not only about reducing the mesh, but also making it possible to animate it properly . for reference here is how good topology could look like. notice how there are loops of faces around certain areas like mouth or eyes ? that way it can be deformed properly
 noble bough
wispy tide
know any good starting things for retro?
noble bough
wispy tide
know any good starting things for retro?
just ping me if you need more help with it, im here 😄
atomic wigeon
model for a friend
 wispy tide
noble bough
just ping me if you need more help with it, im here 😄
wispy tide
noble bough
just ping me if you need more help with it, im here 😄
Having issues finding any good retropology plugins for blender thats not 50$
wispy tide
noble bough
if you mean your model, then you should start with the parts that have the highe...
Im doing it!! 

 noble bough
wispy tide
Im doing it!! <:AAAAAAAH:981478290013446154> <a:3387aasolaaaaaaaaaaaaa:107795688...
noble bough
wispy tide
Im doing it!! <:AAAAAAAH:981478290013446154> <a:3387aasolaaaaaaaaaaaaa:107795688...
good start, but let me give you some advice how to proceed:
- First, try to create the loops around certain landmarks like eyes, mouth, neck, etc., and then work your way towards a connected net. That way your mesh will most likely have the same density throughout.
- Second, try to make the retopo as close to your original model as possible, in terms of shape. From what I can tell from that picture is, that the nose part will look different, cause the peak of it is not captured by the retopo. Try to fix that if you can
- Third, separate your meshes into different parts. Currently you are connecting the tongue to the head (which can be ok), but that way you cant properly animate it in the future. Also please dont retopo over the eyeballs. Try to go around them and make the balls a separate mesh.
Best of luck
Small Addendum to my first point : You should also start with relatively small loops around the other parts of the body, like arms, legs. tail. (small in terms of how many verts are in that loop). You should try to go with 8 or so and if needed add more by inserting loopcuts or using knife tool
 edgy finch
I feel like I should retopologize but idk if it'd ruin the hair or not to do so

 edgy finch
oh okie doke!
noble bough
from what I can tell, the body itself looks pretty good. but the hair seems to be really dense. how many tris are the hair in total ?
hushed leaf
ah yes, definitely you want less
You might switch to studio shaded mode and enable wireframes so it's a bit easier to see, in x-ray mode it can be difficult if something is so dense
noble bough
simply going into edit mode without x-ray and not selecting any faces would also suffice I guess
edgy finch
noble bough
from what I can tell, the body itself looks pretty good. but the hair seems to b...
I kinda just used the path technique to model it so I think maybe a lot?
hushed leaf
you should actually check
noble bough
yeah pls do
edgy finch
here's the hair
 noble bough
is that really ALL the hair ?
edgy finch
noble bough
is that really ALL the hair ?
Oh my fault, I should've specified. The hair on the head
noble bough
cause 38k out of 190k is weird, if its only so few. dont know where the other 150k would be in that body
hushed leaf
the face looks dense in that pic too, but I can't tell much detail
noble bough
can you please send a screenshot with good visibility ? would help a LOT
edgy finch
 noble bough
mhhh
im not gonna comment on the legs or body, cause thats a differnt problem in itself
I guess the problem are the small bushes of hair all around
how much is one bush
hushed leaf
yeah - tail looks real dense too. And yeah a lot of the body, that topo needs work, it's not going to bend well when you start to work on weight paint, and the long verticals are kinda dense on the legs.
This looks like a great start though! The next part is definitely hard
noble bough
retopo is often times make or break i guess
edgy finch
okie doke! sorry the topo is all messed up, It's really hard to find furry avatar tutorials
noble bough
you dont need to specifically search for furry tutorials
hushed leaf
most of that it doesn't matter if it's furry or not, bodies are bodies
noble bough
other tutorials for 3d chars transfer almost 1 : 1 on other styles or chars
hushed leaf
yep
noble bough
in the end its all the same pipeline and workflow
edgy finch
true but I just usually search furry because of the muzzle and digitigrade legs
hushed leaf
yep, totally - but even legs still work like legs
edgy finch
very true
noble bough
ok here is where you could start with the fixing: look at the model from a small distance (not too far away tho, maybe screensize), and then look for parts that appear to you too dark or dense. hide everything else and look why it appears dense : too many loops? redundant mesh ? etc. . and then you should try to remove loops that are not needed
thats my starting point for you
you really just need to remove some loops to decrease the density most times
edgy finch
If I retop, should I make the hair and the body separate in the retopology or should I just make it one big thing?
noble bough
defo separate
edgy finch
ok cool
noble bough
it almost always better to have more independent meshes, cause you can work better with them. only in cases like whole body with attached limbs and so on, it should be one coherent mesh
For example if you have a char wearing a hoodie, you can simply remove and disconnect the hand and arm from the mainbody, cause you wont see it. but if the char is like naked, its better to connect all the parts
for obvious reasons xd
best of luck for your retopo tho. if you have problems, just write here 😄
edgy finch
okay cool! thank you so much for your guys' help!
hushed leaf
Definitely separate. Eyes too. And clothing parts of course. You can join when exporting to FBX.
edgy finch
should I retopo ALL of it or just the parts that're a lot of tris? I feel like maybe retopoing the body might be a bit tedious and unneccessary but I feel like if needed I still will
azure rain
edgy finch
should I retopo ALL of it or just the parts that're a lot of tris? I feel like m...
honestly you would probably be fine with just a loop dissolving the heavy areas
azure rain
yeah the legs are a bit of a mess with the bajillion Edge Loops only in the front

Hey guys, In this video I show you how you can Reroute, Reduce of Terminate some edge loops.
This is the fundamentals to master in order to understand edge flows and topology.
Connect with me :
- Discord : https://discord.gg/XRGu7mzhSG
- Artstation : https://www.artstation.com/thomas1colin
Thanks for watching !
Bye.
#blender #3dmodeling #...
a way you could keep the number of edge Loops required for the head but not have it propagate all the way to the legs
edgy finch
Oh i ended up actually retopologizing all the way to the feet
Blender support cat

I just have to get the inside of the mouth which is
Pain
hushed leaf
hide parts you aren't working on
edgy finch
it's really hard because the mirror modifier and the base mesh are really messing me up\
hushed leaf
turn off the mirror?
edgy finch
I did just that and it is finished!

thank you so much
the body that is
I still very much need to retopo the hair

are the legs better?
azure rain
paws look like they might have been made a little too low poly but the rest looks fine?
edgy finch
tbh the paws are so frustrating so I ended up making them really low poly
like I rushed them bad boys
azure rain
like you can use the loop redirection I showed above to increase the geometry in the paw area without making the legs unnecessarily detailed
edgy finch
I almost wanna remake the whole model because of the paws
azure rain
been working on a opaque only tree to have an easier time rendering them on the quest

how it looks in unity
 edgy finch
Oooooooo!
Should I remake the model I have now or no? I’m really struggling on the feet and they’re really ugly looking in the original model
 nimble solstice
Hi, has anyone encountered ASCII models? In this format there is information about the skeleton. Found a 3d model of the character, there is also a model of obj format, but I do not want to make a skeleton. Did not find a way to import into Blender, dug through the forums and with the help of neural network tried to create a script for importing
tough plover
nimble solstice
Hi, has anyone encountered ASCII models? In this format there is information abo...
you can use this to convert it https://aps.autodesk.com/developer/overview/fbx-converter-archives
Autodesk Platform Services
get this one
 nimble solstice
Tried it, it didn't work
tough plover
nimble solstice
Tried it, it didn't work
didn't work in what way? I've used it successfully before
it's probably something you did wrong along the way
nimble solstice
Model unusual format that I found information on import format like ASCII FBX, ASCII OBJ, etc. This is just ASCII
 tough plover
nimble solstice
Model unusual format that I found information on import format like ASCII FBX, A...
tough plover
nimble solstice
Model unusual format that I found information on import format like ASCII FBX, A...
oh, I assumed it was an FBX file in ASCII format, not an actual .ascii
edgy finch
hello! I really want to make an avatar but idk if I should make a new model or just stick with the one I have
I really don't like the legs and hands
hushed leaf
you could start with that one and modify it
edgy finch
true but how would I modify it? I'm really struggling with hands and feet
hushed leaf
load it into blender, start modeling?
edgy finch
true but I mean like idk how to even fix it
hushed leaf
do you know how to use blender?
edgy finch
yeah
hushed leaf
do you know how you want the model to look?
edgy finch
yes
hushed leaf
sounds like a good place to start then
edgy finch
 edgy finch
got this lower poly mesh from when I tried to make a new model
 noble bough
your problem seems to be, that you use too many vertical loops. the feet are once again extremely dense for no reason
noble bough
edgy finch
got this lower poly mesh from when I tried to make a new model
try to simplify the shape as much as possible, if it doesnt look right at the start, its alright. you can add more loops later on
noble bough
edgy finch
got this lower poly mesh from when I tried to make a new model
I would also try to connect the legs with the body; yours seem to be separated
jovial seal
How would yall rig this since the chestplates technically a hardbody?

are shoulders neccesary for a rig to work?
devout orchid
you may try making them tiny and not weightpainted. bone itself is mandatory
jovial seal
damnit.
 waxen ivy
Im wondering if it might be better to paint hosiery over my model for optimization or just use some combination of shader effect like lil-toon or Poiyomi to shade/matcap a hosiery like material onto my model. Any thoughts from any painters?
hushed leaf
anisotropics!
A friend did a really nice texture that's almost like sheer hose, using a matcap with a gradient for a bit of color, and anisotropics for the shine.
viscid birch
Also if it has netting or you want close up thread patterns, you can use a little 128px texture and tile it across the fabric. Or detail normal map. And use a detail mask to separate it from other parts like the welt.
I've seen a lot of folks put repeating patterns like this in painted maps. And it wastes texture space. Also makes them want to crank the resolution up to make the tiny patterns look better.
azure rain

@poiyomi shaders have the ability to use a color mask for detail normals. I really wish more people would use this. You can use absolutely tiny maps and still have the detail you want. 10 times less VRAM usage for the normal map on this sweater INCLUDING the mask!

 FixupX
·
FixupX
·


Showing the use of Detail Normals with RGBA Color Masking in @poiyomi . Still on my quest to reduce the use of 4K normal maps in VRC. This entire set is a single 2K normal but still has low frequency cloth detail with the use of DNs. DNs are all 256px
 vxTwitter / fixvx
·
vxTwitter / fixvx
·
 wraith obsidian
wispy tide
<a:D_lmao:864065910175301653>
wraith obsidian
wispy tide
<a:D_lmao:864065910175301653>
woah the topologys crazy
atomic wigeon
once more i feul my obsession with digitigrade legs >:3
 waxen ivy
hushed leaf
A friend did a really nice texture that's almost like sheer hose, using a matcap...
waxen ivy
hushed leaf
A friend did a really nice texture that's almost like sheer hose, using a matcap...
@hushed leaf @viscid birch I’m going to send a screenshot of what I’m working with soon, I often get ignored so I’m super sorry I wasn’t checking my discord!
waxen ivy
@hushed leaf @viscid birch and anyone else who like to chime in, I really need the help! >.< I've been stuck on this for a very long time! - So my model is a standard zinfit, I manually retopologized my model from like 160k I think? To 69k, (First Pic) I'm shooting for medium performance as it has a loincloth and complicated hair lots of bones etc. So for (Second Pic) it goes up a lil over 10k polys obviously no good. But for (Pic 2 + Pic 3) It uses this lil texture, some sort of node system, I only a quarter understand it, using the Nylon V2 material from blender kit. It looks super super good though. --I went into substance painter and my brain locked up because no matter how I texture it it doesnt really look right, and im like "Oh right lighting" @hushed leaf You mentioned anisotropics, im really curious what the base texture was, what shader/matcap they decided to try, as soon as I hit enter on this post, im going to look into it, but id love to hear your thoughts on the process. Do I even texture my model, do I just use a matcap/mask with poiyomi, unsure.


 hushed leaf
waxen ivy
<@966400987180961792> <@158835963156627457> and anyone else who like to chime in...
hushed leaf
waxen ivy
<@966400987180961792> <@158835963156627457> and anyone else who like to chime in...
Please don't ping me for new questions I'm not already helping with.
waxen ivy
hushed leaf
Please don't ping me for new questions I'm not already helping with.
I thought you were helping me with this? :c
hushed leaf
oh - maybe I should read the second half first, sorry
re: anisotropics, it was just poiyomi, the matcap was a gradient, not an actual matcap. She created it all herself
I don't really have much more to suggest other than the Poiyomi docs and discord
The only time I personally ever use matcaps is for small metallic items, like jewelry
waxen ivy
hushed leaf
The only time I personally ever use matcaps is for small metallic items, like je...
Okies no worries! I was able to sort of create the effect with Ucupaint but it obviously doesnt translate over to Unity, or I think/pretty sure it wont by using fake lighting, I could just overthinking the whole process and need to play with poiyomi again or ping some of them in their discord? -Ive always only ever used poyomi for similar things when I was first starting out. Thanks for your insight, I didn't know that you were moving on from the question. >.<
 hushed leaf
no not really "moving on", I just don't have anything further to add
I played with doing shine on hair with anisotropics, again used the poi discord for information on that, it's a bit of work to align the UV map to make it work well, but looks nice when done.
viscid birch
waxen ivy
Okies no worries! I was able to sort of create the effect with Ucupaint but it o...
For poiyomi this fake lighting is "rim lighting".
Or you can get the same effect with a gradient matcap.
waxen ivy
viscid birch
Or you can get the same effect with a gradient matcap.
So essentially I should stop overthinking it, use the standard skin texture, matcap it and play with the lighting? Can you adjust that fresnel effect with poiyomi on the hosiery material?
 fluid talon
How to get my 3D skin model on VR chat
I created this skin on belender
hushed leaf
waxen ivy
So essentially I should stop overthinking it, use the standard skin texture, mat...
I'm not really sure what you mean by "matcap it"?
hushed leaf
fluid talon
How to get my 3D skin model on VR chat
I created this skin on belender
what is a "skin" in this case?
fluid talon
hushed leaf
what is a "skin" in this case?
I'm begginer
hushed leaf
and...?
fluid talon
How to input my model on VR chat :3
hushed leaf
is it rigged?
As in, it has an armature and you weight painted so the mesh moves when you rotate the bones?
azure rain
fluid talon
How to input my model on VR chat :3
VRChat has tens of millions of avatars, and anyone can create them! This page explains how you can create your first VRChat avatar. There are two ways to create an avatar:
waxen ivy
hushed leaf
I'm not really sure what you mean by "matcap it"?
I have to play with matcaps and lighting in poiyomi, it seems like poiyomi can give me the effect that I need, from what you and Vavassor said. Im checking the POI discord now, i'm just wondering if I should do any painting on my physical skin texture or if I can do everything I need to have the desired effect with poiyomi alone.
swift jolt
fluid talon
How to input my model on VR chat :3
Unity
viscid birch
waxen ivy
I have to play with matcaps and lighting in poiyomi, it seems like poiyomi can g...
I put together an example.
The texture from nylon v2 might just be an alpha map? But a black and white image can be used for lots of maps/masks. For fun I tried converting it into a normal map by using "create from grayscale" option in texture import.


 broken horizon
new to humanoid riging just trying to rig this but it wont work and i dont know how
 hushed leaf
#avatar-rigging too, but it might help if you describe what you did and probably show the armature
noble bough

ArtStation
Hey !
After doing my talk about Overwatch at the Zbrush summit I got alot of questions about floaters, and I wanted to make this quick tutorial forever but never got the time, also im sure there is 381029381 better info out there.. but hey, i'm doing my part !
hope this helps !
crazy tutorial for stylized detailing
gotta recommend it
edgy finch
noble bough
try to simplify the shape as much as possible, if it doesnt look right at the st...
https://youtu.be/7iqyH4Xa3rA?si=8TrX0A3uPcspihtR
https://youtu.be/Sdrxv-uGsjc?si=28Mf9wsQoj1Pd68m
I've been using these as tuturoials and have been having some trouble q w q

A full avatar made in only 12 hours!
I'd attempted to get a whole model with a VR Chat port, VRM and even facetracking on it. I got most of the way only not achieving the facetracking and a simple outfit.
Compared to the last time my process has gotten a bit more in depth, with a bit more care taken on the model itself.
If you'd like to get ...
Hey cuties!! In this video KaideArt teaches me AND YOU how to 3D Model a Furry Avatar in Blender!!
Hi I'm BlueBirdBreeze, but you can also call me Breezy (she/her)!
Find me on Twitch: https://www.twitch.tv/bluebirdbreeze
and Twitter: https://twitter.com/BreezeBlueBird
Kaide is an amazing 3D Modeler and streamer, find him on:
YouTube: https://...
noble bough
like mentioned, you dont necessarily need furry tutorials
if they are too difficult to understand or not good enough
edgy finch
true true, would you suggest any tutorials perhaps?
edgy finch
Also I lost the model so back to square one unfortunately
 steady zealot
Low poly prop pack I'm working on (108 frames in this gif, around 400 props so far, entire thing is using two palette texture materials for opaque and transparency)
 edgy finch
noble bough
like mentioned, you dont necessarily need furry tutorials
edgy finch
noble bough
like mentioned, you dont necessarily need furry tutorials
is this any better? I tried using a little less vertical cuts but I can definitely try to hold back
 hushed leaf
are you going for very low poly?
 heavy sonnet
edgy finch
is this any better? I tried using a little less vertical cuts but I can definite...
heavy sonnet
edgy finch
is this any better? I tried using a little less vertical cuts but I can definite...
This looks good so far! If you want a low poly model (like a retro art style) you can keep it just like this, or if you want a smoother look to it, try adding a subdivision surface modifier. Make sure it's added after the mirror modifier. You should only need the default of 1 subdivision for a game-ready model, and sometimes that can even be too much, so I recommend trying to optimize poly count both during the modeling process and after applying the subdivision surface modifier
edgy finch
hushed leaf
are you going for *very* low poly?
no I'm not trying to, but everytime I post here it feels like I put too much vertical cuts into the body
edgy finch
edgy finch
https://youtu.be/7iqyH4Xa3rA?si=8TrX0A3uPcspihtR
https://youtu.be/Sdrxv-uGsjc?si...
I wanna make it in a similar style to this
heavy sonnet
heavy sonnet
This looks good so far! If you want a low poly model (like a retro art style) yo...
I would also make use of edge and vertex crease. Vertex crease should be used sparingly — I typically use it for the ends of fur/fluff, but unless you need a single vertex to be sharp, you can usually just use edge crease. These also don't have to be pulled all the way sharp, and they help with reducing polygon count since you don't need as many support loops for the silhouette.
heavy sonnet
edgy finch
no I'm not trying to, but everytime I post here it feels like I put too much ver...
I think you're doing fine, just use a subdivision surface modifier like I said above.
edgy finch
oh ok!
edgy finch
how do I make the hands
winter iron
make a nub then give it fingers
edgy finch
hand hard :(
 edgy finch
aghhhhhh I need help
edgy finch
I wanna sob
 carmine pagoda
I wish you the best of luck Maverick. I’ve been working on a model on and off (mostly off) for about 6 months now. Keep at it you will get through it with enough effort.
edgy finch
I had to restart mine because I accidentally lost the model in a freak accident with the file
I feel stupid and nothing works
is there any way I can try and work on it like this instead or no? I wanna try it but it seems very hard https://youtu.be/RX_evtfpDbE?si=DFgrf4wwNn7lnD7I
 heavy sonnet
edgy finch
I had to restart mine because I accidentally lost the model in a freak accident ...
heavy sonnet
edgy finch
I had to restart mine because I accidentally lost the model in a freak accident ...
Always make sure to check your autosave folder and your .blend1 file if you lose your original file/overwrite it
edgy finch
heavy sonnet
Always make sure to check your autosave folder and your .blend1 file if you lose...
where
heavy sonnet
edgy finch
where
The .blend1 file should be in the same location as your .blend file, just change the file extention to .blend and change the name of the file so it doesn't overwrite the original
edgy finch
yeah then it should be gone
heavy sonnet
Your autosaves should be in file>recover>autosave
edgy finch
I accidentally deleted the entire folder because I was clearing apps
tough plover
you could also just go to your recycle bin and restore the files
edgy finch
found it
tough plover
you should also probably organize your stuff better
heavy sonnet
Yeah that's true, as long as you didn't empty your recycle bin/trash it should still be in there
I believe that's true of any OS
edgy finch
ok so lemme explain what happened
I was uninstalling apps when one of them basiclly said "hey were trying to uninstall app but the files are in this folder" and basically I thought it would just delete the files with the app but it didn't, it just deleted the entire folder
but yeah you are right
I do need to organize better
heavy sonnet
In any case, I think your hand looks fine so far. Just take a face or two from the side of your hand and extrude it to start making the thumb
tough plover
the way I organize my stuff for 3D related projects is something like:
3D Work > [name of client] > [name of character/project] > [actual files]
for my stuff, I have myself as a "client"
heavy sonnet
It's not going to look like a hand at first, the idea with box modeling typically is that you're creating the topology and general shape first, then refine it into the shape you want
edgy finch
I did find it though grtefully enough
tough plover
that's good
heavy sonnet
heavy sonnet
It's not going to look like a hand at first, the idea with box modeling typicall...
It's kinda the inverse workflow of sculpting, where you just focus on the shapes, then retopo (just focus on topology)
If you want something in-between then the video you sent of the kiwi fox model is also a valid workflow. You can do that with both faces and verts, and that is kinda the same process as retopo but without the underlying sculpt, so you're just creating the shapes as you go
In that case it's best to have an outline for everything you're modeling so you get the shapes right. If you don't have a reference for what the shapes should look like from at least the front and the side, you can use the annotate tool to sketch them
edgy finch
heavy sonnet
edgy finch
you might not have looked up tutorials for VRChat rigging, but you do not need to create a full rig for avatars. If you're making this for personal use in Blender then you're fine, but VRChat just needs a Unity humanoid compatible armature, the rest of your rig won't transfer over (no drivers, only some constraints)
hushed leaf
There's a pic of the VRChat humanoid rig pinned in #avatar-rigging
edgy finch
Ooooooooooooooh ok
edgy finch
I followed a tutorial on hands and these look so good I might cry

I even added pawpads!!!
 edgy finch
should I fix the feet? I was having so much trouble I gave up and made them blocks
 edgy finch
is it fine to have your feet and hands as separate meshes or no
tough plover
edgy finch
is it fine to have your feet and hands as separate meshes or no
you shouldn't have things as separate meshes in the final avatar, unless you intend on enabling/disabling them
edgy finch
how to I connect them without messing anything up?
Like keep struggling with the feet and I need help
No tutorials help me
tough plover
edgy finch
how to I connect them without messing anything up?
how does it look at the seam?
edgy finch
I don't know what you mean but I am assuming you mean at the end of where I put it


it's different topology so idk how I'd be able to join it together
and then what do I do about the hair
hushed leaf
wow this actually looks great for low-poly, I like it
edgy finch
thank you! this is like my first attempt at something like this
hushed leaf
to join it you could just make them overlap then use mesh -> intersect (knife) to cut edges and then retopo to make it nice
edgy finch
I already retopo'd
I don't wanna retopo again
I remade the hands because they were ugly
I'm sorry I just really don't wanna do that again
tough plover
edgy finch
I don't know what you mean but I am assuming you mean at the end of where I put ...
you probably want to delete these faces, then as long as the two openings have the same amount of edges, you can select both open loops and do Bridge Edge Loops to connect them
 tough plover
alt + click an edge to select a loop. shift + alt + click to select more loops. then, ctrl + E > Bridge Edge Loops
edgy finch
 hushed leaf
yep, or make edge loops - but that might be awkward in this case if they don't line up well. Try them all!
edgy finch
yeah It won't let me use the two edge loops
tough plover
edgy finch
yeah It won't let me use the two edge loops
are you selecting the full loops, or just one edge on each side?
edgy finch
 tough plover
you missed the first step of what I said
tough plover
tough plover
you probably want to delete these faces, then as long as the two openings have t...
.


 hushed leaf
you can certainly bridge each face manually - select two edges, hit f to join them with a face.
you have like 10 there, it'll be fast.
edgy finch
tough plover
you shouldn't have things as separate meshes in the final avatar, unless you int...
what about the hair ?
tough plover
edgy finch
what about the hair ?
again, if you don't plan on disabling it, keep it merged
you can have it be a separate material if you want, it'll make it easier to do effects like sheen