#3d-modeling
1 messages · Page 15 of 1
 tough plover
 quiet coral
thats the thing i did move them all over
let me make double sure that there isnt some im missing
cause some of them did have stacked uv and i moved them over one on the x axis which works fine. But the main body from what im seeing only has one uv but no other side of the uv anywhere else
see what i mean?
tough plover
to separate that, you'll want to select half of the mesh in edit mode, then move the UVs. that'll allow you to separate them
use X-ray mode and snap the camera to the front
and use Face selection, not vertex selection
@quiet coral
quiet coral
k done, rebaking now
ill do atlasing and what not after i make sure all this is good
the eyes are still weird but everything else seems to be all good now thank you ❤️
@tough plover you wouldnt happen to know of any good atlasing tools? i only know the old-fashioned way of just shoving UVs in corners and dividing UVs up in like 1/6 or 1/4s and then blocking the textures up like that
tough plover
quiet coral
<@93092275638251520> you wouldnt happen to know of any good atlasing tools? i on...
ideally, you shouldn't even be atlasing
you should have started with fewer materials, and packed the UVs properly
atlasing can result in a lot of wasted UV space, and inconsistent UV density
quiet coral
well the model came in seperate meshes with seperate materials, i think only thing i could do is atlas since i didnt make this from scratch
tough plover
are you redoing the textures from scratch?
quiet coral
yeah since they didnt come with substance only photoshop files......and i aint do photoshop XD
wait
since im doing it from scratch it means i could just shove all the uvs together and squeze it all in.......im dumb
tough plover
yea, there's nothing stopping you from just combining materials and packing their UVs together
the only ones I'd consider keeping separate are ones that will require transparency, and maybe the eyes
tough plover
quiet coral
i use some textures but i can just redo them since theyre just simple textures
I'd also maintain stacked UVs whereever possible, since those do help a lot with improving density. I'd also recommend using a good UV packing algorithm, I personally use UVPackmaster but it's paid. Blender's native packing algorithm got a lot better after 3.6, so I'd just recommend using a modern version of blender and it should be ok.
quiet coral
okie dokie
ill download a more recent version of blender then, thank you so much for all the help i really appreciate it ❤️
 timber tide
What do i do to make the rest of the nails move with the foot?

 hushed leaf
timber tide
What do i do to make the rest of the nails move with the foot?
hushed leaf
timber tide
What do i do to make the rest of the nails move with the foot?
weight paint them to the foot bone
timber tide
hushed leaf
weight paint them to the foot bone
thanks that worked i tried the first time but ig i didnt try hard enough lol
hushed leaf
ah nice. Weight painting isn't easy 🙂
 steady zealot
I redid the hair on my avatar! (It was always inspired by Final Fantasy so if you think it looks pretty much like Cloud's hair from 7, you're not far off!)
The old hair was my first time ever doing hair (The entire avatar is my first time doing a person from scratch in general) and the second attempt at the hair turned out so much nicer IMO!


 simple flame
the inside of the jacket keeps clipping through the outside, is there a way to fix this? i just moved the arm slightly and the red inside is showing through
 hushed leaf
either better weight painting or move the mesh further apart
or I guess you could hide the under mesh
steady zealot
simple flame
the inside of the jacket keeps clipping through the outside, is there a way to f...
You can either use shapekeys to "deflate" the under mesh if it'll be covered up, or try to get the weight painting to be more precise. The Data Transfer modifier can help with transfering weights from one to the other, to reduce clipping
simple flame
Okay, I'll give it a shot. Thank you
 fleet parrot
not sure where id ask this but, does VFX graphs work in vrchat or no?
 fair mason
oh yes i love making models of cartoon characters from shows most people dont even know about

 static fable
fair mason
oh yes i love making models of cartoon characters from shows most people dont ev...
static fable
fair mason
oh yes i love making models of cartoon characters from shows most people dont ev...
OH NAH. NOT WOOLDOOR.
fair mason
evil laughter muhahahahahah
 wispy wind
fair mason
oh yes i love making models of cartoon characters from shows most people dont ev...
wispy wind
fair mason
oh yes i love making models of cartoon characters from shows most people dont ev...
hahaha I know that tv show! I like where Captain Hero use "shield".
simple flame
anyone know why this is happening? will it affect the model's function ?

 storm heron
Hey yall, im making a render and i want saliva to like run down the finger, if anyone knows a helpful tutorial itd be appreciated ❤️
 hushed leaf
funny, in Blender I have an object that has a .001 on its name and I can't remove it by renaming, but I cannot find any object which is name-clashing.
 plush cliff
storm heron
Hey yall, im making a render and i want saliva to like run down the finger, if a...
plush cliff
storm heron
Hey yall, im making a render and i want saliva to like run down the finger, if a...
Nasty
 flat kelp


 gloomy heart
Hi everyone, i am trying to sculpt this hat to fit better, but the black parts dont move when i sculpt, just the pink part. why may that be? The Hat underneath is just referance

 hushed leaf
not sure I can see what's happening there
 keen sierra
perhaps masked out
hushed leaf
yeah I don't use sculpt mode much, was wondering if there was some "front faces only" type of thing, or masking
gloomy heart
okay
 proud panther
how do u turn off back faceculling in blendeerrrrrrr google isnt helpingggggggg it use to be hereee

 viscid birch
proud panther
how do u turn off back faceculling in blendeerrrrrrr google isnt helpingggggggg ...
viscid birch
proud panther
how do u turn off back faceculling in blendeerrrrrrr google isnt helpingggggggg ...
It's in that menu when viewport shading is set to "solid." (white circle icon) When it's set to "material preview" like you have, then backface culling is in the material under "settings," like Kazin said
hushed leaf
oh I didn't think of the solid case
fair mason
i just want normal beer...

 jagged flower
 fair mason
 fair mason
its doenenneeeeeee

 stark sand
fair mason
its doenenneeeeeee
stark sand
fair mason
its doenenneeeeeee
Ooohhh cool! Where is this character from?
 velvet oyster
what's up y'all, if anyone is in need of a few low poly weapons for there creative endeavors i got you covered!:) https://www.turbosquid.com/FullPreview/2169720
 glad steeple
fair mason
its doenenneeeeeee
glad steeple
fair mason
its doenenneeeeeee
just because you have the power, doesnt mean you should.... 😔
glad steeple
stark sand
Ooohhh cool! Where is this character from?
Russian funded propaganda "New Norm"
fair mason
glad steeple
just because you have the power, doesnt mean you should.... 😔
Oh relax it’s just for a joke. It’s not actually something I’m gonna seriously wear 😅
glad steeple
😋
 hidden dome
what do you guys think of these? fully modelled, designed, and textured my self


 proud wadi
hidden dome
what do you guys think of these? **fully modelled, designed, and textured my sel...
proud wadi
hidden dome
what do you guys think of these? **fully modelled, designed, and textured my sel...
spooky!
 rapid spade
WIP

 wide imp
rapid spade
WIP
wide imp
rapid spade
WIP
Id suggest trying to push the front of the throat back for a more natural feel or if you wanna keep it where it is to make it flush into the pecs more 
 rare dew
Hello. I recently joined because I'm trying to upload my first avatar, being a roblox avatar, but even while following the instructions, the videos I saw had different results from what was on my screen. So if anyone is familiar with uploading a Roblox avatar, I'd greatly appreciate it because I've been working really hard on this and just want some help.
hushed leaf
... this channel is for 3D modeling
rare dew
Look bruh I don't know what category this falls under. CLEARLY I don't know what I'm doing.
 swift jolt
Sholders

 rapid spade
wip 2

 white moth
Blender question: Does anyone know if you can "paint" a existing blendshape onto a model with a brush? like painting it into the base model
so it deforms into the shapekey as you brush the model
hushed leaf
you could shrinkwrap to another model then apply that modifier as a blendshape
but otherwise not that I've seen
tough plover
white moth
Blender question: Does anyone know if you can "paint" a existing blendshape onto...
you can create a vertex group and assign it to the blendshape to mask it
to "apply" it, you can use New shape from mix
 orchid phoenix
head :') time to texture..

 stray topaz
I'm looking for the eyedropper tool shortcut for painting textures in Blender 4.2.1, but I can't find it
 full steeple
Hey anyone know alot about shapekeys?(in blender).. and possibly be up for a call to help me with a simple issue that i cant for the life of me figure out?
if not i can try my best to send screen shots on my issue and explain what im trying to do but i feel i need to actually say what i need help with lol
orchid phoenix
orchid phoenix
head :') time to texture..
the texturing begins

i also plan on making hair and clothing from scratch  body is zinpia andro
 gray drum
Hey! does anyone know how to make one of those bar machines? Like from the midngiht bar or the sunset bar?
hushed leaf
are we talking model here or the whole logic?
 jagged moat
gray drum
Hey! does anyone know how to make one of those bar machines? Like from the midng...
jagged moat
gray drum
Hey! does anyone know how to make one of those bar machines? Like from the midng...
I'd start with finding a reference of a real machine and then block it out with boxes and cylinders etc, then once you've got the right shape and you're happy with it, start adding the details. Then once you've finished modelling it you'd UV unwrap it and texture it using a program such as substance painter (recommended) or photoshop
Then, once it's all done, I'd reccomend rigging all the moving handles to an armature and animating the various movements. One that's done you can bring it into Unity and use Udon to control the animations
gray drum
hushed leaf
are we talking model here or the whole logic?
I wanna commission for the whole thing
gray drum
jagged moat
Then, once it's all done, I'd reccomend rigging all the moving handles to an arm...
I can try. I can probs do the model, but idk how to do the logistics and animations, but I can’t find anything online to show me how
hushed leaf
gray drum
I wanna commission for the whole thing
Oh probably you want to go to the VRC Traders discord then, you'll just get scammers around here.
jagged moat
Gonna say, typing "c***ission" typically gets a bunch of bots to automatically dm you, be careful about anyone reaching out
hushed leaf
If you want to learn, #world-development is probably a better place
I mean once you get past the modeling part
gray drum
I’ll try, thank y’all
jagged moat
good luck!
gray drum
I found someone who will do it for me. Thank you @edgy pasture
 edgy pasture
gray drum
I found someone who will do it for me. Thank you <@985287993797537843>
edgy pasture
gray drum
I found someone who will do it for me. Thank you <@985287993797537843>
You're welcome
 placid umbra
what do you guys think of these? fully modelled, designed, and textured my self.
 orchid phoenix
the texturing begins
orchid phoenix
orchid phoenix
the texturing begins
lashes

 near mortar
Made this recently


 rapid spade
If I don't go crazy, I'll manage to finish it

 velvet oyster
 rapid spade
I like it, but I'm not sure if I should add some darker tones or a bit more detail. What do you all think?
 tough plover
rapid spade
I like it, but I'm not sure if I should add some darker tones or a bit more deta...
tough plover
rapid spade
I like it, but I'm not sure if I should add some darker tones or a bit more deta...
I think it looks quite good, but the scales on the legs look a little off
it might make more sense to have them more towards the sides of the legs rather than the front, and you could also add some more to different areas like the arms
that's assuming you don't want them just everywhere
rapid spade
I placed the scales where they made the most sense to me, kind of orienting them like a crocodile, where they function more like armor. There are also some on the back, here

They are specifically in those areas because they would be the ones that wouldn’t cause any incoherence in movement and would function like armor.

 tough plover
what if you added some lighter opacity scales to create a more seamless transition?
so basically just add some more scales around the existing patches and mask them out using a soft mask (throw on a blur filter on the mask to smooth it out)
 dusky mirage
I really want to make an avatar like this and customize it since I’m starting to create content but I’ve tried making one last night but my computer is too slow and I wanted something like this (the picture) with a whole bunch of toggles but alsooo I want someone to make it for me but I don’t have any money 😭 the only thing I can do is give them credit in my videos 😭
 tough plover
dusky mirage
I really want to make an avatar like this and customize it since I’m starting to...
tough plover
dusky mirage
I really want to make an avatar like this and customize it since I’m starting to...
either you make it yourself, or pay someone else to do it for you. people deserve to be paid for their time
if you can't do either of those, you can find a public avatar that is close enough
dusky mirage
Ohhhh alr…thanks-..
rapid spade
The model is done, but it seems like I have some slight issues, and I’m not sure why.


 tight ore
Can anyone help me learn how to angle limbs for human like modles. I wanna bend the joints to 3d print them
 prisma berry
i got an interesting question i think, what would happen if i were to paste the texture of say 4 materials in a bigger 1 by 1 one and move the ub maps of each of the respective parts to each and then do the same with the normals and height map
 winter iron
prisma berry
i got an interesting question i think, what would happen if i were to paste the ...
winter iron
prisma berry
i got an interesting question i think, what would happen if i were to paste the ...
thats called atlas'ing
prisma berry
would it work?
winter iron
people already do it so
prisma berry
first time i hear bout it tbh
oh thats great
i was wondering if there was a way to merge my materials into 1
thanks
hushed leaf
I like to make a new UV map and just bake them to that (with SimpleBake)
prisma berry
winter iron
thats called atlas'ing
hey i toyed with it for a while and i wanted to ask what would the normal px be for an atlas
i supose something under 4k?
winter iron
prisma berry
i supose something under 4k?
whatever you want it to be
prisma berry
i cant make a 7424 px image it would kill anyone who tries to load my avatar i think
ok ill try 4096
hushed leaf
Really you should go as low as you possibly can
and definitely not over 4k if at all possible 🙂
 devout orchid
you cannot make it not power of 2 anyway, the way unity/gpu handles those. so it doesnt hurt to have way too hd stuff before the upload, uploaded final res should be 2k or smth.
 spiral sigil
can someone help me with edge loops?
hushed leaf
again, what do you need help with here?
 wet zephyr
prisma berry
i was wondering if there was a way to merge my materials into 1
wet zephyr
prisma berry
i was wondering if there was a way to merge my materials into 1
Yes, you can find addons to do it. Atlasing is a great way to gain performance as material slots are a factor in it
tough plover
prisma berry
i was wondering if there was a way to merge my materials into 1
I'd recommend using the Tuxedo addon
 vapid ledge
I need some help with my character sculpt. I have a couple problems at the moment, the first being the toes and fingers, when i try to remesh the model, especially at lower resolutions, the fingers and toes connect to eachother, I dont know how Im supposed to join them seamlessly without the issue of the topology joining where it shouldnt be. I am also experiencing difficulties sculpting the nose and ear as theyre quite small and thin details, when I try to smooth any changes it just tapers certain points of the mesh way too much. Lastly, I am not sure how to go about opening the characters mouth, I intend to model the inside of the mouth for rigging for expressions and speech and I dont know how to get it from a closed state like this to open. I keep also running into the same issue of sculpting becoming extremely laggy or downright crashing my application. Any help at all or points in the right direction is greatly appreciated thanks.
 keen sierra
Remesh. Aka blenders remesh? You shouldnt use that to topologize for a final mesh. Ideally, you retopo manually. You may be able to cut the model up and retopo limb by limb to avoid too dense topo being in the scene which can definitely cause lag
vapid ledge
nono not for final
keen sierra
When i made my model, i did manual retopo and for the mouth, i kept the lip edge unconnected, added an armature, painted the lower jaw to it and posed it open for easy access
vapid ledge
so how would i then join the limbs in the end? join and do a bigh poly remesh?
vapid ledge
keen sierra
When i made my model, i did manual retopo and for the mouth, i kept the lip edge...
oh, yeah thats one way to do it
keen sierra
All you need in the end is vertice count to match
vapid ledge
lip edge unconnected? whats that mean
keen sierra
The edge where the lips would touch
keen sierra
Knife the arm off. Literally its that easy. The only thing you later need is the same amount of vertices to connect the cut spot
Say you retopo the torso by itself and an arm. Obviously to connect both mesh objects, youll need x same amount of vertices to merge later
vapid ledge
keen sierra
Say you retopo the torso by itself and an arm. Obviously to connect both mesh ob...
but thats after retopo?
thats not a bad idea. so once i retopo, and connect the mesh, i can multires to get a cleaner high poly mesh for my texture painting and uvs no?
vapid ledge
Im just worried that in connecting the pieces afterwards there may be issues when it comes to projecting the detail from the sculpt onto the low res mesh and so on
keen sierra
You can do a heck ton of details with normal maps also (baked from multires object)
 hushed pendant
anyone know why im getting these wierd triangles when baking the position map?
 flat kelp

 sharp siren
flat kelp
https://media.discordapp.net/attachments/1126251067865305239/1291875825024765983...
sharp siren
flat kelp
https://media.discordapp.net/attachments/1126251067865305239/1291875825024765983...
Nice work here
spiral sigil
flat kelp
https://media.discordapp.net/attachments/1126251067865305239/1291875825024765983...
This is amazing
 versed granite
i forget
which blender version do i need to install to make the cats plugin work?
i have the steam version right now.
i need the non steam one from the website right?
(this thing)

i have another question too. i want to remove all the clothes to add my own... how do i know which bones are safe to delete that arent used anymore?
 empty fox
versed granite
which blender version do i need to install to make the cats plugin work?
empty fox
versed granite
which blender version do i need to install to make the cats plugin work?
The unofficial version from here https://github.com/teamneoneko/Cats-Blender-Plugin-Unofficial-
Latest Blender and it apparently have some bugs though, not noticed any myself though.

GitHub
A tool designed to shorten steps needed to import and optimize models into VRChat. Compatible models are: MMD, XNALara, Mixamo, DAZ/Poser, Blender Rigify, Sims 2, Motion Builder, 3DS Max and potent...
empty fox
versed granite
i have another question too. i want to remove all the clothes to add my own... h...
If the clothing is using the same exact armature as your avi then you could probably ignore it unless it is a dress or something with a lot of extra bones. You would basically need to do educated guesses or checking each bone for whether it moves something in pose mode.
If clothing has its own armature and is merged using tools in Unity then just delete the clothing and its armature, I sure hope people aren't stacking bones like they used to anymore.
 hushed leaf
wow
orchid phoenix
versed granite
which blender version do i need to install to make the cats plugin work?
any. use the dev branch https://github.com/absolute-quantum/cats-blender-plugin/tree/development

GitHub
:smiley_cat: A tool designed to shorten steps needed to import and optimize models into VRChat. Compatible models are: MMD, XNALara, Mixamo, DAZ/Poser, Blender Rigify, Sims 2, Motion Builder, 3DS M...
dev version works all the way up to 4.1 for me
 thorn tusk
do yall got a frog hat model a star wand from fortnight a bow and a bunnyhat
spiral sigil
orchid phoenix
any. use the dev branch https://github.com/absolute-quantum/cats-blender-plugin/...
Here's something i don't quite get: what's cats used for, exactly?
orchid phoenix
spiral sigil
Here's something i don't quite get: what's cats used for, exactly?
has some tools and shortcuts that are good for avatar making, like auto generating vrc visemes from 3 shape keys
also decimation and atlasing for quest optimization
spiral sigil
orchid phoenix
has some tools and shortcuts that are good for avatar making, like auto generati...
oh i see
wait, wouldn't you want to have control over those things instead?
i don't get it - what's the use case there?
orchid phoenix
spiral sigil
wait, wouldn't you want to have control over those things instead?
i mean, you do
you can still edit stuff after
and make duplicates
it just makes stuff youd normally do manually faster
spiral sigil
orchid phoenix
also decimation and atlasing for quest optimization
doesn't automatic decimation on deformable meshes always turn out bad, though?
orchid phoenix
np
 inner basin

 untold plinth
Not exactly an avatar, basic 3d model
I've spent hours trying to remove these bits from this piece, I just can't do it
 fair mason

 untold plinth
Eh kinda
 inland sage
dunno if want to continue ~o~

 static fulcrum
untold plinth
static fulcrum
untold plinth
My knowledge is in Maya, but if you want to remove those details, you could just add edge loops halfway up the central cylinder, delete everything above the edgeloop then just extrude/pull the cylider up to where it was.
inner basin

 solar fossil
inner basin
solar fossil
inner basin
Eyo?
inner basin
solar fossil
Eyo?
Wassup Confused?
solar fossil
Looking good
 river gust
 cobalt prism
someone here who knows how to properly make tanlines align it with current meshes is rather hard in photoshop so maybe someone can explain a better way
prisma berry
can i get a hand with a weight paint issue? for some reason my head vertex group is not working but the bones after do
keen sierra
Heads are often a standalone object. Perhaps your armature modifier is referencing an incorrect armature?
prisma berry
i tried deliting the vertex group and making it again but it does not work

 flat kelp
 steady zealot


 humble crag
Hello
 wary reef
Hi
 waxen ivy
For conforming jewelry such as necklaces and rings, is anyone using lattices or curves to deform the jewelry or are there better tools for specifically wrapping a mesh around a cylinder / finger / neck
steady zealot
waxen ivy
For conforming jewelry such as necklaces and rings, is anyone using lattices or ...
I could be wrong, but you might be able to use the shrinkwrap modifer on a curve to get it to follow something else, and then use that
If it doesn't work on a curve, you could convert the curve to a mesh and then back afterwards
Though I suppose that doesn't count as "better"
waxen ivy
So like make the necklace follow a curve, and shrink wrap that to my model? Ive tried using a lattice and using a simple deform 360° however my mesh wasnt able to follow that properly, so ill give that a try if that's what you meant
Yea still weird, making a mesh follow a circle curve doesnt work, so just a regular curve maybe
 steady zealot
 jovial seal
im struggling to tell if this body shape is ok
jovial seal
im struggling to tell if this body shape is ok
I think you won't know until you block out the entire thing (legs, etc)
jovial seal
yeh thats fair god damnit i hate having to ''trust the process'' sometimes
steady zealot
xD
waxen ivy
Does anyone know where the alpha clip \ alpha blend settings are on the material slot on blender? Seems to have moved with a blender update
hushed leaf
waxen ivy
Does anyone know where the alpha clip \ alpha blend settings are on the material...
I noticed that and keep meaning to go look
waxen ivy
hushed leaf
I noticed that and keep meaning to go look
Pls let me know, I might have to revert to an older version
humble crag
I think so
hushed leaf
stack exchange to the rescue I guess? https://blender.stackexchange.com/questions/322198/blend-mode-and-shadow-mode-options-gone-in-blender-4-2

Blender Stack Exchange
So in material settings before I updated to 4.2, I see the usual Blend mode and Shadow mode options in material settings:
Now I see whatever this is: how do I access these options?
waxen ivy
Is anyone experienced with doing clothing retopology?
jovial seal
how big are furry paws usually TwT

im struggling with the structure of these things so badly
wary reef
jovial seal
im struggling with the structure of these things so badly
Cool enough
Nice model
winter iron
jovial seal
how big are furry paws usually TwT
it usually depends on what you are going for and art style but generally you go for enough
also look at the animal its supposed to be to see how the proportions are

 jovial seal
winter iron
it usually depends on what you are going for and art style but generally you go ...
jovial seal
winter iron
it usually depends on what you are going for and art style but generally you go ...
i have no idea what animal this is meant to be i kinda just started and htough hehe wicker head and it turned into whatever this is
thanks for the referance though :D
 naive bolt
Looking at the difference in topology after 3 yrs is wild xD

 flat kelp


 delicate grove
Uuuuuh...are there any sort of like... 3D masks?
I need...a 3D object to never move through the boundaries of another object.

This? This is what I don't want it to do, but I don't want it to be distorted once it tries to move away from the eyelids.

I really almost wish I could do like viseme/shapekey textures.
3D masks in blender, unity, and VRC?

 delicate grove
Oh?
I'll have to import the irises and eyes as separate objects, yes?
If I understand this correctly.
devout orchid
separate material
delicate grove
Two materials minimum?
tough plover
delicate grove
Two materials minimum?
correct
flat kelp
 spiral sigil
how do I add a bone to the list

?
I added a bone and it isnt attached to the mesh
keen sierra
Weight paint mesh to the bone you added will add the group there or make a group manually and assign vertexes in edit mode
hushed leaf
just weight painting with that bone selected will do it, or you can manually create a new vertex group with the same name as the bone.
spiral sigil
how do u select a bone in weight painting? @hushed leaf
hushed leaf
watch a tutorial. ctrl+shift click a bone
 hushed leaf
spiral sigil
doesnt work for me
hushed leaf
spiral sigil
doesnt work for me
again, tutorials go over this. you have to start in object mode, select your armature, then also select the mesh object, then go into weight paint mode.
And this assumes you also have an armature modifier on the mesh object.
Also assumes Blender 4+, with 3 it's just ctrl+click
hushed leaf
get what?
hushed leaf
look, I'm really not going to try to teach you basic things that a tutorial can. I'm happy to help if you get stuck, but it's pretty clear you haven't bothered to learn any basics.
hushed leaf
reasonable
spiral sigil
but I was adding a bone later
after all has been weightened
it is different to the tutorials
hushed leaf
so?
it's not
Your mesh still needs an armature modifier, you still have to know how to go into weight paint mode properly
spiral sigil
what tutorial to watch for this>?
hushed leaf
There's no shortage of blender weight painting tutorials out there, I'm sure any of them would be fine
hushed leaf
then that's not a weight painting tutorial, is it?
spiral sigil
why do I keep getting this>?
 swift jolt
spiral sigil
why do I keep getting this>?
swift jolt
spiral sigil
why do I keep getting this>?
Enforce tpose

Robbit
Made the head from scratch the rest is just alot of kitbashing and editing stuff to fit
Robots are fun like that
spiral sigil
swift jolt
Enforce tpose
yes thx
 flat kelp


 flat kelp
 hushed leaf
hmmm is there an easy way in blender to "aim" the rotation of an object (here, a light) to a specific point (the 3D cursor)?
solar fossil
Lights, specifically area, directional and spot have a little yellow ball that you can grab and drag around to make it point to wherever you want
solar fossil
hushed leaf
hmmm is there an easy way in blender to "aim" the rotation of an object (here, a...
You can also use constraints like the track to, that way it will track continuously even if the light or targeted object is moving.
You can use an empty as the target object and it won't show up in renders
hushed leaf
solar fossil
You can also use constraints like the track to, that way it will track continuou...
Yeah, I considered constraints, and tried a few things, but I was really just looking for a one-shot type of thing, kinda like you can adjust roll for multiple bones around the 3D cursor.
oh and to add - these aren't moving, it was a one-time thing, and there's only 12, so I just manually pointed them all 🙂
 cobalt socket
my CATS keeps giving me these errors when i fix my model
 hushed leaf
that looks like the ancient version of cats that doesn't work with modern blender - the link to the new one has been posted a LOT in #avatar-help, a quick search should find it
 worthy drift
Hihihihi, noobie question here...
For the avatar's head, what kind of primitive should I start with? Quad Sphere, Icosphere, or UV Sphere?
 azure rain
worthy drift
Hihihihi, noobie question here...
For the avatar's head, what kind of primitive...
azure rain
worthy drift
Hihihihi, noobie question here...
For the avatar's head, what kind of primitive...
Quad Sphere is the only one that would be all Quad with no triangles
 twilit veldt
I'm very uninformed. Does anybody know if it's possible to make assets in Nomad Sculpt that are compatible for vr avatars... without a pc?
I guess I'm also asking, if it's possible to do the modeling process and all from an iPad and skip the PC parts.
azure rain
twilit veldt
I'm very uninformed. Does anybody know if it's possible to make assets in Nomad ...
the computer is required for the upload process and giving it a skeleton so it can actually move
worthy drift
azure rain
Quad Sphere is the only one that would be all Quad with no triangles
Yeah, so which is preferred?
azure rain
Quad Sphere
because the rest of them make too much triangle soup for it to be usable on head topology
twilit veldt
azure rain
the computer is required for the upload process and giving it a skeleton so it ...
Which part of the upload. Because I myself am not trying to put it on an actual model
And what if what I'm making doesn't need a skeleton or any sort of phys bones, just a solid item
azure rain
twilit veldt
Which part of the upload. Because I myself am not trying to put it on an actual ...
the part in which it's usable in vrchat at all is dependent on a computer running Unity
twilit veldt
Gotcha
Very unfortunate
I guess my second question, does anybody know if nomad sculpt could be good for making assets? Is it possible to export that to a computer?
azure rain


Export as a GLTF file to your desktop.
Portfolio: Abovewongart.io
Merch: Kawaiiwong.com
https://www.tiktok.com/@abovewongart
https://www.instagram.com/
https://twitter.com/abovewongart
azure rain
twilit veldt
I guess my second question, does anybody know if nomad sculpt could be good for ...
yes you can export the assets to a computer
twilit veldt
Thank you so much 
 timber bay
how can make the rotation balle aligned with the highlighted object? it's for animating the satelite dish i want to rotate on the 2 circles
 hushed leaf
timber bay
how can make the rotation balle aligned with the highlighted object? it's for an...
hushed leaf
timber bay
how can make the rotation balle aligned with the highlighted object? it's for an...
If you're rotating an object, it normally will do so around the object's origin point, so you can move that to wherever you like. Or rig it.
timber bay
i took a break and re-engaged the problem. i found that switching the orientation transformation to normals worked best
 delicate grove
Question for blender peeps:
I have an object with UVs that've been unwrapped. In the edit window I have all relevant faces selected, in the UV window I have only a subset of those faces selected, any way for me to deselect faces in the edit window that are not selected in the UV window?
I need to reassign that subset of faces to a new material, but it will also be laborious to go about and reassign those faces manually
tough plover
delicate grove
Question for blender peeps:
I have an object with UVs that've been unwrapped. In...
enable UV Sync in the top left of the UV editing window
it's like 2 arrows
 main bough
I don't understand how to combine meshes. I want to know how to join them and also make it so they both use the same material. No idea where to even start
 tough plover
main bough
I don't understand how to combine meshes. I want to know how to join them and al...
tough plover
main bough
I don't understand how to combine meshes. I want to know how to join them and al...
select both meshes and do Ctrl + J (make sure your cursor is over the 3d viewport) to combine them. as for combining materials, if you just want everything to use one material, go to the materials tab (red circle in the bottom right after clicking on mesh), and delete every material slot except one. this is also assuming that you've already dealt with the UVs and either atlased or baked textures
main bough
tough plover
select both meshes and do Ctrl + J (make sure your cursor is over the 3d viewpor...
DUDE I never would have found out the hover over the viewport part of that, I was so confused 😭
tough plover
shortcuts in blender do different things based on which parts of the UI you're hovering over
ctrl + A over the viewport is to apply transforms, but ctrl + A over a modifier in the modifiers tab applies a modifier
main bough
tough plover
select both meshes and do Ctrl + J (make sure your cursor is over the 3d viewpor...
Also I'm 2 days into the blender process so I haven't done anything like baking textures. But it is a preexisting model so idk
tough plover
combining materials is not nearly as straightforward as combining meshes
if you have materials with different textures, you'll want to either atlas the textures/UVs (basically just stitching them together in a grid), or re-pack all of the UVs and bake the textures
main bough
I also have a problem with the object I'm adding it looks like. It's just a simple wristband but with backface culling on it's clear that some of the faces are turned the wrong way/different way from the others

I'm not sure if I should find how to make a mesh that has both sides or if there's a way to reverse them or something? Not sure
Nvm I found the flip normals button. I do not know what a normal is lol
azure rain
main bough
Nvm I found the flip normals button. I do not know what a normal is lol
glad you were able to find that
delicate grove
tough plover
enable UV Sync in the top left of the UV editing window
Ooooh! That's neato! Thank you!
 tight lion
i am in a pickle

the points on this bodysuit are stuck in a part and i cant get them to move
like the rest moves with the body and conforms but the two parts there are like rooted in space
and some things like horns and nails arent moving at all even when paired or stuck to the body
 lofty socket
anyone have any idea how to fix this? im making a model from scratch in blender and im trying to add outlines for quest onto it using the solidify tool but when i do it to the hair it makes these weird cone shapes at the end of each strand and idk how to get rid of them
 tough plover
lofty socket
anyone have any idea how to fix this? im making a model from scratch in blender...
tough plover
lofty socket
anyone have any idea how to fix this? im making a model from scratch in blender...
I'd recommend using a matcap to fake the outline, instead of doubling the poly count

 lofty socket
tough plover
I'd recommend using a matcap to fake the outline, instead of doubling the poly c...
lofty socket
tough plover
I'd recommend using a matcap to fake the outline, instead of doubling the poly c...
how would i go about that? :0
tough plover
in Unity, use the Mobile > Matcap Lit shader and plug in one of those matcaps
lofty socket
also i didnt know using solidify outlines would double the poly count ill keep that in mind
lofty socket
tough plover
in Unity, use the `Mobile > Matcap Lit` shader and plug in one of those matcaps
ok thank you!!
tough plover
lofty socket
also i didnt know using solidify outlines would double the poly count ill keep t...
I mean, it's quite literally making an entire second "shell" of mesh
lofty socket
tough plover
I mean, it's quite literally making an entire second "shell" of mesh
oh, yea im just going off of tutorials so 😅
tough plover
Solidify takes a single sided mesh and adds thickness to it by essentially making a second layer and filling in the gap
so it more than doubles the poly count
 dusty heron
 hard hull
what do you guys think? made this hologram collar in blender :v
hard hull
what do you guys think? made this hologram collar in blender :v
Looks pretty neat and simple! Love the slight pulsating (which seems to be in time with the horns, or it could just be coincidence)
Side note I love how the horns look too, espcially the small floating particle pieces they're very pretty
 faint bronze
1 mesh, 1 UV map, 5,867 triangles. Could be better, but just did it as a fun project
Tempted to throw it on a pre-existing Rainbow 6 body and call it a day


 flat kelp
https://media.discordapp.net/attachments/422424977728339972/1300862091338584084/image.png?ex=672261bb&is=6721103b&hm=eeb7eeef3deb0288d8f8e0b165d072afece82e00d30ce248718f9b477804a5eb&=&format=webp&quality=lossless&width=1455&height=1089
https://media.discordapp.net/attachments/422424977728339972/1300862091737169980/image.png?ex=672261bb&is=6721103b&hm=8ee94986355921bfdf68ae20dfee5756e46a3d9434ec9d76dc59c905eff28038&=&format=webp&quality=lossless&width=1455&height=1152


Questification
 rain oracle
Are we allowed to request 3D models or ask of certain availability of them in this channel?
winter iron
rain oracle
Are we allowed to request 3D models or ask of certain availability of them in th...
no
winter iron
flat kelp
https://media.discordapp.net/attachments/422424977728339972/1300862091338584084/...
I enjoy that oversized polygonal hat
rain oracle
I should have phrased it as “seeing if people have certain models that can’t be found on websites like cults3d, sketchfab, ect”
hushed leaf
rain oracle
But it’s not avatars that I’m looking for…
 winter iron
I still love that octagonal hat
orchid phoenix
tough plover
oh my god thank you for these i couldn't find any cartoony matcaps with outline 🙏
flat kelp
thank chu
 terse comet
90's Rei Ayanami from Neon Genesis Evangelion, mine is left, official game models on right.

 flat kelp
 flat kelp

 subtle axle
why everything i make in blender makes any material infinitely stretched in blender? i just merged some cubes and then remeshed and sculpted a little bit, and the i exported as fbx and imported to unity

either scaling positive or negative brings no results
spiral sigil
subtle axle
why everything i make in blender makes any material infinitely stretched in blen...
have you done any unvrwapping before exporting your fbx?
 quasi glen
Does anyone know a tutorial that explains how I can move unity models over to blender to use blenders build in paint?
hushed leaf
what's a "unity model"? If you have a .fbx file in your Unity project, just file -> import that into Blender.
quasi glen
Nice
But then I have the problem where I can't put the texture on the model
(I'm going to say now already, I have no experience )
hushed leaf
textures don't go on models, they go into materials which go on faces 🙂
quasi glen
hushed leaf
textures don't go on models, they go into materials which go on faces 🙂
Ooohhhhh
Thank youuuu
quasi glen
hushed leaf
textures don't go on models, they go into materials which go on faces 🙂
I uhhhh
Thought it was going to be easy
but I still didn't find where to do it
 hushed leaf
This is where I recommend basic tutorials like "The Donut Tutorial"
I'd be doing this in the node editor in the Shading section of Blender.
make an image texture node and pipe it into the material's base color field
quasi glen
Okay... That part... Welp, you do make me realize that the donut tutorial was very very & I mean very worth my time which I didn't put int following it
I'll go and follow that tutorial
but thanks doe for guiding me to a source I could use to understand it
hushed leaf
yeah it's long, and goes into stuff you might not need for avatars, but it gets you a LOT of the basics
 topaz helm
my FIRST ever model, any tips?
 subtle axle
spiral sigil
have you done any unvrwapping before exporting your fbx?
subtle axle
spiral sigil
have you done any unvrwapping before exporting your fbx?
i had forgot about UV unwrapping lol
subtle axle
topaz helm
my FIRST ever model, any tips?
those arms are too slim
 rain pebble
i have a question that's technically animation related but it's primarily blender related so ill ask it here. how do I get an animation I've made in Blender to export correctly for use in Unity? I want to use an animation that's switching between two mapping uvs on my character's face texture to simulate speaking, but I can't seem to get the animation made in Blender to export on my fbx, or anywhere really. is there something I'm missing?


 jagged moat
That is an absolutely incredible texture job! Also much respect for keeping it optimised
 junior bobcat
jagged moat
That is an absolutely incredible texture job! Also much respect for keeping it o...
junior bobcat
jagged moat
That is an absolutely incredible texture job! Also much respect for keeping it o...
thanks! I always start with the lowest detail possible then work my way up to get the fidelity needed
UV map is also decent
 jagged moat
junior bobcat
UV map is also decent
jagged moat
junior bobcat
UV map is also decent
That is indeed a very nice uv, you old probably overlap some parts and get a decent increase in resolution overall however it might bork your texture job depending on what pipeline you're using.
junior bobcat
yeah, Substance Painter doesn’t like overlapping UV’s
plus I like to keep it all separated so others can completely change the look asymmetrically
jagged moat
Ah good point, I've found you can overlap uvs if you only export one instance of a uv island by making a separate mesh with any duplicate geometry removed however that wouldn't work for the sort of customisation you're looking for
Btw for the texturing on the cushioning above the tail, what method did you use because it looks very good
Also I just noticed the clever rebrandxd
junior bobcat
That is a lazy trick I found if you take the built-in denim jeans smart material and remove most of the other stuff and leave the folds/volume layers it adds
it’s usually very harsh so you have to reduce it a bit more to give a more subtle folded fabric effect. in those images I think I still need to tone it down a bit
but there’s also layers of other fabric materials underlaying it to give it the strap texture. I think I downloaded some polypropylene material from substance source
(And also use tri-planar projection to make it look more cohesive around the curves)
jagged moat
Ah gotcha, I'll keep that in mind as I've been wanting to try get more folds in my fabrics in substance for a while. Trying to get every detail by using a cloth sim doesn't always work for things like pinched fabric on corners and such
jagged moat
junior bobcat
That is a lazy trick I found if you take the built-in denim jeans smart material...
tbf before you turn it down I'd check it out in engine since your avatar will mostly be lit by light probes which means you don't get as good shading
tough plover
@junior bobcat @jagged moat Substance doesn't care about overlapping UVs if you move the overlapped islands one tile over
if using the mirror modifier in blender, you can just not apply it, and set "Offset U" to 1, so that when exported, the UVs are automatically shifted
jagged moat
I've not thought about using Offset U before, I'll keep that in mind. The only issue with overlapping UVs I noticed was it can cause AO to burn in details when you bake if your model isn't symmetrical but your UVs are. I'm not sure if that makes sense but I'm having a bit of trouble trying to word it well
tough plover
jagged moat
I've not thought about using Offset U before, I'll keep that in mind. The only i...
I get what you mean. in those cases, you have a few options:
-
don't stack the UVs for those specific parts, but stack everything else you can
-
in substance, add the
Ambient Occlusionchannel to your texture set, changeAO Mixingto Replace instead of Multiply in your texture set settings, add a new fill layer with only the AO channel enabled, and use the baked AO map texture for that layer. now, your baked AO is a layer that you can add a White mask to to mask specific parts of it. -
use a secondary UV map where nothing is overlapping for your AO (or at least with the problematic areas unstacked). you can do this by having a duplicate of your mesh with a different material with the first UV map removed. bake only the AO for that material in substance, and export it separately. basically the "lightmap" approach
this is what I mean with offsetting the UVs btw. you can't paint on parts of the mesh where the UVs are offset, and the baking won't affect them either.


 solar fossil
topaz helm
does this look okay so far? (2nd try)
solar fossil
topaz helm
does this look okay so far? (2nd try)
Not all that good at anatomy myself so take this with a huge grain of salt.
I think you are missing some calf definition, the legs are also spread apart, which isn't necessarily an issue but something to keep in mind that you might want to straighten them out once you have a rig.
The back arch seems a bit too extreme/chest area becomes too wide from the side view
The butt also needs to come down a bit as well
You can also let the thighs curve a bit more in the front
The hip line? (not sure how to call it) might need to be at a steeper angle?
solar fossil
topaz helm
If you want a pretty good reference body blender has some on their website as an asset bundle https://www.blender.org/download/demo-files/
Home of the Blender project - Free and Open 3D Creation Software


 dull willow
Middle car is still WIP but it looks out of place by not having baked normal and occlusion maps
 tough plover
dull willow
Middle car is still WIP but it looks out of place by not having baked normal and...
tough plover
dull willow
Middle car is still WIP but it looks out of place by not having baked normal and...
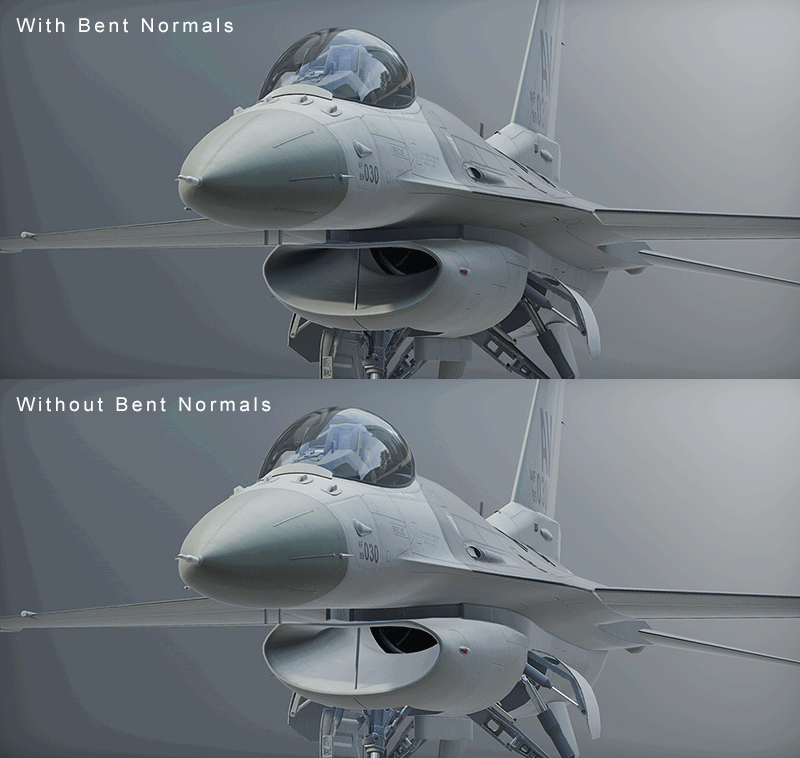
bent normals, interesting. haven't messed too much with those
what shader are you using that makes use of them?
dull willow
the car on the right in motion
dull willow
tough plover
what shader are you using that makes use of them?
I was given the shader by K E I who uploaded this world below. TBF I think standard shader accepts the map better, but doesn't have a clearcoat option like this one does
tough plover
dull willow
I was given the shader by K E I who uploaded this world below. TBF I think stand...
I see. do you just treat it like a typical normal map, or does the shader need special support for it?
dull willow
It seems to work well as a typical normal map too
tough plover
hmm interesting
dull willow
in my experience, standard shader looks okay with it
tough plover
do you do your texturing in substance?
dull willow
no, I still use photoshop since I just work with masks
standard shader with and without the bent normal map

 tough plover
I see
Substance can bake out a bent normal map, and it does appear to behave like the normal map + AO baker combined. wondering how to integrate that properly...
dull willow
tough plover
Substance can bake out a bent normal map, and it does appear to behave like the ...
what do you mean by integrating it?
tough plover
it looks like I can just replace the baked normal map with the baked bent normal map and it seems fine
tough plover
dull willow
what do you mean by integrating it?
when you bake mesh maps in substance, like the normal map from a high poly mesh, it gets put into the "Mesh maps" as the normal map. then, when you add additional details in your texturing, these normals are combined. when you export your textures, you end up with a normal map that contains both the baked normals and the detail you added yourself.
when baking Bent normals, you get the bent normal map in the mesh maps, but it doesn't really do anything. it's just there, it doesn't change anything about how the model looks. you can export it as its own texture, but it won't have any manually added details in it
dull willow
I see
tough plover
one thing you can do in substance is set the "Normal mixing" to Replace, which effectively disables the baked normals, meaning you can add the baked normal map as a texture in your layer stack and it will behave the same. I suppose I could technically do that and use the bent normal map in my layer stack to overwrite the baked normals

and it does seem to work

before:
 dull willow
maybe try a concave model with holes?
 tough plover
with bent normals on right


interesting
it kinda looks better
this will be interesting


neat


@dull willow pretty cool, thanks for the info
dull willow
np


 atomic wigeon

 velvet sluice
model imported from blender made in blender, app in screenshot: unity
 atomic wigeon
atomic wigeon
atomic wigeon
i now evaporate

 lyric isle
anyone know why my scultping tool is doing this?
 lyric isle
how its seperating the mesh peice by peice when its never done that before
lyric isle
flat kelp
In terms of the effect happening
 flat kelp
lyric isle
flat kelp
lyric isle
Are the transforms applied?
 deft cedar
I love VR Chat and use blender a lot to make my worlds.
I wanted to know more about blender so I made this video!
I hope you guys enjoy it 🙂

Join our Discord
https://discord.gg/M2tz5vbR
This conversation explores the remarkable journey of Blender, a free and powerful 3D creation tool that has revolutionized the industry. From its inception in a small Dutch studio to becoming a global movement, Blender's story is one of innovation, community support, and resilience. The discussion hi...
 mighty condor
Im trying to cut the eyes out using the knife tool. Ive figured out how to use symmetrise so thats not an issue. However, when I cut the eye out, the texture is warped so I need to adjust the uv. However I can never get it to look like it did before I cut it out, which I find strange considering I am not warping the geometry just cutting it into sections that already exist. Any idea what I could be doing wrong?
Dont mind the abysmal amount of edges, I thought that maybe adding more geometry would solve the issue (It did not)


Difficult to see in image so here, no idea why the hell it cant just, not do that

 timber badger
is that cut with the knife tool directly on the original original mesh?
mighty condor
Yes
Just straight on the face
Oh no I get the question now
Yes I have multiple saves and this is the model directly before trying to use the knife tool
timber badger
yeah... crappy topology can really warp uvs when you dont know what you're doing
mighty condor
Darn..
timber badger
why are you trying to cutout the eyes, though? to make them blink, or something more complicated? because what you want to do would change how you'd want to approach doing a cutout like that
mighty condor
I think initially I did it because I could warp the edges of the new "eye mesh" to make them look like they were making different expressions. But now that I think about it I may have gotten carried away with that random idea 🤔
Yeah this is a pointless endeavour, I will stop wasting my time with that, cant believe I didnt realise this sooner...
timber badger
edge slide could help with making sure the uvs arent warped
mighty condor
Ooooo thats useful
hushed leaf
definitely edge-slide, it's so useful!
tough plover
yes, you can use Blender to do the vast majority of the creation process, except for what needs to be done in Unity. there are full tutorials on youtube
beware that it is a long, and time consuming process.
@spiral sigil
spiral sigil
tough plover
yes, you can use Blender to do the vast majority of the creation process, except...
much appreciate the warning, ill see if i have the energy to start my own avatar
thanks ❤️
tough plover
spiral sigil
much appreciate the warning, ill see if i have the energy to start my own avatar
you should definitely give it a go, it's very rewarding
tough plover
thanks, it's sort of custom, in the sense that it's a base I bought (that is unavailable now), that I've been working on over the past 4 years. the clothing I make for it is all custom.
spiral sigil
yeah i think it looks cool very well built
 wispy kelp
Going at it like mad to finish these models by the end of this month
spiral sigil
wispy kelp
Going at it like mad to finish these models by the end of this month
teach me the ways of blender
wispy kelp
spiral sigil
teach me the ways of blender
Repetition, looking up how to do things and references
spiral sigil
wispy kelp
Repetition, looking up how to do things and references
oki thanku
spiral sigil

 faint bronze


 faint bronze
Just a lil guy
Did in one day, outta boredom


 spiral sigil

 cunning turtle
anybody extremely well versed in blender wanna make a commission for me? dm me plz
winter iron
cunning turtle
anybody extremely well versed in blender wanna make a commission for me? dm me p...
Hey ho :cirHi: I see you're looking for commissions.
You will probably receive DM's or friend requests from scammers now (or later) that will try to offer you their services. :cirBlech:
:cirNo: Absolutely DO NOT engage with those, regardless of how competent they might seem or their excuse to why they contact you.
This is unsafe practice used by scammers, and also breaks this Discord's rules. :cirCop:
If you seek a creator, check out VRCTraders in https://discord.com/channels/189511567539306508/1204506421631393913 and follow their protocols strictly :cirComfy:
:cirISee: It's extremely important to always DEEPLY investigate the account and social media of the person you plan to commission.
Is their social media linked in Discord? Is it legitimate? Are the references stolen? (Try to reverse image search posts to check.) :cirISee:
The quality of fake profiles out there can be crazy good, be aware of that and NEVER engage with DM or friend requests that originate from the artist.
When in the slightest doubt, do not commission them and contact the moderators of the involved communities. :cirD:
 rigid basin
Ooh yeah but I have given one work and he did perfectly
 zinc leaf
Is there a way to copy the changes to vertexes of a model from one side of the body to the other?
(While keeping blendshapes intact, hopefully)
tough plover
zinc leaf
Is there a way to copy the changes to vertexes of a model from one side of the b...
depends what kind of changes you made
 daring idol
Assuming you're using blender and your model is symetrical on a vertical axis, just cut the model in half on a vertical axis and then in object mode, copy and mirror the mesh to the other side, make sure the normals are correct, make sure the blendshapes work correctly then join the 2 half meshes to make one and then stitch the model back together by "F3" "Merge by distance"
@zinc leaf
tough plover
I would be very careful running Merge by distance, you can easily merge stuff you don't intend to
daring idol
Oh yeah of course
tough plover
there's a default blender addon (need to enable it) called Auto mirror, that handles deleting half the mesh and adding a mirror modifier. to apply the mirror modifier, you can use one of the many addons that lets you apply modifiers when you have shape keys
daring idol
Maybe draw a selection box in edit mode over the verts in the middle to narrow down the intended merge
daring idol
tough plover
there's a default blender addon (need to enable it) called Auto mirror, that han...
Ah I rarely use addons unless I have to
tough plover
you would be shocked how much basic functionality blender lacks that addons can take care of
applying modifiers to meshes with shape keys, re-ordering UV maps (bro how is this not native), removing empty vertex groups, applying a pose as the default pose, it goes on
daring idol
Definitely
tough plover
you should definitely know workarounds in vanilla blender as a fallback, but definitely do not avoid addons for "purity" sake
hushed leaf
you can apply a pose as the default pose, it's just kinda annoying
the UV maps one though, seriously wtf.
steady zealot
tough plover
there's a default blender addon (need to enable it) called Auto mirror, that han...
How does this differ from using the regular mirror modifier with bisect enabled
flat kelp
There are a plethora of add-ons considered native and supported by blender, same with vrchat utilizing the VRC creator companion.
They don't add them by default as some add-ons will bloat the program for specific people's machines, and it's better to let people customize what they're looking for in their workstation.
tough plover
steady zealot
How does this differ from using the regular mirror modifier with bisect enabled
the mirror modifier doesn't delete one half of the mesh for you
steady zealot
tough plover
the mirror modifier doesn't delete one half of the mesh for you
Well no not permanently, but bisect does functionally remove one side (non-destructively until you apply the modifier)
tough plover
is "Bisect" a new option? I'm still using 3.6.11 until they fix the renaming of objects and bones
ah nvm I see what you mean
never used that, that's interesting
good to know
steady zealot
tough plover
is "Bisect" a new option? I'm still using 3.6.11 until they fix the renaming of ...
Nah, it's been around forever. Ai says 2.82 was when they added it, but take that with a grain of salt
lyric isle
 spiral sigil
Hi don't know if it's the right place to say this
I'm looking for someone to help me create a train within 2-3 days and ma budget is 20$ max
hushed leaf
VRC Traders discord, link is in #1204490664637890580
Also your budget seems extremely low.
winter iron
spiral sigil
Hi don't know if it's the right place to say this
I'm looking for someone to he...
Hey ho :cirHi: I see you're looking for commissions.
You will probably receive DM's or friend requests from scammers now (or later) that will try to offer you their services. :cirBlech:
:cirNo: Absolutely DO NOT engage with those, regardless of how competent they might seem or their excuse to why they contact you.
This is unsafe practice used by scammers, and also breaks this Discord's rules. :cirCop:
If you seek a creator, check out VRCTraders in https://discord.com/channels/189511567539306508/1204506421631393913 and follow their protocols strictly :cirComfy:
:cirISee: It's extremely important to always DEEPLY investigate the account and social media of the person you plan to commission.
Is their social media linked in Discord? Is it legitimate? Are the references stolen? (Try to reverse image search posts to check.) :cirISee:
The quality of fake profiles out there can be crazy good, be aware of that and NEVER engage with DM or friend requests that originate from the artist.
When in the slightest doubt, do not commission them and contact the moderators of the involved communities. :cirD:
spiral sigil
Okay thanks about that
spiral sigil
hushed leaf
Also your budget seems extremely low.
Is it bad cause that's actually.the amount I can afford for it
hushed leaf
that's unfortunate
tough plover
spiral sigil
Is it bad cause that's actually.the amount I can afford for it
I'm just telling you right now, you're not finding anyone that will make you a train for 20$. you can maybe find an existing model online and pay someone 20$ to look over it and make sure it's not terribly optimized, but don't expect much more than that
solar fossil
spiral sigil
Is it bad cause that's actually.the amount I can afford for it
Check out Sketchfab, they usually have good models
 swift jolt
Lil lowpoly scifi barrles
 faint bronze
WIP, 16808 tris


 spiral sigil
 faint bronze


 sudden meteor
oops wrong chat
lyric isle
gear room

 wispy kelp
So far so good, just need fur and some adjustments
cobalt socket
Ive tried a few times and always have a weird bumpy finish and when i move the head up and down it never lines up right
What would be the easiest way to cover this gap and maintain a smooth finish?

im very new to blender
hushed leaf
difficult to see what we're looking at, is there a hole that you need to cover with more mesh?
cobalt socket
when the head is angled upwards theres a hap under the chin and neck
i though of maybe extending the neck upwards but i wasnt sure if it would look right that way?
 hushed leaf
ah yeah, you'd want to do some modeling work here
faint bronze
You could also do weight painting but it won't look seamless
hushed leaf
well you'll absolutely have to do some weight painting
 unique galleon
So I'm a bit late to the party but trying to add some Xmas content to my world and I'm really confused about getting a Christmas Tree with Quest support... quest doesn't support CutOut right? Plus, you'd have to double-side the leaves as well... how do people accomplish good Quest supported Crimmas Trees??
Should I be searching for an existing VRC prefab for this?
azure rain
unique galleon
So I'm a bit late to the party but trying to add some Xmas content to my world a...
the transparency support being unavailable is only for avatars you can use transparency on worlds just be careful with them because it's expensive for performance on Quest
 brisk lichen
just got blender and have absolutely no idea what i'm doing!!!
devout orchid
watch the first pin. or rather start with blender donut tutorial
oh, nvm first pin, thought its #world-development
faint bronze
pog, thanks
keen sierra
You can already do this in default blender. You just make a face set from selected, hit h to hide the rest, mask -> fill mask. Sure its 2 clicks more, but seems a little overboard to make an addon for this, no?
timber badger
also seems like it would just be easier to keep those part of the mesh as a separate object until modeling is done 
hushed leaf
that's my suggestion, yup
 dim fable
hey guys any idea what i did wrong? still learning how to use blender and unity lol

 timber badger
dim fable
hey guys any idea what i did wrong? still learning how to use blender and unity ...
timber badger
dim fable
hey guys any idea what i did wrong? still learning how to use blender and unity ...
does it have 2 (or more) uv maps
devout orchid

 dim fable
hi! i managed to figure it out, i tried following a different tutorial on youtube and it did it :D
thank you !
i think it was the way i unwrapped the mesh, should i put the video i used to fix it?
thankyouu xD

How to paint textures in blender and use it in unity
Music used in the video:
We Are Here by Declan DP https://soundcloud.com/declandp
Licensing Agreement: http://declandp.info/music-licensing
Free Download / Stream: https...
oo ok thank you :D
tyy i will haha
spiral sigil
fixed
 spiral sigil

 timid hazel
so i have this model but every time i test it i just get spawned on the normal platform
 hushed leaf
timid hazel
so i have this model but every time i test it i just get spawned on the normal p...
hushed leaf
timid hazel
so i have this model but every time i test it i just get spawned on the normal p...
I'm not sure I understand what you mean
timid hazel
hushed leaf
I'm not sure I understand what you mean
i dont get spawned into the building if i make a spwan it say too many pipe lines
hushed leaf
huh yeah no idea what that means
flat kelp

 foggy echo
This is scary

INSANE AI news: Gemini 2.0, OpenAI SORA, Trellis 3D models, Project Astra, DiffSensei, MMAudio, SwiftEdit #ai #ainews #aitools #agi
Try Wondershare Virbo to save costs and make money online https://bit.ly/3BhzSwk
Sources in order of mention:
https://trellis3d.github.io/
https://motion-prompting.github.io/
https://aistudio.google.com/
https://...
flat kelp

 grand dirge
foggy echo
https://youtu.be/jXCCTg9GRmk?si=8HL6tV09b_9olC_6
grand dirge
foggy echo
https://youtu.be/jXCCTg9GRmk?si=8HL6tV09b_9olC_6
We still need people to rig + retopologizing is needed still
Menacing, but not scary/threatening
jagged moat
grand dirge
We still need people to rig + retopologizing is needed still
Ah rigging and retopo, the parts artists love doing most when making an avi
hushed leaf
I don't mind rigging as much as I do UV unwrapping anything complicated
grand dirge
hushed leaf
I don't mind rigging as much as I do UV unwrapping anything complicated
I'm the opposite
UV unwrapping is easy for me tbh
Although I do have an abnormally high level in being able to mentally unwrap meshes...
 hushed leaf
ye gods, you did this by hand?
 carmine pagoda
tough plover
carmine pagoda
tough plover
Yeah, I’m not onto this. I’m still struggling to model my avatar.
first time blender user syndrome
flat kelp
Takes many small steps to get better
I was unable to complete the donut tutorial the first time I tried
🗣️✨
 vast lodge
how to drill a hole for eye? I try Boolean modifier but it didn't work

 mint silo
tough plover
mint silo
tough plover
ye i'd just ask blender to do it for me lol, or i use a premade model
tough plover
mint silo
ye i'd just ask blender to do it for me lol, or i use a premade model
Blender's built in UV packing isn't this good. it's gotten better in newer versions, but UVPackmaster still dominates.
there's more to it than just packing, too. you want to unwrap, straighten and generally just make sure UV islands are optimal
tough plover
hushed leaf
ye gods, you did this by hand?
somewhat. the packing is done using UVPackmaster's heuristic search, an iterative process to find the optimal packing density, but a lot of work went into tweaking islands like mentioned above, and also stacking islands that could share the same textures. a lot of islands are also folded on themselves for mirrored parts
hushed leaf
Packmaster is good
hushed leaf
vast lodge
how to drill a hole for eye? I try Boolean modifier but it didn't work
I usually just make a cutter cylinder in edit mode for that object then face -> intersect (knife) and delete the parts I don't want
the boolean modifier can be tricky to get right
 queen grail
Anyone know if theres a blender plugin that makes the camera work like unity or roblox studio's?
Not as in render camera as in like
Moving around
Ive been modelling for 2 years and it still pisses me off to this day 😭
tough plover
queen grail
Anyone know if theres a blender plugin that makes the camera work like unity or ...
some tips:
- use numpad period to set the camera pivot to the selected object(s)
- use shift + ` (backtick, next to 1) to use a "first person" camera that you can fly around. left click to stop that mode and stay in current position, right click to return to original position
that first one is really important
you can also just use ` to access some camera controls

doing numpad period is the same as View Selected in that ss
carmine pagoda
Anyone know how I can fix this?

I want it to look like this

Blender ignorance at its finest
hushed leaf
move the selected part to the desired location?
carmine pagoda
Never mind, I figured it out
I was using vertex select when I should’ve been using face
I love blender
hushed leaf
ahh yes
 feral yoke
Not sure where this goes, but I wanna ask:
How hard would it be to make the Eurovision 2025 stage as a world in VRC?
Cause I can't help but see potential for it to be an awesome world in VRC.
feral yoke
feral yoke
Not sure where this goes, but I wanna ask:
How hard would it be to make the Eur...
flat kelp
feral yoke
Cause I can't help but see potential for it to be an *awesome* world in VRC.
Good luck animating that
It is possible, a lot of work!
feral yoke
flat kelp
It is possible, a lot of work! <a:vrcAevSlap:608452275656196176>
Yeah, it seems so.
Would be fun for Visual Jockeys though.
I actually sent an email to the team behind Eurovision asking if they'd consider the idea of bringing it to VRChat to help them bring more publicity to the event.
It'll get ignored, but I tried.
 mild nimbus
tough plover
mild nimbus
tough plover
UVPackMaster?
The margins are all the same across every island
So I assume you used UVPackMaster.
tough plover
mhm
flat kelp

 solid minnow
Making some "assets" for my Akyo avatar.
 solid minnow
Making some "assets" for my Akyo avatar.
solid minnow
solid minnow
Making some "assets" for my Akyo avatar.
Getting close

 tawny pollen
Making a rig for this is probably one of the trickiest parts I'll ever have to do because all I've been doing is using empty controls

But as you can see here, I did this completely from scratch, even the texture
tough plover
 lethal terrace
is cats blender plugin still up to date like
lethal terrace
is cats blender plugin still up to date like
yes

Home of Cats Blender Plugin for Blender. an tool designed to shorten steps needed to import and optimize models into VRChat.
 rose atlas
I made an edit on Zinpia's Haka head and closed the hole in the bottom and sculpted it. This is the UV map before. Now it looks like the second image. Is there somone who can help me either re-uvmap it or show me how to fix it? I'm trying to make a custom avatar and this is my first time. 😢


for reference, that's the head before and after


 honest pewter
How do I make avatars I just got blender tryna download unity how do I get models
devout orchid
huh
you make them (which is kinda point of this channel)/buy them/find ones with an apropriate license


 faint bronze
💀
azure rain
tawny pollen
those triangle counts are completely pointless being that dense
tawny pollen
tawny pollen
Also Ditto
tawny pollen
azure rain
those triangle counts are completely pointless being that dense
Hold on a minute, this actually gets funnier

Complete quads
Also when somebody worked on a fluid simulation with a ball bouncing off of it, just look at this
 azure rain
tawny pollen
Those are quads
azure rain
tawny pollen
Those are quads
quads only exist as a modeling convenience the graphics card only sees triangles
tawny pollen
This is the devs nightmare
azure rain
tawny pollen
that's not funny it's just a waste
azure rain
how is it interesting?
tawny pollen
Because a lot of the game developers behind the scenes use a lot of quads in their workflow from what I've seen in their videos. And most of them have a consistent topology design from a video game perspective.
azure rain
I wasn't saying quads aren't useful I'm just noting triangle count is accurate for assessing geometric density
tawny pollen
Oh I see
azure rain
like vrchat only has its stats in Triangle count not polygons
I was more finding the subdivide modifier to be pointless because it's not meaningfully adding detail
tawny pollen
It just smooths out the original mesh
Like for Scott's modeling technique
Granted it's not the best
azure rain
pass the point that it makes any meaningful difference
tawny pollen
And we've discussed that probably a lot at this point haven't we?
azure rain
if your wire frame is a solid color it's too dense
azure rain
tawny pollen
And we've discussed that probably a lot at this point haven't we?
yes because the consequences for bad optimization is literal nausea on vrc
azure rain
yes your frame rate would be horrendous if you put that hand in
tawny pollen
But it's not like I'm going to put in a million polygons
azure rain
 tawny pollen
The max subdivisions I'm most likely going to give you guys is most likely twice the amount
tawny pollen
azure rain
Definitely not what that is
azure rain
the wire frame show that it's way too much
tawny pollen
Yeah
Thanks for talking to me about this by the way rain
The fact that I actually modeled this a few months back made this all the more better
flat kelp
N gons are expensive
tawny pollen
flat kelp
N gons are expensive
Tell that to Scott Cawthon, he uses it all the time

See the corner of the chin right where the mouth is connected?
Some dedicated FNAF fan actually made this like a one-to-one recreation made from scratch too

And surprise surprise, turns out the original FNAF help wanted "glitchtrap" model is the high poly version of the Springtrap model. Some parts of it are from the original model but optimized for performance
And when I used loop tools to fix up the topology of the model, I realized that it looks like the original model from Five Nights at Freddy's 3
And also this is the model I was talking about
 tough plover
this isn't true, ngons are triangulated when the mesh is imported in unity
sharp edges get split during import though
flat kelp
Ngons are the least efficient shape, this is true for VRChat and unity triangulation
flat kelp
tough plover
this isn't true, ngons are triangulated when the mesh is imported in unity
Regardless of when it happens, VRChat runs on the unity engine and force triangulates the mesh even if you import it non triangulated. Unless they changed it to where it stays as quads when you force it to.
tough plover
"least efficient" in what regard?
flat kelp
The least efficient shape for triangles and their count
tough plover
it's not that black and white
flat kelp
It is when the context is the efficiency of tri count numbers alone
tough plover
ngons are always the most efficient in terms of triangle count. there can be other ways to fill in regions with the same amount of triangles as with ngons, but the point is that you can't do better
 tough plover
the one case where ngons can be bad is when they cause a lot of very slim triangles, which can cause over shading issues
flat kelp
We are talking poly counts, not shaders or texture optimizations
tough plover
flat kelp
Does VRChat not count n gons as split faces anymore?
it never has? vrchat counts the amount of triangles in a mesh, and because meshes are triangulated at import time in unity, you'd get the same number whether or not you triangulated in blender or not
flat kelp
Not what I said
But alright
Either way, a face with four sides is less triangles than any split n-gon, you can use them but like you stated and that is well known, it's not recommended unless you have a specific purpose for them.
tough plover
the only cases where ngons can be problematic to my knowledge is shading, deformation, and small triangles, which I've already mentioned.
flat kelp
So shader stuff, not tri count which it's also a problem for if you triangulate it

There you go
🤷♀️
You are correct that I misspoke in stating that VRChat runtime triangulates
What I mean is that if you don't change your import settings to preserve quads, by the time VRChat has the model it's triangulated via Unity. Here is the documentation!
tough plover
this is only if you enable Keep Quads, which is usually not recommended in most cases regardless
tough plover
ok, so I guess we're mostly on the same page then.
tawny pollen
tough plover
this isn't true, ngons are triangulated when the mesh is imported in unity
And the ngons when subdivided become quads
Remember I've seen it
Sorry I wasn't there to reply as soon as possible
tough plover
tawny pollen
And the ngons when subdivided become quads
yes, but we're not talking about subdivision, we're talking about for final meshes imported into unity
tawny pollen
Oh right
tough plover
you don't subdivide something before exporting it
tough plover
you can maybe use one level of subdivision while creating a model to help with edge flow and topology, and to make it easier to work with (because less goemetry), but you should never over-subdivide a model when exporting for a game
only use additional subdivisions for doing renders
tawny pollen
tough plover
you can maybe use one level of subdivision *while* creating a model to help with...
Oh absolutely
tawny pollen
tough plover
only use additional subdivisions for doing renders
Yeah exactly
tawny pollen
Anyway, this has been done by a friend of mine, call him Mr. Grim
 tawny pollen
Also when it comes to designing stuff, I always think about the canon material for the Avatar of my creation, so when I was designing springtrap again, I went to my good buddy Mal and he told me about looking up how to make flesh textures for blender.


But it really should be discussed in shaders
 modest widget
Here's VR Design Contest.
It's interesting that UModeler X is required.
 faint bronze
Prob cause they sponsored it
tawny pollen
this is what the normals look like as I mentioned in world lighting
 tawny pollen
this is what the normals look like as I mentioned in world lighting
tawny pollen
tawny pollen
this is what the normals look like as I mentioned in world lighting
there's a plan where I'm going to make him slightly higher poly to avoid that issue
to get rid of that unwanted seem
tawny pollen

remember, I'm making this higher poly on purpose because I want there to be more expressions on this guy
you rip one model you've ripped them all, and trust me, for humans in Battlefront 2, they're all the same 💀
they have the same exact topology
some maybe altered based off of the appearance but they're overall the same design
tawny pollen
 tawny pollen
tawny pollen
tawny pollen
this will eventually fix the issue I have with the shading issue

 cobalt tiger
Modeled my first Full outfit! Made in Marvelous and Retopo in Blender, Textured in Substance


 sour tusk
some stock car bodies i did blue is based on super stock body and the grey ones are replicas of the nascar canada series bodies.

 faint bronze
a l i e n
 faint bronze
cobalt tiger
Modeled my first Full outfit! Made in Marvelous and Retopo in Blender, Textured ...
faint bronze
cobalt tiger
Modeled my first Full outfit! Made in Marvelous and Retopo in Blender, Textured ...
cute!


 solar fossil
Peak male physique


 broken sphinx
who can help me edit this drone model to be more photo realistic. i have the real photo, vs this drone taken model which is not very clear wanted to edit.

 charred echo
any substance gurus that can tell me why my curvature bake in substance is just ignoring the blade edge despite it being marked as sharp and as a seam just like every other correctly baked curve?
included side view from blender if you need it


 winged jacinth
I can help you to model your character dm if interested. Thanks
hushed leaf
FYI this person is very likely a scammer, be careful
flat kelp
Yeah don't take dms from people unless it's verified via an official trader discord lol
winged jacinth
Sorry but don't misjudged me am not a scammer
flat kelp
winged jacinth
Sorry but don't misjudged me am not a scammer
Post that portfolio and mid-process render line up and don't solicit people to your DMs, this isn't a place to advertise or spear-fish customers.
Your discord account is also two days old lol, even more sus.
winged jacinth
Ok thanks
hushed leaf
Also rule #10 - don't advertise here.
jovial seal
if i wanna sell an avatar on gumroad but i take pictures of the avatar in an instance which i didnt create can that avatar's listing on gumroad get taken down?
even though im not advertising the instance im just using it to take pictures of said avatar?
faint bronze
I've never seen that happen
Pretty much everyone i know personally who have done that didn't have a problem but try not to get names or super recognizable stuff in your photos
And I would credit the world and world owner in your description somewhere
swift jolt
jovial seal
if i wanna sell an avatar on gumroad but i take pictures of the avatar in an in...
Thats no issue… unless the person who made the world is your nemesis or something lol
cobalt tiger
Yippee my first actual base im proud of!!!

also, does anyone know where i can find a photoshop alternative other than pixlr real quick? i need a masking tool
hushed leaf
gimp?
faint bronze
cobalt tiger
also, does anyone know where i can find a photoshop alternative other than pixlr...
Krita
flat kelp
^ Krita
Gimp is a pain to use (for texturing) and is less supported than Krita for texturing / modeling work
 sullen crown
I use gimp for everything
hushed leaf
I use gimp mostly for graphic design kind of stuff, logos, masks, patterns, etc.,
I like Substance for 3D work, though I tried out ArmorPaint recently, it seems pretty decent as well
hushed leaf
yep, I've used it, I worked at a studio for a while, though I wasn't an artist. Seems great if you have the budget.
tawny pollen
hushed leaf
yep, I've used it, I worked at a studio for a while, though I wasn't an artist. ...
Yeah, unfortunately I don't have those things
hushed leaf
yep
tawny pollen
The most I got are ripped models from Star Wars Battlefront games that are existing ones that are made in those softwares
 tawny pollen
tawny pollen
tawny pollen
This looks a lot like the ones you see in the original trilogy
Especially in Return of the Jedi
tawny pollen
hushed leaf
yep, I've used it, I worked at a studio for a while, though I wasn't an artist. ...
As I said, I don't really have those things but I wish I had the equipment that I can use to manually make whatever I can to make hi-res ones like for Darth Vader
hushed leaf
you have blender, right?
tawny pollen
Yeah
cobalt tiger
Wip
 swift jolt
cobalt tiger
ooh ty
tawny pollen
hushed leaf
you have blender, right?
swift jolt
cobalt tiger
ooh ty
tawny pollen
hushed leaf
you have blender, right?
Yes I do. I feel like I should start sculpting stuff more often because there's too many things I don't
tawny pollen
here we go
tawny pollen
 tawny pollen
hushed leaf
you have blender, right?
tawny pollen
hushed leaf
you have blender, right?
check this out!
 hushed leaf
you really don't need to ping me for this stuff.
tawny pollen
 tawny pollen
 tawny pollen
 tawny pollen
 tawny pollen

 cursive summit
I'm having a really weird issue with Blender, when I go into camera view and zoom in too close, it progressively gets more and more laggy, until it freezes and starts using 90% of my CPU then crashes if I don't keep scrolling out, it only happens in Material mode and Render mode
cursive summit
Also, I tried to subdivide a plane twice, and its fine, but as soon as I put a material on it with textures, it crashed the program instantly
hushed leaf
cursive summit
I'm having a really weird issue with Blender, when I go into camera view and zoo...
weak CPU? I could see that kind of thing happening in render mode
cursive summit
hushed leaf
weak CPU? I could see that kind of thing happening in render mode
I'm not sure, this thing is brand new so it shouldn't be having problems, it happens in material and render mode, but only if I zoom in while in the camera view
hushed leaf
is this with eevee or cycles?
cursive summit
it seems to happen with both
hushed leaf
oh that's really strange then
cursive summit
its acting like it needs to calculate every scroll closer, it'll freeze for awhile then go back to normal until I scroll out or in again
So I just tried again, and now its not doing it anymore?? Blender is weird af
hushed leaf
hah weird!
cursive summit
Knowing Blender, its gonna do it again for no reason in like 3 days or some shi
 drifting sage
cursive summit
its acting like it needs to calculate every scroll closer, it'll freeze for awhi...
drifting sage
cursive summit
its acting like it needs to calculate every scroll closer, it'll freeze for awhi...
does the object have any modifiers?
cursive summit
Only armature, at first I thought it was the volume scatter effect but I removed it and it was still doing it
drifting sage
cursive summit
Only armature, at first I thought it was the volume scatter effect but I removed...
is it only with that specific material active or also default material?
cursive summit
It happened over two different Blender projects that had no connection, which makes it way weirder than just one
cursive summit
hushed leaf
hah weird!
UPDATE: It turns out its tied to the "Render Region/Crop To Render Region"
If I turn either on, it starts to crash for whatever reason
 alpine nimbus
Any blender experts know how to fix this shading?

 stone pine
alpine nimbus
Any blender experts know how to fix this shading?
stone pine
alpine nimbus
Any blender experts know how to fix this shading?
alt + n then reset vectors should work
tawny pollen
In terms of raw details which do you think takes the win? Fallen Order/ Survivor or Battlefront 2? I'm talking about Darth Vader's helmet btw
tawny pollen
 tawny pollen
tawny pollen
tawny pollen
This is very old

 tawny pollen
 cobalt tiger
tawny pollen
cobalt tiger
tawny pollen
like not have the texture float? try adjusting the UV around the hair texture
tawny pollen
cobalt tiger
like not have the texture float? try adjusting the UV around the hair texture
umm
it's visible from the mesh
 crude heron
So I once saw someone who said they used a Manuka as a base for their avatar but her body size and proportions were actually adult sized instead of Manuka default
Is that simple to accomplish?
Is it just as simple as scaling up the body/clothes in blender?
hushed leaf
you may have to scale more... proportionally rather than just the whole thing, but yeah, totally doable
keen sierra
in blender yes
orchid phoenix
cooking, perchance

 exotic obsidian
Getting the shape of the spines right is harder than I thought, but I feel like I'm getting somewhere

 carmine vigil
Does anyone know how to make it so the dress and the coat will react to the movements of the characters legs so there is no clipping. I imported into vrchat and when I ran the costumes would just stay still and the knees would be peaking through.

The boots and arms worked right
and the sleeves
just not the legs with the skirt and coat
i checked the vertex groups
they have a vertex
is it a weight paint thing?
hushed leaf
yep, weight paint the clothing to move with the leg bones
flat kelp
 tawny pollen
https://youtu.be/brkRCD61o20?si=RRchDIiVRvSen33k Lazy is amazing at accuracy modeling

Ok so I was a little bit dead on the channel (Magician Toy video went a little bit wrong Xd) so I decided to do a Happy Frog speed modeling for a FFPS Pack I'm making so here is the Speed Modeling Xd, Next week I might upload a Funtime Chica Speed Modeling video so in the meantime enjoy this one! :D
Other FFPS Models Made By Me: https://x.com/L...
fair mason
recently fell in love with the "pluto's christmas tree" design of mickey so im like making that now https://media.discordapp.net/attachments/1010366516874719352/1331263934593765428/image.png?ex=67924d27&is=6790fba7&hm=2508f731478ce8123247591ac8a3bb0040ab90fcc07c2489fd929f895534a855&=&format=webp&quality=lossless


 tough plover
cobalt tiger
tough plover
cobalt tiger
I think the jaw is too much like a V, it needs to be broader and more defined
the lips might be a bit too tall also
 peak loom
Beginner question for you 3D Modelers: How do I fix the edges so this wall has more even topology?

Made this neat window but it also made a weird triangle bit in the wall
 astral pond
peak loom
Beginner question for you 3D Modelers: How do I fix the edges so this wall has m...
astral pond
peak loom
Beginner question for you 3D Modelers: How do I fix the edges so this wall has m...
select the faces and press i think ctrl + t
which will triangulate it
you can then manually adjust verts to be in better soots for topology
peak loom
Ty ty ❤️
flat kelp
peak loom
Beginner question for you 3D Modelers: How do I fix the edges so this wall has m...
I'd look into the aligned version of the knife tool as well
A stranger way I sometimes use would be using a plane and a boolean modifier to cut apart the mesh and merge the split vertices at the edges.
hushed leaf
IMO that's not strange at all.
I also like to use other faces to cut in mesh edit mode with Face -> Intersect (Knife)

 olive kestrel
has vrchat upped the vrchat quest from 10 mb to 40mb?
azure rain
olive kestrel
has vrchat upped the vrchat quest from 10 mb to 40mb?
the max file size has not changed it's just now enforcing a Max texture memory memory size of 40 MB for Quest
olive kestrel
ah ok
tawny pollen
This is not by me but this is actually pretty cool, I saw it on Twitter
 tawny pollen
This was by me, I just happened to make it look fancier

 granite snow


 golden raptor
why is this no clipping in blender but its clipping in unity? im bout to lose my mind 😭


idk how to begin to fix this issue
jagged moat
golden raptor
why is this no clipping in blender but its clipping in unity? im bout to lose my...
try triangulating in blender before exporting
golden raptor
how do i do that?
golden raptor
plus how would that help? 😭
jagged moat
golden raptor
how do i do that?
Add a triangulate modifier to the mesh
jagged moat
golden raptor
plus how would that help? 😭
Unity triangulates when importing a mesh and it may be triangulating differently to blender, so if you triangulate in blender first you'll know the mesh is the same. The difference in how it triangulates may cause clipping
I've exaggerated for example, but if you have a quad that isn't flat, depending on which way it's triangulated you can get clipping

 devout orchid
also could be exceeding 4 bone weights limit
vertex should not be weightpainted to more than 4 vertex groups
hushed leaf
FYI you can selectively triangulate in face edit mode, select faces then right-click and there's a menu option. Often better than using a modifier. Also you can control how this happens by simply joining two points to make a new edge, at strategic locations.
tough plover
there's also the Flip quad tessellation option to make a quad triangulate the other way
hushed leaf
oh I forgot about that
tawny pollen
Do you want to know something about accuracy guys?
hushed leaf
sure
jagged moat
I guess we'll never know
exotic obsidian
Not necessarily for VRC, but I made a little computer cat I've named "Compmewter"
 tawny pollen
Do you want to know something about accuracy guys?
tawny pollen
tawny pollen
Do you want to know something about accuracy guys?
if the model is accurate and the references don't line up then it's off target, like a shotbow. if a model is inaccurate and it lines up with references then it's like a vampire looking at themselves in a mirror
tawny pollen
jagged moat
I guess we'll never know
you now know
hushed leaf
I'm not really sure I know now
jagged moat
tawny pollen
if the model is accurate and the references don't line up then it's off target, ...
I can't say I follow if I'm honest
tawny pollen
Okay
 noble bough
upcoming first VR Chat avatar, lets see what all can go wrong xdd
 noble bough
starting to optimize the mesh, and so far pretty good
 jovial seal
when yall design furry models, how tf do you address the eys cause i try to approach them with an angle like this and they just look awful from the side view.


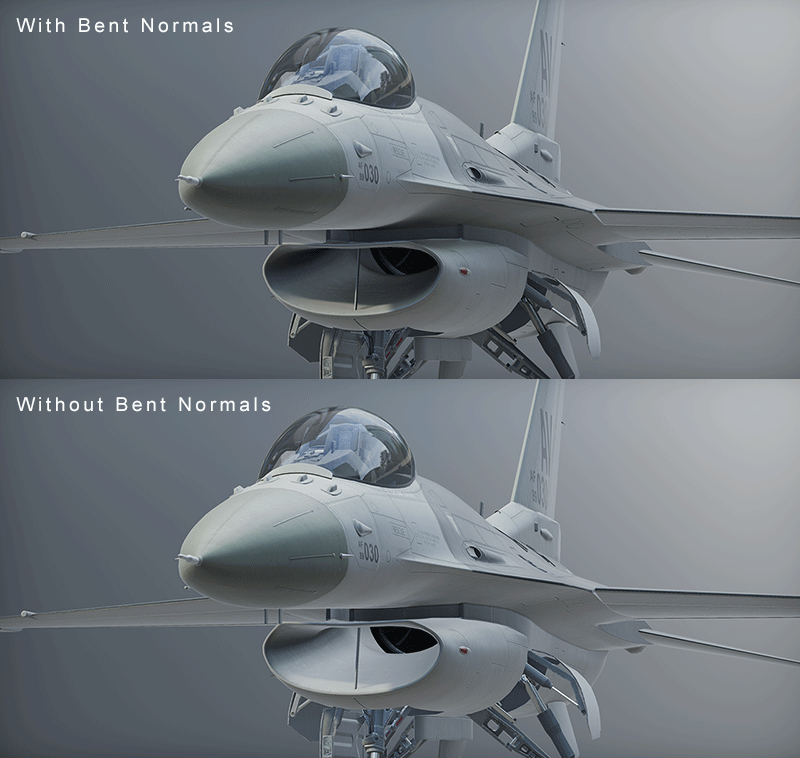


 jovial seal
hm
noble bough
keen sierra
yo wtf is happening in the background
swift jolt
noble bough
yo wtf is happening in the background
Someone is just sitting/half laying down…
noble bough
did some face retopo, now i got the nice flow and far less polys

left is new
this is without the subdiv 1 modifier
 cobalt tiger
vey nice!
noble bough
what was the solution to fixing this ? the normals of my baked texture do no align correctly in blender

I tried flipping the green channel, but that still didn't do it
 dusky bramble
Is the color space of the normal texture set to non-color?
noble bough

i could try to remove the green channel flip for a sec
ok removing the channel flip didnt help either
the thing is, it looks completely normal in substance painter and in marmoset
it has to be the channel flip, but it doesnt work
jagged moat
If you go to solid view and enable backface culling, does the hoodie still look correct?
jagged moat
I mean, you're currently in material view, if you hold down z and select "solid" you'll see a non textured version of the model
noble bough
yeah my bad, we meant the same thing ^^
jagged moat
ah gotcha
noble bough


it is red on the inside, cause the hoodie is single sided
thats why
i deleted the unnecessary mesh on the inside
jagged moat
That looks good, I just noticed in your normal map setup that you're doing the Y-1 though I believe it should be 1-Y instead to flip the green channel. Though I don't think that is the cause
noble bough
i can give that a try
i also tried to flip the normal in the baking process in marmo
but that did nothign
jagged moat
Oooh I also just noticed you have your normal plugged into the strengh part of the Normal Map node and not the color
noble bough
oh my god
jagged moat
Hopefully that fixes it
noble bough
nope still looks like shit xd