#animation
1 messages · Page 176 of 1
For the life of me I can't get setting a metahuman as a third person character to work
I have the IK bones set
I wish Metahuman released instructions on how to rig for UE5 like they did for four
Something new to UE5? Can't say I ever seen that before
GlobalSpace in the context of control rig, would this be the same as component space in the context of anim nodes?
Pretty much that. It's not exactly world space.
Thanks, that makes life a bit simpler 😄
Yes. It seems it is a new thing. I have tried to dig into their github repo but couldn't find my answer. Anyway, I have found at least the bool which is causing to show the icon indicator.

Heh, haven't dive deep into UE5's anim BP, but that's cool
Hi, I wanted to try creating some fully procedural character animations, and watched some tutorials on control rig, and one on Full Body IK with a dragon, but I didn't get the feeling that a setup like that would work for a human character if I just extended with more controls. The way it was set up using multiple different control rigs was also a bit confusing. I'm not sure if I should use animation layers, and do the upper/lower body separately? What would be a good way to set up the control rig(s)?
You're referring to the one on reddit aren't you

It's a mix of control rig techniques (inverse kinematics, rotation distribution, Verlet integration, spring interpolation, aim math, etc) with physics applied on top. The IK is primarily CCDIK and not FABRIK, although I was using the UE5 FBIK before but I wanted more control so I made a custom setup. The dynamic motion comes from the interplay between different controls, where the location of one bone may drive the transform of a certain effector and so on. No pose assets or pre made animations are used.
No, I hadn't seen that one. It was this one: https://youtu.be/Z8eqaFG7lZQ

The Full Body Inverse Kinematic (FBIK) feature in Unreal Engine 5 allows you to construct IK in Control Rig with a high degree of control and flexibility. In this feature video, we show you how to create a 100% procedural animated character with a highly modular setup.
Ahh
Did you want something like this then? https://www.youtube.com/watch?v=4Vum2BW9p6A

https://www.patreon.com/UE4tuts
Control Rig allows you to create custom controls on your imported skeletal mesh in which you can generate new, or modify existing animations within the Unreal Editor.
In this video i'm using Control Rig to Procedurally Aim/Look At the Character to the specific object.This is the Part1 in which we setup control rig...
This is probably beyond the scope of this channel but there really isn't anywhere else so here goes. Trying to convert a ControlRig node to an AnimGraphNode. I'm having a problem with space conversions; something somewhere is incorrect.
// Bone transform in component space
FTransform Result = Output.Pose.GetComponentSpaceTransform(FCompactPoseBoneIndex(BoneIndex));

// BoneSpace should be the space that control rig bones operate in? Convert ComponentSpace Bone transform to BoneSpace
constexpr EBoneControlSpace BoneSpace = BCS_BoneSpace;
FAnimationRuntime::ConvertCSTransformToBoneSpace(MeshTM, Output.Pose, Result, BoneIndex, BoneSpace);

// This should be the equivalent space that a control rig operates in (root bone component space)?
FTransform Space = Output.Pose.GetComponentSpaceTransform(FCompactPoseBoneIndex(RootBoneIndex));

// AimTarget is passed to the node via pin
// MeshTM is in world space, so is AimTarget
// Use it to convert AimTarget to ComponentSpace
AimTarget = AimTarget - MeshTM.GetLocation();

// --- This is where the same logic ControlRig executes occurs ---

// Convert back to component space
FAnimationRuntime::ConvertBoneSpaceTransformToCS(MeshTM, Output.Pose, Result, BoneIndex, BoneSpace);

// Apply the result - and it's wrong (compared to same setup in controlrig)
OutBoneTransforms.Add(FBoneTransform(BoneIndex, Result));
Output.Pose.LocalBlendCSBoneTransforms(OutBoneTransforms, 1.f);
OutBoneTransforms.Reset();
might wana try #cpp
the gurus are there.
lol
My chances are just as low anywhere lol, I haven't seen much animation stuff there 😦
is that a new base for move it?
Nah trying to convert this node so I can use it to keep gun aimed at crosshair without requiring the use of control rig

ohhh
Finally got rid of control rig in v3 don't want to add it back 🤣
Really need access to UDN for help on stuff like this but oh well

I want a similar-ish workflow to the Full Body IK Dragon where I can move around controls to move the feets, and arms to grab / punch towards targets controlled from blueprint. I want it to be powerful enough that it should be easy to set up characters to play twister
Epic really didn't comment their control rig code 😢
there is not documentation on it either, a few pages that pile the basics, and nothing complex.
Now you know how I feel 😛
I've always known
did you look in lyra and see it it uses the aim node?
I didn't, it wont help me much, epic have no problem using control rig but I do
My whole issue is making an anim graph node that behaves the same as the aim node in control rig
i feel ya, i spent 2 weeks keyframing animations for them to be able to be prodecural all together with out a control rig crash 😦
well when i get to my anim graph ill see what i can do
That's not why, it's because every skeleton (even if identical other than proportions) needs a unique control rig and every unique control rig needs a unique anim graph
Works OK if you only ever have one character I guess
And every control rig must be uniquely constructed
Way too much work for games with lots of characters
but if the rig hierarchy is the same, it should work all together, no?
Unless...
fortnite said they use one control rig for there animations on all the characters in a dev stream i watched
I experimented with it, and I've been able to get 58 characters + few outfits with different skeleton controllable with the same control rig
Or have unique anim graphs and remake every control rig for every skeleton?
thats how the animations for everysingle emote works on every character
That's a completely different workflow
Ah
They're basically retargeting in realtime
Well, anim graph for every skeleton, but not that huge
Just a single Copy Pose From Mesh and that's it
Any skeleton with different proportions needs it's own control rig, can't just use a control rig made for mannequin even if your character has same hierarchy and bone orientation
The control rig will modify their pose otherwise
Fortunately for my project it's mostly just the matter of scaling down the proxy skelmesh lol
I'm making a plugin not a game so I can't use any hacky workarounds
For whatever reason this TargetSpace being set to None doesn't result in any transform I can make sense of (and isn't FTransform::Identity)

Seems closer to FTransform::Identity but with some rotation mixed in
It isn't the root's transform, or the bone's, or the meshes, or .. anything actually
But it's definitely something
Just looked at UE5's IK rig stuff, it's pretty neat actually
I don't think it's wrong to expect people to have unique anim BPs if their skeletons are too unique to use IK rig, so I'll just give up and use control rig
Sorry for the random question but is there a way to create some type of animation based off of morphtargets? I am trying to work with live link and am trying to setup facial deformations using 52 blend shape morphtarget. I saw how they created the animation control with the kite demo but am unsure how to re-create the needed animation that has all the curve values so I can map each curve with the needed animation value.
I just set up a very simple control rig + anim blueprint that just let me set controls from a blueprint, but this doesn't look right

is this the right way to calculate direction? im getting conflicting directions(moving forward and backward ) where they keep jumping between negative and positive values (thus making my blendspace all messed up

anyone knows why attaching mesh to a socket enlarges the mesh?

I'm so confused. I have a very simple idle to walking blendspace set up that SHOULD work, but it isn't. When I print the speed variable, it's good. 0-100 when I start to walk. When I manually set the speed in my blendspace to 100, the walking animation plays fine. But when I plug in the variable to the blend space, it doesn't work. Wtf is happening 😩
It used to work, but now it doesn't anymore
Lol, I just created a new anim bp and now it works. Whut 💁
Hey everyone, I'm making an fps game and when I aim down sights my character sways a lot because of the idle ironsights animation, how can I turn this off?
Hi!
Does skeletal FBX export and does UE4 import bone constraints? Like this piston here?
https://www.youtube.com/watch?v=sPiVoH4Z5uI&t=370s
In this episode, learn with Chunck how to take a robotic mesh and develop a robust rig using Inverse Kinematics and Constraints!
Make sure to vote in our next poll: https://www.youtube.com/post/Ugy4GJciDO1DVSVOAOJ4AaABCQ
Access to the working file in this video is available free on the CG Cookie site for all logged-in members: https://cgcookie...
Make a new animation with no sway in it?
Or create a pose and use a simple Boolean on your anim blend space that if you’re aiming down sights to enter pose instead of using the animation that has a sway
As a cheap workaround
No.
Either you set up the constraints for animating in Blender, or set it up in UE4 for procedural animating (either animBP or Control Rig)
Hi,
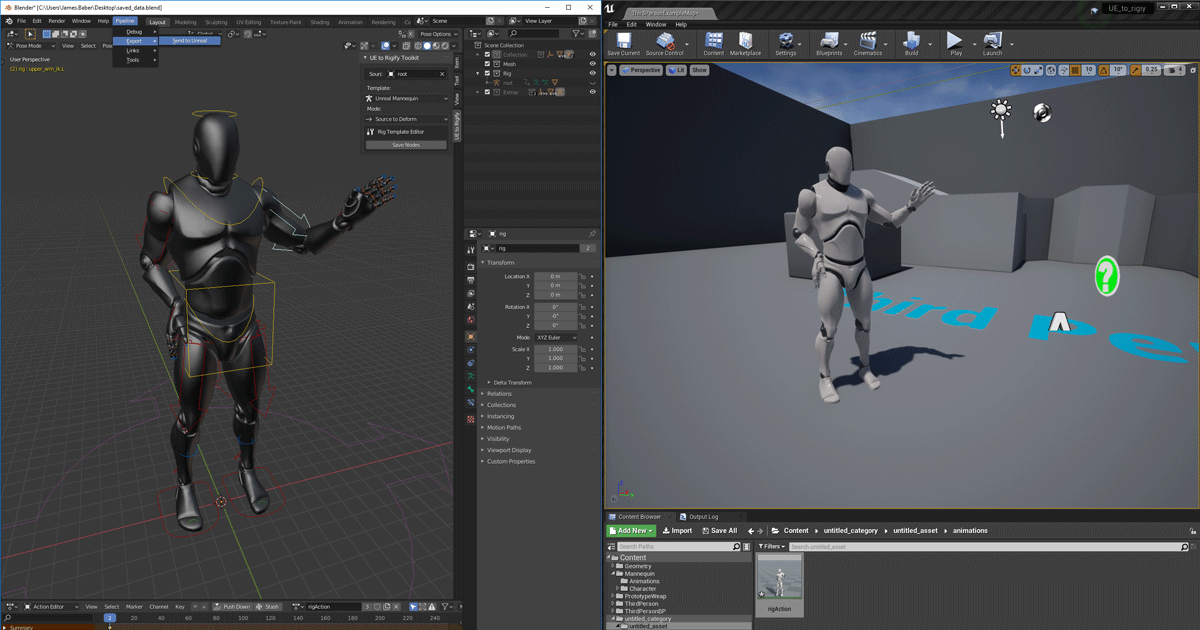
I have the following problem and hope that someone here can help me. I have retargeted the ThirdPersonCharacter (Manny) to my Metahuman and the following problem always happens:
The legs of the metahuman do not move and just slide across the ground.
I hope someone can help me with this.
Hmmm let me try, thanks!
Are the legs seperated?
No, they aren't
Maybe here it can be seen a little bit better.
@sacred condor I'm not too sure, maybe test the code with print string?
Are object constraints imported through FBX as well?
AFAIK You can’t bake IK constraints onto an fbx directly . That’s part of the ik system itself
I'm being completely honest. I am quite a beginner. What would you suggest?
how do I assign vertex groups to a bone in blender so it works when imported?
So basically weighting to rig?
probably, I dunno
FWIW that should not be of your concern, so long as you parented the mesh to the rig, or have Armature modifier assigned to the rig
I have some vertex groups in one object and I don't know how to assign them to several bones
huh, several modifiers worked

Hey there, is there a way to replace animated meshes imported through FBX with other meshes?
Lets say I create a particle system in 3ds max and export that as FBX with simple boxes, could I then somehow replace those in Unreal with nanite meshes?
Hey hey, I have a male and female character on the same skeleton and a control rig set up for the female. I want to use it to adjust the animations for my male character as well. However the male has a different bound pose, does anyone know how I can set up the rig to use the bound pose when I am previewing the male character?
why does my animation shrink the model when it's played?
Are skeleton transforms bugged or something? I think they're the issue
I think ur gonna need pics or more info if you want help friend
nvm I think I solved it, if I export FBX in 0.01 scale it works fine

Hello everyone! I made this in blender and I want to use it as a game asset in unreal. The problem is that I want the window things and the doors to slide open and I want the wheels to turn. I only imported objects that dont move before. Do I need to make a rig or smth like that? Do I have to animate it in blender? do I need to put the moving parts in a different file?

you need to set up bones to do this. https://www.youtube.com/watch?v=RZHUxcBIibE
Rigging a train with a single armature in Blender.
This train was modeled, textured and rigged by trainboi1 of Blendswap.com. All credit goes to him as the original creator. I've simply used his hard work and effort to show some rigging tips and tricks.
Download the original at : http://www.blendswap.com/blends/view/82659
try looking at this?
Ok, thank you! I'll watch it
Hey guys! How do I make smoother animations? I have animations for stopping(from walking), start walking, different degree turning in place, standing to crouch animations, etc. I already blended the animations while in the stances, How do i implement the smooth transitions?
im curious if someone may have some insight on this.
right now im trying to decide between learning blender or learning unreal, ideally ill learn both as time goes but right now i think maybe it might be best to get comfortable in one before the other.
for my purposes im intending to crudely (at first) animate some conversations between me and a friend. im not intending to do animated mouth movements or anything very complicated honestly maybe just a few joint movements here and there>
in typing this it occurs to me i could relatively simply just do this as stop motion with a simple photo editor and Dav.res.
I want though to get better at this over time. I guess what I'm asking is which do yall recommend for my first program to learn.
and why
Learning animation with blender is pointless atm. control rigs are the future for unreal animations. i have a control rig set up here, trying to get my arms and hands for a perfect idle. in blender this would take me hours, in here this takes me 5 minutes.
ok thats good to know. control rigs seem very expensive tbh are there cheap rigs or alternatives to look into
every animation in fortnite uses control rigs.
still 240+ fps on a decent pc.
you can bake your animations with a control rig as well
for a anim sequence if you dont want to use the control rig.
Does anyone know how the IK bones on the default Mannequin are added in Maya? I'm trying to add the IK bones to my mesh and am having a few issues...
I've added them to the bind pose and not skin cluster, had issues... Added them to bind pose and skin cluster and had more issues
Uhh... no.
Control Rigs are cheap. It uses its own lightweight RigVM, so not the same as actor BP's VM.
If you think it's expensive, then something else unrelated could hurt your perf
workflow question because this is driving me nuts, is there a way to tell u4 to open aniamtions or blendspaces as a new tab instead of replacing the ones i have currently open? is such a challenge to be able to do blendspaces or what not because it keeps closing what i have open to open the new animation
huh i just always assumed they were. what would you recommend i look into as far as those go
If performance suffer, always stat unitgraph first
Is there a way to set up a video clip or images as a reference to use when animating?
Lol what are you expecting, a two sentence answer? People spend their careers on this problem it's not something you just solve with a YouTube video or discord response from some rando.
you might be able to do this actually. I mean metahumans are of all different proportions and they use the same control rig i believe
Animating in DCC tool or in editor?
i have these effects from the game store. how do i make them spawn ontop of a mesh on the ground like an ammo pickup

Would you say a decent humanoid control rig in Unreal engine can replace third party applications like Maya/Blender to deal with your day to day animation needs?
Or is there anything missing in Unreal where you would say: "Yeah for this you definitely need to use Blender still"
How do i apply animations to modular meshes
Nope. you dont need any of those programs any more. #work-in-progress message
I understand that control rig is very powerful. Probably even more flexible than a blender rig (that's meant for Unreal).
But I am also wondering about the animation tools itself. Animation layers, flipping poses and such. Is that up to par inside unreal?
Yeah its all simple and easy to use once you learn how to use it, because the documentation is limited.
the only way for you to find if the control rig is better than blendr and maya, is to try it out for yourself.
i have this rig set up in blender
I'd love to get it into unreal but im a bit clueless how to achieve such a thing!
when i import it there are tons of errors and crazy inconsistent scaling
i guess its a question of going through error by error and fixing everything
Is Control Rig fully replicated in 4.27?
In editor. I'm trying to decide if I should learn the UE5 animation system or not.
Question
Coming from After Effects I'm used to adding Noise to an motion path, to make it somewhat more organic. Is there something equal in Unreal Sequencer?
hi, im making a modular character using skeletal meshes, however whenever i set the master pose component it doesn't play the animations, it just stays in the first frame of the idle, any help is appreciated
Control rig is not replicated at all i believe
My jump animation goes higher than my player capsule, i tried root motion but that does not work, anyone know a other solution?
please dont spread false information. The control can be used and replicated in mp. This is how most IK solvers are used.
Control Rig is replicated to some extent, as we are seeing it work on both client/server as expected.
I was simply asking if it is fully/partially replicated, as the documentation doesn't cover replication at all.
Now there is the million dollar question.
i assume it is judging by a video i watched about fortnite using a control rig for basic animations.
I watched that as well, but on their Twitter they mention a lot of custom code for CR in Fortnite 😅
only way to find out is to compile a small demo and see what happens
Eh, I'll come back and share our engineers' findings if nothing else pops up in the meantime.
please do so! I have been here for days learning about this control rig, i hope it all works out. but mainly i wanted to use it just for ik solver for sockets on guns with procedural animations.
Good you answered your own question. NEXT!
control rigs need a node to disable stretch, and not only be in the basic ik.
does anyone know something about the functions you can run when an animation node becomes active?

in that scenario i want to calculate the offset between two bones to update the static hip offset value correct (with the changes that the controlrig made before)
so the question is, can i access the rig in the function somehow, with the previous bone transforms applied?
I am sry i just meant that there is nothing related to networking within control rig. Animation runtime is a different topic.
ahh that makes sense yeah the question was bland anyways lol
Idk for sure but this looks like a control rig use case
Wow this is the most basic controlrig to ever be made. as long as you create your spaces, and controls under the same parented roots, you can control each control with out even creating a transform for it! amazing.

it's problematic as i can't update the offset each frame, and only with a certain pose
so i have to load reference pose and set a bool so that the controlrig knows it can update, then wait for the next frame to set back to the pose before and set the updateBool to false
this however annoys me as the whole character changes pose for a frame
i know it sounds crazy but i am using my control rig as poses and with a blend pose i am using a enum to get the correct pose from each control rig.
and my pose override does actually eliminate all changes which i made to the rig before, so my plan doesn't even work out xD
Downloaded a character with moving hair and clothes but they go crazy when moving her in the level. Character movement set to only 200. Anyway to tame this?
Also seems unrelated but there seems to be quite a bit of blur on her arms and legs when moving, even with a post process motion blur set to 0,
check if "per bone motion blur" is enabled on the skeletal mesh component in the character BP
and check if motion blur is enabled in the project settings
Yeah i wish this was documented a bit better xD
right now all trial and error and figure out yourself
lol
the animation system is probably the most complex part of unreal
but that's due to the nature and flexibility of it
the problem i am facing right now, i am having a locking of the root bones with ik 😦
if i used a sequence not made with that control rig, it will lock the hands arms and everything to a default place, but if it is created with that rig, it wont lock.
@brazen wharf Cheers! looks much better this the blur turned off. Kind of a strange one to have on by default but ok. Also noticed the cloth actor / blend weight settings which solves the l'oreal hair issue 👍
Can anyone help me with cloth/soft body dynamics or any tutorials maybe, i want my tubes to retain the volume but still be affected by gravity and physics asset. Maybe some physics constraints or however its bets to approach this.

looks like a problem with the physics asset
its not the collision thats the problem its retaining the volume of the mesh i know the physics asset is not perfect
ohhh i see, maybe 100% not sure but it seems like it is not weight blended properly?
Hello everyone, I have this stupid question about basic animation..
Am I missing something, or did I do something wrong?
Blueprint Runtime Error: "Accessed None trying to read property CallFunc_TryGetPawnOwner_ReturnValue". Node: Set Speed Graph: EventGraph Function: Execute Ubergraph Pig Anim BP Blueprint: Pig_Anim_BP
Blueprint Runtime Error: "Accessed None trying to read property CallFunc_TryGetPawnOwner_ReturnValue". Node: Set Direction Graph: EventGraph Function: Execute Ubergraph Pig Anim BP Blueprint: Pig_Anim_BP


You can put together a editor utility widget showing image sequence that you put into Sequencer
Maybe you just misunderstood. But I said I have the animations. I just wanted to know how to blend it together. So yes I did figure it out from a youtube video. Thanks for the help
Alright, good to know. So there is an option, but it isn't an out-of-the-box setup like 3d modelling software has.
Can anyone tell me why this doesn't work?

Missing the character SKMesh on the Target input of the AnimMontage?
I'm having trouble getting a turning animation on this. This Blendspace is for Idle-walk-run transitions, and I put my turning animations at the sides. Do I need to make a separate BS just for turning?

And if so, how can I get the rotation rate to feed in?
That shouldnt matter the target is self, i forgot to say but only the first AnimMontage plays no matter the speed and the second never plays
A character can have multiple SKMeshes, so plug it in and check
Also, max walk speed is a constant.
So your boolean check should fail each time, unless you manually dynamically change max speed

Yeah you need the current movement speed if you're trying to get different anims to play at different speeds
this is how you get the player speed
How do i get that?
Or use Last Updated Velocity from the character movement component
#animation message - get velocity from the character movement component
This worked, thanks both 🙂

This is the type of thing you want to probably move over into a Blendspace and Animation Blueprint if you're doing complicated animation transitions and stuff
Hi there. I just upgraded my project to UE5 and I'm experiencing some issues with root motion.
I had a lot of animations with root motion for my player character (like "dashing" anims for example), working as intended in UE4. Now they don't work anymore, animations play "in place" instead.
Anyone else experiencing this issue or have some thoughts on what could be causing this?
I thought that for root motion you needed a AnimMontage, and i cant add those to a BS
Oh I'm actually not sure about any of that yet, you're probably right
just had to use root motion for regular anim senq's to work with control rig.
Thanks anyway for the help
to get past all of this, how do i use a animation sequence in a control rig as a reference pose?
or use a pose asset.
Is it possible to create a skeleton in UE directly now or does control rig only work with imported skeletons from other 3d software?
You can change the root motion mode to be from any kind of anims. (It's from the BP's initial value)

Control Rig only work with existing skeletons.
Neither UE4 nor UE5 can make skeletal mesh from scratch to begin with anyway.
Control Rig is basically making controls for your skeletal mesh asset (or rather the skeleton), NOT making skeletal meshes from scratch.
Got it, thanks! I was hoping that it was also possible to create a skeleton from zero, but alas :). Maybe in UE6
just a future refence for anyone browsing this. Yes you can create pose assets from a control rig just use the distribute rotation node.


does anyone know how ik solvers work in ue5
trying to move a hand that looks off in the transferred animation before exporting baked anims
like in other words, moving around my ik goal doesnt change anything about the animation
judging on what ik goals and shape of the objects around the feet, this has to do with the control rig.
I already have that on, still cant use anim montage in blendspace
or do you mean that i dont have to make anim montage but that root motion also works without anim montages?
Yes.
but then how would i play the animation? and lets say i do it in state machine, how would i recreate this:

and how would i use animations in blendspace
Interestingly, there is no controlrig involved there. it is ik retargeter’s own widget. 😆
Not sure but maybe you want to change your retarget pose? Or another way is that if you select the chain in that ik retargeting tab. In the details panel there should be ik adjustment setting to allow you to add offsets to your ik goals.
Viewport manipulation are for preview only in most cases i think
whats usually the problem when a base meshes anim bp works but not on the modular meshes tied to the base mesh?
It doesn't matter if the bone named root is not actually the root bone
I spent a day trying to figure out why my original hitpoints were sitting on top of my regular hit points so I couldn't read them. Turns out every character was spawning a UI widget. So we all do it.
😂 gotta love it when you look past the simple solution
My favorite is running a montage in the default slot and not the one you need.
So what is this? I see no docs 😄

Seems to be a graph organization thing. Creates a Reference to an existing state
What's the difference with cached pose?
Presumably it will just go to the state you tell it, doesn't need to cache anything, saves having tons of overlapping/messy transition arrows (but IMO this is a user-design flaw to begin with, my graphs have been very neat and tidy since the old days)
Just gotta nest the states
@ashen junco if it's like what I'm imagining based on what @merry loom said, then the left is the old way pre-alias, and the right is with alias

It is in the state machine not anim graph
Yeah that seem to be the intended use case
Hey, is there a simple way to make bones move independently of their parents in an animbp?
For instance: I want to play one animation on the spine down to the lower body, and a separate one on the arms starting from clavicles. HOWEVER, I also want the arms not to inherit the motion from the spine at all, and instead to inherit the correct motion from their original animation.
does anyone have any tutorial recommendations for procedural animation (4 leg walking with direction) in unreal? i can only find plugins sales videos 😑
Where can I find the retarget manager from ue4 in ue5
Old retargeter might be deprecated. Consider using ik retargeter?
ok
https://youtu.be/Z8eqaFG7lZQ maybe this one helps?
The Full Body Inverse Kinematic (FBIK) feature in Unreal Engine 5 allows you to construct IK in Control Rig with a high degree of control and flexibility. In this feature video, we show you how to create a 100% procedural animated character with a highly modular setup.
Whenever I plug in a basic IK into my control rig this immediately happens. I'm not seeing this behaviour in tutorial videos so I'm not sure how to go about correcting it. Does anybody know of any usual culprits that causes this to happen?

I'm on version 4.26.2
i do not think it works this way. first you have to define the spaces, then add controls to each space independent from the rig. The hands need to define some kind of IK first, then you do the fingers after.
example


Thank you, I am still in the process of learning and I'll have a look at your screenshots. But the specific problem I have now is that as soon as I create a basic IK node, I get these limbs stretching to some arbitrary (seemingly) location. At 3:36 in this video, the leg contorts a little because everything isn't set up correctly yet - but it is close. Because mine is controrting so dramatically, I am concerned I am starting off on the wrong foot. This is what I am hoping to get some guidance on.

Until recently, creating character motion was the domain of expensive third party DCC apps. With the release of 4.26, Unreal Engine introduces further refinements to Control Rig: our suite of in editor rigging and animation tools. Whether you are authoring traditional style animation assets via keyframes or driving characters procedurally at run...
In this episode we take a first look at control rig, we talk about some basic functionality and how to setup controls and some inverse kinematics.
Join the Discord server here: https://discord.gg/zBeebU7uv3
Support the work of LeafBranchGames on Patreon here: https://www.patreon.com/LeafBranchGames
thats a better video
Thank you, I will follow along with this. I have just skimmed to when he plugs in the Basic IK node, and although there are a couple of extra nodes (setting transform of effector bone to control), the initial erros still don't appear to be as dramatic as they are with my setup - so I'm still a bit nervous I'm, starting on teh wrong foot
good luck my friend 🙂
hey so i was wondering
is there anyway to animate 2d eyes?

by making a bone connected to the materials (like in blender)
and then moving the UV around
In Control Rig, you can shift the texture around, with the skeleton having curves with the same name as scalar material parameters
Yo ! I'm trying to pose this asset in my level without having to go through the process of rigging and all. I've got this hierarchy which lets me manipulate the elements in the asset inspector, but I can't find a way to do the same thing directly in my level viewport. Is that possible ?

Not without Control Rig.
But will the control rig allow me to manipulate without animating ?
No.
Heh. Alright, if that's my only option I'll dig into that, thanks !
you could always make a pose of the eyes as bones left, up, right, down and use then with a random sequence like what i did here
could you show me or link or video?
i wanna have a working keyframe in my animation timeline of eye movement, anything
https://www.youtube.com/watch?v=pvLG4rmkB8A
check out the first comment on this video, might help

Before you dislike the video, No, this is not suppose to be a full tutorial. This should give you the groundwork and logic behind our method so that you can recreate this yourself. Feel free to ask questions below and I will try to help where I can! :)
We had a bunch of people asking on Twitter on how we get our 2D eyes to work in UE4, so here...
also the video itself, but it's heavily edited
thx
i am doing an animated short film in UE5 and blender with OCs sooo this could help
Have fun with that 🙂
Until recently, creating character motion was the domain of expensive third party DCC apps. With the release of 4.26, Unreal Engine introduces further refinements to Control Rig: our suite of in editor rigging and animation tools. Whether you are authoring traditional style animation assets via keyframes or driving characters procedurally at run...
oh i know about control rig
There is a section where you can manipulate materials with CR
ive made the IK rigs for my chars and- oh?
heres the thing, ive got the UV bone movement working and all

but when imported into blender
Yes, you can manipulate scalar parameters in material with CR (through skeleton)
That's what I did with my Idolmaster anime machinima project, where the eyes are panned 2D texture and not extended meshes
ah okay, also sorry, its just im tryna get my trailer done for may 4th
I'll show the project in question when I go back from dinner, but the gist of it is to add a "curve" value in the skeleton, with the name matching the scalar parameter in the eye material. Then you control said value in Control Rig
hey, helping a guy over on reddit with something, but the animation don't seem to work when played in the anim blueprint. Any advice?
For reference, the machinima project I'm talking about. The model has the eye as a texture, and the mesh is not extended for rotation, so the only way is to shift the texture. (In my original game project, this is not the case - the eyes are controlled by bones)
In the eye material, I have a function to shift the texture. Mine is a little more complex to account for slight imbalance with anime eyes (and I don't want to make separate material for the other side), but the gist of it is to append both scalar parameters to shift X and shift Y into Vector2, and then add it with TexCoord to shift your eye texture.
Then in the skeleton, in the Anim Curves panel, add new "curves", with the name being the exact same with the scalar parameter in the material, and toggle the material influence just beside the curve name. This will influence the material parameter of that name.
In Control Rig, what I did is then use a Vector2D control (or other kind of control you desire - I found Vec2D is way easier to setup than going through converting rotation into float vars) to manipulate the curve that influenced the material parameter. For convenience, I divided the current and maximum value to scale it to -1.0 to 1.0.
Of course you can improvise from this, and tbf I improvised this from the official Unreal Engine tutorial I linked above before. This works like a charm to me, and you can definitely expose it to animBP if you want to for gameplay animations.


thanks
ill try and figure something out
i love this community btw, more than source 2/s&box
Also I think you can skip the Control Rig phase and just control the anim curves directly in anim graph, though I don't remember the exact node
eh its cool
When authoring animations in a LS (and control rig), what is the difference between baking animation sequence and creating a linked animation sequence?

Also, if you're moving the texture with bones in Blender, and marked as deform when exporting it to UE4, you can use the same bone in Control Rig/AnimBP to do the same thing in UE4, as weightless bones won't get lost in export/import.
Does anybody know how to orient the rotation of the bones correctly so they match the orientation of the tutorial mesh that comes with Unreal (right)? I'm playing around with control rig which works perfectly wit hteh tutorial rig (as expected) but I am having problems with my mesh and I think it is down to bone orientation.

From my research it seems like this is not done in blender. I thought about rotating the bones to the armature before pairing but the transforms need to be applied anyway so it would just re-orient everything back to default values.
In some nodes like Basic IK, you should be able to change the primary and secondary axis to account for the bone orientation. The value would be -1, 0, or 1.
Try out the combinations to see which one fits the best.

I did try that, maybe I wasn't making the right combinations but I wasn't having any joy with it
Although come to think of it, I haven't tried after correcting my unit scale - I'l ltry on a corrected one
I am getting significantly better results actually, still a couple of oddities I need to figure out. Is it pretty common to rely on re-orienting via IK if you're not using something like Maya? I did read somewhere that suggests Blender's lack of support for arbitrary bone orientations is why it can be a headache exporting from blender.
I never used Maya that much, but safe to assume it's more of Blender's fault.
Thanks for steering me right!
pardon crossposting shifting here
what would be a good way to play turn in place animations on npcs (idle to walk blendspaces).
It is easy for player using the yaw input but cannot figure this one out (anything to prevent the AI sliding while turing works)
anyway to hide shapes in runtime?

i wanna see what this looks like
but i got my arrows in the way
anyone know why my animations don't run and its flat on the ground when the fbx plays fine in fbx viewer https://img.hexeption.co.uk/i/z0KwwX I'm using Maya 2022

@summer cairn go to frame zero
click on the root of the object inside the skeleton
drag him up or use location in details, press key and save. You can click the record button and save the animation with out the key frame to rerecord it. or you can go in blender and fix the positioning of the animation.
At least in UE4, in the Animation panel, there is an option to hide manipulators. Don't know where it's located in UE5
hide control shapes
thanks
wow that was annoying lol
still not playing the animation
Oh i was fixing the root issue
your skels dont align which will cause the anim not to play.
mhm
hidden in game what are those for anyways?
How would one go about in fixing this?
press T also works similaily i think
those arrows move the thumb 1 , 2, 3, index 1, 2,3 etc.
Import with mesh, dont use the skel you imoprted previously.
Yes this works thank you so much easier!
so uncheck skel mesh https://img.hexeption.co.uk/i/9sNt

this is the skel it gen https://img.hexeption.co.uk/i/80PMLGH6T

but if i preview the animation still broken

I have no idea how to fix that issue with out seeing what it looks like in blendr.
I'm not using blender
never said you where, but you might need to learn how to use it.

Is it common for set master pose to take a while to compile?


That's with the offsets all 0? Ideally you should have either eyes separate material slots and occupy the same spaces in the UV map
wait so the default values should be 1?
It should be 0 by default, and it should be looking at the centre already
another option to do, morph keys of uv eyes moving in blender
not the mesh of the eyes, but the uv materials of the eyes moving
That won't work, because empty morph targets will be discarded
hmm good point
again sorry, i just wanna get a trailer out for this project
specially for may 4th
and 45th anniversary
of SW
Any idea why Target frame rate is grayed out for animation asset?
So after posing my arms i clicked record and my control rig defaulted to an a pose,. now when i try to load the take in the sequencer it wont load?
any ideas
If I remember correctly, that setting is for animations that doesn't have set framerate already
I think it happened on me with some blender anims with framerate anything but 30. Haven't found a way to consistently replicate it yet
Hello, I currently have idle and jogging animations through animation blueprints, and I have hit reaction animations through the actors blueprint using the any damage event. however after the taking damage animation, they remain as idle and dont do the jogging anymore. any suggestions on how to make them go back to using the idle/jogging logic in the animation blueprint would be appreciated, thank you!
Is the damage animation a montage, or physical anims?
i think physical animation? first time using UE sorry lol

its the play animation event, so ya that leads me to believe physical animation
That's not physical animation. But not montage either
You have to make a montage out of the anim sequence, and then have the animBP aware of the slot that the montage used.
ok I think I made the death animations into montages. so I think that should be simple enough. not sure how to handle the animation BP though
is anyone able to explain a bit more what they mentioned above? I have created the animation montage, but im not sure how to "make the animBP aware of the slot that the montage used"
currently my animBP just has two states: idle and jogging, it goes from one to the other based on speed which is set in the event graph, I assume I can just add another state "attacked" and use a new variable to move between all 3 states, but how do I set the variable up when the "anyDamage" event is within the actors bp?
Typically one would create an Interface between the Character and the AnimBP to communicate between the 2
Would it seem reasonable to use a second larger capsule to use to activate Physical Animation OnOverlap?
ah ok. I guess ill have to look into interfaces then lol. im not sure what you mean about the second larger capsule?
@clever iris The original capsule, would be the regular collision capsule. Because I don’t want physical animation on all the time, only when colliding with a wall or player, I would maybe want a second capsule, to simply activate Physical Animation when overlapping with the environment or other players?
right, so right now its setup to do the animation based on a collision capsule that is right in front of it. but the problem is once it does that animation, it no longer does the running/idle animations
maybe im not understanding the suggestion, sorry if im not, but it seems like you might be misunderstanding the problem
Control rig works fine in unreal 4, went to bake my mocap animation in unreal 5 and it does this

Hello
So ive been retargeting my sword fight to the ue4 mannequin
ue5
sorry
Got it all "working"
problem is when I actually do the retarget I cant lock root motion anymore
my guy does the motion of root motion but I cant actually turn it on and or lock him in place
The red root bone bar switches from the root/pelvis that was proper to little orb location at the base middle
I read all the docs and tried multiple different chain setups
different root bone placement
everything else breaks it
it seems be perfect minus dropping the ability to use root motion which breaks it entireely
Im at a loss as I cant find anything and im thinking its an engine bug
please help. @ me if you have an answer or DM me
I'm trying to get a physics tail onto a creature, following this tutorial:https://www.youtube.com/watch?v=T5pCaj0trAQ, but I can't get the tail from just spazzing out and flying off into space. Any ideas?

Here's how to make a physics based ponytail in Unreal. I did my best to make it as simple and straightforward as possible. I hope this helps!

It was blender's Add Leaf Bones on FBX export apparently screwing it up...
dumb question: trying to uses UE5 Manny skeleton in my upload to mixamo, it either fails or the animation i end up downloading has this weird tilt and lock to hip bones. what am i doing wrong?
Update: this is happening lol. For some reason it's flickering, but beyond that how can I get it to stop twitching once it flops onto the ground? https://imgur.com/PMEw8pS
I switched to Hull physics instead of Capsules and that worked pretty well actually
Basic animation question #1 How do BlendTimes work? I am trying to learn animation playing around with the content examples. I modified BasicAnimation example 1.2 so that the character number updates every tick in the anim graph but the animation just snaps between the two variants no matter what I set as the blendtime. Thanks!

Basic animation question #2: In the content examples BasicAnimation 1.3 there is comparison of root motion/non root motion. But the actual location of the mesh/actor doesn't change in either example (I thought this was one advantage of rootmotion for e.g. collision?). How do I get attached children to move with the mesh? I tried selecting EnableRootMotion in the animation asset but then the animation got stuck.
Hey! I assume this is right channel for groom animation cache stuff
My case isn't really groom but, I'm trying to render this as hair and I have a problem with animation cache
I have ~600 versions of this iris geometry in Houdini, as lines
I am faking them as frames, and get a full animated alembic, so different line geo each frame
When I re-import in Houdini animation seems fine

I'm importing as groom with cache, I can see UE detects the frame range correctly during import - but when I add it in sequencer and add groom cache track it's single frame
Any ideas what could I have missed? How to properly import lines animation?
Hello, I have a custom model that has root bone and exatly rigged like Mannequin. I have an animation which is working ok but when I retarget it , the root moves different than the reference aninamation. why does it happen?
Anyone want to animate and blueprint a couple things for me? I'll pay :). They are already rigged.
See #instructions
Can only assume the root bone retarget is not set to Animation Scaled
hey, thank you so much; the root is set to "animation" and pelvis "animation scaled"
Try changing the root retarget space into Animation Scaled, so that it puts into account the new rig's proportions
nope, I tried the all combinations with root and the pelvis bone 😦
sorry people, maybe it's stupid question, about control rig, i'm trying to make very simple aim functionality for some kind of blaster. I forward target location in control rig in tick, and draw debug sphere show correct location, but control rig on same way get some strange location of LookAtControl for aiming


if i move control in control rig manually everything is looks ok
axis is set on correct way

oh GOD FINALLY, got eyes movement working

is it joke or you can help me?
anyone know how to map a skeletal mesh to controll rig in UE5?
controll rig component i mean
nvm figured it out
you have to map it in the preinit event
i found soluton (mistake)

that FromWorld missed me
Hi, is there a "Keep distance" node or similar in Control Rig? Basically I'm trying to rig a bow, I've already setup the control to tension the string, and 2 IKs for two sides of the bow. What I'd like to do is drive the IKs in relation to the string control and from my (lack of) knowledge, probably the easiest way to do so is to constrain the two bones/controls for the bow IK to always maintain the same distance to the string control
Edit: Found it - Transform Constraint
Edit2: It seems to do the opposite of what I want, the base item is constrained in respect to the 2 or more target items... What I want to do is the opposite, is there a way to achieve this? Thanks
Edit 3: It also seems to only copy/paste the transform delta, there doesn't seem to be a way to manipulate this transform change? I.e. I want transform changes of the string control Y axis to translate to changes to the 2 IK controls' X axis... Is there even a way to do this?
does anyone know how I can use the anim bp in lyra with own pawn/character? everytime I apply it to manny, it doesnt do anything
anyone able to help with this question from yesterday please?
I cant figure out how to use an interface to do this
Is this normal for an animation to be floating above ground level when world and local transform are 0,0,0 on the root bone? For some reason I thought normally you would see the feet hitting the ground, but I'm checking multiple projects, and default Epic projects (third person character, subway sequencer) seem to show them all floating on the z axis slightly.


could anyone give me an idea where I am going wrong here? I have an interface with two functions: EnterCombat and ExitCombat. in the actor blueprint I have them called like this, and then I have them implemented in the animation blueprint like this, and then I have the attacking state in the animation graph, using the isAttacking variable to determine the animation like so. the print statements arent even printing, so I dont think the event from the interface is working like I think it is. edit: I have added print statements before, in between and after the calls from AnyDamage and those do print. So I must be making a mistake somewhere in those calls?


@ashen junco im not sure if this is what you were talking about yesterday, but this is sorta just what I could understand and throw together from interfaces lol
maybe use the project to new parent node?
hey guys im just doing a basic" play animation" but then i want to reset and contineu the "thirdperson_AnimBp" but i can select it again or what should i do :/ ?

I have it setup with an animation blueprint from a youtube tutorial, I could send you it if youd like
yes pls
@clever irisignoring the interface or anything like that. The Event Enter Combat and Exit Combat that set your Is Attacking, what blueprint is that in?
animation BP
ok, so all of that code in those screenshots are all in the anim bp?
im feeling dumb, how do i save this a an animation sequence after this????

the first picture is in my actor bp. the rest are animation bp
because the actor bp is what handles the AnyDamage event, the tutorial I was following put it in the actors BP but they also didnt add the getting hit animation, so thats where my confusion is coming from lol
gotcha, so the issue is your not telling WHERE your event enter combat and exit combat are supposed to be called on
does anyone know what these are called?

Basically, when rotated they animate parts of the model
rig controls
Yes, migrate to your project in ue5.
you need something like this @clever iris

your any damage tells the animation blueprint running on that character to call the interface event using your blueprint interface
right now you are telling nothing to run that event
I made my project in UE5 tho
I can't find the actual rig controls thing anywhere on the model
well go to where your control rig is, and drag it into your level.
floofer s screenshot is in blender
in your content folder, just go to content browser, click the 3 lines that look like an upside triangle, go to animation, click control rig
click the 3 lines that look like an upside triangle,
i'm very confused-
if your controls are not showing up when dragging it into a level, press t.
add an asset filter
right click the skeletalmeshactor track and back animation sequence should do the trick
you will need to recreate the whole rig using unreals control rig system. FBX import will not work for this typr of blender rig
I'm trying to find this Full Body IK node, but it won't show up in my graph if i drag off or just right click

arent I with the first picture though?
did you enable the fbik plugin?
maybe im not understanding, but isnt that calling the function when it takes damage?
@merry loom thanks it wasnt active
also just to confirm I want the INT_forest option right?

you are telling "something" to run the event " Enter Combat, and for that code the thing you are telling is "self" or that blueprint
oof
does any other format support it..?
I don't have to be using FBX
oooh I see. so whats the difference in the call
I see yours looks slightly different
yes, you want to call function
that will call the interface function on "something" and the something you plug in is the animation blueprint on that actor

no, those are green for the icon

one targets the interface itself, the other is targeting an actual object (in this case the animation blueprint)
oh so I get the animation instance, cast to the animation blueprint, and then pass it in?
i think im slowly understanding. sorry its taking a bit. these things are so confusing lol
yes, like the screenshot shows. in my case the animation blueprint is ABP_Quinn, but yours would be whatever it is
Nope. You have to do inengine rigging asaik. A rig’s behavior is heavily depend on blender’s solver. And they are not portable. And there is no universal rigging platform existing yet. So….
I'm wondering if i could just use Shape Keys XD
i'm trying to animate the wheels of a train model i found on SketchFab
dont mind the mess ill clean it up once it works lol. I think this is what youre saying

@nova glacieryou should not be using EA.... you should be using final
Is there a Limit Distance bone modifier from Blender equivalent in Control Rig?
@clever irisno, remove those two nodes (enter and exit), and replace then with the correct one when you drag off the cast node
the input icon should be BLUE and not GREEN
unless they re blue and just look weird to me...
theyre all green..
when I enter enter combat I get these options: and theyre all green

you can see this one targets the actual animation blueprint


the others target the interface which isnt what we want, we want to call it on the animation blueprint
I mean u could always save the distance between two bones in a variable, move you bone somewhere and set its length back to the value in the variable
I must be missing something or something is not setup right
Sounds like you can achieve that with a few nodes in a control rig bp
@clever iris when you mouse over the one that is under Anim NP Forest, what does the mouse over say is the target?
@merry loom
In UE42.7 there's no variables in Control Rig 😄 and I can get the initial distance but I have no idea how to apply it back after one of the transform changes
@nimble hatch ignore my typo. it should be BP lol

I am pretty sure there is. In the “my blueprint” tab
Or you could use a aim node
that one should be blue
what is the difference when baking your animations to a higher framerate, other than file size?
why isnt it then 😢

Would that even be recommended?
I'm basically trying to make a physics-based train game
are you dragging off the output from the cast node?
yes
So is ur wheel driven by physics or just the speed of the train?
hmm.. it sounds like you might have some wires crossed somewhere. You should have a blueprint interface created in your project with those 2 functions right?
dragging off both the object as well as the white one (not sure the term for it) both give the same
correct I have INT_forest
no inputs for either

trying to make the wheels be driven by physics
and your actor that you are calling these from, your player I think, should not have these functions or events in them
its an enemy, but thats correct
the only functions in this enemy is AnyDamage and Death
the only place they are actually implemented, is the animationBP
and it does not have the interface set up in it right? its not set to use i
oh yes it is
this is what you mean right?

should it not have the interface in this list in the actor bp?
it should not, it is not listening or using those events
In that case Sounds like you need some kind of setup that would be similar to the car in the racing game sample
I understood that to be able to use them, it had to list it there 😢 so you only add the interface to BP's that implement functions within that interface?
Control rig is for when you want to hand animate the train/do procedural anim, which is then not ur use case
you would add them to the items that want to implement those events or functions, the things that will USE them
and they should show up in the left

@nimble hatch after removing that and refreshing all nodes, the only option when I drag off with a object input is the bottom one

like so as interfaces
the others still have green
and that is fine, the message one
Im guessing something got crossed somewhere, but you want the blue one which messages should have
ok, so am i understanding correctly then, that sending that message will essentially send out a "call" to the "entire program" and anythign that implements it, will then run?
Problem there is uhh..
I don't think it's possible to do it with a 6 wheel setup?
nope, that would be an event dispatcher, yours is just a "can you do this" message to whatever you talk to
a blueprint interface is a generic way of putting stuff on something, it can be there or it can not be there. Using one of the interface messages, you talk to something and go "hey, can you do this?" and it will either do it (if it has that interface on it, and the event created) or it will fail and ignore you because it has no idea what you want it to do
my print statements work!!!!! thank you!!!! but the animation still doesnt 😢
well if your code is still like it is, your setting it to is attacking then immediately setting it to not attacking
right, a delay. which I had implemented and then removed when we started (initially I thought that was the issue)
Sry Idk enough abt car physics to set up wheel friction. Youtube should hopefully help u 😆
that, or you have the animation handle the exit, or the animation handle the setting is attacking back to false
the animation itself has events it can fire off to the animation blueprint when its "done", and your animation blueprint can also naturally leave its state and enter another one when its done/near done
oh I wasnt aware you could/didnt know how to lol
hard coding things with "time" or "delay" is generally very fragile
I would rather do that if you wouldnt mind helping. if not, thats totally fine
there should be some courses and docs on those, its setting up transition rules and you can use time remaining. If you look at the default third person that is how it handles its jump. Jump starts -> when its near done it moves to jump loop
thanks ill check it out!

im tryna manipulate a bone here with the 3d arrow controls, but they're so small in the preview window that i can't zoom in enough to click on them

Bones are not movable in the viewport in control rig
but you can see the RGB arrows there right?
i wonder if scaling and stuff is off because my model is assymetrical :/

Yeah it is just axis visualization
oh this is the right person to ask im sure 😄
im following a tutorial @merry loom and its telling my to make a "control" but i can only create a type "bone" - i guess my skeleton is missing the prerequisite element?
im following a guide that looks more like this

🤣 implemented similarly to this, and the guy just drops off the face of the earth lol
click the first drop down box @nova glacier
I can select "control" but then there are no dropdown instances to choose from
may i ask - what is a control ? i am not sure 😛
nothing under Name?

the scaling is extremely odd there, the central "donut" element should be enormous as in the screenshot above 😄 i suspect ive made a bunch of things up. This is my first skeleton!
First of all do you have a skeletal mesh in the first place? In general you don need to create any new bones in control rig. You create controls to manipulate existing bones in a skeletal mesh
i made this quadraped in blender, id like it to walk around in UE

that's pretty much the depth of my understanding at this point.
right click on the bone, add a node called null, drag it off the skel of the root of the bone structure, then do the same thing again and do it with a control. drag the control into the null, and rename the null into NAME_Space
In ue5 you no longer need nulls everywhere 🙂 you could but probably don need it
i like nulls it keeps it organized lol
you can right click in your hierarchy and create a new control, that is the step that is missing
Emm you robot’s scale looks strange in ue for sure . Maybe u want to fix that first?
something on my mind - sorry to derail you helping me xD - do you think it'll be alright to have a quadraped walking around with 4 slightly different length legs (attached to pelvis at different heights / angles ) ?
Controls have an embedded null, which is called the offset transform
anything is possible with the control rig.
controls are visual representations of data that you can feed into something in the rig, in that case your setting up a control to control the location of something in your rig
But sure:) it does not hurt to add more nulls
oh cool
well dang thanks for letting me know 🙂
are controls how you'd "control" certain joints / bones then? like making a character look at a certain object?
a forwards solver allows you to transform the bones into what ever you want them to do.
you should look into the steps, try on a humanoid first, before approaching it
I mean if u have an idea what the final walk is going to look like it would fine 🙂
i did get a walk cycle running in blender but a friend of mine advised that it wouldnt translate at all over into UE, so i tried to find an up-to-date-ish procedural animation tutorial. Even if its not working yet i feel like i learnt a lot 😄
Controls are the widgets that users can move around. You get the transform of controls and and use them to drive bone transforms in interesting ways
woah look at that - static mesh on the left, control rig on the right xD

Lmao it looks cursed. Some blender bone scale issue probably
i think so yes, nothing too exceptional i hope
use the official unreal blender addon to do ur import 🙂
in blender or ue? xD
Unreal Engine
We’ve released two new, free addons that greatly streamline the workflow between Blender and Unreal Engine.
using blender for anything but weights and bones... idk man this is where i am at these days.
There are other addons that deals with the scale issue for u i believe. Try google 😆
thanks man, this is all as new as possible for me
i can probs run through making a rig again and find a checkbox that will solve my problems like "preserve sanity" or something
interestingly or perhaps not, if i disconnect the nodes in the rig editor, the scaling issue disappears, so it could just be an effect of only half-finishing the set up in the graph

im gonna look for a super simple walking tutorial and start bipedal :/ any suggestions?
i found a nice simple tutorial 😄 will report back on the weekend. Thanks a lot for control info!
sorry to bother you again, there shouldnt be any sort of transform required for the animation in a state right? I've triple checked that the animation I want is selected and my print statements are firing when I expect them to, but my enemy still just dissapears when it goes into attacking state. after the time that it needs for the animation has passed, it randomly reappears. I also paused right after it disappears and found the enemy in the world outliner and the location of it seems correct. so its as if the enemy just isnt showing. When I go to the preview editor and toggle the boolean on, the window shows it like "shrinking down into nothing" and when I toggle it back off, it does the opposite and its back to normal. if anyone else has any ideas I would also appreciate them!
god i hate working with cameras in UE5
they just wont stay even tho ive done the right steps with keyframes
Okay I am having an issue, i created my animation with the control rig, baked it to a sequence. Now the root is off by a foot, and i do not want to rekeyframe each thing to fix this issue, the normal way back in the day you where able to take the root, shown in the first image back, shown in picture 2. but for some reason when key framing the root back like this, the animation wont take the layer track. The third picture shows where the idle is but i cant move it back, i can rotate, and move everything else but the root.


ill try making an additive anim.
whats the difference between additive and not additive animations? thats the only difference I see in mine where the being hit animation is additive and the idle/jogging are not. wonder if thats related?
additive is a anim to be applied to the same anim with modifier
but it does not do any help for this.
same animation meaning the one that was previously being run?
Do you make the mesh in Blender?
thanks!
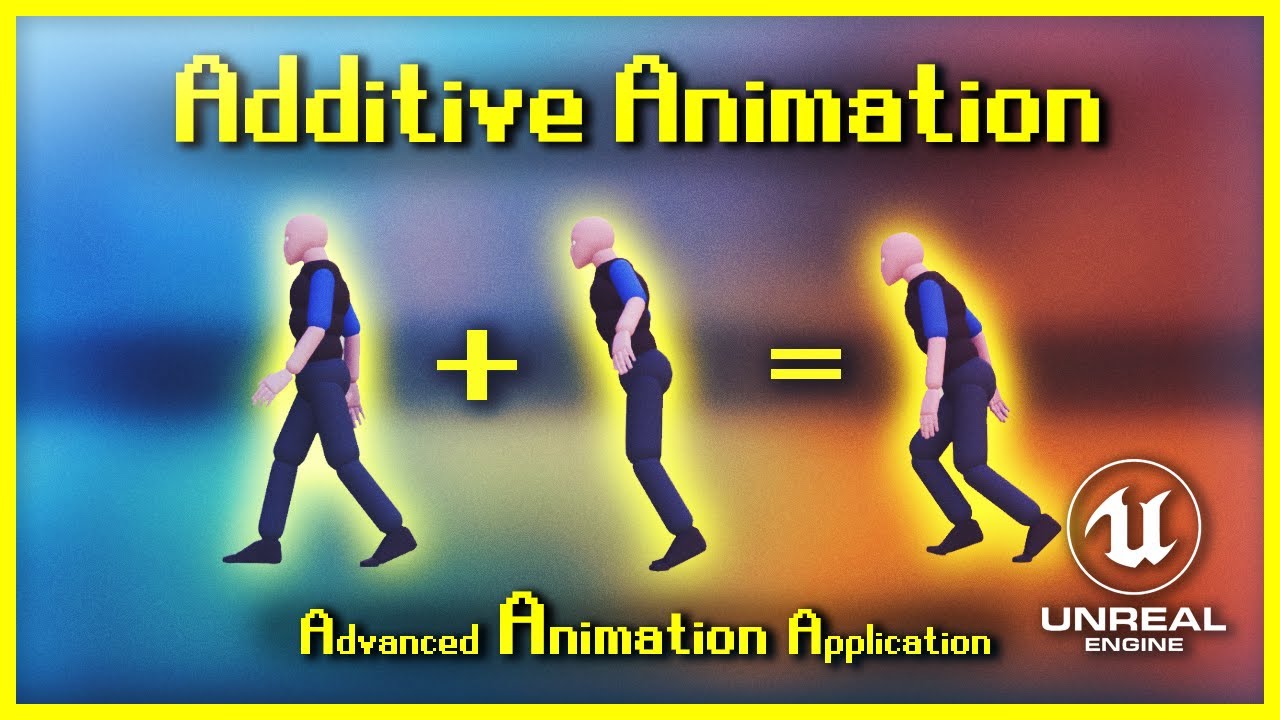
Welcome to my new series, Advanced Animation Application [for UE4]. This fine evening we're exploring the use of Additive Animations - whether it is for purely aesthetic reasons or even for gameplay. The 3 examples I cover today are acceleration leaning, landing compression and breathing animations. Additive animations can be used for absolutely...
this is what I have and idle and jogging work (are normal animations) and then the second picture is my attacking state, and im wondering if the additive is whats screwing it up


ahh ok
thanks! so I do want it additive then. darn
not sure what else could be causing the problem..
this is what im working with lol

Any reason this isn't slot montage and go through layered blend per bone?
its an asset animation
I didnt make it or anything, just trying to use it. same problem as yesterday where when an enemy is attacked, they stop doing all other animations and only slide towards the player. I added an interface and made an attacking state to my state machine, its toggling between all the states properly, but when it goes into the attacking state, the guy just goes away
It's an anim sequence? You can make a montage out of it
@clever iris
yes its an anim sequence. I also have it made into a montage after your suggestion yesterday, but wasnt sure where to go with that and someone mentioned trying this way which worked so far
but now the animation is messed up 😦
here is a great reference if you ever need it
this is the first time ive ever worked with UE so not sure of much lol

thank you!
It does post
it did above

But usually attack animations are montages, not a different anim state
its not the enemy attacking, its the enemy being attacked
same thing
it attacking is a montage, and its working how it should right now
Same thing
oh
One off anims is best with montage
and it wouldnt have the same problem of not returning to the other animations like I had originally?
i should just give up making my game and just work for a damn studio lol
Nope.
naw man, thats what montages are for.
hmm ok thanks! let me give that a shot and see
With montages you're playing an animation in assigned slot.
So it's not changing anim state.
so just to confirm, right here is where I would want the montage to play right?

Yes.
thanks ill give that a shot!
the bottom one right?

Make sure the anim BP aware of the slot you're using.
The first one
cr you self taught as well?
ok thanks.
Me?
yeah
Yeah, I'm pretty much self taught
good. lol i hate the fact people go to school for this
Most of the animation schools are mainly for linear media, not learning technical animation stuff like this lol
van here is a example from my code

you can create an event called Attack
drag play montage into it
then on your line trace, or hit, play that montage
can anyone tell me how to reliable limit rotation of a bone in controlrig? -.-
which bones?
Limit the control instead?
thats behaving unpredictable for me, may be a bug in ue5main?
interpolate a evaluation curve?
e.g: i enable max limit on y axis, it starts to change values of x/z axis, too
and i can't enter every value
I don't know about ue5-master but at least it works well in 4.27
get transform from neck to head?
well, it's all quaternion...
or try rotation constraint
Honestly I distance myself from master branches lol
Oh there also is Set final angle, get final angle
where?
you dont see that?
rotation constraint looks interesting, but i don't fully understand it
hold on
no, which branch are you on?
im using the UE5 release
i would need something like "Rotation Constraint" but with actual values instead of a parent :>
Oh
i forgot this is all custom crap i added.
lol

I have no idea now to use the rotation constraint.
btw. seeing that screenshot :> controlrig now allows to bind variables to inputs (which makes it better readable imho)
i know this video is about making gun animtions
but it can possibly help you in a way
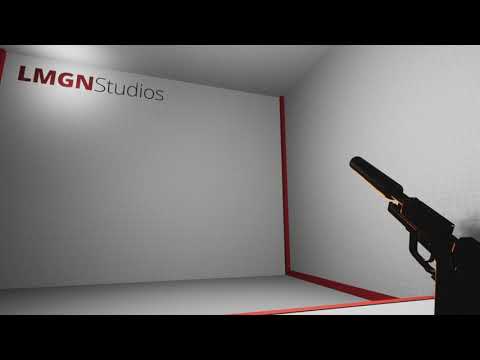
USP Skeletal mesh (FREE) download: https://lmgnstudios.gumroad.com/l/asWnsX
A tutorial covering some basics of control rig to create procedural animations. It may seem complex or overly convoluted at first, but has a wide range of applications that aren't possible through keyframed animations. Most people who have a basic understanding of UE4 o...
the animation instance is what in that?
it hits the min and max rotation.
getting the animation instance of my first person players arms.
its telling the animation blueprint OH he is doing this as well.
naw
Just a new customevent
called Hit
drag from hit, play montage
in anim BP add a slot at the end, call it upperbodyslot
rightclick on animation, create montage
ok i must be missing something with this 😦

add slot upperbody
oh the slot duh
🎰
soo what exactly is a slot? how do I update it?
you might need to make it a multi tho 😛
i'm just running an FullBodyIK on the bone now 😄
im not sure where to add that

oh i see. same as adding a state
mine looks alot different than yours, so not really sure how to go about that...

man this stuffs confusing lol
thats fine then
till you learn you will need more slots 🙂
just give it a go
and to add a slot

i dont see how to add a slot though
like right clicking doesnt give me any add slot
do this
sorry, im sure its frustrating, but I have no idea what youre saying/where to do it lol

AH that explains it

yeah thats fine
ok

that arrow will bring up the slot menu
go to slot name, and assign the slot you are using for the anim, from the anim bp.
how do I select the slot in the anim BP though? I cant drag it onto the graph and right clicking doesnt give me any option for it
hold on
click the slot that says default slot
in details look for the slot in slot name
ok found a solution without FullBodyIK
kind of the ToEuler/FromEuler thing that you posted, thanks atomik
yupp yupp
if I change this to upperBody it stops animating
ok
so I want to change it to the default group upperBody still right?

it was more of an issue in my had rather than in CR, as i start off with a target rotation for the head, then distribute the rotation across the spine, and then have to update the head (which obviously gets moved in the process of rotating the spine...)
still no animation 😢
I told you it needs to be multicasted
does this all look right?


in the actor BP?
Does Control Rig for UE 4.27.2 not support parameters/variables? Do I need to update it somehow? It just says 1.0 BETA in the plugins window

it does, if you set them to visible in the CR, and enable the input pin in your CR Node in the animation graph
then from there you can search it like this

@brazen wharf Thanks! How do I set them to visible though?
Hey when using showdebug animation how do you make it display anims for other characters in the scene? I cant seem to get it to change to anything other then the player anims.
what is the difference between calling it from AnyDamage or adding a new event call and then calling it there?
click the eye next to them
is your game multiplayer?
no
oh
just a super basic zombies style game lol
should be almost the same
where the montage is now, I had originally had the play animation
but now with this, im getting no animation at all
There is no eye next to anything in any nodes in Control Rig, and when I add one to the anim BP and set the class, I only see Alpha and Source pose.
I also cannot right click -> promote to variable on anything within any node
that actually threw everything off. the enemies arent dying now either
you changed the slot to upperbody correct?

did you create variables in the "My Blueprint" tab, or are you actually talking about controls/spaces and such? (which are part of the rig hierarchy)

@brazen wharf The rig graph. There is no My Blueprint tab
in the actor BP?
and follow the instructions of the picutre i posted of my animation bp
i got to go tho
ok I got the death back. I was going off of "on completed" and changed it to the top most one. but still no animation.
damn. alright thanks for trying!
in the control rig there is, click Window in the main menu of unreal and check My Blueprint
you can only expose variables to animation graph, not controls (from what i know)
Ok Im an idiot, never crossed my mind to check the Window menu... Thanks!
is there anyway to simulate physics while playing/animating in the sequencer?
I know if I press the play button for the level, my physics works, but I'm wondering if I can do those simulations while I'm animating in the sequencer?
Slideblendspace!!! I love this editor. If I have an animation that goes into slide mode, would that be seperate from the in slide blendspace? sliding the player will hold down a button, I am not sure if I put the jump to slide animation in the blend space or before it. I will assume I bind it to the button and somehow tell the editor to play blendspace only while sliding? so much fun!

No.
Exception is that anim dynamics in animBP will run if you use control rig.
Oh hey, nice, finally get it working 👌
Hey! I have created a new skeleton with MrMannequinTools and added some bones, the skeleton works fine if I use the imported mesh from blender, however if I retarget a different mesh onto this new skeleton I get the issue of "This bone only exists on the skeleton"

Any solutions?

yes!
Check your unit scaling in Blender. Make sure it's 0.01
hello, just wanna know why when I'm using the motion warping the character doesn't go to the right location (he tries but he stops just before) ? thx
Is there an easy way to retarget pose from unmatching skeletons in realtime? Setup I have - two separate hand skeletal meshes (one is mirrored) and one regular character skeletal mesh. I need to apply pose of those hand meshes to character's skeletal mesh hands.
So far the idea I came up with is to take snapshot poses of both hands and manully retarget those into a third pose snapshot which is then sent into a character's ABP and blended partially. But it would be great if there is an easier way.
lmk if you figure this out
Did you use distance matching with motion warping
no, you think we have to use distance matching ?
im not sure. I am building with both but im working with AI on AI my early testing is limited
I still have to play out what plays with what but im using it so if it works ill let you know
easy set up tho if you are able to try
okay can somone help me to have my camera MOVE WHERE IT WANTS TO BE
i know how to work with timelines or keyframes
but god it wont stay
does anyone know where i can find some muzzle flash assets ?
How can I expose the duration of a transition as a variable?

can i go on a call with someone to help me with someting
even with depth 50, the character does not hold the gun tightly ...
Is there a way to filter the view in sequencer (when animating a control rig) to only display the controls I have selected?

Anyone knows why my additive animations wont apply changes in bone scale?
Okay it seems it's not the animation being additive, but it being played from a montage, which is causing scale animations to be ignored
Okay, got it.
I needed to use the source pin on the slot node instead of an additive blend node and set blend times in montage to zero.
Has anyone managed to retarget paragon animation to ue5 manny/quinn?
There is the three-line icon to the right of the track search bar. The setting is in there to show selected only

idk how to explain this well. but i have an animation where it looks up down left and right, all in one animation. how can i make a blend space for it? Do I have to cut up the animation somehow based on the pitch and yaw values?
Anyone else had issue with getting motion warping rotation to work fine, but translation to location not working?
https://gyazo.com/2aee6271fd7f608b4acb9112e52048d3
when casting to a Animation Blueprint what would be the object then :/ ?
im just setting a variable in the animation bp thats what im after

skeletal mesh component -> Get animation instance
or something
heyy everyone, is anyone a blender > unreal engine expert here?
I'm looking to get a quick tutorial to show me how to export a blender file with animation to unreal, and willing to pay $100usd for a quick tutorial!
Wow.. So if you edit a animation with the sequencer, you no longer are allowed to edit the animation in the additivite layer tracks, the animation is protected some how. No fix for this either 😦
hey,so uhm, how do i fix the hips on a humanoid model not moving with the animation? i'm trying to make my character run but he is also non-stopping running while his hips aren't moving
A prime example of what i mean
i tried making a curve, adding it to additive space. nope.
Anyone ever used copy pose from mesh to attach a weapon to a character?
Trying to get a singular skeleton to work on simple weapons but I need the ABP on the weapon for more interesting stuff
Thing is, I've setup the skeletons correctly (same hierarchy) but the weapon isn't rotating correctly
(This is what's happening frame 0 in unreal)

this is what it should be

add socket, rotate object with preview. use socket.
no idea, always used sockets for transforms. and montages for anims.
yeah that's fine for the shield guy over there, but I really wish I knew what went wrong so unreal would preserve the rotations from the animation
mind you those are 2 skeletal meshes over there
you need to apply the rotations on import then
hmm lemme check that
ue import is a pain in the ass.
try the new blender tools if your using ue5
Blender addons that improve the game development workflow between Blender and Unreal.
yeah I guess i'll have to research a bit more
fixing rotation issues, i always from blender imported to 3ds max, and exported from there to unreal, for somereason blender never worked like that for me lol
maybe it's because of copy pose
I have some free time
so i'll do some experiments
maybe if I join the weapon and the body into one mesh
i dunno
hahahahahaha
i have over 50 sockets on my arms lol
just really curious as to how is the rotation getting borked
each one transforms the location and rotation of a weapon.
I see
anims and blueprint first, then the bullshit later
ok
don't ask me, but I deleted everything and reimported now it's working
¯_(ツ)_/¯
you had to changed a setting
in blender did you change it to operator presets?
maybe there was some weird interaction going on
with the skeleton
because I added a bone for the weapon with this new character
and the older skeleton didn't have one
weird well thats ggs for you 🙂
yeah ahhahaha
i'll share the full results later if you don't mind
maybe it'll be interesting to you
it's a different approach from sockets
I followed epic's video on the fortnite secondary animations
ty for the help 🙂

took me like 2 weeks to come up with this simple system >_<
I want to blend TWO blend spaces 2d's (basically a crouched movement blendspace and a standing movement one) why? because its vr and I dont want to be either crouched or standing theres a lot of in-between thats needed to blend.. I can do it with 1 blendspace 2d if i removed Speed but I need speed/direction & crouch ratio from 2.0 to 0.0) 0 being fully crouched
like i can do this but then i cant have speed

or i can use direction and speed and i lose the crouch ratio
oh shit im dumb well i guess im smart, or something

voila
I downloaded a animation from mixamo and converted it using the blender plugin to Unreal Engine bones and now the animation is messed up, does anyone know why that is or how to fix it? Other animations like running walking crouching jumping work fine when converted but these not.
This one for example also works fine
Protip: Remux the video to mp4 so that it's playable right in the discord app
Oops sorry, thanks
Very new to unreal. Started using UE5 a couple days ago. I have some guns from call of duty that imported into unreal, trying to figure out how to make animations work. The animations are in Maya.
