#animation
1 messages · Page 160 of 1
then of course you export the mesh with the armature so its a skeletal mesh
and set the master pose in script
I literally just started doing animation/rigging stuff 2 days ago so I am a total noob to this
oki thanks..ill try tht
Anyone experimented with soft animation references to reduce the memory load of a large animation blueprint? So like only loading the assets for the weapon set currently used? We have quite a few animations 'per weapon', and having them be a constant memory overhead as they grow is of concern to me. Curious whether others have addressed this using soft asset references to those animations
If I create actions for the top half of the character, would I just use blend spaces in UE to mix the animations? So for example if I have my idle/walk/run/sidestep/crouch actions..would I just animation my top half actions like holding objects/weapons/reloading etc; and blend that in with blend spaces to only use the top animation?
please can anyone tell me Why we need 2 Reflections in Quaternions to rotate? why one Reflections does not consider a rotation ?
🤔
I am wondering the same
was about to order the rokoko suit but every example I saw of it looks terrible
especially where locomotion is concerned
don't feel like spending 4k just so I can mocap idle poses
@paper ether yeah despite Rokoko having a lot of buzz every review hates it
like ppl who actually used it
Was looking at perception neuron PN3 but the 3 finger limitation kinda sucks
now looking at Xsens
ppl seem to generally think it's the most stable, altho more expensive

Xsens MVN Animate is a product line of full-body wearable motion capture (also referred to as mo-cap or mocap) solutions. The inertial motion capture system is portable, easy to use and enables On-Body Recording and superior motion capture data.
was just checking that
this video with the dancer looks really good
dunno how bs it is

Xsens and I had a meeting, so here is their explanation. If you bought before April 2021 you're grandfathered into the older pricing + month to month pricing available
This video is not sponsored. I however did an extra free year promoting in a HaloFollower video the suit + promoting in Halo: Lost Wolves Episode 1. However knowing that the entr...
this guy does good reviews / comparisons / explanations re these, if a bit specific to his needs & longwinded...
so we need that yearly cloud sub to be able to export the files to unreal right?
more than 30 seconds at a time, seems like, yeah
lol what a dumb limitation.
I mean it makes sense from a business perspective in that they are doing reprocessing to clean up anim on the cloud
I can live with 30 sec limitation. %99.99 of the shots are shorter than that
but annoying for end user who just bought expensive stuff to be so limited
but its a bit confusing
that free cloud tier says 30 sec export for free per month
like we can only export 30 sec per month
thats fucking terrible if true
this has been highly recommended to me https://thecaptury.com/captury-live/
unfortunately crazy expensive lol $25k
Hey, guys. What would you suggest I use for a 2d animated sidescroller?
Hey all, I'm trying to use the Control rig to clean up some mocap data but the control rig epic provies for the mannequin and metahumans just completely override any animation played in sequencer. Is there a way to make the control rig additive ?
Animating hands is an absolute giant B word
I dont like the way rigify sets up their hands. The fingers should curl in automatically..its standard method is too error prone..also because I am only on my third day of this idk how to do this shit manually
annnnnnnnnd solved
Hey guys, do you know any tutorial on how to change animation via clicking a button?
uh
...how doth one combine the animations of two rigs.... ..one gun rig constrained to the human rig... .....erm...I need to animate the barrel ..but how doth one sync...

Hi guys, how do i get the white lines on the screen with Animation editor, trying to Retarget animations from Mannequin to Metahuman

my screen doesnt show those white lines
@queen parcel Character->Bones->All Heirarchy

I'm trying to use a FABRIK node to move a finger to a trigger location
Seems like it should be easy, but I've tried every setting I can think of, and all I get is my characters finger looking like it went through heavy machinery
Any good tutorials anyone knows of for that specifically?
I'm trying to manipulate a VR hand
Hey guys, I noticed that when using "Layered blend per bone" in my Animation Blueprint to combine upperbody motion with lowerbody movement locomotion, my character starts position himself up while crouching, so the character is above the ground. It's fine when I hook up my FullLocomotion pose to the Output Pose.
What can I do to prevent this hovering above the ground? I don't want to lower him down by code whenever he is crouching, there should be a better solution right?
I wanted to do a takedown animation but when I use the play anim montage node it doesn't work
When I used a regular play anim node and used the same montage asset, it worked ... kinda
by kinda i mean after the animation completed, the actor goes into a T-pose
Datasmith is driving me nuts.. how can i deactivate the keyframe optimization? i just want that bake all keys. I have an object that from frame 200 to 300 should not move, therefore has 2 keyframes with same transform values in those frames. At 350 should go to another position. Since Datasmith optimize the keyframes by deleteing the one with the same transform values it get the object moving from frame 200 to 350...
i would really need some help
Wait, Datasmith can do animations? I thought it was only for static archvis stuff, considering it was a by-product from Unreal Studio days which was a separate enterprise programme.
Also try asking in #datasmith
Datasmith is cool, can import animation which will be keyframed in a sequencer. You will not get an animation sequence like a skeletal mesh, but this keyframe optimization is making me crazy :). I´ll ask in datasmith channel, Thanks
Why do both methods work in Editor but when I play they will be default?

Can someone help me out with a workflow. I have a character who holds different weapons/objects all with their respective animations, but I am not sure how to combine the skeletal mesh animations to be in sync. I animate them together in blender (they are separate rigs, one gun rig one character rig) So I know they align perfectly, but in UE4 I am not sure how to have them in sync with each other
OR..if that is even how I should approach this
The way I'd approach this is to have a dummy bone serving as the socket for placing the weapon, and animate the socket. That's for the weapon movement.
The weapon skeleton would be running its own anim BP, but reads the same values as the character's anim BP, so you can sync up anim state machines together.
Anyone know how to solve negative animation play rate causing the automatic rule based transition to not work?
Anyone know how do I approach making an intro animation-blend?
I want to make an intro to a level, in which the player is going from running animation to jump and than - it get possessed by the player while in air.
What is the best method for making the run-to-jump animation blend while playing the cutscene?
nailed it https://streamable.com/ha6b4l

Hey I have a problem, my blendspace stutters when I walk backwards. I checked the debug and its flipping the direction between 180 and -180. Any fixes?
Orient rotation is false btw
play the animation as amontage on begin play and when montage ends enable input?
Is there a way of setting the pose of a character using ControlRig without key-framing it to Sequencer? I'm basically trying to pose a character, that has a ControlRig, in a static position and would like it to remain like that in Editor.
Ive been trying to find an example video for this and tried searching this channel but I have yet to see someone have a blended view model where 1st person hides 3rd person model and only the player sees the 1st person model... Is there a reason I cant find this? The problem we're having is the head movements are making the first person view kind of gross looking and we'd rather have a custom animation... maybe should we be animating the whole model in a custom stance when aiming or something?
Any help would be appreciated!
I have been trying to use animation layers to replace the iddle/walk animation based on the current weapon. I have set up an anim layer interface and made different anim bps overriding the layer for each weapon. When I change the weapon I also change the link anim class, but there is a "pop" when this happens, when changing from the current animation to the next one. How can I blend to transition smootly after changing the linked anim class.
@rain nymph Have you used blend spaces?
@compact surge yes, not sure how to use it with linked layers
Gotcha, I haven't tried that yet, but I think that would be a good starting point off my limited knowledge.
can some one point me to the tut that teach u how to make a running and shooting animation blend? i cant seem to figure out the keywords for google
Does this help? @nova mantle https://www.youtube.com/watch?v=fktCz7TtUh8

Here we take a look at how we can blend the top and bottom halves of two animations using the layer blend per bone node to split them from the spine and marge them together to create one animation state.
♥ Subscribe for new episodes weekly! http://bit.ly/1RWCVIN
♥ Don't forget you can help support the channel on Patreon! https://www.patreon.co...
Its reloading but might work the ssame
@queen parcel

This question is for the pros: How do I create multiple Rules like in this pic?

ty
Hey, I'm having issues using the layer blend per bone node. So basically, it works the way I want it to for most animations but any animation that requires falling or jumping, I would rather it not be blended at all. How would I go about making certain animations not follow the blend per bone and just play as it normally would?
so.... my animation montage is not playing for some reason, default shoot montage also doesnt work
im calling it through code
i have no idea why...
can confirm that code line is being called
Hi, I'm trying to make a retarget pose asset for a skeleton by adjusting the pose in the skeleton editor, and I am really confused by the behavior of the bone rotation properties in the details pane. Whenever I enter or paste a value in there for one of the euler angles, it changes the value to something with +/- 5 degrees, and usually changes the other two angle values. It's not even stable, if I repeatedly paste a value in there, I get significantly different outcomes each time. What is going on?
Can someone tell me
I imported this asset from bridge.
https://gyazo.com/3a5b2d7b2cbaeadfda483853ba6a0adc
It exports without textures added. This never seemed to happen in UE4 with bridge as a separate client.
How do I add these textures onto the mesh?
https://gyazo.com/7f69e19398e8fae7a22c565e79260676


I am having problems importing animations from Blender to Unreal using the send to unreal blender tool. It correctly imports my skeletal mesh and skeleton, but it doesn't import the animations. The only error it gives is "Import Failed", and when I drag and drop the animation assets created by the blender tool, it correctly imports. Any ideas?

I have UE 4.26.2, Send To UE 1.8.3 and Blender 2.9
Hey guys, do you prefer Root Motion for realistic movement?
It seems to be the way forward but I'm not used to setting it up
ALS (and in extent the UE5 demo - ALS developer joined Epic for it) doesn't use Root Motion.
Oh wow he did?
That's awesome
Okay. I really need to look at that ALS again... I found it too confusing but I guess I need more time with it
Do you have any tips on how to make sense of it?
Not really.
I'm deploying ALS and went through many trial and error integrating it to my game's characters.
One of the reasons I also kind of lost interest in ALS is how many very strange bespoke animations you need for it
So you could retarget it onto your character but if you wanted to re-create it it would take years
Though once you understand how it works, it really clicked.
Okay thanks agin
did someone use IK bones in a standard skeleton? I shifted right bone to right hand, but what about left?

From many IK implementation that I've seen, hardly anyone uses the ik_**** bones for actually implementing IK solver, and directly used the limb bones.
Rumour has it that those bones were "legacy" stuff from UE3/very early UE4 conventions, but it might not be true either.
thx, what are the differences between using TwoBoneIK and FABRIK systems? which is better to use?
I think that rumour is not true, personally
Not the first time I've heard that
Those bones have some really practical uses
This has some good explanations about diff ik systems
@lone wadi
Anyone have any good resources for determining directional shift transition animations? Like, how can I tell if I am making a sudden turn?
Is it simply just making a variable with the direction from the last frame and comparing it to the current frame?
I'm just trying to figure this out too X_X
Lots of guides out there but hard to know which technique is good
I'm trying to pick apart ALS
Hello! I have made a simple rig in Blender, exported it to UE4, and I am now trying to use the control rig. When I use the basic IK, it messes up the characters foot ALOT. Can you please tell me what could be wrong. I am sure I have missed something when making the rig. Just need a bit of guidence. Thanks!

It's the issue with Blender's bone orientation.
💡Enlighten me 💡
Okay, are you aware of the thing where armature exported from FBX have bones rotated oddly? You can try importing Manny to Blender, without automatic bone reorientation.
I think i have experienced that before, yes
For Blender, it might rotated the wrong way around, but fo UE, it's the right way around.
Is this fixed by changing the roll of the bones? Or can it be fixed with export settings, or something else?
For me, rotating the bones do the work, though I bet there's another better method I have yet to experiment.
Ill see if the blender to ue4 thing makes my life easier
Thanks;)
Im so confused about rigging for UE4. I watch tutorials and they say you can't have ik and stuff when importing to UE..but then how do some skeletons in UE have IK bones?????
I dont understand
And why when importing the mannequin skeleton all the bones are oriented in an impractical and confusing way

Not really sure exactly where to put this, but for a proper fps camera, would it better to have the camera in the middle of the capsule as shown? or just use the default position (slightly behind)

I feel like there is no right or wrong answer..probably what just works and feels best for your project/animations
Guys how can I change a animation by pressing a key on my keyboard?
A documentation or video would be nice
This is actually the right way around for UE4, but not Blender.


So if I want to work well in UE I need to orient my bones this way..
Oof.
What a monstrous pain in the ass
Also what about the ik stuff? They are not actuallty constrained but only parented right?
because from what I see you cant import ik fk stuff
Usually, IK bones are "non deform" bones. These should not be exported from blender.
If you want to animate with IK in UE, you program this, either through the anim-graph, or with the Control Rig Plugin.
.
.
I understand that you use the ik and stuff to animate and you dont export this to UE..but when I import the ALS skeleton it has IK bones...and in the hierarchy there are these bones labeled as ik and such
So my question is just..there aren't Ik bones in the traditional sense like when you are animating in blender..but a bone used for solving IK in engine
OHHHHHHHHHH they're VIRTUAL BONES
I get it now omg
hahah awesome

Hey peeps, I've made a Niagara system that reacts to music that I play through it. I want to adjust the Niagara script values at different points in the song, what would be the best way to go about that? Can I timeline animate floats and vectors? Thanks in advance for any help!
Why my additive animations shrink in size in BlendSpace?
Thankyou
hello everyone.I need to have conditional Ik.Is it possible??.Initially my player will not have a gun.Then there should be no IK.But when player picks weapon then onwards left and right hand should have IK on two socket locations on gun.Plz help me.Thank you
I'm working with retargeting animations to a model I made, which has the same bone structure as the default skeleton (slightly different offsets, hence retarget). I'm very confused as to why the fingers are going off during animations. Seems to happen on all of them. In Maya, their transform is zerod, as is everything else in the structure. They're parented to the corresponding bones.


I got it figured out, bone structure was wrong
Hi, I'm trying to retarget a MotionCapture bvh animationto the UE4 skeleton using Blender and Auto Rig Pro. I have the issue that the UE4 skeleton is always 'in-place' after retargeting, no matter what setting I use
I tried the same process with a Mixamo skeleton and it works there, but not with the UE4 skeleton
I have created a state machine in my animbp to play transition animations when stopping moving, based upon if I was jogging, walking, sprinting ETC.
This all works great and is usinga simple blendspace to trigger the animations.
However, only the animation plays, even if I use root motion versions of them. I am ok with using root motion, in general, but would also be happy to use something like a animcurve to drive the character's stopping.
Any hints on how to make either work?
hey whats up everyone!
im working on a new online multiplayer game called karnage online :)
if anyone is interested in helping please let me know❤
I've done something similar when assets like the paragon weapons and the character are stuck together so separating them in blender should do the trick!
I also have a quick question 🙂 I have two mixamo animations and I want to include them both as an animation montage but I have tried a animation composite but it doesn't blend at all what would be the preffered method?
What is the main reason an FBX would stretch out of control with Basic IK in Control Rig? As soon as I reference the joints in the node my rig explodes.

I rigged it in Maya and Houdini but both rigs are giving me trouble so it must be something I'm doing wrong in the engine but I can't figure it out.
Perhaps it's a scale issue but I've tried bringing it in at 1, 10, 100x the size
does anyone know of a good and up to date physical animation tutorial ? I need to make NPC twitch slightly when hit by projectiles or hitscan weapons.
Is there any way of making a blueprint child of a Control Rig? When I do it, it create a blank control rig
Control Rigs didn't have bog standard variables, and functions. It's different than normal BP.
Ok, thanks!
hey guys, i am playing an animation sequence through code but i think its interpolating with my idle animation, is there any way for it to not interpolate?
Hey guys i'm having trouble importing this animation from Blender to Unreal 4.26. I’m using an FK Rig that is pretty advanced and, there seems to be a problem with transferring it over to Unreal. The animation seems fine in Blender but in Unreal, the leg twitches. That looks like the only problem with the animation which is pretty weird! I’ve been troubleshooting for a while now, I’ve baked the animation in Blender, played around with the FBX import animation settings in Unreal and, I’ve tried just about every option when exporting the FBX out of Blender. Would love it if anyone could help me out thanks! I’m sending a screen record of the animation of how it looks in Blender and Unreal.
does anyone know why my animation stops working when i save it
hmm not sure, I'm sure there's probably someone in this server who could probably help you more than I could I've only just started using unreal maybe removing redundant keys?
I've tried that, I've also tried to bake the action in blender, removing leaf bones, applied all transformations to the mesh itself and rig.
Hey everyone, Can someone here please help me with something it should be a quick fix. I am setting up a fairly basic combo system in C++ and depending on the combo depends on what animation will play from the animation montage. My issue is simply that most of my animations loop over and over instead of playing once. I don't believe my code is doing this, what can i do to stop the looping?? any suggestions? I appreciate the help. #ignore DW
hey so im having this problem with my current animation bp, im using enums to switch states between two gun positions but the very second i play an animation the whole thing falls apart

not sure whether to ask this in animation or blueprint so I'm going to ask it in both:
I have set up my character to be animated by physics. I want only the hands to be excluded from the physics and still follow the preset animations.
How would I do this considering this blueprint?:

hi, im trying to make a player character that turns their head while "curving" a turn (so when moving diagonally they face that direction, think links animation from zelda botw), is this possible to do via blendspaces? ive made an animation of my character running diagonally left and diagonally right and tried to use blendspaces but it doesnt work at all... does anyone know how to achieve this, through blendspaces or any other mean?
Hey, just FYI, there is a lot of new experimental animation plugins in UE5, like motion matching or animation warping stuff. Just in case somebody is interested in this stuff
No docs/examples, but the plugins seem to work
There is AnimationWarping (like slope warp or stride warp), ContextualAnimation (???), MotionWarp (used in the ancient valley demo) and PoseSearch (motion matching is in there). Those are in Experimental/Animation folder, maybe there is also others somewhere else
Animation Gurus:
If I am trying to create an animation composite of two different root motion animations, the root motion of the second animation snaps backwards, is there a way to prevent this?
Hi guys how can I achieve object growth by path?
I tried to export the animation as alembic but the engine doesn't want to accept my file.
Hey, I'm trying to animate a metahuman using the controlRig, but when I "Bake Anim Sequence", it seems to only take in consideration bones rotation data and ignore Translations, is it a normal behavior or did I missed something ?
(Answerhub question for more details : https://answers.unrealengine.com/questions/1035700/controlrig-bake-sequence-ignoring-translation.html )
Hey I want to call a non pure function within a transition rule (conditions between two animations). How can I achieve this?

I want to call the "set" node
I don't think you can, transition rules are designed to receive a bool > Can I do the transition ? Yes|No
Instead in your event graph, when PlayerJumpsInAir is set to true, do your logic here
ok thanks I will do it as you said

Anyone looked at the Anim BP for the new UE5 demo?
why can't I get this animation to work - I first when to the mesh, and then found it's skeleton, then I found an animation that uses it, and I am first setting in to the mesh, then playing it with looping set on - no errors

I've made a blend space modification (basically just retargeting to the skeleton shared by this mesh)
saved everything but it still doesn't work
in the animation blueprint this is using, I updated the blend state
The idle animation changes on the blueprint worked for me, but not the walk/jog blend
But I don't know WTF is going on here -

It's not going the right speed to match - nor is it playing like this in the game world

But I just want to switch to a generic walk
more of a reparenting sketetal issue but there's something I've screwed up on somewhere on the blendspace or on the animation BP
I need help figuring out why every rig I bring into UE explodes' and stretches wildly when I connect a Basic Ik solver in control rig... I've made rigs in maya and houdini but they all explode when I hook this up The tutorials make this look stupid simple but I just can't get it working.

I get that until the effector and pole controls are setup it will snap to the origin, but this is flying way off the screen no where near 0,0,0
So uhm. Couldn't I just setup a control rig with unreals uh.. ..control rig and create animations for the mannequin in there?
I just want to add some more stuff to the als animations.
are your bone rolls compatible with ue4
Rolls? Sorry, I don't follow.
I've tried to make the rig fbx-compliant the best I could
the bone orientation for animating is not compatible with how ue expects them
Could be, I think they use a different up-vector.
I tried the "convert scene" checkbox in the import dialogue
This is with "convert scene" off. It's supposed to handle the coordinate difference but it's just the same thing only rotated 90 degrees

I have no idea why the joints involved in the basic ik are this huge so maybe it's some type of scale thing but I've tried importing at .01,.1, 10, 100x but it's the same
Hey All!
I am trying to achieve this:
I have two animations Idle and playing with a sword.
my character Just gone to stand on one place and not gone move so, I don't need an animation blueprint(I like to avoid it if possible for optimization purposes).
now I want my character to play idle and play with a sword animation one after another so it looks more realistic.
does anyone know how can achieve it?
About getting the Base Pose of your Skeleton similar to the Mannequin Skeleton for Retargeting.
I try to get close to the pose as possible by manually setting the bone rotations, but the fingers seems off.
I had an Idea to have the base pose of the Mannequin retargeted to my Skeletal Mesh, so I can see what is wrong. I had two ways
- Create a blank Mannequin AnimMontage (which displays the Mannequin base pose) and record a single frame. Retarget that one frame to my Mesh and see the difference.
- Save the Pose asset of the Mannequin Skeleton and retarget that pose to my Character.
Both methods should bring the same results right? It doesn't. The fingers look different from both methods. (I can't show it unfortunately) Why is that? Why is retargeting so unclear? I try to understand it, but it just doesn't make sense to me.
I have an animation which uses a variable which is read from a bp. This variable is set via a GAS attribute datatable. However on the first frame the variable hasn't been set yet via the GAS and thus read incorrectly. I have a rather ugly fix which toggles a bool after BeginPlay so the variable can be read in the animBP forcing the attributes to be initialised. Is there a cleaner way to set this up?
Any issues I should expect to run into if I make a small handheld compass? As far as I know, it should just rely on its rotation
To clarify, it’ll be two static meshes rather than a UI
Not much issue will going on with it, though I'd prefer to have it as skeletal mesh, or at the very least not having distance field data.
Should be fine really, just put the pivot in the right location for the compass hand and combine them in a blueprint. Don't necessarily need a single skeletal mesh even, just adds the anim blueprint complexity.
@last vortex
I think something is setup improperly in my player's animation blueprint that is preventing me from working with montages, but I cannot figure out what it is. I setup a slot in the animation blueprint for my montage, but when I use Play Montage from my player blueprint, nothing happens. With the slot added, my player's animation in its default state is also blending in a strange way.
I went to recreate my work in a new project creating the same montage and same slot, and it works fine, which leads me to believe something is up with the animation blueprint itself possibly. It's a very simple montage using one animation.
I tried replacing my animation blueprint with an older version, but it just gave me a bunch of reference errors. This is my first project experimenting with animation so would appreciate any help with how I could best troubleshoot what is causing my animation blueprint to not work properly with montages currently.
Are you using a custom slot or have you tried that?
Has anyone bought a bunch of animation packs for melee combat (sword/sheild, spear, hammers etc) that they have strong preferences for?
I've bought a handful of animations from the marketplace though I feel that its sometimes difficult to determine their quality until you have them on your guy.
Any strong recommendations (or strong avoids?).
Personally I'm a big fan of the kubold animations.
This seller has great animations
I can see some combat ones

This is a set of third-person animations for a character wielding an axe and a shield, ideal for vikings, barbarians, or other similar melee-based characters! It's available now here: https://unrealengine.com/marketplace/en-US/product/axe-and-shield-animation-set
I got their climbing animation set and was definitely happy with it
Are there any alternatives to the epic marketplace y'all are using to buy animations? There are a few really good packs I have purchased but I'm looking for more selection
Just tried a custom slot, but same result. It seems like in either case, the player begins the montage immediately when the game starts and leans forward, but then seems frozen and is blending the regular animations from the blueprint.
Which would explain why trying to call the montage is not working. If I take the slot out of the anim bp the regular player animations work fine though.
Again, starting over with the same super simple animation blueprint and montage, it works fine. I really would like to just revert the animation blueprint to an earlier version as my guess is something deeper inside the animation blueprint is off, but at least with my level of experience, replacing with an older animation blueprint just creates a mess of dependency errors.
Probably the unity-store would be the biggest alternative, though the lack of a standardized skeleton does make using other storefronts certainly less enticing
im still pretty new the animation side of things. What would be a reason for an animation being interrupted? I have an attack animation that sometimes gets interrupted if I am really close to the enemy. Not sure if thats the reason but how would I go about stopping these interruptions?
anyone got any good tutorials for animating a control rig along a spline in sequencer
Hm. In control rig, propagate to children should then move the other bones in the chain..yet for the neck it does not move my head.

Hey folks, anyone know of a way to dynamically change the play rate of the entire anim graph?
I'm adding a slow ability, and I'd rather not hook it up to every montage play and every blend space / animation in the game
But I haven't been able to find anything
Okay, setting Custom Time Dilation on the actor scales the animation like I want, but that will probably introduce lots of new problems
Is there a way to set an animation in a state machine to a specific length? I have some "Cast Time" variables for each ability and want the animation to scale to match those. There might be some cast time buffs/debuffs that would affect how quickly an ability is cast, so I want to make sure it would work with the new values.
@daring pagoda I would probably have the actor set a variable on the anim bp when they start and finish casting
I have those, as an example Ability 1 takes .5 seconds to cast. I'd like for the animation to take .5 seconds in that case. However if the player is hasted the ability might take .25 seconds, ideally in that case the animation would take .25s
I know I could manually set them and bind the hasted effect as the play rate, but it'd mean manually going through each ability and calculating the scalars for the base speed first (I think)
Is casting a looping animation?
If it were me, I would have a function on the anim BP SetCasting (bool IsCasting, float CastingRate)
something like that
Casting Rate being how much the animation play rate is scaled by, if you even want that
for the Haste spell
and call that function when starting, stopping, or changing casting speed
I don't think it would be a looping animation no, I have a similar setup for what you're describing. On cast the player a boolean is set for "IsCastingAny" and "IsCastingAbility1" and a float is set for "CastingTime". The main issue I'm facing is the animations are all different lengths (0.336s, 1.32s etc.) - I'm guessing I'd need to find a way to bring those to 1.00 as a baseline and then scale from there using the CastingTime float? Sorry if I'm misunderstanding!
You could play the animations as montages and bind to montage finished
I believe you can update the montage play rate any time
I'll look into that, thank you!

beautiful
I have a bit of a weird issue here, hopefully I can explain it properly.
When my character is mid-cast the appropriate ability is marked true ("State_[Q1/Q2/E1/E2/R1/R2/F1/F2]"), if any ability is being cast "State_Casting" is marked true. So far this is working properly.
Idle is simply Speed=0, and Walk/Run is Speed>0. They both go into the IsCasting conduit if State_Casting is true.
They all have the same logic but for some reason only some of them are triggering in my state machine. Q1, Q2 and E1 trigger while idle and while moving, but the rest only trigger while moving.
Any idea what I'm doing wrong? I can add more screenshots if needed. I'm not sure why this is happening and I want to fix+avoid it in the future 😅

Animations can be interrupted by a blend to another animation on the AnimGraph or by the execution of a Stop Montage or Montage Set Next Section blueprint node in the Event Graph of your Animation Blueprint. If a character gets hit by a missile while swinging a sword then you would want to interrupt his swinging sword animation and play a "received hit" animation instead or similar. Eh?
that makes sense but the issue here is that it does not move into another animation after. It just stops the animation but doesnt play another one and I have a print string that tells me every time it is interrupted. It happens mostly on the client side so that could be part of it also, I am not sure.
Do you mean it blends to the idle animation?
(unexpectedly)
Or does it freeze entirely?
yeah it blends to the idle animation
and yes it is unexpected
Is the animation that is interrupted played by a Montage Play node?
Yes it is
Inspect the montage for AnimNotifies
If there are any AnimNotifies then look on th eEvent Graph for a red event of the same name
then examine the nodes executed from that red event node
see what they do
That is the Event Graph of your Animation Blueprint
not your Character Event Graph
Yeah I have notifies that will trigger collision events on the collision for the weapon when it plays that attack animation, basically they activate the collision and then deactivate the collision after the swing. It could be getting interrupted when the collision hits the enemy sometimes because that is what it seems like. Sometimes it will go through the full swing and sometimes it will stop the second it hits the enemy and thats when it gets interrupted. I noticed that now that I am testing it again. I am not sure what the reason for that would be though.
Thats what my character does during a swing
enable collision for several frames then disable it
Hm
Anyone know how to get Fabrik working properly in control rig? I cant seem to get the arms to behave properly in fabrik
I assume the order of the algorithm starts with item 0?
I just want to add manual rotation controls for the shoudler and elbow
Got an issue where I'm playing montages back to back, but it's blending in from the root pose, not from where the bones last were on the montage, so when it blends in, it looks super janky. Anyone run into this before?
This may be a user error.
ehy guys which are the best tools to create basic animations?
Built-in Control Rig.
Ok im gonna try it then, thank you
Using MasterPose, is it really necessary that the base mesh is visible?
If i make it invisible, the other skeletal meshes seem to stop moving
ALS getting away with the same technique, probably something else causing the issue 🤔
Hmm... This is used on the ALS system aswell
damn, guess i'll need to figure out what happens then
Found it! A tick setting in the SkeletalMesh component : )

any idea how to fix Female Manquequing lacking of ik bones ?
A question about Blender. When we export fbx, animation becomes broken and not smoothed.
The left one is blender and right one is maya (inside UE is the same).
What are the best fbx export options to export animation from blender to UE?

Hello, I ran into an issue in Sequencer where keyframes are not being added for control rig despite having autokey enabled. It worked for a while and after some time it didn't. I don't know what triggered this. It keeps working with other actors other than ControlRig.
I made a video for better clarification.
Is there someone who can shed some light on the question? Thank you.
I have a simple arm IK control rig setup. The transform seems to be in the local space of the character (Makes sense). So, when I try and input a global transform the effector location is incorrect.

The obvious fix is to make a relative transform from the global position to the characters local position.

I'm getting unexpected results. and the transforms seem to be way off.
Am I converting the global space into the characters local space incorrectly?
When I try to modify a root motion animation via control rig, ive noticed that my offset control (root bone) does not move with the character (see video)
How do I setup the sequence so that my offset controls follow the mesh?
If I save the sequence then my root motion is broken meaning that my char in this example jumps back to his original position after sliding.
Same Problem when rootmotion is turned off.

how would i change my characters rig??
is mixamo good??
From what i saw, yes.
It's a great way to get free animations of any kind
Also got there a **mixamo question **.
Is there a way to perfectly match the base position of a mixamo skeleton to the UE skeleton ?
I'm getting bad results when i try to manually set the new base position by hand
never tried it ive only used the new MetaHuman's recently and ive only been developing for a few weeks
this one tutorial has the dude showing how to add an 'fx pack' to the project, however I don't see any project to add it to, even when I thick 'show all projects'

Both me and tut guys are running UE5
restarted projects and launcers also
Might installing UE4.xx help? I dont have that one
Hello there, i have 3 mp4 vids and i need to add them as intro, outro and middle cutscene in my level, does anyone would be able to help me with this one? im pretty new to unreal  🆘
🆘
Es there a way to add more "universal" anim notifys, or am i stuck with the base ones?

Anyone know of a good UE Skeleton-rigged animation involving bystanders, particularly ones using a cellphone?
like filiming something with their camera phone
You never used UE4 at all, prior to this?
This is why Epic and long time users keep saying that beginners should not start from UE5 just yet.
But they do it anyway.
How do I know the duplicated animation sequences that Unreal made when I retargeted to a different skeleton, how do I know which group are the new ones (I want to remove the old ones and their skeleton) I can find skeleton but I don't want to do that for a hundred of them, I just want to know which group I'm deleting ?
Can I just delete the skeleton and replace it with the one I want - will that retarget them correctly (as long as it's the same skeleton) ?

Yea I'm gonna do it anyway xD
@rigid sky I've been using Unreal engine for 3 years now - I'm not switching to 5 for at least 3-6 months
Actually installing 4.26.2 as we speak, ill check it out
What would cause this fluttering in the hands? I retargeted to what I THOUGHT was a compatible skeleton - but obviously something was off - I'm assuming the previous asset, which I guess was built to be modular, as it only has certain elements, in this case, a torso in the skeletal mesh, so maybe some of the bones didn't transfer over (I thought they did, even if not used)
Yeah, not too sure if it also works with Blueprints, but you can create a C++ class which extends from UAnimNotifyState or UAnimNotify.
You can even create a Notify/NotifyState only for a specific skeletal mesh if you override the CanBePlaced method
Note that both, the declaration and the definition has to be wrappen like here in case that you gonna specify the skeletal mesh
//Header
UCLASS()
class UPlaySoundAndParticleEffect : public UAnimNotify
{
    GENERATED_BODY()
public:
#if WITH_EDITOR
    bool CanBePlaced(UAnimSequenceBase* Animation) const override;
#endif
};

//Source
#if WITH_EDITOR
bool UPlaySoundAndParticleEffect::CanBePlaced(UAnimSequenceBase *Animation) const
{
    if (Animation && Animation->GetSkeleton())
    {
        return Animation->GetSkeleton()->GetName() == FString{ "SkeletalMeshName" };
    }
    return false;
}
#endif
So whats everyones method for animating guns with hands? Im still not 100 percent sure how unreal handles it
I'm also using Blender to model and animate
You can do it any way you want. We author all our animations and weapons to work with a single animation without IK, but you would want to use IK for the non-dominant hand if your weapons have varying proportions between the right and left hand placements.
Is Baked Animation sequence and Linked animation sequence different? Currently making an animation in control rig to use in other game so which one suit my purpose?
Id like to know why too, it looks great!
Hey guys, anyone know why it might be that my Animation Budget Allocator always shows the graph at 0.0?

even with 145 characters
ANy idea why additive animation shrink
Imported with scale?
IDK what went wrong. I'm trying to create a 3d blendspace to my deer so that when it rotates and uses the turn animations. But I can't get the rotation working
I am so confused, i have been trying to figure this out for an hour now but for some reason i cant change when this animation ends and its so annoying

what's the proper way to do a running animation in sequencer?
where it reacts to your transforms
You are supposed to be able to call events from a blueprint and access those variables - I think the variable is "include in cinematics"
@heavy pewter
appreciate it @dark vortex do you know what it is called in the BP editor?
literally it's called Cinematics, check on the details of any variable
how would i make this meta human animated on the 3rd person controller
that's when I click on the blend space node to go to the blend space asset
Dang, is there really no way I can sync a weapon animation with a character animation a bit like sync groups, but for two different skeletal meshes, without playing the same montage together? (Because I want to use state machines and what not on the leader)
How can I interpolate the walk speed to the animation better here? I'm using the same animation that the third person BP does and I'm setting the max walking speed to the same speed set for the walking animation on the blend space for this animation BP - what else am I missing here?
that's the movement speed I want - if I set the max walk speed faster, it look better but doesn't solve my problem
Hey what would be the default approach to have equipment and clothing that changes size for a different proportioned bodies? Sort of like how in world of Warcraft the same shoulder pads are gigantic on a male tauren but tiny on a female undead
If they are added components to say, a socket, you could scale them up depending on which class they are - so basically make each one of those classes a child of your RPG_CharacterBP and then in the construction script of each, target the mesh in question and scale up to what looks good...just my initial thoughts
I suppose every character could have a map of socket names to scale values and just hand tune them. Would take some trial and error but I guess if clipping is good enough for wow, it's good enough for me
Now when it comes to skeletal meshes like clothing, I have no clue how I would do that
hey guys , i just want to change my default viewport ( Which is atm a camera flying around) to a Camera animated in a level Sequence... any idea or a tutorial how i change this? Search for tutorials but didn't worked....
if i have a form of vehicle that i've modelled in blender, and has plenty of moving parts with bones (and drivers in blender)
should i be exporting everything as 1 object? or exporting the different pieces of my object individually ?
Has anyone come across any good guides for setting up an animation system where your character can incrementally open/close a door in 3rd person? Working on a survival horror project where you can slowly nudge doors open and closed, instead of binary opening/closing. I've mainly come across guides on binary open/close systems or first person guides.
Check out Speed Warping ( using IK to decrease the stride)
Do you have a link for that?
There is a free plugin by Berkay Tuna on marketplace if you don't wanna build it urself.
Hold on I'll find a vid and link
Also I'm having trouble with their feet hitting hte ground - the walk animation it's too high, but if I lower the mesh relative to the capsule (which is root) then the idle is completely in the ground

Announcement Post: https://forums.unrealengine.com/showthread.php?97151
Laurent Delayen and Ray Arnett came on the stream to show how they are implementing character animations into Paragon. They pulled back the curtain and opened up their Anim Blueprints to show the details of how everything works behind the scenes.
Also, we introduced Jess ...
Skip ahead to 46:00min
I was able to get the animation to look okay by changin the playrate scale on the blend animation in the animbp
ok
If ur character has upper body movement, then playrate will slow those also
I'm no stranger to Video Memory running out
anyone know what to do if this setting is causing huge fps drop? the LOD on the animating static meshes are even set to 8 RN i thought that would help but no

Assuming I only use static meshes, how does the following sound:
- a watch with a minute hand that turns 6 degrees every second as the hour hand moves by 0.5
- a compass that depends on its rotation along the Z axis and points toward 0
As a side note, would there be a way to make the compass needle behave more realistically, as if it’s magnetically drawn to 0 degrees rather than just snapping
@last vortex Timeline events, looping set by timers
and for the compass needle, make a timeline and have the value go below or above the line (basically backwards) which will make it bounce in the other direction then bounce back
I’ll have to look that all up because smol brain, but thanks
By the way, any tools you can think of that’d fit on a leather gauntlet other than the watch and compass?
Goddamnit I fixed ALL of these meshes and their heights were working, now they are inexplicably walking through the floor
This is really frustrating - it was working fine
I already spent 90 minutes tweaking the feet so they land in the right spot and those settings are still there so I don't know WTF changed
and WTF happened here?

my AdvancedLocomotionSystemV4 character is twitching when idle animation is playing
Can someone tell me how to make a ragdoll go to sleep? The Custom Sleep Threshold doesn't seem to do anything and even with high dampening it is still simulating.
I saw that one old thread about caching the pose and doing something in the Anim BP but that sounds hacky... It seems like my character is still trying to animate
I've been dabbling with UE for a little while. My projects go well during planning etc. But hit a brick wall at Animation.
I'm trying not to shy away from it. Documentation/tutorial suggestions?
Small project ideas to force animation learning? I'd like to stay in UE to learn basic animation, is that a viable option or am I better just biting the bullet and learning Maya?
Look into "Animation Pose Snapshot"
Animation of what? Humans, animals, machines? Everything?
Animating with Blender, Maya, 3DS Max, Cinema4D, Modo?
Check out the UE4 documentation on skeletal meshes and animation
check out the Unreal Engine Youtube channel videos on animation and animation blueprints. Watch all of them.
Check out the Online Learning of the Unreal Engine website. Take all of the animation related courses.
Create some test animations, import into UE4, go back improve them, repeat about 100 times
Machines can be static meshes, animated purely with blueprints, e.g with a Timeline node and AddRelativeRotation nodes etc
but they can also be skeletal meshes
Humans and animals will always be skeletal meshes though
Hey, I set the position of the socket for aiming animation, it works well. However, when animation changes, weapon is not in hands correctly .. Yes, I know that it is possible to configure "Left Hand IK", but weapon will still lie badly in hands. Tell me what solution can be used for position of weapon with different animations?

any idea how i can force a mesh to jitter when being hit by attacks?
I'm no expert but you could go back to your DCC and attach the weapon to right hand bone using a Copy Rotation constraint then adjust your animation (rotation of both hand bones) until its perfect for both hands.

LetMeGoogleThat.com
For all those people that find it more convenient to bother you with their question than to google it for themselves.
lol
As I understand it, you need to store a specific offset for a specific weapon somewhere?
damn bruh. i googled before and didnt get any results. googled exactly what you wrote and suddenly google has all the answer
@lone wadi yes if you have multiple weapons then you can rotate the socket by a specific amount depending on the weapon , when you attach it to the socket
@exotic marlin yeah I guess it's a good idea to try word variations in google
is it best to store turn information in a data table?
@lone wadi absolutely. I love data tables for storing all sorts of initial parameters for my game such as weapon damage, armour rating, spell casting time etc
Then you can load them into an array if you need to edit the parameters in real time/game play
And work with the array instead
ok, is it better to change position of weapon or position of socket?
I would guess socket because if you drop the weapon it may end up looked weirdly rotated on the ground but then again it may not if you spawn another actor for the weapon drop code
ok, thx
Hey folks, thinking about adding a camera skeleton (attached to head bone) which is separate from the character skeleton, but allows for some finer movement control of the camera position. Is anyone aware of a reason why this might not be a good idea? (Syncing animations, multiplayer, etc.)? Just sense-checking the idea before we run with it. Thanks!
Is there a way to setup simple hand IK retargeting using only the character blueprint, without touching the animation blueprint? The guides I've found online for IK retargeting are more involved than what I am trying to do where I am simply playing a single montage, and want to use the IK retargeting in conjunction with the montage.

Nvm mesh preview sockets caused this
If an animation that has started a Notify state but then gets stopped, when it is stopped will it trigger the Notify End even if it has yet to reach the end?
Im trying to change a variable in the player character during a specific time in the animation, I'm trying to use a notify state rn but it doesnt seem to be working. Is it because I'm not using "recieved notify tick" function?
is there a way to use an anim blueprint in cinematics with sequencer?
Hi, I just got into Unreal Engine, how can I animate something like a car? What I've found mostly are about making drivable car.
I am trying to create a short 30 seconds video
Hi. May I ask how do you go about doing a melee attack animation that stops or plays a hit animation when it hits something. I assume you have a regular attack when it doesn't hit something and a modified attack animation that hits an object. This modified attack animation plays when the line trace hits something but I am not sure how to go about it in the linetrace code, or how to override the attack animation when you hit something in order to play that modified attack animation. thank you
video from resident evil 7:
YT: tZveig
hi all. im looking for the mannequin file, allready rigged for blender. i see YT using it, but they dont link it :/
If you store anim montage in a variable, can you play it from AnimBP?
Can anyone help me figure out what I'm not understanding correctly about additive animations? I wanted to take this additive animation: https://gfycat.com/OnlyCoarseFinch

And add it with this reload animation: https://gfycat.com/ConfusedRealAgouti

But the result looks like so: https://gfycat.com/SelfreliantBoilingAmericanindianhorse
An unfortunately misaligned left hand

What am I doing wrong? This is how the base reference of the additive animation looks like, could it be a matter of using the wrong one? https://gfycat.com/SparseThatFlycatcher

Research ok IK and types of IK in unreal and you will find a solution for this
Use splines to move/animate your car : https://www.youtube.com/watch?v=FVyUVJra3KI

Simplistic way to control your vehicle ,no need for behavior tree for calculating next point
29.04.2020.
This is old video, I get lot of questions about it, so I was made simple project for UE4.24 in it I was made most basic easy to understand Sedan follow spline
Updated Way to find LookAt Target to steer
https://i.imgur.com/StqpROh.png
Pro...
you need to add notify at the end of your animation manually, and use that event on end, it doesn't trigger automatically, you have to make Notify for that
X-posting here, because I have a feeling that even though this related to "physics" the best solution might live in some animation trick I'm not familiar with:
I'm trying to figure out a way to have cloth simulations intereact with the world env, especially the ground. From my understanding there isn't a way to do that in-engine, is this correct?
If so, my next hack-y thought would be to create a physics asset that has like a bounding box at the root bone of the character (but only use this physic asset for clothing). This will work but only on level terrain.
I'm wondering if anyone has any other ideas that might work a bit better?
I have a character in the exact same position as the UE4 mannequin and I want to attach the ue4 skeleton to him in Blender. Does anyone have any experience with this or can point me in the right direction?

is there a way for it to run just once and make a variable instead of casting every tick?(besides doing a "do once" node)

yeah, id hate to cast every tick
wasnt sure if there was something like begin play where i could cast once and set it to a variable
Hey guys, I tried altering an existing animation that my animBP is using with an additive layer but it isn't propagating to the animation blueprint... any ideas?
I key framed the arm I moved and saved it but when I'm in the animation BP it's like I didn't change anything.
Here you can see that if I click through on the animation in the anim BP the arm adjustment I made to prevent it from clipping the gun looks correct in the animation editor but looks unchanged in the blueprint.
Could someone plz point me in the direction of what I need to be looking into, please? The two models on the left are from an animation resource pack and I would like to use the model on the right for those animations. I'm aware of retargeting, and that has worked out well enough for prototyping, but as you can see the models on the left have bones (and animations) for weapons and such, and the model I'm trying to use with those animations has two separate static meshes that (again, for prototyping) I've been using with sockets.
Some of the animations have the sword and/or shield leaving the model, as in throwing the shield or tossing the sword. The meshes I have for the sword and shield are just static with no bones. I know this is likely too much to be answered quickly, but I've been trying my best Google-Fu and can't seem to find what discipline I should be looking into to get this figured out. Thanks in advance!

Attach the sword and the shield to the ik_hand_r/hand_l bones (or whichever bone is being "tossed"
@brazen cape
@verbal plover
- Create a variable in your animation blueprint, make it public
- In the Character blueprint, on
Event BeginPlayget the mesh's animation instance and cast that to your animbp class and set the variable
The Unreal Engine 4 Blueprint Vehicle User Guide.
What is best way to sync pawns animation bps? I have player (rpg game) and there is horses. When I start riding player changes anim bp to riding and more speed it changes as like walking/running. But when I posses horse and attach player to it. It doesnt work maybe because (Try to get pawn owner-> velocity vector length = speed) Same as horse when I dismount and posses player again it only loops running animation if I dismount while running.
anyone messing with full body ik UE5? I can't get an effector to maintain a 1 to 1 transform with a bone
Is there any way to smooth out the transition to Idle? It's also affected by the locomotion blend space.
Well I fixed the problem with this state machine but the blinking effect still persists in the blend space.
hello there! just discovered the Enable Update Rate Optimizations setting in the skeletal mesh settings, and also found commands to set the interpolation rate, but these are only setting it globally! Is there a way to set it per character??
any way to have a linked animation layer output more than one pose?
Anyone recommend some bystander/spectator animations, like rubberneckers and crowd watchers ? (i want them to be like gawking at a scene)
There are packs like Generic NPC Animation in the marketplace.
Think I have that one already
Can you also advise this - I'm spawning multiple AI but they are all "synced' up in their animations - I"m trying to offset so I added this to change the position of the animations, so they aren't all synced together

I want to AVOID this
Hey, this probably looks as wrong as it can, but i can't really seem to find any kind of sources to make a skyrim like system (As in Spell on the left hand, Sword on the right hand and similar).
Does this here even makes any sense ?

Hey! Ive rigged my own character, using the maximo bone structure and weightpainted it manually but the animations are all deformed like this.

anyone got a tip on what i might be doing wrong?
The skeleton looks right and doesnt deform when I rotate the bones.
oof
Weight painting is working well in your DCC?
@fleet willow Sounds like you want to use Anim Slots
Make a montage, in the editor create a Left Arm slot and a Right Arm slot
Create two slot nodes in the Anim BP Graph
Assign each to Left and Right
Then you can use Blend Pose Per Bone to select the bones that are affected by each
What is DCC? 🤔
Just to be sure, are this here the anim slots ?


Yes
DCC is your 3D package that you did the weight painting in
Maya/Blender/etc
ahhh okay, well the weightpainting is not great since the modeling of the sweater is kind of shit
I thought this might be an importing problem since its so deformed.
@static falcon Any chance that you've got some sources for this kind of thing ? 😅
Yinsei, that image I sent is a pretty good reference
Not sure why the alpha is 2 though
Think of animation slots as photoshop layers
Each one you pass through will happen on top of the stuff before it
The "Layered Blend Per Bone" node will let you pick the joints that you want each layer to affect

This one looks a bit better
Was about to say that the picture from before is probably too simple to understand how it should work if you extend it with more animations 😄
But this one helps me better now, thanks
I'm trying to make some animations inside the editor - I've done it before but I wanted to check again - I can't see the keyframes/bone changes on existing animations right?
I can only edit things via additive layers (or recording) right? I can't say, go to third person idle and actually see where the animation occurs and modify that original thing directly (I've have to make a NEW keyframe, I couldn't access the previous one)
so this is purely a weightpainting problem?
Might be oddly specific, but is there a way to get to the instanced control rig from an AnimGraph (inside the AnimBP) ?
Or provide an instanced ControlRig (from the actors blueprint) ?
So I can split certain stuff up from blueprint and animblueprint
Had this wrap around during a recent jam and thought might be worth asking
Is there a trick to getting AI to animate after SpawnAIFromClass? I've tried a dozen tutorials but when my AI spawns it just sits there. That node is supposed to take care of the controller and behavior tree right? I'm not sure what this error means:
If I drag my AI into a level it runs the behavior tree as expected, but nothing when I spawn it.
Likely a very dumb question, but how would i "cut" an animation ?
As in, create a copy of an existing animation, but only use the frames from x to y
If you right click on it with the play head set, you can delete frame before the playhead to the beginning or afterwards to the end of the clip.
Got it, thanks 😄
anyone good with un-fucking skeletal mesh importing/exporting between blender and UE?
I export to blender, scale up a mesh, apply transforms (rotation and scale), export back to UE, and it breaks the skeleton mapping and asks to regenerate the skeleton. naturally, when it attempts to do this, it completely breaks the weights (and/or something else) on other skeletal meshes. my fbx export profile is identical to what every single one recommends for exporting blender to UE - enable bake animation, disable add leaf bones, Y forward/Z up, Apply Transform, etc.
can't wait for UE to have more DCC tooling built in so we don't have to deal with this.
Is there a blueprint node for setting a keyframe with the current settings?
Does anyone know how to use a control rig with an animation graph? I see there is a ControlRig node in the anim graph, but I can't figure out how to move the controls for the rig...
Not positive, but generally skeletons come in fine, so I assume so... Can you try rigging it with Mixamo and see if that works?
Found the answer... the panel for making variables doesn't show by default in the control rig editor --

So i'm new to this.
My skeleton animates properly but when it comes to the mesh itself the shirt & Head doesn't animate.
The hands, legs and feet's does work. Does someone know a fix?
Does anyone happen to know why my rig might appear to have all the bones have their parents' transform? eg. In Unreal the foot is where the shin should be.

I want to add a new state (that basically idles) into this - so I have the transition animation I want to do, the additional idle animation and the exit animation for that additional idle information - how would I set that up on the ANIM-BP?

how can I fix this?
they are all on the same epic skeleton
in the unreal content example project in the animation map theres an object retargeting example which focuses on that problem. trying to understand it myself right now tho so i can't really help
check the retargetting skeleton poses for both of the models youre using the animations on and from
if its even a few degrees off during retargetting it could end up scary bad or bent badly
ive had such issues with things like als and mannequin running animations due to a shoulder position or leg being bent in an angle different than the retargetted mesh
Can I do an offset in BP then? setting it on the manniquin will only work for one of the meshes anyway
Well im still learning unreal so take what i say with a grain of salt
however fluffed retargetting seems to be the main reason for me that everything breaks animation wise x3
offsets are possible i believe, but im not as knowledgable about that as some of the others here might be
I'm trying to get the stupid animation to play looped
can someone please leave a message for me on who I can get a section of a montage to play indefinately/looped - I've set it to loop but the montage keeps restarting (but I want the frames of it that are the looped/idle version)
Hi everyone, i'm trying to learn about animation in blender and exporting to ue but i've been having quite a few issues with it, i made a reddit pose on r/blender about it, which includes the blender project file for what i'm currently practising on: https://www.reddit.com/r/blender/comments/o5l5d5/blender_to_unreal_issues/
if anyone is experienced with the blender->unreal workflow where animations are involved any advice/help would be greatly appreciated
Search for Mr. Manniquins - it's an addon for Blender that creates the UE manniquan there and lets you import/export those animations
that sounds cool but i'm not using the ue manniquin, just using my own basic mesh and armature
Hello everyone, I'm playing around with sequencer and control rig and I can't figure out how to pose the character into a default pose before building an animation sequence and baking it.
Does anyone know how to set a "default" pose that the skeletal mesh is in when putting it in the level and then using sequencer?
Basically, I want to put the character in an idle pose (animation BP) and store that pose in the sequence at T0. But I didn't find a method/documentation/forum post to do that.
Montage slots let you set an animation as the root/default slot but I don't know if that will do what you want
I ended up exporting to Blender and used that manniquin plugin I mentioned a few lines up - took about an hour to figure it out because I'm dumb but i was able to modify on top of an idle animation
Montage Slot, okay I'll check that, I don't see that in the docs. I currently set the Animation Mode to the AnimBLueprint, in which I added the control rig node at the end before the output pose.
Hi everyone! I'm having a special situation in my State Machine in Unreal 4, where I want to return to a state for logic but I do not want to play the animation inside that state if it entered by a certain connection. Do you know if it's somehow possible to do this? Thanks a lot!
How do I set the T0 in sequencer to a default pose instead of an A-Pose for that control rig?


Idle is going to loop
When I try to modify a root motion animation via control rig, ive noticed that my offset control (root bone) does not move with the character (see video)
How do I setup the sequence so that my offset controls follow the mesh?
If I save the sequence then my root motion is broken meaning that my char in this example jumps back to his original position after sliding.
Same Problem when rootmotion is turned off.
I want to randomize different walking animations for my pedestrians - how can I easily override the anim_BP to do this - basically when it is in the walking state, I want to be able to randomize/pass in a different walking animations - (I don't even care if the transitions are hacky/choppy)
What is that montage slot you mentioned. Searching only shows Anim Montages which are not what I am looking for.
In blender I could put the skeleton in a pose then animate but I'm trying to do everything in UE.
Use this. Random Sequence Player.

I'm trying to have my fullbody IK control rig only apply when the player is on the ground, but I can't seem to use the output from Locomotion for two things. Any ideas on how I can implement this?

Thank you very much - when I searched for looping montage, there's where the montage slot came from - but I think the word you want is montage section
crap this is going to be harder to figure out for the random sequence
is there a magical way to add that into a blend space, I don't see how there could be
What are you trying to achieve? Random as in deterministic or not?
yes -
Ah, that's still only in montages. In sequencer I don't have those.
literally just some variation in the roamers around the levels
check the windows make sure slots is open
not a very good video but it should show it https://youtu.be/Vqlo8j3gWQ8

In this video, we´ll see how to make loops in animations to persist over time in unreal engine 4.
You can also follow me in facebook:
https://www.facebook.com/3dmaxtutoriales
Yeah, that's in an animation montage. Not a Level Sequence. I could use that but the problem is that I want my animation to start from a set idle position, then to have translations&rotations applied to the skeleton. as it is now, I start in A-pose. That's what I want to change, that A-pose.

A pose should be in the retarget manager

true but I would not change that one. I'd expect that loading a pose on a skeleton mesh should not be that damn hard 😛
May need to code it in myself.
I can understand it in a way, the control rig itself does not have that info, only the skeleton mesh's other assets, such as a pose asset do.
"Play Slot Animation as Dynamic Montage" will not work on just a Skeletal Mesh within a level, but, playing a montage will. Any thoughts on why this might be happening?

The Skeletal ref is good
the animation instance ref is good
its will allow a montage to play on the ref
The slot is working as intended
Nothing else is competing for that slot.
Am I missing something?
Anyone want to confirm this on there end as a sanity check?
I guess I don't know whether this is a blender problem or an Unreal one but upon importing this rigged model into Unreal it always comes in face down

Because I've done some animations with the model being like this but this happens even on the animations where it's standing regularly.
Another issue I have is scaling, I thought blender and Unreal used similar units but I must he doing something wrong in the settings


Since it comes in waaaaaay bigger upon importing to Unreal
Are these the correct settings to use when importing a new skeleton? I've noticed issues with automatically generated physics bodies, and was wondering if I was doing a wrong axis or something.

Set your blender scale to.01 & Metric. Additionally if it's importing at the wrong angle it's your export settings that are bad. I would say copy mine^, but I'm not sure if those are the best ones either. My models do import at the correct rotations though.

I can give yours a try
I'll send mine that I was using

But changed the scale to 4 and checked the apply transform box
hey guys has anyone got 2 minutes to help me figure out why my character isnt running. i have followed a tutorial and for some reason it is not using the Idle state when stationary and also not running when i move. thankyou
Thanks for the super quick reply. The issue I'm having is that the model I'm trying to use the animations with doesn't have the same bones. Is there I way I can add them? I've heard of virtual bones but not sure if that's the answer.
Does random sequence player cycle the animations only when you hit shuffle mode , otherwise it will only choose a random one once you enter that machine state
right/
I am using layer blend by bone animation but there are some animations that I want to just play as is. Is there a way I can do that? For example, I want all of the attacks to be blended but I have a jumping attack that only plays the upper body portion and does not ever jump. Is there a way to play the jumping attack without blending it? Sorry if that was confusing, I'm having trouble putting it into words
Got your Animation blueprint setup correctly ?
Parent your static sword to the rigged sword.
same thing, i followed this tutorial to setup my animation: https://www.youtube.com/watch?v=1K-Hyu4Xn3g&t=492s
but for some reason the running animation doesnt work and play the idle animation instead.

Hey guys, in today's video I'm going to be showing you how to create an animation blueprint and blendspace to smoothly transition between your animations in your game, such as idle, walk, run and jump.
Previous Video - Creating The Character And Animations: https://youtu.be/Ht0ekszftsA
More In-Depth Explanation: https://youtu.be/A6L_8vAx-M0
Un...
this is my animation blueprint

here's my blendspace

*sorry for spamming

Is it common to use custom skeletal meshes for their characters and map the animations on to that or are they mapped to the mannequin and it just uses the characters mesh?
Hopefully that made sense lol
Im really confused, I rigged my character and the weightpaint looks fine but it is all twisted up.

I also put all the bone roll on 0 degrees. but no differnce.
Why does the offset control on my control rig not move along with its animation even though it is linked with the armatures rootbone? If anyone knows the answer, dm me your paypal
@misty dagger what is your transition rule from idle -> walk/run
its Speed >= 10, I already fix it btw. The problem is on the event graph 🙂
Is there a way to add a spline point on a camera rail say in the middle of it?
without having to alt drag the last point?
I'm retargeting animations, but they're for an animal character with an extra leg joint (paragon Boris), and going to a humanoid skeleton. How do I avoid the distortion that comes with the process?

Hey sorry for the late reply I posted that question last night. The reason it didn't work was because when the level loads he does an animation and I have him stationary until he's finished it. I had that set up wrong somehow and it was affecting my movement haha. Disabled it and now all is good 😄
hey everyone, so im working on a full IK body for VR, heres an issue im having while trying to compensate arm movement for wrist movement to mitigate the pinching, while the rotation direction and speed seems to be working fine, the skeletal mesh on the arm seems to flip, i know its likely due to the roll value going between -180 and 0 accordingly but i cant find anything online about it. any ideas?

this is using the epic skeleton btw
Hey guys, anyone know if the new FullbodyIk node will be available in 4.27?
i think there is a version of it in 4.26, u have to enable it in the plugins
Wow! You are right, it is there. Thank you!
for sure! its pretty nice but its layout is not the same as the UE5 one on the epic wiki haha so it could potentially change and break stuff if you end up updating later
But it's something. UE5 is kinda broken at the moment in mobile and it does not seem that they will be paying more attention to iOS in the short term so I won't be updating to ue5 anytime soon
Hey, guys. So i've working on shooter game rn. And already setup the animation blueprint for my character in unarmed mode. So, should I make another animation blueprint of my character holding and interacting with the gun? (excuse my english)
Help me figure out why my lookat function is making them LEAN back - I'm using just neck01 but you can see it's getting everything - How is this vector math wrong like this? What did I miss? It should literally be only different in the z axis =


ugh that lean is going to annoy the piss out of me
I sort of remember there being a way to do additive animations in Sequencer (not on the clip itself), anyone know where that was
Can't seem to find it
oh nevermind
they just add if you stack em
anyone know why this is happening to me? ):
(mesh disappears for a frame during specific animation montage)
Hey, guys. So i've working on shooter game rn. And already setup the animation blueprint for my character in unarmed mode. So, should I make another animation blueprint of my character holding and interacting with the gun? (excuse my english)

Hi guys! Just ran into a problem with an animated character for the Quest2. Suddenly I get an error saying "LogSkeletalMesh: Warning: Skeletal mesh SkeletalMesh /Game/Breach/Characters/Skeletons/SM_guard_v02.SM_guard_v02 has a LOD section with 107 bones and the maximum supported number for feature level ES3_1 is 75." Anyone know how to solve this, before I try to optimize the character rig? I read on answerhub that you can manually tweak this limitation if you edit some settings in the source code, but at the moment, I`m really not too keen on diving into that part of development.
I have the same issue. Does no one knows how to link the rootmotion of an animation with your control rig setup?
Is there any way of "reading out" the XYZ distance a Root Motion Animation moves the character?
Either static from the asset or by checking the last frame or so? It's a marketplace anim without anim curves etc.
Yes
@lofty marlin you can turn on "preview root motion" at the top
And then just look at the joint's position at frame 1 and the end frame
and subtract the two if needed
that's it
Not another anim blueprint... do you mean another State Machine?
Is it definitely the look at node? If you skip that one it still happens? Can we see your settings on the Look at Node?
How do you sync your walk speed with an animation walking in BlendSpace?
Have you looked on the Third Person template?
I know how to set it up. But trying to understand how it works?
You set a variable that gets the speed of the capsule in the anim BP event graph
You set up a blend space that determines which animation to play at which value (0 = idle, 100 = walk for example)
You put that variable into the blendspace in the anim graph
The variable could be anything, such as a lean value
Is that helpful?
Well my max walk speed is set to 100 and in blendspace I've walk animation @ 100. But animation is slower than the speed. I'm seeing a lot of foot slipping.
Well you have to basically match the speed to the speed that the animation was authored to
And if you didn't make the animation it can be hard to know what that is
But it's not that hard to just adjust it visually, Does he look like he's not animating enough or over-animating?
I would limit the max speed of the character movement component and try to figure out what speed looks right with your walk, then you can use that number
Does that make sense?
In the UE5 demo they did some cool stuff where they speed up the animation to catch up with the pawn speed if it's not matching, but it was over my head
It's also a thing in ALS (which is kinda obvious because the ALS developer is now part of UE5 team)
Nice. I desperately want to understand his work but it's so complex to me
Is there a way to copy additive layer curves to multiple animations? I've made a tweak to an animation that I would like to apply the same exact curve to all animations for that character.
And I don't want to do it in the animation blueprint.
Animation Modifiers enable users to define a sequence of actions for a given animation sequence or skeleton.
probably using this but good luck with figuring it out
Some tutorials on youtube that may help if you search around

There ya go @bronze turtle
It ended up being one of my spawn functions, I was having them match the direction of an arrow and was feeding them the X/Y rotations as well, when all I needed was the Z (I still am not sure how the arrow was getting rotating on those axis but once I only fed the spawn location the Z rotation, it fixed it-
TLDR - had nothing to do with animation blueprint
I there a way for components which are attached my mesh with an animation instance to be affected by IK transforms?
so if the IK bone modify says "rotate root bone 30 degrees pitch wise", the components attached also get rotated
or does that have to be done strictly in code by manually setting the rotation GetComponent->SetRotation(X)
Hi, just a general question really ? When should you use Montage's and when should you use a Animation Blueprint? I took a look at the Paragon character from Unreal and I noticed that the attacks are played using montages but the movement is in a State Machine, So i was wondering why the attacks are nto done in the State machine?
a statemachine is usually referred to an ever-going process of things that always correlate. Montages on the other hand are 1-time events
Also, it'd be hell to do multiple character designs if everything was done at the anim instance level
Okay cool. Yeah didn't make sense to me that it could be
@cerulean ridge Thanks, I am struggling with Animations at the moment and am looking into Root Motion movement but im nto sure if it,s something I would need as I do not fully understand it.
Root motion just means that ue4 uses the root bone to actually move the capsule
I was hoping to try to recreate the fluid movement of characters that are similar to Dante from DMC and am having real issues trying to match up Animations timings with the Character Movement component and such like is there any tips you can give for how to achieve a fluid movement with a character please?
All I can say really is that it's incredibly hard to achieve and takes a lot of practice, so I wouldn't expect to get it to DMC standards on your first (or 20th) try
What animation clips are you working with?
Another tip is to check out the Paragon characters, they're better than the third person template and not too much harder to understand
Ahh ok i,ll take a closer look at them 🙂
I was using some animations and characters from Mixamo just to try to learn and combine them
Still haven’t been able to figure out why this is happening 😦 anyone?
I downloaded the Countess one I am surprised no one created a Vampire game using her model yet XD
can any1 tell me how to do animate head and body togther with master pose compoent
my head facial animtion doesnt work if i use master pose compoment to attach to body
@static falcon ty
Ok im lost lol im looking at Countess Ability Jog FWD I assume is Jog Forward when a certain speed is met but they yhave Notifies RightPlant and LeftPlant when feet hit the ground but then I cannot find where they actually call the notifies or what they are even using them for.
@weary frost it's important to realize that there are tons of assets that aren't actually being used. They just made a very simplified version of her for the free asset.
So it's entirely possible those arent even used.
But they could be used for IK and Sound FX
ah I think I need to do more research on Animation Blueprints as everytime I create a character either the animation looks really trashy/glitchy or the character is foot-sliding
This combat is similar to what I am trying to aim for.

Well looking at that is a good way to learn
You just need to make sure the capsule is moving at the same rate as the animation because the animation is just a visual representation
Unless you're using root motion
But that paragon char is not and it isnt sliding much
I guess matching the Capsule move rate and animation rate is the hardest part xD
Were you the person I said this to earlier? I would have the run animation loop (plug it straight into the final pose)
And then experiment with the character movement speed
And find what value matches it
That's the easiest way I can think of
you can "simply" use Root Motion curves from the Character Movement Component though 😛
no you didnt tell me and i didnt scroll up, Sorry.
No that's fine, might have confused you with somebody who said a similar question
Ahhh ok thanks I guess it,s a common issue.
@cerulean ridge lol I think you are trying to confuse me even more XD
I'm just telling you what a game on the scale-level of DMC likely does 🙂
Ahhh 😄
Whoever animated it was probably told to match a specific speed, so there is a speed that works best for that clip, just need to figure it out since you can't ask the animator
So by just setting the max run speed on your char movement and guessing at it you can figure it out more or less
ok thank you, I'll mess with the Max Walk Speed component and see what kind of works.
Same for run, figure out what the run speed is then you can dynamically toggle between those speeds in your blueprint
By holding shift or left stick or whatever
ok ty!
That example you shared looks easy enough to match, I think you can do it
Feel free to DM me if you want more help, I like helping
Ok will do ! Thanks a lot I,ll keep you posted! 🙂
For some reason my animation is laying on the ground. I exported it with the character and imported it with the mesh and skeleton. Everything else is fine. My quesion is, can i change the his position in the animation?

I wouldn't do that if it's right in your 3d program
You can add an import rotation
@static falcon then the export settings are wrong right?
i think i have to look at it
another question is. in the blue print. can i put a timer on an animation, and after the timer or the first animation is over it should automatically start the next?
is there anyway to adjust the speed of random sequence player animations????
Play Rate? @dark vortex
You can do this with montages, there's a "when finished" exec pin
you know how blender has corrective shapekey drivers to fix animations. is it possible to bring those over to unreal?
Hey all, I’ve got a question about shifting the timeline in sequencer. I’ve got recorded tracking data for a camera with the vanishing point tracking system. All my recorded takes start at like key frame 1,000,000 on the timeline. Is there a way to shift it all back to frame 0?
for me i select to 1,000,000 frames that i dont need, right click, then select delete
I need to figure out how to offset the times of this animation (it's using random sequence mainly)
Has anyone retargeted animations to a synty character using blender? I'm having a shitty time.
not to synty - I ended up using the mr. manniquin plugin that rigs to epic skeleton
super handy if you haven't tried
Awesome thanks
Is there anyway to access/randomize the starting point of an animation - on the animation blueprint?
Specifically from random sequence player
what's this?

Hi guys.
What's the correct way of doing hand posing? Let's say you have a first person game (or vr, etc) and you want hands to pose exactly around an object.
For comparisson, in unity using Final Ik, there is a pose tool that lets you setup a bones structures "template" (a pose) in the object, and you can use the ik solver to blend the hand to that pose and position/rotation.
Is there anything like that in Unreal? what would be the alternative if not?
Is there a way of sort of scaling Root motion Montages dynamically based on some values?
I have a Vault Animation which goes something like 175 units far. Doesn't really fit to all kinds of obstacles, so I would love to scale it based on the "width" of the obstacle. Is that a thing ?
Also the height of it
Okay heightwise was actually quite simple. Just lower the character z location by the offset before playing it (given the capsule has collision turned off)
Hello everybody! Is there a console command to display the number of bones?
@lofty marlin I know this is a feature they've been showing off in Ue5
Hey! I have some animation blending issues I've had for 3 years, where the animations start blending but then suddenly snap. It doesn't always happen but enough to cause a big frustration. Does anyone know a remedy for this kind of behaviour, or got any clues about how to start fixing it?
Here's one among a dozen examples (look at the feet):
True, but I kinda hoped that games before UE5 also had a way to do that :D
Please use our Job Board
I don't know if there's a built in way... let me know if you find one, but I am sure you could come up with one yourself
In the UE5 demo they were using curves instead of root motion for certain things
Maybe you could have the height as a normalized curve in the animation and then multiply it by the new height value
They do a lot of AnimCurve stuff in Paragon too I guess
I mean, yeah a curve is nice, but I would need a way to extract the Root Bone Height as a curve, cause these are placeholder marketplace anims
The height is also kinda fine. The distance is more annoying
It vaults like 175 units far, with the hand being placed somewhere around the 80-90 unit distance.
If you stand in front of a 50 unit wide obstacle, it vaults just fine but the hand is placed behind it
I saw some nice anim data modifier blueprint tutorials that can extract root motion to a curve
Seemed like a cool workflow because I think you can batch run it
Awesome, didn't know about that. Looks simple and powerful, thanks!
Another thing I can't comprehend. How can the rotation of the leg blend like this 😄 It goes 360 degrees around
Yeah they are quite an enigma but look to have a lot of potential... kind of hidden too
can i set a value and a key on a sequence through a blueprint?
@lofty marlin just move the capsule component ?
?
By hand ? :D With code ? Why having a nice root motion animation if I would move stuff by hand
Does anyone know any free examples or tutorials of using control rig that is set for unreal FPS arms? I am planning to make aim offsets for a weapon asset within unreal engine.
@pure nexus See the messages right above yours
well i missed the stationary hand, than moving the capsule wont work
but if the handplacement is off, i dunno that prolly where i would start lining it up
id prolly split it lowerbody upperbody, and have an extreme pose i could mix in
im not sure which part you are referring to
Is there a way to alter control rig variables either from the sequencer? I wanted to toggle constraints via a boolean (e.g. making one hand follow the other when holding 2handed weapons), but I can't seem to access the control rig variables in any way except by changing the default value or just disconnecting the nodes, which is not ideal at all

Is anyone familiar with the proper way to export from Houdini?
So far I can select them like the meta humans and chose the right track, not sure on how the use the set editor property with it if you find anything
I don't know anything about animation, but I do know about optimization methods. Watching the latest video that talked about optimization a lot seemed to help me. Is it accurate to say that effectors are more or less what comprise the objective function and the bone settings act as the constraints?
Does anyone have an idea on how to apply forward (or any direction) input to your character during an anim montage?
would I just add input vector in an anim notify ?
Haven't tried metahumans, but I might have found a way: basically, create a control, set its type to boolean, then animate that in the sequencer, it's a bit weird but I guess it works I had completely forgotten you could set control types to things other than transform etc
also the presence of normal BP variables are a bit of a red herring, as far as I can see even though you'd use them in most normal BPs in sequencer, in the control rig you're supposed to use these control points
Selecting the controls I can do, I am trying to set say, that bool you spoke about through a button on a editor utility widget
Then I want to keyframe it to save the setting
How do you mirror animation in UE4?
anyone good with blendspaces who could point me to a guide or tell me how to use em in order to achieve a fluid avian flying animation? so far ive figured out how to control the animation based on speed and pitch so the bird looks up or down depending on Z velocity but id also like to make the bird lean left or right depending on the direction. So I'd like 3 things to happen ideally but obviously blendspace supports only 2 things at once. think i lack the experience to understand how to add a third 'layer' to this mess
I'm sure you can make 3d and 2d blend spaces
ah.. can you, im stuck with unreal engine 4.15 right now since im not really making my own game atm, im actually modding an existing one
Any idea why this happens? I'm making a first person pose for holding a gun (I'll swap out the mesh later) in control rig, standard stuff just the hand bones constraining to IK bones to keep position on the grips etc. Bone position is hard to see on the left but you can see that there's nothing jutting out, they're all in their correct position, however whenever I export it, those IK bones go crazy as seen on the right. They do this no matter if I bake a pose or animation, or create a linked animation

everything is keyed, though it doesn't seem to make a difference, and the bones are always in the right position in the sequencer animation, this is only seen after bake
If we're fairly early in the project and have skeletons built out and a couple animations, but haven't gone into full production on animation, would it be worth doing everything in engine with the control rig or would you recommend sticking with blender? We aren't doing anything super crazy, just your basic top down shooter animations.
blender will give you far more control
i used an additive blendspace to make my animation more believable
anyone know why my anim dynamics might be scaling down the bone in my mesh?
I had to use import uniform scale when importing
get your forward velocity, divide by the "distance traveled in the animation" then set that as play speed for the animation. Then blend your animation based on velocity
aka, check if you're on ground, then check if your velocity is above zero, or some small amount then blend pose by bool
thx
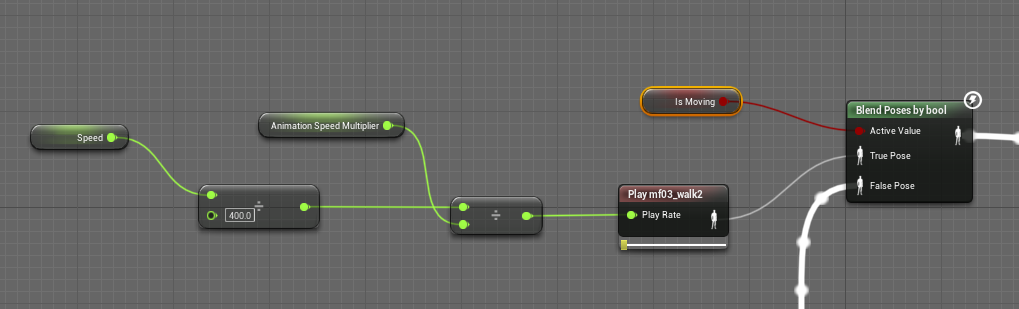
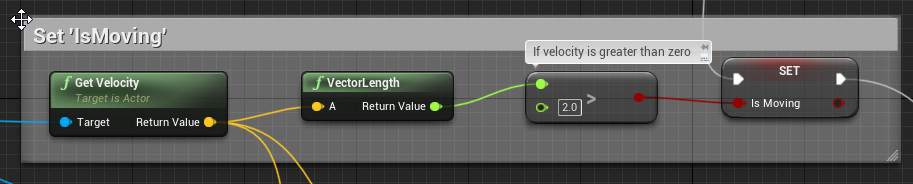
you can ignore the animation speed multiplier
That adjusts the animation speed based on scale
hm
so if I scale a character up and they're going the same speed it slows the animation down
hot damn does animation suck in unreal
I made some attack combos but when I hit w the character moves but is still doing the combo ...what is the best way to fix this?
Guys, if any of you work with blender, can you let me know if my assumption is correct: I wanna do an animated sliding door, so I was planning on animating using key frames in blender. Will that export neatly into unreal so I can just make a blueprint of it and utilise the keyed animation in UE? Or do I need something special?
Researched the issue some more, it just seems to not like the IK bones at all. On the top you can see the setup in control rig (hooked to forward solve and I have unhooked everything else to make sure it doesn't affect it), in the middle it's being posed in sequencer which works fine, the bones follow the controls.
on the bottom is the result of baking or creating the animation, the ik bones are now back to their original position like nothing happened, I've tried just about everything and every bake option, as well as keying and re-keying in the sequencer, but nothing seems to work. At this point I might just have to accept that being in beta these bugs happen and I'm better off doing this in an outside program instead

Is it somehow possible to have 2 state tabs ?

Would really make my life easier cuz switching from LeftHand to RightHand to compare something is really eeeeh
Well I kinda solved the issue by just making my own rig out of the first person arms skelmesh (which is the same skeleton, really), the issue does not seem to happen with this new rig, no idea what was causing it, but I guess if anyone else meets this bug (?), remaking the rig seems to be a last option that works
Ok im seriously lost guys, Can anyone explain how the third person character rotates and but when i import a character from Mixamo and put a run / idle animation on it, It doesnt rotate on the spot and or rotate in a direction when i press a key it just strafes about?
even though i copy and paste the code from the third person character in the event graph
You want the character to always face forwards or what you do you mean?
Hi. What could be wrong here? Imported Mannequin to Maya / HumanIK and imported an animation back to UE4. Anything I can do to fix this? 😊

is that a robot?
if so u might be missing a few screws, maybe some glue and reflective tape should do the trick
no but in all seriousness you might want to re-import it?
Make a copy of the file, go back to where you got the file and re-import it
hehe, I have tried. Looks like the scale of the forearm is messed up 😦
i see that now
yeah
get a new asset
im new to all this so dont take my word for it
There are a couple of restrictions you need to consider before importing blender content into unreal.
Modifiers and shape keys cannot export together. You usually need a plugin to bake em together.
This includes bone modifiers such as IK.
There are special fbx settings and rules you must follow to import.
Volume preservation does not work with unreal engine because epic is too wussy to reimplement dual quaternion.
In general, you cannot export texture and shading nodes into unreal.
If you can follow all of that, in general, it should work.
If it doesn't work, you can bind a single bone to the door so it affects only the entire door and it should still work.
For a simple key frame animation, look into the official pipeline plugin
@here Hey guys, i'm newly using a realsense depth camera (D435i), to try mocap (with skeleton tracking SDK). Works well, but I still can't figure how to export files of a recorded sequence :S
StarterGuide explain how to for c#,c++,python... anybody can give advices ? i'm just looking to integrate the code at the right place !
https://www.intelrealsense.com/depth-camera-d435/
https://www.intelrealsense.com/skeleton-tracking/


Intel® RealSense™ Depth and Tracking Cameras
Depth Camera D435 offers the widest field of view of all our cameras, global shutter on the depth sensor that is ideal for fast moving applications.

Intel® RealSense™ Depth and Tracking Cameras
Skeleton Tracking (body tracking) SDK offers deep learning based 2D/3D full body tracking. Windows/Linux compatibiliy. Free trial. Supports Intel RealSense.
curious how people are organizing their sets of discrete weapon types. in a shooter for instance you might have a discrete weapon set for pistol, rifle, rpg, etc that could include locomotion variations, etc. in our case it's a melee focused game where different weapon sets have a different locomotion set. as you can imagine the anim bp gets complex fast, and the options for re-using aspects are pretty lacking. currently I am using a linked anim graph to compartmentalize the different weapon anim sets into their own anim bp and invoke them on the controlling anim bp, for the 2nd part I need to do, utilizing the linked anim layer seemed like the right tool for the job, but unlike linked anim graph, you can't have more than one of these in a graph for some stupid reason, even if they are all set to a different instance class
anyone know why my animations are rotating 90 degrees on the x when I convert them to root motion?

Does anyone know a good place to dig up some info about Physical animations?
I want to attach a body to a bike and not having a good time with it
@hazy iron need more info
Trying to animate in your 3D program? Or attach character in ue4?
I'm trying to attach a character to a bike and animate it with forces
And I guess I could animate in my 3d program and blend with physics
Hi
I have some problem where my imported character is always gigantic in the retarget screen
when comparing
if I increase the scale he gets smaller
if I lower the scene units to 0.01
he gets bigger
I would think if I increased the scale he would get bigger not smaller. if I make him 0.5 scale he goes gigantic
I dont get it
Is there a way to get the duration of an animation notification state instance on an animation. I want to instruct it to do some easing over the course of it's lifetime
im doing animating and in the ue4 hangout vc if you want to help eachother

from this

to this
I appreciate the response. I will do some research. Seems like it isn’t as “press a button and forget” as I had hoped, but I’ve never shied away from tinkering. Thanks a lot for taking the time.
anyone used auto rig pro in blender to UE4? I wanted to tweak some FPP shooter animations in the unreal marketplace and edit them to make aim offsets. Can we import such animations and just edit it easily then export back to unreal? Thanks
Does anyone know of a tutorial on how the advanced locomotion system works. I want to understand how the system works.
Ugh good luck. Been trying too and it's a massive undertaking. Try joining their Discord first and foremost. @misty dagger
First step is to learn how to do use all blueprinting techniques so you can begin to understand it, need to know blueprint interfaces, macro libraries, anim curves, basically every blueprint concept
#animation message I answered something similar som time ago, try that.
That could be that somehow your weighted bones in your default pose got moved, first check your rest pose(tpose, apose, whatever) in any program you use (the pose of the character with all transform at 0) if is the same in your program just fix him there and then import, if that doesn't work or the issue doesn't exits on your program try importing only your rest pose without any other animations (you may need to check the Use t0 as ref pose in the mesh tab) and then add your animations unchecking the import mesh and selecting the existing skeleton from your rest pose import.
If that doesn't fix it, try to import with the preserve local transforms check on the animation tab
Hi you're using blender? changing the scenes units doesn't do anything because they get converted to 1 anyways later. What works for me is setting real metrics to the objects, like their real size in meters (you can do that in blender in the dimesions settings) and sometimes they import at the correct size without problem.

when they don't just increase the scale when importing, that actually scales the objects instead of the world units which doesn't x100 gives me the better result. Also remeber your skeleton also needs to be scaled correctly and the scale of all of your objects has to be applied (be 1.0) to have better results.

@regal orchid Sorry for the late response but you know the third person character rotates when you press A it,ll face the left direction and run in that direction and when you press D it,ll face that direction and run I just cant seem to get my charcter to do that.
Is your character entirely custom?
Its the Ninja Model from Mixamo
did you just replace the mesh on the default thirdperson character? By character I mean the unreal character/pawn not the mesh being used.
check if this option is enabled on your character

if it is, disable it and it should work the way you want to (assuming you are using a standard character)
Ok i,ll check it out thanks !
If i decide to create a new player character should i declare it as a Pawn or a Character I have been choosing Character.
All characters are pawns, but not all pawns are characters. In your case character is fine. Unless you are making a lot of custom stuff.

ok i unticked that box and now the character faces that direction, The animation stuff is so much harder to get to grips with than the rest xD
now the camera does some weird movements xD
Good stuff!
I thought I would try to recreate something similar to Tenchu , I wanted to make it a personal goal to recreate the 1st level, I kinda got all the stealth and AI stuff sorted but the character animation is pretty hard to understand but i,ll get there only been doing UE for about 7mths.
I applied the rotation in blender to zero everything out but the issue persists. It only flips on it's side when I enable root motion, otherwise it's fine

You could set it up so that all joints simulate and have animation applied using a physical animation component, but then make sure that the pelvis, hands and feet are not included in the physical animation. Or something similar to that. That way the body moves around when you ride the bike but the points where the mesh touches the bike remain planted.
@regal orchid Hi, Just wondering if you would have any ideas why when the character model moves the camera zooms in and out when the model is rotating?
Yeah i thought about that but I'm having trouble linking the hands and feet to the vehicle
Which is more performant AnimNotify or AnimNotifyState? The later has Begin and end funcitons. And they both have tick functions whihc runs on every frame. My thought is the later one is more performant.
In that case go to pose mode, select the root bone or hips or pelvis or your highest hierarchy bone and open the timeline or graph editor and delete the X and Y rotation keyframes from your animation, (this won't damage most grounded animations as root motion is locked in the ground and achieved mostly by translation in Y and X axis and rotation in the Z axis)
i'll give that a go
if that doesn't fix it then you can try selecting your root, hips, pelvis, etc. and changing thabaxis the bone is aligned to in exit mode, I believe the shortcut in Blender is alt+n or ctrl+n and select to align it to +z or -z axis or -y or +y axis that may be also the error (also you can try to change the facing direction when exporting the fbx the default is -y I believe) outside of that I have no idea what it can be 🤔
Hello, does someone know what this weird behaviour causes? I use a Montage to blend between an animation to hold the Flashlight, tho it is completely offset end looks behind the back?


Either animate them in sync or use ik targets to plant the hands and feet on the bike. Should do the trick.
Hello, I am rendering a composure comp in the sequencer in UE4 and the exported mp4 or image sequence plays 4 times faster than it should, this happens with each framerate option and my playback app whether it be the built in windows media player or davinci resolve is set at the correct framerate,
Is it possible to get a playblast out of Houdini?
Oh ok thanks! I don't know how to do that... I have experience in unity and blender but it seems like unreal engine is a completely different thing. That will point me on the right direction though
No problem. Take a look at the various ik solvers available in the animation graph that resides within the animation blueprint.
Anyone know of any good wall-running animation on the marketplace?
I see Clazy and than a few cheap ones. Just checking if there are any other good ones I'm missing
Does anyone know how I can prevent my third person character from intersecting with other geometry. The controller currently has a capsule collider, but I was hoping I could maybe use ragdoll colliders to prevent arms from intersecting with the walls. I'm not sure if that's the proper way of doing it, so please correct me if there's a better way. Any information on how to get me started or links to tutorials would be greatly appreciated. Thanks!
hey, guys so i've been working on applying animation to my character from unarmed idle to idle with rifle. And its working, when i press input for equipping weapon the animation change from unarmed idle to idle with rifle. So its work perfectly as i want. And somehow, this massage appear when i stop play. When I clicked it, the problem is on Unarmed Idle to Rifle Idle transition

here's how my unarmed idle to rifle idle transition looks like

*excuse my english
this is my character event graph


sorry for spamming
that is good. When building buildings I do it my measurements.
ty
Hello everyone
I was wondering what was this error and how could I fix it when Im retargeting character animation to a new model? (weird wavy arm)

open your skeleton asset, select all your bones, except your root, pelvis, and IK bones if you have, right clic and set retargetting to skeleton, then set retargetting to animation for your root and ik bones, and animation scaled for your pelvis
Hello everyone. First time in discord.
While I have been tinkering with UE for several years, I am still pretty green when it comes to animation. I was wondering if you could answer a (hopefully) simple question.
Is there a way when using an animation in the sequencer forward (to move the root?) without modifying the location manually? For example if I wanted to string together 5 walking animations, how do I get it from blinking back to the origin at the end of each loop. Is there another way to do this? I hope this question makes sense.
I am currently working with this asset FWIW https://www.unrealengine.com/marketplace/en-US/product/brachiosaurus-giraffatitan

Unreal Engine
Brachiosaurus (Giraffatitan) Animated 3dmodel
If you do this will it affect other animations that have been retargeted without no problems using the default?
I also had this problem with fps shooter animations from other sellers. Thanks
You can use a physical animation component. Should work with some tweaking, or you can make bespoke animations where the character moves its body away from walls and objects. (Like in the assassin's creed games where the character walks through crowds and twists his torso to avoid intersecting)
You need to check that the reference is valid before accessing it. Chances are at the start of the game the character reference is still null for a frame or two and when the animation blueprint tries to read it, it doesn't exist. Make sure the character exists before using the variable. You can use things like this to check. https://www.youtube.com/watch?v=5d87aoNt-Dg

What are the Is Valid Nodes in Unreal Engine 4
Source Files: https://github.com/MWadstein/wtf-hdi-files
What is the purpose/ the advantage of using IK Bones as Effector Targer instead of simply inputting an Effector Transform? I don't understand why I should add additional bones to my hierarchy 😮
Hey everyone, trying to import geo caches with multiple parts into UE, but for some reason the pivots get offset for some of the parts.
Has anyone encountered this before?
yes it will automatically propagate to other retargeted anims
I see that was my dilemma previously. I have for example ironbelly animations that is using the animation, however other FPP animations from other sellers use skeleton. So I can't mix these different assets.
thanks
Hello everyone.I am building a shooter game.I completed it with around 25 mixamo animations and one skeleton from mixamo.But now i have to add 3-4 mixamo
meshes.Can anyone tell me how to do RUNTIME animation retargeting??.I dont want to waste memory for each and every mesh.Thank you
Dont all characters use the same skeleton on mixamo? Haven't used it in many years so I dont remember.
I thought I'd model a 3D flower real quick and rig it so I can animate it opening.
Ha!
Well that didn't go well first time around.
Sometimes the mechanics in nature can be a lot smarter than it appears to be.
Have to start from scratch today 🙂
I thought "Oh just a little flower that opens"
But oh man its a little more complicated than that LOL
Hello guys. A complete newbie here. I am trying to understand how to get my character drive a bike. Do i have to create that animation in blender or can i combine my character and bike into a animation in unreal engine itself? Can i create a bunch of custom animations in unreal engine or other apps is the only way?
Hello! I want to make animation pose for died npc's. is there any way I can snap ragdolled pose to animation? I mean I drag person to scene set it simulate physics and take that pose to animation because I want to make dead town and 20 npcs with simulated physics are too heavy.
I forget the specifics, but there's a way to "keep simulation changes" that you can search that's pretty easy
Well yes and no, since 4.26 I believe Ue4 added a rigging system called Control Rig, it's a plugin you can use to do just that inside Unreal, but it's pretty new, and I believe is still in beta, if you already know how to use unreal use that. If not I recommend Blender, is easier to find tutorials and stuff than control rig (at least for me it was).
Btw why is so many people talking about guys in bikes xD is it a college project or something like that?
Thank you very much for the detailed reply and your time! It's very appreciated! 😊
Damn i hope nobody is making what i am making. 😂
like yesterday someone was asking about doing physics in a bike and keep the hands and feet attached. And the guy before you asked something about physics also, didn't mention a bike... buuut... it seem pretty similar xD
Ohh. Gotta check the reply to that question too.
Sure i am gonna need it in future. xd
Hey all, what kind of animations would you guys think would be most popular or are in need of most?
Even though these two bones are setup the same, one sets its position to the previous bone, and i dont know why

So what can i do now??
I am trying to grapple with a 2H weapon issue. It's pretty common in different martial arts to change the hand positions on a weapon during certain moves, but it doesnt seem like there is an easy way to do this in-engine. If I parent the weapon to a right handed socket, that hand can't move along the length of the weapon to change positions with the left hand. anyone have ideas?
I'm animating a magazine for a shooter game. 60 rounds and the animation is 61 frames long. 3,660 keyframes... is that too much for UE4?
Guys i have a mixamo skeletal mesh with around 30 animations.Now i imported another skeletal mesh from mixamo.I can retarget them from content panel but it will lead to duplication.Can anyone help me how to do runtime retargeting in ue4 without duplicating the animations??
I think you can't avoid duplication, but if both skeletal meshes are from mixamo and are the exact same, you don't need to duplicate anything, just get the second mesh in rest pose tpose-apose whatever without animations or uncheck the import animations tick (make sure the default pose is the same or real close to the skeletal mesh of your first character, it should be, as both come from mixamo). Then when importing there will be a blue box with a skeleton icon, clic there and select the skeleton of your first character and then hit import
then your characters will share the same skeleton asset
but that only works with similar or the same skeleton (same base bone structure and naming, preferably with no custom extra bones, as they won't inherit any animation at all). For retargeting using the retargeting manager usually you have to duplicate your animations... regarding control rig, no idea xD hope it helps
Anyone know if there is a way to run post process animation blueprints after physics?
Don't use Set Master Pose Component node.
Use Copy Pose From Mesh node inside the anim BP, and it'll follow whatever the parent skelmesh is doing.
Will that work with physics though? I have a physical animation component that is affecting the mesh as well. Also I can't seem to create a sub graph input node in my post process animbp. When I search for any sub node it doesn't show up.
Yes, it works with any post process anims you throw at it.
BTW Sub Graph Input is renamed to Input Pose node.
:no_entry_sign: DogeForce-1#6969 was banned.
Oh, all their documentation still shows the old name. Hence my confusion. 🤦🏿♂️ Thanks!
Time to say
epic pls fix
I'm not sure i follow. I do my IK in a post process graph now. But since it runs before physics it won't go to where the arm actually is.
Animation update -> post process IK update -> physics applied that moves the right arm. Which results in the left arm being in the wrong place. I'm not entirely sure what you meant by the copy pose from mesh node. Since I would assume that also just copies the pose before physics is applied. No?
The only other way I've managed to get it to work was with 1 frame delay and that looks bad when you are moving around.
put in climbing system in blueprints, works on parent, problem is the child's climb blendspace dosen;t work on the child pawn of the parent. But the child' blendspace anim bp boolean works with the child's blendspace but i can't activate the blendspace when switching over from parent pawn into child pawn player. The Parent is the Commander, and his Parent is Third Person Character and the problem pawn is the child of the Commander.
Hi guys
What IK setup would you use? I'm in UE 4.26, and I need IK with joint limits AND physically simulated (My skeletal mesh is an astronaut floating in space, so I really want to be able to push rigidbodies away with the IK and likewise, other rigidbodies shoud be able to push away the astronaut or its arms from their IK targets.)
I tried CCDIK, FABRIK and FBIK, but never really got them to observe the physical asset defining the joint limits and motors on each joints.
Yes, I tried the control rig, and its FBIK, but it does not observe the collision/physical profiles in the physics asset
And I could not get it physical enough... for instance the IK happily make the skeletal mesk self-collide (as in, you can cross the arms and have intersecting elbows)
I've been working on physics simulation and IK. But it is a pain. If you are ok with one frame delay then you can use the physical animation component.
but I need it to be in sync and that is virtually impossible.
Hello guys!
Appearently Removing Bones from LODs does not make a difference in performance and when printing all bones they still show up, no matter which LOD.
Deleting the same bones completely in blender has quite an impact on performance, on the other hand.
Why could that be? Is it maybe possible that these changes only have an impact in a build but not in the editor? Thanks in advance 😊
Is it possible to use Animation Blueprint AND Play Animation node in the same BP class?
When I use Play Animation node in mesh which has an ABP, it feels like that node overrides the ABP (animation blueprint), because after playing the animation ABP just doesn't work!
I'd appreciate some advice on this problem, I have my character animated and bringing the weapon up to aim with blend space then blend per bone on spine to only affect the the top half but when you spam aim, it is resetting the animation for the legs. I only want it to affect the top half and not sure where to improve:


the gif is me walking and spamming aim so you see the dancy feet
this is the blend per bone

?
Good day/evening fellow UE addicts. I may have a request/question about something. Maybe somebody knows a good source for it. I actually implanted this little feature in my project: https://www.youtube.com/watch?v=-dgUoKeCAgg
"Increase Player Speed On Mouse Scroll Wheel"
And I wonder if it would be possible to drive the overall speed of animations inside a Blendspace through a predefined curve. I have the issue that if I walk with like speed 50, the walking animation for example is a little bit too slow and the feet are sliding. In the past, I've set these extra steps inside the blendspace manually but that blew it up and caused a lot of issues. I actually don't want to add or alter the regular blendspace setup as seen here:
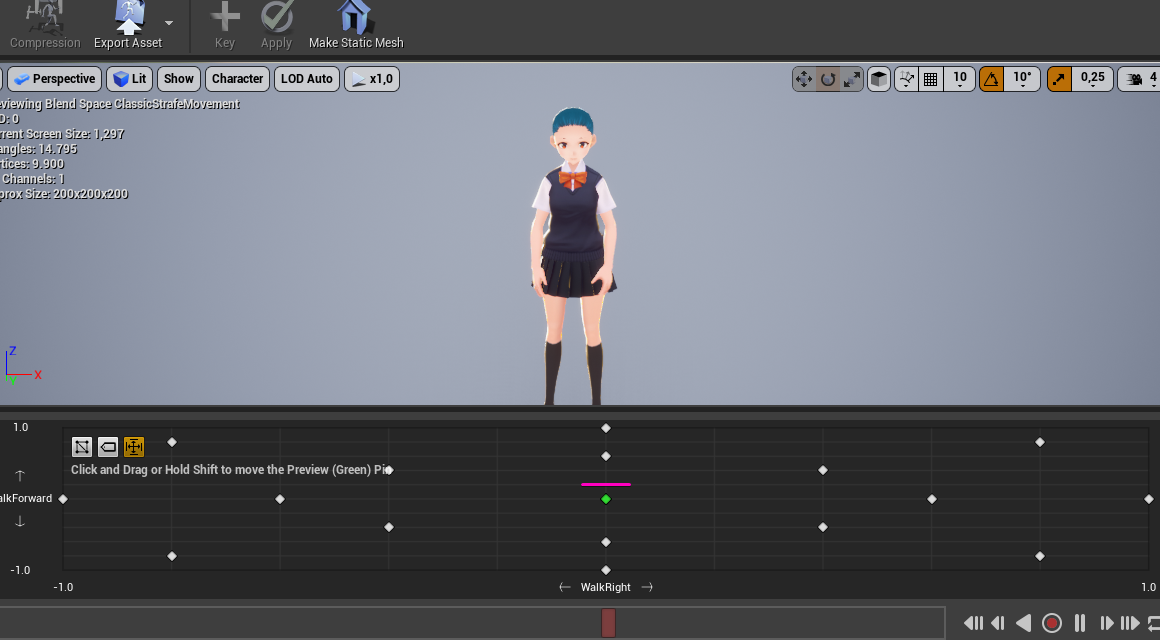
But it would be nice to tell : If my speed is at 50 (which would be at the pink line for example), set animation speed from the blend-space to 1.3 instead of the regular 1.0
@regal orchid oh right. 1 frame is definitely acceptable. Do you know how this component works ? In my tests I could not really get it to work with the control rig+ FBIK. What IK method did you get success with ?
Well depends on what you are doing but I used the two bone IK node in the animgraph.
https://youtu.be/YlKA22Hzerk?t=834 take a look at this

From the nucl.ai 2016 conference, Laurent Delayen shows how Epic Games brings a Hero from Paragon to life. With a programming focus, this talk shows and explains all the pieces involved in animating a real time character in Paragon.
Laurent presents trade-offs, details the locomotion system, the various layers used and the processing done to s...
Speed warping is the way to go in your case I think.
I have never implemented it myself though but it seems like it is possible to do with control rig among other things.
Ouh thank you!! Will take a look at it!
I have an animation notify, and I'm making a sphere overlap on the location of a socket, but the location of the socket seems to return the location of the skeletal mesh as if it wasn't moving at all, instead of the location at the point of the animation
Has epic added a way to mirror a montage or anim sequence?
Solved it, I had to select Always tick pose and refresh bones
Sadly not yet, I was searching for the same one time, but you can do it easily on blender you just import the fbx, select your skeleton, go to pose mode, select all your bones, then you will see all the keyframes for every bone on the timeline, select them all, hit ctrl+c, move the timeline header ahead of the last keyframe you have, hit ctrl+shift+v to paste the keyframes flipped, and then delete the old keyframes which we left behind the timeline header, then just move the frames you just pasted to the start of the timeline and just export (when exporting disable add leafe bones and enable only deform bones, and change the smoothing to face)
Okay thanks, wasn't sure if I'd have to do that or not
Anyone know how to stop my player's camera angle reverting after sequencer plays?
I can't for the love of whatever figure out what this is called so I can start looking for what to do about it/how to https://youtu.be/OI50Xx43vKU

The little turning thing he does
You mean just having a turning animation? Don't think it really has a special name. Turning in place animation that is triggered when your input differs a lot from your characters current movement trajectory.
Np. You could check the direction of the previous frame's input and make an angle between it and the new input. If the difference is close to 180 degrees you trigger the animation. Something like that, never done it myself.
Hey
Does anyone know how to bake a animation to control rig ? Matt did it, but I don't know how, and can't get any info on this..

This my current Rokoko Motion Capture to MetaHuman workflow in Unreal Engine. I wanted to do a breakdown and show the process of retargeting the MOCAP and cleaning up the animation directly in Unreal Engine.
Follow the official Rokoko MetaHuman tutorial for the BoneRemap asset and more detailed walkthrough - https://youtu.be/VB-mXCV8QUU
Yes, so that the bones are driving the controls.
But how to have the keyframes in sequencer like him?
I trying on the Mannequin for now, using control rig setup from UE, using backwork solve. And what's the next step?
I tried "baked animation" option. Even create a new animation but I don't get it 😅

Ooooh I see! I was searching in the control rig asset instead of the animation asset, thanks a lot! So now I can cleanup some of my mocap anim with ease thanks to CR.
Do you know if it's possible, by any way, to have both as the same time without baking tho? Kind of control rig works in C4D, applying a mocap animation + next setup a control rig to cleanup with the help of the controls in the sequencer some parts. i saw we can use CR in additive, don't know if it useful for this. I was also thinking to backward solve and next forward solve, I don't know yet if it's can be working this way, I was planning to test this as well.
is there any way to reverse and append a piece of animation within the animation itself without resorting to recording using anim montage
or does anyone have a neat guide on how to record using an anim montage to create idles and flawless loop animations? my method would be to have an animation run at 1.0 rate till a certain point, then run at -1.0 rate, back and forth to create a perfect loop
seems like i can add empty frames but not copy paste the actual animatio
Hi Guys, I'm having some issue with animations when switching meshes. Basically I have a button that switches my character's mesh and animation instance. Both Animation instances have humanoid rig, and both are pretty much copies of each other, but for some reason my warrior's legs are not right and neither is the weapon socket location, even though they have the same socket location/ name on the skeleton. please let me know if you have any advice on how to fix either of these two issues.


My spear girl works fine

warrior is messed up

