#animation
1 messages · Page 55 of 1
can someone tell me how to prevent the body disappearing?

Thank you very much.
I had an old project from unreal 4 that I converted to the latest version of unreal 5. In the project there's an anim montage that is triggered when the player gets an item, and the montage is intended to freeze on the last frame until the player hits ok on a message widget that pops up, that triggers a "Stop anim montage" node. It used to work fine in 4. But in Unreal 5, when the montage ends the player goes back to idle animation. I have no idea why it's not holding on last frame anymore. Anyone has any idea why that might be the case?
The montage is being called in the character BP.
Just build it from scratch dude
Or you could waste two months trying to reverse engineer the changes
lol great advice thanks
Are you sure the arm is disappearing and you're not just clipping the arm through the camera?
hello everyone i just need a little help on how the root motion for stairs animation works
Might be easier to use feet IK instead of root motion
i'm not sure if that would work correctly in unreal
has anyone found a way to use interfaces with control rig? I have a use case that I'd like to have reusable functions on multiple (completely different) rigs, yet I have never been able to add a blueprint interface to a control rig. I have no yet tried in c++, if anyone knows if that works or not
Anyone have a good tutorial for mechanical rigging specifically in Unreal? All I can find is "rig a person" or "rig a T-rex" but I need something that shows me piston or like mechanical joint movements, anyone got anything along those lines?
Did anyone ever exported fbx animations from blender to unreal? i have problems with rootmotion
Anyone notice an issue when retargeting that the root motion transfers from the root bone in the original animation to the hips in the new one?
Just searched and seems some others had same issue but no clear resolution. Weird because these IK Rigs were built by epic
Sounds like your chain mapping is set up incorrectly
Or target skeleton doesnt have a root. What are your skeletons?

ig the camera is clipping
anyone have a good tutorial for how combat animation work in unreal like dmc
I am trying to retarget a MH_ReloadPistol animation from metahuman to skm_manny but my unreal freezes everytime. I have created a new ik_retargeter.
[2024.07.28-12.54.08:775][302]LogSlate: Window 'Select Export Path' being destroyed
[2024.07.28-12.54.08:827][302]LogAutomationController: Ignoring very large delta of 4.03 seconds in calls to FAutomationControllerManager::Tick() and not penalizing unresponsive tests
[2024.07.28-12.54.09:803][353]LogSlate: Window 'Duplicate and Retarget Animation Assets' being destroyed
these are the lines from visual studio.

maybe these chains are causing the problem?

does anyone know what does this red line indicate? sometimes i get this and idk what it means

the red line is indicating your root motion
so if character moves forward in animation, the lines will scretch, is what you're saying>
?
Epic Games Developer
An overview Root Motion Animations in Unreal Engine.
i see, thanks
Hi, i have a character i got from the store retargeted manny to it, but when i try and add a blendspace into the anim graph i get this error? The animations are from the starter pack and ive changed the refrences to the ue4 skelton as well

Can I use a aim offset with motion matching? or how would you do it with motion matching?
God that is such an exquisite game. I wish it got a remake over Final Fantasy 7. Also that song is awesome and brings back so many memories. 😄
Hi everybody! I was searching for PID controller implementations in UE5 and I found this discord channel through vr_marco's YT. I'm starting a new project where I want to make a Splinter Cell type mechanic with the player RNChoking the enemy and 'driving' them both around.
As an animator and a non-programmer, I'm not sure how to implement this, but I'd imagine it could be done with two PD/PID controllers on both character capsules and have a common psuedo-COM for both of them. Maybe this is not the right approach though. I do want it to feel like the player character is driving the movement though, instead of the characters' common COM.
Any ideas or suggestions on where to start with this? For example what resources could I use to build this type of project on?
How do you transform an IK-Rig at runtime while keeping the relations?
I am trying to make a weapon block when coming close to a wall so that the weapon moves to the side. The problem is, if I do a control rig for it where I transform the Ik right hand and give that over to the hand r then that hand does get transformed but the weapon and hand l do not move with it
I know that many people handle this by making an animation for every weapon where the weapon is to the side and then they blend between that one and the default one when they want to do the weapon block
@somber light how is the weapon connected to the hands
My character is not exact A pose is there anyway i could make it exactly A pose

i can't leave unreal as it could break all my animations and stuffs
Can anyone help?
it's attached to the right hand
Why do you need an A-pose?
Hm now i think every character have different A posses, all are not exact same.Even maniqueen is not fitting the cloth

i guess i need to edit obj files
Why?
clothing stuff
<@&213101288538374145> #animation message
But you don't need identical poses for that. If your character is animated, the origin pose is... well not entirely irrelevant, but not essential.
Because the body and clothing mesh will have the same animation.
Yeah at last the cloth is going to match animations
If I have a FPS view model (arms) with its own arm bones, and a number of guns with their own bones (different guns may have different numbers, names and locations of bones), how can I get these things to join up?
I've read you can use attach to socket, but then I don't have the specific animations of the gun (maybe a revolver has 6 extra bones for the bullets). In the past I've given myself a bunch of unused bones in the view model rig that I can use in guns as I need them, but this doesn't feel very good.
What I was wondering is if, when you equip a weapon, it sets the character's main skeletal mesh to that, and then the view model is a child of that, instead of the other way around. The gun would always have all the arm bones after all, it's just the arms that don't always have all the gun bones.
So it'd be... Camera -> GunModel -> ViewModel
Would this work?
Or is there a better way?
can you child the right hand socket under the right hand IK bone?
which right hand socket?
that's how I structured it


can i see attach component logic
for fp and tp

the socket name is just hand_r
and in abp I got this

I really like working in Anim Blueprints. What role is this for studios? Technical Animator? Animation Programmer?
Anyone know the best way to break into this field?
is there way to multiply all blendshape curves from a livelink source by x value without doing each one individually?
i dont think that would cover it exactly i might be wrong
the way i do it for individual curves is eval live link frame, then setting a variable to the same value of the curve i'm modifying


and then using modify curve to multiply the curve value each LL frame by x amount
but ideally i don't want to set a billion curves haha
is it better to use State Machine? or Anime Montage?
or is it like the state machine is for everything related to the movement and the montage for attack?
UE5's Linear interpolation is inaccurate
Step is accurate but ofc thats just turning off the interpolation
Has anyone run into this issue and found a fix?
There is no other option than Linear/Step
Someone else posted about it years ago, in a much more extreme example: https://www.reddit.com/r/unrealengine/comments/fdunvg/problem_with_animation_interpolation_i_have_this/
I have narrowed this down to how unreal blends transforms
It blends between two frames, if you don't blend, its accurate, if you blend it is inaccurate, or it jitters
Which means FTransform::Blend is the culprit
I dont use comp to comp node, but i remember needing to try a few. Why fpp & tpp?
I am offering both perspectives
So you have weapon attached to right hand with socket. But when you move the right hand with IK, the weapon doesnt follow. Correct?
Can i see your blueprint component hierarchy?
Maybe this. Idk. Good luck man.

This is a control rig setup I created for this, yes, but it's not moving the other hand (oh I was just trying it out rn with the VB of the right hand but that didn't work as well, so imagine that the full body ik node says hand_r)

I have a component called, inventory and that one spawns the weapon and attaches it to the player. So there is no actual weapon skeletal mesh component in the character bp by default
You might want to try parenting it.Somehow
A lot of the stuff I read about I k issues is just a lack of parenting. Which might need to be done explicitly, because it's not done implicitly by being dragged into the hierarchy
Hi, I'm trying to retarget Lyra animations to a Metahuman, but I get this warning about non-existant IK bones, which is true of the Metahuman skeleton, but I assigned the Lyra skeleton, which has the IK bones, to the Metahuman body. Anyone know what the issue is here?

And here shows the SK_Mannequin assigned to the Metahuman body, but no IK bones are showing:

which retargeter are you using?
if you're using the auto retargeter i think that's part of why it's throwing up that issue, the operation is trying to find the IK bones but can't find them
I'm going crazy, where is the option to hide this text in animation preview window?

Dont use auto retarget. Use metahuman rtg from dropdown
Mirroring anims with mirror data table on the Y axis does this, any fixes ? id really appreciate it

Hi all need some help please
I have been informed I can have my child skeletal comps use leader pose comp something like that
I'm fixed using 4.26 however so not sure what I need to do there
bassically what I'm trying to do is have the child comps follow what the leader one does, their all same skeleton just mesh is cut into parts

it's a anim montage that I'm trying to have propergate down the from leader through children which adds complexity
Hi! You just need to setup leader pose component using node "Set Leader Pose Component" in Construction script of your character. The Mesh will be your New Leader Pose Component, and all it's children should be targets.


Yeah, I forgot that it was renamed x)
so if I play anim montage on the mesh the child will follow the mesh ?
or will they not do anything cause i'm playing anim montage on mesh
It will repeat everything you'll setup in your animbp for the parent mesh, so yes, it will work for montages
awsome thank you
Hi everyone! I'm trying to implement root motion jumping in my project, but also I want to adjust this animation according to angle of the floor that character is currently on (I tried to show what I want to archieve in the pic).
I saw in YT that there are settings for location and rotation offsets for the start of the root motion animation in Sequencer, but do we have something like that for animations played in anim bp? And if not, how can I modify root motion curve in runtime like that?

is there a way to have it where the path is calculated in mind of turning circles ??
so when path is calculated if theres a rotation at end of the path say rotates to a speicifc direction is there a way to account for this and kind of have the AI walk in a way that they end up rotated correct way by time they've got to that spot
What role do ik hand bones play when making weapon animations? Like I do want the left hand to follow the right hand with certain animations but when reloading for example, the left hand should move independently. Also there are multiple characters I have with different body proportions but all have the same ue5 skeleton structure and share the same ue5 manny animations.
I just want to understand the general animation workflow, what bones are animated and how do they apply to other characters of the same rig but with different proportions?
I animate in the ue5 sequencer with a manny control rig
I am trying out the modular control rig, is there anyway to offset the controllers, not just the shape, so for example some have come in at strange angles as it has tried to interpolate between two oreintations of the joints, I can offset the shape and rotate it but the axis is still odd. Any ideas? I also have the classive of the PV controller moving into the middle
hi, how can I use Take Recorder for animating other characters? I am looking for a shortcut to animating characters, so they will use the transform of the animation what I will record with Take Recorder, but if I am trying to use the animation that I do in my FirstPersonCharacter, I cannot use it with Metahuman because it uses different Skeletal Mesh, is there a way to use the transform on the Metahuman?
Anyone know how I can fix the last frame and first frame not syncing up in my "walk loop" animation?
I'm trying to use Copy Pose From Mesh but it just isn't working. The Gun and the Arm have all the same bones and same names, although the Gun has extra bones. I'm getting the Arm mesh and sending it to the Gun's Anim BP, and using that mesh for Copy Pose but it just isn't doing anything. Does someone know what's up?

to simplify this, rather than performing the cast, perhaps try enabling the Use Attached Parent checkbox since your gun mesh is a child of the arm mesh in the BP:
Also for your cast, if you're setting the result of your cast on Initialise, you shouldnt need to also be setting it on update. Ideally the initialisation would cast and set the variable once for you to reuse as needed.

This gets into a lot of retargeting workflows which can become fairly complex. I would recommend watching this video, they have some good examples of how differently proportioned characters share animation and can still maintain accuracy in animation: https://youtu.be/vZW8mxlQJEk?si=Tk3c7zQMwM7f_ix8

Senior Gameplay Programmer Laurent Delayen explores animation retargeting and what it can do for improving your animation workflow.
are their any potential issues with casting to the parent BP in the animation BP of a child actor? For example, trying to retrieve a variable that is set in my base enemy class for use in a child actor's animation graph
Why tho

Thanks for the feedback. On Update was just to see if it'd start working. Likewise I already tried Use Attached Parent (without any input) but that didn't do anything either. The gun just floats in its default pose as the arm animates.
If I use two Play Montage nodes, feeding the Gun to one and Arms to the other, the same animation works properly on both, so it's not the animation or the bones that's the problem.
I don't mind just putting 2 Montage nodes everywhere... is there there's a situation where they'd get desynchronized?

Just for reusing parts of the AnimBP. I know I can cast to the actor’s own BP to get the variables but that will vary with each actor. If I cast to the parent I can then reuse the event graph for many enemies. I figure since the base enemy class will be loaded any time an enemy is present it won’t cause any issues just making sure
I'm not exactly sure if this is an animation question.. When using the Skeletal Mesh editor plugin, if I convert a Static Mesh to a Skeletal Mesh, it loses all of its material info -- every poly gets assigned to Material 0. Is there a way to make the Skeletal Mesh conversion retail the Static Mesh's material assignments, or to just edit material assignments on the Skeletal Mesh directly?


hmm
maybe use "Get Owning Actor" to cast on the character instead of Try Get Pawn Owner
this is how I set it up all the time

have you promoted the character ref variable from the Cast To node?
Yeah, its the same actor object [the pawn]
so you didn't manually created the Character ref variable?

have you at least started the simulation?
cause to me it looks like its actually valid
yeah, ill take a recording
well my screen recording software isnt working but the pawn slides around in the idle animation since the speed and direction variables are getting a null variable
do you still get the null string while simulating?
yes unfortunately
Character or Pawn?


he tried it

yaaaaaaaaaaaaayyyyyyyyyyy
That worked
I tried earlier but didnt try get owning actor with character
you guys are great, thank you so much lmao

Ok back to sleep
My character still moves when root motion is enabled. Help anyone?
When I enable root motion the character still moves forward along the path as if it wasnt enabled (No red root path with root bone highlighted), when I have the root bone selected and root motion is off I can see the red root path for it. using force root lock keeps it in place while animating but I am forced to have root motion off for that and it messes up the animations while using force root lock. when I use the animations in playtest the animations jump out in front of me and stretch until done and returning the character back to normal. Idk what to do
Hi guys, I have this weird thing hapenning in contextual anim blueprints where a preview actor is immense and i can't preview anything. See picture. Any idea how to fix that ?


GitHub Project : https://github.com/PolygonHive/GASP-ALS
Subscribe to not miss the cool upcoming updates to the project ^^
I've finally managed to merge the Game Animation Sample and ALS Layering System. I ported all of ALS Layering Overlays and everything looks great. Now let's make some cool games!
Social Media:
Twitter: https://twitter.com/...
I tried to use ALS with a gripping tutorial but the project files have considerably changed since the video guide was made
How can I set the play rate of a specific blendspace in my animation blueprint?
I have a locomotion blendspace, containing animations from walking to sprinting. However I want the play rate of this to be synced to the max walk speed of the character/the default max walk speed. This way my character can move at incredible speeds while never sliding over the ground. (My project includes very fast speedster movement)
How should I do it?
I dont want to use global anim rate, since that would also affect my other animations. I just want the running to be played at a rate synced to how fast the player is actually going.
it sounds like you will need to edit that animation to remove the root motion
The copy pose from mesh should absolutely work. You mentioned there are extra bones in the gun hierarchy, are they leaf bones? Do you happen to have screenshots of your skeletons?
The video is 9 years old, can I assume that the basic workflow is more or less the same since 9 years ago?
If it's because Blender's been renaming my armatures Armature_001 and Armature_003 without telling me, I'm going to burn my house down, with a lemon.

im trying to combine two blend spaces. if i have something in both hands both animations would be used but its doesn't seem to be working. this is have I have.

It's old, but good and yeah these days you could do a lot of it in control rig but yeah the principles are the same
That will be an issue yes. I would recommend naming your Amature_001 and Armature_003 in blender to just Armature, that way Unreal will ignore those nodes on import and not create an extra bone in your hierarchy, then everything should match
God damn you Blender. Both Armatures are in the same scene so Blender renames them to prevent duplicate names. Thanks for the help, I'll check it out.

yeah the armature node doesnt play nice you might need to run two exports and name them each time, or have two scenes which you can do your exports from. It's for sure a hack right not from Unreals import side to ignore those nodes, hoping that blender nukes that implementation when they make their rigging and animation updates
thanks!
I thought the root needed to be following under the animation as it moves forward.
Epic Games Developer
An overview Root Motion Animations in Unreal Engine.
My guess would be this is an issue with your skeletal mesh. Are you coming from blender by chance?
Does anyone have an idea? Ive been stuck on this for a while...
How can i add a aimoffset with motion matching so i can aim with my gun using motion matching?
Because if I try to use it, my modle is completely scambled. Also would it be possible to use this in combination with the Pose Search plugin or should this be handled completely different with motion matching?

any ideas why my modular control rig pole vector controller defaults to the middle, it even does it if I try it with the default manny, at odds with their video of it

When I try dragging an animation notify to a second track and release the mouse, it just pops to the first track. Am I doing something wrong?


Hey :), anyone used ALS C++ refactored version and already integrated custom animations ? do you have any advices on how to understand the system please?
Is there any way I can create a skeletal mesh using a skeleton that's completely different from the imported static mesh?
as in have an object still perform the same animations invisibly, just the mesh is not a similar object to the skeleton
Good luck!
From what I understood a long time ago
The heart is at ALSCustomMovementComponent
They override various functions like Physwalking and Physfalling where they set the values
And use them in the AnimBP
Thank you!
I am new to animation blueprints and trying to do an aim offset but when my characters looks below horizontal it goes to the facing straight up animation for some reason
it looks normal above horizontal
and manually moving the value in the aim offset looks good
how do i lock a control to its bone in control rig - i'm using the fbik node and the bones are transforming the way i want but the control can keep translating into infinity
Any idea why upgrading from 5.3 to 5.4 has flipped all the **root motion animations ** 180 degrees?

Hi community folks!
I am trying to create a non-humanoid character with Modular Rig in 5.4.1. Specifically a "Chain" Module, followed by a regular "AddControl" module. When I try to connect the Parent Control, I get this error:
'AddControl: FRigUnit_SetDefaultParent::Execute': 'Parent item Connector(Parent Control) does not exist.'
Now, I understand that **perhaps **Chain modules aren't designed to be followed by subsequent modules; but if somebody would have an advise on this it would be great.
Thank you!!
EDIT: I just learnt you should also pay attention to the compiler errors, and not just the errors when attempting to make a connection. I also get a cyclic error, which doesn't make a lot of sense to me. LogRigVM: Error: Cannot parent 'Control(AddControl:chain_14_c_ctrl)' to 'Control(AddControl:chain_14_c_ctrl)' - would cause a cycle.

nevermind. It got fixed in 5.4.3
I have a problem with this character feet clipping through the ground. I have made sure in Blender that the pivot of the mesh and the armature is at the bottom of the feet. But it still clipping. How to fix this?
I have a question for you all. I have some animation made in maya alle looks good there but when i import the animation to Unreal 2 and only 2 of the joints moves slower then the rest making them drag behind. Anybody have a good idea what this could be?
For a montage to play while taking into account the aim offset, I assume the aim offset needs to be after the montage node right?
I have problem with 5.4 auto retarget. I cant understand whats issue.


Just hand foot and head retargeted
What is the proper way to loop an upper body animation on a character? For example when the character is channeling a spell or is stunned for a specific duration. Would it make sense to use a separate state machine from the movement one?
If it is for a one time thing even if looping, I'd just use a montage
but yea otherwise a single player node looping or a state machine
So something kind of like that?

Not exactly. When the ability starts you play the montage. When the ability stops you stop the montage. From gameplay, that is it.
The montage asset has an option to set it to loop, you should check that
and then on teh anim graph you add a slot node, and the output goes into the layer blend node
the slot node is where the montage gets played
The thing I don't understand is that it is set to loop from what i can see in the Asset Details but it never does actually loop when I play a specific montage:


Thank you so much for this, I've been struggling for a while because of looping animations 😄
hahah np. it is indeed a bit missleading cause of the other loop checkbox.
you have to think of the sections as a small state machine
GetCurveValue Seems to not work if I'm using a montage - anyone know if there's a way to read the anim curves from a montage anim?
Is there a proper way to set up a rig in blender to make use of twist bones inside the engine? Specifically referring to the way a forearm needs to twist smoothly when rotating the hand. Without twist bones, the mesh gets pinched at the elbow. If I did a smooth weight paint gradient of the vertices in blender, would that be enough for Unreal to exhibit the proper behavior without other additional logic in the AnimBP?
Reason I ask is that I remember people saying Unreal discards some of the data from blender's FBX export (joint constraints, for example). I also thought I remember hearing that Unreal uses vertex groups for the bone animations. Wasn't sure if weight painting would work for this reason
would love to know if you figure this out
nope, that's a store uasset
I believe the issue with a straight gradient on any twist bone limb is that it would also take the bend partially not just the twist, so it wouldn't just be twisting but appearing to snap also.
I attached some pics so you can see how I do it... hopefully this helps.


Vertex groups in blender are exactly that, the weighting to the bone, as long as the vertex group name matches a bone name in the armature.
Also I found the gltf exporter to be much better than fbx. Blender can't use a proper fbx export due to it's licensing, the paid fbx one is better but gltf for me has been working good.
I hadn't considered the elbow, that's probably why mine appears to be breaking at that joint when doing arm IK
it could be a number of reasons with IK involved too. If you use an IK constraint without the bone having a bend at the elbow to guide the IK it will go nuts in Blender. A perfect TPose for example will cause problems if you put an IK constraint on it.
I have a hard weight transition between upper and lower arm
It is essentially just putting a few bones between the joints, for upper/lower arm and upper/lower leg usually 2 but they shouldn't be directly in the chain itself, for example the hand shouldn't be attached to the lower arm twist bones, it should be attached to the elbow and each twist bone should also be attached to the elbow. This way the hand twist isn't influenced by the twist bones. In this case you divide the arm part (lowerarm) into 3rds and paint a blended band for each: elbow | twist 1 | twist 2
Yeah, actually now that I'm looking at it, the lower arm weights are a little too far past the elbow and breaking the rotation. I'll try out the distribution you showed above. And just to be clear: you are using the same bone hierarchy as the standard mannequin, right?

Upperarm has two children, lowerarm has two children
Mine's slightly custom but the unreal one is pretty standard so mine's mostly the same. In terms of twist bones it's identical, unreal has 2 twists in the upper and lower arm I believe at least in the 5.0 manequins. I'll post mine for comparison but i use a different naming convention and the ADJ suffix one's are essentially my equivalents to the corrective (COR) bones the UE 5.0 manequin uses. Yours looks like a perfect match for unreal outside of just having 1 twist per limb part but it would still work in retargeting since your underlying bone chain is the same.

Does anybody know how to get a Mixamo Character to a Player Character?
I created a guide on skeletal mesh optimization. I'd appreciate the feedback on what I could add or improve.
https://dev.epicgames.com/community/learning/tutorials/2JVl/unreal-engine-metahuman-skeletal-mesh-optimization-guide

Epic Games Developer
Optimize your Skeletal Mesh assets. MetaHuman used as example.


anyone have an issue with a m,etahuman control rig on a character in a sequence where you click and hold on a rotation and it slowly rotates the part without moving your mouse after clicking? even after restarting the same controls move while not moving my mouse
it's the last node in the modifications
😭 it's only the right lowerarm, the left arm doesn't do this
idk what i did i got my stuff to work
@somber briar i have no idea,this issue happens to my own rigs too :(
Hi everyone, im having a lot of trouble lately with root motion. Basically I use mixamo animation but i realized that mixamo does not have root animation. Soo i used a tool called rootPie that takes an animation and transform it for unreal. I transformed both, the animation and my T pose (that i previously also downloaded from mixamo). If i dont have root motion active after playing the animation the character is just going back to the starting position, but if I active the root motion, the character simply does not move and play everything in place. Does anyone knows what im doing wrong? Thaaaaanks!!!
Restart & use the blender plugin
yeah that's what i used, the blender plugin called rootpie
but evevn after that i have such problems
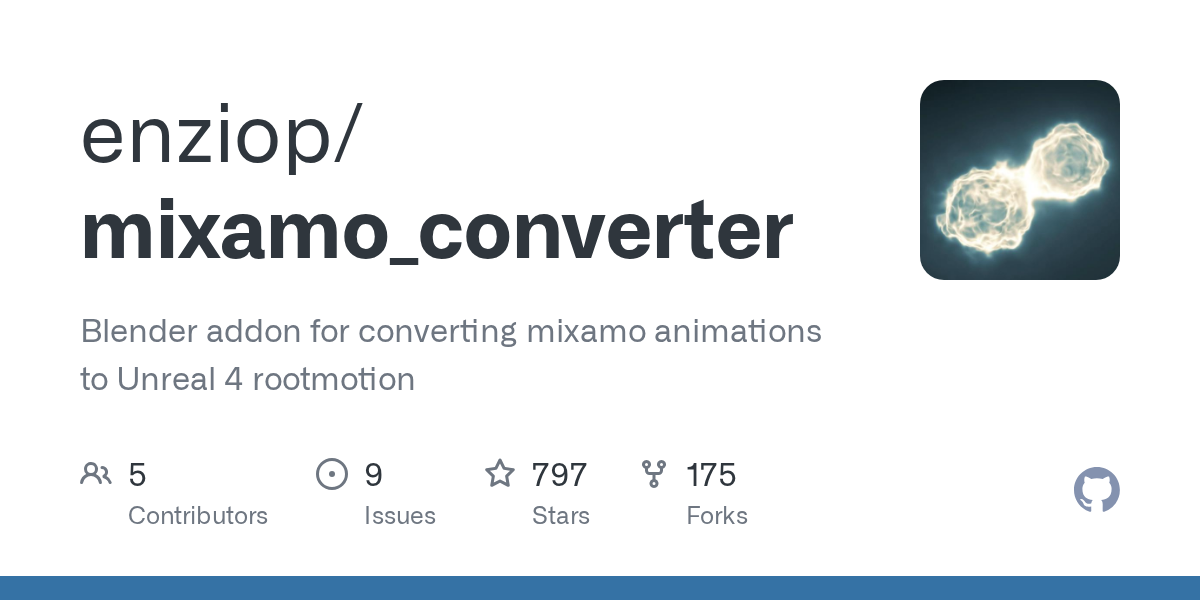
GitHub
Blender addon for converting mixamo animations to Unreal 4 rootmotion - enziop/mixamo_converter
Its old but it worked for me many many times before purchasing the uanmedia plugin from marketplace.
The trickiest part is figuring out which mixamo animations are broken from the get go
Have you tried using the built in retargeter? It has the root motion post retargeter operation, surely the mixamo template used it
UE5 now has retargeter template for Mixamo, it should detect it with Mixamo hierarchy
The problem is generating root motion.
Not retargeting
Some mixamo animations do not come with root keyframes
But it's been a while since i've needed to retarget mixamo. It could have changed
mmm dont know what retargeter it is so I will definetly gonna check it out 😉
yes i used this one with default values
on both the T pose mesh and on the animation
uanmedia plugin from marketplace it does the same thing but better? Cause if is working i might gonna just buy the plugin haha
I forgot the cost. Idk
Screen shot of blender plugin settings?
I remember needing to use specific settings
And I purchased that plug in.Because I wanted to go straight from mixamo to metahuman. Rather than Mixamo > UE4 manny > metahuman.
Almost feels like some sort of "circular dependency". Or in other words that things are relying on each others rotation, so if there is a small floating point error, they start driftng.
Given it only happens on one side, might be a setup issue on the controller bones?
Anyone know how to export UE5 animations to FBX into blender with UE5 ready skeletons?
Is there a reason why root motion doesnt work with animation bp/ control rig, even if i selected the root motion option?
Root motion works fine with everything.
Check your animation has root motion
Check your animation asset has root motion enabled
Check your AnimBP is set to root motion from everything
Wdym by the first 2 points?
I dont currently see these options
so I am trying to make an animation montage
and when i add my animation to it it is blank it the prview below
and when the anim is called nothing happens?

plz ping me if you can help!
Hi there.. Small Question:
Does one have a tutorial for Root Motion Movement for TopDown games.. without the need to have XYZ Animations for each directions.. but just one with rotation..?
I can't get it to work...
Check your animation has root motion: The root bone on your animation has to be animated. Open your animation, select the root bone and check that over the frames its transform changes. You have to set the viewport to character->Bones->LoopAndReset
Check your animation asset has root motion enabled: Open your animation asset (not montage) and in the details panel search for root motion.
I think the retargetting has a glitch in ue5.4. When I retarget anims using Translation Mode -> Absolute, the exported anims are exported as if you chose Globally Scaled
But guys, in genera l for everyone if you struggle with root motion I recommend to do an anim driven locomotion first. It is easier, and generally works better. There are tons of ways to make the anim driven look more grounded
Ive used root motion for montage before but not fully automated via control rigs
wdym by fully automated via control rigs?
already checked that all..
Event set the Root Motion mode to "... from Everything"..
But it seems like, the velocity of my char stays at 0...
be sure you set the root motion mode to from everything in the correct panel. For some reason the default panel that appears in the abp is just a preview one
Are you sure the animation has a root motion?
Like everything is setup in the control rig bp
Yep.. in the Defaults

If you want to use root motion in animbp, it should be Root mOtion From Everything.
Control rig is just a fancy way to manipulate bones at runtime. It is not realted at all with root motion unless you wanna manipulate the root bone somehow
But theres no animation
But that doesn't mean that when you press w the character will move forward.
And my AnimBP is not that hardcore.. i use a BlendSpace 1D to drive the Animations..
On Initialize take the owning Pawn.. on Update get the velocity Length of it.. to drive the speed input of the BlendSpace.. nothing more..
Driving the Movement in my Character with this:

most likely the vector length is 0, as the movement speed of the cmc wil lcome from the root motion delta of that frame, which is extracted from the animation
What is the variable that switches between idle and walk in BlendSpace 1D?
How to make it work
There is none.. velocity of around 0...20 is idle

and now in understandable? 😅
Can you show how you set the Input Speed
What Root motion does?

Root motion consists of your animation moving the character capsule instead of your code.
This won't work
If the input of the blendspace is the character speed, and you are using root motion, the character speed will stay at 0
because you are playing an idle animation
If you are going to do Root Motion locomotion, you need to get key inputs instead of Input Speed.
also tried the capsule velocity
no matter how hard you press the w key
Wjat about me?

i dont understand whay you doing in the control rig
You need to refresh your blendspace using these. @fair sun
Get Velocity doesn't work in Root Motion. Because when you press w your character will not move forward.
do something simpler. Remove the blendspace and play a walking forwaard animation with root motion. See if that works. move on to the next challenge then
i also tried a 2D Belndspace before.. with the same result.. where i inserted a Speed of X and Y, driven by the Input values * Character Speed
You have to understand your character speed when using root motion comes from the animation
Im moving the mesh in the control rig
if you play idle, your characteer speed will remain at 0 forever
For example, store Input values in a variable. If the X direction gives you the forward and backward input, it means that you need to select forward animation in blendspace when X=1 Y=0.
have done that before...
So you are doing procedural animation (like a prcedural walking) which is manpipulating the root bone to simulate root motion?
It's supposed to work, you probably did it wrong.
Yea
Tho the mesh doesnt follow perfectly the capsule component
I am not sure unreal is capable to extract root motion that is not coming from an animation. Would have to double check the source code. Have you tried with the simplest of the motions? just moving the root forward and see what happens?
Maybe its because im trying to smooth things up... i'll Look into it
Maybe unreal doesnt allow it too
just move the root forward each frame and see what happens
if that works, you can do it
if not, most likely not in the convencional way
It moves ofc but not perfectly with it
if the capsule moves with it, then is just that your control rig code needs some work to make it look nicer
But i think its not a root motion problem or else it wouldnt move at all..
Yea that's probably it
AH.. damn.. the fuck.. i switched the control triggers of EIS..
Working now.. Modfier of EIS has to be swizzle.. messed this up when testing alternative inputs for CommonUI...
Thx
Thanks for the Inputs anyway..
Yep.. switched back to my original approach.. now this definitely works..


Whenever I play an anim montage my IK for my hands is no longer working. The structure of my anim blueprint is idle -> slot -> transform nodes -> IK. I'm not sure what I'm missing, but I can see my transforms are working during the montage, but the IK isnt anymore. I saw a post which said your slots need to be before any IK and transforms, which mine are, but it still isnt working correctly. Is there something else Im missing?
Are you trying to blend animation and IK? How should IK react?
I once used Two Bone IK when I was playing Anim Montage. No problem.
So I have an ik_hand_gun bone that Im attaching my mesh to. Im offsetting the position of that bone with the transform modify bone nodes and then im using these two fabrik ik nodes to move my left and right hands to the position of the ik_hand_l and ik_hand_r bones which are children of the ik_hand_gun bone. This works fine until I play a montage, the IK is just not moving the hands at all. My slot is set up before any transforms and IK are being applied and I can see the transforms are working correctly so I know im doing something wrong in this area

Where exactly is the Default Slot? Put it at the end.
If I put it at the end, neither the transforms or the IK get applied. I want both to be applied on top of the montage
The slot is positioned before either my transforms or IK are being applied
What happens when you put it to the right of Transform and IK? As far as I know, it should be on the right.
If I do that, both the transforms and the IK get ignored while the montage is playing and then once the montage is completed everything snaps harshly into the transformed position
I will open my project and try this.
With the save on the left I call the default slot and IK works.

it's the default metahuman control rig though, but still a possibility
You can check the bones of the ik hand in the animation.
ya Ill check it out and see if anything is funky looking, but I don't have much time unfortunately
are there any good tutorials about rigging and skm editing in unreal engine yet?
Idk about rigging but what skel editor tasks are you interested in
everything across the board i guess, my final goal is to make a character editor with morphs like in ark survival
that is, without using external software
Dont think you can use 5.3 skel editor at run time.
But maybe some kinda morph matrix for the face with scaling parameters for body. There are many char creator things already out there for metahuman I think.
Btw, in engine skel editing to any significant degree is pretty much impossible without python or C++.
i heard you can do morphs with control rigs now
i dont need to edit skeleton, just the skeletal mesh
sculpting and the likes
weight painting and all that stuff
Oh well yea sure. Not sure about editing vertex wts @ run time
in editor, not runtime
A bit of a noobie question, do ChooserTables replace State Machines?
Also how could you do a Layerd blend per bone with a Chooser Table, or would this then be a second Chooser table just for that?
why is my control rig doing this

No. Choosers are mainly for switching assets that are being used. State machines can have their own set of anim graph nodes in each state.
Ok thats good to know, thanks! 🙂
Try showing the bone (and the graph)
Anyone knows how to get animations being played in Anim Bp?

Not montages, but any animation being currently outputted (Sequence player / BlendSpace)

// Map of group name->nodes, per class, to run under that group instance
        TMap<UClass*, TMap<FName, TArray<FAnimNode_LinkedAnimLayer*, TInlineAllocator<4>>, TInlineSetAllocator<4>>, TInlineSetAllocator<4>> LayerNodesToSet;

        for(const FStructProperty* LayerNodeProperty : AnimBlueprintClass->GetLinkedAnimLayerNodeProperties())
        {
            FAnimNode_LinkedAnimLayer* Layer = LayerNodeProperty->ContainerPtrToValuePtr<FAnimNode_LinkedAnimLayer>(this);

            // If the class is null, then reset to default (which can be null)
            UClass* ClassToEvaluate = NewClass != nullptr ? NewClass : Layer->InstanceClass.Get();

            if(ClassToEvaluate != nullptr)
            {
                // Now check whether the layer is implemented by the class
                IAnimClassInterface* NewAnimClassInterface = IAnimClassInterface::GetFromClass(ClassToEvaluate);
                if(const FAnimBlueprintFunction* FoundFunction = IAnimClassInterface::FindAnimBlueprintFunction(NewAnimClassInterface, Layer->Layer))
                {
                    if(FoundFunction->bImplemented)
                    {
                        UClass* ClassToSet = InClassSelectorFunction(NewClass, Layer);
                        TMap<FName, TArray<FAnimNode_LinkedAnimLayer*, TInlineAllocator<4>>, TInlineSetAllocator<4>>& ClassLayerNodesToSet = LayerNodesToSet.FindOrAdd(ClassToSet);
                        TArray<FAnimNode_LinkedAnimLayer*, TInlineAllocator<4>>& LayerNodes = ClassLayerNodesToSet.FindOrAdd(FoundFunction->Group);
                        LayerNodes.Add(Layer);
                    }
                }
            }
            else
Not sure if I look at the right place, but isn't there like a helper function?
Hmm maybe it's the ActivePlayers
K I got something but only in Anim Preview, not in runtime 😦
Solved my problem, needed to get the MainInstance
auto MainProxy = Proxy.GetMainInstanceProxy();
if I have 2 SKM/characters that are bound to the same SK skeleton(SK_Mannequin). But 1 has a bit wider shoulders than the others. It's not an extreme difference, but rather subtle. It's causing issues in my final animations/poses that require higher precision placement (mesh overlap issues).
What are some techniques/methods to solve this without having 2 sets of animations?
stupid question, but if I plan on making my own animation do I need to use the UE5 skeleton? I think I should be able to get away with a custom skeleton in my case..
You could add logic in anim BP to transform bones
Is there any tutorial/docs/links on that? Or would I need to add it to the specific shoulder bones +offset code in the ABP manually?
Or is there like an 'additive bone pose' or something to do it? (that could diff it from existing SKM/assets?)
Is it a precision based animation like ik
Here is example, the handgrip for pistol idle/ADS
My frog on left, slightly narrower shoulders compared to right hand default manny

in other animations, 1 hand/arm is often IK'd, and that's solveable thru other IK means. In this case it's not IK'd
Oh these are the lyra animations
in this particular case yes, but would like something more generalized/longer term solution for other things too.
are lyra animations not a good for some reason?
Mostly just trying to learn and understand supporting multiple slight character differences
I mean, if it's IK specific, you're gonna need to retarget.
do you mean retarget the animation/pose itself? So I'll need duplicate asset per character?
I'm in the same exact boat as you, too. The metahumans don't have the same proportions, and I need to retarget some animations. for each height and gender.
Let's use the pistol for example
I know in Lyra, they did a M and F version on pistols (but I don't think they did on rifle)
U e five manny and quinn have different proportions. But they also have different styles, so it's a little bit of both for that reason.
But I don't think they did that for the pistol. I think they're close enough that it works
yeah, I can use same 'movement style' or character style, I just needed the offsets.
There might be a way to do it at runtime without doing live retargeting.
Fortnite has a wide range of slightly different characters with slightly different proportions. No way do they have more than a handful of core animations assets.
I feel like there is some more scaleable solution
My current strategy is to have one set of animations that works for everyone in a general sense. And then for those animations that need pinpoint I k precision retarget it for each proportioned character.
Not the same thing you're looking at, but I believe the Lyra aim offsets are offcenter, because they're designed for a shoulder cam. If your camera is the same angle as Lyra you should be fine but if it's different you might need to make some adjustments
Fortnight utilizes live retargeting maybe
I'd rather have extra animation assets in my packaged project. Than have to tank performance with live retargeting
Oh I totally get that. It's also why sometimes I slightly shy away from IK stuff too. Like what if later I want to have baked vertex animations and use MASS and have thousands of a thing.
IK/live retargetting is out the window then
maybe my desire to avoid bespoke animations is also a bit of the fact that I'm not skilled as animator/character person and my talents would be better spent somewhere else
I probably want the live retarget/ik type solution on shorter term, until I can afford a fulltime animator/artist or something later on?
There's gotta be it simple offset way
I made these bow animations a while ago And instead of retargeting, I just added a node that added a simple rotation to a specific bone
Alternatively I can hire or just redo my character to better fit the base proporitions of animation/skm/sk

yeah, that's what I was thinking/wanting
but I don't want to like hardcode a +10 value in the ABP or something.
That was my janky workaround in unreal, four lol
I had the character play the bow animations. And instead of animating a aim up down, I just bent his entire body lolol
lol
Interpret the spine yaw Until the bow is pointing as specified angle
LOL
Yeah, but i'm pretty sure our only solutions are: live retarget, copy anim assets per character or offset logic.
the closest thing I think I found is this
which I think falls into the 'live retarget'(IK) category of your suggestion?
https://www.youtube.com/watch?v=rCosEReF9J8
or maybe something mentioned in https://www.youtube.com/watch?v=Zwc9uuOYfFg
Looks like in the case of Fortnite. They talk about having all the rotations locked for different body types, and just have only translation/offsets to make retargetting easier
But they imply they have 7 'bodytype/animation retarget'
Yeah, the guardrails on fortnite characters are very set in stone
That video it looks like he builds his own solver. So I'd say that use, just manually programming offsets with a mathematically precise method.
.And he's doing it for fps. I don't need that level of specificity
yeah for now, I think I might just hire someone to redo my character to better fit the manny skeleton proporitions.
I don't have the resources to devote to doing too many custom animations, even if they are only relatively minor tweaks
Hire someone for retargeting? How many animations are we talking here? Thousands?
Just add ik offsets to ik retargeter
I don't have all animations finalized, and many marketplace assets I feel are sized a bit closer to default UE mannequin. So it might be easier for me longer term to do change the character for now.
Or I'd need to hire/contract a more fullstack ue animator/rigger/person to help set some things up
Also I'm not sure where to add the ik offset to retargeting yet, im still very new in that area. All my expertise is non animation.
Okay.I just wouldn't recommend hiring someone to solve a problem that you can't define. Maybe just find someone on fiver to fix your character, really quick.
yeah that's what I'm thinking :/
I'll continue to learn things too, so I can better describe/define what I want/need
As far as I understand it, I don't think you have much of a problem at all. You just need to change a few values in your retargeter for this frog char.
probably, but me being wholly underprepared to make those changes, I don't even know where/how to do that.
I can make changes to the model/animation assets, but the whole ABP area is very foreign to me still. I'm trying to better understand it
Good luck man
pulling my hair here, how can I advance the sequence player to certain time in animation blueprint?
For some reason some of my animations make the character tweak out a bit, I checked to see if it had root motion enabled but it didn't so I don't know what to do on how to fix it.
Dont think so. Tried this a while back as well
why some animation montages dont play? what am i doing wrong
Show bp
this is firearm bp

I can get the ungrouped active players which returns me all the active anim assets but they are all read only
The sequence player can be advanced when dragged in anim bp so there should be a way?
The idea is I need to sync anim position on all machines (multiplayer)
Very easy with montages but I don't want to use montages for idle animations.
What node are we talking here. And when that node fails to play the montage, what animation is playing instead end? Where is that animation logic.
I kinda do at the start of the game for late joiners.
Once they moved then it don't matter, it's a one of a time thing when new client spawn
I think I will spend some more hours seeing how sequence player works after work. See how that go
Alright, what am I missing..
I made this single-frame aim animation in Control Rig using the Manny mesh, then baked it to an Animation Sequence. Quinn has different proportions, so the lect hand placement is a little off. I've discarded the original control rig data, so it's just an animation -- but if I "Edit in Sequencer -> Bake to Control Rig" to send the animation back to Control Rig using the Quinn mesh, the hands are spot on.
Why is control rig accurate, while the animation sequence is off? Does the default UE5 mannequin control rig have some sort of adaptation for Quinn and Manny, or is there something else going on?


Hey guys, I wonder, if i got a animation pack and now have a folder with some subfolders containing the animations and now I want to retarget them, how could I retarget all the animations and keep the folder structure? Or do I even need to retarget them, or is there another way of doing it?
u can
issa checkbox
Do you mean the Use source path? Because I don't want them to be in the same folder, just keep the structure.
Want to avoid to have them mixed up
prefix sufix
delete old ones
Hmm this might work, thanks! 🙂
Lyra question. How does B_Hero_ShooterMannequin transmit data (speed, turn, etc.) to B_Manny`s animation blueprint? In my project(without lyra dependencies), I also want to move the character model (a modular character with many skeletal meshes) into a separate actor. And attach it to the blueprint of the character without a mesh.
Just gonna drop this because we're trying to get more visibility on twitter.
I'm an appointed Art Director for Dead Heat (https://x.com/LuciDoesDev and https://x.com/saxonbristol/) which takes inspiration from various PS classic games. Please, if you can drop us a like and check out these gifs I made as my first 3d animations:


Game Dev | Art Director for Dead Heat on https://t.co/RU1YY2Udc0 and https://t.co/cQivqdfLMO…
@naive mountain
auto AssetPlayers = MainProxy->GetMutableInstanceAssetPlayers("ABP_Female");

    for (auto Asset : AssetPlayers)
    {
        GEngine->AddOnScreenDebugMessage(-1,10.f,FColor::Green,FString::Printf(TEXT("%s"), *Asset->GetAnimAsset()->GetName() ));
        Asset->SetAccumulatedTime(FMath::RandRange(10.f, 18.f));

    }
I actually got it working, I can get the sequence player in the anim layer and adjust it's time.
But now I face another problem, I am actually using Linked anim graph, so the code above works only when I don't use Linked anim graph

😔 hopefully I get to see the light eventually, this has been a struggle
hello why my animation gets freeezzzzee when im attach it to the sequence?
The animation is working in the source but it get freeze when attachet
I could.. use some help


ragdoll refusing to work
the waist bone seems to be the main issue
but i have no clue how to fix it
maybe it's because my stomach and waist bone aren't actually connected in blender?

like in pose mode it works fine but maybe ragdoll is particular idk man
is it possible to dynamically change which blendspace an animbp is using without having a bunch of pre-made state machines? i'm trying to think of a way to handle a variety of weapon hold poses during locomotion, i was hoping to just be able to specify which blendspace to use from the character blueprint
i see that I can create a blendspace reference variable, but I don't see any way to hook that into a BS Player node, so doesn't seem like that's a viable path
ah nevermind i spoke too soon- i remembered you can expose as pin in an animbp- that works!
To be frank, I think you're trying to solve a problem that doesn't exist. Don't fall for the perfectionist's curse.
When I discovered this as well, my brain exploded with the possibilities.
I have a question. I opened the motion matching sample project and copied the contents over to another project. When I try to copy the PoseSearchDatabases to another location in the project I am then unable to save them, does anyone know why this might be?
So is the "Inspect Live Values" tab just GONE in 5.4? It was kinda crucial to quick debugging in control rig...the "watch live value" bubble suuucks in comparison. Maybe there's a setting im missing? Would love to have that enabled again.. (Left image is 5.3, right image is 5.4)


Left shows "Inspect Live Values" working in action, right shows how unusable the current "watch live value" system is for large arrays. 
Don't know for sure, but I would ask the Cobra Code Community discord. They specialize in 2D Unreal stuff 
Hello, I'd like some help with something. I'm working on a dodge system for an action game I'm working on but I need to be able to blend between Anim Montages to do it. Basically, I just want to take a few dodge animations, like say forward, left, right, and back for example and blend between them depending on the direction of the character and the analog stick. I've got most of it down but I need the correct nodes for blending between Montage States. It's a Montage specifically because dodges aren't going to be happening all the time, the animation just needs to play, do its thing, and then end once it hits the end of the animation cycle. If anyone knows how to do that, please let me know.
why not use an enum and blend by enum?


I'll give this a try.
I've exported a working skeletal mesh to fbx imported into blender removed the body to just have the arms and when i import/retarget it new the twist bones go all wonky

Epic Developer Community Forums
I’ve been using Unreal to retarget animations between Humanoid characters for a few months now without issues, but I can’t explain what’s going wrong with this latest character. The twist joint for the left arm has a large offset applied when retargeting anims from the UE4 Mannequin character. It looks like something I’ve set up incorrectly in ...
Finally found the solution after researching for 20 minutes and then posting here 🤣
So it looks like the biggest limitation in BlendByEnum is that while it's capable of storing all of the values I need, it doesn't appear to have any functionality for blending the animations themselves. Blending from the IdleWalkRun into any given dodge works just fine. However, I'm also looking to blend between the dodges themselves. Say for example a character dodges forward left, it should blend the animations for DodgeForward and DodgeLeft. I can make an inbetween animation if I need to but it should be beholden to the analog stick direction and as a result, if it picks a value that falls somewhere between X,Y = 0,1 and X,Y = 1,1 the animations should blend to account for that.
I've retargeted some animations but the root bones not working properly how do I fix this?


Maybe a blendspace would be more apt here?
If they have to be montages, that makes things tough 🤔
More like motion matching
Create a blendspace and export animations from that if you need more than 8 directional animations.
It indeed does. I'm looking at blending animations via Slots and finding a node that can just blend between the slots or at least the animation states by themselves. I really just need some blend node that can blend between different animations based on a float value because that's what the Axis Inputs use. If I really can't find a workaround, then my final option would be to just animation all the inbetween animations by hand and then follow one video I found for playing any of them as sections in a singular montage. It's quite as pretty and doesn't allow as much fluidity between Axis states but I've got to get something done eventually.
are you using the auto retargeter or the IK retargeter? the way i fixed this was by creating a "root" chain mapped out on both IK rigs, which will bake the root motion correctly (in the IK retargeter)
like I have a root chain but it seems to not work proprly do I need to set the root as a goal or something?
in the chain mapping section do you have this?

Yes I have it set


but looking at the two root bones side by side it's not linging up right


In the animation blueprint using fabrik nodes or transform modify bones I am able to make the arms move with the hands of my vr character but is there a way to stretch/scale the arms to reach the hands if they go farther than the mesh is able to reach?
ok so I have to set the root bone as the retarget root?
In your case, your root bone is the metarig bone which seems to have come from your blender export. I would recommend trying to get a clean export with the Root bone as the root in your skeleton.
like I was fallowing the example epic has but I'll give it a shot

alright how do I go about doing that?
your armature needs to be named Armature when you exportso that Unreal will ignore that node when importing the skeleton. That way the root bone will become the root. I would recommend watching this video which goes a bit more in depth on Blender to Unreal for rigged characters: https://youtu.be/YbWfoyf4MqI?si=zr_P_S1KQ35EBSiE
I assume you're using rigify?

In this video I will show you how to correctly export a character from Blender to Unreal Engine 5.
Common mistakes include issues with the scale of the root, joint orientations and differences between bones and joints. In this video I will talk about everything you need to know to correctly export rigged characters that follow Unreal Engine sta...
ok I'll give it a look thanks, yes I used rigify
Maybe this...?

Just gotta right click the node to add more blend pins
Best I could find, sorry 
That's okay, this is definitely helpful. I appreciate the assistance.
Anyone knows if someone made some tutorial on how to get the Game Animation Samples character to play nice with Lyra?
I've tried renaming it and reimporting it but it doesn't work

In your export settings what have you got the Armature Node settings set to?
I've been setting it to fbx when I export
there's a particular setting specifically for the Armature node in Blender's export dialogue. You'llwant to make sure that it's set to Null
oh ok
Wasn't so bad in the end, but there's much to fix.
Anyone know why my mesh rotate whem i rotate my camera? (I want my mesh to not rotate...)
hey all, hoping someone can give me some advice an guidance on this. how do i get the peices of clothing circled to just have cloth physics. ive followed a few tutorials and they never seem to work. ive tried doing it with weight paint data onlt at the start point AND ive tried with no weight paint at all. also if cloth physics isnt the way to go about this what should i do?

In many cases, cloth physics are handled with proxy meshes covering parts where you need to paint the cloth physics weight on (this of course has to be authored in external 3D software). Also it's hard to get Chaos physics to play nice, so lots of settings needs to be toyed around with.
Alternatively you could go with traditional bone chain anim dynamics.
i think bone chain might be the way to go. can i do that within ue5 or do i need to set it up in my 3d software?
You have to make them in your 3D software.
was hoping you wouldn't say that haha. not sure how to add additional bones. spent so long learning how to link ue skeleton to the one i made with is basically humanoid. not sure how to bring in "extra" bone sets lol
There is Skeletal Mesh Editor as of 5.3 that can do post import edits, but it's still too unreliable even as of 5.4
thanks, ill watch some guides now an see if it works for me 🙂
Hello everyone! I'm stuck with threadsafe functions in ABP.
I'm trying to access a Velocity from an Actor that is NOT a Character (nor Pawn). Thus it has it's own movementcomponent that is not Unreal default.
Trying to cast an Actor to the Class that has my getter will not work (as it is not treadsafe) but how do I do this? It will not find my getters unless it knows what class it is (Yes, it's C++ if that helps)

Why not do the cast to the base class in advance? Cast as it and store it as variable in advance. C++ classes tend to be lightweight even as object ref
Hmm, store it you say? Will try it out. Thank you for the lead. 👍
Hello, I have an animbp made on the mannysimple skeleton, but my main character has a unique skeleton. In such a case, should I create a new animbp or should I change the skeleton of the existing animbp?
If you want to use several skeletons but have the same ABP logic: I solved it by creating a AnimBP Template (has no skeleton) and create children of that template.
Yes, you will have to create a new AnimBP if it's "tied" to the MannySimple Skeleton
okok
Hi,
I have an animation retarget problem.
I made my joining chains according to the rig and normally with a good nomenclature.
Do you have any idea what is creating this discrepancy?
Thanks in advance
https://youtu.be/QUzD3ivPSWs

Rate this Animation 1-10
Anyone has a sobriety test animation? haha...I just need something good for testing IK retargeting in many different poses.
Currently using pistol animations for testing, but i want one animation with IK reference to many body parts & stuff
Are the Lyra animations made for Quinn or Manny?
uhh okay. found an epic games video talking all about this.

This week we’ll be sitting down with two of our own incredible animators who helped shape the Lyra Starter Game as we know it, and walk through the process of best utilizing all the animation tools that both the engine and the project itself have to offer. Don’t miss the live Q&A at the end of the show!
ANNOUNCEMENT POST:
https://forums.unreale...
Does anyone know if it is a requirement for the root bone to be called "root" for root motion to work? Running out of ideas now as to why I can't get it working.
If I have an anim notify at the very end of a montage (last frame), is it guaranteed to be called if that montage is allowed to finish? Is there any danger of this being skipped if there's a dip in framerate or the animation has allowed frame stripping?
Hey there! Kinda getting desparate here. After importing the animation fbx files for an npc character, I get an absurdely large file size. I'm talking over 1 gb for an animation that lasts 18 seconds, despite the fbx file being 2.5 mb. Most forums say not to worry about it because animation compression codecs (ACL) compresses the file size, but with such a huge file size my builds are still several gb big because of the animations.
Why is Unreal doing this and is there any solution?
If it helps, I animated the character using an Auto Rig Pro rig in Blender and imported the fbx file with default settings.

your source frame rate is set to 1920 😵 i would suggest tweaking that
you're bringing in an 18.5 second animation in your screenshot that has 35,520 frames
ohh damn I completely overlooked that, fixed it by checking default sample rate when importing. thanks!
I fallowed a tutorial for finger controls but can't find any on how to backwards solve any advice?

So I solved my retargeting problem by not IK retargeting (like a dummy)
Lyra can be retargeted to metahuman with all default settings. BUT the metahuman IK rig chains are missing Neck_02
All metahuman IK rigs come with broken retarget head & neck chains.
Head will be ( neck 02 + head ) & neck 01 will not be assigned to any chain. So i created neck (neck01 neck 02) and made head (head) just like manny. Woohoo... 😴
The most boring solution ever
Better to have a boring solution than an unhelpful one.
Is anyone using runtime retarget without always tick pose and refresh bonea?
question i want to try and make strafe movement with a blendspace but i basically want to do it in two animations made. One for strafing forward and one for strafing left (or right) with the remaining missing spots being the same thing as what i mentioned but flipped. Is there a way to do this? (I'm open to generating an animation from existing one in engine that is flipped if that is a possibility)
[QUESTION}] Hi all , I'm using UE 5.3.4 with the new RigRail...... I'm trying to set the speed (drive mode to speed 5%) but it still goes fast like normal speed 😦 anyone have this problem too? thanks
yes take a look at mirror data tables: https://dev.epicgames.com/documentation/en-us/unreal-engine/mirroring-animation-in-unreal-engine
Epic Games Developer
Mirror animation in Unreal Engine using the Mirror Data Table.
If I have a rigged character that has an IK asset and a retargeter already made... and I rename some of the bones in that character asset, how can I update those renamed bones in the IK asset?
Is there a delegate I can use when anim sequence player finished playing?
There 100% is a button, I had to press it last week. I added IK boned but they wouldn't show up. Just can't remember.
I will buy you a virtual beer if you ever remember!!!
I saw it in a tutorial video. Let me try to find it.
Not sure if applicable. But open Control Rig asset > right click Root in Rig Hierarchy > Refresh > select mesh

from this YT video /watch?v=rxCWtcArhFU
question, how would the animation flipping work in blendspace?
did you read the documentation? it will be a multi step process where you set up the data table and use that to flip the animation sequence and export it as its own sequence which can then be used in the blend space
maybe i'm overlooking something but i don't see where it mentions exporting
only that you can apply it in the animation BP to flip at runtime
https://forums.unrealengine.com/t/is-there-a-simple-way-to-mirror-an-animation-and-save-it-as-a-separate-file/643456/7
after setting up the mirror data table, you should be able to use it in a level sequence with your animation to mirror, or you can use a different DCC to mirror. seems like there isn't a way to run the mirror data tables outside of BPs sorry, i thought that documentation page would mention how to use the data tables!

Epic Developer Community Forums
You have to drag in your SkeletalMesh into Sequencer then add the animation to be mirrored into its Animation track. Right click the sequence in the Animation track and you should find the option there. After adding the MirrorDataTable you can simply bake it to a sequence by right-clicking your Skeletal Mesh track → Bake Animation Sequence. He...
seems like there isn't a way to run the mirror data tables outside of BPs sorry, i thought that documentation page would mention how to use the data tables!
yeah that's what i thought...man
hi everyone new here,
hi everyone new here.
I have a sequence with shots, I have established Marks (bookmarks on the sequencer). I have subsequences for assets I want to animate. In those subsequences the markers are not shown. I know you can "Show marked Frames Globally".
but I want to be able to copy those markers over into that level sequence, yall know how to do that?
Hello! I'm having a problem with Control Rig. If I use CCDIK to move the hand, both the bones of the arm and the vertices of the mesh follow correctly the control, but when I use Basic IK, the bones follow correctly the control but the vertices of the mesh don't. Anyone knows why? I would need the pole direction that only Basic IK offers
does anyone have any experience with this course?
https://courses.sirwade.com/unrealanimation

A workshop designed specifically for animators to learn real-time techniques in the industry's most in-demand software. Learn to animate natively in Unreal Engine with new features introduced in 5.4 and hear from industry guest speakers and start creating full shots made entirely in-engine!
no but damn I really want that course
It looks great but it better be the best to justify the $1250
Hopefully someone can say if it's worth the price
im an extreme noob so this might be super basic idk but I made a blend space for a turning animation however I don't really know how to get that working?
I did something similar for movement speed but I can't find anything about actual rotation

anyone knows how to export animation from unreal to blender?
i tried fbx and gltf, the animation are both wrong when exported to blender
question, so i want to go about having a montage play a part of their skeleton when the player is hit but not completely staggered (a simple upper head flinch but they can still move), but I also want to ensure that my regular montages that use the entire body can be played normally. I know i can use something like booleans but I'm wondering if there is a way to quickly toggle the boolean long enough to play the montage on the upper part of the body but short enough that if i were to do a full body montage, it wouldn't only play at the same upper body.

anyone tried using animation mirroring and this node to detect whether the notify is in a mirrored animation?
somehow it is always returning false even if the animation is mirrored in the ABP
checking for source code doesnt seems anywhere to add the mirror context to the notifyeventreference
EDIT : it only works if the notify is in the sequence, not in a montage


how can I change the controller orientation without affecting the bone (offset) and not just changing the look of it (shape) - so I want to actually rotate the axis

as such

But keeping it at 0,0,0 is important too.
How do you transition/blend between poses with a chooser table?
I'm having a weird bug with my control rig. Here's how it happens:
- Place an instance of the control rig and change some control variables.
- Compile the control rig (no changes has to be made).
- Now certain control variables are reset and others are change value
In the screenshot I have some different controls, gun_ctrl always gets set to 0 and turret_ctrl value stays the same, but it's effect is cut in half. With that I mean that if 360 is a whole rotation, 360 is now only half a rotation. If I compile again, 360 is a quarter rotation and so on

I would really appreaciate some help with this, I have no idea what's going on
Here's the control rig logic


does this channel also applies to ui animation?
Now I'm even more confused. If I change the name to anything but gun_ctrl, it works??
Does anyone know if there is a way to temporarily disable post process blueprints while working in level sequences? I'm swapping between making and testing my corrective poses so making changes to the skeletal mesh every time is a bit annoying..
hey friends, I've imported a skeletal mesh, but the Physics Asset that gets generated, its a complete mess (as shown on the image), i messed around with settings, but the result it pretty much the same regardless of what I do.
I used accurig for this btw, so maybe that's the issue?

I've never had a usable autogenerated physics asset - at least not without heavy editing..
It is possible to copy-paste parts of existing physics assets, if they use the same skeleton, but otherwise I would just do it by hand
What is the most sensible path to creating animation assets in the UE editor? Is it Control Rig -> Sequencer -> Convert the sequence into an animation?
Does anyone know how to fix the shaking of certain parts of a mesh during an animation, i think it is something to do with the time between the keyframes when it is in unreal as in blender the animation does not have this shaking
So is it currently impossible to use Slots in animation blueprint templates?
Hey, has anyone run into an issue where Skeletal Meshes are seperating along UV seams when deformed?

Hey guys, I'm trying to retarget animations from one character to another in ik retarget the animations look fine but when I export the retargeted animation the arm breaks, it becomes rigid, if I configure the skeletal in retarget option as "Skeletal" it looks rigid and if I configure it as "animation" the arm is cut off. Any idea what could be happening?

Whenever I see this issue when working with other people's models, it's usually because the overlapping verts are not weight painted identically to each other. So the best fix will be to go into your rigging/modeling/animation program, and fix that up. The way I do this in Blender is by moving the armature around in pose mode and then going into weight paint and fixing up any seams that appears to be out of place by just adjusting it rigging weight until the verts move to the same locations.. That usually solves it.
Yeah you're correct, its a random library asset I was given to run some tests on and initially there was a lot of detached verts. I fixed them up in maya and generated new skin weights but it kept becoming problematic when the edges of the separated UV islands aren't the exact same values, sounds exactly as you are describing, Thanks for the insight sir 🤝
You're welcome.
I'm experiencing weirdness when exporting a Skeletal Mesh from Unreal Engine - namely an offset of joints around the fingers. The skin is still bound but this offset obviously causes unwanted deformations when the joints move. To start, the joints look like this in Maya:

Then when I bring it into UE it looks like this (still looking good so far):

If I then export this without doing anything else in UE, I now have this when I bring the resulting export back into Maya:

I know it doesn’t have to do with how Maya is interpreting it on re-import but rather how Unreal is exporting it, because if I export from Unreal then immediately re-import back into Unreal I get the same issue
Any insight would be greatly appreciated!
Quick question: I have a monitor that I'm trying to give IK animation to (mostly just to position easily, but also maybe for physics interactions), but I can't figure out how to go about that. Currently the Blender version of the mesh is controlled by 3 controller bones that determined the monitor's position, rotation, and tilt, but that also means that the bones in the monitor "arms" aren't really connected to the ones that go into the tv, so I think UE's IK rig has trouble working. Any adjustments or pointers as to how to resolve this would be appreciated!

this looks like a frame interpolation issue, have a watch of this video and double check your import settings https://youtu.be/YbWfoyf4MqI?si=zr_P_S1KQ35EBSiE
In this video I will show you how to correctly export a character from Blender to Unreal Engine 5.
Common mistakes include issues with the scale of the root, joint orientations and differences between bones and joints. In this video I will talk about everything you need to know to correctly export rigged characters that follow Unreal Engine sta...

for some reason the chaos cache does not work when I play it in game (the yellow cube does move tho) but it's ok in sequencer mode. what did I did wrong?
This is Unreal engine 5.3 btw
Never mind I got it to work now....Thanks anyway I chnaged the varible in the chaos cache

@viscid willow I figured it out, turns my dumb butt didn't attach anything to the root bone so it's working properly now thanks for the help
and for fun, video showing it working
anyone know if an Anim Blueprint Template can have Blend Profiles? I can't seem to figure out how to create blend profile assets independent of the skeletons:

Recent work
Hey all, I just made my very first Modular Rig and I can't find online how to edit the size of the controllers (they're huge for my bird).
I thought it would be through the details panel but I haven't figured it out yet.
Is this possible?
yes, there is a drop down for the visuals of the control somewhere in the details panel
you may have to actually select the control itself, I can't remember, but it's a common thing to fix
They cannot. Known engine limitation. I manually added this to source build using gameplay tags, so we'd tag the transitions and then in derived templates they'd assign profiles to those transitions by name. Epic are aware and haven't figured out how they want to implement it yet. Its just a matter of anim templates still being early days/incomplete.
Hello,i have a question. I have a BP_SwordMaster Blueprint. Inside the Child BPs i have different attack animations for each type of sword. I pass through the animation blueprints to my Character BP. The Arms Model lives in the Character BP and has NO Anim BP. When i equip the sword i want the arms to use the corresponding anim bp, how do i do that?
I would advise you to, as a test, to stop using the Construction Event.
I had an issue which produces a similar error you had (i.e. things break when you press compile). In my case: I was populating an array during construction.
My suspicion is that normal control rig editor changes produces a single Construct event, which first clears the data (array) then adds my elements. But when press compile in the editor, it triggers a series of construct event (I don't have a good insight into this behavior, but I believe it's intended) in this case I believe it would populate the array several times over. The fix in this case was to add Reset Array function first. Whether or not this is a bug or just bad behavior from my part, not sure.
I attached two screenshots of my Spline IK doing dunny things, versus working


How does one ensure the Shape of a Control is 0,0,0 Rotation in World Space?
I don't really feel like "unrotating" the Shape by the Offset Rotation.
thank youuuu, doesn't seme to work in an IK asset tho sadly
Using ProjectToNewParent seems to resolve this nicely.
I do gotta say that, along everything similar on this server, this here too should only be posted in #1054845218723209226 .
thank you
Awesome, thanks for the answer, do u mind elaborate more how did you implement your techniques? I.e how to assign tags to said transitions?
Thanks for your answer! I tested almost everything and found the problem to be the naming of "gun_ctrl". If I changed it to literally anything else then all problems disappeared. So it seems to have been some kind of internal engine problem, the most enjoyable and reproduceable errors that you can find 👍
Happy to hear. Control Rig is difficult to debug. Thought I will say, from using it extensively in specifically UE5.2, it seems more stable now. Given the investment they make on the animation front I expect it to improve further for each update
Hey Guys,
Would it be doable to create a Dynamic Control Rig on a Character in UE5.4 and than Migrate that Control Rig back to 5.3.2?
Or iss that only doomed to break everything?
does anyone know how to save retargeted animations too another location but keep the same folder structure from original project (i don't want every animation all in the same spot i need them still assigned too Inroot folder ect)
even if i do replace existing files it just makes a copy like Attack anim_1 and i don't want to go rename everything in that folder and delete the original source animation manually
is using thread safe update with property access' just generally better to do, or is there some advanced multithreading stuff you have to do in order to actually take advantage of it?
If I want to run a ControlRig only in a given StateMachine State, and the ControlRig node has a Vector input, which value should only be generated and queried while in that state, is it valid to add OnUpdate to the SequenceNode of that State, getting the value for the Vector in there (setting it as a member property of the AnimBP) and feeding that into the ControlRig, or are there any problems with that?
Actually, I think I can't even access anything from that OnUpdate node. hm
No winning in this situation. Just do them batch and rename.
so uhm... why is Manny not facing the world's "forward" by default? D: this was probably asked before but it's really throwing me off
if you go into manny's IK and you set your camera perspective to "Front", you'll see his left side
You have to modify the engine itself, you'll need to look through the source code to find where it looks for the blend profile and fails
All I remember is that its in AnimNode_StateMachine.cpp
FAnimNode_StateMachine::TransitionToState
Our solution was only necessary is because different characters needed different blend profiles for the transitions
If you don't need to do that, then you can just use an FName
It isn't simple at all
The options are
- Don't use anim templates
- Don't use blend profiles on anim templates
- Modify source engine
- Wait however long until Epic adds support
I think we modified UAnimInstance itself to support a TMap with tags/profile names, and then had FAnimNode_StateMachine::TransitionToState pull from that, and templates would modify the TMap to assign the profiles to each transition, and we tagged the transitions, like BlendProfile.StartToStop, so we could indepedently change the blend profile for that specific transition
That should get you 98% of the way there, you'll have to figure out the rest, because I can't just take the code I did under NDA and give it away 🙂
Probably the same reason why UE5 Manny has his left arm mirrored to the right arm, but right leg mirrored to left leg resulting in inverted (erroneous) bone orientations, and we have upperarm_twist_01_l near the upperarm_l yet we have calf_twist_02_l near the calf_l: Because they made multiple mistakes and those careless mistakes propogated into their established standard. Except of course, they established this error during UE4.
My advice is to match their standard 1:1, even though its wrong. Its how you ensure everything works as intended out of the box and bone name mappings/assignments are automatically defaulted. Its just a much easier and smoother experience.
As for facing Y-down instead of X-down, I think that may have happened because they would have created them in Maya, and facing X-down means your camera in Maya then has that issue where "right" is front, and they didn't really think about it, because Maya came before Unreal in the process. Even if they realized, it wouldn't have been overly simple to correct this if they had already rigged him (esp. if there was an animation rig involved, not just bones/weights)
Have a question about chaos cloth stuff and posted it over here, if anyone has any ideas or experience or wants to follow along: #chaos-physics message
Question for the hivemind, my idle animation sequence is the image on the right, when I plug it into my animation blueprint it ends up as the image on the left. I've spent like three days trying to figure out why and how to fix it and haven't gotten anywhere. Any suggestions?

Are we able to animate the ue5 mannequin directly in the engine? Like if I don’t want to do maximo, regathering or Ik rigs?
Does the name of anim notify tracks matter anywhere?
setting up sync groups myself
using the animation starter pack, converting the animations to the ue5 mannequin it works fine as an asset, but in the animation blueprint the legs fold up. The legs still animate so its not a slot issue (I dont think). The 2 values in the blendspace is Prone Idle and Prone Crawl, both have the same issue.
Edit: also the prone transition animation works fine


figured it out that control rig node with the bool in the should do ik trace was messing it all up. Removed it, falling animation looks the exact same but the prone works
Have a look at how Lyra implements a DisableLegIK curve for their Leg IK node
It helps a lot, you can just add the metacurve to any animations you don't want to have leg ik enabled for
Good for animations that leave the ground part way too, like an evade/roll, you can have the curve blend it in/out
my soul
Ye totally understand, thanks for the pointers, I will take a look! Much appreciated for the detailed reply 😃
I bought this model from CGTrader online,how can I Import and use this for animation in UE5?? Im a newbie to unreal please bear with 🙂 https://www.cgtrader.com/3d-models/character/sci-fi-character/nasa-aces-spacesuit-rigged

CGTrader
Model available for download in Autodesk FBX format. Visit CGTrader and browse more than 1 million 3D models, including 3D print and real-time assets
is it just me or is this stupidly complex. I have a cc4 character (which is supposed to be compatible with ue5 skeletons. I have a BP with everything working on it - movement, animations etc. I want to use that blueprint as a parent for all my playable characters. how the heck can i assign the cc4 imported character to use that blueprint
does anyone have a good animation rig for UE5 manny inside blender?
A lot of project setup is weeks of manual work. Set your work expectations to that of a laborer and start grinding pal. 💪
Hello, i have a question. I currently have it set up in my Multiplayer Shooter that i spawn a Firstperson (Arms and Weapon model) and Thirdperson (Body and Weapon) mesh for weapons. I declared the animations (Idle, Shoot, Reload, Equip, Unequip (each different for thirdperson and firstperson) in my weapon child class but put the variables in my master actor bp. Is there a more efficient way to handle those animations with keeping in mind that i need to still declare whats being played for the client and what for the other people seeing the anims?
hey all does anyone know where i can get some good characters skeletons - apolcalypse style characters - i have tried the obvious marketplace, sketchfab, art station - any sugges
There is a free skeletons asset on the markeplace right now.
Right. It includes that
But depending on what you’re doing I think I using the skeleton from the third person character is the best to use.
Unless you’re making animals or creatures
sorry no i am looking for off the shelf apocalyptic type characters
Look in maximo see if you can find anything. Otherwise I’d recommend you make a meta human? And make some clothes to fit the aesthetic
yeh its the clothes bit i am having issues with - i have cc4 but i am no modeller! I am looking for a way to get some clothing
Sketch fab works too, but you’d have to rig your own characters, or make a bunch of IK rigs in ue5
I know how to rig clothes to characters for blender. I found a tutorial on how to do it.
i can learn that if i can find the clothing 🙂
Sketch fab has free use armor sets
And clothing
You’ll prolly have to retarget the rig to match your player character
yeh i can do retargeting of characters, as i said just looking for a resource for clothing obj files outside the obvious places
 that’s the only places I know unless you go to smutbase
Question. I'm not sure why UE refuses to play physics when I enable "Simulate Physics (Body Instance) on static meshes.
When the sequencer playes, every mesh slowly moves down, but when I stop sequencer It's actual physics
THe objects have transform keys... Its the reason why models go down slowly... but there has to be a way to workaround It...
Anybody know why the montage doesn't play on the enemy. The player and the enemy use the same mesh and anim_BP. The player can play montages but the enemy cannot, why is that? (I followed a tutorial and it worked for the guy)

The running animation for the enemy works fine
What's the best way to copy a skeletal mesh's pose into a ragdoll? When a player dies in my game, the ragdoll has to be a seperate actor because it has its own logic.
Also, it needs to be replicated.
Anyone else not have a rotatecharacter Anim notify avaliable?
so that your character rotates too target in chain combo?"
think it's RotateCharacterNS in animation montage
You might be thinking of motion warping? https://dev.epicgames.com/documentation/en-us/unreal-engine/motion-warping-in-unreal-engine
Epic Games Developer
An in depth look at Motion Warping for animations in Unreal Engine.
hmm is that what's replaced everything in 5.4?
or i'm missing a plugin.
I have a fusebox mesh with a door that needs to be able to open and close through character interaction, however, unreal is being really stupid with the pivot points of the mesh, setting everything to the world origin so the door never turns on its hinges it just turns wherever it wants. Is there a way i can import this mesh without the door going to hell when i try to rotate it for the open close animation?
I'm using code to play a couple of montages back to back. These montage are really just different sections of one anim so they all end/start on the same pose. I set the blend in/out times to 0.0, but I still see this weird flickering as the montages change from one to the next. Seems like there might be a single frame where it's trying to blend back to the default pose in the ABP? how might I work around this?
hi anyone know a good trick for locking a rotation like i got this arm for the wheels dont wont it to rotate on forward or backward movement but rotate when turning left and right 😄 thanks in advance

where will i be able to set that is that anim_bp iam lost
Not sure what you mean by replaced everything, but yes it's a native plugin that needs to be enabled.
Typically you would set the pivot point in your DCC tool, alternatively if this is in a BP you can offset the mesh under a scene object and rotate the scene object instead.
Difficult to say but at a guess the montage is ending before the next one is queued and in that time your code is being run to tell the abp what to play. As soon as one montage ends the rest of the anim graph kicks in which is where the pop comes in.
Do you need to set the blend time to 0.0?
Also if they're sections of the same animation which you need to play back to back that sounds like a good use case for Montage Sections. You can call specific sections when you play a montage, loop sections and jump to sections. Sections themselves also have 0.0 blend as they jump around inside a montage.
is it possible to dynamically affect the number of times a particular montage section is going to loop from code? I assumed that it wasn't, which was the motivation for what I'm doing here
I'm listening to OnMontageEnded and then Playing the next montage, so I guess like you mentioned the abp is taking over for a moment somewhere in there. If I set the blend time to not be 0.0 I would expect the blending back to default pose to be even more visible
Hi does anyone have an idea why im unable to retarget to my custom skeleton in 5.4? Thanks!

unless there is a way in code that I can manually queue up a montage to let it know ahead of time what it should be blending into
Any ideas on how to make it so that 'a' makes him turn around and run the other way instead of running backwards?
https://cdn.discordapp.com/attachments/1048406863298957312/1272368356531376202/image.png?ex=66bab8df&is=66b9675f&hm=a8b42552de7056d8cbda97e1b966d53649a8374ed42452b66f91a67f7a24c744& Does root need to be the first bone in heirarchy here?

Could anyone advise how to make a chain of bones "look at" a target? The examples I'm finding for look at control rigs use just a single bone. I'm hoping to use Aim Math and Distribute Rotation to aim a chain at a target.
What's the best way to copy a skeletal mesh's pose into a ragdoll? When a player dies in my game, the ragdoll has to be a separate actor because it has its own logic.
Also, it needs to work in multiplayer.
Does only the head respond to the target? I'm wanting a 3 bone chain to all "turn" toward a target. I actually found the SplineIK which looks like what I might need
Yeah, that's what Aim and AImMath does unless you use create an array and withdraw certain element specific amounts
For any other stuff where the body needs to react i'd use Full body IK
hmm ok. I'm using full body ik for my foot planting. This is for a quadruped so maybe I'll just add this look at to that..
Another issue I have is that axis of my head isn't the same as the look target so specifying the forward axis doesn't align completely. Is there a way to align the rotation of both my head and the target?
You gotta find out what the bone's primary axis is and define it in whatever node you're using
If X is poiting up or down, that is the primary axis, the others usually will then be 0 but i don't know your characters bone structure so i cannot tell what it is
If you're working with IK and your skeleton is proberly made for Unreal, it is usually 0.0.0
the bone is pointed along the X axis, but its at a 45 degree angle between forward and up. I suppose I could just align it to the ground if that makes this easier
Errh... You can try, if you mean align by changing the bone rotation just keep in mind all your other animations is gonna explode
So the way to do it is to figure out your primary
If X is pointing up type in x -1 and leave the others at 0
Then you proberly need to create an offset to take into account what's a bit off and that'll work fine
ok, thanks mate, ill play around with it
When using physics with animation, like doing procedural hit reacts and ragdolling, should we prefer PhysicsControl or the PhysicalAnimaton component?
Hi everyone,
Is there some1 who is experienced in chaos manager, fracture explosions with bombs ?
The outcome from my simulation which I keyframe is somehow different than the real-time simulation I make.
And I got some problems with my physical fracture parts in air they seem to wiggle and spin alot.
Please message me if some1 knows how to optimize the settings.
Hey all, I'm doing animation linking (first time) and was wondering if there's any way to keep the pivot in Local Coordinates instead of World.
It makes absolute sense that if I'm linking a walking animation the character will walk away from the pivot, but is there a way to keep it always within so that if I have to rotate or scale it won't scale into the far distance?
are you looking for root motion animations?
Hey guys!
I was just thinking about the (probably) age old dillemma of LiveLink.
I onow Livelink is currently only available on the high end iPhones because of their LiDar cam options.
Most Android devices don't have these and therefore it doesn't work (at least not out of the box) on Android devices.
Alright fine.
But live link has been out since practically the launch of UE5 a few years ago.
Are there any developments in that area that are worth exploring for the Android people?
Is there alternatives that work well, like the Motion/IR cams from kinect or something?
Has any of you tried different iPhone models? And is one better than the other?
I don't have an iPhone, if I were to get one I'd solely be using it for the occasional live link anims. Would that be worth it? Is the quality of the anims good enough to invest a few 100 bucks in a refurbished iPhone?
(Please ping me with any responses)
Hope to hear from you guys soon! 😇
I'm not doing any blueprints, this is animation linking in the Sequencer only
there's an open source project, https://github.com/justdark/UE_Android_LiveLink
no idea if it's any good
GitHub
an android alternative implementation for unreal face live link - justdark/UE_Android_LiveLink
Defenitly going to check tht out! 😄 Thanks!
Why I cannot select a thread safe function here ? it only shows the option to create binding

This is probably a stupid question with an obvious answer, but I have an animation notify state with a Receive_NotifyTick function. Inside this, I try to print out the current time ratios.
Both of these are just simply always 0 and this makes no sense to me.

Did you change slot locations or perhaps the weapon itself is not aligned to fit the slot - changing the pivot in the Blueprint might work if the mesh is in a non-zero orientation.
Hi does anyone know why these retarget errors might be popping up?

Okay soooo, if you open the weapon blueprint - you should look at how the model's position in relation to the root as it will get attached to a "socket" on the model (i.e. the hand). If it is far away from the 0,0 point, it might get misaligned.

For an Unreal to Houdini workflow with Actors animated in a Level Sequence, what is the proper workflow to preserve the animation on import to Houdini?
I've tried simply baking the animation in my Level Sequence, right clicking and exporting as FBX.
But on import to Houdini, even with Import Animation checked, I have no animation!

Now if only I got an answer to this 
I've done paid courses only. This has kinda melee heavy focus, but Ali El Zoheiry has a bunch of good tutorials. https://www.youtube.com/@AliElZoheiry/videos
Ryan Laley's channel has a bunch of good videos too with step by step instructions.
hi all! i'm having an issue with the undo history buffer when using the curve editor to edit motion capture data. Anytime I move a key or delete a key, it removes all undos in the undo history. Is there a way around this, or is it a bug? thank you so much!
Yes, root should be first in the heirarchy.
I'm working on a system where, after you die, it's possible for other players to pickup your 𝖑𝖎𝖋𝖊𝖑𝖊𝖘𝖘 𝖈𝖔𝖗𝖕𝖘𝖊 and carry it around. I'm thinking I'll have a base animation for being carried, and add ragdoll physics to the limbs on top of that. What's the best approach to this?
If you go to the Epic Marketplace there is a free project called ContentExamples, it has a whole level showing how to do various physics + animation stuff
I'll check it out. Thanks!
Does anyone know if there is an option to make an animation montage played through an animation blueprint via an event only play the root bone’s motion and not the rest of the animated poses? How can I get playback of all the bones?
I can possibly give access to the entire project if needed
Is this my answer? https://forums.unrealengine.com/t/montage-animations-play-either-without-rootmotion-or-will-have-rootmotion-but-no-animation/1710065

Epic Developer Community Forums
I’ve set up animation montages to play when I left-click. But with Metahumans the weapon only works properly if parented to the body not the mesh. so i thought similar would apply for playing the attack montages When I connect the body to the play montage node (as the skeletal mesh component), animations play but without root motion But when I...
what are you trying to do? like what's the desired outcome here
Ragdolls need to have collision enabled to simulate physics, right? What if I'm simulating physics for only part of a skeletal mesh and I don't want it colliding with the world?
The rest of it is a regular animated skeletal mesh parented to a capsule.
Would love some advice on best practices here.
For first-person multiplayer games with characters that hold items or weapons in their hands, is the first person view of the character typically implemented with the entirety of the character model, or just a 3d model of the arms with some rigging? I'm currently using a store-bought template that has two copies of the same character model, one full-sized one for TPP, and one tiny one placed near the head of the main model for FPP. I'm told that this is atypical at best, but I have no point of reference here.
Certainly having to make sure your FPP camera doesn't clip through the head of the character is an extra annoyance, and I end up using only the upper torso from that model anyway, but maybe that's normal?
A long shot, but does anyone have a clue as to why my skeletal mesh deforms like this after firing the weapon? 🤔


I have 88 montages of whales moving through space with spine and limb movements, I want to speed up and slow down the montages according to a MIDI trigger, that is happening, but the montages have movement of the root bone only no fin flaps nor spine bends of the whales, I want to get all the joint animation as it was baked into the montages
Not an accident there are 88 whales 🐳 and 88 piano 🎹 keys
thanks for sending a video and explaining! a little bit confusing reading what you’re saying though, so can you check in your animation sequences, are you able to root lock your animations? does that stop them from moving forward?
Hey does anyone know how to change the anchor point of a blueprint, i know how to change it of an object via modeling -> edit pivot.
But when every i try to use my cloner on the mesh the cloner reacts to the anchor of the blueprint and not of the object inside the blueprint
Also alt dragging middle mouse button doesnt work
I can check that after dinner, but the only source of locomotion for the root bone is the animation clip, so root lock doesn’t solve the problem. I can do it as a diagnostic if that helps.
Think of it as a hierarchy, because that is what a blueprint is in some ways. You need to move its children, the pivot is the scene root of the blueprint
So anyway with "Follow > orbit mesh" mode in animation playback I can confirm the root bone is going through a large orbit, whiel the spine and the flippers are doing and awesome whaley job of an animaiton cycle. How do I "root lock" an animation?
Epic Games Developer
An overview Root Motion Animations in Unreal Engine.
have a read through this and see if it applies to what you are seeing for your whales
LIfesaver
I knew there was a missing piece
So I think if I grab a handful of the animation sources and tick the box and adjust how the anim blueprint interprets the "EnableRootMotion" boolean checkbox, my animation will have no more looping artefact and hopefully the spine and fin motion will be working as I animated all the whales in Maya and I can just let UE 5.4 do the speed up and slow down thing as I have done with the blueprint interaction model
at the moment the whales feel like they are being dragged in bind pose only
basically in Maya it is a spline follow animation with the humpback cycle coming from the rig reference file.
its kinda hard to see, cos the overall loop is 5000 frames and the humping cycle is like 250 frames and the whales are small in frame
hey, does anyone know of a way to manually control what animation frame/time a skeletal mesh is currently displaying?
ait thanks will check this oujt
Does any1 know how do hide hdri from rendering but still infects the lighting in the render
Hey all, I purchased an animated model form the Marketplace and want to edit some of the animations it comes with.
Is it possible to unlock the Start-End?

hi there i'm a begginer unreal engine student, i was making dmx live show in unreal and i was wondering if i can use multply sequence so i can use in one sequence 1 setup light and ecc with other sequencer, but when i press play when i'm working on one sequence the other sequencer they not playing, i saperate difference set up on difference sequencer can i play all of them at the same time when gonna render ?
Hello guys!
In animation blueprint for characters is there a way to fire an event every time the current animation changes? Montages we can handle already but the current animation is the problem.
Hey folks and good morning! I wondered if it is possible to play a section of an animation montage at one rate scale and then change the rate scale on a different section.
got a strange issue. I was playing around in the curve editor in 5.4 and I noticed that when I delete a key sometimes it removes all my undo history and then brings up a warning about exceeding the max undo buffer. I'm at a bit of a loss here as it seems to be pretty consistent with removing the undo history no matter how much or little history there is when performing this action. I don't know if this has much to do with the issue but i'm also using perforce as my source control. I only bring this up because i tried testing this at home where I wasn't on a source control and I couldn't replicate the issue. Maybe theres a connection there? Would greatly appreciate some assistance if anyones ran into the issue.
a couple weeks ago I randomly found a video that mentioned smooth transition inside a Blend Space, so it goes from strafe left to strafe right without stopping at the one in the middle (forward / idle), just goes straight to the other side, but I didn't know I have that issue and didn't save the link, and now I can't find the video again
messing with Smoothing Time for each axis or Sample Smoothing does nothing for this
does anyone know what I'm talking about? I feel it's something simple but can't figure it out
so this is something i've learnt recently, you can actually nest sequences into other sequences which sounds like what you're looking for?
so you can drag all your different sequences into a "master" sequence
Idk whats going on but for some reason one of my animations only applies to my characters upper body, it was supposed to be a fixed version of another animation I had but the original one works fine. If anybody could help me I'd appreciate it a lot
Here's a clip of me alternating between the old and new animation so you can see what I mean
this has pictures of my code and videos of both animation sample if that helps : https://imgur.com/a/v3z2IPO

it must be because of foot IKs but I just dont understand why the old animation is ok
fixed it its alright
All my animation blueprints that use control rig nodes are broken when I package my game - I have a bunch of control rig based animations which use mirroring, but the mirroring doesn't work, leaving the parts being mirrored to in their default pose.
some of the control rig based animations work, but not all parts of the control rig forward solve appear to be running
I've found a bunch of forum posts complaining about this from a few years ago, but no solutions
What is the future of motion matching? is there a roadmap?
wooo thanks man ! 🫡
I'm having an issue that all of the example content I'm looking at doesn't seem to have, which is that when I add sync markers to my animations to represent feet placement, my blend space blends really poorly. So when moving from walking to running, the speed will stay exactly the same as walking until it goes over the half way point, and then it'll be exactly the speed of running
Iam trying to add an animation for jumping when running and one for jumping when idle , the one for idle is working but the one for when walking/running then jumping is doing some strange stuff , any idea?
WalkRun/Jump state is the only one with animation that is green beside blendspace2d for walk/run

i dont suppose theres a magical tool that would convert a humanoid mesh rigged to ue4 skeleton to a ue5 skeleton huh? not just retargeting?
or is the only way to use blender or something and manually paint the new bones the ue5 skeleton has
anyone have any idea how to use interpolate with an array? it seems to only work on the first control and not carry on down the chain

really interpolations carrying on to children in general
similar to the dynamic chains in the modular rig
Heyoo, I'm interested in throwing some money towards someone that can jump on a call where I can ask some questions about best practices when it comes to setting up bone structures for customizable characters with different outfits, best practices to face rigging from scratch, and how to avoid re-exporting retargeted animations every time (amongst other game dev animation related questions)
Anybody have experience altering root motion at runtime? I'm trying to use root motion for 1 montage section, disable root motion, then play another section and Launch, but launch doesn't work with root motion enabled and changing RootMotionMode just before the new montage doesn't seem to take effect in time.
did u fix ur issue i think maby is the animation that have issue maby is for another skeleton with different pivot point so when is you fire (and the animation trigger) than something like this can happen hope it helps
Hello everyone, I have combined 3 animations in a montage and can I create a separate sequence?

Thanks man! I'll give that a check ✌️
Hi, can anyone explain why my control rig does this?
Motion Matching question: In UE 5.4, is there a way to turn off the Root forward motion, so the animation runs in place at 0,0,0?
Anyone know how to fix this ?

this is what I expect obvs the hand is Ik'd to the point on weapon needed

So i seem to have found the issue


the Left Hand transform seems to not move forward and back but diagonally and this messes up with the other joint bit
anyone know best way to sort this please
instead of doing this in a montage, you can combine the three animations in a level sequence and export it as an animation sequence
do you mean in just the animations or with motion matching? why would you want to turn off the root motion for motion matching?
Yes, I did that and it worked, thank you.
I need the forward root motion turn off . This is "not" for Motion Matching. I just like the Motion Matching animations.
in that case, if you can find the animation sequences you can toggle using this:

Epic Games Developer
An overview Root Motion Animations in Unreal Engine.
@lusty venture Is there an "EnableRootMotion" on the individual animations?
anyone at all able to help please 😦

I can't figure out why the elbow is wanting to do that with this two bone IK and Fabrik thing I've setup
#blueprint Anyone have a clue on the above ?
yes
There my settings


I have followed multiple tutorial all showing that so could really use some help here please
Wrong preferred angle somewhere
Don't get what you mean sorry
What I Don't get as well is the thing it's meant to be point towards it doesn't seem to be
This guy's got his blendspace to have filled in triangles
But mine is only just the dots
Is there a difference and why don't I have the filled in triangles?

Its just visual.

Strange, I don't have that

Definitely normal Blend Space

Just putting this here in case anyone wants a solid C++ base to build locomotion systems from, or to use as reference.
You do need to use a little bit of C++ to extend it initially. It is built for maximum possible efficiency, which includes not doing BP calls, but if you want that, you can add it when extending.
This demonstrates best practices, I specialize in locomotion
https://github.com/Vaei/SimpleLocomotion
GitHub
Simple locomotion system code functionality to extend from, with respect to updating in worker threads for maximum performance optimization. - Vaei/SimpleLocomotion
Hello, I am trying to recreate this effect in Unreal, would making a flipbook texture and animating be the right way? It lasts for 4 seconds and that seems like alot of flipbook frames packed onto a texture.
If you do it that way then you should have 3 anims, entry/loop/exit
You can probably animate that in UMG using material FX and transform/scale
They just have this material glitch effect, you'd do the same, then animate that material parameter in UMG, along with it's transform

Okay, so animate the static image transforming and scaling up, and then create the material glitch in UMG on top of it?
Nah
Create a UI material that has a glitch effect, controlled by a scalar parameter called "Glitch"
Create a UMG animation that transforms/scales the image AND modifies the material's "Glitch" parameter
Anyone experimented with mocap suits ? Would you recommend one for third person & first person basic animations (idle, walk, run, jump, crouch) ?
We’re good with budget, we just want something good for it’s price.
are you looking to make loops or do motion matching?
Loop for now
but in future do you think you'd want to do more bespoke things like having motion matching or different levels, stairs, etc?
it's a bit of a tricky situation. we use xsens in house but they recently doubled their pricing for processing animations. we find the quality of capture a lot better by far compared to the rokoko suit, we had V1 but were advised by their team that the V2 of the suits wouldn't be able to do what we wanted
we found rokoko drifty and wasn't great for any quick movements like running, and any actions where actors had to lie down or sit on the floor/chairs made them drift a lot
Alright yeah that's also what I heard about xsens vs rokoko, do you know if the animation cleaning part is heavy with xsens or it's ~ moderate ?
Not at all, we're doing an arcade/fast paced game so pretty basic animations, we're already doing IK for stuff like stairs etc
again it's very much "it depends" especially on what you're shooting
anybody happen to know what fortnite uses for facial animation, are they doing shape keys? bones? i know they use a single 'master' face they animate expressions on and drive everything with curves via pose assets, but im curious if those pose assets are bone offsets or morphs
the reason im asking is because i'm wanting to do something fairly similar and want to hit as many platforms as possible. i figure if fortnite is using morphs for facial animation it's probably performant enough
Hey guys, I recently started learning Unreal Engine 5 and I'm struggling to understand what I'm doing wrong with this animation blueprint.
I retargeted Manny's animations to this new character and the retargeted animations are just fine, however, when I land, my character grows ridculously in size and seems to fall to the ground, here's an example video:
It seems like it's an issue with my landing animation but I can't figure out what exactly. Removing the land animation solves the issue, but I want to know why exactly this issue exists in the first place:
#animation message
Can someone help me with this issue please
Does anyone know how to emulate the dynamics of the chain from the modualr rig, the spring interpolates don't seem to go 'down' the chain and just take their movement from the first joint
I am guessing an array of the controls being driven by the interpolate but not really sure
Your example images are too messy for anyone to really help. Once you spend a bit of time to actually explain and ISOLATE your issue, you often find the error yourself, at the very least a specific culprit. Isolate to one side, don't override too many settings. Find the minimal scenario required to reproduce the problem
my issue is the arm being wierd when the two bone IK and Fabrik stuff is being used
if I manually however preview with the values it's fine, let me show example
only different is obvs there not holding a weapon there so the left hand is where the right hand is
Manually ticking the variables on that activate the Left Hand IK Stuff you can see it looks more realistic

When in play session holding a weapon

I think you'll see why I'm confused by them two screenshots and why I'm not sure whats causing the issue to occur
Hi guys, I want to make a video where a MetaHuman's arm detaches. How can I do this? Thank u
i mean, in the sequencer, i want him to walk normaly, and in a moment, his arm detach, and fall to the ground

Building off the Motion Matching demo shown at GDC, we'll explore the toolset we used to build the Game Animation Sample.
Come and dive into a project showcasing fully functional gameplay animation systems to kickstart your own creations.
We'll reveal our latest best practices, provide a sneak peek at future features, and show how we plan to...
nice work 🙂
anyone? I've got this going on but it only does the first joint, though the rest follow they are not independently working it out

I continue to have an issue where certain nodes in my forward solve graph of my control rig aren't running when I use the control rig node in my animation blueprint (but only in standalone/packaged builds). Any idea what's up with that?
here's a video - top is the animation in PIE, the bottom is a packaged build (whose performance is way better). Why would the cooked animation be different than the one in editor?
check if your landing animation is additive, this can cause scaling issues like you're seeing here
gotcha, it is I guess. I had to remove the control rig addition as my new character does not have the same bone hierarchy and it caused a warning
I'll try adding it back and making it compatible, however, I created a new control rig for the new character and I still had the same issue
Thank you very much for your response @lusty venture, I'll try again later today
@lusty venture I just realized I did not remove the apply addition though, so yes this animation is additive and I'm using apply addition and the bug happens anyway (that is unchanged from the Unreal Engine 5 Manny. Could this be related to the size of my character mesh?
bit tricky to debug without knowing the full picture - are they animations you've retargeted to your character mesh? did you do this in engine or a different DCC?
Yes, retargeted directly from Unreal. I created a retargeted and the animation plays just fine in the preview inside the engine, everything was done inside the engine
I just retargeted to a new mesh
and playing back just the animations, it's not having scaling issues?
Nope, as you can see in the video, it plays just fine without any scaling issues on playback: #animation message
This certainly looks like an additive animation issue, with additives they need their settings to be correctly applied for them to behave as expected. What are your additive settings on your landing animation?
hey quick question i am working on a third person project while using blendspace if i am makeing some custom animations what fps should i be recording at? i see 30 fps but what are current game developers recording there animations at regarding fps? Example would be running and walking animation cycle sequences.
30FPS is very common
There is a case to be made for 60FPS for better quality, though I'm not sure if you'll really actually benefit much, or if it will ever be noticable, and larger anim files as a downside
Either is fine
i dont know where to showcase it so its here, A buffed version of andrew garfield's spiderman
How do I check/customize their settings?
In the asset details of your sequence:

oh shit I completely missed that, I'll double check the difference between the retargeted anim vs the original from unreal
Thank you and nat for the detailed explanation already
🙏
Anyone know why when trying to Mirror an animation using a MirrorDataTable, the character will just A Pose?
The MirrorDataRows are the ones generated from the skeleton (including Virtual Bones and IK Bones). Everything looks right. There is one Metadata curve in the sequence, should I remove it?
Metadata should just be outputting a value so I don't think that's the culprit. How do you have the mirror set up in the anim graph?
Hi! I've got an idle animation and an attack animation from two different packs. For a simple transition of attack=>idle, because of the difference of the "style" of the differing packs, foot sliding happens.
I believe and tested that Orientation Warping/Speed Warping won't fix the issue. I'm no animator either. Does a "Control Rig" solve this issue where it can "dynamically" move the thigh/feet accordingly during transition so it looks natural? Like, raising the thigh and adjust it together with the feet? Any possible solution/s except touching the raw animations? "Foot lock"?
Thanks.
I don't think there is an easy solution there
You could try the Foot Placement node (followed by Leg IK node)
It does have a concept of foot planting that might aid it if nothing else, but I have never tested it for this purpose
Look at Lyra in 5.4 to see their setup
Yeah, I already did that. The Foot Placement is only useful as an "IK" for height correction when in idle or locomotion, locking the foot in place so that it doesn't slide and matches the animation with the velocity. It does not, however, based on my testing, help blend the thigh/feet during transition between two poses. Though, there might be tricks I am not aware of.
any idea why my foot controller for my ik no longer leaves the bones behind if you move it out of length


Hello UE fellas
Here is my issue:
I have downloaded some mesh and basic animations from Mixamo.
I have changed my BP_ThirdPersonCharacter to Mixamo mesh and those animations. Basic movement, run, walk, jump, land is working.
I want to load a punch from Mixamo, and when I make a Key trigger in BP_ThirdPersonCharacter, it wont play the punch animation montage.
When I change my BP_ThirdPersonCharacter to basic Manny mesh and Anim Class for Manny, it will play Animation montage.
There is a chance I am missing something in Blueprint Mixamo mesh, but I dont know where to look. Any help would be appreciated.
Thank you
Malj

I think you forgot the Slot node in your mixamo animBP. put that before output pose, without that you can't play anim montage

Thank you brother. Now I remember that I saw this somewhere, but in the sea of videos, I cannot catch it all. How can I attribute you?
Hey I have an fbx model of a character I want to import him into unreal engine and I want to make him move the model is rigged and textured I want him to be able to fly and shoot guns he has in his holsters his guns shoot portals the other gun is gravity
Need to know how to fully animate every part of him.so he can do regular animations like walking and flying and all different
This is not a small task.
Sounds like you need to invest a lot of time into animation. I Would google how to animate a rigged character in blender and take it from there
Okay but let's skip the blender part as I have already rigged him there
You still need to animate him.
This can be done in unreal, but i would do it in blender.
This way you can export your animations from blender and use them in unreal
Depends who you ask.
Find what suits you best. I would start in blender
Okay
Thank you
🙂
Learn how to RIG your character’s HIPS…with NO weight painting in this Blender 3D tutorial! By only adding a few extra bones to your armature, you can automatically assign weights to your mesh and it’ll be ready to animate!
I have wasted many hours trying to perfectly weight paint this difficult joint, and now I save so much time! And I now use ...
Would this be any good
It doesn't show how to make him fly
character is slightly hovering above the ground only on the idle animation, adjusting capsule half height doesn't fix it. if i remove the animation blueprint from the character, it sits perfectly on the ground

the character seems to be slightly above the pivot point in this animation

inside the animation asset
the animation is from mixamo
I bought a course on animating in blender but when it's animated and I import it to unreal how can I make my character fly? Animations from mixamo? Marketplace?
Or blueprint it
https://youtu.be/miZFpMVYnB4?t=2199
Is this feature live?

This session will explore the latest additions to Unreal Engine’s rigging toolset. Using Control Rig and the brand new Skeletal Editor, we’ll show you how to utilize techniques such as creating skeletons directly in the engine and adding dynamic motion rigs to bring your animations to life.
We’re excited to bring you sessions from Unreal Fest 2...
hi
how can i remove this bones ?

i cannot reimport skeleton
when i trying to replace references, it doesn't work...

Asset > Removed unused bones also dont working
whats the best animation for a fps no weapon anim set? I dont know how to make the hands look “natural”, anyone able to link a game that does it nicely?
Hey, I've created some controls for my bones and once I parent them to a pelvis control, every time I recompile the rig the bone spawns in some incorrect position. What might be causing it?


Before addressing your actual issue
The correct mesh relative location Z is -2.4 - Capsule.HalfHeight
So if your half height is 88 then set it to -90.4
If you do that, then you can be sure you have an accurate starting point
This -2.4 is because CMC floats your capsule slightly above the ground
Even Epic doesn't seem to realize this so it's in none of their projects/templates/samples
I once had an extremely precise/rudimentary procedural IK node that needed 100% accuracy, so I had to figure it out
i fixed the issue. it was a problem with the retargetted animations, i shifted the root down in all of them and that worked
My recommendation stands tho!
Just in general
yeah i applied it, thank you
Is it possible to add an animation variable in an AnimGraph so I could have different idle animations play depending on which character is using them? I don't want to make a bunch of animation blueprints that do 99% the same thing just with different assets selected

this would be a good use case for 'animation layers'
you can create a second abp that contains an animation layer interface, and then have your main abp just say 'grab the idle animation from the connected layer'
and then each character can 'equip' whatever layer they want, so you can have one ABP
and if you need to make changes, it applies to all
ah thanks, i couldn't find the term for what I wanted. I'll look into that
How do I stop my blendspace from doing this?
I feel like I need to offset the animation sample somehow, but I don't know how to do that
Has anyone gotten very far along with replicating motion matching? Seems difficult to optimize due to the amount of data that needs to be sent/received
Anybody know what "blend nodes need to reset children on activation" means? My googling's not helping
I'm having the same issue @tiny mirage was where animations with notifies are only playing once and then never again

nevermind. I was just being extremely thick 🤦 I just switched the logic over to a state machine and it's fine
that was it, just fixed the bug by copying that section of the original anim. It seems like when you retarget the anim, those settings are lost and you need to manually update them:

Thank you very much ❤️
Glad you solved it 😌 the retargeting process makes a new asset so the settings will be the default settings as if you just imported a new animation.
You might want to look at template
Thanks I'll check it out!
I totally don't remember what I did for that
Upload your character to Mixamo, download the fly animation and set up the logic in Unreal for flying 🙂
Tutorial on creating a Superhero inspired Flight System in the Third Person Template.
Issues found from community post upload (making videos are rlly hard lol)
- 11:54 : Calculate Lean Function is placed after setting the Last Velocity Rotation variable inside the Animation Blueprint's event graph. ( Found by scutrera2 )
- 4:05 : Inside the ...
Okay so do I still need to animate in blender or mixamo does it
For the flying, looks pretty good
Mixamo has this one https://www.mixamo.com/#/?page=1&query=fly
You can edit the animation where ever you like, where you find it easier
Thank you so much 😊
it depends if you want to to move its arms and what else more than what the Mixamo animation offers
Im not an animator and Im fine/greatful with basic animations ^^
shouldnt be hard to change the bones
I probably need to animate the character anyway
But to make it easier I'll try the other way you suggested 🙂
I made a few changes to animations in Unreal as I have less experience in Blender ^^ not that much in UE either but I love to read/watch stuff
learning ^^
prob easier ways to do it with money haha
Trying to get my character to lie still when Velocity is less than X. My character is in a ragdoll state, so I am looking for a node I can blend to that is nothing, so my character stops flailing when lying still on the ground. Anyone know of a node or technique? 🤔

So you're in a ragdoll state and you want to freeze the character in place?
You could look using a Pose Snapshot. Essentially, save the current pose of the character so that you can use is somewhere in the animgraph.
https://dev.epicgames.com/documentation/en-us/unreal-engine/animation-pose-snapshot?application_version=4.27
Epic Games Developer
Animation Pose Snapshots can capture a runtime Skeletal Mesh Pose inside a Blueprint and can be used for blending in or out of additional poses within a...
I'm playing some animations during the ragdoll state, but want to blend out of those when character velocity is low enough ✌️
Problem is I dont know how to blend out to nothing
Rather than playing a pose the ragdoll should take over?
does anyone know how to animate control rigs in sequncer using Quaternians instead of euler angles?
I know you can use quaternion interpolation for object transforms but that option dosent seem to be available for control rig controls
uuhhhh do you guys know why is it happen?

it might because of the mash paint i guess but idk how to fix

you have to blend them if you want both at the same time
if i have a cached pose in an animation blueprint and then use that cached pose with a mirror data table, is there some way to blend those two poses (mirrored and unmirrored) with an alpha so I can control how much mirroring is happening?
Hello, I have been building a combat system in UE5. I’m currently using montages for the attack sequences but I’ve been considering instead using a series of blendspace or state machines. Is there any reason I shouldn’t do this? Is it less performant?
You could approach it this way. Typically montages are preferred because they behave a bit like a fire and forget animation. If you are using blend spaces and state machines, you'll then have to manage the transitions in and out.
Although with the systems available you could leverage animation layers and state aliases to reduce some complexity.
You would likely have to cache the mirrored pose too. Then you can take your original cache, and your mirrored cache and blend those.
is use case the only factor I need to consider? in your experience is there anything a montage can achieve a sequence cannot? Is there something more taxing about a state machine change then there is for a combo system with montages for example?
I've done alot of testing with montages and for my use case it seems like a series of state machine transitions would better achieve what I'm looking for but I cannot find any examples of this which leads me to think using the anim graph to control a combat system isn't the optimal way to do things.
For context, I'm currently working on a combat system where the combat is a layer of the movement system, right now it's being done with root motion and montages but a locomotion machine would be far simpler it seems
I think the major consideration is that state transitions and how you're going to control that flow. With a combo system you could just play things as you queue them, with a state machine you need to consider every possible transition you might need between sequences.
I suppose with a montage, they can only really do what a sequence can do, because it's just a sequence inside the montage asset. Ofcourse you can break it up into sections. With state machines you could potentially have all kinds of blending and logic within a single state.
I think that's the only thing I could imagine being a performance consideration. How complex the state itself might get if you're blending a lot of sequences together inside the state. And of course a blend space is going to be heavier than a single sequence or montage, but I doubt it would be a particularly meaningful performance hit.
Last thing I would say is that if you're using a state machine, all those assets will be loaded with the abp, whereas IIRC montages load as needed (I could be wrong on that). But in the case of states they will be loaded as the state machine may need them at any time, which is why Lyra doesn't directly reference animation sequences, they load specific data sets as the gameplay requirements change.
Well it's definitely possible I'm missing something but I think the state machine flow control is what I want? My aim is to minimize my animation needs by blending the lower half of my body with the upper half. I also want to control the animation rate of poses btwn attacks for things like charging an attack or indicating the weight of the weapon (i.e slower transitions). I have a need for alot of transitional animation as well like if the character runs out of stamina after the last attack maybe they stumble
I know that I can do all of this with slots play rate and locomotion sets, but idk the animation blueprint seems like a simpler option
Harder to trigger with constent results
Yeah thats possible
This has been my experience in the past, I would get stuttering when I spammed an input. In this system however I'm buffering my inputs enough I would hope it would be easier to control. I was thinking blend spaces where I could basically have a number on a slider but idk if maybe I could do that same thing with curves and montages and it's just harder to grip for me
Are you meaning your attacks would be in sequence in a blend space?
the attacks would be, not all of them, only the ones that involve moving in a direction. Is that a bad idea? I could just as easily do a state machine to the same end
Right, I mean you could do anything in terms of how to approach this system. It comes down to what kind of result you want to see, and how much time/effort you want to put in.
If it were me I would probably use montages and do some procedural/additive adjustment if I needed it.
But I think its better to start in a direction, see how it goes and change/adjust your implementation if you need it.
I agree, I have this set up with montages already and now just want to manipulate those animations which is why I was exploring other options.
The chief thing I am looking to achieve right now is to have the pitch of the upper body match the mouse rotation.
(My attacks occupy the default slot rn)
Do you know any resources where I can learn more about specifically modifying montages while they play?
There's probably a few ways to approach this, a simple one would be to have some additive poses which pitch the body up and down, have those in a blend space and put as an additive after your montage slot. Then drive the blend space with mouse input. The nice thing about additive poses is you can limit the pose easily.
I'm sure there is also a control rig solution you could look into.
As for specific resources I'm not sure exactly what to suggest other than looking into how you'd set up an additive. Perhaps looking into how you could use control rig to have the character aim toward a target.
I haven’t tried this with control rig, that’s definitely an option to explore
Tho as I was typing what I did try that didn’t work, it occurred to me why it didn’t work lol
Thanks for the advice, its good to know I don’t have to stick with montages of if I don’t want to
where can I hire an animator ?
