

1 messages · Page 47 of 1
Hello everyone! I have a question, I think others have run into. But I can't seem to correctly find an answer. Or maybe I missed something. Been using Unreal for years and on 5.4.1 and was using the Walk/Run with BS and all animation rooted and checked as they should but, still my character does not move only will jump in place when I hit the space bar. Thanks in advance for any help. Bit crazy, this is one I have never, run into and I have gone over it so many times, and still no results.
when i set up my modular control rig and try to turn on IK, my feet end up in my waist. is there any setting that might fix this? i'm thinking i'll have to change my bone orientation in blender but itd be a bunch of work
Idk if this is an appropriate place to ask this board of a question, I’m building a complicated animation system, anyone have some advice on states vs montages? I understand the general use case but I’m worried about committing to montages only to find states are a more cohesive option
Try adjusting your character in the capsule component (assuming this is when you play and not just in the rig bp)
is it not possible to select multiple tangents in ue5? When I shift select it deselects the other ones, only allowing me to modify 1 tangent at a time.

nvm found the fix

When I pose my character the armor starts to deform. Is it because the way I set the weights in Blender or is it something I need to set up in Unreal?

In my experience this is weights and in blender can sometimes be fixed by running a smooth operation in the weightpaint tab. I recommend for pauldrons to weight them to as few bones as possible, I’ve gone so far as to put them on sockets and add physics to avoid clipping and deformation issues
does anyone know why full body IK makes my controller get sent to the stratosphere

how do you use Pose Watch to debug animation? i toggled pose watch on nodes but it seems never shows the pose in preview window.

took a video of my problem, when using full body IK I literally cannot make new controls for bones without them flying off screen 😦 not expecting much since this is so whack but if anyone has any idea of why this is happening/what can fix this any help is appreciated
it seems like circular dependency issue, where 1 condition disqualify another and so on so forth. double check where you set transforms
so the node that does it is the Fullbody IK node
If i remove this, it works

An empty Fullbody IK works
but the second I add any effector it goes crazy
Like its not even the bone thats moving, its just the control that's freaking out
So even if I exclude the tail the problem persists
is it persistent on every bone?
yup
i havent tried EVERY bone
but every bone Ive tried so far it does it
root, hips, spine, head, tail
That's a weird one. I've not played with the full body IK node before, but the shooting off into space thing does tickle my 'scale problem' receptors.
Are you sure your character is at 1.0 scale? The root bone as well?
I've found that it has difficulty doing a pose watch on a state machine. Have you tried other nodes?
I think GWII is correct. This is a weighting issue. Pauldrons like that are notoriously tricky in rigging.
You're not actually adding the movement input.
You don't put the vectors in.
So you're adding nothing - which is why your character won't move.
Character is scaled correctly
but the root bone is rotated 😬
Aw beans.
that might affect it
Maybe, but possibly not.
My first instinct when it comes to solving this kind of problem is always to strip out every variable I can.
So I'd first try the full body IK with a biped, probably with the unreal biped, just to see if I can make it work at all.
Because if I can't, then there's something with the setup I'm using.
If I can then there might be a problem with my mesh or my skeleton or whatever, but I would have eliminated the possibility there is a problem in my script.
Yeah that's a good idea
There's no way to record in sequencer with 2 control rigs huh?

yeah first thing that happens when I try with the mannequin is the controller flies away lol
So that implies that either the node is fully busted - or you're doing something wrong while using it.
Yeah :/ can't find anything online about it though
I'm having trouble with motion matching, root motion and rate scale. The Lyra walk animation is too fast.
When I set the rate scale to 0.5, the character indeed animates mores lowly, but the character still travels the same distance.
Any thoughts?
can someone guide me towards making fullbody mesh modular in Blender and reimporting it back as separate modular meshes.
I am mainly interested in how the animation blueprint and skeleton bones would work in this case
do I need to copy fullbody skeleton bones all over to each individual separate Static Mesh inside blender?
like, cut out legs with blender and then add fullbody skeleton to it with rigidbody? body and other parts the same way?
both are ue4 Skeletons, why doesn't the first Skeleton have the same animation


I designed a blower to use in the game, but I don't know how to animate the opening and closing of the blower. Can you give me information on how to proceed?

I'm using a Goblin Skeletal mesh set from a pack I got who knows when, I made the GoblinBody the main character mesh, gave it an animbp. The weapons are skeletal meshes on the same skeleton so I added it as a sub mesh, but the sword falls out of the goblins hand and all animation stops... no idea whats going on
ohhh... what the hell. why are the weapons on their own skeletal mesh!?
...changed it to a static mesh and it falls off too... what the hell is wrong with this character pack!?
dunno what that socket/bone is set up for, but I added a new socket and he stops dropping the weapon.
so after imparting my animations into UE5 I found the clips has some extra frames such as going from T pose into idle etc. clearly I need to trim the clip.
here is my question, in unity when trimming clips like this you would have some red , yellow , green circles of to the side indicating how accurate of a loop the clip made. is there a tool for that in unreal ?
Google search is not helping much with this.
how do you show key frames of an imported clip?

I fixed it, I made such a silly mistake. I was building so fast I forgot to connect my 'GET" Is Valid to SET - Side Input and then to 'GET' - SET - Forward Input. DUH! But thanks for the suggestion. If I hadn't kept looking and taken the questions into account I might have kept missing it. I will just blame it on a LONG week of game design already. LOL Thanks again. 🇨🇦 🙃

why is "Anim Curve" only displays morph targets for the mesh and doesn't provide access to the animation curves for bone transformations?
were are the practical tools ?

why cant my animationn update? It seems like its not udatin the animatonn

i move the hand but it never updates what I move
when I play it the animation stay the same
this is getting old, how did unity do this better than unreal ?
that cant be try what am I missing ?
giving this a brake before I brake something
To my understanding you can’t in the sequence player which is what you’re image looks like it’s of. If you want to view the keys/modify them you’ll need to use a level sequencer or bake to a control rig.
I’d also add that 2800 frames is a lot of frames. It might be worth cutting up the animation before working with it in engine.
Hey, I'am searching for simple Animations for sword and shield stuff
The Animations I found are very complex what IAM searching for are Zelda Like old school Animations (top down) but for 3d Chars (links awakening Remake). Are there some good Tutorials for making such Animations by my own?
It is very weird, but yeah, you can't see the sequence keyframes! It's silly, and has always been something that really bothered me about Unreal.
While it's elaborate, not cheap, and very long - the 'Alive!' blender animation course is a fantastic primer for 3D animation.
If you want to get into it, I can't think of anything that would give you a better start than that course.

The most extensive Blender animation course ever released to this date!
There's also no tool for this in Unreal. There is a strong assumption in Unreal's toolset that you will be doing all animation editing in another program, specifically Maya.
It has only very recently acquired the ability to do any meaningful animation work in engine within the last two years or so, and Unreal is a 25 year old program.
You probably don't need a blend space, but also - motion matching very seldom has the concept of 'diagonals' in it. Typically, a motion matching system will have turns and then have the character run straight.
So rather than having an animation for running 45 degrees, you'll have a dance card of starts and stops that cover multiple directions, and then several loops of forward running.
You seldom have analogies in traditional gameplay animation sets for the kinds of animations that would correctly feed a motion matching system.
I believe that most animation sets people are working with are generally speaking a bad fit for motion matching, and there's going to be a strong space for anyone who wants to create animation assets in the next few months, because motion matching requires an entirely different kind of animation database.
Unless this is viewed from very close up, you could probably do this with three bones.
You would create a skeleton for this character in your DCC (like Blender or Maya) create a skeleton with a one bone per 'paddle' and then weight paint the handles to one of each bone, and the funnel to the third.
Then, in Unreal, you would attach this to your character, or you would animate the blower and attach the characters hands to the handles using IK.
Your choice.
This looks like it has the same animation, but the gun is misaligned, and it's possible that the bone lengths of the characters arms are different, and you might have to change the IK retarget settings if you need them to hit exactly the same point in space.
This page describes the several different ways you can do modular characters in Unreal:
Create modular characters by combining multiple dynamic skeletal mesh components in Unreal Engine.
It's a good place to start.
Do you mean that the characters pawn is moving too quickly and the animations aren't keeping up?
any one made a plug in for that ?
Not that I know of.
If you find one, let me know.
Hello everyone!
Anybody got animation bugs in network game?
In my case, in AnimBP, variable isFalling sometimes not replicating correctly for other players

Thats really odd. Does it happen with every newly created project?
yes, it is new 5.3
Have you tried in 5.4'?
Not yet. But I tried to run server map without WorldPartition, looks good. I think this bug related to WorldPartition system
World partition, I see...
Sadly thats out of my expertice and can't help. Sowwy
anyway thanks!
Yw
I have a question
well, an issue
I wanted to know if you know how to handle it
Is there something I can do that fires an event every time the animation goes to another state?

nevermind, I found out how

Is there a way to find where the animation curves are being used?
So I've been looking at curves and I'm looking at Paragon examples. It's actually pretty cool.
I've also read the documentation:
https://dev.epicgames.com/documentation/en-us/unreal-engine/animation-curves-in-unreal-engine
In this Paragon example, the sword appears into the hand and you can control the fading with the curve in the animation.
Very cool.

Animate Material Parameters, Morph Targets, and other properties synchronized to your animations using Animation Curves.
However, the next question is: where are all the curves being used?
The curve's name is Ice_Effect_SwordFadeOut.
I'm able to go to its skeleton and try "Find/Replace".
The only relevant result is "Material parameters: Ice_Effect_SwordFadeOut" for "Aurora" which is its Skeletal Mesh.
I double click it and the skeletal mesh opens up. But there are no references anywhere of "Ice_Effect_SwordFadeOut" in the Skeletal Mesh. It is being used inside one of these materials.


The only way I was able to find it is by digging quite deep.
I eventually find it inside:
M_Aurora_Sword > MF_Aurora_Sword_FX

But surely there must be an easier way to search where anim curves are used?
If I am animating a piece of my UI when I hover over various items, is that the wrong way to go about moving the UI? I have a 'slide in' and 'slide out' animation but it seems to get screwed up if i mouse over other items before the animation finishes
Thanks this Looks amazing.
Any phys asset wizzards know how to get this chain charm to work? https://gyazo.com/eba35302dad27d2efb5ba5a6c70a3444
Are the cubes too close together
I was watching this and thinking, "I mean, yeah there's some jitter but it doesn't look that bad..."
Then I got to the end!
I'm with Some, it seems like there's some kind escalating instability in the system, the most common cause of that tends to be some kind of overlap between volumes.
I wonder if a locomotion 4-8 directional movement with quite a few blendings for the upperbody is a big performance hit in general or if this depends alot on other factors mostly
It's going to depend on how many of that character you have running at once.
8
That's probably OK? Animation is seldom an optimization bottleneck unless you have truly enormous numbers of characters, and in that case there are lots of optimization tricks available.
Good 🙂
Thanks for replies.
I have just started a month back or so but after reading some about the next steps in my project development I suspect that characters, especially when they get shot will be a huge bottleneck.
Hit reactions, sounds, animation blends, particle effects and so on.
Everything that hits performance hard at that specific time is an enemy
Modern computers are really fast.
Like extremely fast.
You would have to push a lot of all of those things at the same time for that to be a major optimization challenge.
It's far more likely for the AI's for them to be more expensive then their animations.
This is encouraging to hear 🙂
I think I've spent to much time in the optimization jungle for the level design lately and it has somehow changed me, always watching out for the next possible fps spike, preparing.
"charlie was everywere..."
You just read my mind. Ive gotta get back to splatter paint levels of content creation
Yes, by using rate scale it introduces foot sliding
I was hoping that using rate scale would just actually move the character more slowly, since the animation and the motion match setup are using root motion.
I think the pawns movement speed is still controlled by the character movement component.
And I suspect that playing with rate-scale and motion matching will probably result in shenanigans.
It does!
Essentially @nimble torrent I was trying to "rebias" the animation database, because the walk animation literally travels too fast
So the character is like "power walking" everywhere instead of dropping into the jog animation

Hmm - my experience with motion matching is that it is both extremely finnicky and requires entirely different kinds of animations than the kind in a traditional movement system.
Basically, nobody supplies motion matching animation sets because it has been inaccessible as a technology until Unreal 5.4.
Like - yeah, Ubisoft had it in 2017, but they did not make that available to anyone.
Is there something more modern than blendspace?
I have so much foot sliding when I use those.
A motion matching animation set is typically what's called a 'dance card'.
Right, I've seen that actually
It's a single animation that consists of the character running around, jumping, turning, starting and stopping, and it's all mocapped as once file.
Systematically recording like 10,000 frames of animation that cover all the movement edge cases
Yeah!
I saw that for the first time I think yesterday actually
Epic claims that their system won't necessarily require a dance card, but the animation set that they showed off in their motion matching video did not have a normal locomotion animation set. Instead, it had a lot of starts and stops, a lot of curving circular animations, and acceleration / decelleration animations.
At least, from what I saw.
Right
You seem like you have might a good answer to this, but with root motion I was under the impression there's 2 modes: using the animation to drive displacement (ignoring the CMC) and then using the velocity from CMC to drive the playback rate
Does that sound right to you?
The CMC doesn't ignore root motion, instead it's what translates the root motion into the movement of the pawn.
It can be, yeah.
I've heard that's terrible in multiplayer
Broadly, you can either have the animation drive the movement, or the pawn drives the movement and the animation reflects it.
Okay, the latter sounds feasible for me
It is the method that I tend to recommend for people. It has it's own problems and pitfalls, but it tends to blow up your game less often.
Like - things might look bad, but the game still works.
Which counts for a lot.
Lol
I've been enjoying the start/stop of the motion match proof of concept I got working, and the complete lack of foot sliding
But it's weird in that sometimes the character gets stuck in certain animations
Motion matching, when it works, is awesome.
Plus I had to boost my character base movement speed just so they wouldn't power walk everywhere
But that's a game design change I wasn't really going for
I appreciate your perspective Squishy, I'm still figuring out my animation fundamentals and workflow
You could make additional animations for a slower jog - but that's not free or easy.
And you could change your walk to be slower.
I was thinking about trying to load up the walk into Blender to slow it down at the source
But last time I used a 3d package it was Maya a few years ago, so didn't really know where to start in Blender for that
The great thing about motion matching is that if you have a big pile of animations, you don't have to do a lot of complex system design to make the character look good.
The problem is, you're shifting the burden from design to animation - because you tend to need a lot of it.
Yeah it seems really interesting
I was just enjoying the start/stop/jog, just those 3 as a replacement for a blendspace
But the character basically would "float standing still" at really slow speeds
so I had to add a walk
but that didn't fully fix it, and now they power walk everywhere lol
Unless there's another workflow, I'm thinking of going back to a blendspace for now, but using these new root motion animations I pulled
Anyone familiar with how Master Pose Component works? I'm trying to expand my Metahuman setup with another skeletal mesh that has its own skeleton, and I have replicated completely the spine setup. Seeing how it is setup with a face I thought this is required for copying over bone transforms from body. I have setup a Post process AnimBP that references Control Rig proc.
But I'm not seeing any movement on my additional skeletal mesh unlike the face. Tested with both animation and Control Rig keys in Sequencer. Anyone familiar with this?
Do you have the bone names matching between the master and follower skelmeshes? It requires the bone names to match
Yep, I have created a skeleton as a substitute from the original metahuman body skeleton

Well it seems to be that the movement should happen from AnimBP setup actually, but I still don't see any changes

if i assign skeleton?
ok so this has been bugging me fore a while but this clip should move me back in a straight line, but when I turn on root motion so it will move me, it keeps going to the side
(I can spam the clip to move in circles ? )
what is doing that ? were should I look to fix it ?

trying to use turn in place animations but they all seem to be when you don't use controller rotation yaw. I want to be able to turn when this is enabled (most tutorials check if this value is greater than 45 or less than -45 to turn but that is not valid when controller rotation yaw is enabled)
maybe less hard turning in place but just feet movement so i'm not just gliding in air
Procedural dual wielding weapons https://youtu.be/rO_xrIw4gZo?si=NRwVyel_lKbwGs1F

Hi!
Dual wielding has been an ongoing request to be added to the asset. So..... I did it! There are some other things I need to add such as positioning, but recoil, sway, and shakes are working perfectly! Truly, I am amazed at how my component let me create the dual-wielding weapons in under 30 minutes.
Hope you enjoy this small showcase as t...
Both the leader pose component and the Copy Pose From Mesh node require an identical hierarchy, and ideally a fully identical skeleton. With Copy Pose, you can have additional bones on top of your base skeleton (so you could have bones in addition to the normal skeleton), but they have to otherwise be identical for it to work properly.
How is it procedural?
Figured it out, it was the silliest thing as usual to set checkboxes the same way in Copy Pose From Mesh as it was in Face setup
I would check the rotation of the root bone and pelvis in your animation relative to the rotation of the root bone and pelvis in your skeleton.
Unreal usually automatically normalizes animation rotations (it treats the first frame as having zero rotation), which can be deceptive and lead to scenarios like this.
Checkboxes?
To use attached parent

Everything you see is procedural movement. No baked animations, the only baked animation is the pose
Ooh!
Oh! Neat!
I will take a look when I get home if I change the rotation of the skeleton will that break any thing?
If you change the rotation of the skeleton that will probably break everything.
From your character BP to all your animations to your AI - the whole deal.
You are much better off changing the rotation on that single animation - if that turns out to be the problem.
Yeah I thought that be the response luckily I have not made any other root motion clips, so if that is the problem then it will be easier to fix it now lol
Is there a way to rotate a control that has Aim Constraint setup? Basically I want it to keep aiming at the target, but have an ability to twist around primary axis.
I had this functionality setup with Damped Track in Blender and I'm able to rotate bone, but in UE5 I cannot do that. I can move the control around but not to rotate it
UPD: I was using Aim instead of Aim Constraint node, that was the main problem
is anyone aware of a way to created a baked animation file from two existing baked animation files? I'm seeing a lot of animation BP blending and some experimental animation modifier plug in stuff (which i might resort to) but i want to avoid ABP cause of the cost as this is just for background npcs looping animations
Yes, you can do this. Typically you'd do it in your DCC (in Maya or Blender).
I will say that usually premature optimization is the root of considerable amounts of time wasting.
Unless you're in the final stages of shipping your game, and you have accurately identified that having animation BP's on these background characters is a significant source of slowdown - it's probably not worth it.
Playing an animation on a skeletal mesh and playing an animation BP on a skeletal mesh are relatively similar in terms of cost.
so the cost isnt an issue necessarily and you cant take 2 anims in the engine and create 1 baked one from it is what i get the jist of
So I thought it was the incorrect node, but the problem seems to be different.
The rotation is only working when Target is Location and I set translation based on control or bone. But in this case the node throws a warning with message "Invalid secondary target".
I don't think I understand what is wrong here and how it should be fixed...

I think it's possible to do it in sequencer. You can bake both of the sequences onto a control rig. I'm not sure if it's easy to do a cross-fade, or if you'd have to do that manually - but it is technically doable.
But it's more common to do that kind of operation in a DCC like Maya or Blender.
So, you're correct in thinking that you can use the World Up system to rotate an aimed object, but in your case here, you're using location as the target type, which will try to draw a vector between the aimed node and the upnode, and use that as the upnode.
You probably want to use 'Direction' instead, which will use part of the upnode's matrix as the upnode vector, and should allow you to control the non-aimed part of the rotation.
Not sure if that made a lot of sense, sorry!
I think I was confused by what Target Space is, but from what I just found it is practically an up target area, so if I want to twist the bone I couuuld try to use it. But in my case I'm mixing up two approaches, that's why it was confused lol
Yep, that did the trick!
@nimble torrent do you know if its possible to delete keys in a baked animation? ive got a talking animation that i edited to be sitting but his lower body seems to move unnaturally. ive key'd them into position at the begining and end but they still sem to animate in the middle of the animation
You can in Sequencer.
If you bake them onto a control rig.
and it has to be with a control rig?
I believe so, yes. I don't think you can directly delete animation data from a sequence without doing that. I could be wrong, but I don't think so.
you can select this as well, which will let you edit the animation on the joints :)

Ah! Yes, you could use the FK control rig.
That's a great idea Nat!
Totally forgot about that!
I'm in a project in UE 5.4.1 and every time I try to add an AnimNotify/view the dropdown list of AnimNotify, my entire engine crashes. It's not an intensive project and I have a PC with Ryzen 5 5600 and RX 6650XT so this is surprising to me.
Has anyone encountered an issue like this and is there a way for me to find out what's causing it without building the engine from source?
huh, issue isn't happening after I switched engine scalability settings to medium instead of epic (what unreal auto-recommended for me)
Sounds like it's resource intensive operation
So I'm back at expanding the control rig and I don't think I understand how rotation constraint works.
I was expecting that if you have only one rotation target and you will set weight to less than 1 than it will partially rotate and pretty much interpolate between the target for rotation and its original position. But changing this value does nothing, only when you have at least two targets it will change.
Is there a way to configure partial rotation for just a single control set?
What's weird is this setup works fine when using bones, but not for controls.
this is quite strange, is it crashing if you view in animation sequences vs. animation montages?
even stranger is that it's not happening after I switched engine scalability back to epic
it was happening to me in an animation sequence earlier though
Hey, just thinking about Motion Matching in 5.4 and waiting impatiently for the sample project.
But I was wondering: does motion matching is only supposed to work for the player character or we would be using it for NPCs as well? Think of a single player game.
From the talk Epic did I understood that they were able to use motion matching for all 100 players in fortnite which is incredible. But will it also be viable for NPCs?
Quick question, I most likely just over looking something simple here. This is my personal project Level Build and my main hero's Locomotion build. His Main Locomotion I have built is running perfectly, walk/run/toggle/camera look, sprint. but for some reason after going over all the Blueprints and builds, all I can think of is that the STATE MACHINE is not communicating the CROUCH and DODGE ROLL as those are not working, even though they are Cached and all ROOT animations in Blend Space. But for some reason those two won't Trigger on Input even though those are in there. I'm at a lose? Any suggestions from the group?


I expect so, ao long as the npc is able to generate trajectory data, motion matching should be achievable
In your setup there, you have the state machines in your first image caching those three states, and then in your Main state machine are you reading those caches inside the individual states?
yes I am
Yes, which is that second pic
First thing that i notice is that it's interesting that you split your crouch idle from your crouch locomotion state. Seems like those would belong together unless you have a reason to separate them.
What are your transition rules for moving between those states? And how are you setting them?
I was trying something new, from what I normally do and have done in the past. So I went with this new technique and split it with the Idle animation in the Idle Crouch and the Crouch Locomotion is the Cache that feeds back to the the Crouch State and Loops back through the Default Pose "OR" so they say. But like I said this one is not my normal way, but like to try different ways.
Ah yep, and so in these transition rules, how are you controlling them?

If you can enter a state, say Crouch/Dodge - you get variable - IsCrouching as the input....the oppisite action would be IsCrouching - then a NOT Boolean _ Input _
Yep, and is that bool updating correctly? Have you checked to see its state during play?
just got home, were would I check the rotation ? is it as simple as opening the assets and checking the bone rotation or is it found some were else ?
Should be that simple.
yeah looks like the pelvis rotation is off, last question; can that be fixed in unreal ?
or do I need to redo the clip ?


You can do it in unreal using the Sequencer and possibly the FK Control rig.
It might be a bit messy because the whole animation is rotated.
If you have the animation in another DCC - it's probably easier to fix there.
ok thanks
that may be the problem but its proving to be a pain to fix, need to do some research this weekend as the rotation is changing in unreal 🤔
Cool it worked! Very clever technique
I added the LookAt curve in the animation montage
But you cannot read the animation curves in behavior trees (or really, anywhere else)
So it must go in the animation blueprint
So in ABP, in Event Blueprint Update Animation, just have it read the LookAt curve
A few notes though:


Neat! Nice job!
Couldn't you have read the curve and put that on the on AnimationBP as a variable - and then read that variable?
Or dug into the character BP, got the mesh component, got the animation BP, and read it from there?
You're absolutely right
This works, and is way cleaner too
It's in the BT Task, so it works for any character, not limited to a specific AnimBP if I put the code in AnimBP instead of BT Task
Very useful technique: curves
Thank you so much.

Hurray! That's awesome!
May i ask why is ALS still preferred or lets say hyped up as usually the movement system being used even in ue5, for blueprint users doing single player games? Is it because its free and has already several movement poses with wieldables?
I tried to tinker with it before and i feel like the setup is too hard coded? I know the newer systems are data driven and are sort of derived from lyra.
The movement of ALS becomes a bit obvious especially in prototypes i have seen. Thanks
🤪NO I have not. I have to laugh at myself, after working on games all day then come home and chill and build my own project "to relax" and experiment on new ways to do things you think I would think to check all these things. I will check later today when I have some time. Thanks for hitting me with that reminder.
Hi. Is it standard Unreal Engine behaviour that any Control Rig goes missing upon saving and loading the level? If so, why?


Hey hey
Can anyone point me in the right direction with this full body ik?
I'm trying to copy this example from epic docs
Learn about the primary Rig Elements you can use for constructing Control Rigs.

Using a new bone to solve a finger tip to a control
How ever mine looks like this


No idea why
Hey, I need help, there's a piece of boolean I want to cast onto another page.
OK, I think I sorted it.
Now what I need to do is find a way to keep my characters in the air when they do the combo
looking for some help. ive jsut started messing around with control rig and i was looking for these nodes in 5.4 but cannot find them or anything else to perform the same operation. justing to use them to plug in a curve value. Anyone know an alternative or if they were deprecate or replaced ?

anyone know the best output/settings for getting clean frame by frame audio in sequencer in ue5? I'm wondering if I can do vo anim in ue like I would in maya
so in my ability, I am playing an anim montage. Can I play it without canceling the original animation? For example, if I'm walking forward and I play a montage, is it layered on top rather than overwriting the original animation? Is that even possible?
How do I profile animation graph properly? I tried enabling all trace channels and Stat Named Events but in worker thread animation update I only see blueprint threadsafe update, AnimGraph evaluate and huge enpty space in between which I assume is Update_AnyThread being called on AnimGraph. Is there any cycle counters on Update graph traversal ?
Check out the Layered Blend per Bone node, that should be what you're looking for: https://dev.epicgames.com/documentation/en-us/unreal-engine/animation-blueprint-blend-nodes-in-unreal-engine#layeredblendperbone
Animation nodes that blend multiple animations together based on a set of criteria.
Not even sure what to search for, anyone else run into an issue where animation sharing works but doesn’t, as in, when your first load the project it doesn’t work. Character is in T pose.
Finally if you load all the linked locomotion abp in another window, (just look at them,) then will it work.
And it seems to be the locomotion ones. I’m using a copied out version of lyras animation setup. It’s pretty reliable that I can look at just one layer, like rifle. And that one will work and none of the others till they’re viewed.
A packed project it’s not working… kinda curious if I make it work and then package if it’ll work.
Like, air juggling? Hmm - that's gonna end up being hyper specific to how your combat system works, what you need it to do, and the rest of your game. Hard to offer a suggestion. You could just try playing with the gravity value on the CharacterMovement component.

That is an interesting problem. You say that the packaged build never works?
Are you dynamically attaching the animationBP to the mesh?
I've only tried packaging it once only for this project. I've ran into this before and it disappeared on its own. Aye I am, lemme change these to hard references. maybe the bringing them into life is the issue
Yeah, I wouldn't be surprised if there were some issue with dynamic loading going on.
Yeah something with the map happening on begin play.. i changed it to a hard, it wasnt working at first.. i searched my outliner for all blueprints, saved em all, and reloaded from disk, then, loaded them all, exited and reloaded project and it works. weird.

not using the map. will dive down another rroute, that was testing anyway
I'm glad it worked! Getting packages to load in the right order can be a bit of a bear.
I'm encountering an odd bug I've not seen before (now on 5.4) - I have an animation that's set to play on every weapon fire call. In my other project I'm porting from (also 5.4) it plays the animation at the speed that the calls are coming in. In this new one, however, is seems to be waiting on the aniomation to finish before moving on to the next fire call. THis is on an automatic fire weapon with a decently high fire rate. I've not seen this sort of 'waiting' behavior before, especially on identical code. Anyone else how an explanation of this?
That is weird. Are you using a montage?
I am - I've tried with and without sections. Definitely a new behavior for me. 800 rpm firing like it's only got, say, 20 due to waiting on the animation to finish before firing the next.
Have you confirmed you are sending the 'play animation' instruction that many times?
If I remove the call for the montage to play, it fires at the normal rate. Testing through linetrace debug and a print string.
In my other project, if plays as expected..that's why I'm so confused. lol
Yeah, that is weird.
I mean - paying an animation 800 times a second is unusual.
But the inconsistency is strange.
It's at 800 times per MINUTE. 🙂 It's the firing animation on the player.
I tested it with other animations, as a sanity check, and it fully waits until whatever the animation is to finish before firing the next shot. It's bananas.
This is the simple node structure - it waits until the animation finishes until it fires the node after the Play Montage...and I don't know why...

Well it's not an option on the node. It might be an option on the mesh. I have no idea what it would be.
What happens if you use a dynamic montage?
Same...I'll check the mesh again for somethnig out of place, but all the locomotion anims seem normal, it's just the one within the Timer.
I'll give it a shot
Oh! And what if you don't use a timer? What if you just try to play it using Tick as fast as it can?
Dynamic montage = same behavior. Let me try it on tick.
Hmm...tick seems to give the (mostly) desired results..albeit much faster than anticipated.
Well, it'll do it at least once per frame, so yeah.
What's interesting about that is that it seems to imply that the problem isn't in the montage itself, or the animation system, or the skeletal mesh.
It's something to do with the timer.
It would appear that way...
It just seems to work if the animation isn't there..that's why I'm perplexed.
Ok what will that require?
does anyone know what is TimeToEvent Channel in a PoseSchema (Motion matching) and how to use it ?
Jump animation playing over the motion of the capsule even after root motion is enabled so the animation looks wrong. Pls help. :(
Also I couldn't get the jump anim to work in a state machine so is that the problem? Idle and run is in a state machine but attack and jump is using enhanced input. Also any resources on how to make a combat system will be very helpful. Currently one button plays the whole attack anim. Thanks.

OKAY i think i got it
jump was playing twice since it is already set up in the default tp character bp
hey devs!! I need a quick little help with widget animations... actually I am trying to make a simple slider effect on one of my widgets but the issue is that it would come half way through before snapping back to the start position... I have made some more sliding effect on the other ones but didnt face this one
first of this aint about animations, thats UI/SLATE/UMG stuff
second of all is you should record mp4 files
Hello, I want to rotate my spine bone to simulate an aim offset using a FRotator.
I have a Transform (Modify) Bone on my spine_01 bone, I made it work in World Space, but I'd like to make it works in component space.
From what I understand, the code below should give me the Rotation in component space, but when I apply it to my node, it's just spazzing (Rotation Mode "add to existing" and "replce existing" both have the same behavior).
What am I doing wrong?
        FRotator LookDirection = UKismetMathLibrary::SelectRotator(Character->GetControlRotation(), Character->GetBaseAimRotation(), Character->IsLocallyControlled());

    FTransform Spine01Transform = Character->GetMesh()->GetSocketTransform(FName("spine_01"));
    FQuat LookDirectionQuat = LookDirection.Quaternion();
    FQuat Spine01Quat = Spine01Transform.Rotator().Quaternion();

    Spine01Rotation = (Spine01Quat.Inverse() * LookDirectionQuat).Rotator();
Is it wrong in a consistent way, or does it change continuously?
Both, I guess?
First is when Rotation Mode is in "Add to Existing", second is "Replace Existing".
It does pretty much the same thing regardless of Rotation Space


Well, add to existing definitely seems like it's having a bad day.
I think replace existing is probably what you want, but do you know what 'SelectRotator' does? I've never used that function, but that seems like the obvious place to start looking for an issue.
Like - are you certain that is the value you want, and when that value is applied to the spine it would work - even if this were all functional?
Like - the spine and the pawn (which is where you're getting the values you're putting into SelectRotator) do not have the same orientation.
So I'm really unsurprised to see that the 'Replace Existing' version appears to be rotated at about 90 degree angles to where you want it to be.
Is there a way to check if this mesh component uses a control rig? I don't want adjustment of animation speed to affect the children that use control rigs.

You mean 'use the control rig' as in 'has a control rig node in their animation blueprint'?
Correct.

Well, I don't think you can easily access the node list. There are a variety of ways of tagging objects though. You could use a Gameplay tag, you could implement an interface - those are probably the best ways. You could check for the class directly - though that's fragile.
Hmm. I see the anim blueprint can implement interfaces. So, if I made a BPI_AdjustableAnimRate interface and put it on those that should allow the adjustment. Can I check if the Anim Instance of the mesh implements the interface?
I think so? But it's easier to just send a message to the BP, if it implements the interface than it will accept it, if it doesn't then it won't.
Oh, Anim blueprints have regular event graphs. 🤦♂️
I should be able to set the play rate "directly" then.
Yep!
Ok, I'm feeling pretty stupid here.
I can set the Play Rate as a pin, or dynamic. But I can't find a way to actually set that value in the event graph. I have no reference to the sequence object to work with...

You can make a variable, and then either plug it into that pin, or bind it in the details panel.
The event graph updates first, then the node graph.
I just made a variable. Seems to do the trick. The locusts are slow(for test purposes), while the crawler one over there is doing regular speed. And Mr Leggy Legs still legs around as usual. Thanks a bunch! ❤️
Neat! Lookin' cool!
Hello,
General Animations theory question: I've just bought a pack of animations. They are split to in place animations and root motion animations. They are have walking, walk start/end, hit reacts, attacks, deaths.
Where would I be using in place animations and where root motion?
Thanks! 🙂
Man, the illuminate is crazu
Anyone familiar with using fullbody IK and montages at the same time?
When my montage ends the fullbody IK is extremely jittery as it tries to continue solving
Hi all, when I add certain bones to my full body IK in control rig it seems to completely nullify the rig. Any clues for how to debug this?
quick gif to illustrate the problem:

Can anyone who is an animation expert tell me wtf that is about?
Root motion tends to be useful in single player games for scenarios where the movement of the character is highly varied and tied to the specific animation - such as during attack animations.
Personally - I still say 'control that with the pawn' because I'm a stickler for not using root motion, but I admit that is a particular hobby horse of mine, and not a reasonable thing for most people.
This is probably related to a change in LOD. The mannequin characters in unreal have a lot of procedural nodes controlling their deformation bones, and when they shift between LODs - those bones probably take a frame to realign properly.
Getting LOD shifting with dynamics to be seamless is annoying!
I don't know for certain, but my assumption here is that you're somehow creating a cycle within the fullbody IK, and it is shutting down to prevent a 'halt and catch fire' situation. I wish I knew more about that system, because a lot of people are having trouble with it.
I agree, what can we do to remedy the issue though?
Not use the default mannequins?
You can test my hypothesis by locking the mesh LOD on the mannequin's mesh.
bet one second
im getting ready to switch off of the manny anyway but it still bothered me lol
yeah that was it, strange epic didnt notice that themselves lol thanks for the help 🙂
👍
Genuinely kind of wonder why importing blend shapes is turned off by default in Unreal
Like. If an .fbx has them, is there a single person who wouldn't want them imported? Just an odd default
hmm that's interesting, thank you for sharing. For me in terms of attack animations I would like to have more control on the direction of that, to allow the player to slightly adjust the attack angle after attacking. Same for enemies, so like in dark soul style games where the enemies will rotate slightly after or even during the attack (in the anticipation phase and sometimes in recovery) toward the player. So not sure if root motion is the call here
You can still add to and control the rotation of the character while using root motion.
If you're interesting in that method you could try reading the backscroll of the conversation I had with Sepiiw.
Hello! I am not sure if this has been discussed recently but have anyone encountered the problem of root motion not working for character?
Also, I know that I can use"keep state" to make animation paused at the last frame in level sequence, but the root still moves when the next sequence get triggered by event. Is there anyway to make the root stay where it was(from the last sequence played)?
I'm still a beginner in animation and everything but my understanding is that if you use blendspace then you need to use in place, so things like walk/jog/run
For attacks, it depends. If your character can walk and attack at the same time then you'd use something like blend per bone and use in place attack (legs=movement, upper=sword swing)
If you cannot walk and attack at the same time, then root motion is nice cause it handles the movement while attacking (like one step then swing sword)
Do you have Enable Root Motion checked in your animation sequence?

Yes. I have tried all the related checkboxes and none of them works. From my searching on internet for a whole afternoon experience, it might be an unreal5 bug that hasn't been fixed since 5.1
I am looking for a way to do root motion in blueprint though
Does the animation have root motion? Sometimes like.. the animation doesn't actually move the root so it doesn't have root motion
How do you have your character set up? And what kind of animation are you trying to play?
I have two different characters, one is the player character using level sequence(event play-cast to BP(Player Character)-Play Animation Montage, the second one is an npc character(same with previous one in level sequence)

Blueprint look like this
Right, and the animation plays but there's no root motion?
Yeah it snaps back in previous position when the next sequence plays
Like what @solar totem mentioned, have you confirmed that the animation has been made with root motion? https://dev.epicgames.com/documentation/en-us/unreal-engine/root-motion-in-unreal-engine?application_version=5.3
An overview Root Motion Animations in Unreal Engine.
That makes sense! I need to do a check on my character. Let me come back later. Thank you for your insight!
Yeah there seems to be some problem with my root. I have root for both characters but it does not work like how it works in the document(last picture)


Ah yep, in the case of your custom character there, the root is not animated so you will get no root motion when you apply it. The red bone shows how the root has moved from the origin as you can see in the last image there. You will need to animate the root either in your DCC application and reimport, or you can animate in the engine with control rig to get the root to move as you need it to.
Just guessing but it looks as though this character is based on the mannequin skeleton, have you perhaps retargeted these animation assets and possibly missed the root bone in the retarget?
haha yes it's the mannequin skeleton. I can't really recall what exactly I did when retargeting it but I should definitely look into that root retarget part. Thanks again, man! It has been extra helpful. I am grateful for that
no problem, good luck. happy to help if you run into more issues
Yeah it works. Thanks man! I think you just saved my project, I should buy you a drink if you are around. This is the best hour of my whole day
I live in NZ so I'm probably not around lol glad you got it solved 💪
(nice job!!)
Hey, anyone experienced with Blender (and probably BetterFBX) that could help me export a rig/skeleton as skeletal mesh ready for UE import? ❤️ Thanks
Hey, how can I snap a mesh to a control in a control rig? i.e. how do I copy the location of a control to a mesh?

anyone knows if it's possible to temporarily disable the keys of one control rig? so I can play the sequence without the head moving?

hey guys - anyone know why my montage won't play with the ALSv4 refactored? I've set up a montage to play, I have a reference to the character and the main animation instance, and when I debug and check values, I'm getting an output of "0.23" which is the length of the animation montage, so I assume that it's finding it and playing - but on screen, nothing is playing / changing

hey, does someone have any tips how i can get into viewmodel animations. I use blender but I‘m still new to animations, how would i go about achieving the same camera settings as in unreal engine to match what the player will see at the end. is there anything else i have to consider or any good resources someone can send me? thanks!
Anyone have any good videos showing taking mixamo rig and making it more suitable for UE 5 through blender
I've had success using Auto Rig Pro plugin to export skeleton, skeletal mesh, animations into UE
I don't think you can parent scene objects to controls but you can parent them to bones which are controlled by controls. You do this by parenting to the mesh component inside the blueprint.
What do you mean by 'more suitable'?
Are you playing the montage to the correct slot? Do you have a slot node of that slot in your animation graph?
I thought the skeleton for mixamo was like super complex
it's not though so all good
👍
You can parent objects to controls and that works fine, but it's not what I asked. I want to snap the object to control before I parent it to the control instead of manually positioning it each time
I don't know if you can easily do that. Did you try the 'Mute' button there? If that doesn't work, you could try deleting the keys on the head_ctrl track.
yeah this was the issue squichy - in the new refactored ALS they removed the hands / spine etc slots as it doesn't work in v5 so I needed to either create a new slot, or add it to the post locomotion which seems to be working okay now, although still getting a few odd quirks
You could always add them back in.
I don't think that's easy to do. If you're working with that sword regularly, you might consider adding it to the character blueprint, and then give it a bone specifically for the weapon.
I've had success following the procedure in this video!

In this video I will show you how to correctly export a character from Blender to Unreal Engine 5.
Common mistakes include issues with the scale of the root, joint orientations and differences between bones and joints. In this video I will talk about everything you need to know to correctly export rigged characters that follow Unreal Engine sta...
What's a 'viewmodel animation'?
basically first person animations
I'm not really sure I understand. What kind of first person animations?
https://www.youtube.com/watch?v=TnAtEYY6cKs basic first person animations for guns, melee, interactions etc.
Just shoved like, 5 of my best works in here cuz I needed to make one. Some are old, one of them is recent.
Reposting this from Twitter
Music's Blinding Lights by The Weeknd (Instrumental)
Business email:
alecatillanoart@gmail.com
honestly i just thought i sound smarter saying it like that 😂
(I've usually heard them split between 'first person character' and 'third person character' animations! It seems like valve were the ones to popularize 'viewmodel' - neat!)
You learn something new every day!
As for how to do them - you might consider trying to animate inside unreal using the control rig!
The advantage is that you can use the real camera.
thats what i did before, I just heard that creating animations outside of UE (in maya, blender or something else) is better since these softwares have more options, settings etc. when it comes to animations. But yeah honestly you're right, before i start learning new workflows and software i should probably just stick to what i already know 😄
All the different programs have different strengths and weaknesses!
while i can use the same anim on manny and quinn but i cant use the same animation on my both mixamo chars, i just imported them and they have the same skeleton tree, after retargeted the one anim i wanna use the anim on my both characters like manny and quinn (can switchable easily) can someone help me about it?


That will be because your two characters, while they have the same skeleton, have been imported as two different skeleton assets. Manny and Quinn are Skeletal Meshes of the same Skeleton therefore all animation assets are shared because animation is bound to the skeleton.
In your case, if you want to share animation assets, you will want to import one of your characters which will provide you with a skeleton asset and a skeletal mesh asset. Then import your other character but where you see the skeleton in the import options, you will want to select the skeleton of your first character so that they share a skeleton asset:

If I have a skinned character in a UE 5.4 sequencer and I want to export the skinned character and animation into Maya, how can I do that? All I see are bones and no mesh in Maya.
it’s part of the export settings when you try to export the animation - are you using metahuman?
I read you're trying to get into 1st person animation, i can confirm that yes using Blender, Max or Maya are preferable for working with these.
Could you elaborate on your question, tho? in case its just the camera settings its fairly straight forward, match the 3d program's camera resolution and FOV with your desired one in the engine and wuala (or however you spell this word).
Or perhaps it was a general question of how to achieve the whole animation to work and look that way as the ones in the video, but in the engine, with camera animations and the whole deal.
yeah so first question was on how to sync camera settings and height position of arms in relation to camera, because i guess blender and ue don’t share the same metric system.
and the other question was if someone knows good resources for making first person animations look good and smooth
i started yesterday and made a control rig in ue to test some stuff out but what i dislike or maybe don’t know how to use in ue is that the keyframe graph looks so overwhelmingly full with stuff that it’s very complicated to navigate around and change values
In terms of the camera height, this will depend on how exactly does your 1st person work,
Example, if your 1p is just a pair of arms and a camera. We'd have the camera, and the arms are just parented to it, (sometimes via a spring arm for added sway, etc).
The arms them selves would usually have their origin point at 0x 0y 0z coordinates in a 3d program, (like on the picture below) that way when parented to the camera, and their offset in engine just zeroed out, they would perfectly sit where they're supposed to be and look exactly the way you animated it in a program, and you can just adjust the camera height in engine as you wish, and the arms will follow.

Tho.. im not sure what kind of setup are you using exactly
yeah it’s just a camera with the arms as a children
For making animations them selves look good, i guess just skill is required 🤪
tho you can always just use other animator's work / games as reference 🤷🏻
Please advise on which approach to use when the hands and weapon have different animation blueprints, with a perfectly identical animation graph. There is still no synchronization of animations, even though the transitions have the same blend and everything is ideally identical. Nevertheless, I still have a desynchronization of animation movements. The animations were made independently in May, the animations are of the same length and everything works perfectly in Maya. What approach should be used in such a case when the weapon and hands are different objects, how to synchronize them?
I'm going to delve into Lyra, but I feel it's going to be a long journey 😦
not sure fi this is the right place to ask, but does anyone know how to do this? https://youtu.be/s1yEpFENvP8

A message in its most general meaning is a an object of communication. It is something which provies information or message; it can also be this infromation or message itself.
Luv you bro thanks i didn't realize skeletal and skeletalmesh are different things
does anyone know if there's a solution for inverting curves with weighted tangents other than manually adjusting them?


Hi, I am trying to get an AnimNotify to fire in my linked anim graph but it is not called. Adding a print in the master ABP shows that the anim notify is called. But to keep my code clean, I would rather handle the notify in the linked graph where it belongs. In my linked anim graph I did enable PropagateNotifiesToLinkedInstances. Anything else I am missing?
... buy their plugin?
there is no plugin, it was just clickbait, read the top comment.
You could multiply the result by -1 where you're using it.
but it's true someone did that somehow
Closest would be deformer graph or chaos flesh, but you won't get it work overnight
Yeah, you could do that with chaos flesh, but it would be tricky.
i don't need it to work overnight, i just need to be able to do it and at a reasonable performance for up to 2 skeletal meshes at a time
I wouldn't make the hands and weapon have different animation blueprints. Also - when you say 'no synchronization of animations' do you mean "completely different animations play" or do you mean "the same animation plays, but the timing is wrong"?
honestly the major issue for me isn't the softbody part, it's the collisions
Why?
getting collisions to be that accurate doesn't seem possible with physics asset
i'm not talking about the sphere i'm talking about the skeletal mesh...
The skeletal mesh would be the softbody part.
That's not done with a physics asset.
You'd need a lot of trickery for fully real time procedural smooching
Yeah, it's usually easier to animate it.
Hiding the point of contact is classic as well. An artfully placed candle can solve a lot of problems.
AC Unity is most likely bones and blendshapes, and that's a keyed animation
same goes for TLOU2 (as much as I hate mentioning it)
Both closeup kissees are rendered in engine, but it's premade animations
yes I know but the tangents not following is what I'm asking
OK, sorry. I don't think there is a tool to do what you're trying to do, because inverting a curve is an unusual activity.
Anybody know how to keep my character up in the air while doing combos.
This is the blueprints.

At least what I did for aerial hack and slash is switching movement mode to flying, then switch it back to falling on montage completed
oh really, is there a tutorial that shows that.
Hi, I used new skeletal editor tools to move the weapon bones of my character. But the animations are not updated according to the new positions of the bones. How to apply the changes to the animations?
If I have imported 3 skeletal meshes (each one LOD), can I pick those as LOD's for a skeletal mesh or do I really need to through each LOD setting and import from the base file?
thanks
Any help would be appreciated
Anyone know what might be happening to my animations ? The walk in blender is fine but in UE 5.3 the walk looks really odd yet the run looks fine
hi
I have a problem with BlendSpace, when the direction is calculated, when it is on the border, e.g. 180 or -180, sometimes it will go straight from -180 to 180 and then it looks strange, can anyone help?
How can you get rid of execution pins of a control rig function?
I see some tutorials have them without the execution pins and I don't understand how to remove them keeps telling me I can't.
my npcs now have a "dead" state, I've got the behaviour tree stopping, etc. But the animbp was returning to the idle state. Couldnt seem to google a good way, so I added a Dead state to the animbp, on bp update animation I check if the NPC is dead. However, it seems to be ticking too early and checking before the GAS system actually adds the base health, so it gets told its dead and doesnt go back to idle. How to handle this?
I don't think you can? Can you show one of those videos where they can remove an execution pin?
The only functions that don't need an execution pin are pure functions - ones that generate or return a value.
And they basically ride on the execution context of whatever they're plugged into.
Initializing animation BP's can be a bit of a bear.
Often, I have ended up in a situation where I need the animation BP to poll for the presence of something - often another component, or the fully initialized character, before running an initialize function that flips a switch and allows the full animation BP to evaluate.
So I'll have something on tick that is checking "Am I initialized? I'm not - OK, does the GAS exist yet? It does! OK, I'll run this initialize function which flips the switch to tell me that I've been initialized and activates the ability of the graph to evaluate!"
What are you using your blendspace for?
Changing the skeleton of a character who already has animations is typically something you try to avoid. What are you trying to do by changing the skeleton?
found one post to turn off auto-blend out on the death anim montage, and holy crap it seems to work.
Typically, if you're hand creating your LODs (which you don't usually need to do these days, Unreal's auto LOD system is really robust), you import them in one FBX file. When I was doing it, I used this video:
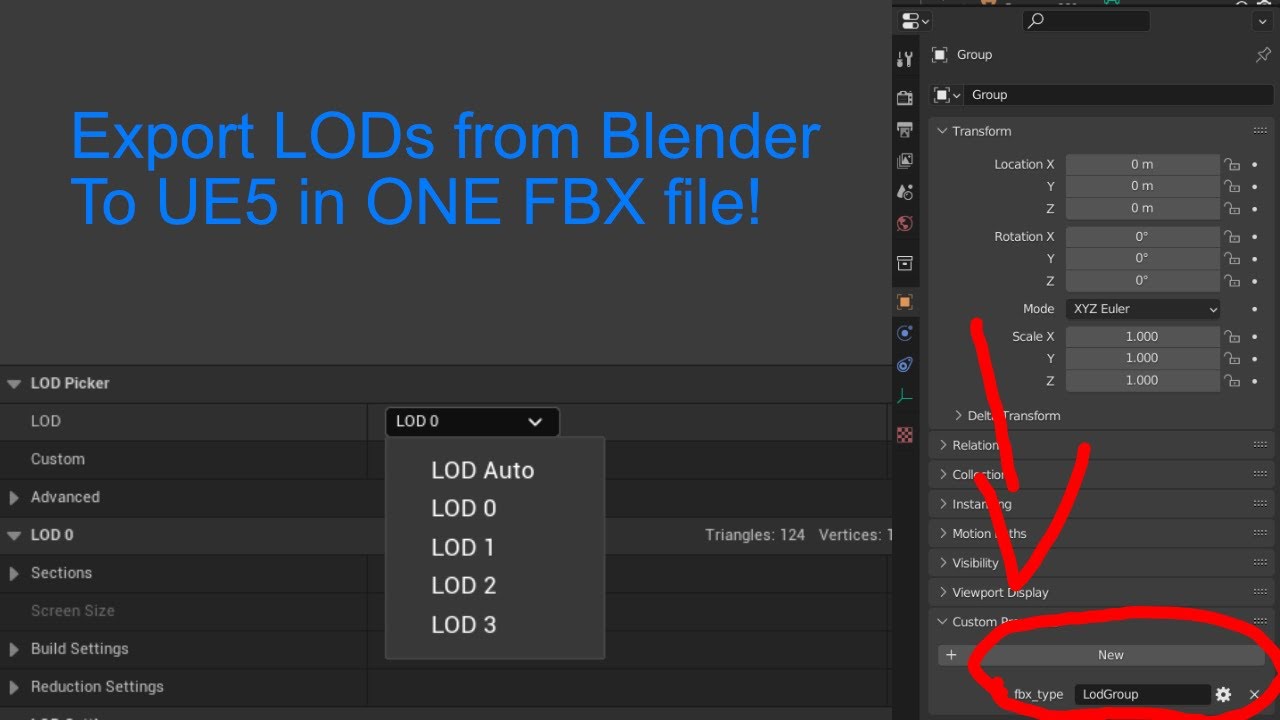
How to export LODs as a single FBX from Blender 3.0 to UE5
Software Used:
Blender 3.2
Unreal Engine 5.0
👍
Hello, thanks for the answer. I'm remaking an unity game (not mine) in unreal that's why. I solved it by just writing code in an editor utility widget that automates the import of LODs.
Hello guys I want to ask about this issue, I don't know why but when I move left or right my Animation become laggy and this video Explains what I mean.
Definitely looks like you have something fighting or delaying it.
Does the stuttering get worse if you move faster?
I don't try this
OK, might be worth looking into. How have you attached the camera and the arms to the character?

OK, so you have your camera attached to your character. Not the way I'd do it.
What happens when you disconnect your camera from your mesh?
Does the camera vibrate or only the character?
That's not surprising.
that clip after I delete the camera
btw I don't make blendspace or anything I'm only take the 3 animation from blender and I put it into ue5 3 animation is (Idle-Run-Shoot)
sorry I'm originally 3d artist and that my first time to make game and animation for game
Curiously, in this clip the issue isn't that the camera and the arms are disconnecting - they appear solid. The issue appears to be the characters actual movement.
How are you doing that?
You are ask about how I make system movement ?
That does appear to be a place you might want to lookl
I'm following this guide step by step until the blendspace and I don't know what the guide making than I stop
this is the guide https://dev.epicgames.com/documentation/en-us/unreal-engine/setting-up-character-movement
In this Tutorial, you will use either Blueprints or C++ to create a playable character that exhibits and smoothly transitions between different forms of...
This was the example I saw, it seemed impossible to re-create. In 5.3.2 https://cdn.discordapp.com/attachments/1177437083250462801/1177437502664093766/HeelTrace.png?ex=66646c60&is=66631ae0&hm=86726ed72dccf110efea5a8c0feb6613e3176ca6eb2a7ffc13af235783989091&

And this is final blueprint I make

Is there a "Pure Function" boolean on the function definition?
Not that I see no
Was told this solved my issue for anyone that has a similar one this was the solution.
"No they were just created this way. As long as I select a group of nodes where none of them have an execution pin, I can right click and collapse them to a function which will itself have no execution pins (also called a "blueprint pure" node). I'm pretty sure I originally had these nodes laid out within the larger foot trace function and then dragged to select and collapsed to function" By: @fossil sonnet
Yeah, that's what I was talking about. Blueprint pure. There should be a boolean for that.
May have overlooked it
My first time using control rig and animating so learning curve been fun though.
Is there a way to stop an Anim Montage Tick from running when a montage is open in the asset browser? UE5 keeps crashing when I open that montage
Maybe a conditional statement to check? that is valid only during play?
Hmm - in 5.4 I was able to just remove the execution pin?
I just clicked 'Remove this Parameter' on the execution pin.

It's so weird that they built another VM inside unreal and didn't make it work the same as Blueprints.
Never mind, GetOwner()->IsActorInitialized() seems to work
I'm not sure why when I hook up the basic IK the arms more a bit I'm sure it's a simple fix but after playing around with some setting I still haven't found anything.


What is the problem? I see an arm apparently reaching towards the target correctly.
I don't know if there's a standard practice for this, but if you want the whole upper body to be 'in control', you could try blending in the legs from the locomotion, rather than blending in the spine from the upper body.
I expect it might look a little weird, but that would probably do it.
Curious - and what happens if you reparent the mesh directly to the root capsule component - rather than having it be child of the skeleton mesh?
Also - did you ever have this working in a not jittery way, or has it been jittery from the start?
just when it's hooked up the elbow joint rotates a bit and off set the hand from the IK hand control
You have a lot of arm bones!
just wondering if it's something that I should care about. the IK works so that's good.
It's jittery from the start
The child skeleton mesh is for gun to sync gun with the arm
Sure! But you're trying to debug something, so sometimes you just do shit to see what happens.
ok I will try, But you don't think the issue from I don't make Enough Animation or because I don't setup for blendspace ?
I don't!
I mean - it's possible but I think it's probably some kind of structural problem.
yeb I agree with when we try to debug thing everything is possible, I will take your advice and try Multiple things then say for what happened thank you very much for your help and time ❤️
Good luck! I wish I could tell you exactly what's wrong!!
hi
I have created a MetaHuman with a tail. I rigged the tail's mesh in Autodesk Maya and attached the custom rig to the MetaHuman's body rig at the pelvis. Now, my question is, after adding the tail rig to the MetaHuman BP in Unreal, I added both the MetaHuman body controller and the custom tail controller in a level sequence. However, the body and tail controllers are not working together. Is there any solution for this?
I want the weapon bones of the paragon wraith to be at their respective hands rather than at the feet. I have edited the skeleton using the new skeletal tools but what's the use of those tools if the changes are not propagated to the animations? Using sockets instead seems to be a good idea but I wonder why the weapon bones even exist.
On my rig with animations should i enable these:

And change the drowdown from "Always Tick Pose" to "Only Tick Pose When Rendered"?
I have 2 animations in my animation blueprint for my sword one for equipping it and the other to use it. How can I make it to play the use animation only once and go back to hold animation (the end of the equipping animation) after the use animation finished?
It depends on your use case. If you are going to hide the mesh in the game , you can set "only tick pose when rendered".
For example, I made a small fps game in January. In that game , I hid the default 3rd person mesh completely and used the first person arms mesh instead for rendering. For natural head Bobbing , I had parented my camera to the head bone of the 3rd person mesh which was set to be hidden. However, the head Bobbing didn't work because "only tick pose when rendered" does exactly that! So in that case I had to switch to "always tick pose" so that the animation pose is gonna tick even when the mesh is hidden. I hope you got the point.
I think i get it, so the 3rd person mesh had the head bobbing animation, but you hid that rig beacause you only wanted to show arms. BUt the arms rig dosent have the head bobbing. So therefore you wanted to change the 3rd person mesh from "only tick pose when rendered" to "always tick pose", so that even though the mesh was hidden it would play headbob animation?
Yes exactly it is!
By "tick pose" it means to play or update the animation
okay, thank you for the example.
You are welcome:)
what would be the best way to make smartphone animations in unreal ? lets say i want to make lockscreen work , integrate an app inside the phone to which i could interact using mouse
im trying to use widgets but animations that i create dont work in game but in designer tab it works
Anybody know how to keep my character up in the air while doing combos and then have them fall down.
This is the blueprints, I'm not sure how to make it work.

Hello, is there anyone with experience making modular characters who can answer a small question for me pls?
@nimble torrent Hi, sorry for ping, i have a problem, i want to implement turn in place feature to my player, i have disabled "Use Controller Desired Rotation", but it does not help and player still rotates with his legs sliding, am i missing something?
Hmm - I'd consider 'Use Controller Desired Rotation' to not necessarily control whether the character has turning movements. It controls whether the characters pawn points in the direction of the 'mouse movement' basically. You can include turning animations when you do this, but the movement tends to be abrupt and it's difficult to make it look good.
Do you really want the player character to rotate only using animations? That seems very slow and unresponsive.
Sure, have you read the 'Working With Modular Characters' page?
Create modular characters by combining multiple dynamic skeletal mesh components in Unreal Engine.
No, like in this video: https://www.youtube.com/watch?v=4iVqMXAplQ4&ab_channel=unrealmagic

have aim offset and when rotate more than 90 degree it should rotate and play turn in place animation
my course link:
Join this channel to get access to perks:
https://www.youtube.com/channel/UClYR7ilx78ng-vol35LHm-Q/join
Off the top of my head:
You need to detect that you are in a combo in the air.
You need to turn on flying movement on the Character Movement Component when you detect this.
You probably need a counter or some kind of limitation so people cannot combo indefinitely in the air.
Video timing: 2:15
I need to make my player not slide his legs when i roteting in idle anim
OK, and when you disable the 'Use Controller Desired Rotation' boolean - your character still rotates in place?
Yeah
OK. Are you separating the upper and lower body of the character with an aiming system like he is?
And when you print the yaw, what do you see?
I haven't seen this part, what timing of vide?
Sec, let me see
What do they do instead of work? I'd probably use widgets, but I might end up rendering them to a texture and applying the texture to the phone - as there might be some z-fighting weirdness.
It really depends on the exact scenario in your game where you're looking at the phone.
It's not in the video, from what I can see. He already has it implemented in his character.
Hmm, i don't really know, like i have head rotations
Body i mean
Like Up and down

Like this
OK, well - in the video, you can clearly see that his character can rotate it's upper body to look around. If you don't have that setup - your character won't be able to do that.
I hadn't watched this guys videos, but maybe he has another one where he shows how he did that.
I have this for sure
This
0.0 like
It does not change
OK, well that certainly sounds like you're still rotating the character somehow.
Because, as you can see, in his video - he gets a value from that between positive and negative 180.
You probably need at least on more animation - an Idle with the character holding the sword. Then you can use a State Machine to control which animation to play.
Is that how you were trying to set it up?
OK, but then he disables the turning option.
I have checked and it is not CR issue
Yeah, but mine does not change anything
OK, is it possible that you are setting the value back on somewhere else in a script?
What happens if you print that boolean value?
Which one?
I don't think so
I can't even imagen where i could set it
The boolean value for 'Use Controller Desired Rotation'.
I would try printing that, just to fully confirm that I definitely had it disabled.
Because it really should stop rotating your character when you do that.
Well, I'm not sure what's going on then. It certainly sounds like your character is still somehow rotating with the controlled rotation.
So that's weird.
Could it be idle animation issue?
If it were me, in your situation, I would probably open a new third person project with no multiplayer in unreal, and try disabling it.
That seems very unlikely to me.
As the problem is directly related to the fact that your character's movement component appears to be ignoring one of it's own values in a way that makes no sense.
Yeah, i understand it
Do you mean make new project and migrate player there?
No, I mean really just start a new project and try it with Manny.
Because it sounds like you have a problem where the engine itself is broken.
Hmm, let's try
Like, based on what you're saying, the 'Use Controller Desired Rotation' boolean appears to be being ignored by the engine - which should not be happening.
So, if I were in your position, I would make the simplest possible test to confirm if that was the case.
Does disabling this boolean affect the example character that Epic provides?
What is it doing instead of working?
If you have an animation created for a different skeleton - you probably have to use a retargeting system of some kind (in Unreal or outside of it) to make the animation work with the new skeleton.
Hm, in default ue Third Person Char it is already disabled
And it does not rotate at all
Or i need to create head rotation system?
I would not do that.
When you say 'does not rotate at all' does that mean that it gets a positive delta yaw value if you print that out like he did?
That's good to know!

Hm, so what i can do from here xD
Wow

Could it be the issue?
Set Movement Mode?
It might be! That's seems odd though. Why set that there?
Idk really for what i did it lol
I think it is from when i just started this project, i really don't even remember doing this
What it even do?
I'm not sure. Unplug it and see what happens.
Hypothetically - your character movement component should already be set to walking.
So it should probably not do anything.
It seems it does not do anything, but now i can't see for some reason print
Ah, my fault
Hm, it is still at 0.0, but in one spot it changes to -0.0 for 1 frame or so


I have checked entire player script, i can't see possible issues
-0.0 doesn't mean anything.
And yet - one still exists. What happens if you make a new character and just try to turn off the rotation option and observe the yaw?
I can try to migrate manny in my project
And try like this
That's an option!
Cool! So now you just need to figure out how yours is different!
Yeah... Xd
not really, I gave up on the old design and just use animation montage, it is more flexible too
Neat! Good luck!
Do you have any advise where it could potentially be?
No, sorry.
As i can see all Char Movements are the same basically
So maybe it's not that? Personally, I would either start rebuilding my character from scratch, building a version that I can confirm uses the boolean value on the Character Movement component properly and then I would start rebuilding my systems slowly to figure out where I went wrong.
Or, you could do the opposite, start disconnecting and taking things out of your existing character until it starts working.
Pick which end to start from, and do that.
Ohhh, okey, i will try t odo that
Thanks a lot for helping, sorry for bothering
Ah, also
Wow
What
When i started 2 players it does work

It still rotates with my legs
But Client does sent the info
Multiplayer is a nightmare. Good luck!
I'm trying to use the ControlRig with an existing AnimSequence. I'm editing the Loc/Rot of bones using the CurveEditor.... is there a tool, menu, plugin, or technique to optimize the curve? The sequence has so many key frames on every curve when really only ones that change direction are needed. I circled a few in my image.

I don't know if there's a filter tool, but you can just delete those keys and use a tangent.
Is there an easier way? With 72 frames, 50 bones, an XYZ loc,rot,scale for every frame that's so many.
Not as far as I know, and in general - if you're working with key per frame data, you typically do not want to simplify your curves in that way, as you tend to want to keep the nuances of your mocap.
I can't imagine a scenario where you're doing an operation to key per frame data where you would want to apply that kind of abstraction on a wide scale.
If it doesn't change how the animation looks deletion of excess keys would result in a smaller file size? If you have thousands of animations that could really add up. Though, that's not my goal here. I'm trying to edit this animation to look like instead of picking up something off the ground you're opening a small door close to the ground
Smaller file size maybe, but I believe the compiled and shipped files are compressed. You're working on a baked version in the control rig, not the actual byte-values of the shipped sequence.
So it is doing kind of what you're suggesting, but to all the animations in your whole game.
As for editing it - you don't need to modify the entire body, just the arm.
So that substantially reduces any potential workload.
Also - you're probably controlling the arm with a single IK - so... it's one control, maybe?
Locomotion
Why is your range 180 -> -180 then?
That sounds like a rotation.
Does anyone know why the animations I just imported to my project are doing this?
I have zero knowledge of how animation works so as simple English as possible please 😅
This is what it's supposed to look like and what it looks like in the asset
what could be the cause of error Accessed None Trying To Read Property
No property is set
So far seems like IK system is affecting your animation, make sure your animation got the IK bones properly keyframed (if they not yours the animations then you need to transform your animations foot bone into the mesh IK bones, basically mess around with the IK system thats what it looks like it might not even be that 🤷🏾♂️)
They aren't mine, I picked them up off the market. That being the case, nothing you just said means anything to me so care to dumb it down for an animation idiot like me 😅 ?
Lmao its fine lets see if i can help, first off are tou using the “Manny_ABP”?
I assume you're meaning on my character, which this is the setup rn I haven't really messed with it

Quinn ABP might work too but i rather work with the source to know what im sending to the childs of the main BP (Quinn is a child from Manny so any modifications in source needs to be done in manny most systems) in this case check if Quinn is using the node “Control rig” a black node in the AnimGraph in ABP_Quinn
Would it be in that heirarchy in the top right? If so I don't see it

That works too theough that hierarchy but its quiet complicated for your case, open ABP_Manny and you should see this

If it opens in EventGraph just change to AnimGraph and this is the view
Click twice on that black node “Control Rig”
Yep got that

This should be the view of control rig

Mine are more wiggly but it seems similar

Next step is to upgrade the sequential node (right click on it and should give the option to upgrade node)
K done
Add a pin on that sequential node, move all pinned cables down and leave the first pin empty
On that first pin add this exactly like this

On the “set transform bone” node open the pin “item” to choose the bone it comes closed so you might miss it, after that try the animation and let me know
You have other fix too, its by adding Virtual Bones and Replacing all IK foot bones for those Virtual Bones (literally would have to be in all system using hes IK original bones as well)
Yeah seems like the animation IK bones is not properly keyframed, remove the control rig node and try again (even if foot slides its fine we just need to see if its IK messing around)
Yeah this is good issue might be animation itself
That worked
The issue then is the IK bones in the animation itself, my fix for that is to export to external software for animations and adjust the IK bones to the foot bones
So in other words I'd have to go manually adjust every single animation? (And also learn how to do that in the first place)
Basically you have to copy all foot bone positions in all frames and past them in IK foot bones in all frames if that makes sense (now not sure if there is any shortcut for that tho)
Well I'm in contact with the animation author so that might just be information I pass along 😂
Yeah just ask whats the situation with the IK bones and if he knows of a fix or a workaround (although let me honest learning animation its major in gaming wouldnt be bad for you to learn as well if you got the time 👌🏾👌🏾)
I definitely plan to at some point but right now I'm getting the systems in place that need to use the animations since that's the part I actually know how to do lol and since I got these from the market probably best that they address the issue so it can get updated anyway
Indeed take your time, i started like you after 6/7 years im officially TODAY making my official animation set for my project 😂😂
My first official idle animation and not finished yet lol
Congrats, that's awesome 🥳 I just graduated last August for Game Design so I'm still getting stuff together to demonstrate that skillset for employer's and such, then I plan to branch out as needed
Looks decent for an idle, gives ninja vibes
Massive congratulations man one of the things im trying to juggle see if i could finish my studys (came from poor background only now im having the chance to grab few opportunity’s eheh) but congrats man you 100% doing right! And thank you very much the aim is exactly that for a Ninja style of game ahah
Well I wish you the best and I appreciate your help pinning down the issues I was having 😁
hi - does anyone know if there's a way to expose the data value of a livelink face blendshape in an animation blueprint? for example, mouth funnel 0-1 value?
When you say 'expose' what do you want to do with it?
Because you can set that value.
But I'm not sure how you want to interact with it.
well i have a bunch of blendshapes per meta's movment sdk, i want to connect them to apples arkit blendshapes
the problem is, something like meta's lip funnel blendshapes comes in a set of 4, whereas apple's is 1
so ideally, id like when apple's lip funnel set to 1, all four of my lip funnel blendshapes will be set to 1
OK! Should be easy enough. In your animation BP for the face, you can use 'Get Curve Value' and 'Set Curve Value' to link those curves together.
ah amazing!! thank you i'll try that!!
my mage enemy attack montage, I'm using montage notifies, but its only triggering the first one on the PlayMontage OnNotifyBegin. why not each notify?
It definitely should be. How are you using them?
in the montage, I added 3 MontageNotify's. Then in the BP that plays the montage, OnNotifyBegin I have it do the trace and spawn a projectile
Oh, OK, so when you say 'I added 3 Montage Notifies' you mean that you connected three of the output pins from Play Montage.
All right, so what are the On Completed and On Interrupted pins doing instead of working?
When you put a breakpoint on 'End Ability' does it ever trigger?
no, in the montage, there are 3 seperate notifys on the notify track
What about a print statement?
OK, so did you custom code those notifies?
Animation Notify is a class, it can be subclassed iirc.
Though it's been a few years since I did that.
no, just the standard "MontageNotify"

yeah, previous screenshot
it fires a projectile at the player, originally it was just one, but I wanna have him do a spread shot type thing
its possible I'm going about this completely wrong?
Hmm - I don't think so.
Why is the third 'StartAttack' blue there?
And you're certain that these are Montage Notifies and not normal animation notifies?
Hmm
I've never played around with these.
Have you read this post:

Have you tried giving them different names?
Rather than all being 'StartAttack' try 'StartAttack1', 'StartAttack2' etc.
yeah tried that, didnt work
I dont understand the post. when I select the montagenotify, it has an option in the details panel to choose a name...
This was from five years ago.
OK, are you 100% sure that you're not hitting all three?
Like, have you used a breakpoint?
Or are you relying on that print statement?
relying on the print statement. I have just given them 3 different names, and have fed the "notify name" into the print
OK, and I'm guessing that also didn't work?
Have you tried deleting all of them and recreating them?
Have you tried copying the one that works and moving it?
If you copied the one that works and moved it - have you tried creating them fully uniquely every time?
deleted and recreated, copied, moved, swore, ....nothing. I even put a print statement on the OnNotifyEnd and it doesnt print
You tried a different montage?
Like - are you sure you're using the correct montage?
(unreal is shockingly bad at surfacing important details about the animation system - especially around montages)
(it's very weird)
only have the one attack montage
When you say 'moved' - did the one 'Begin' notify actually move to a different point of the animation?
yup
yeah and google isnt returning anything good or helpful
At this point, I would definitely grab a random animation throw it into a new montage and try that.
I would try playing the montage from other parts of the game (not just inside the GAS ability).
I would test if animation notifies inside normal animations are working.
There are still avenue's of exploration - but you're going to have to start getting creative.
I've got a death montage, that plays particle effects, and a custom animnotify that makes my enemy dissolve, and that all works fine
Neat!
For attack animations (I'm making them) should I use root animation or animate in place?
I never really get a clear awnser for this
The answer to that is going to be extremely contextual.
So I'm not surprised the answer was a bit fuzzy.
I think it must be bugged in this engine version with the montage notifys. Finally found a video that actually USES them, and it works just fine the same way I have it setup. One difference, when he creates the montage notify it is called "PlayMontageNotify" from what I can tell, the name is cut off, but in the details panel it shows "None". On mine, it is just called "None"
I'm not even seeing a AnimNotify_PlayMontageNotify in the source code, so who knows where that thing is coming from
I think the way engine naming conventions work it would be in the source code just as 'PlayMontageNotify'.
I think.
the other engine default ones are there
Neat!
So maybe its tucked somewhere in the editor code, or in the BP implementation of PlayMontage. but looking at engine code gives me a headache 😦
I'm gonna have to make my own notify to fire the projectile
Possibly!
There are lots of ways of doing it.
It's odd that it isn't working the way it should.
yeah. Tho I did discover that I should update my engine version. I'm on 5.4.0, latest is 5.4.2 apparently
maybe theres a bug report in there somewhere
hm, not in patch notes. ah well
Oh hell. I'm an idiot.
On NotifyBegin - fire projectile - END ABILITY. I had it ending the ability after the first projectile
now it works. 
Aaaah!!
That makes sense!
I'm glad you figured it out!
Squishy is right, it all depends on how your using them in game.
Anecdotally, anytime I've made attack anims for third person action, mostly melee. They have always been built to include root motion because we had the player move forward with every strike, in that sense, as an animator your work heavily influences gameplay and feel.
That said we also implemented a lot of warping (this was before motion warping was added to the engine) to "help" the player in cases where you want to orient toward a target or nudging the character slightly to have attacks connect even if they're slightly out of range.
Conversely, something like botw has Link's basic attacks animate in place.
Thankyou for the response. I was mainly focused on third person action and you gave a good explanation.
What is the most efficient way of having the same animation blueprint logic, but with different animation assets, for different characters?
Like if I have 5 different skeletons, that even tho have different proportions, have the same bone names and hierarchy. I want to have the same animation blueprint logic for all of them, but inside the animation blueprint use retargeted animations for each of them.
I noticed the Template Animation blueprint thing, but didnt find a way to specify different animations for different skeletons.
This is a good way of modelling things, and Unreal has direct support for it with 'Child Animation Blueprints'. You don't need to use Templates.
Which is good, because Templates are weird and not... fully supported yet.
Possibly, but you probably should look into it yourself. If you can't determine this, you have a major problem on your hands because being able to look at something and figure out what's going on is essential for the 10 000 other tasks necessary to create a video game.
Talked with the anim author and they showed me a video to fix it, turns out you had the right idea, we just had it backwards which in hindsight makes sense because we were setting the foot bone to the IK bone's position when we wanted to do the opposite, that's why it was always stuck to the floor
Makes totally sense then 👌🏾👌🏾 although good tip as well thank you next time ill look into that sense too didnt even crossed my mind ahah 🙌🏾🙌🏾
Did you ever figure this out?
I'm trying to do something similar: I have three animations in a blend space, and I want the left hand of my idle anim (clenched fist) to not blend with the other two (walking and running) so the output always has a clenched left fist.
I set Sample Smoothing > Per Bone - Blend Profile > and then for my Blend Profile "LeftFingersMask" was an option. I assume it was auto-generated, because no other Blend Profile options were that specific.
But, if I play with Weight Speed, it only changes how fast it blends, not whether or not it blends.
So I want the speed to be 0.0, but setting it to that appears to just turn off the Blend Profile instead of setting it to no speed.
Also, anyone, if there's an easier way to do this, like just copying or saving a hand pose and then applying it to other animations, please let me know. Obviously I can manually set the finger position for each animation I want to alter, and that would fix this particular instance (just 2 other poses), but I hope there's a more efficient and scalable method.
Hi all, I'm reading through the documentation for Pose Search and noticed the block transition tags. I was wondering if there was a way to positively tag areas of each animation so that Pose Search will favour that area under certain conditions.
For example, when the player transitions from walking to running (and vice-versa), I'd like to be able to tag areas of the animations with something like 'accel' and 'deccel' and then Pose Search would favour those tags for the brief time while the charatcer is changing between the two databases.
Does anyone have any ideas about the right way to go about this?
You could use Layered Blend Per Bone after the blendspace to blend in the hand position.
just reading through the documentation, would this be what you're looking for? haven't had a chance to properly look at the ue5.4 motion matching yet but this is similar to the mosymph plugin that i have used :)

hi, thanks for looking at this. Cost Bias could be the solution, but I'm not really sure how to tell the database to only favour certain animations some of the time. The bias system seems to be something you set in the editor and it can't be altered at runtime.
It's like I need a way to tag parts of an animation, and then tell Pose Search to favour that tag for a brief time, then ignore it the rest of the time.
The only way I can imagine an alternative is to make separate databases, each with speed-up / slow-down animations in and then switch to those during transitions for a brief moment (like 0.5 of a second). But that seems needlessly complex vs just being able to favour different parts of one database as needed.
have you tested setting the bias for those animations on accel/decel, does it not give the right results switching between the movesets?
I'm not sure how I set the bias at runtime. The other issue is that I have long motion matching animation data, not short sequence loops. So I can't just choose a few short animations, it has to be part of longer animations (30secs - 1min).
not setting it in run time, but just setting the bias in the edit window and seeing if it gives you the right results?
doing that causes the system to chose those animations over the others at all times. Even when the player is just moving at full speed. Once particular segments of animations have a greater bias then the system chooses those more often.
gotcha
It would work if I could alter the bias weights of certain sections at runtime - in the same way tagging would.
there's a section of this video where they talk about the Continuing Pose Bias: https://www.youtube.com/live/RuYHfVKfrMM?si=oFx4nBz3J_0qJTXw&t=3402

We'll be sitting down with some of the team this week to discuss & breakdown some of the key features in the latest 5.4 update. From rigging, to rendering, t...
I do think that a clip length of 30sec to a minute is probably too long for what this MM solution might expect, i'm just speculating but from what i've seen the system is often bult around a sparse set of data of fairly short clips
ha, I literally just came across the Continuing Pose Bias setting a minute ago. Thank you though, I'm going to play with it.
I agree with you that most examples of Pose Search have been using sparse looping sequences. This is most likely because that's what most users will have at their disposal when coming from the legacy animation system in UE. However, from what I understand the value of MM is the ability to gain 'coverage' from more dense sets. I've been working with Motion Symphony for a couple of years and that yields great results with more data (eg. longer dance cards).
I could be wrong, but I think Pose Search really shines when it has more coverage to work with.
yep I linked the info about Continuing Pose Bias because it was mentioned above by nat.
you might be right about dance cards, although I don't know that Epic will provide a setup which involves a dense set of dance card data because it's not the solution they went with, so you might be doing a bit of RnD with the system by going down that route. Whether their MM solution is built to accommodate that, I'm not sure. I haven't seen any mention of animation mark-up or tagging involved in Epic's MM setup

Oh no, I tell a lie, there is some mark-up. But it seems optional? https://dev.epicgames.com/documentation/en-us/unreal-engine/motion-matching-in-unreal-engine#motionmatchingnotifies
Use Motion Matching to create responsive animation systems, that select animation poses from a database, to match a dynamic system query at runtime in U...
I have an anim notify state that doesn't use tick(1), but when I make a new one it only shows the tick version(2). Any ideas how to get the one that isn't a tick? I have something I want to do once not every frame that the AN is true.


The other way you could handle this is with Choosers which is used in tandem with MM from what I can see. so you have multiple databases for transitions, jumps, cycles etc and you "choose" them based on conditions
Yeah, I started off by saying that there are some limited tagging (mark up) options, but none seemed to be anything that could be selected at runtime
yes, that's what I was describing here - #animation message
however logical that might be, it seems burdensome to do all of that for brief moments of animation. Especially when those sections of animation are already in the active database - I just want to target them for that moment.
I could either use choosers or just set up the individual DBs as nodes in the anim state machine - either way it's a massive amount of complexity for something that could be simple. Motion Symphony had this option to use 'traits' and select from those as needed. Very useful functionality.
i guess it's a matter of where you put your complexity, choosers is one way, detailed markup in something like Motion Symphony is another way.
I will say if you're going to go down the route of making separate DB's, putting all of them in a state machine seems like the work that Choosers would do.
it's also compounded by the fact that Pose Search is weak at blending between databases - it falls back on traditional transitions in the animBP. It's better overall to have fewer DBs and to let the internal logic of each DB choose and blend the animations.
Yes, you're right, choosers are more tailor-made for that kind of work. I just really dislike distributing the 'parts' of the animation pipeline. If it can all be kept in fewer places it's easier to debug. Having it sprawl out across multiple BPs multiplies the headache later.
hey, im having issues with my animations from blender, when i imported them they are motionless, and trying the to unreal plugin didnt work either
just a personal preference
that's fair, especially when these systems are described "plug and play" 🎉 , which is generally true, until you have specifications lol
can you provide a bit more info about how you're exporting/importing?
exported as fbx, imported as fbx
but then its motionless
if it's a notify state, that would be something that happens over a fixed duration? would a single notify be what you're looking for?
yes, it's very easy to end up with a dozen BPs just to get a simple walking / running system going. I understand the logic of it all, but it's really fiddly to debug when you have so many potential sources for any bugs.
yep, how about the specific settings and what you're selecting on export etc?
i didnt change anything
Thanks for your time anyway 👍
No, I need a duration because I'm waiting on player input to make it happen... trying to build up a combo attack.
absolutely, you're aware of the rewind debugger? might be handy depending on where you take your setup
np
may be going about this the wrong way as I havent made combo attacks before
yes, that is one big advantage over other MM systems. I've yet to dive into it, but it looks very useful.
okay, got a screenshot? it's hard to know where things are going wrong without some details 😅


So something like an input window? I agree that a notify state seems like a good solution, I'll have to have a dig around. That said I'm sure there is some good info around about buildig combo systems
yea exactly - yea I'm using game ability system so it's a bit limited, thanks anyhow.
Judging from your skeleton hierarchy it looks like you have two sets of bones in there? so it looks like your skeleton may be incorrectly set up.
assuming everything exported correctly, it might even be the case that your other set of bones is the one which is animating but they're not skinned to the model
how do i fix that? i dont think i added two skeletons
i only have one set from what it says in blender, maybe it exported weird?

or am i completely missing something lmao
I was gonna say this looks like rigify based on all the extra bones. LIke here, you have two spines:

so rigify messed it up?
well, no
all of blender's rigging setup is built from bones and constraints, all the controls are really just bones with shapes 🤪
that's fine for blender, BUT for the game engine we dont want those extra bones, you want to have only the bones which move the mesh.
There's a setting in the export dialogue for Only Deform Bones, you want to ensure that is enabled when exporting the character initially to the engine
lemme re export with that
This isn't specifically for rigify but it's a good video explaining how to export from Blender to Unreal with all of the quirks: https://youtu.be/YbWfoyf4MqI?si=Kz0zNHNazKOQVHLj
In this video I will show you how to correctly export a character from Blender to Unreal Engine 5.
Common mistakes include issues with the scale of the root, joint orientations and differences between bones and joints. In this video I will talk about everything you need to know to correctly export rigged characters that follow Unreal Engine sta...
I will say unless you're 💯 on what you're doing with it, rigify is not very friendly for game rigs.
it can be done, but there's a lot of gotcha's
tyyy bc i was planning on setting all my animations up tonight still have to make some of them
goodluck, happy to help if you have more questions. Although the video should be perfect, your character is almost identical 😅
yea lmao im surprised i couldnt find anything similar lmao
Hi, i am having some troubles with ragdolling.
On my Enemy i have a main skeletal mesh which has the anim blueprint running and multiple skeletal meshes attached to it, that just run a simple copy pose.
When i want to ragdoll i do
GetMesh()->SetCollisionProfileName(TEXT("Ragdoll"));
GetMesh()->SetAllBodiesBelowSimulatePhysics(TEXT("Pelvis"), true, true);
with this result. The child meshes seem to still run the animation...
it keeps saying this, but theres only one root bone


yeah so, in blender you have the Root, Hip_R and Hip_L at the same level as the root, which means that the engine sees each of those as a root bone. It's a matter of the hierarchy not so much the name. If you parent the hips under the root and then re-export that issue should be gone
how do i do that?
google is your friend 😅

np 🦇
So you're running a modular character? and simulating physics on the main skeleton. It might be related to this physics limitation on the modular characters documentation: https://dev.epicgames.com/documentation/en-us/unreal-engine/working-with-modular-characters-in-unreal-engine?application_version=5.3

Create modular characters by combining multiple dynamic skeletal mesh components in Unreal Engine.
so, when using it as my character, the legs shifted into the body and now its clipping into the floor 😭

this is running an animation? When you watched that video, did you confirm that your scale is correct when exporting/importing?
i had the scale fine, but i didnt import any animations, just the mesh
so you brought the skeletal mesh in to the scene and it changed shape?
and scale

the scale in blender was normal, and was what the tutorial said
but now its starting giant then small when moving
now staying giant
right, okay so you have reexported the skeletal mesh at the correct scale? But not any animations?
If the old animations are playing then that would be messing with scale because presumably you have exported two different scales.

none of the old animations should be playing bc they werent mapped, the only movement was just the mesh sliding around
root scale is 1.0 which is a great start, but that also shows why your mesh is clipping into the ground. The root should be at the bottom of your character, between the feet on the floor. THat way it lines up to the bottom of your capsule.
oh
The scale though, hard to know my only guess is that you've made your character 100x too big, can you show these details on the left. This should show the size in units, and it looks to be in the tens of thousands 🙃

it shouldnt have, idk why it did lemme redo it
can you also confirm, is the root the first bone in the hierarchy?
should i move my root bone? after reimporting w a fixed scale its not clipping anymore

I would say yes, it's standard practice to have the root on the floor at the origin and a scale of 1.0
can i animate in unreal? blender isnt letting me now idk why,
and id use mixamo, but it keeps erroring on my model, and my character has no arms,
It should 😅 but yes you can animate in unreal, you'd need to build a control rig inside the engine: https://dev.epicgames.com/documentation/en-us/unreal-engine/control-rig-in-unreal-engine?application_version=5.3
Rig and Animate characters in real-time using Control Rig.
I don't have much to offer on mixamo
im trying to animate a model i made for a jumppad, it has no bones is just animated w scale in blender, how would i import that to unreal?
Static meshes i.e. meshes without bones, don't support animation. Something like this might be achieved through timelines in the editor, you could drive the scale with a curve
would i be able to do that everytime the player hits it? how would i set up that timeline?
timelines are set up in blueprint, and yes you can play a timeline from an event, you can fire that event each time the player presses it/lands on it
how do i change the scale of the mesh w one?
What is the Set Relative Scale 3D Node in Unreal Engine 4
Source Files: https://github.com/MWadstein/wtf-hdi-files

What is the Set Actor Relative Scale 3D Node in Unreal Engine 4
Source Files: https://github.com/MWadstein/wtf-hdi-files
Im using motion warping to turn and move the player character to the item, but the legs look abit stiff in the turn and moving, does anyone have any recommendations on how to make it look a bit more polished?
with something like motion warping, it's only going to move the character to the desired location/orientation. It wont create any additional motion for the legs/body as it does this.
Presumably this is a montage being played, so if there are no steps in the animation, then the warp will make the character look as if it's sliding
@viscid willow Yea this was what i was thinking, the animation just has like one step forward as he leans.
And only AIControllers can use the move to location with the return boolean so thats a shame.
To make it more believable, you could take a more distinctive step at the beginning of the animation to sell that that the character is turning/moving.
One thing to bear in mind, when turning, we lead with the foot which is in the direction we want to turn in. So turning right, lead with the right foot. So you cooouuld make two montages, one for each leading foot and play the appropriate one based on the angle to the pickup.
I had done an animal skinning mechanic that was similiar a while ago, wasnt this tough xD
@viscid willow good tip thank you. will keep that in mind
There's a joke about multiple ways to skin a cat in here somewhere
Im guessing because the location is on the ground and not blocked by a surface like the Item Pickup might also play a bit of a part
nice, and yeah in that instance it's almost like you can play that animation ambiguously near the animal and it would be acceptable
Yea there i have it checking and choosing a random skinning socket location on the animal so was a bit more forgiving. Just cant remember how it moves to the target so well lol
Just my two cents but in the skinning example, the character doesn't translate or re-orient much at all so I think that goes a long way to making it feel natural, relying on motion warping in little bits rather than applying a large change. Watching it again, are they even warping? 😅
makes sense, and hmm actually yea its hard to tell in the animal one lol, but i could of sworn i was using it in that project.
is anyone able to help me out?

i have this pistol that is above scale but when i try to control rig it using modular rig it scales it down so much


when i add new controll points their biggert than the gun itself
i dont know how to fix
please at me if your able to help me ❤️
As in the IK goal for arms or the whole limb bones?
im not sure, quite new to animation as im mainly a programmer 😅
im essentially just trying to bring the arms out a bit so there not so close to the torso
nvm think i found it, static offset + pole vector offset on the ik goals
Seriously? What makes you think posting this picture is okay
oops, completely forgot, removing
1 unreal unit is 1 cm. You should fix the scale in your 3d program if the scale don't match.
Yeah, for the former, you gotta try it out with existing animations
In your 3d modelling program, change units to cm. Then export and import again
You can edit the bones too in the animation. Eg in your idle animation asset, select the bone for the arm, rotate it so it's more apart from the torso. Then hit s to save the bone transform.
Make sure to do it on the first frame.
I have a animation within a animation blueprint, basically the walking animation. How can my player actor blueprint listen to the animation notify that's playing within the animation blueprint? I don't want to play the sound directly from the animation because I want to add custom logic to making the sound
Using interfaces is one way to do it, after getting the owning actor of the mesh
the moting matching database works well with the root motion as got XY position or velocity to let motion matching to choose, however for inplace animation or jump animation, any idea how to set up correctly. How motion matching know when is start jump, end jump ..etc. just can't wait for the demo, anyone have idea?
Make a custom notify, on begin notify, get owner, cast to your custom bp, run X function from there
Does live ik retargeting break physics simulation on the target mesh? I have a tail that has constraints setup and it seems to work as intended when simulating the ragdoll but not on the live retargeted mesh
Hey guys
I'm having an issue and I'll be really thankful for some help
I'm trying to retarget an animation blueprint from lyra character to my character
I can retarget each animation individually. But if I try to do the anim blueprint nothing happens
My Skeletal mesh might have some issues with bones. But the individual animations still work good enough, so the anim bp should work also
Hello everyone, I have an animation playing at different rate like 4. This animation as an Anim Notify but the notify does not seem to care about the speed and triggers as if the animaition was running at normal rate. Anyone knows how to fix this issue?
EDIT (SOLUTION): I also exposed the "play rate basis" parameter on the animation node and it seems to fixed the problem which is very odd!
PlayRateBasis is just the scale value for the play rate. So if you set it to 100, then PlayScale is out of 100.
So... that's odd!
When you say' try the anim blueprint' what do you mean? How were you retargeting the animation blueprint?
Also, what do you mean by 'nothing happens'? Does the character disappear, do they t-pose, do they play the wrong animations?
Motion matching relies on root motion. I don't think it works for animations that don't have them. You need root motion to calculate velocity.
What does it do instead of work?


