#animation
1 messages · Page 27 of 1
Dm me
Thank you so much
lol
oh haha
Perfect thanks so much!
Hey has anyone got experience animating fps anims in blender and then bringing them in unreal
How are you able to set up the blender camera so that it matches the unreal camera
so that the views are the same and you can see from the same perspective in both programs
Sometimes you animate a fps anim in blender and it looks fine but bringing it in unreal its not positioned properly due to the difference in cameras
I would like to integrate animated 4D characters from animaAXYZ into Unreal Engine. I have downloaded their software and a few free models, created my project in animaAXYZ, and then imported it into Unreal Engine using their plugin.
The problem is that the character animation stops after 2-3 seconds, whereas in my animaAXYZ project, the animation is properly configured and functioning. Whether in Unreal Engine simulation or when integrating into a sequence, it stops.
What am I doing wrong?
Anybody have any idea what the unreal control rigs are doing with their "Softness" attribute on IK legs and arms?
Because it just breaks every rig I see it on. I dont know what they are trying to do with it, it never works, and it is in everything.

I know what softness is SUPPOSED to do in IK rigs in maya, or what I think it should do. It is supposed to ease in and out of a straight pose so you dont get IK lock or IK popping on your knees and elbows.
But it doesnt do that. it just totally breaks the IK calculation.
The IK nodes only seem to work if you leave the Length A and B as 0 and let it work automatically. Put in any other value and it just pops all out of place and screws itself up
Is there any way to create an FPoseSnapshot from the animation graph itself? I'm trying to expose bone transforms from Anim BP into C++, specifically at a point prior to the output pose (so i'll have this data even in the case where it doesn't contribute to final pose due to blend poses by bool being false)
somehow my animations aren't running at all despite having the anim bps set on the character
hmm
and i copied some settings and something fixed it, not sure wtf setting it was @_@ rip lol
Update to this, I couldn't figure out a clean solution so what I ended up doing was creating a second mesh component that's invisible and essentially is a clone of the character mesh. Then in the animation BP if the mesh its operating on is this second custom mesh it will set some internal state to force the blendspace path I wanted to invoke, resulting in this invisible "shadow" mesh having the pose I need in realtime, even if the character animation doesn't go down that code-path.
hey everyone - not sure if this is the right channel so forgive me
working on a 3rd person game prototype
im working with a game dev and constantly finding maya rig issues which is causing him to start from scratch every time.
we have fixed everything now and he is building his system for us but i just discovered our character has no maya face rig (no so much of an issue now)
im curious to know how does it work in the industry with maya rig updates vs sending stuff to UE?
Do game devs have to start from scratch every time because of bone structure changes?
any workaround/ common workflow tips please?
Anyone here good with animation blueprints and state machines?
usually it depends.. I had a project - where I imported the hands in Unreal and then setup the BP
can you elaborate?
Does anyone knows how I can use the curve for animation? To be more precise: I need an mesh to follow a curve during workspace, not only when in Play Mode, cause I need it to render that out and work with it on the timeline.
Adding new joints is not an issue, as long as the hierachy doesn't change. Meaning a joint can have new child joints (such as facial joints for the head), but if a parent joint changes it becomes complicated.
Apart from that, it's always a good idea to saparate your export skeleton and your rig skeleton. That way, you can make as many changes to the rig hierachy as you want, and simply constrain the joints of the export skeleton which is skinned to the mesh. You can look into the ART rigging tools from Epic to see how that can be set up.
would it be better if I use anim montage on the ladder animations that has root motion?
right now I'm using a blend space that plays two animations
one where the character climbs up
and one is in reverse
and I'm checking with notifies if the input is still down by using a float
if the float is 0, then input is down which will pause the animation at the current frame
I need help with this graph, all the animations work besides "ADS". I tried setting the value of aiming boolean in many different ways but none of them seems to work. The character just refuses to play the ADS animations.


All good, figured it out.
I ended up solving the problem but basically the character would glide from position to position without animating, and even the editor crashed at some point due to the anim bp lol
i ended up messing around with nav mesh settings and it seemed to rectify it, why though, im uncertain
Hey should be pretty easy but I am looking to turn on the debug lines for the motion matching node. I can't seem to find the boolean that use to be on there. I tried to use some command lines while playing but nothing seems to work. Can anyone tell me where it is?
Which one?
Oh... Its gone lol - they got rid of that
so other then the Rewind Debugger I can't see them?
Yep they removed it
you can't draw trajectory points
I am waiting for them to finalize it and launch a beta asap.. .
yeah with the right set it's not to bad of a result considering how little effort it requires... but even with official documentation out there isn't many resources to make it viable
The documentation isn't helpful at all - its missing the main steps..
right haha it's wild how unhelpful they are
Have you been able to get a decent result at all? I seem some short clips online with some impressive stuff but no one ever says how they got to it
can anyone explain state aliases to me? the documentation is not very helpful, in the top graph in the image there is no return transition from fall loop, so how would it return to locomotion or land? it looks like if you go into the locomotion state and either jump or start falling there is no way to return back to locomotion, but it seems to be doing the same thing in the alias, but how would you return from an alias after calling it? I cant seem to get it to transition back to any state lol

I think we should all make a petition of how sloppy the doumentation is in general Lmfaoo! 😆
Instead of this - can you explain what exactly you want ur character to do?
so I just want to clean up my graph a bit, this is an linked overlay anim BP for my pistol states, I wanted to link walking/running/sprinting/idle to the falling alias and then return back after landing, but I cant really find a way to do this with aliases since if you add a return transtion it yells at you lol

simply put I just dont want hundreds of transition arrows everywhere haha
it yells at you, it says it only allows one transition at a time, so it can use as many outgoing transition as you want, but you cannot go backwards lol
i guess it makes sense because since an alias is or can be global how can it find what state to return to if they are all equally connected, its just odd there is seemingly no good way to go back into a state lol
I wish I could help but I am still lost lol
Cause I can pull multiple transitions from the alias...
I mean I can call states like (pistol transitions) (sword transitions) etc if that makes sense
its when I do this it doesnt like it, you can add multiple outgoing transtitions coming from an alias, but how do you go backwards and blend into a prior state lol

but did u add a condition let's say - if is falling shooting is false or soemthing?
Like as in ur bp error - it don't have any condition to return on
ah wait I see, you would need multiple aliases if you want to go backwards, since going backwards would require using only 1 state alias reference
so you would need an alias for sprint to falling, walk to falling, etc
yes
thats what I was misunderstanding haha. all good now, thanks!
Np - just have to create the states individualy is all
Did I break something by deleting sections under my control rig track in Sequencer?
I'm seemingly unable to get the viewport to display control shapes, animations or even bones anymore, even if I add a new control rig actor...
*And no, the "Hide Control Shapes" box is not checked
And after closing and reopening the Sequencer window/tab, it and the Anim Outliner are now completely blank :|
I assume my Level Sequence Actor/Asset is borked or something
*Er, opening the Level Sequence asset directly from the content browser got Sequencer to populate again, but all control shapes are still invisible
So I was able to plop a new control rig BP into the level which is displaying control shapes, and after copying the keyframes from my other control rig actor, the new control rig is now displaying the corresponding animations properly somehow
Welp, the moment I save my project in the editor the control rig interface disappears again, though pressing Ctrl+Z makes it reappear 😐
Aaand after unchecking "Only Select Rig Controls" my control shapes are now staying visible after saving
might be a glitch or bug.. did u try restarting the editor?
Yeah, didn't seem to make a difference
duplicate the rig and see
I already deleted the original that was causing problems :/
hmm
I've got a question for those who would probably know better than me, I have a aiming control rig set up in a top down shooter format.
The character rotates to the mouse position and the arm and head is controlled by the rig to look at a collider attached to the cursor position on screen.
That said
Whenever I rotate the character between the Y axis and the -Y axis the rig skips a tiny section of the rotation
My guess is that the bones are snapping out of orientation at that angle (even though they shouldn't as the character is rotated forward)
Anyone have an idea to stop that from happening?

Here's a gif illustrating what's happening
Also, the aiming is perfectly pointing at the target on the X axis side but off by 40 degrees or so on the -X axis side
It's driving me frigging nuts
yeah.. that would be something I would look into first
from the looks of it the weapon rig could be overlapping
Possibly, I had to offset the look at target collision by 250 on the Y axis just to get him to aim at the cursor position straight
I know 110% it's the control rig
As when I disconnect it in the ABP the rotation is perfect
With the exception that he's not aiming straight due to the animation, that is.
Can someone please point me in the right directon. I have a root bone at 0,0,0 for my character that is at the top of the hierarchy, but when I see videos like this, I see connections to the hands. Is this for IK's? I'm confused on where to go from here. I just want to finally have a skeleton that I can start a game with.


In the content examples for control rigs in the aim section there is a control rig shown, that has the green control ball exposed so that its visible in the editor. I want to recreate that, but I can`t find any switch for that. How to I expose a control so that its visible in the editor or ingame?

Anyone Know what this stupid error is. Its just a Blendspace with a default pose and the anim pose.

Is there a new way to convert a staticmesh to a skeleton mesh in ue 5.3 ... its not working
Idk why I even try, yall ain't no help. I've never had one solid answer for any question Ive ever asked up here, as basic as the questions are. Yall really aint shit.
peace out, hope yall have fun running a discord where no one ever helps. ya know, the whole reason this server even exists
The green ball is a control set up in the rig hierarchy, if you open the control rig asset you'll see how they set it up
You've got to install the skeletal tools plug in (currently experimental)
The additional bones that go from the root they're (epic) using for IK instead of dummies. The IK bones are children of the root, base of the root is at 0 Z and the end of the root is the pelvis
You should have a bit of patience, not everyone is online at the time you have questions and not everyone has answers
Thank you
so you just install the plugin and it works or more steps in between?
You install the plug in, the when you right click on the static mesh asset there should be an additional option in the drop down that says convert to skeletal mesh
oh so the old way to exporting the static mesh and reimporting wont work
You an also edit skeletal mesh assets or create new ones via the new bone tools
If it is an asset that already has a skeleton
Then you need to set that on its import properties I believe then reimport
With a new file
The tools are, the import process has been updated since 5.0 with some additional options that weren't available in 4.27
Thanks so much. Super helpful
Pets setup to follow and works, but as they run/follow, the loop STOPS abrubtly at closests point to me, then starts again, looks unnatural, how to make loop not do that ? ;))ty
Is there any easy way to make an animation that runs on hit whenever two swords, sheilds, etc. collide? This needs to work for different sword animations.
yes - use tracing
could be a speed or either BS issue had same issue
Hello, i need help with my character anims
So, i have a weapon socket on the Skeleton, but when player starts moving or playing animations, the socket does not follow the animation as intended and the item held is no longer in proper location...
A small offset appears so the weapon goes through the fingers
Could you explain or send a video on tracing?
https://youtu.be/Yqa2t1LUGBo?si=Ffv3sSXgsk9arsyx
Hey, has anyone ever encountered an issue like this? Got this heavy hammer anim from the marketplace (30$), set up the IK retargeter, did the IK goals, set the goals blend source to 1.0. Did everything I think could have done but the animations don't properly work in game but they work fine in the preview mode


can someone explain me what the IK bones are actually for
if i wanted to make a cool knife animation like in counterstrike, which bone would i animate for that??
shouldnt both hands have a bone for that
i dont know how this works
Should the last keyframe of an animation be set at the very end of the track range in Sequencer, or at the beginning of the last frame?
there are couple diff ways u can do it..
One way would be ...

So i have a broken additive anim.
When i launch editor and import the additive anim and set its additive settings it works just fine. then when i restart the editor it doesnt work anymore. has anyone ever had something similar?
editor version?
5.3
I made an animation where the root bone is moving with the animation, I enabled root bone motion on the animation and the animation blueprint, when I try to move the character now they dont move and the limbs vibrate. It was able to move without the root bone enabled ( though it looked really bad cause of the teleporting back to the first frame). Does anyone know what could be causing this?
could be a bug
from the looks - collision issue
@vernal halo Do you know what I could try to fix it?
are you using IK?
Yeah
Well, how would I run an animation when it collides? It needs to be different for each direction the player swings the sword. Do I have to manually make 10+ animations?
montage?
Ahh no - I would say take character direction and use the blendspace
make a blendspace with sword and use that one
Hello, I am currently using an AnimNotifyState to generate a box trace for the collision detection of a weapon. I was wondering if there was any to have the box trace be visible in the AnimMontage editor where the state is being called so I can more easily see the size of the hit box.
Does anybody know if those arrayNodes in the animGraph are broken (they are experimental) but they don't recognize the types that are connected to them (their icons stay grey) / that they are connected at all (when looking at the errorMessage. Do i do something wrong or is it just broken it is unreal 5.3.1? I can't find any issues with them in the Issues tracker on epic's page

Another question does anybody use rbf-nodes in controlRig without them crashing ?
For me they don't work at all, causing instant crashes when adding 2 targets and hooking the executeContext up
How can I get the control rig asset to find curve data? My curves are not listed for now. Thanks in advance

@fringe ledge it takes a Name as input just plug in a node and give it the Curve name
for example a "fromString" node where you enter the Curve's name and plug that output to the Curve pin
those purplish pins are name-types
if you would want to provide those from external sources you need to declare a variable and make it public (set the eye-icon to open it is the last icon right to the variable's name) in the variables-list and plug the variable into the getCurveValue-node's pin
Does somebody know why stride-warping would lead to those bobbing feet? i can't make it work properly.
In this case i setup the lyra-mannequin to test it with its own animations, but it does the same as when i try stride-warping with my own character and retargeted animations.
I don't do anything differently then those tutorials i have seen on the net.

When i import an Animation i created in blender, my target Frame Rate is 60000. Why is that? how can i prevent that?

you neet to set the primary and secondary axis along with the pole vector
also, turn off auto compile if your using ue5.3 or the editor will crash a lot
Does anyone know why changing the skeletal mesh of a character would result in this? It literally has the same skeleton I just updated the mesh itself. This hasn't happened to me before. Edit: Tobe more specific it is the animation blueprint causing this

He was bit by a necromorph upon import.
When working with Animation Blueprint Templates, is it possible to bind the Blend Mask in Layered Blend per bone at runtime?

They're defined on a Skeleton, so I'm not sure how you would assign it in a template
Quick question: Do Montage Notifies not trigger in an Animation Blueprint?? I can fire AnimNotifies just fine, but MontageNotifies from montages triggered by GAS do not fire in the Anim Blueprint
Can someone help me here? The character's head is supposed to be following my camera's aim
I think something may be wrong in my function inside my animBP


For the sequence player, you just drag the animation into the bp
For the cached pose, you need to have a state machine inside your animgraph linked through to a pose
Thanks sorry i should have said how to get it in the green version*
Hi just started learning unreal a couple weeks ago and im looking for a good course or source of info to learn about skeletal meshes and animations as a complete beginner. I'm using 5.3 and a lot of info I've found on my own seems out of date.
Struggling with this system where I'm trying to rotate the right-hand such that the gun rotates down to the bottom orange dot. It works until I get close to the wall/ground, then it starts spasming. Is this behavior gimbal lock?
Oops re-uploading as mp4 for attachment to embed
is there a way for me to lock in this pose so I can go into edit mode and make tweaks to fingers? Whenever I hit edit it defaults to T-pose

A little stuck here y'all, I have a IK solver for only the feet of my character, this is for VR, so I need it to solve for the feet. Works fine, but I now need to set all the values in the Animation Blueprint. How should I go about automatically lifting the legs and setting the feet back down?

I want to add finishing moves to my combat system. The likes, where player and enemy animations get synced and perform a horeography together.
I move both ACharacters to their respective starting points and play AnimMontage's on them together, but I'm still experiencing some minor desyncs space-wise in their movements. (Eg. the character's root motion looks a little off and they miss the blows by few centimeters after a while)
Are there any particular caveats that I should be aware of when implementing something like this? Any animation compression settings to disable or something? I'd be thankful for any tips.
Hey everyone, so my UE5 keeps crashing whenever i try and run the third person tmeplate. The manny keeps glitching out and i get this crash report. Has anyone ever experienced this?
Hi so I am having an issue with the animation so I want it to delay when you do it once maybe like a 5 second or 10 second delay before you do it again but it's just looping how do I fix it. video link provided to take a look at the problem.

This is "New Recording - 10/23/2023, 9:21:58 AM" by Robert Proctor on Vimeo, the home for high quality videos and the people who love them.
anyone here have experience adding custom animations into the lyra ability system ?
ive got a weird issue happening with my weapons they are all over the place
Im looking for a good beginner course to learn the basics of animation, anybody know a good course with up to date info?
is it about making animations or animation stuff?
if it consider "creating" animations from scratches plz count me in
For those using Auto Rig Pro what export setting do you use?
I'm trying to export animation and for some reason it won't transfer. I've tried multiple setting in the animation tab in export FBX
When i import an Animation i created in blender, my target Frame Rate is 60000. Why is that? how can i prevent that?

I am having a rookie question i think lol
I have an animation where the character moves a bit to the side. Now i have the problem that the character either moves indeed and then snaps back or the character doesn't move at all and plays the animation in place. I want him to play it but then stay there where it ended
try root motion
yea I know about that
It works with the ue5 mannequin
but after retargeting to my character it doesn'T
the root of my character doesn't move in the retargeted animation
unlike the one of the ue5 mannequin
i tried every possible constellation of root setting for the animation before retargeting it but now I think it got to do with my character lol
are you using blender?
I used blender to create the character, yes
if you made a custom armature then make sure that it is not just named "armature"
also maybe check the size of the root bone
its scale is 1 1 1
hmm
should it have some specific name?
it's called ApeArmature because the character is an ape lol

ah thats fine, it just shouldnt have the default name
so far everything ran fine but i never needed a root motion animation before
i am all ears hehe
do you move your character in the animation by moving your bone named "root" or your armature object?
what do you mean? The animation is from mixamo
I didn't make it
i converted it like i did plenty of times before and then had it as a ue5 mannequin animation
the ue5 mannequins root is indeed moving
im asking because if you export from blender unreal thinks that the root bone is the armature object and not the actual root "bone"
No i have an ik rig set up
otherwise i wouldn't be able to retarget
also i tried it out with both
Apearmature as root and root as root
none worked
i got no idea then, sorry. its been a while since ive used mixamo animations and stopped because of issues like these
nah it's not an issue with mixamo
as i said for the ue5 mannequin it works fine
the problem lies betweens ue5 mannequin to my character
well anyways, good luck sorting it out, im out of ideas
thanks tho!
SO for others that might have an idea:
I am trying to retarget a root motion animation from the ue5 mannequin to my character but the root of mine does not move. How to fix?
okay fixed it
had to make ApeArmature as the only component of the root chain
When creating an animation for a character is it okay to move the bones so they fit where they should in the animation? So I am making a base idle pose with the character holding a sword, but the thumb was too long and looked a bit strange when holding the sword so I just grabbed the thumb and move it using one of the axis arrows to "shorten" it. Will this cause issues later, is there a proper way to do this?
^ping with answer please
Hello I need some help bringing a character rigged with riggify to UE5
Hi, I'm looking for someone to help guide me in a process, I want to call animations from an actor to play on my player character, but blend it with my basic locomotion. I want to be able to put animations on any future weapon or gear I make, and have it call without having to add it into my animation BP. Is it possible to do this?
Imma save you trouble, if you use a rigify rig you can't properly blend animations at the lower spine, or anywhere really, rigify isn't unreal ready, you'll have to heavily edit the rig, it's better to just make your own
Sounds like what you're looking for are animation montages. You can setup a slot in your anim BP and then the animation sequences are played through that slot additively
I tried montages in the past and I couldnt figure out how to reinitiate the anim bp, so I just go from montage to t pose
but there is a way to do that without tposing?
like reinitiate the anim bp
should be using an animation slot
ok I figured it out, is there a way to make it hold the last frame and not reset?
as you guys can see in my blend space it works properly but in game it doesn't do you guys know why?
and i aslo have this blend problem in this case my character should be in crouched idle but i dont know why program itself blendting my anim with walking if you guys know smth please help me im struggling
hi. complete noob question: I'm not an animator, but I'm doing a blockout of a scene and I imported a bunch of sequences from mixamo and added them as filler to the scene. Now, when I open the scene on another computer, they've all lost the animation, it's just a t-pose. The assets still say they have x amount of frames, but there's no animation left. Can I fix this or do I have to start over?
Also Noob question: I’m learning/ making a basic FPS game as a side project. For reload animation, is it easier to animate it in Blender then export to UE, or just animate it in UE?
So i made ik legs for my control rig so they can bend when i move the waist, yet for some reason they doint bend and the body goes through the legs. do you guys know of a way to fix this? Ive followed a few different tutorials and they dont seem to have this problem, idk if its the character im using or what
Having an issue with the animation retargeting; the aniamtion on the retargeted model is running away; I went bo to bone and it works fine in the RTG but when viewing it doesn't

turn on root motion lock and it should work fine, but question i see that your characters bones are following correctly 100% with the template character. How did you set up the same skeleton to match the template character? did you use the window, asset details, compatiable skeletons option? or did you do in retargetting where you specifically set up every bone that you want following?
wait you already have "force root lock on" try to enable root motion and i think the two under that you can unclick but i know its a mix of those 3 clickable settings that fix that issue
I think I found the issue; Had to go to root details in RTG and put translation mode to globally scaled

now they stay in place
Hi guys, I would like to play an animation of Manny in this Animation BluePrint composed just of a retargeting ( made by following this video : https://www.youtube.com/watch?app=desktop&v=7q4QZVxzwXM&ab_channel=DavidNGoodman )

I tested a Blend, but I don't want a 50/50 solution, I would like to have 100% of the animation applied to the retargeting
Ahhh and did you just use the skeleton from unreal engine and add what you needed to it, or is your skeleton just set up in blender completely to what you wanted it and you link all the bones in the retargetter?
The skeleton is completely made by me but I kept the names as close to the unreal rig bones
So far all is working now I just need to learn how to add third person cam controls and other animations into the mix; probablly gonna need to make my own anims
I created a flipbook from two sprites that i've highlighted but it didnt combine them when into one flipbook? how do i do that?
almost same do as you wish
just set as root motion
it will fix
Hi! Has anyone encountered this before? I have a weapon that has its own anim blueprint and hands that I see in first person also have its own anim blueprint. When I shoot, the animation plays for my hands, but not for the weapon. “Event Blueprint Update Animation” immediately fades out and is no longer updated. I tried playing anim montage, but that also fails. The only thing that works is the “play animation” node for the skeletal mesh, but I’m losing a lot of control that could give me the anim blueprint. How can I solve this problem? Maybe this isn’t the “right way” to make animations work for my weapon?

When creating an animation for a character is it okay to move the bones so they fit where they should in the animation? So I am making a base idle pose with the character holding a sword, but the thumb was too long and looked a bit strange when holding the sword so I just grabbed the thumb and move it using one of the axis arrows to "shorten" it. Will this cause issues later, is there a proper way to do this?
I posted this a while ago and didnt get an answer. Was hoping for one now. Dont want to be that guy though, but I would like to know
Hi everyone, I am saw this warning today when I was about to implement the anim notify for entering a state. The Second image is what I tried to use but I can't seem to get the same functionality out of it. No Events from it or even a blueprint interface. I was wondering how I can actually use the new recommended on state entry to communicate with my character?


Does anyone know why my character direction changes when playing an "animation composite" of 2 combined animations? It works perfectly fine when playing the animations individually or combined in an "animation montage".
difference between using compatible skeletons option, and ik retargeter?
So I want to calculate the difference in angle (or just do product so I get a value between 1 and -1) between two bones after modifying the pose in the AnimGraph and use that in the AnimGraph itself, but I'm not getting it to work at all
I've tried several methods and I wonder if someone knows a way
I tried getting the Socket rotation of the 2 bones, getting forward from X, get rid of the Y component and normalize, and then dot product. What I should get is a value between 1 and -1 where 1 means they point a similar direction and -1 is they point opposites, but I dont get it to work in either the blueprint update loop or as a pure function in the animgraph
I am trying to setup an it retargeter from ue4 to ue5 skeleton for first person animation, where it matters that the animations are 1 to 1 retargeted, but i wasn't able yet to find a retargeter setup that works for all animations. does someone has a working setup or a good tutorial reference for this ?
Hey guys, I posted in the general chat, but this may be the better place for it. I have been working on a game project in unreal engine for quite some time now. I have created armour assets for a particular character using Maya. I have painted skin weights and bound armour mesh to my character skeleton, i have copied the skin weights from my character mesh onto my armour mesh, so that they would move the same way in game. Now in Unreal engine 5, the imported armour mesh become completely distorted when previewing an animation with it, or when assigning it as an extra skeletal mesh asset in my animation blueprint. I should add that all previous armour sets work perfectly well with the exact same workflow. Can you shed some light on this issue? What might be the reason? Even how to resolve it if possible? I have searched all over the internet for a solution but it is not quite apparent. Your expertise would be greatly appreciated.
Hello is it possible to blend two animations inside montage, or am I doing it wrong. In anim blueprint I use blend per bone to blend face and body animation and it works just fine if I drag face animation in anim blueprint. Hovewer when I am trying the same in montage, just the fullbody animation plays. I tried different groups and their sequence, but couldn't make it work. Is it even possible to use 2 animations inside montage at the same time?


Hi everyone, anyone to answer to my question please ?
#animation message
hi, is possible to call SetTimerByEvent somehow from Animation node functions, e.g. OnNodeBecomeRelevant ?
when using an animation blueprint or previewing an animation asset, the mesh simply breaks despite being properly weight painted
Does the sequencer(ULevelSequence) support looping sections with procedural section playing(like montages), like an into -> loop -> out?
Are some joints going rogue and shooting downwards?
i dont know if its joints, but it could as well be. Other variations of weight paints ive tried cause the deformation to go into other directions, but in this case it is downwards
Is there a way to expose procedural controls in the animation blueprint? There's a procedural control called camera input that's not part of the list here, and I'd like it to be.

is there a way to copy virtual bones//sockets and curves from one skeleton to another?
Try turning on all hierarchy visibility in the character drop menu. If a joint is going rogue, you'll be able to see which ones.

Looks like you can right click a socket in the source to copy the socket(s). If your target skeleton has the same hierarcy, you can go to your destination skeleton and paste sockets. If it doesn't match, you can do them one by one with past to selected joint option.

The joints dont seem to be affect at all
I'm uncertain at this point, so please take anything I'm saying from here on with a grain of salt. I'm seeing grey bones on the right. Could it be that joints are being disabled that are carrying skin weights?
Also, maybe check without the animation on and rotate joints that don't appear to be related. Could be some weights jumped to some other joint.
does anyone have any insight on what I might be doing wrong? I am trying to get my mesh and animation from Blender to Unreal. My problem is that my mesh is in several pieces, each with their own texture. I can't seem to get the mesh and the skeleton to import in a way that I can color the pieces individually. I have materials/UV maps for everything, but it either comes in as all one piece, or when I import it as first the mesh and then the skeletal mesh, it doesn't work properly. I'm rather at a loss, I'm afraid.

not sure I'm understanding correctly. But I think what you want is to create a material for each set of textures and then slot those textures into your Skeletal Mesh material slots here. You can check "Isolate" to view which mesh piece each slot belongs to.
is that what you were looking for?

Maybe? When I import my skeletal mesh, it imports as all 1 mesh instead of separate pieces like I want it to do. I've tried importing my mesh, and then skeletal mesh, and that didn't work either. Thoughts? Is there some setting I need to change?
im following along this tutorial for vaulting over objects and i am told to use root motion, which im supposing has the purpose of keeping your character still during animation. when he showcases his animation after enabling root motion (4:18) https://www.youtube.com/watch?v=es6NA7I_TlQ
the problem im having is that the animations my viewport is showing me are glitchy, whilst his are smooth animations. how they should be. heres a look: (1st is with root motion, 2nd is without).

You can purchase the completed project files here:
https://ue4tutorials.gumroad.com/l/vaultingmantling
Mixamo to Unreal Converter tool: https://terribilisstudio.fr/?section=MC
Welcome back to my parkour tutorial series. In the second video I will be covering how to do an advanced vaulting system for third person characters with animations. It ...
For the purpose of creating animatable collision shapes which do not follow parts of a visible skeletal mesh but still follow the root bone of the mesh, is there a better method than adding new bones to a skeleton in external software with the root bone as the parent, and then attaching collision shapes to those bones to freely transform/etc. in Sequencer?
found it!! omg so simple

*I'm currently looking into attach tracks as an alternative to my previously stated method
if you wanna import skeletal meshes as separate pieces, you have to export them from blender separately. So you would export each piece with the skeleton as its own fbx. Skeletal mesh pieces are differenciated with your skinning profile.
Then on import, you would only import the skeleton with the first piece, and the other piecces on import, you assign the skeleton that you already imported. Then you have separate mesh pieces as 1 asset each.
HOWEVER, I don't really understand why you would want to import them as separate assets, unless you wanna use customization to swap out the teeth of the cat for example, in which case you would need to separate them. SKMs are imported as a single asset, but the mesh pieces are still separate in data. You can preview this if you reimport the fbx to blender, where the meshes will still be separate.


I was actually able to get everything to export with their assigned meshes from Blender into Unreal, all I had to do was change the path mode to "copy" and click the icon next to it, which embeds materials. Then everything exported and imported correctly. I had looked and looked everywhere and couldn't find how to do it, in fact I found the answer quite by accident. https://www.youtube.com/watch?v=FsV3ZUxmWLo&list=PLsRLXWeaiOEJLMtaWItCGc6cVk8zsnOr1&index=23&t=181s&ab_channel=GorkaGames

Hello guys, in this quick and simple tutorial we are going to learn how to import and export your Blender models into Unreal Engine 5
Check out my Steam Game! https://bit.ly/3rVlXU1
Follow me on Twitter: https://twitter.com/GorkaGames
Subscribe to the channel: https://www.youtube.com/channel/UCv_n9oioNF6OpzR2dt6E4xg?sub_confirmation=1
unreal e...
Thank you for your reply, though! I think I was probably not explaining very well just what I was trying to do.
when change a control rig control position (changing its offset) and then compile, it resets the control offset back to 0, i assume im doing something wrong?
Ah cool. Learned something new myself then. Glad you figured it out
I'm using blender + GameRigTools addon to rig and import a character. It has the same skeleton as the UE5 Manny AFAIK but when I retarget the animations my arms are all jagged due to the twist bones I think? Any ideas what I should be looking for to fix this?

i've been wondering, would an ark raptor be able to properly hold and fire a rifle?
Can I make diffrent animations for first person and third person
good evening guys ! i have a problem with lyra !
i wanna use mine setup character with "press left buttn acttack" (& bp/ abp/ animblendspace). migrate it to own clear lvl at lyra, set skeletal Manny then pess mouse button, attack is cacting. BUT he won't move just stay at one position. how to solve it?
So i'm adding zoom to the third person blueprint; I looked up videos multiple ones followed them but the result is a snapping issue when I try to scroll the wheel. is there a conflict somewhere? Maybe a button I missed?
I'm gonna look up stuff for input more; I probably missed something
any ideas why my animations from Blender now import with target frame rate 60000? didn't happen before

Hey everyone, I have a UE Control Rig question. Can anyone tell me how to stop my controls from rotating spontaneously between keyframes?
Does anyone know of any crowd/spectator packs to use for something like a stadium full of background people? Marketplace or otherwise, I cant find anything that is complete.
How can I play an animation between state?
Like I have walking state and crouch state how to play an animation when the character is transitioning from walking to crouching vice versa?
Hi, anyone knows why I can't enable Material Type for the Curve? I got the parameter, all good with that. Not sure why when I press the X to get green checkmark, it's not changing, X disappears and appears again after. I'm trying to do this https://docs.unrealengine.com/5.3/en-US/animation-curves-in-unreal-engine/#materials


Animate Material Parameters, Morph Targets, and other properties synchronized to your animations using Animation Curves.
are you sure that curve debugger is the correct panel?
Found the solution, had to manually create curves in Skeleton and enable material option there
I am creating a head control for my control rig and i have an issue where it is rotating from the center of the control, I want the pivot point to be at the base of the neck, do you know how i can change the location of my pivot point so it is different from where the control actually is
IFAIK If you place the control initial position at the desired pivot point, you should be able to then offset the control itself while keeping the pivot point.

Anyone know why my pose component might not work in sequencer with my control rig?
Alright, so I've read a lot of different opinions on how to export character rigs into UE5, but I'm not sure what the best current solution is.
How do you rig a model for animation in UE5?
To preface, I created a model in blender that I would like to use.
Should I use an auto-rigging plugin like AccuRig or AutoRig Pro?
Or should I try rigging the character in UE5?
And is there any plugin's or addons that you find useful for this?
 Thanks!
Up to you really, you can use auto riggers, the point though is that your "control rig" (the handles/IKs/etc) won't transfer to Unreal, just the skin and bones
Worth learning the process manually so that you understand it
Once you get it, you can do that in Unreal now too, place bones, do a bind, paint weights
Good to have more control over it that way too so you can adjust it to non-standard and asymmetrical characters, props, etc
@winter notch might check displacement
Does anyone know if it's feasible to use Attach Tracks in Sequencer to make a Collision Capsule/Mesh of an Actor BP follow a Control Rig's root bone/control while still allowing the attached Capsule/Mesh to follow an independent animation?
Or should I just create a skeleton from scratch with a bunch of loose bones, and a mesh consisting of invisible shapes to attach to each bone, and selectively check collision for the part of the mesh constituting each shape?
how to fix the hadn offset? i use reatrget pose from mesh

How do I break a rotation in a control rig, and how do I make a rotator? I can't seem to find the nodes to do it
nvm I realised I needed a "to euler" and "from euler", I think
Hey guys, I'm trying to retarget anims from manny to metahuman but when I do that on walking or running animations they.. well walk or run away. Animations are not locked in place
Alright I fixed it
Is something wrong with my animbp if i have to disable control rotation before root motion anim for it to rotate properly?
I want to add a couple new sockets to the skeleton. But I also want to keep my setup within a game feature plugin (which so far I think I have managed).
Adding a socket to the skm_mannequin isn't an option, as it wouldn't come with the plugin.
I tried duplicating the skeleton, and moving it, and retargeting my b_hero to the new skeleton... but some of my other things broke, so I'm assuming either that doesn't work, or I missed a step somewhere.
Is there a way to add sockets to a skeleton via some kind of child class/object, that doesn't affect the base skeleton?
Hey everyone ! Quick question regarding Physical Assets and bone physics:
I'm trying to do an interactive piano, for every single note. I'm almost there, however I'm having a small issue: even tho I locked two axis, my notes still rotate a bit on the locked axis if I interact with them (slightly, but it shouldn't happen at all).
And also, when I move a test sphere around above my notes (so, outside their collision boxes), they still jitter a bit when I hover my object above them. Is there a setting I need to change to prevent that ?
I'm following this https://docs.unrealengine.com/4.26/en-US/AnimatingObjects/SkeletalMeshAnimation/IKSetups/, did it exactly the same, and I get this as the result. The feet get snapped to 0,0,0,

I think the issue lies here, The example has a join target location, mine does not, since they didn't specify it, and I guess the Effector locations are not getting updated correctly

No clue why though, it should be updating correctly, the raycast succeeds, and it should get the position
Is there a way to play only a chunk of sequence in animation blueprint?
I have a sequence where all my moveset is stored. I don't want to crop each single short move into separate sequence as I might change the "big" sequence frequently and will have to do that again and again.
Does anyone know how to handle getting a replicated variable from the player character to the animation blueprint? I'm getting inconsistent behavior of a IK node when referencing a replicated variable. It seems to only work when it the client is also the server
Anyone have an issue with anim montages only playing the first .4 seconds but not the rest of the anim. OR if you slow the rate down, it plays in slow mo in full? I just want to play it regularly but it seems to not want to. Any tips?
I have a noob question. I am trying to create multiple animations in one map so I can see them all at once, then creating linked animations sequences. However, they have dfiferent timings, and when I hit save, depending on the start/end some will be too long/short. Am I doing this wrong? What is the proper workflow?

Is there anyway to stop unreal from automatically triggering events when the timeline cursor is on a trigger? It's really annoying having to move the timeline cursor off a trigger everytime i make a change. Or is this a bug in 5.2?

there's no animations so it T-poses, how do I start making idle, walk, run etc from scratch? I will study the first 3 courses on ue5 before I ask more. thank you so much
I am trying to import a FBX model from Blender into Unreal. We used a UE5 Manny rig skeleton import plugin and it has worked with models in the past, but for some reason the current model I have is giving me all kinds of issues. I don't have access to the modeler so I can't trouble shoot with them tonight so figured I'd give it a go asking in here for advice.
The first problem is I am getting this warning in the first picture:
Now if I do this. It will absolutely mess up the SK_mannequin and all kinds of issues.
If I say no the model imports, I get a simple error about a bind pose.
The big issue comes with this error:
THe Skeleton SK_Mannequin is missing bones that SkeletalMesh ImportedModel needs. They will be imported now please save the skeleton!"
When I attempt to save I get the following:
AssetCheck: Error: [AssetLog] Imported.uasset: This skeletal mesh asset has an incompatible Skeleton. Assign a compatible skeleton to this skeletal mesh asset.
I'm at a bit of a loss as it looks like it has the same skeleton not sure what is causing it. Googling around hasn't turned up too much.


We're going ahead and redoing the skeleton it seems to be the source of the issues.
Does anyone know what it means when the debug view of the Pose Driver node turns black. Adjusting the RBF radius fixes it, but I've not been able to find any documentation on what it actually means/indicates. Thanks.

Hey guys, is there anyone here that possibly had a similar issue and would be able to point me in the right direction to solve it. I'm doing a reload animation where I'm using an IK Rig goal target and animation curve to modify the reload animation that I have so that the left hand finds the clip procedurally. I'm able to set it up so that the animation is modified but when I pass the world location of the clip socket to the new position for the the left hand's IK goal something weird happens:
How do I use On Notify Begin and On Notify End when playing a montage? Do I have to create Notify's named the same in my montage that I'm playing or any name?
How do the animations I make look different in first person view?
Hey guys, i've been finishing up my Crouching state and Animations. I have mostly eliminated Footgliding. But whenever the character initiates movement, it will glide for a short second as the animations blend into Movement animations. (Or vice versa with stopping). Here is a short clip : https://streamable.com/mar7ux.
I've spend hours tweaking the blendspace, and trying other methods. Does anyone have any reccomendations what i could look at to improve this short interval of food gliding?
Your camera position will heavily determine how your animations look. So in FP the camera is most likely angled in a way that makes the animations look Weird.
I create a socket and attached it to head
If your trying to attach a FP camera to a TPP body then its probably good to look into "True First Person" Tutorials. If im correct, thats what your trying to do so that might help.
Yeah I watched true fps camera tutorial but ıf I run animation look weird. I want to add idle anim to fps view
Hmm so that's a choice you have to make. Do i want 2 different meshes that both have their own animations and cameras? Or do i want one character mesh with one set of animations, where you switch between two cameras.
If you want the 2nd option, then i suggest you follow a True FPS tutorial series. Otherwise, you can look for a more traditional Approach of having a TPP Body with Arms just for the FP Camera. There's plenty of tutorials for that aswell.
hi, i dont understand. Paper Sprite i set to ignore on its collision BUT all those "Upper" is the box collision which i set to "block all" and yet when i play the game, it phase through the floor! But when i set the paper sprite to block all and upper to ignore all on their collision, it landed on the floor, why? is it buggy? im so confused, why the collisions are acting so weird here?

this wasnt supposed to be this complicated. why they make it so WEIRD?
I just want the UPper to have a collision thats why i set them in a certain way and the paper sprite collision to be ignored since it is a fixed collision
will the non thread safe stuff actually like break anything
also, ive got an animgraph with a bunch of copy pose from mesh nodes, but it seems like it might be running a frame behind the stuff its copying poses from
with unsteady fps on, greeen mesh is copying pose from grey mesh
is there something i need to do to get the animgraph to run after all of the other animgraphs or something
I already have my animations set up to use different animations based on speed. How can I use my speed variable to determine which jump animation plays? I have one for jumping from idle and one from moving
How do I change the axis in the sequencer to mimic what I did in the viewport? the video explains the problem
this is what made me choose unreal https://www.justtodosomethingbad.com/blog/2023/7/19/announcing-ephemeral-rigging-for-the-unreal-engine even maya riggers want to move to unreal

Just to do Something Bad
I predict that soon people will animate in unreal.
Anyone have problem using paperZD collision??
Hey guys, I wanted to ask if I can post a link to something a little unorthodox.
I have only recently discovered the Unreal Engine animation tools and Control Rig, and I've been trying to dig into the Mannequin rig that Unreal gives you with a few different goals. But I have not been able to find any real clear MANUAL on the rig. I see lots of examples of getting started, basic possibilities, and simple tutorials, but I want to understand how the sample data was made, since it looks much deeper and more complicated.
In trying to undersatnd the Epic Skeleton mannequin rig that Unreal gives you in various packages,
I have written up a long google doc (about 60 pages now) of notes and screenshots, and some friends suggested that I open this up to people or even try to put it in front of an epic dev.
It's far, FAR from done, but I wanted to know if I could post a link here for anybody else to check for their own understanding, and open request for anybody to leave comments with suggestions like explanations or improvements.
I'm writing up a sort of User's Manual of the Epic "CR_Mannequin_Body" control rig - the generic standin for Character Animation in sequencer in Unreal. Haven't found many clear explanations on it so far.
This rig is a good starting point for people who want to animate in Unreal, and knowing how to modify it to work with non-epic skeletons could be useful.
Work in progress, living document, would love if it helps anybody! Please leave comments, questions, suggestions on cleanup, etc!
https://docs.google.com/document/d/19tZAFd6AG_78RtJBexL7fdT7CxJzy9Ni9N3qpguFPW8/edit?usp=sharing

Google Docs
THIS IS A ROUGH WIP If you can read thism, then you should have permission to add comments. Please do so but be courteous! Everybody else can read these, and I have limited time to experiment in my free time to work on this. — Top Level Generic Notes CURVE GRAPH UNREAL MANNEQUIN CONTROL RIG BR...
Anyone have any idea maybe?
I'm sorry, I haven't looked into procedural animation or these kinds of things yet 😦
no need to be sorry my man, thank you for taking the time to read the issue and respond 🙂
tell me how to best rig in maya for unreal purposes please
trying to figure this out myself but coming from Max... have to rig an airplane and all tuts i find are cars and characters
that's a very big question and rigging is complicated
if you want to rig in maya for unreal then try a set of youtube tutorials telling you how to make something with the Epic Skeleton!
there is no dedicated channel for rigging here, correct?
you can make any rig work un unreal but making it with the Epic Skeleton makes it easiest to use many marketplace assets out of the box
I dont see one
but its not animation either, more like the base for animation
makes sense. You could get tips here on some things you can add to / modify in maya to make it work better with unreal
but not on the entire process of maya-ing a rig
just one last question on this... if i wanna use the control rig stuff i have to create a bone setup somewhere else and import as FBX... did i get that right?
but i need a skeletal mesh to begin with
i am not too deep into rigging yet, usually a hierarchy of helpers in max is enough for my purposes
to get a skeletal mesh i need to merge everything again and build a bone setup
its easy to use control rig, but booooy it is kinda tricky to make one
at least, a complicated one with many functions
true there are no women on my rig team yet that have tried it
everybody at my company rigs in Maya
very few companies out in Japan are keen on upending their tools to do stuff in Unreal instead 
I know thats how it gets used most often
but I really am way more interested in the full body animator control rig for sequencer
making stuff that you can modify in-engine without so many fbx exports
I'll try to watch this soon! thank you!
good japanese practice too
How to animate IK_Handgun with control rig?
Is possible to create animation directly on Animation Sequencer Editor or only an additive on top of Animation Sequence that already exists ?
I'm playing around with animation montage pause and resume. It works, but the sounds I'm playing in that montage don't stop and just keep playing. How do I fix this?

I have a question for anybody familiar with rigging. So I'm done modeling my character, I would like to start rigging them. My issue is that I'm not sure if I should copy whatever the UE quinn rig is or not. I want to experiment with retargeting animations does most of Unreal Engine and the marketplace animations use the Quinn rig as a default base?
Any idea why my animation still moving the player even though I have EnableRootMotion and Force Root Lock on?
It makes no difference, I've tried that already. It's a retargeted animation from UE4 to UE5. The original animation has root motion which I stopped with Force Root Lock. When I port it to UE5 it doesn't matter what I do, it moves.
Is there another easy way to retarget meshes from the ue4 skeleton to the ue5 one? I know you can share animations but it looks really off, especially for first person animations
Hi all, I'm doing a tutorial asking me to make an animation montage then setting an animation slot, however when I set the montage to the slot, the animation in the preview becomes t-pose. Is that supposed to happen? What am I doing wrong?


interesting
I was wondering because I was planning on doing something similar to fortnite with shared animations
but I don't think retargeting animations requires identical rigs
content examples?
@stable basin do you know if its possivel to create animation from zero directly on AnimationSequence Editor or only on LevelSequencer ?
Probably a really redudant question, its something all animators have faced but working on a small rabbit minigame with another developer and we are getting some bad jittering on our blendspace transitions. I heard sync groups could be something to utilize, but for something like this I'm really not understanding why its so bad. If anyone could help it would be so much appreciated.
Blendspace is as follows. Weight speed is around 5, does not seem to help at all here. Never really had an issue like this recently with any other quadrupedal character. Character movement rotation on movement component: Desired rotation off. Orient to movement enabled. Same thing on the actual character itself. All other settings are default UE5 third person character settings. We are using Unreal 5.1 for this small project. No collision issues, so nothing to do with that, already checked.

Currently having this issue with my clavicle control, one arm is perfectly fine but the other isnt the set ups are exactly the same except for the postivie negative value. Do you know how i can solve it


How to render a composure in UE5?
retargeting doesnt need identical rigs because of the IK retargeter. But sharing animations is not retargeting. Using the exact same skeleton (names and orientations but different proportions) allows to use the same animations, not retarget them
2 fixes.
You can right click the control and do something like "Set offset by closest bone" assuming it has the same pivot as the clavicle
Or you can use a "Project to new Parent" node instead of a get tranfrom - set transform
Project to New Parent creates a parent constraint relationship that maintains an offset.
Get transform - Set transform is going to manually force all the rotation values to be exactly the same
If you mirrored your control it probably does not have the same orientation as your bones, so it is pulling the bone to match the controls rotations
so for the project to new parents, what should i make the old and new parent
im guessing the bone is the child and the control is the new parents?
then where would that node plug into, set transform?
open up the unreal mannequin control rig and you'll see lots of examples
ok cool thank you

Thanks for Clarifying I'm very new to this process
its still kind of tricky to make it work but Ive been trying to get it working myself on a home project
so my answers arent perfect I know more theory than practice
So even if I have my own rig I can retarget an animation to it from say a mixamo rig or the ue5 manny?
I don't know if software effects this as well but I plan on rigging in blender
my question is who do igive the variable information, liek i get that you can change how it works like the variable type but how to do you give it information. Like the manny rig has everything but doesnt fully explain how it works. I guess i just dont fully understand how the rig is made.
thank you for your help, its pointing me in the right direction
that is why I am trying to write a manual on it! I actually just posted that yesterday. scroll up a bit and youll find the link
its very far from done but I couldnt find one either so I just started taking notes to try and pick it apart.
i feel like they made it needlesly complicated, like they used notes to create and place controls instead of creating and placing them manullay, i guess its faster now that i type it out but it makes it so much more convoluted
The controls already exist, what they're doing is using a lot of code to automatically adjust the rig to anything using the epic skeleton
This rig works for Manny, Quinn, and any custom character you make with the epic skeleton
It's a little over engineered yes but convenient to use
Confusing as heck to unpack
There's code to do ik fk switching too and maintain consistency between them
I get why it's all here but remaking it is a pain
I have a fairly simple humanoid character (normal biped, pretty low poly, very basic) that I would like to get set up with a UE5 mannequin skeleton, preferably in Blender. I haven't done much rigging before so I am looking to learn, and wanted to make sure I was starting off with the best options.
Is there a current 'best method' (or 'easiest method') of getting a decent skeleton set up? Ive seen Rigify + Uefy mentioned, as well as Auto Rig Pro, and a few others (cascadeur? there were some others too), but a lot of the discussions on those were from years ago (perils of the internet) so it's hard to gauge whats actually good nowadays.
Any suggestions?
I recommend CGDive.
I used this guys videos to learn the basics of rigify last year and I think he has developed a script to convert / rig a character in an epic-compatible way
IMPORTANT LINKS:
❖Game Rig Tools
Gumroad: https://gumroad.com/a/598294451/OmHCS
Blender Market: https://blendermarket.com/products/game-rig-tools-blender-addon-game-rigs/?ref=356
------------------------------------------------------------------...
Thanks I'll take a look 🙂
I should add - I think weight-painting is also something important I need to do/learn. I've seen a couple guides for it which seems to show you can get good results fairly quickly, but I also saw some automated process using voxels (voxel heat skinning?) that I thought I'd ask about too
any ideas anyone? 🙂
How do I scroll rotations into negatives past zero in sequencer and anywhere else?
Is there a way to unlock that constraint its not optimal for animating anything
Hey Guys How Can i change the Hight of an annimation ?

my "Talk Animation" the root bone is higher or something so im floating while doing it ? how can i change the Hight of the animation or something ?
Is it easier to animate it in Blender then export to UE, or just animate it in UE?
At this point, this is tough to answer!
Keep it simple then. Reload animations.
personally I just really dont like animating in blender. I dont think the transform tools are intuitive at all for something like animation. And exporting is a pain in the butt
I'm very taken by unreal animation lately, animating stuff entirely in engine with control rig. but I havent done much actual experience with it. It sounds very strong on paper though
yeah still dont know
depends on your comfort with the tools and what you can do in either one
hi, I made a mirror data table for the default unreal mannequin, and I have an existing animation for it that I want to bake a mirrored version of for use in animation montages, is there any way I can do that or can I only use mirror data tables for real time mirroring in the ABP?
A general question on performance, when using the live retargeting setup on a modular character, where i for example have separate meshes for helmet + vest + backpack and i use on all meshes the live retargeter bp, is that performance intensive and if so what would be a better way to handle it?
For those who have a similar issue as this, I fixed by this forum post: https://forums.unrealengine.com/t/modeling-mode-tools-causing-gameplay-bug-jittery-choppy-laggy-mouse-camera-input-during-movement/829564/3 . Just an interesting share I was not aware could cause this sort of issue, but it seems fixed now. Bizarre stuff.

Epic Developer Community Forums
Ok this bug is insane. Was doing a small project for a client and could not put a finger on the issue here. Now it seems to be fixed (using Unreal 5.1). I swear my days just keep getting stranger heh. Thank you for sharing this post.
Hi. I'm a noob. Having issues with my model and animations. I don't know why the preview is acting like this. The model itself seems to be upright but in the animation previews of my animations it acts like this.... going downward instead of forward towards my screen. Any idea how to fix this?

Sorry don’t know where to ask such question:
My question is about 360 unreal mp4 video in VR quest2?
So I’m making a cutscene and I was wondering if there was a way to export this cutscene as a video, and play it on my quest 2.
The graphics are intensive so I can’t android apk it into my quest2 and I don’t want to go through the PCVR hassle, Is there a way to achieve this?
I’d like a step by step solution if possible
Thank you in advance!
How to fix states that are unaccounted for. Like character floating upside down or sideways etc. Just implement ragdolling?
Does anyone know why my character is doing this weird stretching?
I am using only the default UE4 First Person Template, and my character is rigged for use with the Epic skeleton/UE4 mannequin.
I also tried swapping the Unreal units on import to both 1.0 and 0.1, with no changes. 🤷

Check your bone axes in unreal and also in whatever your DCC software is
that looks like a common problem
Hi!
I used to blend my animation output poses using an enumerator but ever since I started using the gameplay ability system framework, I’ve been trying to convert most of my systems to do things based off of gameplay tags.
I have my animations for all my weapons put into a data table and then I’m pulling animations based on the weapon tag that gets set.
To get a “pose” pin though I have to wash the pulled animation sequence node though some random animation.
My question is,
I feel like there’s a better way to select an animation via weapon tag (I can convert the tag to a name). Anyone have any suggestions?

Basically is there an equivalent to “blend pose by (some enumerator)” for gameplay tags or “names”
is there a way to have "additive layer tracks" affect root in montage? I have it showing up in the animation but when I put the animation in a montage the root is just the original without the additive layer track.
Yeah that's a pretty ugly workflow. I'm not sure if this is also any better but you could instead use a sequence evaluator with a bound function that sets the sequence
Sorry I’m not super familiar with sequencer evaluators. Any good documentation on them?
Doesn't look like it. But there is this https://docs.unrealengine.com/5.3/en-US/distance-matching-in-unreal-engine/
I mean they do a lot of things so it might not be worth it for you in the end. But you can also check out any videos about starts, stops or distance matching in https://www.youtube.com/@OutcastDevSchool/videos

An in depth look at Distance Matching in Unreal Engine with an example workflow implementation.

YouTube
Great thank you


all off them in my blend space (just pistol i also have a knife bs and unarmed but they are working properly) doesnt seem good in game do you guys know why
i also have this problem and i customized the anim in ue5 and i recomment to you do also because even though you retargeted it they dont have exact same skeleton did you use retargeted pose or made it youself? if you do youself make sure you set up correct especially hips it doesn't seem true to me
ah i fixed it by uploading ue5 manny to mixamo
this channel so dead i always got my problem fixed before anyone answer anything xd
count me in xd
how did you add in mixamo
@misty dagger i fount it how but may i ask a favor
@misty dagger i made it i didnt know i can handle like this thank you
I have an issue,
when a static mesh is parented to a skeletal mesh's bone
and when you scale the skeletal mesh non-unifromly ( for example scale by x: 1, y: 2, z: 1 )
then the static mesh becomes offset from the skeletal mesh bone and can be more or less offset depending on the position of the parent bone in the animation.
Hello! Regarding the Animation Sharing plugin, I'm trying to track when an animation finishes playing, but within the AnimSharing Anim Instance, I have access to all actors that are registered to the system and I'm not quite sure on how to access the one that is actually in that state and should actually be notified. Anyone who dealt with this plugin, could please give me some general pointers on that flow?
am I dumb or it isn't possible to remove outputs from functions on control rig blueprints? It just doesn't have the remove button

it's just weird
Expand the tab more, it's hidden in the overflow
wow, so the answer is the first part "I'm dumb"
thank you
Not really dumb lol
Just that the Control Rig details panel in UE5 is quite narrow by default (at least in 1080p display), and some important buttons are hidden as a result
there should be a way to right click and do stuff, there's just too many buttons there
I wish the control rig or at least a part of it could be done in cpp
really hate to do large code in blueprint
Well, you could create custom functions for Control Rig, or implement your own anim graph node in C++
Using Control Rig node in anim graph is comparable to custom C++ anim graph node, and also compatible with the multi-threading
Hey guys, prior to releasing my weapon swings I want to slow down the animation a bit, before speeding it up upon release of the attack swing. Slowing down the animation rate does the trick, but it affects the whole character, including the legs, while I just want it to affect the upperbody. Is there a way I can slow down the animation from the pelvis and above? I'm guessing it would be some slot-based magic, but not quite sure how to proceed tbh 🤔
You could do some post editing with Level Sequencer - in there, you can use slots to isolate the body parts and tweak the animations accordingly with existing anim sequences, then bake it into anim sequence
It's not procedural by code, but I'd say it's better to edit the animation directly than guessing the timing every time, and without leaving the editor
I tried to create custom functions but they don't appear in the control rig graph, only on normal blueprints
I'm really new to unreal, but I have a lot of experience with Unity
Right, forgot to mention Control Rig is separate from the usual Blueprint and uses its own RigVM. I recall there is an example of custom CR function in Power IK plugin, but that was for UE4.27 and back when CR is unstable
Control Rig C++ API is undocumented, and you could settle with custom anim graph node instead
I see, thank you anyways
does anybody know why the IK i put in a state machine only works the first time and then it stops working?
I've got it set on "bone space" and gave it the socket of the head, the first time i play it it works just fine, the second time it seems to ignore the IK

so i have 2 animations
one of them has the root rotated by 90d
but when using both in a blendspace and using preview, the root is alwasy the same
Hello!
Is there a way, in blueprint, to get the bone track data from a montage?
Functions such as "Get Bone Track by Index/Name" only seem to work for sequences.
Being able to get the current sequence playing in a montage would also do the trick.
Anyone has any idea what this dumb error means?
I literally unpinned and repined a node in the animation bluepriint...
and this error showed up...
Please ping me so i see your reply.
Hi, noob question. Is there any way to remove the actual "blend" part of a blendspace so the animations kind of "snap" into each other instead of slowly ramping?

Why does this animation still move forward when I have force root lock on? It was originally a UE4 skeleton animation that moved. Root lock would keep it in place. Yet after retargeting to the UE5 skeleton it won't stay in place no matter what

With control rig, does anyone know a way one can bring world movement in to affect cr "global" values?
So, I'm trying to make a running animation that only controls the legs, how do I do it inside of UE5?
can someone tell me what this is called so i can look it up?
Figured it out, you can double click the circle transition thing and it will take you into it.
do you guys know why this is happening, whenever i rotate the hand it causes the fingers to go crazy like that


never mind i fixed it, i miss named something. isnt that the story of my life 🙄
https://www.youtube.com/watch?v=2AJwiGJ6zcM how can i do this without control rig?

Check out my Discord channel: Check Information Page For Discord Link.
Thought I would do a quick breakdown on how they do reach targets in the Content Examples Pack. Btw this breaks down when the arm goes behind the character, you can test this out by moving the ball behind the character in the Blueprint and watch how the arm twists in funny w...
So, has anyone gotten the hidden DQS working?
Inside a procedural control rig, is there any way to identify the skeletal mesh that the rig is running on?
I'm surprised. I had a friend call me out of the blue yelling UE added DQS. Like why wasn't this announced?
#ue5-general message
#ue5-general message
#ue5-general message
Literally me 2021, 2022.
I dropped an entire project because the lack of DQS support lol.
I need a shovel to go dig up a grave now.
Yeah I know about Aliens, I chose not to use it because every time I tried, it led to weird shader corruption.
That was more or less the nail in the coffin.
It occurred to me he might have read this and told me about it, lemme ask.
The answer is yes it was. Thank you Laura.
I'm surprised they didn't announce it. I know it pretty much killed the Daz to UE pipeline.
Not my usage but still that's a lot of business.
I'm just surprised there was no mention about it. It's weird. People make entire engine builds for that.
All 10 people that know what DQS is & why it's so good will read it.
That was my initial reaction to the ML Deformer.
I was just like ok that's cool but it requires maya
And it requires preprocessing
DQS usually "just works"
I just thought it was unviable because of the cost associated with using the ml deformer.
One of the nice things about DQS is it's usually implemented as a vertex pass. I get they only wanted linear transforms at the time but I remember reading how the ML deformer is for non-linear transforms, and I was like..."so why can't we have simpler dqs"
I wouldn't be surprised if it had something to do with nanite.
If I had to guess, they want to eventually bring prebaked deformation to nanite and non linear transforms broke that.
Only a guess.
Irrc, nanite was deeply in development during 4.x.
And nanite did influence other options, like tessellation(also getting re-added experimentally it looks like)
ye
ValleyOfTheAncientDanceDab.gif
I've tried many methods and I've redone the setup in many different ways, but I can't get the following FBX to properly import into Unreal with animations. In its current state it has a bone per each moving vertex group. I've exported the mesh, armature and animations in the FBX, but all the information I've found is conflicting and no combo of options has worked for me. Short video included to show Blender project setup if needed:
Hi there..
I got a small problem with my Anim BP..
After getting the Anim Owning Pawn/Char, i try to get its Velocity and GroundSpeed..
And i use a BlednSpace2D to blend between idle, strafe/sneak, walk and run
When using the default AnimBP of Manny, the character is able to move..
With my one.. The Char is constantly moving and the velocity is set to something that seems to be randon, every tick... So sten speed is always set.. even no Input is done.. the char moves forward...
Can someone lead me into the right direction of how to fix this?


ok.. can it be.. that root motion in animation, while using "Root Motion from Everything" is true.. does not apply any velocity to an actor?
Hi everyone, I have been attempting to make some FPS animations externally outside of UE, I was wondering if anybody here who is a bit experienced would be willing to give me some pointers for how I best should approach this type of work
Afternoon all. I am starting to get to a point where I am implementing attack animations.
All the tutorials I see regarding this shows people putting animations into the character itself.
Would it not be better to add them to the animbp ?
anyone got a tutorial for 8 way blendspace from scratch
like without using the default third person
I'm new to animations. I'm wondering if there's a way to mix or have both motion matching and the traditional state machine animation? If you use motion matching, do you have to go all in? I can't get any upperbody weapon animations with motion matching, but can for movement, so I was thinking of only having motion matching just for the legs
is there a way to have the player character top half hold a fun but switch to not holding a gun or fighting.
is there a something like a character mask?
Hi, I'm getting started with Control Rigs. I'm trying to reuse the CR_Mannequin_Body rig on some Paragon characters. I'm setting the Preview Mesh as the new character Gideon. I'm following the process explained in this video (https://www.youtube.com/watch?v=8lnNh936mYs).
I disconnect FK solve and place the controls on the bones using "Set offset transform from closest bone" . The problem is the control is twisted 90 degrees. I don't really know where to start. When I used the Control Rig from UE4 Mannequin (the one used in the video) I didn't have this issue. Any idea?


You will learn to animate any Paragon character in Unreal Engine 5
From downloading and copying Control rig to baking edited animation to skeleton and mixing different animations.
Türkçe versiyonu: https://youtu.be/rXWp2MSLVaU
Русская версия: https://youtu.be/dbTYrZrGPwk
0:00 Downloading and copying to correct places the Control rig mannequin...
arent paragon characters already rigged to the epic skeleton? Shouldnt need to do that
They have unique skeletons incompatible with the Mannequin skeletons.
I'm trying to showcase some of my animations imported into Unreal, but when I try to review Take Recorder sequences, the Player Capsule (and camera) is rotated 90 degrees (Right). When I'm actually playing in editor (Left) or recording a Take, the player capsule seems fine, this just happens in the Take Recorder and the recorded Animation Sequence is also rotated 90 degrees when I check it. Does anyone know what's causing this? I'm using the ThirdPersonCharacter blueprint in 5.3. I changed the skeleton but that's about it

When I create an anim montage from a 60 frame sequence it's creating a 110,000 frame animmontage???
Hey guys, I need to modify my root bone before doing a Pose Snapshot in my ABP , anyone has an idea how to do that?
You can setup blend masks in the skeleton and use it with a "Layer blend per bone" node in your Anim BP.


Hard to tell without seeing your import/export settings, your setup looks fine at first glance.
I have this BP component set to a character BP. i followed prismatica devs tutorial exactly. but when event begins play it auto enables physics and he falls onto the ground. when in prismatica devs tutorial his character ragdolls but their hips stay at the same point.

After many dozens of attempts, I finally got it imported.
I didn't want to use an armature as I had already keyframed an animation per-object. I had to join all the objects, then manually assign vertex groups instead, and needed to re-animate the whole thing.
At that point I was able to export the same way and import to Unreal.
Now I'm just not sure how to do proper collision for the thing since it has stairs and a structure the character will walk around on.
(Also my UVs are completely broken and I don't know how to use nanite for an animated mesh if it's even possible....)
Hey friends... I have a probably very dumb animation question i'm hoping someone can answer for my FPS style game. I've had lots of success with all other systems, but understanding the workflow for doing animations has been a roadblock for me for some reason (despite watching a bunch of videos to try to wrap my head around it)
Assuming I have a set of rigged FPS arms and 5 firearm models... Assuming i'm comfortable with Blender (mostly)
Do I need to create a separate animation for every firearm and action?
ie...
1 animation for equipping AR15
1 animation for walking with AR15
1 animation for running with AR15
1 animation for reloading with AR15
1 animation for firing with AR15
1 animation for aiming with AR15
1 animation for switch fire with AR15
then... repeat the above x5 (1 set of 7 animations per weapon for a total of 35 animations?)
Then do I just export them all into Unreal? Are the arms separate? The last couple steps (how I create a cohesive and somewhat efficient way to do this for a variety of weapons) is where i'm totally not understanding.
Any help - would be amazing 🙂 thanks in advance!
I'm more interested in the workflow aspect... IE, what's the most efficient way to have a lot of animations and add new ones frequently?
Someone in the other thread mentioned animation retargetting - could someone give me the 2 sentence rundown as to how this would improve my workflow?
Hey,
animation importing in UE 5 is massive pain and mostly does not work at all.
I'm downloading an animation pack from the marketplace into a dummy project (importing into the correct project does not work as it won't show op in the Launcher - never!). I used to copy just the animations into my real projects desired animation and assign my used skeleton.
This no longer works as all those animations then have no animation data.
So I export them as FBX and try to import them. On some animations it works but most of the time I get this error:
Failed to import 'C:/Users/Daniel/Desktop/Game/CoverAnimsetPro/Animations/RootMotion/CoverHi_AimL.FBX'. Failed to create asset '/Game/Assets/Characters/Animations/CoverAnimations/RootMotion/CoverHi_AimL'.
Is anything at all working correctly in UE5 without beeing a massive pain?
If your UVs are also broken in Blender it probably happened when joining the objects.
You can't use Nanite for skeletal meshes. Your mesh looks quite low poly anyways, but if you really want to use Nanite and a skeleton, you can import your floating parts as static meshes and attach them to the bones in a blueprint via "Parent Socket" (see image).
Tbh though, since it's a quite simple translate/rotate animation without deform I would probably just:
- get rid of the skeleton altogether
- revert the blender file to before joining the object or split manually again if you don't have a backup
- import your objects as static meshes in Unreal without animation
- do the animation in Unreal using sequencer or timelines in BP
Then you would setup the collision for your stairs and stuff in the static mesh editor using simple collision volumes (or for a quick fix set Collision Complexity to "Use Complex Collision as Simple", but that's more expensive).


Thanks, stan
How u try to put your collision preset to ragdoll?
What do you mean
Select your main mesh component,

I had it set to custom
Whenever i enabled query and physics it had him fall over in ragdoll on the floor when in the tutorial he ragdolled while having his hips stay in place
can you screen shot your graph?
am assuming you have something like this, make sure to have the "Include self" turn off so the hips don't get affected

Hi, I'm new to this group and self learning about Unreal. Does anyone know what Additive Identity Pose is? I can't find any documentation or much about this node online. Thanks.

So "Additive Identity Pose" means "Returns identity pose". I think what it means is during the blending from one animation to the other, once it's done playing that animation it returns back to its original pose.
I'm wondering if its definition is that simple. Just basing off these two sites I found:
does anyone know if the rotation here is not supposed to be "Addtive Global" as the rest? I'm trying the values (45, 0, 0) and the feet is always pointing downwards 45 degrees

the translation is being added as it should
I feel like this is defining the bone local rotation
Hello! Someone can help on how to export mixamo animations from blender to UE5? From mixamo to UE5 it works, but if I edit the animation in blender and export to UE, the animation skeleton have deformed bones. I just need to make the animation run in place, I tried in UE with force lock, don't know if there's another way
Is there a way to cause an animation to play while an object is currently culled? I'm having an issue where my client tries to open a door and the server only animates the door when they can eventually see it
Which means the server runs an animation that has long been completed on the client (and didn't update our colliders since then)
i got his hips to stay in the capsule by setting colision preset to ragdoll but he still goes into ragdoll automatically
Not sure I would have to see your set up but logically you should map one of the keyboard to enable physics and another to disable it
i cant, im using vr
well then give it your condition when u want to enable it and when u dont want it
even if i completely remove the bp component and just have this, he ragdolls automatically

you Physic asset, is it set to simulate?
where would i find that
Put it to default

kinematic
for hips
everything else is simulated
should everything be set to kinematic
Put it all to default
k
I see a lot of tutorials on how to do foot ik and they all are applied only when the character is in idle position. Is there a way to apply it to walk and run positions too? I know it might make the foot get stuck to the ground, but I wonder if there's a way to use the animation curves to determine which frames I should apply the ik
if possible I could check that the foot is already close to the ground and then maybe have a weight curve, idk. I'd like to hear from somebody with a deeper knowledge

Why isnt this working. the layer setup - mask is setup but nothing ins happening. no dancing arms animation?

pistol animation works but I'm not sure why.

I made a Blend Mask but the last node only works.
Have a look at ALS System on marketplace (its free) as an example - basically you want to look at using overlay poses for different weapons to combine with your base movement animations, reducing the amount of specific animations you need for every possible combination.
Hey! Not sure whether control rig questions go in here but working on my restrictions for this scorpion tail. The initial model and skeleton have the tail straight and I'm having trouble figuring out the settings to make the curve how I need it to be. The tail has an IK control on it.
Currently messing around with the bone constraints but I can't seem to get it to do a smooth, wide curve because it's taking the path of least resistance. Any suggestions? Obviously doesn't have to be perfect but I have a lot of IKs involved on the skeleton at the moment.


anyone manage to get motion matching to work with unreal's built in Foot IK? If I want nice animations with MM, the character won't bend their leg on top of uneven surfaces
Little confused here, I have a system to lift a leg when walking, but its very spazzy, I'm starting to think that IK goal Alpha's don't do what I think they do, which is slowly disable its effect on the rig. Am I correct?

It's supposed to make the left foot limp, raise the knee by setting the location to above the foot, and enabling the knee solver. Kinda broken though, seems to work on the right leg, but knee is locked on the left leg. It isn't cause by this, since I swapped their positions in this graph and it didn't change
The end of this branch leads to the same thing but for the right leg
The solvers on the IK Rig are identical for the knees
Hey guys, working on project in 5.3.1. I added free "Animation Starter Pack" to my project and only way for me to see these animations within blueprint is to toggle "See Incompatible Skeletons". Do I ignore it since its just generic and animations will work regardless or I gotta find new animations kit?
I retargeted the skeleton from the Advanced Locomotion System so that I can use the animations from there to Manny. The animation sequence looks fine, but when I preview it in the animation blueprint, it does a thing with the right leg (see attached). Am I doing something wrong? In the ABP, the only thing there is a "blend poses by bool" node.

I have managed to set up driving morphs from bones using control rig, which works fine in preview editor when manually translating the bone.
However i also has a physics asset that simulates the driving bone and that does not affect the morphs at all.
Example
Translation of hand bone in x cords drives morph value to add morph expand hand size. Works when moving hand in mesh preview.
But simulating hand bone using physics asset on x translation does not drive the morphs.
Are physics assets not actually setting the bone translations when simulating them? I can see the bones moving in the viewport.
This is on unreal 5.3
I think I'm loosing my mind so if anyone can point out what I've missed with setting up an aim offset that would be great.
So i'm trying to setup an aim offset just for the pitch so the character aims up and down. I have a single frame poses for the Up, Middle and Down that are set to mesh space additive (base pose on single frame) but when i add them to the Aim Offset nothing happens. I move the little cross around and it just shows the Preview base pose without any changes.
does anyone know the math behind this node? I want to do something similar from cpp

How can i make my character rotate when i rotate the camara (only while running)? I'm making a project inspired by psychonauts so i'll use it as an example for what i wanna do
in the video i'm moving only the right joystick (camera)
and pressing forward
I have my feet ik rotation looking correctly when my character is rotated 90 degrees (yaw), but looks wrong in every other direction

any one have any idea why this would happen?
it looks inverted when using other rotations

this is how it's set


So I'm abit lost in the sense of where I what direction I should go to be able to have moving parts on a item, in this case a AK47. Need to be able to access the trigger and another part I don't know the name of. Any pointers are greatly appreciated!


is there anyway to have a physical based animation that still follows the exact motion of the animation but can be moved by outside forces? im making a VR game and i got it to where if you hit him you can knock around his limbs. but when i do that his body lacks behind the animation
Hello everyone,
I want to build a fantasy combat game where the players can put weapons (sword, shield...) in their right and left hands something like dark souls. Do you have references to build something like this? I guess I need to have some sort of poses for each weapon for the right and left hands.
I was thinking about the linked anim layers I saw in the Lyra project, maybe one layer per weapon (or 2 for right and left) but I'm not sure how to structure the AnimGraph in the Animation Blueprint.

has anyone in here experience in rewindDebugger and knows how to get the Properties row ? There is an older video (unreal 5.1) where the guy had a "Properties" row where he could see all the variables of the object. But i don't have those rows in the list. Does anybody know if they were removed (tested it in 5.2+). I couldn't make rewindDebugger work at all in 5.0 and 5.1 the way i can in 5.2+ (it wouldn't activate anything that i chose in the selector, just would close the selector and that is it). In 5.2+ it works fine to debug the recorded time except for the properties row.
Why does force root lock no longer keep the animation in place after retargeting from the ue4 to ue5 skeleton

have you checked enabledRootMotion, too? otherwise you probably lost your rootMotion.
Is it still showing the red line, representing the rootMotion?
I've half figured it out. I'm using the Open World Locomotion System. While it's cool it's causing me more bother than it's helping... With the skeleton it provides the pelvis bone translation retargeting is set to Animation Scaled. Setting it to skeleton fixed the root motion issue but broke other animations like vaulting and climbing
Does anyone know a good way to handle anim montages (or something similar to it) for objects without skeletal meshes?
does anybody in here use the RBF-nodes in controlRig and they are working ? For me they crash Unreal, a simple yes if they work at all would be enough for me, just want to know that the problem is on my side
Does anybody know why in ue5 character does not un crouch while moving? I have to stop moving for character to uncrouch. Otherwise it remains crouched but movement speed goes to normal run speed
Hello fellas, currently I am dealing with a problem regarding my character’s mesh while it plays a montage (see video for reference).
The left mannequin is the simple preview of the animation dragged into the scene, that’s how it "should look like".
The right mannequin is my character, playing the same animations as a montage and triggered through the character’s BP (pressing space/jump). As you can see, the mesh gets deformed for some reason.
Now my question is: Why does the mesh of the character get deformed while playing the montage?
My theory is that the "AnimationBP" of the character does interferes with the montage, which is why I post my question/problem here. But I do not know what i am doing wrong exactly…
If needed, I would add some further images of some BP Code-Snippets and settings of the animations. But the code is realy simple and regarding the animations there is nothing special I did as far as I know (this project is relatively old).
In the character’s BP I just trigger the montage. In the AnimationBP, I created a StateMachine for the locomotion, air-movement, and on-ledge animations. Maybe i did just set up something wrongly or did miss some other things to change. Does someone has any clue where to begin with?
P.S.: I already went to #blueprint but they send me to this channel since this might be animation related

I just found out the solution by myself. I made a mistake when I retargeted the animation. I had to create some IK_Goals at the hands and feets and export the animation again. Now it works fine!
is there anyway to get it so during physical animation the arms dont fall to the sides? i have tried positional strength but that dosent help
Not sure if it's the right channel for this.
Is there a way to move or rotate bones while editing weights in the skeletal editor?
how do i get limbs in a physics asset to go back to their original position after they are moved around?
this character can be moved around but he doesnt really return to his original location.
any ideas?
Hi guys! I having a throuble with root bone of the character, that being scaled to 100. I fixed it in blender, but now all my animations still working with previous skeleton. I'm trying to skale my animations to, but when i apply scale, z-dimension become fixed, when its need to be changed a bit during animations. By the way, it's not affect to x and y dimensions. How to apply scale to animations without affecting to the dimensions?
Hello guys, anybody knows how can I change a variable from any blueprint and make all my xxx_anim_bp from the scene blend to another animation? 😵💫
I mean its the same anim_bp for multiple objects, can I control it from 1 BP without need to get every anim_bp instance from each object and change the same boolean for example...?
how would i go about creating a smooth transition animation? for example, i have a set of crouching animations and i want the player to transition smoothly into the crouch 'blendspace' using the animation between idle and crouch
but somehow it just seems to skip the transition and go straight to the blendspace

ive an alias for this basically and it just seems to jumps straight to crouch_bs, the blendspace ive set up and skips crouchstart entirely
Hey i have a question. When i buy Textured Rifle models, gameready. The only thing thats lacking is animations. Is there a way to buy premade generic animations and retarget them to similar weapons with litte effort? For example i have a M4 reload animation, i want to use it on a M16 which is pretty similar. Can i just retarged the arm position and recycle this animation for other guns such as AK etc.? It does not need to be completely accurate, i just don't see me doing reload animations from scratch for 50 weapons if they are pretty similar.

Stil wondering if anyone can help me with this Maya mesh to Unreal problem with the bones all ending up at the exact same spot

If you open your FBX in Maya does it look good? If yes, if you turn of all of your skin clusters does the geometrie moves?
I think i just thought that bones would be created at the pivot of an object, apparently i still need to make joints in maya to get the bones to snap to a good position (i belive)
Will this matter tho. Trying to get all x to point forward , and Z to point to the sky. byt Y on left or right side, does it matter?


First place your bones correctly, then skin your geometry. Make sure your geometry don't move at all when you turn of your skin cluster
hi. why this is happening? it looks like camera rotation is affecting the location of ball_L but in debug its not moving. also i have to mention i'm using lyra method for rotating root bone to 0 based on character rotation in idle while UseControllerRotationYaw is enabled in character BP
Dont know what skin cluster implies, but the bones are done, skinning soon, lets hope i can get the settings to work for exporting into unreal from maya now.

Skin cluster is just the deformer that get added to your mesh stack
hey folks, I am new to ue5 and ue5 animation and stuff. Currently I am working on a vehicle bp and adding basic features like toggling headlights, turn signals, license plate lights etc. and that is working like a charm. I now came to the point where I want to toggle popup headlights or feature active aero (whereas toggled by speed and/or braking).
in the event graph I have access to current speed and pressed keys ofc, so I handled to print out message e.g.
"spoiler speed reached.", "spoiler moving up", "active spoiler detected", "braking detected, moving spoiler up" which are nothing but text outputs for the state needed for further processing.
yet I thought - as my skeleton features bones for spoiler and headlights (spoiler_r, popup_lights) I could "just" access the bones and modify the rotation transform form my pawn BP as easy as I toggle the lights on/off or print the messages.
therefor I created already variables in the BP: spoiler_active_angle, spoiler_brake_angle. spoiler_active_speed, spoiler_brake_speed etc.
But I faced the issue that I am not able to modify the rotation axis of these bones from the car's BP, is that correct?
So I tried to modify the anim BP for the car and started working with the rear wing by adding a sequence for "spoiler up" and a sequence for "spoiler down" and triggered those - as a test - in the anim BP by detecting the simple keypress ("brake"). That is working (kind of) as intended, but breaks the wheel's rotation and steering animation and I don't know why.
Also I would love a solution to pass the variables values to the bones instead of creating animations for each part OR if I have to create animations for each part and using a variable for the animation duration
- how can I avoid breaking the wheels rotation and steering animation
- is there a way that I use one single sequence and use keyframes to toggle the state? As the input of e.g. "braking" has suitable values for it as "started", "ongoing" and "completed" I could (in my mind) perfectly tell e.g. started -> keyframe 1-19, ongoing -> keyframe 20, completed -> keyframe 21-40; but yet I did not find a nice solution for it.
You can use a "Transform Bone" node in the AnimGraph of your AnimBP to modify bones without creating animations (https://docs.unrealengine.com/5.3/en-US/animation-blueprint-transform-bone-in-unreal-engine/).
oh sweet! thank you @slender lagoon - do you have an idea if and how I could cast the values of the car BP to the anim BP?
Not sure how exactly you set everything up, but you need to add all your angle variables to the the AnimBP to access them in the AnimGraph. If you make them public you can also modify them from your CarBP (something like on the image).

so "some angle" needs to be both on car bp and anim bp?
Depends on how you want to set things up, you can also only do it in your AnimBP
or would I first create it on the anim bp and access it publicly from my car bp instead of using the ones in the car bp
well, I would like to modify all values only in the car bp and instances and have them just casted to the anim bp
If I understand correctly, you have multiple angles for different states of a bone (e.g. spoiler) set up in your CarBP, right? Then you probably want a single variable for like "SpoilerAngle" on your AnimBP, and use that for the "Transform Bone" node. From your CarBP you would then for example set "SpoilerAngle" to "spoiler_active_angle" whenever that event occurs or to another variable when another event happens.
yeah, that sound correct. e.g. a car has an active rear wing, the mesh attached to the bone will be in idle state. Then there is a int variable with SpoilerAngle set to e.g. 90, meaning 90 degrees that the bone should be rotated when other requirements (such as min-speed) is reached.
but yet I could not get the "90" handed over to the anim bp.
but I will look into it right away when I am home from work. I will also post the current setup in both car bp and anim bp. thank you very much!
just a quick question, how to I flag a variable "public"? I haven't seen an option in the details tab tbh
Just click the small eye icon next to the variable

np ^^
is there a basic transition duration or would the cast to the bone rotation be instant? I guess it would be instant?
instant, yes
okay, then I will handle this with a interval I think.
is what im trying to do here possible

basically i have a child anim bp, id want it to use the code from its parent but i want it to have some individual bone transforms
i dont think im doing this right
Was there a way to update/alter a Skeletal Mesh's reference pose in Unreal Editor or will I have to update that in a separate program?
Hey guys, any ideas why the jittering is happening? I'm trying to implement Jog Start animations using an approach like Lyra, using Sequence Evaluators and Distance Matching. Not sure why the animation jitters. Thanks in advance
Any direction to where to start looking is welcome


Does anybody knows how to move for example box from A to B, but with additional shakes (using animation curves)? What is efficient way of doing it?
I am a bit confused, because afaik child anim BPs don't have their own anim graphs? 🤔 Like see my first image, I have no anim graphs, only event graphs, if I create it via the menu in the content browser. But you could probably:
- put those "Transform Bone" nodes on the parent
- add variables on the parent for the node settings
- set variable from child event graph


can someone explain me how this compares to FInterpTo function? I find it strange that generally you have an input for the current value and the target value, but here we only have value

oh, I guess this goes from 0 to value probably?
In 5.3 a new skeleton editor was added (still experimental though). That would probably work to update the reference pose. I think apart from that there's no other way within Unreal itself.
Epic Developer Community
The Skeletal Editor is a new set of tools released with Unreal Engine 5.3 that will allow you to Create and Modify Skeletal Meshes. With these tools you...
Interesting, thanks! We're currently still using 5.2 but hopefully that'll come in handy in the future
i would have wanted to do it this way but the thing is the child might have entirely different bones
and it doesnt let the bone names be inputs
Hello, I have multiple types of enemies in my game. I'm trying to make animation blueprints in a reusable way. I already made the ABP for the melee enemies and now I'm trying to use basically the same blueprint just with a different skeleton and animations for the ranged enemies. Is there a way for me to do that? I tried creating an animation template but I couldn't find a way to change the animations. Do you guys know a smart way to do that so I don't have to basically create the same state machine and variables in another ABP?
I don't think child anim bps are meant to be used with skeletons that are not compatible anyways, meaning they should be similar and have same bone names 🤔

Maybe you should look into Animation Blueprint Linking and Templates (https://docs.unrealengine.com/5.0/en-US/animation-blueprint-linking-in-unreal-engine/). I don't have much experience with it myself yet, but looks like this could help in your case to share logic between incompatible skeletons.
yeah thats what im thinking
ive already created a 'bone morph' layer but im not sure how to connect it
otherwise my system is already based a lot on lyra
I figured this is a decent place to ask this, but in the HD2D games (like the Octopath games), how would you approach doing a sword swing facing south and north? I'm finding it tricky to do believably. Left and right swings look fine
For animation templates you would expose your animations as variables. It's explained here in the "Template Usage" section: https://docs.unrealengine.com/5.3/en-US/animation-blueprint-linking-in-unreal-engine/#templateusage
oh nice, thanks
Hello! Using control rig for the first time, how would I go about getting these nodes?

what kind of "set" are you using there @slender lagoon
I can't find a "Set" featuring a target though

found it 😄
@slender lagoon real BIG thx. works like a charm!
thanks to @slender lagoon the active aero works. yet only in instant state, yet I need to modify the transformation to be smoother, but it works as intended.
state 1: aero rotates 20 deg up for additional downforce
state 2: aero is up and rotates to 80 deg up for braking
state 3: braking is finished but min speed is >= aero activation speed, therefor spoiler falls back to 20 deg
state 4: speed < aero activation speed, spoiler is all back down.
Just dropped a new video:

Here we show you how to capture your movements using your phone and an app called Move One and then how to upload to HEAT to use our Easy Drag and Drop Motion Capture Tools across any of your 3D projects.
anyone have an issue where anim notify does not fire in standalone game but works fine in PIE? its on a sequence (footstep notify) in a 'normal' anim bp
specifically my own anim notify child, the built in play sound notify is firing off
what are this options for? prevuewing the the result of adding the animation to the one selected here?

Good night Folks! Need a help with my Animation Blueprint, Perhaps is something simple, but im still learning,
I Got a Fixed Camera , and a Character with walk based on the Camera Direction ( Witch is static) and Can Rotate Looking at the Mouse,
I Dont know, How Set up the Animation Graph to Handle Angles and Inputs, I know how to make a Simple Blend Space with X and Y Speed, but This changes with the Angle
In the Code i have access to The Angle, Inputs and Velocity, But dont know what to do


This is not enough because its not handle the Angle Issue, because if i look Right, and Walk Forward, hes gonna play the Walk Forward, But Should play Walk Right
im really lost with this
i Imagine, i have to Pick the animation based on the Direction my Character is Looking, As Combo with the Direction im walking, But, Blend space is only 2 Floats and dont know if its the way
I think This video Explain better

I think you could just rotate the velocity by your character's rotation and use that for your horizontal and vertical inputs. Something like in the image

@slender lagoon and ofc everyone else in here. Is there a simple option to set a transition duration for bone movements/transforms?
https://docs.unrealengine.com/5.0/en-US/transition-rules-in-unreal-engine/ this is what I found and I wonder if this is applicable for the transform bone modifier 🤔

Blend between states in your State Machine using Transitions.
Hey Can Anyone Help Me I Am Trying To use Multiple Slots In Anim Montage And I Have A Anim Notify In Anim Montage So I Want It To Fire Only Once but by using multiple slot its firing the event X slot times
No, transition rules won't help you with transform bone nodes. The way things are setup right now, you're probably best of using "Timelines" in you CarBP to update the value "smoothly" 🤔 There are also some interpolation nodes in anim graph that could work.
But tbh thinking everything over again, the current setup feels more complicated to me than it should be 😅 I can't tell you what's best, but thinking it over I would after all go the other way and use animation sequences with blend spaces. That will still allow you to set the state by angle. I'd probably do it somehow like this:
- Make animation sequences with just a single frame for the minimum/maximum angles. E.g. if can go from 0° to 90°, make two animations, one where the spoiler is at 0, one where it's at 90 (actually if min or max is 0° for multiple moving parts of your car, you can just reuse a single "Base Pose" anim sequence for the cars default pose).
- Change these to be additive in the animation sequence settings. This should fix messing up animation of other parts of your car like you mentioned in your original post.
- Setup a Blend Space (one for each of your moving parts, e.g. one for your spoiler, etc) with a single axis where the min/max value are your min/max angle, and put the animation sequences at the respective ends
- Blend spaces have options for smoothing, so you basically can define a transition time here
- Add the blend space to your anim graph
- Plug e.g. your "SpoilerAngle" into the blend space node
- Connect the blend space node to your graph with an "Apply Additive" node
That way you should be able set any angle (within the min/max) from your CarBP with a smooth transition. No guarantee though that everything works out of the box like I described it, but I think it should, haha 😅
I mean timelines will probably work fine as well. Just wanted to mention the alternative approach, because it think it's cleaner. But in the end it just depends on how many moving parts, how many different states, etc. to decide what's best in your case.
thanks for your in depth feedback, I will definetly take a look at it. The main reason why I want to avoid creating sequences etc. is the "easier" implementation of the animations for the cars, as I "just" need to stick to the cars skeleton, attach the geometry to the bone and set the values in the cars bp right which seems for me -right now- more suitable for future "DLC" or addon cars, regarding that nobody would need to touch animation sequences etc.
regarding this I will firstly to be honest take a look at the timeline thing as it seems pretty suitable for me and I could hook up the headlights on/off e.g. to it as well, but as you also said there is no right or wrong as it more depends on the use case.
having the bp's in state of the video allowed me to make child car bp's and just replace the mesh, adjusting the variables and I was ready to go, what really is -yet- a nice solution.
Could anyone help out why export to unreal, give a root bone on a wierd location?

so im a little inexperienced with this but how could i have 100% of both? the linked anim layer is basically just a bone demorpher

right now it swaps to one or another depending on how i 'blend' but i need them both to apply 100% 😄
is there a way to create something like a for loop in an AnimGraph? I want to dynamically transform some of my bones, I could create Transform(Modify)Bone for all of my bones but I'd rather have an array of some info that I'm iterating bc it's much cleaner

Wont work , for some reason the Actor rotation is always 0 , but in the inspector he is rotating


i try GetWorldRotation too, but same effect
Butttt
I make a Custom Function in C++
that return my Rotation
and now Works!!
Thanks!!!!!
Well, normally you shouldn't need a custom function for that, but if it works, it works, haha 😅
I agree, but dont know what was missing in the blueprint :/
Nope, don't think so
But im kinda happy too see it working
(dont mind the animations, are just placeholders)
Nice 🥳
Just a wild guess, but maybe "Apply Additive" node is what you need? 🤔 Plus you would probably also need a "Make Dynamic Additive" node.
some very interesting results with apply additive but its something 😄

with 0.1 alpha, this is not at all the settings i have outlined in my layer but

its interesting nonetheless considering the original model without morphs applied looks like

How did you set the nodes up?


this is the layer animgraph, it also needs something else
right now im using an anim player as the start but it obviously overrides animations i actually want to use from my main cached pose
@sharp coyote I think for making the additive thing work, you would need "Make Dynamic Additive". Like maybe try this real quick just to see if it works:
- put a make dynamic node right before output pose in your anim layer
- your current graph goes into "Additive" pin
- in the "Base" pin plug in the same idle animation
Again wild guess 😅
yeah, i tried the 'make dynamic additive' node and it makes some very strange stuff happen
not whats intended at all
Ah okay, haha, well 😅
Can you help me clarify one thing. There is LinkedAnimLayers. U can use them only on parent ABP? I mean here is the situation - i have locomotion template, that is inside main ABP. That locomotion template inherite AnimLayerInterface. But when i do linking - that locomotion template doesn't recognize it
well im using layers and i think the way it works is
you can use many of them which is the point but they cannot use the same interface functions or whatever theyre called
otherwise they override one another from what i can tell
yeah, but main ABP don't inherit that interface
only template that is used inside main ABP
that's where i don't get it. Or maybe i need any additional manipulations
i think the parent needs to inherit the interface if im understanding the question correctly
idk
I done that also
and i can get layer info from parent
but not from linked template
with or without interface on main ABP
mm okay can you clarify just in case what youre trying to achieve again? are you not sure where the code goes?
Okay another guess: couldn't you just add an input pose to your anim layer? 🤔 Then in you anim bp you pass in the cached pose and in your layer instead of the idle anim you have the pose from the input

Okay, i manage layers to work
basically the link function should be run on the instance that suppose to use that linked layer
in my case - need to get instance of my template from mesh/main ABP and do link layer on it. And that way it works
huh i had no clue you could do that, is it possible to expose the input in the main anim graph at all then or how does this work..
but this did solve one issue, how to set up the bone deforming anim graph without needing some weird workaround like i had, with the anim player 😄
aah, i got it to work now, i think... fingers crossed anyways, need more testing
i needed to redrag the linked anim layer node into the graph for the input to show up

so basically you got one master anim blueprint for any skeletal mesh and they can all have unique bone transform morphs depending on their unique skeleton
Nice!
is there an easy solution for mirroring an animset? As in turn a one-handed weapon set into a dual-weild one?
And/Or, are there any good animation sets out there? Unless I'm looking for the wrog terminology, they seem to be quite rare on the market
how do i enable root motion but only for x and y axis.
When I set "Loop Animation" to "false", my animation plays once as it should - but it can never be retriggered, it is as if it ran to the end, stopped and every new trigger of the animation will just freeze in that frame. It retriggers finde if I check looping. What can I do?

I play it via a layered blend:

Ah I found it! Had to check "Reset Child on Activation" in the "Blend Poses by bool"

how do scripted sequences generally work? Ive set up my own blueprint to be able to move the camera, and play an animation on an actor, but if I want unique things to actually happen other than that, would I have to manually set up each one?
For cutscenes and stuff you‘d usually use sequencer (https://docs.unrealengine.com/5.3/en-US/cinematics-and-movie-making-in-unreal-engine/)

Sequencer is Unreal Engine's multi-track editor used for creating and previewing cinematic sequences in real time.
seems a bit overkill for what I need to do, Ive already got most of what I need done
when my character does his attack, his feet go up, this only happens when root motion is enabled, how do i fix his feet while still keeping root motion enabled
definitely not just a problem with the animation itself?
when i disable root motion the animation looks just like when i animated it in blender
hey question - so I have 2 characters that have all the same animations but use slightly different skeletons (ex: one is a thin character, the other is a large bulky character - so they have all the same bones, and all their animation names are the same, but the placement of their bones are completely different) - I already made an animation BP of my first character and wanted to know if their was an easy way to just duplicate that BP and use it for my second character? Or do I have to make a new animation BP from scratch?
anyone know why the frames after 40 are staying even though i've deleted the animation from 40 to the end? All that's happening is the anim plays to frame 40, and then stays locked in this stance

I'd check your import settings for that asset
Ok, anything specific I should look for?
Hi, I'm having some issue with transitioning from a death animation to ragdoll. The moment the ragdoll activates, the skeletal mesh twitches for a second. Timing the ragdoll activation to the character hitting the floor helps a little, but it's still not ideal. There must be a good way to prevent that.
Why is it that in my AO, I get an out put pose of this

but my input looks like this for the center

Hey,
I have a class for a car with a turret
But the turret should probably be weaponclasses so we separated them.
The turret have bones, but i have 2 questions
To be able to get the turret to move and follow the mouse
I need to first of all set up a class where i can set a skeletal mesh as a mesh (how will i do that?)
Second of all i would need to make an animation blueprint from the skeletal mesh ? and if so how and what functionallyity do i need in there?
Also a mor eimportaint thing, in maya every X is forward in the cars direction but in unreal it looks like this when testing to drive

hi im not new in unreal but yes in animation related things. My problem is that i have a vrcharacter and a skeletal mesh and i want to do a vrdriven character, where should i look
This is how it looks in maya for the bones

Does anyone know if there's a good Blender tutorial that teaches how to add a root bone to a character for root motion animation later in UE5? Thanks.
Also when iporting to unreal this happens
Says Y is up but i chose export setting Z up

Basically adding a bone into the armature and parent the top most bone into it. Like this:
root
-> pelvis
--> spine_01
Make sure the armature object is named exactly "Armature" before exporting to FBX. It's a Blender thing
Would that automatically put the root bone to between the feet? 😄
Unless you change some default settings, yes.
Thanks a lot. That sounds like a straightforward and no-magic-involved process! I'll try rigging some later.
Hi all! I would like to record a video with my iphone and simultaneously record the data from gyro so I could use it as a motion data for camera inside unreal. I would like to make a fake face time call with metahumans. Any tips how to achieve this? Thank you very much!
Is there a way to have an additive animation that affects translation? Like having an additive where the pelvis sinks when landing. For me additive animations only work with rotation
Hello, I have a problem when I replace the main character in the Unreal Engine with this knight. The issue is that the scarf on the character goes inside the body of the knight instead of being outside, as shown in the picture. I don't know any suggestions for this problem because I haven't encountered it before. I hope for assistance.

Not a single answered In 2 days , noone using maya or what is this?
I'm mostly Maya now, but haven't dealt with vehicle stuff
Hey everyone, I'm a HND Creative Media Production student working on a project.
I'm in the early stages of developing the interactive experience using blender and twine.
Please, if you are interested in giving feedback that would really help my projects development.
Please reply here or DM me.
Also, I would really appreciate it if you would do a short survey to give me some feedback of my concept.
Thank you!


Google Docs
Introduction:
Thank you for taking the time to provide feedback on our upcoming game project, "The Nest." Your insights are invaluable for the early development stage of our game concept. Please complete this survey to help us understand your thoughts and suggestions.
Concept Synopsis:
In 'The Nest,' players step into the shoes of a young man de...
when my character does his attack, his feet go up, this only happens when root motion is enabled, how do i fix his feet while still keeping root motion enabled
I want to make an short sequence about an animal trying to get out of a net. So I want to make my net moves when animal asset moves
How should I approach?
I tried to use cloth sim but my net cloth sim does not interact properly with an animal.
It just go through. does not properly reacts... and only works with static mesh not with skeletal mesh or animation Sequence mesh(?) even I set collision to the animal...
Any other approach or solution?
I can you UE5, Blender, little bit of maya.
Unless this is a real time game mechanic, you can get away with prebaking the cloth sim, or alternatively go with skeletal mesh and physics asset constraints, with lesser accuracy
If I was getting a character model custom made, which rig should I have it done with? Unreal 5 manny I assume?
so I'm making a behavior tree that's supposed to play a shooting animation when reaching the attack node but instead the BT just stops working at that point. I tried with a native UE5 anim (t posing) but it was only 1 frame long so the code works at least, but when trying with the intended anim that I want to use (30 frames long) the whole BT just stops working as I mentioned before, even when waiting out those 30 frames.
Does anyone have a solution on how to make certain anims actually play out? I haven't set it up properly yet so that is a natural first step but my main question is how does one make an animation work with multiple meshes.
Show your AnimBP. It needs to have the slot for the montage in the animation graph.
Animations are tied to skeletons, not meshes. So the skeletons need to match. Or you can use the Compatible skeleton feature. Or you can retarget from one skeleton to another.
But these issues are most often because the montage isn't set up to be supported through the AnimBP.
only got the standard 3rd person ABP's
haven't set one up for the shooting animations
so I guess that's a place to start?
but I can "play" the t pose anim in the BT and it doesnt have an ABP
and I'm playing the animation in question through a play montage node which only asks for a montage and not the ABP itself

I am looking for any content or tips on how to rig a helicopter inside of UE. Doesnt seem to be alot out there
Please show your animation graph in your ABP as I asked.
this?

Can you show the BTT_Attack node working with any other montage?
the only other montage that "works" is the native UE5 t pose
but its only 1 frame
or well I could try to make a new montage of another native UE5 anim
hey all anyone know why my retarget target is acting like this?
everything matches up

they both have root bones in the same place
whats the difference between "blueprint thread safe update animation" vs "event update animation"? are there any specific reasons to use the former over the latter?
Wondering if it just a multiplayer thing or if I should worry about moving my logic to bp thread safe in a single player context too
Thread Safe Update occurs in worker threads, instead of the game thread, using it will be performant, but you cannot access game thread properties here
Update occurs on game thread
The intended workflow means you access anything you need (eg. ActorRotation = Character->GetActorRotation(); in Update, and then do stuff with it in Thread Safe Update such as math that could be otherwise expensive
If you're making a hobbyist game with a few characters on screen then you probably don't want to bother with all that
(To be clear, it has nothing to do with networking/multiplayer whatsoever)
Been trying to figure this for the better part of a day and I just can't figure it out. I'm not trying to use the UE5 Sk_Mannequin. This is a rigify IK_Rig exported from blender as a new SK in UE5.3.xx. I have tired every result google spat at me. It worked one time and then I started trying to export animations and everything went to crap. Now I'm back to square one because I have absolutely no Idea how I fixed it the first time. I'm running out of hair.
p.s. The problem it the bones being outside of the feet in UE but not in Blender.

I don't use Blender
But maybe the skin definition is missing during the export/import process
By skin definition do you mean the vetext weights? ANd if so how can I see if that is missing in UE?
Rotate one of the bones and see if the mesh moves
It's alright. I appreciate the thought though.
what does this error mean, never used control rig before

Hello ! I am trying to animate with the control rig while doing physic simulation (with the pysics control component). But when I hit "play" to simulate the control rig disapears. Would you know is there is a way to keep it on display? Because I can change the values in the sequencer and it works, it just hides.
Thanks!

That perfectly explains it, thanks a lot!!
Guys can somebody say me how I can animate an parachute
Only visible not for movement
Hello, this is new for me. I was going to import Manny animations and skeleton is missing. Weird thing is that I managed to import those same animations before but had to redo the project. I even tested some other animations from different projects that I know should have worked, but same issue, Manny SK option missing on import, different project, different animations, correct skeleton...
If I use SK_Mannequin skeleton it works, but I worked with Manny SK in mobu so I wanna do it clean 🤔

Hi guys, i have created thos fps arms on blender, i want to use them on my unreal project but i don't know what's the best way to rig them, i saw on a video that create ik on unreal and create animation there is pretty nice, so i want to procede in that way, can anyone link me a video or anything else that show how to properly rig fps arms for unreal?

What tools would you recommend for Blender or in Unreal 5.3 to convert a simple Mesh Character to a Skeleton Mesh that can work with Unreal Engine Mannequin and rigs tools in UE5.3?
Either Blender's rigging tools, or UE5.3's new skeletal mesh editor
The latter currently breaks morph targets though, so use it at your own risk.
for Blender, would you use a add-on like Auto-Rig Pro (https://blendermarket.com/products/auto-rig-pro) or use default rig tools in Blender ?

Whichever you're the most comfortable with, although Auto Rig Pro has several settings that conform to UE5 specs
Blender by default doesn't play well with UE5's bone axis expectations
And for Unreal, is there a magic button somewhere that can just snap the bones armature of the Unreal Mannequin like Quinn to a new Mesh ?
I have this rigged arms model, and i want to create a control rig and animation directly in unreal engine, since i found only tutorial on creating control rigs only on full character, and most of them just copy the default UE5 character one, i don't know how to do, in fact i was tryng to do it, but every time i try to set the transform of my root bone in the control rig, my model became very very small, probably a scale issue, but i don't know how to fix it, can you help me?

I'm trying doing sometingh with this rig, but as soon i plug the get ctrl into the root bone of my skeletal mesh, the mesh become really really small
I solved it sizing the ctrl 100x and the shape 0.01 m, probably it's because blender works in meters and unreal in centimeters, but it strange that the mesh size initially is correct
Suggestion to do it correctly without messing my mesh or my rig?
Those are my export settings for character to UE

should i use scale 0.01?
Ok, thanks anyway, i think i will do all the animation stuff in blender directly
anyone know why my character teleports back while running? if you need any more info lmk
Once i had this problem too, i think it's a problem of the blend space animation but unfortunately i can't help you
Is the animation actually translating forward in the run anim sequencer? Or is it running in place?
Check here.

I was trying another time to create the control rig of the mesh on unreal, on the left you can see the scale of the mesh, on the right i try create the control but the scal get messed up, even the rotation is not correct i think, anyone can help?

fixed the problem just had to make sure when i imported the animation it was running in place
but now I have a new problem with it skipping the walk cycle

yes the only thing I change was the animation used for the blend space
im trying to incorporate a block animation into my game, but when i block the legs freze and the blade stops half way. any idea how to fix this


Hmm. Only thing that initially comes to mind is checking the Blendspace values and seeing if the variable that controls speed/animation are functioning correctly.
Maybe something in the Anim BP? Hard to say atm.
Does anyone know why is my animation cutting off when I'm speeding it up?

My guess would be because the animation time is now shorter, it still tries to blend in and out of it at the same blend lengths.

Try setting them to 0.1 or 0.05 and see if that makes a difference at that speed.
yeah that worked, thanks!

Hi guys how can make hand in animation to interact and push objects? I mean for example when opening door hand don’t pass the door and fit?
I think the simplest would be to have the character locked into a position and animating while they open the door (with the door animating in tandem to the character timing).
Having something more fluid, like say RDR2's interaction probably requires more work.
The first example would look something like this:

Both hands and door are animated in tandem, but the character is locked into that action.
I locked it in that location but the problem is I don't have a motion capture
hard to set right animations
and most importnet I noticed randomly animations get wrong location let me send a video
now it fixed wtf
but still 10% of the time hand getting in wrong location
and still not feels like you are pushing a door I set IK hand for walls and try physic doors but still not the thing that makes you feel like you opend a door
maybe something is missing in outlast 2 we really feel the doors
I bet 70% outlast that made it so good are doors

Outlast 2 Part 3 of my Full Walkthrough I'm scared and I need someone to hold me please!
want to support my channel? become a GFG Hero today! https://www.patreon.com/gamersfitnessgroup
Focused/Energized - HEADSHOT - http://www.opnutraceuticals.com
Want to see what I'm working on Beforehand ?
Twitter @ www.twitter.com/gamersfitness
Instagram @...
You mean like this?
yes
in outlast trails they even improved it and we have more comunicate with doors
it is just about a good god damn door
what is your procces for creating something like door animation (From every app you use till the end)
Framing through it, they fake it pretty well. There's still some clipping going on (Outlast Trials) but everything happens so fast and matches almost perfectly that most of the time the player doesn't realize it.

If it were me, I'd have a separate door rig, and reference it into the DoorOpen/DoorClose animation with the hands, then export that door anim as a separate asset. Lastly call both the player anim and door anim at the same time. Just make sure they are the same length and framerate.
damn you right I'm stuiped I just made the animation with caascude
but still there is problem
I haven't worked with Cascade, so not sure what is possible or not with it 😄
so what are u using for animations?
Maya
but anything that can export bones will probably work. 3dsMax. Or Blender if you want a solid free solution.
Maya is for animationg?
it has physics?
I mean bone physics that effects other bones
Are you trying to mimic the part in Outlast where the player can slowly open a door?
I'm not super familiar with anything physics driven, so I can't help you out on that front 
no I don't want to suffer that much now so I just traying finish game codes and animations to make it a little more realistic
When I export an animation out of blender using hte following recent (Jan 2023) guide for settings - i get the seen results... not really what i'm looking for as far as aesthetics lol. Anyone know what i'm doing wrong?


Hey guys, in today's video I'm going to be showing you how to export animations from Blender and then import them into Unreal Engine 4 and 5.
Get access to the project files from my videos and more on my Patreon: https://www.patreon.com/MattAspland
#UE5 #UnrealEngine5 #UE5Tutorial
_______________________________________________________________...
Fair warning, I know nothing about Blender. But can you open the FBX file you exported and see what it looks like in Blender?
Just trying to figure out if this is an export issue, or an Unreal/import issue.
i'm using a MixamoConverter - which takes mixamo animations, does whatever it does (sorry for the naive-ness here) and "converts" it to UE ready animations..... this .fbx alone works fine - so its not the file coming from this software/tool....
When I bring this file into blender - it looks to be fine - though it has no mesh on it.
I do absolutely nothing to it - but i am trying to remove some root motion from an animation - so it stays in place... which brings me to the problem shown.
Import settings (UE) is the same as any animation that works fine... i do believe its the export from blender :/
just got it so that when my character blocks it only animates his top half, but now his back is bending weird whenever he spawns in, compiles, or ends an animontage. any idea on a fix, removing blend poses 0 fixes the spine but removes all the animation
In the Anim Sequence (with the properly working Mixamo fbx), have you tried using any of these to see if you can lock the RootMotion? I never had to use it, so I'm curious to see if it does what it sounds like it should do.

Never seen it do something like this during Compile. 
In-game it looks like it's randomly playing an additive or some other animation. Can you hit ~ and type in the above debug command? Maybe it'll show you what it's playing.
(it'll be a bit of a clusterfuck of info)
If that isn't showing anything weird, I'd also wonder if Unreal is trying to interpolate some bone data that has differing values.
Can sometimes happen when animations or poses are 360 degrees rotated while trying to blend to a a pose that is zeroed out. You'd think Unreal would understand that it's technically the same, but it can also be pretty dumb about it.
Is there a way to subclass animation montage variables so that they only can be used with a referenced skeleton?
i.e. I have a master weapon that has an animation montage variable on it but I don't want to accidentally assign a montage that doesn't work with the skeleton that get assigned to it in the child BPs
Hello 👋 i'm trying to bind hair to an animated mesh.
Here's what i did: https://i.imgur.com/u1DdU1y.png Is there something i missed? Why doesnt my hair move?
Here's the tutorial i used: https://www.youtube.com/watch?v=ODkhcRvcaso
If you need more screenshots in order to help lmk. And thanks in advance 😄
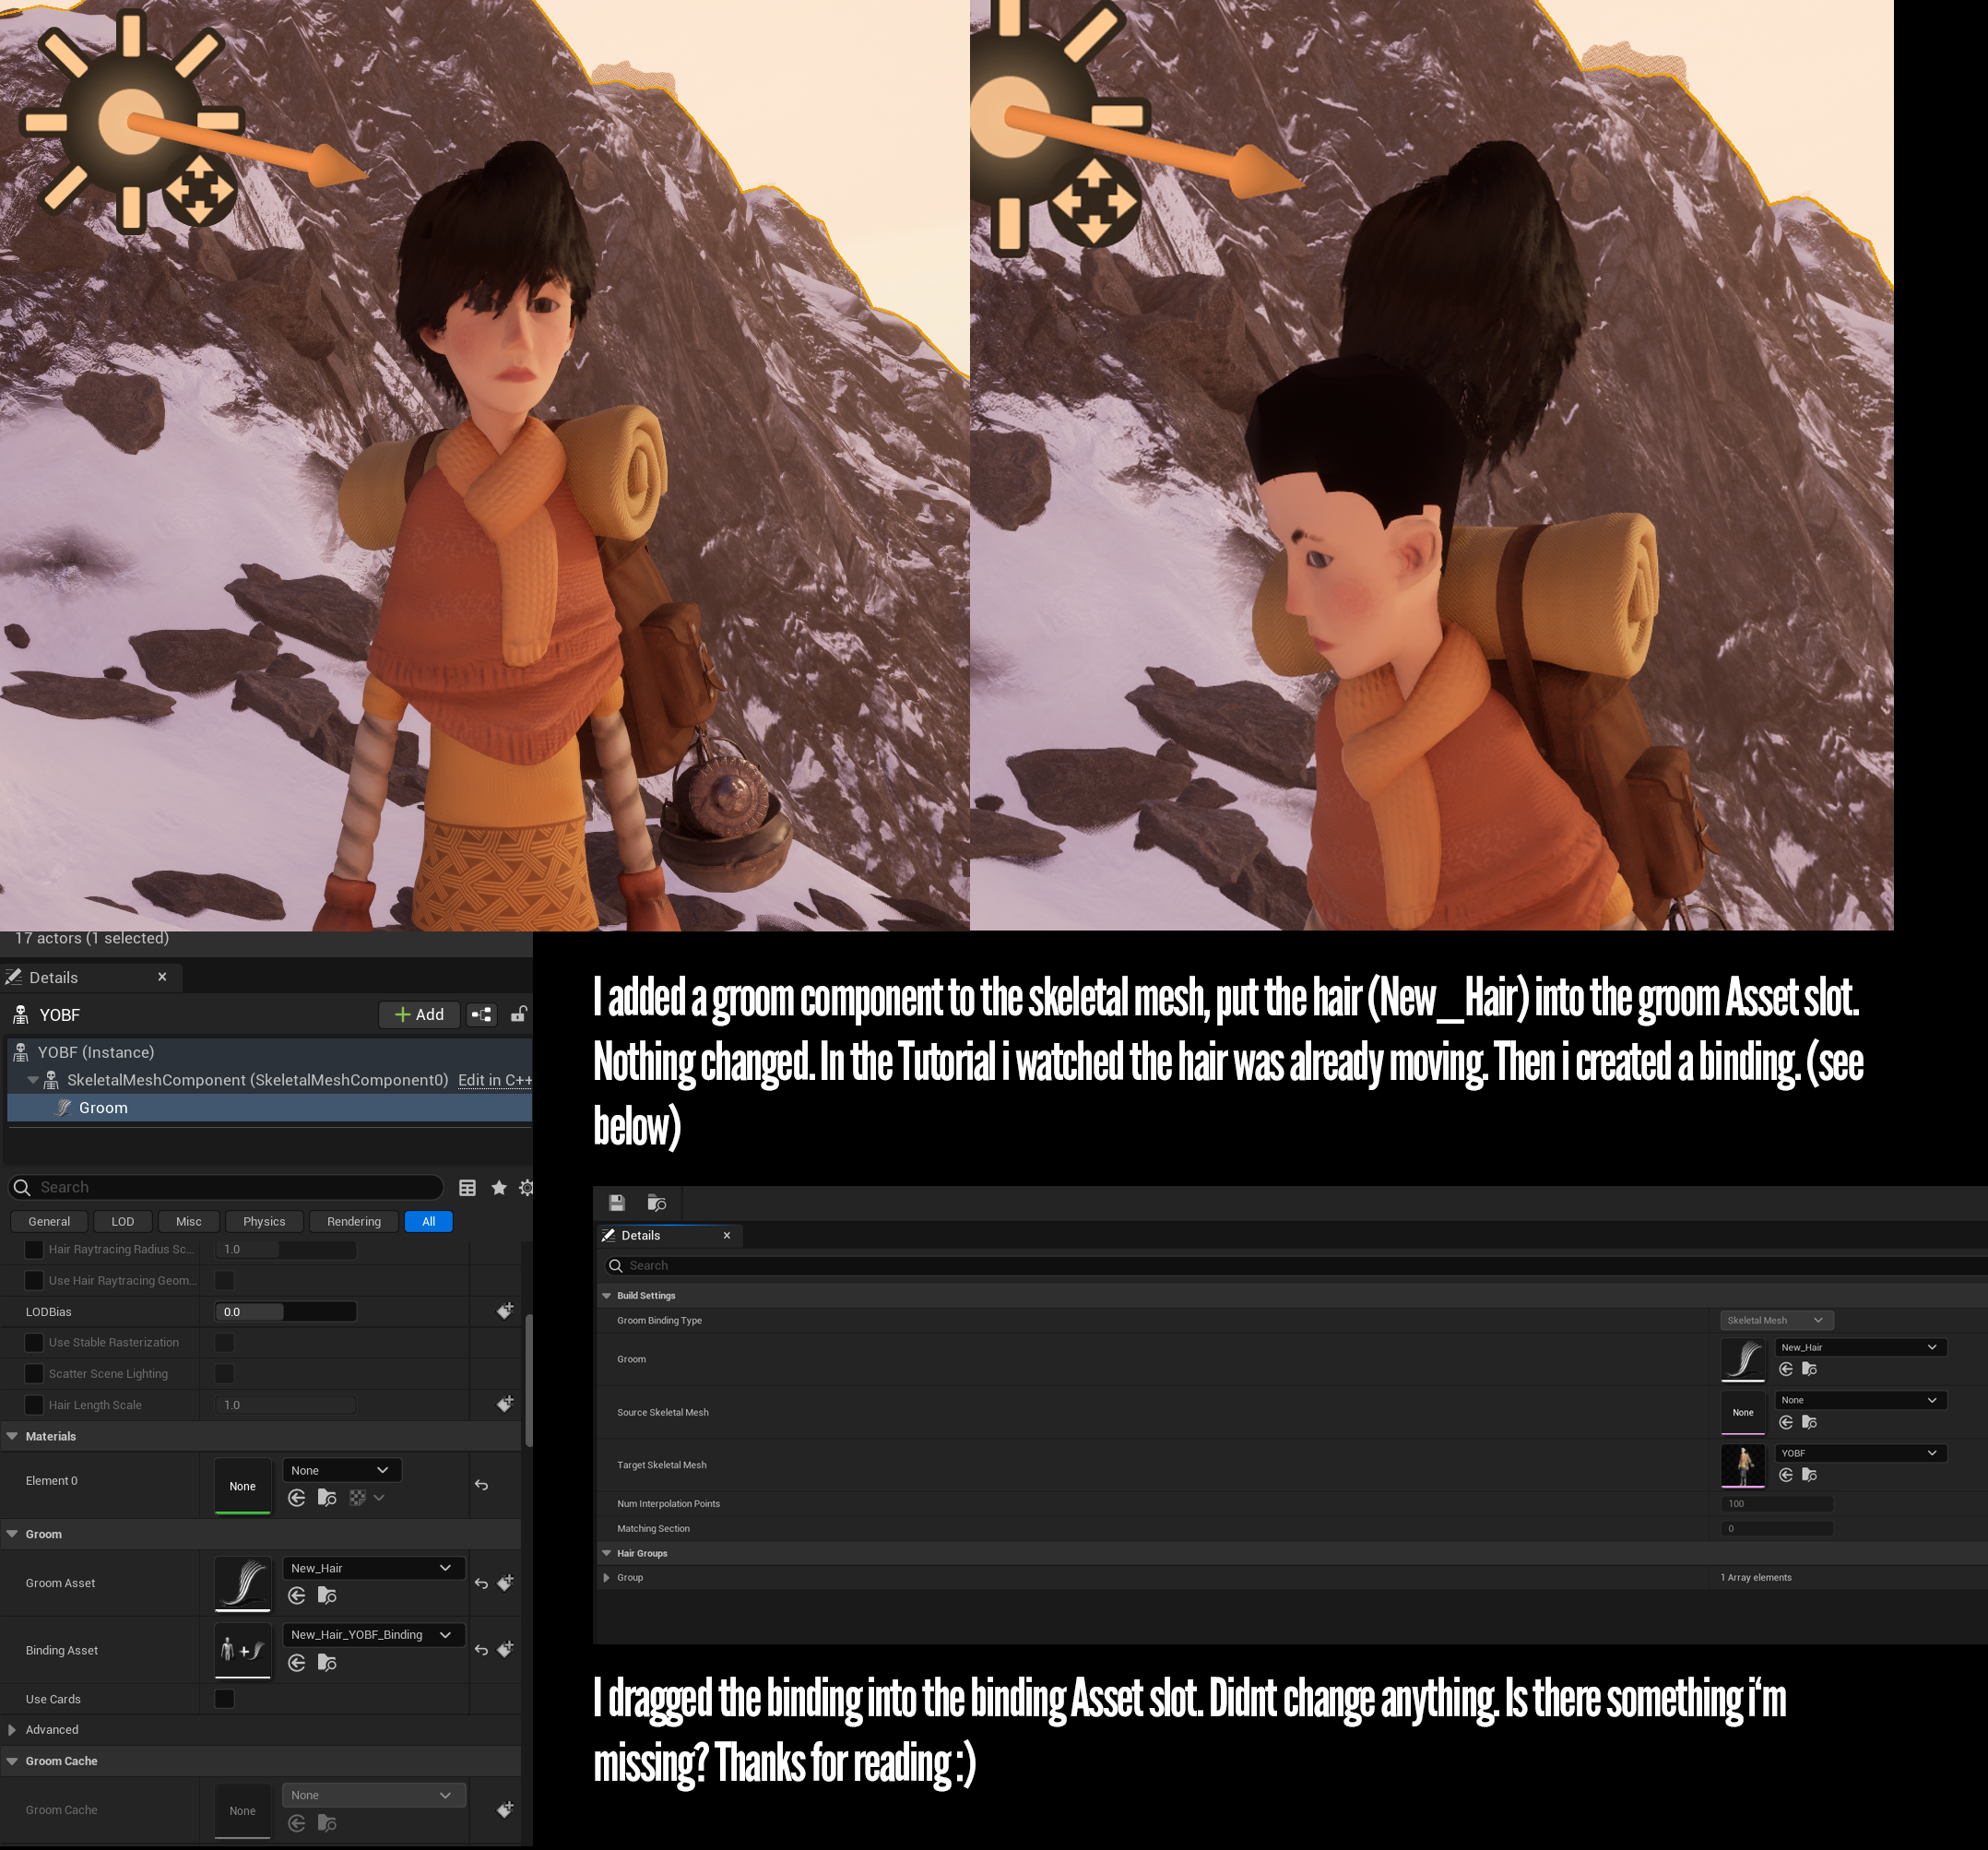

Hello guys, in this quick and simple tutorial we are going to learn how to create hair using the Groom plugin in Unreal Engine 5.
Follow me on Twitter: https://twitter.com/GorkaGames
Subscribe to the channel: https://www.youtube.com/channel/UCv_n9oioNF6OpzR2dt6E4xg?sub_confirmation=1
unreal engine 5,ue5,create hair,tutorial,quixel,megascans,un...
how can I export the default ue5 skeleton ( SK_Mannequin ) out of unreal and into blender
, animate it in blender
and then import the animation into unreal?
I have this firs person character, i want that the arms follows the rotation of the camere, how can I do this?

if no one has replied to this yet - this is an easy fix - ON IMPORT SETTINGS - (Animation group) Check Automatic Bone Orientation
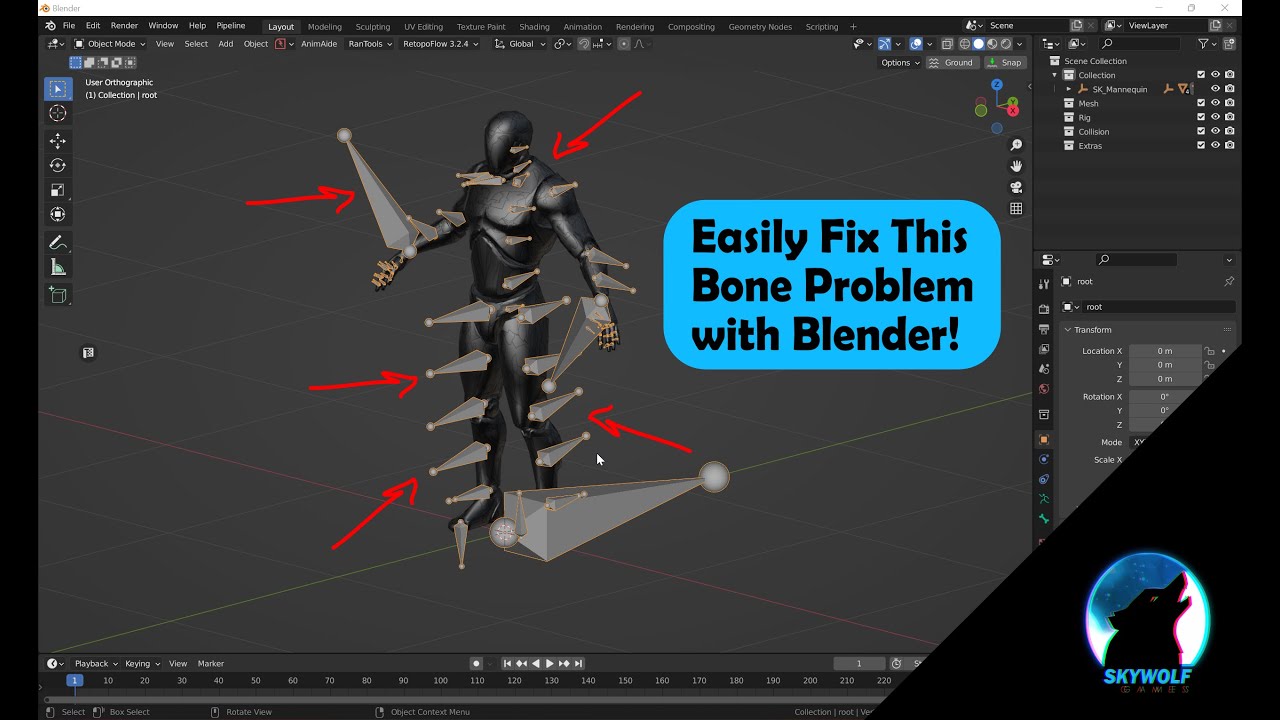
Blender has always been the little guy, however, in recent versions as of 2.8 it's becoming more of the Industry Standard. One Feature I noticed not many know about is a secret weapon to solve strange bone orientations when attempting to import Rigs from outside of blender into it such as from Unreal resulting in a rather strange sideways bone a...
this should be a default/native funcitonality of the FPS Template anyways....
You simply need to OnMouseInput->AddControllerYawInput (on x) & AddControllerPitchInput (on Y)
i didn't use the fps template, i know is a little bit odd
Yeah, this is going to cause some problems when exporting.
Also one of the reason for me to move to Maya full time
Place skeleton into a level, select it & export.... save as FBX.
Import it into blender - making sure first that your UNITS are set to .01.
Animate it.
Export form Blender using BakeAnimation selected - bring it into UE
if maya didnt cost an arm and a leg. i too am a maya fanboy
that doesn't work
the rig in blender is all messed up
and when I try to import the animation I made using it unreal says the skeletons are incompatible
you're gonna have to do some studies and find a workflow. there's several tools/utilities to do this. here's a blender solution - https://www.youtube.com/watch?v=U23WyAd8o_8
IMPORTANT LINKS:
❖Game Rig Tools
Gumroad: https://gumroad.com/a/598294451/OmHCS
Blender Market: https://blendermarket.com/products/game-rig-tools-blender-addon-game-rigs/?ref=356
------------------------------------------------------------------...
So there's a lot going on here:
- Blender disagrees with bone orientation, so it's going to screw up by default.
- Using Auto Bone Orientation on import will break the animation in export and assigning to the same skelmesh
- Blender FBX exporter adds another root bone if the object is not EXACTLY named Armature
- No one figured out a reliable export settings without using any third party addons
Aside from using aforementioned addons (most likely paid), you're pretty much screwed because no one documented it for free and in an easily discoverable way
not to play devils advocate - but why are so many people successfully working with blender as a UE solution for animations?
UEFY is one solution
For one, they're most likely using their own rig and not bothering with how it plays with UE's animation system
UEFY relies on Rigify, which is a huge pain to work with.
and FWIW if you want to get serious about it, 3D software like Maya is going to work with UE out of the box
huge pain to work with? i found it completely easy and massively powerful
dont get me wron g- i still am PRO MAYA
not everyone can afford 200$/mo subscription
or 3500/year
I wasted days to get it work with my custom characters, to no avail. Meanwhile I'm making the rig from scratch in Maya and get it done in less than a day, and works with UE's animation system.
w/e the costs are .. theyre atrocious
After enlightened by Maya, I'd rather pay that amount to cut down days of struggle with Blender.
Not to deny Blender's capabilities, if you're willing to stick with your own rigging workflow and either disregard UE's animation system or bodge it to play nice with Blender
Bot overlord doesn't even get Unreal's up axis right...

devils advocate again - YUp accuracy check?
https://puu.sh/JUbQY/9bd95acb8c.png

Hello, what is the best way, in a FPS game, to attach weapon to the player? because for 2 handed weapons, if I use a socket to attach a weapon, it may float a little. I heard on some GDC talking about special skeletal bone. Any suggestion? Control rig?
i did the anim debug and found that he is doing the jump animation whenever he completes an animontage or compiles. any idea on how to fix this
Nvm im just an idiot, entry on state machine for the top half goes into jump instead of idle/walk...😃
sockets are attached to bones... you cant directly attach things to bones in the first place... only sockets. I dont know what GDC would have talked about this -

yea yea, but attaching a 2 handed gun on a single bone/socket is a issue
I would use a StaticMeshComponent - attached to a socket on the appropriate hand.
From then - you can freely address this StaticMeshComponent - switching out the weapon.
welcome to IK rigging and having a socket on your gun - where you snap the OTHER hand to this socket.