#arma3_texture
1 messages · Page 15 of 1

I'm having an issue with how glass is shown in game. I have a door with a window in it. By itself, when placed in the world, the door/the glass in it is rendered normally. However, I'm putting this door inside a building. The door and building are separate objects/models/configs, etc. Depending on where the door is placed, and the direction you are looking through it, the glass will disappear or not show over the part of the building it is in. But it will still work normally when looking at itself or another object or other parts of the building that are a separate object/model. Any ideas as to the cause?
I think its an rvmat issue, but I have no idea, textures aren't my thing.


You need to do alpha sorting to get your glass surface on top of the alpha stack to render first
That's done on the mesh that has the glass applied
Is that just the "sort alpha" and "move to top" button in obj builder or is there a specific process? I thought I've done that a handful of times to no luck.
Move to top
Yeah
The auto sorting is very unreliable
Unfortunately, moving the glass to top is not doing anything or fixing it. Is there another property or something that it could be instead?
You can try add canNotOcclude named property into the door
It could also be the house is behind it just right to get occluded front the view.
Disclaimer. The engine is not exactly designed for parts building like this
No dice.
If its an engine limitation, then that's a shame.
I figured it was definitely some funkiness going on. Since it works when looking through the door towards the center of the building, but if you look increasing away from the center and at just the right angle it will cause the glass to disappear, despite the model not going to next LOD or anything. The best way to describe it is as if the game is swapping the render order in front of player from player>door>building to player>building>door.
This is what I meant about the engine not meant for stuff like that
Normally doors are made as part of the big building.
Normally. Yes. That is probably the actual solution I need, but not the one I'm willing to do. It is what it is at this point.
Does anyone know of a mod which replaces the white crosses in Spearhead with red ones?
There isn't any.
Hello, I hope you're all well. I apologize if this isn't included in this section. It turns out I'm creating my UNIT https://units.arma3.com/unit/-cots- but the corresponding insignia on the arm isn't showing up in the game. The strangest thing is that when I try to upload the logo, I get a message saying it's blocked or that something didn't go 100% right.
I'd like to know what's going on and how can I solve it? Initially, I uploaded the image based on the 512x512 size requirements, and now I've uploaded it to 400x400, but the same problem continues.
Is there something I'm doing wrong? I thought there was some restriction because I'm in Venezuela, but my co-founder, who is in Mexico, is also getting the same error. I'm leaving a test image so you can see what it's about.
I'd like some help with this.

Arma 3 | Official Website
Experience true combat gameplay in a massive military sandbox. Authentic, diverse, open - Arma 3 sends you to war.
Is there a place on this discord where players can offer payment for the creation of a mod, which can be used privately?
NO
paying for mod creation is not allowed
and anyone who offers you to do that is trying to scam you
the tools required for mod creation are non commercial
so their use can not be paid for
Thanks for the clarification. So we can ask for people to either help or create one voluntarily?
yes
scammers will be contacting you now though since you asked about paying
report those at #discord_tickets
I know about cyber fraud and fraud, but thanks, appreciate it. If they do I will report them.
So, I’m looking for a civil conversation on the following topic if possible please: in a previous chat I asked about red cross medical signage and was greeted with what felt like patronising responses, but am keen to have a sensible exchange to understand the nuances instead of being shut down and told to ‘cope’ 🤣
I noticed a highly regarded Arma 3 mod on the workshop, KAT Medical, which actually reinstates the Red Cross but in the modern assets. So it looks more than possible and hasn’t been taken down. That and the IFA3 mod does this but for their own WWII assets. I am looking for a mod which I can use privately to reinstate the signage for the Spearhead CDLC which I know is not against copyright if its for private, non-commercial use and no-cost due to licensing.
My question is, if someone were to be able to create one, and it’s used privately; then you as a moderator (who clearly has the ear of BIS), would you say that is a problem, in theory? (I’m not looking for personal opinion).
Using the red cross is not really allowed without explicit permission.
I dont know the details on how some other entity might have used it though
private use does not factor in at all.
and the moment you share something with others its no longer private
Okay understood. Thanks for the further clarity
"not against copyright"
But the red cross is about trademark rights and international humanitarian law.
That's a bit more complex than just copyright.
Also non-commercial use is not a factor for copyright, it might be a factor for whether they'd bother to sue you, but it doesn't make it any less of a violation.
Thanks for the clarification.
Guys what's the vanilla resolution for Headgear and facewear icons?
Hello, i need some help, i did a retexturing on a spearhead unifrom, but i dont know how to implement the retexture in-game, and my config.cpp is all messed up
is there a way to export substance painter the working layers as a PSD file keeping blending modes etc
Keep getting this error for some reason. I already have it in the load order

Resolved it
How, correcting path?
Where do i apply a _ca transparant texture?
I've seen it work without a .rvmat, so not sure where to put it/assign it.
it dont work well without rvmat
there is only one way to assign textures on mesh though
doen not matter if its co or ca
What stage would a _ca be?
ca and co are assigned directly on the model
not through stages in rvmat
rvmat defines what shader the surface is drawn with
and what other technical textures the shader uses
like normalmap
I see. So if i were to have a transparency/opacity texture & a base texture, how would i assign them in OB?
I know about base color n all, just haven't worked with _ca's before.
I would recommend assigning the textures in the source program
So Blender im assuming?
if thats is what you use to make the model then yes
Like, base color > alpha?
no
blender material or rendering has nothing to do with Arma
if you use blender and have the armatoolbox to export as p3d the blender materials tab has boxes to write down texture and material paths to be written into the p3d
Correct, which i use, but i still don't know how to assign opacity/transparency textures onto a .p3d.
Base Color > Alpha in shading works fine as i understand Blender for the most part, just don't know how to go about the Arma side of the process.

whats the model from...
Friend of mine gave it to me.
What do you mean?
It's not, their made from scratch and are also being sold. Not ripped from a game.
then he cant distribute it since he bought it not you
He sells them? He's the one that made them.
you can DM me the page its sold at
Does anyone know the reasons why a png might not convert to a paa? I'm working through flags and for some reason one in particular is having an issue but I don't know why
Nevermind. Renaming it to remove a special character fixed it, though it didn't have an issue with a different one so I have no idea what's going on
Probably the conversion tool doesn't like some characters
Best practice to avoid issues with characters is use only ascii characters for filenames
Yes, automatic LOD switching occurs when your PC can't handle the load.
Sometimes you see low poly res LOD's when you first spawn in, then they switch to the high poly.
Try lowering your video settings 1 notch. In particular, shadow distance, particle quality, view distance and number of AI can have an effect on load.
no possible to turn it off
some mods may be made without proper optimization and their assets can be very perfomance demanding.
nothing you can do about it but try to figure out if any mod specifically causes it
I need help with the .rvmat file. I have basecolor, emissive, and normal maps. How can I combine them using an .rvmat file?
there are few wiki pages about rvmat and texture naming rules you can check out.
Then there are example rvmats in P:\a3\data_f\ if your P drive is set up correctly.
normally you dont really use emissive texture in arma rvmats. there is one special case for that but it is rarely used.
rvmat has different amount of "stages" depening on what shader type it is set to use
and all stages a shader uses need to be present with either default procedural color (see the default rvmats) or reference to a texture file
color is assigned to the model straight. other textures are used by the rvmat
any idea how i can get these lens flare effect textures from arma 3?

to put where?
nowhere, i just want to get them to edit them
I think its procedurally generated and not a texture that can be edited
I briefly looked at the wiki page, but I didn’t understand it. It seems that emissive textures cannot be used directly, and can only be set like this: emmisive[] = { 0, 0, 0, 0 };.
But what about normal maps? How do I import them?
Please give me a simple example configuration. I know nothing about rvmat.
yes like I said normal rvmats dont use emmissive and if a thing needs emmissive rmvat it is typically split into its own mesh and given emmissive rvmat . like glowing ironsight post spots are usually spearate mesh that has emmissive rvmat
the default rvmats in the mentioned folder show plain neutral values you can edit further
(rvmats being text files)
super shader is the most commonly used and default_super.rvmat can be used as a base
each stage has neutral procedural texture set you can switch to path to your texture when you enable said stage
and the procedural texture lines are marked with the _suffix of that texture (texture naming rules wiki page)
So in Arma 3, is it possible to directly import an emissive.paa?
And if so, how can I do it?
lets approach this from the direction of what you try to do
as like I said the use of emmisive mask is rare and might not be suitable for your use case
and since you dont know rvmats, its better to explain what you try to achieve/make instead of get stuck in approach you think you need
This is a simple particle sprite sheet I exported from UE5.
I want to import it into Arma 3. Since emissive.paa cannot be used, I will just discard it.
I already know how to import basecolor.paa alone (by not using any .rvmat file).
However, I don’t know how to combine basecolor.paa and normal.paa in Arma 3.
How can I make them work together?


ah ok you are in wrong direction
this is why its good to explain what you try to do first
particle effects are their own thing
and your effect is not made right as it does not have transparency
"basecolor" is not quite the right thing for Arma
Arma uses color or color with alpha _CO or _CA suffixed color textures
suffixes are important for source -> PAA conversion and need to be present in source file name
Since emissive.paa cannot be used
Why can it not?
I'd think SuperExt shader should also work on particle effects, if you can provide a rvmat?
normal particles use the shared universal.p3d shape so they dont have separate parameter to assign rvmat
maybe with custom shape p3d one could assign superExt on it too but for particle like this I dont see it as very useful since explosion would be fully lit anyway right
and the "non lit" parts would be transparent
I do not have any clue what rvmats particles would accept though
Sorry, I’m a beginner and didn’t fully understand your explanation.
I had to use ChatGPT to help me interpret your answer.
ChatGPT said that what you meant is:
Normal maps and emissive maps can’t be used — only basecolor maps can be used.
Is that correct?
normally when one makes particles it is only a texture with transparency
I would start from that since you dont have experience with it
for example vanilla explosion texture

chatgpt is the worst so be very careful with using that
or preferably dont
but ask clarification if you dont understand something
gpt cant think, it just makes guesses
and those can be very wrong
#define ARMA
ambient[] = {0.5,0.5,0.5,1.0};
diffuse[] = {0.34,0.4,0.4,1.0};
forcedDiffuse[] = {0.0,0.0,0.0,1.0};
emmisive[] = {0.0,0.0,0.0,1.0};
specular[] = {1.0,1.0,1.0,1.0};
specularPower = 1.0;
PixelShaderID = "NormalMapDetailSpecularMap";
VertexShaderID = "NormalMap";
class Stage1
{
texture = "a3\rocks_f\data\decal_crater_nohq.paa";
uvSource = "tex";
class uvTransform
{
aside[] = {1.0,0.0,0.0};
up[] = {0.0,1.0,0.0};
dir[] = {0.0,0.0,0.0};
pos[] = {0.0,0.0,0.0};
};
};
class Stage2
{
texture = "a3\rocks_f\data\decal_rock_dark_dt.paa";
uvSource = "tex";
class uvTransform
{
aside[] = {16.0,0.0,0.0};
up[] = {0.0,16.0,0.0};
dir[] = {0.0,0.0,0.0};
pos[] = {0.0,0.0,0.0};
};
};
class Stage3
{
texture = "#(argb,8,8,3)color(1.0,0.0,1.0,1.0,SM)";
uvSource = "tex";
class uvTransform
{
aside[] = {1.0,0.0,0.0};
up[] = {0.0,1.0,0.0};
dir[] = {0.0,0.0,0.0};
pos[] = {0.0,0.0,0.0};
};
};
I don’t know how to configure it, so I don’t have an .rvmat file yet.
But I do have a sample file.
Please tell me how to modify it.
Let’s assume the three textures are named:
basecolor.paa, emissive.paa, and normal.paa.
I see you didnt want to listen to my advice.
No, I want to hear your advice, but brainstorming together is better, isn’t it?
in case of particles, probably not.
your particle color texture is not even right yet and you are hung up on the emmissivity which you probably dont even need.
I have used the original explosion textures before, and I even opened the original explosion .p3d files.
I found that the original ones do not use .rvmat files.
is there some reason you think you need the emmissive texture then? why not just do it like the original design?
The original textures have low resolution and few animation frames, which is why the Blastcore mod appeared, right?
But now, the textures used by Blastcore are also outdated, not clear enough, and there are few types.
So I want to import new ones.
but those are also made with the default method right? so is there reason you want the emmissive texture?
Emissive textures are very useful for particle effects at night.
Explosions in Arma 3 basically have no lighting effects at night.
but they are not used in normal particles
and it might be it does not even work.
anyway
for this kind of texture
you dont need emmissive texture since you can just use the emmissive property
but you would need to make custom particle model too to assign that rvmat on to
I know particles have an emissive parameter, but how can I obtain the correct emissive color values and brightness multiplier from the emissive.paa texture?
well with the parameter you cant. it applies to whole surface the rvmat is applied to
or the particle effect emmissive parameter applies on whole particle as well
transparency of the pixel can be used to modify it Id suppose
I would recommend first making your explosion texture properly with correct transparency
then testing it in game with the default particle way and giving it the emmissivity throught he particle config
and see how that looks
This is the sheet you mentioned with correct transparency, right? The original exported image is too large, and Discord seems unable to display it, so I took a screenshot here instead.

I have another question — does Arma 3 fail to load .paa files larger than 5MB? I think I’ve encountered this issue before.
no that kind of size is not an issue
the resolution might be wrong though
needs to be power of 2
and max 4096x4096 px
Ah, 4096 is probably the reason causing the issue.
I dont know if that black is transparent. Usually I dont think transparency shows like that
You're right — my image did not have a transparent background. It took me some time to figure out how to export a truly transparent image. Anyway, I imported it into the game and tested dedman's method, but it didn't work.
Now I'm wondering:
When exactly does this part of the RVMAT take effect?
class Stage8
{
texture = "z\wolf\addons\wolflogo\tex\wolflogo_em.paa";
texGen = 0;
};
It should work with any image, right? After all, both particles and other materials are essentially using images.
Is it that the engine's particle system intentionally disables the shader stage that class Stage8 refers to?
try the maerial on some simple cube as placeable object
it is completely possible billboard type particle dont use rvmat at all
since the game files dont have specific rvmat applied on them
I think your guess is correct — the particle system simply ignores the RVMAT file, because I set:
cpp
复制
编辑
emmisive[] = {10000, 10000, 10000, 10000};
but there was still no visible glow at all.
However, when I changed the particle .p3d into a placeable object, the explosion image still didn’t emit light in the dark. Why is that?


ambient[] = { 1, 1, 1, 1 };
diffuse[] = { 1, 1, 1, 1 };
forcedDiffuse[] = { 0, 0, 0, 0 };
emmisive[] = { 10000, 10000, 10000, 10000 };
specular[] = { 1, 1, 1, 1 };
specularPower = 100;
pixelShaderID = "SuperExt";
vertexShaderID = "Super";
class TexGen0 {
uvSource = "tex";
class uvTransform {
aside[] = { 1, 0, 0 };
up[] = { 0, 1, 0 };
dir[] = { 0, 0, 1 };
pos[] = { 0, 0, 0 };
};
};
class TexGen1 {
uvSource = "none";
};
class Stage1 {
texture = "fxp_adat\universal\data\TT_added_explosion_01\TT_added_explosion_01_Normal.paa";
texGen = 0;
};
class Stage2 {
texture = "#(argb,8,8,3)color(0.5,0.5,0.5,1,DT)";
texGen = 0;
};
class Stage3 {
texture = "#(argb,8,8,3)color(0,0,0,0,MC)";
texGen = 0;
};
class Stage6 {
texture = "#(ai,64,64,1)fresnel(1.29,0.01)";
texGen = 1;
};
class Stage7 {
texture = "a3\data_f\env_co.paa";
texGen = 0;
};
class Stage8 {
texture = "fxp_adat\universal\data\TT_added_explosion_01\TT_added_explosion_01_Emissive.paa";
texGen = 0;
};
Can you take a look at my RVMAT file and see if there's anything wrong with it?
try plain super
not super ext
Nope, this time even the original flame color disappeared — it turned completely black.

And there were no errors in the RPT file.
Do you think this is what a correct emissive texture should look like?

After exporting the background using my improved method, it’s still black, but the basecolor exported with this method has a properly transparent background.
the normal super shader would not have that emmissive stage but it should take the emmissive parameter values and apply to all visible color pixels on the texture
the superExt is more tricky
don't particles have their own emissive handling
like its part of the color array iirc
iirc negative alpha is what controls the brightness
Sorry, I just realized that the previous method actually worked, because if you look at my in-game screenshot and the emissive texture I sent, it’s not the same as the basecolor one.
The former is the emissive texture, and the latter is the basecolor texture, for comparison.


Is there any parameter in this Stage8 that can adjust the emissive brightness? I want to modify one and confirm this conclusion.
"Please explain in more detail. Are you saying that something like emmisive[] = { -1000000, -1000000, -1000000, -1000000 }; controls the brightness?
    class SmallDestructionFire: Default
    {
        color[] = {{1,0.8,0.8,-80},{1,0.8,0.8,-80},{0,0,0,0}};
    };
emissiveColor also exists, see: https://community.bistudio.com/wiki/ParticleArray
I know, but that’s not the cause of the problem. We're try to solve it from the texture side instead of the particle parameters, because particle parameters can only make the entire particle glow — they can’t make only a specific part of the particle emissive.
ah I missed that part of it
I definitely cannot find a proper yellow to make a good gold color with textures. I only get the right color with a gold rvmat. When using textures its never as bright as the rvmat

shine of gold is not really possible to properly mimic by static color
I would separate the metals for different rvmats
I mean in a way that it works in dynamic lighting
of course a static picture can be drawn but it wont work when light changes
i think that's the only solution
Had a question regarding the static carrier from the Jets DLC. I've been trying to change the flag behind the island. I've looked through the game files and found most of the carrier's textures, but not the flag or the variety of letters and the "Beware of jet blast propellers and rotors" text
Is it stored somewhere else? That would seem a bit weird...
Thanks in advance
if im right the flag is a added own object which has a own class name cause these ships are done with various components cause of its size (size limit of collision etc engine related)
Yeah, figured as much, but it seems kinda weird with pretty much every decal being stored there
Hi all, I'm looking for some help with fitting an image into the large display screen ( briefing room screen Land_BriefingRoomScreen_01_F) but I can't get the dimensions of my image correct to fit. Does anyone know what size an image needs to be to fit correctly into this object?
x:y = 2:1
I'll give that a go. Thanks
I've resolved my issue. I had to go wider on the image in order to get the bit I needed. Cheers for your help.
Retextured uniform is reverting to its previous texture. Can anyone give a helping hand?


Check whether you are inheriting an EventHandler uniform randomiser by looking in-game config viewer.
Your path still doesn't look right (with an \addons) and the texture should be suffixed with _co.
any blue dpm camo here?

nope
Alr
Keep on getting these errors thrown at me, I`ve already mentioned both in required addons

These links might help, there's a flat-ish fabric piece in both
https://iacmc.forumotion.com/t12706-blue-dpm post 14
https://www.joint-forces.com/kit-camo/30955-uk-opfor-blue-disruptive-pattern-material about halfway down
You might have success making it by taking regular 4-colour dpm and recolouring the swatch using GIMP (or other image editor)
Also this, https://www.deviantart.com/milosh--andrich/art/DPM-camouflage-529303708, a large swatch someone recreated
Have you done P: drive setup using mikero's arma3p?
pboProject requires the files unpacked at the appropriate path as far as I remember
👍
Fixed the a3 one but still nothing on the simc one
mods dont extract to P drive automatically
you would have to do that manually or create a dymmy file that fools the check
I`ve made a dummy file but still throwing the error
Got it working although the texture still is what i want it to be
Hello, what application can I use for texturing?
what kind of texturing?
Anyone a clue why the texture would turn from translucent to black when brought ingame?

not saved properly with alpha channel and not using correct naming _suffix before converting to .PAA
naming _suffix.... it's been mentioned to you quite a number of times
nooooooo not that many 
Im a slow learner 🥀
its alright. its lot to learn.
CA is the correct one?
yes
Still nothing
whats the source file format?
For what exactly
the texture
png
Retexture of an S&S Uniform
it is possible the original model is not made with those parts transparent so they can not become transparent now
Hey all, when I apply a normal texture to my model in Object Builder it works fine, when I attach my RVMAT it goes black
ambient[]      = {1,1,1,1};
diffuse[]      = {1,1,1,1};
forcedDiffuse[] = {0,0,0,0};
emmisive[]     = {0,0,0,1};
specular[]     = {0.5,0.5,0.5,1};
specularPower  = 50;
PixelShaderID  = "Super";
VertexShaderID = "Super";

class Stage1
{
    texture  = "TestAR_co.paa";
    uvSource = "tex";
};
class Stage2
{
    texture  = "TestAR_nohq.paa";
    uvSource = "tex";
};
class Stage3
{
    texture  = "TestAR_smdi.paa";
    uvSource = "tex";
};
Texture path should be a full path.
It is the full P Drive path, but still showing the error


not yet as I see
you can export into .PSD but with flattened channels
well, yeah, pretty much useless
That's not a valid super shader rvmat.
It should have 7 stages.
Details: https://community.bistudio.com/wiki/Super_shader
Thanks, is my directories correct, saying it cant find the file in game, but PboProject throws no errors during building
You are referring to the rvmat inside Object Builder right? So that's where to look first.
Check if OB is finding the file.
ambient[] = {1,1,1,1};
diffuse[] = {1,1,1,1};
forcedDiffuse[] = {0,0,0,1};
emmisive[] = {0,0,0,0};
specular[] = {1,1,1,1};
specularPower = 30;
PixelShaderID = "Super";
VertexShaderID = "Super";
class Stage1
{
  texture = "\ws_test_weapon\TestAR_co.paa";
  uvSource = "tex";
  class uvTransform
  {
    aside[] = {1,0,0};
    up[] = {0,1,0};
    dir[] = {0,0,1};
    pos[] = {0,0,0};
  };
};
class Stage2
{
  texture = "#(argb,8,8,3)color(0.5,0.5,0.5,0.5,DT)";
  uvSource = "tex";
  class uvTransform
  {
    aside[] = {1,0,0};
    up[] = {0,1,0};
    dir[] = {0,0,1};
    pos[] = {0,0,0};
  };
};
class Stage3
{
  texture = "#(argb,8,8,3)color(0,0,0,0,MC)";
  uvSource = "tex";
  class uvTransform
  {
    aside[] = {1,0,0};
    up[] = {0,1,0};
    dir[] = {0,0,1};
    pos[] = {0,0,0};
  };
};
class Stage4
{
  texture = "#(argb,8,8,3)color(1,1,1,1,AS)";
  uvSource = "tex";
  class uvTransform
  {
    aside[] = {1,0,0};
    up[] = {0,1,0};
    dir[] = {0,0,1};
    pos[] = {0,0,0};
  };
};
class Stage5
{
  texture = "#(argb,8,8,3)color(1,0,1,0,SMDI)";
  uvSource = "tex";
  class uvTransform
  {
    aside[] = {1,0,0};
    up[] = {0,1,0};
    dir[] = {0,0,1};
    pos[] = {0,0,0};
  };
};
class Stage6
{
  texture = "#(ai,64,64,1)fresnel(0.4,0.2)";
  uvSource = "tex";
  class uvTransform
  {
    aside[] = {1,0,0};
    up[] = {0,1,0};
    dir[] = {0,0,1};
    pos[] = {0,0,0};
  };
};
class Stage7
{
  texture = "a3\data_f\env_land_co.paa";
  useWorldEnvMap = "true";
  uvSource = "tex";
  class uvTransform
  {
    aside[] = {1,0,0};
    up[] = {0,1,0};
    dir[] = {0,0,1};
    pos[] = {0,0,0};
  };
};
class StageTI
{
  texture = "a3\data_f\default_vehicle_ti_ca.paa";
};
So I copied the Default from that wiki link and changed stage 1 to my co texture, now its appearing a base white

Stage 1 in the wiki is for normal maps. So why are you changing it to a diffuse and expecting it to work?
I'll re-read the documentation now, I thought it was the diffuse

Your diffuse TestAR_co.paa is directly set in object builder on the mesh, along with the material TextAR.rvmat.
The rvmat then links in the nohq, smdi and as textures that you might create, along with other lighting stages.
hmmm...i've searches for it it seems there is no way to switch between any of these, you can only export them textures and that,s about it
Just to carry on from this, using renderFlags[] = {"NoZWrite"}; in the glass rvmat is what causes this but its also the solution to the problem seen on the lights in the attatched image. Whereby when something with alpha is inside another object it makes the alpha render the kind of buldozer default blue/grey.
I went through all the renderflags I could find on the WIKI and on here and unfortunately the only fix is using NoZWrite which sometimes displays the glass correctly but it gets a lil confused at differing angles and then doesn't render it, instead rendering the surface behind the alpha first. I don't believe there is a fix for this and its just an engine limitation.
If anyone knows of a fix, LMK 🙂

yup. Its basically an engine limitation. There is no fix. The choices are either not using objects with CA textures inside another object or just live with it.
Its been a bit but if I recall correctly, the NoZwrite isn't the problem. It happens without it. But as you said, its a solution that only works in specific angles/distances/locations.
make the glass parts separate proxy objects
Interesting, and that forces them to be rendered on top?
for some things it can help with rendering issues
or actually before you do that
have you sorted the alpha surfaces in order?
Yes I have
It works perfectly fine outside of another structure
It’s just when placed inside one
But like I said using no write z fixed the blue grey on my screenshot but now renders the object behind that weapon rack infront of the glass part
what rvmat does the structure its inside use?
multimaterial?
does the wall surface have alpha channel removed from the texture?
Not currently a multimat just a standard supershader, but it also occurs in basegame buildings using multimats like the atc tower on stratus
I’m not sure about the alpha channel on the wall for the base game stuff but the structure that’s mine is a co texture with no transparency
what is the correct part in Stage7 for rvmat that will show the enviroment for something reflective? This is wat I have but also could be a object builder viewer problem
class Stage7
{
    texture="a3\data_f\env_co.paa";
    useWorldEnvMap="true";
    uvSource="tex";
    class uvTransform
    {
        aside[]={1,0,0};
        up[]={0,1,0};
        dir[]={0,0,0};
        pos[]={0,0,0};
    };
};
Did you compare to the defaul_super.rvmat
oh where is that at?
P:\a3\data_f\
oh okay I see, okay I got the same as it
well almost the same
Little question about what's possible. Can you make reflective surfaces?
You can surely turn certain colors up a lot, but achieving that reflective effect would be nice
shiny yes, realtime reflective, no
like shiny chrome look is possible
but mirror not as much
Ah, gotcha
Dont mean like mirror, but with VS 17 panels and such. I find the existent mods too dull to notice them.
Oh and, would you be possible to make it more noticable under NVGs? A3TI uses different textures for their thermals, would you be able to do that with NV?
difficult
and not completely realistic
compromises have to be made
what the exsiting mods do is likely about as much you can do
You mean the IR reflective part or the other one?
as a whole
I mean the VS 17 should be IR reflective afaik
They currently dont stand out at all
At day you can still kinda make them out due to the extreme color values, but at night, not a chance
Maybe instead of making them reflective, you could make them a bit shiny under IR
IR shininess might be nice. Perhaps something to bother Dedmen with
Is there an easy way to add a subtle 'fabric' texture to a uniform? I figure I'd have to edit the uv map, but I'm not super sure where to begin
Uniform you are making?
Uv map has not really much to do with that, it mainly defines what areas of a texture are drawn or parts of the model
At the minute, I'm just re-texturing vanilla uniforms. They've got a lot of good detail, but mine tend to look a little... plasticky.
Maybe I'm confusing uv map with normal map? Whatever it is that makes the 'illusion' of height or texture
Texturing is a bit different part of the process
That is normal map yes.
However editing that in image form is very difficult
yeah, I've found that, hah
As normal map contains directional data
And uvmapping is not usually all in same orientation
So different pieces would need any pattern separately aligned on top to match the direction
Also normalmap often has detail like wrinkles that would be very difficult to draw over in natural way.
Usually people just apply recoloring and not try to change the material look.
hm... yeah, I see. I was having issues similar to what you're describing. I was just hoping to make the texture look a little more detailed. It looks fine now, but I've seen some nice additions before and wanted to see if I could pull that off
Somehow the reticial in the optics became blur, I used fixed this issue but I forgot how, anyone still remember how to fix it?

Disable DOF
Hello guys, not sure where to post that, but i'm currently developping an external tool for Arma, but I need the original textures files of the map marker and Otan marker. Do you have any idea of where I could find those? Thank you in advance.
Map icon textures are in ui_f_data.pbo >> map >> 'whateversubfolderyouwant'
thank you 😃
And how can I understand the _CO _SMDI ending?
I mean its obvious tha _CO = _Colour
But what about the rest? Is there a list or a .paa Wiki?
Is Arma3 even capable to render texture maping like displacement?

Thats my first creation
Can anyone detect some issues? Because if I apply it,
it wont show up on the visualLOD
found something: https://community.bistudio.com/wiki/Texture_Map_Types

Okay next step, Ive learned about .rvmat and that its the heart of all textures beacuse it defines
everything and send it to the engine.
Is there a way to read default_super.rvmat with notepad++? Or a reason why it wont work default?
got the input from default.rvmat but from the wiki -> https://community.bistudio.com/wiki/Rvmat_File_Format, still need to read .rvmat files
Hey there again, .rvmat solved, now Im into the config.cpp
I saw that Im able to present a preview picture and wanted to go on
but somewhy the converter wont accept my picture:
Is there a console to look at or someone who can call me the major mistake Ive done?

Its getting weirder

jpg not good source format. dont use that
and your image resolutions are probably wrong
Copy
There can be a wrong resulution?
Found it in https://community.bistudio.com/wiki/ImageToPAA
Ive now did a pic on 1024x1024 -> error
and then with 256x256 -> error

What to do now? It worked as png
Im into reading this https://community.bistudio.com/wiki/Multimaterial at the moment
Can someone explain in its own words what TexGen is and what it does?
What is ment with LERP?

Save that image as a png and then convert that to a paa, don’t forget proper naming conventions for the textures before converting.
I did named it _CO for color
Im looking for the list that explain all the endings
Does the .paa also generate displacement maps from the color map?
Or can it only convert an already existing displacement map?
Displacement? Do you mean texture normal ? If so then you have to convert existing normals
Thats a displacement map. For cuts and stuff that need "hight"


Can someone say me what is:
"TexGen1 etc."
"uvSource = "tex" "
Does it stand in any connection?
Displacement is not supported
Parallax is the only supported texture
_nopx
directx normal rgb and alpha parallax texture
Can someone give me an example of an _mask texture?
And can someone say me how to create it if I want to use it?
source: https://community.bistudio.com/wiki/Texture_Map_Types

it might be more helpful if you say what you’re trying to accomplish rather than ask about random specific things
bc there’s a pretty likely chance you’ll never need to make a mask
I want to learn about random specific things that arent well explained in wikis or forums
if they aren’t well explained there then ur not going to get a good explanation usually
unless some random person who’s done it pops into here
My hope haha
so what are you trying to accomplish with a mask texture?
today I randomly found a tut playlist of the bw-mod team member
I want to learn about the diffrent texture maps in DigitalReality because I learnt them in Blender with _NormalDX _Metalness
gang ur only using a mask texture if you’re using the multimaterial shader, which is only used occasionally on stuff like buildings and even then the super shader is better
look at the super shader, that’s the one ur going to be using 90% of the time
Im into walking from Blender to Arma


are you familiar with substance painter for texturing
Thats the way I usually would try this shader thing, (.rvmat Im also new new bambi new into this)
where can I find some intel about super shader? Is it a map?

It’s a shader not a map
hence super shader 😭
just look at the wiki page titled super shader and the other one titled rvmat basics
https://community.bistudio.com/wiki/Super_shader
That was easy
Sorry lol
My next question is:
What are smdi textures?
Got it

surprise it’s on the wiki page lmao
only on terrain rvmat
ye
that’s a terrain texture so I figured 😭
tileable texture from one of the best websites for free ones
https://ambientcg.com/view?id=Rock022 ambient cg is so nice
Get this asset and 2000+ more materials, HDRIs and models for photorealistic rendering for free under the Public Domain license.
it wont work with objects though
@manic roost for objects you would do just normalmap with _nohq suffix
Wait a second @full quarry, you wanna tell me that I insert a normal .png in ruleset of the .paaConverter and add
the suffix _nohq to it and the .paaConverter genarate the texture map on his own?
Mindblowing.

Its not an converter. Its an generator.
no
its just a converter
it wont make you a normalmap
that you have to do yourself with some other program

this is not a valid normalmap
I really like the fact that the map I never heart from convert itself

😭 we mod in a society
go to sleep
you have stopped reading what I say
Thats really really true
I wanted to go to bed 4 hours ago. Its 3.10 am in germany..
Ive got sucked into progress after a long time of dry learning 😄
I can do this on my own 😄
Good night and thanks for all that help to @wooden lantern/ @full quarry
**# ❤️ **
progress is nice but you need to also remember stuff tomorrow.
Hey there, another learning session and progressing
I would like to get some support about Bakin Normal Maps in Blender
I already got some first ressults wich Ive attached to the post.
I know thats a wrong normal map thats the reason why Im here.
Can someone say me what the "Baking" progress is and how it slightly
works so I can give it the best conditions for the process


youll find basic modeling tutorials from youtube that cover things like this
best use those
for object like this you would not bake normalmap
and geometry lod does not have textures
Thats what the .paa converter does

yes that is correct
Thats my lates try with an diffrent object. That looks more correct
So its the way I bake it

your source texture looks like that
does not look like it here

Im just still a bit confused what the converter does if I add those endings. (in detail)
I got that it add Arma needed or specific things to the already existing map.
correct me when wrong
The .paa converter added one single line on the top bar of the "C".
Thats exactly what my further question ment to ask haha
So why did the .paa converter added this single line and what
does it mean in detail for the other cases.
it converts the source image to paa file
Okay got it, so its part of the .paa file.
Why isnt important for the beginning. Thats just a way
I want to avoid future issues in generating textures and
maybe speeding up the learning
Btw the reason why Ive returned shit from Blender has to be something with the positioning between object and baker
no its important
do go invent your own procedures
So why did the .paa converter add this single line in case of normal map converting?

I dont know what line you talk about
It was a resulution thing. Blender added the line during baking


Left: .paa Converter | Right: Blender.png
you dont really have any normalmap data in that picture
its just the base 0 color
I would recommend setting anything Arma related to the side until you have the basic modeling and texturing things in Blender understood
you jump too much
Thats how I returned that result


I gues its the positioning of objects in the 3D space
Let me show you the case of the other images so you maybe can tell me something
about how to positiong Baker&Object to each other
Thats how Ive done it with the "HaufenScheisse" -> "PieceOfShit"


Are those object not close enough to each other or what leads to the Base color 0?
Those are my baking settings


Thats what Im asking you 😄 "What my mistake in the positioning of Baker&Object?"
is it legit to ask those questions or is it out of topic?
I would recommend looking up baking tutorials for blender online
its very well documented
Ive did
so I dont have to explain same tthings again
Bake objects have to overlap yes
and you can set the distance it samples from
Please dont tell I should investigate online if I try to learn with a human
No front!


the human has other things to do
Thats a good information no one tells in any videos
you can also read blender manual
it has good information
This is model making channel yes, and model making questions can be asked. This is not however learn modeling from 0 to 100 channel
cant expect teaching everything
I totally respect that. But please also respect that the reason Im looking for human is not that Ive found good data online.
And I can relate that it causes traumatha to always repeat the same
I can understand that. but I wont teach you everthing here
I've learned stuff on my own online so the information is out there
------> "Its a good platform to learn and switch data" <------
Not -> "Its a school with teachers"
its a forum
Just anwser the question you can and leave the rest to others or me at least.
Thats how this learnspace works, right?
Can you recommend some good sources where I can read about those specific things?
Maybe a wiki you would recommend or a .pdf?
All Ive found is "BUY MY SHIT"
This workspace is not for teaching people how to model, or bake, or texture.
For that, you should find other online resources dedicated to 3d modelling, such as Blender, or texturing, such as Substance Painter.
Once you know how to model and texture, then this workspace can offer advice on how to get those models and textures into Arma.
Sorry for misunterstand
This is apparently a good course for learning Blender ("Blender Guru" on Youtube).
https://youtu.be/4haAdmHqGOw?si=MYM51O3cIl57sWIk
There are no doubt some Discord servers for helping Blender users too.
The complete beginner blender donut tutorial course in one video for those who prefer it over the multipart series.
Watch it in parts: https://www.youtube.com/playlist?list=PLjEaoINr3zgEPv5y--4MKpciLaoQYZB1Z
===Links🔗===
Blender Guru Discord: https://blenderguru.com/discord
Keyboard Shortcut Cheat Sheet: https://docs.google.com/document/d...
Part of the path to learning is figuring out how to find information.
@lusty mesa scroll up in chat
@full quarry thats why I were here
Have a good one
Btw, thanks for the tips and the "help" you gave me

scroll up in chat ? Not sure what you want me to look at, just trying to point you in the right direction.
Here are more sources for basic learning texturing and generating own things. If you want to machine learn someone else again
http://wiki.polycount.com/wiki/Texture_Baking
https://community.bistudio.com/wiki/Texture_Map_Types
https://www.youtube.com/watch?v=8cCk8h9Eotk
https://www.youtube.com/watch?v=Se8GdHptD4A&list=PLsGl9GczcgBvJPh7D_ITafvmTW7ZzQTEr
see you next time
please dont be a dick about it
Hmm I have heard it is not the best, particularly when one is interested in the making of game assets.
Is someone seriously struggling to find free information on how to work with Blender? There´s millions of videos everywhere.
Feel free to suggest something better to the next person looking to learn 3d modelling, it's not something I'm an expert in, but others had recommended it in the past.
I just looked and the ones I used to learn it are no longer available 
Random Indian guy´s channel isnt up anymore
At the end of the day I think Blender is anyway mostly learned by simply practising rather than spending hours watching tutorials.
Tutorials can give a direction to what to try out
I remember I initially watched a bunch of long tutorials, then opened Blender and couldn´t really do anything anyway since I couldn´t digest all what I had just watched 
Anyone knows, how do I add/replace with my own camo's in this menu ?
Can't find anything about it pretty much . . .

(for vehicles)
Search by VhC in wiki
As Polpox says, "VhC", and specifically class TextureSources {}.
YES, THIS IS EXACTLY WHAT I NEEDED !
God, I spend my two days on searching "Vehicle Multi Camouflage tutorial" . . .
Thanks you very much guys !
Blender have an official discord
And they have (crazy I know) some really good teachers in there
I'm not 3d model expert but they've either given me a link, or explained how to do it
Hey there Im back :D
Im into using the imageToPaaConverter to convert my objects icon.
Im using a 1024x1024p canvas, export it in 8bit .png and try to process file in the converter
but the file remains red. I know about insertion sizes and think that my canvas and bit depth is
good. I also only export 1Layer from gimp into the .png.
What else could be my problem?
Is there a console in the ImageToPAA?


Is the factor of 4x256 valid? Or do I have to change my canvas to 512p. update: a canvas of 516x516/ 512x512/ 256x 256 doesent work aswell
Im really new and unsure because the happening a normal 1k square texture is 8bit because of 1.024x1.024p
this is probably related to some other image property other than resolution
What could collapse with my thing? What is the ruleset?
I only have source of https://community.bistudio.com/wiki/ImageToPAA
There is an ruleset of .png including alpha channels in squares of 256 with fatcor x2 explained
In other formats is a limit of 32bit so I also would be far away from that boarder...
I already succeded once but also try and error...
I would like to know the proccess details
could be you used wrong bit depth for the png export.
Okay thats a gimp thing...
... I want ps back haha
can I send you the export settings?
PS has different bit depth options too
Is that helpfull?
**And I cant open with TexView, ** idk what TexView is

texview2 is one of the programs installed with the arma3 tools package
it opens up paa files


What happens if you save it as icon2_co.tga and then try converting with texView2?
what bit depth did you create the image as
automatic pixel format setting exports it as it is in gimp
which is whatever you created the image with
Why hasn’t there been a ford f-250 super duty 2009 in an arma 3 mod yet?
Been looking such a long time for it
Now I’m trying to make it myself but idk how to and I can’t find the model anyway
You first learn to make 3d models so you can make it.
Hi guys, i need to reimport a model with textures so i can redo the textures, its baked with an rvmat - is there an "easy" way to do this?
I have Blender, 3ds max, obect builder, substance painter, etc etc
but i just cant seem to crack the code
@frozen blade: I think one of the issues would be that the layer composition modes in Substance aren't 1:1 with the Photoshop ones.
From p3d?
Or what do you mean by re import?
Is it model you made?
From p3d yes
Is it model you made?
and what exactly are you trying to do?
Why would you want to redo textures from the p3d instead of exporting the fbx into substance from the .blend?
Retexturing such assets is done by painting over the texture file itself in paint program like gimp or photoshop. Not in 3d. You can not touch someones models like that.
It’s models that were redoing - we have rights and green lights but the old dev is not around anymore, I’m asking if it’s possible to edit the current mask and texture files to fit the changes we made on the model itself
Because I don’t have the .blend - I only have the paa masks and stuff - and then the p3d
Then no. If you don't have source files from the original author there is nothing you can do.
And if the author is not around how do you have rights and green light.
Highly suspicious
And we have 0 tolerance for IP theft.
Messaged you privately buddy - there’s no reason to be suspicious
That’s weird
Hey people, could someone send me an example of an enhanced .rvmat file?
I dont understand it anymore. I watch videos even try to copy and nothing works.
For checking my knowledge: please confirm or correct
- An code formed like {0,0,0,1} means a percentage value of the {R,G,B,Alpha} -> So that object would be visible with no light reflection, right?
- The stages are like on the wiki ment so my _co needs to be stored in Stage1, 2 or 3 -> *or is there also some more system between those ranges of Stage 0-3
And could someone tell me something about the values of "texgen" and its usage?
for dodging all "go informate". I tried now 4 days and did nothing else. I learned a lot but werent able to solve that. So please help me


Stage0-3 is Color map so that shows all the componments of my color.
How can I understand Stage2 and Stage3? (I copied that from another user and tried to learn)

Can also someone say something about that linking from the https://community.bistudio.com/wiki/Super_shader#6._Fresnel_function
https://en.wikipedia.org/wiki/List_of_refractive_indices

Many materials have a well-characterized refractive index, but these indices often depend strongly upon the frequency of light, causing optical dispersion. Standard refractive index measurements are taken at the "yellow doublet" sodium D line, with a wavelength (λ) of 589 nanometers.
There are also weaker dependencies on temperature, pressure/s...
if you want to change how the shine looks you can alter the N and K values of the fersnel stage

And they are all preseted in the list
To create more like them, I would need to understand
the calculation of N and K. Thats what explained in the wikipedia
Understood if correct
But why does everybody stores there MAP_co.paa in Stage7 and not in 0-3 like its in https://community.bistudio.com/wiki/Multimaterial called
yes the values can be anything you want. the examples are just for common materials
_CO should not really be stroed in rvmat the diffuse texture typically with suffix _CO but also can be _CA is not stored in rvamt. Other textures in Rvmat can use _CO suffix though
its assigned on the model itself
except in multimaterial
thats special case type
oh you meant evnironment map
thats the the thing that is drawn in the reflections of shiny surface
it also has a flag to use one defined on the terrain so it can change if the terrain is different environment
_CO is just its suffix that tells its color texture without alpha channel
Confirm that. So its in my case in Blender visualLOD.
yes
unless you use multimaterial
Wait I think I have to go a step back. There are diffrent .rvmat topics?
yes there are many different shaders
supershader that you linked the wikipage for is the most commonly used one
for vehicles, weapons, characters and other small objects
buildings and large things typically use multimaterial shader rvmat
I really needs to say thanks already. Its a lot good information.
So I need to build the construction in form of a multimaterial shader.rvmat
to show the engine what I want. That also would mean that Im not allowed to
miss any Stages in my .rvmat file and need to define it with a tex (I also will need to learn more about intel of marked pic X)
Or can I just dismiss a stage like doing stage 1 in a multimaterial.rvmat with "...\texture_co.paa
But missing the Stage2/3 (because I dont really understand what happens in them, I gues detail work for advanced processing)


please notice if you want structured text instead of screenshots
stage0 is the only one not needed in supershader
In the example file I found somewhere is the Stage2 texture also defined with a fith value in the color section.
I dont know what it means and find nothing similar on the wiki.

Thats where its explained in detail
Stage 0 = Stage 1 if no texture is assigned on the visualLOD I export.

I also noticed haha
Im sorry and will take care
stage0 is not used in super shader
the diffuse texture is assigned on the p3d
in multimaterial
you dont assign diffuse texture on the p3d
you only assign the multimaterial rvmat
and in the multimaterial rvmat stage0 is used
multimaterial uses a red green blue black mask file to project 4 different textures on the model
stage0 corresponds with the black color if I recall right
multimaterial and supershader behave very different
and have different use for the stages
That was gold. I only need to fully understand know what that means and does to me.
you can look up the chat history for more answered question about multimaterial
STRG+F is magic but a risky time invest
theres also couple of pinned messages about that
modding is risky time investment. 
Ouuu Discord got those... I always forget
you cant expect this to be fast
Im all in
Thats a years taking process to really become good.
I started with .sqf as first language and it turned out that its also a great decission to start there because I were completly on my own again because no one could help.
Great thanks to @knotty marsh who really did a great job on helping and explaining. He got my full respect for leading me throw my stone ages in some kind haha
But I luckyly were able to run threw my own 10years roadmap and
build kind of a creativ workspace with diffrent topics . But my friends
are at own development like hunt showdown and have really less time
because they also focus on our Arma projects.
Others may not "teached enough" to help me out.
Im completly on my own and Im also in charge to document everything for
people who want to do similar.
I take this really serious and know what the way will cost me.
yes
heureca...
I feel so dumb
btw. what is "SuperExt" shader? Is it a thing? I saw it in multiple videos
its a special shader with emissive mapping. its not really commonly used though
you can find more info in the chat history about it too
So I gues its more beginner friendly for following generations if I explain them in SuperShader.rvmat
Multimaterial seems to be more enhanced because detail customizing is possible for all stages.
well you are not responsible in documenting anything. people do what they can to help the community.
if you want to sure go ahead
just learn the stuff first before try to tech it forward
Thats a part I really need to explain.
I do it first and bring it to work.
Then I think about and try to write it down. Then I detect knowledge gaps
of course Im not in a position to teach people, but I try to create best conditions
👍
Im reading about the SuperShader at the moment and Im wondered
about the word "Environmental Map". In Stage 7 is MAP_co.paa used so Im asking
to myself if there is a diffrence between.
if I google I only find relevant info about ArmaReforger


I dont understand the question
the names of the files are irrelevant. dont get hung up if they dont always match
it can be aeERTHejai9e5jha_Co.paa
as long as it fills the requirements of the image
names are good to be clear for easier understanding what they do though
I tried to find out something about that "texGen" thing and found a lot usage and a less explanation.
But it formed a picture so I can ask now if I got it right and if the thing Ive found from my german brother
Dedmen is correct in the topic Im looking for info
So:
The texGen is just to preset and copy a setting about UV behaving.
But I dont know if UV = UltraViolet or if UV = UV-Mapping.
In my docs its all about dir/pos/transform. That sounds like UV-Mapping
So I gues mine should be 0,0,0 in all casese to use the texture atlas in combination with already
saved UV-Map from blender.
Only total missing knowledge is what "UVSource = tex" means. I gues its a default value wich most logical would be empty so 0,0,0 so the value I would use for TexGen0.

Thats another high quality information wich brought many puzzle pieces together
So the _co and stuff is good to keep for structur and workflow but not essential for the Multimaterial/SuperShader.rvmat format
tex is the UV given in the model
I gues I tried to think outside the box in wrong way haha
ugh yeah that page doesn't explain what they actually mean, just what the options are
the suffixes are essential
name before them not
lost in space hahaha
Also the suffixes need to be present before converting to paa
That was magic to me when Ive found out. And then Ive learned about diffrence between converting and generating wich leaded me to baking and diffrent texture maps. I really loved to learn about all that and need to give probs to all people on my way who helped me like HorribleGoat
another heureca
**UV means "unwrapping" ** why its UV and not UW doesent matter anymore to me
Thats also why geometry needs to be manifold. To be able to be shown unwrapped in 2D.

Btw I should greet you, Dedmen, from "Spiderman|Uwe", if you remember him. You played Arma2 back in the days.
sry for random moment, but he asked me for that favour
UV refers to the texture space coordinates
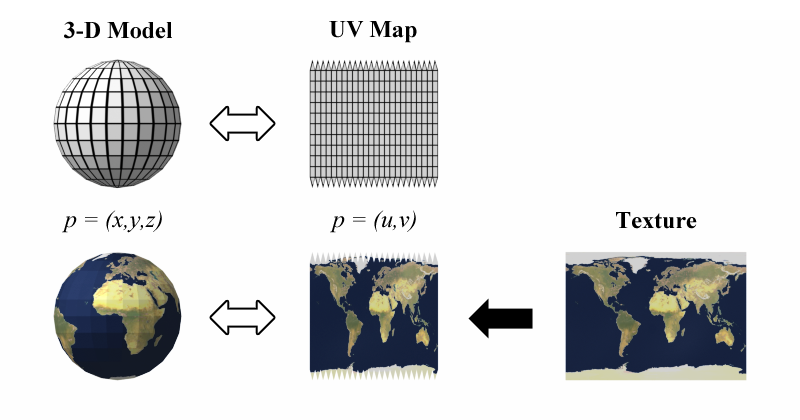
UV mapping is the 3D modeling process of projecting a 3D model's surface to a 2D image for texture mapping. The letters "U" and "V" denote the axes of the 2D texture because "X", "Y", and "Z" are already used to denote the axes of the 3D object in model space, while "W" (in addition to XYZ) is used in calculating quaternion rotations, a common o...
modding a complex game like this is not really far from actual "real game development"
Im back in the sheets now:
So Im looking at the "uvsource = "tex"
I dont know what it does but I gues its the default texGen wich contains the empty UV transform coordinates or applys the arriving data without changements

so there are some basic skills and undrestanding of technology required to then understand how the game parts work
it referes to the uvmap of the model
tex is uvmap 0
tex1 is uvmap 1
most commonly only tex is used as source
I really love that part of learning how games work. Its like back in the day when learning about film and premiere
some things like multimaterial use 2 uvmaps on same mesh
So thats identic:
uvSource = "tex" | texGen = 0
no
that sounds super potential
uvmap might also be called uvSet in places.
uvSet0 is used to uvmap the mesh on the mask. uvSet1 is used to control the tiling texture projection in multimaterial
love it...
But I gues I passed the language barrier and decide that Im missing to many pieces to use


tiling as in repeating
So wait. tiling = ~looping texture?
yes thats one way to put it

multimaterial uses this kind of textures to cover large areas
so the texture quality looks higher
because it repeats/loops
Ill need to learn about that and remember your words to
know how to avoid things like 3m tiles on the roof
Because I plan to use TexturAtlas. so im not able to overscale the UV to loop

thats not how buildings are done in Arma
Thats a screen Ive done in really learning of basic blendering and controls
that were created way before my first questions about blender related texture stuff poped in
sry for that again D:
Thats my meanwhile Blendering
but does nothing to the topic


I usually planed to randomize UV for natural textures and pixel loosing scaling for looping on textur atlas
but this is 1.000 times better
but also harder, I like
Like this but its not multi usable

I would like to find out more about texture looping. Can you give me some keywords to search for?
My creativity stops with "texGen Texture looping"
I have an example blend in the pinned messages
that shows how it can be represented in blender
that could be useful to study
Im pretty sure I have also talked about how it works somewhere in the past
so you might find stuff in the history
lets go
Thanks for the intel 😄
Btw Im bloody new to texture painting/ substance painter.
So lets open another door. I feel confident Ive tamed all monsters in
already opened topics so they dont stab me in the back

But before:
Coffee, Cigarette, connect and think about all new knowlegde
Ill be back
That looks like a really rewarding learning. Lets investigate
but at first Ill need to rebuild the File... what a blender layout, who works vertical?
I really cant say "Thank you" enough

Lets go

each for their own I guess. 🤪
This will take me a lot of time and if Im done Ill achieved a great knowledge base.
But it will be really hard. Talked now in multiple Blender Communitys to experienced useres.
All said that they have no idea why its done that way.
I gues its a output thing dependend with the enviroment I will use it in.
what is the what they dont have any idea on?
The shader map is the biggest issue
Thats how they do it.

Blender shader has no connection to the ingame shader
expect that they use same textures
blender can represent same setup by connecting right textures to right shader inputs
So its a output thing
but it will never look 100% same because its different rendering
I got no idea why you would do this though

Its the scale of the UV Map wich is used by them to scale the texture up for looping

well
I guess sure you can do it there
and then apply same scaling to the rvmat texgen
but you could also just scale the uvmapping


I prefer control the uvmapping directly so its easy to align the patterns
I dont like playing with the scaling through the values
thats what the second uv map/ uvSet is there for
Correct. So Ill drive my attention to your file and understand the how it works
My first gues is that your "just" creating the values in a enviroment you can see their allignment direct
So I gues the shader map is a converter to produce usable values for the multimateria.rvmat
Correct?

In that way your allowed to better relate what is happening on the UV-Editor
sure yeah the same things can be plugged into an rvmat
the value ranges are probably different though
I dont understand the question
Its a statement. So I tried to double check if I correctly understood why you do it like that and wich benefits your achieving
I guess its part of this is how Ive learned to do things and part of this is way to control exactly how the texture looks
Thats exactly what Ive ment 😄 Great ❤️
the shader setup itself mimics how multimaterila works in Arma engine
it takes the mask
and draws the different surfaces on the mask
according to the second uvmapping
its not 100% exact match especially in how the different mask colors blend together
but id say its at least 90% accurate
but it is also a basic setup that can be elaborated further if you have the skills for it
enough and better then 75% of the users
Its just funny talking to movie makers that determine me crazy for their not understanding of our final enviroument haha
the pros quit on that.
Its like programming .sqf with colours haha
how it can look with more elaborate production to paint the macroMap (MC) texture

theres partial generation nodes that are then contolled by painted masks and so on
for a texture to be baked out
but this stuff goes beyond what I have really time to teach
Thats okay of course because those things are created by simply connecting knowledge together.
I call it puzzling.
Put to get the puzzle parts I need to understand the base of everything
Thats where Im at. But "Im diffrent" like the portal turret.
So I want to see the whole picture to create my own draw style 😄
Ive attached with what my journey started.
Im still a bit confused but thats normal haha
So the .blend file is something like a converter that output the tiling settings, right?
Or am I at the woodpath?

no the blender file does not exactly output anything
except the mask texture file
Ive found a really talented guy who where able to kinda explain myself what is going on on Blender site
Next step will be to understand why it does that and how I can use it for my terms
but to have the mask file and tiling textures look same in blender and in game you would want to match the transforms
Ahhhh ohhhh I remember we had this already
So its translation of tranfsormation.
So I can just use the UV from it for tiling, is that correct?
3 brains melted so far - 1 freakout hahahaha
I guess just try it out and dont try to logic it before
as you may lack the experience to have the right questions
Im planing to but also kinda enjoy to see those well experienced guys quiting.
Those guys who lought about the workflow we need for Arma
This is kind of a break without a break. 17oClock my Break is other. Thats the second one I do today.
Im in now for already 10hours today. I really learned a ton of usefull information but take also need
to take care about myself. I dont ate, I slept 3 hours the 3. day but Im so motivated that it doesent matter.
I just need little breaks at strategic points to think about everything and bring silence in my brain
for the next step
I know its not the usual way of living but I also dont see the sence of life in earning money. I want to be happy and this is the essence for it
Thats a real good source to learn from. Im still analyzing and study it but already achieved a lot in my eyes.
Its still a shit ton to go on but slowly the fog goes of
And its good to know that visual LODs can store more then 1 mat/UV-Map at the same and also can be non-manifold

dir should be 0,0,1
Its a identity matrix there
The more I understand the more I see that I will need an TexturAtlas to size down the data volume
It is a super usefull way to first align the UV and then define the range of texture inside the alignment.
I always thought it is build from the other side. So that I would need to export the UV and edit its TexturAtlas.
But in this way Im able to throw them all together, miss a bit of pixel, and pick it out the way I want.
Next step is to understand and learn to reproduce it. Then Im ready to documentate all ways of texturing.
- Single Texture
- SuperShadow
- Multimaterial
- With/without TexturAtlas
- Algining all maps together
That causes the correct lineup in "matrizenmultiplication", right?
Thats because all lines in matrix will stay the same. Other then in the picture.

Can someone send me an example of an Multimaterial.rvmap/ SuperShader.rvmat?
you can find those in the game data
data_f is copyright
?
SupderDefault.rvmat isnt readable for me
get yourself mikeros toolset and unpack the arma data on your P drive with arma3p
Im a bit confused because I dont know wich data exactly
well basically almost all of it
Wait what? I got hours of headaches

if you manually extract all of them
the purpose of this is 2 fold.
you have access to the vanilla files as reference
and when you use pboProject to pack your pbo it can check filepaths against the data on P drive and error out when you make a typo
I need a memory stick from you...
I gues I already did this
I thought its default to receive all Arma Data on that storage

you have the arma data in the game yes
but thats in pbos

there is also all-in-one installer at mikeros shop page
and the free version is enough
there is a paypal to enter the shop to get the free all in one installer

So Ive to assemble them all together by myself
dis

ai ai ai that hurts
In germany we say "Wer lesen kann ist klar im Vorteil"
"Who can read got the benefit"
🔎 👃 🔍
And what does it do in detail? Do I have to worry that something gets deleted or overwriten?
Or is it just going to unpack everything?
it unpacks data in A3
on your P drive
your P drive hopefully is kept neat and clean and only has Arma modding related stuff 😅
Yes. Ive only created a EBER\Folder to sort things. Its structure is attached.

Now I can see
*But also have "Z:\Volume" because P:\ is already taken by Arma3Tool


And thats of course the default_multi https://community.bistudio.com/wiki/Multimaterial

I came, I learned, I can sleep now. Tomorrow Ill fullfill.
Just went back to thank you again @full quarry. That was a great learning!
And also a great and colourfull experience to gather all that info 😄
I know its not complete, Ill need MaskMAP. Good that Ive understood now why its needed hahaha

👍
the mask itself can be hand painted in Blender pretty easily
but it is also possible to generate it with procedural material nodes same way as other procedural materials work.
The main thing is that the Mask can only have those 4 colors (or mixture of them) but most of the time solid colors tend to work best.
But the method of its creation is up to you
https://youtu.be/9adSZvQLWdo
Thats my wake up plan. Wake up, coffee, laptop: Go
I gues the cap is a reason of the multimat.rvmat format of 0-3 CO MAPs
So the Multimaterial is better for higher quality because I use the whole texture instead
of an SuperShader where I would use one canvas of TexturAtlas.
Multimaterial/ SuperShader: passed in theory
"But the method of creation is up to you" <- Im so excited of that day. But Ive got a 10 year roadmap Im in year 6.
Year 10 ends with .sqf and C++ and the eyes on modding and programming own gamemodes with the community.
Long journey... and the hard part only began. LETS GO!
*but now Ill sleep 😴 *

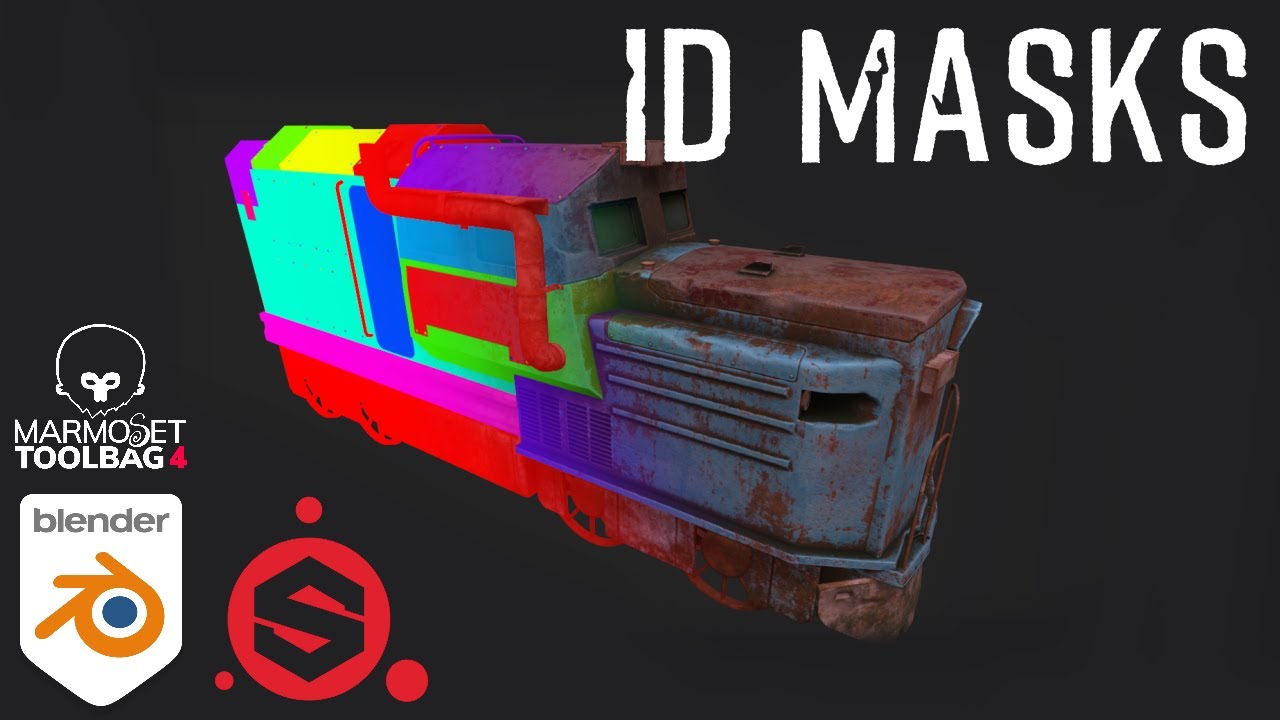
This video covers the baking of ID masks in Substance Painter and Marmoset Toolbag.
Song: https://youtu.be/PWXao2AVDF8
Project files:
https://drive.google.com/drive/folders/1SKfFflOXbmPX19I163YR359Bf8X27WyN?usp=sharing
Contents:
00:00 - Intro
01:14 - Preparing Model in Blender
03:11 - Baking ID Mask in Substance Painter
05:32 - Baking ID Mas...
yes. the tiling textures also can be lower resolution yet still have more texel density than baked textures could have
so multimaterial is very good performance too
ID masks is very similar thing
What happened why did his msg get deleted?
Probably unrelated to the chat
Its important for the creative flow to keep the channels clean.
Its never personal
So lets get to work 💪
IDMask: Done
Understantment how to use: 50/50


I gues I need to investigate more into the align part with the diffrent colors.
Because youve renamed it and recolerd. I need to figure out how. Because this has
to be the missing piece.
So I will need to setup: Purple, Pink etc.
If my theory is correct.
pls delete if out of topic


the color is just visual aid
no relation to actual function
also mask colors must be RED GREEN BLUE BLACK
Ouuu
otherwise the different textures mix together
Thats a good info. Ill do my Mask Map again.
Are there hexcodes of colors I will need to use?
Source: https://www.farb-tabelle.de/de/farbtabelle.htm
Farbtabelle, welche die Farben nach Schattierungen unterteilt. (CSS3 / X11 Farbnamen, Websichere Farben, HTML 4.01 Farben, RGB-HEX Konverter, Webfarben)
just think in RGB color channels.
youre making it sound way too complicated
Got it - your right
just switching colors to RBG and turn Green and Blue to zero that Red remains
for black Ill have to turn down saturation


Slowly it forms 😄
That would be impossible withou you @full quarry.
Im so thankfull ❤️
I just will need to figure out a little more details. But thats Blender related

could not be impossbile! I've learned this stuff without having a me 😅
Thats a terrible imagination 😂😂😂
and time.
youve skipped ahead a lot by having these tips 😛
Ohhhh yes. Thats like a shortcut.
Ill never forget that.

I did all the sidequests.
Next step will be to do it. So to run it through the ObjectBuilder.
Im kinda hyped, kinda scared. LETS GOOO
I only did community work and lazy playing in that time. Ive lost so much time...
I have some basic experience in Blender. Can someone point me to a wiki or tutorial for the steps to make a texture for a new model? I will be making some simple headgear, and eventually some uniforms. I know I can handle the cfg side, so I just need to know how to create the maps or whatever the layers are called, to then make the art for the skin.
there are quite a lot of resources for how to use Blender. youll want to look into UV mappin, then texture baking
possibly highpoly - lowpoly workflow
Thanks! I am awful with terminology. A far too kind dev gave me a rundown of pretty much everything with modding. But it was a crash course in the most basic concepts and steps. I will put that on my to-do list. Obviously, start with a cube 🎨
dont try to rush into it. give it time
and there will be mistakes and things you scrap and remake
That is definitely expected. Slow is fast, and I want to have a solid foundation for sure.
👍
I dont understand it anymore D:
Im back at the SuperShader again because my first object only contain one
color plus the maps.
Ive read https://community.bistudio.com/wiki/RVMAT_basics#Basic_Surface_Setting multiple times and thought I do understand.
All values are RGB Alpha so for example: Diffuse = { 0 , 0 , 1 , 0.5};
That means only Blue colors will be reflected with 50% transperency. Is that correct?
Because my texture arrives darker then the backsite of the moon with all default values from the wiki


After 4 days of suffering I made an step...
My ambient shader is fucked...
Ive converted it with _as as suffix. Is that wrong? Is my main file wrong?


My normalMAP also seems to be not applyed.
I tried to call the sence
-> call denied, sence isnt there


I gues it is something with the uvTransform or better uvSource.
I find literly no explanation.
Also nothing about uvSource. I would like to use my BlenderUV in the Bulldozer
Found something.

Thats interesting. If I assign the Texture with the UV Map printed on, nothing shows up on the Bulldozer
Im breakfasting at the moment and I see that there is a solution gap.
All textures run on 2k. The UV map Ive build goes on 1k. Ill fix and try if im back on the PC

There I go again. Hes not using the color map of the .rvmat
but I gues thats normal

The frustrating part is that I already made it a few times

But its a good learning... for stamina
hmmm, well i can't export the layer as an individual image file
.rvmat is asigned. UV is aligning.
I think its the texture itself that is made in the wrong way...


But its getting to late for me, another 17 hours of ongoing.. Ill also have to prepare the game server for todays op...
So I hope to receive some intel from anyone meanwhile I rest a bit.
I say thanks for everything in advance, hear you later
Anyone wanna talk about setObjectTexture? Or is that more of a topic for #arma3_editor?
Using setObjectTexture [0, "textureName.paa"] on a unit will retexture their uniform top with no issue, but setObjectTexture [1, "textureName.paa"] does not correctly map the texture to the pants. Is there something I can do about this or is that just the way it is and I have to go through the trouble of making a mod in order to make this work?


Which uniform class?
Show us your texture (and did you know you missed the _co suffix)?
Is it difficult to change a flag on gear (uniform, vests, helmets)? Purely just the flag and nothing else?
Relatively easy.
Find the texture, repaint, write some code, pack files into a mod (publish to workshop).
Good to know, is there an example I can look at regarding the code?
That uniform does not have all the necessary selection if I remember right.
You have basically picked the only one that dont work right
There are a few vanilla assets that made me beat my head against a wall and finally give up. Couldn't figure out how they had it set up. The typical camo selection didn't work at all.
Some have bugs in the model that don't work. Or different selections names from the common camo naming
Can the correct variables be found in a config in the pbo?
if its a bug in model then no
is there a way to convert paa files in bulk
converting 4k textures with texview is kind of tedious
If you put the tga files in your data folder, when pboProject packs the pbo it will automatically convert them to paa's.
thanks
Also imageToPaaGUI
Im back with my texture_as.paa :D
I meanwhile tried one of your textures to be sure its not my texture.
I got the same backsite of the moon result...
What can be the issue?
If I replace my normal map with the standart color texture it works
pls dont ghost me lol

Are you trying to apply a super shader rvmat to your texture?
Yes
Thats my file
ambient[] = { 1, 1, 1, 1 };
diffuse[] = {0.9999999,0.9999999,0.9999999,1};
forcedDiffuse[] = { 0, 0, 0, 0 };
emmisive[] = {0,0,0,1};
specular[] = { 1, 1, 1, 1 };
specularPower = 30;
PixelShaderID="Super";
VertexShaderID="Super";


class TexGen0
{
    uvSource = "tex";
    class uvTransform
    {
        aside[] = {1,0,0};
        up[] = {0,1,0};
        dir[] = {0,0,0};
        pos[] = {0,0,0};
    };
};
class TexGen1
{
//    uvSource = "tex";
    class uvTransform
    {
        aside[] = {1,0,0};
        up[] = {0,1,0};
        dir[] = {0,0,1};
        pos[] = {0,0,1};
    };
};


class Stage1
{
//    texture= "#(argb,8,8,3)color(0.5,0.5,1,1)";
    texture = "\EBER\Medien\Texturen\rvmat_Sammlung\SuperShader\SteinSingle\SteinSingle\UVFundament_nohq.paa";
    texGen = 0;
};

class Stage2
{
    texture = "#(argb,8,8,3)color(0.5,0.5,0.5,1,DT)";
    class uvTransform
    {
        aside[] = {10,0,0};
        up[] = {0,10,0};
        dir[] = {0,0,0};
        pos[] = {0,0,0};
    };
};

class Stage3
{
    texture = "#(argb,8,8,3)color(0,0,0,0,MC)";
    texGen = 0;
};

class Stage4
{
    texture = "#(argb,8,8,3)color(1,1,1,1,AS)";
//    texture = "\EBER\Medien\Texturen\rvmat_Sammlung\SuperShader\SteinSingle\SteinSingle\Fundament_as.paa";
//    texture = "\EBER\Medien\Texturen\rvmat_Sammlung\SuperShader\SteinSingle\SteinSingle\CzechHedgehog_01_new_F_as.paa";
    texGen = 0;
};

class Stage5
{
    texture = "#(argb,8,8,3)color(1,0,1,0,SMDI)";
//    texture = "\EBER\Medien\Texturen\rvmat_Sammlung\SuperShader\SteinSingle\SteinSingle\Fundament_smdi.paa";
    texGen = 0;
};

class Stage6
{
    texture= "#(ai,32,128,1)fresnel(3.5,1.22)";
    texGen = "none";
};

class Stage7
{
    texture = "\EBER\Medien\Texturen\rvmat_Sammlung\SuperShader\SteinSingle\SteinSingle\UVFundament_co.paa";
    texGen = "none";
};
Yes, its messed up from try&error
Use this one instead, changing your_path\your_texture to suit of course
diffuse[] = {1,1,1,1};
forcedDiffuse[] = {0,0,0,0};
emmisive[] = {0,0,0,1};
specular[] = {1,1,1,1};
specularPower = 40;
PixelShaderID = "Super";
VertexShaderID = "Super";

class Stage1
{
    texture = "your_path\your_texture_nohq.tga";
    uvSource = "tex";
    class uvTransform
    {
        aside[] = {1,0,0};
        up[] = {0,1,0};
        dir[] = {0,0,0};
        pos[] = {0,0,0};
    };
};
class Stage2
{
    texture = "#(argb,8,8,3)color(0.5,0.5,0.5,1,DT)";
    uvSource = "tex";
    class uvTransform
    {
        aside[] = {10,0,0};
        up[] = {0,10,0};
        dir[] = {0,0,0};
        pos[] = {0,0,0};
    };
};
class Stage3
{
    texture = "#(argb,8,8,3)color(0,0,0,0,MC)";
    uvSource = "tex";
    class uvTransform
    {
        aside[] = {1,0,0};
        up[] = {0,1,0};
        dir[] = {0,0,0};
        pos[] = {0,0,0};
    };
};
class Stage4
{
    texture = "your_path\your_texture_as.tga";
    uvSource = "tex";
    class uvTransform
    {
        aside[] = {1,0,0};
        up[] = {0,1,0};
        dir[] = {0,0,1};
        pos[] = {0,0,1};
    };
};
class Stage5
{
    texture = "your_path\your_texture_smdi.tga";
    uvSource = "tex";
    class uvTransform
    {
        aside[] = {1,0,0};
        up[] = {0,1,0};
        dir[] = {0,0,1};
        pos[] = {0,0,1};
    };
};
class Stage6
{
    texture = "#(ai,64,64,1)fresnel(1.33,0.5)";
    uvSource = "none";
};
class Stage7
{
    texture = "a3\data_f\env_land_co.tga";
    useWorldEnvMap = "true";
    uvSource = "tex";
    class uvTransform
    {
        aside[] = {1,0,0};
        up[] = {0,1,0};
        dir[] = {0,0,1};
        pos[] = {0,0,1};
    };
};
/*
class StageTI
{
    texture = "your_path\your_texture_ti_ca.tga";
};
*/```Im on this since 3 weeks and no one is able to help me... at least @full quarry helped me
Is it possible that you explain my issue? Or is it a preset?
Your texture is broken. You ask how to fix it.
You show your rvmat. Your rvmat is broken.
I supply a working rvmat.
Im really thankfull for that. But I would like to understand. I know that knowledge is expensive and everybody is poor because the rich keep everything.
But I dont care. I want to be creative and give something to the world.
So I would like to understand whats going on. What in detail broke my .rvmat
Okay, in detail?
Btw this is from defaul.rvmat and proofen throught https://community.bistudio.com/wiki/Super_shader
yea I meant what you had after that
default_super.rvmat is what you would want to use as base
well yours looks nothing like it
sometimes one goes to wrong direction
main thing is you turn the donkey cart to right direction
if you take the rvmat apollo posted as base and work through that, is there difference?
Im looking
Once you are using the correct format of rvmat, and if it still doesn't look right, then we can examine with you if your as, nohq or smdi maps are perhaps broken.
Apollos also dont work
please post the rvmat that you used
Meanwhile Ive connected to known lakeside modders and own game devs
They dont have a clue
.rvmat comes
ambient[] = {1,1,1,1};
diffuse[] = {1,1,1,1};
forcedDiffuse[] = {0,0,0,0};
emmisive[] = {0,0,0,1};
specular[] = {1,1,1,1};
specularPower = 40;
PixelShaderID = "Super";
VertexShaderID = "Super";

class Stage1
{
    texture = "EBER\Medien\Texturen\rvmat_Sammlung\SuperShader\SteinSingle\SteinSingle\Fundament_nohq.paa";
    uvSource = "tex";
    class uvTransform
    {
        aside[] = {1,0,0};
        up[] = {0,1,0};
        dir[] = {0,0,0};
        pos[] = {0,0,0};
    };
};
class Stage2
{
    texture = "#(argb,8,8,3)color(0.5,0.5,0.5,1,DT)";
    uvSource = "tex";
    class uvTransform
    {
        aside[] = {10,0,0};
        up[] = {0,10,0};
        dir[] = {0,0,0};
        pos[] = {0,0,0};
    };
};
class Stage3
{
    texture = "#(argb,8,8,3)color(0,0,0,0,MC)";
    uvSource = "tex";
    class uvTransform
    {
        aside[] = {1,0,0};
        up[] = {0,1,0};
        dir[] = {0,0,0};
        pos[] = {0,0,0};
    };
};
class Stage4
{
    texture = "EBER\Medien\Texturen\rvmat_Sammlung\SuperShader\SteinSingle\SteinSingle\Fundament_as.paa";
    uvSource = "tex";
    class uvTransform
    {
        aside[] = {1,0,0};
        up[] = {0,1,0};
        dir[] = {0,0,1};
        pos[] = {0,0,1};
    };
};
class Stage5
{
    texture = "EBER\Medien\Texturen\rvmat_Sammlung\SuperShader\SteinSingle\SteinSingle\Fundament_smdi.paa";
    uvSource = "tex";
    class uvTransform
    {
        aside[] = {1,0,0};
        up[] = {0,1,0};
        dir[] = {0,0,1};
        pos[] = {0,0,1};
    };
};
class Stage6
{
    texture = "#(ai,64,64,1)fresnel(1.33,0.5)";
    uvSource = "none";
};
class Stage7
{
    texture = "EBER\Medien\Texturen\rvmat_Sammlung\SuperShader\SteinSingle\SteinSingle\Fundament_co.paa";
    useWorldEnvMap = "true";
    uvSource = "tex";
    class uvTransform
    {
        aside[] = {1,0,0};
        up[] = {0,1,0};
        dir[] = {0,0,1};
        pos[] = {0,0,1};
    };
};
/*
class StageTI
{
    texture = "your_path\your_texture_ti_ca.tga";
};
*/
(I copy pasted all paths/ names)
Is your project on a p:\ drive at
p:\EBER\Medien\Texturen\rvmat_Sammlung\SuperShader\SteinSingle\SteinSingle

two steinsingle?

Ill delete my discord acc
so you are in the club
Thanks for not loughing
Im ashamed as hell
Sorry for wasting your time
I really want to apologyze

This should be obvious in Object Builder if you know how to look.
Use the Resource Library window and look for green icons against the textures (means they are found at that path), or yellow question marks if they are not found.

but it loaded in
Ill restart the .p3d

does anyone know how to get subdivision surfaces with displacement to show up in object builder
i know i cant use actual height maps but is there a way to turn them into portable meshes
nvm
You cant. This is not a thing for game models
i know
i was just wondering if i could change it into an actual mesh somehow
i know its possible because i saw some props with it but im not sure how they did it

or just baking it into actual geometry
nvm found it out
applying the modifier didnt work for me the first time around but now it did for some reason
thats why i originally asked
If you are making a thing to use as ground surface cover, remember not to make it too detailed so it stands out from it's surroundings
yeah i know
making it less stood out wasnt the only problem though
a flat plane had like 157,000 fucking faces by default 😭
almost crashed my pc trying to apply the modifier without knowing
This is not good 
i decimated it though thankfully after i noticed
not before my pc crashed once and my gpu overthrottled

Fry breakfast eggs on gpu
Hello there ! does anyone have the texture template folder as the forum are down ?
I need it but can't find id
I found this link last week using the search bar.
https://drive.google.com/drive/folders/0B_oVNRg3HRrRUmN5ZHNEOXFndzg?resourcekey=0-r3Cta-gYs-n-yrM9PG-ugQ
You can also use Wayback Machine to access most posts on the forums.
Eamn couldnt find it thankas for the infos
Anyone had luck with importing a _co file and it lays ontop of the P3d fine in blender? i really cant crack the code
Does anyone know where these shading artifacts are coming from? The model is triangulated already and looks fine. I believe it's something to do with the RVMAT's, but I'm unsure.
Also I'm trying to attach a picture but this chat will not let me.
You'll have to verify your account. #✔role-selection also accepted rules #rules
Good evening, gentlemen). I added a macro texture to rvmat in the second uv set, but now there are artifacts (a lot of black stripes). How can this be fixed?

it might be the scaling of your DT is way too small
building models are not really supposed to be textured via supershader anyway
you typically do this kind of large objects with multimaterial and tiling textures
i was asked to port the model. If I were making it from scratch I'd have used multimaterial)
The problem was that I used the entire _ca texture on the whole building, which caused the black stripe artifacts. With _co, there are no such issues.
Is there a way to disable alpha usage in Object Builder for a specific selection set so that only the _ca texture remains?


this is all wrong
I dont really have time to waste for bad practices. sorry
the problem is solved. I don't need any help thank you
if i wanted to add my own textures to clothes like e.g. cod ghosts rangers,How would i approach that task?
hey guys im trying to set up live texture reloading like in the pin, but how do I actually load the mods? Launching diag.exe onlyu loads vanilla arma
Also, how are you supposed to make the PBO with the global drive speciifers, ig et errors:

Read and refer to the pin, also its refered post
neither of these issues are discussed in either pins
#arma3_config message
It is
moved post:
09:46]HorribleGoat[ARMA]
: chromatic shiny look is possible. but often may need its own rvmat for extra shiny parts and another for more rough/matte parts
anwser:
Thats a really great and creative solution. Ill try and test it out after Ive solved my current problem wich is described in
https://discord.com/channels/105462288051380224/105462541215358976
Ive to confess you something @full quarry...
I havent stopped to work on the multimat. I just wanted the training and the
experience with this shader type. But I havent managed for success. Im on this since
4-6 hours now, did talks with topic related people, did talks with game developers and so on
We werent able to detetect the issue...
I will do it finally with the SuperShader and an TextureAtlas. But my inner monk suffers on multimat...
The issue is that my second normal map isnt going to be apllied correct. (The wood desk on the picture)


Thats how Ive interpreted things
how hard can it be?
FACEPUNSH


I will search for an existing multimat my existing files
Ive found shed_multi. The major diffrence I can detect is my "missing" uvTransform.
If Im right, uvTransform only reposit the already exisiting UV. But Ill need to figure out how
I precise allign the UV.
by UV mapping on the model


aiiii
as in the basics of multimaterial
OH MA GAWD I should have known this... Ive assembled the nodes in blender for it
yes
and why I was confused why you were trying to do complete opposite
and use multimaterial like supershader
Now my inner monk is quiet again. Lets do 10 mins of break and then Ill need to find out how to use sertain aspects of SubstancePainter and how to assemble a texture atlas etc.
substance painter is not really that effective for multimaterial making
I gues I havent know 100% of the specific characterization
I believe the multimaterial wiki pages do say all this
Im awake since 3am. Thats also kind of the time Ive investigated into learning and going on (now its 6.30pm)
I was missing the forest because of all the trees...
I need a brake. Im on this since ~14hours
Ill be back.


Pls sleep properly
makes modding easier
max 10 hours of modding in a day for you

George is the sleep
But fun aside -> Your right. But 10hours? For learning: Okay. For processing: Maybe
You cannot make progress without learn. You are not doing right
You are not understanding right.
I say that learning is more intense then doing
you try too hard
you fry your brain
do less
and success more
**I agree to 100% ** slower times will follow
Its like becoming a rabies dog sometimes. its not efficient in succeding only for stamina and roughness
Hello, I've been trying to get into texturing, specifically for the HGU-56/P helmets from RHS. However, after all the guides I've read and seen I have one major problem: I can't find the paa files for the Helmet in the RHS files, much less the Config file. If someone could help me out here, I would really appreciate it:)
The paas would be in the RHS pbos. The config you can see with in-game config viewer
Thank you, I'll have a look
Hello! Lately I've been struggling to improve the way my collimators' reticles look like in arma. Specifically when playing on winter maps.
The problem is whenever the lighting is too bright, for example, when the sun is at it's zenith and the weather is sunny, the reticle is barely visible against the snow.
As far as I understand the way Collimator shader works it takes the color texture assigned to the mesh and uses it to produce light, meaning no matter what the final result will never be completely opaque.
I've been trying to use other shaders like Super, for example, but the problem is that it makes the whole plane with that material opaque when using the NVGs or Thermals.
Currently my rvmat looks like this:
ambient[]={50,50,50,1};
diffuse[]={0,0,0,1};
forcedDiffuse[]={1,1,1,1};
emmisive[]={370,330,350,0};
specular[]={0,0,0,1};
specularPower=8;
PixelShaderID="Collimator";
VertexShaderID="Basic";
RenderFlags[]=
{
    "NoReceiveShadow",
    "AddBlend",
    "NoZwrite"
};
class Stage0
{
    uvSource="texCollimator";
};
Is there a way to improve the contrast of the collimator reticle for such occasions? Thank you in advance.
Ive switched now to the Super Shader but Im not able to load my
texture_co in. All _maps are loading in but not not the _color


_co is not a part of RVMAT
That was a really acurat anwser
Thanks a lot 😄
Ive added the texture now to the texture slot lol
But my result is kinda bright, ive assigned an aluminium fresnal with an 20 specular
My mate gues that the normal map is to extreme. What else, engine related could cause this

I would like to solve this area in final with an Alpha. What do I have to take care of?
Is it okay to have an double face? Is there any source to read about the textureMap_ca?

that you can model into the actual mesh
the model is already very simple so few more faces wont really affect anything
and you can easily close it off in next distance lod
in case like this few faces is better than turning the model into transparency calculation
Thats a thing I will also try out with that modle "Diffrent LOD stages" Ive never seen an explanation about how to do it with Mr.Clocks plugin.
I think thats enough to improve on my skillset, with this item. Ill build something diffrent to learn the textureMap_ca
At first Ill rebuild. Im unhappy with the feets
The seat itself is quite good but the feets looks like a joke.

you will want to model the real mechanical parts
anything that is mechanical and has joints or parts that fold around an axis look better when modeled accurately
Yes but no. So yes for visual. No for usage.
Ive decided to focus my learning on:
- Seating function (player can take a seat with ace/ addAction)
- Diffrent viusalLOD stages
you dont have to make it animate folding or stuff like that
Thats a really good point I tried to visualize on the matching table

but if it looks like it could then it serves the purpose
Now Ive got you. Just make it looks like it works so the people more get immerse the game
for transparency the chair might not be the best test
yes
Okay so:
- Diffrent visualLOD stages
- Seating interaction
(those will become the focus of learning)
Hello, I just finished a repaint of a Hummeve, I used Arma tools to extract the .pbo file, and the image viewer to convert the texture to .png, after the texture is done, what am I supposed to do?
I mean, to replace the repaint inside the .pbo file
You don't replace it in pbo.
You make new pbo with a your texture file and new config that applies the texture via hiddenSelections
If I have a paa that is a ca file and I copy paste it to another folder do I need to resave those paas again for them to work properly?
Is there any tutorial for that?
Bc I'm having a lot of trouble doing that
No. But you'll need to change the paths in Object Builder and / or config
I've done that but Im still getting a grey stroke effect along the edges
First day message for me in here haha
Ive learned about addon prefix https://community.bistudio.com/wiki/Arma_3:_Creating_an_Addon#Addon_Prefix and fixed it
that people arent able to open the mod. Now they are receiving the model but no texture.
I followed the problem and gues that its caused because Im still using the original path in my Blender before exporting with ObjectBuilder/ ToolBox.
Do I also have to type in the prefix\path in there to "transfer" the .rvmat path?

Yes
Do I also have to do the same with the surface_sound texture?
That would also mean that I have to pack that into the final.pbo so the user download it -> would make sence

a3 PBO is always there. Even if you don't pack into. Is that you ask
I think Ive left some informations for you. It was unfair from the beginn haha sry
Z:\ is my mikero drive. Thaths where Ive took the surface_sound texture for making the right stepsounds
Do I have to create a folder in my P:\Prepared.pbo that contains the texture_sound and link it via prefix in the Blender file?
what is Mikero drive??
what
what
how
the "workspace" ?
does not compute


Is that wrong?
yes