#arma3_model
1 messages · Page 23 of 1
 stuck oyster
invalid geometry lod
no component names, no mass on component parts, non convex parts are the typical issues
or its too big
 finite stump
size matters on a geometry cube?
stuck oyster
size of the model might matter. 
but only if its 50m+
just wanted to list all the "common mistakes"
finite stump
Well none of the geometry blocks are that big
they all have weight too
its a building so how much weight should I put for it? I set it at 30000.
 pseudo elbow
Anything I can do to OB to stop it from rotating camera too much?
When I hold left Alt and RMB to rotate the view, it moves very little, but if I move the mouse more, it does 180 degree rotation, very annoying
Tried starting it in Windows 7 compatibility mode, didn't help
Oh, this happens because of HiDPI in Windows
Guess I gotta live with blurred lines then
Okay, rotation works better now but it still jumps 180 degrees if you do much rotation
Not exactly 180, but a lot
 runic plover
finite stump
Well none of the geometry blocks are that big
runic plover
finite stump
Well none of the geometry blocks are that big
The whole Geometry LOD should not be over 50m+ .
Not a single block/box alone.
Means if you do 10x 5m boxes you reach the 50m
If you do 14x 5m boxes you reach 50m + 20m and probably the last 20m wont work, it depends sometimes at grid size of terrain and also rotation/direction of the structure.. sometimes 70m works sometimes not, its a bit weird/misterious and is a 20+ years feature 
Like HG has said
- Component01, Component02 etc
- Needs to be convex
- Mass (you can set 10000000 as example)
finite stump
Thanks, I will redo all my LOD's with more smaller blocks and see if that works
runic plover
Just dont go over these 50m+ with all blocks.
Its not a problem if you do one single 50m x 50m block
finite stump
just to be sure, we are talking length and not volume right?
What if I use multiple geometry lod's?
 west haven
I seem to be getting a strange shadow issue with this, anyone know what the cause is>?

 west haven
okay, it appears to be the normal map and SMDI causing this?
okay, it's the NOHQ file causing the weird lighting issues
 marsh canyon
Quite not sure how wrong it is. Can you show me how it looks in OB?
west haven
the normal map?
marsh canyon
No, the model itself?
marsh canyon
Not Buldozer inb4 you post

 marsh canyon
Can you enable the solid face (purple-white faces)?
marsh canyon
This solid box
 west haven
like so?
 marsh canyon
Well what I was wondered was pretty much wrong
Can you show the pic that what is supposed to happen? (I mean how it look in source)
west haven
oh, like in game or
marsh canyon
Not ingame
west haven
I don't really have access to the source image but really the nohq is supposed to just make everything look a little deeper

here it is in substance painter, as an example
marsh canyon
Do you export the P3D with Blender?
west haven
I put it into the same folder as the blender one, open it in OB and then save the OB one as the one that goes in game
marsh canyon
Open how? 🤔
west haven
as in, i bring OB up, open the exported .p3d and then save it as the one that goes into my addon folder
I had some fuckiness when i was putting a rocket launcher in-game so i did that and it seemingly solved the issue so i've not really gone back
marsh canyon
Do you export the P3D with Blender?
So you do?
west haven
yeah
marsh canyon
Check Blender > Addons > ArmaToolBox's preference
west haven
 marsh canyon
Hmm I was wondered if your o2script path is invalid, but seems like not
What happens if you apply no RVMAT into your rifle?
west haven
i tried with no rvmat and it was fine, just nohq results in strange lighting
but the SMDI seems fine to implement
both SMDI and NOHQ

neither

just NOHQ
 marsh canyon
Oh I see
west haven
and just SMDI
 marsh canyon
How does your NOHQ look?
west haven

looks fairly standard, although it is a thicc boy image. My friend who knows more about textures helped me out on this one
west haven
as in, in the rvmat just have the basic one the game set up?
marsh canyon
More like change your RVMAT's NOHQ into a vanilla game NOHQ
west haven
Oh
I could try and use the MX one
but I'm unsure how to grab the file path for that one
marsh canyon
"a3\weapons_f\Rifles\MX\data\XMX_Base_nohq.paa"
west haven
cheers
okay, launching with the MX NOHQ now

it looks bizarre but otherwise functional?
marsh canyon
Yeah pretty much expected result
west haven
So would that mean an issue with the NOHQ itself?
marsh canyon
Could be, 98% sure
west haven
I'll try again with this NOHQ file
marsh canyon
I think I'm thinking that a bit depth issue
marsh canyon
Maybe
I don't really recall which depth is not accepted by Arma 3 but you can look up this Discord about similar discussion
Or, just in case, do you put _nohq.paa suffix before you convert?
 marsh canyon
Properties, which bit depth?
west haven
32
marsh canyon
Try 24
west haven
okay, I'll see how i go after one more try with this
hmm, is there a program i can change the bit depth with? GIMP and my copy of photoshop don't let me
marsh canyon
Don't you use Substance Painter? I recall there is an option upon you export
west haven
Oh, my friend used the substance painter for that so I don't have the original project file but i do have it, is it possible for me to edit that with just the nohq?
marsh canyon
Maybe GIMP can?
http://gimpchat.com/viewtopic.php?f=8&t=13409
Not quite sure if this is good info now
GIMP Version: 2.8.14 Operating System: Windows GIMP Experience: New User How to change image 24bit rgb to 8bit rgb on gimp ? i tried to ...
west haven
I'll give it a shot
... I just tried to use my photoshop to change it to 16 and now it's 64
marsh canyon
Maybe it does mean 16 per RGBA
west haven
okay, trying the gimp method now
okay, got a bit depth of 8 now
but now texview 2 doesn't like it
marsh canyon
#arma3_texture message
Tried to dig the server
west haven
oh my god
marsh canyon
Possible same with NOHQ
west haven
i found a program that can give it 24 bit depth
fucking paint.net
me throwing several image editors at this to get it to the right bit depth

seems to still result in strangeness

I'll try and make the SMDI 24 bit too and see how that goes
marsh canyon
Before that I'd suggest to make an empty SMDI (aka procedural SMDI)
west haven
I did try that, the NOHQ was the problem since with the procedural SMDI it was still unhappy
west haven
I'm gonna try both with 24 bit
and then i gotta go somewhere but honestly cheers man
you're a huge help in this
it still seems to persist but now I can start trying to go from here, cheers man

I also gotta figure out why my model.cfg isn't working but that can come after
 subtle bison
out of curiosity, is your green channel in the nohq inverted?
runic plover
Looks for me more like a SMDI problem or AS problem.
Probably post your rvmat and your texture as pic to see if everything is alright. Goes quicker
runic plover
west haven
here is the original
This looks good what i see
SMDI and rvmat edits do a lot with your normal map
Also im checking such mostly in the Bulldozer and editing shortly the rvmat file in texteditor to see whats happening instead everytime ingame
west haven
Ah okay ill see how they look when i get home, im out rn
And im not too familiar with OB
subtle bison
west haven
How could i find out
if you didn't do it, it's not inverted
a3 needs the green channel inverted
west haven
Ah okay
What program can i use for that
Also i have foolishly realised i have some gaps in the model i didnt account for
west haven
okay
rvmat and texture
class StageTI { texture="#(argb,8,8,3)color(0.5,0,0,0,TI)"; }; ambient[]={1,1,1,1}; diffuse[]={1,1,1,1}; forcedDiffuse[]={0,0,0,0}; emmisive[]={0,0,0,1}; specular[]={.90,.90,.90,1}; specularPower=55; PixelShaderID="Super"; VertexShaderID="Super"; class Stage1 { texture = "MARS\Rifles\MARSC\Data\MA_21_NOHQ.paa"; uvSource = "tex"; class uvTransform { aside[] = {1,0,0}; up[] = {0,1,0}; dir[] = {0,0,1}; pos[] = {0,0,0}; }; }; class Stage2 { texture="#(argb,8,8,3)color(0.5,0.5,0.5,0.5,DT)"; uvSource="tex"; class uvTransform { aside[]={1,0,0}; up[]={0,1,0}; dir[]={0,0,1}; pos[]={0,0,0}; }; }; class Stage3 { texture="#(argb,8,8,3)color(0.0,0.0,0.0,0.0,MC)"; uvSource="tex"; class uvTransform { aside[]={1,0,0}; up[]={0,1,0}; dir[]={0,0,1}; pos[]={0,0,0}; }; }; class Stage4 { texture="#(argb,8,8,3)color(1.0,1.0,1.0,1.0,AS)"; uvSource="tex"; class uvTransform { aside[]={1,0,0}; up[]={0,1,0}; dir[]={0,0,1}; pos[]={0,0,0}; }; }; class Stage5 { texture = "MARS\Rifles\MARSC\Data\MA_21_SMDI.paa"; uvSource = "tex"; class uvTransform { aside[] = {1,0,0}; up[] = {0,1,0}; dir[] = {0,0,1}; pos[] = {0,0,0}; }; }; class Stage6 { texture="#(ai,64,64,1)fresnel(0.4,0.2)"; uvSource="tex"; class uvTransform { aside[]={1,0,0}; up[]={0,1,0}; dir[]={0,0,1}; pos[]={0,0,0}; }; }; class Stage7 { texture="a3\data_f\env_land_co.paa"; useWorldEnvMap="true"; uvSource="tex"; class uvTransform { aside[]={1,0,0}; up[]={0,1,0}; dir[]={0,0,1}; pos[]={0,0,0}; }; };
and as for my three textures (currently
NOHQ

and the main colour file itself

SMDI
 marsh canyon
SMDI doesn't look good
west haven
oh
marsh canyon
Usually it does look red/magenta
west haven
what's wrong with it you reckon
fair, it does on my rocket launcher and i kinda thought it might
marsh canyon
west haven
gonna try and do just nohq now and see what happens given its now on 24 bit channel
also i need to tweak my model because there's gaps in the stock plate lul
slight oopsie there

yeah i think the issue is with the NOHQ, I tested it with just that and still had the same issue
okay, i inverted the green channel and that seems to have done nothing
 fervent geyser

So i tried looking at the tank test samples
But what are these for and what do i need to add from my model
fervent geyser
Can i just copy it over from the vanilla tests and move it to my location
subtle bison
yes
fervent geyser
Alright thanks
runic plover
west haven
SMDI
Doesnt look right
Also you should add a AS aswell (AO)
west haven
You reckon that would help with the weird shading issue?
runic plover
Yes if your smdi is right it should, AS does also do its job better
west haven
Okay, I'll see about my friend fixing the SMDI, and adding an AS
runic plover
If he does in Substance Painter, there are Arma tools for that
west haven
Yeah he does, he handled it because i was away from home at the time
stuck oyster
fervent geyser
So i tried looking at the tank test samples
This is not sample tank. Where is it from?
fervent geyser
So my tank has addon armor so should by physx geometry follow the base model? Where do i add the physx geomtry for my addon armor

 fervent geyser
stuck oyster
This is not sample tank. Where is it from?
fervent geyser
stuck oyster
This is not sample tank. Where is it from?
Thats my leopard 2 model overlapping the sample tank
stuck oyster
If you study the sample tank separately you can see how different lods align with each other.
stuck oyster
Arma3 game model is built from multiple layers called Lods
So you will also need to build all of those
fervent geyser
Basically lods are a less poly version of the main model right
Viewed from far away= lower poly
west haven
yeah
stuck oyster
Those would be the resolution lods
west haven
you can probably get away with hitting it with a decimate modifier
fervent geyser
Oh thats not the LODs u r referring to?
stuck oyster
But there are also technical lods like geometry, shadow, memory
That serve different purposes
fervent geyser
Icic but about vehicle attachments, detachable armor plates
since i only see one LOD for physx geometry which i assume would be for the entire base tank
fervent geyser
Oh its not possible to remove and add parts onto vehicles in arma?
stuck oyster
But it's not separate attachment
stuck oyster
fervent geyser
Oh its not possible to remove and add parts onto vehicles in arma?
Only through hiding, u hiding them
stuck oyster
fervent geyser
Oh its not possible to remove and add parts onto vehicles in arma?
I have to ask, havr you played the game 😅
fervent geyser
All i saw was liveries
stuck oyster
What you see in game is what you can do in mods
fervent geyser
Yeah some parts u can hide
I think ill just make 2 separate tanks so the armour values are more accurate
stuck oyster
fervent geyser
I think ill just make 2 separate tanks so the armour values are more accurate
This is how up armored variants typically are handled yeah
west haven
oh also as a silly question, do i need some kind of cube or something on the original model to function as a magazine?
stuck oyster
west haven
oh also as a silly question, do i need some kind of cube or something on the ori...
No, magazine proxy would just mark the position of the magazine. However for animation testing purposes some placeholder shape can be useful
That would be removed later
(for testing in Buldozer)
west haven
yeah cause right now none of the things on my gun are animating at all lmao, and right now the accursed permanent muzzle flash is back
stuck oyster
your connection to model.cfg is not working then
pseudo elbow
So I have setup my P: drive with all game assets unpacked there into proper directories. My model uses existing game .rvmat yet BIS's Binarize complains Cannot load material file a3\structures_f_epb\items\documents\data\poster_01.rvmat
Model ends up seemingly without material (its file path is found inside compiled p3d)
I wonder what I can do here or if there is another way to compile my model
fervent geyser
Whats the diff between shadow 1 and 2 and tbh can physx basically be the same model as the shadow model
stuck oyster
distance when they are used
and no physx and the rest of the geometry lods have specific requirements
stuck oyster
pseudo elbow
So I have setup my P: drive with all game assets unpacked there into proper dire...
did you use binarize straight or addon builder?
pseudo elbow
stuck oyster
did you use binarize straight or addon builder?
Straight through command line
Also trying having binarize in P: directory, no change
Model binarizes but lacks material in game
Looks fine in bulldozer
fervent geyser
stuck oyster
distance when they are used
oh?
specific requirements
is there a page with the infos for each lods
stuck oyster
fervent geyser
thanks
stuck oyster
pseudo elbow
Model binarizes but lacks material in game
does it lack the texture or the material or both?
pseudo elbow
stuck oyster
does it lack the texture or the material or both?
I use procedural textures for flat color, its there
Material seems to be missing
stuck oyster
does it error in game?
pseudo elbow
In my previous model iteration I had the material if I used unbinarized model, but it was barely there (only on some faces) if binarized, now I don't have it in either non-binarized or binarized

 stuck oyster
I dont really have much experience packing the way you do it now. its long ago since I started using mikeros tools and pboproject to pack my pbos because it just handles stuff for me.
stuck oyster
pseudo elbow
Bulldozer vs in-game
yeah the material does not seem to apply
pseudo elbow
Maybe binarize ignores\strips UVs somehow?
pseudo elbow
stuck oyster
I dont really have much experience packing the way you do it now. its long ago s...
Couldn't figure out how to use it, "Crunch" is always inactive  even with dummy
 config.cpp in the root of source directory
stuck oyster
that means the rest of the tools package is not installed I think
it requires few other so simplest to install the whole set
pseudo elbow
I think I have it installed properly, it even checks for updates when you run it after some pause (very annoying)
west haven
stuck oyster
your connection to model.cfg is not working then
I sorta thought so but i dunno how to connect em lol
stuck oyster
if you look at the samples you can note the classnames for things in cfgModels match with the names of the p3d in the folder
that is the connection
fervent geyser
For firegeometry we can validate it in object builder can we do the same for shadow geometry?
pseudo elbow
stuck oyster
😅 mine just starts
Built with pboProject, same picture
Also changed flat procedural texture to co instead of ca, no difference
stuck oyster
pseudo elbow
Built with pboProject, same picture
pboproject did not complain about missing files though right?
pseudo elbow
stuck oyster
pboproject did not complain about missing files though right?
Doesn't seem so
So, I used another material and it IS visible now
Still different from bulldozer preview
So I guess its something about material itself?
stuck oyster
pseudo elbow
So I guess its something about material itself?
tested and it should work

the effect is rather subtle sure but its there
pseudo elbow
🤔
Can you send me a source model so I can try to binarize it and see what happens?
I guess its same material + proc flat color too?
 pseudo elbow
21:10:29: Convert model p:\models\xmas\tempTestThing_01.p3d -> p:\models\xmas\out\tempTestThing_01.p3d
21:10:29: <model = "p:\models\xmas\tempTestThing_01.p3d">
21:10:29: Cannot load material file a3\data_f\default_super.rvmat
21:10:29: Cannot load material file a3\structures_f_epb\items\documents\data\poster_01.rvmat
21:10:29: Cannot load material file a3\data_f\penetration\void.rvmat
21:10:29: Warning: 'p:\models\xmas\temptestthing_01.p3d': LODs not ordered by face count 0 (1): 12 faces < 1 (2) 24 faces
21:10:29: </model>

Identical result with both Binarize and through pboProject
So it is my model compile process not working then
stuck oyster
looks like it
pseudo elbow
Doesn't work if I spawn in non-compiled model too, same flat color
I use createSimpleObject btw
Can you createSimpleObject your compiled model?
createSimpleObject ["...\tempTestThing_01.p3d", player modelToWorldVisualWorld [0,2,2]]

works
createSimpleObject ["TemporaryTestFolder\tempTestThing_01.p3d", player modelToWorldVisualWorld [0,2,2]]
pseudo elbow
pseudo elbow
Managed to have a custom texture on a simple object model inside mission file (no addons) through ui2texture hackery 

if only it had a material now
stuck oyster
aa mission file object is the goal? that is probably more tricky then yeah
pseudo elbow
Yeah, no addons environment
 cloud zealot
Is it better to make multiple resolution lods for buildings ?
stuck oyster
yes
cloud zealot
stuck oyster
yes
Thanks
 woeful viper
does anyone of you use a vertical mouse for cad/modelling ? Looking for one but most seem to have pretty poor sensors and i'd hate a lack of precision
 ember heart
urghh vertical mice are terrible :)
woeful viper
my hands hurt from the twisting of the wrist with a normal mouse after long usage, but from what i can see the vertical mouses on offer seem to be overpriced cheap plastic junk designed for 50yo's at a slow office job
ember heart
but they are just so awkward to use, I dont know why would you want one
woeful viper
reduced pain is a good motivation :)
ember heart
Carpal tunnel syndrome?
woeful viper
if that is the fancy name of the problem i have, i guess yes?^^
woeful viper
well he will tell me not to twist my wrist so much
 white oak
a good rule of thumb is to keep halving face count each lod until you're below 1000
woeful viper
its simple ergonomics really
ember heart
mk, just warning you that it might be more serious


 finite stump
Can you have multiple Geometry LOD's like you can have multiple Resolution LOD's?
marsh canyon
No
finite stump
darn. guess I got to break my building into pieces.
west haven
after some time tweaking the lighting and the like, it looks... Pretty good, I'd say

tweaking the position of stuff now too
marsh canyon
Doesn't look bad after all, nice work
west haven
thanks man, it feels like I've been through some arduous shit lmao
next is gonna be to make sure all the attachments and shit work, then likely the other textures, animations and then stuff like sound
marsh canyon
https://steamcommunity.com/sharedfiles/filedetails/?id=1923603532
I can recommend my Mod to replace VR lighting into Altis/Stratis one (shameless ad time)
 west haven
I might have to take you up on that offer
marsh canyon
For ease of load of terrain but checking the proper lighting
west haven
I also need to tweak the hand anim cause right now it's the MX one (after stumbling on the odd original MX one being a vertical foregrip?

I also need to point the fire selector too
marsh canyon
You can use Macser's ArmaRig #arma3_animation ... if you're not so unfamiliar with Blender that will do
west haven
yeah I used that when doing my rocket launcher (that i'm unsure of how to make a scope for so i took a break from that lmao)
so that's on the list after i figure out the anims and shit
for the model cfg
marsh canyon
model.cfg is not really hard to tweak/debug tho
west haven
yeah, it's still a bit of a mystery to me but i am very tired and I'll work that out tomorrow
marsh canyon
... If you're a coder 🙂
west haven
gonna be honest with you
all i know to do is copy what the funny arma 3 config file is and i generally have to process of elimination my way to success
one time it took me an hour to find a single missing };
marsh canyon
Yeah it's bad to have both artist part of your brain and coder part of your brain in order to manage everything. I mean it cannot be avoid to make a modding for any game
west haven
Yeah pretty much
my experienced friend pointed out the file mismatch pretty much immediately after checking it
but for now, i shall go to bed because it is nearly 7am
 west haven
i do work night shift so
this is me winding down from work lmao
tomorrow I'll try and do the config
 mossy mulch
marsh canyon
https://steamcommunity.com/sharedfiles/filedetails/?id=1923603532
I can recommen...
mossy mulch
marsh canyon
https://steamcommunity.com/sharedfiles/filedetails/?id=1923603532
I can recommen...
was literally looking for something like this today i love you
 gusty parrot
im getting this error when importing the sample plane from arma 3 samples in blender using the arma 3 toolbox:

only thing that was imported is this
 marsh canyon
I'd suspect o2script path?
marsh canyon
Addons, ArmaToolbox, setting there
gusty parrot
do i put path to O2Script.exe or something else
marsh canyon
Yes
fervent geyser
Hi guys im wondering if there any any modern tank interior samples we can use to take reference to make my lods and vertices sth like the MBT 52
stuck oyster
fervent geyser
Hi guys im wondering if there any any modern tank interior samples we can use to...
Nope, typically model makers use image references they find on the web (if any can be found)
fervent geyser
As in regarding the LODs
I heard after tank DLC the fire geomtry / hitboxes was revamped
So it isnt quite the same as the one under sample tank so i would like to take a look at more examples eg that of the new MBTs
is there any other samples for tanks available
 obtuse rain
Wacom's put your hand in a different position too.
stuck oyster
fervent geyser
is there any other samples for tanks available
No the sample one is the only one. It should work as a reference though.
There is a wiki page about damage modeling you can also read
 stuck oyster
wee 
west haven
I figured out why the anims werent firing aand it was a skeleton issue
Ive been able to tweak the magazine location too so now itll be geting the alternate colours working, maybe repurposing the Promet 5.56 mags for this, the hold anim, tweakingit all so it linesnup and then sounds
white oak
Halving face count until you end up with less than 1000
Which somewhat translates to what HG said
5 lods takes you from 20k to 1250
On blender you can take the lazy route of stacking 0.5 Decimate modifiers
stuck oyster
The couple of last lods can be reduced more heavily too
But 50 reduction is good rule of thumb
white oak
I wonder if I should replace all my models with the high poly versions as an experiment see how the game likes it
stuck oyster
Fps festival
pseudo elbow
Well, I re-set P: drive through Mikero tools, now its also on C: instead of D:, but I still get same picture, binarize complains about materials, pboProject doesn't complain yet still no materials work in game
What else can I try?
stuck oyster
can you try putting the material and possibly textures into the mission file too?
pseudo elbow
Build same path structure inside the mission?
stuck oyster
well does not need to be same but just have the files and rvmat pointing to the files in the mission
pseudo elbow
Also just tried to binarize with C:\PDrive paths instead of P:\, no difference
stuck oyster
they might load together with the p3d
pseudo elbow
stuck oyster
well does not need to be same but just have the files and rvmat pointing to the ...
You can't have model textures and materials pointing to mission files sadly (that's why I needed ui2texture hackery to use mission texture)
stuck oyster
well technically mission folder should be treated as root in game paths right? you can use scripts and stuff form there too missionfolder\scripts\file.sqf is in game scripts\file.sqf
so maybe loading up the p3d from mission file could do that same
unless you already tested that and it just dont work
which is just as well possible. Missions are not exactly meant to contain p3ds as far as I know
pseudo elbow
Tried binarize instead of binarize_x64, no difference
Tried having p3d in the root of P:, no difference
pseudo elbow
stuck oyster
unless you already tested that and it just dont work
I tested a while ago, doubt it changed
Finally some progress, so I ran it as .bat file in the root of P: with binarize started with full path, and it worked now, no more errors
There is some material now, it is super faint, your test model still doesn't have any material
stuck oyster
🤪
pseudo elbow
 pseudo elbow
Finally some progress, so I ran it as `.bat` file in the root of `P:` with binar...
pseudo elbow
pseudo elbow
Finally some progress, so I ran it as `.bat` file in the root of `P:` with binar...
(no difference with pboProject)
Tried binarizing materials by these paths, no difference
white oak
pseudo elbow
Also just tried to binarize with `C:\PDrive` paths instead of `P:\`, no differen...
Are you packing the mission folder with pboproject?
pseudo elbow
white oak
Are you packing the mission folder with pboproject?
No, mission file isn't packed at all
Simply running it in MPMissions directory
@stuck oyster For the sake of complete-ness, can you send me that test object you did in binarized form please?
So its not a case of mission p3d not running right
stuck oyster
pseudo elbow
<@150949769953411072> For the sake of complete-ness, can you send me that test o...
binned
pseudo elbow
stuck oyster
binned
 stuck oyster

tha shading of the normalmap pops out better when its not noon
but yeah looks like the rvmat dont get loaded in your case there
if you want nice looking boxes I suppose one alternative is to model the wrinkles and such on the model 😅
with good lodding it should still work out alright
pseudo elbow
stuck oyster
if you want nice looking boxes I suppose one alternative is to model the wrinkle...
Thought about this too, gonna add it through texture
pseudo elbow
stuck oyster
but yeah looks like the rvmat dont get loaded in your case there
What's strange is that materials were there, just super faint on my model, none on yours on the other hand
No idea what is going on
stuck oyster
unknown waters for me too im afraid. 😅
 white oak
Arma

 stuck oyster
🎁
woeful viper
but they are pen/pressure tablets, not a mouse
pseudo elbow
Decided to add shadow volume, pretty much 2 boxes for body and lid, getting:
Selection close needs a section. The shadow volume may not work well.
```Can't google this error 🤔Works alright though
Doesn't get shaded in the shadow but I'll take it


 white oak
pseudo elbow
Decided to add shadow volume, pretty much 2 boxes for body and lid, getting:
```...
white oak
pseudo elbow
Decided to add shadow volume, pretty much 2 boxes for body and lid, getting:
```...
Visualex my beloved
white oak
I always wondered if its viable to define weapon parts as different selections so that it would be possible to mix and match camos with the help of ace arsenal extended
I don't really work on guns myself so feel free to take the idea and run with it
stuck oyster
white oak
I always wondered if its viable to define weapon parts as different selections s...
very unfriendly method for performance
making variants is very slippery slope into overdoing it
white oak
well thats where the aceax comes in, or at least I think it would
aceax doesn't need to have the all the variants afaik, it uses the hiddenSelectionTexture to do the mixing
so you only need the 4 or so colour variants and have the players do the mix&match through the arsenal
 fluid copper
Im pretty sure its possible. Ace doesnt actually do the mix and matching though, you have to define a class for EVERY possible combination, and then you tell ace which class to show for each combination of options. Its incredibly tedius and results in huge configs
Would also mean that there is a different weapon class for every gun camo combination 
west haven
okay so weird ish question i guess but
idk if this should go in anims or here but I'm using the SPAR-16 one and

should i shift the magazine down a bit so it lines up better? it's just the axis memory dot to do that iirc
(don't mind the sticker)
stuck oyster
omg this is turning into counterstrike now 😄
but your weapon probably wont fit completely to the spar animation as your magazine well probably aint in same position
your magazine should animate directly down from the magwell
and you will need custom character anims
west haven
the magazine seems to do fine, right now i think the main issue is the bolt moves forward before he hits the "bolt release"
to be honest I don't know anyone who can do animations and doing it myself would likely drive me insane
is this a question i should ask here or in anims for the model.cfg thing
stuck oyster
west haven
is this a question i should ask here or in anims for the model.cfg thing
its alright here too but youll have to experiment with it as long as you learn to do it 😅
west haven
yeah, i mean more in the case of uhhh
what the values are and which one i should even look at
I'm guessing it's bolt 2 but I've never even seen one of these that closely
 stuck oyster
personally Id clear all of that
and add things one by one
as you right now its too much for you to process
which is the problem of copypaste when you dont properly know what you actually copy paste
west haven
from the sample?
stuck oyster
west haven
from the sample?
?
west haven
this is just the sample animation file
stuck oyster
yes dont use it 😄
you can look at if for reference
but build your skeleton and animations from 0
so you learn how it works
the whole setup copypasted is too much to understand at one go
west haven
hmm, is there a wiki page or anything that goes over it?
stuck oyster
we do recommend modding when well rested 😄
fluid copper
You mean I shouldnt mod while im sick with covid...?
stuck oyster
correctomundo
 real crow
If the tank i ported struggles in steering and going over even the smallest of the rocks, then what problem is it? Physx? Or the actual mass i gave into the geo lod? Mass is 53 tons btw
white oak
Bad landcontact lod perhaps
Also a tidbit, arma has weight in imperial units afaik
real crow
white oak
Bad landcontact lod perhaps
Also a tidbit, arma has weight in imperial units afa...
Mm, land contact points are set to the outer edges of the inner parts of tracks
Should they be set to the middle then I suppose
Imperial units
Wattahell is that
I thought it was kg
Ok
Maybe i found out why
Autocenter property was somehow in the land contact lod
stuck oyster
white oak
Bad landcontact lod perhaps
Also a tidbit, arma has weight in imperial units afa...
no its in metrics
this aint no murica
stuck oyster
real crow
Autocenter property was somehow in the land contact lod
that should not matter
but what might be going on is your physX spring mass cant support the vehicle and it drags on
also do you have separate physX lod and geometry lod made in same fashion as the sample tank?
real crow
stuck oyster
but what might be going on is your physX spring mass cant support the vehicle an...
Might be it because the tank is always inclined forward when in game. It looks ok in the editor, but not when it loads in mission
real crow
stuck oyster
also do you have separate physX lod and geometry lod made in same fashion as the...
separate geo physx lod yeah, with the tracks raised up, geometry literally taken from the sample and adjusted to my tank
via blender
stuck oyster
inclidned forward could indicate either your spring cant support the weight or your center of mass is too forward
you cant just take teh geometry from the sample 😅 it wont be set up for your tanks shape
real crow
Center mass looks centered, maybe it’s the spring, i need to fix the physx then. Why I choose to use the sample one? Wanted an easy win, it looked perfect for my tank, just scaled it a bit here and there untill it fitted perfectly 😂
Is there some math that need to be applied to adjust the springs in the physx? Or just an approximation/guess based on..(have no clue)
finite stump
Where are the sounds located for the Roadway layer so it sounds like concrete?
white oak
finite stump
Where are the sounds located for the Roadway layer so it sounds like concrete?
data_f/surfaces
finite stump
When I copy and paste a geometry block it doesnt make a new named selection but keeps it part of the one I copied. How do I make it seperate?
I figued it out
real crow
stuck oyster
you cant just take teh geometry from the sample 😅 it wont be set up for your ta...
Aight, i tweaked the mass and the springs in the physx, now it isn’t bent forward anymore but still it’s difficult for the tracks to properly collide and slide upon an object, so i’m going to remake both the geo lod and geo physx tracks only, is it the correct way, right?
stuck oyster
real crow
Aight, i tweaked the mass and the springs in the physx, now it isn’t bent forwar...
If I remember right neither of those geometry lods have the actual tracks in them.
real crow
In the sample tank there are 🤔
stuck oyster
Tracks don't really exist in the simulation, only the physx wheels that are generated by the config and memorypoints
stuck oyster
real crow
In the sample tank there are 🤔
Well follow the example
 charred bolt
There are tracks shown in the Geometry LOD, but they take no part in the physx calculations.
stuck oyster
👍
real crow
real crow
In the sample tank there are 🤔
Except the geo physx lod 🤦🏻♂️
charred bolt
There are often tracks modelled in the Geo Phys LOD too, but they are also not used in the physx calculations, and are modelled to have their lowest point above the max reach of the base of the real tracks, so just for grenade and other physx collisions (but not driving)
To get physx working for cars/tanks, you should concentrate on the Memory LOD and the config physx parameters, with the model.cfg animations matched in to make it look cosmetically correct.
real crow
charred bolt
To get physx working for cars/tanks, you should concentrate on the Memory LOD an...
Got it, specifically on what points or features should i focus on?
charred bolt
Model wheels in the p3d at 50% compression/droop.
Wheel axis points at centres, wheel bounding points directly below the centre on the base of the track.
naming, left side: wheel_1_1 (front idler), wheel_1_2, wheel_1_3 etc but rear sprocket is always wheel_1_9 regardless of number of wheels
wheel_2_1 etc on the right side
recommend using a common damper_axis in the Memory LOD of length 1m along the y-axis
then the maxCompression and maxDroop in config will be in metres (0.15m typical) and will match with the same numbers in model.cfg damper translation -0.15 to +0.15m for damper values 0 to 1
Set sprungMass on main drive wheels equal to the Geometry LOD mass/number of weight bearing wheels
For a tank, set dampingRate and dampingRateInAir to the same value by experiment, with small numbers making it go faster, and larger numbers, slower.
Use the dev branch diagnostic.exe to run the EPEVehicle data output, allowing you to monitor the engine RPM and gears to help with tweaking engine horsepower, torque curves, transmission ratios.
real crow
Alright, thanks 🙏🏻
stuck oyster
It is rather complex thing to make vehicles right XD modeling is just half the fun
 bright echo
tanks especially are a pain
real crow
HG was right on the center of mass too, it is in a forward position in respect to what its somewhat geometric center should be
real crow
bright echo
tanks especially are a pain
I would request mental health support to BI for this
real crow
real crow
HG was right on the center of mass too, it is in a forward position in respect t...
i can't manually move it right? Or can i?

 livid canyon
real crow
livid canyon
real crow
You can try to shift mass between verts, or put most of mass into 4 small cubes like in sample helicopter.
real crow
livid canyon
You can try to shift mass between verts, or put most of mass into 4 small cubes ...
That’s why the sample tank had those 4 small cubes. Now i get it
real crow
livid canyon
You can try to shift mass between verts, or put most of mass into 4 small cubes ...
Shift mass between verts? First time hearing it, let me google it
livid canyon

Imgflip
 real crow
Just saw that mass wasn't distributed to turret and barrel for some obscure reasons
remade the whole thing
i hate arma ptII
charred bolt
I'd recommend you put 3/4 of the mass into the 4 virtual gravity boxes, but don't assign ComponentXX selections to them.
The other 1/4 of the mass auto assign to the model mesh with ComponentXX names. Each component must have mass or it won't collide with non-phys objects (predominantly people).
real crow
charred bolt
I'd recommend you put 3/4 of the mass into the 4 virtual gravity boxes, but don'...
Alrigth, i will try that. Currently tested the tank with new damper axis, land contact, wheels axis and bound memory points. Improved for sure, but still if the obstacle is too “high” or to steep to climb, the tank will collide. So might be a geo lod issue too at this point? Also it flipped now easily, something that didn’t occurred before. I will try this 4 boxes method 👌🏻
Yep, definitely cursed

 charred bolt
Check where you put the bounding memory points for the idler and sprocket wheels - shown with arrows on screenshot.
 real crow
I put them slightly out the tracks.., same position and height as you showed
I can see they seems to be within the tracks
west haven
I dunno if this should go here or not but what is the game complaining about?

it's like, I don't have the other set for the optics and shit? How do I even make those>?
west haven
Do i need to make one for the scope and all of that to have this work
real crow
Or you can just leave it blank in the ui path, as “”
real crow
As blank space within the commas or wathever you call them in english
real crow
west haven
PictureUi?
Ye this one should be
west haven


it's still throwing a tantrum
like, I don't get it
I give the game the file it wants
and apparently it's still unhappy?

 hollow fulcrum
yeah, part of the reason i use a tablet so much (even when modeling), i broke my good arm when i was young and the doctors just simply couldn't set it back straight. no carpal, but pain relative to long mouse usage is for sure. still use it quite a bit, but mostly tablet. would like something 'new and cool'.
 frozen oriole
Does anyone know how the too many vertices and too many faces messages work? I've had a model at 30K work fine but I just tried to convert a model that has 23K verts and 21K faces but I'm getting the too many vertices error? I know that shading can had an effect on this but I was wondering if anyone could explain it in more detail? Thanks
 white jay
When exporting to FBX via object builder the mesh gets seperated like this and not like this in object builder, how do i export it properly?

 real crow
If i want to avoid my tank crew to turn out in any circumstances (because my model misses all the hatches except the commander one) what parameter should i tweak in the config?
real crow
 twilit seal
This is the way I know, it doesn't properly link but it's under `ForceHide...`
twilit seal
This is the way I know, it doesn't properly link but it's under `ForceHide...`
Nice, thanks 🙏🏻
stuck oyster
white jay
When exporting to FBX via object builder the mesh gets seperated like this and n...
Why do you export fbx from OB 🤔
white jay
stuck oyster
Why do you export fbx from OB 🤔
wanna edit the mesh in blender
should i export via some other file type?
 pallid cape
you can import/export p3d from blender via https://github.com/AlwarrenSidh/ArmAToolbox
GitHub
Arma Toolbox for Blender. Contribute to AlwarrenSidh/ArmAToolbox development by creating an account on GitHub.
white jay
pallid cape
you can import/export p3d from blender via https://github.com/AlwarrenSidh/ArmAT...
tried but i want to seperate the objects by these and not by material


it does fix the shading issues however
white oak
named sections go under the vertex groups window in blender
white jay
white oak
named sections go under the vertex groups window in blender
thanks
stuck oyster
white jay
wanna edit the mesh in blender
Where's the mesh from?
white jay
stuck oyster
Where's the mesh from?
niarms minimi, will just be editing the handguard into a very phallic shape for personnal use.
 dim mica
What command makes the object vanish when its fire upon, like with a tank round? with out rubble/ruins
stuck oyster

west haven
 twilit seal
Maybe APL-SA was a mistake
 last spindle
@woeful viper Try a trackball, takes time getting use to, but the thumb is much more flexible than the wrist, with practice can be as good as a normal mouse
white oak

sometimes you look at the result and go maybe it is worth it
then you look back at Blender/Substance again
white oak
My fortress set, has full snapping
last spindle
@frozen oriole I tried to find this reference textbook from like 2000, but can't remember it's exact name but it explained it perfectly. Hard edges, UV edges, material changes all affect the count, with 3ds max you can use 'Gamefomizer' the calculate roughly the REAL vertex count
frozen oriole
Okay thanks, do you know if there is a Gamefomizer or something similar in Blender?
mossy mulch
am i correct in the assumption that multimat just refers to using multiple rvmats on the same thing
stuck oyster
multiple texture sets within a single rvmat
4 to be exact
4 sets of _CO _NOHQ _SMDI
controlled by RGB-Black mask
@mossy mulch
mossy mulch
ah thanks
(i have no clue what that means but im just going to keep using multiple rvmats on the same p3d)
mossy mulch
yes we are using supershader but we have part of the gun unpainted and part of it painted
so are using 2 rvmats with differing specular powers
stuck oyster
yes that is fairly normal
mossy mulch
do you know what the performance of that is like perchance
stuck oyster
well each rvmat is its own drawcall adding to the scene complexity
there is no studies of singular rvmats impact
but the more you have the more straining it is
mossy mulch
so basically just dont go ham on it
stuck oyster
you can already do a lot with just 1 and good use of specular power and SMDI texture to control the specular power between matte and shiny parts
typically I think painted metal surfaces should work alright with just 1 rvmat
mossy mulch
ya we already tried that but it looked pretty meh
stuck oyster
but if you want the kind of chrome effect etc, that needs its own rvmat
mossy mulch
good on livonia lighting but thats about it
stuck oyster
(mod map lightings may be total bonkers)
mossy mulch
precisely
stuck oyster
livonia is pretty decent
mossy mulch
it may be a pretty bad policy but we try to make it look good in vr lighting so it looks good in 99% of lighting
its worked out so far
just got a few guns recently that have unpainted sections which are causing some annoyance
mossy mulch
precisely
stuck oyster
but also many mod maps are crap 😅
mossy mulch
if it looks good in crap lighting it'll look good anywhere 🙂
stuck oyster
perhaps
mossy mulch
its worked so far
stuck oyster
west haven
do magazine models need any other LODs or are they just fine as-is
if its very simple then one can be enough
as in sub 500
but even then distance lods wont hurt
west haven
fair
friend gonna do a magazine specific for my rifle and we're trying to puzzle out what is needed
bullets disappearing when the mag is empty is a big maybe tho
also weird question but does the distance between usti and konek hlavne memory points affect muzzle velocity?
finite stump
Anyone else have problems where when they import a FBX into OB, some of the textures are offset or wavy but not all?
west haven
cause I was reading the wiki about how the carbines have a lower muzzle velocity and I'm trying to figure out how they did that
west haven
finite stump
Anyone else have problems where when they import a FBX into OB, some of the text...
it may be a scale issue, but apart from that I'm not sure
stuck oyster
finite stump
Anyone else have problems where when they import a FBX into OB, some of the text...
uv mapping not done with model triangulated perhaps
and the triangulation messes it up
or just somehow broken uvmapping
bright echo
west haven
cause I was reading the wiki about how the carbines have a lower muzzle velocity...
initSpeed in the weapon config
finite stump
must be broken somehow.
 plucky depot
stuck oyster
thouhg something like ACE might use them for that
plucky depot
stuck oyster
thouhg something like ACE might use them for that
we dont
bright echo
In A3 this has multiple usages. positive values override magazine initspeed with the fixed number. Negative values act as modifier to the magazine's initispeed.
initSpeed = 1050; //overwrites magazine's value with 1050m/s
 initSpeed = -1.1; //multiplies magazine's value by +1.1
from: https://community.bistudio.com/wiki/CfgWeapons_Config_Reference#initSpeed.3D0
west haven
bright echo
initSpeed in the weapon config
oh shit okay, cheers
finite stump
The UV selection outline doesn't match what is on the object in OB viewer. The outline is correct in the UV editor but in the viewer it shows as if I have selected a larger area. Any ideas on why this is and how do I fix that is OB?
stuck oyster
finite stump
The UV selection outline doesn't match what is on the object in OB viewer. The o...
Always fix your source files
It's easier
finite stump
stuck oyster
Always fix your source files
The source files display it just fine
when it gets in OB, the textures go all wonky
finite stump
yeah on both those
finite stump
sorry, one uv, multiple textures
Everything is fine untill I get to OB. No matter how many times I rebuild it, it still acts weird
first image is in the viewer and the second is in the UV editor. You can see the UV editor is setup where it should be but the viewer is acting like I selected a larger area.


 quick terrace
@frozen oriole - i have explained it so many times before
on bohemia forums than i simply can't do it once more
just search for polycount or max vert count or alike, there is a proper explanation given in at least 2 different threads
 karmic silo
When trying to place a holstered pistol proxy, is there a way to preview the holstered pistols location in object builder? I used to remember how to do it but I haven't been able to figure it out again.
stuck oyster
finite stump
first image is in the viewer and the second is in the UV editor. You can see the...
Too me it looks like it matches. I think you are over thinking this a bit.
If it works on dozer that's what it will be in game
finite stump
stuck oyster
Too me it looks like it matches. I think you are over thinking this a bit.
If i...
It doesn't match. The bulldozer version has the solid blue area which is only there for like a pixel and so it can be a square image. It defently doesn't match what is in Blender. (the attached image)
 stuck oyster
finite stump
It doesn't match. The bulldozer version has the solid blue area which is only th...
stuck oyster
finite stump
It doesn't match. The bulldozer version has the solid blue area which is only th...
Iim on mobile but to me it just looks the same
What does that mean?
Nope
Says nothing to me
Does it need a 3d model?
Well then you would make a new model for it. The rest is probably config magic to create the functionality.
If it is an existing mod you might be able to create your own derivate version that uses yhe existing one as required Addon and the your ne mod would add the changes on top (assuming it's licensed so that you can use it like that) . How that would be done exactly I got no clue. You would have to study the mod or talk to it's authors.
Sounds complicated
Dunno. But it's not really related to model making
😅
Well Arma models are basically in metric dimensions
But if you make ui interfaces you set up the draw sizes in your script/config
The model size doesn't really matter in that
You'll just have to try it out
Make some simple proof of concept and test it out
hollow fulcrum
lol i was so going to say @quick terrace is the guy to ask, but i didnt. :D
Just FYI for those curious, Quixel is officailly closing the beta trials. Release is hopefully within a week. ;)
Just checking the last list of patch foo.. think you guys are going to be stoked. The 3D painting is working splendidly now, some mapping issues regarding shaders sorted and yeah.. looking good. 👍
last spindle
It's toooo late http://i.imgur.com/SvyP8ft.png. finished it all in Suite 1.0.
Now I'm going to have to do it all again :-P
hollow fulcrum
yeah sorry man, i was chatting today specifically about you when i got the current intel. :P
looks great though!
they fixed the 8k painting in 3DO in todays build <3
white jay
anyone else here has any idea how to make an rpg rocket disappear when fired?
white oak
white jay
anyone else here has any idea how to make an rpg rocket disappear when fired?
hasmagazine and reloadmagazine in modelcfg combine it with hide/unhide
karmic silo
I'm still wondering if there is anyway to preview the holsteredhandgun proxy in object builder to aid in it's placement? if anyone knows it would be a great help
stuck oyster
karmic silo
I'm still wondering if there is anyway to preview the holsteredhandgun proxy in ...
Technically you can load any model as that proxy for placement and the change it's name to what it is now when you are done
karmic silo
So If I just proxy in a handgun? then swap the names it will work?
If so that's greats
marsh canyon
It should work prety much
 leaden ferry
hi guys. i have something to ask im new to this stuff. is there any way i can download 3d models from the game? and if its possible. can i do some adjustment to the model n reupload it?
marsh canyon
Nope
karmic silo
Any idea why this is happening? Without the holstered proxy the belt it placed perfect. however once I add the proxt it gets moved several feet to the back right?

 marsh canyon
Do you have autocenter?
karmic silo
Yes on my geo lod
marsh canyon
What is your top img? In Blender or something?
marsh canyon
Also how it looks in OB?
marsh canyon
Ah before and after the proxy

 karmic silo
including the main lod?
Oh shit
I didn't even realize it changed standby
Well it moved after I swapped it back to 0, I don't know when it changed. I guess I just have to reposition it
if there any good way to import that character model to use as reference for placement? or just it just not matter in OB?
marsh canyon
It's good to do in your model software
You really don't want to use OB except for very very last touch
 marsh canyon
Seems fine
karmic silo
I did, but still had to move it a ton in OB it seemed
marsh canyon
Does your vest obj in Blender has position than 0,0,0?
Not mesh, object
Rotation and scales too
 karmic silo
after I play with it in blender I usually export it as FBX then import to OB
marsh canyon
Just export as P3D
karmic silo
Only problem is I always get errors from blender when I do that
Hence why I gave up on doing most the work in blender lol
marsh canyon
What error
 karmic silo
Appreciate it, I'll try to figure it out
 terse elm
Latest wip, a bus station for my map http://i.imgur.com/BNuGkFo.png
stuck oyster
karmic silo
Appreciate it, I'll try to figure it out
Means you have to triangulate before export
white oak
karmic silo
Appreciate it, I'll try to figure it out
In face select mode do
Select > Select All by Trait > Faces by sides
Set it to greater than 4, it'll give you the ngons
Also quads are better than tris for shading
stuck oyster
white oak
In face select mode do
`Select > Select All by Trait > Faces by sides`
Set it to...
It's all tris in game eventually. And no quad is not better as it may split wrong way depending on engine/rendering and become wrong.
white oak
Tris occasionally throw off the baking process on substance/marmoset, especially on curved surfaces in my experience
 dusky peak
Hey guys I’m starting to start off with making arma 3 models and modding using blender but im quite unfamiliar with everything would anyone care to help me start off?
white oak
Are you learning blender aswell or just how to get your models into arma?
dusky peak
white oak
Are you learning blender aswell or just how to get your models into arma?
Well all around really but right now im trying to figure out how to turn my blender models into pbo files and also how to get the models into the game properly, I don’t want my vest to be in the ground and such. Im very new some id appreciate some starting help.
Just basically steps to put my models into arma
white oak
dusky peak
Well all around really but right now im trying to figure out how to turn my blen...
Unfortunately equipment isn't my forte
But for starters if you haven't already grab the blender toolbox from pinned messages and import the vest sample from arma samples (grab these from steam) import the p3d file to blender and have a look at the vertex groups of numbered meshes they'll show you how a model gets rigged/attached to the character skeleton
dusky peak
white oak
Unfortunately equipment isn't my forte
But for starters if you haven't already g...
Oh ok thanks
dusky peak
white oak
Unfortunately equipment isn't my forte
But for starters if you haven't already g...
But how should i pack the p3d from OB to pbo? To I just export it as pbo or smth?
white oak
dusky peak
But how should i pack the p3d from OB to pbo? To I just export it as pbo or smth...
right, appears I approached this a bit ahead
PBO is the final file that gets loaded into arma, everything gets packed to a pbo
you'll need to get a workdrive set up, head over to mikeros tools and grab the AIO installer
once that's installed that'll give you a program called Arma3P which will set up the workdrive
in the workdrive you collect the files you need into a folder, with a model that would be the p3d file which you can get from either OB or blender, the config file and the textures that the model uses
once you got all those you use the pboproject from mikero to pack the folder into a pbo
dusky peak
white oak
right, appears I approached this a bit ahead
PBO is the final file that gets loa...
Thanks a lot ,but I realised that blender dosent export with p3d format , is that a problem in my part or is there a way to do it?
white oak
blender toolbox adds p3d export
hollow fulcrum
very nice. whats the res0 count?
hollow fulcrum
https://gyazo.com/513334aa9dfc0d3a30cae1ce89dd206d whats interesting about the image is that it is straight out of 3DO2 ;)
yeah.. im fairly certain marmoset will fall out of the bag. (pun intended)
karmic silo
https://gyazo.com/5eb386fbd13877c15538e9790ee8314c Anyone know what I'm doing wrong? The muzzle flash just stays as a solid thing? Rather then only appear when firing. I haven't encountered this on any other guns i've done.
 marsh canyon
Do you mean it is your weapon, your P3D and your muzzleflash zasleh is showing even if the moment you pull the trigger?
 plucky patrol
Hi all , I am trying to remake a vechicle and I do not know why this time using the same Geo lods with the same mass volume with small adjusments and mem lod the vechicle is reaching the 500 km/h , and max speed in pshyx config is 60 ... . Any ideeas of where to investigate the issue ? Thanks
 white oak
HG does the models need the +x -y +z for normals like terrains do?
 shadow root
Id like to make variation of the MI-24. Where can I find some free MI-24 assets compatible with blender?
last spindle
It better not....
I just upgraded from a cracked copy to a real one :(
Any news on Megascans?
stuck oyster
shadow root
Id like to make variation of the MI-24. Where can I find some free MI-24 assets ...
Typically one would make a new model.
 pine acorn
Is there any way to retexture the A3 muzzle flashes? Currently making a blaster weapon & I'd like it to have a blue muzzle flash. Is it possible to edit color values in some config?
stuck oyster
pine acorn
Is there any way to retexture the A3 muzzle flashes? Currently making a blaster ...
no
you can make new muzzleflash objects though
pine acorn
I'll go with that then 👍
real crow
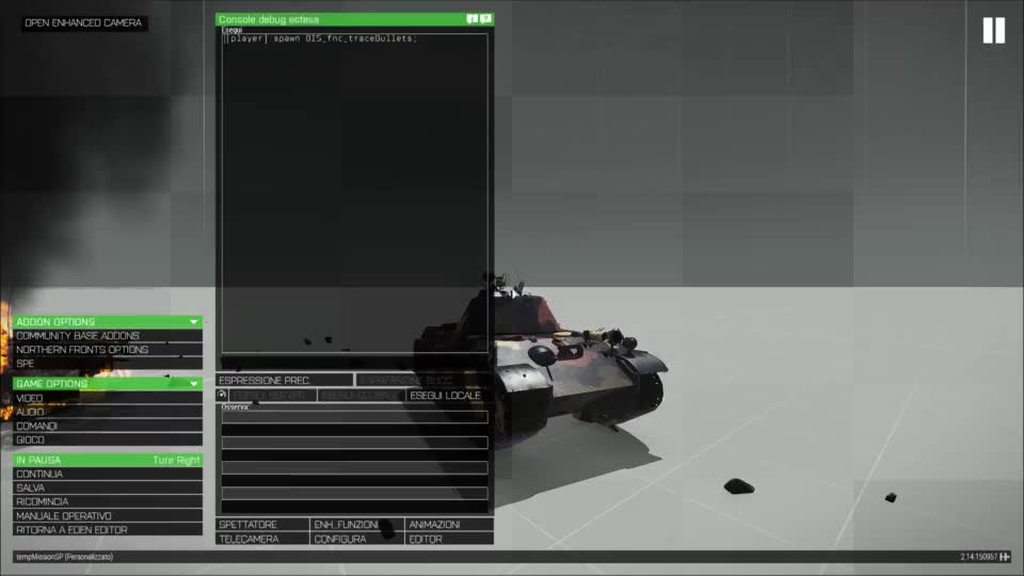
Hi fellas, i got a strange issue with my muzzle sparks. The sparks are off from where the muzzleflashes are. I'm talking about a coax hull mg and an mg turret hull, as showed in this clip, the muzzleflash flames are good to go, while the sparks are not where they should be (they seems to be tied to the turret for some reason, and also spawn at the same point, which isn't in a mem point position at all) https://imgur.com/a/OoLuHR5
 stuck oyster
your mem points dont match with the effect points defined in the weapon is my guess
real crow
stuck oyster
your mem points dont match with the effect points defined in the weapon is my gu...
Mm, so i should dive to check my config?
Btw, the guns are inherited from SPE but i guess that doesn’t matter to this
stuck oyster
no but youll have to figure out the effect point names
real crow
Damn, maybe Kerc can help me, i don’t want to ping him though, doesn’t look right to me
real crow
stuck oyster
no but youll have to figure out the effect point names
Now I remember i had this same problem on the helicopter gun inherited from GM some time ago yes
Thanks for lighting my mind bulb up
stuck oyster
💡
charred bolt
real crow
Thanks for lighting my mind bulb up
Find the class name of the weapon from the turret, then config search for class "weapon_name", and look for child class GunParticles { } . Within that you will find the effects applied, and the names of the memory points required.
last spindle
I like that moment when you find a model you thought you had deleted a long time ago, looked everywhere but couldnt find it, but then just stumble upon it when you werent trying
 tacit karma
It's the Lego-Principle
hollow fulcrum
@last spindle the basic gist of mega scans right now is this (because i've asked.. seemed stupid to me.), but they are waiting for 2.0 to get out a bit, then do the mega beta, then release.
last spindle
good news :D
hollow fulcrum
i also just upgrade Marmoset.. but meh.. is what it is. 3DO2 is wicked regarding rendering ability.
obtuse rain
Does 3DO2 support GLSL shaders?
hollow fulcrum
ermm.. i want to say no, but let me check. there was a bunch of format foo in the last couple beta updates.
oh wait, i can't lol. awaiting licensing foo to be sorted as they ended the beta and yeah.. too many databases type thing. will look as soon as they fix me.
i can run 3DO at the moment, but need DDO to check. see if i can find changlog foo ;)
 bleak heart
What is the config.cpp code required to get COPILOT controls?
I'm on the Copilot, but it won't take the controls.
H-a i find is code isCopilot=1;
İts work
 umbral shuttle
how come vests dont have fire geos?
shadow root
I might be wrong as i dont kuch about models, but the fire geo is the hitbox, right?
Iirc, Vest protection is done in config, and its per body part. So it would make sense that there isnt a fire geo.
marsh canyon
IIRC BAX is correct. A vest can provide a better protection for a body part, not by their fire geo
obtuse rain
I updated the Super shader viewport for the latest Substance Painter recently, but it doesn't seem to get much love.
mossy mulch
you can do it but its Bad
umbral shuttle
Okay cool just confirming. just coming to the realization that caliber doesnt impact how much damage is donw to a unit, only the ratio of impact velocity to typical speed and hit 😦
obtuse rain
(Substance Painter, that is)
hollow fulcrum
which one is this one? i have two for SP. one from P1NGA and one from Mr. Rampling.
and i asked about the GLSL shader support, couldn't find anything on a quick search.
i might need to explain our more 'unique' set of issues with RV.
 true magnet
i have no idea what to do from here could use some help with blender export, this is my first attempt.
 marsh canyon
Remove tempStuff collection that is generated during an export (and it remained still if you fail)
true magnet
so it should look like this right?
 marsh canyon
As long as you have no tempStuff I guess it's okay
true magnet
do i do anything with this?
 marsh canyon
The error is not related with anything there
true magnet
ok
i ended up getting this again dose it have to do with model cylinder .001 contains n-gons and cannot be exported ? if so what dose that mean and how do i correct it?
 white oak
true magnet
i ended up getting this again dose it have to do with model cylinder .001 contai...
white oak
true magnet
i ended up getting this again dose it have to do with model cylinder .001 contai...
N-gons are faces with more than 4 corners
Select all faces and triangulate them
Also when the toolbox/blender fails an export it breaks the file
Restart blender before exporting again
true magnet
Rodger that how do i " triangulate" that seems like it wouldn't be a fast google search.
white oak
ctrl+t
subtle bison
umbral shuttle
how come vests dont have fire geos?
vest is adding protection via hitpoints in config
same with headgear
that's why firegeo there makes no sense and would just conflict with actual player firegeo
umbral shuttle
subtle bison
that's why firegeo there makes no sense and would just conflict with actual play...
ah fair enough, so the only firegeo then comes from the uniform?
 final kayak
When a uniform is worn by a unit, does the torso of the body get hidden like in this mockup I've done?

Also, is there a way to choose whether to show or hide parts of the body on a per uniform basis?
fluid copper
The entire body from the neck down is considered the uniform. Including hands and feet. If the uniform is long sleeve with gloves for example, then the hands and arms are not underneath, they just dont exist
fluid copper
final kayak
Also, is there a way to choose whether to show or hide parts of the body on a pe...
With custom uniforms you can define hiddenSelections that will achieve this
final kayak
fluid copper
The entire body from the neck down is considered the uniform. Including hands an...
Huh! Thanks.
So for a custom uniform with short sleeves and I want the arms shown I would have to include the soldier mesh?
fluid copper
Yes, you can use the example one
final kayak
Well that's made my life a whole lot easier 🙂 Thanks!
fluid copper
Just include the arms/parts shown though. No need to show the things underneath the clothing
final kayak
If in theory I wanted to make a "skeleton" outfit of actual bones. I would not include any of the soldier body mesh in the outfit. Would that work?
Could the head mesh be hidden?
stuck oyster
final kayak
Huh! Thanks.
So for a custom uniform with short sleeves and I want the arms show...
you should really have 2 separate meshes for variation
even if "hidden" with hiddenSelections its not really hidden, its made fully transparent
so its still there and drawn and eating performance
stuck oyster
final kayak
If in theory I wanted to make a "skeleton" outfit of actual bones. I would not ...
you can exclude head being loaded by leaving out the head proxy.
proxies (big triangles on the sample model) are what connect engine features like weapons and gear on top of the character
and the head
head being separated so different types of heads can be swapped
technically you could make the skull a head type too
final kayak
Thanks! I'll give it a go
final kayak
stuck oyster
you should really have 2 separate meshes for variation
Are you suggesting keeping them seperate in the source file and only merging once ready for export?
stuck oyster
no
making 2 different p3ds
its not real hiding when done with textures
and its really more expensive for performance in the long run than having different models
also Im gonna dub the over the top variation making variationSickness now 😅
it can be bad slippery slope to devastating performance drop
some is fine
but it can be overdone
final kayak
I'm not sure I'm following 🙂
My initial question was about how to create a custom uniform that has parts of the body hidden. My goal was to reduce the amount of clipping from the body mesh that would poke through the clothing.
From what I understand I have to include the body mesh as a part of my outfit p3d mesh and use it when creating the custom uniform. Is that correct?
stuck oyster
final kayak
I'm not sure I'm following 🙂
My initial question was about how to create a cus...
you delete parts you dont want to show
if you need only hands visible you have only hands be part of the new uniform
 ashen flicker
hey so I found an uniform mod that has few textures missing. I thought that those could be removed / replaced but have no idea how to do it. If someone can help I would much appreciate it
stuck oyster
ashen flicker
hey so I found an uniform mod that has few textures missing. I thought that thos...
typically the maker of the mod should fix such errors
or you might be missing some mod dependency it has
ashen flicker
yes it most definetly is a missing dependency
the problem is that the original mod is MIA
the version I found is a reupload
stuck oyster
what mod is it?
it might be best to just remove such broken mods
its usually not really worth the hassle to try to fix stuff like that
ashen flicker
i actually got it working
stuck oyster
and do you really want to sped few days minimum on doing it
ashen flicker
another mod developer had used exactly the same textures in his models so he told me the dependency mod
stuck oyster
I see I see
ashen flicker
stuck oyster
it might be best to just remove such broken mods
ye it wasn't in actual use
just found it and really liked the uniforms in it
wanted to see if i could get it working for my group
finite stump
Can part of a model be decal as well? I'm trying to make a baseball field and wondering if I can add the bases and pitchers mound but the rest of the ground be a decal?
stuck oyster
finite stump
Can part of a model be decal as well? I'm trying to make a baseball field and wo...
No I recall that did not work.
 tidal prawn
Hi, i have a problem with my first vehicle model. I don't understand why my vehicle leans on the side in game whereas it doesn t in object builder. Anyone can help me please ?
charred bolt
tidal prawn
Hi, i have a problem with my first vehicle model. I don't understand why my vehi...
Check the weight distribution (centre of mass) is central in the Geometry LOD.
Check the sprungMass is the same for each class Wheel and the total sprungMass = Geometry LOD mass.
Check springStrength for each wheel is symmetrical.
tidal prawn
charred bolt
Check the weight distribution (centre of mass) is central in the Geometry LOD.
C...
Where can you find the center of mass pls ?
charred bolt
In Geometry LOD, select all components, switch off Direct3D and look for the cross.
 tidal prawn
Ok thank you I find it, i check the three items you told me and everything is at the right place so I dont know
charred bolt
So your centre of mass is central on the car axis?
tidal prawn
 charred bolt
Can you show config.cpp and model.cfg? (use pastebin or something like that to post a link to code)
Also your Memory LOD, showing wheel_x_x points
tidal prawn
I send you this in private messages
charred bolt
tidal prawn
I send you this in private messages
Yes, just waiting for you to confirm that you have a license to modify the p3d. Being careful as there are people around that rip models without permission who I wouldn't want to help.
charred bolt
Nehtars leaning car problem fixed - wheel center and boundary memory points needed more careful alignment with the visual model.
 steep crest
P1nga, any updates for asor rp objects to be expected?
hollow fulcrum
@obtuse rain and everyone here really, regarding Quxiel Suite 2.0 and GLSL shader support:
''Teddy Bergsman Lind: Yes, this is something we hope to support in a later release''
that is an official response, i've thus chatted further on the side, hopefully ... soon.
bleak heart
Hello, I'm making a clock mode, I wrote an animation for the wind hive to play but it doesn't work
Can't we write the animation we want in model.cfg in NVG config.cpp?
stuck oyster
bleak heart
Can't we write the animation we want in model.cfg in NVG config.cpp?
No
All gear is a character and only follows rtm animation
bleak heart
stuck oyster
All gear is a character and only follows rtm animation
It would be good to move the scorpion 😄
 lofty comet
what is best way to resize just chin strap?
 stuck oyster
lofty comet
what is best way to resize just chin strap?
stuck oyster
lofty comet
what is best way to resize just chin strap?
could maybe be done with proportional editing
the shape is bit awkward to pull down though
if you made the helmet, might be better to remake the strap to actually fit the head
because it should be something like this
 lofty comet
stuck oyster
if you made the helmet, might be better to remake the strap to actually fit the ...
lofty comet
stuck oyster
if you made the helmet, might be better to remake the strap to actually fit the ...
it look like this, I fixed some stuff on it, the probles is I didnt make it, I am new to blender. Anz tips how I can do it?
 stuck oyster
lofty comet
it look like this, I fixed some stuff on it, the probles is I didnt make it, I ...
stuck oyster
lofty comet
it look like this, I fixed some stuff on it, the probles is I didnt make it, I ...
I assume you did not make the model then?
lofty comet
stuck oyster
I assume you did not make the model then?
yesI didint make it just fix uv add some parts to it
stuck oyster
honestly there is no real tips to make things like that fast. the shape is wrong to begin with and if you are not familiar with the tools you should practice just basics
lofty comet
stuck oyster
honestly there is no real tips to make things like that fast. the shape is wrong...
I know a good idea I just unizp the strap until I figure out how to rebuild the shape
stuck oyster
what does didnt work mean
you seem to have some action happening in there
since the pilot is in stick holding pose
thats not part of the rtm or action
you need to define that in the vehicle
no
in conifg
I have stuff to do but your images are not related to the thing you want to do
its not driveaction code
im just looking up the parameter you need
you are basically looking into completely wrong place
no its not that
like I said earlier
that sets the pose
but does not have anything to do with the hand moving with the stick
now just wait a moment so I can find the thing you need
        driverLeftHandAnimName="";
        driverRightHandAnimName="";
        driverLeftLegAnimName="";
driverRightLegAnimName="";```these are the parameters you can use to tie hands and feet on vehicles model.cfg animations
like the animation for drivingwheel


like these
hollow fulcrum
coughs 'painting normals in NDO2' stupid awesome. like directly on the model in 3DO2 you know..
marsh canyon
Is there any way to check animation in Buldozer smoothly, not by mouse wheel?
Probably using a Select script to Run?
SHIFT+[ and SHIFT+] Animate the selection (very slow)
Oh this looks sufficient enough
stuck oyster
marsh canyon
> SHIFT+[ and SHIFT+] Animate the selection (very slow)
Oh this looks sufficient...
Yes that's the one!
👍👍
 cedar coral
+1
woeful viper
but seriously... their productnaming is just the worst... nDo2, NDO2 ... you always need to clarify which you mean
hollow fulcrum
lol, it is a little less than intuitive for sure.
final kayak
I could use some help fixing a couple of issues with my custom outfit.
- The shadow volume mesh appears to be broken when in game. I've seen something like that before when the mesh isn't triangulated. But I've made sure it is.
- The arm materials seem to be overriding the outfit materials in areas where the mesh is close.
It looked fine when I previewed it using the Object Builder's Model Viewer
stuck oyster
final kayak
I could use some help fixing a couple of issues with my custom outfit.
1) The sh...
shadow needs to be closed, triangulated and sharp edged
in your case it would be easiest to just copy the sample mans shadow
since your model is pretty much normal clothes
you have also copied over the HL identity selection over your whole body
you must remove that from the clothes
final kayak
Oh! This? I wondered what that was.

Thanks for the tips. I'll make the changes and try it out.
Ah awesome. Thanks! That helped a great deal.
In case it helps someone else: With the shadow volume I was relying on the blender modifiers. These seemed to not mark the mesh as flat and were the cause of the broken shadows.

All ready for summer 😎
lofty comet
any one know why I cant view, I tried mutiply textures but it dosent register texture co.paa or rvmt?

I used substance painter for textures
lofty comet
done configs and this error appered in game

but it present in this state when droped
 last spindle
@steep crest probably not...one of those side project ideas that falls by the way side
finite stump
Is there a vanilla sound of fabric or something similar for surface walking?
lofty comet
lofty comet
but it present in this state when droped
fixed texture and its still in state
 stuck oyster
finite stump
Is there a vanilla sound of fabric or something similar for surface walking?
stuck oyster
finite stump
Is there a vanilla sound of fabric or something similar for surface walking?
p:\arma3\data_f\surfaces\ has all the vanilla surface types
stuck oyster
lofty comet
any one know why I cant view, I tried mutiply textures but it dosent register te...
does not look like your helmet is in right position in the model space. you can check out pinned messages about what headwear needs to work
lofty comet
stuck oyster
does not look like your helmet is in right position in the model space. you can ...
you know why it cant open object p3d?
stuck oyster
lofty comet
you know why it cant open object p3d?
what p3d is it?
and open it where?
lofty comet
lofty comet
done configs and this error appered in game
This, in game
stuck oyster
lofty comet
This, in game
path does not match what you have put into the pbo
finite stump
I get an error i when building my PBO in Mikero that just pops up a bunch of "OK" windows about a problem with my config.cpp file. I click "OK" on all pop ups, around 10 or so, and it still gives a success. No error logs. Mod works fine. Anyone else get this oddness?
marsh canyon
It's a Bohemian issue
Official binarization can throw such error, despite they don't tell what it is
Usually I see them if a macro (define) is somewhat bad
finite stump
Ok. I don't see anything wrong but I could be blind.
marsh canyon
Yeah this is VERY hard to spot. When I got that (and fixed eventually) was anount of required argument vs passed argument mismatch IIRC
It could be useful if we at least have "hey why did you think it is an error"
finite stump
would be nice
 frigid roost
lofty comet
This, in game
frigid roost
lofty comet
This, in game
Did you weight it for the head? (On vertex groups bl)
lofty comet
frigid roost
Did you weight it for the head? (On vertex groups bl)
Yes I assign it to head in blender
white oak
lofty comet
Yes I assign it to head in blender
have you defined the selection in the modelcfg
west haven
Okay so bizarre question but
Arma 3 weapons can have two fire modes (like rifle and GL) but can there be three?
stuck oyster
west haven
Arma 3 weapons can have two fire modes (like rifle and GL) but can there be thre...
yes
you can have multiple fire modes and multiple muzzle types (rifle/GL/etc) in one weapon
mossy mulch
you just cant do a different ammo out the same magazine without scripting
stuck oyster
also true yes
west haven
Horrible idea to do underbarrel for my rifle later, and then do an OICW
And then mix the two
stuck oyster
west haven
Horrible idea to do underbarrel for my rifle later, and then do an OICW

its cute
 lofty comet
white oak
have you defined the selection in the modelcfg
lofty comet
white oak
have you defined the selection in the modelcfg
I fixed config and model.cfg and I need to press U in object and to reposition it right beacose in tutorial he said to put all on 0 in blender and my zero is one right side
 stuck oyster
lofty comet
I fixed config and model.cfg and I need to press U in object and to reposition ...
stuck oyster
lofty comet
I fixed config and model.cfg and I need to press U in object and to reposition ...
what tutorial did you follow?
simplest is yo use the example character and example headgear as reference from the Arma 3 Samples on steam
lofty comet
stuck oyster
what tutorial did you follow?

Hello, this is a simple tutorial on how to add a helmet model into Arma 3 and make a Headgear
(So sorry audio is so quiet, I forgot to export it with better audio but I had let it slip by)
00:00 Intro
00:35 Blender
18:...
this one
stuck oyster
seems like the stuff in tutorial are in right place. you must have misunderstood something
lofty comet
stuck oyster
seems like the stuff in tutorial are in right place. you must have misunderstood...
the problem is in blender my zero is not on center its in right side and I need to find right position for helmet
do you know what is right position for helmet


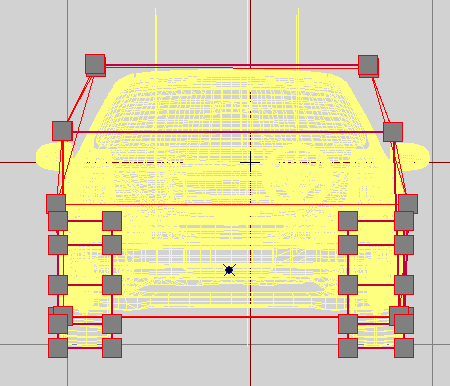
 stuck oyster
lofty comet
the problem is in blender my zero is not on center its in right side and I need ...
stuck oyster
lofty comet
the problem is in blender my zero is not on center its in right side and I need ...
you are trying to run before you know how to stand
as in you got to understand Blender basics first
lofty comet
stuck oyster
you are trying to run before you know how to stand
shood be chin strap be in shadow?
stuck oyster
if you can make it simple enough, sure
its a detail that would be seen pretty rarely though
marsh canyon
@sharp shale Your image posts are restricted because your account is very newborn to prevent spam image attack. Please wait a few days or hours so we may stop or shorten the restriction time.
 twilit hollow
Why is my model doing this? It looks fine in bulldozer and blender

 marsh canyon
Wrongly made weights I suppose
twilit hollow
I’ve checked the weights I think they are fine
marsh canyon
Ever checked in OB with an RTM anim?
stuck oyster
twilit hollow
I’ve checked the weights I think they are fine
the picture does say otherwise
twilit hollow
I have not
stuck oyster
does your jacket have mesh for interior lining too?
marsh canyon
I'd also like to ask what is the difference between pic 1 and 2
twilit hollow
stuck oyster
so hood down model has bad weights
I’ll check the weights again. Thanks.
Any idea why the hooded version doesn’t show the units face ?
No liner