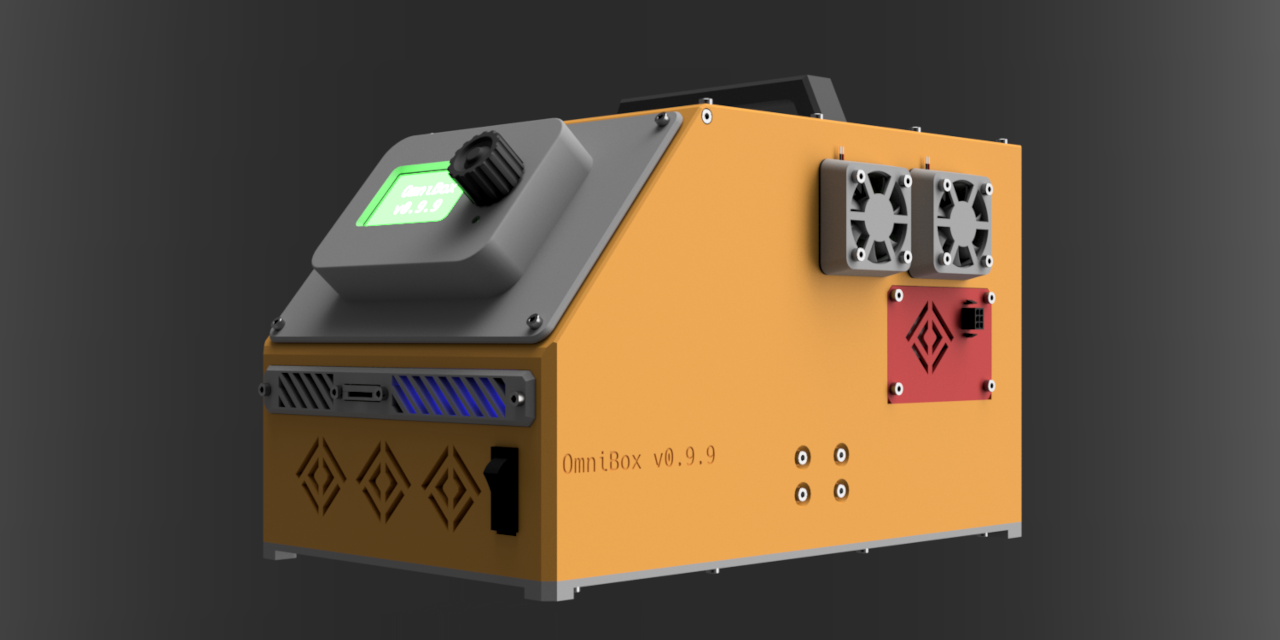
#M1.1/EVA 3/Dual-Z/Custom enclosure
1 messages · Page 4 of 1
and a mosfit ?
yep
Space will get tight in there with that, though. You'll want to skip the side panel with keystone jacks; the cable extensions will take up too much room. Use the PI4B tray instead.
Dangit, ignore me.
huh
I'm tired and recommended an old tray.
The universal CPU tray (https://github.com/jon-harper/OmniBox/blob/0.9.9-frozen/Trays/CPU/Raspberry Pi Universal/CPU Tray - RPi with Fan.stl) is the one you want. But the side panel with keystone jacks does not work well with that tray at all; you'll have better luck with the front panel with keystone.
GitHub
Modular, 3D printable electronics case for 3D printers - OmniBox/CPU Tray - RPi with Fan.stl at 0.9.9-frozen · jon-harper/OmniBox
Sorry, I'm really tired and not explaining stuff well.
its ok need some sleep then
Yeah, definitely. Don't start printing the front and rear case body yet. I'll explain tomorrow.
Thanks dude
Agreed. Filament may not be expensive, but it's not cheap, either.
I did the same and it has seemed to work well
New power supply should be here today.
Still have not determined why the Pi in Big Bird will not talk to the Octopus.
Can't wait to get this power supply.
have you tried via uart instead of usb?
It's in CAN bridge mode. 😬
If I reflash...
ahh, what does lsusb/dmesg tells you?
have you set the usb pins correctly, right?
Nothing changed. It just stopped talking. I may have caused it from updating my distro. I applied the patch, thanks Maze, but it won't show up at all.
The ONLY way to get it to connect is when I power it on. As soon as I try to print, though, it loses connection and won't come back.
Raspbian or Raspberry Pi OS or whatever the name is now.
Installed through a MainsailOS image
I think in this case is best to backup and roll back 😅
I doooooo have a spare image. I can backup my config and swap the SDs.
I have a git repo in the config folder, I commit an push (when I remember) so even catastrophic sd meltdown results just with a swap of sd install os and pull from github
I do the same thing!
I just never update it...
So, new mission, backup and swap.
Maybe I can get TWO mercs running today.
despite my compulsive updating OS disease, I keep the OS. to a minimum up to date status, only bleeding edge on klipper and related stuff. this machine do kot need yo have the latest PnP tech or any fancy things, just wifi and usb, basically 😅
I do my backups through automatic zfs snapshot
for a PI might be overkill running ZFS
but I got mirrored disks as well
it might dent the already limited i/o performance od the sd… right?
on the SD not much I would say but RAM...
that thing is hungry
might require some tuning
I don't run pis anymore, they're hard to find and not that good
(for the current prices you might find them)
all the (cheap) arm devices are all a bit disappointing
might eventually spend some money on something less energy hungry with better performance to replace my very old i5
if only that market would go au pair with apple silicon and qualcomm chips
Not having Cortex M7 or equivalent is the problem. The cheap clones don't have advanced features. Sure, it's 1.5GHz or whatever, but it may not have out-of-order execution or some other stuff because it's a Cortex M4-equivalent.
for the same money or almost the same you can get amd64 arch stuff with nearly identical energy consumption
Does AMD sell SoC CPUs?
Also: I AM STUPID. I didn't CAD the LRS-450. The mounting holes ARE different.
think they do so does intel
there are some decently priced NUCs
I'm so out of date on hardware
I can't afford to upgrade my PC and still fuel my printers. 👿
Yea gets expensive

not easy, I'm going into savings mode exception being the remaining things that might be needed to finish my current goals for the printer
yeah, me too, I’ve almost finished… I only need to make a corexy laser cutting machine to cut proper panels for the printer, and I think that’s it
Does it really need to be CoreXY if you're just cutting panels?
Laser cutting is a slow process, right? So zipping around isn't important?
looks cool, also it needs to be another money pit, right?

A 1.9x1 m table with a hidden corexy mechanism and a layer of "sand" through which the mechanism pulls a steel ball to create geometric patterns.
I’m actually scared about the laser, do I’ll probably never ho around and make one… maybe a small router though
I want a drill press like whaaaat
I had a weird idea the other day, here they consistently trash greenhouses (I also disposed of mine years ago 😅) which have meters long aluminium extrusions… they are weird shaped.. but they are free
building something big that draws or cut would be nice
Ever heard of FarmBot? I just discovered it.

FarmBot
Farming and gardening robots for home, educational, and commercial use. Premium Hardware · Worldwide Shipping · Drag and Drop Farm Designer · Step-by-Step Assembly Instructions · Own Your Food
might be selling one, want to pay shipping from EU to US?
The weight alone to ship in the U.S. would be insane. Can't imagine international, lol.
about laser, don't buy chinese, get non chinese protective gear (glasses)
and yet I ordered mine online, on Amazon!
What should I expect to pay for one?
paid 7.5euro for shipping
price wise for the press?
153euro was mine, ryobi 390W (dont know the exact reference)
Okay, that's not 400 and reasonable
https://www.amazon.es/-/pt/gp/aw/d/B073HF6D42/ref=ya_aw_od_pi?ie=UTF8&psc=1 right now sells for 250

Ryobi 5133002855 - Broca de coluna ryobi 390w - 5 velocidades
fuck me that thing went up

For woodworkers wanting greater precision than a handheld drill offers, the SKIL 6.2 Amp 10-Inch Benchtop Drill Press offers a powerful induction motor with a LASER alignment system (Laser Class: II; Maximum Average Radiant Power: 0.83mW) to execute precise drilling maneuvers. Its five-speed syst...
if it's not for professional use looks good
Sweet, thanks!
Yeah, just want to be able to drill and tap my own extrusions.
ever heard of skill saw? yep the brand ended up being used for the tool
should be enough
yeah, but if I do start a new project like that I have to hide it somewhere my wife would never see
Need more than protective glasses when she gouges your eyes out.
the christmas decorations promise can’t be used anymore, I fear
B-b-but they'll be laser engraved!
i mean yeah !!
I actually printed some
with our names
need to print one for the newest cat
is the chocolate printer working?
Awww, what cat # is this
second cat
Yep. Cocoa Press launched/started shipping about two months ago.
yeah, seen it 😍
name actually makes sense for him Loki, he is indeed mischievous
Very good cat name
English is so stupidly weird. "black long hair" is technically correct but sounds wrong to native speakers.
There's some not-quite-official ordering for adjectives, apparently?
And it cracks me up when I run across it.
Ah, maintenance issues?
wording wise
I already had another with long hair
And, the thing is...you're technically correct.
non native speaker issues
Yep. But ask me to tell you the correct order? I can't put this nonsense into words.

[internal screaming]
dafuq
Right?
I have a lovely, short, cheap, old, oblong, green French whittling knife. <-- Why is this order important? DID LOKI DO THIS?!?
Anyway, build log related:
This power supply is tight. Like, may have to do some funny business to get it to fit and not be an issue with the toggle switch.
fucking weird
Here's the issue with the switch.

I can move it over, but it won't work with socket head screws again.
Mrm.
What about a base without a power switch? Move it to the front panel or rear panel.
Eh, easier: steal the front base from the old 0.9.9 case and use the rocker switch. That fits.

This is quite frustrating. I'm going to have to rip apart the case to get to those base mounting screws.
The front two are easy, but the pair behind that are harder to reach.
@tiny bramble should I wait on the 9.1.0
now there's something I need to buy if I rebuild the original ender
This is unrelated. It's a different power supply I'm making a new mount for. 🙂
The switch?
yep
Would only be better with some nice red sand
And a stillsuit.
Maaaan I got this LRS-450 all setup and ready to go, but the toggle switch touches the PSU. 😠
I guess rocker switches only for large PSUs. 😦
Oh
This is the same PSU as before. Do you have a Pro or Plus?
Already downloaded the files going to start the project this weekend
I have the plus
Ah fsck. I thought you had a Pro. You will definitely need the rocker switch then. 😕
I sold the pro 2 days ago
I guess the question is, you're using an RSP-500 power supply for the plus, right?
Okay, yeah, you'll need to go rocker switch. That PSU is HUGE.
Yep
I am so tired. 😦 I really need a good night's sleep.
Well it is almost weekend depending on where you are located
I'm in DFW, so yep. Getting there. Hopefully we'll get some rain.
Dfw
Dallas-Fort Worth
Alll
I always forget that doesn't get used much outside of aviation and locally.
Is that Central or Eastern time?
@tiny bramble eastern
Thanks. I never know where the line is for eastern time.
Yea
TODO:
- Oscar: print new base with rocker switch (started)
- Oscar: install LRS-450 PSU
- Big Bird: fix USB communication; start by swapping SD card
- Big Bird: test belt alignment resolution.
- Big Bird: test Daylight on a Matchstick, print more mounts
- Oscar: find the right ring connectors for the XT60 extension
I guess I'll work on big bird today. The front base won't be done until tmrw.
Nice
Update: Swapped SD card. Still does not detect the MCU.
dmesg says anything when you connect disconnect
Good question. I was going to just swap the Pi.
It's showing up ATM in dmesg and lsusb
Can't connect. No device in /dev
there's serial0 -> ttyAMA0 actually
OH, duh
gotta configure this device for CAN
rebooting pi aftering configuring CAN
CAN works on the pi
Ah. It's saying the CAN network is down. Hrm.
dmesg | tail
[ 63.734870] usb 1-1-port3: attempt power cycle
[ 64.394348] usb 1-1.3: new full-speed USB device number 5 using xhci_hcd
[ 65.012914] xhci_hcd 0000:01:00.0: ERROR: unexpected setup address command completion code 0x24.
[ 65.224628] usb 1-1.3: Device not responding to setup address.
[ 65.444398] usb 1-1.3: device not accepting address 5, error -71
[ 65.544399] usb 1-1.3: new full-speed USB device number 6 using xhci_hcd
[ 66.163015] xhci_hcd 0000:01:00.0: ERROR: unexpected setup address command completion code 0x24.
[ 66.374653] usb 1-1.3: Device not responding to setup address.
[ 66.594392] usb 1-1.3: device not accepting address 6, error -71
[ 66.595069] usb 1-1-port3: unable to enumerate USB device
does not show up on lsusb again (of course)
It's either the Pi or the Octopus. Betting on the Octopus, but I have a spare Pi.
About to test a new Pi and see what happens
No effect.
[loud swearing]
@tiny bramble bad sdcard ?
Two different SD cards, two different RPis. 😕
Not likely, since it was in operation and stopped, but I can try.
Work ? Y or N
Haven't tried yet. Probably will do it this weekend.
Having a frustrating day, I guess.
Hope so, too. Drop by the Discord if you want to ask questions during your build.
OmniBox Discord 🙂
Ok that discord group
Can't really say for sure, since your printers are all CoreXY. Travel speed and accel make a HUGE different in time.
Well true
More than most projects, because of the distance between the walls. It's like 160mm travel each way for the main body walls.
Watching the rear main body go up is kinda fun that way
About 1.25 max
Ok that's nothing
Mmhmm. Not too bad at all.
oh sick
Redbull car
Oh wow. Those are great prints.
Some moron completely wrapped a McLaren up the road from me.
@tiny bramble does the Rpi reads from a usb stick using the same usb port? it could also be the usb of the mcu or the firmware. but that would be odd since it worked before 🤔. I would 1) try another usb device on the same port (camera/usb stick whatever) 2a) -the usb worked- swap to the usb only firmware of the octopus (no can bridge) and see if you see the mcu 2b) try another rpi/usb port and repeat
I tried a second RPi and had the same issue, but i'll try USB sticks.
it can be the cable, weird that dmesg doesn’t say anything at all
Dmesg does sometimes. The first time you asked me, it couldn't see the device. The next time I tried it, the device is there.
It shows up for a short bit after power on and then disappears, basically.
Also tried 3 USB cables
Can you get the dmesg message right after the device disappears?
#1063165805774245999 message <--yep
Hoo sorry I’ve missed that
You're good; I figured. 😉
It’s a rpi4 64 bit kernel?
Uhhhh
Whatever MainsailOS comes with, basically
Weird, you might have found he same stuff I did on google… have you tried to change your boot cmdline? Adding this usbcore.old_scheme_first=1
What does this do and how do I change it?
@tiny bramble you get it working ?
lol, not yet
You need to edit the file in /boot/cmdline.txt
It will try to apply an older enumeration schema for high speed usbs
It’s something windows does since Windows 8
nice. I'll try that
Also you might have to check that you are running in 64bin only
In /boot/config.txt:
arm_64bit=1
Warning, I am not using a rpi nor mainsailOS, so I just reading things that I find. i use armbian (which also works on rpi if you ever want to try)

Fell asleep early. Sorry y'all.
About to put together Oscar with the new PSU tray. I reassembled Big Bird as it was and will try tmrw.
Oscar is reassembled and preheating for a print. Wooot!
Layer two, no shift. [dances]
Winning!! It’s always nerve racking after a rebuild.
Particularly when it involves swapping PSU and stuff. Too many uncomfortable accident opportunities there.
Trying redoing the frame completely!! That was the worst lol
Ack! I did a partial redo on my frames just to get the tapped brackets out and that was bad enough, lol.
nice!! so indeed it was a power issue! it’s crazy that those were the symptoms, I would expect shutdowns or the rpi throwing all sort of other errors 😅
Power issues are super subtle and hard to diagnose because they make everything else act weird. Thankfully they don't happen often!
Meh. A few uneven layers. Something else is up, but nothing like before.
But, I still had accel at 8k. Dropping to 3k and trying again.
Still shifting, but much less so since the PSU swap.
That belt is riding up.

Definitely too high in #4.


And that's why. Second pic. Must've raised it when I added locktite.


[internal screaming]
Huh. I bet that's going to be the weird 100Hz spike on the bottom belt's resonance tests.
Negative. Still there.


Resin printing is awesome but I don't want to deal with the fumes
same, fumes washing curing etc
Wow, two printers behaving very well today. Got a lovely single-piece stick diffuser off of my stock Ender 5 build plate. 275mm turned at 45 degree angle fit just barely.
Oscar: E-steps calibrated. On to pressure advance.
I wish
Extruder still not working?
sometimes
@tiny bramble looking good so far omnibox
Still finding problems.
When the toolhead is as far forward as possible and towards the left of the build plate, this happens. Belt rides up the toothed pulley.

Better picture. You can see the belt's reached the top of the tensioner's idler and is now twisted at the toothed idler.

Big Bird: So the first SKR is causing its own issues. I have another that I'll swap in instead.
I did try a USB stick and the Pi seems to detect it fine.
It looks increasingly like I will need a new MCU, unless I get the other SKR working and use a buck converter for the case fans.
And lights.
So neither SKR worked. I forgot one has the will-short-your-usb issue and the other was toast.
Wound up ordering another Octopus, FML.
do you have any other boards?
lol, I did. I sold it. 🤣
I was going to suggest the skr mini or pico but I just remembered that they need the transceiver 🤦♂️
Unfortunately I have a lot of 12V stuff on this printer and need the adjustable voltage levels that the Octopus has. Realized that when I was trying to put the SKR 2 to use.
@tiny bramble https://www.printables.com/model/455653-bambu-filament-winder-spooler-remixed/files working o nthis at the moment ....3 rolls with tangles

Printables.com
This is a remix of Miklos Kiszely's amazing spool winder. I copied the geometry but created a new frame and carriage.… | Download free 3D printable STL models
Three?!
brand?

damn
Big Bird: new Octopus is working
nice
Opened up Oscar this morning.
Swapped out the spacers for the left toothed idler, hoping that would help. No.
Replaced the front face with a new one that's like 0.2mm adjusted. No did not help.
Reran belts. Still rides up on the toothed idler. Can't use the left half of the build plate, basically.
Next I guess I'll take the steppers off and try to re-adjust the pulley position?
Just don't know what else to do.
Also replaced the spacers for the toothed idler, just in case.
Oh man
@tiny bramble are you able to move the steppers freely until the belt moves up ..maybe a bad bearing ?
Yes, steppers move freely until the belt rides up on the toothed idler pulley too far.
Tension correct ?
Yep
Or was, at least. Its been loosened since I've worked on it today
I'm going to look into it being a bad bearing more, I think
I haven't pursued that yet at all
@tiny bramble X and Y steps/mm different in the M92 command? Thet would normally be identical for a CoreXY printer.
Steps are the same. The only issue is the belt rides up on the toothed idler when it crosses the halfway point on the build plate (on the X axis).
ok I was looking at the wrong axis
No worries
But it's probably the toothed idler or the tensioner idler, right? otherwise I'd see it on Y axis moves, too. I think.
same size idler gears ?
Yep, both the 8.5mm idlers
ok same as mine
I don't have a spare toothed idler, so I'll swap out the tensioner bearings next.
Didn't help, but the toothed idler does look a little funky.
Left (normal) v. right (looks a bit canted on the bottom lip)

But right may also look funny because of how the belt bends
Also can't tell if it's riding up the tensioner because of the toothed idler or vice versa.
left pic the gear looks higher on the bottom unless thats how its supposed to be
I dont have the 1.1.5 on yet
I think that's a combo of it being two pictures at slightly different angles and the toothed idler being thinner than the bearing stacks.
ok
The bearing stacks are bigger now, too

It does, but I think you've got a small gap in there above the idler
yea i have a spacer
gotcha. let me look at my other 1.1.5
also looks like i need to replace the part has a crack in it
i see it!
just noticed that
those are the 1.1.4 anyway
now that I have the voron up and running Ill print the 1.1.5's
printing the nevermore v 6 right now
nice
moving v5 to the zero g
parts arriving in the next 3 hrs or so
ssr for the PTC heater
and some other parts
oooh

400W? dang
heat quick
run it off the mains with octopuspro
Fully 3D printed carbon cartridge with jalousie lid.
hopefully it works
Oh that's cool

GitHub
Activated Carbon Filters. Bad smells or fumes, or complaints thereof, should not keep you from being a maker! - Nevermore_Micro/V6 at master · nevermore3d/Nevermore_Micro
TODO:
This changed drastically since the last time.
- Oscar: Install new toothed idlers and cross fingers
- Big Bird: figure out CAN issues:
- slow down to 250k from 500k
- reterminate Molex MF3 if that fails
- Big Bird: test belt alignment resolution.
- Big Bird: figure out best way to add more wattage to the system
- Hopefully get this far.
I had to replace a toothed idlers, it was visibly wobbly. I git a pair locally to replace it from 3do, and they were slightly different… but they still work okay. tbh also my belt tends to go on the upper part of the idlers
I think I got a “mellow style” toothed idlers
they have basically no bazel
Hrm. I'm getting more of the kind I got last time, but I also got 4mm x 30mm dowels. Cuz I happen to have 20t toothed idlers with a 4mm bore. Less breakable bearings in that.
Now that the STEP file is out, can modify the X joint for the 4mm dowel if I want.
it should a walk in the park for you, right?
I would mess it up 😅
lol, let's hope it doesn't come to that. I'm gonna try swapping idlers first.
you are lucky you are in the us, if I had the dowels/idlers on hand and your issue I would have gone through the step files already. shipping cost or delivery times makes you want to use what you have on hand
Yeah. We're pretty spoiled.
on hand at hand?… hope it’s the same 😅
On hand = have, at hand = nearby or soon
ohhhh, reeally? thanks!
"Close at hand" is the most common for "nearby", but "[something] is at hand" is a dramatic way of saying it's coming soon or imminent.
This language is so LOLtastic.
@tiny bramble you get it resolved
Not yet, but definitely ahead of two days ago.
Im running Utoc to canbus
@tiny bramble what's the CAN issue?
No talky talky. Found a loose pin on the CAN connector, but it's something else. Might be a wire break.
Tried lowering the CAN speed (was too high anyway)
check wire resistance?
About to do some continuity testing, I think. Could be this janky cable I made for the last leg of the CAN.
The Octopus should not use RJ-12 for their CAN jack. Just...no.
RJ12 is fine, if you have tools for it
Thankfully I do. But it's the only RJ-12 connector around, lol. I don't see the sense in introducing yet another connector for one thing if it's not really necessary.
Found the problem
It's the cable chain
or not
ugh
I'll search for some more telehone wiring. Couldn't find any last time.
@tiny bramble local hardware store should hasve one just need a tele phone cable only nee the twp pair red/green
Found some on a shelf. 🙂
Have a new cable, but not sure the pin order is right on it
Still doesn't work
@tiny bramble octopus pro uses the two middle pins only
Yep
sb2040 ?
EBB36
ahh dont know that one Id have to look it up
Anybody have the 3do nozzle cam
trying to fix the blurryness

No idea on that one
I have the Barfs on the tool head wonder if i solder the white leds that came with the cam if that would work better or will it kill the barfs leds
Does the cam need to be focused?
So this EBB36. Starting from the beginning. Clipper reports:
Created a socket
mcu 'can0': Wait for identify_response
Traceback (most recent call last):
  File "/home/pi/klipper/klippy/serialhdl.py", line 68, in _get_identify_data
    params = self.send_with_response(msg, 'identify_response')
  File "/home/pi/klipper/klippy/serialhdl.py", line 261, in send_with_response
    return src.get_response([cmd], self.default_cmd_queue)
  File "/home/pi/klipper/klippy/serialhdl.py", line 319, in get_response
    cmd_queue)
  File "/home/pi/klipper/klippy/serialhdl.py", line 253, in raw_send_wait_ack
    self._error("Serial connection closed")
  File "/home/pi/klipper/klippy/serialhdl.py", line 61, in _error
    raise error(self.warn_prefix + (msg % params))
error: mcu 'can0': Serial connection closed
mcu 'can0': Timeout on connect
Over and over
I had that error too
Ifconfig shows CAN interface is up, I can see the MCU on lsusb, and it throws a different error when it can't talk to the CAN tunneling MCU.
So MCU is talking, it seems like. I found a break on the old CAN wire, which explains why the EBB36 was not connecting before, but not why it does not work now.
Try a different wireharnes
That's the thing, the old wire is out of the loop. Made a new one. Continuity restored (I checked).
Also double-checked the pin order.
EBB36 does have power.
Reflash it ?
did that earlier today to set it to 250,000bps
hmm
why is lsusb hanging
Strange prime line looks good but nothing sticking to the bed
Reboot ?
standard deviation 0.001718
why not
so lsusb hangs when it's connected to the MCU
and fsck me. it doesn't see the mcu again.
swapped cables and it seems the mcu. Let me get another cable that is good quality.
ok
ahhh got it. MCU hangs if you disconnect it from USB, so have to reset.
okay, so that solves one problem.
back to hanging while trying to talk to the ebb36
follow he guide I poseted
I have a similar guide already open that's specific to the Octopus. I'm well past the initial config, though. This printer has printed for hours before.
Understand
I'm torn between trying to resolve it and tossing CAN out the window and testing it with USB instead.
had to replace mine
USB connectors are just not meant for this application. I wish I could use the CANBUS pins for serial. 🤔
Also, chain rated USB cables are stupidly expensive.
oof
hopefully it last
Here are my serial options and the pins. It looks like I could PB6/PB7


PD8 and PD9 are also options, but they're being used by BLTouch
Mrm. I dooooo have four spare wires run to the toolhead. I could do this without messing with anything yet.
nice
ummm one sec
@tiny bramble
Dang, that is fuzzy
recorded from phone on pc monitor
was looking for a screen capture app
maybe it would look better
fair point
got it with snipit live video capture
Tweaking offset now hopefully i cna get a good print
cam a little low
Need to get a scrubber
Yeah. Doens't look so bad now, though
so you are giving up on canbus? didn’t you get it working at 250k?
nice, is this on a sb or eva?
sb
nope. 250k did not work. 😦
what hapoens?.. let me read 😓
my build log hasn't been the most detailed lately, so there are probably gaps. 🙂
maybe it’s the ebb, have you considered trying another one? the thr36 is cheap, and if it works you can retry/return the ebb?
or another ebb if that’s at hand (🤭)
that could very well be. I do have another ebb...but i'm about to switch to working on that machine.
Also I want to test if serial works.
I doubt it will, but it'll be fun
it’s definitely not the config because if it works and than it goes down, it means something is off
it could be the canbus chip in the octopus, but you tried different mcu with the same results
this is a new board 😦
I figured cable break
I did find a broken cable, but it may have been broken during the mcu swap
Also found a loose pin, but that only fixed it momentarily.
the wires m could be, I had issue getting all the boards to show consistently at the beginning, I rewired and made new crimps and now it’s solid, even if I poke around on the connectors
that's a really good point. and @cedar depot did prod me to try a different wiring harness.
I’m recrimping and rewiring now… hopefully it’s as solid as I go by telling everyone it is
Crimping no fun
I love crimping!
you could try a minimal wiring setup, with the ebb right by the octopus with 4 small wires

Just picked up some new crimpers/ try crimping the usb nozzle cam connector
Hmm. Okay. I'll think on my approach.
For now I need a break and then I want to try these new toothed idlers that just showed up
oh yeah, one thing at a time
I need to adjust the voltage for the PS for the PI getting under voltage
HA! I think I fixed it.
Once again removed the X joint without removing the belts. Kinda weird, but works.

After this print finishes (assuming it does) I'll switch filament and start printing a test body for the next OmniBox release (again/finally).
Nope, wait, gotta do input shaping and tune the belts.
TODO:
Oscar: Install new toothed idlers and cross fingers- Big Bird: figure out CAN issues:
slow down to 250k from 500k- reterminate Molex MF3 if that fails or sub out cable chain wire
- Oscar: tension belts and tune
- Big Bird: test belt alignment resolution.
- Big Bird: figure out best way to add more wattage to the system

Cant get anything to stick to bed at all
What are you printing?
Done that a few times too, works though!! Always good when a printer is back to printing.
TC was the one that told me it was possible. I wouldn't have believed it.
Turned out to be much easier than I expected.
I just looked at it and thought it will work or I just have to rerun the belts anyway and gave it a shot lol I also done this with changing the front tensioners.
Fair point. What could go wrong besides the belts get messed up?
Found my belt issue too, my left idler is on the piss so it makes it rise up and down depending on direction
I had the same. My gut told me something was up with it, but I kept finding other things.
And I ignored my gut, because, why, how can THREE things be broken at once?
Prints are looking good enough. Going to do a full day/full bed print because I need to do one and it's a great test.
Aside from a little trouble getting the z offset right (hard to see the nozzle on the Dragon), looks okay
yea I have that trouble too
And we're back to having kinematic issues.
I wonder if the pulleys lost alignment with the d-cut on the stepper shaft (when they were loose)
Big Bird: Bypassed the cable chain; no luck
BACKGROUND FOR THE BYSTANDERS
Big Bird:
- original Merc build
- Ender 5 Pro
- custom Dual Z
- EVA 3/E34M1
- electronics in an OmniBox
- working on enclosing it
- currently having CAN issues
Oscar:
- new Mercury One.1 build on an Ender 5 Pro
- standards Z
- EVA 3/E34M1
- electronics in an OmniBox
- enclosed in a custom enclosure
Going to buy a USB cam ..nozzle cam dead came out of slot popped inside of SB toolhead from slamming ( vibration ) around. Video feed went black and that is the end of it. Not buying another one
Ouch. That sounds loud and unpleasant.
If my resonance tests today end up funky, it's because I'm playing Tool very, very LOUD.
Wind is blowing like heck. Gonna storm today.

Prolly could tighten that up a bit

Good enough for now. Back to trying for a test print.
Oscar finally has a good first layer.

Feel like it would only help make things better!
It's printing, so the influence is clear.
Still merrily printing away!

looks like you got it going
Still is!
I just got done finally getting my e5+ to consistently print mercury parts again 🤣 Im just gonna admit it, I'm too low on Adderall to try to scroll to the answer: What is the advantage / pros of rolling the dice on printing the eva 3 stuff vs eva 2 (I can always do over with the other, just looking for an easy decision point for what to queue up for the next 19 hours
It's a coin flip, TBH. EVA 3 is, IMO, more serviceable but also slightly heavier (~20g).
Oh, and E34M1 is fully documented, which is helpful.
what's the blocking difference with Eva 4 anyway? belt/rail config?
Bingo can't beat that. I remember being like "woah, this is some solid markdown on this GitHub"
I ask on Eva 4 because I ran across an Eva 4 tool changer mod thing
EVA 4?
isn't the latest 4x?
3.0.2, I believe
Well. then... let's hope it was just a sleep deprived illusion
Stock EVA has the belts run around both sides of the extrusion (2 in front, 2 in back). The big difference is in the belt catches and adding a couple mm between the belts and extrusion.
honestly the less I think about trying to add any more complexity or features to my first damn nontrivial printer build, the better
Stock EVA 3 also has built-in belt tensioners that take up a lot of room and suck. That back green thing is part of EVA 3 but not E34M1.

That's fair. I'm tired of fussing and just want to print now.
I don't make eye contact with the unopened box of hardware for a 12 filament ERCF lately.
not for months.
for reals. if anything my next actual practical step will be some dead simple means to push open an enclosure door, squeeze the wham bam bed to flex it (pop off the parts) and clothesline the print into a bucket. if not just tilt the whole damn printer and let gravity take care of half the issue
trying not to think of the automatic nozzle changer idea. must. finish. SOMETHING
but seriously though you'd think that would already be a thing right
I can't believe we still use our meat hands. if you look at them long enough and high enough they're actually really really weird.
Meat hands! LOL
I almost gave up on these two Mercs. Until I got Oscar running yesterday, I was pretty f'ing fed up.
I'm doing two too!
Twice the madness!
you should have seen my face when I noticed the third shims. I'd assembled everything, headsets and all, and just dragged myself back to slog through finishing this half a year oddessy
my consolation is that going through this is teaching me a lot more along the way (CAD, mechanical engineering, electronics, hell robotics even) than if I did what is increasingly obvious that would've been likely the more practical choice of buying 10 ender 3s
Wait, we're being practical here? 🤣
well if the aim is like printing all the merc parts in a few hours right?
@tiny bramble just wondering if there ever could be an issue with the screw on the tension towers coming loose? I was thinking of putting a locking screw in the top.
Should not be. The belt keeps it under constant tension.
I know I wouldn't be happy that way either but I def see the value of building an array of simple printers out of all the parts I've got laying around now
I have enough spare rods and steppers and extrusions that I really want to build something unique. But time, money, etc...
bro I maxed out my Amazon card buying everything remotely robotic and mechanical and sensor or anything, Jetson nano, rpi, tof sensors, a dozen of every kind of stepper,
all because I know if I get a cool idea,
and I get it cadded up
...and then gotta wait for parts, that's the end of it right there 🤣
"ask him what he's made with all that crap over the last year of hoarding, also, every tool imaginable down to a mig welder, all in a small 2 bedroom apartment driving the wife crazy as walkable space continuously shrinks"
WHO SAID THAT
One of my best moves was organizing all the shit I bought since my journey started. Much space saved, much insanity prevented.
darting eyes I.. I've made .. proudly gestures around him a MESS. that's what. and that's something
I'm doing exactly that right now. I labeled every drawer and .. plastic bin organizer array thing, and have in an excel sheet exactly how many of what is where, how much they cost, link to buying more.. next step is, you know.. not .. having these bins in the hallway. in front of the TV. beside the couch.
If you wanted to put a lock washer in there, I'd recommend a regular washer underneath. That would be worth a try, methinks.
felt like I had to empty the office lab room or I couldn't put everything in there compact so its all out here
Ah, the relocation problem. It doens't belong here, so where do I put it for now?
if you got tips, throw em at me now or later as you remember em
the belt tension seems right, i dont think ive had any issues and its getting vibration from the righjt pulley pin being on an angle and hasnt come loose
boxes that you sort later
If you don't have an immediate storage, it goes in the "sort later" box
I have a sort later box and a sort later screw bowl
my room for my pc and print was a absolute mess
it's too far for that, like those puzzles where you have to slide around the empty square to solve it
Sort into place. If it's going in the office, put it there. If it's not, put it in another, less full box. Eventually, you will have fewer boxes and much more sorted.
a year ago I had the perfect home office music studio.

Damn, nice


LOOK WHAT IVE BECOME
it.. it all started when ... WIDE EYED POINTS AT ENDER 5+ YOU!
yes, that's a salvaged DESK someone threw away at the dumpster broken down for stock fiberboard IN CASE I MIGHT MAKE SOMETHING FROM IT????
a broken $50 students computer desk?!!?
ok for reals though now that I said that out loud I'm throwing that out tomorrow that's just ridiculous
Gotta start somewhere with stuff like that. It snowballs if you let it.
"I'm throwing this out...oh, shit, that goes too..."
"Might as well get a box."
it's...I believe I've hit that point
"Huh, I have four boxes now. Dumpster!"
I've had this welder for over 7 months
A storage unit is also a possibility for anything you might need later, but not now
you're the second person to suggest that. you know what... im going to look at prices in the morning.
Sweet. Sounds like you were ready to make some decisions and changes already, then.
We had our floors redone about a 18mo ago. Had to do a lot of keep or trash thinking then, too.
what'd you end up doing generally?
Boxes. Store, trash, sell. Sort, then resort.
Sort going into storage, sort again coming out.
Judiciously trash stuff
clutches things
I also stayed super stoned during the process, FWIW. Kinda abstract the thinking process and remove attachment.
So you used a storage space of some kind to buffer things out to make it more processable?
Yep. Since everything had to go out during the floors, sorted into boxes, stored, then resorted coming back out.
Two stages of trash/sell
I mostly ended up trashing stuff I forgot I had and saving newer stuff.
I talked my Dr into giving me a lil Xanax Rx ("so I can nap midday despite Adderall, for biphasic sleep"), it might be the trick. I used to smoke every day, it totally turned off the addy and all the good stuff. then one day a switch flipped and one hit and I'm like AAAAAAAAHH-H thinks of everything ever did wrong in my life AHHHHHHH
I dunno what happened lol
Caution with the benzos. That stuff can really mess with your system.
absolutely.
In fact this is the last Rx I'm filling. it's the minimum dose you can get but I've seen the Xanax zombie people. the dependents. then there's that link to alz
ive got a tig ac/dc welder that ive had 3 years and havent even turned it on yet. it was welding for my car and aluminium
😦
sigh I guess im left with "diet and exercise" rolls eyes
I got a cat to help me with work, and it's still sitting sleeping. Definitely a wasted investment.
I think that's a lot of us...
oh I'll be fine, I'm living at least 2,000 years. if I want to. we're all gods playing a video game anyway who cares
lol
I'm literally going to write "& jonspaceharper" on a card when she's shocked with a suddenly hers again dwelling for her houseiversary reunion. Thanks bro 🧙♂️🫵
Print in place Dragon failed
Booo
there must be something wrong with this printer
Think I might give orca slicer a try
I've heard it's good
yea 2 failed prints with SS
I'll just user the defaults in Orca and see what happens
i used voron trident stock and it was good, just fine tuning really
drop and print no setting changes
Oscar is still going strong. This is so exciting.
Might have to check that out, then
Yea it has a device tab, makes it very neat. Plus you can just slice and send to your printer.
Gonna check that out for sure, then.
Just skip SuperSlicer and Prusa Slicer, I guess? Debate's over.
Thats up to you
I ended up moving from cura to prusa, I wanted to go for orca but the lack of proper linux support killed it for me
Hrm. Didn't think about that bit. My back office PC is a Linux box.
yea I tried printing in orca too just a test square its printign a diamond
doesn't make sense
removing the voron bed its so warped it can print anything

funny from a bed that doesn't move
hahah shimming PEI with paper to better bed leveling
anybody own a 3d scanner. Dad ants to get one and I have no experiemce with one at all
@cedar depot check photogrammetry
@feral prawn he was looking at the new creality ferret model
photogrammetry is not a scanner itself its a technique, afaik works with regular photos
@feral prawn told him not going to happen. He dropped it
wtf
it's not printing again
More specifically, it does not move on the XY plane
Motors just grind
Even just homing does not work
It's the A stepper
Checked connections and continuity
And now it works. 😠 Loose connections are sus connections.
@tiny bramble awesome you got it working. Me tuning trying to figure out why z offset keeps changing on voron after every print....
@tiny bramble maybe probe going bad
@cedar depot auto z?
@feral prawn no running quad level mesh every print but when laying 1st layer have to adjust every z offset every time
hmm I'm not much into how voron ia usually built
@feral prawn Ratrig / zero G ?
Yea I have zero g top runs great no z adjust hardly ever
Inductive probe
Thinking about buying thr beacon
I don’t know, it looks cool but also overkill and somewhat fragile for something sitting under the toolhead, klicky gives me much more confidence
I have read about a light sensor that might also be used for PA and other auto tuning… that would be cool
isn't that what bambu claims to do?

I'm finally open sourcing the code for my automatic pressure advance calibration system.
I developed this system for my Computer Engineering capstone project at Utah Valley University. I've been working on it since the end of last year.
This is (as far as I'm aware) the first open-source automatic pressure advance calibration system. The use...
yes, but with a laser and a nozzle camera
I'll have to check that out
it’s pretty rough, but I think something slick from vendors might came out
Hi. I want a third working printer.
Do I order a new toolhead pcb?
or continue troubleshooting...
Sweet. Someone's selling me an Ender 3 build plate carriage so I can go dual Z on another printer.
Eh, I'm not super big on the switchwire.
I know it's faster, but it's still a bed slinger 😕
True
Ordering extrusions will run $45 with shipping-ish.
Hrm.
I'm gonna hold off on this until later, though. I want to get Big Bird working first.
@tiny bramble 1ST Benchy on voron @44mm/300mm sec


Very nice
ditch it
Not mine
Ditch what
The CR-10. @feral prawn is also not a fan of bed-slingers, but I believe he may be more vocal about it than I am. 😉
I'm just honest and outspoken on what I believe
Put bed rails on it already though cr10s
Pshaw, what? I refuse to believe this absurdity.
same thing if I don't like someone
Napalm?
Need to put the cr10s back together and sell
Upgraded ezboard v2 ezabl 18mm sensor/bed rails
nah just gasoline
They're good starter printers
what i meant for ditch is get rid of it
sell, blow up, break it into millions of tiny pieces
up to you
Hopefully I got the extrusion multiplier tuned on this print. I'll see in a few hours.
that thing is my bible
You and Vengeful harping about it made me finally break it open. It's pretty spectacular.
If...vibrant in color.
I'm finally going to look into extruder backlash
took you a while
This is quite valid criticism.
I spend way too much time making stuff and not enough time making it look correct.
I'm kind of the same
I only do full calibration for stuff I'm selling
when it's for me is a good enough basis
Speaking of which, I think I got the flow/EM right.
pics pls

Retraction/prime is still a little off, I think.

adjust PA and retraction becomes nearly useless
That's why I think it's too high. It's 0.5 but might be able to go lower.
I have a standard of .5 at 40mm/s that I enable for oozier filaments
basically the problem is the bottom right. When it starts a line, sometimes it doesn't immediately adhere. Maybe that's not retraction and priming though.
It'll be fun seeing how well this fits.

As long as the first layer succeeds, it'll be okay
I'm not worried about failure outside that
It's enclosed, but the door is open
It's finished a 24 hour and a 20 hr print already, so I trust it to run for awhile
heh I printed the tops for.mine enclosed door closed
Ahhhh
Have the stuff for the exhaust duct already?
it will be wiring week
just need one adapter from 100mm to 70
for the window
because I'm dumb
and printed something downloaded without measuring
Oh, 70mm duct?
remember english is not my native language 😅
I wasn't picking on that. I found the mental imagery hilarious.
How does one explain this thing? Call it an exhaust clamp. 😆
"You can't adjust it." "That's a design flaw! I'm sensitive about it!"
https://www.thingiverse.com/thing:4148187 it's not this one

Kippfenster Durchführung für 100mm Abluftschlauch z.B. K40 Laser, Anycubic Photon oder ähnliche (3-4teilig)
Tilting window lead-through for 100mm exhaust hose e.g. K40 laser, Anycubic Photon or similar (3-4parts)
but kigjt print this sometime in the future
American windows [edit: in suburbia] are all identical. They all slide up.
I'm googling why it's that way and can't find an answer.
because 'MURICA! ?
If that means "mass production of identically-sized windows reduces costs without an equivalent lowering of price," the answer is yes.
found the one I printed https://www.thingiverse.com/thing:5436726
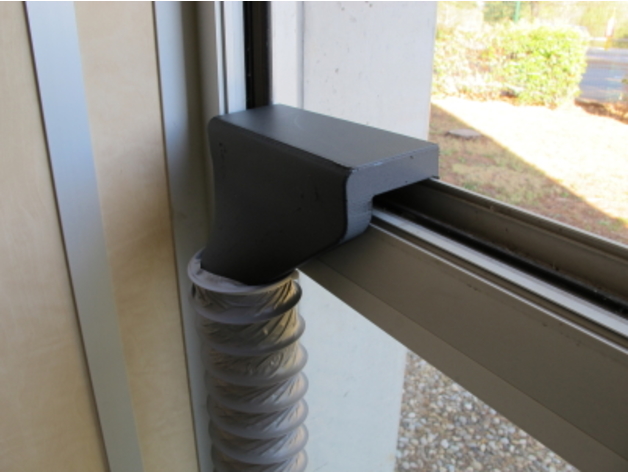
An air extractor to be placed on a window sill to extract the air from the 3D printer outside.
The extractor is mounted on a 100mm external diameter exhaust pipe.
It's extraordinarily uncommon to find that here. I guess I extrapolated too far, but I also rarely encounter them where I've been.
How far north are you?
Mn
I often find differences in building standards relate to climate. That would make sense. I'm in Texas.
its more to do with window size
wide windows slide to the side
narrow window cutouts, slide up
my living room has a 6 or 7 foot window opening, for a single window.
new houses built around here get similar sized windows installed in the main living space.
so 2meter window ?
I've seen those but they don't open here. Unless it's a patio door (which goes sideways, of course).
one big center window, 2 sliding panes on either side
original window was 3 vertical sliding windows?
replaced with modern windows maybe 5 years ago.
just measured it again, its 8 feet lol
Good lord
ohh me likey
This is not a patio door, though?
almost 2.5m love it
nope
wow
I want one of those when I grow up 🤣

Oh that is lovely
the construction around here is all the same. You might find a high window like that, but it's usually in an older home or a custom built one.
my job is for a window company, our domestic sliding windows (side to side) can do 1500mm high x 3010mm wide. but thats slider (25%) fixed (50%) slider (25%) or 4 equal with with fixed slide slide fixed opening from the middle. Our commercial windows can do almost sliding door sizes as windows. we have done doors as windows as people wanted massive windows before. biggest doors we have done at the branch i worked at was 3000mm high by 1800mm wide per door panel, had 11.52 special laminate in them. they were 250kg per panel. Architectural houses are insane and have some crazy stuff!
1800 wide door sounds nice
they were 5.4m wide in total, 2 sliding and 1 fixed
so when open it was about 3.5m opening
Makes me think of the giant sliding doors at natatoriums.
3m wide heavy-ass doors that lift to vent the chlorine fumes and keep cool in summer.
these were just balcony doors lol
Wish my home balcony doors opened to a natatorium
we do some high end stuff and alot of custom made size/configuration. but we also do custom made stuff too. our commercial branch made a completely curved bifold door with curved glass in it
"What's on the second floor?" "Oh, a gateway to a natatorium in another dimension."
That sounds amazing
Btw, found the EBB36 on sale, so I went ahead and bought another to see if that's the issue with Big Bird.
its a very unique industry but there is so much to know and learn, that is what kept me in it
when are you making a mini printer called elmo?
I really would like to get into manufacturing in some way.

STARTING NOW

Actually that would be pretty cool. Maybe 150mm^2 build plate
Elmo has the need. The need for speed.
I have the parts to make The 100 or whatever it's called, I think
this is a what the company i works for can do in a full commercial aspect, we did the curtainwall glass and also the aluminium sun shades

That looks stunning. I love reflective windows.
thats just energy efficant glass
im going with that but in a grey with silverish shine for my enclosure
Is that the super thick stuff?
Energy efficiency in glass is, sadly, not common in America.
that would be 12.76mm energy glass in that pic, so 6mm clear with 6mm energytech with a 0.77 slight green interlayer
we had energy standards come in and the building industry was like "that means smaller windows probably" with using energy glass they only got bigger
Want. That would do wonders for my summer AC bill.
It's not bad compared to my neighbors, but still. I'd like to not have my blinds closed all summer.
About four hours left on the new OmniBox print. That's ridiculously fast; I started it 8 hours ago and it's both halves of the base.

thats looking tidy
Thanks!
That's Oscar; I believe he's about done. Just tuning left.
And hopefully I can get Big Bird to work today, too.
so he isnt so grouchy anymore?
He's never been a grouch, tbh. Oscar is pretty well-behaved. Not as nice as Grover, though. Grover just keeps printing.

Big Bird, however...
Shouldn't complain, though, cuz I got Big Bird for like 100-150$ used. Just needed a lot of dusting.
Big Bird is working. The old EBB36 was dead
I had to replace the sb2040 v2 now put a sb fan 3007 on it to help cool it
Yeah I have a 3010 I need to put on there
It helps
My nice, fancy, brand new EBB36 died instantly when I tried to heat up the hotend.
So, that's not gonna work anymore
As soon as I told it to heat up, died.
Made me wonder if there was a short or something
polarity?
wait doesn't make sense, board would not work or die before
heater has no polarity
unless heater is shorting
Nah, wouldn't power up if that were it.
But it might be some other issue with the board that powering it up shorted something else or who knows
At least this one's in the return window
Update:
- Oscar is printing and working. Unless something else comes up, this build log is back to Big Bird alone.
- Big Bird blew his second EBB36, so I ordered an EBB42 instead.

Happy Fathers Day tomorrow to all the Dad's out there
AND my gantry is square.

Not having a square gantry certainly explains the ringing. Getting it correct was a lot easier with the gantry lock bars, though
Which I will now use religiously again.
How do you get the graphs I ran mine but don't see the graphs
I use the alignment tool also
Got something going on. But not sure what it is

calibrate_shaper.py
Then grab the png file it spits out
I'm printing at ~3000ish accel, 100mm/s and it's coming out beautifully. Sweet.
(Infill and travel are at 4500)
Show and tell coming today. Prints are square, smooth, and delightful.
serial!!
you have 2 to claim 😜
Unfortunately, it's only one printer being delightful. The other one is still waiting a new CAN board.
But yeah, I should get my serial soon.
I wish the printer wiring looked as nice as the enclosure it's in (the wooden one)
well.. I’m sure your “bad wiring” is more than my best effort 😅
It's not bad, just could be neater
Speaking of which, gotta go finish neatening up someone else's printer.


I'm particularly proud that text in the second pic come out so clearly. Ringing is just gone.
New Dual Z Mount
This uses the stock Ender 3 carriage to mount the build plate. These are easier to come by for free than the $30 worth of idler plates I was using.


I'd like the kinks worked out before switching Oscar over to dual Z.
Hail hydra
@tiny bramble which cslicer are you using ...super slicer giving me all kinds of issues
@tiny bramble thinking aboutswitching to pruserslicer
@tiny bramble parts are looking awesome
Cura, lol
Working on a coupler like the one @potent stone modified (or found, can't remember), but has a PC4-M10 coupler on both sides


ohhh, I just also modified one to hold my umbilical wiring 😂… I like it a lot, as I’m fan of any print in place in general
Me, too! I'm playing around with it to see how small I can make it, then maybe adapt it for somewhere else
I have an enclosure that this is perfect for
I am trying to modify one to have an extra support… maybe I’ll send you the sketch, I spent 1 day in fusion and still haven’t figured it out
I'd be happy to look at it
So I made this cable guide, terminating with the "back ring", all the holes are for zip tight, I already printed it and it seems to work

looks nice
but I am struggling with the front piece, right now I printed it like this and it works (8.2mm hole, 20 mm higher, snug fit to my canbus wire)

So wires will go through that?
What part about the front are you struggling with?
yes, the wires would climb to the back of the printers and pass trough there, but I want to reinforce the piece by also connecting to the to panel, where is solid wood (the back is not the stronger plastic, I'll add some plexiglass as well, but still...). So I want to add something like this
ops

I hope you understand 😂
So extra screws holes that attach to the wood?
Ohhhhh where you want those screw holes, there is more wood
yes, the thing is mounted in a vertical wall, the back plate of the enclosure, and the extra holes will grab on the top beam
I probably could have done this differently 😅
Hmm. Tbh, you've got 3 M3 screws holding it in place. And I saw more screws holding the other side down. Are you sure you need more reinforcement?
but I really like this wiggling stuff