#EVA 3 Mercury Mod
1 messages · Page 8 of 1


 fringe zephyr
for.me it's worth it because I can get more area to.move
the pro is tight on the back
 wise karma
Fair enough. I'll try the one I have
 ivory finch
@velvet wing put on new stuff, and love it. the owl eyes don't need the honeycomb mesh, as there is more than enough clearance for the intake. love the new ABL mounts, will not break.

 ivory finch
fringe zephyr
<@472187054625652766> its the inverted?
ivory finch
fringe zephyr
<@472187054625652766> its the inverted?
?
fringe zephyr
ivory finch
?
zerog logo pn shroud
ivory finch
ah, yes, it is. lol
the new stuff I meant new owl eyes, new front, new ABL, and new fan duct.
now to run bed level tests until I have the z-offset dialed in butter smooth. lol
 buoyant zinc
@velvet wing I'd also like to test new dual_5015_owl_eyes.stl, but reading the thread you made more updates - should I print something more too?
buoyant zinc
Thanks @fringe zephyr , I'd skip reprinting it whole (for now). But if weight is greatly reduced, I may rethink my previous sentence.
fringe zephyr
new top does not gain you much weight saving
but I got a few extra mm on X
that I needed
cutout is minimal weight saving IMO
buoyant zinc
I was referring to #1041406799342997544 message
fringe zephyr
ah that's the one for beacon
buoyant zinc
if multiple parts are trimmed down, it adds
fringe zephyr
BTW @velvet wing are you redrawing UHF duct?
buoyant zinc
let him rest 😄
fringe zephyr
not in a rush to get answer
this way I don't forget to ask and he can reply whenever he has timw
we need to give him those Teslas
he did the owl
buoyant zinc
agree - he earned mine
 velvet wing
fringe zephyr
BTW <@755022853040111697> are you redrawing UHF duct?
velvet wing
fringe zephyr
BTW <@755022853040111697> are you redrawing UHF duct?
it saved 1g!
oops, answered the wrong person
fringe zephyr
I'm not giving mine 😛 but I'm currently working on something else he will use
Dutch can too if he feels like it
but that will be later
need to work on the docs
velvet wing
hehe, we'll see. It's already super useful.
buoyant zinc
spill the beans... can is open
velvet wing
buoyant zinc
spill the beans... can is open
hoping to automate a lot of stuff I do on the back end of the documentation.
buoyant zinc
@velvet wing do you have a clue what is "something" @fringe zephyr is working on?
velvet wing
buoyant zinc
<@755022853040111697> do you have a clue what is "something" <@29305063518673305...
yep, but it's his baby to discuss, not mine. 😉
buoyant zinc
nice! ❤️
velvet wing
it'll let me pull data at-will from a single BOM. partially automate generating new documenation, and allow stuff like a configurator for zipped STLs.
fringe zephyr
each part has a different number of HSI, different screws etc depending on what you choose
velvet wing
I'm soooo excited
fringe zephyr
it's like merc or hydra configurator but also generates adapted BOM
also download "should" be faster
and handles dependencies on parts
buoyant zinc
now you got me excited as well.
Versioning? Like if I am updating from older build - can it handle diffs?
fringe zephyr
nope but that's a nice idea
buoyant zinc
here to help
velvet wing
buoyant zinc
here to help
In that case, we were discussing Teslas... 😆
fringe zephyr
now I have to implement it :<
fringe zephyr
velvet wing
In that case, we were discussing Teslas... 😆
the printed ones or the drivable ones
velvet wing
fringe zephyr
the printed ones or the drivable ones
I don't think the owl eyes agreement specified, did it?
buoyant zinc
No worries - I'll put some Pupins besides Teslas
fringe zephyr
velvet wing
I don't think the owl eyes agreement specified, did it?
it did not
velvet wing
oh dear me
fringe zephyr
@velvet wing you tag releases right?
velvet wing
fringe zephyr
<@755022853040111697> you tag releases right?
omnibox ones, yes. E34M1 kinda got away from me
I...uh...did not plan this one
buoyant zinc
@fringe zephyr do you mean to use git diff as a tool to identify updated modules?
 pine jewel
using semver
if you just put a text file in the release with the version, you could compare all part versions
like have an upload to only get the changed parts
or just a basic form to select the version of each part
diffing is my specialty 😆 I do it all day at work lmao
buoyant zinc
Ok, we are spinning the idea...
pine jewel
you can go brain dead simple, or overly complex 🤣
fringe zephyr
the code will be my pain
pine jewel
what are you writing it in, if you open source I can help out
 velvet wing
rofl
fringe zephyr
on top of Quarkus
I couldn't refuse native compilation to host it wherever I want (lambda too if needed)
pine jewel
yeah that's fair, I just haven't dabbled in that realm for ages
fringe zephyr
php guy?
pine jewel
usually stick to web based or Erlang/elixer, go, rust etc
fringe zephyr
fuck Go
fringe zephyr
Go can go die somewhere far
I was forced to write complex business logic with it, I'd rather cut my wrists than do that again
pine jewel
I've mostly stopped thinking about go. I do most in elixir these days
fringe zephyr
elixir can't say anything never played around with it, been mostly a Java/Kotlin guy it's where I know most frameworks and where I'm more productive
pine jewel
that's the important part, productivity
fringe zephyr
it's pretty much what I write daily
hmm let me think about the diffs, not sure how easy it will be at least automatically
also it will become OSS at some point but not polished enough for that
need to pick license as well
usually Apache2 or MIT
buoyant zinc
Did you name it?
fringe zephyr
yes not final though
buoyant zinc
BOMfigurator?
buoyant zinc
Bundlr - taken
fringe zephyr
buoyant zinc
Bundlr - taken
name or domain? I don't care about domain
buoyant zinc
name / there is an app with that name
buoyant zinc
pine jewel
bomulator 🤣
 pine jewel
hahaha exactly!!! 😆
velvet wing
what about "Bombastic"?
buoyant zinc
Name BOMulator- sorted, License MIT - sorted, going for OSS in near future - can survive for now, features - version support, auto builder, dependency management... Release date?
buoyant zinc
velvet wing
what about "Bombastic"?
too explosive
 barren flame
Bomtastic
 north ingot
Awesome! Thank you so much for all your contributions! I literally look forward to these updates!
I'm printing:
- belt_grabber.stl
- front_basic.stl
- hotend_rapido_uhf.stl
- rear_inlet_15mm_cpap_beacon.stl
- beacon_bottom_uhf.stl
- abl_cr_touch_uhf.stl
- top_right_endstop.stl
I'll post updates when everything is assembled and working!
still waiting on the beacon to arrive though :)
 north scroll
@velvet wing (for when you’re awake)could it be that the belt slots in your ‘pre-reworked-for-abl-front’ are about 0.5-1mm too high? I am trying to figure out if I made a mistake in mounting the belts, or if that is the case. since I see the belts tilt very slightly down on my Merc. Pretty sure the carriages and the toothed idler stacks are correct, and that the rail is nice and flush and such… Will try to capture a sphoto when it’s done with the current print.
velvet wing
north scroll
<@755022853040111697> (for when you’re awake)could it be that the belt slots in ...
lemme check really quick. Lines up in CAD, but I can make mistakes.
nope. My test printer has very straight belts
Here's the CAD view, as well
 north scroll
velvet wing
nope. My test printer has very straight belts
north scroll
velvet wing
nope. My test printer has very straight belts
Ok.. Then I'll doublecheck the belt seating, because it is causing the belts to start riding up on those toothed idlers, and that's working its way around the whole system of course. Odd.
Thanks for doublechecking!
north scroll
I think I may have the culprit... The top doesn't sit quite flush with the carriage, it looks like. May have gotten damaged somewhere along the way. Going to disassemble and inspect and see if that is indeed the problem....
 velvet wing
north scroll
I think I may have the culprit... The top doesn't sit quite flush with the carri...
velvet wing
north scroll
I think I may have the culprit... The top doesn't sit quite flush with the carri...
check that your heat set inserts are completely set
i.e. flush with the bottom of the printed Top
barren flame
north scroll
I think I may have the culprit... The top doesn't sit quite flush with the carri...
If the screws that go into the mgn carriage don’t go thru the holes in the top part that is sitting up easy and you need to screw them through you will get issues like this. Easy fix is to take it off the mgn carriage and screw it in and then when it’s tight keep going to make the hole bigger. Then it will go on and screw in without binding up on the top part.
north scroll
Looks like the problem was there. Not quite with screws, or the carriage itself, but there was some gunk build up from pushing in the heat inserts (the 'crater' if that makes any sense?) that made it uneven on the surface that was supposed to mate with the carriage. Cleaned it up, reassembled, and it's looking better now.
velvet wing
north scroll
Looks like the problem was there. Not quite with screws, or the carriage itself,...
ah, that can happen sometimes. glad you figured it out.
 still bluff
@velvet wing Could you add support for the BD sensor?
GitHub: https://github.com/markniu/Bed_Distance_sensor
VzBoT mount for reference: https://discord.com/channels/829828765512106054/1163237892957671424

GitHub
Auto bed level with High resolution distance sensor - GitHub - markniu/Bed_Distance_sensor: Auto bed level with High resolution distance sensor
velvet wing
still bluff
<@755022853040111697> Could you add support for the BD sensor?
GitHub: https:/...
I can take a look, but no ETAs right now 🙂
 terse trench
You are correct. Any ducting that is large will not build up enough pressure in the duct to keep the outlet air from being lazy. However, you can control the velocity at the model by the duct distance away from the model. I print ABS mostly, and this is not a problem to use 50% air from CPAP, or more. The air entering the blower is chamber air and the compression of the air get's heated more in the process. So you are effectively creating a boundary of air over the build plate that is more homogeneous to the model. The ducts also en-train air and pull the bed heat. However, it is necessary to use hjgher temp for ABS. For instance, Bumat ABS, which needs more temp that most, prints at 275C for speedy print at 260-265 for a little slower. Polymaker prints at about 255-265. I recently printed a light bulb, in ABS, using 3 walls, at 200-400mms, 20K acceleration, 20SCV, and for 3 days now still holding water. The duct I designed for VZ is a bastard of my design. The path is not ideal for the air due to the location of the toolhead frame. It was something I made to see if it would work with less than ideal duct path. Many just want to try the duct and discard if does not work to their expectations. A lot of work goes into making these and more R&D is needed to tweak different platforms.
wise karma
@velvet wing what are we using for a klicky dock with the E34M1? My klicky dock that worked on my 2.4 is significantly too high for the Eva 3. I also think the flat dual 5015s might work better for me.


So there's a 4.55mm gap between the klicky probe and the top of the "hump" that holds the magnets on the fan duct. The magnets on the fan duct are 11.55mm lower. I'm thinking the klicky dock needs to be lowered ~7mm for it to clear....
still bluff
@wise karma are you using this one? https://www.printables.com/model/595738-ender-5mercury-one-klicky-probe-dock

Printables.com
This is a Klicky probe dock for Ender 5 and Mercury One printers. | Download free 3D printable STL models
wise karma
@still bluffnope, im printing it now though. thanks!
wise karma
Lol just realized I had to purchase a different microswitch for the x end stop. That'll be here tomorrow. I'm gonna have to reprint some stuff in asa once this is up and running. I'm printing temp parts on my ender 3 out of pla.
 uncut grail
terse trench
You are correct. Any ducting that is large will not build up enough pressure in ...
uncut grail
terse trench
You are correct. Any ducting that is large will not build up enough pressure in ...
Thanks for sharing some of the details!
barren flame
terse trench
You are correct. Any ducting that is large will not build up enough pressure in ...
Been watching the YouTube videos, that printer is nuts! Love the design in it. I’d seen your duct designs and thought they were different but lots of development. Didn’t want to ping you before as I’d seen you’d kinda moved on from being here more.
wise karma
Damn how do you get it to look so good. I think my first layer might be too smooshed
terse trench
barren flame
Been watching the YouTube videos, that printer is nuts! Love the design in it. I...
I move around a bit. Always trying new things... Mainly, I love to solve problems and this is a way to keep my brain functional. I am fairly new to 3DP, so I am looking from the outside in.
still bluff
@wise karma I use this STL a ton to test for the smoothness of my first layer, https://www.printables.com/model/251587-stress-free-first-layer-calibration-in-less-than-5

Printables.com
First layer the base of everything. No proper Z layer no proper print ever.Solving the terrifying mystery of Z layer. | Download free 3D printable STL models
wise karma
@terse trench I just watched Vez's video about the cpap with the intake being in the camber, it got me thinking if I would have more or less luck printing asa/abs with 10-30% fan on since it's in the heated chamber and not fresh outside air.
wise karma
still bluff
<@746404665633276018> I use this STL a ton to test for the smoothness of my firs...
I've seen this one I've never tried it. Added it to my todo list once my printer is operational again
Thanjs
still bluff
Make to slice it with the infill direction at 0, not 45.
terse trench
ABS needs fan, mostly always. How fast you print determines how much you need. This talk that ABS needs zero cooling is just not accurate. Getting that air hotter is better for sure. Too cold and it will warp the filament from sudden temp changes. the air coming out my ducts is hot when I put hand under.
I do have a door to get ambient, but it still get's heated from compression, just not as much. So for PLA that works also.
IMO the EVA 3 duct is worse than the 2.4 duct. It's just too big and those dividers hurt air flow. The 2.4 is too small and does not have any layer cooling. I used that one for a long time then started to change to something different. I looked into EVA3 and gave up on it. 2 5015 fans on a toolhead or 1 4028 is quite large. Just seemed to make more sense to go with CPAP to get rid of the weight. 4028 does work good but just as loud as CPAP.
wise karma
@terse trench I'm gonna stick with the 5015s for the moment, cpap isn't in the near future for my build I think I've spent all I can on this build ATM lol
terse trench
wise karma
<@840043656072396840> I'm gonna stick with the 5015s for the moment, cpap isn't ...
It's ok whatever you use. In the end you are limited by cooling, so use what you have! Some are using the Roborock vacuum cleaner blowers. They say they are much cheaper, but I have not looked into them.
wise karma
terse trench
It's ok whatever you use. In the end you are limited by cooling, so use what you...
Vacuum cleaner blowers??? Well I think if I stick with the 200-250mm/sec range for PLA my set ups should be ok. I made a couple helmets with my old set up which was eva 2.4 with 1 5015 and the helmets came out great. My asa parts were meh but that was with no cooling at all.
terse trench
It also depends a lot on the layer height/nozzle width. If you want to print functional stuff, like a helmet, you can get it done much faster with bigger nozzle. But that will tax cooling quite a bit. most helmets can be post processed for a better look anyway.
wise karma
terse trench
It also depends a lot on the layer height/nozzle width. If you want to print fun...
Yea I do a lot of post processing on my helmets. I'm going to start doing them with a .6 nozzle. I think with my set up the dual 5015s will work great. If not I'll have to figure something out lol
terse trench
Probably be ok.. It's more of a functional print and not close quarter nozzle printing. So there is time to cool the part.
velvet wing
terse trench
You are correct. Any ducting that is large will not build up enough pressure in ...
Thanks for responding! I could tell from the get-go that you put an enormous amount of work in these. ❤️
north scroll
terse trench
ABS needs fan, mostly always. How fast you print determines how much you need. T...
Absolutely agree. ABS hates cold air, but it likes being cooled (gently) with chamber air, provided it's above 50-ish degrees.
 spark dragon
heya, do you know if the bottom mount you made for the eva3 is compatible with the rapido 2 hotend? Thanks and awesome work!
terse trench
I know this is an E3D mod group, but I hope more ppl will start to use this design. I have came up with a way to make this a bit easier now so I may try and change the EVA 3 to something like it. Not sure on the space available for most builds.. it's a fatty.. This is a new 1 piece design I made today. Thought it would be hard to print, but the printer didn't seem to mind! Really good performance with this duct.


 pine jewel
terse trench
I know this is an E3D mod group, but I hope more ppl will start to use this desi...
pine jewel
terse trench
I know this is an E3D mod group, but I hope more ppl will start to use this desi...
… is that mf valves??  👀👀👀👀
👀👀👀👀
terse trench
STraight out of a ZX10
velvet wing
spark dragon
heya, do you know if the bottom mount you made for the eva3 is compatible with t...
it should be, yes!
velvet wing
terse trench
I know this is an E3D mod group, but I hope more ppl will start to use this desi...
I am 100% in favor of a better duct for EVA 3. Also, AMAZING work.
terse trench
Just had to..
 velvet wing
yellow jacket?
velvet wing
ooooh
terse trench
black and yellow will have to be it for now
if you are ok in CAD, these are not hard to make
can't believe more are not using them.
velvet wing
the principle is pretty straightforward, but knowing how large to make the valves, etc. is more difficult
okay, so the principle is not straightforward to 99% of people, but I have a working knowledge of fluid dynamics 😄
terse trench
Not really. You just want a taper to build velocity and make the path easy on the air. Make like motorcycle intake tract
But I don't think this will work with 5015. Maybe.. 4028 for sure and CPAP
velvet wing
what about dual 5015?
velvet wing
fans with high static pressure will count for more than airflow in this application?
terse trench
The octoduct works well with 1 5015. But the layer cooling does not cover all over like the valve duct
terse trench
velvet wing
fans with high static pressure will count for more than airflow in this applicat...
I like static pressure over low pressure high volume
you need some pressure to fill the duct
The reason I make them so big is to have a plenum of air to be controlled by the nozzle
velvet wing
kind of like a compressor tank?
terse trench
The air is not laminar inside
velvet wing
sorry, I mean it acts like a pressure reservoir
velvet wing
I kinda wanna play with this concept now, lol. Never thought I'd want to design a duct, but here I am.
terse trench
There is one already made for VZ with step file for the lower duct. Just place it and add to the back end.
But stay away from 90° turns
velvet wing
yeah, makes sense.
if I have some time in the next month or two, I might take a stab at adapting this
terse trench
this one only 4 sketches/lofts

can't make it perfect with the space you have, but better to try to make the turns gentle
terse trench

it's very big inside. So the air can fill everywhere. the inlet is small, but the velocity is high. That way the duct will deliver air evenly to both sides.
with 5015, you could make 2 separate channels
velvet wing
one for each fan?
terse trench
yes
It might flow more laminar until it get's turbulent, further down. Depends on the speed of the air and what it hits. But it will naturally go turbulent based on temp and speed.
velvet wing
what do you use for your CFD analyses?
terse trench
I use AD CFD
The main thing, for me, it to look at the pressure and velocity. And where it goes. But hard to get all the variables right.
So is just a baseline.
Since you use the EVA3, have you used the EVA 2.4?
velvet wing
terse trench
Since you use the EVA3, have you used the EVA 2.4?
I've modded parts of it for others, but that's it
terse trench
Those that use the EVA 3 are seeing better results from the 3.0?
velvet wing
terse trench
Those that use the EVA 3 are seeing better results from the 3.0?
in general or with the ducts?
terse trench
the EVA 3. This group is using it for Mercury. So I thought it might be good?
Have you seen this video? https://www.youtube.com/watch?v=pFpKKc4nwXM
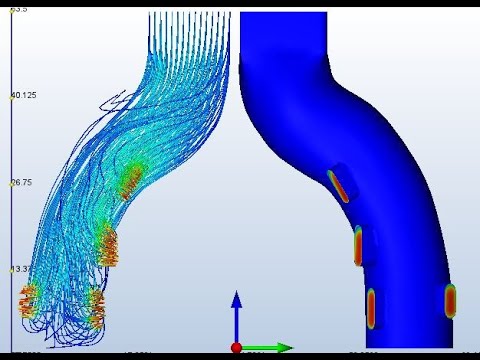
I had a chance to print a benchy in 10 minutes to test the Octoduct vs the EVA 2.4 using the 5015 fan. This test is not directed at the total quality of the benchy or made to discredit the EVA2.4. The EVA 2.4 is a good duct, I just wanted to see if I could make something better and the EVA is a good duct to begin with!
The test is aimed at the...
This was the concept I made the valve duct from
velvet wing
terse trench
the EVA 3. This group is using it for Mercury. So I thought it might be good?
it's a little heavier than EVA 2.4, but it's pretty flexible. I've redesigned a lot of it for weight and convenience. The ducts are the weakest part, IMO.
A lot of folks are also using this mod because of the documentation, too. It's just easier to build.
velvet wing
terse trench
Have you seen this video? https://www.youtube.com/watch?v=pFpKKc4nwXM
I saw a 4 minute version of this, I think
terse trench
I had some issues with that duct. At least what I found with regard to dividers inside the duct. Generally, they do not work well. CFD does not like it either.
That video just shows how those 2 side orifices add to cooling in a different way
it's night and day difference with those side ports.
velvet wing
terse trench
I had some issues with that duct. At least what I found with regard to dividers ...
yeah, there have been hints it's not ideal, but I don't have the knowledge with CFD software to test that
terse trench
Real world testing?
velvet wing
not a lot of options to compare against unless I start designing my own ducts 🙂
I wanted to look further into it, but other stuff's been a priority
terse trench
it is limited. But it performs better than EVA 2.4
There is not enough air with 1 5015 to further make octo better. I had to size up to 4028
Then it still was not omnidirectional
So I had to try something else.
velvet wing
i definitely will find some time to mess with this, just not sure when
pine jewel
terse trench
Have you seen this video? https://www.youtube.com/watch?v=pFpKKc4nwXM
oh dude ive seen this, p rad
also i will send anyone whom needs a valve one from my old gsxr 😂
uncut grail
terse trench
Those that use the EVA 3 are seeing better results from the 3.0?
I moved from the Eva 2.4 tri-horn to Eva 3 dual horn and feel like it was an improvement... Was running dual 5015s for a while, just converted to CPAP
Seems like there's room for improvement, I'm definitely interested in checking out your ducts to compare and contrast!
I'll have to take a closer look, I've got a beacon to account for...
terse trench
uncut grail
Seems like there's room for improvement, I'm definitely interested in checking o...
There is a beacon version on my thingiverse. But no CAD for it. Only the one without flange in CAD.
I have not been handing out CAD, only one model on thingi. In order to develop this duct even more, there needs to be more ppl using it to find weakness.
uncut grail
All good, I'll check it out... thanks for pushing things forward, always good to see new ideas and approaches!
buoyant zinc
Interesting - Ratrig is breaking away from EVA3 https://docs.ratrig.com/v-core-3-1/ratrig-toolhead-v1-0-upgrade
fringe zephyr
yep
north scroll
Isn't there a hint somewhere in one of the chats about Merc adopting the RatRig toolhead too? Or was that the Vz toolhead, or is that same thing?! 🤔
velvet wing
north scroll
Isn't there a hint somewhere in one of the chats about Merc adopting the RatRig ...
Vz is being adapted
an aluminum version, i believe
north scroll
Ah, ok. Got confuzzled... 😂
 dawn sundial
north scroll
Isn't there a hint somewhere in one of the chats about Merc adopting the RatRig ...
dawn sundial
north scroll
Isn't there a hint somewhere in one of the chats about Merc adopting the RatRig ...
that was dropped in the vzbot mod section.
spark dragon
@velvet wing your beacon_bottom_uhf mod, is it for the low profile beacon?
velvet wing
spark dragon
<@755022853040111697> your beacon_bottom_uhf mod, is it for the low profile beac...
correct, no other styles are meant to work, unfortunately
Documentation for the EVA3 for Mercury One mod.
north scroll
Woke up to find this this morning. Left it to print some dessicant containers overnight. No problems at all since the rebuild, haven't swapped nozzles since, new spool of filament.... Blech... Will need to figure out how to salvage the Rapido from that... Very much unhappy.

 fleet idol
Looks like the hotend fan gave up on life
Hm, maybe not, the hotend is still in place
fleet idol
But the blob would end above the heater
Otherwise fresh plastic is just straight up extruded without heating
fringe zephyr
all I know is that it looks painful
velvet wing
yeah, that torque on the plastic is crazy
spark dragon
velvet wing
correct, no other styles are meant to work, unfortunately
thanks for confirming, and my bad for not seeing that page
spark dragon
north scroll
Woke up to find this this morning. Left it to print some dessicant containers ov...
if you can get heat to it it might be salvageable... i had a similar mishap a while back on a creality hotend and was able to rescue it. I imagine for your setup if anything is outright damaged it would be the plastics before the metals.
velvet wing
spark dragon
thanks for confirming, and my bad for not seeing that page
hehe, no worries!
north scroll
I think one of the bits I was printed let go of the bed, got stuck to the nozzle, and that ended up blocking everything.
But I'd have to look into that humungous brick of plastic to get some level of confirmation... No idea..
north scroll
spark dragon
if you can get heat to it it might be salvageable... i had a similar mishap a wh...
Yeah, but the heater is one of those ceramic things, they tend to be a bit fragile... We'll see.
spark dragon
north scroll
Yeah, but the heater is one of those ceramic things, they tend to be a bit fragi...
true... have you tried powering the heater to see if it still works? If so then you might get lucky and be able to pull that hunk of plastic off slowly
I forgot about it being a ceramic heater lol
north scroll
It heated up to 120c, didn't want to push it higher. So it appears to register temp and heat... That's promising.
spark dragon
what material is it?
north scroll
Jayo PLA Plus. Never had issues with it before, and it was a fresh roll. Doubting it was a clog in any case.
But at least I don't have to heat things up to 354870265c to melt the plastic 😂
spark dragon
haha, true
try bumping the heat up to 150c and see if it begins to melt
pla should start to soften between 150-160
north scroll
I already took it off. A bit hard to heat it up the normal way now 🤔 I was pondering putting it in the oven since while it's mounted it's a bit hard to do something with it.
PLA should already go above 70-ish, really. It's not heat-resistant at all. Only the HT-PLA types should resist over 100c worth mentioning
fringe zephyr
oven and heat gun
spark dragon
north scroll
I already took it off. A bit hard to heat it up the normal way now 🤔 I was pon...
yeah, could try baking it or use a heat gun as @fringe zephyr suggests
north scroll
Well.. project for the weekend.. *sigh
fringe zephyr
I wish there was a good "universal" solvent
north scroll
Now printing a hotend mount for two alternative hotends I have lying around so I can at least use my newly serialized Merc.
north scroll
fringe zephyr
I wish there was a good "universal" solvent
That would be SO nice....
spark dragon
north scroll
PLA should already go above 70-ish, really. It's not heat-resistant at all. Only...
true but with that clump, you want to melt it... i used the wrong choice of words ><
north scroll
spark dragon
true but with that clump, you want to melt it... i used the wrong choice of word...
Ahhh, ok.. yeah.. truly make it go liquid, you mean
fringe zephyr
north scroll
That would be SO nice....
I have a hotend to clean that has a mix of PLA and PETG
north scroll
Or semi-liquid
spark dragon
north scroll
That would be SO nice....
I mean... doesn't acetone break down pla?
north scroll
Don't believe so. It works on the ABS family, but not on PLA, I believe.
spark dragon
I thought it outright eats away at pla which is why you can't use it for smoothing
north scroll
That's interesting.... Worth a try
fringe zephyr
ethyl acetate for pla
north scroll
Can't do any harm
spark dragon
I could be wrong though, it's early lol
north scroll
ethyl acetate... euhhh... sounds like one of those things that isn't easy to get.. like MEK (methyl ethyl ketone)
fringe zephyr
mek is way worse
velvet wing
north scroll
ethyl acetate... euhhh... sounds like one of those things that isn't easy to get...
MEK is much harder to get
fringe zephyr
from what I'm reading ethyl acetate can be found in nail polish remover (the acetone free kind)
so should be easier to get
velvet wing
fringe zephyr
from what I'm reading ethyl acetate can be found in nail polish remover (the ace...
it's used as a MEK and acetone substitute
spark dragon
and on amazon, apparently lol
fringe zephyr
might get myself some too
velvet wing
it's still kinda intense. evaporates so fast you can get flash burns.
sunburn flash burns
but still hurts
spark dragon
personally, I'd go the heat route first to at least get that huge blob off, then work my way from there
north scroll
Interesting....... Oooh.. playing around with chemicals too.. Yay! What could possibly go wrong 🦹
spark dragon
north scroll
Interesting....... Oooh.. playing around with chemicals too.. Yay! What could *p...
science is fun!
fringe zephyr
I'd use the chemical way for residue
north scroll
Yup... That's the route I am planning so far 😂 Heating..
velvet wing
ethyl acetate, MEK, acetone...they're very good for soaking to get the remnants off. but it's not like goo gone where it melts off.
north scroll
Escalate from there
fringe zephyr
sodium hydroxide apparently works too
 fringe zephyr
and that's an easy one to get
spark dragon
north scroll
Yup... That's the route I am planning so far 😂 Heating..
time to nuke it...
north scroll
I'll let you all know sometime this weekend, I hope
velvet wing
really? sodium hydroxide...hrm
spark dragon
be sure to log the process, preferably via video
fringe zephyr
I wonder if those eat PETG too
velvet wing
keep the FD on speed dial, too
Experimenting with @terse trench 's concept


this won't be printable, just a proof of concept
I didn't think I'd get this far, tbh. Doing stuff I've never done in Fusion well before.
fringe zephyr
we really need an universal solvent but then how do we store it
velvet wing
fringe zephyr
we really need an universal solvent but then how do we store it
this feels like the unstoppable object and immovable wall question, lol
north scroll
velvet wing
this feels like the unstoppable object and immovable wall question, lol
Ducttape
Ducktape? Ductape.... whatever.. that stuf!
velvet wing
north scroll
Ducktape? Ductape.... whatever.. that stuf!
technically both are correct!
fringe zephyr
velvet wing
this feels like the unstoppable object and immovable wall question, lol
it is, I have read an old story about an alchemist apprentice that claimed he had done an universal solvent, the master immediate question is "how will you store it?"
fringe zephyr
north scroll
Ducttape
one of the engineers best friends along with zip ties
velvet wing
It was marketed as both duck tape and duct tape at different times by different manufacturers, so both are considered correct.
fringe zephyr
does it quack?
spark dragon
not gonna lie, the mishap sounds like the perfect reason to buy a flamethrower
velvet wing
fringe zephyr
does it quack?
lol, the duck does
fringe zephyr
I wonder if the "not a flamethrower" is still sold
spark dragon
north scroll
Ducttape
100mph tape is better ><
fringe zephyr
say what you will, but selling a flamethrower with that name to mock regulations that say you can't sell a flamethrower is genius
velvet wing
OT: my cat's secretly been moving a monitor I did not realize was on a mobile mount. I thought I've been losing my mind.
spark dragon
velvet wing
OT: my cat's secretly been moving a monitor I did not realize was on a mobile mo...
mischevious!
@velvet wing question for ya... of the original eva3 for rapido and lgx (big), how many of the parts are usable with your remix? I may or may not have printed out a full set before realizing it's not compatible with mercury one lol
velvet wing
spark dragon
<@755022853040111697> question for ya... of the original eva3 for rapido and lgx...
the hotend mount and extruder mount are both compatible
pretty much everything else is modified in some way, lol
spark dragon
gotcha, thanks
barren flame
On the solvent talk, could try paint strippers or could try DOT 3 brake fluid if you have exhausted every other possibility and will be looking to throw it out? MEK was/is very popular for paint stripping and is still easy to get in some places. It’s also called butanone.
velvet wing
barren flame
On the solvent talk, could try paint strippers or could try DOT 3 brake fluid if...
we may have different legal obstacles based on local laws. MEK substitute is all you can find here for paint stripping now.
The can says "MEK" and in tiny letters "substitute" 😆
barren flame
velvet wing
Experimenting with <@840043656072396840> 's concept
I would also round the front as a different one to help push the air out of the corner and into the ducts. Looking up car intake manifold design I feel would help here a little too.
velvet wing
barren flame
I would also round the front as a different one to help push the air out of the ...
there does need to be a fat fillet on the front cap
I whipped this up just to see if I could do it, though. I'll start from scratch later and incorporate that.
barren flame
I know why I can’t buy my old model glue, it was MEK based and GW wanted to stop poisoning people lol
north scroll
barren flame
On the solvent talk, could try paint strippers or could try DOT 3 brake fluid if...
Ah good. Alternative names are always useful. I am dutch, living in Luxembourg. And that is a weird little country: has its own language, but the going language tends to be french. But you can also get buy in German, and in most cases in english. And portuguese, of all things. Anyway: things I know by one name are not necessarily easy to find here under that name. Might need to know their french alternative, or german, or official, or brandname, or whatever... Sometimes it's a pain in the backside..
barren flame
Your duct above would print. I’ve printed crazier stuff.
velvet wing
barren flame
Your duct above would print. I’ve printed crazier stuff.
agreed. I think it's on the right track, too
north scroll
velvet wing
agreed. I think it's on the right track, too
Looks badass!
barren flame
The 200L drum is back order 🙁
 north scroll
Could totally drop the whole hotend in there. Fish it out an hour later or so....
barren flame
Lol after an hour it might be “what hotend?” I feel it would do something to the anodising they do too. It’s not like what I’m use to.
north scroll
My dad used to work in a factory where he could get his hands on that stuff every now and again. So he'd bring home a half a liter bottle or so. Used it a lot when I was a teenager (so, back in the 80s) to clean up anything metal.
@velvet wing That alternative hotend I am looking at... The mini sb adapter I got, and the top of the hotend have these little ovals to line things up. Checking the E34M1 model for the mosquito, it doesn't appear to have those. Is that by design?


The holes appear to be in the right place and such, so I am confident it would physically mount, but not sure if those ovals really add anything.
fringe zephyr
north scroll
<@755022853040111697> That alternative hotend I am looking at... The mini sb ada...
my bet is compatibility with the NF crazy
nope also has the ovals
I think they don't add much anyway
north scroll
I'll be able to tell later today.... Got the hotend mount printing now on my lilvoron, alongside a dragon one, in case there's further trouble in paradise....
But I suspect it's probably a 'too much fuss for too little gain'
velvet wing
north scroll
<@755022853040111697> That alternative hotend I am looking at... The mini sb ada...
Interesting. The Mosquito model is based on EVA 3 stock, so I honestly can't say for sure.
north scroll
I don't immediately expect any issues, holes appear to align and such. Just noticed those two thingies missing.
north scroll
Ok.. Doesn't fit through the hole... hole in my printed version is about 13x25mm, and the heatsink is 14.1x25, so a bit too narrow. Heatsink does step in a bit higher up, which might fit, but no way to get it into the hole.
velvet wing
ah crap. Some clones are bigger than normal Mosquitos, I think
I have a friend with one like that
velvet wing
north scroll
Ok.. Doesn't fit through the hole... hole in my printed version is about 13x25mm...

Printables.com
EVA 3 Mod to fit Mosquito Clone "NF-Crazy". | Download free 3D printable STL models
north scroll
Easy enough to fix myself, of course.
Ah.... that actually looks more like what I have than the mosquito, in terms of heatblock
Okido.. went through the slicer, and onto my lilvoron.. Let's see. Thanks for the pointer!
terse trench
velvet wing
Experimenting with <@840043656072396840> 's concept
Nice, don't forget the side ports.. those are the ones doing good work also.
velvet wing
terse trench
Nice, don't forget the side ports.. those are the ones doing good work also.
yes! I did not forget. I saw enough mistakes I made along the way that I didn't finish out the design. I'm going to start from scratch with a little better planning now. 🙂
had to do it wrong once to figure out how to do it a little better
terse trench
So save you grief... if you set up the model in cad, offset the right distance from the center plane, you can mirror one side to the other. Then you only need make one side (if your not already)
velvet wing
terse trench
So save you grief... if you set up the model in cad, offset the right distance f...
hehe, I definitely did that!
terse trench
I worked all day on my new one yesterday. What a nightmare.
velvet wing
oh wow. Yours are quite a bit more complex.
terse trench
not really. But so much more air. Did you see the video I posted last night?
velvet wing
terse trench
not really. But so much more air. Did you see the video I posted last night?
yes! that's where I got the exhaust port shape from
I'm not quite good enough at this (understatement) to build in an interior "ramp" for the air
terse trench
use lofts and a spline. Not hard
 velvet wing
awesome. here we go...
terse trench
 fringe zephyr
Is the guide curve 3D sketch?
terse trench
yes
velvet wing
Nice, I'll check those out. Thanks!
pine jewel
this was awesome man thanks
velvet wing
After 40 my mouth was open
wise karma
That's wild!
fleet idol
Hm, Knomi 2 EVA3 cover when? 😂
velvet wing
fleet idol
Hm, Knomi 2 EVA3 cover when? 😂
I considered making one for the first KNOMI, but never bought one. They're cute, though.
fleet idol
Right? 😅 I still think it's kinda useless extra weight, but at the same time, the cute-factor is high
velvet wing
I thought about a desktop stand to show your print progress, so it looks like a little digital clock or something.
north scroll
@velvet wing that alternate hotend mount fit, it's currently being put through its paces on my merc and seems to be working just fine so far.
You rock :)
velvet wing
north scroll
<@755022853040111697> that alternate hotend mount fit, it's currently being put ...
Awesome! Thanks!
uncut grail
Do you have the printables link for the duct? I can't seem to find it... Thanks!
velvet wing
uncut grail
Do you have the printables link for the duct? I can't seem to find it... Thanks!
It's not compatible with E34M1 😕 Different project.
uncut grail
Yep, still wanted to check it out
velvet wing
ah, my bad
uncut grail
☺️
terse trench
uncut grail
Do you have the printables link for the duct? I can't seem to find it... Thanks!

Give it a try..
Designed for 17mm I,.D, (22mm ends) CPAP hose and WS7040 CPAP blower.
Running CPAP at full speed with Neopixel output or use a logic level shifter to increase the probe servo output from 3.3 to 5V. (74HCT125) or TXS0108E (but need 3.3V and 5V to chip).
Make sure you have horizontal expansion and horizontal hole expansion dialed i...
uncut grail
terse trench
https://www.thingiverse.com/thing:6132041
Thank you! I was using the wrong search term! 🙂 I looked in your youtube video descriptions, may be worth dropping one in there ever now and again to point folks in the right direction. Thanks again!
terse trench
I am laying low. On the down-low. Creeping by. Cloaked.
uncut grail
well, it's a project, buut seems doable - @velvet wing i'd rather work on something supportable vs my one-off hackey - I'll poke at it a bit more and see if I can come up with something reasonable

I know I'm already in the weeds
well - that was a total and instantaneous misrepresentation of reality!
the bottom plate/bolts interfere with the ducts in a way that is probably less than simple
yeah - OK - i stop now ☮️
terse trench
uncut grail
well, it's a project, buut seems doable - <@755022853040111697> i'd rather work ...
Damn.. HUUUUggeee
terse trench
I know on EVA type toolheads there is not much room below and the back end has, basically, a 90° to turn the air into the lower duct. Then you have to contend with the 2020 extrusion above. However, the VZ toolhead is almost the same and it fits. But maybe because Goliath is low and more room. Not sure.
uncut grail
terse trench
I know on EVA type toolheads there is not much room below and the back end has, ...
Yes, totaly agree
terse trench
In that case, the duct needs to go wide.. and that.. can be a problem with hitting stuff..Sigh.
Top down is the way really
uncut grail
I think it's workable... Constraints!
And use case.. sometimes you need specific types of cooling..
Thats more of a question
I guess it all comes down to the model and features.... Dictate your cooling needs
terse trench
it's a bit radical. Maybe a smaller one can be made for X speed
velvet wing
terse trench
In that case, the duct needs to go wide.. and that.. can be a problem with hitti...
I've tried to go wide, but I run into issues with folks who have an ABL arm instead of Klicky or Beacon
fleet idol
terse trench
Top down is the way really
This is what they decided on with breakneck for the archetype toolhead
velvet wing
terse trench
Top down is the way really
I'd like to be able to implement near-straight vertical duct, but the Merc belt path makes that difficult
fleet idol
What about if you integrate it into the main body? Left and right of the hotend
You'd have to offset the belt grabbers a bit too, as well as the abl mount
Or in front, just around the hotend fan
Could possibly even mount on the same screws as the hotend fan
velvet wing
I think I'd need to make some pretty significant changes that would invalidate a lot of the other parts of EVA, though
fleet idol
I don't know enough about the various parts, especially on the front side of things
You could drop the ducts from the backplate, making it totally flat, gaining a few mm of Y travel, and if the ducts go in the front along the fan side, it might not eat any XY travel
It would for sure clash with the front cover
You would need to create some custom beacon mount though, as you would have to drop the ducts from the bottom
velvet wing
I'd probably want to mount the linear rail on front if that happened, tbh
It'd be a more steathburner-ish shape with the weight up front
fleet idol
Something like this

Though I can already see a nightmare with the cpap tube and my reverse bowden line 😂
I suppose this is why breakneck is designed the way it is
velvet wing
toolheads are so compact that the various bits really add a lot of limitation in where you can put what
hmm
fleet idol
That just translates to "time to get creative" 😛
fringe zephyr
I have been feeling tempted to design one from scratch for myself
velvet wing
how many folks are running the new front (v0.5)? any issues?
fringe zephyr
not yet
 terse trench
4:55, seems to be working. Under extrusiuon a little, temp a little high, but seems good for this time.

 fringe zephyr
terse trench
4:55, seems to be working. Under extrusiuon a little, temp a little high, but se...
fringe zephyr
terse trench
4:55, seems to be working. Under extrusiuon a little, temp a little high, but se...
looks nice
barren flame
@velvet wing Xol cpap
https://github.com/Armchair-Engineering/Xol-Toolhead/tree/main/STL/Experimental/XolPAP

GitHub
A soft reboot of Xol 2 aimed at modularity and quality of life improvements for installation and serviceability. We have left the mantis carriage behind, and thus are now just Xol sans Mantis. Don&...
velvet wing
Unrelated note: new assembly videos are almost ready for the updated docs
barren flame
Can confirm straight down ducts of the mantis pushes some air!! Can’t wait to have dirtybird toolhead on, straight down but with 4512 deltas
pine jewel
ha, it’s monday, that means my prototype xol cnc carriage will be here 
pine jewel
or it was delivered ytd and i wasnt paying attention 😆


 velvet wing
well, I've run out excuses not to move the Release 2 files to main now that the docs are updated...
😄
fringe zephyr
configurator?
velvet wing
oh, heck no, just the info about Release 2
I'm planning on working on that next week on vacation
fringe zephyr
just trying to help you get mor excuses
velvet wing
too late, I've pushed the updates and merged in the latest STLs
wise karma
@velvet wing question
forPTFE i am adding 15mm of PTFE tube the dragon uhf requires to the 17.95mm of PTFE that the orbiter 2 requires correct? total of 32.95mm
fleet idol
How do you cut it that precise? I just stuck it into the rapido, then tried to push it up into the extruder until it wouldn't go up any further, then I just pull it out again, clip off a tiny piece, and try again, until it fit.
velvet wing
wise karma
<@755022853040111697> question
yeah, add the two
velvet wing
fleet idol
How do you cut it that precise? I just stuck it into the rapido, then tried to p...
me too, but it lets you pre-measure pretty close without the guesswork
fringe zephyr

Printables.com
This is a filament cutter that uses slight mods to EVA3 for orbiter and rapido, and a servo actuated pushblock | Download free 3D printable STL models
velvet wing
interesting concept
fleet idol
Ah it cuts filament by pushing the toolhead into the side
fringe zephyr
yep
it would be damn useful to me
but without servo if possible (not sure if I can lose space
dawn sundial
terse trench
Top down is the way really
would there be a way to implement your idea on the archetype tool head? they do the top down cpap.
terse trench
dawn sundial
would there be a way to implement your idea on the archetype tool head? they do ...
Yes, I am sure, but that design is not mine. Ask them to consider it?
dawn sundial
terse trench
Yes, I am sure, but that design is not mine. Ask them to consider it?
understandable.
 cursive obsidian
@velvet wing feel free to mod it to E34M1 https://www.printables.com/model/648710-galileo-2-sa-extruder-for-eva3 (this one uses EVA3 heatsets). It's funny to see Voron logo on EVA 🤪 .

Printables.com
Galileo 2 SA extruder drive component for EVA3 | Download free 3D printable STL models
 onyx yacht
I'm running a Dragon UHF hotend with the dual horn for Beacon and single 5015 Fan for beacon. The air blowning 12-15mm in front of the nozzle and nothing is hitting the nozzle or directly below it. Any suggestions on how to correct this?
 wise karma
@velvet wing do you by any chance have a taller x endstop trigger?
velvet wing
wise karma
<@755022853040111697> do you by any chance have a taller x endstop trigger?
how much taller do you need?
and would the STEP file help?
wise karma
velvet wing
how much taller do you need?
Maybe 5mm?
velvet wing
onyx yacht
I'm running a Dragon UHF hotend with the dual horn for Beacon and single 5015 Fa...
Can you clarify a little? Do you mean the horns are projecting too far out?
velvet wing
wise karma
Maybe 5mm?
onyx yacht
velvet wing
Can you clarify a little? Do you mean the horns are projecting too far out?
No. I think the direction the horns point the air is too far out. Maybe if they curved in a few more degrees it would fix it
velvet wing
onyx yacht
No. I think the direction the horns point the air is too far out. Maybe if th...
I would agree that it's not ideal, though it should still do an adequate job. These horns are taken from EVA 3 stock and the duct itself is unmodified. There's an open issue with EVA itself about the duct flow direction, but so far the EVA devs haven't acknowledged it.
OTOH, we've been semi-idly working on concepts to design a new duct lately, ideally with much higher flow and better direction.
For now, I'd run some print tests and see how it turns out.
You're also the first user of the Dragon UHF hotend mount that I've heard from, so it may be blocking more air than expected.
onyx yacht
I printed a non-beacon tri-horn before I ordered the Beacon. I put that one on and it works much better. The air is directed better. I won't be receiving the Beacon for a bit so I'll use that
thats for your input! I appreciate it
velvet wing
onyx yacht
thats for your input! I appreciate it
thanks for letting me know about the issue! Hopefully we'll work out some new ducts here soon.
wise karma
velvet wing
You're awesome, thank you
velvet wing
huh.
I'm re-reading the issue that's open for EVA 3 about the ducts: https://github.com/EVA-3D/eva-main/issues/117

GitHub
Hello! I did not have enough airflow in the configuration with 5015 and I installed server 4028. It turned out that already at half power the air blows beyond the nozzle and forward, and not down o...
And it mentions that adding more airflow resolves the issue. I suspect this is because most airflow misses, so getting adequate airflow to the nozzle requires good cooling, and good airflow requires insane cooling.
cursive obsidian
I have a feeling they do just expect people get powerful airflow solution and don't care for the rest. At RatRig Discord EVA forums are mainly used with 4028 SanyoDenki's.
velvet wing
the lack of a dev response from June makes me feel the same
welp. back to duct design school for me.
velvet wing
Dunno if this is gonna work or just lol at me.


 north scroll
Sounds like the good old american way of solving things: mooooooarrrrrr powerrrrrr 😇 😉 😂
velvet wing
north scroll
Sounds like the good old american way of solving things: mooooooarrrrrr powerrrr...
hopefully more, and directional, too
pine jewel
 velvet wing
pine jewel
https://tenor.com/view/mo-powa-babeh-james-pumphrey-donut-media-more-power-baby-...
velvet wing
pine jewel
https://tenor.com/view/mo-powa-babeh-james-pumphrey-donut-media-more-power-baby-...
the awkwardly smiling faces in the background will give me nightmares 😆
pine jewel
😂
onyx yacht
velvet wing
And it mentions that adding more airflow resolves the issue. I suspect this is b...
Interesting. Hard to get more airflow without reducing Y travel
onyx yacht
velvet wing
Dunno if this is gonna work or just lol at me.
I'll be happy to try that design!
fringe zephyr
it would be interesting to play around with a design that has the fans above in the front
onyx yacht
On that fan mount, is it possible to add a second fan behind it in the same orientation? That way it would take less space than both fans rotated 90 degrees?
fringe zephyr
aka just ignore the current impl
fringe zephyr
onyx yacht
On that fan mount, is it possible to add a second fan behind it in the same orie...
there are 2 variants
onyx yacht
I know. The one with 2 fans, both fans are rotated 90 degrees than that design and they stick out a bunch behind
velvet wing
the owl eyes one isn't in the docs yet. hasn't left the testing repo.
fringe zephyr
GitHub
EVA 3 modified for the Mercury One.1 3D printer. Contribute to jon-harper/E34M1 development by creating an account on GitHub.
but it exists!
and It's awesome
onyx yacht
Read my mind!
barren flame
velvet wing
the awkwardly smiling faces in the background will give me nightmares 😆
Have you actually seen this clip and how he says that lol it will add to the nightmare.
barren flame
cursive obsidian
<@755022853040111697> feel free to mod it to E34M1 https://www.printables.com/mo...
How’s the g2 extruder going? Was tempted to goto it.
barren flame
pine jewel
ha, it’s monday, that means my prototype xol cnc carriage will be here <:chefkis...
You fitted this yet? My mind is playing around with a few ideas for a aluminium toolhead…. I need to start learning the cnc at work me thinks.
pine jewel
barren flame
You fitted this yet? My mind is playing around with a few ideas for a aluminium ...
I did assemble, but am unable to throw it on my machine just yet. still in the middle of building, waiting on a few things to arrive from mainland next week 😎
I think the other 9 betas have all run and given necessary feedback already tho and he's going to make some small tweaks and start the production run after thxg
I was also looking into cnc for this reason, have heard great things about the printnc mini
am probably going to start sourcing it quietly so my gf doesn't notice another robot around the house lol
velvet wing
barren flame
Have you actually seen this clip and how he says that lol it will add to the nig...
nope, just saw the gif 😆
pine jewel
velvet wing
nope, just saw the gif 😆

A little compilation of my favorite scenes from "Up To Speed" by James Pumphrey from Donut Media
This video is for entertaining purposes, all rights reserved to Donut Media
I don't think that timestamp worked. starts at like 2:45
velvet wing
pine jewel
I don't think that timestamp worked. starts at like 2:45
ROLL OUT UP AND DOWN HEADLIGHTS
😆
velvet wing
FYI I'll be on vacation until 11/26. I will probably drop in but am unsure how solid my internet access will be.
fleet idol
Outrageous
barren flame
velvet wing
FYI I'll be on vacation until 11/26. I will probably drop in but am unsure how s...
Have a good holiday!!!
wise karma
velvet wing
This was perfect thanks. For some reason the original one was t triggering the endstop each time and it caused a bunch of crashing.
wise karma
velvet wing
FYI I'll be on vacation until 11/26. I will probably drop in but am unsure how s...
Have fun!
cursive obsidian
barren flame
How’s the g2 extruder going? Was tempted to goto it.
Just installed it (along with new tolboard) . So far so good. Printed one PCCF part with it, works as expected.
I guess next will be some PETG print with cranked temps to make it shiny to see that pesky VFAs. Jared (creator) said it can print TPU so that is something I could try too eventually.
wise karma
Side note if anyone needs the x endstop microswitches I have extras shoot me a pm.
(US lol)
buoyant zinc
wise karma
Side note if anyone needs the x endstop microswitches I have extras shoot me a p...
Not in US but as part of community, let me say: I appreciate your generosity!
wise karma
buoyant zinc
Not in US but as part of community, let me say: I appreciate your generosity!
Only doing what others have done for me! Trying to help where I can
buoyant zinc
wise karma
Only doing what others have done for me! Trying to help where I can
That is the reason we are here. Thanks once more!
spark dragon
@velvet wing any idea why your files won't open in prusa slicer? This is the error I see for all of them.

Oh, i think I see why... right click > save link as apparently results in a corrupted file. Gotta visit the link and download using the github dl button
velvet wing


 fleet idol
When 1 duct just doesn't cut it 😂
velvet wing
There will be directed airflow, dammit! 😛
velvet wing
klicky

 fringe zephyr
now make it UHF and I'll print the damn thing
velvet wing
fringe zephyr
now make it UHF and I'll print the damn thing
this took me all morning, lol. give me a minute 🤣
fringe zephyr
"come on it's easy, you just need to make it lower"
velvet wing
hehe, hehe 😭
fringe zephyr
velvet wing
hehe, hehe 😭
if it was not clear enough I'm just kidding
velvet wing
fleet idol
And don't forget beacon
What's Beacon 😉


so, uh, who's crazy enough to print this? I don't have a printer at the beach.
fringe zephyr
I can print UHF as soon as I get 50 of those things I sell done
velvet wing
 fleet idol
I think it should be called C'thulu duct 😆
cursive obsidian
https://beacon3d.com/product/beacon-h/ single PCB oh well....

Eddy current displacement sensor for homing and surface scanning in 3D printers. Works exclusively with Klipper. Comes fully assembled and includes a USB cable. WARNING: Requires a conductive surface or substrate on printer bed to work. Bed stacks that include oversized fixed magnets are not recommended and may not work with Beacon. Pre-Order No...
onyx yacht
velvet wing
so, uh, who's crazy enough to print this? I don't have a printer at the beach.
Love it! Going to print it now!
ETA 55 minutes

Thank you so much for creating this. It looks awesome
onyx yacht
Did you end up using a cable chain? If so, how did you mount the chain to your tool head?
velvet wing
@onyx yacht are you using a toolhead PCB or running the wires directly from your MCU?
onyx yacht
Directly from the MCU
would love to can but it's a bit over my head. Maybe in the future
velvet wing
onyx yacht
Directly from the MCU
are you committed to doing cable chain, or still deciding?
onyx yacht
I'm not committed
right now i'm running the wires around a PTFE tube and its less than ideal
onyx yacht
uh oh haha
velvet wing
onyx yacht
right now i'm running the wires around a PTFE tube and its less than ideal
so tae does professional wiring stuff. we've been tossing some ideas back and forth about concentric twisting for toolhead cable bundles (he knows the smrt terms for this, not me). the result, done correctly, is a very flexible cable.
I've made some decent umbilicals with 18+ wire counts, but none of them approach what he does
onyx yacht
But how is the bundle run to the toolhead?
velvet wing
Ah! One sec
Along with the PTFE tube. Goes from the rear wire anchor to the green grabby thing
 onyx yacht
Thats what i have now. It works 100%. However, it takes a bunch of space above the printer and I want to enclose it in the future. Which is what got me thinking cable chain
fleet idol
Chain is heavy and slows down your movements a lot
onyx yacht
damn, ok
velvet wing
mounted like the first pic, you have issues at the back of the build plate with snagging. I still use cable chain on one of my builds, but it looks like the second pic.


In the second pic it's anchored above and behind the rear of the build area
onyx yacht
hmmm ok
 wide turtle
I was planning on putting a hook which can turn in the top of my enclosure and attaching the cables, ptfe and cpap to that
velvet wing
wide turtle
I was planning on putting a hook which can turn in the top of my enclosure and a...
I've considered that, or even passing the wires through the center of a top hatch, perhaps
wide turtle
velvet wing
I've considered that, or even passing the wires through the center of a top hatc...
passing them through the top requires more isolation
hook is easier imo
velvet wing
I don't think there's ever a single, perfect solution for this problem
onyx yacht
back to the drawing board haha
there never is haha
i appreciate the insight! thanks again
velvet wing
sure thing!
wide turtle
when I do the wire hook, I can post it, if anyone wants it
Will take some time though as I first have to complete the merc and then design a custom enclosure
onyx yacht
velvet wing
sure thing!
I have the new duct printed. Yesterday i was running a job and couldn't install it. Once i get home from work today I'm going to put it on first thing. Looks even better once its printed. My guess, it will work like a charm
velvet wing
I'm excited to see how it works
north scroll
fringe zephyr
looks like overkill
Overkill is severely underrated :D
Gorgeous work, @velvet wing
velvet wing
north scroll
Gorgeous work, <@755022853040111697>
thanks! still nervous to see how it plays out.
wise karma
onyx yacht
Did you end up using a cable chain? If so, how did you mount the chain to your ...
I did not. I'll probably use the chan on a different printer. It's not really needed with just the can cable.
north scroll
I also find the cable chain to look.. euhh.. goofy if you just hook it up to the head and the back. Not 'neat and structured' like in a voron, tbh
velvet wing
north scroll
I also find the cable chain to look.. euhh.. goofy if you just hook it up to the...
Agreed, and giving the cable chain support like in a Voron would require moving the linear rail.
And that messes with the belt path...
onyx yacht
Bambu Labs did a good job routing the chain on the X1C. It being enclosed also helps haha
onyx yacht
I'm away from family for Thanksgiving so I have a long weekend to mess around and try to figure something out
cursive obsidian
The (PG7-9) Cable glands recently popping around mounts are pretty useful IMO. Have one on Micron gantry and another on Merc1 EBB36 toolhead and the cables are well locked in position, allowing them to flex in 360 directions yet still guarding them against damage.
And for saginess of the long ones you could throw in side frame mounted keyback if you have an enclosure to mount it on.
velvet wing
cursive obsidian
The (PG7-9) Cable glands recently popping around mounts are pretty useful IMO. H...
those cable glands look like they are amazing
cursive obsidian
But mainly I have really good feeling that they protect the cable well. I didn't have the same assuredness when I did zip tied them against something since the cable still did slide while being tied.
cursive obsidian
FYI If you want to model your own mounts, this will become handy https://grumpytechie.net/2017/11/05/custom-thread-definitions-in-autodesk-fusion-360-pg-conduit-threads/

I recently found the first shortcoming of Autodesk’s Fusion 360, it doesn’t have thread definitions for PG conduit threads! If you have no idea what PG conduit threads are, you’re…
onyx yacht
That's awesome
velvet wing
nice!
 lyric bloom
velvet wing
https://github.com/jon-harper/E34M1/commit/4a304818b0a65f3925d56ade0d6429af91551...
lyric bloom
velvet wing
https://github.com/jon-harper/E34M1/commit/4a304818b0a65f3925d56ade0d6429af91551...
Very tempting 😄
pine jewel
@velvet wing you know what you gotta do next for the Kraken ducts 🤣
 north scroll
cursive obsidian
The (PG7-9) Cable glands recently popping around mounts are pretty useful IMO. H...
north scroll
cursive obsidian
The (PG7-9) Cable glands recently popping around mounts are pretty useful IMO. H...
I have a few laying around, just haven't gotten around to installing a set on my Merc yet. It's one of those items on my 'to-do' list. But just don't want to have to tear down the toolhead again, just for the sake of a relatively minor update.
velvet wing
pine jewel
<@755022853040111697> you know what you gotta do next for the Kraken ducts 🤣
increasing internal pressure would be nice, but I'm glad I got one design done. I'll see how this goes then keep iterating, as necessary.
wise karma
@velvet wing thanks for making the 5mm taller block, turns out I was using the wrong one lol.
Anyways. I have a question for you. Would it be way too much to ask for for a zip tie mount on the fan part? I also might go back to the solo 5015, just because the duel one crashes into the stepper mount when I home Y. And the duel mount clashes with the EBB36 mount. I also tried yours but I don't remember if it worked or not lol


Oof that 3rd picture is bad lol. I had to notch one of the fans as well as the "horn" of the fan mount
onyx yacht
@velvet wing I installed the new duct. Way more airflow and directed perfectly


The base it a bit long and didn't fit properly

But that should be an easy fix I may be able to adjust and reprint
velvet wing
onyx yacht
The base it a bit long and didn't fit properly
uh oh, too long is a problem. I'll see what's up there
velvet wing
wise karma
<@755022853040111697> thanks for making the 5mm taller block, turns out I was us...
What version of the mount are you working with?
wise karma
velvet wing
What version of the mount are you working with?
which mount? lol sorry
velvet wing
wise karma
which mount? lol sorry
the dual rear inlet, sorry
wise karma
velvet wing
the dual rear inlet, sorry
um let me see if i can find it on your github
is there a newer version?
velvet wing
I dunno. It's got a version number printed on there somewhere 🙂
wise karma

GitHub
EVA 3 modified for the Mercury One.1 3D printer. Contribute to jon-harper/E34M1 development by creating an account on GitHub.
wise karma
i thought about going to this one, unless theres an updated version of the duel
GitHub
EVA 3 modified for the Mercury One.1 3D printer. Contribute to jon-harper/E34M1 development by creating an account on GitHub.
velvet wing
Unless you want to try the owl eyes dual intake, I'd go to the single.
wise karma
i'll try the owl eye one.
do you think this will clear with the owl eye?
GitHub
EVA 3 modified for the Mercury One.1 3D printer. Contribute to jon-harper/E34M1 development by creating an account on GitHub.
velvet wing
GitHub
EVA 3 modified for the Mercury One.1 3D printer. Contribute to jon-harper/E34M1 development by creating an account on GitHub.
onyx yacht
owl eye is awesome. I'm running and love it
wise karma
i cant get the ebb to clear with the duel mount i have now
velvet wing
wise karma
i cant get the ebb to clear with the duel mount i have now
that dual intake is pretty awkward
wise karma
velvet wing
that dual intake is pretty awkward
lol yes it is
onyx yacht
John, aren't you on vacation? As much as I appreciate you helping us so much. Shouldn't you be relaxing??!!
The new duct is 2.85mm long. my limited CAD ability should be able to fix that and I'll send it in here
velvet wing
onyx yacht
John, aren't you on vacation? As much as I appreciate you helping us so much. ...
I'm quiiiiite relaxed 😉
ooh, that is too long
velvet wing
onyx yacht
The new duct is 2.85mm long. my limited CAD ability should be able to fix that ...
Check the github. It's fixed. 🙂
onyx yacht
damn that was fast. I'm still struggling to open it in fusion and you already fixed it
thank you!
waiting on github to refresh. It still showing yesterday's models. I'll print it out and install as soon as i can
velvet wing
onyx yacht
waiting on github to refresh. It still showing yesterday's models. I'll print ...
https://github.com/jon-harper/E34M1/tree/testing/STL/bottom
You may be looking at the commit from yesterday.
GitHub
EVA 3 modified for the Mercury One.1 3D printer. Contribute to jon-harper/E34M1 development by creating an account on GitHub.
onyx yacht
duh! Thank you! again
spark dragon
@velvet wing will the dual 5015 rear inlet work with the beacon? Looks like it should, is it just a cable routing difference?
onyx yacht
velvet wing
Check the github. It's fixed. 🙂
new version fits great. Going to run a couple test prints
onyx yacht
cooling has improved a lot. There's a ton more air moving. So much so that the air hits your face if you are in front of the print head. I assume it's coming from the ducts in the back but there is still good airflow coming from the sides.
Again, thanks so much John. This is a pretty amazing community that you went out of your way to design this without asking anything in return
velvet wing
spark dragon
<@755022853040111697> will the dual 5015 rear inlet work with the beacon? Looks ...
it won't work with regular hotend and beacon. the probe's connector sticks too far out.
Visual illustration:
 cursive obsidian
onyx yacht
cooling has improved a lot. There's a ton more air moving. So much so that the...
cursive obsidian
onyx yacht
cooling has improved a lot. There's a ton more air moving. So much so that the...
Won't this have same issue like trihorn? So that the middle paths being short and least constrained will get most of the airflow (out)? Maybe make them smaller compared to side ones @velvet wing ?
Regardles I really like the cthulu look .
velvet wing
cursive obsidian
Won't this have same issue like trihorn? So that the middle paths being short an...
Yes! I considered that! The interior, short-path holes are the smallest, followed by the middle ones. The outer paths that swing wide are the largest.
They aren't going to be perfectly balanced without a CFD test, but at least it's some compensation.
 cursive obsidian
Oh yea that intake is already narrower. I completely forgot that and I did mess with it when doing beacon horns pfff.
You really want me to redo my B(e)acon back to sherlock connector 😅 . I didn't want to mess with my current pigtail installment but this is tempting.
velvet wing
cursive obsidian
You really want me to redo my B(e)acon back to sherlock connector 😅 . I didn't ...
heh, you can still leave it pigtailed. the Y offset is the same as your beacon duct design
What intake are you using?
cursive obsidian
Still single 5015. That's another thing that I could redo. I still have unused EBM-Papst RLF 35-8/14 N I meant using it on EVA.
velvet wing
cursive obsidian
Still single 5015. That's another thing that I could redo. I still have unused E...
Oooh, that'd be nice
velvet wing
Working on UHF kraken ducts now
fringe zephyr
with klicky please
velvet wing
fringe zephyr
with klicky please
trying to figure that bit out now
fringe zephyr
velvet wing
trying to figure that bit out now
can't you make it like the other UHF one? just extend
(same height would be perfect, drop in replacement)
velvet wing
fringe zephyr
can't you make it like the other UHF one? just extend
going to for lighter weight and less blocky
velvet wing
@fringe zephyr https://github.com/jon-harper/E34M1/tree/testing/STL/bottom

GitHub
EVA 3 modified for the Mercury One.1 3D printer. Contribute to jon-harper/E34M1 development by creating an account on GitHub.

 fringe zephyr
printed will assemble later
onyx yacht
I put the UHF bolt or bushing on my hotend. Printed the UHF kraken duct. Worked like a charm!
How does that extra bolt/bushing make the hotend UHF? Does it just allow more time to melt the filament which increases the flow rate?
fringe zephyr
longer melt path
so yeah more time to melt
or the same as HF at higher speeds
faster you print less time the filament has to melt
that's why overshooting temperature is something as well
cursive obsidian
velvet wing
Oooh, that'd be nice
That Papst RLF35 is really getting in the way.
I wonder if this screw will be doable:
 velvet wing
cursive obsidian
That Papst RLF35 is really getting in the way.
I wonder if this screw will be do...
velvet wing
cursive obsidian
That Papst RLF35 is really getting in the way.
I wonder if this screw will be do...
😬
That's frustrating. No idea if it'll work, but frustrating to work around.
cursive obsidian
The obvious way will be to have heatsets in the rear part and screw the assembly from the front. But I am trying this approach so that no other parts needs to change. Will se in 20min.
cursive obsidian
Ok worked just fine.
cursive obsidian
@velvet wing Printed Kraken Beacon and I have some feedback: The surface for mounting beacon probe onto the horns should have as much contact as possible. There is risk for beacon PCB to skew forwards/backwards and to have as much contact surface will help flatten it accordingly. When I did the first parts I utilized the whole length for those two mount points.
velvet wing
cursive obsidian
<@755022853040111697> Printed Kraken Beacon and I have some feedback: The surfac...
understood. will fix.
@cursive obsidian does the probe contact the inner two ducts? it's closer in cad than I realized.
fringe zephyr
still need to assemble and install mine
velvet wing
fringe zephyr
still need to assemble and install mine
can't wait to print mine. but first I will snuggle my cats.
cursive obsidian
velvet wing
<@210526068749238274> does the probe contact the inner two ducts? it's closer in...
Oh I haven't mounted it yet. I'll try to validate it in CAD.
cursive obsidian
velvet wing
<@210526068749238274> does the probe contact the inner two ducts? it's closer in...
No kraken step file(s) in testing branch? 😢
velvet wing
cursive obsidian
No kraken step file(s) in testing branch? 😢
not yet, since it's still in progress
but this doesn't look right
 cursive obsidian
Yea that would collide.
 fervent grove
Awesome project/mod! I'm currently gearing up to do my own Mercury conversion of my Ender 5 S1 and I want to use the Eva 3 toolhead.
Since I want to use the stock extruder for now I'll be making my own mount. Any tips or things to look out for when I'm designing the extruder mount?
velvet wing
fervent grove
Awesome project/mod! I'm currently gearing up to do my own Mercury conversion of...
this is the stock Ender 5 extruder?
fervent grove
velvet wing
this is the stock Ender 5 extruder?
stock S1, its the sprite pro extruder pretty much
dual gear direct drive 🙂
velvet wing
fervent grove
dual gear direct drive 🙂
oh nice! did not realize the S1 had a new extruder.
I'd grab the BMG drive mount and modify that. give me a minute to upload it, since I apparently overlooked adding that CAD file
fervent grove
velvet wing
oh nice! did not realize the S1 had a new extruder.
I'd grab the BMG drive moun...
Yeah its been quite good so far for me on my stock machine. No skipping steps and I havent been able to push it to its limit yet, seems like the nozzle is the limiting factor right now for it.
Awesome that will be great, that was my plan initially. Taking the BMG mount and modifying it. 😄
This is the extruder in question, minus that plate you see at the bottom. Quite compact.
 velvet wing
fervent grove
Awesome that will be great, that was my plan initially. Taking the BMG mount and...
velvet wing
fervent grove
Awesome that will be great, that was my plan initially. Taking the BMG mount and...
GitHub
EVA 3 modified for the Mercury One.1 3D printer. Contribute to jon-harper/E34M1 development by creating an account on GitHub.
Good luck 🙂
fervent grove
Awesome thanks!
cursive obsidian
This loks mighty
 velvet wing
that fan is gonna be fun!
this looks better, but still need to add mounting area

@cursive obsidian Hopefully this will do it 🙂


Files are up on the repo
cursive obsidian
velvet wing
Files are up on the repo
I am firing up Micron 🔥 .
velvet wing
noice
cursive obsidian
For those smaller prints it is easier to just do heat soak little bro approx 17min compared to big boy 40min.
 velvet wing
cursive obsidian
For those smaller prints it is easier to just do heat soak little bro approx 17m...
velvet wing
cursive obsidian
For those smaller prints it is easier to just do heat soak little bro approx 17m...
40 min for big boy makes me feel better about mine taking awhile to heat up
kinda wanna get a micron or v0.2
cursive obsidian
400x400mm bed takes its sweet time.
velvet wing
oh good heavens, okay
cursive obsidian
Yea Micron is nice but expensive. I'd say v0 is very good choice.
fleet idol
Yeah I let my 350 bed soak for half an hour before I start anything on my V2.4 too
cursive obsidian
The v0 will be here... That is staple for small printers.
wide turtle
I was quite tempted to get a vminion with the current sales
On the other hand why do I need 4 printers XD
fleet idol
wide turtle
I was quite tempted to get a vminion with the current sales
On the other hand wh...
In case anything breaks on the previous ones 😂
I know a guy who had two and a half of his 3 printers down, the last one was sorta kinda working but it had an issue too 😛
So he had to get creative to get his print 😋
wide turtle
fleet idol
In case anything breaks on the previous ones 😂
That is actually the reason I am upgrading my ender to Merc
Technically hydra and my current modified kinematic are plenty
But the kinematic is huge and I want to enclose the printer in case something on the trident breaks
wide turtle
fleet idol
I know a guy who had two and a half of his 3 printers down, the last one was sor...
I learned to never work on 2 printers at the same time the hard way
Well our neighbors son has a printer too
But he can only print Pla/petg
Which would be fine to get the printer running again in case something breaks but I'd rather use abs/ASA XD
cursive obsidian
I remeber going for hydra from Merc1. I tripple checked that I have all the parts (and some doubled) before I tear it down. But still scared that I did miss something.
With +1 printer not an issue. So comforting to know that you just have the backup you'll print any faulty/parts you missed.
wide turtle
Definitely
The klicky on our trident broke
I was really happy I had a few unklicky parts laying around I printed as backups
Otherwise I would have been screwed
fringe zephyr
having just one I had instances where I needed to reassemble old way only to print more parts
wide turtle
That's annoying
fringe zephyr
or I find myself printing spares
wide turtle
Fortunately we always had 2 or more printers XD
fringe zephyr
I considered a vminion but abs asa will be an issue without a box
so I figured I'd just make a smaller merc
for twice the money
wide turtle
But only one abs/ASA printer rn
But enclosing mine will take time as I have to design a completely custom enclosure
velvet wing
2 enclosed printers is my minimum moving forward
cursive obsidian
I did print my share of ASA parts unenclosed with just draft shield and cranking the bed temp.
fringe zephyr
wide turtle
But only one abs/ASA printer rn
But enclosing mine will take time as I have to d...
I just made a huge MDF box
cursive obsidian
....aaand eventually reprinting them all when enclosed.
Or hobo style, just throw trashbag around it 😆 .
wide turtle
I guess technically I could put our vyper or my ender in the tent we have
But both of them have Pla parts
Vyper has a full Pla toolhead, ender as well, though with the Merc upgrade, I'll print the toolhead out of ASA
eBay is full Pla except for the corners though
And when I do the upgrade I really don't want to put my drivers in an enclosure
Cause 1.7A is gonna be toasty
cursive obsidian
I did print most of my Merc1 parts with just two PETG ducts. Doable you just have to reprint them when they melt 😅 .
velvet wing
wide turtle
And when I do the upgrade I really don't want to put my drivers in an enclosure
...
Need an electronics case for your Vyper or Ender?
wide turtle
velvet wing
Need an electronics case for your Vyper or Ender?
My ender has the ZeroG ebay
And vyper is running fine
Why?
fleet idol
wide turtle
I learned to never work on 2 printers at the same time the hard way
Well our nei...
I found that printers like to schedule their unscheduled maintenance together 😛
velvet wing
wide turtle
My ender has the ZeroG ebay
And vyper is running fine
Why?
Wondered if this would be handy: #1144990245729865840
Really useful when you enclose a printer if you need to get the electronics out
wide turtle
velvet wing
Really useful when you enclose a printer if you need to get the electronics out
I plan on putting a normal enclosure on my ender so the ebay will not be enclosed
And the vyper is staying open air
But thanks for the tip :)
fringe zephyr
velvet wing
Wondered if this would be handy: <#1144990245729865840>
shameless promo 😛
fervent grove
velvet wing
https://github.com/jon-harper/E34M1/tree/main/CAD/drive
limited knowledge of CAD and Fusion360 but I think this might work.

 velvet wing
fervent grove
limited knowledge of CAD and Fusion360 but I think this might work.
velvet wing
fervent grove
limited knowledge of CAD and Fusion360 but I think this might work.
Here's an updated master file for you to check for fit: https://github.com/jon-harper/E34M1/blob/main/CAD/EVA 3 Master V2 v26.step
GitHub
EVA 3 modified for the Mercury One.1 3D printer. Contribute to jon-harper/E34M1 development by creating an account on GitHub.
mostly you'll want to check that the mount does not bump into the X endstop
spark dragon
@velvet wing my beancon arrives today, so will be building your mod for my hotend setup. Doesn't look like I'll run into any issues, but will report back if I do
great work on these parts!
velvet wing
spark dragon
<@755022853040111697> my beancon arrives today, so will be building your mod for...
if you're going with the kraken duct, note that I updated the regular one this morning
spark dragon
do you think there's a way to make the dual 5015 work with beacon?
velvet wing
spark dragon
do you think there's a way to make the dual 5015 work with beacon?
not unless you go UHF, tbh. It's single 5015 or CPAP at the moment for regular hotends
spark dragon
velvet wing
not unless you go UHF, tbh. It's single 5015 or CPAP at the moment for regular h...
I plan to go UHF, actually... is there hope?
velvet wing
spark dragon
I plan to go UHF, actually... is there hope?
UHF Rapido?
spark dragon
yep
velvet wing
one sec
spark dragon
velvet wing
if you're going with the kraken duct, note that I updated the regular one this m...
which one is that?
velvet wing
spark dragon
which one is that?
it's not in the docs yet. it's this. 😄


 spark dragon
ahhh
velvet wing
it's still in testing, but seems good so far. no one's printed the UHF + Beacon yet, however.
spark dragon
velvet wing
it's still in testing, but seems good so far. no one's printed the UHF + Beacon ...
here's everything I've printed so far:

the endstop dupes because I was looking at the machine wrong haha
velvet wing
spark dragon
here's everything I've printed so far:
beacon_bottom.stl is unnecessary with beacon_bottom_uhf.stl, as is the screw_cap. Ditto with hotend_rapido, you just need the _uhf file.
glad you're able to use the PCB mount. I love that thing.
spark dragon
right, I printed both so I'd have the option for either
velvet wing
nice, makes sense
they're pretty similar, don't mix them up 😆 the difference is less than 1mm in height
spark dragon
I probably will at least once lol
velvet wing
hehe, you'll probably get by okay, though
spark dragon
the ducts were a bit hard to print for me, but everything else came out great
velvet wing
yeah, the ducts are a torture test for ABS/ASA printing. I bump the fan a little on it.
spark dragon
had to do some manual work with the soldering iron the shape them up
velvet wing
ooof
spark dragon
they're fine now, just those overhangs
velvet wing
the stock duct isn't perfect. It blows a lot of air, but not all in the right place, along with the crazy overhangs. I made kraken hoping to fix some of that.
spark dragon
I may try to reprint once I get the K1 more dialed in, but they came out pretty good either way
 spark dragon
indeed
I'm ngl, the K1 is quite a capable machine
and a steal for $350
made printing these parts so much easier since I still haven't found a good top cover solution for my merc build
hoping to get access to the beta for merc so I can disappear that problem
velvet wing
spark dragon
hoping to get access to the beta for merc so I can disappear that problem
applying is pretty easy, AIUI
spark dragon
yep, just waiting. I think my initial application bugged out because the bot sent me a DM with a bunch of XML code lol
buoyant zinc
spark dragon
made printing these parts so much easier since I still haven't found a good top ...
In search of top cover as well - if you came across any good ones, please share.
spark dragon
buoyant zinc
In search of top cover as well - if you came across any good ones, please share.
well, my current build is on an E5S1 frame, which makes everything trickier
north scroll
spark dragon
I may try to reprint once I get the K1 more dialed in, but they came out pretty ...
Looks like you just need to turn down the nozzle temp a smidge, or speed. Or fans up a bit.
spark dragon
north scroll
Looks like you just need to turn down the nozzle temp a smidge, or speed. Or fan...
probably fans, I had them completely disabled
north scroll
Yeah, its purely a bit of cosmetic help that appears to be needed.
spark dragon
@velvet wing finishing up my E34M1 build and wanted to ask if you wouldn't mind making a mod of the e5plus_x_axis_stop_block.stl, extending the hole side by 7.5mm (so the block portion sits further away from the mounting hole)? I tried doing it myself but am unable to keep the overall shape and profile you made, so mine looks rather funky, lol. No rush, of course, just whenever you have a few moments to spare. Thanks in advance if you're able!
spark dragon
Here's my bastardized version for reference (my 3d skills are terrible)
spark dragon
I guess it doesn't look completely terrible, after all, lol
 velvet wing
spark dragon
<@755022853040111697> finishing up my E34M1 build and wanted to ask if you would...
velvet wing
spark dragon
<@755022853040111697> finishing up my E34M1 build and wanted to ask if you would...
Once you're out that far, you can use the moveable stop block for that, too 🙂
spark dragon
velvet wing
Once you're out that far, you can use the moveable stop block for that, too 🙂
yeah, I had those before, but after printing both the left-handed and integrated top pieces, I ended up remixing the integrated one, taking 4.5mm off the overhang; and even with those moveable blocks, I was losing too much off that side of my X. After that, I wanted it to look as uniform as possible 
that side is just a failsafe as it were, incase something goes wrong somewhere, to hopefully help prevent my rail from going off that edge
in other news, not sure if you've been able to print and test the clearances yourself, but the beacon sits eerily close to the bed during printing (+-1mm) with the rapido uhf beacon bottom duct. Also not sure if this is intended by the beacon creators as the docs are a bit light, so figured I'd report back
video coming shortly. You'll know better than I if it's intended to sit this close to the bed during printing
spark dragon
@velvet wing here's the test print video. Let me know what you think on that beacon spacing when you can. Thanks!

Just a quick z-offset test print after installing the E34M1 toolhead with the beacon surface scanner on my Ender 5S1, Zero G Mercury One.1 & Hydra build.
Zero G
Mercury One.1: https://docs.zerog.one/manual/build/mercury_eva
Hydra: https://docs.zerog.one/manual/build/hydra
E34M1: https://jon-harper.github.io/E34M1/
Beacon Surface Scanner: http...
still bluff
@spark dragon @velvet wing Found this clearance reference guide on the Annex Engineering Discord
 spark dragon
still bluff
<@415596268522438687> <@755022853040111697> Found this clearance reference guide...
spark dragon
still bluff
<@415596268522438687> <@755022853040111697> Found this clearance reference guide...
nice, thanks!
might need to shave 1mm or so off the beacon mounting block
onyx yacht
Did anybody else get the email from Beacon about Rev H? I decide to hold out for the newest rev
still bluff
onyx yacht
Did anybody else get the email from Beacon about Rev H? I decide to hold out fo...
Yep, it was discounted too.
onyx yacht
Hopefully the mounting isn't changed....
still bluff
onyx yacht
Hopefully the mounting isn't changed....
Looks just about the same to me.
 velvet wing
still bluff
velvet wing
still bluff
Thanks. It's too low by 0.4mm, then, possibly
velvet wing
spark dragon
in other news, not sure if you've been able to print and test the clearances you...
your video looks correct, actually. If you were too low the screws would hit the bed. I checked the Z offset for the beacon to be sure, and it's right at 2.6mm. I can still raise it a little, but not much more than 0.2-0.4mm.
spark dragon
velvet wing
your video looks correct, actually. If you were too low the screws would hit the...
right, I was looking at the distance of the screws, not the beacon.
I haven't run into any print issues so far, so will leave it alone for now. thanks man
velvet wing
spark dragon
I haven't run into any print issues so far, so will leave it alone for now. than...
thanks for checking in!
cursive obsidian
@velvet wing https://github.com/jon-harper/E34M1/pull/25
GitHub
Created rear_inlet_single_Papst_RLF35 normal and beacon variants.
Widened rear/screw_cap pip to make it press fit better.
cursive obsidian
So for the new Beacon H model:
Right now the original beacon is situated so the connector sits inside the rear profile "butt" (pardon my french). UHF version will be ok - the long horns gives us space.
Mount point aren't changed but profile of whole (now single) PCB is shorter and with it the sherlock connector. In current mounts it will be closer to the horns IMO and will likely end somewhere in between horns and rear.
I am waiting for Beacon H CAD to be released so I can see if the whole Beacon H can be moved slightly backwards to the rear. Both Rear and Horns parts will need to change (and y offset).
velvet wing
cursive obsidian
<@755022853040111697> https://github.com/jon-harper/E34M1/pull/25
I'll work up the docs. Thanks!
velvet wing
Working on a 0.4 of the regular Kraken ducts. The interior ducts are too straight (right red line is more ideal), and the second set of ducts hook too sharply at the end (left red line). The right image is what I've got right now to fix it.

 velvet wing
Update. Much better curvature.
 onyx yacht
looks good!
onyx yacht
cursive obsidian
So for the new Beacon H model:
Right now the original beacon is situated so the ...
Maybe I'm not understanding. On the low profile version, doesn't the connector go straight out the back parrallel to the build plate? Shouldn't we be able to route the cable behind the fan(s) with no issue?
 velvet wing
onyx yacht
Maybe I'm not understanding. On the low profile version, doesn't the connector ...
velvet wing
onyx yacht
Maybe I'm not understanding. On the low profile version, doesn't the connector ...
the rear inlet has to be modified to accept the connector
it's not the bottom that's the issue, it's the rear inlet
onyx yacht
ahh i see
velvet wing
Docs should be caught up, including @cursive obsidian's extruder and inlets. Also added the tops with built-in microswitches (there are now two versions).
I feel like the Kraken ducts are...quieter?
cursive obsidian
velvet wing
Docs should be caught up, including <@210526068749238274>'s extruder and inlets....
Just a nitpick, maybe better to link the manufacturer https://www.ebmpapst.com/at/en/products/centrifugal-fans/p/RLF35814N.html instead of US/EU based reseller.
velvet wing
cursive obsidian
Just a nitpick, maybe better to link the manufacturer https://www.ebmpapst.com/a...
Good point, will do
velvet wing
Also merged in the Owl Eyes inlet to main and added it to the docs.
velvet wing
I made GCODE for four benchies at a time, each with the bow pointing in a different direction. Then I printed it with the both the stock horns (trihorns on this one, actually) and the kraken ducts. I did not think to crank up the speed to exaggerate the difference in performance, unfortunately, so the acceleration and speed were not particularly high (2500-5000 accel, 67.5-125mm/s print speed).
Still, there's effectively no difference in the results. Where the regular ducts showed imperfections, so did the Kraken ducts. In a few places, I felt like those imperfections were not as bad, particularly the overhangs (which is most of what I looked at).
Also, the Kraken is lighter by 4.5g
fleet idol
Now make it go faster 😆
velvet wing
fleet idol
Now make it go faster 😆
Gotta upgrade another printer for that 😬
unless you just want a 10k benchy, lol
okay, one stupid fast benchy, coming up
velvet wing
I can't even fast benchy right, lol
Cura has all these safeguard settings...minimum layer time, what?! 😆


 wide turtle
velvet wing
Came in about 20min
wide turtle
velvet wing
Came in about 20min
you have a bit of a benchy in your underextrusion XD
fringe zephyr
speaking of speed benchy time to load my orange pla to try one
fringe zephyr
didn't install the kraken yet but
cursive obsidian
Looks mighty that Kraken horns on EVA3.0. Along with RLF35 it seems at first glance more powerful than my until now used SanAceB52.


 velvet wing
PG7 on the toolhead, too? damn
cursive obsidian
Of course, love that thing. No more not so tightly secured cabling.
velvet wing
I want to get them when I can. they look great!
Cable support is a pet peeve of mine
fringe zephyr
ugh just remembered that I need to replace the rapido mount for uhf
velvet wing
fringe zephyr
ugh just remembered that I need to replace the rapido mount for uhf
It's surprisingly painless to replace a hotend on EVA3
fringe zephyr
I know it is but I need to print it
velvet wing
okay, that's fair
fringe zephyr
I'll get better cooling though currently ducts sit a little high
might improve the benchy
also @velvet wing did the kraken duct change?
velvet wing
fringe zephyr
also <@755022853040111697> did the kraken duct change?
yes, I altered the flow direction for regular and UHF over the weekend
velvet wing
What looks good in CAD does not print the same 😆
cursive obsidian
@velvet wing I am planing to add those securing USB cable points to the 5015 single too. Now that I have validated they are working as intended. Ok?
fringe zephyr
also my toolhead is slowly becoming purple
velvet wing
cursive obsidian
<@755022853040111697> I am planing to add those securing USB cable points to the...
I ❤️ them.
cursive obsidian
Yea the cabling management for Beacon is not ideal.
velvet wing
If you want I can bring the bodies into the existing Fusion file and do it that way?
cursive obsidian
I'll redo the step files and make PR. I'd rather leave that master .step/.f3d file to you.
velvet wing
cursive obsidian
I'll redo the step files and make PR. I'd rather leave that master .step/.f3d fi...
Sweet, works for me.
cursive obsidian
And I likely add those sacrificial supports. I like how they help with overhangs sagginess of entry channel for fan. That RLF35 is nice pres fit.
velvet wing
It's got quite the long inlet
cursive obsidian
Oh yea you're right. The 5015 has that longer inlet. That RLF35 didn't and the bridging didn't end up well without them.

Ok then maybe not needed for 5015 😅 .
velvet wing
cursive obsidian
Oh yea you're right. The 5015 has that longer inlet. That RLF35 didn't and the b...
Oof
fervent grove
Quickly put together to see if it all fits
 velvet wing
fervent grove
Quickly put together to see if it all fits <:chefkiss:854460462297382932>
velvet wing
fervent grove
Quickly put together to see if it all fits <:chefkiss:854460462297382932>
looks sharp
fervent grove
velvet wing
looks sharp
Thanks, great documentation by the way! Pretty much went together without any hassle. Hopefully my drive mount works.
Quality of my print is not the best, open air polylite ABS and speed too high.
velvet wing
fervent grove
Thanks, great documentation by the way! Pretty much went together without any ha...
if it works, it works
fervent grove
It weighs 103 grams, empty toolhead without the spring washers but all inserts in place.
velvet wing
That's down a bit, I think. Some of the recent revisions cut down weight some.
fervent grove
Great! I made sure I had the latest versions of the pieces I printed the other day.
Might also be the Eva 3 Bambulab hotend mount I've used.
velvet wing
fervent grove
Might also be the Eva 3 Bambulab hotend mount I've used.
Can you let me know how that works? I looked at it and wasn't sure how well it would turn out, but that was quite a long while ago.
If it does work, I'll add it to the docs. It was new/untested when I saw it before.
fervent grove
velvet wing
Can you let me know how that works? I looked at it and wasn't sure how well it w...
For sure I'll keep you up to date with it!
I've yet to receive the hotend, ordered it last friday on AliExpress.
I'll also keep you up to date on my extruder mount and upload it. Just in case someone wants to reuse theirs when they want to upgrade their 5S1 to Merc1 and Eva3 (probably not 😄)
velvet wing
fervent grove
I'll also keep you up to date on my extruder mount and upload it. Just in case s...
It's good work
 compact compass
Would there be work to get a mount done for the Bambulabs hotend?
fervent grove
compact compass
Would there be work to get a mount done for the Bambulabs hotend?
There is already 1 or 2 for the Eva 3, they seem to work with this mod. I have yet to confirm it since I have not received the hotend yet.
velvet wing
compact compass
Would there be work to get a mount done for the Bambulabs hotend?
https://www.printables.com/model/393230-eva-3-bambu-x1-hotend-adapter This one looks the most well-done of the three I've seen.

Printables.com
This adapter allows the Bambu X1 hotend to be used in any machine that uses the EVA 3 system. | Download free 3D printable STL models
cursive obsidian
It uses 3030 fan 😒 .
fervent grove
Step files are there so it would be easy to make it for a 40mm fan
wide turtle
Technically smaller fans are better as they have smaller hubs
velvet wing
wide turtle
Technically smaller fans are better as they have smaller hubs
~20% reduced airflow that's going more where you want it, so it's a tradeoff.
 sick bone
velvet wing
https://github.com/jon-harper/E34M1/commit/4a304818b0a65f3925d56ade0d6429af91551...
sick bone
velvet wing
https://github.com/jon-harper/E34M1/commit/4a304818b0a65f3925d56ade0d6429af91551...
Will you be adding a volcano/uhf klicky version?
velvet wing
sick bone
Will you be adding a volcano/uhf klicky version?
GitHub
EVA 3 modified for the Mercury One.1 3D printer. Contribute to jon-harper/E34M1 development by creating an account on GitHub.
sick bone
velvet wing
Mos def: https://github.com/jon-harper/E34M1/blob/testing/STL/bottom/kraken_uhf_...
Thank you is this the 6 horn version or the one that looks like tentacles the stl preview on github isnt working on my phone for some reason
velvet wing
sick bone
Thank you is this the 6 horn version or the one that looks like tentacles the st...
er...I think those are the same thing? 🙂 Let me grab a CAD pic.
github came up faster

er...that's not print orientation, though
sick bone
velvet wing
er...I think those are the same thing? 🙂 Let me grab a CAD pic.
great thank you
 stable viper
I saw the Dragon UHF mount for the EVA 3; is it still compatible with 2.4 or competely different?
Still trying to navigate through all the different toolhead configurations before I put everything together and find something that might ahve worked better lol
velvet wing
stable viper
I saw the Dragon UHF mount for the EVA 3; is it still compatible with 2.4 or com...
EVA 3 and 2.4 are not compatible, sorry
stable viper
no worries! just wanted to make sure first :>>
I'll be here pretty frequently in the next few days lol make sure I get this all set up properly!
velvet wing
stable viper
I'll be here pretty frequently in the next few days lol make sure I get this all...
Right on! Have you gone through the Tour Guide on the docs site yet?
stable viper
yep! I didn't see any offical set up for the UHF dragon but I'm sure it won't be hard to piece together from this thread :>> The only thing I'm wondering, is it a drop in replacement for the 2.4 or are there other thigns you need to pritn to use it on the merc?
I'm still in the process probably should have asked all this before cutting the belts 😭
velvet wing
stable viper
yep! I didn't see any offical set up for the UHF dragon but I'm sure it won't be...
UHF Dragon is in there 😉 https://jon-harper.github.io/E34M1/modules/hotend/#phaetus-dragon-uhf
Documentation for the EVA3 for Mercury One mod.
stable viper
oh shit I thought you mean the EVA docs page this is cool hehehe
velvet wing
stable viper
yep! I didn't see any offical set up for the UHF dragon but I'm sure it won't be...
It totally replaces 2.4, yes
stable viper
big bet >:> I'll read through this after work (using my bambu here to print parts 🤐)
velvet wing
stable viper
big bet >:> I'll read through this after work (using my bambu here to print part...
everything in there is up to date with the exception that there's a duct we're testing that's pretty cool (pun intended).
velvet wing
stable viper
stupid question are all the print orientations as is?
yep. anything that's not is a mistake 🙂
velvet wing
stable viper
the page looks super well put together btw, very nice work!
thanks!
stable viper
and using the same print settings as merc?
velvet wing
huh. I need to make a note of that. Not sure it's in the docs anywhere!
stable viper
I didn't see anything on the modual reference, I haven't read through all of it though
stable viper
oh lmaoooo
fringe zephyr
@velvet wing installing rapido UHF mount but I don't see any difference from the one I had
what differs?
velvet wing
fringe zephyr
what differs?
I think it's about 0.5mm, lol
fringe zephyr
😅
I'm going back to the old one ☹️
UHF duct still stays high (old kraken not sure)
velvet wing
the bottom of the duct should be about 2mm above the nozzle
velvet wing
x and y offset, yes. Z offset, no.
fringe zephyr
xy is the one I care most
z hopefully my variable height dock handles
if higher definitely
velvet wing
it may be a little higher, but I don't recall exactly
 velvet wing
hmmm, try it?
fringe zephyr
will do, old UHF was high too
 misty flame
I'm planning my Mercury One.1 build, but I have a Revo Voron on the way. Does that mean that E34M1 is the best plan for me?
misty flame
misty flame
I'm planning my Mercury One.1 build, but I have a Revo Voron on the way. Does th...
And, if so, how do I decide which top module I need to have printed? It looks like the main decision is to have the endstop on the left or right; is there a correct decision? Any ramifications I won't have thought of yet?
 stark cipher
Howdy! While choosing what parts to print for my E34M1, I got interested by this option: pcb42_mount_cable_chain.stl since I've ordered a CAN pcb kit from BTT. I'm looking for recommendations on a Chain belt to print to go along with it if anyone can recommend something. Thanks,
fringe zephyr
velvet wing
hmmm, try it?
still need to test but has ~2mm clearance from the bed could be less
might be a little better if they blew a little more into the bed
velvet wing
misty flame
I'm planning my Mercury One.1 build, but I have a Revo Voron on the way. Does th...
I'm not sure what other toolheads support the Revo Voron, but I know E34M1 does. 🙂
velvet wing
misty flame
And, if so, how do I decide which top module I need to have printed? It looks li...
Left or right and whether or not you want a way to attach your umbilical. If you've got a toolhead PCB, a lot of those have mounts with a cable guide instead.
velvet wing
stark cipher
Howdy! While choosing what parts to print for my E34M1, I got interested by this...
FYI, those mounts are for NEMA17 steppers and won't work if you're using an extruder with NEMA14 (round) steppers.
TBH, not a lot of folks are running cable chain anymore, particularly given how light the CAN umbilical is.
misty flame
velvet wing
Left or right and whether or not you want a way to attach your umbilical. If you...
It looks like the top module in the default Mercury build has the end stop on the right, so (in the theory that they made that decision for a reason) that's the route I'll go.
velvet wing
misty flame
It looks like the top module in the default Mercury build has the end stop on th...
important question: do you know where your Y endstop will be?
front or rear?
misty flame
Since the instructions stop way before that point, no