#EVA 2.4 Klicky Tri-horn Mod
901 messages · Page 1 of 1 (latest)

 Print both the 30 and 45mm docks for Hydra and the 5 plus, most should be able to get away with the 30mm.
The 65mm dock is for the stock 5 pro

 BOM
BOM 
8x 3x6mm n52 magnets
CA glue (Super Glue)
1x D2F-5 or D2F-5L micro switches (Remove the lever if you have one with a lever)
2x m3 heatset inserts
2x M2x10 self tapping screws
2x M3x20 Socket Head Cap Screws
2x M5x10 Socket Head Cap Screws
2x M5 Roll in spring T-nuts
22-24awg wire
JST-SM or Microfit 3.0 connectors are recommended for use at the hotend
You only need to edit klicky-probe.cfg and klicky-variables.cfg
You should only have to adjust the dock location, bed size, and tool head park location.


Took me a long minute to figure out I had to remove the saved bltouch config! I got impatient and started tinkering on my own but looks like I got it all right. Thanks for taking the time to post.
For those who needs to shave off as much free space I have made 20mm variant dock. Even shorter variant to @keen patio 's ones posted above:
Cant wait to get my clicky working and ditch the rattle-box CRTouch
Dumb question. All the magnets I'm finding are imperial dimensions... 1/4 by 1/8". Those gonna work or be too large to fit the holes in the parts as designed?
They need to be the metric spec, where are you located?
Conus
I've found plenty on amazon, ebay. Fabreeko and west3d also have them.
the later two sources will sell quality n52 magnets
Thanks
Ordered from Fabreeko after too many "didnt measure true to size" amazon reviews
Yeah, hard to find quality magnets on amazon
the cheaper they are, the more out of spec it seems
One of the adds even shows calipers measuring them right on spec, thank goodness for the review that showed them 5% small in both dimensions. And if the dimensions are off, whats the chance they're actually n52 spec
zip-zilch-nada
Do we use the klicky piston thing with this? Or just the bare switch?
either one works
Bits are together. We'll see about making it dance Sunday when the rain comes
It works great for me for homing and bed mesh. Screw adjust and z-tilt dont auto-attach and detach the klicky the way I expect them to reading through the macros. Any advice?
Did you uncomment them in the klicky-probe.cfg file?
or what is it doing that you do not like?

those are macros to force the dock/undock for each of those commands
yup. I had looked at the macros themselves but not into the main cfg to uncomment. Works great now
I had to flip the X offset sign from what was in the files in the zip above but other than that very much turnkey
Thinking about it more, I figure that offset was default from a front mount probe, and needed adjusted for when we pick it up from the back with this mod?
Thanks again for fixing my ID10T error
I'm having some trouble with my klicky. when it's docked, it's far enough away from the magnets on the tool head to not attach - the dock is holding it down.
it doesn't look like the duct placement affects the magnets in the various ducts. Any advice?
post pictures

does it lock into place if you manually attach it? magnets all line up?
almost seems like the rear magnet is pushing it away
yep - can manually attach. with it attached, i can move the tool head over the dock and it will dock, but i can't pick it up from the dock.
all the magnets are correct. the furthest back magnet is flipped so that it doesn't try to attach to one of the front two magnets while docking/undocking.
thanks
i tweaked the file for the doc mount and brought the two mounting holes down 1 mm. it now docks and undocks from the tool head.
hello guys 🙂 can i see where the klicky probe for the nozzle offset goes on the bed and where is this part ?
I like to switch flexible bed plates on my Voron 2.4, but hate adjusting the printer's Z Offset. It's a chore I don't enjoy. If you run Klipper on your 3D printer, have a z-endstop for your nozzle, a Euclid probe or Klicky probe or any probe with a body that can be measured with the nozzle endstop, you never need to calibrate your z offset aga...
like that ?
🧐
I'd be happy to help. I don't understand your question though.
I want the probe for the nozzle so if I change nozzle that I won't have to do paper test or testz z=- xxx
I think that needs klicky and sex bolt.
whats sex bolt ?
KB-3D
Avoid de-flanged pulleys and wandering pins with Hartk's Sexbolt Z Endstop Mod for Voron V2. This kit includes the unique hardware needed to integrate into your own build.
it can be tricky to setup and configure for the first time


should be asking in https://discord.com/channels/747612067951018075/1019074054285692959
but read that thread first
but also get klicky working first, do not try to get both working at the same time.
Ok thx
do you plan to add UHF in future?
I spent a week doing the cad for the standard ducts. Tried to copy the work into UHF and it looked like it would also take a week of cad. And I did not have a UHF setup to test with myself at the time.
I have one now, but to many other things I want to work on currently.
could you share something that could help me out creating something on my own? i was using mod previously but it doesnt fit with merc latest back plate anymore
@keen patio wich duct do you suggest to print for the HF rapido ? thanks
The configurator should include one @dusky heart
High narrow is what I use
I'm currently planning out my build, so I didn't buy anything just yet, but will this mod work on the Ender 5 Pro with Hydra?
Looks like it - you need the 65 mm dock for the 5 Pro
Cool. Just wanted to make sure since it seems like the sex bolt isn't compatible with the 5 pro Hydra.
I don't think it's compatible with 275mm bed.
But 255 should fit that's what turtle has I think.
Klicky Tri-Horn be clickin' ... for now, I had to weaken the dock attachment magnet with a layer of tape so the toolhead could overpower the dock enough to grab it. I think that's a friction/fit issue with my dock. Want to reprint a smaller dock anyway after I replace those aluminum z brackets. Here's the accuracy test:
probe accuracy results: maximum 14.955000, minimum 14.948750, range 0.006250, average 14.952250, median 14.952500, standard deviation 0.001750

still a bit of a mess, but trying to get the printer back up on its feet so I can start printing some revised/final parts...
Very nice, did my writeup help with the config side of things?
Embarrassed to say I didn't know there was a writeup... I pulled the macros and readme from the Klicky github so waded through that to get things going. Things I remember pausing to think about the most... I was converting from a BLTOUCH, so obviously needed to take that out, but then understanding that the [PROBE] was the loose equivalent for a Klicky, and that I could leave the virtual-z-endstop-thing in place on the Z axis. I think I originally tried a negative Y value for picking up the probe (since the tool head was moving back), but trial and error sorted that.
its at the top of this thread lol
Yeah, that would have been spot on... it's been so many weeks since I printed the parts I kinda forgot where they came from.
lol
The first time setting it all up, took be a bit to wrap my head around it all
so I did my best to simplify the steps needed
Sorted my issue with Klicky not wanting to come out of the dock easy enough... The latest revision of the dock has the dock magnet inserted from the back such that some plastic gets between it and Klickys magnet... So a weaker connection and that resolved my issue. I had an older revision that let the dock mag and Klickys mag have full on direct contact.
Hello, did someone had the issue with klicky and "variable" z offset? When i setup z offset to be perfect and then start a print, it sometimes ends up scratching bed plate. If i restart the print and home again it will be too high then... im not really sure where the issue could be because when i checked probe repeatability everything looked fine...
If I'm doing this on a E5pro with a 255mm hydra bed, is there a recommended dock size to use or should I just print and try all 3?
I went with the smallest
thanks!
After printing the short dock and the medium it does look like I need the longer one for the stock setup. @remote acorn Looking at your screen shot, you must have hydra on that. The shortest hits the z rail printed part, and the medium is perfect in y when it homes but the klicky macro screams at you if it cannot go further forward in y to park and release it. With the longest I should be able to have the Y go forward 10-20 mm to park it in place. Should hopefully know later tonight.
Also, with the E5 it homes at max x and y which by default is set to 220 as max travel. I increased it to 280 as the homing position so I can reach where the dock is at but I am thinking I may need to apply another offset in the slicer so that it doest start the print at 280 in x since that will be off the bed. It is new to me so I am not 100% that is the correct way to configure it but it seems right.

@humble zenith That is how I had it it mounted before Hydra
and that was with 300 rails as well, even more room with the 330 rails from Fabreeko
Okay so long extender. Is it not an issue to remove the l brackets on the corners?
If looks like they help with rigidity/alignment
also if you place it past the edge of the bed, you can set a position_min of -20 or something
I used some other corner braces on the frame, you can see them in the upper right
I think most of my issue is I have not done this other than one other time and it has been a like half a year. I just dont remember how I configured it all.

Ahh, nice yeah the aluminum elbow brackets.
It seems like it will fit without but it takes a little force to get the extender in.
I should have done a better job documenting my setup before Hydra

Oh shoot, I didn't even think about this
Long should be perfect I just need to figure out how to configure the lcoation.
I modified my bed setup over a year ago lol
Not sure if it is that it homes at max that is causing it to be weird but when I plug the coordinates in it doesnt seem to behaving and go to where I would think.
I use the dashboard to home X and Y, then I use the controls to manipulate it to the correct position for pickup, I write that down
haha after I installed the short one I looked at your image and thought "yeah thats different"
I thought I had done that but am going to restart.
Are you available for a quick call or not right now?
I won't stay on long since 3am 😛
I just put the chili on and my in-laws are visiting haha. I appreciate it. If I am not able to get it I will definitely be up for a call tomorrow when you are free 🙂
Alright, I'd advise to figure out the x and y 0 positions first
Yeah, I just attached it and it seems like the homing behavior is correct so it is just the pickup and drop off that I need to tweak.
How I do it: I set max to like 300x300
Then home X and Y, move the nozzle to the front left corner
Lets say in the dashboard it says:
x position 35 and Y position 22 you take those of your 300x300
Your new max would be 265x278
That's how I figure out my max position and 0 position
So I threw the probe on the magnets and based on home being 280x and 220y (I made the x this value so that it could reach where the dock is). Moved the magnet probe attached to the toolhead until it was perfectly aligned and docked it. This is at 11x and 200y based on the manual travel. When I enter that value x and y home then the tool head moved maybe 80mm left and tries to go beyond the frame in y.
Looks like it might be skipping steps due to travel speed?
Wow haha, I completely missed the default travel speed was 400mm/s
you could try changing the undock y to 20

maybe the stock board doesnt like 400, might need to drop it to 150 with the stock board
If you where here I would give you a big hug haha

My biggest error was not that I was inputting values wrong, it was that the default speed of 400mm/s was to fast.
It was happening so quick that to me it seemed like it was just going to the wrong coordinates and I assumed it was an error on location configuration. Not that it was skipping steps.
I wonder how long that would have taken me to realize had you not called it out.
Thank you

Yeah, will be interesting to see how it handles when I add the M8P. Still not out of the weeds totally. Getting probe not detected every few grabs. One of the magnets is at an angle so going to file it down and see if that helps.
Hi guys, I’ve been able to set up mi klicky, it home and it does the z-tilt, but I’m not able to do a bed mesh
When I try to do a mesh, it attach the probe and then it try to probe in front of the dock location

Looks like it’s trying to go out of bounds. Is -20 configured in your Y axis endstop_min? Is it within bounds of the frame?
If not you’ll have to tweak your mesh_min and mesh_max under the bed_mesh section to make sure it probes within the boundaries of the print area. https://www.klipper3d.org/Bed_Mesh.html
Need to adjust the bed mesh to account for the probe offsets
I still get confused as to how to offset the values, and often just take my y offset and adjust both min/max y to offset in 5mm or so greater than my y probe offset. Same with X
For a 235 bed, I might start with something like this
Bed max 10,35
Bed max 220,190
And probe a 3x3 grid, as you are using this just to dial in the boundry, then adjust the values after running it, test again. Repeat until you are happy with the area is it probing.
I try, ty
Nope

I also need to write up a guide in setting xy limits
I set the endstops at the end of the rails on the back and right of the printer. Then set position_max and position_endstop to be the same, but set their values to place the nozzle at the front left corner of the bed when the printer is at 0,0
well not quiet the corner, I offset it 2mm or so inside the edges, since you do not want to print on the edge
It’s still trying to probe in front of the dock
post your probe section and bed mesh section


and picture of your setup
also your variable bed max is wrong
you have 10.35 and 220,190 for the other
should just be 220 and 190
or the other way around


what printer, and what size bed?
looks like a 5 plus, but those numbers are more like a 5 pro range
It’s a 5pro with dual z flipped 90°
ahh okay
Like this ?

yes, if those are your max print limits in x and y


actually lets do this, move your nozzle to be over this point using mainsail

then tell me what the xy positions are in that location
we need to fix your endstop settings 🙂
can leave the klicky dock where it is, we will set it up to travel past zero
X24 y30
Stepper_x
position_endstop: 231
position_max: 231
position_min: -24
stepper_y
position_endstop: 225
position_max: 225
variable_docklocation_X -23
variable dock y 195
lets start with that, and see if it still docks
Ok ty
It miss the probe by a little
Ok, with variable_docklocation_x 24 it attach and dock the probe correctly
okay, let me look at bed mesh again now
Ok ty man
bed mesh should be good to test
when you send the tool head to x0 y0 is it now over the bed?
rather than way off to the side

any reason you have different values here?


Yes, I’m not using the trihorn mount

Ok ty, i copy paste them here ?
lets start a thread over in #1006498377938255922
Ok ty
the two 2 m2x10self tapping screws to the switch for the klicky, what sort of head should they have?
I used socket cap hex heads, but cannot recall the size I used...
they were either m2 or m2.5
might have been longer as well? they worked
I think any head style works though
@keen patio a little help please, which one would be the best for the mosquito?
You would want the wider duct, I would start with the high and test fit it before installing magnets
default is wider
I have a image showing all the sizes with the narrow/fault lists and height names
I am also testing a variation that merges the duct into the bottom plate. Its a little more work to install it, but makes the duct far more rigid. The bolts holding my duct on kept coming loose inside my enclosure... I need to verify it doesnt break anything in cad when I change the configurations after I do a little more testing with it.

it does require removing the hotend to install/replace.
I'm quite happy with it split though
this would be optional for those who want it 🙂
did you try loctite or whatever? that specific one for screws
the old version would not go away
had some that were coming loose and it fixed the issue
I do have some vibratite in my amazon cart that I want to try, just been to cheap to buy it... $30 for a little bottle
but its a sticky coating for threads that prevents them from vibrating loose. Designed to be removed and installed multiple times without any issues
same kind of thing that I mentioned
Any chance to incorporate a klickyng?
I've magnets fall out of mine several times so far.
zero space for it
is this the right orientation for the probe or am i to flip it 180?

I put a tiny bit of super glue on my magnets and pressed them in after having several magnets come off. Haven’t had any issues since 🙂
Flip it 90 so that the flat side (with the dock magnet) is down.
I super glue my magnets in too, but with the 50-60* enclosure temperatures I print at, the magnets still fall out from time to time.
I will probably investigate a high temperature glue when I need it next.
Thanks!
@keen patio how are you routing the wires for this? out the front and to the side or somewhere else?

ahh... need to be twisted?
No, I just find twisting them keeps it neater
...i was going to sleeve them with the fan wires and hotend wires..but I am not totally sure that is a good idea
I think I need to shave the sides of the mount, that mounts to the frame down to fit between the corner bracket and the "cheater" extrusion on the 5 pro
@keen patio is the back extrusion different lengths? That part seems too wide for my spot

you might need different corner braces
that do not go in that spot
I put corner braces under the Y and rear X extrusions, into the back corner upright
Is there a rapido uhf duct for klicky?
no, I spent a good week just working on getting it to work with the standard duct options. And I have not had the desire to setup UHF on my rapido as I am not even maxing out flow on my HF setup.
Before I break something, I want to make sure I have my steps in order...
- make sure klicky docks etc
- PROBE_CALIBRATE ... Remove klicky, get to paper to nozzle
- BED_MESH_CALIBRATE
- cast filament remnates to the 3d printer gods
- should work without smashing?
@keen patio
sounds like a plan to me
casually while driving 😂
Nah this time the boss was driving 🙂
I can't figure out why I have such a large gap from the trihorn to the docked klicky probe. Did I do something dumb here?

Going to make an update to change it to use M3 bolts with small slots to adjust for any height issues like that. I have it setup for the short dock now, but I need to push the update to the other sizes as well.
OK. Adjustability solves it but curious why it would be different from printer to printer. All the offsets should be the same from Merc to Merc, no?
I am not sure, I did run into issues on my 5 plus rebuild. And saw others also have had problems with the height. So I looked into making them adjustable after that. But also juggling 20 other side projects at the same time.
I just wanted a sanity check that I wasn't using AB parts when there was a different EVA part, etc. I could see a height difference between toolheads
I'll try to push this up on my todo list. I do have a couple other cad projects I want to clean up this weekend before I work on that.
Don't rush on my account. I'll need to rig something back up because I went headlong into a z-probe change and have only virtual so can't easily printa new one anyway 😄
might have to put bltouch back or just hack something else in the short term
Could file the back flat, and file the holes to allow you to slide it up
Or maybe use some m4 bolts/washers?
yep. I just didn't want to insult your good work by telling you i was going to perform a nasty hack 🙂
m4. will test that in sec
Even with M3's I was only able to pull the dock up about 1.5 mm and it's still not close enough
Going to drill new holes for M3's instead
that will work
I had to add some huge washers between the dock mount and frame because after shifting up with my new holes the bottom of the dock mount would start to pull into the v-slot. So extremely janky dock mount but I'm klicking! Thank you very much for the great work on this mod. Especially with the configuration help. I had to fumble through a few cooridnate issues but I can only imagine how much longer this would have taken starting from scratch.
It is incredibly satisfying to dock and undock.
Well I'm printing all the bits for a klicky, then while checking the prints first layer look up and realise that my led strip is on the extrusion the klicky mounts to. 🤣🤣🤣
Mine also had a large gap that kept klicky from attaching. I modified the dock file to make it work.
Mine is 5+ btw.
@keen patio Any chance of creating tri-horn ducts for the Klicky for the EVA 3.0? If not I will take a stab at the CAD creation if you would be willing to share your 2.4 duct files with me so I can copy the design elements needed for the wiring/klicky mount. Thanks!
I had no interest in doing klicky for 3.0 since they said in the release video that they were already working on duct changes, which would require updating the klicky stuff again
and it took over a week to iron out the settings to work with 2.4 and all of the configuration settings
and what I did wouldnt transfer to 3.0 at all really, is a very different duct setup. Only thing that would transfer is the magnet pockets. Which I just modeled based off the original klicky files
Copy that...I will see what I can come up with...understanding of course that changes are likely coming.
Lets keep this thread for the Eva 2.4 tri-horn setup (might confuse people)
You could make a thread in the #1007998760967737364 section with your mod for eva 3
Will do!
Is this update around already?
So how do you guys setup the safe homing to go and pickup the probe first? mechanically I can do everything, but if I press home all, after x and y it does all upside down, if the probe is already attached it docks it and stops with an error, if the probe is not attached it doesn't go to pick it up and it stops with an error. Instead, I have to home x and y separately, than use the macros: probe pickup, probe lock, home z, tilt/mesh and than dock the pobe with the macro as well
post your klicky-probe.cf file
#[include ./klicky-specific.cfg] #place to put other configurations specific to your printer
[include ./klicky-variables.cfg] #Requires
[include ./klicky-macros.cfg] #Required
[include ./klicky-bed-mesh-calibrate.cfg] #bed mesh, requires klipper configuration
#[include ./klicky-screws-tilt-calculate.cfg] #help adjust bed screws automatically
#[include ./klicky-quad-gantry-level.cfg] #level 4 Z motors
[include ./klicky-z-tilt-adjust.cfg] #level 2 or 3 Z motors```err klicky-variables
hmm, maybe it's again the travel speed. It basically ignores/shorten the movements when the speed is too high
hmm, maybe it's again the travel speed. It basically ignores/shorten the movements when the speed is too high
and you removed safe home from your printer.cfg?
yess
if I hit home all, it homes x, y, then grabs the probe and homes z
what does your z section look like
in pritner cfg
## Hydra triple Z. Z Z1 Z2
## e3v2 MCU - In Z Position
## Z Stepper - Front Right
[stepper_z]
step_pin: e3v2:PB0
dir_pin: !e3v2:PC5
enable_pin: !e3v2:PB1
microsteps: 16
rotation_distance: 4
endstop_pin: probe: z_virtual_endstop
position_min: -15.0
position_max: 250
homing_speed: 12 ### Currently running my first homing speed at 20 ###
second_homing_speed: 5
[tmc2209 stepper_z]
uart_pin: e3v2:PC11
tx_pin: e3v2:PC10
uart_address: 1
run_current: 0.580
stealthchop_threshold: 999999
## e3v2 MCU - In X Position
## Z Stepper - Back
[stepper_z1]
step_pin: e3v2:PB13
dir_pin: !e3v2:PB12
enable_pin: !e3v2:PB14
microsteps: 16
rotation_distance: 4
[tmc2209 stepper_z1]
uart_pin: e3v2:PC11
tx_pin: e3v2:PC10
uart_address: 0
run_current: 0.580
stealthchop_threshold: 999999
## e3v2 MCU - In Y Position
## Z Stepper - Front Left
[stepper_z2]
step_pin: e3v2:PB10
dir_pin: !e3v2:PB2
enable_pin: !e3v2:PB11
microsteps: 16
rotation_distance: 4
[tmc2209 stepper_z2]
uart_pin: e3v2:PC11
tx_pin: e3v2:PC10
uart_address: 2
run_current: 0.580
stealthchop_threshold: 999999```Z it works fine, I'm able to mesh and tilt successfully
apparently, after I home Z, if I call z tilt it goes and attach the probe first
I haven’t setup park location, maybe it’s that?
I left it to False. I’m not sure why it should matter though
nope, the only thing that makes a difference is if I invert the probe pins, so it undocks it before homing z, but than nothing works because I can't use the macro to pickup the probe ... my point is, that klickly is definitely integrated in the homing procedure. I suspect it thinks the probe is already attached when it starts, so it doesn't go and pick it up
I have this log files when trying home all bash Z not homed, forcing full G28 Homing X Homing Y Homing Z probe: TRIGGERED toolhead: max_velocity: 600.000000 max_accel: 1000.000000 max_accel_to_decel: 1500.000000 square_corner_velocity: 5.000000 SET_KINEMATIC_POSITION pos=0.000,0.000,0.000 Stepper stepper_x phase change (was 62 now 46) Stepper stepper_x phase change (was 46 now 50) Stepper stepper_x phase change (was 50 now 61) Stepper stepper_x phase change (was 61 now 62) Probe already docked toolhead: max_velocity: 600.000000 max_accel: 1000.000000 max_accel_to_decel: 1500.000000 square_corner_velocity: 5.000000 probe: TRIGGERED toolhead: max_velocity: 600.000000 max_accel: 3000.000000 max_accel_to_decel: 1500.000000 square_corner_velocity: 5.000000 toolhead: max_velocity: 600.000000 max_accel: 3000.000000 max_accel_to_decel: 1500.000000 square_corner_velocity: 5.000000 toolhead: max_velocity: 600.000000 max_accel: 1000.000000 max_accel_to_decel: 1500.000000 square_corner_velocity: 5.000000 Endstop z still triggered after retract Endstop z still triggered after retract Endstop z still triggered after retract
the klicky probe is not attached
Did you check the endstop condition in mainsail/fluidd?
is that normal?

of course is triggered, but I mean should I have both a probe and an endstop?
bingo!!
I had ```yaml
endstop_pin: probe: z_virtual_endstop```
instead of yaml endstop_pin: probe:z_virtual_endstop
the space broke it? lol
I blame YAML. It's horrible.
don’t want to start a flame, but I rather prefer yaml than json 😅
JSON is great for computers to talk with each other, but also shit for humans
But this is all way off topic lol
@soft tide JSON>YAML
It heard you talking about it

So apparently magnets I bought few months ago for another project are the same size. Anyone know if these will work? I have about 190 left hahaha

They feel strong but not sure compared to n52
worth trying
gridfinity?
@keen patio These are the right offset values right?

Also is it for every hotend the same or is this differend for every hotend?
should be, but you can verify it with the klipper probe offset routine
Uhm @keen patio, when you home x and y does it go to 0 or your _max value?
My thought process, Maybe I need x: 2 and Y -28.75?
My x goes to the x_max value when im homing
did you check using the klipper docs?
But do you know this?
like when it hits the switch, does it set 0 or x/y_max value?
front left is zero zero, that is all that matters
yeah mine does that too so this cant be it...
will check the offset of x and y as soon as I can
I recently calibrated it from scratch and got this ```yaml
[probe]
x_offset: -2.5
y_offset: 29```
Probably @keen patio measure are more accurate. The issue is to put a sign where the klicky probe actual hits the bed (I think I got the pin of the probe, but I might have been off)
I wonder if there is a recommended z offset instead, I have a rapido and the offset is still not perfect, around 9.5~9.6
If I have a pro with 330mm rails do I still use the 65mm dock?
I have 300 mm rails (moved a little on the back) and I use the 30mm dock
but it just occurred to me that I use hydra, you should check if the travel of the toolhead is unobstructed once you home X and Y, going straight to the left it shouldn’t bump into the drop brackets
ill have to check and make sure it clears with klicky on. i have the mercury rod brackets so theres the extra clearance from that
Think I might have to do some sanding. Maybe my bridges sagged and my magnets should be deeper but my dock is too close
was able to get it working by loosening the mount screws and then putting something on each side to stop it from sliding (i used a twist in cable clip). in case that helps anyone else
Can I maybe have that file? I have the same issue
I'll send once I'm home.
thanks!
I think this is it.
Thanks!
Do you also have a file for the longer dock?
I dont think I can get away with the 30 mm one
no - i only modified the one that i used.
oh okay, how did you modify it? just made the holes in the back 1 mm higher?
i moved them down 1mm (which moved the dock up 1 mm).
cant remember if anything else needed to be done.
For some reason I need it to scale to 10% in the slicer since its otherwise too big
But I think I did it
small issue here, it touches the bed before the nozzle

and this is the high duct
and now I can't print because this is my only printer 😅
alright found the issue, the wire was tilting it
The three magnets have the same polarity. I saw a video that the one on the back had the polarity changed. Thank you.

If you flip the rear magnet, it will prevent it from attaching to the toolhead incorrectly.
what is the HSI size for these?
What is hsi?
heat set insert
That's what I was thinking - thanks for confirming.
This uses the standard size that the rest of the Merc/voron parts use.

I don't want to be a Klicky killer, but I have installed a Beacon and it is amazing. 900 point scan done two times (1800 points) in less than a minute on a 370X370 mesh. Also the mount was a breeze to CAD up. Don't mind the poor mesh here, this is just testing.

Yeahh I will go with beacon somewhere next month I think
Really like what im seeing but its pretty expensive compared to an klicky probe or something similar
is there a way to still do auto z with beacon?
Nope
That one of the few downsides
But in theory it isnt neccesary
It might be even possible to use klicky or quickdraw AND beacon but then only use QD or klicky for auto z🤷♂️
Is the klicky probe itself modded from the original version? Like just the part with the microswitch that attaches/detaches.
Nope thats just stock iirc
Okay thanks
Looking for a little help, think I have been looking at to many cfg files today. I have klicky installed and everything sees to be working until I get to bed mesh. I started getting this error "horizontal_move_z can't be less than probe's z_offset" so I changed my mesh horizonal move_z to higher then my probe offset (10.050) but then I start getting "Move out of range: 2.000 -23.750 10.050 [0.000]". What am I missing?
your mesh start is 0 0 right
it will try to move the probe into that coordinate but it can't
(assuming your probe offset is -2 23.75) as it's similar to mine
bed mesh start needs adjustment to something around 0 23.75
Yep, way to many config changes today, forgot to update mesh starting points. Thanks.
so if the klicky probe itself is unmodified from the original klicky, it seems there has been an update since this version was posted. i downloaded the latest version off their github and its a smidge different and the microswitch leg holes came out way better for me. with the one in the pinned folder i had to poke through them with a hot needle. so if anyone is having issues with hole clearance try the one on the klicky github. also the klicky github recommends it be printed on its side with the arrow pointing north (or positive Z i guess? lol) so theres something to try also if you have issues with sagging bridges over the magnet slots
Is there a way to Mount this onto the Eva 2.4 ? @carmine frigate
Please do not post stuff not related to my mod in here.
Understood - deleted
updated klicky dock, uses m3x8 screws in place of the m5's. Adjustable up and down a bit. Also added hex driver clearance through the front.

that was my biggest gtipe with previous one... hard to mount to the frame...
much nicer than my previous solution of just subtracting two cylinders from it using MS 3d builder lol. looks great
I like it, I'll test it out and see if it works with the regular klicky dock, I had to print a modified one to be higher
https://www.amazon.com/gp/product/B00YBMROKC/ref=sw_img_1?smid=A30WUG2ZDGM0XM&psc=1 will these self tappers work?

M2x10mm nickel plated hex socket cap head sound model wood self tapping screws fasteners. Applications: Electronic equipment, Machinery, Buildings, fittings, Sports equipment, etc.
and is it best to go with a omron D2F-5 switch rather than knockoffs?
thats what BOM calls for
I have used m2 and m2.5 self tapping screws on mine
I stand corrected then
test update on the ducts... Intergraded the bottom plate with the duct, and changed the names to reflect the nozzle height offset and duct opening widths. First number is the width, second is the height of the ducts from the bed/nozzle tip.


I was thinking if any of this ducts supports volcano eg the rapido UHF?
looked into it early on, and everything broke when I tried to change it for those offsets. So I gave up since I do not use either myself.
I'll get this printed later on today 🙂
which size is the most suited for an nf crazy?
dunno, I just like to see about 2mm under the ducts if the nozzle is touching the bed
to low, and I had issues with the ducts hitting prints that lifted/warped in the past
Before canbus, I used JST-SM connectors on my klicky ducts. So I could swap them out or replace if I needed to for any reason.
with canbus its less of an issue.
Looks like I was using the TriHorn_Duct_Default_Default_HS file last time
ok
24-3 looks closest to that model 🙂
that would be the same offsets
I decided to move away from confusing names, to just using offset values measured off the ducts
Printed and installed the new frame dock. It worked great for me and resolved my gap issue with the previous version I tried. I do have it positioned high to the point that the bottom just barely grabs the bottom of the extrusion. A little more meat here would make it easier to setup but definitely workable as is.
The previous 65 mm dock was a bit longer than I needed. The 45 mm on stock Z Pro worked for me but just barely. I have my max Y/endstop at 235 and that is also my dock Y.

if anyone is wondering, if you have 330 rails on your E5pro you can use the 30mm mount without moving any rails
E5 Pro Hydra or stock Z? I could not reach 30 mm dock with stock Z setup. I have my Y endstop set to avoid collision with the Z axis assembly and drop brackets for the linear rods
Sorry should've mentioned stock. Yeah it seems like a perfect fit with the 330mm rails. I have it above the z screw and I just put my Y endstop so the dock was at max Y. @vocal valley
even with z drop I'm not sure if the 30mm one fits
Idk it fit on mine. I had my Y0 set like 5mmish from the front of the bed if that matters. Also using the latest files for the other parts from klicky GitHub like the rest of the dock and the klicky itself, again idk if it matters because it fit before I did that. But if you end up only a couple mm short and don't want to use the next size up you could use the 2mm klicky dock spacer on their GitHub and scale it. Oh and I'm using the normal narrow duct, also don't know if that matters
Does this work also with ng/unklicky? Not sure how intercompatible all those systems are
So regular klicky/unklicky, thanks
Which is easier to build and setup? I'll do it during Easter break but I don't really have much time lately
I have only built the standard klicky myself
Unklicky sounds like it's easy after you build one. But the documentation on it is a little confusing.
I'll try klicky and if there's issues with it maybe unklicky, I just need it to be better than bltouch, it gives me sooo many headaches
before the conversion i always wondered why people go klicky when they already got a bl/cr touch. now i know after printing for 2 days. my cr touch vibrates horribly loud at slower speeds 😅. even my neighbors complained from it lol.
I just got tired if the sound and wanted to do auto z offset
The click-slap from the magnets attaching and detaching still make me double check I didn't crack a part but I'm loving the klicky so far
Klicky sometimes thuds and not clicks is that a speed setting or bad switch?
how fast are you moving
What do you mean Thuds? When it docks and undocks?
Docking location and dock height affect how smooth it docks and undocks
what dock should I go with for ender 5 plus hydra dragon HF
45mm?
nvm found it in pinned
30mm i suppose
i printed them all lol.
Started at 5 now at 10 less thud more click
During actual klicky process. Touchdown on bed. Sines times a click like normal sometimes a thud I see the switch going in but no click and I notice the results are different compared to always clicking
I wanna print a new dock and install a new switch. Thinking I have a bad switch. It was a factory switch soldered to a board. I think the heat from removing from board may have messed it up
most likely does not sound like its good
If I click with my finger a few times it clicks every time. And if I do probe accuracy a few times it’s all the same IF it clicks every time
You can always run unklicky
Na I like klicky. Just think I have a bad switch.
There’s just something about the CLICK But I’ll look into unklicky
Is my probe accurate enough? These are after four probe accuracy runs 0.002408,0.003068,0.002964,0.001127 overall 0.00239175
so that's a maximum of 0.003mm
my bad 0.002
deviations
completely irrelevant IMO for what it is
Yup that’s what I figured. So why the different Z offsets? We’re talking like -/+ 0.050 each print. Swings both ways so doesn’t explain heat expansion messing with it
5x5 bed mesh is 0.125 over 255,255
mine is similar and its the stock one
I just 5x5 before a print and offset was perfect 🤔
my Z tilt adjust wont work with the rename _Z_TILT_ADJUST line in the cfg
If i comment it out it goes to attach probe, says unknown command _Z_TILT_ADJUST and then docks probe
if I get rid of the _ in front of Z, it says its running recursively
nvm got it
I’m running unklicky, the pin doesn’t seem to push in at all when probing it’s crazy. I want to remake it with Single strand wire to make it better. Just remember if you go unklicky you need to do a probe check with 2000 odd probes to wear it in.
I missed that instruction lol maybe I'll build a new one and try to wear it in. I abandoned my unklicky because it was giving me like .025 standard deviation vs my klicky's less than .006
Did I do something wrong? It doesn't fit 😕


I have some smaller angle brackets I could use with tnuts, just not sure if it's needed
Or I could also use a Dremel 
Ah you're hitting what i hit. I think most put it on the smaller extrusion to the right, near the lead screw
I took the corner joint off and used a smaller one. It's just using t-nuts though
mine is to the left of the lead screw
but that gave me an idea, might make it thinner to put there
Oh, if it fits I'll do this, thanks!
That'd work but I'd rather trim the piece a bit than reduce stiffness
Agreed. It's not permanent for sure
I switched my corner brackets early on in my build


I would not mount it on the side you home to, it becomes to easy to grab it during homing XY, or when a print finishes and goes back to that corner.
I tried it on that side, it is better on the other side.
Oh, ok, I haven't setup the macros yet
Am I just dumb or it's written poorly? Why does it want to bring me to y -30 to dock?


Ok, maybe I have to fix the fact that it hits the back supports first if I set up the precise dock location

Y move should be positive, you can increase it if needed
and x is the distance to undock it
if you have it on the left side, you will want a positive value
10 is the smallest amount that can work
you can increase the y value, I use 30. But you could increase that to 50
I think the problem is that I have to cheat a bit because the toolhead hits the back supports if I set it to move directly to 250; -10 and gets misaligned
picture of the issue?
Post homing the carriage moves straight left and the back of the duct hits on the supports and gets gets misaligned

It's out of the printing bed so I thought moving to 250 0 or 10 and then back would work but apparently it doesn't
The position where the probe reliably attache to the toolhead is 250 -10
No, y endstop is 0 and x is -14
well that sounds like a problem
front left of your printer should be 0,0
so you set your x and y endstops at the distance from the front left corner
What
as well as position_max
I only had this printer with 0,0 in right back

Ok, that might be part of the issue then
having zero zero in the back either makes all your settings have to be in negative space, or makes your parts mirrored
but can cause a lot of confusion on settings
you will probably need to reverse stepper direction on x and y
Ok, your physical endstops are still right and back? So it's just config changes?
yup
That explains why I always had to change the bltouch offsets and stuff to negative
this is how you would set the x value for endstop position and position max

then you can include a position min, to travel past the left edge of the bed
Ok, this assumes the nozzle on the edge of the bed? I'll move the rail and try again, thank you!
I set mine just inside the bed
since I do not want to print on the very edge, so I set mine in about 2mm
to find the values you can either set a smaller safe value and move to 0, measure how much further you want to move
or set it to something like 260, and slowly jog it to where you want
then note the positions in klipper, and adjust
Perfect, thanks again, I'll play with it a bit to find the actual values
Is there any similar information out there for the plus on setting endstop positions?
It all works perfectly now, how fast do you all probe z/meshes with klicky?
Both, I'm used to the slow speeds of the bltouch
right now 100 for xy 25 for z
just a quick one. i installed all and for the first homing its working fine. but when he put it back it just moves a bit in front and dont start to go in the middle
That is the settings here under klicky-variables.cfg:

this is attach and disattach
thats working
but if he is done the postiion is

Yup. That is the dockmove variables.
he is taking the klicky goes for homing
put it back and stay in this poistion
its not attached anymore
ok thats done
found its
I have not attempted this portion of the config but this might be what you are looking for...

but when i want to do the bedmesh
18:19
Move out of range: 0.000 -0.750 8.000 [0.000]
18:19
Move out of range: 0.000 -0.750 8.000 [0.000]
18:19
probe: open
the dock and undock is relative motion so it is allowed to go out of bounds (I believe)
just set your y min value in printer.cfg to -2
@vagrant terrace
i got this running. bed mesh working fine also
think i doing something wrong...maybe its my start gcode
G90 ; use absolute coordinates
M83 ; extruder relative mode
M104 S170 ; set extruder temp for bed leveling
M140 S[first_layer_bed_temperature] ; set bed temp
M109 R170 ; wait for bed leveling temp
M190 S[first_layer_bed_temperature] ; wait for bed temp
G28 ; home all axis
G29 ; Bed Mesh
G1 Z10 F240
G1 X2.0 Y10 F3000
M104 S{first_layer_temperature[0]} ; set final nozzle temp
M109 S{first_layer_temperature[0]} ; wait for nozzle temp to stabilize
G1 Z0.28 F240
G92 E0
G1 X2.0 Y140 E10 F1500 ; prime the nozzle
G1 X2.3 Y140 F5000
G92 E0
G1 X2.3 Y10 E10 F1200 ; prime the nozzle
G92 E0
why does he not take the bedmesh he has done with the klicky ?!
Looks like you are not calling the “BED_MESH_CALIBRATE” macro in your start_print
Replace your G29 with that and try it
I was just about to mention that there was a conflict lol
Where is the _Z_Tilt_Adjust supposed to be defined? I Only see references to it in the z-tilt-adjust.cfg

I had this issue too, cant remember what i did to fix it
commented that out and now i can get console again - however now im getting "Endstop Z still triggered after retract"

You need to add a ztilt section to your printer.cfg
Any chance you got the specs for an e5+?
[z_tilt]
z_positions: 11.5, 8 #stepper_z Mini Tank
361.5, 8 #stepper_z1 Mini Tank
187.5, 362 #stepper_z2 Mini Tank
points: 349,321 #probe location Right Rear
22,321 #probe location Left Rear
22,0 #probe location Left Front
349,0 #probe location Right Front
speed: 400
horizontal_move_z: 20
retries: 2 # Number of times to retry if the probed points aren't within tolerance.
retry_tolerance:0.02
this is mine for klicky e5+
Been trying to get klicky to work. I've added the probe section like in the pin and changed the pin value in the [probe] section to my correct value. But when I restart the firmware I get the error "Option 'pin' is not valid in section 'probe'". Any ideas?
What does the cfg look like? Where do you have the [probe] section located?

Do I need to remove the [bltouch] section? When I do it says "Option 'control_pin' in section 'bltouch' must be specified"
To test, I suggest commenting out the bltouch section entirely and removing the bltouch section under the save_config. Based on the pinned message.
Ah damn I forgot the save_config section
Lol I have slept only 4 hours in the last 2 days
Then for the ‘pin’ issue, have you tested without the ^ in front of the pin?
Lol no worries
Omg I got through that pin error message and I am just getting more and more errors now. Time for a power nap. Thank you for your assistance!
@prisma solar what port did you plug the klicky into on the ebb36?

PB8 and ground, got it thx
if I remember correctly from a year ago with my Voron, the klicky should be in a triggered state when the probe is attached and open when the switch is actuated, or am I wrong?
trigged when docked or actuated
open when attached, but it looks for the open signal before probing
ah ok, yeah when I remove the probe it says triggered, cool
ok which dock do I use for ender 5 plus (no hydra yet) and where does it mount? I'm looking for pics but I haven't found any. Plenty for the 5 Pro tho
back left is where it mounts
and I think the 30mm dock fits the stock and plus variants on the plus build
assuming I need to do a negative y_min in order to reach the probe dock
should be able to set your y endstop far enough back that you do not need to do that
but I do use a negative x
back of your bed should be around Y 370
and you can set klicky to around 380-390 depending on the Y endstop location and max travels
I use 30mm on my 5 plus
the carriage almost comes off the linear rail when I use the 30mm
maybe, I guess
Out of all the mods I've ever done to my crealities, Vorons, and now Mercury, Klicky is by far the coolest
I wholeheartedly agree.
whats your z-offeset with klicky ?
## [probe]
## z_offset = 9.145
k
That is what mine calibrated out to be
so my dock is at -10, 380 so I set my Y bed size to 380. My nozzle 10mm off the bed at this point. With a position_min=-10 on my X axis, I can assume a print won't happen at below 0. But what prevents the printer from printing above >370 on the Y axis ?
your slicer settings control the max print area
I have both my x and y max positions around 380+, and control the bed size in the slicer
is it off the front?
yeah
measure how far it is off the front
about 10mm
and subtract that from your position max
or move the endstop back 10mm
also need to change position home to 370
but I would move the endstop back
towards the back of te machine correct
can u show how u mounted the can on your eva mount?
Here is a picture. Then for the mount, there are mount’s specific for the extruded you can get/have.

Here is the thread for canbus and mounts:
https://discord.com/channels/747612067951018075/1058784239539191838
Here’s mine


What was the fix here?
i don’t remember
do u have z tilt defined in printer.cfg
and do u have all the klicky macros?
I think this may be my problem do you have an example of what this is suposed to look like? This is mine


you have the r and c in macros flipped in first pic
says marcos instead of macros
move the z tilt definition to your printer.cfg
i would only store print start and end and gcode macros in a macros folder
that’s more of ztilt definition stuff
doh!
lol does it work now
Kind of lol - its attempting it now anyway.

how is this even possible..

With klicky? My klicky map looks terrible too. Wasn’t that way with bltouch
@empty crypt reference index
or something like that let me find the name
try that out
did you z tilt before meshing?
Yeah i think i finally have it somewhat good
what’s ur variance in z @empty crypt
printing right now on this

that is a pretty poor variance. this conversation is probably not appropriate for the klicky chat tho. If you wan to open a build log or troubleshooting thing tag me
how do you probe the z-offset with the klicky probe?
I think this command if I recall correctly: PROBE_CALIBRATE
Then you do the paper test and then save the config.
https://www.klipper3d.org/Probe_Calibrate.html?h=z_#calibrating-probe-z-offset
should the porbe be docked or attached for that? i tried to remove it manually but then i got a move out of range error message
well turn out i can't even probe the bed, it gives me that pesky move out of range message immediately.
If I recall correctly, I think that you leave it on but there will be a prompt to manually take it off right before you press the buttons to do the paper test.
well if there is it doesn't show up to me xD
did you come right? I had the same issue but there was a value in the Klicky_Variables that causes the system to try move out of the bed area.
Yes it's solved now and it works 🙂 Dunno what i did but it works xD
is the step available for this?
anyone know which klicky trihorn stl is a match for the "high / wide" original (I'm not sure what the dimensions in the stl names specifically refer to, but my best guess is the 33mm/5mm variant..)
That sounds correct
I changed the naming to the distance above the nozzle tip and space between ducts
gotcha that makes sense
Anybody heard or had an issue where only when heating to abs temps your klicky loses continuity in the connection and fails to undock?
I have not
All I can think off is bad connection to the magnets with the wires
Or maybe they're glued in at an angle
abs parts have internal stresses that I'm pretty sure can result in flexing slightly, even below glass transition temperature, but this would be very small unless some part is long and thin and can result in connected things moving more significantly the further from the flex.
but that is almost certainly not it...
Yes but you can minimize it in a chamber that's hot enough, the newly extruded plastic shrinks when they cool down creating tension in the part.
I was just saying that the only thing that I could think of that could cause an issue similar to that where it occurs past or below a certain temperature threshold, if hypothetically there was a part that had a shape, stress distribution, and influence over two two parts of a broken solder connection then it could be flexing just enough to pull the broken parts away and when cooled put them back into connection
but yeah to note the flip side of avoidance, if you did have a situation like that, You wouldn't have to reprint it in a chamber you could save the part by annealing it which releases the tension I don't know really who I'm telling this to lol but I figured I'd add that on
Translation
Text translated: Klicky printer.cfg settings
Create a new directory in mainsail or fluidd and name it klicky
Upload all config files from the klicky zip into the klicky directory
Add [include klicky/klicky-probe.cfg] to your printer.cfg
Comment out or remove your current [safe_z_home] section, The klicky cfg includes a new safe z home.
If switching from a BLtouch, remove the [bltouch] z_offset from the save_config section.
[stepper_z]
endstop_pin: probe:z_virtual_endstop
position_min: -15.0
position_max: 300
homing_speed: 12 ### Currently running my first homing speed at 20 ###
second_homing_speed: 5
[probe]
pin: ^PG10 ### Check your board pinout, this is an example pin ###
x_offset: -2
y_offset: 28.75
z_offset: 0
speed: 5 ### I have found it accurate on my setup running as fast as 10, at 16 the accuracy started to degrade ###
samples:1 ### Klicky is accurate enough for a single sample, the remaining lines are not needed if you run a single sample ###
samples_result: median
sample_retract_dist: 1.0
samples_tolerance: 0.02
samples_tolerance_retries: 3
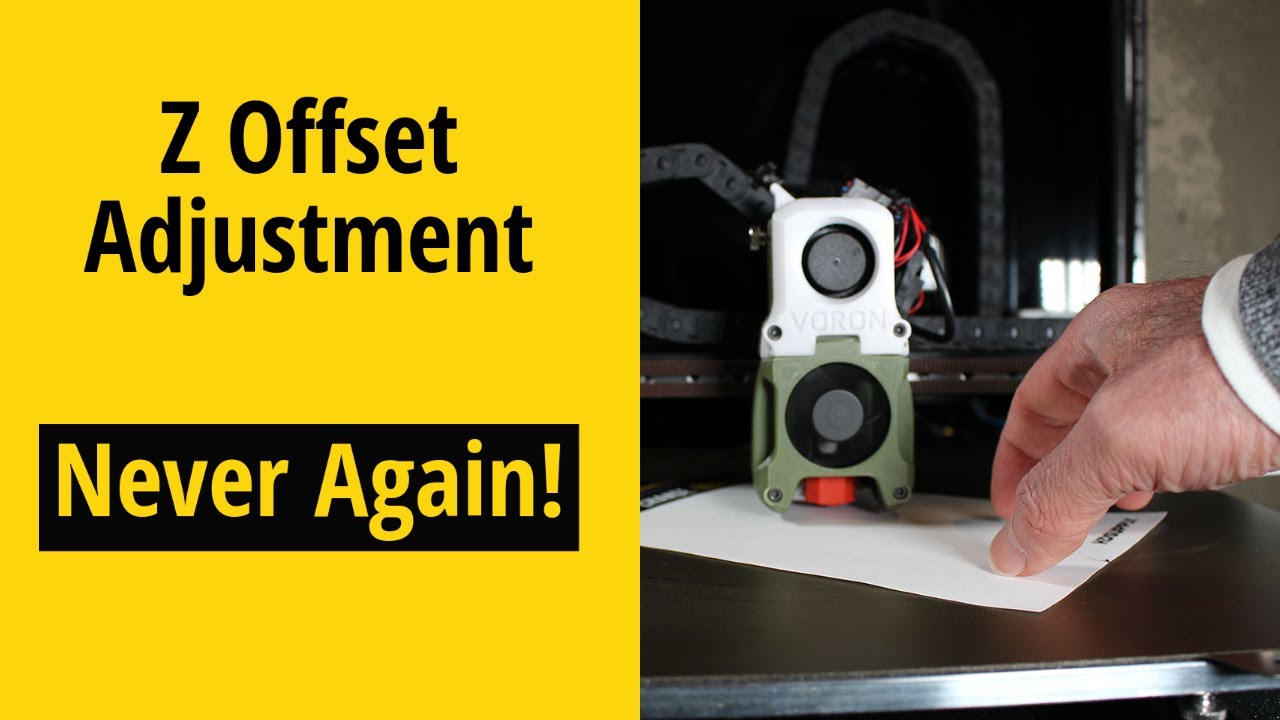
Narrow ducts on the left fit most hotends, while the default on the right fits wider hotends like the Mosquito.
High is the highest offset, Safe is a medium offset, and default is the lowest.
[Jump to original message](#1010991671426682951 message "Hovertext")
Translated from: English
**Translated to:** English
**Translated text:**  Klicky printer.cfg settings 
Create a new directory in mainsail or fluidd and name it klicky
Upload all config files from the klicky zip into the klicky directory
Add [include klicky/klicky-probe.cfg] to your printer.cfg
Comment out or remove your current [safe_z_home] section, The klicky cfg includes a new safe z home.
If switching from a BLtouch, remove the [bltouch] z_offset from the save_config section.
[stepper_z]
endstop_pin: probe:z_virtual_endstop
position_min: -15.0
position_max: 300
homing_speed: 12 ### Currently running my first homing speed at 20 ###
second_homing_speed: 5
[probe]
pin: ^PG10 ### Check your board pinout, this is an example pin ###
x_offset: -2
y_offset: 28.75
z_offset: 0
speed: 5 ### I have found it accurate on my setup running as fast as 10, at 16 the accuracy started to degrade ###
samples:1 ### Klicky is accurate enough for a single sample, the remaining lines are not needed if you run a single sample ###
samples_result: median
sample_retract_dist: 1.0
samples_tolerance: 0.02
samples_tolerance_retries: 3
Narrow ducts on the left fit most hotends, while the default on the right fits wider hotends like the Mosquito.
High is the highest offset, Safe is a medium offset, and default is the lowest.
Name the item that does not belong... lol

What is that? Klicky magnet?
mine are currently just pressed in place
older duct had to glue them otherwise that would happen
I used gorilla glue. And the magnets are very tight fit. I don't think mine will fall out.
haha, yep, started falling out, caught the print and ripped it right out. 🤷♂️ added some more glue, pressed it back in, tested the trigger and we are back rolling again.
I had a magnet fall out of my klicky a few weeks ago... just swapped in a spare. Had that one drop a magnet yesterday. Dropped glue into each magnet pocket.
Lol you guys gotta use real glue! 😆
cyanoacrylate 😁
Strong recommendation for Gorilla Super Glue Micro Precise
Is the 24mm 3mm duct for a Rapido HF?
Can this work with the PCB klicky?
I never used the probe before so I’m a bit confused on the differences between the standard and PCB one
does not afaik
It does not. I bought the PCB version thinking it would. I ended up having to tear it apart to get the switches out.
Which toolhead did u end up using with the PCB klicky
And if there is a CAD file can u send it to me?
I'm saying that I only ended up using the switches from the PCB klicky. Literally tore apart the PCB to get them out.
So if you want to use this mod then just get the switches. Don't buy the PCB unless you want to tear it apart for the switches.
How are the wires supposed to be routed using the newer single piece duct? Do I snake it downwards to avoid rubbing the gantry beam and then route it up with the rest of the hotend wires?

the holes are for zip ties to guide the wires that might work but idk i dont use the cnc gantry and im still on the old duct lol
There is a newer version that has a slot we're currently testing
Right now you'd pull it tight to the side and add a zip tie
Got it

Was hoping someone who is a bit better at CAD than I am, could help me make this happen. https://www.printables.com/model/391744-eva-fan-duct-mit-led-fur-voron/comments

Printables.com
EVA Fan Duct für Voron | Download free 3D printable STL models
Gimme a moment and I can combine that the which ever duct you want. What size do you need?
Thank you! I am looking for the stl, I cant for the life of me remember what size i put in there.
No problem, I threw it into Blender and I've detached the LED mounts from the one model I just need to know which one you want me to attach them to and then I will drop the STL here for you
Damn, I am at work and not at my machine, so I can not get the exact number. It was one of these two. Im sorry if this is too much. You're a saint! Thank you, I am sure others would appreciate this as well. @orchid heron
It's no problem, once I put it on one I can put it on the other just as easily
Thank you!
Check both of these to see if they work for you.
This is how the 4mm one loaded, tried it a few times.

the 3mm appears to load fine.
Oh I forgot to recalc normals LOL one sec
Sorry it's 3AM here and I half dead waiting for a long print to finally finish
No worries, your a saint, it looks like it is going to print amazingly. I cant wait!
Gorgeous, Thanks again, I will post the finished product when I get it done.
Looking forward to it!
This is going to awesome if I can get this wiring to fit. lol Anyway, could I get the step file, so I can make some extrusions?


I'll have to make you one, today 👍
I appreciate you!
I didn't forget about you, I just got busy and then passed out but I'll take care of this today.
No worries, no rush, also, I am really fighting my self to ask as you have done a great service already, but I am really unsure what size I have in there and I am kinda freaking out about it. The machine is currently printing amazingly and I am currently printing non stop to complete some projects at the moment and don't want to risk taring the toolhead apart just to check at this time. Is there anyway you could add them to this last size, and if there is anything I can do for you just DM me and let me know. Thanks again.
Here you go. I'll convert into a step file after I put m y kids to bed.
Thank you, 🙏
This one’s for you!! 🙏
Looks a lot better in person. 😅
Damn, that looks fun. Which hotend is that?
hello @keen patio can you confirm me that it works for klicky pcb .. i dont know much about klicky so wanted to know if it works as well with klicky pcb thanks
Mine? It's a Slice Engineering Mosquito Magnum.
wich klciky attach do i need 🙂 ? thanks
@amber bear I forgot to tell you, I didn't make the step version because I had to pay to be able to use prismatic conversion. 😦 I might pay for it in the future but not today. 😅
No worries, I have that, I will see if I can get it to work.
Hello, please where did you get The zero g fan shroud ? Thx
Dude thats a old one. Got it from files page forgot the name damn…
But i think i have the files i can send it to you ed me a dm
If I home the Z-axis, the klicky is not measuring in the center but is offset by about 15mm along the X-axis. What could be the issue? The offset is correct, and bed mesh leveling also measures in the correct positions.
[safe_z_home}
Safe Z homing. One may use this mechanism to home the Z axis at a specific X, Y coordinate. This is useful if the toolhead, for example has to move to the center of the bed before Z can be homed.
https://www.klipper3d.org/Config_Reference.html?h=pixel#safe_z_home
It worked, I had to modify this:
variable_z_endstop_x: 0
variable_z_endstop_y: 0
from 0 to the correct position.
I just wanted to say good work on the led mod. I like it so much, I would also please like to request if you can mod these sizes also
Klicky-24mm-3mm_trihorn
Klicky-24mm-4mm_trihorn
Klicky-24mm-5mm_trihorn
Thank you so much in advance.
Ok I didn't see it posted here, probably because it's common sense, but where is the 2 leads for the klicky getting plugged into on the board? Am I right to assume a signal and ground pin from the BLtouch port? (I'm running the octopus 1.1)
I found some space, on a volcano anyway...

You can use a common end stop port.
@clever silo so basically after I do this and sexbolt I'll have an x, y, z ,and klicky endstop?
(Plug)
I don't have a Sexbolt so I can't say for sure.
So right now you have x, y and klicky?
I have zero interest in supporting the pcb version, the standard height ducts are what most use.
do not try to figure out sexbolt until you understand klicky
If this is for me I'm using the mod here. Not the pcb
both are complicated
@keen patio oh no I'm doing klicky first lol. Sexbolt is next
I'm not doing them at the same time
both took me a good day to figure out
I did my best to explain what to configure in the pins in here
Hmm I didn't see the post. I read the thread twice.
I'll look again

Oh yea the pins I get. I was wondering about where to actually plug the wires into the board.
its just an endstop
configure it the same as any other, but read the klicky github and look at the settings
Thanks. That's what I was thinking and that's how I have it wired up. I just wasn't sure if people were using the pin from the BL Touch port or not
what ever endstop pins you want
@keen patio so i got it moving and it grabs the klicky but i get this error :Error evaluating 'gcode_macro _SetProbeState:gcode': gcode.CommandError: Probe attach failed!:
your directions are spot on, it was just a little rough finding the stuff in my config
Check to make sure it triggers the probe state
probe state?
On my phone, and my phone is refusing to connect to klipper
i think i figured it out. i just checked continuity with the klick mounted to the tool head and i was getting nothing back. so i cleaned off the magnets with some sand paper and now i have continuity. letting it boot back up and trying again
@keen patioyour directions were perfect everything is set up. now to just change the z-tilt locations, bed mesh points and screw points.
thanks for this! way better than my BL Touch
great 🙂
klicky isnt to wrap your head around the first time
when I add it to a printer now, its seamless
@keen patio yea it seems really complicated but you laid it out nicely. I would never have been able to do it without this thread. Thank you.
Now I just need to figure out how to se my z offset.... at 0 I'm about 10-20mm off the bed lmao
most seem to be around -8 to -11
set your z min to -15 to allow enough travel
if needed, increase it more
@keen patio are you manually setting the z offset though? I'm just trying to wrap my head around how to set z offset to get a proper first layer

Ok so that still applies. Thanks
I was using that with the bl touch
How's it work with the probe being so much lower than the nozzle?
klicky has its own macro that overides it
but you do need to remove the klicky probe manually
I just push it off the back, and place it in the dock
@keen patio thanks for everything.
@keen patio lol im getting this now when i do PROBE_CALIBRATE Error evaluating 'gcode_macro PROBE_CALIBRATE:gcode': gcode.CommandError: Must perform PROBE_CALIBRATE with the probe above the BED!
i put it in the center then put the probe on manually then took it off
anyone know what this means? horizontal_move_z can't be less than probe's z_offset happens when i do z-tilt, after i calibrated my z offset....
if your probe offset is -11.324 then your horizontal move needs to be a larger value than that
I set mine to 15 or 20
20 is safer, but slightly slower
@keen patio which file is that under?
search your configs for it
should be bed mesh or z tilt
Did someone else make these sizes yet? If not I can do it. I just missed the comment, sorry. 😅
Since you are doing all of them, You start a community with the updated led ones.
@keen patio should i start a thread in trouble shooting? i cant figure out horizontal_move_z being lower than z_offset. horizontal z is 30 and my z_offset is 8.xxx
im looking at the klicky github, do i need to have this in my printer.cfg? [stepper_z]
endstop_pin: probe:z_virtual_endstop # Klicky probe Z endstop
#position_endstop: -0.10
disregard, i figured it out. in my z-tilt i didnt have a horizontal move. so once i added that, its all good
I've got klicky setup and running great with 1 exception. When I hit home or z tilt it grabs the klicky and works great. But bed mesh calibrate fails as it doesn't attach the probe. I've checked everything I can think of but can't figure it out. Anyone have any ideas?
so klicky is set up and working great, however, i have since lost my adaptive mesh with KAMP. is there something i need to add somewhere to get that back? now it just does a mesh of the whole bed before each print.
@orchid heron not trying to bug, I know your just volunteering, but please I just wanted to remind you/ checkin. This is in regards to the trihon leds mod. Thank you.
No problem, I'll try to get to this today or tomorrow 👍
Thanks alot.
Getting this error "Existing command 'BED_MESH_CALIBRATE' not found in gcode_macro rename" not sure why. Anyone run across this?
you don't have mesh configured?
In the printer config?
yep
Nope. I will do that.
I am trying to run the attach_probe function, I home X and Y, perfect listed at 0 for both as absolute. As soon as I send attach_probe it errors the move is out of range -17 for Y. It never moves from home. I set my dock location as per the many instructions online and set my probe offset from the pinned messages in here. Not sure where its getting a -17 move on Y from. Anyone encounter this?
Would need to see your y max position and y endstop position
As well as klicky dock position
Thanks @keen patio


correct
This a 5 pro?
Yes.
Your endstop and max should be the same
Both 305
You have a backwards motor or switched motors
X should also have the same values
I would start with 250 or 260 for both. I think you can get around 280 if your endstops and rails are set properly
#klipper message
B is X on the left and A is Y on the right?
Yes
Check the link I posted
X zero should be the left edge and y zero the front edge
Ok. I wasn't aware of that. Perfect. Its a simple fix then.
If your x endstop was on the left then you would have endstop position -5 and X min -5 with a X max of 275 as an example
Thank you very much for your time
What variable changes the docking for klicky only after bed mesh calibrate is ran? it will home perfect every time. However, after it completes a bed mesh calibration, the tool head sets too far back on Y and as it heads toward the dock on X it hits the and drops the probe. Then it crashes into the left X joint. I am assuming there is a relative move that is calculated wrong since its going into the negative territory at that point.
nothing there unless you got code of yours doing changes between relative and absolute
I didn’t think so. I have some figuring to do. Thanks.
if you run it manually are there issues?
Homing? Or the bed mesh?
Let me try
@copper coyote G28 runs perfect either way. BMC has the same behavior either way. I adjusted my bed parameters and endstops and its better, but there are two issues:
-
The toolhead still overshoots the dock on docking procedure after a BMC event only--this behavior is not present after a G28
-
After the probe attaches for a BMC the toolhead makes an odd move where it looks like its heading to one point more center of the bed, reaches it's Y coordinate then heads negative X for the first probe point--it bangs on this move.
So I do have some improvement, but still ironing out small details it seems.
hmm parking position maybe
Are there UHF ducts? Got a Rapido 2 UHF
Thank you
Does anybody know what duct would fit the Mellow NF Crazy hotend?
wide high IIRC
The updated ducts with the integrated bottom plates are named based on the offsets of the nozzle and width. I suppose I can print the older one, but they are named narrow and default.
Ok, so default and high.
The bigger number is the distance between tips. Default was wide and low
Is there a way I can figure out what duct to use with the NF Crazy?
I am in my basement doing some wiring right now, so can't look at the numbers
But you would want to the first number to be larger
The second number is the theoretical height from the bed to the tips of the duct outlets
I would probably stay with the middle height
Or print all 3
The heater block on the NF Crazy is not very wide. I think I may try one of the 24mm ducts and see how it works.
I have no experiance with them
can always test fit before gluing the magnets
I also advise printing at least one spare of the size you need, either in case you crash and break one, or if you have issues gluing in the magnets
I've got two Ender 5 Pro's. One is torn down to the frame ready for the Mercury conversion and the other is printing the necessary parts, so no problem there.
that helps
Thanks a lot. Good luck with your wiring.
24mm is narrow and 33mm is default or wide
the narrow and default naming seemed confusing to me
as did the height names
so I went with measured values
Ah, so 33mm. I may end up trying both, but we'll see. Thanks again.
What did you use in the and
i want the same hotend
I'm using this for now. In order to use the twin duct I need to modify it to fit my Klicky PCB but the mesh has too many triangles to work with in Fusion so unless I get the step file theres not much I can do.
which duct do I run with rapido?
I believe it is the 24mm 3mm duct. I think that's what I have on mine. I can take apart the toolhead and check unless @inner cosmos knows, already.
@astral summit first off beefsammich—love it. Second, I’m not 100% let me remote in and see if I can find what I printed.
24mmx3mm that’s for Rapido 2.0 HF.
I was about to say "you know you printed like 4 different ones" 😅
Don’t say that so loud. lol. I printed all the same size. Some with klicky and some very poorly.
23x3 is what I used
@keen patio Do you have the source somewhere? 🙂 I would like to remix it to use magnets with screws instead.
Is it not in the CAD?
my cad for those is a mess and I have not had time to clean it up
@keen patio Wondering if you can help me out. I am stuck. I did everything and I keep getting the error QUERY_PROBE already registered. If I enter the probe info it pulls this error up and idk what to do.
Not sure if any of the klicky macros have changed since I last used klicky, due to klipper updates. I am no longer using klicky on any of my printers.