#Poprox weird thingy channel
1909 messages · Page 2 of 2 (latest)
if it doesn't work even when I rebuild
I will absolutely return this
and buy the neo
then I will rebuild the neo of course
because as you said factory assebly is
its funny, cuz i buy amazon returned enders
💩
yours might be on my bench one day
ah, I didn't buy on amazon
ok
I think the best way to explain is if you just look on this site
Alza
Největší obchod s počítači a elektronikou! 43 prodejen, přes 2400 Alzaboxů, PC sestavy, notebooky, mobily, monitory, tiskárny, digitální foto. Vše skladem a ihned k odběru!
it's just an online shop with everything
gotta walk only a few km to get the stuff
ok
they are also very very lenient on returns
I kinda returned a bricked e scooter
and they accepted it
somehow
flash bricked
okay so
the print ended up even worse
my sanity is getting to a bad level
trying for a week now
I have time till tuesday to be able to just return it
not even warranty
just return it without reason
(love my country for that, it's a law)
and they wil just return you all the money in 2 or 3 days
hey actually
we didn't try one thing
yea?

GD
do NOT use that firmware
I don't have bl touch
ok
or cr touch
this fw looks so innocent lol
so empty
actually I have started the printer once with that firmware before when I was reinstalling today
it did look broken but it did look like the original one lol
now it looks normal
wait

is it possible I had the wrong firmware then?
are those made for GD?
oaky
print number who knows
testing
hey
I just hear the fan go off
the height is currently
0.8
I just thought to check when the fan turned off, just out of curiosity
it wasn't 0.4
it was 0.8
gonna do it manually then
at the second layer
oh you have it set to gradually speed up I see
fuck itt
I'm rebuilding this shit
but I really need to find a guide
and I don't mean build guide
I mean complete super detail guide that goes deeper than just build guids
but factory rebuild guide basically
yea

Check out our Kickstarter! https://www.kickstarter.com/projects/1679800548/dragonlocktm-3d-printable-miniatures?
Tom shows you how to assemble the Ender 3 printer, plus some helpful hints to get it tuned perfectly. Learn how to align the X-axis assembly, get the Ender 3 gantry aligned, and much more. Build the Creality Ender 3 today!
LINKS:
A...
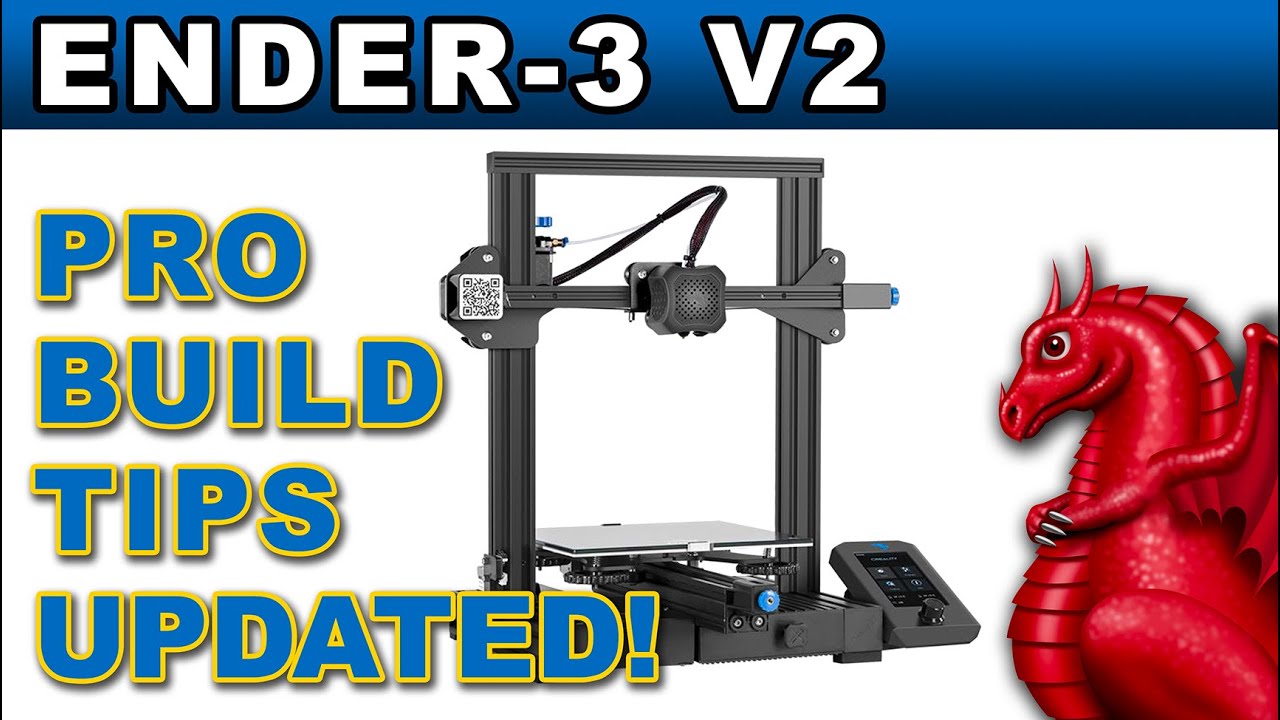
Updated Dec. 2021! Learn how to assemble the Ender-3 V2 printer plus some helpful hints to get it tuned perfectly using common household items. This is a revised and updated version of my original Aug. 2020 video on building the Ender 3 V2 with additional info and a few clarifications.
LINKS:
Get our FDM optimized fantasy terrain and miniature...
these two
watch both
they're the best
done
already senyt me this a while ago haha
well
gonna go dismantle everything
to factory defaults basically
I just found something

1

it's rotated like hell as we can see
2
the fan duct is literally not aiming at it
well i don't know if that is normal or not
the rotation, sure
the hotend in that printer isn't the best
but the pointing
not sure
I pressed on it real hard and heard a click and it moved it a little closer
but I don't think it's still close enough
I will look into it before instlaling it
wait this should be aligned?

@sharp dew
I do have the z axis rod to a side
so I just pushed it in
thought it was normal
what aligned?
the z axis rod
so it's just centered
I just managed to the whole x axis rod together
to find out I put the extruder the other way around

yep
YEET IT
I have no idea how the fuck did they manage to get me a printer this bad
like
this was bad from factory
no way it wasn't
yea their QC doesn't exist
oh yea
ok
its a glass bed, right?
how the f did you scratch it?
just cosmetically?
cos brass is softer than that glass
lol
and a scrubbing brush
ya
free pronter
load firmware on with the name "this printer never worked right so i returned it"
oof
when this company sells back
they sell at a reduced price
depending on use
they will probs well this 40% off
or smth
I'll just rebuy for spare parts lol
(jk)
hah
https://www.ebay.co.uk/itm/363848262441 i buy this

eBay
This item is 100% Creality 3D Genuine 3D Printer. Unrepaired Creality Ender 3/Ender 3 Pro/Ender 5/Ender 5 Pro/CR-10 V2 3D Printer. Slicing Software Creality Slicer/ Cura/ Simplify3D. CR-10 Smart 3d printer supports both WIFI & RJ45 wired network connection.

ohkk

in 4 days I will have a new printer then
do you think if I buy the same one
Ender 3 V2 I will still have the problems

40 more dollars
cr touch really good yes
and remember to take the mod out of the extruder
what mod
the shim you made
oh you mean the z shunt
yea the parts you added
especially my auto power off
that's the most important thing ever
lol
idk if I get neo
it's near christmas
my wallet is empty
ok
i'd send you my cr touch but... you have no mount for it on a normal ender v2
and shipping is expensive
half the price of a unrepair ender3
eeh
I'll ask my mom to borrow then
I'll find a way
it's just 40 dollars
repaid in no time
after christmas
okay made a request to return it
I will get it there tomorrow
new one in 3 days
hopefully
(2 days to get the money and 1 day they will be checking it n shit)
(they usually just check if everything is in the box I think)
wait
I just realized
they are not gonna be fucking building the printer
they are gonna be like
okay it no work
let's just believe
@sharp dew
yes
exactly 40 dollars more, I will get the neo then yes


so I've returned the printer
should have the money on wednesday at most
so should have the v2 neo at wednesday
already ordered it and I set it to pay at pickup
oh also, you said something that it comes prebuilt or something?
badly prebuilt, but prebuilt either way
yea its meant to be just 4 bolts, plus the spool holder plus the screen
yea you remembered right
ohk, I'll reasemble it
factory bad you said right
1 finger nearly impossible 2 fingers easy
kk
Jesus they just said that it's gonna take some time
And they apologize for the delay
They actually gonna take the time to try that shit
Anyway @sharp dew I got hands on some money so I'll have the printer today
I won't actually fully rebuild it
But I still make sure everything is setup right
So I'll tightenall screws setup eccentric nuts, etc
I'm not feeling like rebuilding it completely when I don't need to
Just making sure it's setup right is enough
Will it be a 4.2.7 board or no? Or is it just luck to get over that has it
Yes I'll put on the v2s1
here ahve a video
I'll need a guide on how to especially use the Blu touch

See how to build the new Ender-3 V2 NEO!
LINKS:
Get our FDM optimized fantasy terrain and miniatures here:
Cura profiles:
http://www.fatdragongames.com/fdgfiles/?p=4934
Supplies Links:
http://www.fatdragongames.com/fdgfiles/?p=5863
*****************************************************************************...
That's the only thing I don't know about
its fine
Thanks
The v2 neo sure looks cooler
A little bit
Oh
he puts the spool holder on wrong. the screws are hidden from view when you do it right
you can change the side the roller screws into
and where he fastens the zip tie, move the printhead to the far right and up first
and where he plugs in teh z axis motor, undo the top grub screw and make sure the z-rod isn't toughing the stepper shaft
for the belt, push the bed back and make it say DUM DUM DUM
and you've got a z offset wizard and a tramming wizard so you can ignore all the probe stuff
print this first after you install Ender3V2S1
Europe
Like a high dum or low dum?
Ok great
As for the hair spray, can I use glue stick if I know how, cause I don't have any sticky hair spray rn
I do know how, I have used it before
Okok
low as possible is 90Hz, that is fine. 110Hz is ideal
Okok
bed too bumpy it will eat the whole glue stick
you can make a gluestick water mix and dab it onto a hot bed with a sponge
Ok, I will do that
and you glue the whole bed ideally
So I just mix glue stick with water
it lasts all your life
Yeah I'll get something specific for it
ok
well 3dlac or hairspray
removing is easy
you bend the plate
pop
it releases
so simple
Wait it's bendable plate?
That would be great if it is
The ender 3 v2 is a glass plate so you cannot really bend that one
yea its powder coated steel
and nothing really sticks to it UNTIL you use glue
then its better than PEI
and yea use the spray :)
I'll get 3dlac it's basically free
just trust
yea
8 euros
same as hairspray
thats all it is
unscented hairspray
PVP
instead of PVA
So the glue also does pop from the bed?
thats lasts 10-15 prints
whatever
something liek that
when first layer doesn't go down properly its time for more glue
Okok, I'll look if I have hairspray, any sticky hair spray should work right
Yeah ok
Ik*
So just any sticky hairspray
i made a cool box to spray in

Are you American, because you have no brand stuff there
im english
We don't have any hairspray that's just "hairspray"
this is the spray box

you either put the build plate in it like that to spray it without making a mess
or you turn it over and put it on the pritner and spray into the space it makes
I'll just go to the balcony if I want to spray it
Or that
Brb

Yeah
Ill figure it out lol
I don't mind making a mess in the room
I clean my room every other day so it's fine
haha don't spray glue on the pritner
cos it will get dirty and never cleanable
and dirt on the extrusion is 💀
bad prints forever
cos the roller
Oof
don't glue dirt to the extrusions
But what if I do 
then you wash it off
I'll buy the 3dlac tomorrow
well not sterong enough to make it unremovable
Until then glue water thingy
yea sure
i ahve a tupperware with a new sponge
a couple teaspoons of water in the box
the lid stops the glue slurry getting dirty


not lots of water
But won't water make it fluidy
the sponge is heavy, but the box is pretty dry

yea people have GD phobia
I love the magnetic plate so much
they're a bit different
well the mag plate is shit
things no stick
its the worst
until you add glue
then it becomes the best
ah whatever go with that yea
i was gonna suggest one with liunear advance
but you prob don't know know that that is right?
print this after you upgrade
after you print it go to configuration / reboot printer
no
first you need to either do the physical configuration steps
or print the file i just gave you and reobot
THEN you can do the tramming wizard
great
now you can tramming wizard
did you do the eccentric nuts?
and tighten the terminal blocks
yes I did
and all that stuff
well how compressed are the springs already
completely
5mm poking out the bottom of the wheels?
nah they were completely compressed
well back it off until there is 5-7mm poking out the bottom
do 2 wheels together
to avoid tacoing the bed
if I unscrew that much, the wheel just starts spinning freely
as the spring is not that long
jsut don't 100% close the spring cos then it overlaps itself and loses all ability to spring
90% is fine
close the springs don't smash em
you know
yea do magic
then z offset magic
then load filament and poop a little
then MPC magic and bed magic
oh i brought the author of this firmware here eysterday
so he's on the discord now
ok
you babystep it to get teh first layer good nayway
does the right hand side of the x-axis wobble up and down when you wiggle it?
does it wiggle when u wobble?
cos if it wiggles when u wobble then u in trubble
gucci
it hates you too
good to know
which spray or glue did you get
3dlac, the seller had it in stock on the place
lets GOOOOO
yeah
400ml?
yeah

got about 3 hours until I go sleep
benchy then
just gonna tell prusa that I am on the neo instead of just v2
configuration wizard
more magic
G90 ; use absolute coordinates
M83 ; extruder relative mode
M140 S{first_layer_bed_temperature[0]} ; set final bed temp
M104 S{first_layer_temperature[0]} ; set final nozzle temp
G28 ; home all axis
G1 Z50 F240
G1 X2.0 Y10 F3000
M190 S{first_layer_bed_temperature[0]} ; wait for bed temp to stabilize
M109 S{first_layer_temperature[0]} ; wait for nozzle temp to stabilize
G1 Z0.28 F240
G92 E0
G1 X2.0 Y140 E10 F1500 ; prime the nozzle
G1 X2.3 Y140 F5000
G92 E0
G1 X2.3 Y10 E10 F1200 ; prime the nozzle
G92 E0
don't have G29 anywhere
M83 ; extruder relative mode
M140 S{first_layer_bed_temperature[0]} ; set final bed temp
M104 S{first_layer_temperature[0]} ; set final nozzle temp
G28 ; home all axis
M420 S1 Z10 ; Enable UBL with 10mm z-fade
G1 Z50 F240
G1 X2.0 Y10 F3000
M190 S{first_layer_bed_temperature[0]} ; wait for bed temp to stabilize
M109 S{first_layer_temperature[0]} ; wait for nozzle temp to stabilize
G1 Z0.28 F240
G92 E0
G1 X2.0 Y140 E10 F1500 ; prime the nozzle
G1 X2.3 Y140 F5000
G92 E0
G1 X2.3 Y10 E10 F1200 ; prime the nozzle
G92 E0```thanks
doing the auto build mesh
just curious about it

It's in tolerance
Sorry that it's a screenshot, brother took my phone and forced me to send it this way lol
so hey
I tried it without the glue/3dlac
it holds perfectly
like absolute perfect


im not goot at reading this
is my z offset right
@sharp dew
maybe lift up 0.05
but that leads to 1.61, so I will set it to 1.60 because good number
popping?
okok
benchy at 1.60 z offset
I have seen that I don't need to 3dlac yet, so I won't use it yet unless I need to
like 2 mins ago
gl
that will work
yo
you did something at your start code
after it draws the start line
it moves up and to side a little and then wipes
I would like that
;TIME:5607
;Filament used: 4.46023m
;Layer height: 0.2
;MINX:80.627
;MINY:98.415
;MINZ:0.2
;MAXX:147.298
;MAXY:136.589
;MAXZ:48
;Generated with Cura_SteamEngine 5.2.1
M140 S60
M105
M190 S60
M104 S210
M105
M109 S210
M82 ;absolute extrusion mode
; Ender 3 Custom Start G-code
G21 ; Set units to mm

;G91 ; Relative positioning
;G0 Z2 ; Raise Z 2mm

G90 ; Absolute positioning

G92 E0 ; Reset Extruder
G28 ; Move to home position
M420 S1 Z2 ; Bilear or UBL previous grid
;M420 S1 L0 Z2 ; Bileanear or UBL grid 0
;G29 L0 T1 V4  ; load slot 0 and display
;G29 A V4   ; activate
;G29 F2 V4  ; fade height 2mm
;G29 J2 V4  ; measure tilt
;G29 D ; DEACTIVATE leveling


G1 Z10.0 F3000 ; Move Z Axis up little to prevent scratching of Heat Bed
G1 X10.1 Y20 Z0.3 F5000.0 ; Move to start position
G1 X10.1 Y200.0 Z0.3 F1500.0 E15 ; Draw the first line
G1 X10.4 Y200.0 Z0.3 F5000.0 ; Move to side a little
G1 X10.4 Y20 Z0.3 F1500.0 E30 ; Draw the second line
G92 E0 ; Reset Extruder
G1 Z2.0 F3000 ; Move Z Axis up little to prevent scratching of Heat Bed
G1 X15 Y20 Z0.3 F5000.0 ; Move over to prevent blob squish
G92 E0
G92 E0
G1 F2700 E-6```I cannot find it in your start code
can you tell me which code does that
is it this
G1 X15 Y20 Z0.3 F5000.0 ; Move over to prevent blob squish```yeah I'll steal the whole line code you got
you you pulled that out of a sliced gcode
and replace mine with it
yes
out of the boat code you sent me
this is mine ```
; Ender 3 Custom Start G-code
G21 ; Set units to mm
M413 S0 ; Disable power-loss recovery mode
; if Z-axis drops when printer is idle use this
;G91 ; Relative positioning
;G0 Z2 ; Raise Z 2mm
G90 ; Absolute positioning
G92 E0 ; Reset Extruder
G28 ; Move to home position
M420 S1 Z2 ; Bilear or UBL previous grid
;M420 S1 L0 Z2 ; Bileanear or UBL grid 0
;G29 L0 T1 V4 ; load slot 0 and display
;G29 A V4 ; activate
;G29 F2 V4 ; fade height 2mm
;G29 J2 V4 ; measure tilt
;G29 D ; DEACTIVATE leveling
G1 Z10.0 F3000 ; Move Z Axis up little to prevent scratching of Heat Bed
G1 X10.1 Y20 Z0.3 F5000.0 ; Move to start position
G1 X10.1 Y200.0 Z0.3 F1500.0 E15 ; Draw the first line
G1 X10.4 Y200.0 Z0.3 F5000.0 ; Move to side a little
G1 X10.4 Y20 Z0.3 F1500.0 E30 ; Draw the second line
G92 E0 ; Reset Extruder
G1 Z2.0 F3000 ; Move Z Axis up little to prevent scratching of Heat Bed
G1 X15 Y20 Z0.3 F5000.0 ; Move over to prevent blob squish```
thanks
I will steal that a little
I will just steal the whole start code, except for the temperature stuff
I like it to start heating both at once and home at the same time
yea there no temperature stuff in my start code
leaving it out is the best tactic, in cura
yea thats not as good
cos nozzle heat time lets the heat spread to the corners
and its gentler on the power supply

yours is shit though, it hoems the printer before the bed is heated up
the bed moves as it gets hot
thermal expansion
okie dokie
first layer is the most important
don't spoil the ship for a thruppence of tar
yeah ik
I can see that the 40 dolllars was worth it
just for the blu touch
like just for that it's worth it
the other stuff is nice to have
but the blu touch is game changer
got the stringy haha
I will do the whole calibration tomorrow
like speed, acceleration, retraction, etc..
ok
it's only a little bit though, I may be overretracting
I heard that can also cause stringing
kk
and toohot makes strings too
hotend too hot makes strings too
if it oozes before you print its more liable to string
200 degrees
sounds good
but yeah looks quite good for first print
k
still printing so I'll send pic later
what is enable runout?
is that for when you have filament detector
ok


but good for first print
its ok

looks like the priontheads wobbly

okay I can fix that easily
just more work with the eccentric nuts
i had to spray over it because it blocked the image too
the AI overlords do not like criticism

what's that
reports for bad discord
AI has gone mad with power
yeah
where is taht chart
downdetector.com
Real-time problems and outages for Discord. Is the server down? Can't log in? Here you see what is going on.
ahhh ok
it stopped countring
it got lazy
Still got no idea what you meant that it doesn't stick
I have tried 3 beds basically including this one
ok
The ender 3 v2 original bed, the flipped ender 3 v2 bed(glass) and this one
well good luck
It sticks the best of them all
and this one is working with no glue?
Yeah
i hope it lasts forever
I just cleaned it with 99.9% isopropyl
Sure do too, thanks
you know i've been solving tickets for a year
Oh cool
and dozens of them ahve been for that buildplate
of which i've woined 3 myself
and you've had it for 5 minutes :)
But I'm just saying it works now
So no glue needed yet
Anyway I need to run from discord, it's getting annoying
and IPA is ok, but it doesn't remove grease, only spreads it aroundf
waters it down and dries out to give an even grease coat
ok!
Ohk, see you tomorrow, slow sending of messages is really painful
Have a nice day and thanks so much for all the hell
Help
Did building a mesh make it also automatically move up and down depending on that mesh
Because display says it's moving between .38 and .41
Oh when I asked about it before you said it no do that, maybe I asked wrong
Same
miscommunication
Anyway really gonna go now
really night
hi
Yo @sharp dew what line width do you think should use for details
Something like .12 line height
usually 0.4 but 0.48 is fine too
I always used .44, as thats the default
yea thats fine
Alrighty
Should I take it that less width = more time and more detail
Just like height
not always
But I shouldn't go too low, like .3 - .5 at .4 nozzle
smaller than nozzle width will give you a mess
reddit lies and google trusts it
Yeah
theres info, youtube tomb of 3d printed horrors for mini printing
So if I really wanted good detail ushoukd go down to like .2 nozzle
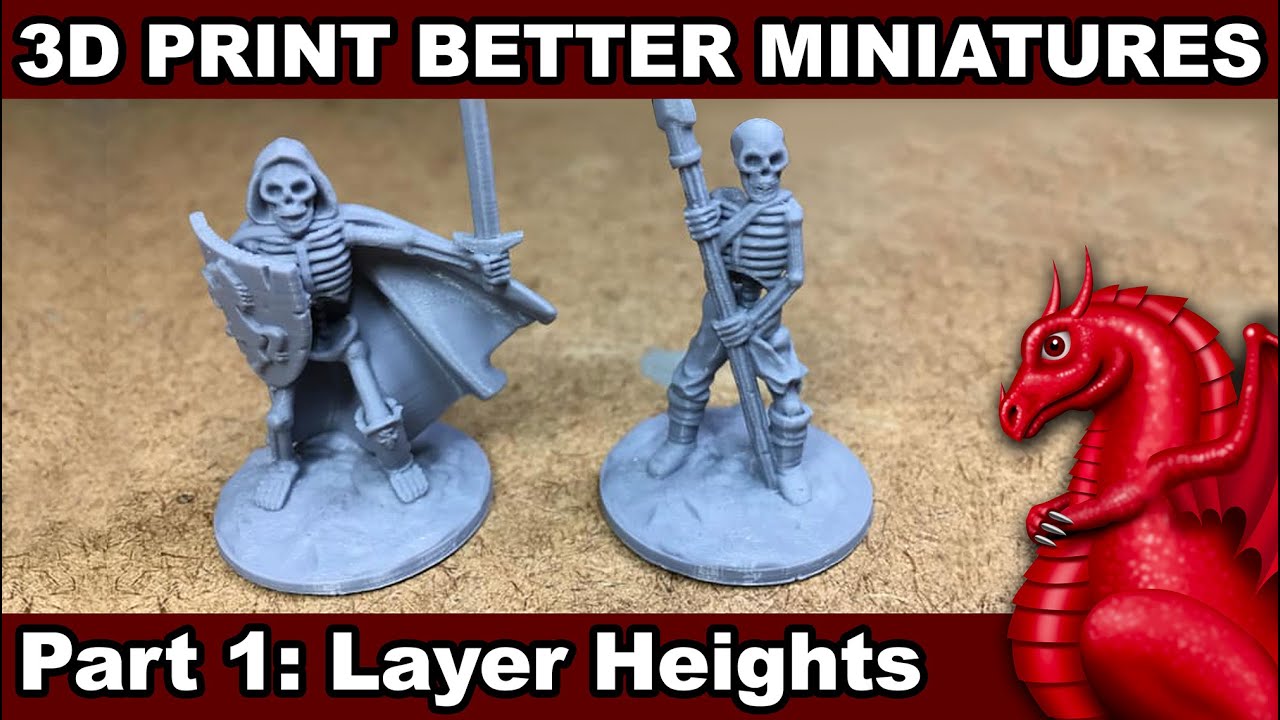
Learn which layer heights work best for miniatures on your Ender 3 or Ender 5 3D printer.
NOTE: Using full step numbers for layers, even when the starting Z home position is on a micro step, means it will continually use those same micro steps and even out variations/inconsistencies that would occur hitting different micro step positions for s...
And print at like .22
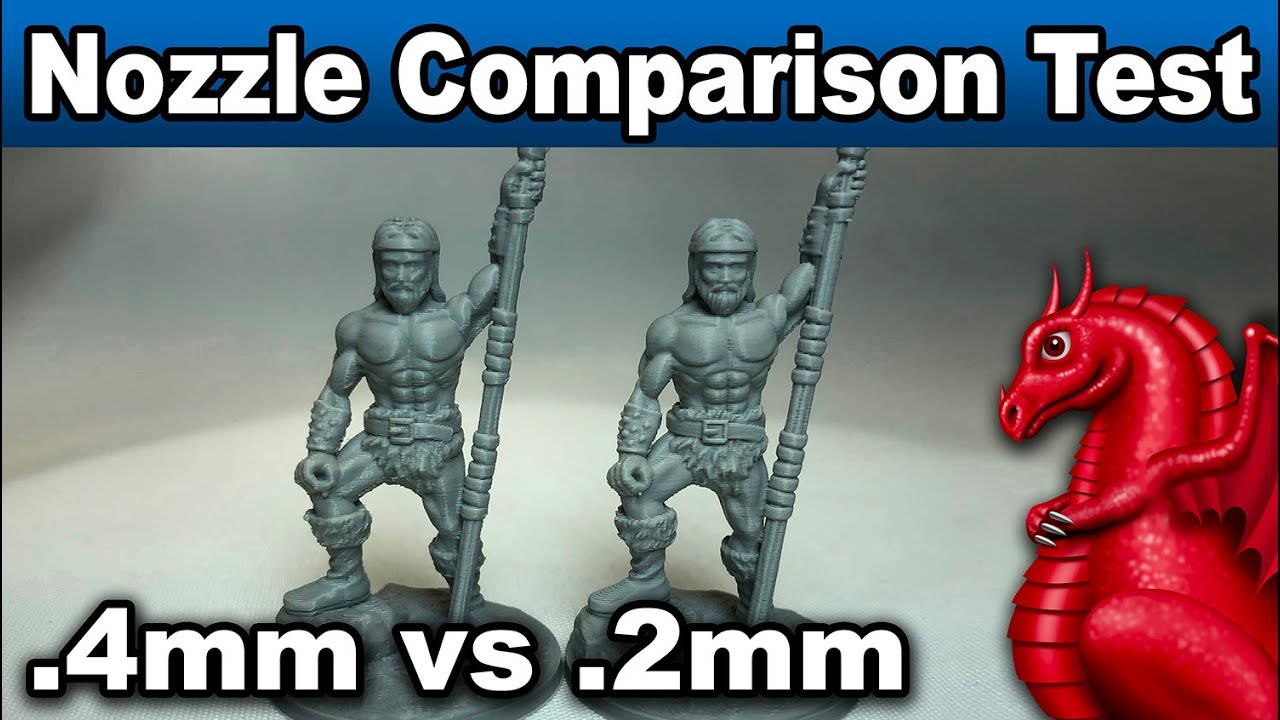
.4mm nozzle compared to a .2mm with Cura's new variable line width feature. REALM OF THE GOBLIN KING Kickstarter: https://www.kickstarter.com/projects/fatdragongames/realm-of-the-goblin-king?ref=7pgzrh
Recommended 3D printer supplies list:
https://www.fatdragongames.com/fdgfiles/recommended-3d-printer-parts-list/
I'll check out that series
yea
I especiaply have problem at angles like when you want something smooth but you have steps
tl;dw: 0.4 is fine
Kk, I'll watch the video when done with classes
We are closing in on 2000 messages lol
This deserves our own channel
this is our own chanel
Poprox weird thingy channel
@sharp dew is there a way to park the head after first layer and wait for confirmation or something
You know, so I can check if the first layer is good and stuff
It's quite hard to see on smaller prints
i guess you could tell it to do a filament change
and not change the filament
im not sure basically
we could try asking the master!
How does the user pause their printer to inspect the print, after the first layer is complete. @mental kettle?
he is using your firmware on ender3 v2 neo
maybe move to park and G4 Dwell for 20 seconds?
maybe M600?
do you have the MP though to fight the boss?
interesting
I don't think MRisco has read the messages yet, that is also possible
yes he is very busy
they would probably at least say they don't know
ah I see
You can use the normal pause; the printer head will move to the parking position if you are printing via USB. But also, you can slowdown the printing speed.
No, M600 is for filament change, M25 is normal pause
so, wait for the end and press pause on LCD
M25 thanks
M25 only for SD card
we need a good Marlin pause command:
Works with SD and USB.
Parks print head
Bed and hotend stay hot
resume with LCD and/or timer
i think M600 is best?
guess so yeah
is filament automatically unloaded?
no idea, hope not
ah ok
Pause with Octoprint depends on the G-code pause script configured in Octoprint
no octoprint yet :(
With M600 yes, with M25 no
and does it retract a little to prevent drooping(? don't know if it's the right word)
or can I set that up in config file
I don't remember, but if not, you can add a G10 or G1 E-5....
pausing prints isn't something that we usually do
oh yeah
ik, I just want great first layers
remember I told you to turn on firmware retract?
ye
put G10 ; Firmware retract M25 ; Pause SD card print G11 ; Firmware unretract
I am gonna do the retract tower on this printer today
kk
that is so good
that looks cool
In Orca/Prusa/Super slicer you can add a conditional to execute that snipped only after the first layer
oh that's great
I was thinking of adding a post processing python script to do it
if it's already built in that is much easier


jesus, I hate cura but I love seeing what it can do sometime
lovely
😁


G10 and G11 only if Cura has the firmware retract enabled.
yes i told him to use this
he has enabled it, I hope

poprox24?
do you have this setting and is it enabled?
you might need "printer settings" plugin
What is the problem with the printing?
he is examining first layer, new printer
ah there is no problem anymore, more like setting up now
I ended up finding out that I am never buying ender 3 v2 again
the v2 neo is really cool so far
but just the v2 is bad
if you scroll up you will see 2000 messages of Ender-3 V2 problems
this is a new printer
V2? it is old, I have a V2 and I'm happy with it.
professional firmware makes v2 good
this was the old printer troubleshooting

100% rebuild
v2s1 firmware is really good yes, praise the god MRiscoC
twice
only if it has a STM32F1 RET6 SoC
I got GD haha
2208 and 2209 drivers
no idea for the drivers, didn't check
Some GD RET6 only has flash of size similar to RCT6.


If you have a programmer, try to fill the flash memory and do a binary comparison.

I know the specs, but I read a while back that some GD32 RET6s came with a bad flash that rendered the top 256K unusable.
ahhhhhhh very good
I will perform the test
i am not sure what to binary compare with though
if it is not present it will be FF FF FF FF
but could be a bad batch used in some boards were it is not necessary to fill the entire flash.
yes i understand
and I believe 100% creality would use this cheaper product
it seems like printing error
GD-Link should report size
Ender3V2-422-BLTUBL-IS-LA-MPC-20230511 size: 216kb
😂
I will use RC :)
@mental kettle

Sorry, I can no longer find the original reference to this statement.
safe side
selling RET6 with 256KB
Maybe they know that they have a bad batch
I must go for now, see you later.


Here, my first layers at two different places
Think they are quite good,but the second one looks a little broken on the further
Just a very little


how often should I build the mesh
like how often is it needed
I don't mean it as like psychiological needs because it looks cool
alsoo why can I save different meshes


