
#❓ask-a-question
1 messages · Page 23 of 1
ton of layers

Freepik
Download this Free PSD File about Fathers day text effect, and discover more than 144 Million Professional Graphic Resources on Freepik. #freepik #psd #texteffectmockup #texteffect #text
this one
thank you
Gave +1 Creative Carma to @sly hawk (current: #7 - 705)


Just keep hiding/showing the different layers to see what each layer is...
Sweeet thank you 🙏
Gave +1 Creative Carma to @sly hawk (current: #7 - 706)
Alternatively, if you don't have the patience to edit like that, you could just do this....
but you'll get far less control!
Hello! I'm having trouble with the Auto Blend function. I've been following a tutorial but whenever I finally click "auto blend", I get this box saying, "the parameters for trim are not currently valid". Does anyone know how to fix ths?
I've had a ton of trouble with this and would appreciate the help!
Can ui scale to a higher count to fit 4k?
Is there anyone that could photoshop 3 pictures for me n merge them together?
What should be done?
Is it alright if I dm you details about it
Maybe you are trying with more than 2 layers.
Only 2 layers should be visible.
Hide others.
You can DM.
canceling my adobe CC subscription since I'm getting a free one through Uni. Do I need to worry about access of any files/psds? I can't remember of Adobe CC started saving stuff to the cloud
How do I easily color this picture?

magic wand
How do I get to that?
wait
Okay thank you!

Am I able to do it on android devices? Or do I have to move to my laptop?
laptop
Ohhh okay okay. That was my problem. Thank you!
Sorry , can you please tell me what I'm doining wrong...I'v changed the text to 49, selected it with ctrl+click, deleted the mask and created a new one, inverted it and that's the result...


can anymore help me make the font look better

it looks funky in my opinion
the words not the font
i think the strength of the chrome effect that you have applied needs to be decreased a bit
Not a probelm bro👍
im trying to change the color of an object. the object is originally white but when i change the hue/saturation of the object it is not giving me the color that i want because im assuming that its changing the hue/saturation of the orginal color. how do i change the color so that i can set it to a specific color that i want
That's the right asumption! The Hue Saturation doesn't colour things (it just changes them) unless you tick the "colorize" option.
This tutorial will tell you more!
https://www.youtube.com/watch?v=syUYNIgram0

How to instantly change the color of anything in Photoshop, no selections required. Even change color to black or to white. Colin Smith shows you in this Photoshop tutorial.
► Free Photoshop add ons: https://photoshopcafe.com/vault
► THE GEAR I USE: https://www.amazon.com/shop/photoshopcafe
► THE MUSIC I USE: http://share.epidemicsound.com/p...

I can see you only got the contour of the 48 that is masked. It looks like you inverted twice or somtehing (I do that all the time). It's either you need your text all black to hide it, or the outside all black. For now you seem to have just a slight stroke hidden in your mask

I would relected, invert if need be and fill the seelction with black
That said, you need to select the word 48 (not 49) for it to work as it's probably intended

That means this colour is off-gamut

that means it's off the colour range of the colour mode you've chosen (RGB, CMYK etc)
I'll have to learn more about that thanks
See in the colour picker?
The top one is off-gamut, the bottom one are web-safe colour. Ignore the bottom one, it's outdated

It's a tough subject. I wouldn't worry about it too much if you're doing work for screens only. It gets critical if you work in print though
In color reproduction, including computer graphics and photography, the gamut, or color gamut , is a certain complete subset of colors. The most common usage refers to the subset of colors that can be accurately represented in a given circumstance, such as within a given color space or by a certain output device.
Another sense, less frequently u...
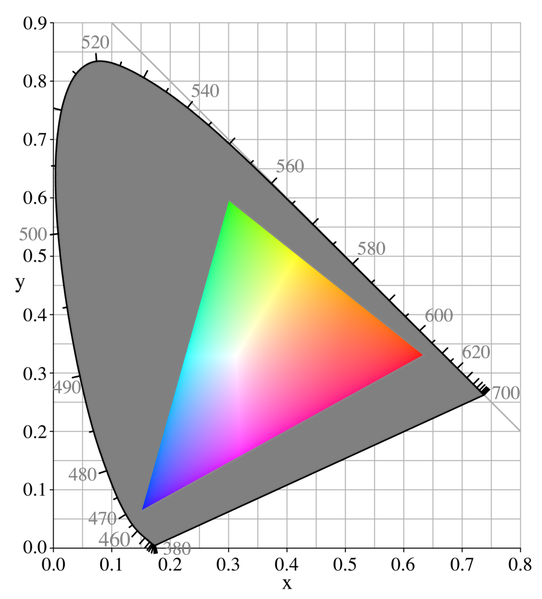
Every screen is different, and unless you work for games that are to be played on the exact same screen (Thinking handheld consoles) then whatever you do, the colours will always be slightly different.
I see thanks
Gave +1 Creative Carma to @vapid flume (current: #8 - 489)
how do they get the no stylist text colour to change from black to white and what filter are they using?

it's probably not a filter, but the text layer blending mode is likely set to one of these

difference/exclusion/substract etc
Test which one works better
of course the text layers needs to be on top
okay tysm
Thanks @vapid flume 🙂
Gave +1 Creative Carma to @vapid flume (current: #8 - 490)
here's a short video, thx for the help:)
Gave +1 Creative Carma to @vapid flume (current: #8 - 491)
It seems to work now!
nope
So maybe I didn't understand what you are trying to do. Did you try to just apply the levels to the number 49?
in that case just invert the mask (CTRL+I)
if that's not that, I probably didn't understand
49 should looks like that

The mask is not updating with the smart object if that's what you are trying to do
If what you wanted is the mask to upadte from 49 to 48, that's not possible
oh i see
You need to select the new number and create a new mask for each number
i just want to make the text editable...and keep the same effects
You'll need to find another solution than a mask. Would a clipping mask help?
clip the group to the number
thank you, I'll try later
if you change the number, the effects will only apply to the number, whatever it is
Sorry, my bad, I don't think you can clip a group!
Just remove the layers from the group and clip them to the text layer (see the layer stack in my screenshot)

my goal is to keep the curved gradient effect
Dude. You saved me 🙏 Thank you so-so-so-so much 🍻
Gave +1 Creative Carma to @ripe quest (current: #4 - 1602)
that's how i did it...with two text layers

hey guys, i was wondering if someone could help me, im trying to remove the logo and the text from this image, but i cant, i wanted to use that AI stuff

i wanted just the background image
thx for the help, appreciate it:)
Gave +1 Creative Carma to @vapid flume (current: #8 - 492)


I did that and then it somehow filled the entire image outside of the selected area
My photoshop ui is just bugging out and sometimes not working
I think the default resolution is clipping if that makes any sense
It seems to break when I'm using my huion tablet and the degree it stops functioning varies
What version of Photoshop is this? Help > About Photoshop...
biggest issue though is on my huion tablet the ui is too small, Ive tried to scale it in edit>preferences
its
The display issue has nothing to do with Photoshop. That is a display issue with your resolution and tablet display size.
Oh okay, so probably my tablet driver?
And you would have to Scale that in Windows Display Settings.
ah okay, never done that before
Right-click on the Desktop and choose "Display settings" from the context menu. Scroll down to "Scale and layout" and "Change the size of text, apps and other items.."
there is no layout option for me
only scale
oh nvm I see
How can I change this for only my tablet?
My main monitors are 1080
but my tablet is 4k
Nevermind I think I understand
Thank you
You should be able to choose the display (toward the top of Display Settings) and then change its settings.

Yes. These things are handled by the Operating System. Or your Tablet Display settings, (if they exist). But generally you do this in Windows.
Need some help with Levels/Curves. I want to use the sample in image to set black point on the blue channel of an RBG image but the point I select only turns to darker grey (R13 G13 B13) and not Black (R0 G0 B0).
is it possible to edit photos in photoshop like lightroom
Yes, you have a specific filter called "adobe Camera Raw" which is exactly the same module than Lightroom. it's in "filter> Camera Raw filter"
Best used with a smart layer IMHO
It's been a while since I've used it on a single channel so I tested it and it acts as intended, can you show a screenshot, just in case?
The only thing that could happen if it it shows RXX/GXX/B0, XX being whatever but not 0 (because you only set the black point to one layer)
Thanks for the reply, this is the blue channel of the image. The image is a computer game PBR files (R and G are normal map channels, the Blue is metallic and the alpha is Roughness. The game engine prefers metallic to be an all or nothing value so trying to turn the dark grey items in the bottom right part of the image to pure black.

Gave +1 Creative Carma to @vapid flume (current: #8 - 493)
Did you triy it by selecting the layer and set the balck point here
or running a curves or levels directly in the chanel?

Note that I chose the blue channel in the curves properties
I didn't run the adjustment on the channel
running the curves or levels directly in the channel, the other channels need to remain unchanged
You could also use the calculation option


Only working on the blue channel
OK< I ran a test on another image and mine got stopped as 50/50/50 although I was able to get it manually by moving the sliders
I will try to search if we can tweak the black point to take everything into account
I think I will just do it manually. as all the PBRs I need to amend pretty much have the same issue so the same level setting will fix them. Thanks for the help. I was hoping it would be something like a setting or preference change.
Gave +1 Creative Carma to @vapid flume (current: #8 - 494)
Once you done it manually you can use the settings as a preset

when you want to apply it, just select the preset in the list where "custom" is.
You can also try and double click on the back and white eyedropper to set the white and white point respectively. It launches the colour picking tool. Mine were set at respectively 000 and 255/255/255 so this was not the issue anyway.
Also we may both have a black point compensation in the colour profile that mess things up?
Let's see if someone has a better idea. Honestly it's not the kind of thing I use, so I probably never noticed it
If it bugs you you can ask the question on the Adobe Community Forum and see if another set of brains has a solution
https://community.adobe.com/t5/photoshop-ecosystem/ct-p/ct-photoshop?page=1&sort=latest_replies&lang=all&tabid=all
https://community.adobe.com
Master Photoshop with the help of our global community.
i copied the channel and pasted it into a layer and it works as normal, the sample in image to set black point turns the grey to black. So looks like something that happens when working on just individual channels.
Good to know there is a Plan B at least!
Hi! I was wondering if there is a simple method to achieve a partial outline like portrayed in this image? I want to have a line like in the tree perfectly bend around the edges of another shape

I also have to keep it as a shape, so it can't be rasterized
Good evening, Looking for some help with PS.
I am having several issue which I shall list. I should state that I have reinstalled photoshop and my Wacom drivers. I have also spent the morning with Adobe customer server adjusting things with remote desktop without any luck. These issues are random, restating PS helps temporarily but then they return. My keyboard mouse and tablet only have issue in PS. Any help with these issues would be appreciated as Photoshop is becoming unusable. Thanks.
When selecting transformation (ctrl T) it is freezing and I am unable scale, move an anchor or the reference point. I went to preferences, switched to legacy mode but the problem still persists.
Select brush tool, left click with the mouse or tab the pen to use the brush and it paints crazy zigzag lines all over the canvas.
Keyboard and mouse keep dropping out, keyboard short cuts randomly stop working. My pen also stops working but when I left click the mouse it works again.
This one happens less but rapidly zooming all the way in and out.
Which tablet is this? I've not experienced anything like this with my Cintiq. Have you checked that the firmware for your Wacom is up-to-date? Not the drivers but the firmware.
Wacom Intuos Pro Small
Have you looked through the Forum/FAQs at Wacom to see if anyone else has experienced this?
I'm looking through Forum at the moment, Photoshop Guru and Adobe. I'll check there, thanks.

Hows this?
If you want the stroke INSIDE the shape, just select this option:

Hi guys I’m very new to photoshop and I want to add some red smoke to the bottom of this image but I’ve been trying for 2h and have been having a very hard time can someone give me a hand?

Have you try to use a downloaded "smoke effect" brush with a red color ?
Hi all, anyone know what's the name of this font? please?


anyone know how i can achieve the blackness effect or what I can search up on google to find out how? I am trying to simulate a glaucoma effect

hi everyone, im having trouble with this, any insights why photoshop (cs6) wont allow me to divide 15/15? At first it would change the number for me, now its just stuck like this

(the Horizontal slice seems to be the problematic one)
Hi everyone, my problem is that when I attempt to fill the image in, it turns the whole layer black
any help?
You'll have to provide more information than this.
I try to fill this exact icon in and chose the black option so that I can give it a glow effect, instead of just making the image black it makes the entire layer black. Does that help more?

I still don't understand what it is that you're trying to do. Can you share a screenshot of the Photoshop UI with the Layers Panel open?
What is supposed to be filled with black?
just the icon
You have to make a selection first. Hold Ctrl and keep it pressed. Then click on the Layer Thumbnail for the "Champion Rank seige" layer. Then use the Fill option.
Do you understand?

hello? is this photo edited?

It would be difficult to know for certain.
i suspect this could be the real source

was editing like this possible in the 1940s?
oh no the channel is specifically about photoshop questions
uhhhhhhhhh
They physically airbrushed prints in those days. Painted right over thing
have... mercy?
i see.
back then they didnt need software when they could just cover it up in real life
considering the camera angle would it be safe to say it's edited?
If someone wanted to fake an image, they would paint over it, mount the painted image on an artboard, shoot another photo of it and then develop the photo. Otherwise, someone would obviously see the paint.
judging by the shadow of the propeller on the engine cowling, even the time of the day would've been the same


Why would you assume this was faked in the 1940s?
Rocket powered? It has a propeller. heh
well, such plane definitely existed
it's just that this image could've been edited for some reason
screenshot from an engine test

It could have been but it would be difficult to know.
The tail is not the same.
yeah i noticed that too but don't know what to make about it
bro was there
so the tail fuselage was cut because there's a rocket engine there now, the rear wheel was moved forward, markings were added, and also a cockpit canopy...?
i wanted some way to say with certainty it was edited 😔
any way to zoom in and out while selecting something?
You can hold Space, then click and hold the Ctrl key, then click and drag left/right to zoom in/out
Sorry, I was away, had to reinstall computer.
You need to disable fill and color overlay effect and then make selection for a mask, so only wanted stroke or strokes get selected.
Genuine question
not done yet and I look goofy af but thats not the problem hahah
the title actually matches the thumbnail
so its not clickbait
question is mainly if it looks alright or not
i tried but i cant use the rectangular marquee tool w that
You should not copy "wow" thumbnails. But, that is up to you.
wow thumbnails?
its really hard to properly communicate what someone has trouble with on photoshop idk how to explain it clearly lmao
You can zoom independently while the selection is still active but you cannot zoom and add to a selection at the same time.
Medium
Analyzing the Potential Shift in Thumbnail Trends and Their Influence on Click-Through Rates
Everyone consider such content as bad.
I have put the time into making it so I will keep it but next time I will change them up a bit. Thanks for the advice
Instead, you could make like wink thumbnail with thumbs up, way more professional.
Or just normal thumbnail of yourself.
yeah I will try and do something like that
im only just starting off so I need to learn things like this anyways
The "shocked face" image has just been done to death. Its just comical now. I would do something different. :)
alrighty will do thank you
You need patent for everything.
There are thousands wannabe Mr.Beast, who started it first and that is why he is famous.
Brand yourself.
hi

how can i get the red chrome effect on a text like the picture “hi”
any tutorials?
what is the best way to add neon lights and bright lights here?

is that neon genesis evangelion
ye
See if it helps. It may not be exactly what you need, but once you get the gist, you can adapt to theexact effect you need.
https://www.youtube.com/watch?v=_LroDHm7sWM

Just came back with another chrome typo effect tutorial done in photoshop. The fundamentals are mostly the same but the settings are different that leads you to new results!
👉Subscribe: https://www.youtube.com/channel/UCS1gMhu2KgHqW4OunIAaKrA?sub_confirmation=1
Check out these insane Photoshop online courses with photo manipulations, photo...
Ahahh I was obsessed with Evangelion (more the serails than the movie to be honest) When I had access to it many years ago! Fantastic sttuff 🙂
I think you might want to have a look at the layer styles
https://helpx.adobe.com/uk/photoshop/using/layer-effects-styles.html
you can add a glow layer style to one of the shapes you already done, or if it doesn't fit your needs, create new shapes, add some glow, and then put the "fill" section to 0 (and leave the opacity to 100) so that the shape is invisible but the glow is still visible
One possibility is that it may have been badly built
That happens, not everyone is a professional!
its not it works perfectly fine in photopea or any other platform
might be up something with my settings but dk what
I am not aware of any kind of settings for western style typography that could affect that in PS, but maybe I just never stumble upon it (If you ever type in Japanese characters, there are some settings that can affect how the characters of a typeface look, and I supposte for arabic, chinese and all the other non-roman languages)
Do you have one of the letter with a sort of underscript when you select the whole word?
Let me try to show what I mean
yea
yep
this undersipt may be the trigger for alternative glyphs

nope i dont know that
the little rectangle beneath the I, gives you alternative gliphs for the I
What do you have when you change the font?
its the same with other fonts
yep just noticed
I would say, reset your preferences, becase it's not normal. Last question. Did you copy and paste the text, or did you typed it in full?
What happens when you type another text?
copy and paste
same with all the texts
but i copy and paste
Type it in full, your copied text may have non-visible character that only PS recognises
maybe the ! is just a way to warn you of such a character
Just to see if it's a copied text error.
i typed but its still not working
that text line shows like that
In that case, I would go to the preferences (edit>prefrences) an in general, click on the "reset preferences on quit"

so i think it might be because of my extension
how do i delete my extensions
in manage plug ins?

if they're in the old extension menu (legacy) I think you need to remove them from the CC app "stock and marketplace" panel. If it was an unofficial extension then you'll have to remove manually
https://community.adobe.com/t5/photoshop-ecosystem-discussions/remove-extensions-cc2019/m-p/10343528
https://community.adobe.com
Extensions Manager (latest version d/l from CC app) isn't displaying my version of PS. I have a bunch of old extensions that I want to remove but can't locate them on my HD (OSX) - how can I delete these extensions please? Thanks.
yes its working after i deleted and reinstalled it
OK, good to know. Mind if you tell us the name of the extension? Maybe it will help someone else...
its typertools
and nvm it actually didnt work it was the file which was bugged
just needed to redownload the file and retry
OK, I was susggesting that you put a bug request on their forum as well, just to help other users of that extension, but it doesn't matter now...
alr ty
Gave +1 Creative Carma to @vapid flume (current: #8 - 495)
You don't need to resort to skulls if nobody answers your question. It may just be bad timing etc.
The style of your image is sort of hybrid, and I doubt nobody will tell exactly how it is done. It will be a combination of threshold adjustment, colourisation (by hand), multiple filters like halftones and a good bunch of the effects available in the filter>filter gallery.
You can try finding specific tutorials (which aren't likely to cover everything you need, but could be a good start for you to experiment) if you search for "Punk posters", "distressed poster", etc..
https://www.youtube.com/watch?app=desktop&v=JX-9aDKb9y0

Caroline Dietl, Graphic Designer and poster artist is my guest today on The Jesse Nyberg podcast.
If you want to hear more about Caroline, go check out Patreon for a bonus Q&A segment: https://www.patreon.com/Jessenyberg
New episode with Caroline: https://youtu.be/ZSFC2xTDONo
Caroline is a talented young designer from Germany. She has gained s...
see Caroline Dietl here (and check her Behance page) to see if fits somehow with what you want to do
You can also put your image into Pinterest, and it will suggest you similar images based on the design, and you can search for tutorials accordingly. At least you can get a "name" for that style and it helps with further research.
tes
How do I add a font that I have downloaded from a website?
You need to install it. Locate the .otf, .ttf or whatever file format the font is in, right click and choose install.
It should show up in PS immediately
Hi, I’m a student in the uk, and am interested in buying adobe crearive cloud for students, I have looked to see if I am eligible for this. When mentioning secondary schools, which I am in, adobe mentions those approved by US organisations, as I am on the uk, would I still be able to get the discount?
Yes you can. The wording is US based (I will flag that by the way) but you need a school email (.edu or something of the kind)
The best bet here, to know the full extend of the proof you have to provide would be to contact customer service there
https://helpx.adobe.com/contact.html?rghtup=autoOpen
the eligibility is that it needs to be an accredited school (public or private)
Ye I have a school email, thanks
It should be I don’t see why it wouldn’t be
If it's a state school, then no worries. It's just sometimes people are either honmschooled or atending schools that don't follow the curriculum (I don't know how they're called) and in that case it's likely not to work
Oh ok thank, you, but I think there’s a misunderstanding I didn’t mean skulls, it was more of an expression like laughing emoji
Gave +1 Creative Carma to @vapid flume (current: #8 - 496)
That's OK! I know some people use this as a sign of anger or frustration. That's why it felt weird.
No offence taken 😉
🙌🏻
how would i ake these lines smooth instead of choppy?

make ur artboard bigger, like 2000 x 2000 pixel & 150 resolution , or use illustrator better than photoshop

Redraw, or se image trace
Redraw better, to practice more
what tool should i use to redraw, im very new
pentool
ok
anyone know how to remove backround and leave sibject with white back round
Select object tool
how would i make it to where someone could go into a setting and change the color of one point of my hat template

For some reason generative expand doesnt work for me, its basically greyed out and i cant select it no matter what. Does anyone else have this issue?
is there a way to justify text such that the spacing is distributed over the letters instead of the words?
like if i want there to not be that much space between 'programming' and 'camp'

anyone got a similar background like that purple smoke?

Hi

hello ,can anyone tell me how te remove the white outline from the christmas tree

This is done by evergreen trees brush on mask.
But, you can do it by going on Modify - Contract.
Hey, happy to help but it depends on the image. Can you post it?
Ok give me a minute I’m not at my computer
Depending on how/if it's masked, you can maybe just 'shift the edge'
You'd likely make it using SHAPES.
Hi

anyone know why i have this ?

Hey I'm confused. I thought that that particular statue from the Vatican had more missing fingers and a broken arm.
I'd do this 🙂
It seems to think you're using a pirated copy of photoshop 🙂
🏴☠️
...are you?
how can i get the select subject and remove background menu back
I clicked a button and it disappeared
@rich cloak

Sure. 🤣
You had trial version.
hello, can someone help me with an image i really don’t understand what im doing but I’ve done almost of whats needed but i csbt figure out rhe last little bit
If you'd like help, you'll have to describe what the issue is.
thanks
i guys, i would like to move the selected image around the grey area but when it goes out of the black line, i want it to not been seen, how can i do that?

to make it something like the red icon in the background of this ilustrarion

did i explain my self correctly?
Help, any action that I undo in Photoshop is shown to me with a negative effect, how can I remove this/off that function?
Shortcut key input timeout is too short

Even if I briefly press the 'z' key, the 'zoom' tool stays on for only a moment and returns to the original tool.
I try to press the z key very, very briefly to switch to the zoom tool, but many times it fails.
How do I solve this problem?
wild
?
Seems like a glitch. Save your work. Restart Photoshop.
I am continuing to work on this computer
Even if I turn Photoshop on and off or the computer on and off, it doesn't work.
What version is installed? Main menu: Help > About Photoshop...

Photoshop originally has a function that allows you to use a tool only while pressing a button if you hold it down for a long time. There is no problem with the function itself.
But my problem is that the 'long press time' is too short. I have a problem because even if I press only briefly, it is recognized as a 'long press'.

I'm running 25.3.1 and I'm not experiencing that. Still testing it.
I don't know exactly what the problem is
It may not be a Photoshop problem, but a 'Wacom Screen Tablet' problem, or a keyboard problem...
I'm using a Wacom Cintiq Pro.
hmm.. me too..

hi there! Can someone help me edit letting into a picture? I’ve tried myself and it just looks meh, kinda really bad lol so im hoping one of you can lend a helpful hand 🙏🏽 dm open
Instead of just pressing the 'z' key try the 'press and hold' method.
As long as you hold the key that particular tool will be active and when you release it, it will revert back to the tool you were using before.
Works with all the tools (I've used so far).
(I use this method all the time for rotating the canvas)
Pressing (and holding) R (Rotate Canvas) and Spacebar (Pan) + click/drag is how these tools work. You don't press and hold "Z" for Zoom. Pressing "Z" switches to the Zoom Tool.
If you want to initiate Zoom from the keyboard, the user can hold the Spacebar (which initiates Pan) then also press and hold the Ctrl key. This switches to the Zoom operation. Click and drag to interactively zoom. However, you must have the "Scrubby Zoom" option enabled.
Oh, okay
Sorry
I didn't know😅
Alt + scroll on mouse can work too, right?
I just use the mouse wheel with Scrubby Zoom enabled to interactively zoom.
oh okay👍
I was just mentioning these other ways you could pan and zoom. :)
It is helpful knowing different ways of doing a thing. 🙂
Thank you😁
Yes you did. This is done using either a clipping mask, or layer mask.
Here is the solution, using a CLIPPING Mask.
Thank you SO much 😁😁😁
Gave +1 Creative Carma to @sly hawk (current: #7 - 708)
whats the differences between tool presets and brush presets? is there one better than the other? i see you can convert from tool to brush but not the opposite?
How do I make the background gradient like the original


I tried Gradient tool but it doesn't work becuase I can't use it on this layer
Another question I have is how do I get the details like the and stuff
you can change your gradient layer to a different blending mode like Darken or smth might do the trick
I am changing it but the color is not becoming gradient

choose a different type of gradient

yours currently looks like it's the "transparency to white" gradient
I'm not sure if this is the right channel, but my pc is down atm. Is anyone willing to add two pics together that I have?
I have, nothing is happening
show me your whole screen
add?

I'll DM ya
Also, if you want that over-exposed look, try this:
I was gonna use Camera Raw Filter but I'll use that
The issue that I found is that the color of the top & buttom is not the same in the original picture
The top is darker then the buttom
Yeah, camera raw will allow it, I didn't know if you had the original raw files.
So is camera raw better or should I try your teqnuiqe
I think my technique/route is fine.
I could do both and see what is better
You can add as many colour points to a gradient as you want, also, note a gradient doesn't have to be linear...
How about this?
Also where can I find the propeties?

No this, your in propeties
anybody knows why this happens and how could I fix?
https://gyazo.com/1a52f73c1c5ed6c98ef33ef29b08d050

what bit?
the black lines around the box?
that's just looks like a massively thick stroke with the dash settings enabled and tweaked

Also... it helps if you can share your whole screen and PS interface
You need to apply the gradient to a fresh layer, not an existing adjustment layer
Looks like you've already got it here:

I tried using the Gradient tool but it is not working
I found that I can edit the curve background but I dont have the Line showing like you do
Curve and gradient are two different things.
On the video above, you just need to wiggle this line around here:

to change the background GRADIENT, click the gradient tool on the left and then the GRADIENT layer:

@dreamy oracle
I can't change it to gradient
Fill color adjustment and draw with gradient tool on maks.
I didn't read all conversation, but that's the answer.
Considering you have white background, you would add greyish color fill.
In case you don't have background, then add gradient fill.
Where can I find Gradient fill?
Layer adjustments.
All I have is this as background

Why you have a man as mask?
Put that gradient layer bellow man.
And add inverted man mask on man layer itself.
Because otherwise it's like this, I can't make it myself bigger because it ruins it

Hold alt and drag that mask on man layer, press CTRL+I.
After that,move gradient layer bellow man, delete existing mask, add new mask, grab gradient tool, and draw.
So what I need to do
- Put a gradient layer below my mask?
The last thing i write one by one.
So I go on Layer 1, and press Ctrl i
On its mask, that you just put by holding alt.
Okey, I just inverted the Mask

Youre not following whats told you to do.
Can you put it all in one message as steps?
- Go on that mask, hold alt, drag mask to layer 1 (man).
- Click on mask of a man, press Crtl plus I.
- Grab gradient layer by mouse and drag it bellow man.
- Click on gradient layer mask and press Del.
- Click on gradient layer and add mask.
- Grab gradient tool and draw.
Or you can just drag without alt to move it instead copying.
But im trying to teach you more.
Okay, step one finished. I held alt and copied to under Layer 1 (Original Picture, Man)
Step two finsihed, I inverted the mask underneth (layer 1) that I just copied.
Step 3, what gradient layer. I have 2 now?

I dont think you know whats layer, whats mask.
You 'll have to start from beginner tutorials.
Also, James show you in video how to do it without mask.
Nvm, I got it. Didn't know I could seperate them

Step 5, where is my gradient layer, did I just not delete it by pressing del?
You did haha
Just add new
Below
You can draw gradient fill on its layer, and on its mask. Depends what you are going for.
guys how do I blend the edges of an image ??
I have parts of my image that werent cut out properly and I want to blend it into the background
Okay, so I make a new layer and gradient filter?
No.
Gradient fill adjustment.
And on its layer you can draw with gradient tool with colors per wish.
And you can draw with gradient over mask as well.
On mask, black hides, white shows.
what is this error

anyone knows?
Thats man layer not gradient fill adjustment.
So wheere do I go to make a gradient fill adjustment
Its not error, some tools work only on raster image.
how can i color these easier?

Quickly add color and preserve the texture of a paper using a custom Gradient Adjustment Layer with a Linear Burn Blend Mode. DOWNLOAD the manual and card file: http://bit.ly/dst-color-gradient
Are you trying to use magic wand?
im trying to use the paint bucket
after i used the magnet thingie
What's the image? - It sort of depends on what you're doing.
i need to raster my thing?
Or you can make selection without magic wand.
@sly hawk

No, I get that 🙂 - I was just thinking it's better to avoid rasterising if you can help it.

any other way to color them?
thenn?
You've filled it with picture frame boxes?

im actually just wondering how to cut out more of an image once it has already been cut out because it doesnt work
Can you please just send over the PSD. Using pictureframe boxes looks like the mistake was made an hour ago when you made them all.
Cut out as in MASKED?
My issue is that the top is darker than the buttom in the original picture

Masked?#
I mean I have used the magnetic lasso tool to cut it out
Then choose darker color in gradient, or by eyedropper tool from original image
Why his frames look like this?
The middle is lighter than both buttom and top
How can I get 3 colors in a gradient
Can you share your pic please. - I'm sure there is a much better way than using the magnetic lasso tool.
well unless there is a better way to cut it out other than the magnetic lasso tool. select and mask does not seem to work properly when I do it hense why I used the magnetic lasso tool in the first place
I've shown you this
Got the original pic? before you tried clipping out?
Yeah I have the original pic
Mind PMing/sharing please? - I'll send a video of how it can better be done.
alright will do
@sly hawk tell me if object selection does it please, after you get the image.
What's the best way to recreate all the lines and background details like the Plus
Also where can I find good fonts for free


Dafont is a good start
The 'best' way is to find the matching font and literally re-type out every line of text


How? Painting and/or pixel manipulation. Either paint it by hand or find a similar image asset to composite into the existing image.
does anyone know how i could edit my images to get this shadowy boarder effect thing

cant ai do it?
by giving a similar mask at least
You can try. I don't know that it will give you the mask that is shown in the other image. Maybe you can get it close and then paint and manipulate to completion.
this isnt my image btw i saw it and i am wondering how he did it
It's just a rectangle with either a blur effect or a dark outer glow.
ty both 😅
I am not getting daily creative challenges channel updates why?
I'm not sure that there have been any updates in a while.
Do you have the notifications turned off for the #📣creative-challenges channel?


It seems so. When new challenge events are scheduled, they are announced in that channel.
how can i remove the white parts of this image and make it blend in with my background

Please describe what "make it blend with my background" means to you. If you just want to drop the white pixels, you can set the Blend Mode for that Layer to "Multiply."

with this tshirt

oh wait i just figured it out, thank you so much 🙏
Gave +1 Creative Carma to @ripe quest (current: #4 - 1606)
Depending on the desired effect, you may want to choose "Soft Light" for the Blend Mode and use a subtle Advanced Blending effect on it...
thank u bro ur the best
Gave +1 Creative Carma to @sly hawk (current: #7 - 709)
is there a way to make the right eye look like the left one (in the shape not the color)

hello , can somebody help me , the color is not the same when i want to export

select the eye you want to duplicate and mirror it @limber jolt
uhhhh
idk how?
most of the time , it is black and white

select eye and ctrl+t and click first option option on left
uhh how do i even duplicate first
yes
uhh how do i duplicate....
ctrl+j
okkkk..
THANK YOU
Gave +1 Creative Carma to @ivory rampart (current: #222 - 6)
also ctrl+t allows you to transform, so you can fit in new position
I noticed..
new knowledge gained
Anyone know how in photoshop i can resize a image to a certain size with quality
it doesn't matter if the dimensions arent righ
t
Free Transform? Cntrl T
Try that, I am not an expert tho
That worked fine
Anyone know how I can best emulate this text? I have the font & color

wi want the letters to like overlap over each other like this
decrease the letter spacing I guess?
In your font, do the O's have stars in then @hushed oyster ?
oops, not quite right 🙂

Hello, I have a problem with nicht recovery. I watched some tutorials where the object was marked and then put into „screen“ mode, after that they were brighter but still looked good. When i copied these steps my stuff got brighter but looked very bad, I don’t know what I did wrong

The masked engine was put into screen mode
So, if anyone else encounters this problem ( glitching ), I have found a solution. The problem was that the video drivers were outdated, I updated them to the latest version and it was fixed 
how do itake out a black back round invert it ?
hi any one help me out ?
i have a black back round that i want to invert to white .any suggeestions?
ctrl+I
I have a question in this tutorial you provided you changed the blending mode, but blending mode color stays only when the t shirt layer is behind it correct? How would I keep the same color effect and just have the image of the guy on the transparent backround
You only want the dark and no yellow don't you? That's Easy enought but it's 1.30am for me. If you don't get an answer in the next 8 hours or so, I'll drop you a guide/recording in the morning. - it would be extra handy if you could supply the highest res image/drawing you have to work from. - ta
Yes I'd just like to keep the look that is achieved once linear burn is applied but have everything else transparent, here is how it looks on normal without linear burn.
Yes. Blending Modes only work when there is a layer behind/underneath to blend with.
What would be the best way to keep the color or achieve a similar look without anything underneath?
You can try the Advanced Blending > Blend If... but this really depends on the effect you're trying to get.
Like James said above, if you can provide the original without the shirt one of us could probably demonstrate various methods.
Gotcha
If you watch in the demo video I made, you can see the Blend If section. Instead of the Underlying Layer, use the Current Layer sliders. Hold ALT and split the white handle.
Should I upload it if I send it in discord res prob gets lower right?
So if I hold ALT and split the white handle it will stay even if I remove the backround?
Set the Blending Mode back to Normal if you changed it.
I did that and used the ALT shift key while chaging the current layer slider and it helped with removing the white parts on the image I needed to get rid of, now I used color overlay to change the color around a bit would that work?
It would be something like this...
This is just a quick attempt but it might be similar.
Thanks for your help gonna try it
And, yes. You could potentially use an Adjustment Layer > Hue/Saturation + Colorize to do a color shift...

your a beast thanks
Gave +1 Creative Carma to @ripe quest (current: #4 - 1607)
achieved pretty much same color effect
Did you get done what you wanted?
Yeah it looks a bit different when exporting it
Not sure if cause of my settings or it just how the preview looks
u think its fine?
I'm a little bit confused by this workflow. Was the original image created as vector art? SVG? Or what is going on here?
All those lines in the drawing were vector shapes?
It was created by a hand drawing artist I paid
and I used a ai converter
to convert it to svg
should I just edit the png instead?
following the same steps
I thought maybe the vector shapes would be better cause ima print it on the t shirt
Hmm. So was it a bitmap "embedded" in SVG or were all of those lines in the original artwork all vector shapes?
No the original artwork was a scanned pencil sketch
i could send it to u
to show what I mean
Oh. So it wasn't vector shapes. OK.
Yes after that I used this software called vectorizer.ai to convert it into vector shapes
is that bad?
No. Its not bad. But if you have that as vector shapes, I'm not sure why you'd want to convert it to pixels.
Hmm youre prob righjt
Thats what my manufacturer is asking for
How do I export as SVG though I dont see an option
Im gonna ask him if he can use a SVG
You already have the SVG file. There shouldn't be any need to convert this to SVG. You have the original SVG, yeah?
Yes so would I just click save on photoshop?
Or save as
With my edited corrected color version of the svg file
I just dragged it into photoshop
Hang on one sec. I'm gonna look at your SVG file.
ok

Trace pixels to vectors in full color. Fully automatically. Using AI.Free while in Beta.
I used this tool on the png
So, I suppose you're not familiar with working with vector files and thus, you brought it into Photoshop? Is that why?
I was trying to make sure it comes out nice on the t shirt so I was having trouble erasing all the necessary white parts like inbetween the necklace and earrings
Haha im not a graphic designer or vector artist at all
I see. I get it now.
Adobe Illustrator
Thats prob better for this type of job?
Well... Illustrator is for creating/editing vector graphics. Photoshop is [primarily] for creating/edit raster graphics (i.e. pixels). Though, Photoshop has some rudimentary vector editing tools.
It just depends on the job and the final output which one you'd choose for a particular project.
So I should prob edit in photoshop first then once complete vectorize it
Yeah I was reading and it says vector graphics are the best for t shirt printing so just learning all this stuff step by step
Welcome back to Instagram. Sign in to check out what your friends, family & interests have been capturing & sharing around the world.
Well... I'm not sure you want to convert this back to vector art again after you've edited it in Photoshop. You might lose some detail along the way.
I been growing my instagram for like 3 months now and getting ready for my first clothing collection
so just tryna make sure the graphics are good
I think it might be fine because my manufacturer is doing direct to garment and from my knowledge it prints the ink directly onto the t shirt with the image so PNG and not a vector file is fine aslong as its high quality
Ideally, you'd do all of your editing, and layout design in Illustrator and export PDF or whatever file format the printer is requesting.
The PNG is probably fine. As long as the file is large enough/high quality.
Yeah this is what he tells me so prob png is just better
So instead of exporting this svg to png you think I should just edit the original png version?
That's fine. I'd follow their directions.
He actually sent it to me in .tif
whatever format that is
but I think just changing it to png is fine
I was mentioning what I would do if it were my project. But since the printer is requesting the PNG, then just follow their directions.
They know what will work best for their workflow. :)
Yep, thanks.
So this current image I have that I edited you think if I export it to png it will lose quality?
this one
The Export As screen, you're viewing a "Preview" at 10% of the total size. Did you export the file out and look at it?
It should be fine.
yep looks good hopefully it doesnt come out wonky looking on the shirt
and it blends well
Check with the printer and see what they think. Maybe they can look at it and know if it will work with their process. Or they can do a test run on some fabric before running a lot of them.
If not, you can go back and adjust the Photoshop file.
thanks for your help really appreciate it
Gave +1 Creative Carma to @ripe quest (current: #4 - 1608)
No prob. Good luck with the project!
hi guys i made my design with 60x30 how do i change it 30x80 without streching the thing

Image > Canvas size
ya i tried that but i need to stretch the image to fit in the canvas
then you have to modify your layer to cover the canvas
JUS wanted to confirm, cloud syncd files are now going to be discountinued? This means?
can you please elaborate this

yes i need to make it higher quality edges

i dont know how to do it or what to do.
The only thing that the announcement means is that the synced folder present in your computer, will no longer sync with what you feed it with

only that, and nothing else
i just need it cleaned up and back in DDS or png format.
SVG are mainly vector charactor file.
i dont care how it gets done.
All the files that are synced at the moment will be deleted from your Staroga espace, but not from your computer
i am open to ideas.
got it. This means, cloud files is no longer to accessible.
what bout the work project which are going on cloud ?
as a team.
so this will hamper the team coperation?
No, all your cloud files will still be available, just not synced with your computer in that special folder I shown in my screenshot. They will exist indedemdent;y, not synced anymore. But YOU WILL NOT LOOSE ANYTHING.
you jus meant, you don't want the edge like that?
lined which is showing up in the image?
If you need to work as a team, upload your files using the CC app, instead of using that folder in your computer
if the cloud isn't going to store file then how can we work and colloborate on the same file online?
Who said the cloud isn't going to store files? Re-read what I said...
means, the file will stage in the cloud, all online?
right
The folder on your COMPUTER will stop syncing with your Cloud. The Cloud will stay the same
I think the main issue with this, is that nobody uses the synced folder, and so it makes sense then why they are dropping it
hmm.
exactly
Unfortunately it was a very useful feature to me (I used it everyday to transfer stuff between my phone and my computer)
you can do some brush work on the edges.
no. thats not the answer. @ripe quest has helped me with this before but i cant damn well remeber what they did.
the search box is the answer 🙂

will look
if you remember particulars like date, links attached etc, you can filter accurately

hi
How can I make this better
The + and stuff. I don't know how I can do the rocket drawing at the top tho
I should have taken a better picture from the start


The bottom heading in the original magazine uses a drop shadow. yours looks wierd with an outer stroke. - I assume you did this because your arms make it hard to read the text

That's because your color mode is grayscale (not RGB) some filters work in RGB and nothing else
image>mode>RGB 8 bits
I'm not sure what you're referring to, pal. :)
Can you show me the image and describe the goal?
right here: #❓ask-a-question message thx for looking.
Gave +1 Creative Carma to @ripe quest (current: #4 - 1610)
Yeah. I see it. But what is the goal here? If you just draw straight lines, its safe to assume that it will look "jagged." :)
You mentioned that you're trying to convert a pixel-based image to SVG. I'm assuming that you mean that you're trying to convert the pixels to shapes with color fills. Or are you wanting to embed the raster graphic into the SVG format?
If you're trying to convert pixels to shapes/fills, you're going to need Adobe Illustrator to effectively trace the bitmap. That is the only way that you're going to be able to do that with any sort of fine control over the results.
thx for letting me know. is the methdo you describe same as how youve done it in the past for me?i dont know if you recall but you have helped with this before. i went and looked up those convos but didnt make much sense then as it doesnt now either.
I help hundreds of people. My apologies. I can't recall every instance. But I've asked you a few specific questions about the goal. Can you answer them?
does anyone know a font like this?

yes i just need the jagged edges refined and smooth without changing the overall shape.
How can I export the image that defines a pattern?
This still doesn't really tell me what you need or how the SVG will be used. Regardless, it sounds like you want to edit the anchor points, converting the corners to Bezier curves. Then, depending on what version of Photoshop you have (and which Preferences are set), you might need to enable "Legacy Export As" for the SVG export options to show up in the Export As dialog...
Sorry. I don't understand your question. You've defined a pattern and now you want to use it to fill an area and then export it out to a specific file format?
Or the image you used to define the pattern, you just want that to be exported to a specific format?
@rare widget - If its the latter, you'll have to figure out the size of the pattern. You can do this by opening up the Pattern Window. Then hovering over the Pattern you're interested in. You can see the dimensions in the tooltip. Then you can create a document at that size. fill it with the pattern. Then export it out to whatever file format you need.
i have 24. i dont know how to explain it better. my shape needs a higher resolution definition i thought converting to SVG would help?
Do you understand the difference between raster and vector graphics?
As I said, if you're trying to convert a pixel-based image to vector shapes (with color fills), you'll need to a tool like Adobe Illustrator, and the Trace Bitmap function that it has.
If you're just trying to draw a basic vector shape in Photoshop and export it out to SVG, see the video I posted above.
Beyond that, I'm not sure what to suggest to you.
i have a shape already, its perfect except its jagedness. i dont know what else to do and no i dont think bexier curves would help. thank you for all your help as always 😁
The only way to NOT make it sharp corners or "jagged" is to convert the corners to curves.
I suppose you could rasterize the vector layer and blur the edges but that defeats the purpose of using vector objects.
Which is why I asked what it is that you intend to do with this...
i intend to use it in another tool. but mainly i intend it to keep its shape. that is the most important thing. destination, not journey.
I wish you the best of luck with it.
many thanks 🙂
how to choose background color ? maybe gradient?
There are many different ways to get the same result...
Guys why cant I change the smoothness of my pencil?

i use the threshold option and now i cant use colors on this layer but black grey and white, how can I get to use all colors?

I think your file is set to Grayscale, but you can change it to RGB or CMYK depending on your needs by going File > Document Color Mode
Sorry, thought this was the Illustrator server. It's Image > Mode in Photoshop
I have a problem when distribute spacing after I create clipping mask a photo to a shape , distributing spaces with the selected shapes is OK but photes inside shape displaced any fix?

hi guys i have a problem cuz i need to make a loterry card of some kind for my school and i wonder how do i auto insert following numbers into those cells like 1, 2 ,3 etc? pls help

till like 250
This would probably require scripting. And I would probably do this with Adobe Illustrator.
i started doing it manually but ty tho lol
Ouch. This solution looks decent: https://youtu.be/02SLTH26sMQ?si=Und8bA70jdyZQ-UR

Hi everyone. This tutorial shows you how to quickly add automatic numbering to any text in Adobe Illustrator using my free script MakeNumbersSuequence.
Download scripts with installation instructions:
https://github.com/creold/illustrator-scripts/
https://ais.sergosokin.ru/text/make-numbers-sequence/
***************** DONATE *****************
...
aww I already finished it but ty so much i check out the video!

I feel like I'd have just fudged something using Microsoft Excel or used Adobe Indesign since it allows you to use TABLES!
what rank you going for?
so, i want to smudge this edge, or rather blend it in general BUT the orange and the grey are both on diffrent layers

so its not blending em with the smudge tool!
what can i do
i tried google. maybe i googled wrong but i tried
Rank?
Maybe just blur the top layer? or add an outer glow?
that is essentially exactly waht i was looking for
What rank is there above "God"? lol
lol
"God's Wife"
Can't argue with that logic.
Glad I could help 🙂

what am i doin wrong :p
its a gradient layer i might add, (it was a gradient before as i am experimenting on how best to do it)
also doesnt work on this normal fill layer, where it did ask me if i wanted to convert in a smart object

ahhh the second thing worked
um its been doing this in an infinte loop how do I fix it?

I would restart your computer and then try signing in through the CC Desktop App.
that is what i have been doing
should i try the browser?

Did you restart the PC?
I am reinstalling creative cloud rn
nvm

fixed the login issue now this
its my wifi
thats the problem
ima try to fix it ig
There could be some file corruption somewhere. You might have to uninstall AE and delete the directories from "AppData." I would [first] back up any custom files, scripts or similar resources that might be in there. Restart Windows. Then reinstall the app.
How can I have my "Gradient map 2"-layer above my "ARVA"-layer, but not affect the layers below the "ARVA"-layer without moving the "ARVA"-layer below them.

Right-click on the Gradient Map layer and choose "Create Clipping Mask" from the context menu.
That helped kinda, now the text lost some color (I used the smudge tool on this text)


Are you sure that its a "Gradient Map" that you want to use? Gradient Map will map colors of the gradient to the luminance values of the image.
This is my first day using photoshop so I don't know what I'm doing :D, any tips on how I could get the same distorted colorful look on the text withouth using gradient map then?
Instead of the clipping mask, you could try a Layer Mask.
Not sure if that will produce the desired effect, though.
I'm currently trying to figure out how that works, hasn't worked still though.
Remove the Clipping Mask. Either Undo that last operation or right-click on the layer and choose "Release Clipping Mask" from the context menu. Then Ctrl-click on the ARVA layer to make a selection of those pixels. Then add a Layer Mask to the Gradient Layer.
This may be a bit complicated since you're just getting started. :)
I'm catching on, and you don't get how much I value your help ❤️
I've been smacking at this for hours already and this is a huge help already
feels like nothing is happening when I do this
Do I highlight both layers and create an layer mask
or just highlight the arva layer and right click the gradient map 2 and create a layer mask
Its going to be a bit difficult to describe since I don't know if you're familiar with how Layer Masks work.
I'm watching a youtube video 😄
you can try of course

these are my current layers
One moment...
The relevant text layer is named "text"
and the gradient that I want on the text is "gradient map 2"
And I didn't want the gradient to effect anything below the "text"-layer
This is the difference between the Clipping Mask and the Layer Mask. Hopefully, it makes sense.
You could basically recreate my problem
Add a more colours to your gradient
then use the "smudge tool" on the letters
and get them disrtorted
The result will be the same. I was trying to demonstrate how both types of masks work.
I figured out kinda how I could do this, but It would require a lot of manual work:

It might be better to choose a different strategy to create the effect.
I got an idea
Didn't work
I tried to create a text box
before I smudged It I created a clipping mask with the gradient map
then smudged it
but it was just solid yellow
One moment...
You could Smudge the text or also try Warping the text with Transform > Warp. Then you can play with Layer Styles to add various color effects. Perhaps you can work it a different way. Perhaps using Layer Styles, it will be easier for you to modify the colors, etc.
Yeah, I could try that
OK. I have to step out. Good luck.
Thank you D. Humann!! You really helped alot and I learned a lot from this! I really respect the time you gave me
Gave +1 Creative Carma to @ripe quest (current: #3 - 1615)
You're welcome. Good luck on your creative journey! Hopefully, you'll have a lot of fun!
What is the red spot on the image ? I am using Lightroom.

that indicates your whites are blown out - if you look at the histogram, you'll see the far right line - amount of white - and a triangle. Clicking on the triangle will show/hide the warning.
@keen edge see example attached - I intentionally increased my exposure, causing the whites on right to over-expose "blow out" (loss of data), which relates to the line far right (amount of photo that is over-exposed) and triangle also circled

I am using adobe photoshop cs3 and i want to change the multiple undo shortcut in liquify from ctrl+alt+z to ctrl+z,
TIA.
In the modern day Photoshop it would be in EDit>keyboard shortcuts. But honestly, since CS3 is not maintained anymore (and by a long shot) I don't know if changing the keyboard shortcuts was a thing right then...
You should still have a PDF of the help files
If you lost it (It should have been on a separate CD when you bought CS3 first time, even if it was an upgrade)
well I'm working on my work pc so i don't have the cd and I don't think its possible i've searched it on edit>keyboard shorcuts didn't find it there,Thanks for the help anyway🙂
Double check in the PDF I pointed you to (and save it then!)

How do I bend a line in photoshop
Is your line a vector line or a raster line?
I got no cluee, but I got another issue now.
I can't even make a line
I think it's time to reset the preferences
edit>preferences>general>reset on quit
It is indeed bizarre
Fort the first one. If it's a raster line (pixel instead of shape or path, what I suppose is "bana" and form" in your inteface), then you can use CTRL+T (edit>transform>warp)
or go to "warp directly by right-clicking on the shape if you've done CTRL+T

when there, you get the choice between custom (you bend the line using the grid that shows)
or presets

Where? I'm on Mac.
And my PS is on Swedish, can't find any results on google
It should be the same path for Mac
I don't know any Swedish sorry, English is not even my first language
nvm solved it
But you got the help files in Swedish with you go to help (the last entry in the menu)

the help files are linked to the language of you interface
Good you solved it!
The thing about wrapping, it doesn't bend good

I am trying to recreate the transparent line
You cannot do that with a bending since it's got an angle. You need to do that with a vector path (bana?) and not with "pixlar"
You need to draw it with the angle
That said, I wouldn't use a line (since lines mean "straight lines" in Photoshop. I would use the pen tool, with a shape, with no fill and only a stroke of the colour you need. You can then control the thickness of the stroke in the top panel.
Again, refer to the help files to see it in Swedish
That's the pen tool

Failing that, you could simply take a brush with the colour of your choice, tweak the thickness and opacity, and simply draw it by hand.
As a photo retoucher, I routinely draw hair by hand (assuming it's hair you're trying to reproduce)
With a good graphic tablet and the right brush, that is easily done.
That's the brush tool
The first tool will be a vector path, the second tool will give you a raster/pixel stroke
Whatever I do I can't get it right
I am trying to reproduce the lines, hte transparent ones.
Do you know how I can do it?
Yeah, you just need to watch some simple beginner videos on how to use the pen tool
@dreamy oracle
Learn what the HANDLES do, etc:

is there a way of converting a psd file to pdf without having photoshop?
there are lots of online converters. Have you tried googling it?

Best way to convert your PSD to PDF file in seconds. 100% free, secure and easy to use! Convertio — advanced online tool that solving any problems with any files.
Really thanks. I was in doubt from a long time.
Gave +1 Creative Carma to @rugged iron (current: #837 - 1)
Somehow I didn't get any of these results 
But thank youu
Gave +1 Creative Carma to @sly hawk (current: #7 - 715)
Anybody good at identifying fonts?
How should i phrase or could anyone send me tutorials on how to achieve this type of look 


How can i create the same effect as here where the laughing emojis are behind the colour?

Any help would be appreciated
that is the opacity slider

just set it to somewhere around 33-50 percent
you'll get the same effect
thank you
how to fix shadows on lantern its very dark


ty
can someone tell me what is this? i am a beginner

how can i crop this single image?

what would you like to crop out exactly?
like the side part
i want to cut some yellow part on the left
i select that part and press delete and this pops up


for me its grayed out
but
click on your gun layer
then go to Layer > resterize > layer
and then try to do what you're doing again
Thank you man it worked
Gave +1 Creative Carma to @lunar belfry (current: #78 - 21)
how can i change this background's colour?

thank you
Gave +1 Creative Carma to @ripe quest (current: #3 - 1616)
Hey guys, can someone help me quickly with a pattern? Does anyone know about it?
Does anyone know a marble statue effect?? Like something I can just downloaded and put it on any image??
If yes, please ping me
you probably will need a bit of work to achieve marble effect
it won't be a single click
If you have a specific question, feel free to ask. Post any relevant screen shots that will help to demonstrate the problem/issue.
I don't know of any Action or plugin that will do this automatically. You would likely have to create the effect using various operations. And each image you try to use will probably require a slightly different approach.
any fix? pls
If possible, can you recommend a video?

Watch the full tutorial on Skillshare: https://skl.sh/3em0CQC
If you want to become a Photoshop master, join The Dojo Masterclass.
Enroll now and get a 2 month FREE trial of Skillshare: https://bit.ly/thedojofree
For more artworks, process videos and mini tutorials, follow @thedojotutorials on INSTAGRAM: https://www.instagram.com/thedojotutori...
Did you try going to YouTube and typing "Photoshop marble statue effect"?

i send you my question in privat chat
Fix? I'm not sure there is a fix since its not broken. You could try converting the layers to a Smart Object and then align it.
No. Please ask questions here in the channel.
All good! thanks
Gave +1 Creative Carma to @ripe quest (current: #3 - 1618)
https://youtu.be/TpNBBZ4cHHo?si=pZYOZllE5NU7qJ81 This is my template

and i want to get it into this projekt

how can i create a layer where i can insert my pattern @ripe quest
You could do something like this with a Clipping Mask...
But the tutorial uses a Layer Mask on the Adjustment Layer.
I hit append and now my shapes menu is duplicated for the defaults.
Also 2nd question, I went to adobe stock and added some shapes to my library, how do I import them? Is it just find the download location and import?

how can i convert a jpg/png to a pattern (.pat)
Make a Selection (or Select > All if you want the entire canvas). Then Edit > Define Pattern. Give it a name.
You can delete the duplicates.