#❓ask-a-question
1 messages · Page 11 of 1
Where do I find this texture here?

does anybody know how to do this effect?

Lmao what
?
Just squint your eyes and boom
aight 😄
does anyone know if this type of graphic is drawn in photoshop or if they are made in anothere way

how can i colorize using the eye dropper?
prehaps in fresco?
Lots of ways of doing it. This is probably not completely hand drawn, they may have found some graphics online and put them together. You can definitely find a lot of graphics like this to use, maybe even royalty free. But if you want to draw it, you can do that as well. The method will depend on the way you want to print the piece as well. I'm not super familiar with printing as a whole, but if you want it screen printed I believe you can simply deliver a high quality pdf.
(Which you can get by drawing the illustration in Photoshop, for example)
Does anyone have any iPhone 15 mockups or device mockups in general?
This page is pretty good https://www.mockupworld.co/ :)

Mockup World
Tons of free and legal, fully layered, easily customizable photo realistic PSD mockups: Ready to use in your projects, app showcases and presentations!
Thanks
Gave +1 Creative Carma to @sweet field
Done, thank you 👍
hey how can you make things blink in photoshop like a gif? Like words. Like say i have three words and theyre using the RBG effect (glitch effect). How can i make it so it looks like they’re flashing and changing colors fast

Like that but with words
How would I make this into a brush (The fade) without it ending up like this


I want it to be so when I draw, it has the fade but Im not sure how to define that into a brush preset
isn't it simply a low flow hard brush?
yup
is there a way to create a seemless altercation to an image? Such as changing an eye color, making a helmet lenses glow? Generative fill seems to change the shape and makes the changes seem too out of place with the original image
how to disselect the rectangle?

command/ctrl + D
thx
Gave +1 Creative Carma to @fringe wren

ctrl + D ig
how can i get rid of such infractions


what?
I sent it to see how it was 😁
This is my first experience with photoshop
hi, is there a tutorial somewhere or maybe a actions script , where i can learn to make this kind of path ?

YouTube video cover photo
I wanted to get your opinion on how you think it works.
i aint even got a clue what an action script is
its alright


ya it for rec your process and run again your stack list
Yes. Just google it. - "change eye color photoshop"
There are over 23 million results. I'm sure any of the top 50 would answer your query 🙂

I meant using the generative fill, maybe that was a simple example but yeah I know how to change eye color easy but I was trying to get generative fill to do that and more advanced stuff


How can I save .dds files in photoshop on a mac?
It's not built into PS. A plugin is required: https://www.youtube.com/watch?v=6yimyuWzgkg

How To Edit Open A DDS File in Photoshop 2022 - Assetto Corsa Car Skin
🔔 Subscribe for more Sim Drifting videos! 🔔
🔥 Drop a LIKE! 🔥
Link To DDS Plugin:
http://fnordware.blogspot.com/2014/09/dds-plug-in-for-after-effects-and.html
Twitch: https://www.twitch.tv/crilla18
TikTok: https://www.tiktok.com/@crilla18
Instagram: https://www.instagram.c...
Justt select inside the letters with Magic Wand tool and delete

Sorry, I should have clarified. I know it's not native to PS. I have tried the tool linked in this video but it isn't working. I have Adobe CC 2024. Is there another way or app that's Mac friendly?
Sorry, I don't know. Others here may be able to help when online.
Update: I did find this. Not sure if it works though 🙂
https://community.adobe.com/t5/photoshop-ecosystem-discussions/how-do-we-save-dds-files/m-p/7716374
https://community.adobe.com
I currently have nearly 4000 files to export to dds from Photoshop files and no way to do it in Photoshop CC. This is crazy. Yes I can install the most recent dds file format plugins into PS 2015 but trying to save just results in a crash to desktop. So my questions are 1. does anyone have a viable...
Who who wants to help me with t-shirt graphics?

I wish this graphic was of better quality for a T-shirt
without background
hey people :) i have a question: when trying to write a text converting it to Paragraph doesnt work... it makes the text invisible that was there before and i cant write in the text box anymore
A better solution would be to pick your font, add a STROKE and then make the FILL 0%.
Plenty of others seem to have been able to nick the image already 🙂
idk if a lightroom question is ok here but ill ask anyway. I'm trying to intersect a mask with a really tricky subject mask that I already have, but it seems like there is no way to intersect a mask with another mask that you already have. I dont want to have to redo the entire mask so does anyone know of a work around?
i noticed there was no indesign discord so ive come here. - Any ideas why my page running head is incorrect on my spreads?

for context, the left spread should always say 'Satanic Panic' the book title, while the right is automated to be the relevant chapter.
nevermind i figured it out
I'm not sure you will get an answer here 😦
Please try in the main Indesign community: https://community.adobe.com/t5/indesign/ct-p/ct-indesign
I use indesign, so can help - but I'm not sure what I'm looking at on your screenshot
is the the top half of the image how it's supposed to look, and the bottom half is how your attempt is currently looking?
Can I assume you know you can aware that you can have MASTER spreads?
yeah ive been using masters @sly hawk
and yes, top half is the correct format. Bottom is broken.
Am I missing something, can't you just add it here?

I assume your indd file is setup for 'facing pages'?
Also, you appear to have some extremely large margins is that intentional?
I can't really tell much more without seeing the document. Could you perhaps share the indd file with me via a DM?
please
Sure thing
I'll send it over
You somehow created multiple 'right hand spreads'
So the trick is to put a new LEFT spread in, and then move the copy back over.
then delete the old wrong spread.
What forgery is this for then? 🙂
I do not want the border to be kept outside the country's borders, how can I do it? The country border was drawn with the drawing tool

What?
like this

@warped totem red parts on a different layer right?
Ok so select the pixels for the red part
Hide the layer
Click on other layer (with pixels still selected)
Then click the mask button

Should be all good then
thanks
Gave +1 Creative Carma to @strange hull
hey i need help the ctrl x doesnt work for me so i cant cut anything in photoshop can someone help?
my ctrl and x is working
other binds like ctrl z is also working
please i have important work to do but i cant do anything without cutting
Edit > Cut
Send the pic here
Ctrl+Alt+Shift+K
wrong reply my bad
Hello there! So I'm having an issue with every adobe app.
Every time I launch any apps (such as 3D substance painter or photoshop), I get this message

I can't figure out how to fix it, anyone able to help?
Everything worked fine the last time I used it
SOLUTION 1
Sign out and sign in back to the Adobe app.
SOLUTION 2
Search for Command Prompt in the Windows search box.
Run the following command:
for /F "tokens=1,* delims= " %G in ('cmdkey /list ^| findstr /c:"Adobe App "') do cmdkey /delete %H
It clears the Credential Manager storage for all the Adobe apps.
Well, actually i was in the middle of adobe remote support when you mentioned it (still am), fixed issye by removing all credentials like ya wanted me to, but in addition sign in with email and password, rather than gmail account
Now everything works except substance painter specifically
After restart, doesnt work again
wsg everyone, can someone please help a brother out with something it would mean the world to me
Hi! I'm hunting for an InDesign Maven... Is there anyone here that would consider themselves an expert?


That's the point of a watermark tho
Yup
question, im trying to make a wallpaper for my esports team, but everytime i export the image to my files and set it as my wallpaper it looks like this, could i get help? why is it so zoomed in

this is what its supposed to look like

its so zoomed in
on my pc
doesnt it look like
That’s the exact same image u sent?
oh well how can I make it zoomed out on PS? sorry if i sound like a noob i just want it to look good

Because that’s not photoshop….
then..?
How do I remove the grey square on the right?

Adobe express
huh
Its not part of the picture it was there when I loaded up photoshop

Hello?
Hey
Hi do you know how I can remove the grey square? Its not part of the picture, it was there when i loaded up photoshop. Its like a window or something? Thanks!

The one one the left*
I tried looking for an option to disable it and draggiing and moving it but it wont move
rightclicking it doesnt work either
Photoshops not a website
That’s adobe express
A lite version that has 2% of the overall festures
You gotta download photoshop
What are your right click options on it?
weird 
I never seen anything like that before, maybe just restart photoshop?
There arent any its just this grey square.
Yeah i will try that
Other then that I'm not too sure, does it only appear on photoshop, if you click to another app does it go away?
Restarting Photoshop fixed it. It was my first time loading Photoshop so I guess it was supposed to be like a welcome box or something but I just skipped everything
Thank you!!!
Gave +1 Creative Carma to @tight vine
Oh that makes sence. NP
how do you remove them tho without messing up with the background?
Not really a legal thing to do...
what do you think of photopea?
it's fansite for chinese manga scanlations
it's not official
A watermark is a watermark regardless of it's "official-ness". If you really wanna know just google it.
it's not illegal
especially the one i am working with
it's there for aggregators but i am not one
Alr
Cringe off brand
can someone help me please to edit photo
I think it’s good for noobs, I use it
But do you know how to remove that specific watermark?
why are you here then
this is for photoshop
Hi, is the light room classic enough to just put the photo and some presets?
you can but photoshop is way better
I mean, ya
There is Photoshop on the Web.
So, yes, Photoshop is also a web app on the Adobe website.
Photoshop exists on multiple platforms: Desktop, iPad and web. The iPad and web versions are more similar to each other than the desktop version.
What’s that? I clicked it and it didn’t work
It's a link to "Let me Google that for you" which I suppose is a troll response to your question.
why did they troll me for
You'd probably have more luck doing something like this with Adobe After Effects, using a "wiggle" expression on an image or group of shapes.
but its not full photoshop
they got annoying with the names
I don't know. Perhaps they think they're being funny.
Please don't tell people things when you don't know the answer. Its perfectly fine to say nothing.
yes it does work, and yea its kinda troll but get tbe right answer
i was right tho
"why is my photoshop differant"
cuz its not full photoshop
You're not correct. Photoshop on the web is a thing. And that wasn't even their question.
problem solved
Thanks. I was also gonna try making several images and apply some effect in a video editing software to get the effect. I’ve never made a gif/animated art before. But thanks.
Gave +1 Creative Carma to @ripe quest
Please don't argue with me. Just stop being a troll in this server.
I’m not
This isn't a debate. Just stop acting that way to people.
You can probably do it with Photoshop but there aren't any expression controls there so you would have to make every frame of the animation by hand. Its do-able; its just a lot of work. (After Effects is a better choice for that sort of visual effect, if you have access to it.)
Aah ok gotcha. I have after effects from a bundle I think
Creative cloud
Good evening,
I was wondering if someone might be able to guide me on how to properly stream from Photoshop on Discord. While I was streaming in a friend's server, they told me that I was constantly minimizing my window, but I was certain I wasn't doing that. I found out what caused the repetitive disruptions was when I opened a tool in PS, it would pop open a new window for the tool. This would "minimize" my PS window, causing Discord to stop the stream because it assumed I minimized it. Only to resume my stream whenever I exited the tool. Is there a way to fix this somewhere in PS's settings?
just stream full screen
otherwise you only show one window on discord
just how it works
In the Screen Share dialog window in Discord, choose "Screens" instead of Applications. Just remember the entire screen is visible; not just Photoshop.

Ah, ok. A small shame that that's the only solution to it. But, I can live with that. I'll do that moving forward.
Thank you, guys!
Tutorials for photoshops also helps with photopea
Photopea is poundshop version of photoshop
well you arnt really ment to remove watermarks lol
Depends
Whatever I am doing is not illegal 😭
Watermark is for aggregator sites and not for normal people
so I'm trying to photoshop mark knopfler into this image. I've made the selection, and now the only challenge is getting the lighting right. I'm thinking of approaching it by using brush strokes with the same colour as the lights on the layer above then changing the blend mode to multiply or overlay; is this the right approach?

Yea cuz piracy is such a problem for other piracy sites lol
If not, how could I achieve this?
Exactly!
First, convert the Knopfler layer to a Smart Object. Then use Filters > Neural Filters > Harmonization... and adjust the sliders. This should push it in the right direction. After that, you can further tweak the effect with Adjustment Layers. You can also make a merged copy of all the Layers and use a Camera Raw filter to bind it all together a bit better. (Don't forget to include a shadow under him that matches up with the other shadows in the image. That will help to make the composite look more natural and realistic.)
thanks, I appreciate it!
Gave +1 Creative Carma to @ripe quest
Is there a way to change the orientation of a project midway?
After spending a while making multiple things, I thought that it would be much easier I did the project in a portrait orientation instead
How would I do that?
You can rotate the canvas but you'll probably have to edit all of the layers to conform to the new aspect ratio.
oh
I can give it a try
How would I rotate the canvas?
Well, not "rotate" per se but use Image > Canvas Size to change the size and aspect ratio.
It didn't change the aspect ratio from 16:9 to 9:16
It seems to have done something but did nothing visually
it just moved the canvas to the bottom left
If you change the Canvas size from 1600 x 900 to 900 x 1600 (for example) it is a different aspect ratio. I thought that was the goal here. (?)
yep that is what I'm trying to achive
I also said that you will have to modify the layers themselves. Canvas size only changes the canvas; not the layers themselves.
from 1920 x 1080 to 1080x 1920 (landscape to portrait)
Image > Image Size rescales the image completely but I'm certain you don't want that.
You would have to adjust the Canvas and then adjust the layers inside the canvas.
the canvas seems to be the same
after resizing the layers, the blank white canvas becomes visible and is still the same as b4
There is no magical "readjust all my layers to match the new aspect ratio" button
It might make a difference that I am using artboard (?)
No. That doesn't make a difference.
Hi (adobe newbie here), there is probably an easy way to do this but how can I export a photoshop file into InDesign?
Define what you mean by "export" to InDesign. You just want to use the file in an InDesign project?
I'm doing a school project and it needs to be transferred in. They made clear instructions that it's made in Photoshop then placed into Indesign
Then you just need to make an InDesign project and save it. Then, (in InDesign) use File > Place... and locate the .PSD file and draw a box in the InDesign doc for it to be dispayed.
Thanks !
Would these NFL football field outlines be possible to make in photoshop or is that more for illustrator?


Yes
I would like to get the look of the left-most object in the first photo closer to the top right object in the second photo, is there an optimal solution?


While I would prefer to build these lines in Illustrator, they are definitely possible with the vector tools in Photoshop.
The masking of the lines I would definitely do in Photoshop.
does anyone here have any kind off a brush import i could use in general, I am generally looking for something like a smoke ect, i've tried importing from different websites but they haven't turned out as wished
Totally not what you are asking for but something that might help... Add an image with white smoke against a black background and change the Blending Mode to something like Screen.
that's smart, thanks for that!
Gave +1 Creative Carma to @nocturne cairn
Thanks mate. Hope it helps.
Gave +1 Creative Carma to @arctic mirage
Why are my images are all randomly jumbled up when I pick SVG format as export? What's wrong?

Is that the image itself, or a print out?
This is the original image

https://community.adobe.com/t5/photoshop-ecosystem-discussions/svgs-not-exporting-properly-from-photoshop/m-p/12061544 @bold hull idk if this is the same thing as you but you might wanna look
https://community.adobe.com
Hi, I can't get my head around why the vector files I'm trying to create and export from Photoshop are both losing resolution whilst upscaling when placed back into Photoshop, and are also not able to be imported into DaVinci Resolve Fusion. I created a vector mask of my logo with paths, right cli...
what exactly do you expect when exporting images as svg? what is the goal here?
Thank you Michael and @strange hull
Gave +1 Creative Carma to @nocturne cairn
Thank you. Happy to help.
Gave +1 Creative Carma to @urban dune
Because it's the only way to get from PSD to ai 😦
I need to convert it
convert raster image to vector image?
Sorry idk what u mean. I want from PSD file to AI file 😄
You can place a Photoshop file in Illustrator but you won’t be able to edit it.
But will it have high Res? Like print huge pixel
Whatever size you build in Photoshop will be honoured inside of Illustrator. You can also resize the Photoshop file inside Illustrator. Inside Illustrator go to…
File > Place
and choose your Photoshop file.
You can export PSD images as SVG within Photoshop but there is a trick 😉 @bold hull
Go to preferences "edit>preferences>export"

and tick the "use legacy export as"
I’m signing off. I’ll leave you in the very capable hands of @vapid flume 🙂
Now when you go to file>export>export as you'll get SVG as an option
Thanks @nocturne cairn !
Gave +1 Creative Carma to @nocturne cairn
Any time 🙂
Sorry if someone already responded, I didn't see... you just want to make it more white/..ish and less glittery I presume?
I want to increase the sense of glitz!
I want the thing on the left of the first one to be the same as the one on the upper right of the second one.
This much of an improvement?
Sorry, it's the other way around!
I want to add the same glare on the upper right of the palette to the powdered one.
I want the powdery side to be more glittery.
I'm Japanese, so I'm sorry I can't communicate well in English....
"I'm Japanese, so I'm sorry I can't communicate well in English...."
What are you talking about?! - That's amazing english communication! 🙂
but... oops, I made the image backwards in that case!
Can you add glare to the powdery stuff?
I want to make the powder glare instead of transferring it to a palette...?
Yeah, I understand now. Sorry
Tanukis are cunning creatures but with exceptionnal language skills 😂
Sorry, still around but in call
I just had a go with James is on a call @outer crown
Not sure if that's you wanted, but just added some "shadows/highlight" adjustment in there ( image>adjustments>shadows/highlights)


- a levels adjustment layers to increase the contrast even further and a new layer with a "noise" brush that makes white dots , set to linear light..
It's rather crude 🙂
Hello everyone.
I'm tasked to mockup several design elements on the wall of a building. So far I've used perspective warp to fit the different elements on the wall, but since I have to do individual warps, they always end up looking slightly different in perspective.
Is it possible to create a layer or layer group/mask that forces the same perspective warp to anything put on that layer or in that group?
I feel I've seen it on free online mock-up ressources, but I haven't been able to find one now, or to manually recreate it.
Thanks for any help in advance.
@outer crown My favourite method would be using ACR (Camera Raw)
Adding lots of texture and clarity, + increasing contrast


I would try the Vanishing point function (filter>vanishing point)
https://www.youtube.com/watch?v=w5aMceFycN4
you can combine multiple elements inside a "grid", you created yourself from the original image
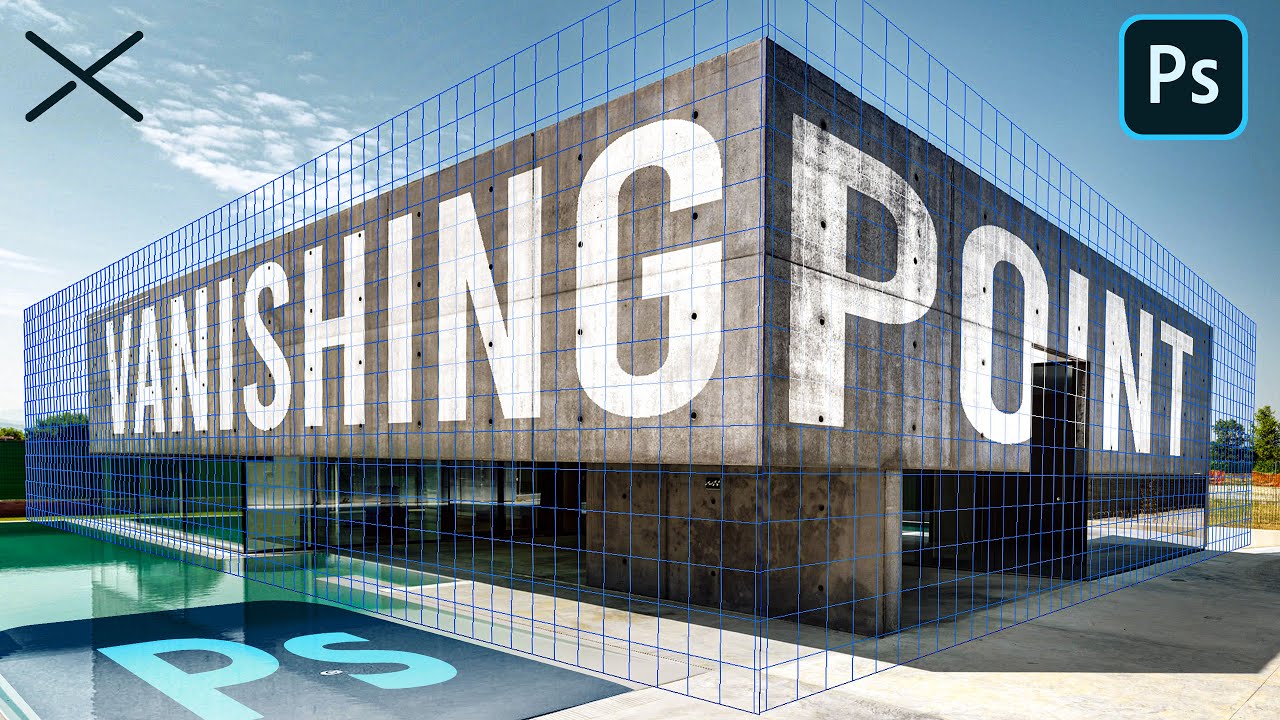
The Vanishing Point Filter and Perspective | Photoshop CC Tutorial | EASY
This Photoshop CC Tutorial discusses how to use the Vanishing Point Filter to add images, text and graphics to a photograph while maintaining proper perspective. This Photoshop tool allows us to create a simple grid and panels based on the perspective of your current image...
Excellent. I'll check it out. Thanks a lot! ❤️
Gave +1 Creative Carma to @vapid flume
You're welcome @cerulean nimbus
@sly hawk @vapid flume
thanks you!!!!
i try it!!!
Gave +1 Creative Carma to @sly hawk
See what @sly hawk also have to share, he'll probably do better than my attempts 🙂
This was my 2 minute attempt...
@vapid flume
wowwwww!!
So you're saying that we just need to add a bit of glitz here...!

James solution is better 🙂
the aim is to increase the local contrast, make whites whiter while not touching the rest of the tones. That's how the material react in real life, they add small particles of quartz/mica or similar to increase the brilliance, but only on very small concentrated areas. The material used is highly reflective, while the rest of the material not so much,...
!!!!!!!!
I changed the drawing mode and it looks great!
Thank you so much!
Thanks to both of you!

Gave +1 Creative Carma to @sly hawk
ooh very fancy
By the way,... I just have one more question, is it ok?
I would like to make the first photo look pull-glossy like the second one, what is the best approach?


This is how the detailing gets fluffed up...;;

Do you want to lose all those details or not? (most people within the beauty industry would, but I think it's wrong 🙂 )
Since you want to enhance all the highlights, the method is the same than with your previous question (the glossy part is a mixture of evening out the details AND increasing the local contrast)
Worked like a charm btw. Perfect help 👌🏻
When you apply a gloss (on lips, on a painting, on a car paint) you are adding a layer of material that redirects light in all directions, completely erasing small details, so you can 't have a perfect gloss with all the tiny details, unless you remove a bit of gloss here and there to allow for the details to come out
Aahah, glad it helped!
I agree, too...lol
But this time I want to pull it closer to the second one since that's the shape they are asking for.
I can get a glossy surface, but I just can't get a crisp outline (the whole thing is blurry).
I used a "dry" scratchy brush in white and then small blur localized on the additional paint

In that case, you can restrict the effects to an area by masking it. If the mask is spuer sharp (or you have a vector mask), then the outline will be super crisp
Because there, you applied the blur (it seems) to the whole face, and unless they specifically ask for it, then it's not good. But clients are not necessarily right 🙂
Instead of blurring it, you could apply a "dusst and scratches filter (Filter>noise>dust and scratches) it's a bit more subtle than blurring it out.
Also, by blurring, you get less defined "shimmering" areas.
You could also try to go back using the Camera raw filter and use a negative texture slider to remove all the tiny details, while keeping the highlights/shadows intact, and then mask that filter (like James shown you in his video) to restrict it to the lips only

Basically you are going to play with the sliders there 🙂
And then add @tawdry cliff suggestion at the end 🙂
A variation: @outer crown

this is the before and after. would you say the lights are realistic enough?


Not so much, why is the light circular if the source of it is rectangular? that's the main thing that makes me feel like this is not realistic...
Then, add a more faded light around the main one, because the edges are too sharp atm
Also, I think you should desaturate more the colors (you can desaturate the blue and the red in the "hue/saturation" panel by using the single color instead of the "master") and decrease their brightness.
Try to look at real pictures (or in real life) cars at night and ask yourself where are the differences between the reality and your version. This will help you become more realistic (not only in this case).
ill work on it now. thanks!
Gave +1 Creative Carma to @fringe wren
is there any youtube channel that teaches the Ps basics?

Set the Distance to 0 and adjust the Size and Spread. (Probably the opacity as well. 100% is probably too much. :)
oh! great thank you
@buoyant tinsel Have you checked out https://www.youtube.com/c/piximperfect?

YouTube
PiXimperfect, hosted by Unmesh Dinda, is a free resource for learning Photoshop and Lightroom. We believe in learning the concept, rather than learning the steps so that you can translate "your" imagination visually to the world. This will make you a better decision-maker, rather than letting others make decisions for you. Since every situation ...
When I use type tool he is always taking the right side how i can make it always like this

Does anyone know how to blend in skintones
Yes
Can u help me im newcomer
Hi, you can also move the drop shadow on the image, when the layer styles window is open
so a youtube video thumbnail is maximum of 1280x720
how do i resize it to fit on the 1280x720

not sure i understand
When you have the window you posted, you can click and drag directly on the document to reposition the shadow, but D.Human has also given good starting points.
Hi, if the image ratio is not the same, the crop tool might not be enough, Content aware scale might be useful: https://helpx.adobe.com/photoshop/using/content-aware-scaling.html or the generative fills options
Hi, phlearn is also plebiscited: https://phlearn.com And a text and image addition that I also recommend is photoshopessentials: https://www.photoshopessentials.com/basics/
Everything you need to know about Photoshop, Lightroom, and Photography from YouTube’s #1 Instructor. 450+ tutorials for any style and skill level photographer or retoucher.
Photoshop Essentials
New to Adobe Photoshop? These Photoshop Basics tutorials for beginners from Photoshop Essentials will get you started with Photoshop quickly and easily.
You can also set an outer glow set to a dark color, in multiply mode.
Anyone knows how to fix these artifacts(I don't even know what this is?) when resizing objects in photoshop?

I have this problem only on versions 23 and above
This looks like a graphical error, maybe try updating your graphics card drivers?
i've got updated all drivers
Could you try these and see if they may fix it?
Go to Preferences > Performance... click the Advanced Settings button and uncheck "Use OpenCL" - Restart Photoshop and try to reproduce the problem.
If the problem persists - Go to Preferences > Performance... and uncheck Use Graphics Processor. Restart Photoshop.
guys how to u remove backround from an image
still the same
so many ways
whats ur hardware
The Remove Background Quick Action...
Help > GPU Compatibility.... any errors or issues reported there? Maybe just a driver update required.
nvm i got it
is this normal? i was just gunna check mine

i7-6700HQ
GTX 960m
16gb ram
Had to restart photshop odd

That is an outdated graphics card, maybe Photoshop no longer supports it in the newest version?
Hey! I made a little animation in Photoshop. How can I export it while keeping the transparent background?

choose File > Save For Web. In the Save For Web dialog box, select GIF, PNG‑8, or PNG‑24 as the optimization format. Select Transparency @river otter
Hey guys! I made a project with some layers and stuff and exported some pictures. I closed photoshop, moved the pictures. Today I wantes to create a new picture and wanted to load the old project with all my layers - just wanted to switch something.
There is no project anymore and I just can open the final picture as a jpeg.
Is it possible to recreate the old layers or where can I find the .psd file?
Why is it that when I draw with white it shows black on mask? this is not really a problem, however what is a problem is that when I switch colours (trying to draw back the image), the brush doesnt work. opacity and flow are defiitely up.

TYVM!

very cool
You are in substract mode in your brush blending mode, you should go back to "normal"

how can i possibly achieve this kind of logomark in photoshop? Everytime I try, I either can't get the text to look good, or either the keycap to be nice & smooth
This is a logo for myself, and it's an keycap, on the top there is esc (escape) and on the side there is keys

Logos are better done in Illustrator; it will be vector based, so you can size up infinitely.
In Photoshop I would do this using the pen tool, making one side at the time. In Illustrator, I would build it up using rectangle shapes.
And for the text, it's easier to use a downloaded typeface than trying to create it from scratch.
Yeah, I was going to do it with an font, but I just suck at transforming it
I'm gonna try to do with Illustrator
does anyone have a good resource for artistic textures like charcoal graphite, and such?
Does anyone know any tools to make a mockup like this? I tried to make one from scratch but it isn’t as professional

Are you wanting a quick way to…
- Make colour variants of a design, or
- Layout a bunch of existing images in a grid with rounded corners and a drop shadow?
Do you mind explaining how to do it using the rectangle method? I saw some tutorials, and I understand the basics I just don’t get it how to make the logo lol
I would also do this in Illustrator, @brave wigeon, but here's quick look at one way to approach this in Photoshop.

The second way
how could I rebind the hand tool so it is middle mouse button
because it's default is space
I tried removing the background and it didn't work, the last one is what it looks like in the photoshop editor and the first one is the one i downloaded


try the colour range feature
nvm
thank you though
Gave +1 Creative Carma to @latent flare
actually
Is it possible to take the second pic and only select everything that isn't white?
But i didnt do color range
i selected pixel by pixel myself
How does color range work?
oh colour range allows you to select stuff via its colour
aka "oh I want to get rid of all the red in this mage" colour range allows you to sample the red you want to remove and delete all of it in a picture
that awesome
i got it fixed even better
thank you so much
it looks so much cleaner now
no worries
Is it possible to remove a range of colors?
wdym
If i do just white select, the first image comes out but the borders look awful


is it possible to do like colors between like
white and gray?
just do it again
ye
(and @lucid crane )
Sorry for the late reply!
Thank you! I will give it a try!
Gave +1 Creative Carma to @vapid flume
By the way, is it possible for you to tell me how you made your choice,,,?
I can't get a good outline like you..,
Hey guys, I am designing a t-shirt for an event. I had created this with ai and need to recreate it now in photoshop. I need to recreate that arched line thing, how would you suggest I do that?

Just put it in photoshop and cut it out
just un angle it
bro i know like nothing about photoshop lol

I need a defferent bird and want to move the lines around and stuff
bruh thre bird is the only good part of this
bruh lol, its just inspiration
im not taking this exact thing, i just wanna know how to make that type of effect with lines
draw
im not learning anything by doing that tho
i want to do this more and actually learn how to do things, i feel like there has to be a way to make precise lines
I think that’s more of a illustrator thing
ahh okay
There would be several ways. First you can as mentioned put the Image in Photoshop and draw what you need from that image over on another Layer, change Font, Color, Elements like the bird, etc. and Trace the Lines. For the Text you can warp the Text and draw the lines under it.
But if you want it to be precise so that the lines are all straight you want to rebuild that idea in Adobe Illustrator (also AI) as mentioned. For this you can head over to the AI Discord https://discord.gg/adobeillustrator and ask there for help also. Hope that helps.
Awesome thank you. ill try out illustrator
hey! I hate to just pop in here and ask a question before vanishing, but it's 4 am and I'm trying despearately to get this assignment in 😂
So i have a GIF that's refusing to play. It won't export in preview, and saves as a still image. Any advice? I've combed around the internet, but I'm not very adobe savve
Can you share your screen? I mean the whole thing, timeline, layers panel and all
That helps a lot


if you mean in a call or something, that's fine by me!
but as for the timeline and basic screenshots, this is what we're working with. Just keeps exporting as an image from the timeline rather than the GIF
I'm supposed to be uploading the finished gif onto a google slide
Can you try a couple of things
Render as an MP4 (if it works keep the resulting file, it may be useful) File>export>render video

2- reduce your size to 1500 px. I know there is a size limitation to Gif, although now I can't remember what is it
You can do that at the save for web stage
(use save for web, not export by the way)
okay cool! Im giving the MP4 thing a shot :)))

if it works with a reduced file, try the big size with save for web instead of export as
Let me know if any of these works and based on the results, we can turn a video into a gif if needed
its taking a bit of time for the preview to load- hoping that just means it's putting together the gif?
How long is it in total?

It's probably too big and too long
try to reduce the size
I'm pretty sure it's too big for a Gif, also it will be limited to 256 colours so there will be some banding and stuff
GIf is useful for looping meme LOLs but it's a rather antiquated file format to be honest
gotcha! I was hoping that was it
i got it to look nice, selected done, whole window went away. should i be searching around for it in my files, or export it again?
(oops- thats my bad. fixing it up again lol)
OK Great
In case you need it in the future, there is a way to quickly transform your MP4 in GIF via Adobe Express
https://new.express.adobe.com/
It could be a last minute solution if you're pressed again.

Adobe Express
THANK YOU!! i can finally go to bed 😭 Ill absolutetly keep that in mind, this was a lifesaver
hope you have a good night!
I need to work with big aspects, yet photoshop seems to be laggy.
need to work on a poster with H80'' and W33'' as the sizes that needs to be printed on CMYK-32 bit 300 PPI .
I have a powerful computer but i don't know how to improve photoshop performance.
Gave PS 8 gb of ram, enabled my GPU
my specs are:
16 gb of DDR4 Ram
I7-12k
RTX 4050 Laptop GPU
First I suggest you Check your GC compatibility

it should check "all green"
if all good, you need to check what's up in the preferences
With the file open or without?
Either, that's not an issue
in preferences, check the performance tab

and check also the advanced settings

enable 30 bit display?
You need the GPU taking the biggest part of the burden if possible
Hi i want to add custom colors to this image can someone help me please


for example this color here
If you have a 30 bit display, yes!
i have like 90 diffrent colors that i need to add but is there a way to do them quickly
is it just the colours or also a texture?

I suspect this a 3D model, it would be much simpler changing the texture at the 3D stage
I'm going to summon @sly hawk for that one, he probably have more streamlined workflows than mone for this
should i use photoshop or what. And the textures that i got are for real products they r 900 x 900 pixels
You called? 🙂
can u help please
Custom colours aren't an issue, but textures are a way different task.
lets start with colours
For changing whole textures on a 3D render, do you have any tutorials to share? This is your expertise field 🙂
I need to apply all these colors and textures to any kitchen model. Its like a commercial type thing
But im not quite sure how to get it done
What is your level in Photoshop, what are comfortable with? (smart objects? transformations?, creating repeating patterns?)
None of your samples are reapeating patterns, so you'll need to create patterns from your samples
Im not that good in it. I need those to add it to the website i created
my designing is weak
That's quite a big task. I hope you're not on a deadline!
which tools should i use do u have any idea
if u give me a pattern or way ill start with that. Because at the moment i have no idea what to start with
Let's see what James is saying, but first learn to create repeating patterns from your samples in Photoshop
I cannot give you a pattern, you'll have to build it yourself.. For ALL your samples
creating repeating patterns will smooth my work but i didnt have any experience with this type of work

In this tutorial, learn the basics of creating and using simple repeating patterns in Photoshop!
May I inquire something that may sound bizarre, and there is no ill intend there
Why did you accept this job?
I have more than 10 years in the field and I can tell you that I'll have to be given lots of time (and money) to do that kind of things
Definitely not something for someone who isn't used to this
i accepted the job for the website i made them the website but the guy wants to add smth like this to the website. I thought it would be easy so i said okay i can do it
but then i got lost and now im depressed
Unless you feel ready to learn the hard way and have enough time, I will suggest you hire someone else separtely to do it. That's my honest advice
im in their office rn im sufferring someone help me
I don't want to give you false hopes
istg
Well here is the way to do your solid colours...
If the client changed the brief, you don't have to comply
You signed for a website, not a design job
yeah but there are alot of issues im just 18 but thanks
Gave +1 Creative Carma to @vapid flume
See what James comes up with
I work in an agency and if a client changed the brief to replace textures on a kitchen there is no way I'd agree to that without a big cost increase
Obviously the original mask needs to be done well, but ONLY once!
You don't have to agree if it's not in the contract. The fact that you are 18 have nothing to do with it
You can then use the same mask for all.
This is one of mine:
https://doorvisualiser.com/
Try before you buy with the new JB Kind Door Visualiser. Experience the stunning impact our internal doors can have on your home with our easy-to-use tool.
Im doing it because its my dad friend company im forced to it man im not getting anything in return
There is another one somewhere I did for a kitchen company and the counters change colour.
Without spilling too many beans, how much do they charge to do that kind of things @sly hawk and how long would you expect to work on it, given that it's your actual expertise
@red scroll Don't do it, that's crazy. what will they do if you don't do it?
If I was tasked to change the colour of that image to maybe 20 different BASIC colours, I'd charge... at **least ** £60 per colour... - £1,200
alot of issues man.. im working for free im actually depressed i can dm u my problems if u care
It's not even batsh*t crazy
thats alot
@red scroll You're taken advantage of, do you realise that?
....so is a kitchen.
That's NOT a lot
i do but i have no other choice
Given the work involved
i will brb
At least tell them you need time
The client needs to provide a decent set of textures. This amount is useless.

Where about in the world are you anyway?
because changing the colours, James told you how to do it, but you'll need to get proper textures, these ones are not good, You can't work with what you got
Sorry @sly hawk already answered that
Turkey man
and yeah, if you're down, yeah of course you can DM me. I'll help where I can
@red scroll
Also, are you sure these are real kitchens?
This coffee machine looks suspisciously fake

IThis would be the basics of adding a texture
I am asking because it could be much simpler changing the texture on a 3D model.
but given that the entire scene is fake, it would be better if the client stopped penny pinching, and went to the 3D artist and asked them to swap out the texxtures in their render.
It's a steep learning curve though,, so you'll have to learn a 3D software (and of course have proper textures to begin with)
@sly hawk great minds! 🙂
That's definitely a job for the 3D artist!
applying your own textures over the top is a LOT of work, since you'd need the right scale, the proper pattern repeat (if there is one), and you'd need to use multiple angles/smart objects for where it's not 'straight on'
I already checked on a few of the textures and they aren't repeats, so they'll need retouching (and it will look bad given the small size)
probably a stupid question but how do i make an image all one colour like the man in red?

(for logic/reference - only - I'm not suggesting you try to repeat it)
Gradient map is the easiest
You'd need to use a gradient map
ok thank you
Plays 7 nations army in the background
many thanks
ignore the colour, but whats the name of this type of filter/style

I'd call it duotone
Hi. When editing DNG files from my iPhone and imported from Mac Photos app they are converted to .tiff files and the raw plugin is not activated. If I airdrop it to my mac's download folder it works. I checked all settings and everything is updated. Is this a bug in PS or photos app?
when exactly are the files being converted to tiff?
They just open as tiffs and the plugin is not activated. However if I airdrop the same photo to my mac and open from download folder it works. Something with the photos app? I could not find any settings that would cause this.
Hello! I know this is a photoshop server but I don't know whereelse to ask! if there is anybody who could help me out on why I do only have " regular" font in Indesign, I've already installed the bold/ italic fonts on my laptop and they appeared in indesign but since I updated they disappeared again & don't know how to install them in indesign!
much appreciation for your help!
I don't really work a lot in InDesign, but I don't think you install fonts in InDesign, they are installed on your system, or synced from your Adobe Fonts
"When editing DNG files from my iPhone" - are you editing the photos in the iPhone?
"imported from Mac Photos app" - imported how? Opened using Ps? Downloaded?
"If I airdrop it to my mac's download folder it works" - is it a DNG file then?
Are they Adobe fonts ? or fonts you own? (as in bought or downloaded from a website)
How would I go about turning a normal picture into exactly this effect? Anybody got some ideas?

I did not edit them on the iPhone
My photos are synced via iCloud to my Mac
I just right-click on the photo in the Photos app and choose edit with... If I look at the info in the Photos app it is a .dng file, but the file extension is changed to .tiff in PS
After airdropping it to the download folder the file info looks exactly the same as in the Photos app.
My guess is that the issue is about how the Photos app handles the DNG files. Couldn't find anyone else having a problem with this though...
pattern + mosaic filter
https://youtu.be/75WaK2Y8fXo
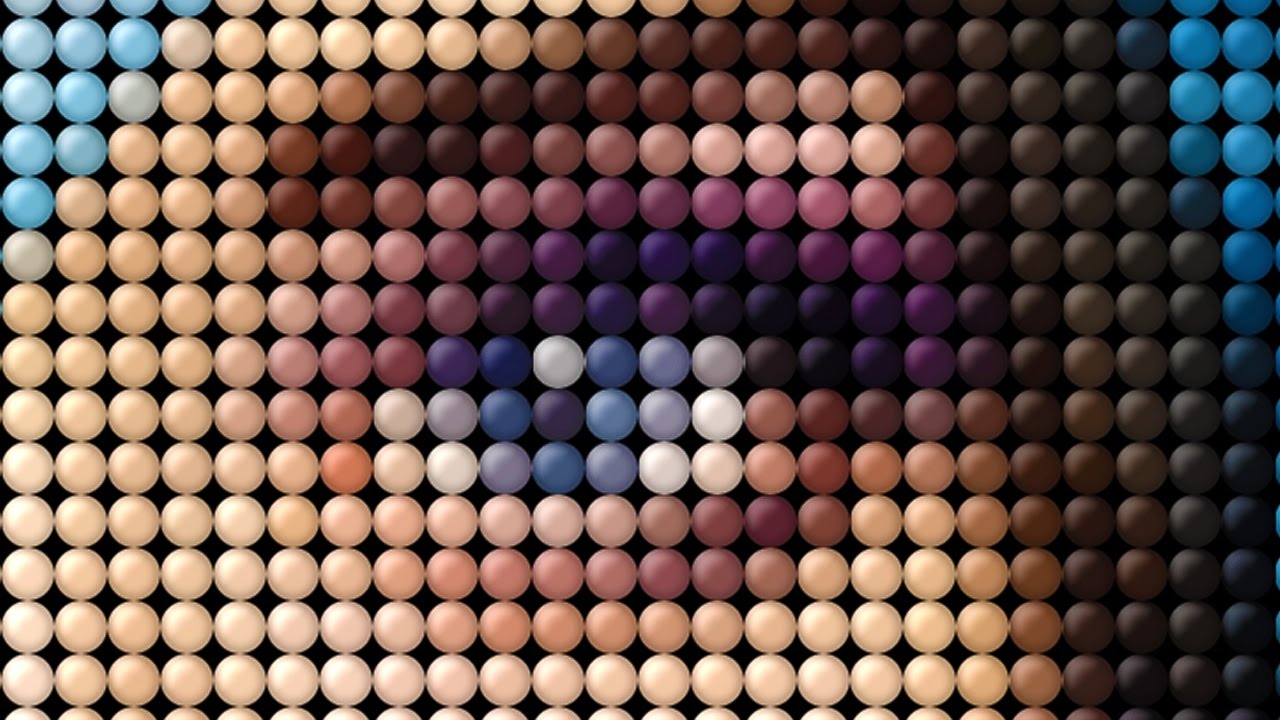
Photoshop CC 2015.5 tutorial showing how to create a futuristic, dot mosaic portrait from a photo and how you can quickly replace it with another photo without having to redo all the effects.
➤ Get 15% off BORIS FX OPTICS! - The BEST special effects plug-in for PHOTOS in Photoshop! Go to https://bit.ly/3aDnh4A and use my special code: bltv202...
Sounds like the "edit with" option converts the file to tiff
Yes maybe, same issue if I try to edit with Lightroom. Is there a workaround if I want to open a photo from the photos app?
I think you are right about the edit command. If I export the original from the Photos app to another folder and open it from there it works as expected. An "open with" command is missing in the Photos app.
they are already installed on my system but they don't appear in my adobe app!
I've installed the bold from internet!
Are they appearing in - say - microsoft word?
What are the font that you installed? Can you point me to the website?
They appeared once, and then disappeared after update!
no, the link to the font on the website (I'd be wary of fonts from Dafonts, they're no professional ones, and sometimes are badly designed)
The Bold Font | dafont.com
For example they still distribe type1 fonts that aren't recognised anymore
it says that I've already installed but they don't appear in the app

I see only one variation here. no italics available
so where should I download the fonts
This seems like the current version
https://the-bold-font.com/
also you have way here to contact the designer of the font, maybe ythey can help?
What is the file format of this font you downloaded? (I don't want to download it to find out)
okay, thank you, I'm going to download this one and let you know shortly!
Gave +1 Creative Carma to @vapid flume
I see it's a .ttf, it should be all good
I made a puppet in PS, and using it in Char Animator, and I was wondering if anyone knows how to resize the puppet in Char Animator. His legs are off the background, and I am not sure how to move him or resize him.
why is my 1 pixel grid not aligned with my pixels?

i just went into grids and set the size to 1 px
Maybe it's not a 1 pixel grid?...
Thank you!
Gave +1 Creative Carma to @serene coral
I'm trying to use inpaint with an AI plug-in but failing. Is this the place to ask?
it is i think

What plugin? You'd probably need to contact the plugin manufacturer for problems with their software.
It's the Abdullah Alfaraj Stable Diffusion AI for PS. It works but I'm not able to make changes within the selection, the entire bounding box makes changes. I'll have to do some searching I guess.
i need help im trying to recreate this but i dont even know where to start.

You'd need to contact them through their GitHub page. I don't think they are tracking issues on their Discord anymore.
i just accidentally hit a hokey to hide all ui. Which key was that?

Tap the Tab key
ty mate
This appears to be based on a screenshot of a Google Map in 3D view. I would start there. However, I'm not entirely sure people have the rights to use that imagery for commercial purposes as I think Google licenses that data from Maxar or another geospatial data provider.
I went to update my photoshot beta, however it keeps saying update failed and i can no longer access the app? Any ideas
i have both the picture and the plat, is there some way i can just get the plot lines?


Try removing it completely. Then restart the PC. Then go back to the Creative Cloud app and try reinstalling it.
You're going to need to transform it. You can try dropping the layer into doc with the aerial view. Then use: Edit > Transform > Distort to attempt to position it. You'll probably want to turn the opacity down on that layer so you can line it up.
this is where im at, i changed the perspective i just can't seem to line it up properly.

sounds like a good idea ill give it a try ty!
Similar to this...


yes like that but if you look closely its not perfectly lined up, and everytime i try to distort it and move it, it moves somewhere else too
its just a huge back and forth thing and i just cant seem to line it up
also are you using photoshop? or a different adobe app?
You'll probably have to scale it disproportionately. You'll just have to do the best you can. There no way to do it automatically.
I'm using Photoshop.
Ok thank you ill keep trying!
You can get it pretty close.

Here is my example PSD. You can use that/play around with it if you like. Notice that the lot lines are a Smart Object and that layer uses Advanced Blending for the opacity.

Thank You, ill play w it!
If you double-click on the Lotlines Smart Object, you should just be able to copy/paste your unredacted version of the image in there, save it, close it and continue editing the main document. (This is one of the many benefits of the Smart Object.)
Its the top layer in the Layers Panel.
Got it!
You might want to read up on it a bit. They're pretty important for modern workflows and for working effectively in Photoshop.
https://helpx.adobe.com/photoshop/using/create-smart-objects.html
Edit: nevermind, I figured it out. Hi! How would I go about backing up all of my photos from the creative cloud on lightroom to my external hard drive and still have them viewable? Do I need to download all 46,000 of my photos or is there another way then manually doing it?
is there a way for me to make these lines thicker, like ai or something that can basically re-draw the lines?

No. You would have to redraw them yourself. I would probably do this with vector shapes.
Is there a way to make the move tool not make pixels look kinda bilinear but stay hearest neigbor?
already turned this on

but when i move my pixel art it turns from this

to thus

ayo
is that a eggplant w veins or am i trippin?
anyone knows why my images suddenly become lower quality after closing and opening the file
it does am im scared
had a stroke readin this

anything else i could do to improve?

Is it possible to fuse to pictures with the same background?
They have sligltly differenr thi gs going on but background is the same

On what format are you saving?
Are you moving things in single pixel increments? Maybe setup a single pixel grid and snap to grid? Am on my phone, do not remember if there is a snap to pixels
No, its lies an deciet
There is in illustrator so i assume its a thing in ps, ill give that a shot
Ty
psd
well like look i got this text and i want to fill the outlines with like some cool effect or something

I think that’s more a adobe illustrator thing
ok
But I’m sure you can do something like it here
Yeah, it's likely because your pixels aren't 'solid'
many are 50/60/70 % opacity
I used the blend tool for a lot of it so i might need to take care of that
Wdym get it?
Did you make the image yourself?
I did
looks nice.
Dont question my reasoning lol
very colourful :
yeah cool. - So how many pixels is the original image?
The canvas is 64x64
Perfect.
Not sure how big the bananaplant is
Would you please mind sharing the image here? - the PSD?
We can try making it SOLID first, (no partial opacity) and then increasing the size.
Sure gimme a min
hello guys, do you have any ideas using what tools can I recreate such surface fire? i wanna make another object "enveloped" with flames idk if i express my thoughts correct, but here's a reference picture


What did you change=
👆

ummm good question.
i literally have no ideas how to recreate this, so i will be glad to hear your opinions
Have you tried googling it?

🔥Learn Creative Photo Manipulation with Abbey’s Full Course ► https://photomanipulation.com/photoshop-surrealism-yt-des
In this video Digital Surrealist Abbey Esparza will show you how to create an abstract ‘burned’ portrait effect in Photoshop, using photo-stocks, Adjustment Layers, Blend functions, and a few extra sneaky tricks!
► Get the st...
of course i had tried googling before I asked for help here, but for now I haven't found anything that looks like what I want to make
I imagine a lot of it is just finding a good reference image in the first place I guess.
these references that I've sent are the exact same thing I wanna do
but with another object
I see what you did there with removing the transparent pixels thats very neat. How come you upscaled the image and then added the grid? doesnt that mean i cant really edit the pixle art with the pencil tool?

Caught Fire – Download this photo by Mafujur Rahman on Unsplash
do you have any ideas how can I make this blue basis of fire?
It was just to show that it was a 'perfect' one, since much pixel art isn't literally 1:1 scale. Otherwise it's too small!
fair, gotcha
transition from blue to orange, like on the pics above. to make fire more realistic
and by the way, thanks for this image, it fits perfectly for the main part of the fire
Is this cheating too much?
how come, that when instead of using crtl + j in just copy and paste the layer, the third one is offset by on px?
(just in case you want to change the flame colour)
Sorry not sure. - That's probably why Cntrl+J is a better option.
seems a decent way to do that, now i need to figure out how to make blue edging
makes sense
what do you use to make those quick screen recordings? just obs?
Try this
ShareX
combined with 'KeyVis' for the keyboard strokes
is that just a hotkey to record and quick send or smth?
and to add some depth to fire, i have to find more dense picture of it? or i can make it look more dense using ps tools

no. I need to open the software and manually set it to record.
It then saves to a location and I drag the file to discord to share it
why do you use it over obs then?
because its lot more easy to use than obs
yea ig thats fair
sharex is a very powerful app tbh, i love it
Make it more dense by duplicating it a few more times perhaps.... Cntrl+J
but once you have everything set up in obs...
its still a massive pain
oh yea one more question... why when i set up a grid like this on the 64x64 canvas...

do i get this

its just not aligned for some reason
and the pixels are smaller in the grid
which does not add up to me
tf what
whats that goofy ah non deterministic feature
im so confused
what is curious too is, that if i rescale the object i get this perfect smaller pixel art in the preview and as soon is i confirm it goes to being blurry


good it shouldnt be veiny 💀
Any way to make it just keep the preview and not interpolate the pixels wierdly?
i mean the preview also isnt veiny (:
(sorry, back)
If it's going blurry you have the wrong interpolation settings
switch to nearest neighbour.
I cannot believe it said interpolations setting right there
I was looking thru setting and stuff
Which interpolation setting does it use for the preview? seems to still be different to the final image
Strange, there should be no compression. Maybe you were seeing the doc at an uneven percentage, and Ps reopens the file at 100% if possible, therefore you do see the real image.
I don't think you can. - The render it's making mid-resize is just a preview. @ripe quest or @serene coral are welcome to correct me though! - Sorry]
It's sorted.
They were shrinking/expanding pixel art without the correct interpolation settings.
Its so interesting to see how the backend works in these sorta programs. Really strange that they use an "inaccessible" algorithm for the preview
We could ask the source directly... 😁
Hey @spark snow, what interpolation method is used while transforming in the transform mode before it is applied?
@deep geyser 👆
I assume pete is the god of photoshop, creator of every photo?
But fr im really curious now
what do you mean with uneven percentage? like the size?
Hi I'm getting a 205 error and I have no idea how to fix it?
They're the Photoshop Product Manager, been with Adobe for close to 20 years.
Oh, my bad i meant about the interpolation mode, read their bio alr
Can someone help me photoshop something i dont think it will take long
yo who can help me out with something?
i want to make the effect of the bills going thru the watch

but i tried multiple methods that i use most of the times and more but i can add highlights after like shadows
I was wondering how I would go about doing this:
I have a bunch of text from a book im reading, to fit the entire (white) canvas. I will add the text in, and get an image. Then, I will make it so that the image is only visible through the individual characters rather than having the whole image visible with text over it, to create an effect where its as if the text is creating the image
does anyone have any ideas?
like this type of shadow

hey everyone how do i move a shape that i've created a clipping mask for?
everytime i create a clipping mask for a basic shape, im unable to move the shape until i merge the layers

my bad im sorry i didnt know that was fraud
hello, I'm french student at my third year at uni in Paris, i study math and economics
can someone please help me creat a cool powerpoint slides for a group presentation of 4students
it's for microeconomics game theory and my topic is "battle of sexes"
i asked dall-E for introduction slide , but the spelling is terrible

1-Introduction Slide
Depicting an overview of the "Battle of the Sexes" game theory concept with vintage-styled graphics (inspired of revolutionary road film adaptation of richard yates novel).
2-Nash Equilibrium Slide
Illustrating the concept of Nash Equilibrium in the context of the "Battle of the Sexes" with appropriate diagrams and vintage design elements.
3-Application Slide
Showcasing scenarios where the "Battle of the Sexes" game theory can be applied in real-world situations.
4-Open Question Slide
Presenting a thought-provoking question to the audience, engaging them with the topic in a retro design framework.
5-Conclusion Slide
Summarizing the key points of the presentation, with a retro graphic summarizing the "Battle of the Sexes" theme.
anyone care to help please , i want to impress my professor and the other students, it's kinda of a competition of who'll get the best grade , and this semester is crucial for my master applications

Whenver I click the adjustments, it hides my 1 layer and says no layers match the filter
I'm trying to use the curves tool but cant because of htis, anyone have any ideas?
Hi, this is a filter, to show or hide layers. To add an adjustment, click the button at the bottom of the layers panel.
how can i fix not being able to transform the layer with control T? its just showing a purple outline now
keep getting this every time i try to open a newly created smart object and unsure why, i can open older ones in older projects but any new ones i make i can't open

I've been getting a similar issue too. Except my photoshop won't open any file or image.

If I go to preferences and disable my GPU it goes away
I have a 4080 Nvidia GPU.
Still trying to figure out a solution.
Switching to a previous studio driver for the GPU worked for a day or so, but now I'm getting the same issue again.
Which version of Ps? Did you try the beta as well, or to roll back Ps?
Hi, a regular layer? Which version of Ps? Are they smart guides? Layer unlocked?
Did you try to start without plugins? (Hold shift as you start)
Fresh preferences, when you tried 24.7.2? (Prefer the manual method: https://helpx.adobe.com/photoshop/using/preferences.html )
Hi! Click on the mask itself, not the fill.
Thank you! Emptying the appdata Photoshop preferences manually seemed to do the trick.
Gave +1 Creative Carma to @hushed niche
I wonder what it was - Will see if it comes up again.
I'm on a relatively new system and didn't have any plugins installed and didn't change many default settings in preferences.
It started off with black boxes appearing in places on the workspace - and then got progressively worse until any image file wouldn't open upon launching PS.
The computer has a pretty good hardware.  Thanks again.
Yes, a pretty good GPU. Sometimes Ps does not close properly, corrupting prefs. The plugins thing was for troubleshooting. What is strange is both versions had issues. Prefs are per version.
Hello (ou Salut!)
Do you specifically a power point slideshow or can it be done in another software?
Because we predomidently deal with Photoshop here 🙂 I would have no idea how to use power-point to be honest 🙂
You can do very simple slide shows, either with Photoshop, or if you're a beginner I would suggest using Adobe express, you got slide show templates in there and it makes the whole experience really pain free
Also in addition to what @hushed niche said. Check your layer filter system

you are now in a layer sorting mode (the system info to know what to display, but you chose adjustment layer in the kind field (the adjustment layer icon is pressed)
Just slide down the layer filter toggle and you'll be good
when no icon is pressed
so either be sure you deselect the adjustment layer icon, or you toggle the layer filter off
Show us a screenshot or it didn't happen 🙂
Joke apart, a screenshot speaks a thousand words (and then some)
The clipped layer needs to move together with the layer it's clipping, if you separate them in the stack, they're no longer clipping. It's even best you group them if you run into that issue often (you can clip to a layer or a group by the way)
That's easy enough you'll need to mask the back of the watch.
if i install photoshop beta from cc app, will it replace stable ps or just be as separate installation?
This would be your logic/workflow
It will be a separate installation. In fact, nothing will ever be uninstalled if you don't choose uninstall, specifically. However, if you choose "update", the updated version will replace the current one.

I'm pretty sure you can even install multiple stable versions of the same software, although I've never done it
Hi, if you update to 25.2 it is now possible to hide the filters in the panel (Hamburger) menu.
salut , thank you for responding :), is there a cool powerpoint software i could use that would answer my needs? i only need 5 slides themed in that style
Gave +1 Creative Carma to @vapid flume
I don't think Microsoft has jumped the Discord bandwagon yet, but there is probably either a reddit for that somewhere (I am not really acquainted with reddit to be honest)
The thing is it depends if you are asking for "design" inspiration, or for "technical inspiration"
Design inspiration can be found irrespective of the software used, while technical is really down to the software used.
like i used dall-e to generate the introduction slide , but the spelling is terrible :/
i'm looking for smth with style
i took off the misepelled words, but that's far as it gets with my photoshop skills

you can try Adobe Express for that. There are tons of Templates or you make your own or you use Text-to-Image AI to generate your Images as you like.
I agree with @grand stump with using Adobe express for that.
1- you'll have generative AI within Adobe Express directly. If you need to prompt to generate images, you can do it directly there. Gen AI with Adobe Express only uses copyright free base images to generate new images. That's important...
2- You can remove some elements in a very simple way, and perform basic retouching tasks
3- You get templates to start from, which makes the work to actually create a layout way simpler. You start from something tried and tested, and then you can tweak individual elements to suit your needs.
If you have Photoshop, use your Adobe Credencial to log in to the web app
https://new.express.adobe.com/
This is the discord server for Adobe Express
https://discord.gg/adobeexpress
Adobe Express
thank you so much both of you. Merci !
i'm just trying to impress the professor 😉
is there a way i get it for free , it's expensive , and i' don't come .....from let's say wealthy background
It's free, and since you already have photoshop, it's included in your subscription. Also your school should entitle you to a free account if they happen to have a CC team subscription (which most French schools have)
To know, you need to contact your school administration

But I see you've joined the Adobe Express discord, you will get some useful info there
i don't have photoshop
ok thanks , i'll see to it
are you french?
OK, I thought you had it since you posted on the Photoshop discord server 🙂
You also said you retouched the text
Yes I am French, but I live in the UK now
with online free software
cool ! 🙂
Oh OK 🙂
bonne journée Sandrine
A toi aussi!
i tried using layer mask multiple times
but i would always do smth wrong and i cant do that shadows
Hello! Is there a way to copy the text effects in 1st image (for example the one i encircled in red) to the text in 2nd image?


its some king of texture and a clipping mask created and the texture having a different blending mode
like lemme show u

something like this?

need help, i'm trying to pay for my photoshop plan but it tells me that my card, city and postal code is invalid (it's 100% valid)
nah bro it doesnt work
i tried and it literally doesnt work
yes, something like this
No one here can help with that. Ask in the main community.
https://community.adobe.com/t5/account-payment-plan/ct-p/ct-account-payment-and-plan
Are you saying that the thing I proved work in a literal video...doesn't work?
how do i place the one on the right over the left one without losing the distort effect


in my case idk or im too dumb and i did something wrong...
like copy the position its in and place the new one down
hasn't this already been answered by @ripe quest ?
what?
oh yeah he helped me get it in position, now i need help to see if i can copy the new photo on the right to the same postion without having to distort it all over again
do you understand what im trying to say? its just a tad confusing lol
Just out but can help later
If its the same dimensions, you should be able to dbl-click on the Smart Object to open it. Copy/paste or drag in the new lot lines image and position so that it matches the previous one. Then save and close it and go back to the main doc. However, there is no guarantee that these are going to exactly line up. You might have to re-adjust it.
If you scroll up to yesterday, you can see the example PSD I posted for this. Have at it, if you like. I'm heading into a meeting. #❓ask-a-question message
How do I select modify? It's Grey's out for some reason and I'm trying to get rid of the white outline around my horn

You can see the outline better here

guys i selected this part with a pen tool, how do i select it now?

so that i can mask it
Hii
It’s not a giftcard right?
navigate to Window > Workspace > Essentials (Default) to reset your Adobe Photoshop workspace back to the default
Ops sorry I deleted it,
Tysm 🥰♥️✨
I've been using photoshop for 8 years and I've never had this happen. I'm making a logo for someone and for some reason it's changed size and ppi but when I hover over it, the data changes back to what I had it set as?

What?
how can i get this ripped effect on ps? tyy

Why does to hood have a zipper 💀😭
hey guys, is there a way to let the colours be better visible for example the 2 left lines on the DC are poorly visible

i know i use gimp but still
what was the shortcut key to unselecting while cutting out something
Ctrl D to de-select but I'm not sure what you mean exactly.
bro i only want to change some thing on this one specific photo there are surely people here who know a bit about gimp
You'll have to ask in the Gimp server or consult the documentation for it.
where can i find this
I don't know. Search the Discord channels. There is bound to be one.
wow xD
The people who help out here and answer questions use Photoshop. Not Gimp. Sorry.
no problem
I assume that a smart object must be used somewhere and it's confusing something, or someone
Modify there means modify the selection. You don't have any pixels selected.
I mean if u wanna help me out cuz im tired
I gottchu!
I made a video showing each step.
yeah but idk i just cant do it
even following the steps
somethings aint adding up
No way that’s actually crazy thanks bro