#❓ask-a-question
1 messages · Page 8 of 1
well if you embed the video the users never download the whole thing at once anyway, they stream it in chunks so the video size never really matters for them
it's images that users have to download all of before they can see everything
I'm talking about a website background here, not a video playing on a site
or maybe you knew that
want the entire web page to be filled with this video
looping
I'm not entirely sure but I think you can use videos for that purpose, just hiding the controls and looping it automatically but I've never done something like that before
pop up on a programming discord and you'll have a hundred nerds answering every question you could ever have at the speed of light
I feel annoying asking about this again, but the only problem I have with this solution is that it hides any other windows I have open, which I'd like to avoid, is there a way for it to both be "fullscreen" but also keep the other floating windows visible?
I guess it seems antithetical to fullscreen, but I figured I'd ask anyway
Can you screenshot your current layout?

as you can imagine pressing f will hide my reference image, but maintains the position of the document when I open/close dockers
I've tried that, don't seem to be very many good servers on that surprisingly 😅 especially if you're impatient
try the C# discord, I've had a lot of luck there myself
I see. One of the solutions I can think of would probably be undocking your main document panel
Your brushes are together with your layers panel. Can you screenshot it when it's wrong?
wow, what an interesting solution, this might be perfect actually
not sure what you mean but it just moves the document to the center of the resized window when I open a docker, so the before and after looks something like this (I haven't moved the document at all, only opened the layer docker)


Haha I see now, it gets centered... In this case, a not-docked-view workflow might be for you. That's how things were back in the old days haha
y0 can someone explain to me how i can add a image to a waved line like i this picture https://i.imgur.com/UKjTqBn.png
i guess with the path tool right?
A friend of mine sent me this and wants to cut out the emote to include it in their discord server, what would be the workflow for that? I think 128x128 pixel is the resolution discord takes emotes, but if I put the photoshop project through the image to it the source image gets scaled down into that as well, even after I cut out the emote already with the quick selection tool.
How to prevent the downscaling and how to get this Emote in max quality in proper resolution?

there are "addons" to discord that let you copy emotes from servers to your server
since you're screenshotting, the image is rasterized and therefore downscaling is completely unavoidable
that's just how graphics fundamentally work. Your only solution is to hire an artist or find the original image in its native resolution
In this case the image you're adding isn't going to be wavy itself. It's just a matter of good positioning and using layer masks to hide unwanted parts or using the brush tool to add them
This is what I could do, this is the maximum I can get, right ? 128x128 pixel


Thank you very much!
np
How did you do this ?

Is it possible to edit videos in photoshop
While it is possible, I would recommend using a video editing software to do this
do you know of any good video editing softwares for free?
DaVinci Resolve
thank you!
Search the world's information, including webpages, images, videos and more. Google has many special features to help you find exactly what you're looking for.
Bigger one here if you want/need it

James can you help me in dm? kinda personal and don't want to post here.
@sly hawk
Yeah. - but not right now. gimmie 30 mins
thanks
Gave +1 Creative Carma to @sly hawk
Hi I wanted to ask a question here , I dont know if the last one is resolved
Hi everybody! After denoising my picture my brick wall appears too smooth and lacks the realistic, weathered, and aged look I want. Is there a recommended overlay texture/brush that i could use to add details like cracks, weathering, and an overall older appearance to make it more authentic?

Does Anyone know how to Distort and Image
I have this masked out sign of a Cinemark Sign and I wanted to distort it so that it presented to be on top of this building seamlessly
Here is a image of my screen, layer, and Where I want each thing to go
I can also supply a PSD if needed

I want the perspective and left sign to be on top of this building on the right
what option bar?
what is the best way to identify a font?
Why does it keep saying cannot make new layer because selected area is empty? I made a selection using pen tool then used the rect tool to make a layer via copy but it keep showing that message
can anyone help me?
Right inside Photoshop... Main menu: Type > Match Font and Ps will try to suggest fonts that are similar. There is also the Adobe Fonts website: https://fonts.adobe.com/ (and also, third-party sites like What The Font)
Adobe Fonts
Adobe Fonts partners with the world’s leading type foundries to bring thousands of beautiful fonts to designers every day. No need to worry about licensing, and you can use fonts from Adobe Fonts on the web or in desktop applications.
I don't understand what this means. Sorry. You drew paths/shapes with the Pen Tool? Are you saying that you made a selection from the path?
didn't work can you help me this?

Sorry. I don't know what font that is. Maybe try What the Font: https://www.myfonts.com/pages/whatthefont
Identify any font with our font finder tool. Upload an image, and we’ll search our collection of over 133,000 fonts for the best match.
got it! thank you! have another question how dose 3d work on photo shop. also how do you get bubble text on photoshop?
Gave +1 Creative Carma to @ripe quest
Unfortunately, I can't explain all of 3D features. You should consult the documentation for that: https://helpx.adobe.com/photoshop/using/essential-3d-concepts-tools-photoshop.html
I don't know what "bubble text" means. Sorry.
is there any videos on it?
HOW DO YOU GET THIS TYPE OF BUBBLE TEXT?

Probably. Try searching YouTube for "Photoshop 3D"
I don't know.
got it! thank you for your help.
That would probably work in Adobe Firefly or searching for a Font.
what is adobe firefly.
Have a look at firefly.adobe.com
my brush is coming out in solo circles instead of a smooth line
how do i fix it

nvm i got it
Just putting this back up here to see if anyone got anything
This right here. It is frustrating. It always happen after I make like 3 layers

Sorry but this doesn't tell me much about what caused it. Please show the Photoshop GUI with the Layers Panel open.

So you're trying to copy that portion of the hair to a new layer?
Yes? Im following a tutorial about how to animate hair
i need to create multiple selections and create layers via copy but I always come across this
So click on the Background layer in the Layers Panel to activate it (the layer with the image of the woman) and then do Ctrl J to copy and duplicate those pixels to a new layer.
Ctrl J will jump a copy of the selected area to a new layer.
ahh right that works. Thanks For some reasons that isn't an issue when clicking on certain layers. Im assuming it's beecause the selection was outside of the domain of whatever layer I was on
You were trying to copy a portion of a layer that was completely empty. There was nothing to copy and thus you were getting that error.
Make sure you are working on the correct layer when you're trying to copy something. Its an easy mistake to make.
do anyone know how to use the 3d feature on photoshop?
can not move my text in 3d.

will not let me move my text up side down side ways. won't let me change anything. do anyone know how to resolve this?
How do I crop this transformation box to match the exact dimensions of the entire image? The two images shown are separate, but I have them both selected.

With both layers selected you're transforming all of them together. What is your goal?
3d features are currently being removed from Ps
Trying to add a vignette to the entire screen but since uneven portions of the images are outside of the boundaries, the vignette is also outside of the boundaries
Make a new layer, fill it with white and make it a smart object. Apply vignette from camera raw to the layer and set the blending mode to multiply
Or just use a gradient fill layer
Thank you! Still figuring out the basics, so sorry if it was an easy question
Gave +1 Creative Carma to @serene coral
Hey guys,
the lower image is my ps preview and the other the export window
As you can see, the gradient just doesnt show up
why? and how do i fix it?

well i still dont know why
but i saved a copy as png and it worked
if you have a fix for the export please tell anyways
would be great to see the whole ui and layers. can you send the psd here?
@serene coral
sure
hi i was wondering how to make the copy css available? i`ve tried creating new text/ shapes and it still doesn:t work

https://helpx.adobe.com/photoshop/using/copy-css-shape-or-text.html
It will work with text, shape and regular layers but it is generally unused feature
yeah i was trying to use it on shapes, text but does not worked
if you're trying to select more that one layer, group them and right click the group
no i was trying to select only one layer, what i meant i tried on so many different things and it still does not work
i thought maybe there is some sort of settings i turned off?
can you screenshot more than just the menu?
this?

Hi, Good morning ive was wondering trying how to get this aesthetic on the first three images on the tree background but i dont have an idea on how to do it, does anyone have an idea


What do you mean exactly by aesthetic? Because for me they feel vastly different.
You want the last image (brown grass) to look bright and vibrant?
except for the grass 🙂
i mean mostly the third one i want to feel warm and have the same time of colours
yeah the last image too look vintage and indie like the third one
third, being "Terrenoire"?
yes
The 3rd one is slightly lower in contrast with a yellow/magenta tint
oh ok, let me try that
do you can try that for a start
lol. SHOUTING! @vapid flume
CAPS LOCK!
yeah let me me try that
I would do either with a curve adjustment layer, or you can do with level, or exposure, and a hue/sat adjustment layer for the tint
I tried a gen-fill, "lucious green grass" and it kind of went a little overboard and changed the entire landscape!

There is a neural filter to change the "season" of landscape photos as well
If that's what you wanted to do, but I gather you were more concerned about the colour and lighting of the whole scene?
yeah a little bit like this
So landscape mixer in the neural filters can change the exact landscape from "winter" to "summer" and then you can do your grading after the filter results are in

I think you’ve all gone a bit Laa Laa 😉
Yeah. Probably.
Question for LR but i'm guessing PS has the same feature
a couple weeks ago i accidentally figured out how to compare the original + edit side by side. I can't remember what the bind was tho.. There were a few different 'modes' if i remember correctly
i've tried everything on my keyboard, i'm 99% sure it was a keybind
LR 2024 btw


omg i feel so dumb lool tysm
I'm pretty sure it's Y by default
nope that brought up activity for me
i haven't changed any binds, don't even know how to
are you in the develop view?
i dunno how to get to that haha
mate of mine said it's in development but i thought he meant the feature is a work in progress
🤦🏻♂️
press D or select it in the top right corner
D didn't do anything for me
are we talking LR or LRC?
i couldn't stand classic haha
How can i do this effect in ps?

bluring the text a bit
Put the text tight togetether and then add some outer glow like this


Not perfect, bu in that direction
possibly normal blur will help too
Ohh okayy, thanks a lot!
Gave +1 Creative Carma to @pine berry
is there a way to add colored shapes to images on photoshop?
With the custom shape tool sure
Key U
Maybe somehow i can round the edges?
The rectangle tool can round edges
where is that
Press the U key
oh mb thankyou

Use a font with round edges
gaussian blur + threshold
Thanks a lot!! Ill try it as soon as im home, yall are really helpful♥️
since when did delete on a selection activate content fill? can't find how to fix that anywhere in the shortcuts menu
they really gotta add a search bar for shortcuts. Biggest thing I miss from krita and no excuse why it shouldn't exist in photoshop
yeah, I can remember it being like this years ago... are you on mac or pc?

pc. I ended up just setting the content fill to "white", and after a couple minutes it just...stopped activating content fill with delete and went back to normal?
I don't understand photoshop lmao
Hi again
been a while
question: How do I selete the images at the top left

the logo
You could do this with a crop then color range selection and then levels but unless you have a higher resolution starting image it will be a bit rough

"Selete"? Is that some combination of "select and delete"? :)
Someone help me, the blending modes in my photoshop are not all available and I don't know what to do to fix this 😭

Those are Blend Modes for the Brush Tool. Is your document in Indexed Color? You'd need to work in RGB. Image > Mode > RGB...
@shy pilot - I'm glad you got it figured out. :)
I need help and am very frustrated. I am making a simple christmas card for mass print. Saving it as a pdf and one part of an M will not come out in color. I have googled it and tried everything. I have even painted over it in another layer and it is still not showing in acrobat.


I had to draw on the pdf in acrobat to make it work
That's a strange issue. If that is a font, perhaps make a copy of that Text Layer and rasterize it. Then export. See if that works.
How do I make like a text warped like this

You can try selecting the Layer, converting to Smart Object and then using Edit > Transform > Warp...
Why does photoshop mix red and blue into black shades of them?
How do I make it stop?

There is a slight feathering on the Brush tool and those pixels at the edge are semi-transparent. If you don't want that, you could try using the Pencil Tool...

brush has mode: normal, layer has mode:normal
it's also consistent between documents

but I do want that, it just shouldn't turn so dark
Well, it will be a the combination of the two colors...
Where the transparent edge shows through to the color below. The result is a mixture of those two colors.
I thought combinations are not changing how dark it is
my bad
Thanks for explaining
I thought I had some weird blending mode on
It will also appear to be more pronounced when you're zoomed way in on it. Viewing at 100% zoom, it is only slightly noticeable.

is there a way to change blending mode but only for how transparency is treated?
Hey guys can someone whos like really really really experienced help me for a sec?
its the same thing i had discussed with wertos this morning but i really need a fix for that.
as this is now not only a export problem but also occurs when importing the file into ae
help me pls 
Hi! Can someone help me with a color palette for a layout. I'm trying to replace the purple(s) with a tan/brown to match the header image I want to use. I have attached the current theme & its colors hex codes and the header I want to use. (the main background will match the header)


guys im literally going crazy right now
isnt it horizontal already?
i think u mean diagonal


oh well thats embarrsing i ment vertical
np xD
so how do i do that


thanks
Gave +1 Creative Carma to @main forge
np
Hi! Is that kind of style possible to make in photoshop ? I want to make similar things.

possible? yes
how? idk
So probably is made in photoshop ? Am I right ? If someone know how this type of art s called you can tell me 🥲
this looks like an acrylic painting but i dont know what this kind of style is called
was not made in ps
Its oil paint on canvas. You can certainly use PS brushes to give the paint effect and you can use textures to get the canvas look. Its less easy to get the paint build up effect.
See https://www.photoshopessentials.com/photo-effects/oil-paint-filter/

Learn how to easily turn photos to painted works of art with the amazing Oil Paint filter in Photoshop. Check it out in our complete tutorial at Photoshop Essentials.
why would it only be oil? Could also be acrylic
The filter in Photoshop is called Oil Filter, the effect could be called acrylic as well, they just decided to call it oil 🙂
The thick paint effect (in the green) is called "inpasto" ...it's not a style, it's a painting technique. It's difficult to identify a style from a close up, the whole image would be better.
The canvas is very visible, so unless the artist really went for maximum realism in Photoshop, I would still err on the side of a canvas painting. That bristle dual colour in the aqua colour, while being possible in PS, suggest it as well...
@vapid flume would you mind to have a look at my problem?
.
If I know the answer. Can you point me to the original message?
@vapid flume
Yes sorry, I saw it. I tried to look, and I don't know the answer...
Otherwise I would have answered!
hey guys, do someone has a envato elements account, wanna get help for finding images
It honestly looks like a bug to me, at first sight
the gradient gets changed in export or import in after effects whenever it is masked
i think so too but it also occurs on new files with diffrent dpi
Not me... I can give you the link to the free section of Adobe stock if you want
no, i mean for having help to find images, like keywords
but i appreciate that
you're the most helpful person with dhumann on this server you got deserve a medal fr
In that case, and if you're more or less sure it's a bug, then that's ground for a bug report so the devs can have a look at it. I means they are the ones who can correct it
Does it happen also if you tried to revert back one version?
(i'm looking for pictures from a special angle, perspective) and i struggle to find what i search
when i see people doing photo manipulation i'm jealous of them finding so much images fitting perfectly with their editing
could you maybe start a new file in your photoshop and give it to me to import into ae? i wanna know if its system based
just a gradient masked by a box like this

yea i was gonna go and report it but forgot xD
also happens in beta
OK, it's a pet peeve of mine too 🙂 (People who submit assets to stocks website, bloody put the angle of view in the KEYWORDS!)
But I digress 🙂
Can you show the kind of angle you need and I'll try to come up with keywords. Also, on most stock websites you can upload a photo to match, sometimes that helps for the angle
didnt try with a lower ver
As I said, I honestly don't know
You can report the bug either in the app (the help section) or directly on the community forum
That's where the devs, sometimes, hang out
https://community.adobe.com/t5/photoshop-ecosystem/ct-p/ct-photoshop?page=1&sort=latest_replies&lang=all&tabid=all
https://community.adobe.com
Master Photoshop with the help of our global community.
Will do
Don't forget the tag with "bugs" and be prepared to share your photoshop version and computer specs (they will ask for it)

i kinda want like a top pov
i know the words in my native language but suck at english for finding them
things to know is "styles"
For example objects on a table where the camera looks top down@ Lay Flat
Same with landscape (think drone image): Birds-eye
view from the floor: worm view
etc
What is your native language?
OK, what is your word in French?
like underwater?
but the literal translate is "dive view"
try top down then


left side gonna be the first plan with someone standing up
So top down view for me
but you see on this picture it's too much top down
Yes but you will not find the exact thing!
and with a desert theme too

plongee litterally means that the camera is higher than the subject
i think in my case you talk with degres lol
Yes, but I doubt anybody puts degrees in their keywords
hi guys
ahah fr

I need to go anyway. I came to answer to a DM and I got caught up in the answers 🙂
lesgo
Excellent!
https://www.openhousepictures.co.uk/8-types-of-camera-angles-and-how-to-use-them-in-your-photography

Discover the importance of camera angles, the different types of camera angles, and how to use them in your photography to tell a story. Find out more today.
in case that helps in the future
sandrine drop a masterclass before leaving
byee have a good evening ty for the link
Hey, how do I make a quick selection I have into a new layer?
Cmd J / Ctrl J will copy the selected pixels to a new layer
alright, I've messed this up. Is there any way I can do it for everything that is NOT selected?
You could invert the selection and then do Ctrl J
Select > Inverse (Shift Ctrl i)
How do I invert the selection?
Ill give it a shot, thanks
How important is a dedicated gpu for photoshop? I'm building a system for a hobbyist and I was under the impression it was more cpu/ram heavy, but someone earlier told me it does infact include a dedicated gpu in the minimum requirements.
I was hopeful the i5-13500 (14 cores) and 32gb of ddr5 6000mhz CL30 would have done the job, but I guess I may need to rearrange the build to incorporate a gpu afterall :/?
i did that lol ty @vapid flume

Gave +1 Creative Carma to @vapid flume
More and more, software apps are offloading tasks to the GPU. Not just Photoshop but many titles will utilize those resources. It would be advisable to have a dedicated GPU in the PC going forward. I think you'll be glad later that you have it.
Well... it'll mean I have to get a way worse monitor or cpu
So... its kinda hard to balance all this in a $1000 budget
I wanted the asus proart monitor but I guess I have to sacrifice and get some random gaming monitor with decent color coverage :x
I mean, integrated gpus are good nowdays too.
Many people with laptops use igpu that shares ram, and have no problems with it.
I don't think it is a big deal for image works, for videos it is another story.
I have ideapad flex 5 and it is igpu. Works almost same as my desktop with nvidia card.
I really did not noticed difference, and I know to do heavy projects too.
But if you want a good GPU for that prize, I would half a ram. 16GB RAM.
Older i7.
For that money you can built monster PC.
I wanted to buy Deco Mini7, is it any good and do I really need it for simple designs?
I barelly create art, I am in doubt to buy it for my art hobby, I think it won't benefit me much with flat designs, bit art and drawings.
im trying to transfer the color from one image to another, and this gives great results by using an Indexed color table from the colored image onto another image, but its there any way to do this with more than 256 colors?


Match Color gives severly muted results.
(reason being is that the first parchment is not made to be tileable, while the others are.)
Can someone remove the 2 watermarks off

I was wonder how can i make my photo light skinned tone
Hi, can anyone guide me on how to add Bokeh on Photoshop 2024?

How Good or Bad is the New "Lens Blur" Feature in Photoshop and Lightroom? In this video, we dive deep into the biggest limitations of this feature and also learn techniques to overcome them. We will test Camera Raw's Lens Blur with several examples, including simple and busy backgrounds, and learn more about the additional features like Bokeh, ...
I wants to add hue at a specific layer... How to do that??
Add it as an adjustment layer and link it to that specific layer
How to link?


Thanks bro
Gave +1 Creative Carma to @strange hull
@strange hull ur insane thx
Gave +1 Creative Carma to @strange hull
Many thanks, well have a look so do!
Gave +1 Creative Carma to @grand stump
How to crop an image in photoshop? ( When I crop it, It crops the whole canvas)
How do I save a photoshop project as an image when ive finished it?
Click file and export
oh ok thankyou
How to remove filter from any image? like Gaussian blur from the image...
You can't unless,
1- you can go back in the hitory to revert to an earlier state of the file (that means not having saved and closed the file between those two states)
2- If you applied the filter on a smart layer, you can remove it as it appears at the bottom of the layer. Just select the filter and hit delete
If you show us your file opened in Photoshop with all the panels visible, then it will be easier to say what is your case
I added blur on an image and copy pasted it... now I wanna remove the blur from the 2nd image

Well , all you need to do is remove it from the first and copy paste again. If you copy paste instead of properly place a .psd file, then you don't have access to what's inside this file anymore
see two cross
I wanna remove blur from one cross

damnn
Well, you gotta use smart layers! 🙂
Making them smart layers are a good p[ractice?
I installed today idk
choose file>place, instead of copy and paste when you want to add a new image as a layer
Well, let's be honest, it's quite a project to start on your first day 🙂
Thumbnail or big poster, the system is the same. You need a basic understanding of how the app works, otherwise it will be very frustrating!
Well, it's quite a complex software, unless you want to do simpler stuff, so expect a bit of a learning curve! (That's why there are Discord servers, otherwise we wouldn't need them! 🙂 )
frfr
Thanks bro
Gave +1 Creative Carma to @vapid flume

How to use smart objects, in a 2 Minutes Photoshop tutorial. Smart objects are realy helpful especially if you want to work non-destructively in a document. A layer can retain its original resolution by converting it into a smart object. Smart effects and filters can also be applied which let you change any values later in the edit.
📢 Unlimited...
how can i make two overlapping layers invert colours when they overlap with eachother?
You can use the blending mode "difference" (or try the ones below as well)

use it on the top layer, not both 🙂
What is the easiest and quickest way to remove reflections in glasses in photoshop
This is one way from Unmesh https://www.youtube.com/watch?v=plOsuoh0eFg&t=625s
Or if you have gen fill : https://www.youtube.com/shorts/r5UUiHuIoFw

3 Simple Steps to Remove Complex Glare from Glasses in Photoshop! Discover the best way to avoid and fix glare or reflections. Using advanced dodging and burning, in this tutorial, we will learn how to even out the brightness to make the glass completely transparent. Then, with the help of blending modes, we will remove any color cast and correc...

Amazing thank you!
HI, is there a way to add multiple text lines from a sheet as a text layer each one at once? Is there a function, a plugin or an extension for that?
Perhaps this can help?
https://youtu.be/6W9C61U5jgU?si=TfrPWYSio6Ejxu4e

Welcome to this complete tutorial on how to import and save variable data in Adobe Photoshop CC 2020. We start of with a blank document and a spreadsheet and end up with 20 different data sets which can be saved as .psd .jpeg and .pdf! Make sure to subscribe if it helped you!
(00:00) Start
(00:16) Set up Photoshop document
(01:25) Define the va...
Thanks, but it's not that. I don't wanna replace the text of one single layer, but add many of them at the same time.
Hey, could anyone please help me with this?
someone (not me) has tried brightening image 2608 and has gone a bit overboard.

I think the colour of the brown is ok, but the shadows have lost their depth/shade.
I tried image > adjusments > shadows but it ended up changing too much of the 'non-shadows' too

(I'm just heading out - back later!)
Hey everyone. It's not directly Photoshop, but Lightroom Classic related... I did retouch a wedding as usual, but when I export now, the files are 5 times bigger than they used to be even though the export settings are all the same?! Did I miss a change? @ me
Does this work for you using curves? Too close to 2607? Use the opacity slider to blend it as you wish?

The proart display takes up 40% of the budget xD
But I want a very impressive monitor, seems important 😮
<2 delta, 95% dci-p 1440p 27" 144hz 90w PD/display, insane stand, it is a beaut
Microcenter has a 12900k + z790 and 32gb of 6000mhz ddr5 for $400 but the mobo kinda sucks
But i5 13500 is $264 :x
gentlemen got a question.
id like to actually have content within this font, but it is just outline. How can i change this?

Why not use the filled in version of the font 🙂
https://www.dafont.com/mckloud.font
McKloud Font | dafont.com
which one is the filled one? i have them all and they just turn out like this
NVM LOLOLOL
Thats a very broad brief !
You'll need to give some more details of who its for, what its about etc.
You might want to take a look here for inspiration 🙂
http://www.logobook.com/
A gallery and showcase of the best logo design inspiration in the world, featuring over 5000 logo's searchable by designer, shape, object, and style
well man
im creating a logo for a future brand rn
more like a side hobby
Designing a timeless logo is challenging, but we’re here to help. Discover logo design best practices, helpful tools, and a guide to creating the perfect logo.
First, learn what a logo is and the best practices for creating one.
You could brainstorm with Photoshop but [ideally] you'd want to build the logo in vector format. Adobe Illustrator is a more suitable tool for these sorts of tasks.
thank you D.human
Gave +1 Creative Carma to @ripe quest
There is also this tutorial: https://youtu.be/UyoXKGQrmtY?si=F4OTjnHYiSXYqFDG

-- https://bit.ly/3GdrdrK 👈 Learn UI/UX Today. Use "LAUNCH" for 15% Off!
Course resource files:
https://s3.amazonaws.com/coursetro/vizid-resources.zip
This is a 3 hour course that I previously charged $$ for. I'm making it 100% free today. You will learn how to tackle both logo design and full visual identity design projects from scratch in th...
d.human by any chance do you watch one piece
Nope. I haven't seen it.
besides what D.Humann said you also can check ot the Adobe Express Logo Maker for a quick start https://www.adobe.com/express/create/logo
im getting illustrator instead
That would be the best idea if you want to get serious Logo for sure.
someone gift me nitro fr
im gonna get so good at logos that ill sell logos for nitro 💀
Well, as long as you get the propper paid plan in Adobe you can build as much Logos as you wish and sell them. Good luck.
yo
How do I create cool text in photoshop
saw this on tiktok, but it doesn't seem like a font

You could do this fairly easily using Layer Styles on a Text Object...
this my third time using photoshop, ain't really know stuff around it, thanks for the tutorial, it'll probably take me prob 10 minutes just to follow it
Gave +1 Creative Carma to @ripe quest
Practice, practice, practice. :)
What D.Human said! AND always search for Tutorials on youtube. There are tons of good ones there to learn from and get inspiration!
anyone know how to create something like these?


Sorry, just got back
Yeah, just look at a normal image, then squint your eyes a bit....

Perhaps reduce the Opacity for that Layer in the Layers Panel.
(or put Color Fill layer over it and turn down the Opacity on that layer.)
when i do that, the whole image goes darker and darker, not just the corners
lemme try the second option
didn't work either
Oh. I misunderstood your question.
One moment...
I would make a Layer Mask with a feathered edge on it...
anyone know why applying a layer mask seems to reduce the opacity of the masked layer? is there a way to prevent that?
That's what a Layer Mask does. It reduces opacity when used with various shades of grey. Black is completely hidden. White is completely visible.
I see, I just assumed if you selected the entire layer and applied a mask, the mask would be 100% white but that doesn't seem to be the case. Probably because the pixels themselves are slightly transparent
does it take the value of each pixel to create the mask? or just the opacity?
It's going to depend on the values of the color in the Foreground Color chip in the Toolbar.
I don't understand the question. When you paint on a Layer Mask with black, those pixels will be completely hidden. Paint with white and they are revealed. Paint with shades of grey, you get varying levels of opacity. The darker the shade of grey, the more transparent it will be.
right, I just didn't know that the generated mask itself wasn't 100% white. If I want the layermask to be 100% white, how do I edit the mask without "adding" to it, if that makes sense?
without expanding the boundry of the layermask
You can adjust it with perhaps, a "Levels" command.
man you're a genius. All very eye opening, thanks
Gave +1 Creative Carma to @ripe quest
If you ALT click on the Layer Mask in the Layers Panel, it will show you the mask by itself. Then you can do Image > Adjustments > Levels...
(Alt Click it again to return to normal viewing mode)
oh woah, I've just been left clicking on the mask to select it and then adjusting it, that's kind of interesting
There are some cool ways to adjust it. I don't think a lot of people realize this...
oh man that's insane
since I have you for a second, I wonder if you've seen this before? I've been wondering what this was for months:

these little colored squares next to the clipping masks. I asked here before, but no one seemed to know what they were
I think they're just Color Fill layers. They appear to have been rasterized. However, regardless, I'm not sure of their purpose since they are completely masked out. Their Layer Masks are completely black.
Unless the areas are just small and I can't see any details that might be on the masks.
Someone must have a good reason for doing that. I suppose it could be to just paint on the mask to reveal those colors in certain areas of the image.
it looks like you might be right, never even heard of these before so I have some reading to do
thanks man seriously this was a lot of help, I really appreciate it @ripe quest
Gave +1 Creative Carma to @ripe quest

No prob!
There is anyone who can help me with a question about the Adobe Bridge?
Best way to remove the background?

The Remove Background Action...
how should i remove these water spots

how do i turn down the opacity of an image where the opacity stays when downloading the image because if i just turn down the opacity on the slider over the layers
Greetings 
I am blending in a characters leg into a bush and ive usually done this by hand masking away some leaves and stuff using the normal soft edge circular brush. Is it possible to make any brush act 'soft'? For example im here showing how ive used some water spray brush to make it more randomized than a circular soft edge (The edes are sudden and rough) (Yes im yet blur the environment around the foot, dw ill do it hehe)

i see that i think every other brush has its hardness grayed out
I’m trying to do a photoshoot where one of the props is a copper colored visor kinda thing that would be worn like a VR headset, but I’m finding trouble getting a material that would be cheap and easy to work with to make it. How hard do y’all think it would be to just make it out of poster paper or something and then edit it to be a reflective copper color? I can send a sketch of what I want it to look like but it’s kinda simple I feel like
I’d also want to have a few different angles of it, so that’s why I feel like it’ll be hard to edit- just because consistency might be hard
And if anyone has any ideas about if there’d be a material easier to edit into this copper reflective visor thing, I’m all ears!
Hey, I would like to change the color of the black stitching on the shoe, but without changing other black elements, how to do it?

I ended up buying like a reflective chrome cardstock thing, hopeful that it won’t be too hard to make it copper colored
Dms
Spray paint

Hue and saturation.
I could if I have to but would it be that hard to just edit the color?
Unelsss you know exactly what your doing, I’d go with spray praint tbh
@foggy ore also raise levels on head.
Btw that hand looks like baby hand.
Unrealistic.
You could try: Neural Filters > Harmonization... However, the quality of these images are... not great.

You already did the best it could look.
Not really. That's like 5 secs and I'm working from a screenshot.
Hopefully, they have better quality images to use. :)
Wasn’t his image lol
But yea that’s best best ur gunna get with screenshot quality

What?
You HAVE added a gradient layer mask! 🙂
I can see the blur bit at the top of the yellow.
it doesn
But it does
original image has transparency
not because of layer mask
as you see there's no black at layer mask preview side
Well add some then
cannot add gradient to layer mask.
Add grey to mask
cannot add gradient to layer mask
i remember i used that feature
last time
maybe before 24,0 update?
In Photoshop, you can't directly apply a gradient directly to a layer mask like you would apply it to a regular layer. Instead, you can create a gradient on a separate layer and then use that as a mask for the layer you want to affect. Here's how to do it:
Create a new layer above the layer you want to apply the gradient mask to.
Select the new layer.
Use the Gradient tool to create the gradient on this new layer. You can select the type of gradient and draw it as needed.
Once you have your gradient on the new layer, you can then apply it as a mask to the layer below. To do this, hold the Alt (Option on Mac) key and click between the two layers in the Layers panel. This will use the contents of the top layer as a mask for the layer below it.
Now, the gradient you created on the new layer will act as a mask for the layer you wanted to apply it to. Adjust the opacity and blending mode of the top layer to fine-tune the effect.
-ai
In 10 mins I'll check my own photoshop and try it out, and send a recording

The other person said "just make a mask", but that's a LOT harder said than actually done. There is a quick video here of me trying things, none of them worked particularly well.
See that. I know it's nopt copper, but it will be easy to adjust the colour in Photoshop. That's the only "real" mirror like material in that price range I know of
https://culturehustle.com/collections/magic/products/mirror

Culture Hustle
We are delighted to be able to offer this super substance again within the EU, UK and USA. With it's unique nature, your MIRROR needs to be sent out by a special shipping service, this may cause a small delay on your order. Here it is - your very own liquid mirror in a bottle! Ultra high grade mirror chrome hybrid solv
Maybe it's because you're using the wrong gradient (sorry, I didn't read the whole excahnge as the messages - one line at a time - are too long to read, it's tedious... Please stop 😁)
I am not saying it's that or not, but since there are new gradients since a couple of versions back, I am tentatively trying to find a solution.

Also it would be cool if you could to share your screen as there is no point trying to solve a problem, when something, maybe completely obvious, prevents you to create a gradient on a mask, while the rest of us can.
It's obviously something on your end, and if you don't show us your screen, we'll never know why
Any good ? 🙂
Yes, that was absolutely much better. - I played around with the curve, sent my version back - only for the agency account director to say "oh, sorry, I forgot to tell you - the samples are still with the photographer and he's just re-shot them"
Welcome to the club 🙂
lol. It's all good. - That was like... 6 jobs ago now 🙂
Next I have a client asking if I can edit his DWG files
I'm pretty sure the last time illustrator could handle DWG was about 2010.
Last week I had samples of wallper to to grade, retouch and turn into repeat pattern. They said "well just like the other job"
Turns out the photo studio "forgot" to shoot them flat on the wall. So they aren't evenly lit and all curved!
For this job, I am paid hourly, so more work = more money.
But in the case it would have been a project charge, I'd have renegociated the fees...
There is a reason why I wanted this job to be hourly, and every day confirms my decision 🙂
JEEESUS. - That's awful.
You're obviously biased 🙂

Repeat pattern and they aren't evenly lit and all curved! - I'm surprised you're even trying.
Not the first time neither!
ahh. - ok. Maybe the youtube video was out of date. I'll boot up AI and try it!
Don't tell the client, but generally I tend to recreate the design, but cutting all the elements and distribute them on a background (does it make sense?) I am not distorting the images unless it's super straightforward. Luckily some are very abstract shapes on a slightly textured background so easy enough to do
Bugger me, it worked.

BOOM! 💥
Yeah. Makes sense. - I've made a pattern repeat on a basic wallpaper/carpet by just using like a 3cm square.
since it was just some checkerboard looking thing anyway
So basically I retouch the close up trying to match as well as possible so the shapes aren't distorted visually, but when it comes to the repeat patterns, I try to reproduce them "digitally", so I would create the background using a sample from a well-lit area, making a repeat from the background then cut out all the shapes, making them straight and everything and composite the shapes onto the background.
The repeats end up on a mock up I create from photos, so they aren't meant to be scrutinised in a close up
The only important thing is that the texture feels real and the design and colours are matching
We gotta do what we gotta do!
Do y'all know what font is this

Could be impact, could be something else!
Have a look at this post to find ways to identify fonts
https://www.instagram.com/p/CqughxJstif/?utm_source=ig_web_copy_link
What do you do when you find a font you like, but then have no idea what it is: You use a font identifier!
Whether it's in an app like Photoshop or Adobe Capture, or using online resources online: I got you covered!
See the links below:
https://fonts.adobe.com/
https://www.whatfontis.com/
http://www.identifont.com/
https://new.myfonts.com/WhatT...

Hello, I have this only image that I want to retouch, the quality is very poor

Should I use Lightroom, Photoshop and which tool (perhaps AI tool) to improve quality, remove noise, colorize and upscale ?
Well you could certainly try Photoshop > Filters > Neural filters > Colorize and photo restoration and see if it works for you

I tried it's very bad 
The super zoom doesn't seem to work
And the AI denoise of Lightroom "does not work on this picture" ^^
Hello People 🙂 I struggle to find capture one since they updated, does any one has it for mac?
update the super zoom finished loading

Now, it looks like a "gueule cassée" from WWI haha !
It depends on the magnification X you've put in. I would stay within the 2x 3x range max
I put 3x or 4x
Is there a Topaz upscaler similar feature within Adobe suit ?
What should I do to remove the noise?
The issue with those automatic system is that it works well when it's obvious what the shapes are. When there is no recognition possible, then the things tries to "invent" the missing bit. That's where you'll have to do it by hand.
There is a nice noise removal feature in Lightroom, but I think it's only available for Raw files
I wouldn't know for Topaz, I don't really use that kind of plugins
The scan doesn't look tip-top 🙂
Is that your scan (a member of your family perharps?) or is it an image you found online for practice purposes?
That highlight on the top left looks like it's a photo with a ray of light and not a scan, although it's so small I can't really see
hey. Recently I get the message OpenCL is not available. I have an Nvidia 3060, which is also recognized. This has also been updated and is up to date. Photoshop is also loaded with the 3060 by default. How do I fix the problem?
Have you checked the compatibility with the dedicated option
and checked if you have the GC optimised in the preferences?


I got this window, like everytime I startet Photoshop

that's when you click on advanced settings in my previous screenshot
you can tick "use Open CL"

That seems to mean that your GPU is not compatible on that front

see if that helps
Even when I activate I get the same Windows
Well - for 3 days it worked oO its a 3060


I think it should be 3.0
I stumbled upon that
https://www.daz3d.com/forums/discussion/532106/dforce-not-using-gpu-no-opencl-on-rtx-3060
not sure it helps, it's like Wolof to me 🙂
Daz 3D Forums
Maybe someone with more knowledge can chime in?
it just said, so make a clean reinstall. i can try but I think its not that valid because it 2 years ago, and photoshop worked liked 3 days ago without this error
Have you tried an older driver from Nvidia? Just in case
I find maintaining up to date drivers from them pretty tedious
I will try it later :/
Yes the AI Denoise tool is only available for RAW files (https://community.adobe.com/t5/lightroom-classic-discussions/how-to-use-the-denoise-filter-in-lightroom-classic-quick-tip/td-p/13900452)
It's for practice purpose, the scan is from the cover of a book.


I don't find the back cover or a mention of the photography source
How did you scan it. Which settings? unless you're showing just a screenshot,. I'm sure youcan do better
I know it's not the same one
https://en.wikipedia.org/wiki/Pierre_Taittinger#/media/File:Pierre_Taittinger.jpg
(the one in the book is probably a family photo)
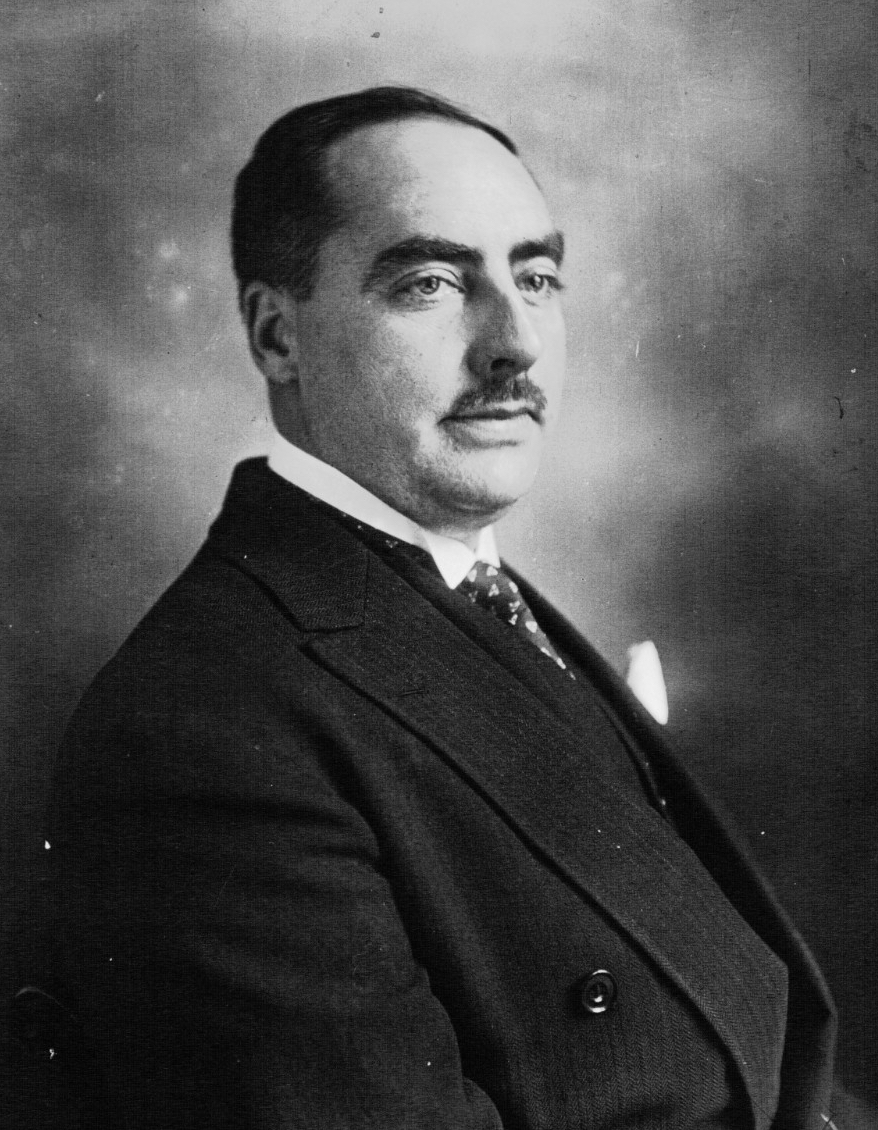
Pierre-Charles Taittinger (4 October 1887 – 22 January 1965) was the founder of the Taittinger champagne house and chairman of the municipal council of Paris in 1943–1944 during the German occupation of France, in which position he played a role during the Liberation of Paris.
There are plenty of places where you can find hi-res old photos to retouch. The library of congress is such a place, where you can find high qulaity images and is completely copyright-free
I used it quite often to work on samples to put on my portfolio when I was still doing that sort of things, because I couldn't show proper commercial work (since they were personal images from clients)
But there's lots of websites specialised in cultural artifacts
https://www.europeana.eu/en

Search, save and share art, books, films and music from thousands of cultural institutions
I had a look online too with a reverse image lookup and didn't find much
I did the same, but nothing came up...

How did you scan it. Which settings?
It's a screenshot
You applied PS colorization too?
I remember when I had to colorised by hand, and how easy is it now (when it works 🙂 )

Having a wierd blue suit loolked a bit strange
so I removed the blue and painted his tie
Yeah. I first upscaled it used Upscayl and then let photoshop do its colourise thing.
don't you dare panting ze tie of a french man! (said in a Hallo Hallo accent, of course!)
then I removed the blue from the suit...
then according to @vapid flume, I ruined it all by painting his tie 🙂 👔
What's the error in the GPU Compatibility? Perhaps just update your Nvidia drivers.
Made the Update twice :/ not working
Thanks for the time invested
Gave +1 Creative Carma to @sly hawk

That's where I really don't understand why didn't you scan at a higher resolution (I understood you got the book at hand, maybe it's not the case)
It's a screenshot from the web, not a scan
The picture looks like old (early 1900s) I don't think the original is any better.
I had some good results from old images scanned and when I mean old, they were from the 19th century
Not my scan obviously, but I did scan family photos the size of a Carte de visite (The Disderi style) and they ended up something around 6000 px wide, without any of that nasty noise/jpeg compression
it helps a lot because upscaling is always worse than having the real pixel count
Also a proper scanner with some good optics does wonder


Hi, I want to create the second look but when I directly use the screen it makes the cat pinker. But I don't want any color changes. How can I cut the parts outside of the brush stroke behind like the one in the second picture?
select your top layer and right click in the layer panel to choose "create clipping mask"

Your top layer will appear like that, with that arrow

that will mean your top layer pixel content will get constrained to the pixel content of the bottom one
Thank you very much

Hello guys, i have question that i can´t solve, even google doesnt give a good response. I want to copy something i drew from a layer and paste it into a blank video layer but it always creates a normal new layer. Anyone got a solution?
Thanks for the recommendation!
Gave +1 Creative Carma to @vapid flume
How to i change the opacity of an image but also keep the opacity level when exporting
Are you trying to export as a JPG or something?
If so... Pick PNG and try again 🙂
Png but if i just change the opacity slider over the layers it dosent stay when exporting
With Topaz PS plugin:

hi can you make a gif in photoshop
Yes, File>export>export as > choose gif 🙂
thanks, is there a way to make this in photoshop but instead of a circle in middle it’s a square?
Gave +1 Creative Carma to @lucid crane

I misunderstood when you said make a gif and read it as export a gif!
However, yes you could if you use the Photoshop > window > timeline and then make the two parts:
one static like shown but then make the middle square and animate it over the correct number of frames, then export.
It will take some work to do! Masks, layers, animating!
Hey is there anyway i can get something free cause i need to do something quick and im broke
sir this is photoshop
what would be on your wishlist for a new photoshop feature?
Ai assistant
And it’s probably happening
Can’t tell ya anything more tho lol
@ionic perch A simple & fast document de-warping and de-skew, perspective warp works for skewing , but it slow for multiple document and Acobat's inplmentation in great. I would like something similar to what Adobe Adobe Scan provides. Or maybe a AI de-skew / de-warp. I have to do this weekly and would save tons of time.
@ionic perch More tools for Panoramas and stitching such as linear stitching where the camera moves vertically or horizontally as apposed to rotating around a singular axis. Useful for photos subject like murals where lens correct starts to fail or scans of large maps, paintings and prints for document archiving. PTGUI and Hugin work but the UI and workflow is a pain and linear stitching is a pain to setup.
What's up with you?
Updates are simply loaded, synchronizations simply start, even though automatic updates and syncs are turned off in the "great" CC?
PS beta works 0, PS v24 only program errors?
Unfortunately, the opinions are piling up and after almost 20 years I'm really starting to think about looking for other tools.
Unfortunately, your functionality has fallen into disarray.
Was ist bei euch los?
Updates werden einfach geladen, synchronisationen starten einfach, obwohl in der "tollen" CC automatische Updates und Syncs aus sind?
PS beta funktioniert 0, PS v24 nur Programmfehler?
Leider häufen sich die Meinungen und langsam nach fast 20 Jahren überlege ich wirklich mir andere Tools zu suchen.
Leider sind eure Funktionalitäten ins bodenlose gefallen.
Schade. Ich installier mir jetzt Gimp.....
Cheers
for generative fill... what would be the best language for a backwards baseball cap.
backwards cap is the closest ive gotten, one out of the three will display it correctly but id like to make it red but if i add red to any spot of the prompt, it puts it back wearing it forward.
thoughts?
Also my selection is pretty solid given how it does it right sometimes, i think i just need to work on the prompt.
how do i use the feature where ai creates things
like you just select an area
type a prompt
and ai makes it
how many
Hello this is somewhat related to PS but on my Lightroom it shows I have 2TB available but on my other programs it is showing I only have 100gb. So I used up 200gb out of 2TB in Lightroom but in PS or other program it is showing that my cloud storage is full at 200gb out of 100gb. Does anyone if I'm syncing wrong or something? Thanks in advance
help
Hi! In the newest version of PS, you can select an area and the context bar should show up on the bottom of your screen. You can type your prompt in there.
can someone help me
how can i apply camera raw filter to this and not make it 30mb xD

cuz this is low quality
7mb
does anyone know how I can fill the center of this masked object without going through pain?

select object - paint bucket tool
or select the inside and color fill
Its a masked object so I literally cannot fill the inside
yeah than you need to make a selection of the inside and while the selection is actibve ad a color fill adjusment layer
And if I try coloring in another layer, the outline dissapears
.
and magic wand is just not doing it


Yeah, but thats from a snip and clip. I am dealing with a masked and a outlined thing
check dms
@inland creek - to be fair, this does feel wierd.
You mask something, even then smart object and rasterise it, and it STILL seems to remember the previous pixels when you try and use a simple paint bucket.
he sent me the psd and after i duplicated the layer and rasterized it, it worked. idk why it doesn't fore some people
help
with
i already got help
bruh
How would i make the second image look a little like the first, not exactly js the blur and the colour and the qualloity


Sorry what do you mean by “look like the first”
Hi, I have some text above a backgound image, as in the first image. But if I applied some Gaussian Blur to the text, the ball in the background image would look like it is infront of the text, as in image 2 and 3. In there a method that I can apply some Blur to the text but the inner of the text doesn't go transparent, so the ball in the backgound would not appear in front? Thank you!


why does this red bar keep appearing behind my layer?
its on all my layers how do i fix this
The red bar appearing behind your Photoshop layer indicates that you have entered Quick Mask Mode. To exit this mode, you can simply press the Q key on your keyboard, which is the shortcut to toggle Quick Mask Mode on and off. Alternatively, you can click the Quick Mask icon at the bottom of your toolbar. Quick Mask Mode is used for viewing and adjusting active selections, and it represents unselected areas with a semi-opaque red highlight
@final fractal
thank you so much
I have a question and please delete if not allowed bit will someone please help me with a small project?
Tell us what the question/request is then.
You want to make the text the same colour ad the background?
You want the inside edge of the text to stay sharp, but the outside part to be blurry/faded?
@sly hawk I have private messages you as I feel that would be easier to explain send things etc
whats the question
i wanna see
yes. The Gaussian Blur makes the text Blur and transparent, I hope the inside of text stay solid.
Actually, I want to remove the text and replace it with the background color in order don’t have text
That translates to me as "simply paint over the text in the same red paint colour as the background"
yeah
The problem is that the text is on a PNG image and I cannot cover the text with color
oh, why not?
Maybe share more of the image/context because I have no idea what the problem is at the moment.
I have dmd you
I want to replace the "William" with the color in the background, only the "William"

I'd maybe do it like this then....
So you simply want to REMOVE the word 'william'?
Probably something like this....
maybe a bit more of this too...

why the heck is it making a star instead of a polygon shape?
i wanted to make an octagon but it made a star instead


🙌
Hey, as a favour in return @solid prism - what do you think the top 3 letters say here?

first glance. - etc
I want to know if it's clear/obvious enough

Can you share that pic without the big white circles, and I'll show you
(and preferably without the headshots in)
I would honestly create a pattern from a piece of the lines and remove the old one to repace by a repeating pattern layer.
@sly hawk I'm reading WMZ
Thanks 🙂
I'm sure it can help both the OP and you @sly hawk
There 's this website
https://architextures.org/

There's some examples of corrugated repeating patterns ready to us there, although it seems very simple to create from scratch with a couple of straight lines
Cheers. - I've been suckered in to helping a mate come up with a logo and build them a website, I know very little about their company except what he wants to call it.
If you crate two rectangles with the right colour and one with a gradient overlay to simulate the shadow
Something around that

And then turn that into a repeat pattern (edit> define pattern)
this is what it makes

took me two minutes!
the thing is that you need to flatten the layers before going to "define pattern" (because the option wiill only take into account the selected layer)
or do like I did, create a stamped layer on top, so as not to loose all the work done in case something isn't quite right

and actually it could be only one pixel in height, since it's just need to repeat the shapes horizontally. Mine here is too big for no reason
Hello, ive got a simple question. Im designing this zip up on ps and in order to make it black idk why I inverted the colors. But as you might asume, im having problems adding new ones. Is there any way to eliminate the inversion effects from now on while mantaining the parts that has edited?

thanks in advance
The "invertir" adjustment layer is what makes it black I suppose?
Anything on top will not be affected
Maybe invert is not the best way to go about this?
Can you show how is the layer stack without that adjustment layer?
I would just fill the interior of the white lines with black if I had to do it (maybe with a masked solid colour adjustment layer so I could change the black to another colour if I needed)
yes it is
what is the stack layer?
theorically, but when I use feather tool it is still black using red although it wont happen with the brush tool for example
The layer stack is all the layers in your layers panel. It has an order and the top layer affect what's underneath it according to its blending mode
If you place your invert layer in the middle of your layer stack, then it will affect only what's below, not what's on top
What made you choose to invert the colour instead of creating a black shape with white cut out lines?
what I assume are these 3 layers there

And more importantly how did you create those lines? (that I assume are black, inverted as black
Because you could just invert those lines (applying an invert adjustment just on that layer, preferably as a smart layer) so your invert layer wouldn't affect all the other layers
I know it's a joke, but it's not funny

Some people might report you 🙂
With good reason
With this sentence, I am even more confused of what you want to do... Why would you use the feather tool? There is nothing that warrants a blurred result here. You need sharp shapes
i just had made it black and white background so i chose to invert
those are both pockets and pieza 7 be the entire piece
okay, how can i do this?
i dont know lol, im a beginer so i guess im making many silly mistakes hahaha
Are those 3 layers just black lines initially? where did you found them if you haven't created them? Because there might be a simpler way to get what you want.
No problem, you got to start somewhere 🙂
i mean i drew them, and they were black yes, so i inverted
If I give you a step by stel, then you can follow it and I can explain the why after... Is that OK?
So it's not the work of a beginner 🙂
That's a good job
yes sure!
thanks! watched some tutorials
Gave +1 Creative Carma to @vapid flume
First, hide all your layers. You want to keep them just in case, but they are not needed for the moment.
To hide them, just click on the little eye icon nest to the layer
When you're done, tell me, so I can go to step number 2
OK, now. Take one of your black line for the hoodie, and right click on the layer and choose "convert to smart object". You need to unhide it first, sorry

Hide it too
then go to image>adjustment>invert
it will invert the layer only, and by converting it to a smart object, you'll be able to change the adjustment or even delete it.
hello! got a question. How do i extract the hand shadows in pic 1 then place it on the table of pic 2?


okay thanks, imma try
Gave +1 Creative Carma to @vapid flume
You can, but it will be tricky because you'll have to retouch the bit where the shadow cross the gap between the tiles, Which is not the same tone as the ground
But, personnally I would so with blend if, in order to remove all the white from the photo and just keeping the shadow
https://www.youtube.com/watch?v=yAMXBYx0r5g


In this Photoshop tutorial, you will learn how to use "Blend If" like a pro.
This Photoshop tutorial will demystify this scary command to help you create fast and easy blends.
With the techniques that you will learn in this tutorial, you will be able to make fast and easy sky replacements, apply textures to text, create cool special effects, ...
then you'll have to remove the black bits at the top and fill in the gaps left by the tiles
it worked, thanks!
Gave +1 Creative Carma to @vapid flume
Do it for the other two layers now
Do you need the interior of the hoodie black?
Also a question, how did you draw the hoodie lines, is it vector?
wait, where are the black bits?
these?
at the top! delete them with the eraser tool or mask them using a mask and a black brush

alright, thank you
i will try this now
When you're done, change the blending mode to "multiply", change the opacity to suit according to how it show in the bowl layer

but as I said, you need to retouch those lines with the clone tool before adding blend if
Unless you manage to line them up perfectly, but it seems that the perspective is a bit different
Next time, prepare your photo by putting a white piece of paper (or a bed sheet) on top of the table 🙂
I need to go now, so if you still need more help, someone else will fill in (if someone does, it's best to refer to the conversation we have with a link as a way of not explaining everything again)
i'll make sure to do so next time, thank you for the help!
Gave +1 Creative Carma to @vapid flume
Thank you so much! I got your idea, I applied an inside glow effect to the duplicate text layer below the blur text layer, and it look good.
Gave +1 Creative Carma to @sly hawk
Guys any tips how I can add fur skin to shark body?

Legacy brushes -> Grass
You can also put original cat body over shark by clipping it, and change blending mode.
After that fix with grass or hair brush.
I unfortunately don't have full cat body bcs it was only a head
but I will try my best, thanks for the brush idea
Download cat image. 😐
can any one help im trying to use the ps Ai but it just not doing what i want
can anyone help me with stroke with these jeans
.

how do you get it like the image above?
Does anyone know if there's a way I can figure out if there's a gif of this image on the internet anywhere?

Not asking to look for me, just wanna see if anyonhe knows any tools I can use other than reverse search since that hasn't helped me
did you try google lens
no
maybe it will be there
alr ill check it out
theres this weird grid thingy thats ruining my drawing. how can i get rid of it

(its adobe fresco)
nvm i finally got rid of it
and?
is google lens only on mobile?
nope also on pc
Hey all. Having an issue with PS. Im trying it out because Windows photo viewer doesnt seem to allow the use of printer profiles (sublimation)
But windows photo viewer seems to be smart enough to print the photo at the correct size whereas photoshop zooms in to the photo and tells me it wont print correctly
I cant seem to fix it nor do I know why Photoshop wants to zoom the photo when an extremely basic prog can print it correctly
How could I / or would it be even possible without too much struggle to get rid of the white mark on lens

How can i get rid of the sun lines and make the photo look better? I took while driving so its a bit messed up

a bit of a newbie question, but how do i fill the blank region here

maybe try using clone stamp? or spot healing brush tool
Can you share more of the image?
Looks like you can just clone it in from the content nearby

how?
thank you so much
Gave +1 Creative Carma to @sly hawk
Maybe something like this?
There's probably smarter ways, but here is one method/try...
Do you mean an animated gif?
if so... no, doesn't look like it
wich effects do u think i should use to transform this

Into what?

thanks so much <3
Gave +1 Creative Carma to @sly hawk
I'm not entirely sure what you mean but does any of this help?
How can I do this in photoshop? I want to create a circle and rotate it around the center of the canvas
I@ new to the server ! Hi ! Does anyone here help with ps stuff? I need help photoshopping something. More specifically, adding text or handwritten text on the body
i was drawing in photoshop and i was undoing a bunch of actions and then all my work dissapeared like 80% of my layers, so im back to where i started 5 hours ago 😦 does anyone know how i can go back or something cuz this is so weird


@rare idol
Can u try making the red toned down by a lot , it’s too bright too see
Then it’ll look good

U can try with this too @rare idol
@everyone

Can u just do the “ stop “
…
Just the word “stop” in red
Why don’t you just do it if it’s your photoshop project
It’s way easier if you have the text layer on its own lol
I did it
I’m good now
Idk how to fix the red that’s not filled in fully tho

Can sm1 help with dat
Why are you in photoshop server then… lol
Idk just cause
My quality is messed up when I do the red @rare idol could u just send it with just the “stop” being in red instead of all of it?
That’s all
And I’ll never come back
Please take these conversations to DM. This channel is for learning Photoshop. Not for fulfilling your special requests.
how can i turn a path into a stroke?
can anyone answer dis!
cuz very sad
You can only go back a certain number of steps in History (defined in Preferences).
i did but it didnt work
and couldnt go back further
i just lost all my work and idek how i did it
sadly thats the only solution i can think of at least. any chance you saved it on cloud and your computer?
i didnt do any saves, i just did it in one day with no breaks ndd stuff :((
Did you open the History Panel and look at the steps there?
where do i do that
Window > History...
😦

History is only stored during the session. If you've closed the document and re-opened, it will be empty.
My exports are coming out really low quality

Does anyone know why this is and how I can fix it?
Export to PNG
That is a png it also looks low quality in photos when I zoom in a tiny bit or resize the logo
Is it my settings ?
You can't arbitrarily increase the size of a bitmap and expect the image to remain the same quality. Especially if you're scaling it up a lot.
I see a barely noticeable difference on my TN monitor, the avatar gives off a little green tint
It's impossible for me to know this. I have no idea what you're doing, the size of the document, how you're exporting it, etc.
I'm not sure what its "supposed" to look like but this doesn't look bad to me.
Does anybody know how to remedy this issue I'm facing? Working on a video game render and I'm changing the color of the eyes via layer mask with color fill and the blending mode set to color. When the color is changed, the color pixelates. Any tips for me?


hey could somebody help me please I've got a problem with my Open CL. Whenever I open photoshop an error message pops and says that my Open CL is unavailable
these are the messages that show up. I cannot enable the Open CL in the settings because it is grayed out


Are the Nvidia drivers up-to-date? Its easy to check and update with the Geforce Experience app
yes nvidia and intel are up to date
photoshop too
i noticed that this problem occurred shortly after updating photoshop

but i have updated them already i don't know why it is saying that
Try a different method. Perhaps use an Adjustment Layer > Hue/Saturation + Colorize instead of using a Color Fill and a Blend Mode.
Looks to me like the orginal might have been an 8bit, index color PNG. You might need to convert it to RGB first and use the blend tool or create a mask and slightly blur the green gradient a little.
Good idea, but it didn't work :(

I got Photoshop 3 days ago
It is pretty different from Photopea, so I'm a little lost hearing that
It's already RGB, correct?
Are you speaking of the channels
In the tab, it will say: RGB/8. Its currently covered in your screenshot.
Oh. Never mind. Its a layered document.
Did you import this graphic in from some other source? Was it originally Indexed color?
I am not entirely sure what indexed color is. The origin file type is a .BNTX, which is basically Nintendo's version of a .DDS. I had issues converting it to a .DDS so I had to export it as a .PNG.
here's a better view of the pixelation

I don't know anything about BNTX files. Indexed color are a limited color palette, only a max of 256 colors available.
That's not what this is
I just notice you have a brighness and contrast layer between the eye layer and your color layer. Try reducing the contast, that would likly case the issue.